Read me first. User Guide 01
|
|
|
- María Ángeles Fuentes Alcaraz
- hace 8 años
- Vistas:
Transcripción
1 USER MANUAL

2

3
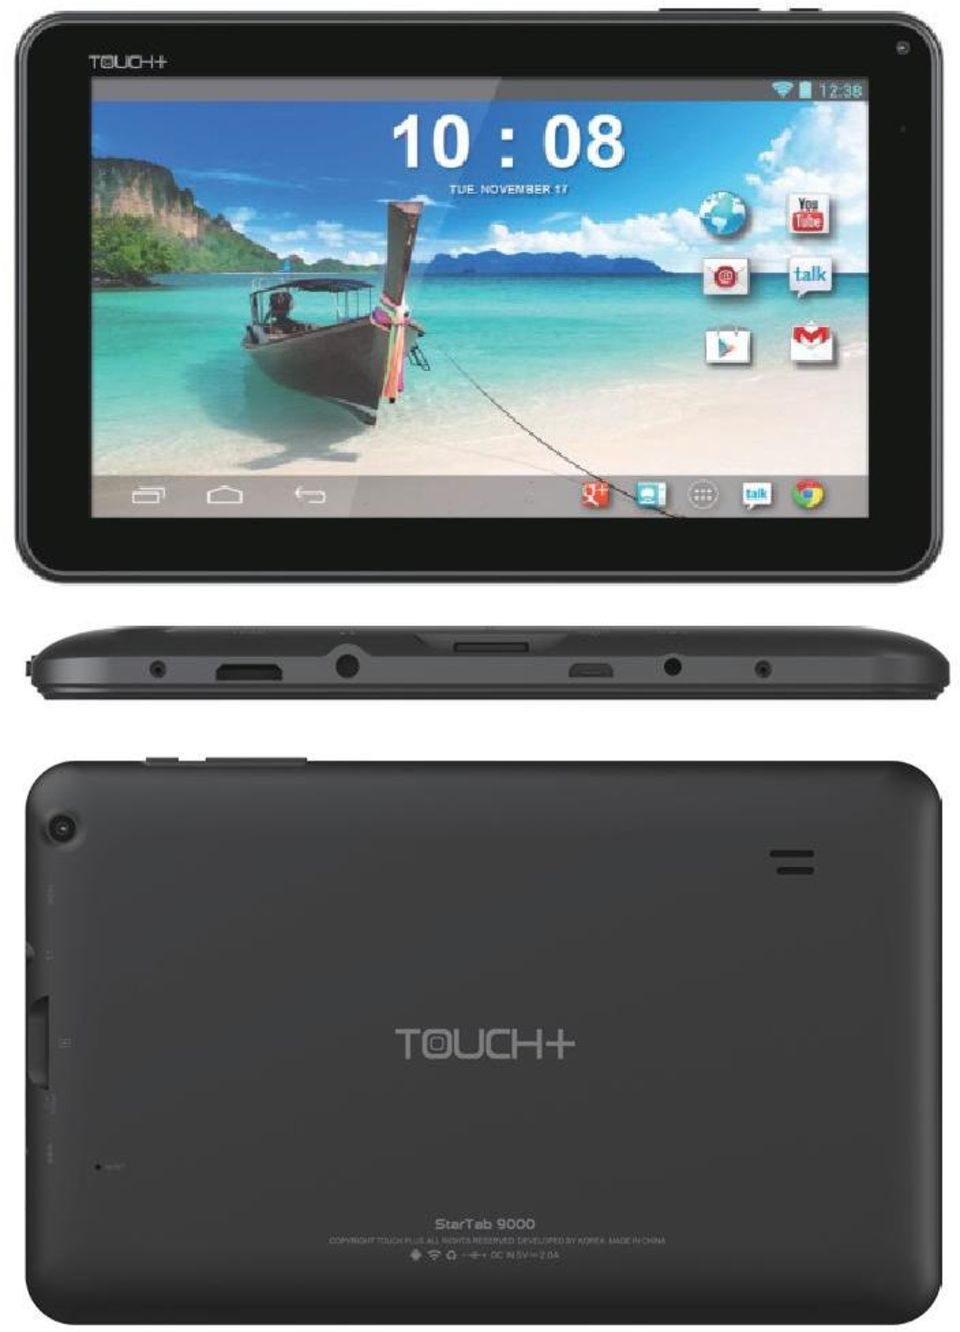
4 Read me first Please read this manual before operating your tablet, and keep it for future reference. The descriptions in this manual are based on the default settings. Images and screenshots used in this manual may differ from the actual product. Available features and additional services may vary by device, software or service provider. Our company is not liable for performance issues caused by third-party applications. User Guide 01

5 CONTENTS Assembling Unpack...06 Charge the battery...06 Install the memory card...06 Getting started Turn your device on and off...07 Switch to flight mode...07 Device layout...07 Home screen...08 Add items to the home screen...09 Task bar...09 Notification panel...11 Auto rotation...11 Lock & unlock the screen...12 Enter text...12 Customize your device...12 Manage applications...12 Security...13 Reset tablet...13 Web Gmail User Guide

6 Browser...17 Play Store...18 Talk...18 Entertainment Super-HD Player...19 Music...21 Camera...22 Tools Calendar...25 Alarm...25 File Manager...26 Sound Recorder...26 Calculator...26 Connectivity USB Connection...27 Wi-Fi...27 Safety Precautions...28 Care & Maintenance User Guide 03

7 CONTENIDO Preparar...31 Desempaquetar...31 Cargar la batería...31 Para comenzar Encendido y Apagado del dispositivo...32 Cambiar al modo de vuelo...32 Botones y Conectores...33 Pantalla de inicio...34 Agregar elementos a la pantalla de inicio...34 Barra de tareas...35 Iconos indicadores...36 Panel de notificaciones...37 Rotación automática...38 Bloquear y desbloquear la pantalla...38 Introducir texto...38 Personalizar el dispositivo...39 Administrar aplicaciones...39 Seguridad...39 Restablecer tablet...41 Web Gmail User Guide

8 Navegador...44 Play Store...46 Hablar...46 Entretenimiento Super-HD del jugador...47 Música...49 Cámara...50 Herramientas Calendario...53 Alarma...53 Administrador de archivos...54 Grabadora de sonidos...54 Calculadora...55 Conectividad Conexión USB...55 Wi-Fi...55 Precauciones de seguridad...56 Cuidado y Mantenimiento User Guide 05

9 Assembling Unpack Check your product box for the following items. Tablet User manual Adapter You can purchase additional accessories from your local retailer. Charge the battery Before using the device for the first time, you must charge the battery. 1. You can charge the device with a travel adapter or by connecting the device to a PC with a USB cable. 2. Battery full icon is shown when finished if your device is off. Warning Use only original batteries and chargers. Unapproved chargers or cables can cause batteries to explode or damage your device. Install the memory card To store additional multimedia files, you need insert a memory card. 1. Insert a memory card with the gold contacts facing downwards. 2. Push the memory card into the slot until it clicks. Notice: Our company uses approved industry standards for memory cards, but some brands may not be fully compatible with your device. 06 User Guide

10 Getting started Turn your device on and off To turn on your device, press and hold the power key. To turn off your device, press and hold the power key, and then tap OK. Switch to flight mode To use only your device s non-network services, switch to flight mode. Please follow the instructions below to turn on flight mode: Tap Settings/WIRELESS & NETWORKS/More/Airplane mode from application list to create a checkmark. Device layout User Guide 07

11 Botones y Adjust the device volume. Conectores Power/Lock/Reset Press and hold for 2 seconds to turn on or turn off the device. Press to lock the device. Press and hold for 6 seconds to reset the device. Home screen The home screen has multiple panels. Scroll left or right to the panels on the home screen, you can view indicator icons, widgets, shortcuts to applications, and other items User Guide

12 1 Open the search bar 2 Scroll left or right to the other panels 3 Access the application list and widget screen 4 Task bar Add items to the home screen Tap the application icon to access the application list shown below from home screen. Scroll left or right to view more items. To add items to the home screen, tap and hold an item, then drag the item to a new location. To remove items from the home screen, tap and hold an item, then drag the item to the Remove area at the top of the home screen. Task bar The task bar is shown at the bottom of the screen. It displays commonly used option buttons, battery level indicator, current time and other indicator icons. User Guide 09

13 Return to previous screen. 2 Return to home screen. 3 View the applications you have accessed recently. 4 Capture the screen. 5 Adjust the device volume to low level. 6 Adjust the device volume to high level. 7 Open a list of options available on the current screen. 8 Display notification icons. Tap the notifications area to open the notification panel. Indicator icons Icon Definition Icon Definition Open Wi-Fi available Wi-Fi connected Uploading data Flight mode activated Music being played Downloading data Connected to PC Alarm activated Battery power level 10 User Guide

14 Notification panel Tap the notifications area to open the notification panel shown below. You can access a list of notifications. Tap to activate or deactivate wireless connection features and other settings. Wi-Fi: Activate or deactivate the Wi-Fi connection. Auto-rotate screen: Activate or deactivate the auto rotation feature. Brightness: Adjust the basic brightness level of the display to lighter or darker. Notifications: Activate or deactivate the notification feature. Settings: Access Settings application. Auto rotation If you rotate the device while using some features, the interface will automatically rotate as well. To prevent the interface from rotating, open the notifications panel and select Auto-rotate screen, then scroll it to Off. User Guide 11

15 Lock & unlock the screen To unlock the screen, tap and hold the lock icon, then drag it to the unlock area where the unlock icon is. To lock the screen manually, press Power key. Enter text You can enter text by selecting characters on the virtual keyboard. Tap the text input field to display the virtual keyboard. To hide the keyboard, tap at the task bar. To change the text input method, tap at the task bar. From a text field, you can use the copy and paste feature for fast inputting. Customize your device To customize your device according to your preferences, tap Settings from application list or notification panel. Manage applications To manage the applications installed on your device, tap Settings/ Apps. 1. To uninstall an application, select DOWNLOADED, then select an item and tap Uninstall, tap OK to confirm. 2. To stop or change the settings of an application, select RUNNING or ALL, then select an item and tap the option you need. 12 User Guide

16 Security You can protect your device and data by setting screen lock or encrypting your tablet. Set a screen lock To set a screen lock, tap Settings/Security/Screen lock from application list. None: Deactivate the screen lock. Slide: Slide to unlock the screen. PIN: Enter a numeric PIN to unlock. When prompted, enter the PIN to unlock the screen. Pattern: Draw a pattern to unlock. Follow the instructions to draw your lock pattern. When prompted, draw the pattern to unlock the screen. Password: Enter a passcode to unlock. When prompted, enter the passcode to unlock the screen. Face Unlock: Look at your tablet to unlock it. Follow the onscreen instructions to set it up. Tap Continue to choose your backup lock in case Face Unlock can t see you. When prompted, to unlock your tablet, just look at it. When Face Unlock can t see you, enter the PIN code or draw the pattern saved before. Screen time-out Select Settings/Display/Sleep from application list, you can set the time before the screen times out and goes into lock mode. ( you have not entered any characters or made other selections). Reset tablet You can reset system and desktop settings to their original values User Guide 13

17 by the following steps: 1. Select Settings/Backup & reset from application list. 2. Tap Factory data reset. 3. If you want to erase all data on your tablet, such as music, pictures, and other data, tap Erase SD card checkbox to create a checkmark. 4. Tap Reset tablet. The device resets to the factory default settings automatically. Warning!: Factory data reset will erase all data from your device and SD card, including your google account, system and application data and settings, and downloaded applications. Web To receive and send mail, you must have a remote mailbox service. This service may be offered by a service provider. Your device is compliant with applicable internet standards for POP3/IMAP/ Exchange. Before you can send or receive mail on your device, you need to set up an account and define the settings correctly. You can define more than 1 mailbox. Set up your 1. Tap from application list. 2. You can use mailbox guide to set up your mailbox, tap Next until it s done. 3. If you need to add another account, tap the option 14 User Guide

18 button at the upper right Settings/ADD ACCOUNT, then set up the account with the mailbox guide. When you are finished setting up the account, the messages are downloaded to your device. If you have created more than two accounts, you can switch between accounts. Select an account name at the top left of the screen and select the one you want to retrieve messages from. Delete your account 1. Open the application list and select Tap the option button at the upper right, then select Settings and the account you want to delete. 3. Tap Remove account. 4. Tap OK to confirm. Create and send 1. Open application. 2. Tap. 3. In To field, enter the recipient s addresses manually and separate them with a comma. Add more recipients by tapping Cc/Bcc. 4. To insert attachments, tap the option button at the upper right and select Attach file. 5. Enter the subject and the text. 6. Tap SEND to send the . Gmail You can retrieve new messages from the Google Mail webmail service to your inbox. Before you can send or receive mail User Guide 15

19 on your device, you need to set up a Gmail account. Create a Gmail account If you don t have a Google Account, tap New, then follow the on-screen instructions to create a new one. Set up a Gmail account If you want to add an existing account, tap Existing, enter your address and password, and then select Next, when you are finished setting up the account, the messages are downloaded to your device. View messages 1. When you open the account, the amount of unread messages is displayed at the title bar and the unread messages are displayed in bold. 2. To view an message, tap it. 3. To mark an important message, tap the star icon below the date. To cancel the mark, tap the star icon again. Create and send an 1. Tap. 2. In To field, enter the recipient s addresses manually and separate them with a comma. Add more recipients by tapping Cc/Bcc. 3. To insert attachments, tap the option button at the upper right and select Attach file. 4. Enter the subject and the text. 5. Tap SEND to send the User Guide

20 Browser Tap Browser from application list to access to the web. Browser webpages 1. Select Browser to launch a specified homepage. 2. To access a specific webpage, select the URL input field, enter the web address of the webpage, and select Go. 3. To zoom in, place two fingers on the screen and spread them apart. To zoom out, move your fingers closer together. You can also double-tap the screen. Add windows You can have multiple windows open at one time. 1. To add a new window, tap at the title bar. 2. To open up a window, tap the title of the window. 3. To close the window, tap at the title bar. Set homepage 1. Tap the option button at the upper right. 2. Select Settings/General/Set homepage. 3. Enter the web address of the desired webpage. Add bookmarks While navigating a website, tap to add current URL to your bookmark list and easily access it later. View bookmarks and history Tap to open the bookmark list and the recent history. Tap a bookmark or any entry to display the webpage. User Guide 17

21 Customize browser To make adjustments in your browser settings, tap the option button at the upper right, and then select Settings. Play Store Talk Play Store allows you to easily download an abundance of applications directly to your device. Before using the Play Store, you must have a Google Account. 1. From the application list, tap Play Store. 2. Sign in to your Google Account. 3. Search for and download applications as desired. 4. Follow the on-screen instructions. Note All applications offered by Play Store are developed by third party. To get the information about the developers, you can read the descriptions of each application. Our company is not liable for performance issues caused by third-party applications. Google Talk is a free web-based application for instant text, voice and video chats. Before using the Google Talk, you must have a Google Account. 1. From the application list, tap Talk. 2. Set up a Google account or sign in, follow the on-screen instructions. 3. Select Add friend, enter a friend s address and select Send 18 User Guide
22 invitation. 4. When your friend accepts the invitation, he or she is added to your friend list. You can start talking. Entertainment Super-HD Player To view or organize your images and video clips, or edit and send your files to other devices, or set photos as wallpapers, select Super-HD Player from application list. Note: It takes a few more minutes to enter this application if you store more files. Supported file formats Type Image Video Format JPEG, GIF, BMP, PNG AVI, RM, RMVB, MOV, FLV, 3GP, MP4 Note: Some files may not play properly depending on how they are encoded. View a photo 1. Select a folder. 2. Select a photo to view. To view more photos, scroll left or right. 3. To zoom in, place two fingers on the screen and spread them apart. To zoom out, move fingers closer together. You can also double-tap the screen. 4. To start a slideshow, tap the option button and then select User Guide 19
23 Slideshow. 5. To view the details of a file, tap the option button, then select Details. 6. To share a photo with others via , Gmail or Messaging, tap at the title bar. 7. To set a photo as wallpaper, tap the option button at the upper right select Set picture as/wallpaper drag the slides of the crop box to create the crop area, then tap Crop. 8. To set a photo as a caller ID, tap the option button at the upper right select Set picture as Contact photo/contacts/create a new contact or select an existing contact drag the slides of the crop box to create the crop area, then tap Crop. Edit a photo 1. To crop the image, tap the option button at the upper right, then select Crop. To move the crop box, tap and hold the crop box and drag it to the desired location. To add or subtract from the selection border of the crop box, drag the crop box to the desired size. When you are finished, tap Save. 2. To edit photos and apply various effects, tap the option button at the upper right, then select Edit. To apply a color effect, tap. To apply a photo frame effect, tap. To crop, straighten, rotate or flip the image, tap. To adjust contrast, tap. 20 User Guide
24 Music Play a video 1. Select a folder. 2. Select a video to play. 3. Control playback with the virtual keys. 4. To watch a video saved on your device on TV, connect your device and TV with HDMI cable. With Music, you can play music files. The music player supports the following file formats: MP3, AAC, APE, WMA, OGG, WAV, M4A and so on. Note: Some files may not play properly depending on how they are encoded. Add music files to your device Start by transferring files to your device or memory card. Play music 1. Select a music file. 2. Control playback with the virtual keys. The current list of songs are randomly shuffled for playback. Replays the current list when the list ends. Repeats the current playing song. Create a playlist 1. Tap and hold a music file. User Guide 21
25 2. Select Add to playlist. 3. Select New. 4. Enter a name. 5. Tap Save. Delete a playlist 1. Tap Playlists. 2. Tap and hold the playlist you want to delete. 3. Select Delete. Camera With the camera function, you can capture photos and take videos. Capture a photo 1. Open the application list and select Camera. 2. Before taking a picture, you need to make some adjustments. Place two fingers on the screen and spread them apart or move fingers closer together to zoom in or zoom out. 22 User Guide
26 Icon Definition Tap to switch between the front and rear camera lenses. Change the resolution option or set storage location. Change to video mode. Change to panorama mode to take a landscape photo. Adjust the color balance. Adjust the exposure value. 3. Aim the lens at the subject and tap to take a photo. The photo is saved automatically to the folder DCIM. 4. Select the image viewer icon at the upper right to view the pictures. Record a video 1. Open the application list and select Camera. Tap to change to video mode. 2. Before recording a video, you need to make some adjustments. User Guide 23
27 Place two fingers on the screen and spread them apart or move fingers closer together to zoom in or zoom out. Icon Definition Tap to switch between the front and rear camera lenses. Change the resolution option or set storage location. Change to video mode. Adjust the color balance. 3. Tap to start recording. The length of the video recording is restricted by the available space on your storage. 4. Tap to stop recording. The video is saved automatically to the folder DCIM. 5. After recording videos, select the image viewer icon at the upper right to view the recorded videos. 24 User Guide
28 Tools Calendar With the Calendar feature, you can consult the calendar by day, week, or month, create events, and set an alarm to act as a reminder, if necessary. To access the calendar, tap Calendar from application list. 1. To create an event, tap. Fill in the fields, and set category, date, time & an alarm. After you finish, select DONE. 2. You can view calendar in different views, Day, Week, Month and All. 3. To delete an entry, tap the event to open it, and then select / OK. Alarm From application list, tap Clock, and then select. 1. Tap to add alarm. Tap the numeric pad to set alarm time, and then select AM or FM, when you are finished, tap OK. Tap set alarm details, when you are finished, tap. Tap the time to change alarm time. To activate a preset alarm, set the alarm to ON. To cancel an alarm, set the alarm to OFF. 2. When the alarm sounds, to stop the alarm, drag the alarm icon to. To repeat the alarm after a specified length of time, drag the alarm icon to. User Guide 25
29 3. To delete an alarm, tap and hold the alarm/select /OK. File Manager Many features of the device, such as images, videos, documents, received attachments and downloaded files or applications, use memory to store data. With File manager, you can store and browse files and folders in your device, or edit, move, copy files; you can send files to compatible devices as well. Note: 1. Some files formats are not supported depending on the software of the device. 2. Some files may not play properly depending on how they are encoded. Sound Recorder With Recorder, you can record a voice memo. From application list, tap Recorder. 1. To record a voice memo, tap. 2. To pause the recording, tap. 3. To listen to a voice recording that you just recorded, tap. Calculator With this feature, you can use the device as a calculator. The calculator provides the basic arithmetic functions. Tap the virtual numeric and calculation keys to perform a calculation. 26 User Guide
30 Connectivity USB Connection You can connect your device to a PC and use it as a removable disk, which allows you access the file directory. 1. If you want to transfer files from or to a memory card, insert a memory card into the device. 2. With a USB cable, connect your device to a PC. 3. Open the notification panel, select USB connected. 4. Tap Turn on USB storage. 5. Open the folder to view files. 6. Copy files from the PC to the memory card. Wi-Fi With Wi-Fi, you can connect to the internet or other network devices anywhere an access point or wireless hotspot is available. Activate the Wi-Fi feature 1. From application list, tap Settings. 2. In the field of WIRELESS & NETWORKS, turn on the Wi-Fi feature. Find and connect to Wi-Fi 1. Once the Wi-Fi feature is activated, the device automatically search for available Wi-Fi connection. 2. Select a network. 3. Enter a password for the network (if necessary). 4. Select Connect. User Guide 27
31 Safety Precautions Read these simple guidelines before using your device. Not following them may be dangerous or illegal. Aircraft Switch off in aircraft and follow any restrictions. Wireless devices can cause interference in aircraft. Vehicles Never use your device while driving. Place it in a safe place. Position your device within easy reach. Be able to access your device without removing your eyes from the road. Electronic devices In some circumstances your device may cause interference with other devices. Potentially explosive environments Switch off your device when in any area with a potentially explosive atmosphere, and obey all signs and instructions. Sparks in such areas could cause an explosion or fire resulting in bodily injury or even death. Pacemakers and other medical devices Pacemaker manufacturers recommend that a minimum separation of 8 inches be maintained between a wireless device and a pacemaker to avoid potential interference with the pacemaker. Operation of any radio transmitting equipment, including wireless phones may interference with the functionality of inadequately 28 User Guide
32 protected medical devices. Consult a physician or the manufacturer of the medical device to determine if they are adequately shielded from external RF energy or if you have any questions. Switch off your device in heath care facilities when any regulations posted in these areas instruct you to do so. Operating environment When connecting to other device, read its user guide for detailed safety instructions. Do not connect incompatible products. Do not place your device in the air bag deployment area. Use the device only in its normal operating positions as explained in the product documentation. Always switch off your device when its use is prohibited or when it may cause interference and danger. Areas with posted regulations Switch off your device when any regulations posted in these areas instruct you to do so. Care & Maintenance Use only manufacturer-approved accessories. Use general accessories may shorten the life of your device or cause device to malfunction. Keep your device dry. Humidity and all types of liquids may damage device parts or electronic circuits. Do not use or store the device in dusty, dirty areas. Do not store the device in hot or cold areas. Do not store your device near magnetic fields. Do not store your device with such metal objects as coins, keys and necklace. Do not drop your device or cause impacts to your device. User Guide 29
33 Léame primero: Lea este manual antes de usar su tableta y guárdelo para consultarlo en el futuro. Las descripciones de este manual se basan en la configuración predeterminada. Las imágenes y capturas de pantalla utilizadas en este manual pueden diferir del producto real. Las funciones disponibles y los servicios adicionales pueden variar según el dispositivo, el software o el proveedor de servicios. Nuestra empresa no se hace responsable de los problemas de rendimiento causados por aplicaciones de terceros. 30 User Guide
34 Preparar Desempaquetar Compruebe que la caja del producto contenga los siguientes elementos. Tableta Manual del usuario Adaptador Puede adquirir accesorios adicionales en su distribuidor local. Cargar la batería Antes de utilizar el dispositivo por primera vez, debe cargar la la batería. 1. Puede cargar el dispositivo con el cargador suministrado o conectar el dispositivo a un PC con un cable USB. 2. El ícono de la batería se muestra cuando finaliza si el dispositivo está apagado. Advertencia: Utilice sólo baterías y cargadores originales. Usar cargadores o cables no aprobados puede hacer que la batería explote o dañe el dispositivo. Instale la tarjeta de memoria Para almacenar archivos multimedia adicionales, debe insertar una tarjeta de memoria 1. Inserte una tarjeta de memoria con los contactos dorados hacia User Guide 31
35 hacia abajo. 2. Empuje la tarjeta de memoria en la ranura hasta que haga clic. Aviso: Nuestra empresa utiliza estándares industriales aprobados para tarjetas de memoria, pero algunas marcas pueden no ser totalmente compatibles con su dispositivo. Para comenzar Encendido y Apagado del dispositivo Para encender el dispositivo, mantenga pulsada la tecla de encendido. Para apagar el dispositivo, mantenga pulsada la tecla de encendido y a continuación, toque Aceptar. Cambiar al modo de vuelo Para utilizar solamente los servicios sin red del dispositivo, cambie al modo de vuelo Por favor, siga las siguientes instrucciones para activar el modo de vuelo: Pulse Configuración / Conexiones inalámbricas y redes / Más / Modo avión de la lista de opciones. 32 User Guide
36 Botones y Conectores Teclas de volumen Encender / Bloquear / Reset Ajusta el volumen del dispositivo. Mantenga pulsado durante 2 segundos para encender o apagar el dispositivo. Se pulsa para bloquear el dispositivo. Mantenga pulsado durante 6 segundos para restablecer el User Guide 33
37 Pantalla de inicio 1 La pantalla de inicio tiene múltiples paneles. Desplácese hacia la izquierda o hacia la derecha de la pantalla de inicio. Podrá ver iconos indicadores, widgets, accesos directos a aplicaciones, y otros elementos Abrir la barra de búsqueda 2 Desplácese hacia la izquierda o la derecha para los otros paneles 3 Acceda a la lista de aplicaciones y la pantalla de Widgets 4 Barra de tareas Agregar elementos a la pantalla de inicio Toque en el icono de la aplicación desde la pantalla principal.para 34 User Guide
38 acceder a la lista de aplicaciones que se muestra a continuación Desplácese hacia la izquierda o hacia la derecha para ver más artículos. Para agregar elementos a la pantalla de inicio, toque y mantenga presionado un elemento y a continuación, arrastre el elemento a una nueva ubicación. Para quitar elementos de la pantalla de inicio, toque y mantenga presionado un elemento y a continuación arrastre el elemento a la zona de eliminación en la parte superior de la pantalla principal. Barra de tareas La barra de tareas se muestra en la parte inferior de la pantalla. Muestra botones de opción de uso común, indicador de nivel de batería, hora actual y otros iconos. User Guide 35
39 Volver a la pantalla anterior. 2 Volver a la pantalla de inicio. 3 Ver las aplicaciones a las que ha accedido recientemente. 4 Captura imagen de la pantalla. 5 Ajusta el volumen del dispositivo de bajo nivel. 6 Ajusta el volumen del dispositivo de alto nivel. 7 Abre la lista de opciones disponibles en la pantalla actual. 8 iconos de notificación de visualización. Toque el área de notificaciones para abrir el panel de notificaciones Iconos indicadores Icono Definición Icono Definición Abre Wi-Fi Modo de vuelo disponible Wi-Fi conectado Reproductor de Musica Cargando datos Descargando datos Conectado al PC Alarma activada 36 User Guide
40 Icono Definición Icono Definición Nivel de carga de la batería Panel de notificaciones Toque el área de notificaciones para abrir el panel de notificaciones que se muestra a continuación. Puede acceder a una lista de notificaciones. Pulse para activar o desactivar las funciones de conexión inalámbrica y otros ajustes. Wi-Fi: Permite activar o desactivar la conexión Wi-Fi. Pantalla giratoria: Permite activar o desactivar la rotación automática de la pantalla. Brillo: Ajusta el nivel de luminosidad de fondo de la pantalla para que sea más clara o más oscura. Notificaciones: Permite activar o desactivar la función de notificación. User Guide 37
41 Configuración: Accesa la aplicación de Cofiguración. Rotación automática Si se gira el dispositivo mientras utiliza algunas funciones, la interfaz gira automáticamente. Para evitar que la interfaz gire, abra el panel de notificaciones, seleccione Pantalla Giratoria y desplácelo a Off. Bloquear y desbloquear la pantalla Para desbloquear la pantalla, mantenga pulsado el icono del candado y a continuación arrástrelo al área de desbloquear donde está el icono de desbloqueo. Para bloquear la pantalla manualmente, pulse la tecla de alimentación. Introducir texto Puede introducir texto seleccionando caracteres en el teclado virtual. Toque el campo de entrada de texto para mostrar el teclado virtual. Para ocultar el teclado, toque en la barra de tareas. Para cambiar el método de entrada de texto, pulse en la barra de tareas. 38 User Guide
42 Desde el campo de texto, puede utilizar la función de copiar y pegar para escribir rápidamente. Personalizar el dispositivo Para personalizar el dispositivo según sus preferencias, toque Configuración de la lista de aplicaciones o del panel de notificación. Administrar aplicaciones Para gestionar las aplicaciones instaladas en el dispositivo, toque Configuración / Apps. 1. Para desinstalar una aplicación, seleccione DESCARGADOS. A continuación, seleccione un elemento y pulse Desinstalar, Pulse OK para confirmar. 2. Para detener o cambiar la configuración de una aplicación, seleccione 3. RUNNING o ALL. A continuación, seleccione un elemento y pulse la opción que necesite. Seguridad Usted puede proteger su dispositivo y datos estableciendo el bloqueo de pantalla o encriptación de su tableta. Definir un bloqueo de pantalla Para establecer un bloqueo de la pantalla, pulse en Ajustes / User Guide 39
TABLET GOCLEVER TERRA 9o
 TABLET GOCLEVER TERRA 9o MANUAL DE USUARIO VISITE NUESTRA PAGINA WEB WWW.GOCLEVER.COM INDICE DE CONTENIDOS Introducción 4 Batería 4 Pantalla principal y lista de aplicaciones. 5 Tajeta MicroSD 7 Idioma
Manual de Usuario PX-TAB-A4. pyxissecurity.com. Tablet Android Edición Especial
 Manual de Usuario PX-TAB-A4 pyxissecurity.com Tablet Android Edición Especial Nota: Por favor lea este manual antes de operar su tableta, y manténgalo a la mano para futura referencia. Las descripciones
Amour manual de usuario
 Amour manual de usuario 1 Tabla de Contenidos Información de Seguridad... 3 Apariencia y Funciones... 5 Introducción... 6 Bloqueo de Pantalla... 8 Personalización... 9 Menú de Aplicaciones... 11 Funciones
Introducción a la aplicación móvil Android. Instalación
 Introducción a la aplicación móvil Android La aplicación móvil SanDisk +Cloud le permite acceder a su contenido y gestionar su cuenta desde el dispositivo móvil. Con la aplicación móvil SanDisk +Cloud,
Introducción a la aplicación móvil de ios. Instalación
 Introducción a la aplicación móvil de ios La aplicación móvil SanDisk +Cloud le permite acceder a su contenido y gestionar su cuenta desde el dispositivo móvil. Con la aplicación móvil SanDisk +Cloud,
Sistema:Android4.0 - Procesador:VC0882 - Edición:V01 - DA30
 Introducción Básica... 1 Guía Rápida... 1 Manejo y carga de la batería... 1 Encendido y Apagado... 2 Conexión con el PC... 3 Introducción al Sistema... 4 Barra Inferior del Sistema... 4 Menú de la pantalla
TAB R104 MANUAL DE USUARIO
 TAB R104 MANUAL DE USUARIO VISITE NUESTRA PÁGINA WEB WWW.GOCLEVER.COM Introducción Gracias por haber confiado en nosotros y adquirir uno de nuestros productos. Debido a constantes actualizaciones para
1. Contenido de la caja. 2. Diseño del dispositivo. カメラ Cámara フラッシュ Flash 音 量 ボタン Botón Volumen 電 源 ボタン Botón Encendido
 4. Manual de usuario 1. Contenido de la caja - Dispositivo - Guía de inicio rápido - Adaptador AC - Batería de iones de litio - Manual - Cable USB 2. Diseño del dispositivo Botón Menú Púlselo para acceder
Agustiniano Ciudad Salitre School Computer Science Support Guide - 2015 Second grade First term
 Agustiniano Ciudad Salitre School Computer Science Support Guide - 2015 Second grade First term UNIDAD TEMATICA: INTERFAZ DE WINDOWS LOGRO: Reconoce la interfaz de Windows para ubicar y acceder a los programas,
EP-2906 Manual de instalación
 EP-2906 Manual de instalación Con el botón situado a la izquierda se configura en el modo de cliente y de la derecha es el modo de Punto de acceso AP (nota: El USB es sólo para la función de fuente de
TABLET TAB M813G MANUAL DE USUARIO VISITE NUESTRA PÁGINA WEB WWW.GOCLEVER.COM
 TABLET TAB M813G MANUAL DE USUARIO VISITE NUESTRA PÁGINA WEB WWW.GOCLEVER.COM Introducción Gracias por haber confiado en nosotros y adquirir uno de nuestros productos. Debido a constantes actualizaciones
Marco Digital de Fotos
 Manual del Usuario Marco Digital de Fotos AVISO El cable de corriente/dispositivo de desconexión debe ser de fácil uso / desconexión. 1 Introducción Felicitaciones por la compra de su Marco Digital de
Creating your Single Sign-On Account for the PowerSchool Parent Portal
 Creating your Single Sign-On Account for the PowerSchool Parent Portal Welcome to the Parent Single Sign-On. What does that mean? Parent Single Sign-On offers a number of benefits, including access to
9233506 Edición 1 ES. Nokia y Nokia Connecting People son marcas comerciales registradas de Nokia Corporation
 9233506 Edición 1 ES Nokia y Nokia Connecting People son marcas comerciales registradas de Nokia Corporation Guía del usuario de Zip Manager Guía del usuario de Zip Manager Vaya a Zip Manager Pro. Nota:
Dash Jr. Manual de usuario
 Dash Jr. Manual de usuario 1 Tabla de Contenido Información de Seguridad...4 Apariencia y Funciones...6 Introducción...8 Realizar una Llamada...9 Contactos... 11 Mensajería... 12 Navegador de Internet...
VCM II inalámbrico Manual del usuario
 VCM II inalámbrico Manual del usuario Publicación: 20 de marzo de 2012 CONTENIDO Introducción... 3 Descargue e instale el software de IDS... 3 Prepare la COMPUTADORA para un VCM II inalámbrico... 3 Configurar
ESPAÑOL. Características de VideoCAM GE111. Instalación de VideoCAM GE111. 1 Botón de disparo 2 Indicador LED 3 Objetivo
 Características de VideoCAM GE111 1 Botón de disparo 2 Indicador LED 3 Objetivo Instalación de VideoCAM GE111 1. Instale el controlador antes de conectar la VideoCAM GE111 al puerto USB. 2. Instalación
TAB R106 MANUAL DE INSTRUCCIONES
 TAB R106 MANUAL DE INSTRUCCIONES VISIT OUR WEBSITE WWW.GOCLEVER.COM TO SEE MORE PRODUCTS TAB, NAVIO, DVR, DVB-T INTRODUCCIÓN Gracias por su confianza y su decisión de comprar nuestro producto! Como estamos
Tablet PC 708 Manual de Usuario / Android 4
 Tablet PC 708 Manual de Usuario / Android 4 Vista General Contenidos Cámara Frontal Volumen: +/- Encendido...Suspención Reiniciar HDMI Micrófono Auriculares DC / Cargador Tarjetas TF USB Altavoz 1. Pantalla
GUÍA DE INICIO RÁPIDO
 GUÍA DE INICIO RÁPIDO 1. RETIRE LA CUBIERTA TRASERA 2. INSERTE LAS TARJETAS SIM Y LA TARJETA DE MEMORIA 3. INSERTE LA BATERÍA 4. CARGUE EL TELÉFONO POR 8 HORAS ANTES DE ENCENDERLO 5. ENCIENDA EL TELÉFONO
Principios básicos de las redes propias Nokia N93i-1
 l Principios básicos de las redes propias Nokia N93i-1 Principios básicos de las redes propias 2ª edición ES, 9200197 Introducción Con la arquitectura UPnP y una red de área local inalámbrica (WLAN), es
Software TRENDnetVIEW Pro. Guía de instalación rápida de TRENDnetVIEW Pro (1)
") Software TRENDnetVIEW Pro Guía de instalación rápida de TRENDnetVIEW Pro (1) TRENDnetVIEW Pro/10.08.2013 Índice Requisitos del software de gestión TRENDnetVIEW Pro... 19 Instalación de TRENDnetVIEW Pro...
Software TRENDnetVIEW Pro Guía de instalación rápida de TRENDnetVIEW Pro (1) TRENDnetVIEW Pro/10.08.2013 Índice Requisitos del software de gestión TRENDnetVIEW Pro... 19 Instalación de TRENDnetVIEW Pro...
Zune 8GB/4GB Start. Iniciar.
 Zune 8GB/4GB Start. Iniciar. SETUP 1 Visit www.zune.net/setup to install the Zune software. 2 When installation is complete, connect your Zune to your PC to start syncing. Your Zune charges whenever
Modelo Tablet Banghó AERO: 1024
 Guía del usuario Tablet Modelo Tablet Banghó AERO: 1024 Tabla de contenidos Acerca de esta guía del usuario...1 Instrucciones para el cuidado y funcionamiento...3 Contenido del empaque... 4 Introducción
CÁMARA HD PARA COCHES
 CÁMARA HD PARA COCHES Manual 87231 Para hacer un mejor uso de todas las funciones de la cámara digital para coches, por favor lea el manual detenidamente antes de usarla. Precaución 1. Por favor, inserte
BTPC-905-QC TABLET PC 9 -QUAD CORE-HD 1024X600-WIFI-ANDROID 4.2. Manual de Instrucciones
 BTPC-905-QC TABLET PC 9 -QUAD CORE-HD 1024X600-WIFI-ANDROID 4.2 Manual de Instrucciones ADVERTENCIAS DE SEGURIDAD Por favor lea este manual antes de usar el dispositivo, y consérvelo para futuras referencias.
Guía de usuario. Por favor lea cuidadosamente antes de manual de instrucciones. ( la imagen de arriba es solo para referencia)
") Guía de usuario Por favor lea cuidadosamente antes de manual de instrucciones. ( la imagen de arriba es solo para referencia) Appearance 1 Interfaz cargador 2 Luz 3 Pantalla principal 4 Tecla M2 5 Tecla
Guía de usuario Por favor lea cuidadosamente antes de manual de instrucciones. ( la imagen de arriba es solo para referencia) Appearance 1 Interfaz cargador 2 Luz 3 Pantalla principal 4 Tecla M2 5 Tecla
MANUAL EASYCHAIR. A) Ingresar su nombre de usuario y password, si ya tiene una cuenta registrada Ó
 Ingresar su nombre de usuario y password, si ya tiene una cuenta registrada Ó") MANUAL EASYCHAIR La URL para enviar su propuesta a la convocatoria es: https://easychair.org/conferences/?conf=genconciencia2015 Donde aparece la siguiente pantalla: Se encuentran dos opciones: A) Ingresar
MANUAL EASYCHAIR La URL para enviar su propuesta a la convocatoria es: https://easychair.org/conferences/?conf=genconciencia2015 Donde aparece la siguiente pantalla: Se encuentran dos opciones: A) Ingresar
Modelo Tablet Banghó AERO: J01
 Guía del usuario Modelo Banghó AERO: J01 Tabla de contenidos Acerca de esta guía del usuario...1 Instrucciones para el cuidado y funcionamiento...3 Contenido del empaque... 4 Introducción a las partes
GUÍA DE INICIO RÁPIDO
 GUÍA DE INICIO RÁPIDO 1. RETIRE LA CUBIERTA TRASERA 2. INSERTE LAS TARJETAS SIM Y LA TARJETA DE MEMORIA 3. INSERTE LA BATERÍA 4. CARGUE EL TELÉFONO POR 8 HORAS ANTES DE ENCENDERLO 5. ENCIENDA EL TELÉFONO
Proceso Desde un PC Desde un celular (las tomas de pantalla son de un iphone)
") Todas las tomas de pantalla de este documento están en inglés. Si selecciona el idioma español en las configuraciones iniciales, la información aparecerá en español. Puntos básicos para usar Amigos de
Todas las tomas de pantalla de este documento están en inglés. Si selecciona el idioma español en las configuraciones iniciales, la información aparecerá en español. Puntos básicos para usar Amigos de
Comunicado para los socios
 Instrucciones de configuración por única vez del correo electrónico de Class C IMPORTANTE! Imprima este documento y el mensaje de correo electrónico que lo acompaña para poder activar su cuenta de correo
V.45. Manuale. Android 4.2.2, Jelly Bean
 V.45 Manuale Android 4.2.2, Jelly Bean 1 CONTENIDO 1. Introducción a los comandos básicos...3 2. Características de la aplicación del teléfono...6 3. Pegar o copiar funciones de texto...7 4. Características
Introducción a la aplicación web móvil
 Introducción a la aplicación web móvil La aplicación móvil SanDisk +Cloud es una interfaz basada en la web que le permite acceder a sus contenidos y gestionar su cuenta. Con la aplicación móvil puede reproducir
Tableta TABI EUTB-745 GUÍA DE ANDROIDTM
 Tableta TABI EUTB-745 GUÍA DE ANDROIDTM USO DE ANDROID Pantalla de inicio La pantalla de inicio es la primera pantalla que aparece después de desbloquear su dispositivo. Puede utilizar hasta 5 pantallas
BlackBerry Link para Windows. Versión: 1.1.1. Guía del usuario
 BlackBerry Link para Windows Versión: 1.1.1 Guía del usuario Publicado: 2013-07-22 SWD-20130722150052226 Contenido Introducción... 5 Acerca deblackberry Link... 5 Conozca BlackBerry Link...5 Conectar a
1. INTRODUCCIÓN 2 2. EVERDRIVE LITE 3 3. SINCRONIZADOR DE EVERDRIVE 4 4. VISTA GENERAL DE LAS OPCIONES DE LA APLICACIÓN 5
 Aplicación everdrive: Usuario Resumen Funcionalidades disponibles en la aplicación Registro de Modificaciones Versión Descripción [o descripción de cambios] Autor Fecha creación Aprobado por Fecha aprobación
Características de VideoCAM Trek. Instalación de VideoCAM Trek
 Características de VideoCAM Trek 1 Botón de disparo 2 Indicador LED 3 Objetivo 4 Base giratoria Instalación de VideoCAM Trek 1. Instale el controlador antes de conectar la VideoCAM Trek al puerto USB.
ZOEY Tabla de Contenidos
 ZOEY Tabla de Contenidos 1. Para Empezar... 3 1.1 Instalando la tarjeta SIM, Tarjeta de Memoria y la Batería... 3 2. Tipo de Entradas... 4 3. Guía de Menús... 5 3.1 Mensajería... 5 3.2 Contactos... 6 3.3
PREGUNTAS FRECUENTES TABLETS INFINITY
 PREGUNTAS FRECUENTES TABLETS INFINITY ÍNDICE PÁGINA 2. Antes de empezar 3.Primera Carga / Desbloqueo 4. Conexión USB / Conexión WiFi 5. Drivers / Mensaje de error al descargar aplicación / Error al conectarse
Guí a Ra pida Dropbox.
 Guí a Ra pida Dropbox. Software desarrollado para alojar y compartir archivos vía WEB. Ing. Verónica Lisset Nieto Quintanilla vlnietoq@gmail.com http://www.veronicalnieto.blogspot.com/ www.vlnieto.wikispaces.com
Sierra Security System
 Using Your SpreadNet Accessories With Your Sierra Security System Uso de Sus Accesorios SpreadNet Con Su Sistema de Seguridad Sierra SN990-KEYPAD SN961-KEYFOB SN991-REMOTE 1 SN990-KEYPAD The SN990-KEYPAD
1. Sign in to the website, http://www.asisonline.org / Iniciar sesión en el sitio, http://www.asisonline.org
 Steps to Download Standards & Guidelines from the ASIS International Website / Pasos para Descargar los Standards & Guidelines de la Página Web de ASIS International 1. Sign in to the website, http://www.asisonline.org
BWATCH-BT1 SMARTWATCH BLUETOOTH. Manual de Instrucciones
 BWATCH-BT1 SMARTWATCH BLUETOOTH Manual de Instrucciones FUNCIONES Y CONTROLES 1. Altavoz 2. Encendido/Apagado 3. Entrada USB/Auriculares 4. Atrás 5. Botón Home 6. Botón Llamada 7. Micrófono 8. Botón RESET:
Manual de Instrucciones
 BSPORT-10-N-R-V-A PULSERA DEPORTIVA-BLUETOOTH Manual de Instrucciones FUNCIONES Y CONTROLES Pulsar el botón de encendido durante 3 segundos para encender el dispositivo. BATERÍA El dispositivo cuenta con
CONTENIDO 1 GUÍA RÁPIDA... 3 INTRODUCCIÓN A LA INTERFACE... 3 DESCRIPCIÓN DE LOS ICONOS.. 4 PREPARACIÓN... 5 ENCENDIDO / APAGADO DEL APARATO...
 Manual del usuario CONTENIDO Parte 1 GUÍA RÁPIDA... 3 INTRODUCCIÓN A LA INTERFACE... 3 DESCRIPCIÓN DE LOS ICONOS.. 4 PREPARACIÓN.... 5 ENCENDIDO / APAGADO DEL APARATO...... 5 El funcionamiento del dispositivo..5
BTPC-908QC TABLET PC 9 -QUAD CORE-WIFI-BLUETOOTH-A4.4
 BTPC-908QC TABLET PC 9 -QUAD CORE-WIFI-BLUETOOTH-A4.4 Manual de Instrucciones 1 CONTENIDO CARGA DE BATERÍA TARJETA DE MEMORIA INICIO - Encendido/Apagado del dispositivo - Modo de vuelo - Diseño - Pantalla
ismartviewpro (iphone) Manual usuario 2015-05 VER 4.0
 Manual usuario 2015-05 VER 4.0") Cámara IP ismartviewpro (iphone) Manual usuario 2015-05 VER 4.0 1. Resumen ismartviewpro ismartviewpro es una software desarrollado por Wansview para su uso en iphone, ipad and ipod, compatible con versiones
Cámara IP ismartviewpro (iphone) Manual usuario 2015-05 VER 4.0 1. Resumen ismartviewpro ismartviewpro es una software desarrollado por Wansview para su uso en iphone, ipad and ipod, compatible con versiones
Una vez instalado el dispositivo, busque el número de serie en la etiqueta del producto y regístrelo en https://my.netgear.com.
 Introducción Soporte Gracias por elegir un producto NETGEAR. Una vez instalado el dispositivo, busque el número de serie en la etiqueta del producto y regístrelo en https://my.netgear.com. Deberá registrar
Tablet 7 Talius Quartz
 Tablet 7 Talius Quartz MANUAL DE USUARIO Gracias por comprar su Talius Quartz. Este manual ha sido especialmente diseñado para guiarle a través de las funciones y características de su dispositivo. Por
Creando Cuentas Nuevas para Padres / Alumnos en el
 Creando Cuentas Nuevas para Padres / Alumnos en el Portal de Internet Aeries de YCJUSD El portal de Internet Aeries proporciona una manera segura para acceder a información sobre la asistencia y el progreso
QUÉ SISTEMAS OPERATIVOS SOPORTA EL SERVICIO SEGURIDAD MOVISTAR?
 Seguridad Movistar_Para Computadoras PREGUNTAS Y RESPUESTAS TÉCNICAS QUÉ SISTEMAS OPERATIVOS SOPORTA EL SERVICIO SEGURIDAD MOVISTAR? El programa soporta los siguientes sistemas operativos: Microsoft Windows
6 Botón de la cámara abajo para ajustar el volumen, o para silenciarlo.
 Guía rápida para familiarizarse con su teléfono 1 Botones laterales Presione suavemente el botón hacia arriba o hacia 6 Botón de la cámara abajo para ajustar el volumen, o para silenciarlo. Presiónelo
Printer Driver. Esta guía describe la instalación del controlador de la impresora en Windows Vista, Windows XP y Windows 2000.
 4-129-722-51 (1) Printer Driver Guía de instalación Esta guía describe la instalación del controlador de la impresora en Windows Vista, Windows XP y Windows 2000. Antes de utilizar este software Antes
MANUAL DE USUARIO DE CUENTAS DE CORREO
 MANUAL DE USUARIO DE CUENTAS DE CORREO Existen dos formas de consultar el correo, por Interfaz Web (Webmail), la cual se realiza desde un navegador de Internet, o mediante un cliente de Correo, tal como
Manual aplicación Android NeoCoolcam
 Manual aplicación Android NeoCoolcam Menú aplicación Android cliente (Compruebe tener conexión a Internet cuando utilice la aplicación) 1. Como descargar: 1.1 Puede descargarla desde el CD incluido coolcam1.0.0.2.apk
Tabla de Contenidos. Para Empezar... 3. 1.1 Instalando el SIM y la Batería... 3 1.2 Cargando la Batería... 3 1.3 Enlace de la Red...
 Tabla de Contenidos Para Empezar... 3 1.1 Instalando el SIM y la Batería... 3 1.2 Cargando la Batería... 3 1.3 Enlace de la Red... 4 Tipo de Entrada... 4 1.4 Métodos de Ingreso... 4 1.5 Ingreso Numérico...
COPIAR CORREOS ENTRE CUENTAS USANDO IMAPSIZE
 COPIAR CORREOS ENTRE CUENTAS USANDO IMAPSIZE Vamos a usar el programa gratuito IMAPSize para copiar todos los correos (y configuración de carpetas) de una cuenta de correo (portería@etsii.ull.es) a otra
BlackBerry Desktop Software. Versión: 7.1. Guía del usuario
 BlackBerry Desktop Software Versión: 7.1 Guía del usuario Publicado: 2012-06-05 SWD-20120605131219667 Contenido Conceptos básicos... 7 Acerca de BlackBerry Desktop Software... 7 Configurar el smartphone
Manual mcloud. Manual del Usuario. Versión 1.4.2. 2015 Movistar. Todos los derechos reservados.
 Manual del Usuario Versión 1.4.2 2015 Movistar. Todos los derechos reservados. 1 1 mcloud... 3 2 Instalación del mcloud... 4 3 Configuración y uso de los componentes mcloud... 7 3.1 Home... 7 3.1.1 Barra
Contenido. Contenido... I Montaje... 1. Desempacar... 1 Cargar la Batería... 1 Instalar la tarjeta SIM... 1 Instalar tarjeta de memoria...
 Contenido Contenido... I Montaje... 1 Desempacar... 1 Cargar la Batería... 1 Instalar la tarjeta SIM... 1 Instalar tarjeta de memoria... 1 Comenzando el uso de su tablet... 2 Encender y Apagar su Dispositivo...
Tutorial Fotos Narradas
 Tutorial Fotos Narradas Prof: Nino, Santiago Fabricio ETR - TIC Región 18. 0 Fotos narradas 3 para Windows Fotos narradas 3 permite crear atractivas narraciones en vídeo a partir de imágenes. Con unos
ENKVM-USBB. 2-Port USB KVM switch with Easy Switch and Cable. User Guide
 ENKVM-USBB 2-Port USB KVM switch with Easy Switch and Cable User Guide i Package Contents 1 ENKVM-USBB 2-Port USB KVM Switch with Easy Switch and Cable 1 User Guide Requirements Console A VGA, SVGA, XGA,
MANUAL DE SHAREPOINT 2013. Por: Área de Administración de Aplicaciones.
 MANUAL DE SHAREPOINT 2013 Por: Área de Administración de Aplicaciones. Indice 1. Tipos de Cuentas de Usuario... 2 2. Compatibilidad con exploradores de Internet... 2 3. Como acceder a un sitio de SharePoint
JVC CAM Control (para Windows) Guía de usuario
 Guía de usuario") JVC CAM Control (para Windows) Guía de usuario Español Este es el manual de instrucciones del software (para Windows) de Live Streaming Camera GV-LS2/GV-LS1 realizado por JVC KENWOOD Corporation. El sistema
JVC CAM Control (para Windows) Guía de usuario Español Este es el manual de instrucciones del software (para Windows) de Live Streaming Camera GV-LS2/GV-LS1 realizado por JVC KENWOOD Corporation. El sistema
Jenny TV 2.8 Tabla de Contenidos
 Jenny TV 2.8 Tabla de Contenidos 1.Para Empezar... 3 1.1 Instalando la Tarjeta SIM, Tarjeta de Memoria y la Batería... 3 2. Tipo de Entradas... 4 3. Guía de Menús... 5 3.1 Mensajería... 5 3.2 Contactos...
GUIA DE USO DE DONGLE HAIER DMA6000
 1 Accesorios: 1. Dongle Haier 2. Adaptador HDMI 3. Cable micro USB 4. Manual de usuario 5. Cargador 5V USB 6. Adaptador Bluetooth para control remoto 7. Control remoto Bluetooth con teclado QWERTY 2 Funciones
Tablet Multimedia de 7" para niños Modelo: OxJr+
 MANUAL DE INSTRUCCIONES Tablet Multimedia de 7" para niños Modelo: OxJr+ ATENCION: Gracias por elegir esta Tablet de la marca OX. Lea atentamente este manual antes de utilizar este dispositivo y guárdelo
Instalación. Encontrará el instalador de la aplicación SanDisk +Cloud en su unidad flash SanDisk.
 Instalación Encontrará el instalador de la aplicación SanDisk +Cloud en su unidad flash SanDisk. Asegúrese de que su ordenador está conectado a Internet. Conecte después la unidad flash y haga doble clic
Descripción 2. Uso del botón Encendido Puesta en marcha: Apagado: Apagado y encendido de la pantalla:
 Descripción 1. Cámara trasera 2. Altoparlante 3. Encendido / apagado 4. Toma de auriculares 5. Interfaz Micro USB 6. DC charger interface 7. EIVolume+, Volume 8. Interfaz TF-CARD 9. Reiniciar 10. Cámara
MobiShow para Android TM Manual del usuario
 MobiShow para Android TM Manual del usuario Aviso importante Todos los comunicados, información técnica y recomendaciones relacionados con los productos de 3M se basan en información que se considera confiable,
GUÍA DE USUARIO PC-331117. Bienvenidos al mundo Perfect Choice. Antes de comenzar a usar el producto es importante que leas esta guía.
 GUÍA DE USUARIO PC-331117 Bienvenidos al mundo Perfect Choice Antes de comenzar a usar el producto es importante que leas esta guía. Conexión 1. Inserta el transmisor en el conector para encendedor de
Cuando está en modo de espera, deslice con su dedo sobre la pantalla a la derecha para desbloquear la pantalla o responder a una llamada.
 Company name: Guangdong Appscomm Co., Ltd. Address: Rm 903, Block C3, Chuangxin Building, No.182, Science Ave, Science Industry Zone, LuoGang District, Guangzhou, Guangdong, China Tel: 86-20-28065366 Fax:
Operación Microsoft PowerPoint 97
 Sonido y vídeo en las presentaciones PowerPoint incluye música, sonidos y vídeos que se podrán reproducir durante las presentaciones. Algunos sonidos como el de aplausos o el de máquina de escribir, se
Felicidades por comprar su EasyPad 700. Siga las instrucciones en este manual atentamente.
 Guía de Usuario Felicidades por comprar su EasyPad 700. Siga las instrucciones en este manual atentamente. Declaración: Si la versión final de este producto presenta diferencias de la descripción de la
IdeaTab A1000L-F. Guía del usuario V1.0
 IdeaTab A1000L-F Guía del usuario V1.0 Lea la Información importante de seguridad y manejo presente en el manual suministrado antes de utilizar el producto. Capítulo 01 Resumen de IdeaTab A1000L 1-1 Aspecto
Manual de Notas de voz
 Manual de Notas de voz Copyright 2002 Palm, Inc. Todos los derechos reservados. HotSync, el logotipo de Palm y Palm OS son marcas registradas de Palm, Inc. El logotipo de HotSync y Palm son marcas comerciales
Configuración del Xpy4002-KX, Xpy4004-KX y Xpy80004-KX con DDNS y aplicación móvil
 Configuración del Xpy4002-KX, Xpy4004-KX y Xpy80004-KX con DDNS y aplicación móvil Configuración del Xpy4002-KX, Xpy4004-KX y Xpy8004-KX con DDNS y aplicación móvil Pasos preliminares: 1. 2. 3. Nuestro
GUÍA RÁPIDA DE. Instalación de Nokia Connectivity Cable Drivers
 GUÍA RÁPIDA DE Instalación de Nokia Connectivity Cable Drivers Contenido 1. Introducción...1 2. Requisitos...1 3. Instalación de Nokia Connectivity Cable Drivers...2 3.1 Antes de la instalación...2 3.2
Gestión centralizada. Aplicación Cliente. (IPCMonitor) Septiembre, 2012 Versión 1.7. Manual de Usuario. 1 ofertasmultimedia.es
 Septiembre, 2012 Versión 1.7. Manual de Usuario. 1 ofertasmultimedia.es") Cámara IP Gestión centralizada Aplicación Cliente (IPCMonitor) Septiembre, 2012 Versión 1.7 Manual de Usuario 1 ofertasmultimedia.es Contenido 1. Introducción... 2 2. Requisitos del Equipo... 3 3. Instalación...
Cámara IP Gestión centralizada Aplicación Cliente (IPCMonitor) Septiembre, 2012 Versión 1.7 Manual de Usuario 1 ofertasmultimedia.es Contenido 1. Introducción... 2 2. Requisitos del Equipo... 3 3. Instalación...
La Video conferencia con Live Meeting
 Página 1 INSTRUCCIONES PARA TRABAJAR CON LIVE MEETING.- PREVIO. Para que tenga sentido la videoconferencia es conveniente que tengamos sonido (no suele ser problemático) y que tengamos vídeo. Si el ordenador
On Video. Disfrutá la libertad de ver Guía de Uso CINE MÚSICA FOTOS VIDEOS
 On Video Disfrutá la libertad de ver Guía de Uso CINE MÚSICA FOTOS VIDEOS Índice 1. Introducción 3 2. Contenido de la caja 4 3. Instalación y configuración 6 3.1 Conexión del equipo decodificador (Set
Guía de inicio rápido. Español VTE-1016
 Guía de inicio rápido Español VTE-1016 7025690 1 Empecemos! Conexión del mando al sistema PlayStation TV Puedes utilizar el mando inalámbrico DUALSHOCK 3 o DUALSHOCK 4 con el sistema PS TV; basta con conectar
Móvil Seguro. Guía de Usuario Terminales Android
 Móvil Seguro Guía de Usuario Terminales Android Índice 1 Introducción...2 2 Descarga e instalación de Móvil Seguro...3 3 Registro del producto...5 4 Funciones de Móvil Seguro...7 4.1 Antivirus... 7 4.1
MANUAL BÁSICO WEBMAIL
 MANUAL BÁSICO WEBMAIL Procedimiento básico para el uso de nuevo webmail Servicio salud Maule, en esta guía se podrá conocer los aspectos básicos que permiten la utilización de la herramienta webmail. Contenido
Manual de usuario gdmss-plus
 Manual de usuario gdmss-plus 1 ASPECTOS GENERALES... 3 1.1 INTRODUCCIÓN GENERAL... 3 1.2 CARACTERÍSTICAS PRINCIPALES... 3 1.3 ENTORNO... 3 2 INSTRUCCIONES DEL SOFTWARE... 4 2.1 BÚSQUEDA E INSTALACIÓN...
DVRs JPEG2000 AIRSPACE. Como configurar el Web-Viewer
 DVRs JPEG2000 AIRSPACE Como configurar el Web-Viewer * La function DDNS está disponible desde la versión V1.30 firmware de los modelos SAM-563/478/479/480 Actualizar el DVR con V1.30 si la version es anterior
Tableta K-BOOK mini M ANUA L DE USUARIO
 Tableta K-BOOK mini M AN U AL D E USUAR I O Por favor conserve estas instrucciones. Lea este manual de usuario cuidadosamente para que se familiarice completamente con su nueva TABLETA antes del primer
Guía de Aplicación del Servidor de Impresión. Esta guía aplica para los siguientes modelos.
 Guía de Aplicación del Servidor de Impresión Esta guía aplica para los siguientes modelos. TL-WR842ND TL-WR1042ND TL-WR1043ND TL-WR2543ND TL-WDR4300 CONTENIDO Capítulo 1. Descripción General...1 Capítulo
Reproductor multimedia Android Manual de Usuario
 Reproductor multimedia Android Manual de Usuario Nota: 1. Gracias por adquirir nuestro producto, este manual contiene información importante sobre el manejo del reproductor multimedia Android. Léalo detenidamente
BlackBerry Desktop Software Guía del usuario
 BlackBerry Desktop Software Guía del usuario Versión: 2.4 SWD-1905381-0426093716-005 Contenido Conceptos básicos... 3 Acerca de BlackBerry Desktop Software... 3 Configurar el smartphone con BlackBerry
Manual de uso de correo por webmail
 Manual de uso de correo por webmail Para ingresar a su cuenta de correo vía web; se debe utilizar un Navegador de Internet, entre los más comunes están Internet Explorer, Mozilla Firefox, Google Chrome,
Manual del Usuario 1
 Manual del Usuario Gracias por haber comprado la cámara de acción GoXtreme WiFi. Antes de comenzar a usar este producto, lea el manual cuidadosamente para maximizar el rendimiento y prolongar la vida útil
Tablet Plan Ceibal. Guía de usuario
 Tablet Plan Ceibal Guía de usuario Antes de usar la Tablet por primera vez, es necesario cargar la batería con el cargador que viene en la caja, durante 8 horas para obtener mejores resultados. La Tablet
Notas para la instalación de un lector de tarjetas inteligentes.
 Notas para la instalación de un lector de tarjetas inteligentes. Índice 0. Obtención de todo lo necesario para la instalación. 3 1. Comprobación del estado del servicio Tarjeta inteligente. 4 2. Instalación
Manual de iniciación a
 DOCUMENTACIÓN Picasa y otras nubes Manual de iniciación a DROPBOX 1 Últimamente se ha hablado mucho de la nube y de cómo es el futuro de la Web. También se han presentado servicios y aplicaciones que ya
Manual de Usuario del Sistema de Vigilancia Profesional (Professional Surveillance System, PSS)
") Manual de Usuario del Sistema de Vigilancia Profesional (Professional Surveillance System, PSS) Interface de inicio de Sección La interface de Inicio de Sección (Login) es como se muestra en la figura.
Manual de Usuario del Sistema de Vigilancia Profesional (Professional Surveillance System, PSS) Interface de inicio de Sección La interface de Inicio de Sección (Login) es como se muestra en la figura.
Android TV. Dual Core. Guia de inicio rápido
 Android TV Dual Core Guia de inicio rápido Manual en Español. Contenido: Android TV 4GB Adaptador AC, Cable MicroUSB Manual de usuario. Iniciar el dispositivo: 1. Conectar el dispositivo Dispositivos externos:
Guía del propietario. Owner s Guide. December 6, 2010 NSOG-1.0-100
 Guía del propietario Owner s Guide December 6, 2010 NSOG-1.0-100 Legal 2 2 Información legal Copyright 2011 Google Inc. Todos los derechos reservados. Copyright 2010 Google Inc. All rights reserved. Google,
3 Visualización de LCD 7 Ranura para tarjeta de TF. 4.1 Indicador de poder 9 Botón para encender WIFI
 Gracias por comprar nuestra videocámara de Wi-Fi, por favor, lea atentamente este manual con el fin de maximizar el rendimiento y extender la vida útil del producto. Descripción de la apariencia y del