Power Windows Leve-glace Electrique Elektrische Fensterheber Elevalunas Electricos Alzacristalli Elettrici. Ford Fusion (7/2002>)
|
|
|
- Francisca Campos Navarrete
- hace 8 años
- Vistas:
Transcripción
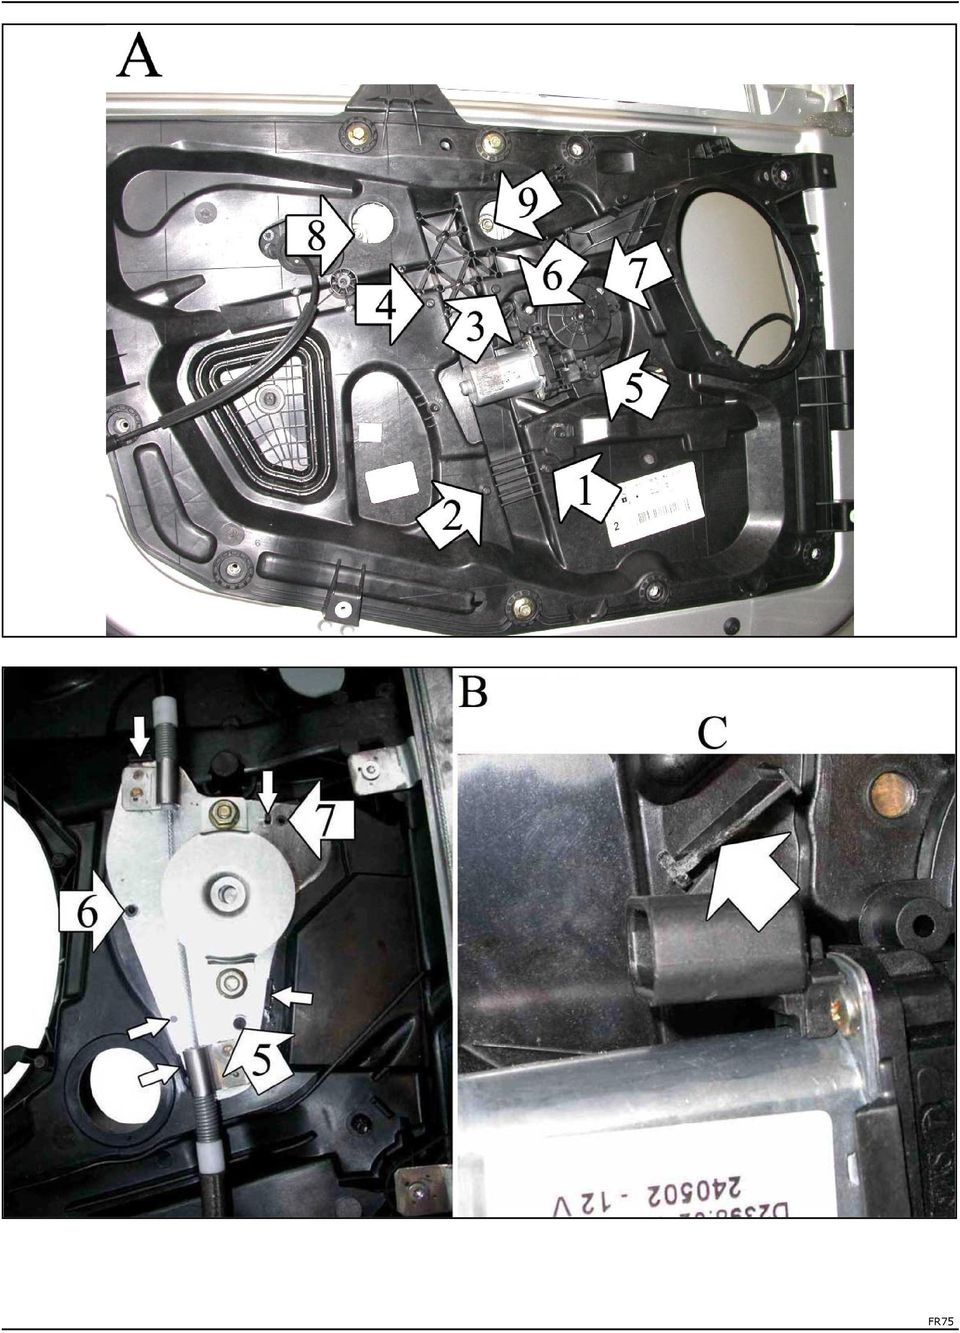
1 Power Windows Leve-glace Electrique Elektrische Fensterheber Elevalunas Electricos Alzacristalli Elettrici front doors (4d) - portes avant (4p) - vordere türen (4t) - puertas anteriores (4p) - porte anteriori (4p) Ford Fusion (7/2002>) advised position for the switches installation position conseillee pour l installation des boutons emfohlene lage für den schalterneinbau posicion aconsejada para la instalacion de los pulsadores posizione consigliata per l istallazione dei pulsanti

2 left door - portière gauche - linke tür - puerta lado izquierdo - porta lato sinistro USE THIS INSTALLATION INSTRUCTION ALSO FOR THE OPPOSITE SIDE. UTILISER CETTE INSTRUCTION DE MONTAGE AUSSI POUR L'AUTRE COTE. BENUTZEN SIE DIESE MONTAGE-ANLEITUNG AUCH FÜR DIE ANDERE SEITE. EMPLEAR ESTA INSTRUCCION DE MONTAJE TAMBIEN POR EL OTRO LADO. LA PRESENTE ISTRUZIONE VALE ANCHE PER L'ALZACRISTALLI DELLA MANO OPPOSTA. FR75

3 FR75
4

5 USE THIS INSTALLATION INSTRUCTION ALSO FOR THE OPPOSITE SIDE. A) Remove door panel. Remove inner panel and window regulator. B) Secure electric window regulator onto inner panel onto positions 1, 2, 3 and 4 (photo A). C) Secure motor plate onto original mounting position on the regulator side of inner panel and drill holes at positions 6 and 7 (ø 5 mm.) (photo B). D) On the passenger side of the inner panel, opposite motor plate, reduce the height of plastic up-stand to create sufficient motor connector housing clearance to allow insertion of the motor connector (photo C). E) On passenger side of inner panel, secure the motor at positions 5, 6 and 7 (photos A-B). F) Remount inner panel. When you insert window onto window plate, the original window plastic pin must position itself onto arranged position. G) Secure window onto positions 8 and 9. Wire as per wiring diagram. Check correct window operation before re-installing door trim. H) For the replacement of the spare-part, in case the motor connector is not compatible with the original one, make the wiring connection with the cable supplied. UTILISER CETTE INSTRUCTION DE MONTAGE AUSSI POUR L'AUTRE COTE. A) Demonter le panneau de la porte et le leve-vitre. B) Placer le leve-vitre electrique sur le panneau et le fixer avec les vis appropriees sur les points 1, 2, 3 et 4 (photo A). C) Fixer la platine moteur et percer les troux 6 et 7 (ø 5 mm.) (photo B). D) Emousser la piece d'origine pour inserer le connecteur du moteur (photo C). E) Inserer le moteur et le fixer sur les points 5, 6 et 7 (photos A-B). F) Remonter le panneau. Lorsque Vous posez le leve-vitre sur le panneau, il est imperatif que le clips d'origine se place sur la position prevue. G) Fixer la vitre sur les points 8 et 9. Effectuer les liaisons electriques. Verifier le fonctionnement de la vitre avant de remonter le panneau. H) Pour le remplacement du piece detache, quand le connecteur du moteur n'est pas compatible avec le connecteur d'origine, effectuer les liaisons electriques avec le cable fourni. BENUTZEN SIE DIESE MONTAGE-ANLEITUNG AUCH FÜR DIE ANDERE SEITE. A) Demontieren Sie die Türverkleidung. Demontieren Sie das Türinnenverkleidung und bauen Sie den Fensterheber aus. B) Legen Sie den elektrischen Fensterheber auf die Türinnenverkleidung. Schrauben Sie den elektrischen Fensterheber an den Punkten 1, 2, 3 und 4 (Abb. A) fest. C) Fixieren Sie die Motor-Platte an der original vorgesehen Position. Fertigen Sie in den Punkten 6 und 7 zwei Bohrungen an mit einem Durchmesser von 5 mm (Abb. B). D) Schrägen Sie die original Motorarretierung ab und setzen Sie den Motoradapter ein (Abb. C). E) Setzen Sie den Motor ein und befestigen Sie ihn an den Punkten 5, 6 und 7 (Abb. A-B). F) Montieren Sie die Türinnenverkleidung. Setzen Sie die Seitescheibe wieder ein. Beachte Sie beim einsetzen der Seitenscheibe dass die Arretierung sich selbst positioniert. G) Befestigen Sie das Fenster im Punkt 8 und 9. Verlegen Sie die elektrische Verkabelung. Überprüfen Sie die einwandfreie Funktion des elektrischen Fensterhebers bevor Sie die Türverkleidung wieder montieren. H) Um den Ersatzteil zu ersetzen, wenn der Motor-Verbinder nicht kompatibel mit den Original-Verbinder ist, verlegen sie die elektrische Verkabelung mit dem beigefugten Kabel. EMPLEAR ESTA INSTRUCCION DE MONTAJE TAMBIEN POR EL OTRO LADO. A) Desmontar el panel de la puerta. Desmontar el panel interior con el elevalunas. B) Sujetar el elevalunas eléctrico sobre el panel interno en los puntos n 1, 2, 3 y 4 (foto A). C) Sujetar el soporte del motor en el sitio original y taladrar 2 agujeros en los puntos n 6 y 7 con una broca de 5 mm. (foto B). D) Desmontar la canaleta original para conectar el conector del motor. E) Introducir el motor y sujetarlo en los puntos n 5, 6 y 7 (foto A-B). F) Volver a montar el panel interior de la puerta. Controlar que, ponendo la luna en el soporte del cristal, la corredera original del cristal se posicione en su posición correcta. G) Sujetar el cristal en los puntos n 8 y 9. Efectuar las conexiones eléctricas. Verificar el funcionamiento del cristal antes de colocar el panel de la puerta. H) Para la substitucion del repuesto, caso que el conectador del motor no es compatible con el conectador original, hacer las conexiones electricas con el cable del kit. ITALIANO ITALIANO LA PRESENTE ISTRUZIONE VALE ANCHE PER L'ALZACRISTALLI DELLA MANO OPPOSTA. A) Smontare il pannello portiera. Togliere il pannello interno e l'alzacristalli. B) Fissare l'alzacristalli elettrico sul pannello interno nei punti n 1, 2, 3 e 4 (foto A). C) Agganciare la piastra motore nella sede originale e forare nei punti n 6 e 7 (ø 5 mm.) (foto B). D) Smussare la aletta originale per inserire il connettore del motore (foto C). E) Inserire il motore e fissarlo nei punti n 5, 6 e 7 (foto A-B). F) Rimontare il pannello interno. Controllare che, inserendo il vetro nella piastra cristallo, il nottolino originale del vetro si posizioni nella sede predisposta. G) Fissare il vetro nei punti n 8 e 9. Eseguire i collegamenti elettrici. Verificare il funzionamento del cristallo prima di rimontare il pannello portiera. H) Per la sostituzione del ricambio, nel caso il connettore motore non fosse compatibile con il connettore originale, effettuare il collegamento elettrico mediante il cavo in dotazione.
 On the passenger side of the inner panel, opposite motor plate, reduce the height of plastic up-stand to create sufficient motor connector housing clearance to allow insertion of the motor")
Power Windows Leve-glace Electrique Elektrische Fensterheber Elevalunas Electricos Alzacristalli Elettrici. Suzuki Santana 410. Suzuki Santana 413
 Power Windows Leve-glace Electrique Elektrische Fensterheber Elevalunas Electricos Alzacristalli Elettrici 2 doors - 2 portes - 2 türen - 2 puertas - 2 porte 82012 Suzuki Santana 410 Suzuki Santana 413
left door - portière gauche - linke tür - puerta lado izquierdo - porta lato sinistro USE THIS INSTALLATION INSTRUCTION ALSO FOR THE OPPOSITE SIDE. UT
 Power Windows Leve-glace Electrique Elektrische Fensterheber Elevalunas Electricos Alzacristalli Elettrici 2 doors - 2 portes - 2 türen - 2 puertas - 2 porte 90050 Volkswagen Golf 3 - Cabriolet (1994>5/1995)
1. DESCARGA DEL SOFTWARE DE BLUETOOTH EN EL SMARTPHONE
 MANUAL DEL USUARIO PARA BLUETOOTH ES 1. DESCARGA DEL SOFTWARE DE BLUETOOTH EN EL SMARTPHONE Entre en Apple Store o Google Play y busque: - BH Premium BH Premium 2. FIJACIÓN DEL MÓDULO BLUETOOTH Fije el
MINI corniche. Istruzioni di montaggio Installation instructions Instructions de montage Montageanleitung Instrucciones de montaje. www.platek.
 MINI corniche Istruzioni di montaggio Installation instructions Instructions de montage Montageanleitung Instrucciones de montaje www.platek.eu I Sicurezza e avvertenze per l installazione: L installazione
Boxed Intel Celeron Processor Installation Notes
 Boxed Intel Celeron Processor Installation Notes Before installing the processor, please consider integration issues found in the installation notes available on the World Wide Web. Avant d effectuer l
Nuovo sistema per porte pieghevoli modello Pratico. New system for folding doors Pratico model. Nouveau système pour portes pliables modèle Pratico
 Modello model Modèle Modell Modelo práctico Nuovo sistema per porte pieghevoli modello New system for folding doors model Nouveau système pour portes pliables modèle Neues System für faltbare Türen Modell
Quickstart Guide. WiPry 5x. 1) Connect antenna to the appropriate port. TM
 Connect antenna to the appropriate port. TM") Quickstart Guide ACCESSORY ANTENNA W A R N I N G DO NOT APPLY MORE THAN 20DBM TO THE ANTENNA WITHOUT EXTERNAL ATTENUATION CONNECT TO HOST DEVICE 1) Connect antenna to the appropriate port. TM 2) Download
Quickstart Guide ACCESSORY ANTENNA W A R N I N G DO NOT APPLY MORE THAN 20DBM TO THE ANTENNA WITHOUT EXTERNAL ATTENUATION CONNECT TO HOST DEVICE 1) Connect antenna to the appropriate port. TM 2) Download
AT07. Board for Arduino UNO with terminal block placa para Arduino UNO con bornes Plaque pour ARDUINO UNO avec borniers pour CI
 Board for Arduino UNO with terminal block placa para Arduino UNO con bornes Plaque pour ARDUINO UNO avec borniers pour CI AT07 Support board for the Arduino UNO. It makes easier the installation and assembly
 Table of Contents Part Replacement Instructions Instructions pour le remplacement des pièces Instructies voor het vervangen van onderdelen Anleitung für den Austausch von Bauteilen Instrucciones para el
S-TYPE. 13 Pin - Electrical Kit, Kit électrique 13 broches, 13 Pin - Elektrik-Kit, Kit para conectores de 13 terminales, Kit elettrico 13 pin,
 13 Pin - Electrical Kit, Kit électrique 13 broches, 13 Pin - Elektrik-Kit, Kit para conectores de 13 terminales, Notice No. UEE1 E 11314749 000 Date 29/03/02 Number of pages. 1 of 16 SK2R83-15A416-CB Notice
 3.2.6.1. Câblage type 3.2.6.2. Autres câblages RC1 : Sélection des courbes de charge SW1 : Sélection de la fonction BOOST RC1 SW1 NF EN 61000-6-1: Compatibilité électromagnétique (CEM) - Partie 6-1
SOFT TIMELESS DESIGN, HIGH QUALITY COMPONENTS AND SOFT STOP CLOSURE
 SOFT TIMELESS DESIGN, HIGH QUALITY COMPONENTS AND SOFT STOP CLOSURE INDICE SOFT INHALT SOFT INDEX SOFT INDICE SOFT NS NS + WS AS Soft NS/AS Soft WS 238 SHOWER SOFT DIN EN 14428 SMS BOX CON PARZIALE TELAIO
Process Control Work Instructions Control de Procesos Instrucciones de Trabajo. for / para
 Process Control Work Instructions Control de Procesos Instrucciones de Trabajo for / para 629096898 VFCB Kit Relay Cable Harness Assy Ensamblar el Kit del Arnés de Cables del Relevador Publication Number:
VH - Designazione / Designation / Désignation / Bezeichnung / Designación /
 VH - Designazione / Designation / Désignation / Bezeichnung / Designación / Variariduttore Variator with reducer Variateur avec réducteur Verstell mit getriebe Variador con reductor Versione Version Version
Ä.Ubgä. L force Controls. I/O System 1000
 EDKPM SXXX.Ubg Ä.Ubgä L force Controls Montageanleitung Mounting Instructions Instructions de montage Instrucciones para el montaje Istruzioni per il montaggio I/O System 1000 EPM S1xx... EPM S9xx Buskopplermodule
HPFD12XCP, HPFD12XHP
 HPFD12XCP, HPFD12XHP 1 2 3 4 1. Main window panel and extension panels (extends from 20 up to 46 )... 3 pieces 2. Exhaust nozzle with diameter 130mm...1 piece 3. Exhaust nozzle with diameter 110mm...1
Scion IQ 2012-up
 INSTALLATION INSTRUCTIONS FOR PART 99-8234 APPLICATIONS Scion IQ 2012-up 99-8234 KIT FEATURES DIN head unit provision with pocket ISO DIN head unit provision with pocket KIT COMPONENTS A) Radio Housing
Emax DOC. N. 1SDH000460R L3633
 Emax DOC. N. 1SDH000460R0629 - L3633 Contatti ausiliari supplementari dditional auxiliary contacts Zusätzliche Hilfsschalter Contacts auxiliaires supplémentaires Contacto auxiliares suplementarios In aggiunta
ISTALLATION INSTRUCTION OF DUCT ELECTRICAL HEATER KITS INSTRUCTIONS D INSTALLATION POUR LES KITS DE CHAUFFAGE ELECTRIQUE DE CONDUITES
 EN FR GER SP IT ISTALLATION INSTRUCTION OF DUCT ELECTRICAL HEATER KITS INSTRUCTIONS D INSTALLATION POUR LES KITS DE CHAUFFAGE ELECTRIQUE DE CONDUITES MONTAGEANLEITUNG FÜR ELEKTRISCHE HEIZROHRKITS INSTRUCCIONES
Thank you for purchasing the General Motors Cargo Shade for your vehicle. Your package should contain one Cargo Shade and this instruction sheet.
 Thank you for purchasing the General Motors for your vehicle. Your package should contain one and this instruction sheet. Contents Description Quantity Cargo shade upper 1 (Figure 2) Cargo shade lower
Vedi foto 4. See photo 4. Voir photo 4. Ver foto 4
 MARCA MAKE FAIRE - HACER MODELLO MODEL MODÈLE - MODELO REV. 00 HYUNDAI TUCSON 15 Funzione - Function SCHEDA TECNICA DI INSTALLAZIONE PER SISTEMI DI ALLARME CAN CAN ALARM SYSTEM FITTING INSTRUCTIONS SCHEMA
File naming. Dateibenennung. Nommage de fichiers. Nomenclatura de archivo. 3shape. Release. Version. Version. Version. Software CAD.
 ENGLISH DEUTSCH FRANÇAIS ESPAÑOL DESS-3SHAPE LIBRARIES Download and installation instructions of dess interfaces (titan bases, gap cemented 0.09mm diameter) 3shape libraries. Download der Bibliotheken
MILANO ART. 72000H091
 MILANO Istruzioni di preinstallazione / Pre-Installation Instructions / Instructions de pré-installation / Pre-Installationsanleitung / Instrucciones previas a la instalación ART. 72000H091 Installazione
π H-2561 Parts Assembly 1-800-295-5510 uline.com Tools needed H-2562 rectangular picnic table
 π H-2561 H-2562 rectangular picnic table 1-800-295-5510 uline.com Para Español, vea páginas 3-4. Pour le français, consulter les pages 5-6. Tools needed 3/4" (19mm) Socket Wrench Power Drill 3/8" (10mm)
GMT900 Pick-Up Instrument Panel DIC Switch
 GMT900 Pick-Up Instrument Panel DIC Switch Contents Description Quantity Trim plate 1 DIC Switch 1 200 Grand Pointe Dr., Grand Blanc, MI 48439 4. Remove the park brake release handle from the knee bolster.
68 Q-BOX GW GW GW GW GW GW GW GW GW GW GW GW
 68 Q-BOX QUADRI GENERALI CABLATI FISSI ASC DI DISTRIBUZIONE FINALE A S C w i r e d A n d i n S ta l l e d g e n e r A l f i n A l d i S t r i b u t i o n b o x e S Ta b l e a u x g é n é r a u x c â b
742-273 INSTRUCCIONES DE INSTALACIÓN/ELIMINACIÓN: EL MOTOR ELEVADOR DE VENTANA
 ELIMINACIÓN E INSTALACIÓN EL MOTOR ELEVADOR DE VENTANA (742-273) Ford Expedition 1997 2002, Lincoln Navigator 1998 2002, Ford F-150 Super Crew Cab 2001 Consejos Generales Técnicos: Usar cinta de pintor
Mission Berlin. Deutsch lernen und unterrichten Arbeitsmaterialien. EPISODIO 26 Contrarreloj
 EPISODIO 26 Contrarreloj Ya en 2006, Anna decide bloquear blockieren la máquina. Para ello necesitan un código que desconocen. Anna sigue la música, pero aparece la mujer de rojo. Frustrará ésta los planes
Elementi scorrevoli per basi ad angolo. Sliding elements for corner base units. Éléments coulissants pour armoires de base angulaires
 Elementi scorrevoli per basi ad angolo Sliding elements for corner base units Éléments coulissants pour armoires de base angulaires Elementos deslizantes para bases en ángulo Schiebeelemente für Ecksockel
SYSTEM INSTALLATION MANUAL MANUAL DE INSTALACIÓN
 SYSTEM INSTALLATION MANUAL MANUAL DE INSTALACIÓN Measuring Tape Cinta métrica Ø 8 mm twist drill (wood) Broca espiral Ø 8 mm (para madera) Ø 14 mm stone drill (brick) Broca para piedra Ø14 mm (ladrillo)
Door Stop Kit, 316 SS Compas de porte, 316 SS Tope para puerta, 316 SS
 Door Stop Kit, 316 SS Compas de porte, 316 SS Tope para puerta, 316 SS Rev. E 2018 Hoffman Enclosures Inc. PH 763 422 2211 nvent.com/hoffman P/N 87798474 87798663 NOTE: Door stop kit is not intended for
Hyundai 1995-2006 95-7309
 INSTALLATION INSTRUCTIONS FOR PART 95-7309 APPLICATIONS Hyundai 1995-2006 95-7309 KIT FEATURES Double DIN head unit provision Stacked ISO DIN head unit provision KIT COMPONENTS A) Double DIN trim plate
Wall Mount Bracket [9A474]
![Wall Mount Bracket [9A474]](/thumbs/71/64957710.jpg "Wall Mount Bracket [9A474]") Wall Mount Bracket [9A474] Compatible with: Ritter 253 Exam Light Intended Use: To mount Ritter 253 exam light to wall. Equipment Alert The wall anchors supplied are designed for drywall. If your wall
Wall Mount Bracket [9A474] Compatible with: Ritter 253 Exam Light Intended Use: To mount Ritter 253 exam light to wall. Equipment Alert The wall anchors supplied are designed for drywall. If your wall
SP-U. Soporte colgado universal para JK26 / JK10 / JK10MA / JK12 / JK12MA / JK15 / KEY10 / KEY12 / KEY15
 Soporte colgado universal para JK26 / JK10 / JK10MA / JK12 / JK12MA / JK15 / KEY10 / KEY12 / KEY15 Universal U-bracket for JK26 / JK10 / JK10MA / JK12 / JK12MA / JK15 / KEY10 / KEY12 / KEY15 Copyright
CORTE Y PERFORACIÓN CUTTING AND DRILLING DÉCOUPAGE ET PERÇAGE
 CORTE Y PERFORACIÓN CUTTING AND DRILLING DÉCOUPAGE ET PERÇAGE CONSEJOS DE COLOCACIÓN ESP Tanto el corte como la perforación no deben suponer ningún problema si se utilizan las herramientas adecuadas y
Vedi foto 4. See photo 4. Voir photo 4. Ver foto 4
 MARCA MAKE FAIRE - HACER MODELLO MODEL MODÈLE - MODELO REV. 00 JEEP GRAND CHEROKEE 14 Funzione - Function SCHEDA TECNICA DI INSTALLAZIONE PER SISTEMI DI ALLARME CAN CAN ALARM SYSTEM FITTING INSTRUCTIONS
KIT VW T4 VW T4 Lift Roof
 fiamma.com K VW T4 VW T4 Lift Roof für die Halterungen for brackets pattes Instrucciones de instalacion de los estribos staffe Fiamma F45 Fiamma F45 fiamma.com für die Halterungen for brackets pattes Instrucciones
Kia Rondo 2007-2010 99-7329
 INSTALLATION INSTRUCTIONS FOR PART 99-7329 APPLICATIONS Kia Rondo 2007-2010 99-7329 KIT FEATURES Recessed DIN mount radio provision with pocket ISO mount radio provision with pocket KIT COMPONENTS A) Radio
Technische Alternative elektronische Steuerungsgerätegesellschaft mbh. A-3872 Amaliendorf, Langestr. 124 Tel +43 (0)2862 53635 mail@ta.co.
2862 53635 mail@ta.co.") Technische Alternative elektronische Steuerungsgerätegesellschaft mbh. A-3872 Amaliendorf, Langestr. 124 Tel +43 (0)2862 53635 mail@ta.co.at USB-Treiber Vers. 2.2 ES Controladores USB Índice de contenidos
Technische Alternative elektronische Steuerungsgerätegesellschaft mbh. A-3872 Amaliendorf, Langestr. 124 Tel +43 (0)2862 53635 mail@ta.co.at USB-Treiber Vers. 2.2 ES Controladores USB Índice de contenidos
Audio Connectivity Module, Module de connectivité audio, Audio-anschaltmodul, Modulo per connettivita avanzata, Módulo de conectividad de audio
 Audio Connectivity Module, Module de connectivité audio, Audio-anschaltmodul, Modulo per connettivita avanzata, Módulo de conectividad de audio Jaguar accessory fitting instructions can be found at the
π H-2526 ZEBRA DESKTOP DUAL BARCODE PRINTER 1-800-295-5510 uline.com 14, 16 21 15, 17
 π H-226 ZEBRA DESKTOP DUAL BARCODE PRINTER -800-29-0 uline.com Para Español, vea páginas 3-4. Pour le français, consulter les pages -6. 2 23 3 4 22 3 6 2 0 20 8 9 3 4, 6 2, 9 PAGE OF 6 08 PH-226 π H-226
LAMPADE A CERO /18 cm fi18x14 12, /24 cm fi24x19flø8, / /25 cm fi25x18fl11x10
 lampade a cero lampes a cierges lamps lamparas de vela laternen 10 611/18 cm fi18x14 12,5 10 622/24 cm fi24x19flø8,5 10 133/18 cm fi18,5x13 13 10 150/23 cm fi23x13fl8,5x8,5 10 120/18 cm fi18,5x13 13 10
Vedi foto 4. See photo 4. Voir photo 4. Ver foto 4
 MARCA MAKE FAIRE - HACER JEEP MODELLO MODEL MODÈLE - MODELO REV. 00 RENEGADE (Keyless) 15 Funzione - Function SCHEDA TECNICA DI INSTALLAZIONE PER SISTEMI DI ALLARME CAN CAN ALARM SYSTEM FITTING INSTRUCTIONS
BOOKCAGE design Emmemobili
 BOOKCAGE design Emmemobili Multifunctional element inspired to the design of Cage sideboards. Shelves, flap and swing doors and drawers. It s also available a version with a wide panel as TV-holder with
π H-2888 RECYCLED PLASTIC BENCH WITH BACK parts 1-800-295-5510 uline.com TOols NEEDED
 π H-2888 RECYCLED PLASTIC BENCH WITH BACK uline.com Para Español, vea páginas 3-4. Pour le français, consulter les pages 5-6. TOols NEEDED 7/16" Socket Wrench or 7/16" Drill and Socket Bit parts Single
R167EV. for. YAMAHA Xmax
 R17V for YAMAHA Xmax 1 2 R17V YAMAHA Xmax L x 4 B x 2 x 4 x 2 KIT DI MONTAGGIO ASSMBLY KIT x 1 VISTA RIPILOGATIVA Summary view step 1 step B 1 step A step D step L B 3 bis step 2 bis 2 step G 3 STP A I
Vedi foto 4. See photo 4. Voir photo 4. Ver foto 4
 MARCA MAKE FAIRE - HACER MODELLO MODEL MODÈLE - MODELO REV. 01 PEUGEOT 208 2014 Funzione - Function SCHEDA TECNICA DI INSTALLAZIONE PER SISTEMI DI ALLARME CAN CAN ALARM SYSTEM FITTING INSTRUCTIONS SCHEMA
AMBIENT LIGHT KIT Call Out Description Parts Quantity
 1 AMBIENT LIGHT KIT Call Out Description Parts Quantity 1 Plastic Mounting Strap Not used in all vehicles 2 Adhesive Tape (Double-Sided) Supplied in Kit 1 Switch Frame Supplied in Kit 1 4 Power Harness
Hyundai. Indice / Contents
 Indice / Contents H160S2x5...164 HD45...166 HD 55...168 HD65 Carcasa Recta / Straight housing...170 HD 170...172 HD 170...173 KH 10...174 T060S5 / 5.180 - Carcasa Recta / Straight housing...176 271_03
Usos y gramática. DESAYUNAR desayun. COMER. CENAR cen... cen... cen... cen... cen... cen...
 Protagonista 1 Lesen Sie noch einmal den Bericht über die Hauptdarstellerin dieser Lektion und kreuzen Sie die richtigen Antworten an. 1. Rosa Iglesias recibe el premio por a) su profesionalidad y simpatía.
Table of Contents ACT LABS GS Addendum
 GS Addendum Table of Contents ACT LABS GS Addendum English --------------------------------------------------------------- 4 Français ------------------------------------------------------------- 5 Deutsche
2011 Hyundai Sonata 99-7342
 KIT FEATURES INSTALLATION INSTRUCTIONS FOR PART 99-7342 APPLICATIONS 2011 Hyundai Sonata (For models equipped without Nav and with manual climate controls) 99-7342 ISO DIN head unit provision with pocket
Cassetti e cassettoni in alluminio premontati e completi per mobili Complete, pre-assembled shallow and deep aluminium drawers for furniture units
 Cassetti e cassettoni in alluminio premontati e completi per mobili Complete, pre-assembled shallow and deep aluminium drawers for furniture units Tiroirs et tiroirs profonds en aluminium pré montés et
Quick Start Guide. EHS Advanced. Wireless-Headset Adapter
 Quick Start Guide HS dvanced Wireless-Headset dapter snom technology G snom rance SRL Wittestr. 0 G Parc des fontenelles 0 erlin, eutschland 0 ailly, rance Tel. + 0-0 Tel. + 0 a + 0 a + 0 info@snom.com,
Matrox M-Series. Getting Started Guide Guide de mise en route Erste Schritte- Handbuch Guida introduttiva Guía de introducción
 Matrox M-Series Getting Started Guide Guide de mise en route Erste Schritte- Handbuch Guida introduttiva Guía de introducción 20071-G50-0220 FMSR-BKT22I Install your graphics hardware Choose a PCI Express
SERRATURE MERONI S.p.A. via Valsorda SP 40, Inverigo CO - Italy / T: / E: / W: ufomeroni.com
 PORTA posteriore - BACK DOOR - PUERTA TRASERA - PORTE ARRIÈRE SERRATURE MERONI S.p.A. via Valsorda SP 40, 22044 Inverigo CO - Italy / T: +39 0316949301 / E: ufo@serme.it / W: ufomeroni.com 1 2 PULIRE LA
Matrox Epica Series 20162-G50-0110 FEP2-BKT11I
 Matrox Epica Series Epica TC20+ Epica TC48 Getting Started Guide Guide de mise en route Erste Schritte- Handbuch Guida introduttiva Guía de introducción 20162-G50-0110 FEP2-BKT11I Install your graphics
Trekhaken Attelages Anhängevorrichtungen Tow bars. EEC APPROVAL N : e6*94/20*0561*00 X 0.00981 < 9,65 KN
 Trekhaken Attelages Anhängevorrichtungen Tow bars Hyundai Sonata GDW EEC APPROVAL N : e6*94/20*0561*00 X D= X X 0.00981 < 9,65 KN S/ = 75 Kg Max. = 1800 Kg GDW nv Hoogmolenwegel 23 B-8790 Waregem TEL.
Versión 1.0. Intrucciones Montaje Kit Gold Strike- Red Pirates
 Versión 1.0 Intrucciones Montaje Kit Gold Strike- Red Pirates Desmontaje previo y preparación del mueble -Para empezar desconectamos i extraemos todo el cableado que esté conectado a la MPU5 con las conexiones
Package Contents. Hardware Package. Tools Needed
 Reverso en español HWGWTR-1 REAR REGISTER KIT INSTALLATION INSTRUCTIONS INSTRUCTIONS MUST BE LEFT WITH THE OWNER FOR FUTURE REFERENCE AFTER INSTALLATION. Package Contents REGISTER BOOT REGISTER WITH DAMPER
ENKVM-USBB. 2-Port USB KVM switch with Easy Switch and Cable. User Guide
 ENKVM-USBB 2-Port USB KVM switch with Easy Switch and Cable User Guide i Package Contents 1 ENKVM-USBB 2-Port USB KVM Switch with Easy Switch and Cable 1 User Guide Requirements Console A VGA, SVGA, XGA,
Double Door Enclosed Corkboard
 globalindustrial.ca Distribucion Industrial Globales S DE RL DE CF Assembly Instructions Instrucciones de Ensamblaje Directives d assemblage Customer Service US: -800-645-986 Servicio de atención al Cliente
Model :RFBW01014 Model :RFBE Model :RFBG 01014
 Model :RFBW01014 Model :RFBE 01014 Model :RFBG 01014 Wall Cabinet Operators Manual Manual de Operadora del Gabinete de pared Inspect product prior to installation. Contact info@runfinegroups.com prior
KIT MULTI. Montageanleitung für die Halterungen Installation instructions for brackets. Instructions de montage pattes
 fiamma.com K MULTI Montageanleitung für die Halterungen Installation instructions for brackets Instructions de montage pattes Instrucciones de instalacion de los estribos Istruzioni di montaggio staffe
For use with Edge, Duo Wall and Layers Wall range hood
 customer service 1.888.880.8368 Duct Cover Extension Z1C-00LA For use with Edge, Duo Wall and Layers Wall range hood Mounting the duct cover Pag. 3 Fixation des cheminees Pag. 4 Fijación de las chimeneas
ASSEMBLY INSTRUCTIONS INSTRUCTIONS DE MONTAGE INSTRUCCIONES DE ENSAMBLAJE
 an LDI Company New Hope, MN 55428 www.safcoproducts.com ASSEMBLY INSTRUCTIONS INSTRUCTIONS DE MONTAGE INSTRUCCIONES DE ENSAMBLAE 8926 Impromptu Flat Panel TV Cart Charoit téléviseur à écran plat Carro
Non-Mortise Hinge Charnière sans mortaise Bisagra para gabinetes sin muesca
 MNUFTURING ORPORTION Non-Mortise Hinge harnière sans mortaise isagra para gabinetes sin muesca For ease of installation, RED through LL instructions before you begin. Pour faciliter l installation, LISEZ
English - EN Français - FR Deutsch - DE Italiano - IT Português - PT Español - ES
 English - EN Français - FR Deutsch - DE Italiano - IT Português - PT Español - ES Push upward to open battery door, insert batteries as shown. Pair your mouse with your Windows device: A. On the underside
2011 Honda CR-Z
 INSTALLATION INSTRUCTIONS FOR PART 99-7879 APPLICATIONS 2011 Honda CR-Z 99-7879 KIT FEATURES ISO radio mount provision with pocket KIT COMPONENTS A) Radio housing B) ISO brackets C) Pocket D) (11) #8 x
741-551 INSTRUCCIONES DE INSTALACIÓN/ELIMINACIÓN: REGULADOR DE VENTANA
 ELIMINACIÓN E INSTALACIÓN DEL REGULADOR DE VENTANA (741-551) Chrysler Minivan Voyager, Dodge Caravan 1996 2000 Consejos Generales Técnicos: Usar cinta de pintor en lugar de cinta adhesiva para segurar
LIBRO TÉCNICO SISTEMA MDS-VDS. Sección II. Esquemas de instalación
 LIBRO TÉCNICO SISTMA MS-VS Sección II squemas de instalación MS - VS LIBRO TÉCNICO MS-VS l libro técnico MS-VS está compuesto de dos secciones: - Sección I: escripción del Sistema MS-VS (Cod. 97002b-1)
DODGE JOURNEY 08 FIAT FREEMONT 2011
 DODGE JOURNEY 08 FIAT FREEMONT 0 Nº Revisión Fecha Aprobación Nº 006 05-09-0 Homologation EC/94/0 DODGE JOURNEY 08 FIAT FREEMONT 0 A 50-X A 50-X F F F e3 00-3454 e3 00-3455 e3 00-880 e3 00-880 e3 00-880
DELUXE SHOP DESKS PARTS uline.com TOOLS NEEDED H-6865, H-6866, H-6867 H-6868, H-6870
 H-6865, H-6866, H-6867 H-6868, H-6870 π DELUXE SHOP DESKS uline.com Para Español, vea páginas 3-4. Pour le français, consulter les pages 5-6. TOOLS NEEDED Phillips Screwdriver 10 mm Wrench PARTS Shop Desk
P/N INSTALLING HD3000 SERIES HANDLE SET : INSTALL LATCH / DEADBOLT STRIKERS:
 INSTALLING HD3000 SERIES HANDLE SET : A: Drill the 1/8" diameter handle hole ( third from the top of the door, on the room side ) to a 5/16" diameter. B: Slide the inside handle into its base. Tighten
Quick start guide ewon Flexy 205
 Quick start guide ewon Flexy 205 1 ewon Flexy uses a default fixed IP address (10.0.0.53, Mask: 255.255.255.0). To change it for network compatibility, follow the steps on reverse side. L ewon Flexy utilise
PL3101CAM. Sp. 5mm GL TEF M6x16 616TEF 2. TECF M8x20 820TECF 2. TECF M8x40 840TECF 4. Auto Bloccante Flangiato Ribassato M6
 PL0CM SUZUKI DL50 V-STROM L-L (0-0) N Descrizione Caratteristiche Codice Quantità Supporto - Support - Support Halterung - Soporte - poio - - (Dx,Sx) Ponte Posteriore - Rear Bridge - Pont Posterieure Verbindungsrohr
Customer Service Information
 SERVICIO AL CLIENTE Customer Service Information Fecha Asunto Diciembre de 2011 Servicio de información la "True Thinline de Rado Muy estimados Señoras y Señores: Los pasados meses Rado ha lanzado con
2.4L ENGINE BLOCK HEATER CHRYSLER 200 / DODGE AVENGER. www.mopar.com 1. CALL OUT DESCRIPTION QUANTITY 1 Engine Block Heater 1 2 Cord 1 3 Tie Straps 2
 www.mopar.com 1 2.4L ENGINE BLOCK HEATER CHRYSLER 200 / DODGE AVENGER CALL OUT DESCRIPTION QUANTITY 1 Engine Block Heater 1 2 Cord 1 3 Tie Straps 2 TOOLS REQUIRED Front End Cutters Flat Bladed, Phillips
2 2. Support RH side of fuel tank with jack stand. TO FRONT OF VEHICLE 3. Remove (1) and (3) support bolts from around fuel tank.
 and (3) support bolts from around fuel tank.") 1 Fuel Tank Skid Plate JEEP GRAND CHEROKEE B C A CALL OUT DESCRIPTION QUANTITY A RH Fuel Tank Skid Plate 1 B LH Fuel Tank Skid Plate 1 C Flange Bolt 6 FUEL TANK SKID PLATE 1. Mounting location shown. NOTE:
1 Fuel Tank Skid Plate JEEP GRAND CHEROKEE B C A CALL OUT DESCRIPTION QUANTITY A RH Fuel Tank Skid Plate 1 B LH Fuel Tank Skid Plate 1 C Flange Bolt 6 FUEL TANK SKID PLATE 1. Mounting location shown. NOTE:
Hyundai Santa Fe 2007-up 99-7325
 INSTALLATION INSTRUCTIONS FOR PART 99-7325 APPLICATIONS Hyundai Santa Fe 2007-up 99-7325 (not for factory equipped NAV models) KIT FEATURES DIN radio provision with pocket ISO radio provision with pocket
Information Hard Equipment
 Information Hard Equipment Anbauanleitung Akrapovic Slipon Enddämpfer Für alle Modelle LC Mounting instructions for the Akrapovic Slipon main silencer All LC models Istruzioni di Montaggio Silenziatore
1-800-295-5510 uline.com. Phillips Screwdriver Mini Flathead Screwdriver Electric Drill 5/16" Drill Bit PARTS. Flat Display Wall Mount Bracket x 1
 π H-2769, H-4665 TAKE-A-NUMBER-SYSTEM ADDITIONAL 2 AND 3-DIGIT LED DISPLAY 1-800-295-5510 uline.com Para Español, vea páginas 3-4. Pour le français, consulter les pages 5-6. TOOLS NEEDED Phillips Screwdriver
SIMATIC. SIMATIC S7 Easy Motion Control V12. Welcome Tour. Totally Integrated Automation PORTAL
 SIMATIC S7 Easy Motion Control V12 Welcome Tour Totally Integrated Automation www.siemens.com/tia-portal-welcometour Totally Integrated Automation PORTAL www.siemens.com/easy-motion-control SIMATIC Siemens
JetNet 6710G-HVDC Series. Industrial 8-Port PoE plus 2 Gigabit-TX Managed Ethernet Switch. Quick Installation Guide. www.korenix.com V1.
 JetNet 6710G-HVDC Series Industrial 8-Port PoE plus 2 Gigabit-TX Managed Ethernet Switch Quick Installation Guide V1.0 www.korenix.com 1. Overview The JetNet 6710G-HVDC is Managed Industrial Power over
START INICIAR - DÉMARRAGE - INIZIO - INICIAR - INICIO
 START INICIAR - DÉMARRAGE - INIZIO - INICIAR - INICIO ENG: Microsoft wireless mouse PTB: Mouse sem fio da Microsoft FRA: Souris sans fil Microsoft ITA: Mouse senza fili Microsoft PTG: Rato sem fios Microsoft
GAUDI MODEL HOTEL LOCK
 INSTRUCTION MANUAL and SPARE PARTS GAUDI MODEL HOTEL LOCK HOTEL: ADDRESS: TOWN: TELEPHONE: FAX: E-MAIL: OMNITEC DEALER: CONTACT: ADDRESS: TOWN: TELEPHONE: FAX: E-MAIL: ZARAGOZA, Month and year of manufacture.
All Models. Auxiliary Power Socket, Prise d'alimentation auxiliaire, Zusatzsteckdose, Presa di corrente ausiliaria, Enchufe auxiliar,
 All Models Auxiliary Power Socket, Prise d'alimentation auxiliaire, Zusatzsteckdose, Presa di corrente ausiliaria, Enchufe auxiliar, Notice No. UEV4 e 11352552 000 Date 11/11/02 Number of pages. 1 of 31
KD A 02 KD A. Sistema de puertas correderas Sliding doors system Système de portes coulissantes Schiebetüren system
 02 KD A KD A Sistema de puertas correderas Sliding doors system Système de portes coulissantes Schiebetüren system Interiorismo Madera / Interior Design Wood / Décoration d Intérieur Bois / Innenausstattung
JFVD-60 JFL-60 JFVS-60 JNR-H/GC-A/CB-28/LED JNR-H/GC-DS/CB-28/LED. Lente asimétrica Asimetric lens Lentille asymétrique
 5 DIMENSIONES DE LA LUMINARIA SIZES OF THE LUMINAIRE DIMENSIONS DES LUMINAIRE 204 INSTRUCCIONES DE MONTAJE / MOUNTING INSTRUCTIONS / INSTRUCTIONS DE MONTAGE JNRH/GCA/CB28/LED Lente asimétrica Asimetric
HYUNDAI TUCSON (without 4.3 screen) 2010-UP 99-7341B
 2010-UP 99-7341B") Installation instructions for part 99-7341B HYUNDAI TUCSON (without 4.3 screen) 2010-UP 99-7341B KIT FEATURES ISO DIN Head Unit Provision With Pocket DDIN Head Unit Provision Painted Matte Black to match
Installation instructions for part 99-7341B HYUNDAI TUCSON (without 4.3 screen) 2010-UP 99-7341B KIT FEATURES ISO DIN Head Unit Provision With Pocket DDIN Head Unit Provision Painted Matte Black to match
DETECCION DE GAS CENTRALITAS Y SENSORES
 DETECCION DE GAS CENTRALITAS Y SENSORES CATALOGO TECNICO 2016 1 DETECCION DE GAS CATALOGO TECNICO Índice Centralita RGI 000MBX2 (para 2 zonas) 3-4 Centralita RGI MSX2 (para 2 zonas o 1+1 zona) 5-6 Centralita
Concurso de música en el Colegio Alemán «Alberto Durero» de Sevilla
 2016 Concurso de música en el Colegio Alemán «Alberto Durero» de Sevilla 1. Fechas. 2. Participantes. 3. Convocatoria y categorías. 4. Participación en varias categorías. 5. Repertorio. 6. Categorías por
ferrva Industriales Industrial doors Portes industrielles Eco In Timber SF-35 SF-40 SF-65 SF-75
 Industriales Industrial doors Portes industrielles Eco In Timber SF-35 SF-40 SF-65 SF-5 Industriales Industrial doors Portes industrielles Correderas Sliding doors Portes coulissantes SF-35 SF-40 SF-65
PREPOSICIONES. (por Elena Martín-Cancela)
") PREPOSICIONES (por Elena Martín-Cancela) ACUSATIVO DATIVO ACUSATIVO Y DATIVO Bis Aus Ab Durch Bei (beim) An (ans, am) Für Mit Auf Gegen Nach Hinter Ohne Seit In (ins, im) Um Von Neben Wieder Zu (zur, zum)
PREPOSICIONES (por Elena Martín-Cancela) ACUSATIVO DATIVO ACUSATIVO Y DATIVO Bis Aus Ab Durch Bei (beim) An (ans, am) Für Mit Auf Gegen Nach Hinter Ohne Seit In (ins, im) Um Von Neben Wieder Zu (zur, zum)
PUB. DIM-1012-000. Transfer Utility. Installation Guide. Guide d Installation. Guía de instalación
 PUB. DIM-1012-000 Transfer Utility Installation Guide Guide d Installation Guía de instalación Jp En Fr Es Jp 02 Windows users only: The supplied software offers a convenient way to save your movies to
INSTALLATION INSTRUCTIONS FOR PART 99-7341B APPLICATIONS 2010 HYUNDAI TUCSON
 INSTALLATION INSTRUCTIONS FOR PART 99-74B KIT FEATURES KIT COMPONENTS APPLICATIONS 00 HYUNDAI TUCSON 99-74B ISO DIN Head Unit Provision With Pocket DDIN Head Unit Provision Painted Matte Black To Match
Reflections García Cumini 2016
 Reflections García Cumini 2016 cod. 6048 Fambuena Luminotecnia S.L. C/ Fundacion Marques de Dos Aguas 12/14 P oligono Industrial de Massanassa 46470 M ass a n a s s a V a lenc ia S P A I N T. + 3 4 9 61
Serie MINI/MONO Power Led Kit
 R Power LED Kits C Serie MINI/MONO Power Led Kit R Mini Chrome Mini Titan Mono Flat Mono Mini White PLK110/112 CB 043 1..12 Spots Kit MINI/Mono spot 1W a LED di potenza Kit with Power Led MINI/MONO 1W
π H-4694, H-4695 RIPACK HEAT GUN EXTENSION ATTACH EXTENSION 1-800-295-5510 uline.com
 π H-4694, H-4695 RIPACK HEAT GUN EXTENSION uline.com Para Español, vea páginas 3-4. Pour le français, consulter les pages 5-6. ATTACH EXTENSION 1. In order to use a Ripack Heat Gun Extension, you must