Instructional videos are posted at:
|
|
|
- María Victoria Contreras Miranda
- hace 8 años
- Vistas:
Transcripción
1 V.16
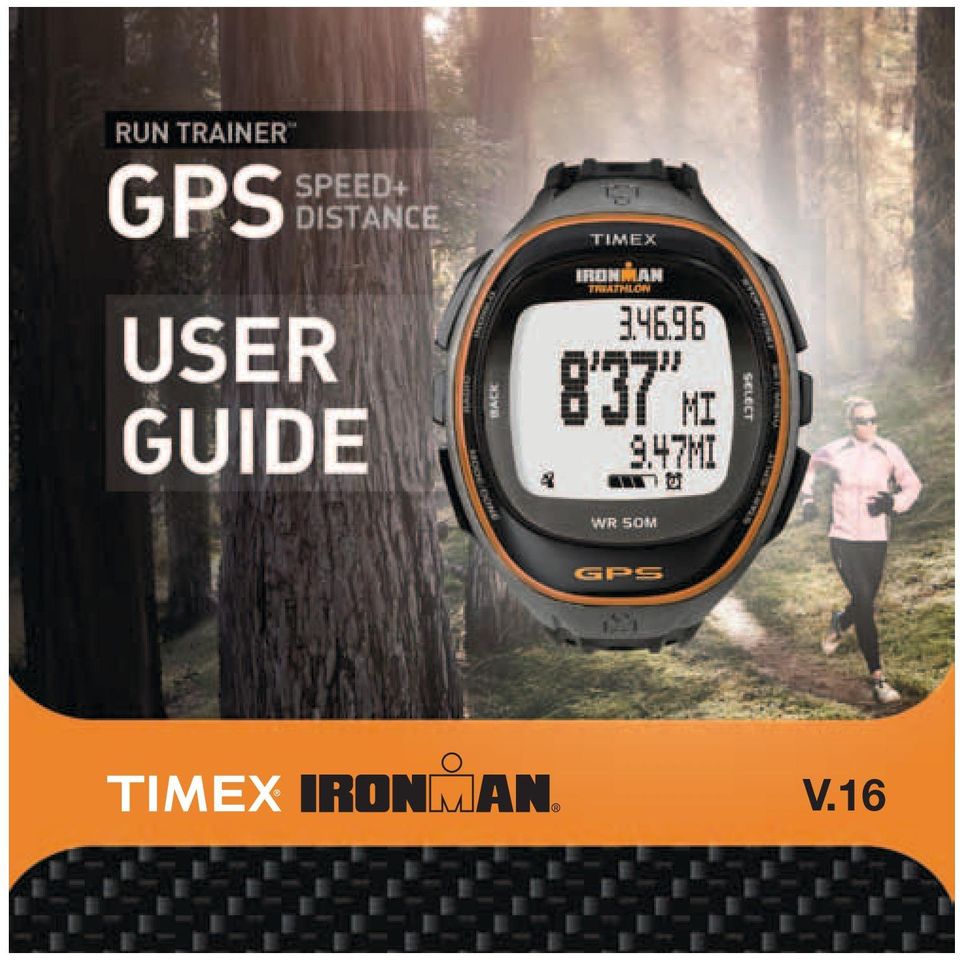
2 Table of Contents Introduction...3 Features Overview...3 Charge Your Run Trainer Watch...4 Get the Latest Firmware...4 Create a Free Timex Online Account...4 Configure the Watch...4 Pairing ANT+ Sensors with Your Watch...6 Select GPS and ANT+ Sensors for Your Workout...6 Calibrate the Foot Pod Sensor...7 Acquire the GPS Signal and Connect to ANT+ Sensors...7 Chrono Mode...8 Start a Workout...9 Automate a Workout...10 Navigate to the Hands-Free Menu...10 Configure the Chronograph Interval Timer Mode...12 Set Up a Workout...13 Customize Intervals...14 Time an Interval Workout...15 Select the Interval Timer Display...16 Timer Mode...16 Configure the Timer...17 Start the Timer...18 Stop the Timer and Save the Workout...18 Recovery Mode...19 Review Mode...20 Download Data Using Computer Software...21 Alarm Mode...22 Turn an Alarm On or Off...22 Configure the Alarm...22 Configure Mode...22 Configure Zones Settings...23 Configure Goals Settings...24 Configure Units Settings...24 Configure User Settings...25 Configure Watch Settings...25 Configure Recording Settings...26 Configure Smoothing Settings...26 Configure Contrast Settings...26 Care and Maintenance...26 Water Resistance...26 Warranty & Service...27 Declaration of Conformity...28

3 Introduction Congratulations on your purchase of the Timex Ironman Run Trainer GPS watch. For first use, please follow these six easy steps: 1. Charge the watch 2. Load the latest firmware 3. Configure the settings 4. Acquire the GPS signal 5. Record your workout 6. Review your performance or your convenience, we have posted the Run Trainer Quick Start Guide at: F Instructional videos are posted at: Features Overview GPS SiRFstarIV technology tracks pace, speed, distance, and altitude. Wireless ANT+ Radio Wireless capability enables the Run Trainer watch to connect to a Heart Rate and/or Foot Pod sensor. Heart Rate (HR) Sensor When connected to a heart rate sensor, monitor your heart rate to maintain a level of activity that matches your personalized workout requirements. Foot Pod Sensor When connected to a Foot Pod sensor, track multiple values in your workout including pace, speed, distance, and cadence. The INDIGLO night-light Illuminates the display with the press of the INDIGLO button. The Night-Mode feature illuminates the display with any button press. When Constant On is active, the display remains illuminated until the INDIGLO button is pressed again. OPERATIONAL BUTTONS Indiglo Button Stop/Reset (p) Set/Menu/Select/Next ( ) ( ) Radio/Back Start/Split/Down (q) Mode/Exit/Done Indiglo night-light Press the INDIGLO button at any time to activate the INDIGLO night-light for a few seconds. Hold it to turn on Night-Mode feature or constant-on lighting. Radio/Back Press RADIO to begin searching for a GPS signal. In a menu, press BACK to go back to the previous item. When setting parameters such as time, press this button to move from right to left through the fields. In any workout mode or Time of Day mode, hold RADIO to open the SENSOR menu. Mode/Exit/Done When in time of day mode, press MODE to cycle through the operational modes. When done with selecting an option in a menu or submenu, press DONE to go back to the menu containing the option. Start/Split/Down In a menu, press DOWN to select the item below the current one. In Chrono, Interval Timer, or Timer modes, press START to start the workout. Press SPLIT to take a split while a Chrono workout is running. Stop/Reset/Up In a menu, press UP to select the item above the currently selected one. When the chronograph running, press STOP to stop or pause the chronograph. If the chronograph is stopped (or paused), hold RESET to reset the chronograph. Set/Menu/Select/Next In a menu, press SET to select the current option. This may open a submenu or select the item with a check mark. 3

4 Press NEXT to select the next set of options or move to the next data field. STATUS BAR ICONS d Battery icon Alarm icon Shows the approximate charge of the battery. More dark segments indicate a higher charge. Battery segments blink during charging until the watch is fully charged. Displays in Time of Day and Alarm modes when alarm is set. N Alert icon Displays in Time of Day mode when the watch is set to beep each hour. g Heart icon Shoe icon Satellite icon Solid: Heart rate sensor is communicating properly. Blinking: Watch is searching for heart rate sensor. None: Heart rate sensor is not selected or Radio is off. Solid: Foot Pod sensor is communicating properly. Blinking: Watch is searching for Foot Pod sensor. None: Foot Pod sensor is not selected or Radio is off. Solid: GPS has a satellite fix and is communicating properly. Blinking: GPS is seeking a satellite fix. None: GPS cannot acquire a satellite fix, is not selected,or Radio is off. Charge Your Run Trainer Watch Before you use the watch for the first time, charge the battery for at least 4 hours to insure complete charging. In order to maximize the rechargeable battery life: Deplete the battery until the last battery indicator segment disappears and the empty indicator begins to flash. If the watch display goes blank, you can still proceed as long as it has been in that state for no more than 1-2 days. Fully charge the watch battery for at least 4 hours until all four segments in the battery level indicator are no longer blinking. Repeat this discharge/recharge procedure two more times. NOTE: You should repeat this procedure every two months if the watch is not used or recharged regularly. Charge within a temperature range of 32 F F (0 C - 45 C). The charging cable has a clip on one end and a standard USB connector on the other end. 1. Attach the clip to the watch so the four pins on the clip align with the four metal contacts on the back of the watch. The clip has two black pins that align the clip into the watch case back. 2. Insert the other end of the cable into a powered USB port on your computer. The blinking battery level icon confirms that the watch is charging. Get the Latest Firmware Use the Device Agent to connect the Run Trainer watch to your computer and get the latest updates. 1. Download the Timex Device Agent at: 2. Connect the watch to your computer using the USB cable, and then double-click the Device Agent icon on your computer desktop. 3. If prompted by the Device Agent, follow the onscreen instructions to download the latest watch firmware. Create a Free Timex Online Account To download data from the watch to the free online log powered by TrainingPeaks, go to: Configure the Watch Set the time and date You can set up to 3 time zones manually, through the computer Device Agent, or by using the GPS signal. NOTE: The GPS automatically sets the time to UTC (Coordinated Universal Time). When you set only the hours to the local time, the watch will automatically correct the minutes and seconds. You will need to set the correct date. 1. Press SET. The SET menu displays. 2. Press DOWN to select TIME 1, TIME 2, or TIME 3, and then press SELECT. 3. Press SELECT to open the TIME/DATE setting screen. 4. Press UP or DOWN to change the blinking value. Press NEXT to move to the next value. 4

5 Choose the Primary Time Zone To select the primary time zone: 1. Press SET. 2. Press DOWN to select PRIMARY, and then press SELECT. 3. Press UP and DOWN to select the time zone you want to set as primary, and then press SELECT. 4. Press DONE. View the Alternative Time Zones or Switch One to Primary From the Time of Day display: 1. Press DOWN to view each alternative time zone. The seconds value changes to identify the time zone (T1, T2, or T3) being temporarily displayed. 2. Press and hold DOWN to make that time zone the primary time zone. A message prompts you to hold the button until the time zone is changed. Customize the Display Views In Time of Day, Chrono, Interval Timer, and Timer modes, you can set up the RUN, CUSTOM 1 and CUSTOM 2 displays to show various statistical data when GPS or ANT+ sensors are active. NOTE: While these displays have the same name in each mode, they are independent from mode to mode. In EACH of these modes: 1. Press SET. 2. Press SELECT to open the DISPLAY menu. 3. Press UP or DOWN to select the display view to customize (RUN, CUSTOM 1, CUSTOM 2), and then press SELECT. 4. Press UP or DOWN to choose 3-Line or 4-Line. Press SELECT to check the display (3 or 4 line) to use for the view. 5. Press DOWN to select SETUP, and then press SELECT. 6. Press UP or DOWN to select 3- or 4-LINE to customize, and then press SELECT. 7. Press UP or DOWN to select the line for which you want to choose a display item, and then press SELECT. 8. Press UP or DOWN to choose the data that will display in the line, and then press SELECT. A check mark appears. 9. Press BACK to return to the 3- or 4-LINE menu. 10. Repeat steps 7 through 9 until you have chosen a display value for each line. NOTE: These steps will set up each display, but to select the display for each mode, you need to be in that mode with at least GPS or one ANT+ sensor active. Select the Display Views In Time of Day, Chrono, Interval Timer and Timer modes, You can select the DEFAULT display or any of the three customizable displays (RUN, CUSTOM 1, and CUSTOM 2). 1. Press RADIO to turn on the GPS and/or ANT+ sensors the icons will blink. 2. Press RADIO to cycle through the display views. Values that can be Displayed in Time of Day Mode Data Altitude Cadence & Average Cadence Calories Date Day Distance & Segment Distance Units Feet or Meters Steps per Minute Kilo Calories DD-MM or MM-DD format Day of Week Miles or Kilometers / Feet or Meters 5

6 Heart Rate (HR) & Average HR Odometer Pace, Average Pace & Segment Pace Speed & Average Speed Time of Day None Beats per Minute / % of Max Miles or Kilometers Minutes and Seconds per Mile/Kilometer Miles or Kilometers per Hour 12-hour or 24-hour format NOTE: When Average data is shown, the A character is shown on the left side of the display. Pairing ANT+ Sensors with Your Watch Your Run Trainer watch is capable of receiving signals from an ANT+ Heart Rate and/or a Foot Pod sensor to enhance your training experience. To insure proper reception, especially in crowded environments, we recommend pairing the watch to your sensors. NOTE: Make sure to do this at least 30 feet / 10 meters away from other sources of sensor data. To pair with the Heart Rate sensor, wet the sensor pads, and place the sensor around the chest with the TIMEX logo on the transmitter facing up. In Time of Day, Chrono, Interval Timer or Timer mode: 1. Hold RADIO to go to the Sensor Menu. 2. Press DOWN to highlight SEARCH, and press SELECT. 3. Highlight HR and press SELECT. 4. The watch will display SEARCHING FOR HEART RATE, and flash the heart icon. 5. If successful, it will display FOUND HR. 6. If unsuccessful, it will display HR SENSOR NOT FOUND. Repeat the above procedure, and reposition the chest sensor or replace the sensor battery if further efforts are unsuccessful. To pair with the Foot Pod sensor, lightly shake the sensor to activate it. In Time of Day, Chrono, Interval Timer or Timer mode: 1. Hold RADIO to go to the Sensor Menu. 2. Press DOWN to highlight SEARCH, and press SELECT. 3. Highlight FOOT POD and press SELECT. 4. The watch will display SEARCHING FOR FOOT POD, and flash the shoe icon. 5. If successful, it will display FOUND FOOT POD. 6. If unsuccessful, it will display FOOT POD SENSOR NOT FOUND. Repeat the above procedure, and replace the sensor battery if further efforts are unsuccessful. NOTE: Pairing is only necessary when a new Heart Rate and/or Foot Pod sensor is added, or when a battery is replaced on a previously paired sensor. NOTE: The pairing settings are remembered by the watch, so re-pairing is not necessary when previously paired ANT+ sensors are selected or de-selected for your workouts (see next section). NOTE: The search/pairing process will activate the GPS sensor (if selected in the Sensor Menu). Turn off the Sensor Menu to preserve the battery Hold RADIO, highlight POWER OFF, and press SELECT. Select GPS and ANT+ Sensors for Your Workout Depending on the particular workout, the Run Trainer watch works with the GPS system, an ANT+ Heart Rate sensor (available in some packages or sold separately), and/or an ANT+ Foot Pod sensor (available separately). In Time of Day, Chrono, Interval Timer or Timer mode: 1. Hold RADIO to go to the Sensor Menu. 2. Press DOWN to highlight each sensor (GPS, HR, and/or Foot Pod) 3. Press SELECT (to check or uncheck it). 4. Press BACK to return to the mode s display. NOTE: Any changes to the Sensor Menu affect all modes usage of GPS and ANT+ sensors. 6

7 Calibrate the Foot Pod Sensor To ensure accurate measurements by a foot pod, you can calibrate the (optional) foot pod either automatically over a known distance, or you can manually enter the calibration factor. Calibrate the Foot Pod Automatically You run a known distance with the foot pod enabled, while the foot pod measures your progress. Once you have progressed more than 0.2 miles / 300 meters, you enter the actual distance you traveled into the Run Trainer. The watch then calculates the calibration factor of the foot pod by comparing the distance measured with the actual distance you traveled. 1. In Time of Day, Chrono, Interval Timer, or Timer mode, hold RADIO until HOLD FOR SENSOR MENU displays. 2. Press DOWN to select CALIBRATE, and then press SELECT. 3. Press SELECT to open the FOOT POD calibration screen. NOTE: The foot pod must be synched with the watch in order to calibrate. If NO FOOT POD DATA displays on the watch, make sure the foot pod is synched, and then try again. See the instructions to Select ANT+ Sensors for Your Workout that preceded this section. 4. Begin running a known distance. The distance must be at least 0.2 miles / 300 meters to give the foot pod enough data to calibrate. 5. When you have reached the known distance, stop running, and then press STOP. The ACTUAL DISTANCE screen opens. NOTE: If NEED MORE DATA displays, the foot pod has not measured at least 0.2 Miles / 300 meters. Continue running until you reach a minimum of 0.2 miles / 300 meters. 6. Press UP or DOWN to change the blinking value, and press NEXT to move to the next value. Continue doing this until the actual distance you ran is entered. 7. Press DONE. The watch compares the measured distance with the distance you entered and assigns a calibration factor. NOTE: If insufficient or no data has been gathered, the calibration is CANCELED. Enter a Calibration Factor If you have previously calibrated a foot pod and are re-synching it with the watch, you can enter the calibration factor the foot pod used the last time it was synched with the watch to avoid going through the automatic calibration process again. NOTE: The foot pod must be synched with the watch in order to edit the calibration factor manually. 1. In Time of Day, Chrono, Interval Timer, or Timer mode, hold RADIO until HOLD FOR SENSOR MENU displays. 2. Press DOWN to select CALIBRATE, and then press SELECT. 3. Press DOWN to select FACTOR, and then press SELECT. 4. Press UP or DOWN to change the blinking value, and press NEXT to move to the next value. Continue doing this until the desired calibration factor is entered from 0.1% to 199.9%. NOTE: The Calibration Factor is determined by taking the KNOWN distance and dividing it by the REPORTED distance (by the Foot Pod). 5. Press DONE. Acquire the GPS Signal and Connect to ANT+ Sensors NOTE: Make sure to set the time and date before turning on reception of the GPS, HR, or Foot Pod sensors to ensure that the workout data will be captured correctly. GPS: Go outside with a clear view of the sky away from buildings or obstructions. heart Rate: Make sure that the chest sensor pads are wet, the strap fits snug around the chest, and the TIMEX logo on the transmitter is face up and centered over the sternum. NOTE: Make sure to remove the snap-on heart rate transmitter and hand wash the strap in cool water to maintain its heart rate-sensing capability. foot Pod: Install the sensor on the laces or underneath the insole accordingly to its included directions. NOTE: Please remove your Foot Pod during bicycling to allow the GPS sensor to provide live speed and distance data. NOTE: Remember to remove the Foot Pod between workouts out to prolong its battery life. Press RADIO to turn on watch s sensor reception. It will look for the signals selected in the Sensor Menu, and flash the appropriate icons at the bottom of the watch display. 7

8 If you selected GPS: 1. A message appears that the GPS is being powered on. 2. The watch searches for satellites and a message WAITING FOR GPS with a status bar show on the display. 3. GPS READY displays when the watch obtains a strong satellite fix. NOTE: If you fail to start your workout (through Chrono, Interval Timer or Timer Mode) within 30 minutes, the GPS radio will shut down. This is done to preserve watch battery life in case the GPS radio is accidentally activated. HINT: Even though the watch has very fast GPS acquisition, some athletes want the GPS signal locked before starting a race or portion of a triathlon. Simply start the chronograph and pause it (after a second or two), and the 30-minute GPS auto-off feature (described above) will be disabled. All of the data, except Rest Time reported in Review Mode will be accurate. If the watch fails to get a strong GPS signal after 5 minutes, a message displays asking if you are indoors. Select YES to turn the GPS off. Select NO to continue to search for GPS satellites indefinitely. NOTE: If you do not respond within 30 seconds, the watch assumes you are indoors and turns off the GPS search. If you selected the Heart Rate and/or Foot Pod Sensor: 1. The watch tries for 10 seconds to detect a signal from one or both of the specified ANT+ sensors. 2. If no signal is detected, the watch stops searching for the sensor, and the applicable icon is turned off. 3. When the sensor is successfully connected, the heart rate or shoe icon is steadily lit. NOTE: Sensors must be within 3 feet of the watch to connect. You may need to reposition your HR chest sensor to initiate a signal. You may need to slightly move your shoe to initiate a signal from the Foot Pod sensor. NOTE: If you do not see the watch trying to connect with the desired GPS and/or ANT+ sensor, hold RADIO to bring up the Sensor Menu to confirm your sensor settings. Chrono Mode The Chrono Mode is used as a stopwatch to time your workout segments, such as Laps and Splits, and offers the following features: Store up to 15 workouts total (including Interval Timer and Timer workouts) and 100 laps per workout Three customizable display formats (when the GPS, HR, or Foot Pod sensor are active) Hands-free settings including auto split, auto start, and auto stop Optional heart rate recovery timer when the chronograph is stopped Drink and Eat timers to remind you when to hydrate and consume calories The following data are always tracked in Chrono mode: Total time Time per lap Rest time (when the Chrono mode is paused, but the workout is active) What are Lap and Split Times? Lap time is the length of an individual segment of your workout activity. Split time is the time elapsed from the beginning of your workout through the current segment. When you take a split, you have completed timing one segment (such as one lap) of the workout and are now timing the next segment. The graph below represents the lap and split times for a workout in which 4 laps were taken. 8

9 When the GPS, Heart Rate and/or Foot Pod sensors are active, the watch keeps track of the following data in Chrono mode and reports it in Review Mode: Data GPS Heart Rate (HR) Sensor Foot Pod Sensor Calorie Expenditure Calorie Expenditure per lap Average speed Average speed per lap Maximum speed Average pace Average pace per lap Minimum pace Distance Distance per lap Elevation Elevation per lap Maximum altitude Minimum altitude Total ascent Total descent Heart rate Minimum heart rate Average heart rate Average heart rate per lap Peak heart rate Recovery heart rate HR within a HR target zone Average cadence Average cadence per lap Maximum foot cadence Start a Workout 1. Press MODE until CHRONO displays. 2. Press START to start the first split of your workout. By default, the Split time is shown in the bottom line of the display. NOTE: Only the first 100 splits are retained in memory. A low memory warning or a memory full message may be shown if the watch has already been connected to the Device Agent. The data should be downloaded to the Device Agent and erased from the watch if these messages occur. If the watch is connected to any of the sensors, the sensor icons will be displayed in the status bar. 9

10 Take a Split/Lap 1. Press SPLIT to start the second split, and any successive splits, of your workout. In the graphic below, the LAP # is shown on the top line, the lap time is on the second line, and the split time is on the third. The data displayed varies depending on the display setup. NOTE: Any live GPS/sensor data will be reported for that lap, and Pace/Speed, Heart Rate, and/or Cadence will have its average data within the lap reported (as designated by an A to the left of the data). Stop and Save a Workout / TURN OFF SENSORS 1. Press STOP to stop/pause the workout. NOTE: If you are wearing a Heart Rate Sensor and have the Heart Rate Recovery feature activated, wait until the recovery is completed before proceeding to Step 2 to save the workout. 2. Press and hold RESET until SAVE WORKOUT displays. 3. Press UP or DOWN to select YES, and then press SELECT. NOTE: The SAVE WORKOUT YES/NO message is displayed if only one workout is running. If multiple workouts (across the Chrono, Interval Timer, and Timer modes) are active, you do not have the option to reset without saving. The workout is automatically saved when the RESET button is pressed and held. 4. To preserve battery life, the watch will ask to turn off all sensors after the workout is reset. Press UP or DOWN to select YES to the TURN OFF SENSORS message and press SELECT. If neither YES or NO is selected, the sensors will turn off after 30 seconds. NOTE: If a heart rate recovery is in-progress, turning off the sensors will interrupt HRM data and provide -- as a result. Instead, select NO and wait until your recovery has ended. After the recovery, press and hold RADIO to display the Sensor Menu. The indicator should appear next to POWER OFF. If not, press UP or DOWN to adjust, and press SELECT to turn off the watch sensors. Automate a Workout Automate your workout using the Hands-Free features of your watch. Once set, Hands Free settings activate automatically in Chrono mode. Automatic split The AUTO SPLIT setting can be enabled for time or distance options. The watch automatically takes a split when you reach the distance or time threshold. NOTE: A manual split does not reset the distance or the time counter. Automatic start The AUTO START setting starts/re-starts your workout when the speed is equal to or above the speed threshold. Automatic stop The AUTO STOP setting pauses your workout when the speed is below the speed threshold. Speed threshold The THRESHOLD setting is the speed value that triggers your Auto Start and Auto Stop settings. NOTE: If both the GPS and Foot Pod sensors are supplying distance and speed data, the Foot Pod takes priority for Hands Free operations. Navigate to the Hands-Free Menu 1. Press MODE until CHRONO displays. 2. If the chrono is running, stop and reset it. 3. Press MENU. 4. Press DOWN to select HANDS-FREE, and then press SELECT. The HANDS-FREE menu displays. Auto Split 1. From the HANDS-FREE menu, press SELECT to open the SPLIT setting screen. 2. To navigate through the AUTO-SPLIT menu: a. Press UP or DOWN to switch to the next auto-split type (OFF, TIME, or DISTANCE). b. Press SELECT to begin changing numeric values for time or distance. c. Press UP or DOWN to change the blinking value, and press NEXT to move to the next value. d. Press DONE when you have finished setting the time or distance. 10
. Stop and Save a Workout / TURN OFF SENSORS 1. Press STOP to stop/pause the workout.")
11 Auto Start 1. From the HANDS-FREE menu, press DOWN to select START-STOP, and then press SELECT. The START-STOP menu displays. 2. Press SELECT to open the AUTO START setting screen. 3. Press DOWN to select ON and then press SELECT. A check mark appears. Auto Stop 1. From the HANDS-FREE menu, press DOWN to select START-STOP, and then press SELECT. The START-STOP menu displays. 2. Press DOWN to select AUTO STOP, and then press SELECT. 3. Press DOWN to select ON and then press SELECT. A check mark appears. Threshold 1. From the HANDS-FREE menu, press DOWN to select START-STOP, and then press SELECT. The START-STOP menu displays. 2. Press DOWN to select THRESHOLD, and then press SELECT. 3. Press UP or DOWN to change the blinking value, and then press NEXT to move to the next value. 4. Press DONE. Configure the Chronograph You can customize the display format and set the Drink timer and the Eat timer. Choose the Chrono Display Format WITHOUT Sensors You can choose from two formats when GPS or ANT+ sensors are NOT used. LAP SPLIT puts the lap time on the top line and the split time on the bottom line. SPLIT LAP puts the split time on the top line and the lap time on the bottom. NOTE: You must stop and reset the chrono before you can configure it. 1. Press MODE until CHRONO displays. 2. Press SET. 3. Press DOWN to select FORMAT, and then press SELECT. 4. Press DOWN to choose the format, and then press SELECT. NOTE: This display becomes the DEFAULT display. Choose the Chrono Display Format WITH Sensors You can select one of the four displays (RUN, CUSTOM 1, CUSTOM 2, or DEFAULT). 1. Press RADIO to turn on the GPS and/or ANT+ sensors the icons will blink. 2. Press RADIO to cycle through the display views. Values that can be Displayed in Chrono Mode Data Altitude Cadence & Average Cadence Calories Distance & Lap Distance Heart Rate (HR) & Average HR Lap Number Lap Time Odometer Pace, Average Pace & Lap (Avg.) Pace Speed & Average Speed Split Time Time Day None Units Feet or Meters Steps per Minute Kilo Calories Miles or Kilometers / Feet or Meters Beats per Minute / % of Max A number Minutes.Seconds.Hundredths or Hours:Minute.Seconds Miles or Kilometers Minutes and Seconds per Mile/Kilometer Kilometers or Miles per Hour Minutes.Seconds.Hundredths or Hours:Minute.Seconds 12-hour or 24-hour format The line will remain blank 11

12 Drink Timer 1. Press MODE until CHRONO displays. 2. Press SET. 3. Press DOWN to select DRINK, and then press SELECT. 4. Press UP or DOWN to select ON, and then press SELECT. 5. Press UP or DOWN to change the blinking value, and then press NEXT to move to the next value. 6. Press DONE. A DRINK message will repeatedly display every selected time interval. NOTE: If both the Drink and Eat timers have been set to display at the same time, the Drink message displays first. 7. Press any button to acknowledge the message and go back to the previous screen. Eat Timer 1. Press MODE until CHRONO displays. 2. Press SET. 3. Press DOWN to select EAT, and then press SELECT. 4. Press UP or DOWN to select ON, and then press SELECT. 5. Press UP or DOWN to change the blinking value, and then press NEXT to move to the next value. 6. Press DONE. An EAT message will repeatedly display every selected time interval. NOTE: If both the Drink and Eat timers have been set to display at the same time, the Drink message displays first. 7. Press any button to acknowledge the message and go back to the previous screen. Interval Timer Mode An interval is a time period of the workout customized for speed/pace zone, optional heart rate intensity, or optional cadence zone. A repetition (rep) is a series of intervals that is repeated during a workout. The following features are offered in the Interval Timer mode: Store up to 15 workouts total (including Chrono and Timer workouts) Five interval workouts with up to five intervals each Customizable interval name Optional warm up and cool down at the beginning or end of each workout Set up to 99 repetitions Three customizable display formats (when GPS, HR, or Foot Pod sensors are active) The following data are always tracked in Interval Timer mode: Total time Time for each completed interval Rest time (when the Interval Timer mode stops) 12

13 When the GPS, Heart Rate and/or Foot Pod sensors are active, the watch keeps track of the following data in Interval Timer mode and reports it in Review Mode: GPS Heart Rate (HR) Sensor Foot Pod Sensor Calorie Expenditure Calories per interval Average speed Average speed per interval Maximum speed Average pace Average pace per interval Minimum (or best) pace Distance Distance per interval Elevation Elevation per interval Maximum altitude Minimum altitude Total ascent Total descent Amount of time the user s heart rate was within the heart rate zones Minimum heart rate Average heart rate Average heart rate per interval Peak heart rate HR within a HR target zone per interval Average cadence Average cadence per interval Maximum foot cadence Set Up a Workout Customize a workout by giving it a name up to 7 characters (such as Hills, Steady, or Repeats), and set the number of repetitions, your target HR, pace, cadence, and speed zones. NOTE: You must stop and reset the Interval Timer before you can configure it. Name the Workout 1. Press MODE until INTERVAL TIMER displays. 2. Press SET. 3. Press DOWN to select the workout to rename and then press SELECT. 4. Press DOWN to select RENAME, and then press SELECT. 5. Press UP or DOWN to change the blinking letter, and then press NEXT to move to the next letter. 6. Press DONE. NOTE: If the workout name is set to all blank characters, the name shall revert to the previous name upon exiting the RENAME screen. Set Number of Repetitions 1. In INTERVAL TIMER mode, press SET. 2. Press DOWN to select the workout for which to set reps, and then press SELECT. 3. Press DOWN to select REP COUNT, and then press SELECT. 13

14 4. Press UP or DOWN to change the REP COUNT. 5. Press DONE. Customize Intervals 1. In INTERVAL TIMER mode, press SET. 2. Press DOWN to select the workout for which to set intervals, and then press SET. 3. Press SELECT to open the INTERVALS menu. 4. Press UP or DOWN to select the interval to customize, and then press SET. A menu with a list of setup options for the selected interval displays. For example, if you selected the INT 3 interval workout, then the setup options for customizing INT 3 displays. The setup options are: Time, Zones, and Goals. You will also see a RENAME option for all intervals except WARM UP and COOL DOWN. Refer to the following sections for customizing the interval setup: Set Interval Time Interval time is the total time that the interval will last before you are prompted to switch to the next activity. a) Press UP or DOWN to select the interval to set, and then press SELECT. b) Press SELECT to open the TIME setting screen. c) Press UP or DOWN to change the blinking value, and then press NEXT to move to the next value. d) Press DONE. Set HR Zones HR zones describe upper and lower limits for your heart rate during this interval. An alert will sound if your heart rate moves outside of this range. a) Press UP or DOWN to select ZONES, and then press SET. b) Press SELECT to open the HR setting screen. c) Press UP or DOWN to select the heart rate zone that you want to be in during this interval. d) Press DONE. For more about customizing HR zones, see the CONFIGURE mode. Set Pace and Speed You can set the minimum and maximum pace or speed you want to maintain during the interval. An alert will sound if your speed or pace falls below the minimum or rises above the maximum. a) From the ZONES menu, press UP or DOWN to select PACE-SPEED, and then press SELECT. b) Press UP or DOWN to select PACE or SPEED, and then press SELECT. A check mark appears. c) Press DOWN to select SETUP, and then press SELECT. d) Press UP or DOWN to select PACE or SPEED, and then press SELECT. e) Press UP or DOWN to change the blinking value, and then press NEXT to move to the next value. f) Press DONE. Set Cadence You can se the maximum and minimum steps per minute you want to maintain during this interval. An alert will sound if your cadence falls below the minimum or rises above the maximum. a) From the ZONES menu, press DOWN to select CADENCE, and then press SELECT. b) Press UP or DOWN to select ON, and then press SELECT. c) Press DOWN to select SETUP, and then press SELECT. d) Press UP or DOWN to change the blinking value, and then press NEXT to move to the next value. e) Press DONE. Set Goals You can set goals for the amount of distance or altitude you want to achieve during this interval. An alert sounds when you have reached this goal. a) From the INTERVALS menu, press UP or DOWN to select an interval, and then press SELECT. b) Press DOWN to select GOALS, and then press SELECT. c) Press UP or DOWN to select DISTANCE or ALTITUDE, and then press SELECT. d) Press UP or DOWN to select ON, and then press SELECT. 14

15 e) Press DOWN to select SETUP, and then press SELECT. f) Press UP or DOWN to change the blinking value, and then press NEXT to move to the next value. g) Press DONE. Name the Interval You can change the name of any interval within the workout except for the WARM UP and COOL DOWN intervals. a) From the INTERVALS menu, press UP or DOWN to select any interval except WARM UP or COOL DOWN, and then press SELECT. b) Press DOWN to select RENAME, and then press SELECT. c) Press UP or DOWN to change the blinking letter, and then press NEXT to move to the next letter. d) Press DONE. NOTE: If the interval name is set to all blank characters, the name shall revert to the previous name upon exiting the RENAME screen. 5. Repeat the above sections for setting up each interval that you want to include in your workout. 6. Press DONE. Clear All Interval Data You can reset all interval times to their default values. 1. From the INTERVALS menu, press DOWN to select CLEAR ALL, and then press SELECT. 2. Press UP or DOWN to select YES, and then press SELECT. All of the interval times in this workout are cleared. Time an Interval Workout This section describes how to start, stop and save workouts in INTERVAL TIMER mode. Start a Workout 1. Press MODE until INTERVAL TIMER displays. 2. Press START to start the first interval of your workout. By default, the Interval time is shown in the second line of the display. In the graphic below, the interval time has been set to display in the pre-selected time format in the middle of the three lines. The data displayed varies depending on the display setup. When the time has run out on the first interval, an alert sounds and the next interval begins. When all intervals are complete and more than one repetition has been set, the first interval begins again. This continues until all repetitions are complete. NOTE: Only the first 100 repetitions are retained in memory. Skip an Interval Hold START to stop timing the current interval and begin timing the next. Stop and Save a Workout 1. Press STOP. 2. Press and hold RESET until SAVE WORKOUT displays. 3. Press UP or DOWN to select YES, and then press SELECT. NOTE: The SAVE WORKOUT YES/NO message is displayed if only one workout is running. If multiple workouts (across the Chrono, Interval Timer, and Timer modes) are active, you do not have the option to reset without saving. The workout is automatically saved when the RESET button is pressed and held. 4. To preserve battery life, the watch will ask to turn off all sensors after the workout is reset. Press UP or DOWN to select YES to the TURN OFF SENSORS message and press SELECT. If neither YES or NO is selected, the sensors will turn off after 30 seconds. NOTE: If a heart rate recovery is in-progress, turning off the sensors will interrupt HRM data and provide -- as a result. Instead, select NO and wait until your recovery has ended. After the recovery, press and hold RADIO to display the Sensor Menu. The indicator should appear next to POWER OFF. If not, press UP or DOWN to adjust, and press SELECT to turn off the watch sensors. 15
 Press UP or DOWN to change the blinking letter, and then press NEXT to move to the next letter. d) Press DONE.")
16 Select the Interval Timer Display You can select the DEFAULT display or any of the three customizable displays (RUN, CUSTOM 1, and CUSTOM 2). 1. Press RADIO to turn on the GPS and/or ANT+ sensors the icons will blink. 2. Press RADIO to cycle through the display views. Customize the 3-Line or 4-Line Display The 3-Line or 4-Line Display can be customized to display parameters of your choice. 1. Press MODE until INTERVAL TIMER displays. 2. Customize the display as described in the Configure the Watch section earlier in the User Guide. Values that can be Displayed in Interval Timer Mode DATA Altitude Cadence & Average Cadence Calories Distance & Interval Distance Heart Rate (HR) & Average HR UNITS Feet or Meters Steps per Minute Kilo Calories Miles or Kilometers / Feet or Meters Beats per Minute / % of Max Interval Name Interval Number Interval Reset Time Interval Time Odometer Pace, Average Pace & Interval Pace Rep Number Speed & Average Speed Time Day None Name given to interval in setup Sequential number of current interval Hours:Minutes.Seconds Hours:Minutes.Seconds Miles or Kilometers Minutes and Seconds per Mile/Kilometer Sequential number of current repetition Miles or Kilometers per Hour 12-hour or 24-hour format The line will remain blank NOTE: When Average data is shown, the A character is shown in the left side of the display. Timer Mode The Timer is a countdown from a preset time duration and can be used as a reminder to begin/end a task or workout. A repetition (rep) is a count of the number of times the countdown has been repeated during a workout. The following features are offered in Timer mode: Store up to 15 workouts total (including Chrono and Interval Timer workouts) Countdown time up to (Minutes.Seconds) Set timer to stop, repeat or start chronograph when time runs out Counts up to 99 timer repetitions Halfway reminder alert Three customizable display formats (when GPS, HR or Foot Pod sensor are active) The following data are always tracked in Timer mode: Total time Time for each completed repetition Rest time (when the Timer is stopped) 16
 & Average HR UNITS Feet or Meters Steps per Minute")
17 When the GPS, Heart Rate and/or Foot Pod sensors are active, the watch keeps track of the following data in Timer mode and reports it in Review Mode: GPS Heart Rate (HR) Sensor Foot Pod Sensor Calorie Expenditure Calories per repetition Average speed Average speed per repetition Maximum speed Average pace Average pace per repetition Minimum (or best) pace Distance Distance per repetition Elevation Elevation per repetition Maximum altitude Minimum altitude Total ascent Total descent Amount of time the user s heart rate was within the heart rate zones Minimum heart rate Average heart rate Average heart rate per interval Peak heart rate HR within a HR target zone per interval Average cadence Average cadence per interval Maximum foot cadence Configure the Timer Set the length of the timer, what happens when the timer runs out, and whether or not to alert you at the halfway mark. You can also customize the display in Timer mode. Set the Timer 1. Press MODE until TIMER displays. 2. Press SET. 3. Press DOWN to select TIME, and then press SELECT. 4. Press UP or DOWN to change the blinking value, and then press NEXT to move to the next value. 5. Press DONE. Set Timeout Action You can set the timer to start the CHRONO mode when it runs out. You can also set it to STOP, or to REPEAT until you stop it manually. 1. From TIMER mode, press SET. 2. Press DOWN to select AT END, and then press SELECT. 3. Press UP or DOWN to select CHRONO, REPEAT, or STOP, and then press SELECT. 4. Press DONE. Set Halfway Alert You can set the timer to sound an alert when half of the set time is expended. 1. From TIMER mode, press SET. 2. Press DOWN to select HALFWAY, and then press SELECT. 17

18 3. Press UP or DOWN to select ALERT ON or ALERT OFF. 4. Press DONE. Customize the 3-Line or 4-Line Display The 3-Line or 4-Line Display can be customized to display parameters of your choice. 1. Press MODE until TIMER displays. 2. Customize the display as described in the Configure the Watch section earlier in the User Guide. Values that can be Displayed in Timer Mode Data Altitude Cadence & Average Cadence Calories Distance & Rep Distance Heart rate (HR) & Average HR Odometer Pace, Average Pace & Rep Pace Rep Number Speed & Average Speed Time Day Timer Time (active) Timer Time (reset) None Units Feet or Meters Steps per Minute Kilo Calories Miles or Kilometers / Feet or Meters Beats per Minute / % of Max Miles or Kilometers Minutes and Seconds per Mile/Kilometer The current repetition of the timer Miles/Kilometers per Hour 12-hour or 24-hour format Hours:Minutes.Seconds Hours:Minutes.Seconds The line will remain blank NOTE: When Average data is shown, the A character is shown in the left side of the display. Start the Timer To start the timer once it is set up: 1. Press MODE until TIMER displays. 2. Press START. If selected, the Timer alerts at the halfway point. At the end of the countdown, the Timer performs the task selected for the AT END option in the TIMER menu. Stop the Timer and Save the Workout To stop the timer once the timer has been started: 1. Select STOP. 2. Press and hold STOP until SAVE WORKOUT displays. 3. Press UP or DOWN to select YES, and then press SELECT. NOTE: The SAVE WORKOUT YES/NO message is displayed if only one workout is running. If multiple workouts (across the Chrono, Interval Timer, and Timer modes) are active, you do not have the option to reset without saving. The workout is automatically saved when the RESET button is pressed and held. 4. To preserve battery life, the watch will ask to turn off all sensors after the workout is reset. Press UP or DOWN to select YES to the TURN OFF SENSORS message and press SELECT. If neither YES or NO is selected, the sensors will turn off after 30 seconds. NOTE: If a heart rate recovery is in-progress, turning off the sensors will interrupt HRM data and provide -- as a result. Instead, select NO and wait until your recovery has ended. After the recovery, press and hold RADIO to display the Sensor Menu. The indicator should appear next to POWER OFF. If not, press UP or DOWN to adjust, and press SELECT to turn off the watch sensors. 18
 Timer Time (reset) None Units Feet or Meters Steps per Minute Kilo Calories Miles or Kilometers / Feet or Meters Beats per Minute / % of Max Miles")
19 Recovery Mode Recovery mode lets you track the change in your heart rate over a user-set period. This change in heart rate, or delta ( ), can be compared between workouts to see how your cardio fitness improves over time. The following features are offered in Recovery mode: Set recovery time up to (Minutes.Seconds) Start recovery timer automatically, or manually start the recovery timer in recovery mode Display beginning and instantaneous heart rates during recovery period Display recovery and delta ( ) heart rates when recovery timer runs out Recovery Timer Start Conditions The recovery timer is automatically reset and started when the following conditions are met: A Chrono/Interval Timer/Timer workout is stopped or has run to completion and the watch was connected to a heart rate sensor. There is no on-going Recovery Timer countdown that was manually started from reset through this mode. NOTE: The recovery timer does not start automatically when connected to a computer. Set Up Recovery Time To set up the recovery time: 1. Press MODE until RECOVERY displays. 2. Press SET. 3. Press SELECT to turn recovery time ON. A check mark appears. 4. Press DOWN to select TIME, and then press SELECT. 5. Press UP or DOWN to change the blinking value, and then press NEXT to move to the next value 6. Press DONE. Once set, when the start conditions above are met, the Recovery Timer activates, and a message displays as shown in the graphic below. The starting heart rate displays in the FROM field and the recovery heart rate is displayed in the TO field. Press START while the Recovery Timer is counting down to get an instant recovery value shown on the bottom line of the display. This instant recovery value shows the difference between the starting heart rate and the instantaneous or recovery heart rate. Hold START to end the Recovery Timer before its set recovery time, and capture the accumulated data in memory. Press STOP to end the Recovery Timer before the specified time. Hold STOP to reset the Recovery Timer. Starting heart rate Instantaneous or recovery heart rate Recovery Timer When the timer runs out, starting heart rate, recovery heart rate, and recovery time are all stored in the workout data. NOTE: If the value displays as double dashes (--), the recovery heart rate is greater than the starting heart rate or no heart rate reading is present. Recovery States The following states exist in Recovery mode depending on your inputs and the wireless connections: If the watch is not connected to a heart rate (HR) sensor, HR SENSOR OFF displays. If the watch is unable to retrieve HR data, HR DATA NOT FOUND displays. To begin a new Recovery Timer cycle, hold RESET for 2 seconds to reset Recovery mode, and then press START to restart the Recovery Timer. 19
 Start recovery timer automatically, or manually start the recovery timer in recovery mode Display beginning and instantaneous heart rates during recovery period Display recovery and delta (")
20 Review Mode Review mode allows you to view stored Chrono, Interval Timer and/or Timer workout data. The following features are offered in Review mode: Store up to 15 workouts View total distance traveled (odometer) Store all workouts by date, arranged in reverse chronological order Lock or unlock workouts Recall data while the workout is running View summary data for each workout Review Laps, Intervals, and Repetitions for Chrono, Interval Timer, and Timer workouts Choose Workout to Review 1. Press MODE until REVIEW displays. The watch displays the number of stored workouts available for review. If no workouts have been saved, NO WORKOUT displays. 2. If the Odometer is displayed, press UP or DOWN. 3. Press MENU. The WORKOUTS menu displays with a list of dates that had workouts saved. 4. Press UP or DOWN to select the date, and then press SELECT. A list of workout(s) with the workout time and type (CHR for Chrono, INT for Interval Timer, and TMR for Timer) for the selected date displays. The graphic below displays the list of workouts for TODAY. 5. Press UP or DOWN to select the workout, and then press SELECT. Choose Data to Review Once you have the specific workout selected for review, you can review either a Summary of the entire workout, or data for individual laps, intervals, or reps. Summary: 1. Press UP to select SUMMARY, and then press SELECT. 2. Press UP or DOWN to scroll through the workout data. The best lap display toggles every 2 seconds between the best lap time and the corresponding best lap number. Laps/Intervals/Reps: 1. Press UP or DOWN to select: LAPS to view data for laps in a Chrono workout INTERVALS to view intervals in an Interval Timer workout REPS to view reps in a Timer workout NOTE: If no lap has been taken yet, or no interval or rep has expired, a message displays that no lap data has been saved yet. 2. Press UP or DOWN to scroll through the lap/interval/rep data. 3. Press BACK or NEXT to view data for another lap, interval, or rep. 20

21 Review, Edit, and Reset Odometer Values The odometer displays the total distance you have traveled since the odometer was reset 1. Press MODE until REVIEW displays. 2. Press UP or DOWN until ODOMETER displays. 3. Press MENU. The ODOMETER submenu displays. 4. To edit the Odometer: a. Press UP to select EDIT, and then press SELECT. b. Press UP or DOWN to change the blinking the value, and then press NEXT to move to the next value. c. Press DONE. 5. To reset the Odometer: a. On the ODOMETER submenu, press DOWN to select RESET, and then press SELECT. b. Press UP or DOWN to select YES, and then press SELECT. c. Press DONE. Lock and Unlock Workouts Once you have the specific workout selected for review, you can lock or unlock it. Lock workouts to keep them from being overwritten by new workouts. If the workout is unlocked, you will see a LOCK option on the review menu for the workout. If the workout is locked, this option will read UNLOCK. NOTE: You cannot delete individual workouts manually. Workouts are only removed when overwritten by a newer one. All workouts are removed if the watch is reset. 1. Press MODE until REVIEW displays. The watch displays the number of stored workouts available for review. If no workouts have been saved, NO WORKOUT displays. 2. If the Odometer is displayed, press UP or DOWN. 3. Press MENU. The WORKOUTS menu displays with a list of dates that had workouts saved. 4. Press UP or DOWN to select the date, and then press SELECT. A list of workout(s) with the workout time and type (CHR for Chrono, INT for Interval Timer, and TMR for Timer) for the selected date displays. The graphic below displays the list of workouts for TODAY. 5. Press UP or DOWN to select the workout, and then press SELECT. 6. Press DOWN to select LOCK or UNLOCK, and then press SELECT. 7. Press UP or DOWN to select YES, and then press SELECT. 8. Press DONE. NOTE: You cannot lock a workout in progress. The LOCK option only appears if the workout has been saved and reset. Download Data Using Computer Software The two-way wired communication between the watch and computer enables you to download data from the watch to the computer. 1. Connect the watch to your computer using the USB cable, and then open the Device Agent application on your computer desktop. PC SYNC READY displays when the computer starts communicating with the watch. An error message displays if it was unsuccessful. PC SYNC IN PROGRESS displays during the sync process. 2. If a workout is in progress, the computer application requests confirmation that you wish to continue with the sync process. Select NO to end the sync process and return to Time of Day mode, or select YES to continue. 3. If you select the blinking YES option to continue with the computer sync: a. Another message pops up asking if you wish to save the workouts. b. Select YES to save the workout session (Chrono/Timer/Interval Timer) with sensor information. The watch stops currently running workouts, turns off the GPS and ANT+ Radio, and continues the computer sync process. c. Select NO to stop the workout without saving. The watch continues the computer sync process. 4. When the computer download is complete, the PC SYNC TRANSFER COMPLETE message displays, and the watch returns to Time of Day mode. 21
Digital Heart Rate Monitor
 W-248 843-095002 EU 2008 Timex Group, USA, Inc. TIMEX, TRIATHLON and NIGHT-MODE are registered trademarks of Timex Group USA, Inc. INDIGLO is a registered trademark of Indiglo Corporation in the US and
Digital Heart Rate Monitor
 W-267 536-095002 EU 2010 Timex Group USA, Inc. TIMEX, TRIATHLON, NIGHT-MODE, INDIGLO, FLEX TECH and RACE TRAINER are trademarks of Timex Group B.V. and its subsidiaries. ANT+ and the ANT+ Logo are trademarks
Nueva confirmación de pedido de compra con cambios: proveedor ES
 Ayuda de trabajo Nueva confirmación de pedido de compra con cambios: proveedor ES Step 1. This Supplier portal activity lists the steps necessary for confirming a new purchase order with changes on price,
Save Money 2-up Single Doorhanger Set OH payday advance edition, 4 different doorhangers, Spanish
 Save Money 2-up Single Doorhanger Set OH payday advance edition, 4 different doorhangers, Spanish PACKAGE CONTENTS How to Customize 4-color doorhanger, Editable PDF (50% OFF first loan) 1-color (black)
manual de servicio nissan murano z51
 manual de servicio nissan murano z51 Reference Manual To understand featuring to use and how to totally exploit manual de servicio nissan murano z51 to your great advantage, there are several sources of
Puede pagar facturas y gastos periódicos como el alquiler, el gas, la electricidad, el agua y el teléfono y también otros gastos del hogar.
 SPANISH Centrepay Qué es Centrepay? Centrepay es la manera sencilla de pagar sus facturas y gastos. Centrepay es un servicio de pago de facturas voluntario y gratuito para clientes de Centrelink. Utilice
Performance Watch User Guide
 W-218 607-095004 NA performance watch user guide BODYLINK SYSTEM Performance Watch User Guide English page 1 Français page 75 Español página 153 Português página 229 2005 Timex Corporation TABLE OF CONTENTS
Performance Watch User Guide
 W-219 608-095000 NA performance watch user guide BODYLINK SYSTEM Performance Watch User Guide English page 1 Français page 75 Español página 153 Português pàgina 231 2005 Timex Corporation TABLE OF CONTENTS
Performance Watch User Guide
 W-218 607-095000 NA performance watch user guide BODYLINK SYSTEM Performance Watch User Guide English page 1 Français page 71 Español página 145 Português página 219 2005 Timex Corporation Alarm Mode...33
Performance Watch User Guide
 W-188 589-095005 NA performance watch user guide BODYLINK Performance Watch User Guide SYSTEM English page 1 Français page 79 Español página 155 Português página 233 2005 Timex Corporation TABLE OF CONTENTS
Agustiniano Ciudad Salitre School Computer Science Support Guide - 2015 Second grade First term
 Agustiniano Ciudad Salitre School Computer Science Support Guide - 2015 Second grade First term UNIDAD TEMATICA: INTERFAZ DE WINDOWS LOGRO: Reconoce la interfaz de Windows para ubicar y acceder a los programas,
Steps to Understand Your Child s Behavior. Customizing the Flyer
 Steps to Understand Your Child s Behavior Customizing the Flyer Hello! Here is the PDF Form Template for use in advertising Steps to Understanding Your Child s Behavior (HDS Behavior Level 1B). Because
Installation Guide. Green momit
 Installation Guide Green momit 2015 www.momit.com momit Deviceses Gateway: Model 1 and 2 Wall option The momit Gateway allows your thermostat to be connected to the Internet. It s included in the Starter
INSTRUCCIONES PARA ENVIAR SU PELICULA PARA LA VIDEOLIBRERIA
 For English version, please scroll down to page 11 (eleven) INSTRUCCIONES PARA ENVIAR SU PELICULA PARA LA VIDEOLIBRERIA Especificaciones técnicas Container format:.mp4 / tamaño de archivo no superior a
Manual de Instrucciones
 BSPORT-10-N-R-V-A PULSERA DEPORTIVA-BLUETOOTH Manual de Instrucciones FUNCIONES Y CONTROLES Pulsar el botón de encendido durante 3 segundos para encender el dispositivo. BATERÍA El dispositivo cuenta con
Creating your Single Sign-On Account for the PowerSchool Parent Portal
 Creating your Single Sign-On Account for the PowerSchool Parent Portal Welcome to the Parent Single Sign-On. What does that mean? Parent Single Sign-On offers a number of benefits, including access to
CONTROLADORA PARA PIXELS CONPIX
 The LedEdit Software Instructions 1, Install the software to PC and open English version: When we installed The LedEdit Software, on the desktop we can see following icon: Please Double-click it, then
SIGUIENDO LOS REQUISITOS ESTABLECIDOS EN LA NORMA ISO 14001 Y CONOCIENDO LAS CARACTERISTICAS DE LA EMPRESA CARTONAJES MIGUEL Y MATEO EL ALUMNO DEBERA
 SIGUIENDO LOS REQUISITOS ESTABLECIDOS EN LA NORMA ISO 14001 Y CONOCIENDO LAS CARACTERISTICAS DE LA EMPRESA CARTONAJES MIGUEL Y MATEO EL ALUMNO DEBERA ELABORAR LA POLITICA AMBIENTAL PDF File: Siguiendo
Owner s Manual (English language)
") Owner s Manual (English language) INTRODUCTION First of all, thank you for purchasing our product POLAR VIMA MMI 2G/3G. Here, we will explain you briefly the steps to use your new product easily and without
Owner s Manual (English language) INTRODUCTION First of all, thank you for purchasing our product POLAR VIMA MMI 2G/3G. Here, we will explain you briefly the steps to use your new product easily and without
2. Under user name, use your Panther ID (Same as Maximo) Use el Panther ID en la seccion que dice User Name (El mismo de Maximo)
 Use el Panther ID en la seccion que dice User Name (El mismo de Maximo)") 1. After opening the application the screen should always look like this one: Despues de abrir la aplicacion, la pantalla deberia de lucir exactamente de la siguiente manera: (Note: If you see a green
1. After opening the application the screen should always look like this one: Despues de abrir la aplicacion, la pantalla deberia de lucir exactamente de la siguiente manera: (Note: If you see a green
Quick Installation Guide Internet Setup
 CBR-970 Wireless-N Broadband Router www.cnet.com.tw Established in California, U.S.A. since 1987 Quick Installation Guide Internet Setup What s included in the box CBR-970 Wireless N Broadband Router Quick
Wi-Fi HD Camera Quick Setup Guide
 Wi-Fi HD Camera Quick Setup Guide What s Included First Alert HD IP Camera Unit Power Cord Ethernet Cable Camera Software CD Removable Antenna Mounting Bracket and Hardware Quick Setup Guide Initial Camera
In the following you see an example of a SPAC calculation run. BKtel systems 26.07.2004 Seite 1/8
 SPAC (System Performance Analysis for CATV Systems) is a tool for planning the performance of CATV distribution networks and their return path channel. SPAC calculates all important system parameters like
1) Install the included batteries into your blood pressure monitor (BPM).
 Install the included batteries into your blood pressure monitor (BPM).") DELUXE CONNECTED BLOOD PRESSURE ONITOR UA-651BLE 1) Install the included batteries into your blood pressure monitor (BP). 2) Insert the air connector plug into the air socket. 3) Download the free A&D
DELUXE CONNECTED BLOOD PRESSURE ONITOR UA-651BLE 1) Install the included batteries into your blood pressure monitor (BP). 2) Insert the air connector plug into the air socket. 3) Download the free A&D
IE12_ CONSOLIDACIÓN Y DESARROLLO DE NUEVAS TÉCNICAS DE EVALUACIÓN INTENSIVAS ON-LINE YA IMPLEMENTADAS POR EL GIE E4
 IE12_13-03001 - CONSOLIDACIÓN Y DESARROLLO DE NUEVAS TÉCNICAS DE EVALUACIÓN Departamento de Estructuras de la Edificación Escuela Técnica Superior de Arquitectura de Madrid Universidad Politécnica de Madrid
Brief Introduction to Docking and Virtual Screening with Autodock4 and Autodock Tools
 Brief Introduction to Docking and Virtual Screening with Autodock4 and Autodock Tools Environment set up Launch AutoDock Tools Gui. Aplicaciones --> MGLTools-1.5.4 --> AutoDockTools-1.5.4 You should see
Flashcards Series 2 Las Necesidades de la Vida
 Flashcards Series 2 Las Necesidades de la Vida Flashcards are one of the quickest and easiest ways to test yourself on Spanish vocabulary, no matter where you are! Test yourself on just these flashcards
Flashcards Series 3 El Aeropuerto
 Flashcards Series 3 El Aeropuerto Flashcards are one of the quickest and easiest ways to test yourself on Spanish vocabulary, no matter where you are! Test yourself on just these flashcards at first. Then,
Meet the Nest Learning Thermostat
 Welcome Guide Meet the Nest Learning Thermostat Display Turns blue when cooling and orange when heating. Status Nest shows you Time-to-Temperature and if it s heating, cooling or using Airwave. Current
Zune 8GB/4GB Start. Iniciar.
 Zune 8GB/4GB Start. Iniciar. SETUP 1 Visit www.zune.net/setup to install the Zune software. 2 When installation is complete, connect your Zune to your PC to start syncing. Your Zune charges whenever
Sierra Security System
 Using Your SpreadNet Accessories With Your Sierra Security System Uso de Sus Accesorios SpreadNet Con Su Sistema de Seguridad Sierra SN990-KEYPAD SN961-KEYFOB SN991-REMOTE 1 SN990-KEYPAD The SN990-KEYPAD
Crear alarma GATE. Aparecerá una ventana emergente para crear alarma.
 Crear alarma GATE Para crear una alarma, accede a través del menú principal de myhome.wattio.com a Seguridad, posteriormente arriba a la derecha haz click en Alarmas. En esta pantalla, en el menú izquierdo,
1. Sign in to the website, http://www.asisonline.org / Iniciar sesión en el sitio, http://www.asisonline.org
 Steps to Download Standards & Guidelines from the ASIS International Website / Pasos para Descargar los Standards & Guidelines de la Página Web de ASIS International 1. Sign in to the website, http://www.asisonline.org
QUICK GUIDE RECORD SETUP CONFIGURACIÓN DE GRABACIÓN English / Español
 QUICK GUIDE RECORD SETUP CONFIGURACIÓN DE GRABACIÓN English / Español ENGLISH SECTION Once you enter to the Main Screen on your DVR, press right button on the mouse and select the third icon called Record
WebForms con LeadTools
 WebForms con LeadTools 21.01.2007 Danysoft Con la aparición de la version 15 de LEADTOOLS, LEAD ha incluido un control.net para la gestión de formularios en la Web. A continuación le incluimos unas instrucciones
Manual para Cambio de Apariencia en Acrobat Reader DC. Change of Appearance in Acrobat Reader DC
 Manual para Cambio de Apariencia en Acrobat Reader DC Change of Appearance in Acrobat Reader DC Desarrollado por: DTE, LLC Versión: 02.2016 Developed by: DTE, LLC Revisado en:25 de Octubre de 2016 support@dtellcpr.com
Portal para Padres CPS - Parent Portal. Walter L. Newberry Math & Science Academy Linda Foley-Acevedo, Principal Ed Collins, Asst.
 Portal para Padres CPS - Parent Portal Walter L. Newberry Math & Science Academy Linda Foley-Acevedo, Principal Ed Collins, Asst. Principal (773) 534-8000 Formando su cuenta - Setting up your account Oprima
EN / ES Airtribune Live tracking Instructions
 Airtribune Live tracking Instructions 1. Activate the desired service plan: Personal GSM live tracking with pilots devices Personal GSM & satellite tracking GSM tracking with rented of own tracker set.
GUÍA RÁPIDA QUICK GUIDE
 GUÍA RÁPIDA QUICK GUIDE GUÍA RÁPIDA - VINCULACIÓN Medidor de potencia VINCULACIÓN AUTOMÁTICA ES Asegúrese de que está al menos 10 metros alejado de cualquier otro sensor ANT+TM y siga los siguientes pasos.
In this short presentation we ll explain: It will be explained here:
 In this short presentation we ll explain: It will be explained here: 1. Qué es FIXIO? FIXIO es una aplicación para teléfonos inteligentes y tabletas creada por MN Legal Firm cuyo objetivo es hacer más
School Preference through the Infinite Campus Parent Portal
 School Preference through the Infinite Campus Parent Portal Welcome New and Returning Families! Enrollment for new families or families returning to RUSD after being gone longer than one year is easy.
Real Time Systems. Part 2: Cyclic schedulers. Real Time Systems. Francisco Martín Rico. URJC. 2011
 Real Time Systems Part 2: Cyclic schedulers Scheduling To organise the use resources to guarantee the temporal requirements A scheduling method is composed by: An scheduling algorithm that calculates the
Digital Heart Rate Monitor
 W-248 843-095000 NA 2008 Timex Group, USA, Inc. TIMEX, TRIATHLON and NIGHT-MODE are registered trademarks of Timex Group USA, Inc. INDIGLO is a registered trademark of Indiglo Corporation in the US and
Sesión 3: PL 2b: Sistema para la adquisición de señales analógicas.
 Sesión 3: PL 2b: Sistema para la adquisición de señales analógicas. 1 Objetivo... 3 Signal Logging Basics... 3 Configure File Scope (xpc) Blocks... 3 File Scope Usage... 4 Create File Scopes Using xpc
MANUAL EASYCHAIR. A) Ingresar su nombre de usuario y password, si ya tiene una cuenta registrada Ó
 Ingresar su nombre de usuario y password, si ya tiene una cuenta registrada Ó") MANUAL EASYCHAIR La URL para enviar su propuesta a la convocatoria es: https://easychair.org/conferences/?conf=genconciencia2015 Donde aparece la siguiente pantalla: Se encuentran dos opciones: A) Ingresar
MANUAL EASYCHAIR La URL para enviar su propuesta a la convocatoria es: https://easychair.org/conferences/?conf=genconciencia2015 Donde aparece la siguiente pantalla: Se encuentran dos opciones: A) Ingresar
EP-2906 Manual de instalación
 EP-2906 Manual de instalación Con el botón situado a la izquierda se configura en el modo de cliente y de la derecha es el modo de Punto de acceso AP (nota: El USB es sólo para la función de fuente de
CESVA USB DRIVER. M_CUD_v0001_20130226_ESP_ENG
 CESVA USB DRIVER M_CUD_v0001_20130226_ESP_ENG CESVA USB DRIVER ESPAÑOL CONTENIDO 1. Instalación del CESVA USB Driver... 2 2. Conocer el puerto COM asignado para la comunicación con el PC... 2 2.1. Windows
Xfinity Prepaid. Roku setup guide
 Xfinity Prepaid Roku setup guide Use your new Roku and the Xfinity Stream app to watch your favorite Instant TV shows right on your TV. Let s get you set up. Step 1: Setting Up Your Roku Express 1. Remove
Video Server. Quick Installation Guide. English, Español
 Video Server Quick Installation Guide English, Español 2 Video Server NOTES Quick Installation Guide 3 Video Server Quick Installation Guide To get your Video Server up and running on an Ethernet network,
Quick Installation Guide Internet Setup
 www.cnet.com.tw Established in California, U.S.A. since 1987 CBR-971 Wireless-N 3.5G Broadband Router Quick Installation Guide Internet Setup What s included in the box CBR-971 Wireless N 3.5G Broadband
24-Port 10/100Mbps Web Smart PoE Switch with 4 Gigabit Ports and 2 Mini-GBIC Slots TPE-224WS
 24-Port 10/100Mbps Web Smart PoE Switch with 4 Gigabit Ports and 2 Mini-GBIC Slots TPE-224WS ŸGuía de instalación rápida (1) ŸTroubleshooting (3) 1.12 1. Antes de iniciar Contenidos del Paquete ŸTPE-224WS
Guía de instalación rápida TEG-160WS TEG-240WS
 Guía de instalación rápida TEG-160WS TEG-240WS C2 Table of Contents Español 1 1. Antes de iniciar 1 2. Instalación del Hardware 2 3. Herramienta de gestión Web 3 Troubleshooting 6 Version 02.02.2010 1.
150Mbps Micro Wireless N USB Adapter
 150Mbps Micro Wireless N USB Adapter TEW-648UBM ŸGuía de instalación rápida (1) ŸTroubleshooting (5) 1.11 1. Antes de iniciar Contenidos del paquete ŸTEW-648UBM ŸCD-ROM (herramienta y guía del usuario)
MANUAL DE INSTRUCCIONES / USER'S GUIDE VD53
 MANUAL DE INSTRUCCIONES / USER'S GUIDE VD53 ESP AJUSTAR LA POSICIÓN DE LAS MANECILLAS DEL CRONÓMETRO - Antes de fijar la hora, compruebe que todas las manecillas del cronógrafo - segundos, minutos - estén
TLC 3 Student Mobile Device Configuration Specifications
 TLC 3 Student Mobile Device Configuration Specifications All students are REQUIRED to configure and maintain their mobile devices as outlined in this document. Non-compliance is a violation of District
Guía de instalación rápida TE100-P1U
 Guía de instalación rápida TE100-P1U V2 Table of Contents Español 1 1. Antes de iniciar 1 2. Cómo se instala 2 3. Configuración del servidor de impresora 3 4. Añadir la impresora a su PC 5 Troubleshooting
T R A N S TECHNICAL SPECIFICATIONS:
 A R P O L T R A N S TECHNICAL SPECIFICATIONS: 1, or - look casing Specially designed rubber gasket (various models) Steps of up tc 8 mm between outside diameters Working pressures up to bar F l e x i b
TX MULTI MANUAL TX MULTI. Mando copiador multifrecuencia 1. PASOS PARA COPIAR UN MANDO CÓDIGO FIJO Y ROLLING ESTÁNDAR:
 MANUAL TX MULTI Mando copiador multifrecuencia 1. PASOS PARA COPIAR UN MANDO CÓDIGO FIJO Y ROLLING ESTÁNDAR: 1. Situar el mando original que desea copiar junto al TX Multi, en torno a 2-4 centímetros de
Manual de Arduino Wifly Shield
 Manual de Arduino Wifly Shield Material necesario: Arduino UNO. Wifly shield Software requerido en la PC: Arduino IDE v.1.0.1 Librería Wifly Alpha2 Preparando el hardware: Como se puede ver 4 LEDs parpadean
USER MANUAL VMS FOR PC VMS PARA PC English / Español
 USER MANUAL VMS FOR PC VMS PARA PC English / Español ENGLISH SECTION You must enter into the application with the following data: Account Type: Local User Name: admin Password: admin If you want your PC
Product Renewer for PrestaShop - Renew your products! - Renueve sus productos!
 http://envato.com/wp-content/themes/envato/images/favicon.ico Product Renewer for PrestaShop - Renew your products! - Renueve sus productos! Product Renewer lets you decide if any of your products are
Get an early start. Read this first. Use these Back-to-School flyers to reach parents early in the school year.
 Get an early start. Read this first. Use these Back-to-School flyers to reach parents early in the school year. Choose your favorite style, complete the form, then make enough copies to distribute them
Welcome to lesson 2 of the The Spanish Cat Home learning Spanish course.
 Welcome to lesson 2 of the The Spanish Cat Home learning Spanish course. Bienvenidos a la lección dos. The first part of this lesson consists in this audio lesson, and then we have some grammar for you
Setting Up an Apple ID for your Student
 Setting Up an Apple ID for your Student You will receive an email from Apple with the subject heading of AppleID for Students Parent/Guardian Information Open the email. Look for two important items in
Message Id Message English Message Spanish DCAS System
 10090 10091 10092 10093 10094 10098 10099 10100 10101 10102 10104 10105 10106 10107 10111 10124 10126 There was a problem with the system. Please give this number to your. Se produjo un problema con el
Mobile Application Guide Guía de aplicación móvil
 Welcome to the Donations Desk mobile application guide. Bienvenidos a la guía de la aplicación móvil de Donations Desk. TABLE OF CONTENTS Tabla de contenido Navigation: Getting Around... 3 Navigation:
Speak Up! In Spanish. Young s Language Consulting. Young's Language Consulting. Lesson 1 Meeting and Greeting People.
 Buenos días Good morning Buenos días Good afternoon Buenas tardes Good evening Buenas tardes Good night Buenas noches Sir Señor Ma am/mrs. Señora Miss Señorita Buenas tardes Culture Note: When greeting
MANUAL DE INSTRUCCIONES / USER'S GUIDE VD31
 MANUAL DE INSTRUCCIONES / USER'S GUIDE VD31 ESP AJUSTE DE LA POSICIÓN DE LA HORA DUAL - Después de configurar o de cambiar la batería, antes de configurar la hora, verifique si la aguja de hora dual está
BWATCH-BT1 SMARTWATCH BLUETOOTH. Manual de Instrucciones
 BWATCH-BT1 SMARTWATCH BLUETOOTH Manual de Instrucciones FUNCIONES Y CONTROLES 1. Altavoz 2. Encendido/Apagado 3. Entrada USB/Auriculares 4. Atrás 5. Botón Home 6. Botón Llamada 7. Micrófono 8. Botón RESET:
Quick Installation Guide TU2-DVIV H/W: V1.0R
 Quick Installation Guide TU2-DVIV H/W: V1.0R Table Table of Contents of Contents Español... 1. Antes de iniciar... 2. Cómo se instala... 1 1 3 Troubleshooting... 6 Version 06.27.2008 1. Antes de iniciar
Flashcards Series 4 El Hotel
 Flashcards Series 4 El Hotel Flashcards are one of the quickest and easiest ways to test yourself on Spanish vocabulary, no matter where you are! Test yourself on just these flashcards at first. Then,
appkbws03 Wireless Multimedia Keyboard Set Black
 appkbws03 Wireless Multimedia Keyboard Set Black Español 01 English 06 Capítulo 1. Introducción y descripción del producto Gracias por elegir el teclado inalámbrico APPKBWS03. Descripción del producto
Ready. Set. Go. Vonage Box. Quick Start Guide
 Ready. Set. Go. TM Vonage Box Quick Start Guide Start here. Congratulations and welcome to Vonage! Now that you have your Vonage Box TM, it s time to enjoy exceptional home phone service, including a wide
USER MANUAL LOGAN CAM VIEW FOR PC LOGAN CAM VIEW PARA PC English / Español
 USER MANUAL LOGAN CAM VIEW FOR PC LOGAN CAM VIEW PARA PC English / Español ENGLISH SECTION PC Installation 1. Download the application Logan Cam View for PC through the following link: https://support.logan-cam.com/hc/enus/articles/115000940287-logan-cam-view
VELOCIDAD + DISTANCIA GUÍA DEL USUARIO V.16
 VELOCIDAD + DISTANCIA GUÍA DEL USUARIO V.16 Índice Introducción...3 Reseña de funciones...3 Cargue su reloj Run Trainer...4 Obtenga el firmware más reciente...4 Cree una cuenta gratuita Timex Online...4
Vermont Mini-Lessons: Leaving A Voicemail
 Vermont Mini-Lessons: Leaving A Voicemail Leaving a Voice Mail Message Learning Objective 1) When to leave a message 2) How to leave a message Materials: 1) Voice Mail Template blanks & samples 2) Phone
VERIFICACIÓN FÍSCA CON DIVA
 SEMINARI DE DOCTORAT HERRAMIENTAS CAD DE DISEÑO MICROELECTRÓNICO I VERIFICACIÓN FÍSCA CON DIVA José Luis González Jiménez (Extraído del material del Hit-Kit de AMS) Departament d Enginyeria Electrònica
QUICK GUIDE RECORD SETUP CONFIGURACIÓN DE GRABACIÓN English / Español
 QUICK GUIDE RECORD SETUP CONFIGURACIÓN DE GRABACIÓN English / Español ENGLISH SECTION Once you enter to the Main Screen on your DVR, press right button on the mouse and select the third icon called Record
Guía de instalación rápida TE100-P21 3.01
 Guía de instalación rápida TE100-P21 3.01 Table of Contents Español 1 1. Antes de iniciar 1 2. Cómo se instala 2 3. Configuración del servidor de impresora 3 4. Agregue la impresora a su computadora 5
Performance Watch User Guide
 W-219 608-095000 NA performance watch user guide BODYLINK SYSTEM Performance Watch User Guide English page 1 Français page 75 Español página 153 Português pàgina 231 2005 Timex Corporation TABLE OF CONTENTS
Save Money Tear-off Flyer Set: 8.5 x11 CA edition, 4 different flyers, Spanish
 Save Money Tear-off Flyer Set: 8.5 x11 CA edition, 4 different flyers, Spanish PACKAGE CONTENTS How to Customize 4-color flyer with tear-off coupons, Editable PDF (50% OFF first loan) 1-color (black) flyer
Guía de instalación rápida TV-IP512WN 1.31
 Guía de instalación rápida TV-IP512WN 1.31 Table of Contents Español 1 1. Antes de iniciar 1 2. Inslatación y configuración del Hardware 2 Troubleshooting 8 Version 02.08.2010 1. Antes de iniciar Contenidos
DIAMOND Gear Company, LTD. an ERIKS Company. Installation, Maintenance, & Operation Manual DECLUTCHABLE WORM GEAR
 DIAMOND Gear Company, LTD. an ERIKS Company Installation, Maintenance, & Operation Manual 2013 INSTRUCTIONS This is an instructional manual which provides general installation, operation, and maintenance
Bluetooth Pairing Guide For iphone
 Bluetooth Pairing Guide For iphone Pairing your phone 1 is the first step in connecting with your Toyota for hands-free calling and for audio streaming via Bluetooth 2. This pairing process is quick and
OSCILLATION 512 (LM 3R)
") Application Note The following application note allows to locate the LM series devices (LM3E, LM3R, LM4 and LM5) within network and check its connection information: Name, MAC, dynamic IP address and static
Application Note The following application note allows to locate the LM series devices (LM3E, LM3R, LM4 and LM5) within network and check its connection information: Name, MAC, dynamic IP address and static
ENKVM-USBB. 2-Port USB KVM switch with Easy Switch and Cable. User Guide
 ENKVM-USBB 2-Port USB KVM switch with Easy Switch and Cable User Guide i Package Contents 1 ENKVM-USBB 2-Port USB KVM Switch with Easy Switch and Cable 1 User Guide Requirements Console A VGA, SVGA, XGA,
MANUAL DE INSTRUCCIONES
 MANUAL DE INSTRUCCIONES GUESS WATCHES 1 MUJER MUJER 2 MUJER Enhorabuena por la compra de su nuevo reloj GUESS. Éste ha sido desarrollado con una avanzada tecnología electrónica y se ha fabricado con los
Connecting Cloudino Connector to FIWARE IoT
 Hoja 1 DE 9 Connecting Cloudino Connector to FIWARE IoT 1. What is FIWARE IoT FIWARE is an open software ecosystem provided by the FIWARE Community (htttp://www.fiware.org). FIWARE exposes to developers
GUÍA DE USUARIO PC-331117. Bienvenidos al mundo Perfect Choice. Antes de comenzar a usar el producto es importante que leas esta guía.
 GUÍA DE USUARIO PC-331117 Bienvenidos al mundo Perfect Choice Antes de comenzar a usar el producto es importante que leas esta guía. Conexión 1. Inserta el transmisor en el conector para encendedor de
Some examples. I wash my clothes, I wash the dishes, I wash the car, I wash the windows. I wash my hands, I wash my hair, I wash my face.
 Reflexive verbs In this presentation, we are going to look at a special group of verbs called reflexives. Let s start out by thinking of the English verb wash. List several things that you can wash. Some
AUTOMATISMOS PRÁCTICAS DE PROGRAMACIÓN S7300 EN LENGUAJE DE CONTACTOS KOP
 AUTOMATISMOS 5º Ingeniero de Telecomunicación Curso 2003/2004 PRÁCTICAS DE PROGRAMACIÓN S7300 EN LENGUAJE DE CONTACTOS KOP 1. Control de motores 2. Control de Válvulas 3. Guía de selección de temporizadores
INDEX. To find the instructions that apply to your watch, please refer to the descriptions listed below:
 I N S T R U C T I O N M A N U A L INDEX The innovative design of this LAPIZTA timepiece is crafted using materials and elements that reflect extreme lifestyles. Enjoy it and embrace your INFINITE PASSION.
LAB 2: Circuitos de Corriente Directa (DC) PARTE I OBJECTIVES
 PARTE I OBJECTIVES") LAB : Circuitos de Corriente Directa (DC) PARTE I OBJECTIVES To learn to design and construct simple circuits using batteries, bulbs, wires and switches. To draw circuit diagrams using symbols To understand
LAB : Circuitos de Corriente Directa (DC) PARTE I OBJECTIVES To learn to design and construct simple circuits using batteries, bulbs, wires and switches. To draw circuit diagrams using symbols To understand
Guía de instalación rápida TPL-303E TPL-303E2K 1.01
 Guía de instalación rápida TPL-303E TPL-303E2K 1.01 Table of Contents Español 1 1. Antes de iniciar 1 2. Cómo se instala 2 Troubleshooting 6 Version 02.19.2010 1. Antes de iniciar Contenidos del paquete
Qué viva la Gráfica de Cien!
 Qué viva la Gráfica de Cien! La gráfica de cien consiste en números del 1 al 100 ordenados en cuadrilones de diez números en hileras. El resultado es que los estudiantes que utilizan estás gráficas pueden
Page English 2 Español 4 Update File Control Units with TFT screen
 Page English 2 Español 4 Update File Control Units with TFT screen Update the control unit software 1. Download the JBC Update File from www.jbctools.com/software.html which contains the latest update
SFD-200-N-B DESPERTADOR-PROYECTOR-CON VOZ. Manual de instrucciones
 SFD-200-N-B DESPERTADOR-PROYECTOR-CON VOZ Manual de instrucciones Funciones: - Proyección de la hora - Proyección controlada por sonidos y vibraciones (palmada, etc.) - Pantalla retroiluminada azul - Hora
INSTALLATION INSTRUCTIONS
 Brix Ratio Check Instructions for ColdFusion and Flavor Overload Units INSTALLATION INSTRUCTIONS Brix Ratio Check Instructions For Coldfusion, Flavorfusion and Flavor Overload Units Kit P/N 629096865 SAFETY
Robert T. Kiyosaki. Click here if your download doesn"t start automatically
 By - El Cuadrante del Flujo de Dinero: Guia del Padre Rico Hacia la Libertad Financiera = The Cashflow Quandrant (Negocios) (Tra) (8/16/11) Click here if your download doesn"t start automatically By -
Flashcards Series 5 El Agua
 Flashcards Series 5 El Agua Flashcards are one of the quickest and easiest ways to test yourself on Spanish vocabulary, no matter where you are! Test yourself on just these flashcards at first. Then, as