Deluxe Wrist Blood Pressure Monitor Instruction Manual Table of contents
|
|
|
- Arturo Moya de la Fuente
- hace 8 años
- Vistas:
Transcripción
1
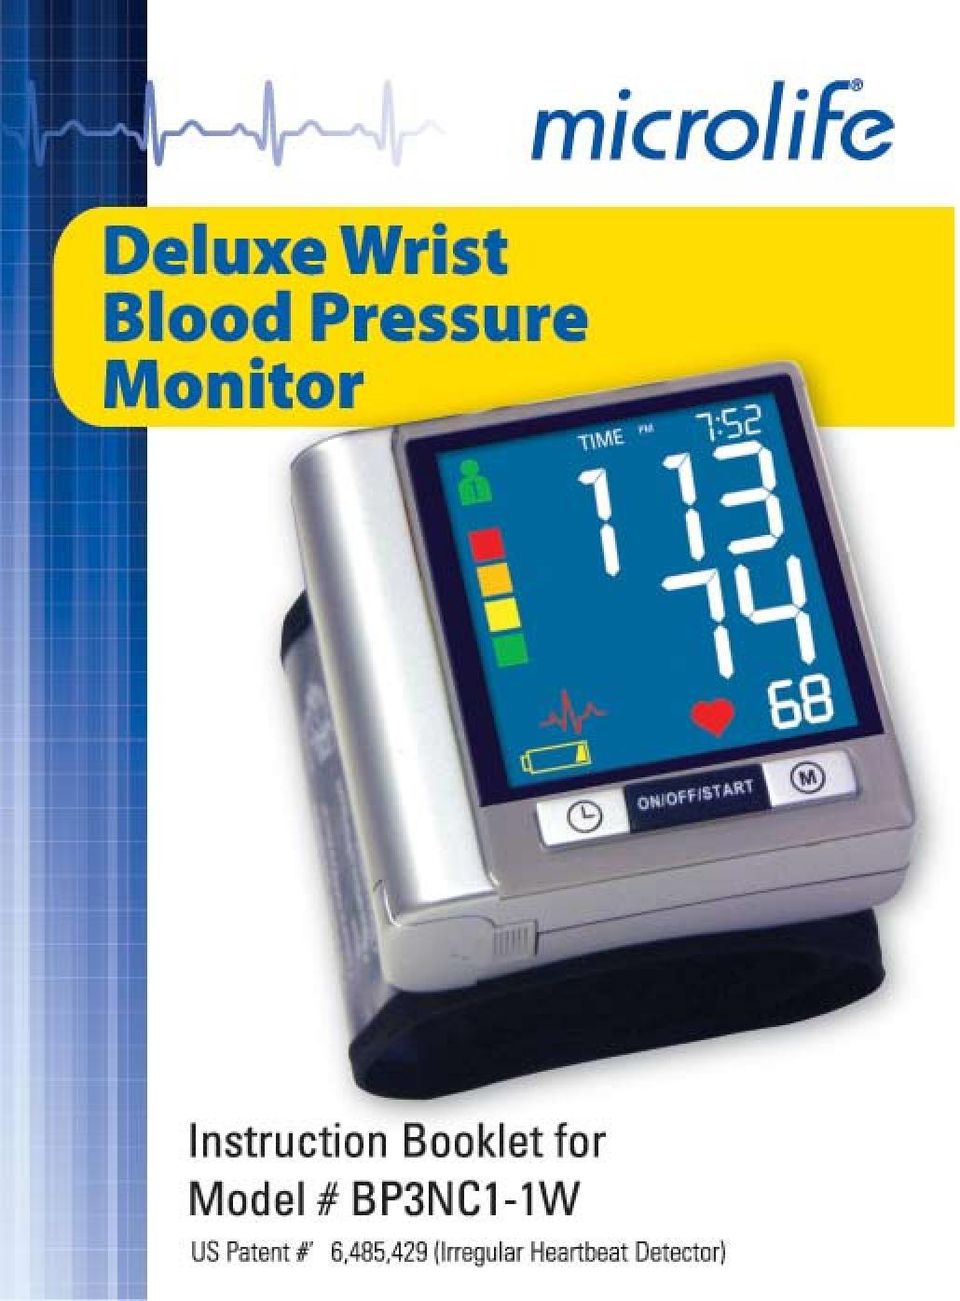
2 Deluxe Wrist Blood Pressure Monitor Instruction Manual Table of contents 1. Introduction 1.1. Features of the Wrist Blood Pressure Monitor 1.2. Important information about self-measurement 2. Important information about blood pressure and its measurement 2.1. How does high/low blood pressure arise? 2.2. Which values are normal? 2.3. What can be done, if regular high/low values are obtained? 2.4. Irregular Heartbeat Detection 3. Components of your blood pressure monitor 4. Using your blood pressure monitor for the first time 4.1. Activating the Pre-Installed Batteries 4.2. Setting the time and date 5. Taking a blood pressure measurement 5.1. Before the measurement 5.2. Common sources of error 5.3. Fitting the cuff 5.4. Measuring procedure 5.5. Discontinuing a measurement 5.6. Irregular Heartbeat Detection 5.7. Hypertension Risk Indicator 5.8. Memory storage and recall of the measurements 5.9. Memory cancellation of all measurements 1

3 6. Software Functions 6.1. Installation and data transmission 7. Setting the Medication Reminder 8. Battery Charge Indicator 9. Error messages/malfunctions 10. Care and maintenance 11. Warranty 12. Reference to standards 13. Technical specifications 14. How to contact us 2

4 1. Introduction 1.1. Features of the Wrist Blood Pressure Monitor This blood pressure monitor (with Irregular Heartbeat Detection) is a fully automatic, digital blood pressure measuring device for use on the wrist. This monitor enables very fast and reliable measurement of your systolic and diastolic blood pressure as well as pulse by way of the oscillometric method of measuring. This device offers a very high and clinically tested measurement accuracy and is designed for maximum user-friendliness. Before using it, please read through this instruction manual carefully and keep it in a safe place. For further questions on the subject of blood pressure and its measurement, please contact your doctor. Attention! 1.2. Important information about self-measurement Self-measurement means control, not diagnosis or treatment. Your values must always be discussed with your physician. You should never alter the dosages of any medication without direction from your physician. The pulse display is not suitable for checking the functioning of heart pacemakers!! In cases of irregular heartbeat, measurements made with this instrument should only be evaluated after consultation with your doctor. Electromagnetic Interference: This device contains sensitive electronic components. Avoid strong electrical or electromagnetic fields in the direct vicinity of the device (e.g. mobile telephones, microwave ovens, etc.). These can lead to temporary impairment of the monitor s measuring accuracy. 2. Important information about blood pressure and its measurement 2.1 How does high/low blood pressure arise? Your level of blood pressure is determined in the circulatory center of the brain and adjusts to a variety of situations through feedback from the nervous system. To adjust blood pressure, the strength and frequency of the heart (Pulse), as well as the width of circulatory blood 3

5 vessels is altered. Blood vessel width is affected by way of fine muscles in the blood vessel walls. Your level of arterial blood pressure changes periodically during heart activity. During the "blood ejection" (Systole), the value is highest (systolic blood pressure value). At the end of the heart s "rest period" (Diastole) pressure is lowest (diastolic blood pressure value). Your blood pressure values must lie within certain normal ranges in order to prevent particular diseases. 2.2 Which values are normal? Blood pressure is too high if your diastolic pressure is above 100 mmhg and/or your systolic blood pressure is over 160 mmhg, while at rest. In this case, please consult your physician immediately. Long-term values at this level endanger your health through continual damage to the blood vessels in you body. Should your systolic blood pressure values lie between 140 mmhg and 159mmHg and/or your diastolic blood pressure values lie between 90 mmhg and 99mmHg. Consult your physician. Regular self-checks will be necessary. If you have blood pressure values that are too low, (i.e., systolic values under 105mmHg and/or diastolic values under 60 mmhg), consult your physician. Even with normal blood pressure values, a regular self-check with your blood pressure monitor is recommended. You can detect possible changes in your values early and react appropriately. If you are undergoing medical treatment to control your blood pressure, keep a record of values along with time of day and date. Show these values to your physician. Never use the results of your measurements to independently alter the drug doses prescribed by your physician. Which values are normal? The following standards for assessing high blood pressure (without reagard to age) have been established by the U.S. National Institutes of Health JNC7, Category Systolic Diastolic (mmhg) (mmhg) Normal <120 and <80 Self-Check Pre-Hypertension or Stage or Hypertension Stage or 100 Hypertension

6 Further information If your values are mostly normal under resting conditions but exceptionally high under conditions of physical or psychological stress, it is possible that your are suffering from so-called "labile hypertension." Consult your physician. Correctly measured diastolic blood pressure values above 120mmHg require immediate medical treatment. * This device is not intended for use on children 12 years of age or younger. 2.3 What can be done if regular high/low values are obtained? a) Consult your physician. b) Increased blood pressure values (various forms of hypertension) are associated with considerable health risks over time. Arterial blood vessels in your body are endangered due to constrictions caused by deposits in the vessel walls (Arteriosclerosis). A deficient supply of blood to important organs (heart, brain, muscles) can result. Furthermore, the heart will become structurally damaged with increased blood pressure values. c) There are many different causes of high blood pressure. We differentiate between the common primary (essential) hypertension, and secondary hypertension. Secondary hypertension can be ascribed to specific organ malfunctions. Please consult your physician for information about the possible origins of your own increased blood pressure values. d)there are measures you can take to reduce and even prevent high blood pressure. These measures must be permanent lifestyle changes. 1) Eating habits: Strive for a normal weight corresponding to your age. See your doctor for your ideal weight. Avoid excessive consumption of common salt. Avoid fatty foods. 5
 Increased blood pressure values (various forms of hypertension) are associated with considerable health risks over time.")
7 2) Previous illnesses Consistently follow all medical instructions for treating illness such as: diabetes (diabetes mellitus or sugar diabetes), fat metabolism disorder, and gout. 3) Habits Give up smoking completely. Drink only moderate amounts of alcohol. Restrict your caffeine consumption (coffee, tea and chocolate). 4) Your physical condition After a medical examination, and with your doctor s approval and direction; exercise. Choose sports which require stamina and avoid those which require strength. Avoid reaching the limit of your performance. With previous illnesses and/or an age of over 40 years, please consult your physician before beginning your exercise routine. You must receive advice regarding the type and extent of exercise that is appropriate for you. 2.4 Irregular Heartbeat Detection The appearance of the symbol signifies that a certain irregular heartbeat was detected which could cause cardiovascular disease. This indicator is only a caution. This blood pressure monitor can detect blood pressure and pulse rate measurement with specifications even if the patient is having an irregular heartbeat interval. It is important that you be relaxed, remain still and do not talk during measurements. Note: We recommend contacting your physician if you see this icon frequently. CAUTION: An irregular heartbeat can be a serious medical condition requiring medical attention. See your doctor if you have an irregular heartbeat. 6

8 3. Components of your blood pressure monitor The illustration shows your blood pressure monitor, consisting of: Jumbo, Color LCD Hyperension Risk Indicator Memory Recall Battery Cover Time/Date Button ON/OFF/START Button Universal Size Wrist Cuff Fits wrist size cm (5.3"-7.7") 7

9 TIME PM 4. Using your Blood Pressure Monitor for the First Time 4.1. Activate the Pre-Installed Batteries Pull out the protective strip protruding from the battery compartment. 4.2 Setting the date and time 1. After the new batteries are activated, the year number flashes in the display. You can advance the year by pressing the "M" button. To confirm and then set the month, press the time button. 2. You can now set the month using the M button. To confirm and then set the day, press the time button. 3. Please follow the instructions above to set the day, hour and minutes. 4. Once you have set the last minute and pressed the time button, the date and time are set and the time is displayed. 5. If you want to change the date and time, press and hold the time button down for approx. 3 seconds until the year number starts to flash. Now you can enter the new values as described above. Memory Button Time/Date Button 5. Taking a Blood Pressure Measurement 5.1. Before the measurement: Avoid eating, smoking as well as all forms of exertion directly before your measurement. These factors influence the measurement result. Relax by sitting in an armchair in a quiet atmosphere for about ten minutes before your measurement. Always measure on the same wrist (normally left). Compare readings at the same time of day, since your blood pressure changes during the course of the day. 8

10 5.2. Common sources of error: Note: Comparable blood pressure measurements always require the same conditions! These are normally always quiet conditions. All efforts by the patient to support the arm can increase blood pressure. Make sure you are in a comfortable, relaxed position and do not activate any of the muscles in the measurement arm during the measurement. Use a cushion for support if necessary. If the wrist artery lies considerably lower (higher) than the heart, an erroneously higher (lower) blood pressure will be measured! (Each 15cm/6" difference in height results in a measurement error of10mmhg!) A loose cuff causes false measurement values. With repeated measurements, blood can accumulate in the respective arm, which can lead to false results. Correctly executed blood pressure measurements should therefore first be repeated after a 1 minute pause or after the arm has been held up in order to allow the accumulated blood to flow away Fitting the cuff a) Remove all objects and jewelry (e.g. wristwatch) from the wrist in use. Put the cuff over the wrist with the monitor face on the inside of the wrist. b) The distance between the cuff and the hand should be approx. 10 mm (1/2"). c) Secure the cuff with the Velcro fastener, so that it lies comfortably and not too tight. No space should remain between the cuff and the wrist. 9
 than the heart, an erroneously higher (lower) blood pressure will be measured!")
11 d) Lay your arm on a table, with the palm upwards. Support the arm a little with a cushion, so that the cuff rests at about the same height as the heart. Remain still for 2 minutes, before beginning the measurement Measuring procedure After the cuff has been appropriately positioned, the measurement can begin: a) Press the ON/OFF button to begin. After pressing the ON/OFF button the pump begins to inflate the cuff. In the display, the increasing cuff-pressure is continually displayed. b) After reaching the inflation pressure, the pump stops and the pressure slowly falls. The cuff pressure (large characters) is displayed during the measurement. When the device has detected the pulse, the heart symbol in the display begins to blink and a beep tone is audible for every pulse beat. c) When the measurement has been concluded, a long beep tone sounds. The measured systolic and diastolic blood pressure values as well as the frequency are now displayed. (Pulse=number of heartbeats each minute) 10 Example (Fig.): Systolic 118, Diastolic 73, Pulse 75. The measurement results are displayed until you switch the device off. 1 Pulse Detected - Unit measuring mmhg mmhg 1 1 mmhg mmhg
 After reaching the inflation pressure, the pump stops and the pressure slowly falls. The cuff pressure (large characters) is displayed during the measurement.")
12 If no button is pressed for 5 minutes, the device switches off automatically to save the batteries Discontinuing a measurement If it is necessary to interrupt a blood pressure measurement for any reason (e.g. the patient feels unwell), the ON/OFF button can be pressed at any time. The device then immediately lowers the cuff pressure automatically and enters into sleep mode Irregular Heartbeat Detection This symbol indicates that certain pulse irregularities were detected during the measurement. In this case, the result may deviate from your normal basal blood pressure repeat the measurement. In most cases, this is no cause for concern. However, if the symbol appears on a regular basis (e.g. several times a week with measurements taken daily), we advise you to tell your doctor. Please show your doctor the following explanation: Information for the doctor on frequent appearance of the Irregular Heartbeat Symbol This instrument is an oscillometric blood pressure monitor device that also analyzes pulse frequency during measurement. The instrument is clinically tested. If pulse irregularities occur during measurement, the irregular heartbeat symbol is displayed after the measurement. If the symbol appears more frequently (e.g. several times per week on measurements performed daily) or if it suddenly appears more often than usual, we recommend the patient to seek medical advice. The instrument does not replace a cardiac examination, but serves to detect pulse irregularities at an early stage. 11

13 5.7. Hypertension Risk Indicator The colored bars on the left-hand edge of the LCD show you the range within which the indicated blood pressure value lies. Depending on the color of the bar, the readout value is either within the normal (green), borderline (yellow) or danger (orange, red) range. The classification is based on standards established by the National Institutes of Health JNC7, Refer to the chart in section 2.2 of this instruction manual for details of the classifications. The traffic light bar illuminates according to your measurement: If the green bar lights up, your measurement is Normal according to NIH standards. If the yellow bar lights up, it is Pre-Hypertension according to NIH standards. If the orange bar lights up, it is in the Stage 1 Hypertension zone. If the red bar lights up, it is in the Stage 2 Hypertension zone Memory storage and recall of the measurements This blood pressure monitor automatically stores the last 99 measurements values for each user. By pressing the MEMORY button, average of existing memory readings displayed first with an A and (MR) at the lower left. Press MEMORY button again, the last measurement (MR99) as well as the previous 98 measurements (MR98, MR97,..MR1) can be displayed one after the other. 5.9.Memory cancellation of all measurements Attention! Before proceeding to clear all the memory, make sure that you don t have to make reference to the readings in the future. To delete all stored readings, press the MEMORY button for at least 7 seconds. The display will show the symbol "CL" and 3 short beeps will sound to indicate deletion of stored readings. 1 12

14 6. Software Functions This unit can be used in connection with your personal computer (PC) running the PC Link Blood Pressure Analyzer software. Your Windows XP, Vista, 7 PC will allow a capacity of monitoring 80 patients, each with 1000 data (note: overuse will lower system efficiency). The memory data can be transferred to the PC by connecting the monitor via the included USB cable with your PC. Note: The software does not work with Mac computers Installation and Data Transmission a) Insert CD into CD ROM drive of your PC. The installation will start automatically. If not, click on SETUP.EXE. b) Connect the monitor via USB cable with the PC. Three horizontal bars will appear on the display and last for 3 seconds. c) The bars will then flash to indicate that the connection between computer and device is successfully made. As long as the cable is plugged, the bars will keep flashing and the buttons are disabled. During the connection, the device is completely controlled by the computer. Please refer to the help file in the software for detailed instructions or call Setting the Medication Reminder This instrument allows you to set two alarm times at which an alarm signal will then be triggered. This can be a useful aid, for instance as a reminder to take medication or to remind you to take your blood pressure at the same time each day. 1. To set an alarm time, press the time button (the instrument must have been switched off beforehand) and 13
 Insert CD into CD ROM drive of your PC. The installation will start automatically. If not, click on SETUP.EXE. b) Connect the monitor via USB cable with the PC.")
15 immediately afterwards the "M" button and hold both down until the bell symbol appears in the bottom left of the display. Then release both buttons. The flashing "1" in the display indicates that the first alarm time can now be set. 2. Press the time button to set the hours the hours display flashes and pressing the "M" button allows you to set the alarm hour. To confirm, press the time button. 3. The minute display will now flash. The minutes can be set using the "M" button. To confirm, press the time button again. 4. The bell symbol will now flash. Use the "M" button to select whether the alarm time is to be active (bell) or inactive (crossed-out bell). To confirm, press the time button. TIME PM To set a second alarm time, proceed as above but if the "1" flashes, press the "M" button to select "2" and confirm with the time button. An active alarm time is indicated by the bell symbol in the display. The alarm sounds at the set time every day. To switch-off the alarm when it is sounding, press the START/ON/OFF button. To permanently switch-off the alarm, proceed as above (steps 1-4) and select the crossed-out bell symbol. This will then disappear from the display. The alarm times must be re-entered each time the batteries are replaced. 14

16 8. Battery Charge Indicator Batteries almost discharged When the batteries are approximately 75% used the battery symbol will flash as soon as the instrument is switched on (if at least one of the batteries still has some charge). Although the instrument will continue to measure reliably, you should obtain replacement batteries. Batteries discharged replacements required When the batteries are discharged, the battery symbol will flash as soon as the instrument is switched on. You cannot take any further measurements and must replace the batteries. 1. Open the battery compartment at the back of the instrument. 2. Replace the batteries ensure they are inserted correctly, as shown on the symbols in the compartment. 3. The memory retains all values although date and time must be reset - the year number will flash automatically after batteries are replaced. 4. To set date and time, follow the procedure described in Section 4.2. Which batteries and which procedure? Use two new, longlife 1.5V AAA batteries. Do not use batteries beyond their expiration date. If the monitor is not going to be used for a prolonged period the batteries should be removed. Using rechargeable batteries You can also operate this instrument using rechargeable batteries. Please use only type "NiMH" reusable batteries! If the battery symbol ( ) appears, the batteries must be removed and recharged! They must not remain inside the instrument, as they may become damaged through total discharge even when switched off. The batteries must NOT be discharged in the blood pressure monitor! If you do not intend to use the instrument for a week or more, always remove the rechargeable batteries! Recharge these batteries using an external charger and follow manufacturer s instructions carefully. 15

17 9. Error messages/troubleshooting If an error occurs during a measurement, the measurement is discontinued and a corresponding error code is displayed (Example: Error No. 2). Error No. ERR 1 ERR 2 ERR 3 ERR 5 HI LO Possible cause(s) No pulse was detected. Ensure the cuff is properly placed on the inside of you wrist and repeat a measurement Unnatural pressure impulses influenced the measurement result. Reason: The arm was moved during the Measurement (Artefact). Repeat, keeping still and quiet. Inflation of the cuff takes too long. The cuff is not correctly seated. Re-position cuff and repeat The measured readings indicated an unacceptable difference between systolic and diastolic pressures. Take another reading following directions carefully. Contact your doctor if you continue to get unusual readings. The cuff pressure is too high. Relax for 5 minutes and repeat the measurement.* The pulse is too low (less than 40). Repeat the measurement.* * If this or any other problem occurs repeatedly, please consult your doctor. 16
. Repeat, keeping still and quiet. Inflation of the cuff takes too long. The cuff is not correctly seated.")
18 Other possible malfunctions and their remedies If problems occur when using the device, the following points should be checked and if necessary, the corresponding measures are to be taken: Malfunction The display remains blank when the instrument is switched on. The device frequently fails to measure blood pressure values, or the values measured are too low (too high). Remedy 1. Check batteries for correct polarity. 2. If the display is unusual, re-insert batteries or exchange them. 1. Check the positioning of the cuff. 2. Measure blood pressure again in peace and quiet carefully following the details in Section 5. Every measurement produces a different value. 1.Please read the following information listed in Section 5.2 "Common sources of error." Repeat the measurement. Please note: Blood pressure fluctuates continually so successive measurements will show some variability. Blood pressure values 1.Record the daily development of the measured at your doctors measured values and consult your doctor. office differ from your Please note: Individuals visiting their measurements. doctor frequently experience anxiety which can result in a higher reading than at home under resting conditions. 17

19 10. Care and maintenance a) Do not expose the device to either extreme temperatures, humidity, dust or direct sunlight. b) The cuff contains a sensitive air-tight bubble. Handle this carefully and avoid all types of straining through twisting or buckling. c) Clean the device with a soft, dry cloth. Do not use Gasoline gasoline, thinners or similar solvents. Spots on the cuff can be removed carefully with a damp cloth and soapsuds. The cuff must not be washed! d) Do not drop the instrument or treat it roughly in any way. Avoid strong vibrations. e) Never open the device! Otherwise the manufacturers warranty becomes invalid! Further information Blood pressure is subject to fluctuations even in healthy people. Comparable measurements always require the same conditions (quiet conditions)! If fluctuations in readings are larger than 15mmHg, and/or you hear irregular pulse tones, consult your doctor. In order to receive market clearance from governmental bodies, this device was subjected to strict clinical tests. The computer program used to measure blood pressure values was tested by experienced cardiac specialists in Germany. Never attempt to repair the instrument yourself! Any unauthorized opening of the instrument invalidates all warranty claims! Periodical accuracy check Sensitive measuring devices must from time to time be checked for accuracy. We therefore recommend a periodical inspection of the static pres- 18
 Never open the device! Otherwise the manufacturers warranty becomes invalid! Further information Blood pressure is subject to fluctuations even in healthy people.")
20 sure display every 2 years. Call customer service at to arrange the test. 11. Warranty Your Microlife blood pressure monitor is guaranteed for five years against manufacturers defects for the original purchaser only, from date of purchase. The warranty does not apply to damage caused by improper handling, accidents, professional use, not following the operating instructions or alterations made to the instrument by third parties. Five year warranty only applies to the instrument. All accessories including the software and USB cable are guaranteed for one year. There are no user serviceable parts inside. Batteries or damage from old batteries is not covered by the warranty. Please note: According to international standards, your monitor should be checked for accuracy every 2 years. 12. Reference to standards Device standard: Device corresponds to the requirements of the standard for non-invasive blood pressure monitors: ANSI/AAMI SP10 IEC IEC Electromagnetic compatibility: Device fulfills the stipulations of the standard IEC Clinical testing: Clinical performance tests were carried out in the US according to ANSI/AAMI SP10 standard. The B.H.S. (British Hypertension Society) clinical protocol was used to measure the accuracy of this product. Blood pressure units using the same measurement technology are graded AA for systolic/diastolic accuracy by indepen- 19

21 dent investigators using the BHS protocol. This is the highest grading available for blood pressure monitors. Please see bhsoc.org for more information. 13. Technical specifications: Weight: 148g (with batteries + cuff) Size: 85 x 77 x 75mm (including cuff) Storage temperature: 20 to +55 C (-4 F to +131 F) Humidity: 15 to 90% relative humidity maximum Operation temperature: 10 to 40 C (50 F F) Display: LCD-Display (Liquid Crystal Display) Measuring method: oscillometric Pressure sensor: capacitive Measuring range: SYS/DIA: 30 to 280 mmhg Pulse: 40 to 200 per minute Cuff pressure display range: mmhg Memory: Stores the last 99 measurements Measuring resolution: Accuracy: Power source: Accessories: 1 mmhg Pressure within ± 3 mmhg or 2% of reading >200mmHg Pulse ± 5 % of the reading 2 dry cells (Batteries) size AAA 1.5V storage case Technical alterations reserved! device. Read the instructions carefully before using this 20
22 Type BF applied part. 14. How to contact us: Distributed by: Microlife USA, Inc. 424 Skinner Blvd., Suite C Dunedin, FL Toll Free: custserv@microlifeusa.com Made in China 21
23 Tensiómetro Reloj de Pulsera con Detector de Latido Irregular Manual de instrucciones Modelo # BP3NC1-1W 22
24 Tabla de contenido 1.Introducción 1.1. Características del tensiómetro reloj de Pulsera con Detector de Latido Irregular 1.2. Información importante sobre la automedición. 2.Información importante sobre la tensión arterial y su medición 2.1. Cómo se origina la tensión arterial alta/baja? 2.2. Cuáles son los valores normales? 2.3. Qué podemos hacer si se miden regularmente valores altos/bajos? 2.4. Detector de Latido Irregular 3.Componentes del tensiómetro 4.Puesta en funcionamente del tensiómetro 4.1. Como activar las baterías pre-instaladas 4.2. Ajuste de fecha y hora 5.Procedimiento para la medición 5.1. Antes de la medición 5.2. Fuentes communes de error 5.3. Ajuste de la muñequera 5.4. Procedimiento de medición 5.5. Terminación de medición 5.6. Detector de Latido Irregular 5.7. Indicador de Hipertensión 5.8. Memoria - almacenamiento de las medidas 5.9. Memoria - cancelación de todas las medidas 23
25 6. Programa de Análisis de la Presión Arterial 6.1. Instalación y transmisión de datos 7. Como fijar el recordatorio para la medición 8. Indicador de la carga de la batería 9. Mensajes de error/funcionamiento defectuoso 10. Cuidados y mantenimiento 11. Garantía 12. Referencia a estándares 13. Especificaciones técnicas 14. Contacto para la ayuda 24
26 1. Introducción 1.1. Características del tensiómetro reloj de pulsera con Detector de Latido Irregular El tensiómetro es un aparato digital totalmente automático de medición de la tensión arterial para ser usado en la muñeca, que permite medir muy rápidamente y de forma fiable la tensión arterial sistólica y diastólica, así como el número de pulsaciones mediante el método de medición oscilométrico. El aparato presenta una alta precisión de medición que ha sido clínicamente comprobada, y su diseño lo hace muy sencillo de utilizar. Antes de usarlo, lea detenidamente este manual de instrucciones y luego guárdelo por si necesita consultarlo de nuevo, en el futuro. Contacte con su médico si tiene más preguntas sobre la tensión arterial y su medición. Atención: 1.2. Información inportante sobre las automediciones No lo olvide: automedición significa control, no diagnóstico o tratamiento. Los valores inusuales deben ser discutidos siempre con su médico. No modifique bajo ninguna circunstancia las dosis de cualquier medicamento que le haya recetado su médico. El indicador de pulsaciones no es apropiado para medir la frecuencia de los marcapasos. En casos de irregularidad cardiaca, las mediciones realizadas con este instrumento deben ser evaluadas sólo, previa consulta con el médico. Interferencia electromagnética: El aparato contiene componentes electrónicos sensibles (microordenador). Por ello, evite los campos eléctricos o electromagnéticos fuertes en proximidad directa al aparato (por ejemplo, teléfonos 25
27 móviles, microondas); pueden dar lugar a la pérdida temporal de la exactitud de medición. 2. Información importante sobre la tensión arterial y su medición 2.1. Cómo se origina la tensión arterial alta/baja? El nivel de la tensión arterial se determina en una zona del cerebro, en el llamado centro circulatorio, y se adapta a cada situación concreta por retroalimentación, a través del sistema nervioso. Para ajustar la tensión arterial se modifican la potencia y la frecuencia cardiacas (pulso), así como la anchura de los vasos sanguíneos. Esto último se efectúa mediante los músculos de las paredes de los vasos sanguíneos. El nivel de la tensión arterial cambia periódicamente junto con la actividad cardiaca: durante la impulsión de la sangre (sístole) el valor es máximo (valor sistólico de la tensión arterial); al final del «periodo de relajación» del corazón (diástole), mínima (valor diastólico de la tensión arterial). Para evitar ciertas enfermedades, los valores de la tensión arterial deben estar situados entre unos valores límite determinados. 2.2 Cuáles son los valores normales? La tensión arterial es excesiva si en reposo la presión diastólica es superior a 100 mmhg y/o la presión arterial sistólica es superior a 160 mmhg. En este caso, consulte con su médico de forma inmediata. Valores de este nivel durante largo tiempo ponen en peligro su salud debido al daño progresivo que ello conlleva para los vasos sanguíneos de su cuerpo. Si el valor sistólico de la tensión arterial está entre 140 mmhg y 159 mmhg y/o el valor diastólico de la tensión arterial está entre 90 mmhg y 99 mmhg, consulte igualmente con su médico. Además, será necesario efectuar automediciones de forma regular. 26
28 Con valores de la tensión arterial muy bajos; esto es, valores sistólicos inferiores a 100 mmhg y/o valores diastólicos inferiores a 60 mmhg, consulte igualmente con su médico. Incluso con valores normales de la tensión arterial es recomendable efectuar de forma regular automediciones con su tensiómetro. De esta forma, Ud. podrá detectar a tiempo los posibles cambios en sus valores normales y actuar al respecto. Si Ud. está siendo sometido a un tratamiento médico para controlar su tensión arterial, lleve un registro de los valores de su tensión arterial, efectuando automediciones de forma regular automediciones determinadas horas del día. Muestre esos valores a su médico. No use nunca los resultados de sus comprobaciones para alterar por su cuenta el tratamiento prescrito por su médico. Los estandares siguientes para determinar la tension arterial alta (sin consideracion alguna hacia edad) han sido establecidos por los U.S. Institutos Nacionales de la Salud JNC7, Category Systolic Diastolic (mmhg) (mmhg) Normal <120 y <80 Pre-Hipertensión o Stage o Hipertensión Stage o 100 Hipertensión 27
29 Información adicional Si sus valores son prácticamente normales en reposo, pero excepcionalmente altos bajo estrés físico o psíquico, es posible que sufra de la llamada «hipertensión lábil». Consulte con su médico si tiene la sospecha de que ese puede ser su caso. Un valor diastólico de la tensión arterial, medido correctamente, superior a 120 mmhg requiere tratamiento médico inmediato. * No previsto para el uso en niños 12 años de edad o más jovenes Qué puede hacerse si se obtienen valores altos/bajos de forma regular? a) Consulte con su médico. b) Los valores altos de la tensión arterial (diversas formas de hipertensión) están asociadas a medio y largo plazo con riesgos importantes para la salud. Esto afecta a los vasos sanguíneos de su cuerpo, que están en peligro debido a la constricción causada por los depósitos que se van formando en las paredes de los vasos (arterioesclerosis). La consecuencia puede ser una deficiencia en el aporte de sangre a órganos importantes (corazón, cerebro, músculos). Es más, con valores altos de la tensión arterial a largo plazo, el corazón sufrirá daños estructurales. c) Existen muchas causas diferentes para la aparición de valores altos de la tensión arterial. Diferenciamos entre la hipertensión primaria (esencial) y la hipertensión secundaria. El último grupo puede ser adscrito a disfunciones orgánicas específicas. Consulte con su médico para que le informe sobre el posible origen de sus valores elevados de tensión arterial. d) Hay medidas que Ud. puede tomar, no únicamente para reducir una hipertensión médicamente diagnosticada, sino también como prevención. Estas medidas son parte de su forma de vida general: 1) Hábitos alimentarios Esfuércese por mantener un peso normal que se corresponda con su edad. Reduzca el sobrepeso. 28
30 Evite el consumo excesivo de sal común. Evite los alimentos grasos. 2) Enfermedades anteriores Siga fielmente cualquier instrucción médica para el tratamiento de posibles enfermedades anteriores, tales como: diabetes (Diabetes mellitus) trastornos en el metabolismo de las grasas gota 3) Hábitos Deje de fumar por completo Beba sólo cantidades moderadas de alcohol Reduzca el consumo de cafeína (café) 4) Constitución física: Haga deporte de forma regular. Elija deportes que requieran vigor y evite aquellos que requieran fuerza. Evite llegar al límite de su capacidad física. En caso de haber sufrido enfermedades con anterioridad y/o tener una edad superior a los 40 años, consulte con su médico antes de comenzar a practicar deporte. Él le aconsejará sobre el tipo de deporte más apropiado para Ud Detector de Latido Irregular Cuando aparece en su pantalla este símbolo significa que se han detectado latidos irregulares que pueden causar o indicar una enfermedad cardiovascular. Este indicador es una advertencia. El Monitor de Presión Automático de Microlife con Detector de Latidos Irregulares puede detectar presión arterial y pulso con especifica- 29
31 ciones aún cuando el paciente está experimentando latidos irregulares con intérvalos. Es importante que usted esté relajado, se mantenga inmóvil y no hable durante la medición. Nota : Recomendamos contacte a su médico si usted ve este símbolo con frecuencia. PRECAUCION : Latidos del corazón irregulares pueden resultar en una condición seria que requiera atención médica. Vea a su doctor si usted sospecha tener un latido irregular. 3. Componentes del tensiómetro La figura muestra el tensiómetro que consta de: Muñequera para una circunferencia de muñeca de (13.5cm cm). Indicador de hipertensión Botón ON/OFF/START Botón de la hora Botón de la memoria Tapade la pila Brazalete le muñeca 30
32 TIME PM 4. Puesta en funcionamiento del tensiómetro 4.1. Como activar las baterías instaladas Tire la película protectora que sale del compartimiento de la batería Ajuste de la hora y la fecha 1. Luego de que las baterías nuevas estén activadas, las cifras del año se observarán en forma intermitente en la pantalla. Usted puede avanzar el año presionando el botón de la memoria M. Para confirmar y luego fijar el mes, presione el botón de la hora. 2. Usted ahora puede fijar el mes usando el botón M. Para confirmar y luego fijar el día, presione el botón de la hora. 3. Por favor siga las instrucciones anteriores para fijar el día, hora y minutos. 4.Una vez que usted haya fijado los minutos y presionado el botón de la hora, la fecha y hora fijados se observarán en la pantalla. 5. Si usted quiere cambiar la fecha y hora, mantenga presionado el botón de la hora por aproximadamente 3 segundos hasta que el número del año se vea intermitente. Ahora usted puede entrar nuevos valores siguiendo las instrucciones arriba mencionadas. 31
33 5. Procedimiento para la medición 5.1. Antes de la medición: Evite comer, fumar, así como cualquier forma de ejercicio antes de la medición. Todos estos factores influyen sobre el resultado de la medición. Busque y encuentre tiempo para relajarse sentado en un sillón en una atmósfera tranquila durante unos diez minutos antes de la medición. Efectúe la medición siempre en la misma muñeca (normalmente la izquierda). Intente efectuar las mediciones de forma regular a la misma hora del día, ya que la tensión arterial se modifica con el curso del día Fuentes de error comunes: Tenga en cuenta: Para poder comparar los resultados de las mediciones de la tensión arterial se requiere que las condiciones sean las mismas. Estas son normalmente condiciones de tranquilidad. Los esfuerzos del paciente para mantener el brazo en la posición de medición pueden aumentar la tensión arterial. Asegúrese de estar en una posición cómoda y relajada, y no active ningún músculo del brazo en el que se está efectuando la medición. Si es necesario, utilice un almohadón de apoyo. Si la arteria de la muñeca se encuentra considerablemente más baja (alta) que el corazón, se medirá una tensión arterial errónea más alta (baja). (Cada 15 cm de diferencia de altura da lugar a un error de medición de 10 mmhg) Una muñequera demasiado suelta da lugar a valores de medición erróneos. Si se repiten las mediciones, la sangre se acumulará en el brazo correspondiente, lo que puede dar lugar a resultados erróneos. Por ello, 32
34 para efectuar la medición de la tensión arterial de forma correcta no la repita hasta pasados 1 minuto, o hasta después de haber mantenido el brazo en alto para permitir que la sangre acumulada fluya Ajuste de la muñequera a) Retire todos los posibles objetos y joyas (p. ej., reloj de pulsera) de la muñeca en cuestión. Coloque la muñequera sobre la muñeca con la pantalla hacia el lado interior de la muñeca. b) La distancia entre la muñequera y la mano debe ser de aprox. 10 mm ( 1/2 in). c) Asegure la muñequera con el cierre velcro, de forma quede ajustado confortablemente y no demasiado fuerte, sin que quede ningún espacio entre la muñequera y la muñeca. d) Ponga el brazo sobre una mesa con la palma de la mano hacia arriba. Apoye ligeramente el brazo en una base (almohadón), de forma que la muñequera quede más o menos a la altura del corazón. Tenga cuidado de que la muñequera quede libre. Permanezca así, tranquilamente sentado durante 2 minutos, antes de comenzar con la medición. 33
35 5.4. Procedimiento de medición a) Una vez que haya seleccionado el usuario correcto,y la posicion de la medicion puede apretar el botón do ON/OFF, la bomba comienza a inflar la muñequera. En la pantalla se visualiza de forma continua el incremento de la presión de la muñequera. b) Una vez alcanzada la presión de inflado,la bomba se detiene y la presión va cayendo poco a poco.la presión de la muñequera (dígitos grandes) se visualiza durante la medición.una vez que el aparato detecta el pulso comienza a parpadear el símbolo del corazón en la pantallay se escucha un bip por cada pulsación. El pulso detectó 1 c) Una vez concluida la medición, suena un bip largo. Los valores sistólicos y diastólicos de la tensión arterial medidos, así como el número de pulsaciones por minuto, se visualizan ahora en la pantalla. Ejemplo (fig.): sístole 118, diástole 73, pulso 75 Los resultados de la medición se visualizarán hasta que Ud. desconecte el aparato. Si durante 5 minutos no se aprieta ningún botón, el aparato se desconecta de forma automática para no gastar la batería. 1 mmhg mmhg 1 mmhg mmhg 34
36 5.5. Terminación de medida Si por alguna razón es necesario interrumpir la medición de la tensión arterial (p. ej., el paciente no se encuentra bien), se puede apretar el botón ONN/OFF en cualquier momento. El aparato disminuye entonces, de forma inmediata, la presión de la muñequera Detector de Latido Irregular El símbolo indica que se ha detectado un pulso irregular durante la medición. En este caso, el resultado puede variar su presión básica. Repita la medición, esto no es motivo de inquietud. Sin embargo, si el símbolo aparece con regularidad (ej. Varias veces a la semana durante mediciones diarias), le aconsejamos consulte con su médico. Por favor enseñe a su médico la siguiente explicacion: Información para el médico sobre la frecuente aparición del Símbolo de Latido Irregular. Este instumento es un monitor oscilométrico de presión sanguinea que también analiza la frecuencia del pulso durante la medición. El instrumento está clínicamente analizado. Si durante la medición ocurren irregularidades del pulso, se observará el símbolo de latido irregular. Si el símbolo aparece con mas frecuencia (ej. Varias veces a la semana en lecturas diarias) or si aparece repentinamente con mas frecuencia que lo usual, recomendamos al paciente consultar con su médico. Este instrumento no reemplaza un examen cardiado, pero sirve el propósito de detectar irregularidades del pulso a temprana edad. 35
37 5.7. Indicador de Luz de Trafico Las barras en el lado izquierdo de la pantalla muestran el alcance de la presión arterial. Dependiendo de la altura de la barra, la lectura está dentro de los parámetros normales; (verde), al borde; (Amarillo) on en peligro; (rojo). La clasificación está basada en los standards establecidos por El Instituo Nacional de la Salud JNC7, 2003 Refierase a la tarjeta en el monitor o al cuadro en la pagina 3 de este manual de instrucciones para un detalle de las clasificaciones. La barra del semáforo levanta según su medida. si su medida tiene verde, su medida está en la zona verde, o "Normal" según estándares de NIH. si su medida tiene amarillo, está en la zona amarilla, o "Pre-Hipertensio'n" según estándares de NIH. si su medida tiene naranja, está en la "hipertensión anaranjada de la etapa 1" zona. si su medida tiene rojo, él está en "la zona roja de la hipertensión de la etapa 2" Memoria almacenamiento de las últimas mediciones Este medidor de presión arterial automáticamente almacena los valores de las últimas 99 medidas de cada usuario. Al apretar el botón de MEMORIA, el promedio de los valores en memoria aparece en la pantalla con un símbolo A y (MR) en la esquina inferior izquierda. Presione el botón de MEMORIA nuevamente, los valores de la última lectura (MR99) y los previos a estos (MR98, MR97, MR1) pueden ser enseñados uno luego del otro. 5.9.Cancelación en la memoria de todas las medidas Atención! Antes de borrar todas las lecturas almacenadas en la memoria, asegúrese de que no va a necesitar hacer referencia a ellas más adelante. Es prudente guardar un registro escrito que puede proporcionar una información adicional cuando visite a su médico. 36
38 Para borrar todas las lecturas memorizadas, oprima el botón MEMORIA durante al menos 7 segundos. La pantalla mostrará el símbolo "CL" y se escucharán 3 pitidos cortos para indicar que se han borrado las medidas memorizadas Programa Analizador de Presión Arterial Esta unidad se puede utilizar en conección con su computadora personal para el Programa Analizador de Presión Arterial. Su computadora tiene la capacidad de monitorial 80 pacientes, cada una con la capacidad de 1000 lecturas. (Nota: El sobre uso disminuirá la eficiencia del sistema).los datos en la memoria pueden ser Requisitos del sistema para el Programa Analizador de la Presion Arterial: Windows XP, Vista, 7 CD-ROM Drive Mínimo 256MB RAM USB versión 1.0 en adelante Monitor de la presion arterial de Microlife con la conexión de USB transferidos a la computadora conectando ambos dispositivos por medio de un cable. 6.1 Instalación y Transmisión de Datos a) Inserte el disco CD en el compartimiento correspondiente de su computadora. La instalación comenzará automáticamente. De lo contrario presione el ícono SETUP.EXE. b) Conecte el monitor a su computador por medio del cable PC. Tres barras horizontales aparecerán en la pantalla por un lapso de 3 segundos. c) Las barras comenzarán a parpadear indicando que la conección entre ambos dispositivos se ha establecido exitósamente. Siempre y cuando el cable se halle conectado, las barras continuarán viendose en forma intermitente y los botones desabilitados Durante la conección, el dispositivo está completamente controlado por la computadora. Por favor utilice la opción Help del programa analyzador para instrucciones adicionales o llame al número
39 7. Como fijar el recordatorio para la medición Este dispositivo le permite fijar dos horarios de alarma. Este rasgo es muy util para recordarle que tiene que tomar su medicina o medirse la presion cada dia a la misma hora. 1. Para fijar la hora de la alarma, presione el botón de la hora (el instrumento debió de ser apagado previamente) e inmediatamente presione el botón M manteniendo los dos botones presionados hasta que el símbolo de la campana aparezca en la pantalla. Luego suelte los dos botones. El número 1 en forma intermitente indica que se puede fijar la primera alarma. 2. Presione el botón de la hora para fijar el horario las horas se verán centelleando y presionando el botón M le permitirá fijar la hora. Para confirmar, presione el botón de la hora. 3. Los minutos ahora se verán centelleando. Los minutos pueden ser fijados usando el botón M. Para confirmar, presione el botón de la hora de nuevo. 4. El símbolo de la campana se verá ahora centelleando. Utilice el botón M para selecionar si la alarma será activada (campana) o desactivada (campana cruzada). Para confirmar, presione el botón de la hora de nuevo. Para fijar un segundo horario de alarma, proceda de la misma manera pero si el número 1 centellea, presione el botón M para seleccionar el número 2 y confirme con el botón de la hora. Cuando se ha fijado un horario de alarma se verá la indicación por medio del símbolo de una campana TIME PM 38
40 La alarma sonará a la hora establecida todos los días. Para apagar la alarma cuando está sonando, presione el botón On/off. Para apagar la alarma permanentemente, proceda da la misma manera pero seleccione el símbolo de la campana cruzada. El símbolo desaparecerá de la pantalla. La alarma deberá ser fijada cada vez que se reemplacen las baterías. 8. Indicador de batería Baterías casi completamente descargadas. Cuando las baterías llegana estar aproximadamente 75% discargadar, se podrá observar el siguiente símbolo centelleando en la pantalla al momento de encender la unidad. A pesar de que el instrumento continuará tomando las mediciones correctamente, usted ya debería reemplazar las baterías. Baterías complétamente descargadas. Cuando las baterías están completamente descargadas, se podrá observar el símbolo intermitente de la batería tan pronto como usted encienda el dispositivo. Usted no podrá tomar ninguna otra medición, las baterías deben ser reemplazadas inmediatamente. 1. Abra el compartimiento de la batería en la parte posterior del dispositivo presionando en los dos extremos del compartimiento y levantándolo. 2. Reemplace las baterías, asegúrece de que estén puestas correctamente conforme a la indicación del compartimiento. 3. La memoria retendrá todos los valores aunque el día y la hora (posiblemente las alarmas) deberan ser nuevamente fijados. Los números que indican el año centellearán automáticamente luego de que las baterías sean reemplazadas. 4. Para fijar la fecha y la hora, siga el procedimiento descrito en
41 Cuales baterías y cual procedimiento? Utilice 2 baterías nuevas de larga vida 1.5V AAA. No utilice baterías que han expirado. Si el dispositivo no será utilizado por un largo periodo, es aconsejable que remueva las baterías. Utilización de baterías recargables Este instrumento puede operar con baterías recargables. Por favor utilice únicamente el tipo NiMH Si aparece el símbolo de la batería descargada ( ), las mismas deben ser removidas y recargadas! No deben permanecer dentro del dispositivo porque se pueden dañar (se descargarán completamente como resultado del poco uso de las mismas aún estando el dispositivo apagado. Las baterías no se deben descargar dentro de la unidad! Si usted no tiene la intencion de utilizar el monitor por un período de una semana o más, siempre remueva las baterías que son recargables. Recargue las baterías en el cargador externo y siga las indicaciones sobre el cuidado y durabilidad. 9. Mensajes de error/funcionamiento defectuoso Si se produce un error durante una medición, se interrumpe la medición y se visualiza el correspondiente código de error (ejemplo: error nº 2). Error no. ERR 1 ERR 2 ERR 3 Posible(s) causa(s) No se ha detectado pulso. El resultado de la medición se ve influido por impulsos de presión no naturales. Razón: se ha movido el brazo durante la medición (artefacto). El inflado de la muñequera tarda demasiado. La muñe quera no esta colocada correctamente. 40
42 ERR 5 Las lecturas medidas indican una diferencia inacept able entre las presiones sistólicas y diastólicas. Tome otra lectura observando cuidadosamente las instrucciones. Póngase en contac to con su médico si sigue obteniendo lecturas no usuales. HI La presión del brazalete es muy alta. Relájese por 5 minutos y repita el procedimiento.* LO El pulso es muy bajo (menos de 40). Repita el procedimiento.* * Si este o algún otro problema ocurre repetidamente, por favor consulte con su médico. Otros posibles funcionamientos defectuosos y su solución Si aparecen problemas al usar el aparato, deben comprobarse los siguientes puntos y, si es necesario, deben tomarse las medidas correspondientes: Funcionamiento defectuoso Solución La pantalla permanece en blanco al conectar 1. Compruebe que la polaridad de el aparato a pesar de que las pilas están las pilas sea la correcta y si es necesario insértelas colocadas correctamente 2. Si la visualización es inusual, reinstale las pilas o sustitúyalas. El aparato falla con frecuencia al medir la 1. Compruebe la posición de la muñequera. tensión arterial; o los valores medidos son 2. Vuelva a medir la tensión arterial otra vez en demasiado bajos (demasiado altos). condiciones de reposo y tranquilidad, observando los detalles indicados en el punto 5. Cada medición produce un valor diferente 1. Lea la siguiente información y los puntos aunque el instrumento funciona normalmente listados bajo "Fuentes comunes de error". y los valores mostrados son normales. Repita la medición. Tenga en cuenta: La tensión arterial fluctúa continuamente, de forma que las mediciones sucesivas mostrarán cierta variabilidad. 41
1) Install the included batteries into your blood pressure monitor (BPM).
 Install the included batteries into your blood pressure monitor (BPM).") DELUXE CONNECTED BLOOD PRESSURE ONITOR UA-651BLE 1) Install the included batteries into your blood pressure monitor (BP). 2) Insert the air connector plug into the air socket. 3) Download the free A&D
DELUXE CONNECTED BLOOD PRESSURE ONITOR UA-651BLE 1) Install the included batteries into your blood pressure monitor (BP). 2) Insert the air connector plug into the air socket. 3) Download the free A&D
Sierra Security System
 Using Your SpreadNet Accessories With Your Sierra Security System Uso de Sus Accesorios SpreadNet Con Su Sistema de Seguridad Sierra SN990-KEYPAD SN961-KEYFOB SN991-REMOTE 1 SN990-KEYPAD The SN990-KEYPAD
BAI-220 AURICULAR INALÁMBRICO
 BAI-220 AURICULAR INALÁMBRICO Manual de usuario ESPECIFICACIONES TÉCNICAS EMISOR Frecuencia: 86 ± 0.5 MHz Modulación: FM Distancia de emisión: 30 m. Recepción de cualquier equipo de audio y video con salida
High Blood Pressure. Taking Your Blood Pressure. Normal Blood Pressure. High Blood Pressure
 High Blood Pressure Blood pressure is the force put on the walls of the blood vessels with each heartbeat. Blood pressure helps move blood through your body. Taking Your Blood Pressure Blood pressure is
SFD-200-N-B DESPERTADOR-PROYECTOR-CON VOZ. Manual de instrucciones
 SFD-200-N-B DESPERTADOR-PROYECTOR-CON VOZ Manual de instrucciones Funciones: - Proyección de la hora - Proyección controlada por sonidos y vibraciones (palmada, etc.) - Pantalla retroiluminada azul - Hora
Manual de Instrucciones
 BSPORT-10-N-R-V-A PULSERA DEPORTIVA-BLUETOOTH Manual de Instrucciones FUNCIONES Y CONTROLES Pulsar el botón de encendido durante 3 segundos para encender el dispositivo. BATERÍA El dispositivo cuenta con
Agustiniano Ciudad Salitre School Computer Science Support Guide - 2015 Second grade First term
 Agustiniano Ciudad Salitre School Computer Science Support Guide - 2015 Second grade First term UNIDAD TEMATICA: INTERFAZ DE WINDOWS LOGRO: Reconoce la interfaz de Windows para ubicar y acceder a los programas,
ROCK N STEREO SOUND DESK
 Read and save these instructions ROCK N STEREO SOUND DESK RTA-M1102-BK INSTRUCTIONS TABLE OF CONTENTS PACKAGE INCLUDES Package Includes... 2 Specifications... 2 Product Parts List... 3 1 2 3 Product Details...
ENKVM-USBB. 2-Port USB KVM switch with Easy Switch and Cable. User Guide
 ENKVM-USBB 2-Port USB KVM switch with Easy Switch and Cable User Guide i Package Contents 1 ENKVM-USBB 2-Port USB KVM Switch with Easy Switch and Cable 1 User Guide Requirements Console A VGA, SVGA, XGA,
Quick Installation Guide TU2-DVIV H/W: V1.0R
 Quick Installation Guide TU2-DVIV H/W: V1.0R Table Table of Contents of Contents Español... 1. Antes de iniciar... 2. Cómo se instala... 1 1 3 Troubleshooting... 6 Version 06.27.2008 1. Antes de iniciar
PREMIER WRIST BLOOD PRESSURE MONITOR UB ) Install the batteries to your blood pressure monitor. LR03 or AAA batteries only.
 Install the batteries to your blood pressure monitor. LR03 or AAA batteries only.") PREMIER WRIST BLOOD PRESSURE MONITOR UB-543 1) Install the batteries to your blood pressure monitor. LR03 or AAA batteries only Battery cover Used batteries New batteries 2) (Optional) Set the Built-in
PREMIER WRIST BLOOD PRESSURE MONITOR UB-543 1) Install the batteries to your blood pressure monitor. LR03 or AAA batteries only Battery cover Used batteries New batteries 2) (Optional) Set the Built-in
Creating your Single Sign-On Account for the PowerSchool Parent Portal
 Creating your Single Sign-On Account for the PowerSchool Parent Portal Welcome to the Parent Single Sign-On. What does that mean? Parent Single Sign-On offers a number of benefits, including access to
MANUAL DE INSTRUCCIONES CAJA FUERTE CF-4333
 MANUAL DE INSTRUCCIONES CAJA FUERTE CF-4333 ESTIMADO CLIENTE Con el fin de que obtenga el mayor desempeño de su producto, por favor lea este manual de instrucciones cuidadosamente antes de comenzar a utilizarlo,
MANUAL EASYCHAIR. A) Ingresar su nombre de usuario y password, si ya tiene una cuenta registrada Ó
 Ingresar su nombre de usuario y password, si ya tiene una cuenta registrada Ó") MANUAL EASYCHAIR La URL para enviar su propuesta a la convocatoria es: https://easychair.org/conferences/?conf=genconciencia2015 Donde aparece la siguiente pantalla: Se encuentran dos opciones: A) Ingresar
MANUAL EASYCHAIR La URL para enviar su propuesta a la convocatoria es: https://easychair.org/conferences/?conf=genconciencia2015 Donde aparece la siguiente pantalla: Se encuentran dos opciones: A) Ingresar
1. Sign in to the website, http://www.asisonline.org / Iniciar sesión en el sitio, http://www.asisonline.org
 Steps to Download Standards & Guidelines from the ASIS International Website / Pasos para Descargar los Standards & Guidelines de la Página Web de ASIS International 1. Sign in to the website, http://www.asisonline.org
Conditioning Exercises: Standing
 Conditioning Exercises: Standing Do all these exercises slowly. Do not hold your breath during these exercises. If unusual pain occurs in your joints or muscles while you are exercising, do not continue
INSTRUCCIONES REGISTRADOR PL-125-T2USB
 INSTRUCCIONES REGISTRADOR PL-125-T2USB Botones: 1. Puerto de sensores. 2. Temperatura 1 y temperatura 2 3. Display 4. Medidas en Cº, Fº 5. Botón de grabación. 6. Conexión USB 7. Retención de lectura. 8.
GUÍA DE USUARIO PC-331117. Bienvenidos al mundo Perfect Choice. Antes de comenzar a usar el producto es importante que leas esta guía.
 GUÍA DE USUARIO PC-331117 Bienvenidos al mundo Perfect Choice Antes de comenzar a usar el producto es importante que leas esta guía. Conexión 1. Inserta el transmisor en el conector para encendedor de
Northwestern University, Feinberg School of Medicine
 Improving Rates of Repeat Colorectal Cancer Screening Appendix Northwestern University, Feinberg School of Medicine Contents Patient Letter Included with Mailed FIT... 3 Automated Phone Call... 4 Automated
SpecWare 8. Spectrum. Professional. Guía Rápida de Inicio. Technologies, Inc.
 SpecWare 8 Professional Guía Rápida de Inicio Spectrum Technologies, Inc. Tabla de Contenido Instalación 3 Actualización de Versiones Anteriores de SpecWare 3 Directorio SpecWare 3 Parámetros Predeterminados
Crear alarma GATE. Aparecerá una ventana emergente para crear alarma.
 Crear alarma GATE Para crear una alarma, accede a través del menú principal de myhome.wattio.com a Seguridad, posteriormente arriba a la derecha haz click en Alarmas. En esta pantalla, en el menú izquierdo,
High Blood Pressure in Pregnancy
 High Blood Pressure in Pregnancy Blood pressure is the force put on the walls of your blood vessels as blood travels through your body. Blood pressure helps pump blood to your body. Taking Your Blood Pressure
Live Your Best For Less.
 BP3NP1-3ERL-0813-2 Live Your Best For Less. Wrist Blood Pressure Monitor Instruction Manual Table of contents 1. Introduction 1.1. Features of the Wrist Blood Pressure Monitor 1.2. Inflation Mode Technology
Sistemas de impresión y tamaños mínimos Printing Systems and minimum sizes
 Sistemas de impresión y tamaños mínimos Printing Systems and minimum sizes Para la reproducción del Logotipo, deberán seguirse los lineamientos que se presentan a continuación y que servirán como guía
Lump Sum Final Check Contribution to Deferred Compensation
 Memo To: ERF Members The Employees Retirement Fund has been asked by Deferred Compensation to provide everyone that has signed up to retire with the attached information. Please read the information from
Asistente Liberador de Espacio. Manual de Usuario
 1 Manual de Usuario 2 Introducción...3 Qué es el?...3 Propósito de la aplicación...3 Precauciones y recomendaciones al momento de usar el Asistente...3 Cuándo se abre o cierra el Asistente?...4 Conceptos
Improving Rates of Colorectal Cancer Screening Among Never Screened Individuals
 Improving Rates of Colorectal Cancer Screening Among Never Screened Individuals Northwestern University, Feinberg School of Medicine Contents Patient Letter Included with Mailed FIT... 3 Automated Phone
Guía de instalación rápida TEG-160WS TEG-240WS
 Guía de instalación rápida TEG-160WS TEG-240WS C2 Table of Contents Español 1 1. Antes de iniciar 1 2. Instalación del Hardware 2 3. Herramienta de gestión Web 3 Troubleshooting 6 Version 02.02.2010 1.
manual de servicio nissan murano z51
 manual de servicio nissan murano z51 Reference Manual To understand featuring to use and how to totally exploit manual de servicio nissan murano z51 to your great advantage, there are several sources of
KMR SCA-05 Mounting Instructions Instrucción de Montaje Instruções de Montagem 0899.4897
 0899.4897 KMR SCA-05 Mounting Instructions Instrucción de Montaje Instruções de Montagem 0899.4897 KMR SCA-05 Mounting Instructions Instrucción de Montaje Instruções de Montagem The KMR SCA-05 kit is a
FCC Information : Warning: RF warning statement:
 FCC Information : This device complies with Part 15 of the FCC Rules. Operation is subject to the following two conditions: (1) This device may not cause harmful interference, and (2) This device must
Mini Cámara espía Coche Full HD Visión Nocturna y Detector
 Mini Cámara espía Coche Full HD Visión Nocturna y Detector NOTA DEL FABRICANTE: Gracias por elegir nuestros productos. Por favor, lea atentamente el manual de usuario antes de utilizar el producto y asegúrese
Matemáticas Muestra Cuadernillo de Examen
 Matemáticas Muestra Cuadernillo de Examen Papel-Lápiz Formato Estudiante Español Versión, Grados 3-5 Mathematics Sample Test Booklet Paper-Pencil Format Student Spanish Version, Grades 3 5 Este cuadernillo
La Video conferencia con Live Meeting
 Página 1 INSTRUCCIONES PARA TRABAJAR CON LIVE MEETING.- PREVIO. Para que tenga sentido la videoconferencia es conveniente que tengamos sonido (no suele ser problemático) y que tengamos vídeo. Si el ordenador
PR70150 - PASTILLERO CON ALARMA
 PR70150 - PASTILLERO CON ALARMA Este pastillero le ayuda a organizar la toma diaria de sus pastillas, ayudándole a recordar las tomas con una alarma y/o vibración hasta 5 veces al día. No es necesario
Manual de Usuario de d>busca Windows. versión 1.0
 Manual de Usuario de d>busca Windows Tabla de Contenidos Instalación...3 Requisitos de Hardware y Software.... 3 Proceso de instalación.... 3 Antes de Comenzar...5 GPS Interno... 5 Bluetooth en su terminal...
DataMAX pa r a PS3. Manual del Usuario V1.0
 DataMAX pa r a PS3 Manual del Usuario V1.0 IMPORTANTE! Debe seguir los pasos de este manual antes de que pueda usar tarjetas de memoria de 8, 16, 32 o 64MB de otras compañías en su PlayStation 3. Índice
Quick Installation Guide TU-S9
 Quick Installation Guide TU-S9 Table of of Contents Contents Español... 1 1. Antes de iniciar... 1 2. Instalación del Hardware... 2 Troubleshooting... 5 Version 11.08.2007 1. Antes de iniciar Contenidos
OSCILLATION 512 (LM 3R)
") Application Note The following application note allows to locate the LM series devices (LM3E, LM3R, LM4 and LM5) within network and check its connection information: Name, MAC, dynamic IP address and static
Application Note The following application note allows to locate the LM series devices (LM3E, LM3R, LM4 and LM5) within network and check its connection information: Name, MAC, dynamic IP address and static
TOUCH MATH. Students will only use Touch Math on math facts that are not memorized.
 TOUCH MATH What is it and why is my child learning this? Memorizing math facts is an important skill for students to learn. Some students have difficulty memorizing these facts, even though they are doing
MANUAL DE USUARIO UPS LINEA INTERACTIVA EAST EA200 LED-LCD 650 1500 VA
 MANUAL DE USUARIO UPS LINEA INTERACTIVA EAST EA200 LED-LCD 650 1500 VA 1. Observaciones de seguridad (Con el fin de mantener la seguridad en el uso de los UPS, por favor, cumplir con lo siguiente :) Por
Guía de instalación rápida TBW-107UB 1.01
 Guía de instalación rápida TBW-107UB 1.01 Table of Contents Español 1 1. Antes de iniciar 1 2. Cómo se instala 2 3. Configuración del adaptador Bluetooth 5 Troubleshooting 7 Version 02.25.2010 1. Antes
Guía de instalación rápida TE100-P1U
 Guía de instalación rápida TE100-P1U V2 Table of Contents Español 1 1. Antes de iniciar 1 2. Cómo se instala 2 3. Configuración del servidor de impresora 3 4. Añadir la impresora a su PC 5 Troubleshooting
Quick Installation Guide Internet Setup
 CBR-970 Wireless-N Broadband Router www.cnet.com.tw Established in California, U.S.A. since 1987 Quick Installation Guide Internet Setup What s included in the box CBR-970 Wireless N Broadband Router Quick
T R A N S TECHNICAL SPECIFICATIONS:
 A R P O L T R A N S TECHNICAL SPECIFICATIONS: 1, or - look casing Specially designed rubber gasket (various models) Steps of up tc 8 mm between outside diameters Working pressures up to bar F l e x i b
Setting Up an Apple ID for your Student
 Setting Up an Apple ID for your Student You will receive an email from Apple with the subject heading of AppleID for Students Parent/Guardian Information Open the email. Look for two important items in
Video Server. Quick Installation Guide. English, Español
 Video Server Quick Installation Guide English, Español 2 Video Server NOTES Quick Installation Guide 3 Video Server Quick Installation Guide To get your Video Server up and running on an Ethernet network,
Creando Cuentas Nuevas para Padres / Alumnos en el
 Creando Cuentas Nuevas para Padres / Alumnos en el Portal de Internet Aeries de YCJUSD El portal de Internet Aeries proporciona una manera segura para acceder a información sobre la asistencia y el progreso
What is family health history?
 Family Health History Project Pre-Survey What is family health history? Family health history is information about diseases that run in your family, as well as the eating habits, activities, and environments
DELUXE ADVANCED AUTOMATIC
 by DELUXE ADVANCED AUTOMATIC Blood Pressure Monitor Model #BP3MC1-PC ID #344534 (3MC1-PC/A100+) Instruction Manual Instrucciones de Uso Questions? Preguntas? 1-866-464-6184 PLEASE NOTE: THIS MEDICAL INSTRUMENT
Guía de instalación rápida TU2-HDMI 1.01
 Guía de instalación rápida TU2-HDMI 1.01 Table of Contents Español 1 1. Antes de iniciar 1 2. Cómo se instala 2 3. Configuración de los parámetros de imagen 4 Troubleshooting 6 Version 02.16.2011 1. Antes
LECTOR PROXIMIDAD 4K AUTONOMO STANDALONE 4K PROXIMITY READER REF: 507222 HI / 255 01/14
 LECTO POXIMIDAD 4K AUTONOMO STANDALONE 4K POXIMITY EADE EF: 507222 HI / 255 01/14 LECTO POXIMIDAD 4K AUTONOMO egistro de la maestra y para suprimir 1. Apagar el lector 2. Poner el dipswitch nº1 en posición
I NTRODUCCIÓN 1. ORDENADOR E INFORMÁTICA
 I. INTRODUCCIÓN 1. ORDENADOR E INFORMÁTICA 1.1. Informática Informática (Información Automática) es la ciencia y la técnica del tratamiento automatizado de la información mediante el uso de ordenadores.
GARAGE DOOR OPENER CONNECTIVITY HUB QUICK START GUIDE
 GARAGE DOOR OPENER CONNECTIVITY HUB QUICK START GUIDE Thank you for purchasing a Craftsman garage door opener Connectivity Hub enabled with AssureLink technology. Once you have created your account and
Manual de Instrucciones Termohigrómetro Digital CM-DT172
 Manual de Instrucciones Termohigrómetro Digital CM-DT172 CM-DT172_Manual_NNNNN Página 1 de 10 ÍNDICE Calzada del Valle 400, Ote. Oficina No.1205 INTRODUCCIÓN... 3 FUNCIONES Y ESPECIFICACIONES TÉCNICAS...
01 ipad CU-SP2 (AED & DESFIBRILADOR MANUAL)
") a. ipad CU-SP2 (Desfibrilador AED & Desfibrilador MANUAL) El ipad CU-SP2 es más manejable e incorpora más funciones que nuestros anteriores modelos el Paramedic CU-ER1 y CU-ER2, siempre con la tecnología
a. ipad CU-SP2 (Desfibrilador AED & Desfibrilador MANUAL) El ipad CU-SP2 es más manejable e incorpora más funciones que nuestros anteriores modelos el Paramedic CU-ER1 y CU-ER2, siempre con la tecnología
MODELO: 301 RESPALDO DE TARJETA SIM
 MODELO: 301 RESPALDO DE TARJETA SIM Con establecimiento de password y visión de la agenda telefónica MANUAL DE OPERACIÓN INTRODUCCION El modelo 301 es uno de nuestros nuevos dispositivos para respaldar
Save Money 2-up Single Doorhanger Set OH payday advance edition, 4 different doorhangers, Spanish
 Save Money 2-up Single Doorhanger Set OH payday advance edition, 4 different doorhangers, Spanish PACKAGE CONTENTS How to Customize 4-color doorhanger, Editable PDF (50% OFF first loan) 1-color (black)
TSQM (Version 1.4) Treatment Satisfaction Questionnaire for Medication
 Treatment Satisfaction Questionnaire for Medication") TSQM (Version 1.4) Treatment Satisfaction Questionnaire for Medication Instructions: Please take some time to think about your level of satisfaction or dissatisfaction with the medication you are taking
TSQM (Version 1.4) Treatment Satisfaction Questionnaire for Medication Instructions: Please take some time to think about your level of satisfaction or dissatisfaction with the medication you are taking
MANUAL DE INSTRUCCIONES
 MANUAL DE INSTRUCCIONES GUESS WATCHES 1 MUJER MUJER 2 MUJER Enhorabuena por la compra de su nuevo reloj GUESS. Éste ha sido desarrollado con una avanzada tecnología electrónica y se ha fabricado con los
Cómo comprar en la tienda en línea de UDP y cómo inscribirse a los módulos UDP
 Cómo comprar en la tienda en línea de UDP y cómo inscribirse a los módulos UDP Sistema de registro y pago Este sistema está dividido en dos etapas diferentes*. Por favor, haga clic en la liga de la etapa
1.0 Información general
 1.0 Información general Enhorabuena! Ha adquirido Ud. un pulsómetro HiTrax TIP. Con él puede medir el ritmo cardiaco y ajustar una zona de entrenamiento con los límites superior e inferior, según su plan
Manual del usuario. Higro-Termómetro Digital EasyVision. Modelo EA20. Introducción
 Manual del usuario Higro-Termómetro Digital EasyVision Modelo EA20 Introducción Felicitaciones por su compra del Higro-Termómetro Digital EasyVision de Extech. Este dispositivo mide humedad, temperatura,
Manual del usuario SoundEarV Medidor de ruido para ordenador personal. www.svantek.es
 Manual del usuario SoundEarV Medidor de ruido para ordenador personal www.svantek.es Manual del usuario SoundEarV Felicitaciones por la adquisición del medidor SoundEarV. SoundEarV Mide los niveles de
Learning Masters. Early: Force and Motion
 Learning Masters Early: Force and Motion WhatILearned What important things did you learn in this theme? I learned that I learned that I learned that 22 Force and Motion Learning Masters How I Learned
Steps to Understand Your Child s Behavior. Customizing the Flyer
 Steps to Understand Your Child s Behavior Customizing the Flyer Hello! Here is the PDF Form Template for use in advertising Steps to Understanding Your Child s Behavior (HDS Behavior Level 1B). Because
Some examples. I wash my clothes, I wash the dishes, I wash the car, I wash the windows. I wash my hands, I wash my hair, I wash my face.
 Reflexive verbs In this presentation, we are going to look at a special group of verbs called reflexives. Let s start out by thinking of the English verb wash. List several things that you can wash. Some
Nitroglycerin. If you use tablets:
 Nitroglycerin Nitroglycerin is a medicine used to treat chest pain called angina. Take nitroglycerin as directed by your doctor. If you are pregnant or breastfeeding, talk to your doctor before using this
24-Port 10/100Mbps Web Smart PoE Switch with 4 Gigabit Ports and 2 Mini-GBIC Slots TPE-224WS
 24-Port 10/100Mbps Web Smart PoE Switch with 4 Gigabit Ports and 2 Mini-GBIC Slots TPE-224WS ŸGuía de instalación rápida (1) ŸTroubleshooting (3) 1.12 1. Antes de iniciar Contenidos del Paquete ŸTPE-224WS
MANUAL DE INSTALACIÓN Y MANUAL DE USUARIO
 MANUAL DE INSTALACIÓN Y MANUAL DE USUARIO Mando por cable KC-01.2 Lea detenidamente este manual antes de utilizar el aire acondicionado y guárdelo para futuras consultas. Versión 1.0 ÍNDICE 1. Precauciones
 Control and Functions Guia de Funcionamiento Front View Configuración PAN/TILT 9 1 11 1 13 "Assign" 1 PROGRAM MUSIC/BKC MIDI/REC AUTO/DEL TAP/DISP 15~ BLACKOUT PAN TILT ASSIGN REVERSE MODE TILT PAN FINE
GUÍA RÁPIDA DE. Instalación de Nokia Connectivity Cable Drivers
 GUÍA RÁPIDA DE Instalación de Nokia Connectivity Cable Drivers Contenido 1. Introducción...1 2. Requisitos...1 3. Instalación de Nokia Connectivity Cable Drivers...2 3.1 Antes de la instalación...2 3.2
Reloj Espía Profesional Máxima Calidad Sensor Visión Nocturna
 Reloj Espía Profesional Máxima Calidad Sensor Visión Nocturna Manual de usuario 1. Prefacio... 1 2. Instrucciones de uso... 1 Antes de usar, leer la siguiente información... 1 Partes funcionales del aparato...
M DJ SERIES. User Manual/Manual de Uso
 M DJ SERIES User Manual/Manual de Uso User Manual Installation 1. In order to enhance the cast function of listening to space sound, it is appropriate to set the center part of tweeter right to the position
Carlos Martínez B. Hidrostática 1. Carlos Javier Bernal Avila. Lunes, 26 de octubre de 2009
 ESCUELA SUPERIOR POLITÉCNICA DEL LITORAL INSTITUTO DE CIENCIAS FÍSICAS LABORATORIO DE FISICA B Profesor: Carlos Martínez B. Título de la práctica: Hidrostática 1 Nombre: Carlos Javier Bernal Avila Grupo
150Mbps Micro Wireless N USB Adapter
 150Mbps Micro Wireless N USB Adapter TEW-648UBM ŸGuía de instalación rápida (1) ŸTroubleshooting (5) 1.11 1. Antes de iniciar Contenidos del paquete ŸTEW-648UBM ŸCD-ROM (herramienta y guía del usuario)
Guía de instalación rápida TFM-561U
 Guía de instalación rápida TFM-561U V1 Table of Contents Español 1 1. Antes de iniciar 1 2. Cómo se instala 2 Troubleshooting 5 Version 08.25.2010 1. Antes de iniciar Contenidos del paquete TFM-561U CD-ROM
Puede pagar facturas y gastos periódicos como el alquiler, el gas, la electricidad, el agua y el teléfono y también otros gastos del hogar.
 SPANISH Centrepay Qué es Centrepay? Centrepay es la manera sencilla de pagar sus facturas y gastos. Centrepay es un servicio de pago de facturas voluntario y gratuito para clientes de Centrelink. Utilice
Solartec SCCOM Manual de Instrucciones
 Solartec SCCOM Manual de Instrucciones Contenido 1. Requisitos del Sistema... 3 2. Configurando el Menú del Controlador de Carga del Solartec SC... 4 3. Instalando los Controladores para el Solartec SCU
- 1 - ÍNDICE. Haga clic en Instalar Software. PASO 3: Primero le hará falta elegir su lengua en esta pantalla:
 GUÍA DE INSTALACIÓN PASO A PASO DEL SOFTWARE PARA WINDOWS VISTA Número 3.2 Gracias por haber comprado este dispositivo Roadpilot. Esta guía de instalación le ayudará a instalar el software y los controladores
EP-2906 Manual de instalación
 EP-2906 Manual de instalación Con el botón situado a la izquierda se configura en el modo de cliente y de la derecha es el modo de Punto de acceso AP (nota: El USB es sólo para la función de fuente de
Preguntas frecuentes T920
 Preguntas frecuentes T920 1.- El navegador no enciende 2.- La pantalla no enciende 3.- La pantalla responde con lentitud 4.- La pantalla se congela 5.- La pantalla se lee con dificultad 6.- Respuesta imprecisa
El Colesterol y su Nuevo Órgano. Un recurso para la salud cardiovascular después de un trasplante de órgano. Compartir. Informar. Inspirar.
 El Colesterol y su Nuevo Órgano Un recurso para la salud cardiovascular después de un trasplante de órgano Compartir. Informar. Inspirar. Comprender el colesterol en sangre Los términos colesterol en sangre
5. Solución de Problemas
 FLUID COMPONENTS INTL 5. Solución de Problemas Cuidado: Solo personal calificado debe intentar probar este instrumento. El operador asume toda la responsabilidad de emplear las practicas seguras mientras
Instrucciones de uso Termo higrómetro para punto de rocío TG190
 EQUIPOS DE PRECISIÓN GIS IBERICA S.L Avda. de España nº11, 2ªC Cáceres 10004 ; Tlfe 927-224600 Tlfe-Fax 927-212207 gisiberica@gisiberica.com www.gisiberica.com Instrucciones de uso Termo higrómetro para
VSD821 BINI CAM WINNER. Manual de uso INDICE
 VSD821 BINI CAM WINNER Manual de uso INDICE 1. Introducción 1.1 Binóculo VSD821 1.2 Contenido 1.3 Nombres de las partes 1.4 Display LCD 1.5 Especificaciones 2. Funcionamiento del VSD821 2.1 Encendido On/Off
Software TRENDnetVIEW Pro. Guía de instalación rápida de TRENDnetVIEW Pro (1)
") Software TRENDnetVIEW Pro Guía de instalación rápida de TRENDnetVIEW Pro (1) TRENDnetVIEW Pro/10.08.2013 Índice Requisitos del software de gestión TRENDnetVIEW Pro... 19 Instalación de TRENDnetVIEW Pro...
Software TRENDnetVIEW Pro Guía de instalación rápida de TRENDnetVIEW Pro (1) TRENDnetVIEW Pro/10.08.2013 Índice Requisitos del software de gestión TRENDnetVIEW Pro... 19 Instalación de TRENDnetVIEW Pro...
Volatilidad: Noviembre 2010 Futuros Frijol de Soya
 Observaciones Junio 09, 2010 1. La volatilidad tiene una tendencia a aumentar de Junio a Julio. 2. Este reporte sugiere que se debería considerar la implementación de estrategias largas con opciones en
Dolores de cabeza Trabaje con su doctor para evitar las visitas a la Sala de Emergencia
 Headaches, Working with your Doctor to Avoid the Emergency Room Dolores de cabeza Trabaje con su doctor para evitar las visitas a la Sala de Emergencia Conozca a su equipo de cuidados para los dolores
Uso Pretendido: Haciendo Productos Ordinarios de Manera Extraordinaria
 DETECTOR DE ALIENTO ALCOHOLICO Alc-Alert Modelos BT5500 & BT5300 63-1147 Manual del Usuario Favor de leerlo antes de utilizar el equipo ADVERTENCIA/ ACUERDO: Debido a las variables involucradas en el registro
GUÍA RÁPIDA DE. Instalación de los Controladores para cable de conectividad Nokia
 GUÍA RÁPIDA DE Instalación de los Controladores para cable de conectividad Nokia Contenido 1. Introducción...1 2. Requisitos...1 3. Instalación De Los Controladores Para Cable De Conectividad Nokia...2
Table of Contents. Español... 1. Antes de iniciar... 2. Cómo conectar... 3. Cómo utilizar el conmutador... Troubleshooting... Version 10.13.
 Quick Installation Guide TE100-S800i TE100-S810Fi Table of Contents Español... 1. Antes de iniciar... 2. Cómo conectar... 3. Cómo utilizar el conmutador... Troubleshooting... 1 1 2 3 5 Version 10.13.05
TUTORIAL: Cómo puedo instalar el Renault Media Nav Toolbox? TUTORIAL: Cómo puedo crear una "huella digital" del dispositivo en un dispositivo de
 TUTORIAL: Cómo puedo instalar el Renault Media Nav Toolbox? TUTORIAL: Cómo puedo crear una "huella digital" del dispositivo en un dispositivo de almacenamiento USB? TUTORIAL: Cómo puedo empezar a utilizar
CUESTIONARIO Encuesta de prevalencia de autismo. Instituto de Estadísticas de Puerto Rico
 CUESTIONARIO Encuesta de prevalencia de autismo 17 de diciembre de 2010 Cuestionario Trasfondo Este documento contiene el cuestionario de la nueva Encuesta de prevalencia de autismo y trastorno del espectro
Ultimate Blood Pressure Monitor with Irregular Heartbeat Detection, Microlife Averaging Mode and PC Link Blood Pressure Analyzer
 Ultimate Blood Pressure Monitor with Irregular Heartbeat Detection, Microlife Averaging Mode and PC Link Blood Pressure Analyzer Instruction Booklet for model# BP3MC1-PC US Patent # s 6,485,429 (Irregular
KAISSA Manual Rápido De Usuario. Rev 1.0
 KAISSA Manual Rápido De Usuario Rev 1.0 Ante todo gracias por adquirir el innovador reloj de ajedrez KAISSA, diseñado bajo la filosofía del Diseño Para Todos. KAISSA tiene dos modos de funcionamiento principales
Manual de instrucciones PE108N
 Manual de instrucciones PE108N SPANISH 1 Contenidos: 1. Listo en solo 3 pasos 3 2. Introducción 4 3. Como usar correctamente el podómetro. 5 4. Seleccionando una función(mode): 6 4.1 Reloj (TIME) 6 4.2
Zune 8GB/4GB Start. Iniciar.
 Zune 8GB/4GB Start. Iniciar. SETUP 1 Visit www.zune.net/setup to install the Zune software. 2 When installation is complete, connect your Zune to your PC to start syncing. Your Zune charges whenever
Tarjeta PCI USB 2.0 / FireWire IEEE 1394a
 Tarjeta PCI USB 2.0 / FireWire IEEE 1394a 1 Contenido 1. Instalación del hardware 3 2. Limitaciones 3 3. Instalación de drivers Windows VISTA 4 4. Instalación de drivers Windows XP 5 5. Instalación de
TERMOMED Cl. Uruguay, 11 7º despacho 708 46007 - Valencia ( Valencia ) Tel. / Fax. 96 344 89 31 info@termomed.net www.termomed.net
 Tel. / Fax. 96 344 89 31 info@termomed.net www.termomed.net") PARTE 1: USO DEL HT-3 INTRODUCCIÓN El HT-3 muestra de forma continua por medio del display LCD los registros de temperatura actual, máximos y mínimos. Pueden ser definidos alarmas de máxima y mínima para
PARTE 1: USO DEL HT-3 INTRODUCCIÓN El HT-3 muestra de forma continua por medio del display LCD los registros de temperatura actual, máximos y mínimos. Pueden ser definidos alarmas de máxima y mínima para