5-Device Universal Remote Control with Learning
|
|
|
- Felipe Duarte Alvarado
- hace 7 años
- Vistas:
Transcripción
1 5-Device Universal Remote Control with Learning Control Remoto Universal de 5 Dispositivos con Aprendizaje OARC05G User s Guide Guía del Usuario Contents Installing the Batteries... 2 Care and Maintenance... 2 Setting Up the Remote... 2 Direct code setup... 2 The search method... 3 The Keypad... 4 Code Retrieval... 6 Quick Code Reference... 6 The Learning Feature... 7 Operational Reset... 8 Extra Features... 9 Volume punch through... 9 Macros (Sequence of commands) Troubleshooting Additional Information Limited Lifetime Warranty Contenido Instalación de las Baterías Cuidado y Mantenimiento Cómo Configurar el Control Remoto Configuración a través de la entrada directa de códigos El método de búsqueda El Teclado Recuperación de Códigos Referencia Rápida de Códigos La Función de Aprendizaje Restablecimiento de las Funciones Funciones Adicionales Irrupción de Volumen Macros (Secuencia de comandos) Resolución de Problemas Información Adicional Garantía Limitada Durante la Vida Útil del Producto... 23

2 The OARC05G Universal Remote Control by One For All is a perfect way to simplify home entertainment. It lets you control up to five of your home entertainment devices from a single, easy-to-use remote. Take a minute to watch the mini-dvd that comes with the OARC05G it gives you a tour of the remote s features. Then come back to this manual to set up the remote for your home entertainment system. Installing the Batteries This remote needs 2 new AA alkaline batteries (not included). 1. Remove the battery cover from the back of the remote. 2. Match the batteries to the + and - marks inside the battery case, then insert the batteries. 3 Press the battery cover back into place. Battery Precautions: Do not mix old and new batteries. Do not mix alkaline, standard (carbon-zinc) or rechargeable (nickel-cadmium) batteries. Always remove old, weak or worn-out batteries promptly and recycle or dispose of them in accordance with Local and National Regulations. Care and Maintenance Keep the remote dry. If it gets wet, wipe it dry immediately. Use and store the remote only in normal temperature environments. Handle the remote gently and carefully. Don t drop it. Keep the remote away from dust and dirt. Wipe the remote with a damp cloth occasionally to keep it looking new. Modifying or tampering with the remote s internal components can cause malfunction and invalidate its warranty. Setting up the remote There are two ways to program this remote to control your devices: by entering the code directly or by searching through the codes to find the one that controls your device. Try the Direct code setup first. Direct code setup 1. Find the code for your device in the Code list. Codes are listed by device type and brand name. The most popular code is listed first. Make sure your device is switched on (not on standby). 2. Press the device key on this remote for the device you wish to set up. 3. Press and hold down the SET key until the (power) key blinks twice (the key blinks once, then twice). 2
. 1. Remove the battery cover from the back of the remote. 2. Match the batteries to the + and - marks inside the battery case, then insert the batteries.")
3 4. Enter a five-digit code for your device s brand using the number keys. The (power) key blinks twice. Note: If the (power) key gives one long blink instead of two shorter blinks, you ve entered an invalid code. Try entering a code again. 5. Now, aim this remote at your device and press (power). If your device switches off, the remote is ready to operate your device. 6. Turn your device back on and try all the remote s functions to ensure they are working properly. If the functions do not work properly, repeat steps 1 5 using another code listed for your brand. 7. If your device does not respond, follow steps 1 to 5 with each code listed for your brand. If none of the codes listed for your brand operate your device, or if your brand is not listed at all, try the search method described in the next section. Important notes: If your device does not respond or is not functioning properly with one of the codes, try another code listed under your brand. If your device s original remote control does not have a POWER key, press (play) instead of (power) when setting up your device. Remember to press the correct device key before operating your device. Only one device can be assigned to a device key. If your original remote operates more than one device, you need to set up each device separately. The search method If your device does not respond to this remote after you have tried all the codes listed for your brand, try searching for your code. The Search Method allows you to find the code for your device by scanning through all the codes contained in the remote s memory. The Search Method may also work if your brand is not listed at all. 1. Switch your device on (not on standby). 2. Press the device key on this remote for the device you wish to set up. 3. Press and hold down the SET key until the (power) key blinks twice (the key blinks once, then twice). 4. Press The (power) key blinks twice. 5. Press the number key corresponding to the device you want to program: 0 for cable, satellite, digital TV converter, or video accessories; 1 for a TV; 2 for a DVD player, VCR, or PVR; 3 for an audio component (tuner, amplifier, etc.). 6. Aim this remote at your device. Now press CH+ over and over, until your device turns off (every time you press the CH+ key the remote sends out a power signal from the next code contained in the memory). You may have to press this key many times (up to 150 times) so please be patient. If you skip past a code, you can go to the previous code(s) by pressing the CH- key. Remember to keep pointing the remote at your device while pressing this key. 7. As soon as your device turns off, press the SET key to store the code. Important note: If your device s original remote control does not have a POWER key, press (play) instead of (power) in step 5. 3

4 The Keypad 4
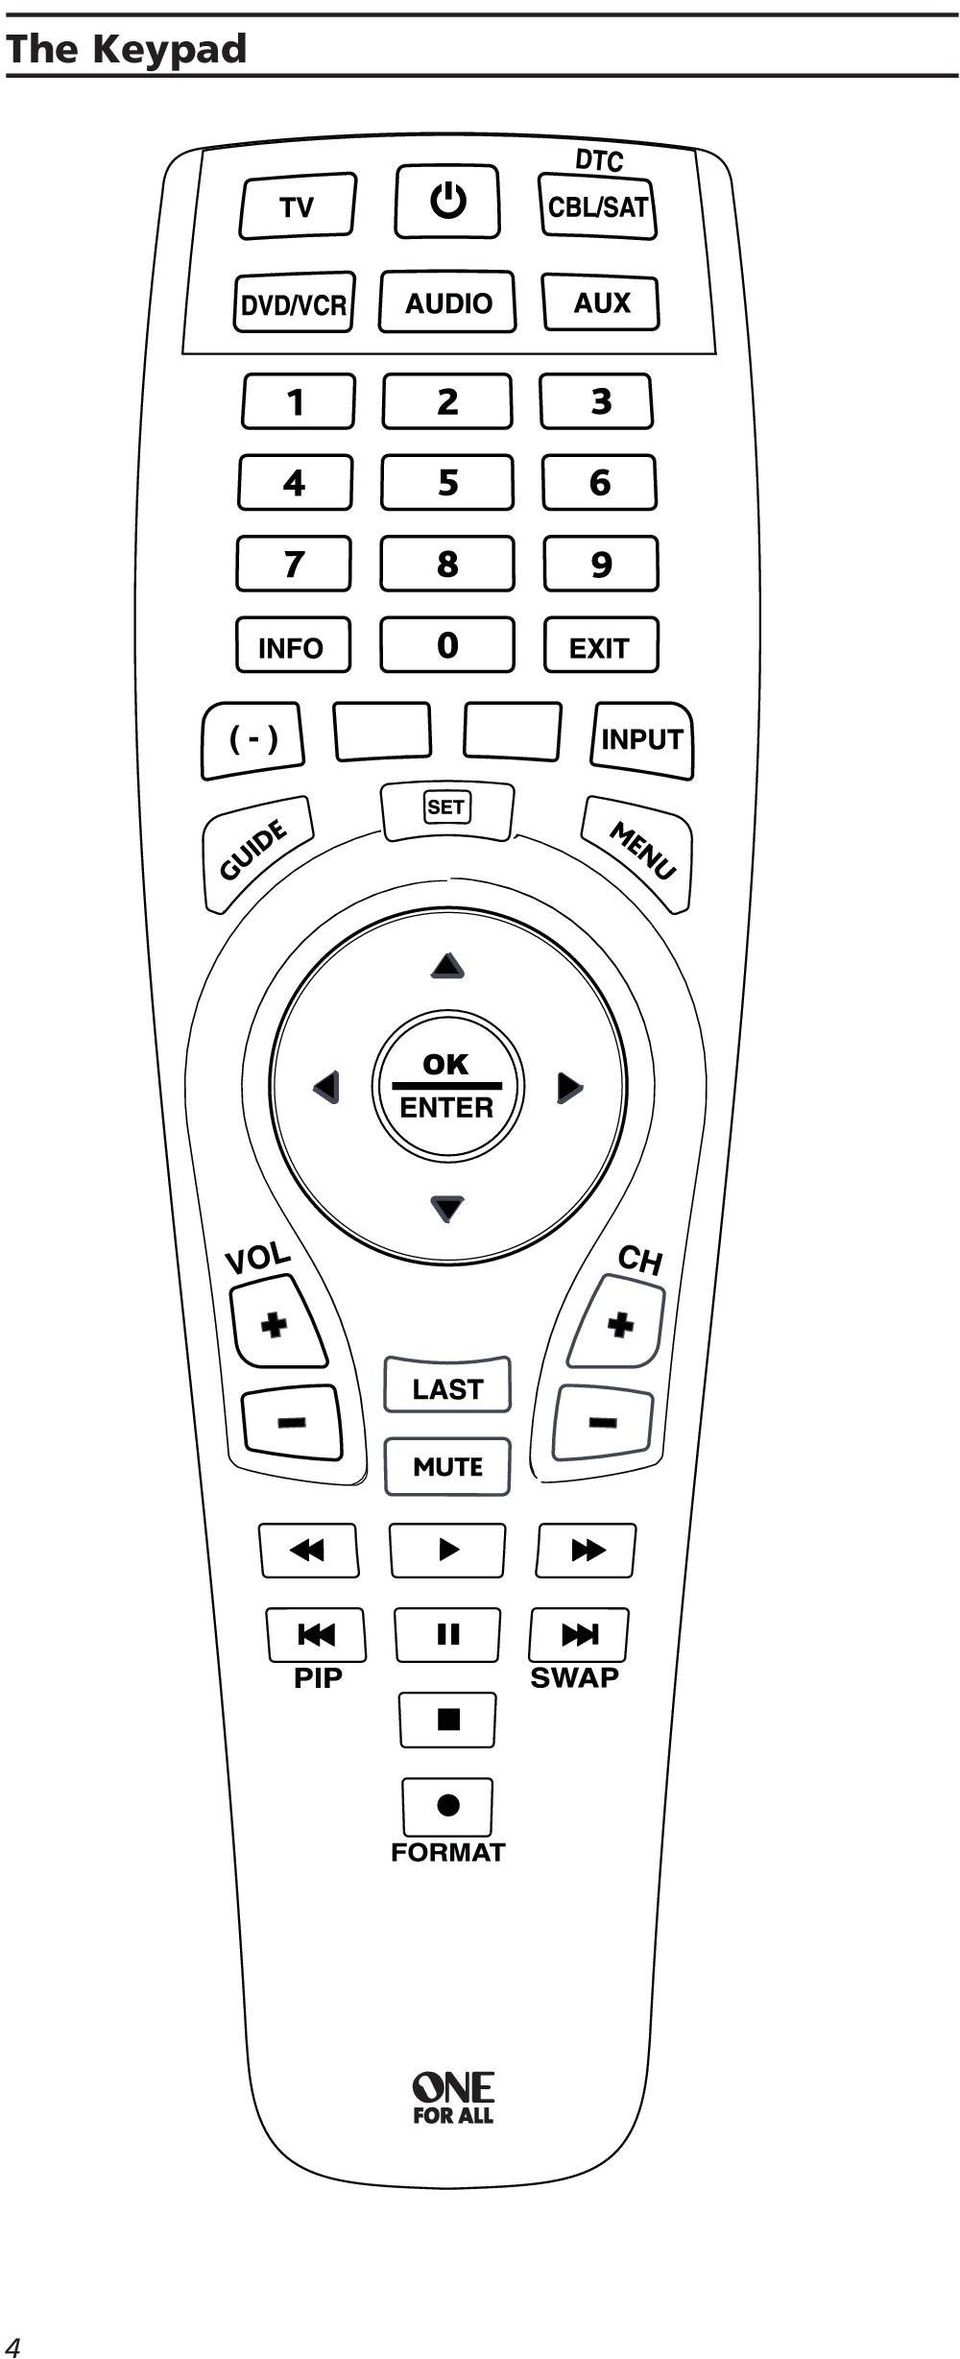
5 (Power) The power key operates the same function it did on your original remote control. The indicator light underneath the power key will light up every time a key is pressed. TV, DVD/VCR, AUDIO, CBL/SAT (DTC), AUX The device keys determine which device you re controlling. For example, to play a DVD on your DVD player, press the DVD key first. Then press the (play) key to start playback. Note: DTC stands for Digital TV Converter. Number Keys The Number keys (0-9) provide functions just like your original remote. In AUDIO mode, these keys may (if available on your original remote) provide an INPUT function. If your original remote features a function select or input select function you may find this under the INPUT key. INFO The INFO key displays any available information about the program or disc you re watching (if your device offers this functionality). EXIT The EXIT key takes you out of the current menu or guide screen. Red, Green, Yellow, Blue Use these keys to access additional features on your satellite receiver or cable box (consult your satellite or cable program provider for details). Two of the keys have additional functions in other modes: In TV mode, the Blue Key (INPUT) goes through the inputs on your TV. In DVD/VCR mode you will obtain the TV/DVD or TV/VCR function, if available on your original remote. In CBL/SAT (DTC) mode you will obtain the TV/SAT or TV/ DTV function, if available on your original remote. In TV mode (or if controlling a digital TV converter), the Red Key ( ) lets you separate the main channel number from a subchannel number. For example, to access channel 29.1, press 2 9, then the key, then 1. GUIDE In TV, DVD/VCR and/or CBL/SAT (DTC) mode you will obtain the Guide function (if available on your original remote). SET The SET key is used to set up this remote. MENU The MENU key controls the same function as it did on your original remote. Directional Keys If available on your original remote, these keys let you navigate through the menu mode of your device. OK/ENTER The OK/ENTER key confirms your choice in menu operation. VOL +/- Keys These keys operate in the same way as the keys on your original remote. CH +/- Keys These keys operate in the same way as the keys on your original remote. LAST The LAST key takes you to the previous channel or screen (if this function is available on your device). MUTE The MUTE key reduces your device to its minimum volume (if this function is available on your device). 5
 provide an INPUT function.")
6 (transport keys for DVDs, VCRs, PVRs, DVRs) These keys operate the transport functions (play, fast-forward, rewind, etc.) of your device. To prevent accidental recording, the (RECORD) key must be pressed twice to start recording. In TV mode the key activates Picture-In-Picture (if available on your TV), and the key swaps between the main picture and the Picture-In-Picture. FORMAT This key provides you the (16:9) wide screen view function (if available on your original remote). Code Retrieval The code retrieval feature allows you to find out which code is currently programmed for each device key. This is useful if you used the Search Method to program a device key. 1. Press the device key once. 2. Press and hold down the SET key until the (power) key blinks twice (the key blinks once, then twice). 3. Press The (power) key blinks twice. 4. For the first digit of your five-digit code, press 1 and count all the blinks. If there are no blinks, the digit is For the second digit, press 2 and count all the blinks. If there are no blinks, the digit is For the third digit, press 3 and count all the blinks. If there are no blinks, the digit is For the fourth digit, press 4 and count all the blinks. If there are no blinks, the digit is For the fifth digit, press 5 and count all the blinks. If there are no blinks, the digit is 0. Now you have your five-digit code. Quick Code Reference Device Type Code 6
 wide screen view function (if available on your original remote).")
7 The Learning Feature If your original remotes have functions that this remote doesn t have, this remote can learn those functions from your original remotes. For example, you could learn the Sleep Timer function from your original TV remote and assign it to the Green key on this remote. Before you start: Make sure your original remote control is working correctly. Make sure neither this remote nor your original remote control is pointing at your device. To learn a function: 1. Place both remote controls (this one and your original) on a flat surface. Make sure the ends which you normally point at your device are facing each other. Keep the remotes at a distance of 2 to 5 cm. 2. Press and hold down the SET key on this remote until the (power) key blinks twice (the key will blink once, then twice). 3. Press (the key blinks twice). 4. Press the device key on this remote to select the mode to which you want to copy the learned function (Example: press the TV key for a function that works with the TV). 5. Press the key on this remote where you want to place the learned function (Example: Green key). The key will flash rapidly. 6. Press and hold the key on your original remote that you want to copy. Hold it down until the key on this remote blinks twice (Example: Sleep key). 7. If you want to copy other functions within the same mode, simply repeat steps 5 and 6 pressing the next key you want to copy by learning. 8. To exit the learning mode, press and hold down the SET key until the key blinks twice. Important notes: Learning is mode specific. To access your learned function, press the appropriate device key first. This remote can learn approximately functions. You can replace a learned function by placing another learned function on top. Upon changing the batteries, your learned functions will be retained. To delete a learned function: 1. Press and hold down the SET key until the (power) key blinks twice (the key blinks once, then twice). 2. Press (the key blinks twice). 3. Press the device key from which the function will be deleted. 7
 on a flat surface. Make sure the ends which you normally point at your device are facing each other.")
8 4. Press twice on the learned key which will be deleted (the key blinks twice). To delete a Shifted Learned feature, press SET before you press the learned key to be deleted in this step. 5. If there is another learned function you wish to delete, repeat steps The original functions of this remote will now be restored. To delete all learned functions within a specific mode: 1. Press and hold down the SET key until the (power) key blinks twice (the key blinks once, then twice). 2. Press (the (power) key blinks twice). 3. Press the appropriate device (mode). Operational Reset The Operational Reset will erase all learned functions across all modes and some other programmed functions like Macros. 1. Press and hold down the SET key until the (power) key blinks twice (the key blinks once, then twice). 2. Press (the (power) key blinks four times). 8

9 Extra Features Volume Punch Through You may be able to use some functions of your Television, Video recorder, DVD player, Amp./Tuner, Satellite receiver or Cable converter at the same time. For example: if you are watching a program on your video recorder, you can adjust the volume (a TV function) without pressing the TV mode key on this remote. To punch through to TV volume while in the AUX, DVD/ VCR, AUDIO, or CBL/SAT (DTC) mode: 1. Press and hold down the SET key until the (power) key blinks twice (the key blinks once, then twice). 2. Press Then press the TV key and the (power) key blinks twice. To cancel Volume Punch Through for a single mode: 1. Press the device key for the mode you want to cancel volume punch through. For example, to cancel volume punch through for DVD/VCR mode, press the DVD/VCR key. 2. Press and hold down the SET key until the (power) key blinks twice (the key blinks once, then twice). 3. Press Then press the VOL key and the (power) key will blink four times. The Volume keys will now control the VOL+/ and MUTE functions on the original device (not on the TV). For example, if you canceled volume punch through for DVD/VCR mode, you will be able to control VOL+/ or MUTE functions of your DVD player or VCR (provided it has volume control). To cancel Volume Punch Through for all modes: 1. Press and hold down the SET key until the (power) key blinks twice (the key blinks once, then twice). 2. Press Press the VOL+ key and the (power) key will blink four times. 9
 key blinks twice. To cancel Volume Punch Through for a single mode: 1. Press the device key for the mode you want to cancel volume punch through.")
10 Macros (Sequence of commands) Macros (Direct) You can program this remote to issue a sequence of commands at the press of one button. Any sequence of commands you regularly use can be reduced to one key stroke for your convenience. For example, you may want to make a single key the master power off button for all of the devices this remote controls. To set up a master power off macro on the yellow key: 1. Press and hold down the SET key until the (power) key blinks twice (the key blinks once, then twice). 2. Press Press the key to which the Macro will be assigned (in this case, the yellow key). 4. Next press the commands you want to be part of the macro (in this case, TV,, AUX,, DVD/VCR, ). 5. To store the Macro, press and hold down the SET key until the (power) key blinks twice (the key blinks once, then twice). 6. Whenever you press the key you assigned to this macro (in this case, the yellow key), the remote will automatically send the sequence of commands you entered in step 4 (in this case, it will turn off your TV, VCR and DVD player). To erase the Macro from the Yellow key, press: [SET]* [9] [9] [5] [Yellow key] [SET]* * Here you must hold down the SET key until the (power) key blinks twice (the key blinks once, then twice). Important notes: Each MACRO can consist of a maximum of 15 key presses. This remote can hold up to 15 macros, depending on the complexity of each. In other words, the more complex the macros, the fewer separate macros the remote can store. Make sure that you program a Macro on a spare key that you don t use in any mode. Once you program a Macro on a specific key, the sequence will work regardless of the mode (TV, AUX and DVD/VCR) you are using. To avoid accidental recordings with this remote, you must press the Record key twice to begin recording. Because of this, you cannot assign a Macro to the Record key. If you have to hold down a key for a few seconds on the original remote control to get a function, this function may not work in a macro on this remote. If you program a Macro on a key, the original function will become shifted (excluding CH+/- and VOL+/- keys). Press the SET key then the key to access it. 10
 key blinks twice (the key blinks once, then twice). 2. Press 9 9 5. 3.")
11 Troubleshooting My brand is not listed in the code section. Try the procedure described in The Search Method section. The remote does not operate my device(s). Try all the codes listed for your brand. Try the procedure described in The Search Method section. The remote is not performing commands properly. You may be using the wrong code. Try repeating the Direct Setup using another code listed under your brand or start the search method over again to locate the proper code. Problems changing channels. Enter the channel number exactly as you would on your original remote. Video not recording. As a safety feature on this remote, you must press the (Record) key twice. The remote does not respond after pressing a key. Make sure you are using new batteries and are aiming the One For All remote at your device. The (power) does not blink when I press a key. Replace batteries with 2 fresh, new AA alkaline batteries. For additional information: Internet: Additional Information ONE FOR ALL is the registered trademark of Universal Electronics Inc. Audiovox Accessories Corporation is the Licensee of the ONE FOR ALL brand for North America by Universal Electronics Inc. No part of this publication may be reproduced, transmitted, transcribed, stored in any retrieval system, or translated to any language, in any form or by any means, electronic, mechanical, magnetic, optical, manual, or otherwise, without the prior written permission of Universal Electronics Inc. The One For All 5-Device Universal Remote Control is compatible for use in North America, excluding Mexico. This One For All 5-Device Universal Remote Control is covered by one or more of the following US Patents: 6,587,067 6,496,135 5,515,052 5,959,751 6,587,067 5,481,256 OARC05G 06/09 11
 key twice.")
12 El Control Remoto Universal OARC05G de One For All es una manera perfecta de simplificar el entretenimiento en el hogar. Esta unidad le permite manejar hasta 5 dispositivos de entretenimiento en el hogar desde un solo control remoto fácil de usar. Tómese unos minutos para ver el mini DVD incluido con la unidad OARC05G el mismo ofrece un recorrido por las funciones del control remoto. Luego, consulte este manual para configurar el control remoto para su sistema de entretenimiento en el hogar. Instalación de las Baterías Este control remoto utiliza 2 baterías alcalinas AA nuevas (no incluidas). 1. Retire la cubierta del compartimiento de las baterías de la parte posterior del control remoto. 2. Cerciórese de que las polaridades + y correspondan con el diagrama que aparece en el compartimiento de las baterías. Luego, instale las baterías. 3. Vuelva a colocar la tapa del compartimiento de las baterías en su posición. Precauciones sobre las Baterías: No combine baterías nuevas y viejas. No combine diferentes tipos de baterías: alcalinas, estándar (carbónzinc) o recargables (níquel-cadmio). Siempre remueva de inmediato baterías viejas, débiles o desgastadas, y recíclelas o deséchelas según lo disponen las normas locales y nacionales. Cuidado y Mantenimiento Mantenga el control remoto seco. Si se moja, séquelo inmediatamente. Utilice y almacene el control remoto únicamente en entornos de temperatura normal. Maneje el control remoto de forma cuidadosa. No lo deje caer. Mantenga el control remoto resguardado del polvo y la suciedad. Limpie el control remoto con un paño húmedo de vez en cuando para mantenerlo en buenas condiciones de operación. Modificar o sabotear los componentes internos del control remoto podría ocasionar desperfectos y anular la garantía. Cómo Configurar el Control Remoto Este control remoto se puede programar de dos maneras para manejar los dispositivos: ingresando el código directamente o buscando a través de códigos para encontrar el que maneje el dispositivo. Intente primero la configuración a través de la entrada directa de códigos. Configuración a través de la entrada directa de códigos 1. Encuentre el código para el dispositivo en la Lista de Códigos. Los códigos aparecen según del tipo de dispositivo y la marca. El código más común aparece primero. Asegúrese que su dispositivo esté encendido (no en el modo de espera). 2. Oprima la tecla de dispositivo en este control remoto para el dispositivo que desea configurar. 3. Oprima y sostenga la tecla SET hasta que la tecla (potencia) parpadee dos veces (la tecla parpadeará una vez y luego dos veces). 12

13 4. Ingrese el código de cinco dígitos para la marca del dispositivo utilizando las teclas numéricas. La tecla (potencia) parpadeará dos veces. Aviso: Si la tecla muestra un parpadeo continuo en lugar de dos parpadeos cortos, usted ha ingresado un código inválido. Ingrese el código nuevamente. 5. Ahora, apunte este control remoto al dispositivo y oprima. Si el dispositivo se apaga, el control remoto se encuentra listo para manejar el dispositivo. 6. Encienda nuevamente el dispositivo y pruebe todas las funciones del control remoto para asegurarse que estén operando de forma correcta. Si las funciones no operan de forma correcta, repita los pasos 1 a 5 utilizando otro código para la marca del dispositivo. 7. Si el dispositivo no responde, siga los pasos 1 a 5 con cada uno de los códigos para la marca del dispositivo. Si ninguno de los códigos para la marca del dispositivo puede controlar la unidad, o si la marca no aparece en la lista, pruebe el método de búsqueda que se describe en la próxima sección. Notas importantes: Si el dispositivo no responde o si no funciona adecuadamente con uno de los códigos, pruebe otro código para la marca del dispositivo. Si el control remoto original del dispositivo no incluye la tecla POWER (potencia), oprima (reproducir) en lugar de cuando configure el dispositivo. Recuerde oprimir la tecla correspondiente al dispositivo antes de hacerlo funcionar. Sólo puede asignársele un dispositivo a una tecla de dispositivo. Si el control remoto original maneja más de un dispositivo, necesitará configurar cada dispositivo de forma separada. El método de búsqueda Si el dispositivo no responde al control remoto luego de haber probado todos los códigos para la marca del dispositivo, intente buscar el código. El Método de Búsqueda le permite encontrar el código para el dispositivo navegando a través de todos los códigos almacenados en la memoria del control remoto. El Método de Búsqueda puede funcionar además si la marca no aparece en la lista de códigos. 1. Encienda el dispositivo (no en el modo de espera). 2. Oprima la tecla de dispositivo en este control remoto para el dispositivo que desea configurar. 3. Oprima y sostenga la tecla SET hasta que la tecla (potencia) parpadee dos veces (la tecla parpadeará una vez y luego dos veces). 4. Oprima La tecla (potencia) parpadeará dos veces. 5. Oprima la tecla numérica correspondiente al dispositivo que desea programar: 0 para cable, satélite, convertidor de TV digital o accesorios para video; 1 para un televisor; 2 para un Lector de DVD, VCR o PVR; 3 para un componente de audio (sintonizador, amplificador, etc.). 6. Apunte este control remoto al dispositivo. Ahora oprima la tecla CH+ continuamente hasta que el dispositivo se apague (cada vez que oprima la tecla CH+, la unidad enviará una señal de potencia proveniente del próximo código almacenado en la memoria). Quizás deba oprimir esta tecla varias veces (hasta 150 veces). Sea paciente. Si salta un código, puede regresar al código(s) anterior oprimiendo la tecla CH-. Recuerde continuar apuntando el control remoto al dispositivo cuando oprima esta tecla. 7. Tan pronto se apague el dispositivo, oprima la tecla SET para almacenar el código. Nota importante: Si el control remoto original del dispositivo no incluye la tecla POWER (potencia), oprima (reproducir) en lugar de (potencia) en el paso 5. 13

14 El Teclado 14

15 (Potencia) La tecla de potencia maneja la misma función que en su control remoto original. La luz indicadora debajo de la tecla de potencia se encenderá cada vez que se oprima una tecla. TV, DVD/VCR, AUDIO, CBL/SAT (DTC), AUX Las teclas de dispositivo determinan el dispositivo que está controlando. Por ejemplo, para reproducir un disco DVD en su lector de DVD, oprima primero la tecla DVD. Luego oprima la tecla (reproducir) para dar inicio a la reproducción. Nota: El DTC hace referencia al convertidor de TV digital. Teclas Numéricas Las teclas numéricas (0-9) brindan funciones tal como lo hacen en el control remoto original. En el modo AUDIO, estas teclas pueden (si el control remoto original las incluye) brindar una función de ENTRADA. Si el control remoto original incluye una característica de selección de función o selección de entrada, podrá encontrarla en la tecla INPUT. INFO La tecla INFO muestra cualquier información disponible acerca del programa o del disco que esté viendo (si el dispositivo ofrece esta funcionalidad). EXIT La tecla EXIT lo saca del menú o pantalla guía actual. Roja, Verde, Amarilla, Azul Utilice estas teclas para obtener acceso a funciones adicionales en el receptor de satélite o aparato de cable (para obtener mayores detalles, consulte el proveedor de programación de satélite o cable). Dos de estas teclas tienen funciones adicionales en otros modos: En el modo TV, la Tecla Azul (INPUT) recorre las entradas en el televisor. En el modo DVD/VCR, obtendrá la función TV/DVD o TV/ VCR, si se encuentra disponible en el control remoto original. En el modo CBL/SAT (DTC), obtendrá la función TV/SAT o TV/DTV, si se encuentra disponible en el control remoto original. En el modo TV (o si está controlando un convertidor de TV digital), la Tecla Roja ( ) le permite separar el número de canal principal de un número de canal secundario. Por ejemplo, para obtener acceso al canal 29.1, oprima 2 9, luego la tecla, y seguidamente 1. GUIDE En el modo TV, DVD/VCR y/o CBL/SAT (DTC), obtendrá la función Guía (si se encuentra disponible en el control remoto original). SET La tecla SET se utiliza para configurar este control remoto. MENU La tecla MENU maneja la misma función que en el control remoto original. Teclas Direccionales Si se encuentran disponibles en el control remoto original, estas teclas le permiten navegar a través del modo Menú del dispositivo. OK/ENTER La tecla OK/ENTER confirma su selección durante el funcionamiento de los menús. Teclas VOL +/- Estas teclas funcionan de la misma manera que las teclas en el control remoto original. Teclas CH +/- Estas teclas funcionan de la misma manera que las teclas en el control remoto original. LAST La tecla LAST lo regresa al canal o pantalla anterior (si esta función se encuentra disponible en el dispositivo). MUTE La tecla MUTE reduce al mínimo el volumen del dispositivo (si esta función se encuentra disponible en el dispositivo). 15
 brindan funciones tal como lo hacen en el control remoto original.")
16 (teclas de transporte para lectores de DVD, VCR, PVR, DVR) Estas teclas manejan las funciones de transporte (reproducir, avance rápido, rebobinar, etc.) del dispositivo. Para evitar grabaciones accidentales, deberá oprimir la tecla (GRABAR) dos veces para dar inicio a la grabación. En el modo TV, la tecla activa (Imagen en Imagen) (si se encuentra disponible en el televisor), y la tecla alterna entre la imagen principal e Imagen en Imagen. FORMAT Esta tecla le ofrece la función de visualiza-ción en pantalla ancha (16:9), (si se encuentra disponible en el control remoto original). Recuperación de Códigos La función de recuperación de códigos le permite encontrar el código que ha sido programado para cada tecla de dispositivo. Esta función es de utilidad si configuró una tecla de dispositivo a través del Método de Búsqueda. 1. Oprima la tecla de dispositivo una vez. 2. Oprima y sostenga la tecla SET hasta que la tecla (potencia) parpadee dos veces (la tecla parpadeará una vez y luego dos veces). 3. Oprima La tecla (potencia) parpadeará dos veces. 4. Para el primer dígito del código de cinco dígitos, oprima 1 y cuente los parpadeos. Si la tecla (potencia) no parpadea, el dígito es Para el segundo dígito, oprima 2 y cuente los parpadeos. Si la tecla (potencia) no parpadea, el dígito es Para el tercer dígito, oprima 3 y cuente los parpadeos. Si la tecla (potencia) no parpadea, el dígito es Para el cuarto dígito, oprima 4 y cuente los parpadeos. Si la tecla (potencia) no parpadea, el dígito es Para el quinto dígito, oprima 5 y cuente los parpadeos. Si la tecla (potencia) no parpadea, el dígito es 0. Ya encontró el código de cinco dígitos. Referencia Rápida de Códigos Tipo de Dispositivo Código 16
, (si se encuentra disponible en el control remoto original).")
17 La Función de Aprendizaje Si los controles remotos originales incluyen funciones distintas a las de este control remoto, este control remoto puede aprenderlas a través de los controles remotos originales. Por ejemplo, podría aprender la función de cronómetro de dormir ( Sleep ) del control remoto original del televisor y asignarle ésta a la tecla Verde de este control remoto. Antes de comenzar: Asegúrese que el control remoto original esté funcionando correctamente. Asegúrese que ni este control remoto, ni el control remoto original estén apuntando al dispositivo. Para aprender una función: 1. Coloque ambos controles remotos (el original y este control remoto) sobre una superficie plana. Asegúrese que los extremos que por lo general apuntan al dispositivo estén orientados entre sí. Mantenga los controles remotos de 2 a 5 cm de distancia. 2. Oprima y sostenga la tecla SET en este control remoto hasta que la tecla (potencia) parpadee dos veces (la tecla parpadeará una vez y luego dos veces). 3. Oprima en este control remoto (la tecla (potencia) parpadeará dos veces). 4. Oprima la tecla de dispositivo en este control remoto para seleccionar el modo al cual desea copiar la función aprendida (Ejemplo: oprima la tecla TV para una función que se pueda utilizar con el televisor). 5. Oprima la tecla en este control remoto donde desea guardar la función aprendida (Ejemplo: tecla Verde ). La tecla (potencia) parpadeará rápidamente. 6. Oprima y sostenga la tecla en el control remoto original que desea copiar. Continue oprimiendo hasta que la tecla (potencia) de este control remoto parpadee dos veces (Ejemplo: tecla Sleep ). 7. Si desea copiar otras funciones dentro del mismo modo, sólo tiene que repetir los pasos 5 y 6 oprimiendo la próxima tecla que desea copiar a través de la función de aprendizaje. 8. Para salir del modo aprendizaje, oprima y sostenga la tecla SET hasta que la tecla (potencia) parpadee dos veces. Notas importantes: El aprendizaje es específico de cada modo. Para obtener acceso a la función aprendida, oprima primero la tecla correspondiente al dispositivo. El control remoto puede aprender alrededor de 25 a 40 funciones. Puede reemplazar una función aprendida almacenando otra función aprendida encima de ella. Las funciones aprendidas se conservarán en la memoria incluso cuando se cambien las baterías. 17
 sobre una superficie plana.")
18 Para borrar una función aprendida: 1. Oprima y sostenga la tecla SET hasta que la tecla (potencia) parpadee dos veces (la tecla parpadeará una vez y luego dos veces). 2. Oprima (la tecla parpadeará dos veces). 3. Oprima la tecla de dispositivo de la cual se borrará la función. 4. Oprima dos veces la tecla aprendida que se borrará (la tecla parpadeará dos veces). Para borrar una función Aprendida Cambiada, oprima la tecla SET antes de oprimir la tecla aprendida que se borrará en este paso. 5. Si hay otra función aprendida que desea cambiar, repita los pasos 1 al Ahora se restablecerán las funciones originales del control remoto. Para borrar todas las funciones aprendidas dentro de un modo específico: 1. Oprima y sostenga la tecla SET hasta que la tecla (potencia) parpadee dos veces (la tecla parpadeará una vez y luego dos veces). 2. Oprima (la tecla (potencia) parpadeará dos veces). 3. Oprima la tecla correspondiente al dispositivo (modo). Restablecimiento de las Funciones El Restablecimiento de las Funciones borrará todas las funciones aprendidas de todos los modos y otras funciones programadas como Macros. 1. Oprima y sostenga la tecla SET hasta que la tecla (potencia) parpadee dos veces (la tecla parpadeará una vez y luego dos veces). 2. Oprima (la tecla (potencia) parpadeará cuatro veces). 18

19 Funciones Adicionales Irrupción de Volumen Usted podrá utilizar algunas de las funciones del televisor, grabadora de video, lector de DVD, Amp./Sintonizador, receptor de satélite o convertidor de cable simultáneamente. Por ejemplo: si está viendo un programa en una grabadora de video, puede ajustar el volumen (una función de TV) sin oprimir la tecla de modo TV en el control remoto. Para irrumpir el volumen del televisor mientras se encuentre en el modo AUX, DVD/VCR, AUDIO o CBL/SAT (DTC): 1. Oprima y sostenga la tecla SET hasta que la tecla (potencia) parpadee dos veces (la tecla parpadeará una vez y luego dos veces). 2. Oprima Luego, oprima la tecla TV y la tecla parpadeará dos veces. Para cancelar la Irrupción de Volumen para un solo modo: 1. Oprima la tecla de dispositivo para el modo para el cual desea cancelar la irrupción de volumen. Por ejemplo, para cancelar la irrupción de volumen a través del modo DVD/VCR, oprima la tecla DVD/VCR. 2. Oprima y sostenga la tecla SET hasta que la tecla parpadee dos veces (la tecla parpadeará una vez y luego dos veces). 3. Oprima Luego, oprima la tecla VOL y la tecla parpadeará cuatro veces. Las teclas de Volumen controlarán ahora las funciones VOL+/ y MUTE en el dispositivo original (no en el televisor). Por ejemplo, si canceló la irrupción de volumen para el modo DVD/VCR, podrá controlar las funciones VOL+/ y MUTE de su lector de DVD o VCR (siempre y cuando tenga control de volumen). Para cancelar la Irrupción de Volumen para todos los modos: 1. Oprima y sostenga la tecla SET hasta que la tecla (potencia) parpadee dos veces (la tecla parpadeará una vez y luego dos veces). 2. Oprima Oprima la tecla VOL+ y la tecla (potencia) parpadeará cuatro veces. 19
: 1.")
20 Macros (Secuencia de comandos) Macros (Directo) Puede programar el control remoto de manera de emitir una secuencia de comandos cuando se oprima un botón. Cualquier secuencia de comandos que utilice con regularidad se reducirá a una sola pulsación de tecla para su conveniencia. Por ejemplo, sería útil convertir una sola tecla en botón maestro de apagado para todos los dispositivos que el control remoto maneje. Para configurar una macro maestra de apagado en la tecla amarilla: 1. Oprima y sostenga la tecla SET hasta que la tecla (potencia) parpadee dos veces (la tecla (potencia) parpadeará una vez y luego dos veces). 2. Oprima Oprima la tecla a la cual se asignará la Macro (en este caso, la tecla amarilla). 4. Luego, oprima los comandos que desea incluir en la macro (en este caso, TV,, AUX,, DVD/VCR, ). 5. Para guardar la Macro, oprima y sostenga la tecla SET hasta que la tecla (potencia) parpadee dos veces (la tecla parpadeará una vez y luego dos veces). 6. Cada vez que oprima la tecla que le asignó a esta macro (en este caso, la tecla amarilla), el control remoto enviará automáticamente la secuencia de comandos que ingresó en el paso 4 (en este caso, apagará el televisor, la VCR y el lector de DVD). Para borrar la Macro de la tecla Amarilla, oprima: [SET]* [9] [9] [5] [tecla Amarilla] [SET]* * Aquí deberá oprimir y sostener la tecla SET hasta que la tecla (potencia) parpadee dos veces (la tecla parpadeará una vez y luego dos veces). Notas importantes: Cada MACRO puede consistir de un máximo de 15 opresiones de tecla. El control remoto tiene capacidad para hasta 15 macros, dependiendo de la complejidad de cada una. En otras palabras, mientras más compleja sea la macro, menor será la cantidad de macros que el control remoto podrá guardar. Asegúrese de programar una Macro en una tecla de repuesto que no utilice en ningún modo. Una vez que haya programado una Macro en una tecla específica, la secuencia funcionará independientemente del modo (TV, AUX y DVD/VCR) que esté utilizando. Para evitar grabaciones accidentales con el control remoto, deberá oprimir la tecla Grabar dos veces para dar inicio a la grabación. Debido a esto, no podrá asignarle una Macro a la tecla Grabar. Si tenía que oprimir una tecla por varios segundos en el control remoto original para activar una función, quizá no se pueda utilizar esta función en una macro en el control remoto. Si programa una Macro en una tecla, la función original cambiará (excepto las teclas CH+/- y VOL+/ ). Oprima la tecla SET y luego la tecla para obtener acceso. 20

21 Resolución de Problemas Mi marca no aparece en la sección de códigos. Intente el procedimiento descrito en la sección El Método de Búsqueda. El control remoto ONE FOR ALL no maneja mi dispositivo(s). Intente todos los códigos que aparecen para su marca. Intente el procedimiento descrito en la sección El Método de Búsqueda. El control remoto ONE FOR ALL no ejecuta los comandos debidamente. Podría estar utilizando el código equivocado. Intente repetir la Configuración Directa utilizando otro código incluido bajo su marca o inicie nuevamente el método de búsqueda para encontrar el código correcto. Problemas cambiando de canales. Ingrese el número de canal tal y como lo haría en el control remoto original. El video no graba. Como característica de seguridad en el control remoto ONE FOR ALL, deberá oprimir la tecla (grabar) dos veces. El control remoto ONE FOR ALL no responde luego de oprimir una tecla. Asegúrese de utilizar baterías nuevas y de apuntar directamente el control remoto One For All al dispositivo. La tecla (potencia) no parpadea cuando oprima una tecla. Reemplace las baterías con dos 2 baterías alcalinas AA nuevas. Para obtener asistencia, póngase en contacto con nosotros: Internet: Información Adicional ONE FOR ALL es la marca comercial registrada de Universal Electronics Inc. Audiovox Accessories Corporation es la concesionaria de la marca ONE FOR ALL para EE.UU. y Canadá. Copyright 2009 por Universal Electronics Inc. Ninguna parte de esta publicación puede ser reproducida, transmitida, transcrita, almacenada en ningún sistema de recuperación, o traducida a cualquier idioma, en ninguna forma o medio, ya sea electrónico, mecánico, magnético, óptico, manual o de otro tipo, sin el consentimiento previo por escrito de Universal Electronics Inc. El Control Remoto Universal One For All para 5 dispositivos es compatible para su uso en América del Norte, excepto México. Este Control Remoto Universal One For All para 5 dispositivos está cubierto por una o más de las siguientes patentes estadounidenses: 6,587,067 6,496,135 5,515,052 5,959,751 6,587,067 5,481,256 OARC05G 06/09 21
22 Limited Lifetime Warranty Audiovox Electronics Corporation (the Company ) warrants to you the original retail purchaser of this product that should it, under normal use and conditions, be proven defective in material or workmanship during its lifetime while you own it, such defect(s) will be repaired or replaced (at the Company s option) without charge for parts and repair labor. To obtain repair or replacement within the terms of this Warranty, the product is to be delivered with proof of warranty coverage (e.g. dated bill of sale), specification of defect(s), transportation prepaid, to the Company at the address shown below. Do not return this product to the retailer. This Warranty does not cover product purchased, serviced or used outside the United States or Canada. This Warranty is not transferable and does not extend to costs incurred for installation, removal or reinstallation of the product. This Warranty does not apply if in the Company s opinion, the product has been damaged through alteration, improper installation, mishandling, misuse, neglect, accident, or the simultaneous use of different battery types (e.g. alkaline, standard or rechargeable). THE EXTENT OF THE COMPANY S LIABILITY UNDER THIS WARRANTY IS LIMITED TO THE REPAIR OR REPLACEMENT PROVIDED ABOVE AND, IN NO EVENT, SHALL THE COMPANY S LIABILITY EXCEED THE PURCHASE PRICE PAID BY PURCHASER FOR THE PRODUCT. This Warranty is in lieu of all other express warranties or liabilities. ANY IMPLIED WARRANTIES, INCLUDING ANY IMPLIED WARRANTY OF MERCHANTABILITY OR FITNESS FOR A PARTICULAR PURPOSE SHALL BE LIMITED TO DURATION OF THIS WARRANTY. IN NO CASE SHALL THE COMPANY BE LIABLE FOR ANY CONSEQUENTIAL OR INCIDENTAL DAMAGES WHATSOEVER. No person or representative is authorized to assume for the Company any liability other than expressed herein in connection with the sale of this product. Some states/provinces do not allow limitations on how long an implied warranty lasts or the exclusion or limitation of incidental or consequential damage so the above limitations or exclusions may not apply to you. This Warranty gives you specific legal rights and you may also have other rights, which vary from state/province to state/province. U.S.A.: Audiovox Electronics Corporation, 150 Marcus Blvd., Hauppauge, New York CANADA: Audiovox Return Center, c/o Genco, 6685 Kennedy Road, Unit 3, Door 16, Mississauga, Ontario L5T 3A5 Trademark(s) Registered Marca(s) Registrada(s) OARC05G US IB 01 22
23 Garantía Limitada Durante la Vida Útil del Producto Audiovox Electronics Corporation (la Compañía ) le garantiza a usted, el comprador original de este producto que si, bajo condiciones y uso normales, se encontrara que presenta defectos materiales o de mano de obra durante su vida útil mientras sea de su propiedad, tales defectos serán reparados o reemplazados (a opción de la Compañía) sin cargo alguno por las piezas y labores de reparación. Para obtener los servicios de reparación o reemplazo dentro de los términos de esta Garantía, el producto se entregará con prueba de cubierta de garantía (por ejemplo, factura fechada de venta), especificación de los defectos, transporte prepagado, a la Compañía a la dirección indicada abajo. No devuelva este producto al distribuidor. Esta Garantía no cubre un producto adquirido, mantenido o utilizado fuera de los Estados Unidos o Canadá. Esta Garantía no es transferible y no incluye los costos incu-rridos en la instalación, remoción o reinstalación de este producto. Esta Garantía no aplica si, es opinión de la Compañía que, este producto ha sufrido daños debido a alteraciones, instalación inadecuada, abuso, uso indebido, negligencia, accidente o el uso simultáneo de diferentes tipos de baterías (por ejemplo, alcalinas, típicas o recargables). EL ALCANCE DE LA RESPONSABILIDAD DE LA COMPAÑÍA BAJO ESTA GARANTÍA ESTÁ LIMITADO A LA REPARACIÓN O EL RE- EMPLAZO PROVISTO ARRIBA Y, EN NINGÚN CASO, DEBERÁ LA RESPONSABILIDAD DE LA COMPAÑÍA EXCE-DER EL PRECIO DE COMPRA PAGADO POR EL COMPRADOR DE ESTE PRODUCTO. Esta Garantía reemplaza cualesquiera otras responsabilidades o garantías expresas. CUALESQUIERA GARANTÍAS IMPLÍCITAS, INCLUYENDO CUALQUIER GARANTÍA IMPLÍCITA DE COMERCIA- BILIDAD O ADAPTABILIDAD PARA UN PROPÓSITO EN PARTICU- LAR ESTARÁN LIMITADAS A LA DURACIÓN DE ESTA GARANTÍA. EN NINGÚN CASO LA COMPAÑÍA SERÁ RESPONSABLE POR DAÑOS EMERGENTES O INCIDENTALES. Ninguna persona ni representante está autorizado a asumir, a nombre de la Compañía, ninguna responsabilidad salvo la expresada aquí en conexión con la venta de este producto. Algunos estados/provincias no permiten limitaciones sobre la duración de una garantía implícita o la exclusión o la limitación de daños incidentales o emergentes, de modo que es posible que las limitaciones o exclusiones anteriores no apliquen en su caso. Esta Garantía le confiere derechos legales específicos; según el estado/provincia, puede disfrutar además de otros derechos. EE.UU.: Audiovox Electronics Corporation, 150 Marcus Blvd., Hauppauge, New York CANADÁ: Audiovox Return Center, c/o Genco, 6685 Kennedy Road, Unit 3, Door 16, Mississauga, Ontario L5T 3A5 23
24
5-Device Universal Remote Control with Learning
 5-Device Universal Remote Control with Learning Control Remoto Universal de 5 Dispositivos con Aprendizaje Contents Installing the Batteries... 2 Care and Maintenance... 2 Setting Up the Remote... 2 Direct
Part No: KTI (Page 1-13) (Pagina 14-26) K-Tool International Wixom, MI 48393
 (Pagina 14-26) K-Tool International Wixom, MI 48393") Part No: KTI-70099 (Page 1-13) (Pagina 14-26) K-Tool International Wixom, MI 48393 (800) 762-6002 www.ktoolinternational.com support@ktoolinternational.com The KTool Walkie-Talkie can use a NiMH rechargeable
Part No: KTI-70099 (Page 1-13) (Pagina 14-26) K-Tool International Wixom, MI 48393 (800) 762-6002 www.ktoolinternational.com support@ktoolinternational.com The KTool Walkie-Talkie can use a NiMH rechargeable
TX MULTI MANUAL TX MULTI. Mando copiador multifrecuencia 1. PASOS PARA COPIAR UN MANDO CÓDIGO FIJO Y ROLLING ESTÁNDAR:
 MANUAL TX MULTI Mando copiador multifrecuencia 1. PASOS PARA COPIAR UN MANDO CÓDIGO FIJO Y ROLLING ESTÁNDAR: 1. Situar el mando original que desea copiar junto al TX Multi, en torno a 2-4 centímetros de
Xfinity Prepaid. Roku setup guide
 Xfinity Prepaid Roku setup guide Use your new Roku and the Xfinity Stream app to watch your favorite Instant TV shows right on your TV. Let s get you set up. Step 1: Setting Up Your Roku Express 1. Remove
1. Conecte el transmisor FM al dispositivo encendedor del coche o a una fuente de alimentación.
 INSTRUCCIONES PARA EL USO DEL TRANSMISOR FM: 1. Conecte el transmisor FM al dispositivo encendedor del coche o a una fuente de alimentación. 2. Sintonice la radio en la frecuencia FM que desee y haga coincidir
CERTIFICADO DE GARANTÍA LIMITADA DE POR VIDA DE FREGADEROS ELKAY
 CERTIFICADO DE GARANTÍA LIMITADA DE POR VIDA DE FREGADEROS ELKAY Elkay garantiza al comprador inicial de fregaderos de acero inoxidable Elkay que reemplazará sin cargo todo producto que falle debido a
KM-9738 KARAOKE MIC WITH SPEAKER WIRELESS BT. KM-9738 User Manual KM-9738 Manual del Usuario MICRÓFONO INALÁMBRICO CON PARLANTE BT
 KM-9738 KARAOKE MIC WITH SPEAKER WIRELESS BT KM-9738 User Manual KM-9738 Manual del Usuario MICRÓFONO INALÁMBRICO CON PARLANTE BT KM-9738 - USER MANUAL Thanks for purchasing PANACOM KM-9738. Please read
RX MULTI. MANUAL RX MULTI 433 A 868 MHz
 1. Esquema RX Multi RX MULTI MANUAL RX MULTI 433 A 868 2. Selector de marca Con el selector de 8 DIPs, el usuario puede realizar diferentes combinaciones para las diferentes marcas de mandos. La selección
URC Guarantee English GARANTIE Deutsch Instructions manual P. 1 English
 URC-8210 703221 English Deutsch Français Español Português Italiano Nederlands Instructions manual................................ P. 1 Bedienungsanleitung............................. S. 31 Mode d emploi.....................................
Manual para Cambio de Apariencia en Acrobat Reader DC. Change of Appearance in Acrobat Reader DC
 Manual para Cambio de Apariencia en Acrobat Reader DC Change of Appearance in Acrobat Reader DC Desarrollado por: DTE, LLC Versión: 02.2016 Developed by: DTE, LLC Revisado en:25 de Octubre de 2016 support@dtellcpr.com
Installation Guide. Green momit
 Installation Guide Green momit 2015 www.momit.com momit Deviceses Gateway: Model 1 and 2 Wall option The momit Gateway allows your thermostat to be connected to the Internet. It s included in the Starter
Los números. 0 cero 1 uno / un 2 dos 3 tres 4 cuatro. 6 seis 7 siete 8 ocho 9 nueve 10 diez 5 cinco
 53 31 16 0 cero 1 uno / un 2 dos 3 tres 4 cuatro 6 seis 7 siete 8 ocho 9 nueve 10 diez 5 cinco 11 - once 12 - doce 13 - trece 14 - catorce 17 - diecisiete 18 - dieciocho 19 - diecinueve 20 - veinte 15
Flashcards Series 4 El Hotel
 Flashcards Series 4 El Hotel Flashcards are one of the quickest and easiest ways to test yourself on Spanish vocabulary, no matter where you are! Test yourself on just these flashcards at first. Then,
RS MULTI MANUAL OF RS MULTI
 MANUAL OF RS MULTI 1. RS MULTI Central for tubular motor with power supply 110-240 V. With function OPEN/STOP/CLOSE available for AC switch and control remotes (frequency ). 2. Brand selector With 8 dip
RX MULTI MANUAL RX MULTI 433 A 868 MHz
 1. Esquema RX Multi RX MULTI MANUAL RX MULTI 433 A 868 2. Selector de marca Con el selector de 8 DIPs, el usuario puede realizar diferentes combinaciones para las diferentes marcas de mandos. La selección
Cómo comprar productos de ServSafe International
 Cómo comprar productos de ServSafe International Desde la página www.servsafeinternational.com, haga clic en el menú desplegable del Idioma y elija Spanish/Español/Spanisch. How to Place Orders for ServSafe
MANUAL DE INSTRUCCIONES / USER'S GUIDE VD31
 MANUAL DE INSTRUCCIONES / USER'S GUIDE VD31 ESP AJUSTE DE LA POSICIÓN DE LA HORA DUAL - Después de configurar o de cambiar la batería, antes de configurar la hora, verifique si la aguja de hora dual está
Use and Care Guide. English
 Use and Care Guide 8 9 WINIX Air Cleaner 1 Year Limited Warranty When installed, operated and maintained according to all instructions supplied with this product, Winix, at its option, will repair or replace
PUSH. Power MERGER DMX. User Manual / Instrucciones de Usuario
 PUSH Power Power Indicator DMX Indicator A DMX IN B DMX OUT MERGER DMX User Manual / Instrucciones de Usuario Power MERGER DMX ACCESORIO USER'S MANUAL PUSH Power Indicator DMX Indicator A DMX IN B DMX
RCRH02BR RCRH02BR. 2-Device Universal Remote Control User s Guide. Guía del Usuario del Control Remoto Universal para 2 Aparatos
 RCRH02BR 2-Device Universal Remote Control User s Guide Congratulations on your purchase of the RCRH02BR. This 2-Device Remote Control does just what a basic remote should: simplify! Made for streamlined
4-Device Universal Remote Control
 4-Device Universal Remote Control Control Remoto Universal de 4 Dispositivos OARN04S User s Guide Guía del Usuario Contents Step 1: Install your batteries... 2 Step 2: Program your remote... 2 Auto Code
CONTROLADORA PARA PIXELS CONPIX
 The LedEdit Software Instructions 1, Install the software to PC and open English version: When we installed The LedEdit Software, on the desktop we can see following icon: Please Double-click it, then
3-Device Universal Remote Control
 3-Device Universal Remote Control Control Remoto Universal de 3 Dispositivos OARN03S User s Guide Guía del Usuario Contents Step 1: Install your batteries... 2 Step 2: Program your remote... 2 Auto Code
Assembly Instructions. Tools required for assembly: Small wrench. Operating Instructions. Cleaning Your KaZAM Bicycle WARNING: WARNING:
 A Assembly Instructions WARNING: WARNING: Tools required for assembly: Small wrench Operating Instructions - Cleaning Your KaZAM Bicycle Limited Warranty - two THIS WARRANTY DOES NOT COVER NORMAL WEAR
BZ User Manual Manual del Usuario
 BZ-4060 User Manual Manual del Usuario BZ-4060 RECHARGEABLE SPEAKER User s Guide Thank you for purchasing BZ-4060 Panacom s Rechargeable Speaker. Please read the manual carefully before operating. PACKING
Antena multidireccional plana amplificada para interiores Guía del usuario de ANT1650
 Antena multidireccional plana amplificada para interiores Guía del usuario de Felicidades por su adquisición de la Antena multidireccional plana amplificada para interiores como digitales. Antenas multidireccionales
Creating New Parent Accounts on SDUHSD Information Portal
 Creating New Parent Accounts on SDUHSD Information Portal Open your internet browser. Type in the URL address my.sduhsd.net Click on CREATE NEW ACCOUNT located on the bottom. In order to create an account,
QUICK GUIDE RECORD SETUP CONFIGURACIÓN DE GRABACIÓN English / Español
 QUICK GUIDE RECORD SETUP CONFIGURACIÓN DE GRABACIÓN English / Español ENGLISH SECTION Once you enter to the Main Screen on your DVR, press right button on the mouse and select the third icon called Record
Agustiniano Ciudad Salitre School Computer Science Support Guide - 2015 Second grade First term
 Agustiniano Ciudad Salitre School Computer Science Support Guide - 2015 Second grade First term UNIDAD TEMATICA: INTERFAZ DE WINDOWS LOGRO: Reconoce la interfaz de Windows para ubicar y acceder a los programas,
ZAPPER kameleon 6. Universal remote. Universal Fernbedienung. Télécommande universelle. Mando a Distancia Universal. Telecomando Universal
 URC-8060 702478 UK Universal remote Instructions manual................................p. 1 D Universal Fernbedienung Bedienungsanleitung..............................S. 17 F Télécommande universelle Mode
Creating your Single Sign-On Account for the PowerSchool Parent Portal
 Creating your Single Sign-On Account for the PowerSchool Parent Portal Welcome to the Parent Single Sign-On. What does that mean? Parent Single Sign-On offers a number of benefits, including access to
Decodificador de funciones v.2
 Decodificador de funciones v.. Introducción Este decodificador de funciones posee cuatro salidas para activar luces, fumígeno, etc. Dirección de locomotoras corta y larga hasta 9999 Control de las salidas
Learning Spanish Like Crazy. Spoken Spanish Lección Uno. Listen to the following conversation. Male: Hola Hablas inglés? Female: Quién?
 Learning Spanish Like Crazy Spoken Spanish Lección Uno. Listen to the following conversation. Male: Hola Hablas inglés? Female: Quién? Male: Tú. Hablas tú inglés? Female: Sí, hablo un poquito de inglés.
Sierra Security System
 Using Your SpreadNet Accessories With Your Sierra Security System Uso de Sus Accesorios SpreadNet Con Su Sistema de Seguridad Sierra SN990-KEYPAD SN961-KEYFOB SN991-REMOTE 1 SN990-KEYPAD The SN990-KEYPAD
Flashcards Series 2 Las Necesidades de la Vida
 Flashcards Series 2 Las Necesidades de la Vida Flashcards are one of the quickest and easiest ways to test yourself on Spanish vocabulary, no matter where you are! Test yourself on just these flashcards
1
 PARTS AND ACCESSORIES COLOR OF PIECES MAY VARY PARTES Y ACCESORIOS EL COLOR DE LAS PIEZAS PUEDE VARIAR 5 x 7 x IMPORTANT PRE-BUILD STEPS PREVIA IMPORTANTE PASOS DE COMPILACIÓN STEP PASO SEPARATE AND COUNT
Guía de instalación rápida TFM-561U
 Guía de instalación rápida TFM-561U V1 Table of Contents Español 1 1. Antes de iniciar 1 2. Cómo se instala 2 Troubleshooting 5 Version 08.25.2010 1. Antes de iniciar Contenidos del paquete TFM-561U CD-ROM
TELEVISOR A COLORES MANUAL DE SERVICIO MODELO : CP-29C40P. ATENCIÓN Antes de dar servicio al chasis, lea las PRECAUCIONES DE SEGURIDAD en este manual.
 LG TELEVISOR A COLORES MANUAL DE SERVICIO CHASIS : MC-53A MODELO : CP-29C40P ATENCIÓN Antes de dar servicio al chasis, lea las PRECAUCIONES DE SEGURIDAD en este manual. - 1 - - 2 - - 3 - - 4 - - 1 - -
 + 5.Instrucciones de Uso 5.1 Conexión del Reproductor Conecte el dispositivo como se muestra en las imágenes, encienda el reproductor y siga los siguientes pasos: 1. Si quiere usar el modo de video A/V
PARTS LIST LISTA DE PIEZAS
 PARTS LIST LISTA DE PIEZAS KEY GLIDE PATA DESLIZANTE ARTICULADA (9) END CAP TAPA DE EXTREMO (2) CENTER CENTRO (1) LEFT SIDE RAIL RIEL IZQUIERDO (1) RIGHT SIDE RAIL RIEL DERECHO (1) Bed Frame Assembly Instructions
 Limited TWO-YEAR Warranty SENSIO Inc. hereby warrants that for a period of TWO YEARS from the date of purchase, this product will be free from mechanical defects in material and workmanship, and for 90
Lea la hoja de INFORMACIÓN IMPORTANTE DE SEGURIDAD incluida en este empaque.
 frontal ANT3036W / ANT3036X Antena exterior Guía del Usuario ANTES DE COMENZAR!!! Lea la hoja de INFORMACIÓN IMPORTANTE DE SEGURIDAD incluida en este empaque. Paso 1: Desempaque Extraiga las tres secciones
FlexCage. User Manual MB975SP-B. 5 HDD Slots in 3 Device Bay. Tray-Less SATA Backplane Module
 FlexCage MB975SP-B 5 HDD Slots in 3 Device Bay Tray-Less SATA Backplane Module User Manual English Package Contents Front Panel Information HDD3 POWER BUTTON POWER / ACCESS LED INDICATOR HDD2 POWER BUTTON
USER MANUAL VMS FOR PC VMS PARA PC English / Español
 USER MANUAL VMS FOR PC VMS PARA PC English / Español ENGLISH SECTION You must enter into the application with the following data: Account Type: Local User Name: admin Password: admin If you want your PC
USER MANUAL LOGAN CAM VIEW FOR PC LOGAN CAM VIEW PARA PC English / Español
 USER MANUAL LOGAN CAM VIEW FOR PC LOGAN CAM VIEW PARA PC English / Español ENGLISH SECTION PC Installation 1. Download the application Logan Cam View for PC through the following link: https://support.logan-cam.com/hc/enus/articles/115000940287-logan-cam-view
IE12_ CONSOLIDACIÓN Y DESARROLLO DE NUEVAS TÉCNICAS DE EVALUACIÓN INTENSIVAS ON-LINE YA IMPLEMENTADAS POR EL GIE E4
 IE12_13-03001 - CONSOLIDACIÓN Y DESARROLLO DE NUEVAS TÉCNICAS DE EVALUACIÓN Departamento de Estructuras de la Edificación Escuela Técnica Superior de Arquitectura de Madrid Universidad Politécnica de Madrid
Añadir para firmar digitalmente documentos EDE. Add digital signatures to EDE documents
 Añadir para firmar digitalmente documentos EDE Add digital signatures to EDE documents Desarrollado por: DTE, LLC Versión: 01.2017 Developed by: DTE, LLC Revisado en: 27 de Marzo de 201 support@dtellcpr.com
Lentes deportivos con cámara espía integrada
 Lentes deportivos con cámara espía integrada Manual de instrucciones V0.1 / 0917v SPORTGLASS Antes de utilizar el producto, lea cuidadosamente este instructivo para evitar cualquier mal funcionamiento.
Tips to Complete the USI International Student Application Consejos para completar la solicitud de admisión como estudiante internacional en USI
 Tips to Complete the USI International Student Application Consejos para completar la solicitud de admisión como estudiante internacional en USI University of Southern Indiana no longer accepts paper applications.
Asignar y seguir el progreso del curso en línea de Seguridad de los alimentos de ServSafe International
 Asignar y seguir el progreso del curso en línea de Seguridad de los alimentos de ServSafe International Desde la página www.servsafeinternational.com, haga clic en el menú desplegable del Idioma y elija
Messages from Austin ISD via School Messenger
 Parental Controls in AISD Parent Cloud Messages from Austin ISD via School Messenger Parents/Guardians can choose how they receive messages from Austin ISD that are sent via SchoolMessenger. 1. Log in
Zune 8GB/4GB Start. Iniciar.
 Zune 8GB/4GB Start. Iniciar. SETUP 1 Visit www.zune.net/setup to install the Zune software. 2 When installation is complete, connect your Zune to your PC to start syncing. Your Zune charges whenever
QUICK GUIDE RECORD SETUP CONFIGURACIÓN DE GRABACIÓN English / Español
 QUICK GUIDE RECORD SETUP CONFIGURACIÓN DE GRABACIÓN English / Español ENGLISH SECTION Once you enter to the Main Screen on your DVR, press right button on the mouse and select the third icon called Record
Work Place 1M. Count & Compare Butterflies. 1. Find a partner.
 Blackline WP 1M.1 Run back-to-back with WP 1M.2 Work Place 1M WORK PLACE GAMES & ACTIVITIES Count & Compare Butterflies This Work Place basket will need H 3 Count & Compare Butterflies gameboards H 3 sets
AIR CONDITIONER OWNER S MANUAL. Please read this manual carefully before operating your set and retain it for future reference.
 OWNER S MANUAL AIR CONDITIONER Please read this manual carefully before operating your set and retain it for future reference. TYPE:WINDOW MODELS:LW1211ER P/NO:MFL67020201 www.lgappliances.com UNIT
Flashcards Series 5 El Agua
 Flashcards Series 5 El Agua Flashcards are one of the quickest and easiest ways to test yourself on Spanish vocabulary, no matter where you are! Test yourself on just these flashcards at first. Then, as
Might. Área Lectura y Escritura. In order to understand the use of the modal verb might we will check some examples:
 Might Área Lectura y Escritura Resultados de aprendizaje Conocer el uso del verbo modal might. Aplicar el verbo modal might en ejercicios de escritura. Contenidos 1. Verbo modal might. Debo saber - Verbos
Level 1 Spanish, 2013
 90911 909110 1SUPERVISOR S Level 1 Spanish, 2013 90911 Demonstrate understanding of a variety of Spanish texts on areas of most immediate relevance 9.30 am Tuesday 3 December 2013 Credits: Five Achievement
5-Device Universal Remote Control with Learning
 5-Device Universal Remote Control with Learning Control Remoto Universal de 5 Dispositivos con Aprendizaje Contents Step 1: Install your batteries... 2 Step 2: Program your remote... 2 Auto Code Search...
OWNER'S MANUAL MANUAL DEL PROPIETARIO
 Read all instructions BEFORE assembly and USE of product. KEEP INSTRUCTIONS FOR FUTURE USE. Lea todas las instrucciones ANTES de armar y USAR el producto. GUARDE LAS INSTRUCCIONES PARA USO FUTURO. www.gracobaby.com
El teclado viene pre-cargado de fábrica pero es recomendable cargarlo completamente la primera vez que lo utilices.
 PC-200680 Bienvenidos al mundo Perfect Choice Antes de comenzar a usar el producto es importante que leas esta guía. Carga del teclado El teclado viene pre-cargado de fábrica pero es recomendable cargarlo
TRONIC PRO MONTAJE / ASSEMBLY
 MONTAJE / ASSEMBLY 2 www.keya.cat www.keya.cat 5 6 www.keya.cat www.keya.cat 7 8 www.keya.cat www.keya.cat 9 10 www.keya.cat www.keya.cat 11 FAQ s Preguntas más frecuentes / Frequently asked questions
RCR460_NA_IB_.qxd 3/2/06 9:50 AM Page 1
 RCR460_NA_IB_.qxd 3/2/06 9:50 AM Page 1 CONTROLS UP TO 4 COMPONENTS MULTI-BRAND USE. MANEJA HASTA 4 COMPONENTES USO PARA MÚLTIPLES MARCAS. AdvancedTV VCR DVD Satellite/Cable functionality Special Home
Tiding with a double nut all together.
 Instrucciones para el material de práctica y uso del Reloj y La Hora para utilizarse en centros. 1. Imprima todo el material siguiente en cartonite tamaño 8.5 x 11 y corte las tarjetas en las líneas continuas
CHAMELEON R+A: ROLLER SHUTTERS AND AWNINGS CONTROL BOARD PARA PERSIANAS ENROLLABLES Y TOLDOS
 CONTROL BOARD PARA PERSIANAS ENROLLABLES Y TOLDOS Cuadro de control monofásico de alimentación 230V AC para puertas enrollables correderas y persiana, con receptor incorporado. Entradas de pulsador arriba/abajo
LAB 2: Circuitos de Corriente Directa (DC) PARTE I OBJECTIVES
 PARTE I OBJECTIVES") LAB : Circuitos de Corriente Directa (DC) PARTE I OBJECTIVES To learn to design and construct simple circuits using batteries, bulbs, wires and switches. To draw circuit diagrams using symbols To understand
LAB : Circuitos de Corriente Directa (DC) PARTE I OBJECTIVES To learn to design and construct simple circuits using batteries, bulbs, wires and switches. To draw circuit diagrams using symbols To understand
MANUAL DE INSTRUCCIONES BTW-41-B-N TORRE DE SONIDO BLUETOOTH-RADIO
 MANUAL DE INSTRUCCIONES BTW-41-B-N TORRE DE SONIDO BLUETOOTH-RADIO MONTAJE 1. Alinee los tornillos y apriete de manera uniforme. 2. No fuerce en exceso ya que podría provocar daños irreparables a la caja
WebForms con LeadTools
 WebForms con LeadTools 21.01.2007 Danysoft Con la aparición de la version 15 de LEADTOOLS, LEAD ha incluido un control.net para la gestión de formularios en la Web. A continuación le incluimos unas instrucciones
Level 1 Spanish, 2012
 90908 909080 1SUPERVISOR S Level 1 Spanish, 2012 90908 Demonstrate understanding of a variety of spoken Spanish texts on areas of most immediate relevance 9.30 am Tuesday 4 December 2012 Credits: Five
Timulus. Setup Manual CLEARTON, LLC. The Smart Security Camera. Better Technology for Humanity
 Timulus The Smart Security Camera Setup Manual CLEARTON, LLC Better Technology for Humanity Welcome to the World of Timulus! The smart security camera enabling the Free Use, the Never 21, and the Free
Guarantee English URC-8206 703070 GARANTIE Deutsch Instructions manual................................ P. 1 English GARANTIE Français
 ZA URC-8206 703070 English Deutsch Français Español Português Italiano Nederlands Instructions manual................................ P. 1 Bedienungsanleitung............................. S. 27 Mode d
Los nombres originales de los territorios, sitios y accidentes geograficos de Colombia (Spanish Edition)
") Los nombres originales de los territorios, sitios y accidentes geograficos de Colombia (Spanish Edition) Click here if your download doesn"t start automatically Los nombres originales de los territorios,
Los nombres originales de los territorios, sitios y accidentes geograficos de Colombia (Spanish Edition) Click here if your download doesn"t start automatically Los nombres originales de los territorios,
Paso 2: Descargar la app Wattio SmartHome Crear reglas en la app. Wattio SmartHo Guía rápida - Quick starting guide
 Guía rápida - Quick starting guide Paso 1: Abrir el pack Step 1: Open the pack Paso 2: Descargar la app Wattio SmartHome Crear reglas en la app. Wattio SmartHo Step 2: Download the Wattio SmartHome app
Step 2: Unfold the antenna s elements
 ANT751 Outdoor Antenna User s Guide BEFORE YOU START!!! included in this package. Step 1: Unpack Remove the antenna and the hardware bag from package. Make sure the following parts are in the package:
ATLAS DVR/PVR 5-DEVICE Universal Remote Control with Learning Control Remoto Universal con Aprendizaje
 ATLAS DVR/PVR 5-DEVICE Universal Remote Control with Learning Control Remoto Universal con Aprendizaje Users Guide Guía del Usuario TABLE OF CONTENTS Introduction............................................
Ingreso a DatAcademy mediante Telefónica Accounts. Versiones: Español / Ingles Guía de usuario / User Guide
 Ingreso a DatAcademy mediante Telefónica Accounts Versiones: Español / Ingles Guía de usuario / User Guide Versión Español: Guía de usuario 2 Qué es Telefónica Accounts? Es una solución de Single-Sign-On
RM94904 Universal. Remote Control INSTRUCTION MANUAL
 RM94904 Universal Remote Control INSTRUCTION MANUAL Table Of Contents Button Description...................1-3 Battery Installation.....................2 Programming Your Universal Remote TV..............................4
Going Home. Medicines. Pain. Diet
 Going Home After an illness or injury, some things may change in your life. Make sure you and your family know the answers to these questions before you go home from the hospital. Medicines Am I taking
QUICK START GUIDE ENGLISH
 QUICK START GUIDE ENGLISH WHAT S INCLUDED [ 1 ] Pro 3 Battery [ 1 ] Pro 3 Atomizer (2.0ohm) [ 1 ] Pro 3 Tank (w/ pre-installed 2.0ohm atomizer [ 1 ] Micro USB Cord [ 1 ] Pack of O-rings (4) NOTE: Included
8-Device Universal Remote Control with Learning
 8-Device Universal Remote Control with Learning Control Remoto Universal de 8 Dispositivos con Aprendizaje OARN08G User s Guide Guía del Usuario Contents Step 1: Install your batteries... 2 Step 2: Program
Bluebeam Digital Certification Manual
 Manual Certificación Digital en Bluebeam Revu Bluebeam Digital Certification Manual Desarrollado por: DTE, LLC support@dtellcpr.com Developed by: DTE, LLC Revisado en: 20 de julio de 2016. Ver. 1.101.0720
Model: XL180. User s Guide. Bathroom Scale Extra-Large Display.
 Model: XL180 User s Guide Bathroom Scale Extra-Large Display www.escali.com OPERATING INSTRUCTIONS Thank you for choosing the Escali XL180, Extra Large Display scale. This precision state-of-the-art measuring
SuperInventos.com S MANDO 8 EN 1. SuperInventos.com S MANDO 8 EN 1 MANDO REMOTO X10 8 EN 1. Manual de Instrucciones
 SuperInventos.com Sistemas de Automatización del Hogar S110227 MANDO 8 EN 1 MANDO REMOTO X10 8 EN 1 Manual de Instrucciones CARACTERISTICAS PRINCIPALES Mando de control remoto universal pre-programado
INDEX. To find the instructions that apply to your watch, please refer to the descriptions listed below:
 I N S T R U C T I O N M A N U A L INDEX The innovative design of this LAPIZTA timepiece is crafted using materials and elements that reflect extreme lifestyles. Enjoy it and embrace your INFINITE PASSION.
ELBE ALTAVOZ PORTÁTIL
 ELBE ALTAVOZ PORTÁTIL ATENCIÓN Este producto está diseñado para uso doméstico. No debe utilizarse con ninguna otra intención o aplicación, como con fines comerciales o entornos no domésticos. ESQUEMA ES-1
Universal Remote Instruction Manual
 Universal Remote Instruction Manual 29519 25040 7252 Table of Contents Introduction... 2 Setup... 3 Button Functions... 4 Programming Your Remote... 6 Direct Code Entry... 6 Auto Code Search... 8 Master
ATTIC/OUTDOOR COMPACT DESIGN HD ANTENNA User s Guide. What s in the box? (1) Antenna boom (2) Reflectors. (2) Reflector clamps.
 Antenna boom (2) Reflectors. (2) Reflector clamps.") ATTIC/OUTDOOR COMPACT DESIGN HD ANTENNA User s Guide What s in the box? (1) Antenna boom (2) Reflectors (2) Reflector clamps (1) Balun housing (2) VHF folding dipoles (2) UHF X dipoles (1) Mounting bracket
ATTIC/OUTDOOR COMPACT DESIGN HD ANTENNA User s Guide What s in the box? (1) Antenna boom (2) Reflectors (2) Reflector clamps (1) Balun housing (2) VHF folding dipoles (2) UHF X dipoles (1) Mounting bracket
Do Now! Question 1: Pregunta 1
 Do Now! Question 1: What do you predict Scratch Cat will do according to this block of code? Write your response in your journal. Pregunta 1 : Qué predices el gato hará de acuerdo con este bloque de código?
BAI-220 AURICULAR INALÁMBRICO
 BAI-220 AURICULAR INALÁMBRICO Manual de usuario ESPECIFICACIONES TÉCNICAS EMISOR Frecuencia: 86 ± 0.5 MHz Modulación: FM Distancia de emisión: 30 m. Recepción de cualquier equipo de audio y video con salida
car seat adapter adaptador del asiento de automóvil CXBEX/MAXI COSI/NUNA babyjogger.com ASSEMBLY INSTRUCTIONS INSTRUCCIONES DEL ENSAMBLAJE PD349778A
 CXBEX/MAXI COSI/NUNA car seat adapter adaptador del asiento de automóvil PD349778A babyjogger.com ASSEMBLY INSTRUCTIONS INSTRUCCIONES DEL ENSAMBLAJE CITY PREMIER CITY SELECT CITY SELECT LUX 1 2 CLICK 3
5-Device Universal Remote Control with Learning
 5-Device Universal Remote Control with Learning Control Remoto Universal de 5 Dispositivos con Aprendizaje OARN05G User s Guide Guía del Usuario Contents Step 1: Install your batteries... 2 Step 2: Program
Universal Remote Instruction Manual. Control Remoto Universal Manual de Instrucciones
 Universal Remote Instruction Manual Control Remoto Universal Manual de Instrucciones 25020 11561 11560 11558 7252 Table of Contents Introduction... 2 Setup... 3 Button Functions... 4 Programming Your Remote...
Computer Science. Support Guide First Term Fourth Grade. Agustiniano Ciudad Salitre School. Designed by Mary Luz Roa M.
 2018 Computer Science Support Guide First Term Fourth Grade Designed by Mary Luz Roa M. Agustiniano Ciudad Salitre School PLANEACION PRIMER PERIODO UNIDAD TEMATICA: GENERALIDADES DE POWER POINT Y USO RESPONSABLE
Soluciones Innovadoras
 CONECTOR TLC 8802 Manual de instalación para cable FRP Soluciones Innovadoras Your Broadband Deployment Partner Para cable FRP El nuevo conector de 3M TLC 8802 sin herramientas permite una rapida instalación
SAMPLE EXAMINATION BOOKLET
 S SAMPLE EXAMINATION BOOKLET New Zealand Scholarship Spanish Time allowed: Three hours Total marks: 24 EXAMINATION BOOKLET Question ONE TWO Mark There are three questions. You should answer Question One
BT-119-RDS MANUAL DE INSTRUCCIONES
 BT-119-RDS MANUAL DE INSTRUCCIONES SITUACIÓN DE LOS CONTROLES 1.Pantalla LCD 2.Apagado.FM.AM (OFF.FM.AM) 3.M+ / Borrado 4.Control de volumen 5.Toma para auriculares estéreo 6.Orificio para la correa 7.
Teoría general del proyecto. Vol. I: Dirección de proyectos (Síntesis ingeniería. Ingeniería industrial) (Spanish Edition)
 (Spanish Edition)") Teoría general del proyecto. Vol. I: Dirección de proyectos (Síntesis ingeniería. Ingeniería industrial) (Spanish Edition) Manuel De Cos Castillo Click here if your download doesn"t start automatically
Teoría general del proyecto. Vol. I: Dirección de proyectos (Síntesis ingeniería. Ingeniería industrial) (Spanish Edition) Manuel De Cos Castillo Click here if your download doesn"t start automatically
MANUAL DE INSTRUCCIONES TECLADO PARA TABLETA ACC-5188TKB
 MANUAL DE INSTRUCCIONES TECLADO PARA TABLETA ACC-5188TKB ESTIMADO CLIENTE Con el fin de que obtenga el mayor desempeño de su producto, por favor lea este manual de instrucciones cuidadosamente antes de