GGM.L038 Ed CHRONOGRAPH. INSTRUCTION MANUAL BEDIENUNGSANLEITUNG MANUAL DE INSTRUCCIONES USE FOR SERIES 9440
|
|
|
- Victoria Torres Medina
- hace 7 años
- Vistas:
Transcripción
1 GGM.L08 Ed CHRONOGRAPH INSTRUCTION MANUAL BEDIENUNGSANLEITUNG MANUAL DE INSTRUCCIONES USE FOR SERIES 9440

2 H I G F L CRONÓGRAFO A C KEY LEYENDA Push button Crown Drücker Krone Botón pulsador Corona Hour hand Stundenzeiger Aguja de las horas Minute hand Minutenzeiger Aguja de los minutos Second hand Sekundenzeiger Aguja de los segundos * * * * R B

3 Chrono: seconds Chrono: Sekunden Cronógrafo: segundos * Chrono: minutes and hours Chrono: Minuten und Stunden Cronógrafo: minutos y horas Date Datum Fecha

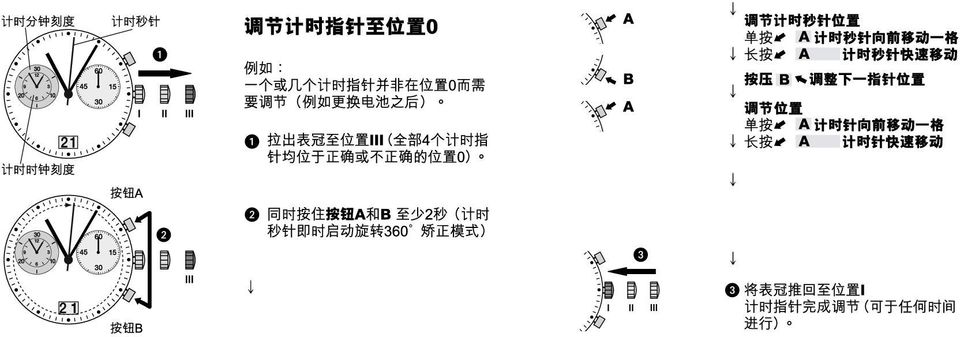
4 Minute counter Centre stop-second 0 I II III Hour counter Push-button A 0 III Push-button B Adjusting the chronograph hands to zero position Example: One or several chronograph hands are not in their correct zero positions and have to be adjusted (e.g. following a battery change). Pull out the crown to position III (all chronograph hands are in their correct or incorrect zero position). Keep push-buttons A and B depressed simultaneously for at least 2 seconds (the centre stop-second rotates by 0 corrective mode is activated). I A B A II III Adjusting the centre stop second Single step A 1 x short Continuous A long Adjusting the next hand B Adjusting the minute counter hand and the hour counter hand (mechanical coupled) Single step A 1 x short Continuous A long Returning the crown to position I Termination of the chronograph hands adjustment (can be carried out at any time).
")
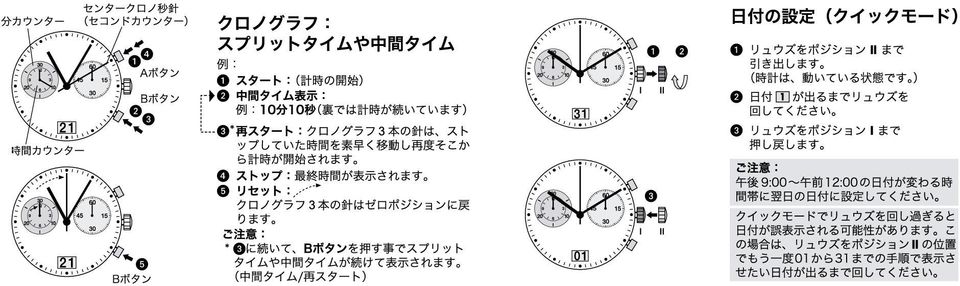
5 Minute counter 9 Hour counter 45 0 Second counter 15 Push-button A Chronograph: Basic function (Start / Stop / Reset ) Example: Start: Press push-button A. Stop: to stop the timing, press push-button A once more and read the chronograph counters: 4h / min / 8 sec Minute counter Second counter Hour counter 0 Push-button A Chronograph: Accumulated timing Example: Start: (start timing) Stop: (e.g. 15min 5 sec following ) Restart: (timing is resumed) * Stop: (e.g. min 5 sec following ) = 25 min sec (The accumulated measured time is shown) Push-button B Zero positioning: Press push-button B. (The chronograph hands will be reset to their zero positions). 0 Push-button B Reset: The chronograph hands are returned to their zero positions. Please note: * Following, the accumulation of the timing can be continued by pressing pushbutton A (Restart / Stop, Restart / Stop, )
. 0 Push-button B Reset: The chronograph hands are returned to their zero positions.")
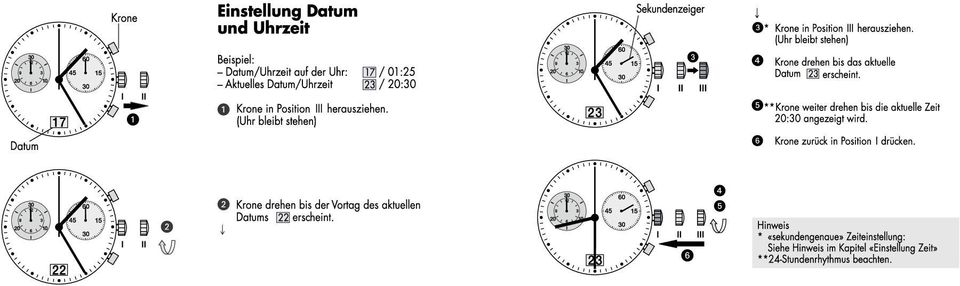
6 Minute counter Second counter Hour counter 0 0 Push-button A Push-button B Push-button B Chronograph: Intermediate or interval timing Example: Start: (start timing) Display interval : e.g. minutes seconds (timing continues in the background) * Making up the measured time: (the 4 chronograph hands are quickly advanced to the ongoing measured time) Stop: (Final time is displayed) Reset: The chronograph displays are returned to their zero position. Please note: * Following, further intervals or intermediates can be displayed by pressing push-button B (display interval / make up measured time,...) 0 0 I I II II Setting the date (quick mode) Pull out the crown to position II (the watch continues to run). Tu rn the crown until the correct date 1 appears. Push the crown back into position I. Please note: During the date changing phase between 9 PM and PM; the date must be set to the date of the following day. An extreme acceleration in setting the date with quick mode can induce a false date indication. The synchronization is re-established by setting the date from 01 till 1 (crown in position II).

7

8 Minutenzähler Stundenzähler 0 Sekundenzähler I II III Drücker A Ausrichtung der Chronographzeiger auf Nullposition Beispiel: Einer oder mehrere Chronographzeiger sind nicht in ihren korrekten Nullpositionen und müssen ausgerichtet werden (z.b. nach Batteriewechsel) Krone in Position III herausziehen. (Alle Chronographenzeiger stellen sich in ihre korrekte bzw. nicht korrekte Nullposition) A B A Ausrichtung der Zentrumstoppsekunde Einzelschritt: A 1 x kurz Kontinuierlich: A lang Nächsten Zeiger ausrichten B Ausrichtung des Minutenzählerzeiger und des Stundenzählerzeigers (Pos. 9h) (sind mechanisch gekoppelt) Einzelschritt: A 1 x kurz Kontinuierlich: A lang 0 III Drücker A und B gleichzeitig während mindestens 2 Sekunden drücken. (Der Zentrumstoppsekundenzeiger dreht um 0 Korrekturmodus ist aktiviert) I II III Krone in Position I zurückdrücken Abschluss der Chronographzeiger -Ausrichtung. (dies ist jederzeit möglich) Drücker B
 (sind mechanisch gekoppelt) Einzelschritt: A 1 x kurz Kontinuierlich: A lang 0 III Drücker A und B gleichzeitig während mindestens 2 Sekunden drücken.")
9 Minutenzähler Stundenzähler Sekundenzähler 0 Drücker A Chronograph: Grundfunktion (Start / Stopp / Nullstellung) Beispiel : Start: Drücker A drücken Stopp: Um die Zeitmessung abzubrechen, Drücker A nochmals drücken und die 4 Chronographenzähler ablesen: 4h / Min. / 8 Sekunden Minutenzähler Stundenzähler Sekundenzähler 0 Drücker A Chronograph: Aufaddierte Zeitmessung Beispiel : Start: (Zeitmessung starten) Stopp: (z.b. 15Min. 5 Sek. nach ) Restart:(Zeitmessung wieder freigeben) * Stopp: (z.b. Min. 5 Sek. nach ) = 25 Min. Sek. (Aufaddierte Messzeit wird angezeigt) 0 Drücker B Nullstellung: Drücker B drücken. (Die Chronographenzeiger werden in ihre Nullstellungen zurückgestellt). 0 Drücker B Nullstellung: Die Chronographanzeigen werden in ihre Nullpositionen zurückgestellt. Hinweise * Nach kann die Aufaddierung der Zeitmessung fortgesetzt werden. Dies über Drücker A (Restart / Stopp, Restart / Stopp, )
 Restart:(Zeitmessung wieder freigeben) * Stopp: (z.b. Min. 5 Sek. nach ) = 25 Min. Sek. (Aufaddierte Messzeit wird angezeigt) 0 Drücker B Nullstellung: Drücker B drücken.")
10 Minutenzähler Stundenzähler Sekundenzähler 0 0 Drücker A Drücker B Drücker B * Chronograph: Zwischenzeitmessung Beispiel : Start: (Messzeit starten) Zwischenzeit anzeigen: z.b. Min. Sek. (die Zeitmessung läuft im Hintergrund weiter) Messzeit aufholen: (die Chronographanzeigen werden im Schnelllauf auf die weitergelaufene Messzeit nachgeführt.) Stopp: (Endzeit wird angezeigt) Nullstellung: Die Chronographanzeigen werden in ihre Nullpositionen zurückgestellt. Hinweise * Nach können weitere Zwischenzeiten angezeigt werden. Dies über Drücker B (Zwischenzeit anzeigen / Messzeit aufholen,...) 0 0 I I II II Schnellkorrektur Datum Krone in Position II herausziehen. (Uhr läuft weiter) Krone drehen bis das aktuelle Datum 01 erscheint Krone zurück in Position I drücken Hinweis In der Kalenderschaltphase von 21:00 bis 24:00 Uhr muss das Datum des folgenden Tages eingestellt werden. Extreme Beschleunigung in der Schnellkorrrektur kann zu einer falschen Datumsanzeige führen. Durch Schalten des Datums von 01 bis 1 (Krone Position II) wird die Synchronisation wieder hergestellt.
 Krone drehen bis das aktuelle Datum 01 erscheint Krone zurück in Position I drücken Hinweis In der Kalenderschaltphase von 21:00 bis 24:00 Uhr muss das Datum des folgenden Tages")
11
12 Contador de minutos 9 Contador de horas Cronómetro segundero central I II III Botón pulsador A Ajuste de las agujas del cronógrafo en la posición cero Ejemplo: Una o más agujas del cronógrafo no están en la posición cero que les corresponde y es necesario ajustarlas (por ejemplo después de cambiar la pila). Tire de la corona para situarla en la posición III (las tres agujas del cronógrafo se sitúan en su posición cero, correcta o incorrecta). A B A Ajuste del cronómetro segundero central Paso a paso: A 1 x corto Continuo: A largo Ajuste de la siguiente aguja B Ajuste de la aguja del contador de minutos y de la aguja del contador de horas (acoplamiento mecánico) Paso a paso: A 1 x corto Continuo: A largo III Mantenga pulsados simultáneamente los botones pulsadores A y B durante al menos 2 segundos (la aguja del cronómetro segundero central gira 0 se activa el modo de corrección). I II III Situar de nuevo la corona en la posición I Fin del ajuste de las agujas del cronógrafo (esto puede hacerse en cualquier momento). Botón pulsador B

13 Contador de minutos Contador de segundos 9 Contador de horas Botón pulsador A Cronógrafo: Función básica (Puesta en marcha / Parada / Puesta a cero) Ejemplo: Puesta en marcha: Pulse el botón pulsador A. Parada: Para detener la cronometrización, pulse nuevamente el botón pulsador A y lea las cuatro agujas del cronógrafo: 4h / min. / 8 seg. Contador de minutos Contador de segundos 9 Contador de horas Botón pulsador A Cronógrafo: Cronometrización acumulada Ejemplo: Puesta en marcha: (inicio de la cronometrización) Parada: (por ejemplo 15 min. 5 seg. después de ) Reinicio: (se reanuda la cronometrización) * Parada: (por ejemplo min. 5 seg. después de ) = 25 min. seg. (Se muestra el tiempo medido acumulado) Botón pulsador B Puesta a cero: Pulse el botón pulsador B (Las tres agujas del cronógrafo vuelven a su posición cero) Botón pulsador B Puesta a cero: Die Chronographanzeigen werden in ihre Nullpositionen zurückgestellt. Nota: * Después de puede proseguirse con la acumulación de la cronometrización pulsando para ello el botón pulsador A (Reinicio / Parada, Reinicio / Parada, )
 Reinicio: (se reanuda la cronometrización) * Parada: (por ejemplo min. 5 seg. después de ) = 25 min. seg. (Se muestra el tiempo medido acumulado) 9 45 0 15 Botón pulsador B Puesta a cero: Pulse el botón pulsador B (Las tres agujas del cronógrafo vuelven a su posición cero).")
14 Contador de minutos Contador de horas Contador de segundos Botón pulsador A Botón pulsador B Botón pulsador B * Cronógrafo: Cronometrización de tiempos intermedios o intervalos Ejemplo: Puesta en marcha: (inicio de la cronometrización) Lectura del intervalo: por ejemplo minutos segundos (la cronometrización continúa en segundo plano) Recuperación del tiempo medido: (las tres agujas del cronógrafo recuperan a marcha rápida el tiempo medido ya transcurrido) Parada: (se muestra el tiempo final) Puesta a cero: Las tres agujas del cronógrafo vuelven a su posición cero Nota: * Después de pueden mostrarse otros tiempos intermedios o intervalos, pulsando el botón pulsador B (lectura de intervalo / recuperación del tiempo medido, ) 0 0 I I II II Ajuste de la fecha (modo rápido) Tire de la corona para situarla en la posición II (el reloj prosigue su marcha). Gire la corona hasta que aparezca la fecha correcta 01. Empuje la corona para situarla de nuevo en la posición I. Nota: En la fase de cambio de fecha comprendida entre las 21:00 y las 24:00 horas, la fecha debe ajustarse en la fecha del día siguiente. La aceleración extrema en el ajuste de la fecha con el modo rápido puede inducir una indicación falsa de la fecha. La sincronización se restablece ajustando la fecha del 01 al 1 (corona en la posición II).
 0 0 I I II II Ajuste de la fecha")
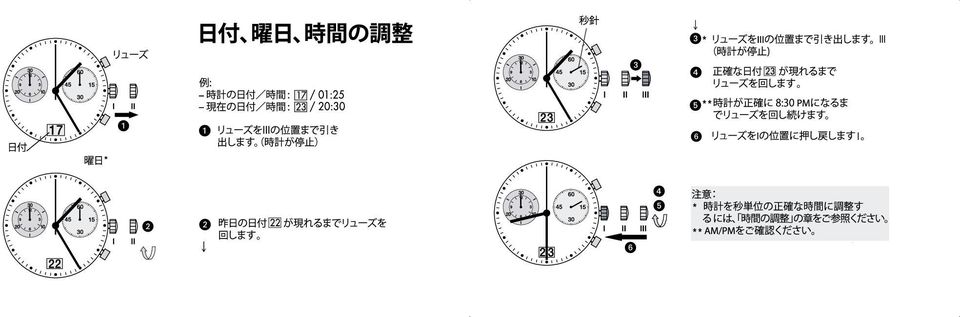
15 Ajuste de la fecha / hora Ejemplo: - Fecha / hora en el reloj: - Fecha / hora actuales: Tire de la corona para situarla en la posición III (el reloj se para). Gire la corona hasta que aparezca la fecha del día anterior. Second counter Tire de la corona para situarla en la posición III (el reloj se para). Gire la corona hasta que aparezca la fecha correcta. Siga girando la corona hasta que aparezca la hora correcta :. Empuje la corona para situarla de nuevo en la posición I. Nota: Para ajustar el reloj en el segundo exacto, consulte el capítulo titulado Ajuste de la hora. Tenga en cuenta el modo horario de 24 h (AM / PM).

16

17

18
19
20
21 8
22
23
24 TECHNICAL DATA TECHNISCHE DATEN DATOS TÉCNICOS 48 month Ronda 50.B 95/SR 927 SW Movement Battery Battery life Working temperatures Stainless steel case Uhrwerk-Typ Batterie-Typ Batterie- Lebensdauer Betriebstemperatur Edelstahlgehäuse Movimiento Pila Duración de la pila Temperatura de funcionamiento Caja de acero inoxidable
25 SCREWED CROWN VERSCHRAUBTE KRONE CORONA ATORNILLADA The watch is equipped with a screw-in crown. The crown must be screwed in order to guarantee the water resistance. The crown may only be unscrewed and screwed down by hand. Die Uhr wurde mit einer verschraubten Krone ausgestattet. Um die Wasserdichtigkeit zu garantieren, muss die Krone verschraubt sein. Die Krone darf nur von Hand auf- und zugeschraubt werden. El reloj está equipado con una corona atornillable. La corona debe estar atornillada con el fin de garantizar la resistencia al agua. La corona solo puede desatornillarse y atornillarse manualmente.
H I G * A B S F L 21 C
 1 1 4 H I G * S F L K R 0 45 1 0 15 B 1 C Minute counter Centre stop-second 0 0 1 1 Hour counter 1 1 0 0 I II III 1 second counter Push-button III Push-button B djusting the chronograph hands to zero
INDEX. To find the instructions that apply to your watch, please refer to the descriptions listed below:
 I N S T R U C T I O N M A N U A L INDEX The innovative design of this LAPIZTA timepiece is crafted using materials and elements that reflect extreme lifestyles. Enjoy it and embrace your INFINITE PASSION.
CARACTERÍSTICAS AGUJA DE DÍAS MINUTERO AGUJA DE HORAS SEGUNDERO CORONA N 1 2
 VX7PE CARACTERÍSTICAS AGUJA DE DÍAS MINUTERO AGUJA DE HORAS SEGUNDERO CORONA AGUJA DE FECHA Corona N : Posición normal 1 : Primera posición de clic 2 : Segunda posición de clic 3 Cómo ajustar la hora
(position 6h) (position 9h)
 (position 9h)") 7 6 1 1 8 2 1 8 9 8 (position 6h) (position 9h) the three chronograph hands: 1h / 20min / 10 sec. (e. g. 1 min 5 sec following = 28 min 10 sec (The three chronograph hands will be reset to their zero
7 6 1 1 8 2 1 8 9 8 (position 6h) (position 9h) the three chronograph hands: 1h / 20min / 10 sec. (e. g. 1 min 5 sec following = 28 min 10 sec (The three chronograph hands will be reset to their zero
MANUAL DE INSTRUCCIONES / USER'S GUIDE VD31
 MANUAL DE INSTRUCCIONES / USER'S GUIDE VD31 ESP AJUSTE DE LA POSICIÓN DE LA HORA DUAL - Después de configurar o de cambiar la batería, antes de configurar la hora, verifique si la aguja de hora dual está
MANUAL DE INSTRUCCIONES / USER'S GUIDE VD53
 MANUAL DE INSTRUCCIONES / USER'S GUIDE VD53 ESP AJUSTAR LA POSICIÓN DE LAS MANECILLAS DEL CRONÓMETRO - Antes de fijar la hora, compruebe que todas las manecillas del cronógrafo - segundos, minutos - estén
Calibre-Caliber-Kaliber-Calibre 9238/1970 (WITH ALL THE FUNCTIONS) 9231/1890 (WITHOUT 24-HOUR / SECOND TIME ZONE) 9238/1960 (WITHOUT DAY)
 9231/1890 (WITHOUT 24-HOUR / SECOND TIME ZONE) 9238/1960 (WITHOUT DAY)") JOUR, DATE, 24-HEURES / DEUXIÈME FUSEAU HORAIRE DAY, DATE, 24-HOUR / SECOND TIME ZONE TAG, DATUM, 24-STUNDEN / ZWEITE ZEITZONE DIA, FECHA, 24-HORAS / SEGUNDA ZONA HORARIA Calibre-Caliber-Kaliber-Calibre
JOUR, DATE, 24-HEURES / DEUXIÈME FUSEAU HORAIRE DAY, DATE, 24-HOUR / SECOND TIME ZONE TAG, DATUM, 24-STUNDEN / ZWEITE ZEITZONE DIA, FECHA, 24-HORAS / SEGUNDA ZONA HORARIA Calibre-Caliber-Kaliber-Calibre
MANUEL D INSTRUCTIONS - INSTRUCTIONS MANUAL - BETRIEBSANLEITUNG - MANUAL DE INSTRUCCIONES Français - English - Deutsch - Español
 JOUR, DATE, 24-HEURES / DEUXIÈME FUSEAU HORAIRE DAY, DATE, 24-HOUR / SECOND TIME ZONE TAG, DATUM, 24-STUNDEN / ZWEITE ZEITZONE DIA, FECHA, 24-HORAS / SEGUNDA ZONA HORARIA MANUEL D INSTRUCTIONS - INSTRUCTIONS
DATE DAY DATE BIG DATE. Instruction Bedienungsanleitung Mode d emploi Instrucciones de uso Istruzioni per l uso
 DATE DAY DATE BIG DATE Instruction Bedienungsanleitung Mode d emploi Instrucciones de uso Istruzioni per l uso DATE Normal position: Position 1 Setting the date: Position 2 Pull the crown out to position
MANUEL D INSTRUCTIONS - INSTRUCTIONS MANUAL - BETRIEBSANLEITUNG - MANUAL DE INSTRUCCIONES Français - English - Deutsch - Español
 2 AIG., 3 AIG. ET 3 AIG./DATE ANALOGIQUE 2 HANDS, 3 HANDS AND 3 HANDS/DATE ANALOG 2 ZEIGER, 3 ZEIGER UND 3 ZEIGER/DATUM ANALOG 2 MANECILLAS, 3 MAN. Y 3 MAN./FECHA ANALÓGICO MANUEL D INSTRUCTIONS - INSTRUCTIONS
MANUAL DE INSTRUCCIONES
 MANUAL DE INSTRUCCIONES GUESS WATCHES 1 MUJER MUJER 2 MUJER Enhorabuena por la compra de su nuevo reloj GUESS. Éste ha sido desarrollado con una avanzada tecnología electrónica y se ha fabricado con los
MANUAL DEL USUARIO E S F E R A PROGRAMACIÓN DE LA HORA
 E S F E R A PROGRAMACIÓN DE LA HORA A B C = /0 seg. J D I H G F E AJUSTAR Chrono automatic LISTO A B D H E I C G F AJUSTAR Retrograde A G C = / min. D E I H B F A: Contador de minutos (60 minutos) A: Contador
AUTOMATIC CHRONOGRAPH
 www.luminox.com 7 6 1 1 3 8 2 2 7 7 3 7 4 GGM.L010 Ed. 05.15 AUTOMATIC CHRONOGRAPH INSTRUCTION MANUAL BEDIENUNGSANLEITUNG MANUAL DE INSTRUCCIONES USE FOR SERIES 1860, 1180, 9080, 5260, 9460 KEY 60 A+C
MANUAL DE INSTRUCCIONES
 MANUAL DE INSTRUCCIONES GUESS WATCHES 1 MUJER MUJER 2 MUJER Enhorabuena por la compra de su nuevo reloj GUESS. Éste ha sido desarrollado con una avanzada tecnología electrónica y se ha fabricado con los
SFD-200-N-B DESPERTADOR-PROYECTOR-CON VOZ. Manual de instrucciones
 SFD-200-N-B DESPERTADOR-PROYECTOR-CON VOZ Manual de instrucciones Funciones: - Proyección de la hora - Proyección controlada por sonidos y vibraciones (palmada, etc.) - Pantalla retroiluminada azul - Hora
1. Conecte el transmisor FM al dispositivo encendedor del coche o a una fuente de alimentación.
 INSTRUCCIONES PARA EL USO DEL TRANSMISOR FM: 1. Conecte el transmisor FM al dispositivo encendedor del coche o a una fuente de alimentación. 2. Sintonice la radio en la frecuencia FM que desee y haga coincidir
GUÍA RÁPIDA QUICK GUIDE
 GUÍA RÁPIDA QUICK GUIDE GUÍA RÁPIDA - VINCULACIÓN Medidor de potencia VINCULACIÓN AUTOMÁTICA ES Asegúrese de que está al menos 10 metros alejado de cualquier otro sensor ANT+TM y siga los siguientes pasos.
Tiding with a double nut all together.
 Instrucciones para el material de práctica y uso del Reloj y La Hora para utilizarse en centros. 1. Imprima todo el material siguiente en cartonite tamaño 8.5 x 11 y corte las tarjetas en las líneas continuas
ENGLISH ENGLISH EASY SET ALARM
 ENGLISH ENGLISH EASY SET ALARM HOUR MARKER ALARM SET TURNING RING MINUTE MARKER A B C D E F TIMEKEEPING / INDIGLO NIGHT-LIGHT CROWN. PUSH CROWN TO ACTIVATE THE INDIGLO NIGHT-LIGHT POSITION POSITION ALARM
BT-119-RDS MANUAL DE INSTRUCCIONES
 BT-119-RDS MANUAL DE INSTRUCCIONES SITUACIÓN DE LOS CONTROLES 1.Pantalla LCD 2.Apagado.FM.AM (OFF.FM.AM) 3.M+ / Borrado 4.Control de volumen 5.Toma para auriculares estéreo 6.Orificio para la correa 7.
CHAMELEON R+A: ROLLER SHUTTERS AND AWNINGS CONTROL BOARD PARA PERSIANAS ENROLLABLES Y TOLDOS
 CONTROL BOARD PARA PERSIANAS ENROLLABLES Y TOLDOS Cuadro de control monofásico de alimentación 230V AC para puertas enrollables correderas y persiana, con receptor incorporado. Entradas de pulsador arriba/abajo
INSTRUCCIONES DE USO RELOJES ESTáNDaRES
 INSTRUCCIONES DE USO RELOJES estándares Modo de empleo Instrucciones para relojes con movimiento de cuarzo Cuarzo con 2 agujas Posición normal de funcionamiento: corona en posición I, contra la caja. Puesta
MM9238 A0 PRESENTACIÓN SINCRONIZAR EL DÍA Y LA FECHA AGUJA HORARIA MINUTERO DÍA DE LA SEMANA SEGUNDERO CORONA 24H FECHA
 8 0 MM98 A0 MANUAL DE NSTRUCCONES PRESENTACÓN AGUJA HORARA MNUTERO DÍA DE LA SEMANA SEGUNDERO SAT SUN MON TUE FR THU WED 6 0 8 6 5 7 9 5 7 9 7 5 9 CORONA H FECHA SNCRONZAR EL DÍA Y LA FECHA de la fecha
USER GUIDE Weather Station Clock Functions: Display time Calendar (date, week, year year display: 2003 to 2052) Alarm & Snooze Temperature
 Alarm & Snooze Temperature") USER GUIDE Weather Station Clock Functions: Display time Calendar (date, week, year year display: 2003 to 2052) Alarm & Snooze Temperature (Fahrenheit/Centigrade: 0 to 50 or 32 to 122 Humidity: 20% to
USER GUIDE Weather Station Clock Functions: Display time Calendar (date, week, year year display: 2003 to 2052) Alarm & Snooze Temperature (Fahrenheit/Centigrade: 0 to 50 or 32 to 122 Humidity: 20% to
CLK-150 CRONÓMETRO DEPORTIVO RESISTENTE AL AGUA. Manual de instrucciones
 CLK-150 CRONÓMETRO DEPORTIVO RESISTENTE AL AGUA Manual de instrucciones 0417m V0.1 IMPORTANTE Lea cuidadosamente este instructivo para evitar cualquier mal funcionamiento. La información que se muestra
M M 6 P25-6 P75 MM6P25-6P75.indd 1 7/11/14 15:45:33
 MM6P25-6P75 MANUAL DE INSTRUCCIONES A) Visualización B) Procedimiento de manejo C) Ajuste del día y la hora (hora, minuto, segundo) D) Ajuste de la fecha (por operación rápida) A) VISUALIZACIÓN MANECILLA
TX MULTI MANUAL TX MULTI. Mando copiador multifrecuencia 1. PASOS PARA COPIAR UN MANDO CÓDIGO FIJO Y ROLLING ESTÁNDAR:
 MANUAL TX MULTI Mando copiador multifrecuencia 1. PASOS PARA COPIAR UN MANDO CÓDIGO FIJO Y ROLLING ESTÁNDAR: 1. Situar el mando original que desea copiar junto al TX Multi, en torno a 2-4 centímetros de
FUNCIÓN DE AJUSTE DE LA HORA PARA 2 Y 3 MANECILLAS
 ESPAÑOL FUNCIÓN DE AJUSTE DE LA HORA PARA 2 Y 3 MANECILLAS Manecilla de la hora Minutero I II Corona AJUSTAR LA HORA 1. Tire de la corona hacia afuera y colóquela en la posición II (el reloj se parará).
BAND WIRELESS. Funcionamiento. Especificaciones de seguridad. - Tiempo de reacción <60ms - EN13849-1 - Equipo con alimentación SELV/PELV.
 Kit formado por un transmisor y un receptor para la comunicación de bandas resistivas o bandas mecánicas hacia el cuadro de maniobra vía radio. Funcionamiento Especificaciones de seguridad - Tiempo de
MMS. Operation. Engine Start and Stop
 MMS Operation Engine Start and Stop Engine Start MAZDA MOBILE START (MMS) 1) Tap the "Start" icon on the lower menu. 2) Tap the "START" button. 3) Enter your PIN (4 digits) to start the engine. [For iphone]
Decodificador de funciones v.2
 Decodificador de funciones v.. Introducción Este decodificador de funciones posee cuatro salidas para activar luces, fumígeno, etc. Dirección de locomotoras corta y larga hasta 9999 Control de las salidas
ESPAÑOL. 3 Agujas con Fecha (Modelo 715) (Automático STP1-11)
 (Automático STP1-11)") ESPAÑOL 3 Agujas con Fecha (Modelo 715) (Automático STP1-11) Aguja de minutos Aguja de horas Aguja de segundos Fecha Cambio de hora 1. Tire de la corona hasta la posición III (el reloj se detendrá). 2.
ESPAÑOL 3 Agujas con Fecha (Modelo 715) (Automático STP1-11) Aguja de minutos Aguja de horas Aguja de segundos Fecha Cambio de hora 1. Tire de la corona hasta la posición III (el reloj se detendrá). 2.
PREMIER WRIST BLOOD PRESSURE MONITOR UB ) Install the batteries to your blood pressure monitor. LR03 or AAA batteries only.
 Install the batteries to your blood pressure monitor. LR03 or AAA batteries only.") PREMIER WRIST BLOOD PRESSURE MONITOR UB-543 1) Install the batteries to your blood pressure monitor. LR03 or AAA batteries only Battery cover Used batteries New batteries 2) (Optional) Set the Built-in
PREMIER WRIST BLOOD PRESSURE MONITOR UB-543 1) Install the batteries to your blood pressure monitor. LR03 or AAA batteries only Battery cover Used batteries New batteries 2) (Optional) Set the Built-in
FELICITACIONES POR POSEER EL NUEVO RELOJ NAUTICA, DESARROLLADO CON TECNOLOGÍA ELECTRÓNICA AVANZADA, LA RELOJERÍA ESTÁ FABRICADA CON COMPONENTES DE LA
 FELICITACIONES POR POSEER EL NUEVO RELOJ NAUTICA, DESARROLLADO CON TECNOLOGÍA ELECTRÓNICA AVANZADA, LA RELOJERÍA ESTÁ FABRICADA CON COMPONENTES DE LA MEJOR CALIDAD Y ALIMENTADA CON UNA PILA DE LARGA VIDA.
QUICK GUIDE RECORD SETUP CONFIGURACIÓN DE GRABACIÓN English / Español
 QUICK GUIDE RECORD SETUP CONFIGURACIÓN DE GRABACIÓN English / Español ENGLISH SECTION Once you enter to the Main Screen on your DVR, press right button on the mouse and select the third icon called Record
TEMPORIZADOR DE YATES DIGITAL NMX 15
 TEMPORIZADOR DE YATES DIGITAL NMX 15 (S1) LIGHT (LUZ) START/STOP (S5) (INICIAR/PARAR) MODE (MODO) RESET/SPLIT (S4) (RESTABLECER/ DIVIDIR) SYNC (S3) (SINCRONIZAR) I. CIRCUITO DE MODO HDD ALARMA (modo) PASEOS
TERMÓMETRO DIGITAL / DIGITAL THERMOMETER / THERMOMÉTRE DIGITAL TERMÓMETRO DIGITAL
 TERMÓMETRO DIGITAL / DIGITAL THERMOMETER / THERMOMÉTRE DIGITAL TERMÓMETRO DIGITAL DIGITAL THERMOMETER PARTS OF THERMOMETER 1. LCD Display 2. ON/OFF Switch: The ON/OFF key turns the thermometer on or off.
AIR CONDITIONER OPERATION OPERACIÓN DEL ACONDICIONADOR DE AIRE
 AIR CONDITIONER OPERACIÓN DEL ACONDICIONADOR DE AIRE Operating the unit Hacer funcionar la unidad OFF/ON 1. Start operation by pressing OFF/ON. Operation will start and the display panel will light up.
Regatta Master Watch_W012. Manual de Instrucciones
 Regatta Master Watch_W012 Manual de Instrucciones Este reloj tiene 2 años de garantía. Para condiciones de la garantía, contacte a su distribuidor más cercano Necesita comprobante de compra 1.0 Introducción
ENGLISH FRANÇAIS DEUTSCH ITALIANO ESPAÑOL PORTUGUÊS
 RETROGRADE We thank you for the confidence that you have shown in us by choosing the PIRELLI PZEROTEMPO brand. To enable you to use your watch to the best advantage, we recommend that you carefully read
1) Through the left navigation on the A Sweet Surprise mini- site. Launch A Sweet Surprise Inicia Una dulce sorpresa 2016
 Through the left navigation on the A Sweet Surprise mini- site. Launch A Sweet Surprise Inicia Una dulce sorpresa 2016") [[Version One (The user has not registered and is not logged in) Inicia Una dulce sorpresa 2016 To launch the Global Siddha Yoga Satsang for New Year s Day 2016, A Sweet Surprise, enter your username and
[[Version One (The user has not registered and is not logged in) Inicia Una dulce sorpresa 2016 To launch the Global Siddha Yoga Satsang for New Year s Day 2016, A Sweet Surprise, enter your username and
Reloj QC500E. Manual de Uso
 Reloj QC500E Manual de Uso TABLA DE CONTENIDOS 1. Introducción..... 3 1.1 Contenido del Paquete.. 3 1.2 Identificación de las Partes... 4 1.3 Botones de Ajustes...... 6 2. Funciones...... 6 2.1 Códigos
ESQ PIPELINE WITH TIDE MOVEMENT
 ESQ PIPELINE WITH TIDE MOVEMENT OPERATING INSTRUCTIONS T S A 1 2 3 F B Legend S - Small seconds hand F - Moon phase indicator T - Tide indicator hand 1, 2, 3 - Crown positions A, B - Push buttons to set
USER MANUAL LOGAN CAM VIEW FOR PC LOGAN CAM VIEW PARA PC English / Español
 USER MANUAL LOGAN CAM VIEW FOR PC LOGAN CAM VIEW PARA PC English / Español ENGLISH SECTION PC Installation 1. Download the application Logan Cam View for PC through the following link: https://support.logan-cam.com/hc/enus/articles/115000940287-logan-cam-view
ISA ASPECTOS GENERALES 1.1 Modos 1.2 Pulsadores 1) Pulsador C (corona) 2) Pulsador A 3) Pulsador B 4) Pulsador D
 Pulsador C (corona) 2) Pulsador A 3) Pulsador B 4) Pulsador D") ISA 9002 1. ASPECTOS GENERALES 1.1 Modos 1.2 Pulsadores 1) Pulsador C (corona) 2) Pulsador A 3) Pulsador B 4) Pulsador D 2. DESCRIPCIÓN DE MODOS 2.1 Modo TIEMPO1 (zona horaria local) 2.2 Modo fecha 2.3
ISA 9002 1. ASPECTOS GENERALES 1.1 Modos 1.2 Pulsadores 1) Pulsador C (corona) 2) Pulsador A 3) Pulsador B 4) Pulsador D 2. DESCRIPCIÓN DE MODOS 2.1 Modo TIEMPO1 (zona horaria local) 2.2 Modo fecha 2.3
español modelos con calendario
 español modelos con calendario 1 2 3 fecha ajuste de fecha 1. tire de la corona a la posición 2. 2. gire la corona y fije la fecha del día anterior. la dirección en que se mueve la fecha varía en los distintos
UNIT 2 DIVISIBILITY 1.- MULTIPLES AND FACTORS Concept of multiple Concept of factor
 UNIT 2 DIVISIBILITY 1.- MULTIPLES AND FACTORS 1.1.- Concept of multiple We say that a number a is a multiple of another number b if the division a : b is an exact division, that is, if b contains a a whole
O P E R AT I N G I N S T R U C T I O N S A N D S E RV I C E G U I D E
 O P E R AT I N G I N S T R U C T I O N S A N D S E RV I C E G U I D E LANGUAGES English 4 Español 80 O P E R AT I N G I N S T R U C T I O N S A N D S E RV I C E G U I D E CONTENTS About ESQ SWISS Watches...
Level 1 Spanish, 2013
 90911 909110 1SUPERVISOR S Level 1 Spanish, 2013 90911 Demonstrate understanding of a variety of Spanish texts on areas of most immediate relevance 9.30 am Tuesday 3 December 2013 Credits: Five Achievement
RX MULTI. MANUAL RX MULTI 433 A 868 MHz
 1. Esquema RX Multi RX MULTI MANUAL RX MULTI 433 A 868 2. Selector de marca Con el selector de 8 DIPs, el usuario puede realizar diferentes combinaciones para las diferentes marcas de mandos. La selección
A I RTRONIC. Manual de usuario User Manual.
 A I RTRONIC Manual de usuario User Manual AIRTRONIC Partes que incluye Parts inlcuded 1 Goldeneye Airtonic Unit 1 Power supply Input: 100-240 V ~ 50-60 Hz Output: 12 VDC, max. 1000 ma 12 W max. 1 Dermograph
ESQ PIPELINE WITH TIDE MOVEMENT
 ESQ PIPELINE WITH TIDE MOVEMENT 2007 ESQ by Movado Printed in USA 5/07 SKU 570049503 Esquire and ESQ are registered trademarks of The Hearst Corporation, licensed to Movado Group, Inc. OPERATING INSTRUCTIONS
USER MANUAL VMS FOR PC VMS PARA PC English / Español
 USER MANUAL VMS FOR PC VMS PARA PC English / Español ENGLISH SECTION You must enter into the application with the following data: Account Type: Local User Name: admin Password: admin If you want your PC
<<OPERATION MANUAL -- VD7 MULTIEYE SERIES>>
 ENGLISH VD72 VD73 VD74 24 hours VD75 VD76 VD77 24 hours VD78 VD79 VD72, 73, 74, 75, 76, 79 1. Pull out the crown to the second
MANUAL DE INSTRUCCIONES CAJA FUERTE CF-4333
 MANUAL DE INSTRUCCIONES CAJA FUERTE CF-4333 ESTIMADO CLIENTE Con el fin de que obtenga el mayor desempeño de su producto, por favor lea este manual de instrucciones cuidadosamente antes de comenzar a utilizarlo,
BOSS BLACK BOSS ORANGE RELOJES CON FUNCIONES SIMPLES. Modelos con 2 ó 3 agujas RELOJES CON FUNCIONES SIMPLES
 INSTRUCCIONES DE USO DEL RELOJ BOSS BLACK RELOJES CON FUNCIONES SIMPLES Modelos con 2 ó 3 agujas RELOJES CON FUNCIONES SIMPLES Modelos con 2 ó 3 agujas 3 Modelos con 2 ó 3 agujas y ventanilla de fecha
RS MULTI MANUAL OF RS MULTI
 MANUAL OF RS MULTI 1. RS MULTI Central for tubular motor with power supply 110-240 V. With function OPEN/STOP/CLOSE available for AC switch and control remotes (frequency ). 2. Brand selector With 8 dip
Flashcards Series 2 Las Necesidades de la Vida
 Flashcards Series 2 Las Necesidades de la Vida Flashcards are one of the quickest and easiest ways to test yourself on Spanish vocabulary, no matter where you are! Test yourself on just these flashcards
Para Poner la Hora 1. Tire de la corona hasta la posición Gírela para poner las agujas en la hora deseada. 3. Devuelva la corona a la posición
 ESPAÑOL INTRUCCIONES PARA ANALÓGICOS 1 2 1 2 Para Poner la Hora 1. Tire de la corona hasta la posición 2. 2. Gírela para poner las agujas en la hora deseada. 3. Devuelva la corona a la posición 1. 14 Movimiento
Flashcards Series 4 El Hotel
 Flashcards Series 4 El Hotel Flashcards are one of the quickest and easiest ways to test yourself on Spanish vocabulary, no matter where you are! Test yourself on just these flashcards at first. Then,
ESPAÑOL MANUAL DE INSTRUCCIONES
 ESPAÑOL MANUAL DE INSTRUCCIONES 1 2 INDICE Página CONSEJOS Y CONDICIONES DE LA GARANTÍA... 4 INSTRUCCIONES DE RELOJES RESISTENTES AL AGUA... 6 MANUAL DE MOV MIYOTA Cal. OS10, OS00, OS20, OS21 y JS50...
Para que usted pueda familiarizarse mejor con su nuevo reloj, hemos incluido directrices sobre el funcionamiento y el mantenimiento adecuados.
 Gracias y felicitaciones por su nuevo reloj Emporio Armani Swiss Made. Usted ha adquirido un instrumento verdaderamente maravilloso que ha sido diseñado para ser lo último en precisión y resistencia acorde
MANUAL VOLKSWAGEN CLIMATRONIC CODES (GENERACIONES NUEVAS DEL CLIMATRONIC GENERATION AB 1998)
") Hojas: Página 1 de 8 MANUAL VOLKSWAGEN CLIMATRONIC CODES (GENERACIONES NUEVAS DEL CLIMATRONIC GENERATION AB 1998) Hojas: Página 2 de 8 Manual destinado para estos vehículos: Modelo Versión Todos y PASSAT
Hojas: Página 1 de 8 MANUAL VOLKSWAGEN CLIMATRONIC CODES (GENERACIONES NUEVAS DEL CLIMATRONIC GENERATION AB 1998) Hojas: Página 2 de 8 Manual destinado para estos vehículos: Modelo Versión Todos y PASSAT
ANALOG DIGITAL CHRONOGRAPH
 www.luminox.com 7 6 1 1 3 8 2 3 9 2 7 1 8 GGM.L034 Ed. 06/14 ANALOG DIGITAL CHRONOGRAPH INSTRUCTION MANUAL BEDIENUNGSANLEITUNG MANUAL DE USO R DIGITAL CHRONOGRAPH DIGITALER CHRONOGRAPH DIGITAL CRONÓGRAFO
 ChritianVanSant Resistencia al Agua Resistencia al agua Uso en relación con el agua Marca en el Respaldo Profundidad Lavarse las manos Ducharse, Bañarse Nadar, Bucear con tubo Bucear con tanque WR 3 ATM
Reloj/Termómetro de pared. Modelo: BEM-104
 Reloj/Termómetro de pared Modelo: BEM-104 Características Reloj. Calendario perpetuo hasta 2069. Selección del formato de visualización de la hora (12/24 horas). Pantalla de calendario. Alarma diaria con
Manual para Cambio de Apariencia en Acrobat Reader DC. Change of Appearance in Acrobat Reader DC
 Manual para Cambio de Apariencia en Acrobat Reader DC Change of Appearance in Acrobat Reader DC Desarrollado por: DTE, LLC Versión: 02.2016 Developed by: DTE, LLC Revisado en:25 de Octubre de 2016 support@dtellcpr.com
KAISSA Manual Rápido De Usuario. Rev 1.0
 KAISSA Manual Rápido De Usuario Rev 1.0 Ante todo gracias por adquirir el innovador reloj de ajedrez KAISSA, diseñado bajo la filosofía del Diseño Para Todos. KAISSA tiene dos modos de funcionamiento principales
Con Reloj y Termómetro. Luz Nocturna LCD
 Con Reloj y Termómetro Luz Nocturna LCD 11152 Reloj y el modo de configurar Funciones de LED background iluminación fondo lighting con LEDs functions Month Mes Day Year Dia Año Date Fecha Temp IMPORTANTE:
Quarzwerk. Quarz movement J JUNGHANS DIE DEUTSCHE UHR
 Quarzwerk Quarz movement J645.85 JUNGHANS DIE DEUTSCHE UHR JUNGHANS EL RELOJ ALEMAN ESPAÑOL 34 Le felicitamos por la adquisición de uno de los relojes de la colección Junghans. Lo que comenzó en 1861 en
Go to: Select Tickets Festival Passes. Ir a la página:
 For The BPM Festival, PayPal is the only option for EARLY BIRD FESTIVAL PASSES PayPal es la única opción de compra para brazaletes EARLY BIRD de The BPM Festival Go to: www.thebpmfestival.com/tickets Select
Might. Área Lectura y Escritura. In order to understand the use of the modal verb might we will check some examples:
 Might Área Lectura y Escritura Resultados de aprendizaje Conocer el uso del verbo modal might. Aplicar el verbo modal might en ejercicios de escritura. Contenidos 1. Verbo modal might. Debo saber - Verbos
Xfinity Prepaid. Roku setup guide
 Xfinity Prepaid Roku setup guide Use your new Roku and the Xfinity Stream app to watch your favorite Instant TV shows right on your TV. Let s get you set up. Step 1: Setting Up Your Roku Express 1. Remove
MODELOS DE 2 Y 3 MANECILLAS (RONDA 703, 762, 783, 713, 1069)
") ESPAÑOL Gracias por haber adquirido este reloj MICHELE. La precisión y calidad del movimiento del cuarzo garantizan una exactitud excelente y hacen que no sea necesario darle cuerda nunca. Las siguientes
ESPAÑOL Gracias por haber adquirido este reloj MICHELE. La precisión y calidad del movimiento del cuarzo garantizan una exactitud excelente y hacen que no sea necesario darle cuerda nunca. Las siguientes
Instrumentos para medir el tiempo.
 ESPAÑOL Instrumentos para medir el tiempo. Con el visionario fundador de la empresa Erhard Junghans, en 1861 comenzó una nueva era de la fabricación de relojes en Alemania. Hoy en día, Hecho en Alemania
VRW201 US ARW2 US ARW201 US
 VRW201 US ARW2 US ARW201 US EN User s manual ES Manual del usuario THESE INSTRUCTIONS SHOULD BE ATTACHED TO THE APPARATUS ESTAS INSTRUCCIONES SE DEBEN ANEXAR AL APARATO PARA MÉXICO LEVITON LEVITON S de
Maquina laminadora automática y semi-automática tipo flauta
 Maquina laminadora automática y semi-automática tipo flauta Cantidad mínima: 1 Pieza Tipo de pago: 30% al colocar la orden, 40% al envío del BL y 30% al instalar el equipo en su planta de trabajo. Incluye
Rotator Cuff Exercises
 Rotator Cuff Exercises These exercises may be used after rotator cuff injury to the shoulder or for strengthening the shoulder. Do these exercises while lying face down on an exercise table or other sturdy
CONTROLADORA PARA PIXELS CONPIX
 The LedEdit Software Instructions 1, Install the software to PC and open English version: When we installed The LedEdit Software, on the desktop we can see following icon: Please Double-click it, then
INTRUCCIONES PARA ANALÓGICOS MODELOS CON CALENDARIO
 Español INTRUCCIONES PARA ANALÓGICOS Para Poner la Hora 1. Tire de la corona hasta la posición 2. 2. Gírela para poner las agujas en la hora deseada. 3. Devuelva la corona a la posición 1. 1 2 MODELOS
FlexCage. User Manual MB975SP-B. 5 HDD Slots in 3 Device Bay. Tray-Less SATA Backplane Module
 FlexCage MB975SP-B 5 HDD Slots in 3 Device Bay Tray-Less SATA Backplane Module User Manual English Package Contents Front Panel Information HDD3 POWER BUTTON POWER / ACCESS LED INDICATOR HDD2 POWER BUTTON
GARANTÍA Y CUIDADO DEL RELOJ
 GARANTÍA Y CUIDADO DEL RELOJ GARANTÍA Y CUIDADO DEL RELOJ CONTENIDO Garantía & Instrucciones de utilización Garantía Internacional Páginas 3-4 Precauciones particulares Páginas 5-7 Instrucciones Modelo
NOTE: The day is automatically calculated in accordance
 KILLER SHARK Tide S4 S3 S5 Tide/start Button Stop/reset Button S3 Mode Button S4 Set Button S5 Light Button SPECIAL FEATURE This SHARK product features unique Hydro Pushers these pushers can be pressed
Flashcards Series 5 El Agua
 Flashcards Series 5 El Agua Flashcards are one of the quickest and easiest ways to test yourself on Spanish vocabulary, no matter where you are! Test yourself on just these flashcards at first. Then, as
 8 9 10 11 12 13 14 14 15 16 20 A B M C E K D G F H L I J FRANÇAIS A. Lunette B. Cadran C. Aiguille des heures D. Aiguille des minutes E. Aiguille du chronographe F. Compteurs du chronographe G. Poussoir:
Programación lineal Optimización de procesos químicos DIQUIMA-ETSII
 Programación lineal PROGRAMACIÓN LINEAL PROGRAMACIÓN LINEAL se formula siguiendo el planteamiento general: Función objetivo Restricciones de igualdad Restricciones de desigualdad Límite variables PROGRAMACIÓN
DEUTSCH FRANÇAIS ENGLISH ESPAÑOL ITALIANO
 8 9 10 11 12 13 14 14 15 16 20 A B M C E K D G F H L I J FRANÇAIS A. Lunette B. Cadran C. Aiguille des heures D. Aiguille des minutes E. Aiguille du chronographe F. Compteurs du chronographe G. Poussoir:
Manual de Instrucciones
 BAMP-611-B-N-R ALTAVOZ BLUETOOTH-RADIO FM-MICROSD Manual de Instrucciones FUNCIONAMIENTO Encendido/Apagado: Mantenga pulsado durante 2-3 segundo el interruptor trasero de encendido para encender la unidad.
happy safari travel cot cuna de viaje happy safari guía para el usuario importante. retenga para referencia futura - lea con cuidado.
 happy safari travel cot user guide important. retain for future reference - read carefully cuna de viaje happy safari guía para el usuario importante. retenga para referencia futura - lea con cuidado.
MB673SPF. User Manual. 3 HDD Slots in 2 Device Bay Screw-Less SATA Backplane Module
 MB673SPF User Manual 3 HDD Slots in 2 Device Bay Screw-Less SATA Backplane Module English 1. Package Contents 2. Front Panel s LED Signal Explanation HDD1 Power/Failure Indicator OVER HEAT HDD2 Power/Failure
Manual de Instrucciones Operation Manual. (Evita Pink Press)
") Manual de Instrucciones Operation Manual (Evita Pink Press) EN ES Datos Técnicos / Technical Parameters Modelo/Model NO Medidas/Machine Size Área de trabajo/work area Voltaje/Voltage Poténcia/Power Rango
Manual de Instrucciones Operation Manual (Evita Pink Press) EN ES Datos Técnicos / Technical Parameters Modelo/Model NO Medidas/Machine Size Área de trabajo/work area Voltaje/Voltage Poténcia/Power Rango
Alarmas. Universidad de Sonora 1
 Alarmas Universidad de Sonora 1 Créditos Tutorial https://developer.android.com/training/scheduling/al arms.html 1 1 Content is licensed under Creative Commons Attribution 2.5 Universidad de Sonora 2 Alarmas
With temperature switch Cover for protection against high surface temperatures
 Descripción The BW 156 braking is designed for drives with frequency converters of small to medium output. Installation in and outside the control cabinet is possible. In addition to the high protection
Ingreso a DatAcademy mediante Telefónica Accounts. Versiones: Español / Ingles Guía de usuario / User Guide
 Ingreso a DatAcademy mediante Telefónica Accounts Versiones: Español / Ingles Guía de usuario / User Guide Versión Español: Guía de usuario 2 Qué es Telefónica Accounts? Es una solución de Single-Sign-On
MANUAL DE INSTRUCCIONES SMARTWATCH-TELÉFONO-BLUETOOTH BWATCH-BT7-B-N-A
 MANUAL DE INSTRUCCIONES SMARTWATCH-TELÉFONO-BLUETOOTH BWATCH-BT7-B-N-A CONTROLES FUNCIONAMIENTO ON/OFF/INICIO: Pulse para encender/apagar el reloj. Pulse para enceder o apagar la pantalla. Permite volver
Spanish 103 Web Primavera 2009
 Spanish 103 Web Primavera 2009 KEY TO ASSIGNMENTS: texto = textbook pages in Sabías que? to study for the next lesson and to use with Moodle MOODLE = web-based introduction to the next lesson (due by beginning
FLUIDAL, S.L Fax
 VALVULAS EQUIPADAS CON ACTUADOR ELECTRICO PARA ACCIONAMIENTO AUTOMÁTICO Y A DISTANCIA. CARACTERISTICAS DE LOS ACTUADORES: Específicamente diseñados para aplicaciones de ¼ de vuelta (90º) y reversibles,
MMS. Operation. MMS Quick Setup Guide
 MMS Operation MMS Quick Setup Guide MMS Quick Setup Guide In order to use Mazda Mobile Start, you must complete the account registration process and download the MMS app. Web Registration Do you have a
WARNING. Programmable Electronic Dual Outlet Water Timer Instructions Model Specifications
 Programmable Electronic Dual Outlet Water Timer Instructions Model 804014 Specifications A Easy swivel coupling Acoplamiento giratorio fácil B LCD Display Pantalla de LCD C Dial position indicator Indicador
QUICK GUIDE RECORD SETUP CONFIGURACIÓN DE GRABACIÓN English / Español
 QUICK GUIDE RECORD SETUP CONFIGURACIÓN DE GRABACIÓN English / Español ENGLISH SECTION Once you enter to the Main Screen on your DVR, press right button on the mouse and select the third icon called Record