OO9 UOEJDflJISUI J!SJMEQ!01
|
|
|
- Milagros Martínez Contreras
- hace 8 años
- Vistas:
Transcripción
1 J!SJMEQ!01!SeWeU1ELU!IE EWUEHfl).j QISUEW op seuo!ddnj1ui OO9 UOEJDflJISUI 8OO/tLftO

2 cord whenever you have to leave the Make sure you unplug the power ye asaiya doru hareket eden ine a) Makinayi kullanan kimsenin, yukariya fingers by the needle during sewing. makinalari için guvenlik talimatlari Take care to avoid injury to your Kisim 2c ye gore evde kullanalan diki me safety rules DIN (Alman End üstri Norm u) Flettiô essari siôu Bu sayfayi diariya doru katlayiniz dice pag. 69 ontents on page 67 bombilla es de 15 vatios. La potencia max. admisible de Ia enchufo do a red. camente, as decir, deberá sacarse el Ia use, deberá desconectarse eléctri prensatelas. Ia canilla y Ia placa de ongrasar Ia maquina, o cuando no so aguja, 10 mismo quo a! limpiar o Antes de cambiar a aguja, el pie costura. dado posiblo durante 01 trabajo y no el usuarlo deberã poner todo el cui representa 01 movimiento de Ia aguja, deberá apartar Ia vista do a zona do Debido al peligro de accidentes que , parte 2C iquinas de coser domésticas segun didas de seguridad para las r safety rules applicable in the bulb in the sewing lamp. Be sure to use only a 15watt light parts. change mechanical and accessory ited Kingdom please see page 47. machine or want to clean it, oil it or Efnisyfirlit or a bls. 73 çindekiler Sayfa 71 15W. c) Aldrei ma vera sterkari pera i vélinni en smyrja vélina. saumfót. eôa egar ér eruo ao hreinsa og sambandi. iegar skipta part urn nál. b) Geriô aô ao venju yoar ao taka vélina ür egar saumao or. a) GstiO hess ao fingur veroi ekki fyrir nálinni. Nokkrar öryggisráôstafanir c) Lâmbanin müsaado obunan azami ceryanin kesilmesi gerekir. fiini pnizden cikarmak suretiyle, deitiriimesi sirasinda, makinanin bakim isbn esnasinda veya makina b) Makinanin terkodilmesi esnasinda, gerekir. parçabannin veya iláve parçalanin gucü 15 Vattir. diki yerini devamli olarak gözlemesi davranmasi ye çalisma esnas?nda dolayistyla, yeteri kadar dikkatli Extienda esta hoja I% %%4L LI II

3 00 Tasima kolu 02 El çarki 03 Ayirma diski 06 Dikis (batis) uzunluu ye ärnek 07 Dikis (batis) tusu 08 Ana salter 09 Teferruat (iiáve parcaiar) kutucuu uzuniuu örnek uzuniuu tusu uzunlukiari arasinda dengeleme) ye 04 Gosterge sahasi 05 Balans (äne ye arkaya doru bati Takki fyrir sporlengd og mynzturlengd 109 VinnuborO rneô holfi fyrir aukahiuti 01 Acihr kapanir kapak Péttleiki og rnyzturiengd 107 Takki fyrir sporbreidd 108 Aôalrofi 110 Stingplata S niflotur LausagangsskrUfa HandhjOl 101 Fellilok Handfang )iki makinasinrn parçalari 27 Tus: tek ärnek cm tu 24 Sarici 25 Programin seyri ye diki tavsiyeieri 32 Serbest koi 34 ineye p11k geçirme yarikiari 39 Däner diskil makara tutucusu 45 ineye p11k geçiridi tasimasi 41 Tus: tekrariama (yukanya çevriiebiiir) 30 Zemin ievhasi 21 2 program tuu 31 Kapak kiapesi, arkasinda kiskaç 17 Tus: takviye dikii/iiik 18 Kumas bastirma cubuu 12 lne tutamai, tespit vidasi lie birfkte 15 Tus; yava ciikme biriikte 20 Program gôstergesi 22 Program cetveii (diki kitabina bakiniz) 23 Surguiu cetvei böime cm 26 Tus: ärnek ters görünumo 28 Tu: örnek baiangici 29 Tus: cift ine 33 Diki ii 35 Ust p11k gerinhi 36 Sarici-iplik kilavuzu 37 Horoz 38 Sarici-iplik kilavuzu (çevriiebiiir) 40 kind makara tutucusu 42 Tus: düzeitme 43 Tus: program sunumu 44 Iplik kesicisi lie biriikte cift kuma 11 Batis ayai tutami, diki ayai lie 10 Batis levhasi 13 Alt iplik-kontrol gostergesi 14 Tus; iplik asaida 16 Tus: geriye doru 19 Kumas bastirma koiu (dikeiecek deisebiien eyin üzerine konduu. kaldinlabilir) dikis yüzeyi ye teferruat böyimesiyie birlikte 119 FOtiyftir Upprifjunartakki og ráôieggingar 126 Takkl rnynzturspegiun 127 Takki,eitt rnynztur 129 Takki,tvr náiar 130 Botnplata 135 Yfirtvinnaspenna 137 ráogjati 142 Takki.IeiOretting 144 Efri fiytjarinn og tvinnahnifur Takki,endurtekning (sern er smelit it) 113 LjOs fyrir undirtvinna 115 Takki saurnao hgt 117 Takki hefting SpOlari 133 LjOs 134 Raufar tyrir rôingu hnappagot 112 Nálahalda 114 Takki nálin niôur 116 Takki.afturábak 118 Fotstong 120 Nürner saurnspors 128 Takki mynzturbyrjun 132 Friarmur 136 frôissfyring fyrir spolun 138 1DrOisfyring fyrir spólun 139 Tvinnakefiishaida meo skiturn 140 Aukakeflispinni (sern er tt upp) 143 Mynzturminni 145 I roarinn 111 Halda fyrir saurnftur 131 Armiok og ar fyrir innan gripari Hóif tyrir bkling urn sporin Tafla yfir saumspor (sja saumabok) Valtakkar fyrir saumspor Hiutir vélarinnar
")
4
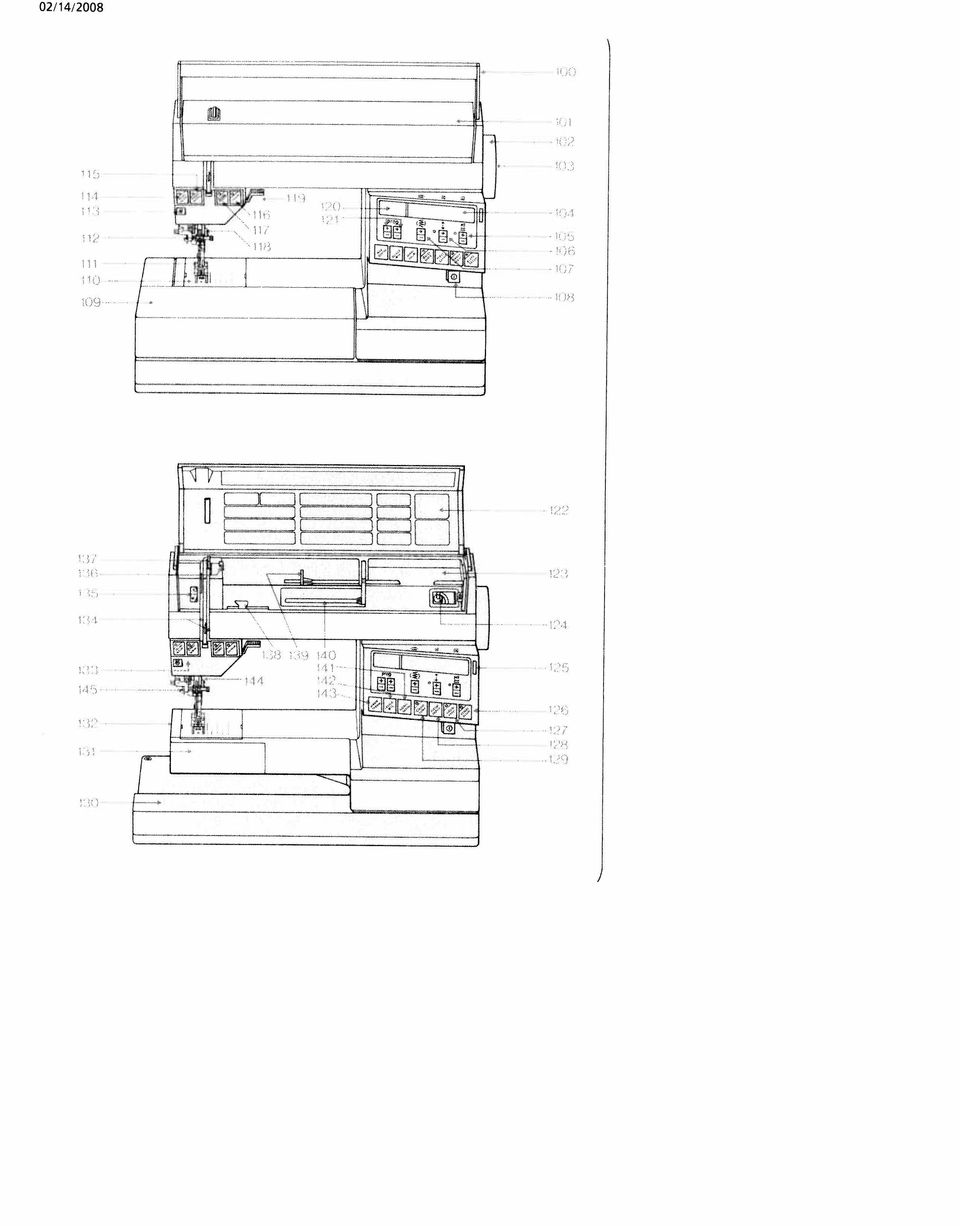
5 para accesorios 102 Hand wheel 104 Display 110 Needle plate accessory box and compartment 101 Hinged top cover 100 Carrying handle 103 Stop motion knob & 105 Balancing-out pattern length & key 106 Stitch length pattern length key 107 Stitch width key 108 Master switch 109 Detachable work support with 102 Volante 103 Disco de desembrague 104 Panel indicador 106 Botón para argo de puntada y 107 BotOn para ancho de puntada 109 Suplemento con compartimentos 105 BotOn compensador y para argo 108 Interruptor general motivo de motivo Parts of your sewing machine selector recommendations 121 Programming keys (2) 118 Presser bar with thread cutter 122 Program chart (see sewing book) 145 Threader (swing-out) hook 117 tie-off / buttonhole key 125 Key for program cycle and sewing 130 Base plate 135 Needle thread tension 136 Bobbin winder thread guide 137 Take-up lever 139 Spool holder with unreeling disc 142 corrector key 141 repeat key 112 Needle holder with set screw 113 Bobbin thread monitor light 114 needle down key 115 sew slow key 116 reverse key 119 Presser bar lifter 120 Program display 123 Compartment for sewing data 124 Bobbin winder 126 pattern mirroring key 127 single pattern key 128 pattern start key 129 twin needle key 132 Free arm 133 Sewing light 134 Threading slots 138 Bobbin winder thread guide 140 Second spool holder (swing-up) 143 program key 144 Dual feed with thread cutter 111 Sewing foot holder with sewing foot 131 Free arm cover, enclosing sewing 110 Placadeaguja 117 BotOn para rematar ojal 119 Palanca aizaprensatelas 120 lndicador del programa 123 Compartimento para regla de 126 BotOn para inversion motivo 130 ZOcalo 133 Lámpara de costura 134 Ranura de enhebrado 137 Palanca tirahilos 139 Portacarretes con discos 143 BotOn para programacion 145 Enhebrador costura (véase cuademo de costura) botones programadores 113 Control del hilo inferior 116 Botón para costura atrfts 122 Tabla de programas 124 Devanador 127 BotOn para motivo individual 136 Guiahilos para el devanador 144 Doble arrastre con cortahilos (abatible) 135 Tensahilos superior 131 Tapa del garfio recomendaciones de costura 112 Portagujas con tornillo 114 BotOn para aguja abajo 115 Botón para costura lenta 118 Barra del prensatelas 125 Botôn para control del programa y 128 BotOn para comienzo del motivo 129 Botón para agujas gemelas 132 Brazo al aire 138 Guiahilos para el devanador 140 Segundo partacarretes (abatible) 142 BotOn para correccion 141 Botón para repeticion 111 Portaprensatelas con prensatelas 101 Tapa abatible 100 Asa Eementos y maridos de Ia máquina I
 118 Presser bar with thread cutter 122 Program chart (see sewing book) 145 Threader (swing-out) hook 117 tie-off / buttonhole key 125 Key for program cycle and sewing 130 Base")
6 LeggiO handfangio niour. Elektrik batantis4 Tenging vélarinnar Taima kolunu arkaya doru deviriniz Eche hacia atrás el asa. Conexión eléctrica Fold down the carrying handle. Machine connection Tengiâ vélina vio rafmagn. Ceryan kablosunu baiayiniz Conecte Ia maquina con Ia red..j 1 L Plug in the machine. - Opniö teiiiiokio 101. Açilir kapanir kapai (101) açiniz Levante Ia tapa abatible 101. Tilt cover 101 backwards. 4 Lyftiôlokinu. canta kapaini kaldiriniz Saque el maletin, 4 Lift off the cover
 açiniz Levante Ia tapa abatible 101. Tilt cover 101 backwards. 4 Lyftiôlokinu.")
7 7\_ Togiã IeiOsluna r mótstoounni. Kabloyu martan dariya doru çekiniz Saque el cable del pedal.._ Pull the power cord out of the foot control. -- Mar Iósinu. Prstià a aoalrofann 108. og urn IeiO kviknar a ii yanar Ana altere (108) basiniz, bu arada dikis para de costura se enciende. Pulse el interruptor general 108. La lam 108; the sewing rnotstöouna a golfio. TengiO IeiOsluna vio vélina. og setjiô kablosunu makinaya balaytniz ye mari yere koyunuz Coioque:ipedal en el suelo y conéctelo.-- control on the floor. machine socket and place the foot Plug the foot control lead into the

8 snüiôvitilvinstri, UndirbUiô spolun: GripiO undir borôiô, sola doru çevirerek dondürünüz. ii. Preparación Diki EpIii masuraya sarmanin hazirlanmasi: izquierda. suplemento por abajo y girelo hacia Ia para & deyanado: Tome el yuzeyinin altini tutunuz ye bunu toward the left. H SleppiO loku A. og á dettur spolan ür, çikariniz. I Release latch A and take out the bobbin. -. i A klapesini serbest birakiniz ye masurayi ) Suelte Ia bisagrita A y saque a Togiô I loku A. og takio spóluhüsiô /r. disariya doru çekiniz. A klapesini yukariya kaldiriniz ye mekii portacanillas. Levante Ia bisagrita A y saque el A and pull out the bobbin latch Opniôlok 131 niôurávio, Kapak klapesini (131) geriye doru Abralatapadeig:fb 131 hacia abaj under the work support and swing it out,\ b000(fl winaing preparalions: Meacn

9 ao falla I rauf B. SetjiO spoluna a spolarann 124. Hak A verour kadar masurayl, sarici uzerine takiniz. A pimi B yarii içerisine oturuncaya ranura B. Coloque a canilla en el devanador 124 y girela hasta que Ia espiga A encaje en a V SetjiO Mnnakefli og litla skifu C a pinnann. tutamak üzerine sürünüz. Makarayi ye kucuk döner diski (C) C en el portacarretes. lntroduzca el carrete y el disco pequeno collar onto the holder. Push a spool of thread and unwinding tio auka ketlispinnanurn upp. cevirerek döndürünüz! kind makara tutucusunu geriye doru portacarretes. Eche hacia atrás el segundo back. wing the thread spool towards the handhjáliô og losiô skrüfu 103. Setjiô vélina I lausagang: Haldô urn doru ceviriniz. ni sikica tutunuz ye disk 103 ü äne Diki mekanizmasini kapamak: El carki 103 hacia el frente. costura: Sujete el volante y gire el disco Desconexión del mecanismo de knob 103 towards you. Hold the hand wheel steady and turn isengaging the sewing mechanism: it until pin A engages in slot B. ji Place the bobbin on winder 124 and turn

10 U t. II II L it r- _1 is selected. Before winding is begun a bobbin. Push the full bobbin towards the Important: It is not possible to wind the bobbin when an empty M- or P-memory left and take it out, cutting the thread in Press down the foot control and wind the bobbin towards the right. thread cutter B. selected. turns of thread on the bobbin and push guide 138, placing it between guide and program between 00 and 99 must be towards the right. the thread through guide 136, then into When you place a bobbin with thread Swing thread guide 138 forwards. Pull slot on the spindle, the slot must point Winding from a second spool: tension spring A (see ill.) Wind a few sujetar el hilo, dicha ranura deberá carrete, queder a Ia derecha al introducir el En el caso do carretes con ranura para un programa entre 00 y 99. Nota importante: Si se ha seleccionado cortelo en el gancho B. lena, corrala hacia Ia izquiorda y hacia Ia derecha. Accione ahora el pedal una memoria vacia M o P, entonces no devanar, tendrá que estar seleccionado vueltas de hilo en Ia canilla y empujela muelle tensor A. Arrolle ahora unas retirela. Tire del hilo hacia el frente y mo se muestra en Ia figura y de forma Eche el guiahilos 138 hacia adelante. que el hilo quede entre Ia guia y el Devanado desde un segundo carrete: Pase el hilo por las gulas 136 y 138 co para devanar. Cuando Ia canilla esté se puede devanar. Antes de comenzar a 4 ) 1 11 I

11 doru çekiniz ye B kesicisinde kesiniz. sola doru basit,rcniz, cikanniz, iplii one suraya sariniz. Doimus olan masurayi bastiriniz. Mari çaiitiriniz ye iphi ma masuraya sariniz. Masurayi saa doru gelmesi gerekir. $imdi iplii birkac defa ipliin kiiavuz ye geriiim yayi (A) arasina YtiO nü spolaranum Iii hgri. StigiO nu a mótstoouna og spoho a spoluna. tekin at og tvinninn er skorinn meo hnifnum B i Ef ér hafi6 vaiiô tomt M- e6a P-minni er kilavuz 138 içerisine çekiniz; bu arada cevirerek döndürünüz. ipiii, kiiavuz 136 içerisine ye ekilde goruiduu gibi, Sarici-iplik kilavuzunu (138) one doru sarmak: kinci bir makaradan ipligi masuraya iegar spoian er fuii er henni tt til vinstil, hun stnngu 138. tvinnanum nokkrum sinnum knngum spoiuna. roist undir spennifjoôur A. Snüiô sloan snir I st9ringu 138, en gtiã aô vi ao hann tvinnann I st9ringu 136, og ems og myndin sada bulunmasi gerekir. karalarda, makaranin sürüimesi (takil iplik tutamak yariini (kertiini) haiz ma 9erekir. masi) esnasinda yariin, yani kertiin arasindaki bir programiri seçilmis olmasi Sarmaya baiamadan änce, 00 ye 99 seçilmise, iplik masuraya sarilamaz. Onemii: Bir bo M- veya P-Biriktiricisi volante hacia adelante hasta quo encaje. smá smell. towards the back, then turn the hand hacia atrás. Seguidamente gire el Gangverk vélarinnar tengio ér nu aftur doru çeviriniz. çarkini sikica tutunuz ye diski (103) çarkini, yerine oturuncaya kadar One wheel forward until it snaps in. geriye doru ceviriniz. Daha sonra el DikiS mekanizmasin,n calitirilmasi: El sujete el volante y gire el disco 103 Conexión del mecanismo de costura: Hold the wheel firmly, turn disk 103 Engaging the sewing mechanism: skárauf, séu sett annig a pinnann ao raufin ekki hgt a6 spoia a spoluna a meöan. SmeiiiO st ringu 138 tram a via. rôio AOur en spoia6 er verôur vélin a6 vera stilit a einhvern af fostu saumunurn a mliii 00 og 99. ArlOandi er ao au tvinnakefli, sem eru meo vlsi til hgri. haldio urn handhjoiio og festio skifu 103. SnüiO handhjolinu aoeins tram a vio, ar til per heyrio SpóIaô at tvinnakefli:
 one doru sarmak: kinci bir makaradan ipligi masuraya iegar spoian er fuii er henni tt til vinstil, hun stnngu 138.")
12 1L 4 N 4 Winding through the needle: Raise the sewing foot with the needle in its up position. Place a bobbin on spindle 124. Disengage the sewing mechanism. Draw the needle thread under the sewing foot, up and through guide 138 (see ill.). Wind a few turns of thread on the bobbin and push the bobbin towards the right. Press down the foot control and wind. Push the full bobbin towards the left and take it out, cutting the thread in thread cutter A. Important: It is not possible to wind the bobbin when an empty M- or P-memory is selected. Before winding is begun a program between 00 and 99 must be selected. Devanado a través de Ia aguja Eleve el pie prensatelas y Ia aguja. Coloque Ia canilla en el devanador 124. Desconecte el mecanismo de costura. Pase el hilo superior por debajo del prensatelas hacia a derecha y por Ia guia 138 (v. figura). Arrolle unas vueltas de hilo en Ia canilla y corrala hacia Ia derecha. Accione el pedal para devanar. Corra Ia canilla Ilena hacia Ia izquierda, retirela y corte el hilo en el gancho A. Nota importante: Si se ha seleccionado una memoria vacia M 0 P, entonces no se puede devanar. Antes de comenzar a devanar. tendrá que estar seleccionado un programa entre 00 y 99.

13 durumu: yukarida. Masurayi, sanc (124) kapatiniz. Diki ayai altindaki üst iplii, cekiniz ye B kesicisinde kesiniz. bastiriniz, çkarinz, iplii one doru Dolmu olan masurayi sola doru çalitiriniz ye iplii masuraya sariniz. suretiyle cekiniz (ekle bakiniz). lplii masurayi saga doru bastirintz, Mars birkaç defa masuraya sariniz ye saa doru ye kilavuz 138 den geçirmek megin, og sloan i st ringu 138 ems og myndin ekki hsgt a8 spola a spoluna a me6an. StIglO no a motstoouna og spólio a spoluna. Ef pôr hafio vali6 tomt M- efa P-minni or kringum spoluna, og itio henni sloan til hgri. tekin af og tvinninn or skorinn meo hnifnum A. legar spolan er fuller henni tt til vinstri, hon s nir. SnOlO tvinnanum nokkrum sinnum üzerine takinz. Diki mekanizmasini DragiO tvinnann undir saumfotinn hgra Diki ayaini yukanya kaldiriniz. lnenin igne vaitastyla iphi rnasuraya sarmak - gerekir. arasindaki bir programin seciimi olmasi Sarmaya baømadan once, 00 ye 99 seçilmisse, p11k masuraya saritamaz. Onemli: Bir bo M- veya P-Biriktiricisi 4 I smá smell. / handhjolinu aoeins tram a vio, ar til pôr heyrio haidlo urn handhjolio og festio skifu 103. SnOiO the wheel firmly, turn disk 103 towards the back, then turn the hand wheel Gangverk vélarinnar tenglo Ier no aftur doru çeviriniz. geriye doru ceviriniz. Daha sonra el carkini sikica tutunuz ye diski (103) Diki mekanizmasinin çaiitirilmasi: El te hacia adelante hasta que encaje. hacia atrás. Seguidamente gire el volan sujete el volante y gire el disco 103 Conexión del mecanismo de costura: forward until it snaps in. çarkini, yerine oturuncaya kadar one Engaging the sewing mechanism: Hold mull 00 og 99. A6ur en spola6 er verôur vélin a6 vera stilit a einhvern af föstu saumunum a spolarann 124, takiô gangverkiô Or sambandi. FOtlyftir og nál I efstu stöôu, SetjiO spolu a Spolaô gegn urn náhna

14 eye C. lntroduzca Ia canilla como se muestra Masurayl yenietimiek A (Iplik arkaya muehe tensor hasta que salga por el on hilo por Ia ranura B y por debajo del en A (hilo hacia atrás). Pase luego el Colocación de Ia canilla en Ia cápsula: (A). Draw the thread into slot B and into that thread unwinds towards the back Inserting the bobbin: insert bobbin so snüningur losar, hgri snüningur heroir.) ao renna aoeins niour. (Stilliskrüfa D = vinstri niour, rykkiô lauslega i tvinnann, og á a DaO Rett undirspenna: Látiô spoluhusio hanga ceviriniz = daha siki). weaker tension. sola çeviriniz = daha gevsek, saga asaiya inmesi gerekir. (Ayar vidasi D yi inferior: Suspendiendo Ia cápsula del hareket ettiriniz. Mekiin kademeli olarak Mekii, hafifce, aniden yukariya doru Alt iplik gerginhiinin kontrol edilmesi: izquierda, a tension disrninuye, y viceversa.) citos del hilo. (Girando el tornillo D a Ia Comprobación de Ia tension del hilo for stronger tension and to the left for hilo, solo deberâ deslizarse al dar tiron downwards. (Turn screw 0 to the right your hand the bobbin must gradually slip With a brief, sharp upward movement of Checking the bobbin thread tension: og üt urn op C. spolunni Tvinninn lagour i rauf B undirtaorina Spolan sell i. Tvinninn a ao renna aftur af kadar çekiniz. doru). lplii B yanina ye C deliine
. weaker tension.")
15 Inserting the bobbin case: Raise latch A and push the bobbin case onto stud B as far as it will go, making sure cutout C points upwards. Colocación de Ia cápsula con Ia canhlla en el garfio: Levante Ia bisagrita A e introduzca Ia capsula hasta el tope en Ia espiga B. La muesca C tiene que mirar hacia arriba. Mekii takmak: A klapesini kaldiriniz ye mekii dayanaa kadar B pimi üzerine sürünüz. Bu sirada C kesiminin yukariya doru yonelmi olmasi gerekir. Spoluhusiô sett I: Haldiô urn loku A, og setjio ao a tiff B, annig ao ürtakiô C vlsi upp a vio. 4 Placing spool of thread on pin: Place the small or medium-size unwinding collar D in front of small spools, and the large collar E in front of large spools. Colocaciôn del carrete: Para carretes pequenos coloque el disco pequeno o mediano D; para grandes el disco grande E. Makaranin takilmasi: Kuçuk makaralarin änüne kuçuk veya orta buyuklukte olan doner rondelayi (D), boyük makaralarin önune buyük rondelayi (E) sürünoz. Tvlnnakeflin sett a: Fyrir liii kefli or litla skifan D soft fyrir framan kefliô, en skifa E fyrir strri kefli. I

16 por Ia gula derecha del portagujas. holder. tirahilos 137, de nuevo por Ia ranura B y the right thread guide on the needle de abajo por Ia ranura B, por Ia palanca aguja y el prensatelas. Pase el hilo, siguiendo Ia flecha, por a ranura A, des Enhebrado del hilo superior: Eleve a JI arrows), then back into slot 8 and into slot B and take-up lever 137 (see N,0 / I / /III1Ic. V.._ \J 0 1 I A 4 / niour. tvinnann. Togiô sioan rôarann 145 alveg Leggi yfirtvinnann undir hak D og haldiô I gancho D y sujételo. Empuje el tamamen asaiya doru çekiniz. Ust ipiii D çengeli arkasina yerietiriniz ye tutunuz. Ineye iplik geçiriciyi (145) enhebrador 145 hacia abajo ei todo. and hold it there. Pull threader 145 fully Coloque el hilo superior detrás del downwards. Place the needle thread behind hook D sioan I hgri stringu a nálahöldunni. neoan I rauf B. i ráogjafa 137. aftur I rauf 8. og PrOiO ems og ärvarnar sna I rauf A, ao Pr8ing: Nálin I efstu stöôu. Fôtur uppi. sa kilavuz içerisine çekiniz. yariina ye iplik tutamainda bulunan horoz (137) içerisine, geriye doru B üzere, A yarlina, alt taraftan B yariina, kaldiriniz. Iplii, ok istikametinde olmak Ust ipiiin takilmasi: inenin durumu, yukarida. Diki ayaini yukariya the thread into slot A, from below into top position, raise the sewing foot. Draw Upper threading: With the needle in its
 enhebrador 145 hacia abajo ei todo. and hold it there.")
17 forma que su gancho penetre por el ojo gegn urn nalaraugao. SnóiO nü rôaranum annig aô hann fan i lneye iplik geçiriciyi, nenin on tarafina de Ia aguja. Gire el enhebrador hacia Ia aguja de needle. Swing threader towards front against getiriniz. N endann I gegn. gegnum nálaraugao og ler getiô nü dregio alla leiô upp. Tvinninn kemur nili sem lykkja i Látiô nü L,rOarann ganga hgt til baka, og igne deliinden çekiniz. kaydirtiniz. Daha sonra iplii tamamen lneye iplik geciriciyi arkaya doru getini ineye iplik geçiriciyi yukariya doru riiz, bu arada iplii serbest birakiniz ye Ia aguja. haga pasar el hilo del todo por el ojo de hilo y eleve el enhebrador. Finalmente, Gire hacia atras el enhebrador, suelte el fully through the needle eye. to move upwards, then pull the thread thread at same time and allow threader Swing threader towards back, release anum. Leggiô tvinnann nü undir krokinn E a rôar Iplii, asaidan E çengeline asiniz. gancho E. Enganche el hilo desde abajo en el Place thread into hook E from below.

18 0 ID 0 Hold the needle thread taut. Turn the iplikle, alt iplii yukariya doru cekiniz. doru ceviriniz, Bir batis dikiniz, Ust Ust iplii sikica tutunuz. El carkini one saque el hilo inferior tirando del hilo needle thread. Sujete el hilo superior, gire el volante hacia el frente, haga una puntada y bobbin thread up by pulling on the moves down and up again. Pull the superior. hand wheel toward you until the needle Lokiôlokinu 131. kapatiniz, Kapak klapesini (131) yukarsya doru Cierre a tapa 131. Close the free arm cover. megin. Lãtiô ytir- og undirtvinnann undir totinn hgra altina koyunuz. Ust- ye alt iplii saoa doru, diki ayai debajo del prensatelas. Eche ambos hilos hacia Ia derecha por sewing toot. Place both threads to the right under the attur TogiO undirtvinnann upp. vio ar til nãliri hefur tariô niour og kemur upp HaidlO I yfirtvinnann, SnuiO handhjö{inu tram a j
 yukarsya doru Cierre a tapa 131. Close the free arm cover. megin.")
19 -. L I! - Swing work support 109 back against the free arm. Gire hacia dentro el suplemento 109. Diki yüzeyini (109) makinaya virerek döndürünüz. YtiO vinnuboroi 109 aô arminum. doru çe f Place fabric under sewing toot. Coloque Ia tela debajo del prensatelas. Kumasi diki ayai altina koyunuz. SetjiO efnio undir fotinn, J 7- To insert extra-thick fabric plies raise ver 119 higher. Al colocar piezas de tela muy gruesas, levante más Ia palanca 119. le cok kahn olan kumaiarin yerletiriimesi esnasinda, kolu (119) daha yukariya diriniz. kal Ef ér eruô meo mjog iykk efni, tiã tio fotlyftir 119 hrra. J Lower presser bar lifter 119. (A indicates the darning position). Baje Ia palanca alzaprensatelas 119. (A es a posicion para zurcir). Kuma bastirma kolunu (119) diriniz, (A, örerek tamir etme - yama yapma - durumudur). aaiya in SetjiO fótlyftirinn 119 niour. (StaOa A er fyrir stoppvinnu). /
 daha yukariya diriniz. kal Ef ér eruô meo mjog iykk efni, tiã tio fotlyftir 119 hrra. J Lower presser bar lifter 119.")
20 stigiô. vi hraoar saumar vélin. StigEô a mótstöôuna: tvi fastar sem lér machine runs. okadar süratli diker, fazia bir sekilde basilirsa, creative Marsa ayakla basiniz. Marsa nekadar presion aumentarâ Ia velocidad. pise el pedal: a medida que aumente a Para poner en marcha Ia máquina, you press the pedal down, the faster the Operating the toot control: The farther interlock in the middle of the material. Sew a short seam. The threads should by entering program 10 (page 22). between 3 and 5. The higher the num tension, set the machine for zigzag stitch The normal setting is in the white range ber, the tighter the tension. To check the zona blanca entre 3 y 5. Cuanto más piezas de costura. Ajuste: pulse el programa 10 (pag. 22): ran quedar anudados dentro de las Checking the needle thread tension: haga una costura corta; os hilos debe puntada zigzag. alto sea el nümero tanto mayor será a tension. La comprobacion se hace con Ia La regulacion normal se encuentra en a 4Comprobación de Ia tension del hilo: 4 N A viomiôun tyrir rétta spennu. Ytirspenna 135 A = Ayar aretlemesi. Ust iplik gerilimi 135 A = Marca para Ia regulacion. Tensahilos superior 135 A = Setting mark. Needle thread tension 135
. between 3 and 5.")
21 kumaslarin arasinda kalmaktadir, trot, zikzak dikile (batila) yaplmaktadr. Ayar: Program 10 na basiniz (Sayfa 22). eoa i miôju efnnu. saum, Hntingin a aô vera i oddum sporanna Kisa bir dikis yapiniz. Iplik balantisi, StihliO a mynztur 10 (bls. 22).SaumiO stuttan PrOfiO meo breiôasta zik zak spori. arasmda bulunrnaktadir. Says nekadar Normal ayar, beyaz balgede 3 5 iplik gerginhiinin kontrol edilmesi, büyuk se, gerginhik okadar slkldfr. Kon spennan. 1rá 3 5. t vi hrri sem talan er. vi stifari er V/ N / skáraufina og togio beggja megin. Tvlnnahnitur A: Leggio tvinnaendana I geriye doru cekiniz. iplik kesicisi A. Iplikieri yerletiriniz ye ranura y tire de ellos hacia abajo. Cortahilos A: lntroduzca los hilos en Ia the slot and pull them downwards. Thread cutter A: Draw the threads into Lyftiô fotlyftir 119. TakiO efnio aftur undan ftinum. fabric by pulling it towards the back. cikariniz. getiriniz. Kumai arka tarafa doru Kuma bastirma kolunu (119) yukanya Levante Ia palanca alzaprensatelas 119. Retire Ia tela hacia atrás. Raise presser bar lifter 119. Remove the Rett sporstilling: Venjulegast er rêtt spenna miouo viô hvita bihiô
22 7 Dual feed This prevents shifting of the material plies during sewing. Before engaging or disengaging the dual feed always raise the sewing foot. C Doble arrastre El doble arrastre evita el que una pieza quede más larga que otra después de cosidas. Antes de conectarlo o desconectarlo, eleve el pie prensatelas. çift kuma taimas,. Bu, kuma katlarinin diki esnasinda kaymasini engeller. cahstirmadan veya kapatmadan änce, dikis ayaini yukariya kaldrinz. 0 0 _. samband Efri f1ytarinn Kernur i veg fyrir aô efnin geti misfsrst. Lyftiô ftinurn áour en ér setjiô efri flytjarann I eôa takiô hann Or sambandi. II / To engage: lower top feed 144 until it snaps in place. To disengage: push feed lightly down wards, pull it towards the rear and allow it to move upwards. Para conectarlo: empuje el pie transpor tador 144 hacia abajo hasta que encaje. Para desconectarlo: empuje ligeramente hacia abajo y tire de él hacia fuera. Th ii Qalistirma: Ust taiyiciy (144), yerine Q oturuncaya kadar, asaya doru L sürünüz. Kapatma: Hafifce asaiya doru bastiriniz, arkaya doru çekiniz ye yukariya doru kaydirtiniz. Til aô setja hann i samband 9tiô per 0 lega a yfirflytjarann 144, par til hann smellur I 0 / samband. o :2 ill aô taka hann Or sambandi tiô per a hann.0 niôur a viô og takiô hann Or rauf fótarins urn leiô. Fer hann pa aftur I sina efri stou.
23 )perating keys of the electronic system hose are described on the following ages. otones de mando de Ia parte lectrónica. Sus funciones so describen n as páginas siguientes. :Iektronic in kullanim tulari Iektróniskir st)ômhnappar sing a eim era nstu siôum. Stick the enclosed English labels on the keys Pegue en los botones correspondientes los letreros en espanol adjuntos. Ekteki tus etiketlerini, turkçe olmak üzere, yapistiriniz. LimlO hjálagoa mioa viokomandi takka. i
24 indicator light goes on and the needle el botôn 114 para aguja abajo, se inserted and sewing is resumed. push needle down key 114, the retained at its up position. When you kept closed. the machine stops, the needle is always Needle up and down positions: When estar cerrada. Posición superior e inferior de Ia queda en su posicion superior. Pulsando aguja: al pararse Ia máquina, Ia aguja Important: Free arm cover 131 must be flash when the bobbin thread is running Bobbin thread monitor light 113 starts to out. It goes off when a full bobbin is Nota importante: a tapa 131 tiene que terminarse, el piloto 113 comienza a coser. se apaga. colocar una canilla lena y comenzar a lucir intermitentemente. Después de Electronic bobbin thread monitor: I entered in darning program 09. mine and memorize the seam length Darning: Key 116 is also used to deter long as you keep the key depressed. key during sewing, the light does not go on and the machine sews backwards as wards permanently. When you push the goes on and the machine sews back you start sewing. The indicator light Reverse sewing: Push key 116 before key 117 serves to determine and hole: When buttonhole program 86 is on, the end. Then the light goes off. Button right away, while a pattern is tied off at the light goes on and a seam is tied off memorize the seam length. When you push the key during sewing, beginning, then the light goes off again. programmed seam is tied off at the 117, the indicator light goes on and the Tie-off/buttonhole: When you push key machine again sews at top speed. sews at half its speed. When you push indicator light goes on and the machine you press sew slow key 115, the key 115 again, the light goes off and the Electronic top speed selection: When again, the light goes off, the needle moves up and remains up. machine stops. When you push key 114 remains down in the fabric when the zurcido 09 y se memoriza. determina Ia ongitud del programa para Zurcido: con el botón 116 también so el botôn pulsado. cose hacia atrás mientras se mantenga lámpara no so enciende pero Ia máquina dicho botón durante a costura, Ia se constantemente hacia atrás. Pulsando Ia Iámpara se enciende y Ia maquina co botôn 116 antes do comenzar a coser, Costura en retroceso: pulsando el con el botón 117 so determina Ia tiempo. longitud del ojal y so memoriza al mismo en el caso del programa 86 para ojales, un motivo, y Ia Iámpara se apaga. Ojal: enciende, Ia costura gueda rematada queda rematada al comienzo y Ia se enciende, Ia costura programada lámpara se apaga. Pulsando dicho boton durante Ia costura. Ia Iámpara se inmediatamente o al final, si se trata do do: pulsando el botôn 117, Ia Iampara Rematado de Ia costura/ojal. Remata apaga y Ia máquina vuelve a coser a Ia quina cose a media velocidad. Pulsando de nuevo el boton 115, Ia Iámpara se velocidad maxima. lenta, a Iámpara se enciende y Ia ma Limitación electrónica de Ia vebocidad: pulsando el botôn 115 para costura posicion superior y permanece arriba. Pulsando de nuevo el boton 114, Ia lámpara se apaga y Ia aguja pasa a su permanece abajo aj pararse Ia mãquina. enciende Ia lámpara y Ia aguja Control electrónico del fib inferior: cuando et hilo inferior estã proximo a
PFAFII. Instruction Book Instrucciones de manejo Kullanma talimatnamesi Leibarvisir PFAF
 PFAFII Instruction Book Instrucciones de manejo Kullanma talimatnamesi Leibarvisir PFAF Parts of your sewing machine Elementos y mandos de la miquina 100 Carrying handle 100 Asa 101 Hinged top cover 101
Creating your Single Sign-On Account for the PowerSchool Parent Portal
 Creating your Single Sign-On Account for the PowerSchool Parent Portal Welcome to the Parent Single Sign-On. What does that mean? Parent Single Sign-On offers a number of benefits, including access to
Conditioning Exercises: Standing
 Conditioning Exercises: Standing Do all these exercises slowly. Do not hold your breath during these exercises. If unusual pain occurs in your joints or muscles while you are exercising, do not continue
EP-2906 Manual de instalación
 EP-2906 Manual de instalación Con el botón situado a la izquierda se configura en el modo de cliente y de la derecha es el modo de Punto de acceso AP (nota: El USB es sólo para la función de fuente de
Crear alarma GATE. Aparecerá una ventana emergente para crear alarma.
 Crear alarma GATE Para crear una alarma, accede a través del menú principal de myhome.wattio.com a Seguridad, posteriormente arriba a la derecha haz click en Alarmas. En esta pantalla, en el menú izquierdo,
MANUAL EASYCHAIR. A) Ingresar su nombre de usuario y password, si ya tiene una cuenta registrada Ó
 Ingresar su nombre de usuario y password, si ya tiene una cuenta registrada Ó") MANUAL EASYCHAIR La URL para enviar su propuesta a la convocatoria es: https://easychair.org/conferences/?conf=genconciencia2015 Donde aparece la siguiente pantalla: Se encuentran dos opciones: A) Ingresar
MANUAL EASYCHAIR La URL para enviar su propuesta a la convocatoria es: https://easychair.org/conferences/?conf=genconciencia2015 Donde aparece la siguiente pantalla: Se encuentran dos opciones: A) Ingresar
Flashcards Series 3 El Aeropuerto
 Flashcards Series 3 El Aeropuerto Flashcards are one of the quickest and easiest ways to test yourself on Spanish vocabulary, no matter where you are! Test yourself on just these flashcards at first. Then,
 Control and Functions Guia de Funcionamiento Front View Configuración PAN/TILT 9 1 11 1 13 "Assign" 1 PROGRAM MUSIC/BKC MIDI/REC AUTO/DEL TAP/DISP 15~ BLACKOUT PAN TILT ASSIGN REVERSE MODE TILT PAN FINE
KAISSA Manual Rápido De Usuario. Rev 1.0
 KAISSA Manual Rápido De Usuario Rev 1.0 Ante todo gracias por adquirir el innovador reloj de ajedrez KAISSA, diseñado bajo la filosofía del Diseño Para Todos. KAISSA tiene dos modos de funcionamiento principales
Learning Masters. Early: Force and Motion
 Learning Masters Early: Force and Motion WhatILearned What important things did you learn in this theme? I learned that I learned that I learned that 22 Force and Motion Learning Masters How I Learned
ES-S6A Sirena de interior. www.etiger.com
 ES-S6A Sirena de interior www.etiger.com ES Características La ES-S6A puede utilizarse como sirena adicional conectada a su sistema de alarma o como sirena independiente conectada a un mando a distancia
MANUAL DE INSTRUCCIONES
 MANUAL DE INSTRUCCIONES GUESS WATCHES 1 MUJER MUJER 2 MUJER Enhorabuena por la compra de su nuevo reloj GUESS. Éste ha sido desarrollado con una avanzada tecnología electrónica y se ha fabricado con los
KMR SCA-05 Mounting Instructions Instrucción de Montaje Instruções de Montagem 0899.4897
 0899.4897 KMR SCA-05 Mounting Instructions Instrucción de Montaje Instruções de Montagem 0899.4897 KMR SCA-05 Mounting Instructions Instrucción de Montaje Instruções de Montagem The KMR SCA-05 kit is a
PA600 Rugged Enterprise PDA
 PA600 Rugged Enterprise PDA unitech unitech is a member of Oracle Embedded Software Licensing Program Quick Reference Guide 400577G RevB Front Left View 1 8 7 English 6 3 4 5 1 Status indicator 5 Universal
Sierra Security System
 Using Your SpreadNet Accessories With Your Sierra Security System Uso de Sus Accesorios SpreadNet Con Su Sistema de Seguridad Sierra SN990-KEYPAD SN961-KEYFOB SN991-REMOTE 1 SN990-KEYPAD The SN990-KEYPAD
Process Control Work Instructions Control de Procesos Instrucciones de Trabajo. for / para
 Process Control Work Instructions Control de Procesos Instrucciones de Trabajo for / para 629096898 VFCB Kit Relay Cable Harness Assy Ensamblar el Kit del Arnés de Cables del Relevador Publication Number:
Matemáticas Muestra Cuadernillo de Examen
 Matemáticas Muestra Cuadernillo de Examen Papel-Lápiz Formato Estudiante Español Versión, Grados 3-5 Mathematics Sample Test Booklet Paper-Pencil Format Student Spanish Version, Grades 3 5 Este cuadernillo
happy safari travel cot cuna de viaje happy safari guía para el usuario importante. retenga para referencia futura - lea con cuidado.
 happy safari travel cot user guide important. retain for future reference - read carefully cuna de viaje happy safari guía para el usuario importante. retenga para referencia futura - lea con cuidado.
Agustiniano Ciudad Salitre School Computer Science Support Guide - 2015 Second grade First term
 Agustiniano Ciudad Salitre School Computer Science Support Guide - 2015 Second grade First term UNIDAD TEMATICA: INTERFAZ DE WINDOWS LOGRO: Reconoce la interfaz de Windows para ubicar y acceder a los programas,
TOUCH MATH. Students will only use Touch Math on math facts that are not memorized.
 TOUCH MATH What is it and why is my child learning this? Memorizing math facts is an important skill for students to learn. Some students have difficulty memorizing these facts, even though they are doing
An explanation by Sr. Jordan
 & An explanation by Sr. Jdan direct object pronouns We usually use Direct Object Pronouns to substitute f it them in a sentence when the it them follows the verb. Because of gender, him and her could also
Disco duro ATA. Nota: Encontrarás instrucciones en línea en http://www.apple.com/support/doityourself/.
 Español Instrucciones para la sustitución Disco duro ATA AppleCare Sigue atentamente las instrucciones de este documento, de lo contrario podrías dañar tu equipo e invalidar la garantía. Nota: Encontrarás
1) Install the included batteries into your blood pressure monitor (BPM).
 Install the included batteries into your blood pressure monitor (BPM).") DELUXE CONNECTED BLOOD PRESSURE ONITOR UA-651BLE 1) Install the included batteries into your blood pressure monitor (BP). 2) Insert the air connector plug into the air socket. 3) Download the free A&D
DELUXE CONNECTED BLOOD PRESSURE ONITOR UA-651BLE 1) Install the included batteries into your blood pressure monitor (BP). 2) Insert the air connector plug into the air socket. 3) Download the free A&D
LECTOR PROXIMIDAD 4K AUTONOMO STANDALONE 4K PROXIMITY READER REF: 507222 HI / 255 01/14
 LECTO POXIMIDAD 4K AUTONOMO STANDALONE 4K POXIMITY EADE EF: 507222 HI / 255 01/14 LECTO POXIMIDAD 4K AUTONOMO egistro de la maestra y para suprimir 1. Apagar el lector 2. Poner el dipswitch nº1 en posición
Instalación de software y manual Mars Gaming
 Instalación de software y manual Mars Gaming Requisitos del sistema: * Compatible con Windows XP/Windows Vista/Windows 7/Windows 8 * Un puerto USB (1.1/2.0) * CD-ROM drive * 50MB de espacio disponible
Vamos a Multiplicar Al estilo maya!
 Vamos a Multiplicar Al estilo maya! Resumen de la actividad Esta lección le permite a los estudiantes realizar multiplicación al estilo maya como una actividad de seguimiento a la herramienta interactiva
PARTES FUNDAMENTALES DE UNA CÁMARA FOTOGRÁFICA
 PARTES FUNDAMENTALES DE UNA CÁMARA FOTOGRÁFICA 1. Lente El lente es el componente de la cámara fotográfica que sirve para enfocar y regular el foco (las cámaras que tienen zoom son capaces de acercar y
Installation Guide. Green momit
 Installation Guide Green momit 2015 www.momit.com momit Deviceses Gateway: Model 1 and 2 Wall option The momit Gateway allows your thermostat to be connected to the Internet. It s included in the Starter
La Video conferencia con Live Meeting
 Página 1 INSTRUCCIONES PARA TRABAJAR CON LIVE MEETING.- PREVIO. Para que tenga sentido la videoconferencia es conveniente que tengamos sonido (no suele ser problemático) y que tengamos vídeo. Si el ordenador
USB 2.0 INTERNAL MEMORY CARD READER/WRITER USER MANUAL CRW-UINB
 USB 2.0 INTERNAL MEMORY CARD READER/WRITER USER MANUAL CRW-UINB FEATURES HARDWARE INTRODUCTION 1 USB port for plugging into any USB device 2 Slot for SD, MMC and RS-MMC cards 3 Slot for Memory Stick, Memory
GUÍA DE USUARIO PC-331117. Bienvenidos al mundo Perfect Choice. Antes de comenzar a usar el producto es importante que leas esta guía.
 GUÍA DE USUARIO PC-331117 Bienvenidos al mundo Perfect Choice Antes de comenzar a usar el producto es importante que leas esta guía. Conexión 1. Inserta el transmisor en el conector para encendedor de
Structuring Numbers (ST) Score out of 4
 Score out of 4") VASD 1 st Grade WINTER and SPRING Minimal Basic Proficient Winter 0-9 10-12 13-20 Spring 0-12 13-15 16-20 Fall 0-12 13-15 16-20 and 2 nd Grade Fall Math Screener If student gets 20/20 in WINTER do NOT
VASD 1 st Grade WINTER and SPRING Minimal Basic Proficient Winter 0-9 10-12 13-20 Spring 0-12 13-15 16-20 Fall 0-12 13-15 16-20 and 2 nd Grade Fall Math Screener If student gets 20/20 in WINTER do NOT
Caldera VAILLANT. Mantenimiento, regulación y limpieza de aparatos domésticos a gas. Hoja 1 de 3
 VALLANT Hoja 1 de 3 1 3 4 2 5 Abrir la tapa 1 tirando de ella. Girar 1/4 de vuelta los dos tornillos 2 de plástico estrella que se encuentran en los laterales del frontal de mandos y abatirlo. En caso
Zune 8GB/4GB Start. Iniciar.
 Zune 8GB/4GB Start. Iniciar. SETUP 1 Visit www.zune.net/setup to install the Zune software. 2 When installation is complete, connect your Zune to your PC to start syncing. Your Zune charges whenever
Puede pagar facturas y gastos periódicos como el alquiler, el gas, la electricidad, el agua y el teléfono y también otros gastos del hogar.
 SPANISH Centrepay Qué es Centrepay? Centrepay es la manera sencilla de pagar sus facturas y gastos. Centrepay es un servicio de pago de facturas voluntario y gratuito para clientes de Centrelink. Utilice
School Preference through the Infinite Campus Parent Portal
 School Preference through the Infinite Campus Parent Portal Welcome New and Returning Families! Enrollment for new families or families returning to RUSD after being gone longer than one year is easy.
Qué viva la Gráfica de Cien!
 Qué viva la Gráfica de Cien! La gráfica de cien consiste en números del 1 al 100 ordenados en cuadrilones de diez números en hileras. El resultado es que los estudiantes que utilizan estás gráficas pueden
BAI-220 AURICULAR INALÁMBRICO
 BAI-220 AURICULAR INALÁMBRICO Manual de usuario ESPECIFICACIONES TÉCNICAS EMISOR Frecuencia: 86 ± 0.5 MHz Modulación: FM Distancia de emisión: 30 m. Recepción de cualquier equipo de audio y video con salida
SP-U. Soporte colgado universal para JK26 / JK10 / JK10MA / JK12 / JK12MA / JK15 / KEY10 / KEY12 / KEY15
 Soporte colgado universal para JK26 / JK10 / JK10MA / JK12 / JK12MA / JK15 / KEY10 / KEY12 / KEY15 Universal U-bracket for JK26 / JK10 / JK10MA / JK12 / JK12MA / JK15 / KEY10 / KEY12 / KEY15 Copyright
MANUAL DE UTILIZACION SPRINTER MB 413 CDI
 TRANSPORTS DE BARCELONA, S.A. MANUAL DE UTILIZACION SPRINTER MB 413 CDI VEHICULOS 4225-4231 Oficina Técnica Marzo 2002 OT-71 INDICE Arranque del motor 3 Cuadro de instrumentos y controles 4 Mando central
Para crear una lista como la anterior, primero escribe la información, y después selecciona el texto y aplícale el formato de viñetas.
 Módulo 3 Herramientas de Cómputo Listas, tabulaciones, columnas y cuadros de texto Listas En muchas ocasiones es necesario que enumeres diferentes elementos en tus documentos. Word no sólo reconoce números
Manual de instrucciones. Opción en línea
 Manual de instrucciones Opción en línea Generalidades...3 El PowerControl con la opción en línea...3 El software SRM de la opción en línea...4 La pestaña Mode...5 La pestaña Main Chart...5 La pestaña Predefined
Fácil reparación de Packard Bell
 Fácil reparación de Packard Bell Unidad CD-ROM / DVD Importantes instrucciones de comprobación de seguridad Tiene que leer todas las instrucciones con cuidado antes de que comience a trabajar y cumplir
Pie del monitor. Nota: Encontrarás instrucciones en línea en http://www.apple.com/support/doityourself/.
 Spanish Pie del monitor Instrucciones para la sustitución Sigue las instrucciones de este documento con cuidado. No hacerlo podría dañar tu equipo y anular su garantía. AppleCare La sustitución del pie
Unidad de alimentación. Nota: Encontrarás instrucciones en línea en http://www.apple.com/support/doityourself/.
 Español Instrucciones para la sustitución Unidad de alimentación AppleCare Sigue atentamente las instrucciones de este documento, de lo contrario podrías dañar tu equipo e invalidar la garantía. Nota:
Objetivo: You will be able to You will be able to
 Nombre: Fecha: Clase: Hora: Título (slide 1) Las cosas _ Capítulo 2 1 (Chapter Two, First Step) Objetivo: You will be able to You will be able to First look at the other sheet of vocabulary and listen,
Quick Installation Guide Internet Setup
 CBR-970 Wireless-N Broadband Router www.cnet.com.tw Established in California, U.S.A. since 1987 Quick Installation Guide Internet Setup What s included in the box CBR-970 Wireless N Broadband Router Quick
RELACIÓN DE MATERIAL NECESARIO PARA LA REALIZACIÓN DE LAS PRÁCTICAS:
 RELACIÓN DE MATERIAL NECESARIO PARA LA REALIZACIÓN DE LAS PRÁCTICAS: Para la realización de las prácticas, necesitaremos el siguiente material: 1 5 m de cable de hilos de cobre de pequeña sección. Cartón
ROCK N STEREO SOUND DESK
 Read and save these instructions ROCK N STEREO SOUND DESK RTA-M1102-BK INSTRUCTIONS TABLE OF CONTENTS PACKAGE INCLUDES Package Includes... 2 Specifications... 2 Product Parts List... 3 1 2 3 Product Details...
Portal para Padres CPS - Parent Portal. Walter L. Newberry Math & Science Academy Linda Foley-Acevedo, Principal Ed Collins, Asst.
 Portal para Padres CPS - Parent Portal Walter L. Newberry Math & Science Academy Linda Foley-Acevedo, Principal Ed Collins, Asst. Principal (773) 534-8000 Formando su cuenta - Setting up your account Oprima
Connection from School to Home Kindergarten Math Module 2 Topic A. Making 3 with Triangles and Chips
 Connection from School to Home Kindergarten Math Module 2 Topic A Making 3 with Triangles and Chips Here is a simple activity to help your child learn about composing and decomposing the number 3 and analyzing
SYSTEM INSTALLATION MANUAL MANUAL DE INSTALACIÓN
 SYSTEM INSTALLATION MANUAL MANUAL DE INSTALACIÓN Measuring Tape Cinta métrica Ø 8 mm twist drill (wood) Broca espiral Ø 8 mm (para madera) Ø 14 mm stone drill (brick) Broca para piedra Ø14 mm (ladrillo)
Video Server. Quick Installation Guide. English, Español
 Video Server Quick Installation Guide English, Español 2 Video Server NOTES Quick Installation Guide 3 Video Server Quick Installation Guide To get your Video Server up and running on an Ethernet network,
ENKVM-USBB. 2-Port USB KVM switch with Easy Switch and Cable. User Guide
 ENKVM-USBB 2-Port USB KVM switch with Easy Switch and Cable User Guide i Package Contents 1 ENKVM-USBB 2-Port USB KVM Switch with Easy Switch and Cable 1 User Guide Requirements Console A VGA, SVGA, XGA,
appkbws03 Wireless Multimedia Keyboard Set Black
 appkbws03 Wireless Multimedia Keyboard Set Black Español 01 English 06 Capítulo 1. Introducción y descripción del producto Gracias por elegir el teclado inalámbrico APPKBWS03. Descripción del producto
La instalación manual del termostato electrónico para la calefacción o refrigeración TH-7281B
 La instalación manual del termostato electrónico para la calefacción o refrigeración TH-7281B PREPARACIÓN: Antes de instalar este termostato, revise su esquema de cableado del sistema. Si su sistema no
LED Strobe Panel - Manual
 PAG. 2 LED Strobe Panel - Manual SPECIFICATION Voltage: Power consumption: LED: Color temperature: Operation mode: Weight: Size: 3 00VAC 20VAC 05W (Max) 448* SMD5050 white LED 900K LED display 3.KGS *2.35*9.
 (for some optional presser feet) 2 1. Raise needle and presser foot. 2. Remove the needle. 3. Loosen presser foot screw (1) and remove presser foot with shank (2), guiding it toward you and to the right.
Accesorios / Accesoires not included base de empotrar Ø60. 140 recessed base INCL. INCL. INCL. INCL. 170 surface base
 120 350º MR16LED IP20 351 LAMP NOT 13845 aluminio inyectado die cast aluminium código W lm lámpara casquillo ºK 120 351 7,5W.12V. 500 MR16LED GU-5,3 2.700 code W lm lamp socket ºK No todas las lámparas
 2 (For some optional presser feet) 1. Raise needle and presser foot. 2. Remove the needle. 3. Loosen presser foot screw (1) and remove presser foot with shank (2), guiding it toward you and to the right.
PLAN DE MANTENIMIENTO DE BOMBAS DOLL S.A.U. DOLL S.A.U. PUMPS MAINTENANCE PLANNING.
 PLAN DE MANTENIMIENTO DE BOMBAS DOLL S.A.U. DOLL S.A.U. PUMPS MAINTENANCE PLANNING. RODETE IMPELLER BRIDA CIERRE MECÁNICO CLAMP CIERRE MECÁNICO APLICACIÓN DE LAS OPERACIONES DE MANTENIMIENTO PARA BOMBAS
Contador Calorífico W2 - VA 40
 Contador Calorífico W2 - VA 40 El Contador Calorífico Electrónico RESOL W2-VA 40 controla el transporte de calor (en kwh) en sistemas de Calefacción Central o instalaciones de Energía Solar. El portador
CONTROLADORA PARA PIXELS CONPIX
 The LedEdit Software Instructions 1, Install the software to PC and open English version: When we installed The LedEdit Software, on the desktop we can see following icon: Please Double-click it, then
Instrucciones de montaje
 Instrucciones de montaje Gracias por comprar mecanismo elevadot NELSON Por favor, coloque todos los componentes en una superficie acolchada / alfombra para evitar daños. Por razones de seguridad, se recomienda
Medidor de consumo LEGO
 Medidor de consumo LEGO Primeros pasos El Medidor de consumo se compone de dos partes: La Pantalla de consumo LEGO y el Acumulador eléctrico LEGO. El Acumulador eléctrico encaja en la parte inferior de
π H-3539 MONARCH 1130 ONE LINE LABEL GUN
 π H- MONARCH ONE LINE LABEL GUN --- uline.com Para Español, vea páginas -. INSTRUCTIONS Changing the ink roller. Pull the latches back and swing the cover open completely. You should hear a click. NOTE:
Adaptado Por: Alexander Chaverra Instructivo Configuración PPjoy Y SmartPropo Para Aerofly
 MANUAL DE INSTALACION DE CABLE Y APLICATIVO PARA SIMULADOR. Objetivo: Explicar la forma mas eficiente de configurar el aplicativo PPJoy y Smartpropo para que funcione de una forma correcta en el PC a través
Installation Instructions Front Floor Liner
 Installation Instructions Front Floor Vehicle Application Jeep Wrangler (TJ) 1997-2006 Part Number: 51509 Jeep Wrangler (CJ / YJ) 1976-1995 Part Number: 51511 INSTALLATION TIME SKILL LEVEL 1/2 Hour 1 -
2_trabajar con calc I
 Al igual que en las Tablas vistas en el procesador de texto, la interseccción de una columna y una fila se denomina Celda. Dentro de una celda, podemos encontrar diferentes tipos de datos: textos, números,
MANUAL DE INSTALACIÓN DE POLAR FIS+ PARA SCIROCCO ( desarrollado por BacardiMan )
") MANUAL DE INSTALACIÓN DE POLAR FIS+ PARA SCIROCCO ( desarrollado por BacardiMan ) I N D I C E 1. INICIO 2 2. DESMONTAJE 3 3. CONEXIONADO DE POLAR FIS+ 5 4. FINALIZAR LA INSTALACIÓN 8 Manual de usuario
MANUAL DE INSTALACIÓN DE POLAR FIS+ PARA SCIROCCO ( desarrollado por BacardiMan ) I N D I C E 1. INICIO 2 2. DESMONTAJE 3 3. CONEXIONADO DE POLAR FIS+ 5 4. FINALIZAR LA INSTALACIÓN 8 Manual de usuario
Ejercicios Input/Output 11 de Mayo, 2013
 503208: Programación I 1 er Semestre 2013 Ejercicios Input/Output 11 de Mayo, 2013 Prof. Leo Ferres Autor: Javier González N. 1. Archivos de texto Cuando se usa redireccion (./a.out < archivo.txt, por
TX MULTI MANUAL TX MULTI. Mando copiador multifrecuencia 1. PASOS PARA COPIAR UN MANDO CÓDIGO FIJO Y ROLLING ESTÁNDAR:
 MANUAL TX MULTI Mando copiador multifrecuencia 1. PASOS PARA COPIAR UN MANDO CÓDIGO FIJO Y ROLLING ESTÁNDAR: 1. Situar el mando original que desea copiar junto al TX Multi, en torno a 2-4 centímetros de
www.superrobotica.com Sensor rastreador de líneas (Tracker) Versión 2.0
 Versión 2.0") Sensor rastreador de líneas (Tracker) Versión 2.0 1 Sensor rastreador de líneas Advertencias: Le recomendamos que lea este manual antes de proceder a cablear y a alimentar la placa. Los errores de cableado
Sensor rastreador de líneas (Tracker) Versión 2.0 1 Sensor rastreador de líneas Advertencias: Le recomendamos que lea este manual antes de proceder a cablear y a alimentar la placa. Los errores de cableado
DT-210/DT-210L/DT-210V. E Revision 1
 DT-210/DT-210L/DT-210V E Revision 1 1 2 3 4 5 6 7 8 9 10 11 12 13 14 A B C D E F Controles Interruptor de selección estéreo/mono/ altavoz Botón de memoria Sintonización ascendente/descendente Conector
24-Port 10/100Mbps Web Smart PoE Switch with 4 Gigabit Ports and 2 Mini-GBIC Slots TPE-224WS
 24-Port 10/100Mbps Web Smart PoE Switch with 4 Gigabit Ports and 2 Mini-GBIC Slots TPE-224WS ŸGuía de instalación rápida (1) ŸTroubleshooting (3) 1.12 1. Antes de iniciar Contenidos del Paquete ŸTPE-224WS
UNIVERSIDAD LIBRE FACULTAD DE INGENIERÌA DEPARTAMENTO DE CIENCIAS BÁSICAS GUIA N 2
 UNIVERSIDAD LIBRE FACULTAD DE INGENIERÌA DEPARTAMENTO DE CIENCIAS BÁSICAS GUIA N 2 NOMBRE DE LA ASIGNATURA: TÍTULO: DURACIÓN: BIBLIOGRAFÍA SUGERIDA: INGLES III USOS DE ING 1 Hora Castañeda Jenny et. Al.
Gustar. Use gustar to talk about what a person likes, or literally, what is pleasing to them. Gustar uses mainly 2 conjugations:
 Gustar Use gustar to talk about what a person likes, or literally, what is pleasing to them. Gustar uses mainly 2 conjugations: It also HAS to be used with an indirect object pronoun. Gustar To say what
Scholarship 2014 Spanish
 93007 930070 S SUPERVISOR S USE ONLY Scholarship 2014 Spanish 9.30 am Tuesday 25 November 2014 Time allowed: Three hours Total marks: 24 Check that the National Student Number (NSN) on your admission slip
Guía de instalación rápida TEG-160WS TEG-240WS
 Guía de instalación rápida TEG-160WS TEG-240WS C2 Table of Contents Español 1 1. Antes de iniciar 1 2. Instalación del Hardware 2 3. Herramienta de gestión Web 3 Troubleshooting 6 Version 02.02.2010 1.
Citizenship. Citizenship means obeying the rules and working to make your community a better place.
 Citizenship Citizenship means obeying the rules and working to make your community a better place. I show good citizenship when I help keep my school and community clean. I am a good citizen when I follow
Lump Sum Final Check Contribution to Deferred Compensation
 Memo To: ERF Members The Employees Retirement Fund has been asked by Deferred Compensation to provide everyone that has signed up to retire with the attached information. Please read the information from
Unidad óptica. Aviso : A lo largo de este proceso, mantén las piezas pequeñas fuera del alcance de los niños.
 Español Instrucciones para la sustitución Unidad óptica AppleCare Sigue atentamente las instrucciones de este documento, de lo contrario podrías dañar tu equipo e invalidar la garantía. Nota: Encontrarás
EN / ES Airtribune Live tracking Instructions
 Airtribune Live tracking Instructions 1. Activate the desired service plan: Personal GSM live tracking with pilots devices Personal GSM & satellite tracking GSM tracking with rented of own tracker set.
INSTRUCCIONES PARA ENVIAR SU PELICULA PARA LA VIDEOLIBRERIA
 For English version, please scroll down to page 11 (eleven) INSTRUCCIONES PARA ENVIAR SU PELICULA PARA LA VIDEOLIBRERIA Especificaciones técnicas Container format:.mp4 / tamaño de archivo no superior a
INTRODUCCION A LA PROGRAMACION DE PLC
 INTRODUCCION A LA PROGRAMACION DE PLC Esta guía se utilizará para estudiar la estructura general de programación de um PLC Instrucciones y Programas Una instrucción u orden de trabajo consta de dos partes
Welcome to lesson 2 of the The Spanish Cat Home learning Spanish course.
 Welcome to lesson 2 of the The Spanish Cat Home learning Spanish course. Bienvenidos a la lección dos. The first part of this lesson consists in this audio lesson, and then we have some grammar for you
Módulo II - PowerPoint
 Módulo II - PowerPoint Índice Copiando diapositivas Menú Edición... 2 Copiando diapositivas utilizando la barra de herramientas... 3 Copiando diapositivas utilizando el menú contextual... 3 Copiando diapositivas
MODEL: 11222895 / MODELO: 11222895 COMPUTER DESK ESCRITORIO DE COMPUTADORA
 MODEL: 222895 / MODELO: 222895 COMPUTER DESK ESCRITORIO DE COMPUTADORA NO 2 3 4 5 6 7 8 9 PARTS LIST AND HARDWARE LISTA DE PARTES Y ACCESORIOS HARDWARE LIST LISTA DE PARTES Y ACCESORIOS CHIPBOARD SCREW
Some examples. I wash my clothes, I wash the dishes, I wash the car, I wash the windows. I wash my hands, I wash my hair, I wash my face.
 Reflexive verbs In this presentation, we are going to look at a special group of verbs called reflexives. Let s start out by thinking of the English verb wash. List several things that you can wash. Some
Vermont Mini-Lessons: Leaving A Voicemail
 Vermont Mini-Lessons: Leaving A Voicemail Leaving a Voice Mail Message Learning Objective 1) When to leave a message 2) How to leave a message Materials: 1) Voice Mail Template blanks & samples 2) Phone
Creando Cuentas Nuevas para Padres / Alumnos en el
 Creando Cuentas Nuevas para Padres / Alumnos en el Portal de Internet Aeries de YCJUSD El portal de Internet Aeries proporciona una manera segura para acceder a información sobre la asistencia y el progreso
Unidad de alimentación. Aviso : A lo largo de este proceso, mantén las piezas pequeñas fuera del alcance de los niños.
 Español Instrucciones para la sustitución Unidad de alimentación AppleCare Sigue atentamente las instrucciones de este documento, de lo contrario podrías dañar tu equipo e invalidar la garantía. Nota:
SECUENCIADOR ELECTRONICO A MICROPROCESADOR. Modelo: MT. Manual de Instalación y Mantenimiento
 SECUENCIADOR ELECTRONICO A MICROPROCESADOR Modelo: MT Manual de Instalación y Mantenimiento Secuenciador Electrónico mod. MT Los secuenciadores a Microprocesador modelo MT, son equipos diseñados expresamente
Los bloques DLL (Figura A.1) externos permiten al usuario escribir su propio código y
 externos permiten al usuario escribir su propio código y") Apéndice A Bloques DLL Los bloques DLL (Figura A.1) externos permiten al usuario escribir su propio código y programarlo en lenguaje C, compilarlo dentro de un archivo DLL usando el Microsoft C/C++ o el
Apéndice A Bloques DLL Los bloques DLL (Figura A.1) externos permiten al usuario escribir su propio código y programarlo en lenguaje C, compilarlo dentro de un archivo DLL usando el Microsoft C/C++ o el
Packard Bell Easy Repair
 Packard Bell Easy Repair Serie EasyNote MX Instrucciones de reparacion é de disco duro www.packardbell.com Instrucciones de comprobación de seguridad importantes Debe leer con atención todas las instrucciones
www.totalspanishsimulator.com
 I ) Instalación / Installation Pg. 2 II ) Conexión del cableado / Plug in the connectors Pg. 4 III ) Cambiar Posición Imán / Change Magnet Position Pg. 6 IV ) Configuración de Software Pg. 7 IV ) Software
Destructora de papel S7-CD de corte en tiras
 Destructora de papel S7-CD de corte en tiras Manual 91605 Gracias por comprar este producto de alta calidad. Por favor, lea detenidamente estas instrucciones de funcionamiento antes de utilizar este dispositivo
Bluebeam Digital Certification Manual
 Manual Certificación Digital en Bluebeam Revu Bluebeam Digital Certification Manual Desarrollado por: DTE, LLC support@dtellcpr.com Developed by: DTE, LLC Revisado en: 20 de julio de 2016. Ver. 1.101.0720
GARAGE DOOR OPENER CONNECTIVITY HUB QUICK START GUIDE
 GARAGE DOOR OPENER CONNECTIVITY HUB QUICK START GUIDE Thank you for purchasing a Craftsman garage door opener Connectivity Hub enabled with AssureLink technology. Once you have created your account and