PFAFII. Instruction Book Instrucciones de manejo Kullanma talimatnamesi Leibarvisir PFAF
|
|
|
- Catalina Valdéz Ruiz
- hace 8 años
- Vistas:
Transcripción
1 PFAFII Instruction Book Instrucciones de manejo Kullanma talimatnamesi Leibarvisir PFAF

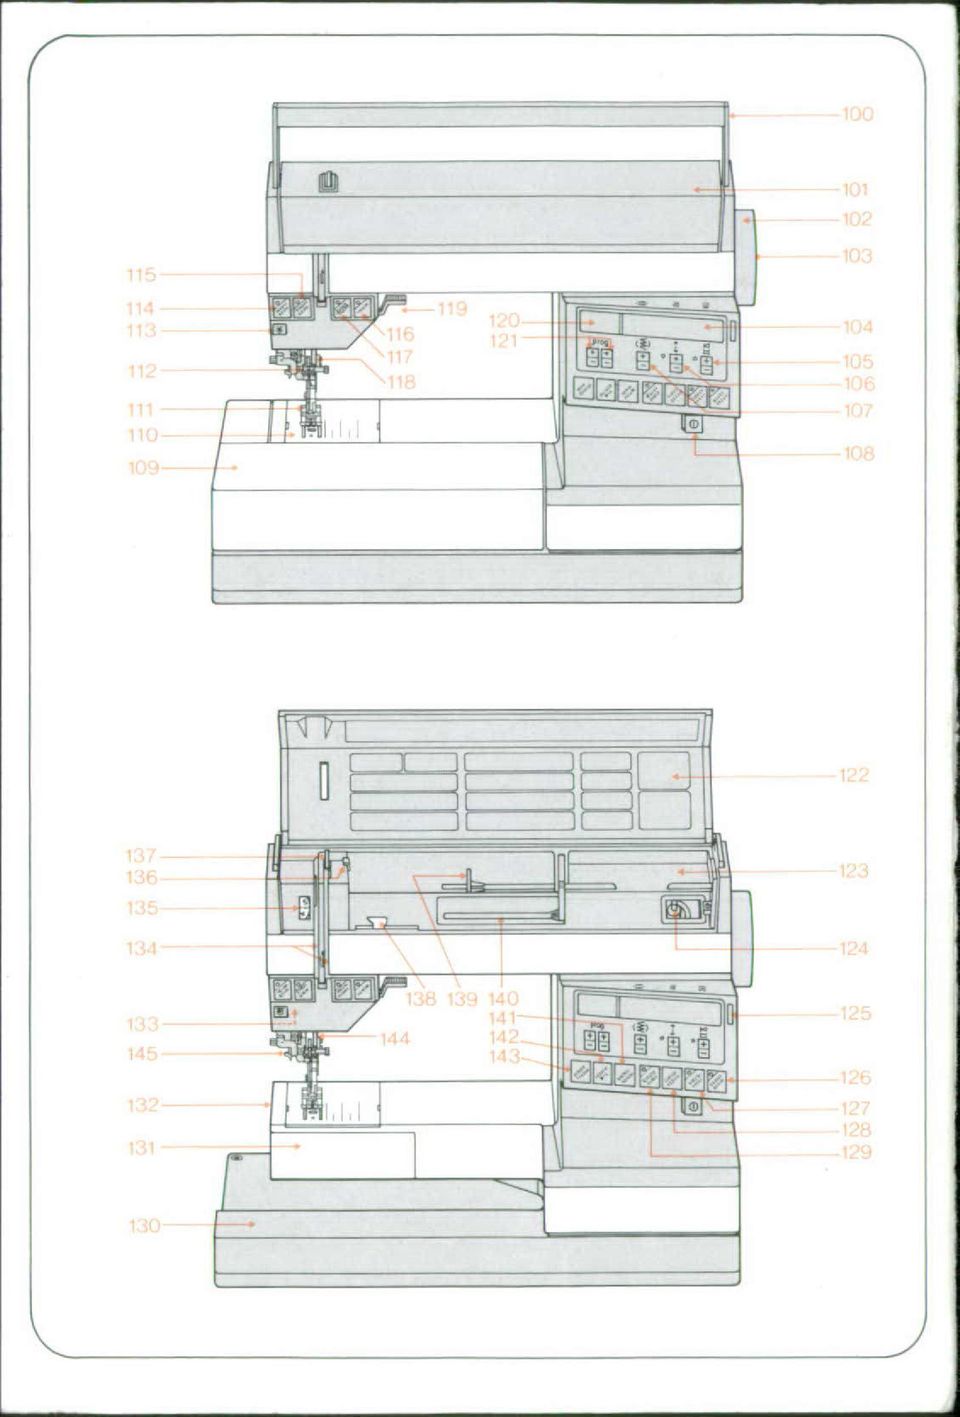
2 Parts of your sewing machine Elementos y mandos de la miquina 100 Carrying handle 100 Asa 101 Hinged top cover 101 Tapa abatible 102 Hand wheel 102 Volante 103 Stop motion knob 103 Disco de desembrague 104 Display 104 Panel indicador 105 Balancing-out & pattern length key 105 Boton compensador y para largo 106 Stitch length & pattern length key de motivo 107 Stitch width key 106 Botdn para largo de puntada y 108 Master switch motivo 109 Detachable work support with 107 Botdn para ancho de puntada accessory box and compartment 108 Interruptor general 110 Needle plate 109 Suplemento con compartimentos 111 Sewing foot holder with sewing foot para accesorios 112 Needle holder with set screw 110 Place de aguia 113 Bobbin thread monitor light 111 Portaprensatelas con prensatelas 114 "needle down" key 112 Portagujas con tornillo 115 "sew slow" key 113 Control del hilo inferior 116 "reverse" key 114 Botbn para "aguja abajo" 117 "tie-off I buttonhole" key 115 Boton para "costura lenta" 118 Presser bar with thread cutter 116 Boton para "costura atras" 119 Presser bar lifter 117 Boton para "rematar ojal" 120 Program display 118 Barra del prensatelas 121 Programming keys (2) 119 Palanca alzaprensatelas 122 Program chart (see sewing book) 120 Indicador del programa 123 Compartment for sewing data botones programadores selector 122 Table de programas 124 Bobbin winder (v6ase cuademo de costura) 125 Key for program cycle and sewing 123 Compartimento para regla de recommendations costura 126 "pattern mirroring" key 124 Devanador 127 "single pattern" key 125 Botbn para control del programa y 128 "pattern start' key recomendaciones de costura 129 "twin needle" key 126 Bot6n para "inversion motivo" 130 Base plate 127 Botbn para "motivo individual" 131 Free arm cover, enclosing sewing 128 Bot6n para "comienzo del motivo" hook 129 Bot6n para "agujas gemelas" 132 Free arm 130 Zocalo 133 Sewing light 131 Tapa del garfio 134 Threading slots 132 Brazo al aire 135 Needle thread tension 133 Lampara de costura 136 Bobbin winder thread guide 134 Ranura de enhebrado 137 Take-up lever 135 Tensahilos superior 138 Bobbin winder thread guide 136 Guiahilos para el devanador (swing-out) 137 Palanca tirahilos 139 Spool holder with unreeling disc 138 Guiahilos para el devanador 140 Second spool holder (swing-up) (abatible) 141 "repeat" key 139 Portacarretes con discos 142 "corrector" key 140 Segundo partacarretes (abatible) 143 "program" key 141 Boton para "repeticibn" 144 Dual feed with thread cutter 142 Bot6n para "correccibn" 145 Threader 143 Botrn para "programaecin' 144 Doble arrastre con cortahilos 145 Enhebrador

3 r7k...
4 Fold out this page Extienda esta haja Bu sayfayn dw~anya da~ru katlayaniz Flettib hessari si6u Some safety rules DIN (Alman Endiustrl Normu) a) Take care to avoid injury to your IKisim 2c'ye gore evde kullanilan dikl# lingers by the needle during sewing. makinalari Irin g(.venlik talimatlar. b) Make sure you unplug the power a) Makinayi kullanan kimsenin, yukariya cord whenever you have to leave the ye a~a~iya do~ru harelket eden igne machine or want to clean it, oil it or dolayisiyla, yeteri kadar dikkatli change mechanical and accessory davranmasr ye gali~ma esnasinda parts. dikis yerini devamli olarak gbzlemesi c) Be sure to use only a 15-watt light gerekir. bulb in the sewing lamp. b) Makinanin terkedilmesi esnasinda, For safety rules applicable in the bakim i~leri esnasanda veya makina United Kingdom please see page 47. par~alarlnr veya iliva pargalarin degistirilmesi sirasenda, makinamnn fi~ini prizden 9ilkarmak suretiyle, Medidas de segurided pars las ceryanin kesilrnesi gerekir. mhquinas de coser dom6stlcas segidh c) L-Ambanin ml~saade olunan azami! DIN , parte 2 C g~cii 15 Vattir, a) Debido al paligro da accidentes que rapresenta al movimiento dle la aguja, el usuaria deberat poner todo el cui- Nokkrar orygigisribtbartfanir dado posible dlurante el trabajo y no a) Gaeti6 bass abfingur verbi ekki tyrir nahnni. deabrs apartar la vista de la zona de begar saumab er. costura. b) Gerib bab a65 venju yoar ab taka v~lina Or b) Antes de cambiar Ia aguja, el pie sambandi, Pegar skipta Part urn n~l. prensatelas, Ia canilla y Ia placa de saumfdt, e6a oegar b6r eru6 ab hreinsa og aguja, lo mismo que a] limpiar o smyrja velia. engrasar Ia maquina, o cuando no se c) Aldrei m6 vera sterkari pea i velinni en Ia use, deber6 desconectarse eldctri- 1SW. camnente, es dlecir, dlebara sacarse el enchufe de la red. c) La potencia max. admisible de la bombilla as de 15 vatios. Cntents on page 67 l9indekiler Sayf a 71 L Indie p.69 Efnisyfirlit er 6bls. 73,
 Be sure to use only a 15-watt light gerekir.")
5 OikiV maklnasinrn pa~alari 7H~utir v6larinnar 100 Tasima kolu 101 Agilir kaparur kapak 100 HanrWJanCJ In 102 El garki 101 Fellilob 103 Ayirma diski 102 Handhjdi 104 Gbsterge sahasi 103 Lausagan5sskrufa 105 Balans (6ne ye arkaya dogru batis 104 Syndilotur uzunlukiar, arasinda dengeleme) ye 105 P6ttteiki oq myzturienqd brnek uzunluguti usu 106 Takkr tynir soorlenod og mrnyzturlenqd 106 Dikis (bats~) uzunluou ye ornek10taktyrpored uzurnlu~u 108 Abalroft 107 0ikis (batis) tu$u 109 Vinnubor6) me6 h61fi fyrtr aukahiuti 108 Ana salter 109 Teferruat (Rlave parcalar) kutucuou 110 Stingplata ye teferruat b(5ylmesiyle birlikte Ill Halda tyrir saumketur dlegisebilen (dikelecek seyin Ljzerine 112 Nilahalda kondu~u. kaldirifabilir) dikis yuizeyi 113 Lj6s fyrir undirtvinna 110 Batts levhasi 114 Takkt.nain n,6ur 111 Batts ayaot Iutamgi, dikis ayagsi le 115 Takki saumnab haegt birlikte 116 Takki-attur Abak 112 lone tutamai' tespit vidlast le birlikte 117 Takki.1elting henappaqot 113 Alt iptik-kontrol gostergesi 118 Fbtstbng 114 Tus: "iplik asa~ida" 119 Fbtlyfttr 115 Tuý:.'yavas dlikmet 120 N6mer saumnspors 116 Tus: "takviye diki~/ili 121 Valtakkar fynrjsaumspor 11cubutavyedktiulk 122 Tafle yfir saumnspor (soa saumabd6k) 118 Kumas bastirma 12 Hltyibakngmpoi 119 Kumas bastirma kolu12 6ftr bklnumsoi 120 Program gbstergesi 124 Spdlari program tusu 125 Uppritjunartakki og rableggingar 122 Program cetveli (dlikis kitabina bakiniz) 126 Takki.mynzturspeqlun* 123 Sbjrgblii cetvel gpin boime 127 Takki,eittmynztur* 124 Sanrc 128 Takki..mynzturbyrjun 125 Programin seyri ye diki$ tavsiyelert 129 Takki..tvmr nalar pin tus 130 Botniplala 126 Tus: 'drnek tars gbrunuimb 131 Am~bokoqpOar frrrnnangrpari 127 Tue. ter brnek 12Fi ru 128 Tus: Ornek bhaslangici" 133 Lramu 129 Tus. gift ione" 134 Rafatnrr6ig 130 Zemin levhasi14ree ytorong 131 Kapak kiapesi. arkasinda kiskac 135 Ytirtvinnaspenna 132 Serbest kol 136 Praebisstrinnq fyrir spolun 133 Diks sij 137 Pr~6bgafi 134 ioneye iptik gepirme yaiktar; 138 l'ra1uistring tyrer spdliun 135 Ust plik germnhii (serm er smetlt Oil 136 Saici-plik kilavuzu 139 Tvinnakeflishalda meo skifum 137 Horoz 140 Aukalkeffispinni, (sem er $1 upp) 138 Sanici-iplik kilavuzu (g~evrtlebiltir) 141 Ta~kkendurtelkninq 139 Obner diskli makara tutucusu 142 Takki letribtting 140 1kindi makara tutucusu 143 Mynzturminri (yukariya gevrilebilir)14elrfytanng nahiu 141 Tus: "tekrarlamn14onfyan gtiahfu 142 Tus: "dizeltms 145 Pr~ariannn 143 Tus: "program.,unumu" 144 Iplik kesicisi iae birlkte gift kumas tasimas' 145 ioneye iplik gepirici

6 Lift off the cover. Fold down the Carrying handle. Compartment N contains foot control and Instruction Book. Tire hacia arrba do la rnaleta funda. Eche hacia atr~s el asa. El compartimento N sirve para guarder el pedal do arranque y el cuadorno do "Instrucciones do manejo". % ~arkaya Qantanin kapagint kaldirrniz. Ta~ima kolunu dlogru deviriniz. N bblmosi, ayak mar~i ye kullanilma talimatnamosi i9indir. Lyttib lokinu at og setji6 handfangib si~an nibur. Hof6f N or geymsluh6lf fyorr mbtstobuna og leibarvisirinn. Tilt cover 101 backwards. Levanto la tapa abatible 101. A9ilir kapanir kapaol (101) a~iniz Opnib fellilokib 101. Plug in the machine. Conecte la maquina con la red. Ceryan kablosunu ba~layiniz Tengi6 v6lina vi6 ratmagn. 2
 a~iniz Opnib fellilokib 101. Plug in the machine. Conecte la maquina con la red.")
7 FPull1 tihe pwer cord out of the foot Saque el cable del pedal. -< Kabloyu marstan disariya dogru vekiniz Togib e,~sluna ir motsto6unn. Plug the foot control lead into the machine socket and place the foot control on the floor. Goloque el pedal en el suelo y con~ctelo con la mn~quina. Mars kablosunu maktnaya baglayinz ye marsi yere koyunuz Tenq6 let6sluna vib velina, og setipb rn6tstoouna a qdlff Push master switch 108: the sewing lamp then goes on. Pulse el interruptor general 108. La lampara dle costura se enciende. Ana saltere (108) basinz, bu arada dikis isg~i yanar r'rysti6 A a6alrofann 108. eo urn lob kviknar a I dinu 3
 basinz, bu arada dikis isg~i yanar r'rysti6 A a6alrofann 108.")
8 Bobbin winding preparations: Reach under the work support and swing it out toward the left. Preparacldn para el deyanado: Tome el suplemento por abajo y girelo hacia la izquierda. Iplioi masurays sarmanin hazirlanmasi: Oikis yl~zeyinin altim tutunuz ye bunu sobe dooru cevirerek dbndijr~noz. Undirbtuib sp6lun: Gripi6 undir borbia og Open free arm cover 131. Abra Ia tapa del garfio 131 hacia abajo. Kapak klapesini (131) geriye dogru aciniz. Opnib lok 131 nibur a vi6. 0 Switch off master switch 108. Raise latch A and pull out the bobbin case. * Desconecte el interruptor general 108. Levante Ia bisagrita A y saque el portacandlas. * Ara ýalteri (108) kapatiniz. A klapesini yukariya kaldiriniz ye mekigi disariya dogru cek~ntz. * Slbkkvi6 6 aoalrofa 108. Togi6i i loku A, og taki?, sp6luhta'?, Jr. Release latch A and take out the bobbin Suelte Ia bisagrita A y saque la canilla. A klapesini serbest birakiniz ye masurayi gikariniz. Sleppi6) loku A. og 06 dettur spolan OJr 4
 kapatiniz. A klapesini yukariya kaldiriniz ye mekigi disariya dogru cek~ntz.")
9 B Place the bobbin on winder 124 and turný it until pin A engages in slot B. Coloque la canilla en el devanador 124 y girela hasta que la espiga A encaje en [a ranura B. FApimi B yariot icerisine oturuncaya kadar mauryl saric jizerine taklniz. 124 Setj;6 spoluna A spdlarann 124. Hak A verbur a6 falla i rauf B. Disengaging the sewing mechanism: Hold the hand wheel steady and turn knob 103 towards you. Desconexidin del mecanismo de costura: Sujete el volante y gire el disco \ 1C)1103 hacia el frente. Dikip mekanizmastni kapamak: El Qarkini sikica tutunuz ye disk 103 ui one dogru ceviriniz. Set jib voi na i lausagang: HaliM urn Swing the second thread spool towards the back. Eche hacia atras el segundo portacarretes. lkindi makara tutucusunu geriye dogru gevirerek dbnd~r~jn~z! ~ YtiO auka keflispinnanurn upp. Push a spool of thread and unwinding \ >Ik-»collar onto the holder. D Introduzca el carrete y el disco pequeino C en el portacarretes. Makarayi ye kociik dbner diski (C) tutarnak Ozeanne su*runuz. Setji6 tvinnakefli og line skitu C a pinnanfl

10 FA 14 Winding from a second spool: Devanado desde un segundo carrete: Switch on master switch. Desconecte el interrupter general. Swing thread guide 138 forwards. Pull Eche el guiahilos 138 hacia adelante. the thread through guide 136, then into Pase el hilo per las gufas 136 y 138 coguide 138, placing it between guide and mo se muestra en Ia figura y de forma tension spring A (see ill.) Wind a few que el hilo quede entre Ia guia y el turns of thread on the bobbin and push muelle tensor A. Arrolle ahora unas the bobbin towards the right. vueltas de hilo en la canilla y emp6jela Press down the foot control and wind hacia Ia derecha. Accione ahora el pedal bobbin. Push the full bobbin towards the para devanar. Cuando la canilla estd left and take it out, cutting the thread in Ilena, c6rrala hacia Ia izquierda y thread cutter B. retfrela. Tire del hilo hacia el frente y Important: It is not possible to wind the c6rtelo en el gancho B. bobbin when an empty M- or P-memory Nota importante: Si se ha seleccionado is selected. Before winding is begun a una memoria vacia M o P, entonces no program between 00 and 99 must be se puede devanar. Antes de ceomenzar a selected. devanar, tendra que estar seleccionado When you place a bobbin with thread un programa entre 00 y 99. slot on the spindle, the slot must point En el caso de carretes con ranura para towards the right. sujetar el hilo, dicha ranura debera queder a la derecha al introducir el carrete. 6
 Wind a few que el hilo quede entre Ia guia y el turns of thread on the bobbin and push muelle tensor A. Arrolle ahora unas the bobbin towards the right.")
11 ikinci bir makaradan ipligi masuraya Sp6Iab at tylnnakefli: samnalk: Kveiki) 6 a6alrofanum, Ana salteri a9iniz, Smellib stvringu 138Btram Av,6 Prwn~i6 Sarici-iphik kdlavuzunu (138) bne do~ru tvtnnann fstyringu 136 og emfs 09 myndin 9evirerek dtndur~n~z. ipligi, kdlavuz 136 synir istyrinqu 138. en getib a6 Ovia6hann iperisine ye sekilde gorldtioq qibi, praist undir spennitjo~ur A. Snuti) siban kdlavuz 138 9ierisine 9elkiriz: bu araida Ivinnanumn nokkrurn sinnumn krinqum spbluna. ipligin kilavuz ye gerilimn yayi (A) arasina Vti6 nlu spolaranum at haegr gelmesi gerekir. $imdi ipli~i birka9 del a masuraya sarunuz, Masurayj saga dogru Stigub no A m6tsto~una 09 spolb A spbluna. basturnnuz. Mar~i cabustirnnz ye ipligi ma- Pegar spdlan er full er hern, ytt til vinstri, hdn suraya sarnnuz. Dolmu$ clan masurayi telvn at. 09 tvrnninn erskorinn meb hnifnum B sola dogru basitirnnuz, cilkarmniz, ipli~t one stjringu 138 dooru pekiniz ye B kesicisinde kesiniz. fprhfbvlbtm -eapmme Onemli: Sir bos MI- veya P-Biriktiricisi ekki haagt ab spdla A spdluna A metan secilnmise, iplik masuraya sarilamaz, Sarmaya bavlamadlan once, 00 ye 99 Obur en spdla!, er ver~ur v~lin a6 vera arastndakt buir programin sactilmis olmasi Stillt A einhyarn at tdstu saumunum A 9erekir. milli 00 og 99 Iplik tutamak yaruiunu (kertigini) ha'z ma- Aribandi ar a6 pau tvinnakefi,, sam eru me6 karalarda, makaranin sbr~lmesi (takil- sk~rauf sdu sell parnng A pinnano ab rail in masi) esnasinda yarugun, yani kertigin vs ihgu sa~da bulunmasi gerekir.vs i mn Engaging the sewing mechanism: Hold tha wheel firmly, turn disk 103 towards the back, then turn the hand wheel forward until it snaps in. Conex16n del mecanismo, de costura: sujete el volante y gire al disco 103 hacia atras. Seguidamante gire el volante hacia adelante hasta qua encaje. Dikis mekanizmasangn 9a11#tfirllmast: El yarkini sukuca tutunuz ye diski (103) geriye do~ru Qevirini?. Daha sonra al 9arklim, yarine otuwuncaya kadar one dogru 9eviriniz. Gangverk viblarinnar tangib Nr no aftur - haldlib urn handthjolibo09 estib skifu 103. Sn~ib handhj6linu abeins tram A vib, O~ar fti per heyrib sins smell. 7

12 , 124 Winding through the needle: Devanado a travts de la aguja Switch on master switch. Desconecte el interruptor general, Engage dual feet. El doble arrastre connectado. Raise the sewing foot with the needle in its Eleve el pie prensatelas y Is aguja. up position. Place a bobbin on spindle Coloque Ia canilla en el devanador , Disengage the sewing mechanism. Desconecte el mecanismo de costura. Draw the needle thread under the Pase el hilo superior por debajo del sewing foot, up and through guide 138 prensatelas hacia Ia derecha y por Ia (see ill.). Wind a few turns of thread on guia 138 (v. figura). Arrolle unas vueltas the bobbin and push the bobbin towards de hilo en Ia canilla y corrala hacia Ia the right. Press down the foot control derecha. Accione el pedal para devanar. and wind. Push the full bobbin towards Corra la canilla Ilena hacia Ia izquierda, the left and take it out, cutting the thread retirela y corte el hilo en el gancho "A". in thread cutter "A". Nota importante: Si se ha seleccionado Important: It is not possible to wind the una memoria vacia M o P, entonces no bobbin when an empty M- or P-memory se puede devanar. Antes de comenzar a is selected. Before winding is begun a devanar, tendrd que estar seleccionado program between 00 and 99 must be un programa entre 00 y 99. selected. 8
. Arrolle unas vueltas the bobbin and push the bobbin towards de hilo en Ia canilla y corrala hacia Ia the right. Press down the foot control derecha.")
13 lane vattasityla ipligi masuraya sarmak Spolab gegn umrnetinal Ania salteri actrazr KvedibnZ a a~alrofanurn Qýft kumaý tasimasi 9ahstjrtlmt$ halde. Skal efri flytjarann Dilkis ayaginr yukanya kaldtniniz. lonenin F6tlyftir og n~l i efstu sto6u Seti6 spolu 6 durumu yukartda. Masurayi. sarci (124) spdlarann 124. taki6 gangvedu6b ur sambandi uizerine takiniz. Dikis mekanizrnasmni Dragib Ivinnann undir saumftitnn hagra kapatiniz. Dikis ayagi altindaki Ost splii. marlin, og si6an istyringu 138 eins og myndin saga dogru ye kdlavuz 138'den qepirmek sqnjr, Sntur6 tvinnanurn nckkruyn sinnum suretiyle gekiniz (sekle bakiniz). Ipligi kningum spdluna. Do ytib henry 5i6an til haegrr birkac deta masuraya sarninz ye StigO6 no A mbtstdouna og spolib A spoluna. masuray. saga do~ru bastirrrnz. Mart~i Pegar spdian er full er henninti t il vinsti, hun qal'istnnhz ye ipligi masuraya sarnnrz. tlekrn af og tvinninn or skorinri me6t hnilnum A Dolmus clan rnasurayj sola dogru bastirnnrz, cilkariniz, iplii brne dogru Ef 0~r hafi6 vali8 t~int M- et~a P-minni er Qekiniz ye 8" kesicsinde kesiniz. ekki haegt at, spbla A spbluna A me~an. Onemli: Bir bos M- veya P-8iriktiricis kaur en spblat, er ver~ur v~lin a6~ vera seqilmi~se, iplk masuraya sarilamaz. stillt A einhvern at tdstu saumunum a Sarmaya ba~lamadan once, 00 ye 99 mlli 00 eq 99. arasindaki bir programmn secilrnis irnasi gerekir. '/ý 17ýý& 1zllEngaging the sewing mechanism: Hold C I z Ithe wheel firmly, turn disk 103 towards the back, then turn the hand wheel forward until it snaps in. Conexldn del mecanismo die costura: sujete el volante y gire el disco 103 hacia atr~s. Seguidamente gire el volanhe hacia adelante hasta que encaje. 103 Diki mekanizmasangn qahilltirimasi: El 9arklnl sikica hutunuz ye diski (103) geriye do~ru 9eviriniz. Daha sonra el 9arlkmn, yerine otururicaya kadar one dlogru geviriniz. Gangverk velarinnar tengi8 per no attur - haldib urn handhjbli6 09 feshio sklfu 103. Snbi6 handhj6iinu abeins tramn a vit. par til Or heyri6 sm6 smell.
. Ipligi kningum spdluna.")
14 Inserting the bobbin: insert bobbin so <r that thread unwinds towards the back (A). Draw the thread into slot B and into eye C. CD ý!k Colocaci6n die Ia canilea en [a chpsula: lntroduzca [a canilia como se muestra en A (hilo hacia atr~s). Pase luego el hilo por as ranura B y pot debajo del muelle tensor hasta que salga por el orificia C. Masurayi yerlestimiek A (iplik arkaya dogru). Ipligi B yarigina ye C deli~ine kadar 9ekiniz, Sp6lan sett i. Tvinninn a a6 renna aftur at sp6lunni. Tvinninn lag~ur i rauf B undirfto~rina 09; bt urn op C. ýj Checking the bobbin thread tension: With a brief, sharp upward movement of your hand the bobbin must gradually slip downwards. (Turn screw D to the right for stronger tension and to the left for weaker tension. Comprobaci6n cle Is tension del hilo inferior: Suspendiendo as capsula del hilo, solo deberi deslizarse al dlar tironcitos del hilo. (Girando el tornillo D a la izquierda, Ia tension dismiriuye, y viceversa.) Alt iplik gerginliolnin kontrol edulniesi: Meki~i, hafitq~e, aniden yukanuya dogru harelket ettiriniz. Mekigin kademeli olarak ai~a~iya inmesi gerekir. (Ayar vidasi D'yi sola 9~eviriniz = daha gev~ek, saga 9evininiz = daha siki). Rttit undirspenna: LAti sp6luh~si6 hanga nibur, rykki6 lauslega i tvinnann, og 06 A Oa6 a6 renna abeins nibur, (Stilliskriila 0 ý vinstri snuiningur losar, haegr snuningur heribir 10

15 Inserting the bobbin case: * Switch off master switch 108. Raise latch A and push the bobbin case onto stud B as tar as it will go, making sure cutout C points upwards. Colocaci6n de Is cipsula con Ia candlea en el garflc: C 0 Desconecte et internxptor general 108 Levante la bisagrita A e introduzca la c~psula hasta el tope en la espiga B La muesca C tiene gue mirar hacia arriba, Meki~i takmak: * Ania "aitent (108) kapatiniz, A kiapesini kaldiriniz ye mekigi dayanaga kadar B pimi uzerine suriiniz Bu sirada C kesiminiri yukariya dogru yonelmiý olmasi gerekir. SpbluhCisi?. sett i: * Slbkkvi6 A ai~alrofa 108. Haldi6 urn loku A, og setjii) bab6 titt B, pannig ai! ijrtakib C visi upp A vi6 Placing spool of thread on pin: Place the small or medium-size unwinding F) collar D in front of small spools, and the large collar E in front of large spools. M Colocaci6n del carrete: Para carretes pequerios coloque el disco peqluetia o mediano D; para grandles el disco grandle E Malcaranin takilmasi: K~GOk makaralarin dnpne koyilk veya orta buyiikiikte clan d6ner rondelayi (D), byuyk makaralarin bn~ne b~iyik rondelayi (E) sur~nuz, E Tvinnaketlin seti : Fyrir litil kefli or Itfla skifan D sent fyrir framan kefli6, en skifa E fyrir staerh kefit
 bab6 titt B, pannig ai!")
16 A (7 A~e Upper threading: * Switch off master switch 108. With the needle in its top position, raise the sewing foot Draw the thread into slot A, from below into slot B and take-up 137 lever 137 (see arrows), then back into slot B and into the right thread guide on the needle holder. Enhebrado del hilo superior: * Desconecte el mnlerruptor general 108. Eleve [a aguja y el prensatelas. Pase el B hilo, siguiendo Ia flecha, por la ranura A, desde abajo por [a ranura B. por l palantairathilos 137, de nuevo por Ia ranura B y pornl guma derecha del portagujas. ý,v LU fist ipligin takilmnasi; * Ann sa/teri (108) knpattniz, ignenin dlurumu. yukanda. Dikis nyagini yu knriyn kaldinniz. plialii, ok istikametinde olmak wiere, A yanigina, alt taraftan B yanigina, horoz (137) iperisine, geriye dogru B yangina ye p11lk tutamaginda bulunan sag kilavuz i;erisine cekiniz. l'reabing: * Slbkkvi6 6 aoalrofa 108. NAlin iefstu stdbu. Fbtur uppi, b'ra6ib emns eq orvarnar sqna r auf A. a6 neban i taut B, i r6?bgjafa 137, aftur i rauf B, oq sioan h mgri styringu A n~lahbidunni. o Place the needle thread behind hook 0 and hold it there. Pull threader 145 fully downwards. Goloque el hilo superior detr~s del gancho D y suj~telo. Empuje el enhebrador 145 hacia abajo el todo. Ost iplioi D 9engeli arkasina yerle~tiriniz ye tutunuz. l~neye iplik geoiriciyi (145) tamamen a~a~jya do~ru gekiniz. D ~ Leggib yfirtvinnann undir hak D eq haldi6 tvinnann. Togi6 si6an ifragarann 145 alveg nibur, 12

17 Swing threader towards front against needle. -Gire el enhebrador hacia la aguja de forina que su gancho penetre par el ojo de Ia aguja. igneye iplik geciriciyi, ignenin 6n tarafina Snujib nu Or aranum pannig a6 hann fan eg in nmalarugab. Place thread into hook E from below. Enganche el hilo desde abajo en el gancho E. pligi, asagidan E ýengeline snz - Leggi6 tvinnann no undir kr6kinn E A braii6aranum. Swing threader towards back, release to move upwards, then pull the thread 0 fully through the needle eye. Gire hacia atr~s el enhebrador, suelte el hilo y eleve el enhebrador. Finalmente, haga pasar ef hilo del todo par el ojo de la aguja. V -T- lgneye iplik geciniciyi arkaya do~ru getininiz, bu arada ipligi serbest birakiniz ye igneye iplik gegiriciyi yukariya dogru ~kaydirtiniz. Daha sonra ipltgi tamnamen igne deliginden cekiniz. E~tib no brw~arann ganga haegt tii baka, og alla leab upp. Tvinninn kemur no semn lykkja gegnumn nalaraugab 09 okr geti6 n6 dregzo endann igegn. 13

18 0 // Hold the needle thread taut. Turn the 0 hand wheel toward you until the needle moves down and up again. Needle and take-up lever must be raised. Pull the bobbin thread up by pulling on the needle thread. Sujete et hilo superior, gire et volante hacia el frente y hnaga una puntada. La 0 aguja y el tirahilos deberan estar elevados. Saque el hilo inferior tirando del hilo superior. (1st ipligi sikica tutunuz. El parkini bne dogru geviriniz. Sir batiý dikiniz. (1st iplikie, alt ipli~i yukariya dogru 9ekiniz. (3 Haldib i ylirtvinnann. Sntib handhjdlinu tramn A vi6 ýar tit nilin hefur farib ni6ur og kemur upp aftur. Togib undirtvinnann upp. Place both threads to the right under the 0 sewing toot. o Eche ambos hilos hacia Ia derecha por debajo del prensatelas. (1st- ye alt ipli~i saga dlogru, dlikiý ayaoi altina koyunuz. LAWi yfir- og undirtvinnanri undir Idtinn hmgra megin. Close the free arm cover 131. ~> Cierre Ia tapa 131. Kapak klapesini (131) yukariya do~ru kapataniz. Lokiblokinu

19 Swing work support 109 back against the free arm. Gire hacia dentro el suplemerito 109. Dikis yuzeyini (109) makiraya dogru pevirerek d~nd~r~noz. Ytbvinnubor~i 109 a? arminum * Switch off master switch 108. Place fabric under sewing foot. * Desconecte el interruptor general 108. Coloque la tela debajo del prensatelas. ~ 0 Ana sa/teri (108) kapatiniz. Kumasi dlikis ayagi altina koyunuz. * S1dkkvib A abalrofa 108. Setjib efni6i undir fdtinn. To insert extra-thick fabric plies raise lever 119 higher. Al coiccar plezas de taea muy gruesas, levante m~s la palanca 119. Qok kahn olan kumaslarin yerlestirilmesi esnasinda, kolu (119) daha yukariya kaldiriniz. Ef bar erub me6 mjog dykk etni, 06 9tib t6tlyftir 119 haerra. Is a Si Switch on master switch. Lower presser bar lifter 119. (A indicates the darning position), Desconecte of interrupter general. Baja la palanca alzaprensatelas 119. ("A" as la k (4, ~posicido para zurcir). \t- 'Ana - saiteri aq;niz. Kumas bastirma kolunu (119) a~agiya ircidriniz, (A, drerek tamir "A etma -yama yapma - durumudur). Kveikii! A a~alrofanum. Setji6 fdtlyftirinn 119 nibur, (Sta~a A er fyrir stoppvinnu). 15
 daha yukariya kaldiriniz.")
20 Operating the foot control: The farther you press the pedal down, the faster the machine runs. Para poner en marcha Ia mdquina, pise at pedal: a medida que aumente [a presi6n aumentara Ia velocidad. Maria ayakla bastniz. Maria nekadar fazla bir ýekilde basilirsa, "creative" okadar suratli diker. Stigib 6 m6tstobuna: Pvi fastar sem or stigi6. pvi hratarsaumarvelin Needle thread tension 135 A = Setting mark. A, Tensahilos superior 135 Ai A = Marca para la regulacion. Ust iplik gerilimi 135 A = Ayar isaretlemesi. Yfirspenna 135 A = vi~mi6un fyrir retta spennu. Checking the needle thread tension: Comprobaci6n de Ia tension del hilo: The normal setting is in the white range La regulaci6n normal se encuentra en Ia between 3 and 5. The higher the num- zona blanca entre 3 y 5. Cuanto mas ber, the tighter the tension. To check the alto sea el n6mero tanto mayor sera la tension, set the machine for zigzag stitch tension. La comprobacion se hace con ]a by entering program 10 (page 22). puntada zigzag. Sew a short seam. The threads should Ajuste: pulse el programa 10 (peg. 22); interlock in the middle of the material. haga una costura corta; los hilos deberan quedar anudados dentro de las piezas de costura. 16

21 Iplik gerginli~inin kontrol edilmesi. Normal ayar, beyaz bolgede 3-5 arasinda bulunmaktadir. Sayi nekadar buiyik ise, gergirdik okadar sikidir. Kontrol, zikzak dlikisle (bati~la) yaptimaktadir. Ayar: Program l0'na basiniz (Sayf a 22). Kisa bir dikis yapiniz. lplk ba~lantisi, kumaslarin arasinda kalmakiadir.eamiuefiu ROtt sporstfilling: Venjulegast er rant spenria m,6ubvib hvita bi16 fra 3-5, vi hart sem talan er, bvi stitar er sperinan Pr6Ii6 me6 brei6asta zik zak sport Stillib Amriyzitur 10 (his 22p.Saumio stuttan saum. H-nytingiri A a6 Vera ioddum sporanna Raise presser bar litter 119. Remove the fabric by pulling it towards the back. Levante la palanca alzaprensatelas 119. Retire la tael hacia atrras. Kumaq bastirma kolunu (119) yukariya getiriniz. Kumaai arka tarafat dogru qikarnniz. Lyfti6 fdttyftir 119. Takib etnic6 aftur undan faetinum, Thread cutter A: Draw the threads into the slot and pull them downwards. Cortathilois A: introduzca Ins hilos en la ranura y tire de ellos hacia chajo. iplik kesicisi A. Iplikieri yerle~tiriniz ye geriye do~jru qekiniz, Tvinnahnifur A: Leggi tvinnaendanat sk~raufina og loqi6 begigja megin 17
22 Dual feed This prevents shifting of the material plies during sewing. Before engaging or disengaging the dual feed always raise the sewing foot. Doble arrastre El doble arrastre evita el que una pieza quede m~s larga que otra despu6s de cosidas. Antes de conectarlo o desconectarlo, 0 eleve et pie prensatelas. Qift kumaý ta~imasi. Bu, kumas katlarini dlikis esnasinda kaymasini engeller. 9alistirmadan veya kapatmadan once, dikis aya~inr yukariya kaldirrniz. Kernur i veg tyrir ab efnin geb rnisfaerst. 92 U Lyftib fmatinum dbur en ~tir setjib efri flytiarann I sarnband eba takib hann Osr sambandi. To engage: lower top feed 144 until it snaps in place. To disengage: push top feed lightly downwards, pull it towards the rear and allow it to move upwards. Para conectarlo: empuje el pie transportador 144 hacia abajo hasta que encaje. Para desconectarlo: empule ligeramente hacia abajo y tire de 61 hacia fuera. oturuncaya kadar, asa~iya do~ru TiI ab setja hann i samband 0i0 per einfald- ~lega A yfirtlytjarann 144, oar fil hann smollur 0 samband. WI-" Til a6 taka hann Or sambandi 9t1 jar A hann nibur A vib o9 taki6 hann O~r rauf f~tarns urn leib. Fer hann PA aftur i sina efri stdbu. a Kapatma: Hafifi~e a~agtya do~ru bastirtniz, arkaya dogru pekiniz ye yukartya dooru kaydirtintzr 18
23 Operating keys of the electronic system fstick the enclosed English labels on the These are described on the following keys pages. Botces mano deis d prtspegue en los botones correspondientes electronics. Sus funciones se describen olerosnepai djts en las paginas siguientes. Ekteki tus etiketierini, turki~e olmak Elektronlc'n kullanim tuolant (zere, yapistinniz. Elektr6nisklr sti6rnhnappar tmib~ hjalag6a mi6a a vi6komanct lakka 1-tising a, beirn er 6 aestusi 19
24 Rematado de Is costura/ojal. Remata- do: pulsando el bot6n 117, la l6mpara se enciende, la costura programada queda rematada al comienzo y Ia Iimpara se apaga. Pulsando dicho bot6n durante la costura, (a lampara se enciende, la costura gueda rematada inmediatamente o al final, si se trata de un motivo, y la lampara se apaga. Ojal: en el caso del programa 86 para olales, con ei botbn 117 se determina la Iongitud del ojal y se memoriza al mismo tiempo. Electronic bobbin thread monitor: Bobbin thread monitor light 113 starts to flash when the bobbin thread is running out. It goes off when a full bobbin is inserted and sewing is resumed. Important: Free arm cover 131 must be kept closed. Needle up and down positions: When the machine stops, the needle is always retained at its up position. When you push "needle down" key 114, the indicator light goes on and the needle remains down in the fabric when the machine stops. When you push key 114 again, the light goes off, the needle moves up and remains up. Electronic top speed selection: When you press "sew slow" key 115, the indicator light goes on and the machine sews at half its speed. When you push key 115 again, the light goes off and the machine again sews at top speed. Tie-off/buttonhole: When you push key 117, the indicator light goes on and the programmed seam is tied off at the beginning, then the light goes off again, When you push the key during sewing, the light goes on and a seam is tied off right away, while a pattern is tied off at the end. Then the light goes off. Buttonhole: When buttonhole program 86 is on, key 117 serves to determine and memorize the seam length. Reverse sewing: Push key 116 before you start sewing. The indicator light goes on and the machine sews backwards permanently. When you push the key during sewing, the light does not go on and the machine sews backwards as long as you keep the key depressed. Darning: Key 116 is also used to determine and memorize the seam length entered in darning program 09. Control electrdnico del hilo inferior: cuando el hilo inferior esta pr6ximo a terminarse, el piloto 113 comienza a lucir intermitentemente. Despu6s de colocar una canilla lena y comenzar a coser, se apaga. Nota importante: Ia tapa 131 tiene qua estar cerrada. Posicibn superior e inferior de Ia aguja: a] pararse [a maquina, Ia aguja queda en su posici6n superior. Pulsando el botdn 114 pare "aguja abajo", se enciende Ia lampara y la aguja permanece abajo at pararse Ia m~quina. Pulsando de nuevo el botbn 114, la lampara se apaga y Ia aguja pasa a su posicibn superior y permanece arriba. Limitaclin electronica de Is velocidad: pulsando el botdn 115 para "costura lenta", la lampara se enciende y la ma- quina cose a media velocidad. Pulsando de nuevo el bot6n 115, Is lampara se apaga y Ia m~quina vuelve a coser a la velocidad maxima. Costura en retroceso: pulsando el bot6n 116 antes de comenzar a coser, Ia Iimpara se enciende y la maquina cose constantemente hacia atres. Pulsando dicho bot6n durante la costura, la lampara no se enciende pert Ia maquina cose hacia atr~s mientras se mantenga el bot6n pulsado. Zurcido: con el bot6n 116 tambien se determina la longitud del programa para zurcido 09 y se memoriza. 20
OO9 UOEJDflJISUI J!SJMEQ!01
 J!SJMEQ!01!SeWeU1ELU!IE EWUEHfl).j QISUEW op seuo!ddnj1ui OO9 UOEJDflJISUI 8OO/tLftO cord whenever you have to leave the Make sure you unplug the power ye asaiya doru hareket eden ine a) Makinayi kullanan
Conditioning Exercises: Standing
 Conditioning Exercises: Standing Do all these exercises slowly. Do not hold your breath during these exercises. If unusual pain occurs in your joints or muscles while you are exercising, do not continue
Process Control Work Instructions Control de Procesos Instrucciones de Trabajo. for / para
 Process Control Work Instructions Control de Procesos Instrucciones de Trabajo for / para 629096898 VFCB Kit Relay Cable Harness Assy Ensamblar el Kit del Arnés de Cables del Relevador Publication Number:
KMR SCA-05 Mounting Instructions Instrucción de Montaje Instruções de Montagem 0899.4897
 0899.4897 KMR SCA-05 Mounting Instructions Instrucción de Montaje Instruções de Montagem 0899.4897 KMR SCA-05 Mounting Instructions Instrucción de Montaje Instruções de Montagem The KMR SCA-05 kit is a
Creating your Single Sign-On Account for the PowerSchool Parent Portal
 Creating your Single Sign-On Account for the PowerSchool Parent Portal Welcome to the Parent Single Sign-On. What does that mean? Parent Single Sign-On offers a number of benefits, including access to
Learning Masters. Early: Force and Motion
 Learning Masters Early: Force and Motion WhatILearned What important things did you learn in this theme? I learned that I learned that I learned that 22 Force and Motion Learning Masters How I Learned
Agustiniano Ciudad Salitre School Computer Science Support Guide - 2015 Second grade First term
 Agustiniano Ciudad Salitre School Computer Science Support Guide - 2015 Second grade First term UNIDAD TEMATICA: INTERFAZ DE WINDOWS LOGRO: Reconoce la interfaz de Windows para ubicar y acceder a los programas,
EP-2906 Manual de instalación
 EP-2906 Manual de instalación Con el botón situado a la izquierda se configura en el modo de cliente y de la derecha es el modo de Punto de acceso AP (nota: El USB es sólo para la función de fuente de
MANUAL EASYCHAIR. A) Ingresar su nombre de usuario y password, si ya tiene una cuenta registrada Ó
 Ingresar su nombre de usuario y password, si ya tiene una cuenta registrada Ó") MANUAL EASYCHAIR La URL para enviar su propuesta a la convocatoria es: https://easychair.org/conferences/?conf=genconciencia2015 Donde aparece la siguiente pantalla: Se encuentran dos opciones: A) Ingresar
MANUAL EASYCHAIR La URL para enviar su propuesta a la convocatoria es: https://easychair.org/conferences/?conf=genconciencia2015 Donde aparece la siguiente pantalla: Se encuentran dos opciones: A) Ingresar
Flashcards Series 3 El Aeropuerto
 Flashcards Series 3 El Aeropuerto Flashcards are one of the quickest and easiest ways to test yourself on Spanish vocabulary, no matter where you are! Test yourself on just these flashcards at first. Then,
 Control and Functions Guia de Funcionamiento Front View Configuración PAN/TILT 9 1 11 1 13 "Assign" 1 PROGRAM MUSIC/BKC MIDI/REC AUTO/DEL TAP/DISP 15~ BLACKOUT PAN TILT ASSIGN REVERSE MODE TILT PAN FINE
Crear alarma GATE. Aparecerá una ventana emergente para crear alarma.
 Crear alarma GATE Para crear una alarma, accede a través del menú principal de myhome.wattio.com a Seguridad, posteriormente arriba a la derecha haz click en Alarmas. En esta pantalla, en el menú izquierdo,
Sierra Security System
 Using Your SpreadNet Accessories With Your Sierra Security System Uso de Sus Accesorios SpreadNet Con Su Sistema de Seguridad Sierra SN990-KEYPAD SN961-KEYFOB SN991-REMOTE 1 SN990-KEYPAD The SN990-KEYPAD
MANUAL DE INSTRUCCIONES
 MANUAL DE INSTRUCCIONES GUESS WATCHES 1 MUJER MUJER 2 MUJER Enhorabuena por la compra de su nuevo reloj GUESS. Éste ha sido desarrollado con una avanzada tecnología electrónica y se ha fabricado con los
PA600 Rugged Enterprise PDA
 PA600 Rugged Enterprise PDA unitech unitech is a member of Oracle Embedded Software Licensing Program Quick Reference Guide 400577G RevB Front Left View 1 8 7 English 6 3 4 5 1 Status indicator 5 Universal
Matemáticas Muestra Cuadernillo de Examen
 Matemáticas Muestra Cuadernillo de Examen Papel-Lápiz Formato Estudiante Español Versión, Grados 3-5 Mathematics Sample Test Booklet Paper-Pencil Format Student Spanish Version, Grades 3 5 Este cuadernillo
KAISSA Manual Rápido De Usuario. Rev 1.0
 KAISSA Manual Rápido De Usuario Rev 1.0 Ante todo gracias por adquirir el innovador reloj de ajedrez KAISSA, diseñado bajo la filosofía del Diseño Para Todos. KAISSA tiene dos modos de funcionamiento principales
Disco duro ATA. Nota: Encontrarás instrucciones en línea en http://www.apple.com/support/doityourself/.
 Español Instrucciones para la sustitución Disco duro ATA AppleCare Sigue atentamente las instrucciones de este documento, de lo contrario podrías dañar tu equipo e invalidar la garantía. Nota: Encontrarás
BAI-220 AURICULAR INALÁMBRICO
 BAI-220 AURICULAR INALÁMBRICO Manual de usuario ESPECIFICACIONES TÉCNICAS EMISOR Frecuencia: 86 ± 0.5 MHz Modulación: FM Distancia de emisión: 30 m. Recepción de cualquier equipo de audio y video con salida
Vamos a Multiplicar Al estilo maya!
 Vamos a Multiplicar Al estilo maya! Resumen de la actividad Esta lección le permite a los estudiantes realizar multiplicación al estilo maya como una actividad de seguimiento a la herramienta interactiva
1) Install the included batteries into your blood pressure monitor (BPM).
 Install the included batteries into your blood pressure monitor (BPM).") DELUXE CONNECTED BLOOD PRESSURE ONITOR UA-651BLE 1) Install the included batteries into your blood pressure monitor (BP). 2) Insert the air connector plug into the air socket. 3) Download the free A&D
DELUXE CONNECTED BLOOD PRESSURE ONITOR UA-651BLE 1) Install the included batteries into your blood pressure monitor (BP). 2) Insert the air connector plug into the air socket. 3) Download the free A&D
happy safari travel cot cuna de viaje happy safari guía para el usuario importante. retenga para referencia futura - lea con cuidado.
 happy safari travel cot user guide important. retain for future reference - read carefully cuna de viaje happy safari guía para el usuario importante. retenga para referencia futura - lea con cuidado.
TOUCH MATH. Students will only use Touch Math on math facts that are not memorized.
 TOUCH MATH What is it and why is my child learning this? Memorizing math facts is an important skill for students to learn. Some students have difficulty memorizing these facts, even though they are doing
Installation Guide. Green momit
 Installation Guide Green momit 2015 www.momit.com momit Deviceses Gateway: Model 1 and 2 Wall option The momit Gateway allows your thermostat to be connected to the Internet. It s included in the Starter
Video Server. Quick Installation Guide. English, Español
 Video Server Quick Installation Guide English, Español 2 Video Server NOTES Quick Installation Guide 3 Video Server Quick Installation Guide To get your Video Server up and running on an Ethernet network,
Instalación de software y manual Mars Gaming
 Instalación de software y manual Mars Gaming Requisitos del sistema: * Compatible con Windows XP/Windows Vista/Windows 7/Windows 8 * Un puerto USB (1.1/2.0) * CD-ROM drive * 50MB de espacio disponible
Zune 8GB/4GB Start. Iniciar.
 Zune 8GB/4GB Start. Iniciar. SETUP 1 Visit www.zune.net/setup to install the Zune software. 2 When installation is complete, connect your Zune to your PC to start syncing. Your Zune charges whenever
Puede pagar facturas y gastos periódicos como el alquiler, el gas, la electricidad, el agua y el teléfono y también otros gastos del hogar.
 SPANISH Centrepay Qué es Centrepay? Centrepay es la manera sencilla de pagar sus facturas y gastos. Centrepay es un servicio de pago de facturas voluntario y gratuito para clientes de Centrelink. Utilice
 (for some optional presser feet) 2 1. Raise needle and presser foot. 2. Remove the needle. 3. Loosen presser foot screw (1) and remove presser foot with shank (2), guiding it toward you and to the right.
ES-S6A Sirena de interior. www.etiger.com
 ES-S6A Sirena de interior www.etiger.com ES Características La ES-S6A puede utilizarse como sirena adicional conectada a su sistema de alarma o como sirena independiente conectada a un mando a distancia
SP-U. Soporte colgado universal para JK26 / JK10 / JK10MA / JK12 / JK12MA / JK15 / KEY10 / KEY12 / KEY15
 Soporte colgado universal para JK26 / JK10 / JK10MA / JK12 / JK12MA / JK15 / KEY10 / KEY12 / KEY15 Universal U-bracket for JK26 / JK10 / JK10MA / JK12 / JK12MA / JK15 / KEY10 / KEY12 / KEY15 Copyright
 2 (For some optional presser feet) 1. Raise needle and presser foot. 2. Remove the needle. 3. Loosen presser foot screw (1) and remove presser foot with shank (2), guiding it toward you and to the right.
USB 2.0 INTERNAL MEMORY CARD READER/WRITER USER MANUAL CRW-UINB
 USB 2.0 INTERNAL MEMORY CARD READER/WRITER USER MANUAL CRW-UINB FEATURES HARDWARE INTRODUCTION 1 USB port for plugging into any USB device 2 Slot for SD, MMC and RS-MMC cards 3 Slot for Memory Stick, Memory
π H-3539 MONARCH 1130 ONE LINE LABEL GUN
 π H- MONARCH ONE LINE LABEL GUN --- uline.com Para Español, vea páginas -. INSTRUCTIONS Changing the ink roller. Pull the latches back and swing the cover open completely. You should hear a click. NOTE:
Quick Installation Guide Internet Setup
 CBR-970 Wireless-N Broadband Router www.cnet.com.tw Established in California, U.S.A. since 1987 Quick Installation Guide Internet Setup What s included in the box CBR-970 Wireless N Broadband Router Quick
Structuring Numbers (ST) Score out of 4
 Score out of 4") VASD 1 st Grade WINTER and SPRING Minimal Basic Proficient Winter 0-9 10-12 13-20 Spring 0-12 13-15 16-20 Fall 0-12 13-15 16-20 and 2 nd Grade Fall Math Screener If student gets 20/20 in WINTER do NOT
VASD 1 st Grade WINTER and SPRING Minimal Basic Proficient Winter 0-9 10-12 13-20 Spring 0-12 13-15 16-20 Fall 0-12 13-15 16-20 and 2 nd Grade Fall Math Screener If student gets 20/20 in WINTER do NOT
ARH-2 GUÍA DE INSTALACIÓN RÁPIDA Versión 1.4, 21 febrero 2001
 ARH-2 GUÍA DE INSTALACIÓN RÁPIDA Versión 1.4, 21 febrero 2001 NOTA: ÉSTA ES UNA GUÍA DE REFERENCIA RÁPIDA PARA USUARIOS CON EXPERIENCIA. SI LO DESEA, PUEDE CONSULTAR EL MANUAL COMPLETO DE INSTALACIÓN,
CONTROLADORA PARA PIXELS CONPIX
 The LedEdit Software Instructions 1, Install the software to PC and open English version: When we installed The LedEdit Software, on the desktop we can see following icon: Please Double-click it, then
Ejercicios Input/Output 11 de Mayo, 2013
 503208: Programación I 1 er Semestre 2013 Ejercicios Input/Output 11 de Mayo, 2013 Prof. Leo Ferres Autor: Javier González N. 1. Archivos de texto Cuando se usa redireccion (./a.out < archivo.txt, por
LECTOR PROXIMIDAD 4K AUTONOMO STANDALONE 4K PROXIMITY READER REF: 507222 HI / 255 01/14
 LECTO POXIMIDAD 4K AUTONOMO STANDALONE 4K POXIMITY EADE EF: 507222 HI / 255 01/14 LECTO POXIMIDAD 4K AUTONOMO egistro de la maestra y para suprimir 1. Apagar el lector 2. Poner el dipswitch nº1 en posición
GUÍA DE USUARIO PC-331117. Bienvenidos al mundo Perfect Choice. Antes de comenzar a usar el producto es importante que leas esta guía.
 GUÍA DE USUARIO PC-331117 Bienvenidos al mundo Perfect Choice Antes de comenzar a usar el producto es importante que leas esta guía. Conexión 1. Inserta el transmisor en el conector para encendedor de
Bluebeam Digital Certification Manual
 Manual Certificación Digital en Bluebeam Revu Bluebeam Digital Certification Manual Desarrollado por: DTE, LLC support@dtellcpr.com Developed by: DTE, LLC Revisado en: 20 de julio de 2016. Ver. 1.101.0720
Funda para móvil. Patrón 1 Patrón 2 Recorte para la guata adhesiva
 Instrucciones Necesitas: Máquina de coser Totally Me! 2 trozos de tela (4,5" x 13") (11,4 cm x 33 cm) 1 trozo de guata adhesiva 2,5" (6,4 cm ) de goma elástica fina 1 botón de color Tijeras Alfileres Patrones
MANUAL DE INSTRUCCIONES PARRILLA BARBACOA (18 ) ED-4047BQ
 ED-4047BQ") MANUAL DE INSTRUCCIONES PARRILLA BARBACOA (18 ) ED-4047BQ ESTIMADO CLIENTE Con el fin de que obtenga el mayor desempeño de su producto, por favor lea este manual de instrucciones cuidadosamente antes de
MANUAL DE INSTRUCCIONES PARRILLA BARBACOA (18 ) ED-4047BQ ESTIMADO CLIENTE Con el fin de que obtenga el mayor desempeño de su producto, por favor lea este manual de instrucciones cuidadosamente antes de
 (for some optional presser feet) 2 1. Raise needle and presser foot. 2. Remove the needle. 3. Loosen presser foot screw (1) and remove presser foot with shank (2), guiding it toward you and to the right.
Pie del monitor. Nota: Encontrarás instrucciones en línea en http://www.apple.com/support/doityourself/.
 Spanish Pie del monitor Instrucciones para la sustitución Sigue las instrucciones de este documento con cuidado. No hacerlo podría dañar tu equipo y anular su garantía. AppleCare La sustitución del pie
ENKVM-USBB. 2-Port USB KVM switch with Easy Switch and Cable. User Guide
 ENKVM-USBB 2-Port USB KVM switch with Easy Switch and Cable User Guide i Package Contents 1 ENKVM-USBB 2-Port USB KVM Switch with Easy Switch and Cable 1 User Guide Requirements Console A VGA, SVGA, XGA,
appkbws03 Wireless Multimedia Keyboard Set Black
 appkbws03 Wireless Multimedia Keyboard Set Black Español 01 English 06 Capítulo 1. Introducción y descripción del producto Gracias por elegir el teclado inalámbrico APPKBWS03. Descripción del producto
Packard Bell Easy Repair
 Packard Bell Easy Repair Serie EasyNote MX Instrucciones de reparacion é de disco duro www.packardbell.com Instrucciones de comprobación de seguridad importantes Debe leer con atención todas las instrucciones
MANUAL DE INSTRUCCIONES PARRILLA BARBACOA (14 ) ED-4045BQ
 ED-4045BQ") MANUAL DE INSTRUCCIONES PARRILLA BARBACOA (14 ) ED-4045BQ ESTIMADO CLIENTE Con el fin de que obtenga el mayor desempeño de su producto, por favor lea este manual de instrucciones cuidadosamente antes de
MANUAL DE INSTRUCCIONES PARRILLA BARBACOA (14 ) ED-4045BQ ESTIMADO CLIENTE Con el fin de que obtenga el mayor desempeño de su producto, por favor lea este manual de instrucciones cuidadosamente antes de
Lump Sum Final Check Contribution to Deferred Compensation
 Memo To: ERF Members The Employees Retirement Fund has been asked by Deferred Compensation to provide everyone that has signed up to retire with the attached information. Please read the information from
An explanation by Sr. Jordan
 & An explanation by Sr. Jdan direct object pronouns We usually use Direct Object Pronouns to substitute f it them in a sentence when the it them follows the verb. Because of gender, him and her could also
Caldera VAILLANT. Mantenimiento, regulación y limpieza de aparatos domésticos a gas. Hoja 1 de 3
 VALLANT Hoja 1 de 3 1 3 4 2 5 Abrir la tapa 1 tirando de ella. Girar 1/4 de vuelta los dos tornillos 2 de plástico estrella que se encuentran en los laterales del frontal de mandos y abatirlo. En caso
ROCK N STEREO SOUND DESK
 Read and save these instructions ROCK N STEREO SOUND DESK RTA-M1102-BK INSTRUCTIONS TABLE OF CONTENTS PACKAGE INCLUDES Package Includes... 2 Specifications... 2 Product Parts List... 3 1 2 3 Product Details...
SYSTEM INSTALLATION MANUAL MANUAL DE INSTALACIÓN
 SYSTEM INSTALLATION MANUAL MANUAL DE INSTALACIÓN Measuring Tape Cinta métrica Ø 8 mm twist drill (wood) Broca espiral Ø 8 mm (para madera) Ø 14 mm stone drill (brick) Broca para piedra Ø14 mm (ladrillo)
Manual de instrucciones. Opción en línea
 Manual de instrucciones Opción en línea Generalidades...3 El PowerControl con la opción en línea...3 El software SRM de la opción en línea...4 La pestaña Mode...5 La pestaña Main Chart...5 La pestaña Predefined
www.totalspanishsimulator.com
 I ) Instalación / Installation Pg. 2 II ) Conexión del cableado / Plug in the connectors Pg. 4 III ) Cambiar Posición Imán / Change Magnet Position Pg. 6 IV ) Configuración de Software Pg. 7 IV ) Software
Los bloques DLL (Figura A.1) externos permiten al usuario escribir su propio código y
 externos permiten al usuario escribir su propio código y") Apéndice A Bloques DLL Los bloques DLL (Figura A.1) externos permiten al usuario escribir su propio código y programarlo en lenguaje C, compilarlo dentro de un archivo DLL usando el Microsoft C/C++ o el
Apéndice A Bloques DLL Los bloques DLL (Figura A.1) externos permiten al usuario escribir su propio código y programarlo en lenguaje C, compilarlo dentro de un archivo DLL usando el Microsoft C/C++ o el
Scholarship 2014 Spanish
 93007 930070 S SUPERVISOR S USE ONLY Scholarship 2014 Spanish 9.30 am Tuesday 25 November 2014 Time allowed: Three hours Total marks: 24 Check that the National Student Number (NSN) on your admission slip
La Video conferencia con Live Meeting
 Página 1 INSTRUCCIONES PARA TRABAJAR CON LIVE MEETING.- PREVIO. Para que tenga sentido la videoconferencia es conveniente que tengamos sonido (no suele ser problemático) y que tengamos vídeo. Si el ordenador
Qué viva la Gráfica de Cien!
 Qué viva la Gráfica de Cien! La gráfica de cien consiste en números del 1 al 100 ordenados en cuadrilones de diez números en hileras. El resultado es que los estudiantes que utilizan estás gráficas pueden
Accesorios / Accesoires not included base de empotrar Ø60. 140 recessed base INCL. INCL. INCL. INCL. 170 surface base
 120 350º MR16LED IP20 351 LAMP NOT 13845 aluminio inyectado die cast aluminium código W lm lámpara casquillo ºK 120 351 7,5W.12V. 500 MR16LED GU-5,3 2.700 code W lm lamp socket ºK No todas las lámparas
LED Strobe Panel - Manual
 PAG. 2 LED Strobe Panel - Manual SPECIFICATION Voltage: Power consumption: LED: Color temperature: Operation mode: Weight: Size: 3 00VAC 20VAC 05W (Max) 448* SMD5050 white LED 900K LED display 3.KGS *2.35*9.
Objetivo: You will be able to You will be able to
 Nombre: Fecha: Clase: Hora: Título (slide 1) Las cosas _ Capítulo 2 1 (Chapter Two, First Step) Objetivo: You will be able to You will be able to First look at the other sheet of vocabulary and listen,
MANUAL DE UTILIZACION SPRINTER MB 413 CDI
 TRANSPORTS DE BARCELONA, S.A. MANUAL DE UTILIZACION SPRINTER MB 413 CDI VEHICULOS 4225-4231 Oficina Técnica Marzo 2002 OT-71 INDICE Arranque del motor 3 Cuadro de instrumentos y controles 4 Mando central
Theatrelight NOVA 24
 Apuntes Capacitación: Operación Básica Consola Theatrelight NOVA 24 1.- Características 1.1.- Acceso a 24 canales dimmer en forma directa. 1.2.- Capacidad para el registro de 80 escenas (10 páginas con
Some examples. I wash my clothes, I wash the dishes, I wash the car, I wash the windows. I wash my hands, I wash my hair, I wash my face.
 Reflexive verbs In this presentation, we are going to look at a special group of verbs called reflexives. Let s start out by thinking of the English verb wash. List several things that you can wash. Some
GARAGE DOOR OPENER CONNECTIVITY HUB QUICK START GUIDE
 GARAGE DOOR OPENER CONNECTIVITY HUB QUICK START GUIDE Thank you for purchasing a Craftsman garage door opener Connectivity Hub enabled with AssureLink technology. Once you have created your account and
24-Port 10/100Mbps Web Smart PoE Switch with 4 Gigabit Ports and 2 Mini-GBIC Slots TPE-224WS
 24-Port 10/100Mbps Web Smart PoE Switch with 4 Gigabit Ports and 2 Mini-GBIC Slots TPE-224WS ŸGuía de instalación rápida (1) ŸTroubleshooting (3) 1.12 1. Antes de iniciar Contenidos del Paquete ŸTPE-224WS
INSTRUCCIONES PARA ENVIAR SU PELICULA PARA LA VIDEOLIBRERIA
 For English version, please scroll down to page 11 (eleven) INSTRUCCIONES PARA ENVIAR SU PELICULA PARA LA VIDEOLIBRERIA Especificaciones técnicas Container format:.mp4 / tamaño de archivo no superior a
DIAMOND Gear Company, LTD. an ERIKS Company. Installation, Maintenance, & Operation Manual DECLUTCHABLE WORM GEAR
 DIAMOND Gear Company, LTD. an ERIKS Company Installation, Maintenance, & Operation Manual 2013 INSTRUCTIONS This is an instructional manual which provides general installation, operation, and maintenance
Unidad de alimentación. Nota: Encontrarás instrucciones en línea en http://www.apple.com/support/doityourself/.
 Español Instrucciones para la sustitución Unidad de alimentación AppleCare Sigue atentamente las instrucciones de este documento, de lo contrario podrías dañar tu equipo e invalidar la garantía. Nota:
TH-550 series. Motor Servo LIBRO DE INSTRUCCIONES
 TH-550 series Motor Servo LIBRO DE INSTRUCCIONES IS09001:2008 Contenido *********************************************** Instrucciones de Seguridad Introducción del producto 1. Descripción general 2. Componentes
BILINGUAL MUSIC I MÚSICA I BILINGÜE ACTIVITY BOOK UNIT 1. THE ART OF SOUND
 BILINGUAL MÚSICA I BILINGÜE UNIT 1. THE ART OF SOUND VOCABULARY 1. Translate 2. Listen to the sound and identify the pitch, intensity, duration and timbre in the table below. SOUND 1 SOUND 2 SOUND 3 SOUND
Adaptado Por: Alexander Chaverra Instructivo Configuración PPjoy Y SmartPropo Para Aerofly
 MANUAL DE INSTALACION DE CABLE Y APLICATIVO PARA SIMULADOR. Objetivo: Explicar la forma mas eficiente de configurar el aplicativo PPJoy y Smartpropo para que funcione de una forma correcta en el PC a través
PLAN DE MANTENIMIENTO DE BOMBAS DOLL S.A.U. DOLL S.A.U. PUMPS MAINTENANCE PLANNING.
 PLAN DE MANTENIMIENTO DE BOMBAS DOLL S.A.U. DOLL S.A.U. PUMPS MAINTENANCE PLANNING. RODETE IMPELLER BRIDA CIERRE MECÁNICO CLAMP CIERRE MECÁNICO APLICACIÓN DE LAS OPERACIONES DE MANTENIMIENTO PARA BOMBAS
TX MULTI MANUAL TX MULTI. Mando copiador multifrecuencia 1. PASOS PARA COPIAR UN MANDO CÓDIGO FIJO Y ROLLING ESTÁNDAR:
 MANUAL TX MULTI Mando copiador multifrecuencia 1. PASOS PARA COPIAR UN MANDO CÓDIGO FIJO Y ROLLING ESTÁNDAR: 1. Situar el mando original que desea copiar junto al TX Multi, en torno a 2-4 centímetros de
DT-210/DT-210L/DT-210V. E Revision 1
 DT-210/DT-210L/DT-210V E Revision 1 1 2 3 4 5 6 7 8 9 10 11 12 13 14 A B C D E F Controles Interruptor de selección estéreo/mono/ altavoz Botón de memoria Sintonización ascendente/descendente Conector
EN / ES Airtribune Live tracking Instructions
 Airtribune Live tracking Instructions 1. Activate the desired service plan: Personal GSM live tracking with pilots devices Personal GSM & satellite tracking GSM tracking with rented of own tracker set.
MANUAL DE INSTRUCCIONES CAJA FUERTE CF-4333
 MANUAL DE INSTRUCCIONES CAJA FUERTE CF-4333 ESTIMADO CLIENTE Con el fin de que obtenga el mayor desempeño de su producto, por favor lea este manual de instrucciones cuidadosamente antes de comenzar a utilizarlo,
MANUAL DE INSTRUCCIONES PARRILLA BARBACOA (17 ) ED-4046BQ
 ED-4046BQ") MANUAL DE INSTRUCCIONES PARRILLA BARBACOA (17 ) ED-4046BQ ESTIMADO CLIENTE Con el fin de que obtenga el mayor desempeño de su producto, por favor lea este manual de instrucciones cuidadosamente antes de
MANUAL DE INSTRUCCIONES PARRILLA BARBACOA (17 ) ED-4046BQ ESTIMADO CLIENTE Con el fin de que obtenga el mayor desempeño de su producto, por favor lea este manual de instrucciones cuidadosamente antes de
Santiago: Av. Santa María 481 CP 8420505 Recoleta Tel: (56-2) 777 9994* Fax: (56-2) 777 5229 Concepción: Chacabuco 951 Concepción Tel: (56-41) 285
 777 9994* Fax: (56-2) 777 5229 Concepción: Chacabuco 951 Concepción Tel: (56-41) 285") AUTOCLAVE PORTATIL HANDYCLAVE MODELO LS-1 PPENG LIIM ENTERPPRIISSE CO..,, LTD.. Santiago: Av. Santa María 481 CP 8420505 Recoleta Tel: (56-2) 777 9994* Fax: (56-2) 777 5229 Concepción: Chacabuco 951 Concepción
AUTOCLAVE PORTATIL HANDYCLAVE MODELO LS-1 PPENG LIIM ENTERPPRIISSE CO..,, LTD.. Santiago: Av. Santa María 481 CP 8420505 Recoleta Tel: (56-2) 777 9994* Fax: (56-2) 777 5229 Concepción: Chacabuco 951 Concepción
Sistema!de!iluminación!de!un!longboard!
 Sistemadeiluminacióndeunlongboard RESUMEN JuanJacoboMonteroMuñoz GradoenIngenieríaelectromecánica,electrónicaindustrial DoblediplomaconSupélecParís. Este proyecto ha sido desarrollado en París, en la Ecole
TYPE SUITABLE FOR INPUT VOLTAGE. 1 ~ 3 leds 1W 100-240 VAC 2-12 VDC 350 ma IP67 Blanco White FUSCC-4-350T TYPE POWER INPUT VOLTAGE.
 Nuestros distintos productos basados en los diodos leds no estarían completos sin una gama de drivers y fuentes de alimentación lo más completa posible. Hemos querido dotar a nuestros clientes del máximo
PROLIGHT 400 P. Instrucciones de Usuario
 PROLIGHT 400 P Instrucciones de Usuario MANUAL DE FUNCIONAMIENTO INTRODUCCION: Este modelo es un programador dimmer de 4 canales, dispone de 7 modos de funcionamiento y 42 programas pregrabados, dispone
SFD-200-N-B DESPERTADOR-PROYECTOR-CON VOZ. Manual de instrucciones
 SFD-200-N-B DESPERTADOR-PROYECTOR-CON VOZ Manual de instrucciones Funciones: - Proyección de la hora - Proyección controlada por sonidos y vibraciones (palmada, etc.) - Pantalla retroiluminada azul - Hora
MANUAL DE INSTRUCCIONES / USER'S GUIDE VD31
 MANUAL DE INSTRUCCIONES / USER'S GUIDE VD31 ESP AJUSTE DE LA POSICIÓN DE LA HORA DUAL - Después de configurar o de cambiar la batería, antes de configurar la hora, verifique si la aguja de hora dual está
2_trabajar con calc I
 Al igual que en las Tablas vistas en el procesador de texto, la interseccción de una columna y una fila se denomina Celda. Dentro de una celda, podemos encontrar diferentes tipos de datos: textos, números,
DVR Plus Guía de referencia
 DVR Plus Guía de referencia 9903001CAP0911COLSP Versión 1.2 Su DVR Plus io TV le brinda DVR Plus que le permite grabar y ver programas desde sus cajas de cable digitales io: Grabe y reproduzca su programa
UNIT 2 DIVISIBILITY 1.- MULTIPLES AND FACTORS Concept of multiple Concept of factor
 UNIT 2 DIVISIBILITY 1.- MULTIPLES AND FACTORS 1.1.- Concept of multiple We say that a number a is a multiple of another number b if the division a : b is an exact division, that is, if b contains a a whole
Módulo II - PowerPoint
 Módulo II - PowerPoint Índice Copiando diapositivas Menú Edición... 2 Copiando diapositivas utilizando la barra de herramientas... 3 Copiando diapositivas utilizando el menú contextual... 3 Copiando diapositivas
Disfruten su verano! Hola estudiantes,
 Hola estudiantes, We hope that your experience during Spanish 1 was enjoyable and that you are looking forward to improving your ability to communicate in Spanish. As we all know, it is very difficult
Instrucciones de montaje
 Instrucciones de montaje Gracias por comprar mecanismo elevadot NELSON Por favor, coloque todos los componentes en una superficie acolchada / alfombra para evitar daños. Por razones de seguridad, se recomienda
La instalación manual del termostato electrónico para la calefacción o refrigeración TH-7281B
 La instalación manual del termostato electrónico para la calefacción o refrigeración TH-7281B PREPARACIÓN: Antes de instalar este termostato, revise su esquema de cableado del sistema. Si su sistema no
1. Sign in to the website, http://www.asisonline.org / Iniciar sesión en el sitio, http://www.asisonline.org
 Steps to Download Standards & Guidelines from the ASIS International Website / Pasos para Descargar los Standards & Guidelines de la Página Web de ASIS International 1. Sign in to the website, http://www.asisonline.org
ARTICULO: 5810 Sistema de Posicionador Digital para Actuador Eléctrico Digital Positioning System for Electric Actuator
 ARTICULO: 5810 Sistema de Posicionador Digital para Actuador Eléctrico Digital Positioning System for Electric Actuator Características El DPS es un accesorio para los actuadores eléctricos que convierte
Instructivo de uso y cuidado del Aplicador de Implantes Lapisa. Productos Destacados
 Instructivo de uso y cuidado del Aplicador de Implantes Lapisa Productos Destacados Diseño ergonómico Producido con materiales de larga duración para asegurar una vidá útil prolongada Espacio para aguja
MODEL: 11222895 / MODELO: 11222895 COMPUTER DESK ESCRITORIO DE COMPUTADORA
 MODEL: 222895 / MODELO: 222895 COMPUTER DESK ESCRITORIO DE COMPUTADORA NO 2 3 4 5 6 7 8 9 PARTS LIST AND HARDWARE LISTA DE PARTES Y ACCESORIOS HARDWARE LIST LISTA DE PARTES Y ACCESORIOS CHIPBOARD SCREW
Citizenship. Citizenship means obeying the rules and working to make your community a better place.
 Citizenship Citizenship means obeying the rules and working to make your community a better place. I show good citizenship when I help keep my school and community clean. I am a good citizen when I follow