DELUXE CONNECTED BLOOD PRESSURE MONITOR. Model UA-651BLE. Instruction Manual 1WMPD A&D Medical (Toll-Free):
|
|
|
- Josefina Castilla Molina
- hace 8 años
- Vistas:
Transcripción
1 DELUXE CONNECTED BLOOD PRESSURE MONITOR Model UA-651BLE Instruction Manual Original 1WMPD

2 1. GREETINGS This A&D blood pressure monitor is one of the most advanced monitors available and is designed for ease of use and accuracy. This device will facilitate your daily blood pressure regimen. We recommend that you read through this manual carefully before using the device for the first time. The Bluetooth word mark and logos are registered trademarks owned by Bluetooth SIG, Inc. and any use of such marks by A&D is under license. Other trademarks and trade names are those of their respective owners. 2. PRELIMINARY REMARKS The device complies with part 15 of the FCC rules and contains the FCC ID VPYLBVZ. The device is designed for use on adults only, and is not intended for infants. This device is designed for use in the home healthcare environment to measure blood pressure and pulse rate of people for diagnosis. 3. PRECAUTIONS Precision components are used in the construction of this device. Extremes in temperature, humidity, direct sunlight, shock or dust should be avoided. Clean the device and cuff with a dry, soft cloth or a cloth dampened with water and a neutral detergent. Never use alcohol, benzene, thinner or other harsh chemicals to clean the device or cuff. E-1

3 PRECAUTIONS Avoid tightly folding the cuff or storing the hose tightly twisted for long periods, as such treatment may shorten the life of the components. The device and cuff are not water resistant. Prevent rain, sweat and water from soiling the device and cuff. Measurements may be distorted if the device is used close to televisions, microwave ovens, cellular telephones, X-ray or other devices with strong electrical fields. When using the device, confirm that the device is clean. Used equipment, parts and batteries are not treated as ordinary household waste, and must be disposed of according to the applicable local regulations. When the AC adapter is used, make sure that the AC adapter can be readily removed from the electrical outlet when necessary. Do not modify the device. It may cause accidents or damage to the device. To measure blood pressure, the arm must be squeezed by the cuff hard enough to temporarily stop blood flow through the artery. This may cause pain, numbness or a temporary red mark to the arm. This condition will appear especially when measurement is repeated successively. Any pain, numbness, or red marks will disappear with time. E-2

4 PRECAUTIONS Do not apply the cuff on an arm in which another medical device is attached. The equipment may not function properly. People who have a severe circulatory deficit in the arm must consult a doctor before using the device, to avoid medical problems. Do not self-diagnose the measurement results and start treatment by yourself. Always consult your doctor for evaluation of the results and treatment. Do not apply the cuff on an arm with an unhealed wound. Do not apply the cuff on an arm receiving an intravenous drip or blood transfusion. It may cause injury. Do not use the device where flammable gases such as anesthetic gases are present. It may cause an explosion. Do not use the device in highly concentrated oxygen environments, such as a high-pressure oxygen chamber or an oxygen tent. It may cause a fire or explosion. This device complies with Part 15 of FCC rules. Operation is subject to the following two conditions: (1) This device may not cause harmful interference, and (2) this device must accept any interference recieved, including interference that may cause undesired operations. E-3

5 ? TABLE OF CONTENTS PARTS IDENTIFICATION... E-5 SYMBOLS... E-6 - E-7 USING THE MONITOR... E-8 - E-15 MEASUREMENT... E-16 - E-18 WHAT IS AN IRREGULAR HEARTBEAT... E-19 PRESSURE BAR INDICATOR... E-19 TROUBLESHOOTING... E-20 MAINTENANCE... E-21 TECHNICAL DATA... E-21 - E-24 CONTACT INFORMATION... E-24 E-4

6 PARTS IDENTIFICATION Proper fit range Index Artery position mark Air Hose DC jack M Arm Cuff AC adapter Plug Display START Button Air Socket Air Connector Plug Battery Compartment Battery Cover Display Systolic Pressure Diastolic Pressure r I.H.B. symbol (Irregular heartbeat symbol) Communication mark Heart Mark Battery Indicator Pressure Bar Indicator E-5

7 SYMBOLS E-6

8 SYMBOLS and are illuminated alternately during communication SE BT Date of Manufacture Bluetooth Address E-7

9 USING THE MONITOR Installing/ Changing the batteries 1. Remove the battery cover. 2. Remove the used batteries from the battery compartment when changing them. 3. Insert new batteries into the battery compartment as shown, taking care that the polarities (+) and (-) are correct. 4. Replace the battery cover. Use only R6P, LR6 or AA batteries. Step 2 Step 4 Step 3 Step 1 CAUTION Insert the batteries as shown in the battery compartment. If installed incorrectly, the device will not work. When blinks on the display and the device indicates that the battery needs to be replaced, replace all batteries with new ones. Do not mix old and new batteries. It may shorten the battery life, or cause the device to malfunction. Replace the batteries two seconds or more after the device turns off. If does not appear, then the batteries are completely drained. The battery life varies with the ambient temperature and may be shorter at low temperatures. Use the specified batteries only. The batteries provided with the device are for testing the device performance and may have a limited life. Remove the batteries if the device is not to be used for a long time. The batteries may leak and cause a malfunction. E-8

10 USING THE MONITOR Connecting the Air Hose Insert the air connector plug into the air socket firmly. Connecting the AC Adapter Insert the AC adapter plug into the DC jack. Then, insert the AC adapter into an electrical outlet. The AC adapter part # TB-233, is sold separately. Air Hose Air Connector Plug Air Socket AC adapter Plug DC Jack Wireless Function In the unlikely event that this monitor causes radio wave interference to a different wireless station, change the location where this monitor is used or stop use immediately. Be sure to use in a location where visibility between the two devices that you want to connect is good. The connection distance is reduced by the structure of buildings or other obstructions. In particular, connection may be impossible when devices are used on either side of reinforced concrete. Do not use Bluetooth connection in the range of a wireless LAN or other wireless devices, near devices that emit radio waves such as microwaves, in locations where there are many obstructions, or in other locations where signal strength is weak. Doing so may result in frequent loss of connection, very slow communication speeds and errors. E-9

11 USING THE MONITOR Using close to an IEEE802.11g/b/n wireless LAN device may cause mutual interference to occur, which may result in reduced communication speeds or which may prevent connection. In this case, switch off the power supply to the device that is not being used, or use the monitor in a different location. If the monitor does not connect normally when used near a wireless station or broadcast station, use the monitor in a different location. A&D Medical cannot accept liability for any damages incurred due to impaired operation or data loss, etc. that occur through the use of this product. This product is not guaranteed to connect to all Bluetooth compatible devices. Bluetooth Transmission This product is equipped with a Bluetooth wireless function and can connect to the following Bluetooth devices. iphone, ipad, ipod ( iphone 4S or later ) Applications and devices that are compatible with Bluetooth 4.0 Each device needs an application to receive data. For connection methods, refer to the manual for each device. To connect with your mobile device - download and install the A&D Connect app: Follow the instructions in the app to connect. E-10

12 USING THE MONITOR Connecting to a mobile device (Pairing) A Bluetooth device needs to be paired with this blood pressure monitor in order to communicate with that device. If this monitor is paired with a receiver device from the start, measurement data is transmitted automatically to the receiver device each time a measurement is made. Tips for pairing Be sure to turn the power of all other Bluetooth devices off when pairing. Multiple devices cannot be paired at the same time. If the receiver device cannot receive measurement data, try pairing once again. Communication is possible with one of the receiver devices. If a third receiver device is paired, the device other than the most recently connected device will be unpaired to enable the new device to be paired. Some applications may allow pairing with only one device. Follow the steps on the next page to pair or unpair the monitor with a Bluetooth compatible receiver device. Also refer to the manual of the receiver device. Please use a pairing wizard if one is provided. E-11

13 Pairing procedure USING THE MONITOR 1. Follow the instructions in the manual of the receiver device to switch it to the pairable status. When pairing this monitor, place it as close as possible to the receiver device to be paired with. 2. Install the batteries or connect the AC adapter. Press and hold the "START" button until "Pr" is displayed, then release the button. The monitor will be in a state that can be found by the receiver device for about one minute. 3. The monitor displays "End" to indicate that pairing is complete. 4. If "Err 10" is displayed or pairing is failed, remove the batteries or disconnect the AC adapter and try steps 1-3 again. 5. Follow the manual of the pairing receiver device to search for, select and pair with this monitor. Communication distance The communication distance between this monitor and the receiver device is about 33 feet (10 m). This distance is reduced by the conditions in the surrounding environment, so be sure to check that the distance is short enough for a connection to be made after measurement is complete. E-12

14 USING THE MONITOR Transmitting Temporarily Stored Data In cases when the receiver device cannot receive measurement data, the measurement data is temporarily stored in the monitor memory. The data stored in the memory is transmitted the next time a connection is successfully made to the receiver device. A total of 30 sets of measurement data can be stored. When the amount of data exceeds 30 sets, the oldest data is deleted and the new data is stored. The amount of data that can be stored temporarily may vary with the application. Time This monitor has a built-in clock. The date and time a measurement was taken is included in the measurement data. The built-in clock is designed to be automatically adjusted by syncing with the clock of a receiver device. Refer to the specifications of the receiver device. This monitor has no clock adjustment function. Selecting the correct cuff Using the correct cuff size is important for an accurate reading. If the cuff is not the proper size, the reading may yield an incorrect blood pressure value. The arm size is printed on each cuff. The index and proper fit range, on the cuff, tell you if you are applying the correct cuff. Refer to "Applying The Arm Cuff". If the index points outside of the range, contact your local dealer to purchase a replacement cuff. The arm cuff is a consumable. If it becomes worn, purchase a new one. E-13

15 USING THE MONITOR Arm size Recommended Cuff Size Part Number 9.0"-14.6" (23 to 37 cm) Medium SlimFit UA "-17.7" (31 to 45 cm) Large SlimFit UA-291 Arm size: The circumference at the biceps. Note: Model UA-651BLE is not designed to use a small cuff. Symbols printed on the cuff. Symbols Function / Meaning Recommended Action Set the mark on the artery of the upper Artery Position Mark arm or in line with the ring finger on the inside of the arm. Index REF Catalog number Proper fit range for the medium cuff. M It's printed on the medium cuff. Range to use the large cuff. Over Use the large cuff instead range printed on the large cuff. of the medium cuff Proper fit range for the large cuff. It's printed on the large cuff. Under range printed on the medium cuff M Range to use the medium cuff. It's printed on the large cuff. Lot number Use the medium cuff instead large cuff Large cuff M Medium cuff Proper fit range M E-14

16 USING THE MONITOR Applying the arm cuff E-15

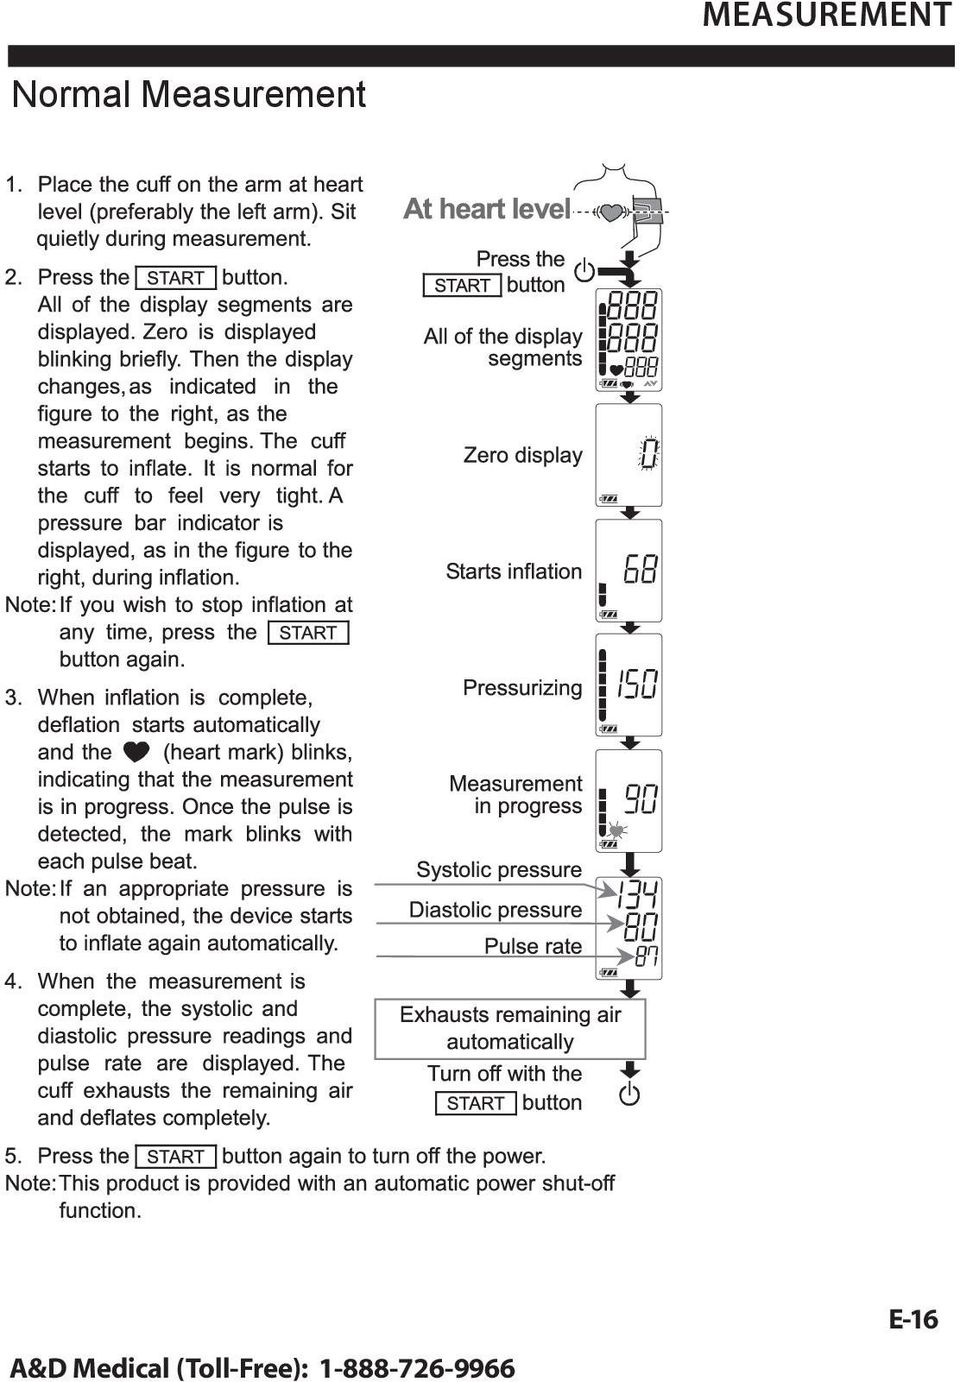
17 MEASUREMENT Normal Measurement E-16
18 MEASUREMENT Measurement with the Desired Systolic Pressure Notes for Accurate Measurement Sit down in a comfortable position. Place the arm to be used for the measurement on a table or other support so that the center of the cuff will be at the same height as your heart. Relax for several moments before measurement. E-17

19 MEASUREMENT Remove constricting clothing and place cuff on bare arm. Unless your physician recommends otherwise, use left arm to measure pressure. Do not talk during measurement. Do not measure immediately after physical exercise or a bath. Do not smoke or ingest caffeine at least 30 minutes prior to measurement. This device bases its measurements on the heartbeat. If you have a very weak or irregular heartbeat, the device may have difficulty determining your blood pressure. Should the device detect a condition that is abnormal, it will stop the measurement and display an error symbol. Refer to the section "Symbols" for the description of the symbols. This device is intended for use by adults only. Consult with your physician before using this device on a child. A child should not use this device unattended. Compare blood pressure taken at the same time each day. Do not cross legs and keep your feet flat on the floor during measurement. E-18

20 WHAT IS AN IRREGULAR HEARTBEAT The UA-651BLE provides a blood pressure and pulse rate measurement even when an irregular heartbeat occurs. An irregular heartbeat is defined as a heartbeat that varies by 25% from the average of all heartbeats during the blood pressure measurement. It is important that you are relaxed, remain still and do not talk during measurements. Note: We recommend contacting your physician if you see this symbol frequently. PRESSURE BAR INDICATOR The indicator monitors the progress of pressure during measurement Pressurizing Releasing air Measurement in progress Inflation complete Inflation in progress E-19

21 TROUBLESHOOTING Problem Possible Reason Recommended Action Nothing appears on the display, even when the power is turned on. The cuff does not inflate. The device does not measure. Readings are too high or too low. Batteries are drained. Battery terminals are not in the correct position. Replace all batteries with new ones. Reinstall the batteries with negative and positive terminals matching those indicated on the battery compartment. Battery voltage is too low. blinks. If the batteries are Replace all batteries with new drained completely, ones. the mark does not appear. The cuff is not Apply the cuff correctly. applied properly. You moved your arm or body during measurement. The cuff position is not correct. Make sure you remain still and quiet during measurement. Sit comfortably and still. Place your arm on a table with your palm facing upward and the cuff at the same level as your heart. If you have a very weak or irregular heat beat, the device may have difficulty in determining your blood pressure. Other The value is different from that measured at a clinic or doctor s office. Remove the batteries. Place them back properly and take another measurement. Note: If the actions described above do not solve the problem, contact the dealer. Do not attempt to open or repair this product, as any attempt to do so will make your warranty invalid. E-20
22 MAINTENANCE Do not open the device. It uses delicate electrical components and an intricate air unit that could be damaged. If you cannot fix the problem using the troubleshooting instructions, contact the authorized dealer in your area or our customer service department. A&D customer service can provide technical assistance and spare parts. TECHNICAL DATA Type Measurement method UA-651BLE Oscillometric measurement Measurement range Pressure: mmhg Systolic pressure: mmhg Diastolic pressure: mmhg Pulse: beats /min Measurement accuracy Pressure: ±3 mmhg Pulse: ±5 % Power supply Number of measurements 4 x 1.5V batteries (R6P, LR6 or AA) or AC adapter (TB-233) (Not included) Approx. 700 times LR6 (alkaline batteries) Approx. 200 times R6P (manganese batteries) With pressure value 180 mmhg, room temperature 23 C. Classification Internally powered ME equipment (Supplied by batteries) / Class II (Supplied by adapter) Continuous operation mode Clinical test According to ANSI / AAMI SP Wireless communication E-21 VZ (MURATA Manufacturing Co.Ltd.) Bluetooth Ver. 4.0LE BLP
23 TECHNICAL DATA Operating conditions +10 to +40 C / 15 to 85 %RH / 800 to 1060 hpa Transport / Storage conditions -20 to +60 C / 10 to 95 %RH Dimensions Approx. 96 [W] x 68 [H] x 130 [D] mm Weight Approx. 250 g, excluding the batteries Ingress protection Device: IP20 Applied part Useful life Cuff Type BF Device: 5 years (when used six times a day) Cuff: 2 years (when used six times a day) Accessory AC adapter Please contact your local A&D dealer for purchasing. The AC adapter is required to be inspected or replaced periodically. TB-233 Input: 120 V Output: 6V 5 00mA Accessories are sold seperately Cuff Part Number 139 C 2A AC adapter: TB-233 Note: Specifications are subject to change without prior notice. EMC table information is listed on our website: en.pdf E-22
24 TECHNICAL DATA FCC CAUTION Changes or modifications not expressly approved by the party responsible for compliance could void the user s authority to operate the equipment. This transmitter must not be co-located or operated in conjunction with any other antenna or transmitter. This equipment complies with FCC radiation exposure limits set forth for an uncontrolled environment and meets the FCC radio frequency (RF) Exposure Guidelines in Supplement C to OET65. This equipment has very low levels of RF energy that it deemed to comply without maximum permissive exposure evaluation (MPE). But it is desirable that it should be installed and operated keeping the radiator at least 20 cm or more away from person s body (excluding extremities: hands, wrists, feet and ankles). NOTE: This equipment has been tested and found to comply with the limits for a Class B digital device, pursuant to part 15 of the FCC Rules. These limits are designed to provide reasonable protection against harmful interference in a residential installation. This equipment generates, uses and can radiate radio frequency energy and, if not installed and used in accordance with the instructions, may cause harmful interference to radio communications. However, there is no guarantee that interference will not occur in a particular installation. If this equipment does cause harmful interference to radio or television reception, which can be determined by turning the equipment off and on, the user is encouraged to try to correct the interference by one or more of the following measures: Reorient or relocate the receiving antenna. Increase the separation between the equipment and receiver. Connect the equipment into an outlet on a circuit different from that to which the receiver is connected. Consult the dealer or an experienced radio/tv technician for help. E-23
25 CONTACT INFORMATION Our products are designed and manufactured using the latest scientific and technological methods, and offer accurate, easy to use, home monitoring and treatment options. Our full product line includes: Digital Blood Pressure Monitors Manual Blood Pressure Monitors Blood Pressure Cuffs Personal Health Scales Digital Thermometers Activity Monitors Wireless Products Limted 5 year warranty Manufactured for: A&D Engineering, Inc Automation Parkway San Jose, CA U.S.A Cuff: Limited 2 year warranty E-24
26 WARRANTY LIMITED 5 YEAR WARRANTY A&D Medical Blood Pressure Monitor Only for Retail Purchasers within the US. [For retail purchasers outside the US, NO warranty is provided by A&D please contact your local distributor or dealer.] A&D Medical ( A&D ) warrants to the first retail purchaser ( You ) that this blood pressure monitor (the Product ) will be free from defects in material and workmanship for 5 years under normal use. If the Product contains a blood pressure cuff, the warranty period for such cuff is limited to two years from the date You purchased the Product. This Limited Warranty is personal to You and is not transferable. If a Product is defective, You can return the Product to the retailer You purchased it from (if within such retailer s return time frame) or return it to A&D in accordance with the procedure set forth below. A&D s warranty obligation is limited to the repair or replacement, at A&D s option, of the defective Product that has been returned by You within the warranty period. Such repair or replacement will be at no charge to You. The repaired or replacement Product is warranted hereunder for the longer of the remainder of the original warranty period or 90 days from the date of shipment of the repaired or replacement Product. If you return the Product for warranty service to A&D, You must return the Product, freight and insurance prepaid, within the warranty period to the address set forth below, together with satisfactory proof of the date of Your purchase (such as a sales receipt or statement of online warranty registration). Also, please enclose a check for return shipping and insurance of the Product back to You. In the United States, to: A&D Medical Attn.: Warranty Department 1756 Automation Parkway San Jose, CA Please contact in the US: A&D Medical, at the numbers set forth above for the appropriate shipping costs. E-25
27 WARRANTY This Limited Warranty does not cover, and A&D will not be liable for (i) any shipment damage, (ii) any damage or defect due to misuse, abuse, failure to use reasonable care, failure to follow written instructions enclosed with the Product, accident, subjecting the Product to any voltage other than the specified voltage, improper environmental conditions, or modification, alteration or repair by anyone other than A&D or persons authorized by A&D, or (iii) expendable or consumable components. THIS LIMITED WARRANTY IS THE ONLY WARRANTY FROM A&D; THERE ARE NO OTHER EXPRESS WARRANTIES. If A&D cannot reasonably repair or replace the Product, A&D will refund the amount You paid for the Product (not including taxes), less a reasonable charge for usage. To receive a refund you must have returned the Product and all associated materials to A&D. The above remedy of repair, replacement or refund is your only and exclusive remedy. IN NO EVENT SHALL A&D BE LIABLE FOR ANY DAMAGES, INCLUDING, WITHOUT LIMITATION, LOST PROFITS, LOST INFORMATION OR REPLACEMENT COSTS, ARISING OUT OF YOUR USE OF OR INABILITY TO USE THE PRODUCT, INCLUDING, WITHOUT LIMITATION, ANY SPECIAL, INCIDENTAL OR CONSE- QUENTIAL DAMAGES, EVEN IF A&D HAS BEEN ADVISED OF THE POSSIBILITY OF SUCH DAMAGES. Some states do not allow the exclusion of incidental or consequential damages, so that the above exclusions may not apply to you. This warranty gives you specific legal rights, and you may also have other rights that may vary from state to state. No distributor, dealer or other party is authorized to make any warranty on behalf of A&D or to modify this warranty, or to assume for A&D any liability with respect to its products. Bluetooth devices carry the Bluetooth logo mark. iphone,ipad and ipod are trademarks of Apple Inc., registered in the U.S. and other countries. Google and Google logo are registered trademarks of Google,Inc. E-26
28 Monitor conectado de la presión arterial DE LUJO Model UA-651BLE Manual de instrucciones TRADUCCIÓN
29 1. CORDIAL SALUDO El monitor de presión arterial A&D es uno de los más avanzados monitores disponibles, diseñado para un uso fácil y preciso. Este dispositivo facilitará la toma diaria de su presión arterial. Le recomendamos que lea atentamente este manual antes de utilizar el dispositivo por primera vez. El Bluetooth marca y logos son marcas registradas que pertencen a Bluetooth SIG, Inc y cualquier uso de estas marcas por A&D está bajo licensia. Otras marcas registrados y uso de nombres registrados pertencen a sus due nos respectivos. 2. OBSERVACIONES PRELIMINARES El dispositivo cumple con la parte 15 de las normas de la FCC y contiene el número de identificación VPYLBVZ de la FCC. El dispositivo está diseñado para su uso en adultos, y no está diseñado para los bebés o infantes. Este dispositivo está diseñado para su uso en interiores, para medir la presión sanguínea y la frecuencia cardíaca para diagnósticos. 3. PRECAUCIONES Componentes de precisión se han utilizado en la construcción de este dispositivo. Condiciones extremas de temperatura, humedad, luz solar directa, golpes o polvo deben ser evitados. Limpie el dispositivo y el brazalete con un paño suave y seco o un paño humedecido con agua y un detergente neutro. Nunca utilice alcohol, benceno, disolvente u otros productos químicos abrasivos para limpiar el dispositivo o el brazalete. S-1 Línea médica de A&D Medical (sin cargos):
30 PRECAUCIONES Evite doblar el brazalete de manera firme o ajustada o guardar la manguera retorcida durante períodos prolongados, dado que ello puede acortar la vida útil de los componentes. El dispositivo y el brazalete no son resistentes al agua. Evite que la lluvia, el sudor o el agua manchen el dispositivo o el brazalete. Las mediciones pueden verse distorsionadas si el aparato se usa cerca de televisores, hornos de microondas, teléfonos celulares, rayos X u otros dispositivos con campos eléctricos fuertes. Al utilizar el dispositivo, compruebe que se encuentre limpio. Los equipos usados, piezas y baterías no deben ser tratados como basura doméstica, y deben desecharse de acuerdo a las normas locales aplicables. Cuando utilice el adaptador de CA, asegúrese que puede ser fácilmente removido de la toma de corriente cuando sea necesario. No modifique el dispositivo. Puede causar accidentes o daños en el mismo. Para medir la presión sanguínea, el brazo debe ser temporalmente apretado por el brazalete lo suficientemente duro como para parar el flujo de la sangre a través de la arteria. Esto puede causar dolor, entumecimiento o una marca roja de carácter temporal en el brazo. Estas condiciones aparecerán especialmente cuando la medición se repite sucesivamente. Cualquier dolor, entumecimiento o marca roja desaparecerá con el tiempo. Línea médica de A&D Medical (sin cargos): S-2
31 PRECAUCIONES No ponga el brazalete en un brazo que esté conectado a otro dispositivo médico. Los equipos pueden funcionar de manera incorrecta. Las personas que tienen un grave déficit circulatorio en el brazo deben consultar a un médico antes de utilizar el dispositivo, para evitar problemas de salud. No auto-diagnostique los resultados de la medición ni comience el tratamiento por sí mismo. Consulte siempre a su médico para la evaluación de los resultados y el tratamiento. No coloque el brazalete en el brazo con una herida abierta. No aplique el brazalete en un brazo que esté recibiendo goteo intravenoso o transfusión de sangre. Esto puede provocar lesiones. No utilice el dispositivo en presencia de gases inflamables, como gases anestésicos. Podría producirse una explosión. No utilice el dispositivo en entornos altamente concentrados de oxígeno, como una cámara de oxígeno de alta presión o una tienda de oxígeno. Puede causar un incendio o una explosión. Este dispositivo cumple con la Parte 15 de las normas de la FCC. El funcionamiento está sujeto a las dos condiciones siguientes: (1) Este dispositivo no puede causar interferencias perjudiciales, y (2) este dispositivo debe aceptar cualquier interferencia recibida, incluy endo interferencias que puedan provocar operaciones no deseadas. S-3 Línea médica de A&D Medical (sin cargos):
32 TABLA DE CONTENIDOS? IDENTIFICACIÓN DE LAS PIEZAS...S-5 SÍMBOLOS...S-6 - S-7 UTILIZANDO EL MONITOR...S-8 - S-15 MEDICIONES...S-16 - S-18 QUÉ ES UN LATIDO IRREGULAR...S-19 PRESSURE BAR INDICATOR...S-19 RESOLUCIÓN DE PROBLEMAS...S-20 MANTENIMIENTO...S-21 DATOS TÉCNICOS...S-21 - S-23 INFORMACIÓN DE CONTACTO... S-24 Línea médica de A&D Medical (sin cargos): S-4
33 IDENTIFICACIÓN DE LAS PIEZAS Pantalla Clasificación de Presión Marca de comunicación Símbolo de latido irregular S-5 Línea médica de A&D Medical (sin cargos):
34 SÍMBOLOS Línea médica de A&D Medical (sin cargos): S-6
35 SÍMBOLOS Símbolos Función/Significado Acción recomendada y son iiluminado alternativamente durante la comunicación El enlace no ha sido efectuado correctamente Remueva y re inserte las baterias otra vez. Trate de connector se nuevamente. Enlace en curso SE Enlace en curso Enlace finalizado Símbolos impresos en la caja del dispositivo IP Dispositivo Clase II "IP" Símbolo de Protección BT Mantener en un lugar seco Polaridad del conector de CC Date of Manufacture Bluetooth Address S-7 Línea médica de A&D Medical (sin cargos):
36 Instalación/sustitución de las pilas 1. Retire la tapa de las pilas. 2. Si va a cambiarlas, retire las pilas usadas del compartimento. 3. Inserte pilas nuevas en el compartimento como se muestra en la figura, teniendo cuidado de que las polaridades (+) y ( -) sean correctas. 4. Coloque la tapa nuevamente. Utilice sólo pilas R6P, LR6 o AA. PRECAUCIÓN UTILIZANDO EL MONITOR Introduzca las pilas en el compartimento como se muestra. Si se instalan incorrectamente, el dispositivo no funcionará. Cuando el símbolo en la pantalla y en el dispositivo prende de forma intermitente indicando que las pilas deben reemplazarse, cambie todas las pilas con otras nuevas. No mezcle pilas usadas y nuevas. Puede acortar la vida útil de las pilas o hacer que el dispositivo no funcione correctamente. Espere dos segundos o más después de que se apaga el dispositivo para cambiar las pilas. Si no aparece, las baterías están completamente agotadas. La duración de las pilas varía con la temperatura ambiente y puede ser menor a bajas temperaturas. Utilice solo las pilas especificadas. Las pilas suministradas con el aparato son para probar el rendimiento del dispositivo y pueden tener una duración limitada. Retire las baterías si el dispositivo no se va a utilizar durante un largo tiempo. Las pilas pueden tener fugas y causar un mal funcionamiento. Línea médica de A&D Medical (sin cargos): S-8
FCC Information : Warning: RF warning statement:
 FCC Information : This device complies with Part 15 of the FCC Rules. Operation is subject to the following two conditions: (1) This device may not cause harmful interference, and (2) This device must
1) Install the included batteries into your blood pressure monitor (BPM).
 Install the included batteries into your blood pressure monitor (BPM).") DELUXE CONNECTED BLOOD PRESSURE ONITOR UA-651BLE 1) Install the included batteries into your blood pressure monitor (BP). 2) Insert the air connector plug into the air socket. 3) Download the free A&D
DELUXE CONNECTED BLOOD PRESSURE ONITOR UA-651BLE 1) Install the included batteries into your blood pressure monitor (BP). 2) Insert the air connector plug into the air socket. 3) Download the free A&D
Guía del usuario. Xperia P TV Dock DK21
 Guía del usuario Xperia P TV Dock DK21 Contenido Introducción...3 Descripción general de la parte posterior de TV Dock...3 Primeros pasos...4 Gestor de LiveWare...4 Actualización de Gestor de LiveWare...4
Xperia TX TV Dock DK22 Xperia T TV Dock DK23
 Guía del usuario Xperia TX TV Dock DK22 Xperia T TV Dock DK23 Contenido Introducción...3 Descripción general de TV Dock...3 Primeros pasos...4 Conexión inteligente...4 Actualización de Conexión inteligente...4
Super Mini Retractable Mouse
 Super Mini Retractable Mouse Instruction Manual 98820 www.jascoproducts.com 98820-1 2/10 Package Contents Super Mini Retractable Mouse Instruction Manual System Requirements Windows 2000, XP, Vista, Windows
BAI-220 AURICULAR INALÁMBRICO
 BAI-220 AURICULAR INALÁMBRICO Manual de usuario ESPECIFICACIONES TÉCNICAS EMISOR Frecuencia: 86 ± 0.5 MHz Modulación: FM Distancia de emisión: 30 m. Recepción de cualquier equipo de audio y video con salida
ENKVM-USBB. 2-Port USB KVM switch with Easy Switch and Cable. User Guide
 ENKVM-USBB 2-Port USB KVM switch with Easy Switch and Cable User Guide i Package Contents 1 ENKVM-USBB 2-Port USB KVM Switch with Easy Switch and Cable 1 User Guide Requirements Console A VGA, SVGA, XGA,
Guía del usuario. Funda con batería CP12
 Guía del usuario Funda con batería CP12 Contenido Introducción...3 La carga más sencilla...3 Especificaciones...3 Uso de la funda con batería...4 Carga del teléfono...4 Información legal...6 2 Introducción
Software TRENDnetVIEW Pro. Guía de instalación rápida de TRENDnetVIEW Pro (1)
") Software TRENDnetVIEW Pro Guía de instalación rápida de TRENDnetVIEW Pro (1) TRENDnetVIEW Pro/10.08.2013 Índice Requisitos del software de gestión TRENDnetVIEW Pro... 19 Instalación de TRENDnetVIEW Pro...
Software TRENDnetVIEW Pro Guía de instalación rápida de TRENDnetVIEW Pro (1) TRENDnetVIEW Pro/10.08.2013 Índice Requisitos del software de gestión TRENDnetVIEW Pro... 19 Instalación de TRENDnetVIEW Pro...
 Limited TWO-YEAR Warranty SENSIO Inc. hereby warrants that for a period of TWO YEARS from the date of purchase, this product will be free from mechanical defects in material and workmanship, and for 90
Quick Installation Guide TU2-DVIV H/W: V1.0R
 Quick Installation Guide TU2-DVIV H/W: V1.0R Table Table of Contents of Contents Español... 1. Antes de iniciar... 2. Cómo se instala... 1 1 3 Troubleshooting... 6 Version 06.27.2008 1. Antes de iniciar
GARAGE DOOR OPENER CONNECTIVITY HUB QUICK START GUIDE
 GARAGE DOOR OPENER CONNECTIVITY HUB QUICK START GUIDE Thank you for purchasing a Craftsman garage door opener Connectivity Hub enabled with AssureLink technology. Once you have created your account and
Sierra Security System
 Using Your SpreadNet Accessories With Your Sierra Security System Uso de Sus Accesorios SpreadNet Con Su Sistema de Seguridad Sierra SN990-KEYPAD SN961-KEYFOB SN991-REMOTE 1 SN990-KEYPAD The SN990-KEYPAD
SFD-200-N-B DESPERTADOR-PROYECTOR-CON VOZ. Manual de instrucciones
 SFD-200-N-B DESPERTADOR-PROYECTOR-CON VOZ Manual de instrucciones Funciones: - Proyección de la hora - Proyección controlada por sonidos y vibraciones (palmada, etc.) - Pantalla retroiluminada azul - Hora
GUÍA DE INSTALACIÓN CÓMO EMPEZAR TELEVISIÓN
 GUÍA DE INSTALACIÓN CÓMO EMPEZAR TELEVISIÓN Finalidad de esta guía Antes de empezar le recomendamos leer lo siguiente Para que sus audífonos puedan recibir el sonido de la televisión, hay que conectar
Part No: KTI (Page 1-13) (Pagina 14-26) K-Tool International Wixom, MI 48393
 (Pagina 14-26) K-Tool International Wixom, MI 48393") Part No: KTI-70099 (Page 1-13) (Pagina 14-26) K-Tool International Wixom, MI 48393 (800) 762-6002 www.ktoolinternational.com support@ktoolinternational.com The KTool Walkie-Talkie can use a NiMH rechargeable
Part No: KTI-70099 (Page 1-13) (Pagina 14-26) K-Tool International Wixom, MI 48393 (800) 762-6002 www.ktoolinternational.com support@ktoolinternational.com The KTool Walkie-Talkie can use a NiMH rechargeable
GUÍA RÁPIDA DE. Instalación de los Controladores para cable de conectividad Nokia
 GUÍA RÁPIDA DE Instalación de los Controladores para cable de conectividad Nokia Contenido 1. Introducción...1 2. Requisitos...1 3. Instalación De Los Controladores Para Cable De Conectividad Nokia...2
Manual de instrucciones de WS 9006. Manual de usuario 1. Funciones
 Manual de instrucciones de WS 9006 Manual de usuario 1. Funciones 1.1 Medidor de lluvia - Actual, 1 Hr, 24 Hrs y comprobación del nivel total de precipitaciones. - Comprobación Diaria, Semanal y Mensual
Assembly Instructions. Tools required for assembly: Small wrench. Operating Instructions. Cleaning Your KaZAM Bicycle WARNING: WARNING:
 A Assembly Instructions WARNING: WARNING: Tools required for assembly: Small wrench Operating Instructions - Cleaning Your KaZAM Bicycle Limited Warranty - two THIS WARRANTY DOES NOT COVER NORMAL WEAR
GUÍA RÁPIDA DE. Instalación de Nokia Connectivity Cable Drivers
 GUÍA RÁPIDA DE Instalación de Nokia Connectivity Cable Drivers Contenido 1. Introducción...1 2. Requisitos...1 3. Instalación de Nokia Connectivity Cable Drivers...2 3.1 Antes de la instalación...2 3.2
MANUAL EASYCHAIR. A) Ingresar su nombre de usuario y password, si ya tiene una cuenta registrada Ó
 Ingresar su nombre de usuario y password, si ya tiene una cuenta registrada Ó") MANUAL EASYCHAIR La URL para enviar su propuesta a la convocatoria es: https://easychair.org/conferences/?conf=genconciencia2015 Donde aparece la siguiente pantalla: Se encuentran dos opciones: A) Ingresar
MANUAL EASYCHAIR La URL para enviar su propuesta a la convocatoria es: https://easychair.org/conferences/?conf=genconciencia2015 Donde aparece la siguiente pantalla: Se encuentran dos opciones: A) Ingresar
Manual de Instrucciones
 3626H-Spanish_Manuals 7/6/10 1:00 PM Page 1 Nivel Láser para Baldosas y Pisos Modelo N.º 40-6616 Manual de Instrucciones Lo felicitamos por haber elegido este Nivel Láser para Baldosas y Pisos. Le sugerimos
MANUAL DE INSTRUCCIONES
 MANUAL DE INSTRUCCIONES MINI PINZA DE FUGAS AC CMP-200 Versión 1.6 La pinza digital CMP-200 esta diseñada para la medida de corrientes de fugas y bajas intensidades en AC. Las principales características
Conditioning Exercises: Standing
 Conditioning Exercises: Standing Do all these exercises slowly. Do not hold your breath during these exercises. If unusual pain occurs in your joints or muscles while you are exercising, do not continue
Guía de instalación Manual de instrucciones ADAPTADOR PARA TV 2
 Guía de instalación Manual de instrucciones ADAPTADOR PARA TV 2 2 Índice Precauciones generales 6 Introducción 8 Generalidades del Adaptador para TV 2 9 Instalación 11 Cómo activar el Adaptador para TV
Seguridad Personal. Alarma Con Sensor De Movimiento Y Control Remoto. Manual Del Usuario. No utilizar en lugares húmedos
 Seguridad Personal Alarma Con Sensor De Movimiento Y Control Remoto Manual Del Usuario No utilizar en lugares húmedos Alarma Con Sensor De Movimiento Con Control Remoto Soporte de pared Luz indicadora
Manual de Instrucciones
 BSPORT-10-N-R-V-A PULSERA DEPORTIVA-BLUETOOTH Manual de Instrucciones FUNCIONES Y CONTROLES Pulsar el botón de encendido durante 3 segundos para encender el dispositivo. BATERÍA El dispositivo cuenta con
Transmisor Bluetooth DigiMemo para teléfonos Smartphone
 Transmisor Bluetooth DigiMemo para teléfonos Smartphone Guía de usuario BTX-100 Preparación... 1 Enlace con el transmisor Bluetooth... 1 Instalación del software DigiMemo Express en su teléfono... 1 Encendido
Audífonos con Transmisor Inalámbrico 5 EN 1
 Manual de instrucciones VTA- 81706 Audífonos con Transmisor Inalámbrico 5 EN 1 Transmisor Inalámbrico Radio FM Diadema para Chat Monitoreo Audífonos por voz Estereo 3.5mm Garantía de 1 año por defectos
Medidor de monóxido de carbono (CO) portátil
 portátil") GUÍA DEL USUARIO Medidor de monóxido de carbono (CO) portátil Modelo CO40 Introducción Gracias por seleccionar el Modelo CO40 de Extech Instruments. El CO40 mide simultáneamente la concentración de CO
GUÍA DEL USUARIO Medidor de monóxido de carbono (CO) portátil Modelo CO40 Introducción Gracias por seleccionar el Modelo CO40 de Extech Instruments. El CO40 mide simultáneamente la concentración de CO
PEQUEBOLA MANUAL DE INSTRUCCIONES. VTECH Impreso en China 91-01373-002
 PEQUEBOLA MANUAL DE INSTRUCCIONES VTECH Impreso en China 91-01373-002 Queridos padres: En VTECH sabemos que los niños tienen la capacidad de hacer grandes cosas. Ésta es la razón por la que nuestros juguetes
Manual de Palm BlueChat 2.0
 Manual de Palm BlueChat 2.0 Copyright 2002 Palm, Inc. Todos los derechos reservados. Graffiti, HotSync y Palm OS son marcas registradas de Palm, Inc. El logotipo de HotSync, Palm y el logotipo de Palm
GUÍA DE USUARIO PC-331117. Bienvenidos al mundo Perfect Choice. Antes de comenzar a usar el producto es importante que leas esta guía.
 GUÍA DE USUARIO PC-331117 Bienvenidos al mundo Perfect Choice Antes de comenzar a usar el producto es importante que leas esta guía. Conexión 1. Inserta el transmisor en el conector para encendedor de
PREMIER WRIST BLOOD PRESSURE MONITOR UB ) Install the batteries to your blood pressure monitor. LR03 or AAA batteries only.
 Install the batteries to your blood pressure monitor. LR03 or AAA batteries only.") PREMIER WRIST BLOOD PRESSURE MONITOR UB-543 1) Install the batteries to your blood pressure monitor. LR03 or AAA batteries only Battery cover Used batteries New batteries 2) (Optional) Set the Built-in
PREMIER WRIST BLOOD PRESSURE MONITOR UB-543 1) Install the batteries to your blood pressure monitor. LR03 or AAA batteries only Battery cover Used batteries New batteries 2) (Optional) Set the Built-in
INSTALACIÓN DE NOKIA CONNECTIVITY CABLE DRIVERS
 GUÍA RÁPIDA DE INSTALACIÓN DE NOKIA CONNECTIVITY CABLE DRIVERS 1/6 Copyright 2003-2004 Nokia. Reservados todos los derechos. Contenido 1. INTRODUCCIÓN...3 2. REQUISITOS DEL SISTEMA...3 3. INSTALACIÓN DE
Digital Blood Pressure Monitor. Model UA-787
 Digital Blood Pressure Monitor Model UA-787 Instruction Manual Manuel d instructions Manual de Instrucciones Manuale di Istruzioni UA-787EX-C WM:PD4000287 Observaciones Preliminares Este aparato se ajusta
Table of Contents. Español... 1. Antes de iniciar... 2. Cómo conectar... 3. Cómo utilizar el conmutador... Troubleshooting... Version 10.13.
 Quick Installation Guide TE100-S800i TE100-S810Fi Table of Contents Español... 1. Antes de iniciar... 2. Cómo conectar... 3. Cómo utilizar el conmutador... Troubleshooting... 1 1 2 3 5 Version 10.13.05
La Video conferencia con Live Meeting
 Página 1 INSTRUCCIONES PARA TRABAJAR CON LIVE MEETING.- PREVIO. Para que tenga sentido la videoconferencia es conveniente que tengamos sonido (no suele ser problemático) y que tengamos vídeo. Si el ordenador
Guía de instalación rápida TBW-107UB 1.01
 Guía de instalación rápida TBW-107UB 1.01 Table of Contents Español 1 1. Antes de iniciar 1 2. Cómo se instala 2 3. Configuración del adaptador Bluetooth 5 Troubleshooting 7 Version 02.25.2010 1. Antes
Presenter SNP6000. Register your product and get support at Manual del usuario
 Register your product and get support at www.philips.com/welcome Presenter SNP6000 ES Manual del usuario 1 a b c d e 2 3 4 Federal Communication Commission Interference Statement This equipment has been
Manual del Usuario. Español
 Manual del Usuario Gracias por adquirir los auriculares Bluetooth EP605 de August. Este manual ha sido editado para que se familiarice con las características del producto. Por favor, lea detenidamente
1. Información general del Sistema de Monitorización y Gestión de VOLTA Smart Energy... 2. 2. Instalar el gate (Smart Gate)... 4
... 4") Manual del Usuario 1. Información general del Sistema de Monitorización y Gestión de VOLTA Smart Energy... 2 2. Instalar el gate (Smart Gate)... 4 3. Instalar un medidor (Smart Meter) y sincronizarlo con
Manual del Usuario 1. Información general del Sistema de Monitorización y Gestión de VOLTA Smart Energy... 2 2. Instalar el gate (Smart Gate)... 4 3. Instalar un medidor (Smart Meter) y sincronizarlo con
AV Surround Receiver SR6010. Quick Start Guide. Read Me First... Please do not return this unit to the store. If you need help
 ENGLISH FRANÇAIS AV Surround Receiver SR6010 ESPAÑOL Quick Start Guide Guide de configuration rapide / Guía de configuración rápida Read Me First... Lisez-moi en premier... / Lea esto primero... Please
Manual. Isolation transformer 7000 W 230V 32A
 Manual ES Isolation transformer 7000 W 230V 32A Copyrights 2008 Victron Energy B.V. All Rights Reserved This publication or parts thereof may not be reproduced in any form, by any method, for any purpose.
Quick Installation Guide TU-S9
 Quick Installation Guide TU-S9 Table of of Contents Contents Español... 1 1. Antes de iniciar... 1 2. Instalación del Hardware... 2 Troubleshooting... 5 Version 11.08.2007 1. Antes de iniciar Contenidos
1. Sign in to the website, http://www.asisonline.org / Iniciar sesión en el sitio, http://www.asisonline.org
 Steps to Download Standards & Guidelines from the ASIS International Website / Pasos para Descargar los Standards & Guidelines de la Página Web de ASIS International 1. Sign in to the website, http://www.asisonline.org
EM1037 Conmnutador KVM de 2 puertos USB
 EM1037 Conmnutador KVM de 2 puertos USB Cómo se conecta a los Puertos USB: El teclado se debe enchufar en el puerto USB superior. El ratón se debe enchufar en el puerto USB inferior. 2 ESPAÑOL EM1037 -
24-Port 10/100Mbps Web Smart PoE Switch with 4 Gigabit Ports and 2 Mini-GBIC Slots TPE-224WS
 24-Port 10/100Mbps Web Smart PoE Switch with 4 Gigabit Ports and 2 Mini-GBIC Slots TPE-224WS ŸGuía de instalación rápida (1) ŸTroubleshooting (3) 1.12 1. Antes de iniciar Contenidos del Paquete ŸTPE-224WS
MICROMETRO DIGITAL RECOMENDACIONES
 MICROMETRO DIGITAL RECOMENDACIONES No desmonte ni modifique este instrumento, ya que eso podría dañar el documento. No utilice ni guarde el micrómetro en lugares donde se produzca cambios bruscos de temperatura.
FrSky V8 de 2,4 GHz Sistema de Control de Radio Manual de Instrucciones para V8HT
 FrSky V8 de 2,4 GHz Sistema de Control de Radio Manual de Instrucciones para V8HT Gracias por la compra de nuestro radio de 2,4 GHz RF FrSky sistema de trasmisión de radio. Con el fin de aprovechar plenamente
PRODUCT ASSEMBLY INSTRUCTIONS
 PRODUCT ASSEMBLY INSTRUCTIONS KARLSEN SWIVEL GLIDER RECLINER SAM S CLUB #402411 BERKLINE #4160061 PLEASE READ THIS BOOKLET CONTAINS IMPORTANT INFORMATION. KEEP FOR FUTURE REFERENCE. Page (Pagina) 1 of
PRODUCT ASSEMBLY INSTRUCTIONS
 PRODUCT ASSEMBLY INSTRUCTIONS HAUGEN SOFA SAM S CLUB # 610256 BERKLINE #2450438 PLEASE READ THIS BOOKLET CONTAINS IMPORTANT INFORMATION. KEEP FOR FUTURE REFERENCE. Page 1 of 10 CUSTOMER SERVICE INFORMATION
Cámara de seguridad de domo varifocal de alta definición A851
 Cámara de seguridad de domo varifocal de alta definición A851 Para utilizar con DVR HD serie 4400 de Swann MANUAL DE INSTRUCCIONES ES Introducción Felicitaciones por su compra de la cámara de seguridad
Uso de la red telefónica
 Copyright y marca comercial 2004 palmone, Inc. Todos los derechos reservados. palmone, Treo, los logotipos de palmone y Treo, Palm, Palm OS, HotSync, Palm Powered, y VersaMail son algunas de las marcas
Monitor para BEBÉS MANUAL DE USUARIO
 Monitor para BEBÉS MANUAL DE USUARIO Nota importante: Este dispositivo es una ayuda para supervisar el estado de los niños de manera remota, de ni ninguna manera reemplaza la supervisión directa de un
Transmisor de Señales de Audio/Video 15-2572 Manual del usuario favor de leerlo antes de utilizar el equipo
 Transmisor de Señales de Audio/Video 15-2572 Manual del usuario favor de leerlo antes de utilizar el equipo Gracias por comprar el Transmisor de Señales de Audio/ Video de RadioShack. Su Transmisor A/V
Guía del usuario. MHL to HDMI Adapter IM750
 Guía del usuario MHL to HDMI Adapter IM750 Contenido Introducción...3 Descripción general de MHL to HDMI Adapter...3 Primeros pasos...4 Conexión inteligente...4 Actualización de Conexión inteligente...4
GUÍA DEL USUARIO. Probador de Cloro Libre y Total Patente en trámite. Modelo CL500
 GUÍA DEL USUARIO Probador de Cloro Libre y Total Patente en trámite Modelo CL500 Introducción Agradecemos su compra del probador de cloro CL500. El CL500 es un revolucionario dispositivo de medición, primero
VH110 Guía del usuario
 VH110 Guía del usuario Contenido Descripción general del auricular...5 Introducción...6 Carga...7 Encendido y apagado...8 Asociación del auricular...9 Cómo asociar del auricular con un teléfono...9 Encender
Microteléfono adicional de coche Nokia Guía de instalación Guía del usuario
 Microteléfono adicional de coche Nokia Guía de instalación Guía del usuario HSU-4 CUW-3 9232831 2ª Edición 2004-2006 Nokia. Reservados todos los derechos. Queda prohibida la reproducción, transferencia,
Control Remoto Acondicionador de Aire Portátil 551TG. Este material pertenece al website de TOTALINE ARGENTINA
 Manual de Usuario Control Remoto Acondicionador de Aire Portátil 551TG Por favor lea las instrucciones de operación y las precauciones de seguridad cuidadosamente antes de instalar y operar su sistema
Automedida de la Presión Arterial Home Blood Pressure Monitoring
 Home Blood Pressure Monitoring Chronic Kidney Disease Chronic kidney disease chapter 3 pre-dialysis CKD stages 1-3 La automedida de la presión arterial (AMPA) es la toma de su presión arterial (PA) por
Manual de instrucciones de uso del Data logger LOG1O
 C/ Mayor, 53 - Bajo 02500 Tobarra Albacete-España Tel. : +34 967 543 548 Fax: +34 967 543 542 info@pce-iberica.es Manual de instrucciones de uso del Data logger LOG1O 1. Introducción Estimado cliente,
Lump Sum Final Check Contribution to Deferred Compensation
 Memo To: ERF Members The Employees Retirement Fund has been asked by Deferred Compensation to provide everyone that has signed up to retire with the attached information. Please read the information from
AV Surround Receiver NR1606. Quick Start Guide. Read Me First... Please do not return this unit to the store. If you need help
 ENGLISH FRANÇAIS AV Surround Receiver NR1606 ESPAÑOL Quick Start Guide Guide de configuration rapide / Guía de configuración rápida Read Me First... Lisez-moi en premier... / Lea esto primero... Please
Manual de Palm BlueBoard 2.0
 Manual de Palm BlueBoard 2.0 Copyright 2002 Palm, Inc. Todos los derechos reservados. Graffiti, HotSync y Palm OS son marcas registradas de Palm, Inc. El logotipo de HotSync, Palm y el logotipo de Palm
Inicio Receptor Teatro de la música
 MANUAL DE USUARIO Inicio Receptor Teatro de la música Con el apoyo códec apt-x Con A2DP, aptx y NFC Emparejamiento Automático / Conexión Monoprice Producto ID 10248 CARACTERÍSTICAS Utiliza la avanzada
appkbws03 Wireless Multimedia Keyboard Set Black
 appkbws03 Wireless Multimedia Keyboard Set Black Español 01 English 06 Capítulo 1. Introducción y descripción del producto Gracias por elegir el teclado inalámbrico APPKBWS03. Descripción del producto
EM6053 Vídeo sobre UTP 200m
 EM6053 Vídeo sobre UTP 200m EM6053 Vídeo sobre UTP 200m 2 ESPAÑOL Contenidos Contenidos... 2 1.0 Introducción... 2 1.1 Functions and features... 2 1.2 Contenido del paquete... 3 2.0 Lo que necesita en
Temperature Humidity Meter
 971 Temperature Humidity Meter Manual de uso PN 2441047 (Spanish) September 2005 Rev.1, 5/06 2005-2006 Fluke Corporation, All rights reserved. Printed in Taiwan All product names are trademarks of their
Manual de instrucciones DPR-15/DPR 215
 Manual de instrucciones DPR-15/DPR 215 Controles 1. Control de sintonía 2. Botón Select (Seleccionar) 3. Botones de presintonías 4. Control de volumen 5. Pantalla LCD 6. Botón Info 7. Botón de Sintonía
TITLE VI COMPLAINT FORM
 [CITY SEAL/EMBLEM] The Capital City of the Palm Beaches TITLE VI COMPLAINT FORM Title VI of the 1964 Civil Rights Act requires that "No person in the United States shall, on the ground of race, color or
Voyager Serie 1400g. Guía de inicio rápido. Escáner alámbrico de Captura de Imágenes (Area-Imaging) VG1400-LS-QS Rev A 10/12
 VG1400-LS-QS Rev A 10/12") Voyager Serie 1400g Escáner alámbrico de Captura de Imágenes (Area-Imaging) Guía de inicio rápido VG1400-LS-QS Rev A 10/12 Nota: Consulte el manual de usuario para obtener información sobre la limpieza
Voyager Serie 1400g Escáner alámbrico de Captura de Imágenes (Area-Imaging) Guía de inicio rápido VG1400-LS-QS Rev A 10/12 Nota: Consulte el manual de usuario para obtener información sobre la limpieza
Sistemas de impresión y tamaños mínimos Printing Systems and minimum sizes
 Sistemas de impresión y tamaños mínimos Printing Systems and minimum sizes Para la reproducción del Logotipo, deberán seguirse los lineamientos que se presentan a continuación y que servirán como guía
Documentación PopGrabber
 Documentación PopGrabber En esta documentación se detallará el funcionamiento y configuración del programa PopGrabber. 1. Funcionamiento: Eclarsys PopGrabber es un programa que recupera e mails desde cuentas
Guía de inicio rápido. Español VTE-1016
 Guía de inicio rápido Español VTE-1016 7025690 1 Empecemos! Conexión del mando al sistema PlayStation TV Puedes utilizar el mando inalámbrico DUALSHOCK 3 o DUALSHOCK 4 con el sistema PS TV; basta con conectar
Check our AVR setup tips online Usa.denon.com/SetupTips Ca.Denon.com/SetupTips
 ENGLISH AVR-S710W INTEGRATED NETWORK AV RECEIVER FRANÇAIS ESPAÑOL Quick Start Guide Guide de configuration rapide / Guía de configuración rápida Read Me First... Lisez-moi en premier... / Lea esto primero...
Teclado POS HP USB para Sistema de Punto de Venta Guía del Usuario
 Teclado POS HP USB para Sistema de Punto de Venta Guía del Usuario 2006, 2008 Hewlett-Packard Development Company, L.P. Microsoft, Windows, y Windows Vista son marcas comerciales o marcas registradas de
MANUAL DE INSTALACIÓN Y MANUAL DE USUARIO
 MANUAL DE INSTALACIÓN Y MANUAL DE USUARIO Mando por cable KC-01.2 Lea detenidamente este manual antes de utilizar el aire acondicionado y guárdelo para futuras consultas. Versión 1.0 ÍNDICE 1. Precauciones
Digital Indoor Antenna
 24700-2 Digital Indoor Antenna User s Manual Thank you on your purchase of the Digital Indoor Antenna. Before installation, please read this manual carefully and keep for future reference. INTRODUCTION
JABRA STYLE. Manual de instrucciones. jabra.com/style
 JABRA STYLE Manual de instrucciones jabra.com/style Índice 1. Bienvenido... 3 2. VISTA GENERAL del auricular... 4 3. cómo se coloca... 5 3.1 Cómo cambiar el eargel 4. Cómo cargar la batería... 6 5. cómo
EMC SourceOne TM para Microsoft SharePoint 7.0 Búsqueda de archivo Tarjeta de referencia rápida
 EMC SourceOne TM para Microsoft SharePoint 7.0 Búsqueda de archivo Tarjeta de referencia rápida Utilice la búsqueda de archivo para buscar y restaurar contenido de SharePoint que se encuentre archivado
Tarjeta FireWire IEEE1394 Tipo ExpressCard
 Tarjeta FireWire IEEE1394 Tipo ExpressCard EC13941A1B Revisión del manual: 02/28/2011 Para la información más reciente, por favor visite www.startech.com. Declaración de Cumplimiento de la Comisión Federal
Extension Cords Extensiones Eléctricas We light your world
 We light your world 07.14.1 Household Domésticas 3 outlet indoor cords allow use of up to three items in one small place. This provides flexibility, while allowing multiple devices to be use without the
GUÍA DEL USUARIO. Medidor Ambiental 5 en 1 con PCM / MCM. Modelo 45170CM
 GUÍA DEL USUARIO Medidor Ambiental 5 en 1 con PCM / MCM Modelo 45170CM Introducción Gracias por elegir el Medidor Ambiental 5 en 1 Modelo 45170CM de Extech. El 45170CM mide flujo del aire, velocidad del
Registro de Semilla y Material de Plantación
 Registro de Semilla y Material de Plantación Este registro es para documentar la semilla y material de plantación que usa, y su estatus. Mantenga las facturas y otra documentación pertinente con sus registros.
Podómetro digital. Modelo BP-160. Podómetro digital con analizador de grasa corporal
 Podómetro digital Modelo BP-160 Podómetro digital con analizador de grasa corporal CONTENIDO CARACTERÍSTICAS FUNCIONES BÁSICAS DE LOS BOTONES CÓMO UTILIZAR EL ANALIZADOR DE GRASA CORPORAL CÓMO COLOCARSE
Medidor de consumo LEGO
 Medidor de consumo LEGO Primeros pasos El Medidor de consumo se compone de dos partes: La Pantalla de consumo LEGO y el Acumulador eléctrico LEGO. El Acumulador eléctrico encaja en la parte inferior de
app ADSL2V1 COMMUNICATIONS LINE www.printyourideas.com
 app ADSL2V1 COMMUNICATIONS LINE www.printyourideas.com 1. CONECTAR EL ROUTER Antes de conectar el dispositivo asegúrese de que el servicio de banda ancha (ADSL), suministrado por su proveedor ISP, se encuentra
ADVERTENCIA: Instrucciones de seguridad importantes. Es importante para la seguridad de las personas seguir estas instrucciones. Consérvelas.
 Motores DOOYA Manual de operaciones Importador: A. D. Barbieri S. A. Luis M. Drago 1382, Parque Industrial Almte. Brown B1852LGP Burzaco, Pcia. de Buenos Aires Tel: (011) 4136-4000 ADVERTENCIA: Instrucciones
TERMOMED Cl. Uruguay, 11 7º despacho 708 46007 - Valencia ( Valencia ) Tel. / Fax. 96 344 89 31 info@termomed.net www.termomed.net
 Tel. / Fax. 96 344 89 31 info@termomed.net www.termomed.net") PARTE 1: USO DEL HT-3 INTRODUCCIÓN El HT-3 muestra de forma continua por medio del display LCD los registros de temperatura actual, máximos y mínimos. Pueden ser definidos alarmas de máxima y mínima para
PARTE 1: USO DEL HT-3 INTRODUCCIÓN El HT-3 muestra de forma continua por medio del display LCD los registros de temperatura actual, máximos y mínimos. Pueden ser definidos alarmas de máxima y mínima para
Puede pagar facturas y gastos periódicos como el alquiler, el gas, la electricidad, el agua y el teléfono y también otros gastos del hogar.
 SPANISH Centrepay Qué es Centrepay? Centrepay es la manera sencilla de pagar sus facturas y gastos. Centrepay es un servicio de pago de facturas voluntario y gratuito para clientes de Centrelink. Utilice
A W. Product Label Identification. Etiqueta de identificación del producto. Andersen
 Product Label Identification Etiqueta de identificación for Andersen Windows and Patio Doors para puertas para patio y ventanas de Andersen Use this document to locate product identification () of your
Agustiniano Ciudad Salitre School Computer Science Support Guide - 2015 Second grade First term
 Agustiniano Ciudad Salitre School Computer Science Support Guide - 2015 Second grade First term UNIDAD TEMATICA: INTERFAZ DE WINDOWS LOGRO: Reconoce la interfaz de Windows para ubicar y acceder a los programas,
Pima Printer - Guía del Usuario. Español
 Pima Printer - Guía del Usuario Español Índice de símbolos M Símbolo de atención. Indica problemas especiales o información importante. Lea detenidamente el texto adjunto. Fabricante h Número de catálogo
Quick Installation Guide TW100-BRV304
 Quick Installation Guide TW100-BRV304 Table Table of Contents of Contents Español... 1 1. Antes de iniciar... 1 2. Instalación del Hardware... 2 3. Configuración del enrutador... 3 Troubleshooting... 5
HumidiPRO H6062 Humidistato digital programable
 HumidiPRO H6062 Humidistato digital programable Guía del usuario Lea y guarde estas instrucciones. Su nuevo termostato viene preprogramado. Para obtener ayuda, visite yourhome.honeywell.com Controles y
Creando Cuentas Nuevas para Padres / Alumnos en el
 Creando Cuentas Nuevas para Padres / Alumnos en el Portal de Internet Aeries de YCJUSD El portal de Internet Aeries proporciona una manera segura para acceder a información sobre la asistencia y el progreso
La central reproduce un sonido largo si los datos de configuración son almacenados de forma correcta, y dos sonidos cortos si hay un error.
 Programación Básica de Alarma GSM Última modificación: 15 de Octubre de 2013 Antes de nada, queremos darle las gracias por adquirir en zoominformatica.com este producto, esperamos que cubra todas sus expectativas
MANUAL DE INSTRUCCIONES
 MANUAL DE INSTRUCCIONES MODELO SP2014 1 ÍNDICE SOUP MASTER Seguridad eléctrica Seguridad durante el uso Conozca su Soup Master Consejos de Uso Modo de Uso Limpieza y mantenimiento pag. 3 pag. 4 pag. 5