CT 1830 NFI GB ES PT. Instruction for use. Instrucciones para el uso. Manual de Instruções
|
|
|
- Esther Piñeiro Quiroga
- hace 8 años
- Vistas:
Transcripción
1 CT 1830 NFI GB ES PT Instruction for use Instrucciones para el uso Manual de Instruções

2 WARNING! In order to ensure a normal operation of your refrigerating appliance, which uses a completely environmentally friendly refrigerant the R600a (flammable only under certain conditions) you must observe the following rules: Do not hinder the free circulation of the air around the appliance. Do not use mechanical devices in order to accelerate the defrosting, others than the ones recommended by the manufacturer. Do not destroy the refrigerating circuit. Do not use electric appliances inside the food keeping compartment, other than those that might have been recommended by the manufacturer. ADVERTENCIA! Para asegurarse del funcionamiento normal de vuestro refrigerador, conteniendo le refrigerante R 600a que contribuye a la protección del ámbito (inflamable sólo en ciertas condiciones), le conviene a respectar las reglas siguientes : No impide la circulación del aire alrededor del aparato. No utilize utensilios mecánicos o otros dispositivos para acelerar el proceso de descongelación otros de los recomendados por el fabricante. No cause daño al circuito refrigerante. No utilize aparatos eléctricos en el interior de los compartimentos de la conservación de los alimentos, si estos no están conformes con el tipo de aparato recomendado por el fabricante. AVISO! Afim de assegurar um funcionamento normal do seu aparelho de refrigeração que utiliza um refrigerador, o R600a, completamente amigo do ambiente (inflamável apenas sob certas condições), deve observar as seguintes normas: Não obstrua a livre circulação do ar ao redor do aparelho. Não utilize dispositivos mecânicos que não os recomendados pelo fabricante para acelerar o descongelamento. Não destrua o circuito de refrigeração. Não utilize aparelhos eléctricos que não aqueles que devem ter sido recomendados pelo fabricante dentro do compartimento para guardar comida. This appliance is not intended for use by person with reduced physical, sensory or mental capabilities or lack of experience and knowledge unless they have been given supervision or instruction concerning use of the appliance by a person responsible for their safety. Children should be supervised to ensure that they do not play with the appliance. Este aparato no ha sido diseñado para ser usado por personas con discapacidades físicas, sensoriales o mentales; tampoco para personas sin experiencia o conocimiento del aparato, a no ser que estén supervisadas o instruidas por alguien responsable de su seguridad. Los niños deben de estar controlados para que no jueguen con el aparato. Este aparelho não deve ser utilizado por pessoas com capacidades reduzidas quer a nivel físico, psíquico ou mental ou com falta de experiência e conhecimento, excepto quando supervisionados ou se lhes foram dadas instruções relacionadas com a utilização do aparelho, por alguem responsável pela sua segurança. As crianças devem ser supervisionadas para se assegurar que não brincam com o aparelho.

3 GB Index Safety comes first! /1 Transport instructions /2 Disposal /2 Device Setup /2 Electrical connections /2 Get to know your device /3 Prior to startup /3 Setting the operating temperature /3 Cooling /5 Freezing /6 Defrosting of the device /6 Replacing the interior light bulb /7 Cleaning and care /7 Practical tips and notes /8 Examples of use /9 Normal operating noises /9 What, if... /10 Reversing the doors /11 Technical data /11 ES Índice La seguridad es lo primero /12 Instrucciones de transporte /13 Eliminación /13 Instalación del electrodoméstico /13 Conexiones eléctricas /13 Detalles del electrodoméstico /14 Antes de empezar /14 Ajuste de la temperatura de funcionamiento /14 Refrigeración /16 Congelación /17 Deshielo del aparato /17 Sustitución de la bombilla interior /18 Conservación y limpieza /18 Notas y consejos útiles /19 Ejemplos de utilización /20 Ruidos normales de funcionamiento /20 Resolución de problemas /21 Inversión de las puertas /22 Datos técnicos /22 PT Índice A segurança está sempre em primeiro lugar! /23 Instruções de transporte /24 Eliminação /24 Configuração do dispozitivo /24 Ligações eléctricas /24 Detalhes do equipamento /25 Antes de colocar em funcionamento /25 Ajustar a temperatura de funcionamento /25 Arrefecimento /27 Congelar /28 Descongelação do equipamento /28 Substituição da lâmpada interior /29 Limpeza e cuidados /29 Notas e dicas práticas /30 Exemplos de utilização /31 Ruídos normais de funcionamento /31 O que fazer se /32 Inverter as portas /33 Significado da ficha de energia /33

4 1 2
5

6 GB Instruction for use Congratulations on your choice of our product which will certainly provide you with many years of good service. Safety comes first! Please read the operating manual carefully. It contains important information on how to use your device. If instructions are not adhered to, you may lose your right to service at no charge during the warranty period. Please keep this manual in a safe place and pass it on to later users if applicable. Do not connect your appliance to the power supply until all packing and transit protectors have been removed. Leave to stand upright for at least 4 hours before switching on to allow the system to settle if transported horizontally. This appliance must only be used for its intended purpose, i.e. the storing and freezing of edible foodstuff. We do not recommend use of this appliance in an unheated, cold room e.g. garage, conservatory, annex, shed, outdoors, etc. See Location. On delivery, check to make sure that the product is not damaged and that all the parts and accessories are in perfect condition. Do not operate a damaged appliance; if in doubt, check with your dealer. Do not allow children to play with the appliance. Do not sit or stand on or let the children sit or stand on the appliance or on the pull-out parts. Do not hang on the appliance door. Your device contains no fluoridated coolants (CFC/HFC), but contains the coolant isobutane (R600a), a natural gas which is highly compatible with the environment. (R600a) is easily flammable. Therefore, be sure that the cooling circuit is not damaged either during transport or during operations. In the event of damage; Avoid any open flame, sources of sparks and flammable substances. Immediately air the room in which the appliance is located. In case the coolant spraying out contacts your eyes it may cause eye injuries. The space in the room where the appliance is installed must not be smaller than 10 cubic metres. Do not dispose of the appliance in a fire. Your appliance contains non CFC substances in the insulation which are flammable. Please contact the local authority in your region for information on disposal methods and facilities available. Warning - Keep ventilation openings on the appliance enclosure or in the built-in structure, clear of obstruction. Warning - Do not use mechanical devices or other means to accelerate the defrosting process, other than those recommended by the manufacturer. Warning - Do not damage the refrigerant circuit. Warning - Do not use electrical appliances inside the food storage compartments of the appliance, unless they are of the type recommended by the manufacturer. Avoid touching the metal condenser wiring on the backside of the appliance; there is risk of injury. In the event of a possible malfunction, disconnect the appliance from the power supply first. Prior to cleaning the device always unplug the power supply or shut off the fuse. Do not pull from the cable - pull from the plug. Repairs to the electrical equipment may only be made by qualified experts. If the connection cable is damaged, the manufacturer or customer service must replace it in order to avoid danger. 1

7 GB Transport instructions The appliance should be transported only in upright position. Before the performance of the working test in the shop, the packing of the appliance must be intact. After a transport in the horizontal position, the device may only be taken into operation 4 hours after being stood up vertically again. The appliance must be protected against rain, moisture and other atmospheric influences. The manufacturer assumes no liability if safety instructions are disregarded. Disposal Make the device unusable immediately. Pull out the mains plug and cut the power cable. Remove or destroy snap or latch locks before disposing of the device. In this manner you prevent children from locking themselves in and endangering their lives. Device setup Do not operate your appliance in a room where the temperature is likely to fall below 10 C at night and/or especially in winter. At lower temperatures the appliance may not operate, resulting in a reduction in the storage life of the food. The climate class rate of your appliance is given in Technical Features leaflet and written on the rating label inside the appliance. It specifies the appropriate operating ambient temperatures as explained below. Climatic class Ambient temperatures SN C to 32 C N C to 32 C ST C to 38 C T C to 43 C SN-ST C to 38 C SN-T C to 43 C Location Only place the appliance, as shown in the illustration in dry rooms which can be aired. Avoid direct sunlight or direct heat sources such as a stove or a heater. If this cannot be avoided, the following minimum distances should be maintained: Electric stoves: 3,00 cm Heater: 3,00 cm Cooling devices: 2,50 cm Ensure sufficient air circulation for your device. Make sure that sufficient room is provided around the appliance to ensure free air circulation (Item 3). Fit the two plastic wall spacers supplied with the appliance rotating 1/4 turn to the condenser at the back of the appliance (Item 4). The appliance should be located on a smooth surface. The two front feet can be adjusted as required (Item 5). To ensure that your appliance is standing upright adjust the two front feet by turning clockwise or counter-clockwise, until the product is in firm contact with the floor. Correct adjustment of feet avoids excessive vibration and noise. Electrical connections Instruction for use Warning This appliance must be grounded. Check whether the power type and voltage in your region corresponds to the one stated on the rating label inside the appliance. The electrical safety of the appliance is only assured when the grounding system in the house is installed in accordance with regulations. When placing the appliance, do not let the power cable get stuck under it; otherwise the cable will be damaged. Ensure that the plug remains readily accessible. Do not use a multiple adapter bar or an extension cable. 2

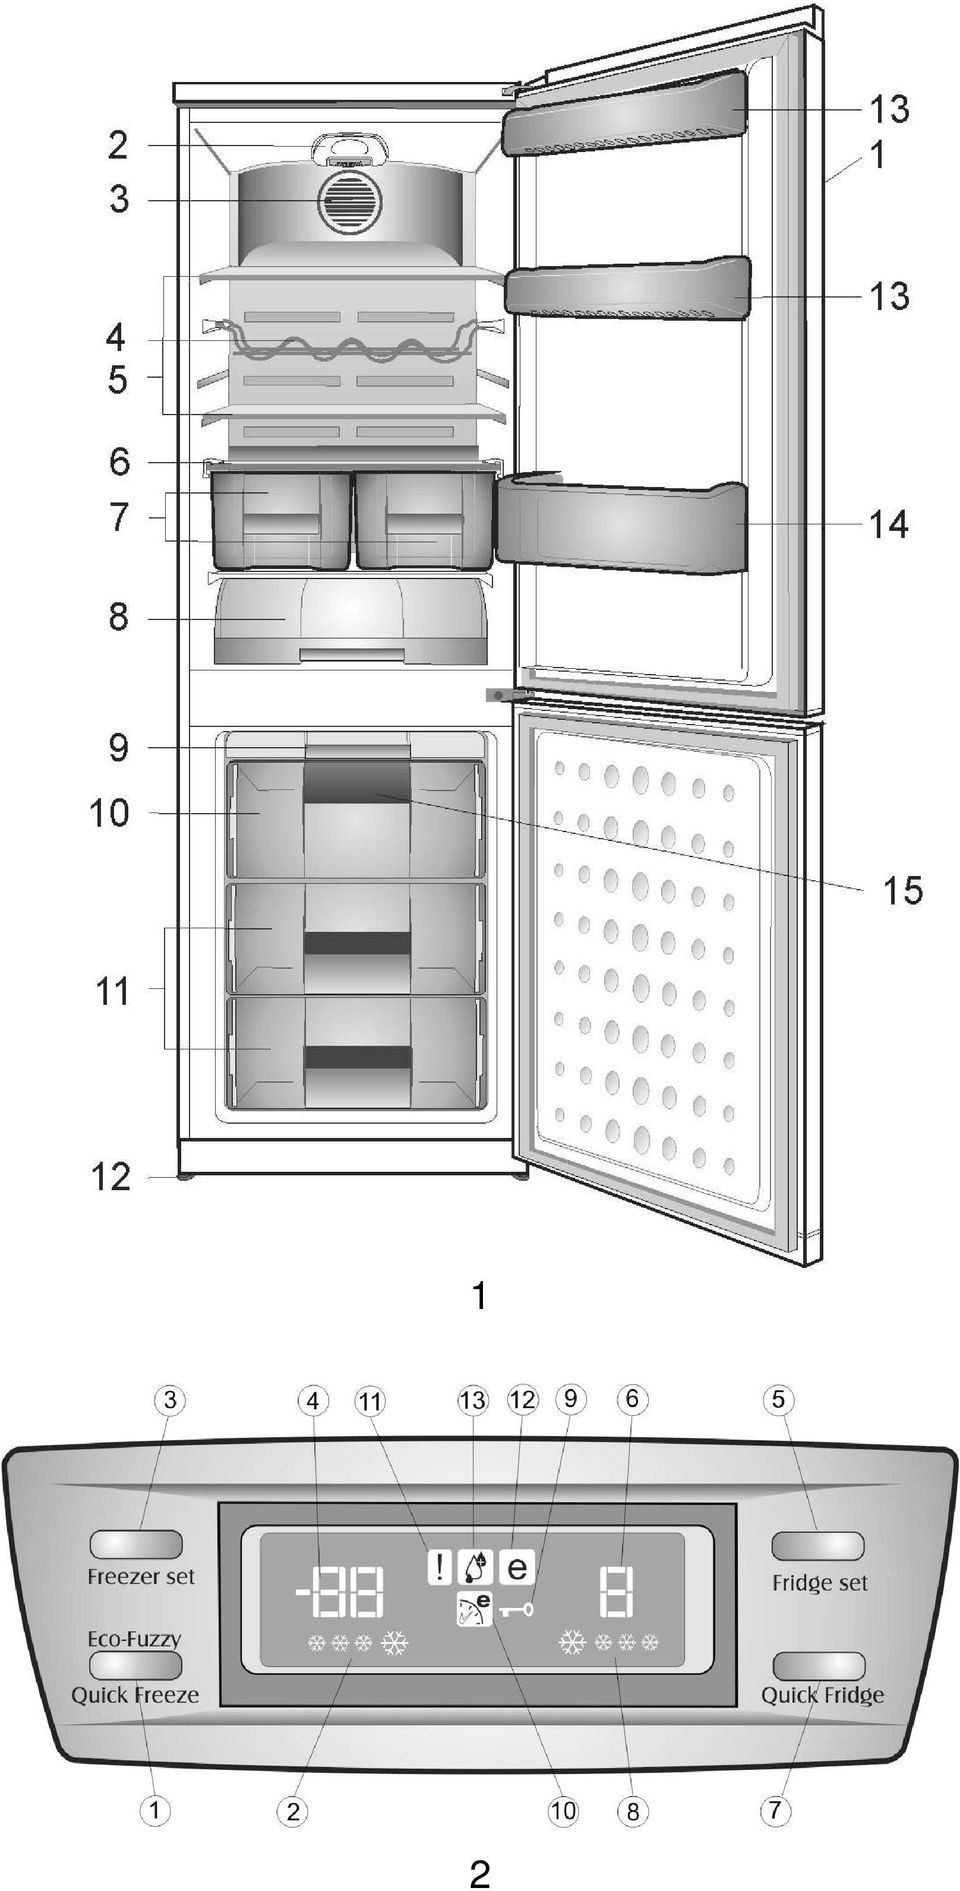
8 GB Instruction for use Get to know your device Waring Below information about accessories are supplied just for reference. Below accessories may not be exactly same as the accessories of your appliance. Item 1 1. Control panel 2. Interior light 3. Fresh Food fan 4. Wine rack 5. Adjustable Cabinet shelves 6. Crisper cover 7. Salad crispers 8. Fresh zone compartment 9. Ice tray support & ice tray 10. Compartment for quickly freezing 11. Compartments for frozen froods keeping 12. Adjustable front feet 13. Shelf for jars 14. Shelf for bottles 15. Freezer fan The fans has the purpose to provide the circulation of the air in compartment. Setting the operating temperature Fresh Food and Freezer Compartment Temperature can be adjused by the electronic display (Item 2) Control Panel Control Functions Considering Figure 2, the following functions are implemented on the appliance. 1. Quick Freeze Function 2. Quick Freeze Indicator 3. Freezer Set Function 4. Freezer Compartment Temperature Setting Indicator 5. Fridge Set Function 6. Fridge Compartment - Temperature Setting Indicator 7. Quick Fridge Function 8. Quick Fridge Indicator 9. Lock Function 10. Eco-Fuzzy Function 11. Hight Temperature/Error Warning Indicator 12. Economic Usage Indicator 13. Humidity Indicator Prior to startup Before you begin operating your device, the following points should be re-checked for safety: Is the device standing properly on the floor? Is there sufficient space for good air circulation? Is the interior clean? (Also see the section Cleaning and care ) Now connect the appliance to the mains. The compressor is turned on; the interior light comes on when the Fridge door is opened. Do not place foodstuff into the refrigerator until the temperature has reached the desired level. 3

9 GB Description of the Control Functions 1. Quick Freeze Function Quick Freeze indicator will remain lit when the Quick Freeze function is enabled. To cancel this function press Quick Freeze button again. Quick Freeze indicator will turn off and return to its normal settings. If you do not cancel it, Quick Freeze will cancel itself automatically after 4 hours or when the freezer compartment reaches to the required temperature. If you want to freeze large amounts of fresh food, press the Quick Freeze button before putting the food into the freezer compartment. Compressor will not start running immediately if you press the Quick Freeze button for more then once with short intervals since the electronic circuit protection system will be activated. This function is not recalled when power restores after a power failure. 2. Quick Freeze Indicator This icon flashes in an animated style when the Fast Freeze function is active. 3. Freezer Set Function This function allows you to make the freezer compartment temperature setting. Press this button to set the temperature of the freezer compartment to -18, -20, -22, -24 respectively. 4. Freezer Compartment Temperature Setting Indicator Indicates the temperature set for the Freezer Compartment. 5. Fridge Set Function This function allows you to make the fridge compartment temperature setting. Press this button to set the temperature of the fridge compartment to 8, 6, 4, 2 respectively. 6. Fridge Compartment Temperature Setting Indicator Indicates the temperature set for the Fridge Compartment. Instruction for use 7. Quick Fridge Function When you press Quick Fridge button, the temperature of the compartment will be colder than the adjusted values. This function can be used for food placed in the fridge compartment and required to be cooled down rapidly. If you want to cool large amounts of fresh food, it is recommended to active this feature before putting the food into the fridge. Quick Fridge indicator will remain lit when the Quick Fridge function is enabled. To cancel this function press Quick Fridge button again. Quick Fridge indicator will turn off and return to its normal settings. If you do not cancel it, Quick Fridge will cancel itself automatically after 2 hours or when the fridge compartment reaches to the required temperature. This function is not recalled when power restores after a power failure. 8. Quick Fridge Indicator This icon flashes in an animated style when the Quick Fridge function is active. 9. Lock Function Press Freezer Set and Fridge Set buttons simultaneously for 3 sec. to activate the Lock function. Not other function can be selected from the display panel when the lock function is active. Press Freezer Set and Fridge Set buttons simultaneously for 3 sec. again to deactivate the Lock function. 10. Eco-Fuzzy (Special Economic Usage) Function Press the Quick Freeze button for 3 seconds to activate the Eco Fuzzy Function. If this function is activated, refrigerator will start to operate at the most economic mode minimum 6 hours later and economic usage indicator will turn on. Press the Freeze button for 3 seconds again to deactivate the Eco Fuzzy Function. 4

10 GB 11. High Temperature/ Error Warning Indicator This light comes on during high temperature failures and error warnings. 12. Economic Usage Indicator Economic Usage Indicator turns on when the Freezer Compartment is set to -18 C. Economic Usage Indicator turns off when the Quick Fridge or Quick Freeze function is selected. 13. Humidity Indicator Indicator light lights up continuously. This light indicates that the food kept in the refrigerator is preserved for a long time under ideal humidity. Cooling Food storage Instruction for use The fridge compartment is for the short-term storage of fresh food and drinks. Store milk products in the intended compartment in the refrigerator. Bottles can be stored in the bottle holder or in the bottle shelf of the door. Raw meat is best kept in a polyethylene bag at the second shelf from the top of the refrigerator. Allow hot foods and beverages to cool to room temperature prior to placing them in the refrigerator. It is suggested not to keep frozen food over crisper cover for thawing purposes. The other shelves can be used for thawing purposes. Attention Store concentrated alcohol only standing upright and tightly closed. Attention Do not store explosive substances or containers with flammable propellant gases (canned cream, spray cans etc.) in the appliance. There is a danger of explosion. 5

11 GB Freezing Freezing food The freezing area is marked with symbol. You can use the appliance for freezing fresh food as well as for storing pre-frozen food Please refer to the recommendations given on the packaging of your food. Attention Do not freeze fizzy drinks, as the bottle may burst when the liquid in it is frozen. Be careful with frozen products such as coloured ice-cubes. Do not exceed the freezing capacity of your appliance in 24 hours. See Technical Features leaflet. In order to maintain the quality of the food, the freezing must be effected as rapidly as possible. Thus, the freezing capacity will not be exceeded, and the temperature inside the freezer will not rise. Attention Keep the already deep-frozen food always separated with freshly placed food. When deep-freezing hot food, the cooling compressor will work until the food is completely frozen. This can temporarily cause excessive cooling of the refrigeration compartment. If you find the freezer or fresh food door difficult to open just after you have closed it, don t worry. This is due to the pressure difference which will equalize and allow the door to open normally after a few minutes. You will hear a vacuum sound just after closing the door. This is quite normal. Making ice cubes Fill the ice-cube tray 3/4 full with water and place it in the freezer. As soon as the water has turned into ice, you can take out the ice cubes. Never use sharp objects such as knives or forks to remove the ice cubes. There is a risk of injury! Let the ice cubes slightly thaw instead, or put the bottom of the tray in water for a short moment. Defrosting of the device Instruction for use The appliance is a frost free refrigerator. So there will not be any frost accumulation inside the food storage area. However there will be an automatic defrost at the evaporation area of the appliance when it needs. The water drams into reservoir at the back of the appliance and evaporates automatically through the compressor heat. Ensure that the reservoir is fixed properly above the compressor. Warnings! The fans inside the freezer and fresh food compartments circulates cold air. Never insert any object through the guard. Do not allow children to play with the fresh food andfreezer fan. Never store products that contain inflammable propellant gas (eg dispensers, spray cans etc.) or explosive substances. Don t cover the shelves with any protective materials, which may obstruct air circulation. Do not allow children to play with the appliance or tamper with the controls. Do not obstruct the fan guards to ensure that you obtain the best possible performance from your appliance. (Item 9 and Item 10) Warning! Your appliance is fitted with 2 circulating fans which are essential for the performance of the refrigerator. Please ensure the fans are not blocked (stopped) or impaired by food or packaging. Blocking (stopping) or impairing the fan can result in an increase of the internal freezer temperature (Thawing). 6

12 GB Replacing the interior light bulb (Item 11) In case that the light bulb is out of function it is easily to replace. First make sure that the refrigerator / freezer is disconnected from the power supply by removing the plug. Take a flat screwdriver and keep it carefully without force into the left gap between lamp cover and internal cabinet. Then press the handle of the screwdriver carefully to the left side until you notice that the left pin of the cover is disengaged. Repeat this procedure on the right gap, however now press the handle of the screwdriver carefully to the right side. If both sides are loosened the cover can be removed easily. Ensure that bulb is screwed securely in the bulb holder. Plug the appliance into the power supply. If the light still fails, replace E14 screw-cap type 15 Watt (Max) bulb from your local electrical store and then fit it. Carefully dispose of the burnt-out light bulb immediately. If you have changed the light bulb please fix the cover again in it s former position. Take care that the cover snaps-in correctly. Cleaning and care Interior and Exterior Surfaces Clean the condenser at the back of the appliance once a year using a brush or a vacuum cleaner. Dust build-up leads to increased energy consumption. Inspect the door gasket at regular intervals. Clean with water only, and wipe totally dry. Cleaning of the accessories Instruction for use Door shelves: Remove all food from the door shelves. Lift the cover of the shelf upwards and pull it off sideward. Remove the bottom of the door shelf by pushing it upwards. Collecting container (Pan): Make sure that the pan at the back of the appliance is always clean. Gently release the snap of the pan from the compressor by pushing it using a tool (like screwdriver), so that the pan can be removed. Lift the pan, clean it and wipe it dry. Re-assemble in reverse order. Crisper or Drawers: To clean a drawer, pull it out as far as possible, tilt it upwards and then pull it out completely (Item 7-8). Attention Always unplug the power cable or switch off the circuit breaker before cleaning. Clean the exterior using lukewarm water and a mild detergent. Never use detergents, abrasive or acidic agents. Wipe the inside compartment dry. Be careful to prevent water from getting into contact with the electrical connections of the temperature control or the interior light. If the device is not going to be used for a long period of time, unplug the power cable and remove all food. Clean the appliance and keep the door open. To preserve the appearance of your appliance, you can polish the exterior and the door accessories with a silicone wax. 7

13 GB Practical tips and notes Cooling Clean fresh food and vegetables before storing in the crisper bin. Always pack or wrap food, or put it in a suitable container, before storing it in the appliance. Wrap food which is not suitable for storage at cold temperatures in polyethylene bags (pineapple, melons, cucumbers, tomatoes etc.). Food with strong odour or apt to acquire odour should be wrapped in airtight or smellproof packaging material. Keep fresh food separate from cooked food, to avoid bacteria contamination. Never keep fresh meat in the fridge for more than 2 or 3 days. Remove any left-over canned food from the can and store it in a suitable container. Refer to the shelf life indicated on the food packaging. Do not obstruct the air circulation inside the device by covering the shelves. Never keep any dangerous or poisonous substances inside your device. Always check food that has been stored for a long period of time for its suitability for consumption. Do not store fresh and cooked food together in the same container. Close the door immediately after opening, to avoid unnecessary energy consumption. Do not use hard or sharp objects to remove the ice build-up. Do not load hot food into your appliance. Freezing Instruction for use Always leave food to thaw in a container that allows the thawing water to run off. Do not exceed the maximum allowable freezing capacity when freezing fresh food (see the section "Freezing") Do not give children ice-cream and water ices direct from the freezer. The low temperature may cause freeze burns on lips. Never re-freeze defrosted food; defrosted food must be consumed within 24 hours. Only food that has been cooked can be refrozen. Do not take out frozen food with wet hands. Store only fresh and impeccable food. Always use appropriate packaging material to avoid odour penetration or degradation of the food. Store commercially frozen food in accordance with the instructions given on the packaging. Freeze cooked food in small quantities. This ensures rapid freezing and maintains the quality of the food. Do not freeze liquid in tightly closed bottles or containers. The bottles/containers may burst at low temperatures. Carry pre-frozen food in suitable bags and place it in your freezer as soon as possible. Always defrost food in the fridge compartment. 8

14 GB Instruction for use Examples of Use White wine, beer and mineral water Bananas Fish or offal Cheese Melons Raw meat and poultry chill before use do not store in a fridge store in polyethylene bags only use airtight containers or polyethylene bags; for best results, take out from the fridge an hour before consumption. store only for a short period of time, use airtight packaging/wrapping do not store together with delicate food such as cooked food or milk Normal operating noises Various functional noises are completely normal due to the operation of the cooling system of your appliance; Gurgling, hissing, boiling or bubbling noises are caused by the refrigerant, circulating inside the cooling system. These noises can still be heard for a short period of time after the compressor shuts off. Sudden, sharp cracking or popping noises are caused by the expansion and contraction of the inside walls or some components inside the cabinets. Also to avoid disturbing vibrations and noises make sure that; Your refrigerator is standing level on all four feet. Your refrigerator is not in contact with the walls, surrounding objects or kitchen cabinets and furniture. Cans, bottles or dishes inside the refrigerator are not touching and rattling against each other. All shelves and bins are mounted correctly inside the refrigerator cabinets and doors. Buzzing, whirring, pulsating or high-pitched humming noises are caused by the compressor. These noises are slightly louder at the start-up of the compressor and reduce when the appliance reaches the operating temperatures. 9

15 GB What, if The appliance will not work, even though it is switched on. Check if the power cable is properly connected! Check if the mains supply is in order, or if a circuit breaker has been tripped! Check the temperature control for correct setting! 2- There is a power failure. Keep the doors of your device closed. Frozen food will not be affected if the power failure lasts less than the Conservation Time From Failure (hours) declaration mentioned in the Technical Features leaflet. If the power failure lasts longer, check the food and consume it immediately. You can also cook the defrosted food and then refreeze it. 3- The interior light does not work. Check the power supply! Check the installation of the light bulb! Unplug the power cable before checking the light bulb. (Also see the section Replacing the interior light ) 4- There is high temperature alarm If the actual temperature of the freezer compartment is warm then the alarm icon on the display (Fig. 2/11) lights on. The alarm icon lights off when the actual temperature of the freezer compartment cools down. The high temperature alarm may rise up due following situations. a) Warm food storage b) Warm air in the freezer compartment c) Freezer door is left open for a long time If the high temperature alarm remains on for more than 24 hours then contact with the customer service. The high temperature alarm is not active in 24 hours after plugging the appliance into the electricity. Instruction for use 5- There is error messages and alarm Incase any failure condition due wiring connection of the appliance occurs, and then the alarm icon on the display (Fig. 2/11) starts blinking together with the relevant error message. Incase some certain characters (E0, E3,..etc.) appear on the display then contact with the customer service. The alarm icon lights off just after the removal of the failure. 6- There is actual fridge temperature failure The appliance performs cooling considering the fridge set temperature. The actual fridge temperature shown on the display will reach the adjusted fridge set temperature, when the packages are cold enough. There may be some oscillations on the actual fridge temperature shown on the display due; a) The fridge door is Opened / Closed frequently b) Loading warm packages inside the fridge. c) Leaving the fridge door open for a long period of time 8- Other possible malfunctions Not every malfunction is a case for our customer service. Very often, you can easily resolve the problem without requesting service. Before requesting service, please check if the malfunction has been caused by an operating error. If this is the case, and a service has been requested, a service charge will be levied even if the device is still under guarantee. If the problem persists please contact your dealer or customer service. Please have the type and serial number of your device when calling. The rating label is located inside. 10

16 GB Door Open Alarm There is a built in buzzer in the appliance that will inform customer if the fridge door is left open for a minute. This alarm is a periodic alarm and it reminds the customer that the fridge door is left open. There is no buzzer alarm related to freezer door. In order to stop the door open alarm, it is enough to press any button on the display or close the door. Thus the alarm will stop till next time. Reversing the doors Instruction for use The door of your refrigerator is designed to operate towards both sides at your convenience. If you want the door to open towards the other side, please call the nearest authorized maintenance service for assistance. Technical data Brand SAIVOD Model CT 1830 NFI Appliance type COMBI NO FROST Total gross volume (l.) 320 Total usable volume (l.) 273 Freezer usable volume (l.) 80 Refrigerator useful volume 193 Freezing capacity (kg/24 h) 5 Energy class (1) A+ Power consumption (kwh/year) (2) 304 Autonomy (h) 17 Noise [db(a) re 1 pw] 40 Ecological refrigerating agent R600a (1) Energy class : A... G (A = economical... G = less economical) (2) The real power consumption depends on using conditions and appliance location. The symbol on the product or on packaging indicates that this product may not be treated as household waste. Instead it shall be handed over to the applicable collection point for the recycling of electrical and electronic equipment. By ensuring this product is disposed of correctly, you will help prevent potential negatyve consequences for the environment and humann health, which could otherwise be otherwise be caused by inappropriate waste handling of this product. For more detailed information about recycling of this product, please contact your local city office, you household waste disposal service or the shop where you purchased the product. 11

17 ES Instrucciones de uso Enhorabuena por elegir nuestro producto, el cual sin duda le proporcionará muchos años de buen servicio. La seguridad es lo primero. Por favor, lea el manual de instrucciones detenidamente. En él encontrará información de importancia acerca del uso de su electrodoméstico. Si no se atiene a las instrucciones, podría perder el derecho a reparación gratuita durante el período de garantía. Por favor, guarde este manual en un lugar seguro y entréguelo a futuros usuarios en caso pertinente. No conecte el electrodoméstico a la toma de corriente hasta que no se hayan retirado todos los protectores de embalaje y transporte. Si el aparato se transportó horizontalmente, déjelo en posición vertical al menos 4 horas antes de conectarlo, para que el sistema se asiente. Este frigorífico sólo debe utilizarse para su finalidad prevista, es decir, la conservación y congelación de alimentos. No recomendamos la utilización de este dispositivo en lugares fríos no calefactados tales como garajes, invernaderos, cobertizos, cabañas, exteriores, etc. Consulte la sección Ubicación. A la recepción del producto, compruebe que éste no presente daños y que todas sus piezas y accesorios se encuentren en perfecto estado. No utilice nunca un electrodoméstico que presente daños; en caso de duda consulte a su proveedor. No permita que los niños jueguen con el electrodoméstico. No se siente ni se suba en el electrodoméstico ni en sus partes extraíbles, ni permita que los niños lo hagan. No se cuelgue de la puerta del electrodoméstico. Su aparato no contiene refrigerantes a base de flúor (CFC/HCF), pero sí refrigerante isobutano (R600a), gas natural altamente compatible con el medio ambiente. El (R600a) es fácilmente inflamable. Por tanto, asegúrese de no dañar el circuito de refrigeración durante el transporte o el funcionamiento. En caso de avería: Evite las llamas, las fuentes de chispas y las sustancias inflamables. Ventile de inmediato la estancia en donde se encuentre el aparato. El refrigerante en contacto con los ojos puede causar lesiones oculares. No instale el electrodoméstico en una estancia de menos de 10 metros cúbicos. No arroje el electrodoméstico al fuego. Su aislante contiene sustancias inflamables sin CFC. Solicite a las autoridades locales información sobre recogida de residuos y centros de reciclaje disponibles. Advertencia: Mantenga limpias y sin obstrucciones las aberturas de ventilación del armario del frigorífico o de la estructura incorporada. Advertencia: Utilice sólo los dispositivos mecánicos u otros medios recomendados por el fabricante para acelerar el proceso de deshielo. Advertencia: Evite provocar daños al circuito de refrigeración. Advertencia: No utilice aparatos eléctricos dentro de los compartimentos para alimentos del electrodoméstico, a menos que sean del tipo recomendado por el fabricante. Evite todo contacto con el alambrado del condensador metálico situado en la parte posterior del electrodoméstico, ya que existe riesgo de lesiones. En caso de posible fallo del aparato, desenchufarlo de inmediato de la toma eléctrica. Antes de limpiar el aparato, desenchúfelo siempre de la toma eléctrica o desactive el fusible. No tire del cable, sino del enchufe. Las reparaciones de los equipos eléctricos sólo deben ser realizadas por expertos cualificados. Si se encuentra dañado el cable de conexión, el fabricante o el servicio de atención al cliente deben sustituirlo para evitar peligros. 12

18 ES Instrucciones de transporte El frigorífico sólo se debe transportar en posición vertical. Antes de la ejecución de la prueba de funcionamiento en el negocio, el paquete de la aplicación debe encontrarse intacto. En caso de haberse transportado en posición horizontal, es preciso colocarlo de nuevo en posición vertical y esperar 4 horas para poderlo poner en funcionamiento. El electrodoméstico debe estar protegido de la lluvia, la humedad y demás fenómenos meteorológicos. El fabricante no asume responsabilidad alguna en caso de ser ignoradas las instrucciones sobre seguridad. Eliminación Asegúrese de que el electrodoméstico quede inutilizado de inmediato. Extraiga el enchufe y corte el cable de corriente. Retire o inutilice cerraduras y pestillos antes de deshacerse del aparato. De esta manera evitará que los niños se queden encerrados y pongan en peligro sus vidas. Instalación del electrodoméstico No instale el frigorífico en habitaciones donde la temperatura pueda descender por debajo de los 10 C por la noche y/o especialmente en invierno. A temperaturas inferiores, es posible que el aparato no funcione, reduciéndose el periodo de conservación de los alimentos. La clase climática de su electrodoméstico se detalla en el folleto de Características Técnicas y en la etiqueta de datos técnicos en el interior del aparato. En ella se especifican las temperaturas ambiente de funcionamiento adecuadas, según se detalla a continuación. Clase climática Temperaturas ambiente SN... Entre 10 ºC y 32 ºC N... Entre 16 ºC y 32 ºC ST... Entre 18 ºC y 38 ºC T... Entre 18 ºC y 43 ºC SN-ST... Entre 10 ºC y 38 ºC SN-T... Entre 10 ºC y 43 ºC Ubicación Coloque el electrodoméstico únicamente en estancias secas que dispongan de ventilación, tal como se ve en la ilustración. Evite la luz solar directa o fuentes de calor tales como estufas o calentadores. Si ello no fuera posible, observe las siguientes distancias mínimas: Estufas eléctricas: 3,00 cm Calentadores: 3,00 cm Aparatos de refrigeración: 2.50 cm Asegúrese de que hay suficiente circulación de aire para su electrodoméstico. Compruebe que hay espacio suficiente en torno al aparato para garantizar la circulación de aire (Figura 3). Monte ambos espaciadores de plástico de pared suministrados junto con la aplicación, girándolos 1/4 de vuelta en el condensador en la parte trasera de la aplicación (Figura 4). El aparato debe estar situado sobre una superficie lisa. Los dos pies delanteros se pueden ajustar según sea necesario. (Figura 5). Para garantizar la verticalidad del frigorífico, ajuste los dos pies delanteros girándolos a derecha o izquierda hasta que el contacto con el suelo sea firme y seguro. El correcto ajuste de los pies evita vibraciones o ruidos excesivos. Conexiones eléctricas Instrucciones de uso Aviso Este electrodoméstico debe conectarse a un enchufe provisto de toma de tierra. Compruebe que los tipos de corriente y voltaje locales corresponden a los indicados en la etiqueta de datos técnicos situada en el interior del electrodoméstico. Sólo se puede garantizar la seguridad eléctrica del aparato cuando la toma de tierra de la vivienda se halla instalada en conformidad con la normativa vigente. Instale el aparato de forma que el cable no quede atrapado bajo él, ya que podría resultar dañado. Asegúrese de que el enchufe sea fácilmente accesible. No utilice bases múltiples o cables de extensión. 13

19 ES Instrucciones de uso Detalles del electrodoméstico Uso Se suministra a continuación información sobre los accesorios a modo de referencia. Es posible que los accesorios que aparecen no coincidan con los de su electrodoméstico. Figura 1 1. Panel de control 2. Luz interior 3. Ventilador de alimentos frescos 4. Rejilla para vino 5. Estantes interiores ajustables 6. Tapa del cajón de frutas y verduras 7. Cajones de frutas y verduras 8. Compartimento para hielo 9. Soporte de bandeja de hielo y bandeja de hielo 10. Compartimiento de congelación rápida 11. Compartimento de conservación de alimentos congelados 12. Pies delanteros ajustables 13. Estante para botes 14. Estante para botellas 15. Ventilador del congelador Los ventiladores tienen el propósito de hacer circular el aire en su correspondiente compartimento. Ajuste de la temperatura de funcionamiento La temperatura del compartimento de alimentos frescos y del compartimento congelador puede ajustarse por medio de la pantalla electrónica (Figura 2) Panel de control Funciones de control Atendiendo a la Figura 2, el electrodoméstico dispone de las siguientes funciones. 1. Función de congelación rápida 2. Indicador de congelación rápida 3. Función de ajuste del congelador 4. Indicador de ajuste de temperatura del compartimento congelador 5. Función de ajuste del frigorífico 6. Indicador de ajuste de temperatura del compartimento frigorífico 7. Función de refrigeración rápida 8. Indicador de refrigeración rápida 9. Función de bloqueo 10. Función "Eco-Fuzzy" 11. Indicador de alta temperatura/aviso de error 12. Indicador del modo ahorro 13. Indicador de humedad Antes de empezar Antes de empezar a utilizar su electrodoméstico, deben comprobarse detenidamente los siguientes puntos para su seguridad: Está correctamente colocado el aparato sobre el suelo? Hay espacio suficiente para una buena circulación de aire? Está limpio el interior? (Ver también la sección de Conservación y limpieza ). A continuación, enchufe el aparato a la toma de corriente. Se activará el compresor, y la luz interior se encenderá al abrirse la puerta del frigorífico. No deposite alimentos en el frigorífico hasta que la temperatura haya alcanzado los niveles deseados. 14

20 ES Instrucciones de uso Descripción de las funciones de control 1. Función de congelación rápida El indicador de congelación rápida permanecerá encendido mientras la función de congelación rápida esté activa. Para cancelar esta función pulse de nuevo el botón de congelación rápida. El indicador de congelación rápida se apagará y el electrodoméstico volverá a sus valores normales. Si no cancela manualmente la función de congelación rápida, ésta se cancelará automáticamente transcurridas cuatro horas o bien una vez el compartimento congelador alcance la temperatura deseada. Si desea congelar grandes cantidades de alimentos frescos, pulse el botón de congelación rápida antes de introducir los alimentos en el compartimento congelador. El compresor no empezará a funcionar inmediatamente si pulsa repetidamente el botón de congelación rápida en un breve intervalo de tiempo, ya que el sistema de protección del circuito electrónico se activará. En caso de apagón, esta función no se activará automáticamente con el restablecimiento del suministro eléctrico. 2. Indicador de congelación rápida Este icono parpadea de forma llamativa cuando la función de congelación rápida esté activa. 3. Botón de ajuste del congelador Esta función le permite ajustar la temperatura del compartimento congelador. Pulse este botón para ajustar la temperatura del compartimento congelador a -18, -20, -22 y -24 respectivamente. 4. Indicador de ajuste de temperatura del compartimento congelador Indica la temperatura ajustada para el compartimento congelador. 5. Botón de ajuste del frigorífico Esta función le permite ajustar la temperatura del compartimento frigorífico. Pulse este botón para ajustar la temperatura del compartimento congelador a 8, 6, 4 y 2 respectivamente. 6. Indicador de ajuste de temperatura del compartimento frigorífico Indica la temperatura ajustada para el compartimento frigorífico. 7. Función de refrigeración rápida Al pulsar el botón de refrigeración rápida, la temperatura del compartimento descenderá por debajo del valor fijado. Esta función puede utilizarse para enfriar con rapidez alimentos depositados en el compartimento frigorífico. Si desea enfriar grandes cantidades de alimentos frescos, se recomienda activar esta función antes de depositar los alimentos en el frigorífico. El indicador de refrigeración rápida permanecerá encendido mientras la función de refrigeración rápida esté activa. Para cancelar esta función pulse nuevamente el botón de refrigeración rápida. El indicador de refrigeración rápida se apagará y el electrodoméstico volverá a sus valores normales. Si no cancela manualmente la función de refrigeración rápida, ésta se cancelará automáticamente transcurridas dos horas o bien una vez el compartimento frigorífico alcance la temperatura deseada. En caso de apagón, esta función no se activará automáticamente con el restablecimiento del suministro eléctrico. 8. Indicador de refrigeración rápida Este icono parpadea de forma llamativa cuando la función de refrigeración rápida esté activa. 9. Función de bloqueo Pulse simultáneamente los botones de ajuste del congelador y ajuste del frigorífico y manténgalos pulsados durante 3 segundos para activar la función de bloqueo. No podrá seleccionar ninguna otra función en el panel de visualización mientras el bloqueo esté activo. Pulse de nuevo los botones de ajuste del congelador y ajuste del frigorífico simultáneamente y manténgalos pulsados durante 3 segundos para desactivar la función de bloqueo. 10. Función "Eco-Fuzzy" (modo especial de ahorro) Pulse el botón de congelación rápida y manténgalo pulsado durante 3 segundos para activar la función Eco Fuzzy. Al activar esta función, el frigorífico empezará a funcionar en el modo más económico durante un mínimo de 6 horas. El indicador del modo ahorro se iluminará. Pulse de nuevo el botón de congelación rápida y manténgalo pulsado durante 3 segundos para desactivar la función Eco Fuzzy. 15

21 ES 11. Indicador de alta temperatura/aviso de error Esta luz indicadora se enciende en caso de fallo de alta temperatura o aviso de error. 12. Indicador del modo ahorro El indicador del modo ahorro se enciende al ajustar el compartimento frigorífico a -18 ºC, y se apaga al seleccionar las funciones de congelación rápida o refrigeración rápida. 13. Indicador de humedad La luz indicadora se mantiene iluminada de forma permanente. Esta luz indica que los alimentos depositados en el frigorífico se conservan durante mucho tiempo en condiciones ideales de humedad. Refrigeración Instrucciones de uso Almacenamiento de los alimentos El compartimento frigorífico está destinado al almacenamiento de alimentos frescos y bebidas por un periodo de tiempo breve. Almacene los productos lácteos en el compartimento destinado a tal efecto. Las botellas pueden guardarse en el portabotellas o en el estante para botellas de la puerta. La carne cruda se conserva mejor en bolsas de polietileno depositadas en el segundo estante superior del frigorífico. Deje enfriar los alimentos y las bebidas calientes antes de introducirlos en el frigorífico. Se recomienda no depositar alimentos congelados sobre la tapa del cajón de verduras para su descongelación. Puede utilizar las demás bandejas para ese propósito. Atención El alcohol concentrado debe depositarse únicamente en posición vertical y firmemente cerrado. Atención No deposite en el electrodoméstico sustancias explosivas ni productos que contengan gases inflamables (botes de nata a presión, aerosoles, etc.). Existe riesgo de explosión. 16
22 ES Congelación Congelación de alimentos El área de congelación aparece marcada con el símbolo Puede utilizar la aplicación para congelar comida fresca como también para almacenar comida precongelada. Por favor, remítase a las recomendaciones provistas en el envase de sus alimentos. Atención No congele bebidas gaseosas, ya que las botellas pueden estallar cuando el líquido en su interior se congele. Tenga cuidado con productos congelados tales como cubitos de hielo de colores. No rebase la cantidad de alimentos que es capaz de congelar el frigorífico en 24 horas. Remítase al follero de características técnicas. Para mantener la calidad de los alimentos, la congelación de los mismos debe realizarse lo más rápidamente posible. De esa manera, no se excederá la capacidad de congelación y no aumentará la temperatura en el interior del congelador. Atención Mantenga los alimentos ya congelados separados de los colocados recientemente. Cuando introduzca alimentos calientes en el congelador, el compresor de refrigeración se mantendrá en funcionamiento hasta que estén completamente congelados, cosa que puede temporalmente provocar un enfriamiento excesivo del compartimento frigorífico. Puede resultar difícil abrir la puerta del congelador o del frigorífico justo después de haberla cerrado. No se preocupe. Ello es debido a la diferencia de presión, que se igualará y permitirá la normal apertura de la puerta en pocos minutos. Oirá un sonido de aspiración nada más cerrar la puerta. Esto es perfectamente normal. 17 Cubitos de hielo Instrucciones de uso Rellene la cubitera hasta 3/4 de su capacidad y colóquela en el congelador. Una vez el agua se haya transformado en hielo, puede sacar los cubitos. Nunca utilice objetos con punta o bordes afilados, como cuchillos o tenedores, para retirar los cubitos. Existe riesgo de lesiones! Deje que los cubitos se derritan ligeramente, o introduzca la parte inferior de la bandeja en agua caliente durante unos instantes. Deshielo del aparato Este electrodoméstico es del tipo sin escarcha. Por lo tanto, no se acumulará escarcha en la zona de almacenamiento de alimentos. No obstante, cada vez que sea necesario se iniciará automáticamente un proceso de deshielo de la zona de evaporación del electrodoméstico. El agua se vierte en un depósito situado en la parte trasera del aparato y se evapora automáticamente gracias al calor del compresor. Asegúrese de que dicho depósito está correctamente sujeto encima del compresor. Avisos Los ventiladores de los compartimentos congelador y frigorífico hacen circular aire frío. No introduzca nunca objetos a través del protector. No permita que los niños jueguen con los ventiladores de los compartimentos congelador y frigorífico. No deposite nunca productos que contengan gases inflamables (por ejemplo, dosificadores, aerosoles, etc.) ni sustancias explosivas. No cubra los estantes con ningún material protector que pueda obstruir la circulación del aire. No permita a los niños jugar con el electrodoméstico ni manipular sus mandos. No permita que se obstruyan los protectores de los ventiladores con el fin de obtener el mayor rendimiento posible del electrodoméstico. (Figuras 9 y 10) Advertencia Su electrodoméstico dispone de dos ventiladores de circulación que son fundamentales para el rendimiento del frigorífico. Asegúrese de que los ventiladores no se encuentran bloqueados (detenidos) o bloqueados por alimentos o paquetes. El entorpecimiento o bloqueo (detención) del ventilador puede derivar en un incremento de la temperatura interna del congelador (deshielo).
23 ES Sustitución de la bombilla interior (Figura 11) En caso de que la bombilla no funcione, es muy fácil sustituirla. En primer lugar, asegúrese de que el frigorífico/congelador está desconectado de la red eléctrica desenchufándolo de la toma. Tome un destornillador plano e insértelo sin forzar en la ranura izquierda entre la cubierta de la bombilla y la pared. A continuación gire el destornillador hacia la izquierda con cuidado hasta que note que la patilla izquierda de la cubierta se ha soltado. Repita el procedimiento con la ranura derecha, esta vez girando el destornillador hacia la derecha. Una vez aflojados ambos lados, podrá retirar la cubierta con total facilidad. Compruebe que la bombilla esté bien enroscada en el casquillo. Vuelva a enchufar el aparato a la toma de corriente. Si la luz sigue fallando, adquiera una bombilla de 15 vatios (máx.) de casquillo de rosca E14 y sustituya la antigua bombilla. Es preciso deshacerse con cuidado de la bombilla defectuosa. Si ha sustituido la bombilla, no olvide volver a colocar la cubierta en su posición. Asegúrese de que la cubierta encaje en su sitio correctamente. Conservación y limpieza Superficies interiores y exteriores Atención Desconecte el disyuntor o desenchufe el cable de alimentación siempre antes de proceder a la limpieza del aparato. Limpie el condensador situado en la parte posterior del electrodoméstico una vez al año mediante un cepillo o una aspiradora. La acumulación de polvo provoca un aumento del consumo energético. Verifique regularmente las juntas de la puerta. Limpie únicamente con agua y seque completamente. Limpieza de los accesorios Instrucciones de uso Estantes de la puerta Retire todos los alimentos de los estantes de la puerta. Levante la tapa del estante y retírela lateralmente. Levante el fondo del estante de la puerta para retirarlo. Recipiente de recogida (Depósito): Asegúrese de que el molde en la parte posterior del aparato esté siempre limpio. Separe del compresor el cierre del depósito ejerciendo una ligera presión, ayudándose para ello de una herramienta (un destornillador, por ejemplo), para poder retirar el depósito. Levante el depósito y secarlo con un trapo. Vuelva a colocarlo siguiendo los pasos en orden inverso. Cajón para frutas y verduras y otros cajones: Para limpiar un cajón, tire de él tanto como sea posible, inclínelo hacia arriba y, a continuación, extráigalo completamente (Figuras 7 y 8). Limpie el exterior con agua tibia y un detergente suave. No emplee nunca productos abrasivos o a base de agentes ácidos. Seque con un trapo el compartimento interior. Trate de evitar que el agua entre en contacto con las conexiones eléctricas del control de temperatura o de la luz interior. Si no se va a utilizar el aparato durante un largo periodo de tiempo, desconecte el cable de alimentación y retire todos los alimentos. Limpie el aparato y deje la puerta abierta. Para conservar el buen aspecto del electrodoméstico, se pueden abrillantar el exterior y los accesorios de la puerta con una cera a base de silicona. 18
MANUAL DE INSTRUCCIONES
 MANUAL DE INSTRUCCIONES MODELO SP2014 1 ÍNDICE SOUP MASTER Seguridad eléctrica Seguridad durante el uso Conozca su Soup Master Consejos de Uso Modo de Uso Limpieza y mantenimiento pag. 3 pag. 4 pag. 5
DESHUMIDIFICADOR MH 120 MANUAL DE INSTRUCCIONES. Gracias por haber elegido este producto. Por favor, lea este manual de instrucciones antes de usarlo.
 DESHUMIDIFICADOR MH 120 MANUAL DE INSTRUCCIONES Gracias por haber elegido este producto. Por favor, lea este manual de instrucciones antes de usarlo. INDICE Contenidos: Presentación del producto... 1 Instrucciones
M DJ SERIES. User Manual/Manual de Uso
 M DJ SERIES User Manual/Manual de Uso User Manual Installation 1. In order to enhance the cast function of listening to space sound, it is appropriate to set the center part of tweeter right to the position
Hairdryer. www.philips.com/welcome. Register your product and get support at HP8183 HP8182 HP8181 HP8180. Manual del usuario
 Register your product and get support at www.philips.com/welcome Hairdryer HP8183 HP8182 HP8181 HP8180 ES Manual del usuario Español Le felicitamos por su compra y le damos la bienvenida a Philips. Para
ENKVM-USBB. 2-Port USB KVM switch with Easy Switch and Cable. User Guide
 ENKVM-USBB 2-Port USB KVM switch with Easy Switch and Cable User Guide i Package Contents 1 ENKVM-USBB 2-Port USB KVM Switch with Easy Switch and Cable 1 User Guide Requirements Console A VGA, SVGA, XGA,
Refrigerador con revestimiento de hielo, Modelo MK
 Dinamarca DK-6705 Esbjerg Ø Tel.: +45 79 14 22 22 Fax: +45 79 14 22 55 Correo electrónico: export@vestfrost.dk Refrigerador con revestimiento de hielo, Modelo MK ÍNDICE PÁGINA 1 INFORMACIÓN GENERAL 3 1.1
Conditioning Exercises: Standing
 Conditioning Exercises: Standing Do all these exercises slowly. Do not hold your breath during these exercises. If unusual pain occurs in your joints or muscles while you are exercising, do not continue
Sierra Security System
 Using Your SpreadNet Accessories With Your Sierra Security System Uso de Sus Accesorios SpreadNet Con Su Sistema de Seguridad Sierra SN990-KEYPAD SN961-KEYFOB SN991-REMOTE 1 SN990-KEYPAD The SN990-KEYPAD
MODEL: 11222895 / MODELO: 11222895 COMPUTER DESK ESCRITORIO DE COMPUTADORA
 MODEL: 222895 / MODELO: 222895 COMPUTER DESK ESCRITORIO DE COMPUTADORA NO 2 3 4 5 6 7 8 9 PARTS LIST AND HARDWARE LISTA DE PARTES Y ACCESORIOS HARDWARE LIST LISTA DE PARTES Y ACCESORIOS CHIPBOARD SCREW
Crear alarma GATE. Aparecerá una ventana emergente para crear alarma.
 Crear alarma GATE Para crear una alarma, accede a través del menú principal de myhome.wattio.com a Seguridad, posteriormente arriba a la derecha haz click en Alarmas. En esta pantalla, en el menú izquierdo,
Fácil reparación de Packard Bell
 Fácil reparación de Packard Bell Unidad CD-ROM / DVD Importantes instrucciones de comprobación de seguridad Tiene que leer todas las instrucciones con cuidado antes de que comience a trabajar y cumplir
ST8-U5. 8 Bay External Storage Enclosure
 ST8-U5 8 Bay External Storage Enclosure Prólogo Manual de usuario de STARDOM SOHOTANK Serie Acerca de este manual Gracias por haber adquirido los productos STARDOM. Este manual presenta los productos de
Usted ha realizado una gran inversión y vale la pena cuidarla! Para garantizar que usted disfrute de muchos años de operaciones libres de problemas,
 FUENTES DE AGUA Usted ha realizado una gran inversión y vale la pena cuidarla! Para garantizar que usted disfrute de muchos años de operaciones libres de problemas, hemos desarrollado este manual de instrucciones
Disco duro ATA. Nota: Encontrarás instrucciones en línea en http://www.apple.com/support/doityourself/.
 Español Instrucciones para la sustitución Disco duro ATA AppleCare Sigue atentamente las instrucciones de este documento, de lo contrario podrías dañar tu equipo e invalidar la garantía. Nota: Encontrarás
MANUAL DE USO CAFETERA ELÉCTRICA PERCOLADORA Modelo HEJA203DH
 MANUAL DE USO CAFETERA ELÉCTRICA PERCOLADORA Modelo HEJA203DH Español Manual de Uso V2 Importantes medidas de seguridad Cuando se utilizan aparatos eléctricos, se deben respetar ciertas medidas de seguridad,
INSTALLATION INSTRUCTIONS
 Brix Ratio Check Instructions for ColdFusion and Flavor Overload Units INSTALLATION INSTRUCTIONS Brix Ratio Check Instructions For Coldfusion, Flavorfusion and Flavor Overload Units Kit P/N 629096865 SAFETY
Process Control Work Instructions Control de Procesos Instrucciones de Trabajo. for / para
 Process Control Work Instructions Control de Procesos Instrucciones de Trabajo for / para 629096898 VFCB Kit Relay Cable Harness Assy Ensamblar el Kit del Arnés de Cables del Relevador Publication Number:
SUSTITUCIÓN DE LA BOMBILLA O LED (según el modelo)
") PRIMER USO Conectar el aparato a la red eléctrica. En algunos modelos podría activarse una señal acústica. Esto significa que se ha disparado la alarma de temperatura: pulsar la tecla de apagado de la
PRIMER USO Conectar el aparato a la red eléctrica. En algunos modelos podría activarse una señal acústica. Esto significa que se ha disparado la alarma de temperatura: pulsar la tecla de apagado de la
Instrucciones de uso SECADOR DE PELO. SECADOR DE PELO ES página. Type M3001
 Instrucciones de uso SECADOR DE PELO SECADOR DE PELO ES página 1 Type M3001 GUÍA ILUSTRATIVA [A] 1 2 9 8 3 7 4 5 6 DATOS TÉCNICOS I Manual de instrucciones para el uso del secador de pelo Estimado cliente:
Lump Sum Final Check Contribution to Deferred Compensation
 Memo To: ERF Members The Employees Retirement Fund has been asked by Deferred Compensation to provide everyone that has signed up to retire with the attached information. Please read the information from
Food can take some crazy twists and turns through. Food can take some crazy twists and turns through your operation, so it s your
 Let It Flow Food can take some crazy twists and turns through Food can take some crazy twists and turns through your operation, so it s your responsibility your operation, to make sure so it does it s
MODELO BRD-887 RADIO RELOJ DESPERTADOR CON DOBLE ALARMA
 AVISO SOBRE SALPICADURAS Y VENTILACIÓN MODELO BRD-887 RADIO RELOJ DESPERTADOR CON DOBLE ALARMA MEDIDAS DE SEGURIDAD ESTE APARATO NO DEBE QUEDAR EXPUESTO A GOTAS NI A SALPICADURAS. TAMPOCO DEBERÁ COLOCAR
Quick Installation Guide TU2-DVIV H/W: V1.0R
 Quick Installation Guide TU2-DVIV H/W: V1.0R Table Table of Contents of Contents Español... 1. Antes de iniciar... 2. Cómo se instala... 1 1 3 Troubleshooting... 6 Version 06.27.2008 1. Antes de iniciar
ARMARIOS PARA INSTALACIONES INTEGRADAS ENCLOSURES FOR INTEGRATED INSTALATIONS
 Wall mounted A605002 cabinet Wall mounted A607002 cabinet Wall mounted A307002 cabinet Wall mounted A212825 wifi cabinet Armario mural plano A605002 Armario mural plano A607002 Armario mural plano A307002
MANUAL EASYCHAIR. A) Ingresar su nombre de usuario y password, si ya tiene una cuenta registrada Ó
 Ingresar su nombre de usuario y password, si ya tiene una cuenta registrada Ó") MANUAL EASYCHAIR La URL para enviar su propuesta a la convocatoria es: https://easychair.org/conferences/?conf=genconciencia2015 Donde aparece la siguiente pantalla: Se encuentran dos opciones: A) Ingresar
MANUAL EASYCHAIR La URL para enviar su propuesta a la convocatoria es: https://easychair.org/conferences/?conf=genconciencia2015 Donde aparece la siguiente pantalla: Se encuentran dos opciones: A) Ingresar
Mantenimiento. Mantenimiento
 Mantenimiento Esta sección incluye: "Carga de tinta" en la página 7-32 "Vaciado de la bandeja de desechos" en la página 7-36 "Sustitución del kit de mantenimiento" en la página 7-39 "Limpieza de la cuchilla
HELADERA FB-RA01. Manual de Instrucciones
 HELADERA FB-RA01 Manual de Instrucciones Antes de utilizar, por favor, lea detenidamente este manual. Antes de comenzar a utilizar la unidad Limpie la aplicación, sea cuidadoso especialmente al limpiar
Straightener. www.philips.com/welcome HP8309/00 HP8310/00. Register your product and get support at. Manual del usuario
 Register your product and get support at www.philips.com/welcome Straightener HP8309/00 HP8310/00 ES Manual del usuario d e c b a Español Le felicitamos por su compra y le damos la bienvenida a Philips.
INSTRUCCIONES DE INSTALACIÓN Y RECARGA CISS HP CARTUCHO SERIE 1
 Antes de empezar Es muy importante que no realice ninguna acción hasta leer completamente las instrucciones. Léalas de forma detenida y completa!!! Es muy importante que compruebe que su impresora se encuentra
Router Wi-Fi N150 (N150R)
") Easy, Reliable & Secure Guía de instalación Router Wi-Fi N150 (N150R) Marcas comerciales Las marcas y nombres de productos son marcas comerciales o marcas comerciales registradas por sus respectivos titulares.
Easy, Reliable & Secure Guía de instalación Router Wi-Fi N150 (N150R) Marcas comerciales Las marcas y nombres de productos son marcas comerciales o marcas comerciales registradas por sus respectivos titulares.
EP-2906 Manual de instalación
 EP-2906 Manual de instalación Con el botón situado a la izquierda se configura en el modo de cliente y de la derecha es el modo de Punto de acceso AP (nota: El USB es sólo para la función de fuente de
Easy Repair de Packard Bell
 Easy Repair de Packard Bell Serie EasyNote MZ Instrucciones de reparación de la memoria 7429180004 7429180004 Versión de documento: 1.0 - Mayo 2007 www.packardbell.com Importantes instrucciones de comprobación
GUÍA DE USUARIO USER GUIDE 2.1 Multimedia Speaker System Design Line APPSP2102
 GUÍA DE USUARIO USER GUIDE 2.1 Multimedia Speaker System Design Line APPSP2102 Gracias por adquirir los Altavoces Multimedia 2.1 de Approx. Podrá conectar sus altavoces a cualquier ordenador, walkman,
 CKFDV- 01 1 1 5 6 6 5 2 4 8 3 7 2 8 3 7 4 C:*El condensador es opcional de acuerdo a diferentes modelos de compresores ADVERTENCIAS / PRECAUCIONES DE SEGURIDAD Para evitar lesiones físicas a personas
Rejilla salida de aire Rejilla entrada de aire
 Calentador de Ambiente K-CAG20 MANU AL DE USUAR IO Instrucciones Por favor conserve estas instrucciones. Lea este manual de usuario cuidadosamente para que se familiarice completamente con su nuevo CALENTADOR
Read all instructions BEFORE assembly and USE of product. KEEP INSTRUCTIONS FOR FUTURE USE.
 Read all instructions BEFORE assembly and USE of product. KEEP INSTRUCTIONS FOR FUTURE USE. Lea todas las instrucciones ANTES de armar y USAR este producto. GUARDE LAS INSTRUCCIONES PARA USO FUTURO. 2013
FCC Information : Warning: RF warning statement:
 FCC Information : This device complies with Part 15 of the FCC Rules. Operation is subject to the following two conditions: (1) This device may not cause harmful interference, and (2) This device must
PLAN DE MANTENIMIENTO DE BOMBAS DOLL S.A.U. DOLL S.A.U. PUMPS MAINTENANCE PLANNING.
 PLAN DE MANTENIMIENTO DE BOMBAS DOLL S.A.U. DOLL S.A.U. PUMPS MAINTENANCE PLANNING. RODETE IMPELLER BRIDA CIERRE MECÁNICO CLAMP CIERRE MECÁNICO APLICACIÓN DE LAS OPERACIONES DE MANTENIMIENTO PARA BOMBAS
ROCK N STEREO SOUND DESK
 Read and save these instructions ROCK N STEREO SOUND DESK RTA-M1102-BK INSTRUCTIONS TABLE OF CONTENTS PACKAGE INCLUDES Package Includes... 2 Specifications... 2 Product Parts List... 3 1 2 3 Product Details...
PRECAUCIONES DE SEGURIDAD
 PRECAUCIONES DE SEGURIDAD SÍMBOLO DE PELIGRO SÍMBOLO DE ADVERTENCIA Este icono recuerda a los usuarios la existencia de voltaje peligroso. ADVERTENCIA: Este icono recuerda a los usuarios la importancia
La instalación manual del termostato electrónico para la calefacción o refrigeración TH-7281B
 La instalación manual del termostato electrónico para la calefacción o refrigeración TH-7281B PREPARACIÓN: Antes de instalar este termostato, revise su esquema de cableado del sistema. Si su sistema no
Instrucciones de uso SECADOR DE PELO. SECADOR DE PELO ES página. Type I6401
 Instrucciones de uso SECADOR DE PELO SECADOR DE PELO ES página 1 Type I6401 1 [A] 6B 6 6A 5 5A 4 3C 3 3B 1 3A 2 7B 7A 7 TYPE I6401 220-240 V 50/60 Hz 1680-2000 W Manual de instrucciones para el uso del
KAISSA Manual Rápido De Usuario. Rev 1.0
 KAISSA Manual Rápido De Usuario Rev 1.0 Ante todo gracias por adquirir el innovador reloj de ajedrez KAISSA, diseñado bajo la filosofía del Diseño Para Todos. KAISSA tiene dos modos de funcionamiento principales
Agustiniano Ciudad Salitre School Computer Science Support Guide - 2015 Second grade First term
 Agustiniano Ciudad Salitre School Computer Science Support Guide - 2015 Second grade First term UNIDAD TEMATICA: INTERFAZ DE WINDOWS LOGRO: Reconoce la interfaz de Windows para ubicar y acceder a los programas,
MANUAL DE INSTRUCCIONES PARA EL REFRIGERADOR DE BEBIDAS MODELO N : BC36
 MANUAL DE INSTRUCCIONES PARA EL REFRIGERADOR DE BEBIDAS MODELO N : BC36 1 Gracias por comprar nuestro refrigerador de bebidas, esperamos que nuestro producto avanzado le dé a su bebida un distintivo sabor
Manual de Instrucciones Campana Cilíndrica Isla de 35mm
 Manual de Instrucciones Campana Cilíndrica Isla de 35mm Model: 21-19AI-35I3288E1 CONTENIDO 1.Aviso 2.Precaución 3..Advertencia 5.. Operación 6 Mantenimiento 7 Anormalidades y soluciones AVISO Lea atentamente
Manual de Instrucciones
 BSPORT-10-N-R-V-A PULSERA DEPORTIVA-BLUETOOTH Manual de Instrucciones FUNCIONES Y CONTROLES Pulsar el botón de encendido durante 3 segundos para encender el dispositivo. BATERÍA El dispositivo cuenta con
MANUAL DE INSTRUCCIONES OLLA ARROCERA ED-4588T
 MANUAL DE INSTRUCCIONES OLLA ARROCERA ED-4588T ESTIMADO CLIENTE Con el fin de que obtenga el mayor desempeño de su producto, por favor lea este manual de instrucciones cuidadosamente antes de comenzar
BAI-220 AURICULAR INALÁMBRICO
 BAI-220 AURICULAR INALÁMBRICO Manual de usuario ESPECIFICACIONES TÉCNICAS EMISOR Frecuencia: 86 ± 0.5 MHz Modulación: FM Distancia de emisión: 30 m. Recepción de cualquier equipo de audio y video con salida
Unidad óptica. Aviso : A lo largo de este proceso, mantén las piezas pequeñas fuera del alcance de los niños.
 Español Instrucciones para la sustitución Unidad óptica AppleCare Sigue atentamente las instrucciones de este documento, de lo contrario podrías dañar tu equipo e invalidar la garantía. Nota: Encontrarás
ES-S6A Sirena de interior. www.etiger.com
 ES-S6A Sirena de interior www.etiger.com ES Características La ES-S6A puede utilizarse como sirena adicional conectada a su sistema de alarma o como sirena independiente conectada a un mando a distancia
A I RTRONIC. Manual de usuario User Manual.
 A I RTRONIC Manual de usuario User Manual AIRTRONIC Partes que incluye Parts inlcuded 1 Goldeneye Airtonic Unit 1 Power supply Input: 100-240 V ~ 50-60 Hz Output: 12 VDC, max. 1000 ma 12 W max. 1 Dermograph
Hair Styler. www.philips.com/welcome. Register your product and get support at HP4698/22. Manual del usuario
 Register your product and get support at www.philips.com/welcome Hair Styler HP4698/22 ES Manual del usuario e f h g i j d c o p n m l b q k a r s t v u Español Le felicitamos por su compra y le damos
happy safari travel cot cuna de viaje happy safari guía para el usuario importante. retenga para referencia futura - lea con cuidado.
 happy safari travel cot user guide important. retain for future reference - read carefully cuna de viaje happy safari guía para el usuario importante. retenga para referencia futura - lea con cuidado.
REFRIGERADOR FREE IT
 REFRIGERADOR FREE IT El aparato está diseñado para ser empotrado. Instale el aparato en muebles No utilice alargadores ni adaptadores. El fabricante declina cualquier responsabilidad por daños a personas,
GUÍA DE USUARIO PC-331117. Bienvenidos al mundo Perfect Choice. Antes de comenzar a usar el producto es importante que leas esta guía.
 GUÍA DE USUARIO PC-331117 Bienvenidos al mundo Perfect Choice Antes de comenzar a usar el producto es importante que leas esta guía. Conexión 1. Inserta el transmisor en el conector para encendedor de
PROTOCOLO DE MANIPULACIÓN DE SERVIDORES ANEXO D
 ANEXO D RECOMENDACIONES DE SEGURIDAD Antes de manipular cualquier SERVIDOR es importante tener en cuenta las siguientes medidas de seguridad. ATENCIÓN! No portar anillos, ni joyas Utilizar Manilla Antiestática
MANUAL DE INSTRUCCIONES REFRIGERADOR DE 2 PUERTAS NV-5643, NV-5644S
 MANUAL DE INSTRUCCIONES REFRIGERADOR DE 2 PUERTAS NV-5643, NV-5644S ESTIMADO CLIENTE Con el fin de que obtenga el mayor desempeño de su producto, por favor lea este manual de instrucciones cuidadosamente
SIGUIENDO LOS REQUISITOS ESTABLECIDOS EN LA NORMA ISO 14001 Y CONOCIENDO LAS CARACTERISTICAS DE LA EMPRESA CARTONAJES MIGUEL Y MATEO EL ALUMNO DEBERA
 SIGUIENDO LOS REQUISITOS ESTABLECIDOS EN LA NORMA ISO 14001 Y CONOCIENDO LAS CARACTERISTICAS DE LA EMPRESA CARTONAJES MIGUEL Y MATEO EL ALUMNO DEBERA ELABORAR LA POLITICA AMBIENTAL PDF File: Siguiendo
GUÍA DEL USUARIO Y CONSEJOS PARA EL AHORRO DE ENERGÍA
 GUÍA DEL USUARIO Y CONSEJOS PARA EL AHORRO DE ENERGÍA Deshumidificador por rotor desecante Modelo: DD8062FW Lea esta guía En su interior encontrará muchos consejos útiles sobre cómo utilizar y mantener
Medidor de consumo LEGO
 Medidor de consumo LEGO Primeros pasos El Medidor de consumo se compone de dos partes: La Pantalla de consumo LEGO y el Acumulador eléctrico LEGO. El Acumulador eléctrico encaja en la parte inferior de
appkbws03 Wireless Multimedia Keyboard Set Black
 appkbws03 Wireless Multimedia Keyboard Set Black Español 01 English 06 Capítulo 1. Introducción y descripción del producto Gracias por elegir el teclado inalámbrico APPKBWS03. Descripción del producto
SFD-200-N-B DESPERTADOR-PROYECTOR-CON VOZ. Manual de instrucciones
 SFD-200-N-B DESPERTADOR-PROYECTOR-CON VOZ Manual de instrucciones Funciones: - Proyección de la hora - Proyección controlada por sonidos y vibraciones (palmada, etc.) - Pantalla retroiluminada azul - Hora
PRODUCT ASSEMBLY INSTRUCTIONS
 PRODUCT ASSEMBLY INSTRUCTIONS KARLSEN SWIVEL GLIDER RECLINER SAM S CLUB #402411 BERKLINE #4160061 PLEASE READ THIS BOOKLET CONTAINS IMPORTANT INFORMATION. KEEP FOR FUTURE REFERENCE. Page (Pagina) 1 of
Creating your Single Sign-On Account for the PowerSchool Parent Portal
 Creating your Single Sign-On Account for the PowerSchool Parent Portal Welcome to the Parent Single Sign-On. What does that mean? Parent Single Sign-On offers a number of benefits, including access to
KMR SCA-05 Mounting Instructions Instrucción de Montaje Instruções de Montagem 0899.4897
 0899.4897 KMR SCA-05 Mounting Instructions Instrucción de Montaje Instruções de Montagem 0899.4897 KMR SCA-05 Mounting Instructions Instrucción de Montaje Instruções de Montagem The KMR SCA-05 kit is a
Software TRENDnetVIEW Pro. Guía de instalación rápida de TRENDnetVIEW Pro (1)
") Software TRENDnetVIEW Pro Guía de instalación rápida de TRENDnetVIEW Pro (1) TRENDnetVIEW Pro/10.08.2013 Índice Requisitos del software de gestión TRENDnetVIEW Pro... 19 Instalación de TRENDnetVIEW Pro...
Software TRENDnetVIEW Pro Guía de instalación rápida de TRENDnetVIEW Pro (1) TRENDnetVIEW Pro/10.08.2013 Índice Requisitos del software de gestión TRENDnetVIEW Pro... 19 Instalación de TRENDnetVIEW Pro...
Unidad de alimentación. Aviso : A lo largo de este proceso, mantén las piezas pequeñas fuera del alcance de los niños.
 Español Instrucciones para la sustitución Unidad de alimentación AppleCare Sigue atentamente las instrucciones de este documento, de lo contrario podrías dañar tu equipo e invalidar la garantía. Nota:
Manual de Instrucciones. Bebé al volante! 91-002430-004-000
 Manual de Instrucciones Bebé al volante! 2010 91-002430-004-000 Queridos padres: En VTech sabemos que los niños tienen la capacidad de hacer grandes cosas. Ésta es la razón por la que nuestros juguetes
A W. Product Label Identification. Etiqueta de identificación del producto. Andersen
 Product Label Identification Etiqueta de identificación for Andersen Windows and Patio Doors para puertas para patio y ventanas de Andersen Use this document to locate product identification () of your
PEQUEBOLA MANUAL DE INSTRUCCIONES. VTECH Impreso en China 91-01373-002
 PEQUEBOLA MANUAL DE INSTRUCCIONES VTECH Impreso en China 91-01373-002 Queridos padres: En VTECH sabemos que los niños tienen la capacidad de hacer grandes cosas. Ésta es la razón por la que nuestros juguetes
DIAMOND Gear Company, LTD. an ERIKS Company. Installation, Maintenance, & Operation Manual DECLUTCHABLE WORM GEAR
 DIAMOND Gear Company, LTD. an ERIKS Company Installation, Maintenance, & Operation Manual 2013 INSTRUCTIONS This is an instructional manual which provides general installation, operation, and maintenance
Welcome to lesson 2 of the The Spanish Cat Home learning Spanish course.
 Welcome to lesson 2 of the The Spanish Cat Home learning Spanish course. Bienvenidos a la lección dos. The first part of this lesson consists in this audio lesson, and then we have some grammar for you
GARAGE DOOR OPENER CONNECTIVITY HUB QUICK START GUIDE
 GARAGE DOOR OPENER CONNECTIVITY HUB QUICK START GUIDE Thank you for purchasing a Craftsman garage door opener Connectivity Hub enabled with AssureLink technology. Once you have created your account and
EM1037 Conmnutador KVM de 2 puertos USB
 EM1037 Conmnutador KVM de 2 puertos USB Cómo se conecta a los Puertos USB: El teclado se debe enchufar en el puerto USB superior. El ratón se debe enchufar en el puerto USB inferior. 2 ESPAÑOL EM1037 -
PRODUCT ASSEMBLY INSTRUCTIONS
 PRODUCT ASSEMBLY INSTRUCTIONS HAUGEN SOFA SAM S CLUB # 610256 BERKLINE #2450438 PLEASE READ THIS BOOKLET CONTAINS IMPORTANT INFORMATION. KEEP FOR FUTURE REFERENCE. Page 1 of 10 CUSTOMER SERVICE INFORMATION
DECLARACION DE CONFORMIDAD DECLARATION OF CONFORMITY
 DECLARACION DE CONFORMIDAD DECLARATION OF CONFORMITY La Empresa: BASOR ELECTRIC, S.A. The Company: BASOR ELECTRIC, S.A. Declara que el producto: Declares that the product: Instalado de acuerdo con las
SIMILAC ADVANCE Mixing Instructions for Concentrating 20 calorie per ounce formula. To make 22, 24, 27, and 30 kcal/oz. formula
 SIMILAC ADVANCE Mixing Instructions for Concentrating 20 calorie per ounce formula To make 22, 24, 27, and 30 kcal/oz. formula Preparing 22 Calorie Per Ounce Formula From Powder (Using Similac Advance
Manual de Instrucciones
 3626H-Spanish_Manuals 7/6/10 1:00 PM Page 1 Nivel Láser para Baldosas y Pisos Modelo N.º 40-6616 Manual de Instrucciones Lo felicitamos por haber elegido este Nivel Láser para Baldosas y Pisos. Le sugerimos
Guía de Buenas Prácticas de Ahorro Energético
 CALEFACCIÓN: Evitar abrir las ventanas con la calefacción encendida. Para ventilar la casa son suficientes 10 ó 15 minutos. No tapar las fuentes de calor con cortinas, muebles o elementos similares. Instalar
Aire Acondicionado tipo split
 Aire Acondicionado tipo split Manual de instrucciones, Listado de Servicios Técnicos Autorizados y Certificado de Garantía ATS45C08 ATS45H08 soles y aero- técnico ATMA. - Nombre y función Control
ESTUFA CON LLAMA AZUL ADVERTENCIAS
 Datos técnicos ESTUFA CON LLAMA AZUL Tipo Categoría Potencia Potencia Potencia Presión máxima media mínima del gas G30/G31 I3+ KW g/h KW g/h KW g/h 4.20 305 2.85 207 1,50 109 28 30 mbar Este aparato funciona
Instrucciones de uso. Secador de cabello
 Instrucciones de uso Secador de cabello E 8 1 7 6 2 3 4 5 2 E Secador de cabello Conexión a la red eléctrica Debe conectar este aparato solamente a una toma de tierra instalada según las normas en vigor.
Destructora de papel S7-CD de corte en tiras
 Destructora de papel S7-CD de corte en tiras Manual 91605 Gracias por comprar este producto de alta calidad. Por favor, lea detenidamente estas instrucciones de funcionamiento antes de utilizar este dispositivo
Dicore Aire Acondicionado
 Dicore Aire Acondicionado MANUAL DE USUARIO ASDGR09AYIRDC ASDGR09IAYIRDC ASDGR12AYIRDC ASDGR12IAYIRDC Gracia por elegir nuestro aire acondicionado para un correcto funcionamiento, por favor lea detenidamente
Humidificador MiniDry160. Manual del usuario
 Humidificador MiniDry160 Manual del usuario Gracias por elegir un deshumidificador FRAL para proveer a usted y a su familia con las necesidades de confort del hogar. Este manual de instrucciones le proporcionará
guía rápida del usuario www.redcx.com
 SD guía rápida del usuario www.redcx.com Información de Seguridad Este sistema fue diseñado y testeado para alcanzar los últimos estándares de seguridad, sin embargo, para asegurar su buen funcionamiento,
Quick Installation Guide Internet Setup
 CBR-970 Wireless-N Broadband Router www.cnet.com.tw Established in California, U.S.A. since 1987 Quick Installation Guide Internet Setup What s included in the box CBR-970 Wireless N Broadband Router Quick
MANUAL DE USO Y CUIDADO CONGELADORES HORIZONTALES WHA21BAD WHA25BAD-WHA31BAD-WHA46BAD
 MANUAL DE USO Y CUIDADO CONGELADORES HORIZONTALES WHA21BAD WHA25BAD-WHA31BAD-WHA46BAD ANTES DE USAR EL APARATO Este aparato está destinado para ser utilizado en aplicaciones domésticas y similares, como
CONTROL REMOTO DE AIRE ACONDICIONADO ORION. Instrucciones de Montaje,Instalación y Funcionamiento para el INSTALADOR y USUARIO
 CONTROL REMOTO DE AIRE ACONDICIONADO ORION ES Instrucciones de Montaje,Instalación y Funcionamiento para el INSTALADOR y USUARIO ÍNDICE INDICACIONES IMPORTANTES... 1 DESCRIPCIÓN DE BOTONES... 2 CONTROL
INSTRUCCIONES GENERALES PARA LUMINARIAS DE USO DOMÉSTICO
 INSTRUCCIONES GENERALES PARA LUMINARIAS DE USO DOMÉSTICO INSTRUCCIONES GENERALES PARA LUMINARIAS DE USO DOMÉSTICO INSTRUCCIONES DE SEGURIDAD El fabricante aconseja un uso correcto de los aparatos de iluminación!
Fácil reparación de Packard Bell
 Fácil reparación de Packard Bell Módem Importantes instrucciones de comprobación de seguridad Tiene que leer todas las instrucciones con cuidado antes de que comience a trabajar y cumplir con todos los
PRECAUCIONES IMPORTANTES
 Licuadora K-BL500G MANU AL DE USUAR IO Instrucciones Por favor conserve estas instrucciones. Lea este manual de usuario cuidadosamente para que se familiarice completamente con su nueva LICUADORA antes
EM6053 Vídeo sobre UTP 200m
 EM6053 Vídeo sobre UTP 200m EM6053 Vídeo sobre UTP 200m 2 ESPAÑOL Contenidos Contenidos... 2 1.0 Introducción... 2 1.1 Functions and features... 2 1.2 Contenido del paquete... 3 2.0 Lo que necesita en
SECADOR DE PELO MODELO: JF-5030 DC
 SECADOR DE PELO MODELO: JF-5030 DC ATENCIÓN! LEA ATENTAMENTE ESTE MANUAL DE INSTRUCCIONES ANTES DE PONER EN FUNCIONAMIENTO SU NUEVO SECADOR DE PELO Y CONSÉRVELO PARA FUTURAS CONSULTAS. Estimado Cliente,
UTILIZACIÓN ADVERTENCIAS:
 UTILIZACIÓN ADVERTENCIAS: Cuando se enciende la placa por primera vez, o cuando ha permanecido apagada durante un largo periodo de tiempo, debe secarse durante 30 minutos con el mando en la posición n
Installation Guide. Green momit
 Installation Guide Green momit 2015 www.momit.com momit Deviceses Gateway: Model 1 and 2 Wall option The momit Gateway allows your thermostat to be connected to the Internet. It s included in the Starter
C100 Manual de Instrucciones
 C100 Manual de Instrucciones Lea estas instrucciones y las indicaciones de seguridad antes de poner en funcionamiento el aparato! PRECAUCIONES DE SEGURIDAD IMPORTANTES Al utilizar aparatos eléctricos,
Manual de instrucciones de uso del Data logger LOG1O
 C/ Mayor, 53 - Bajo 02500 Tobarra Albacete-España Tel. : +34 967 543 548 Fax: +34 967 543 542 info@pce-iberica.es Manual de instrucciones de uso del Data logger LOG1O 1. Introducción Estimado cliente,
MANUAL DE INSTRUCCIONES
 MANUAL DE INSTRUCCIONES SANDWICHERA Modelo: SL-SM6178 www.smartlife.com.uy Importado, distribuido y garantizado por Visuar Uruguay S.A. Ruta 101 Km. 28.600, Canelones, Uruguay RUT N 216175440017 1 IMPORTANTES