ZooMI CaR SEaT InSTRUCTIonS
|
|
|
- Juan Carlos Gómez Moreno
- hace 8 años
- Vistas:
Transcripción
1 ZooMI CaR SEaT InSTRUCTIonS E Instrucciones del asiento de coche del Zoomi GUaRanTEE E Garantía de 4 años válida sólo en Reino Unido e Irlanda

2 IMPORTANT: READ THESE INSTRUCTIONS CAREFULLY GB BEFORE USE AND KEEP THEM FOR FUTURE REFERENCE. YOUR CHILD S SAFETY MAY BE AFFECTED IF YOU DO NOT FOLLOW THESE INSTRUCTIONS user guide Thank you for choosing a Cosatto product. Please take a little time to read the important safety notes detailed below. This will ensure many years of happy, safe use. The instruction manual should be kept safely with child car seat for its life period: There is a pocket on the back of the seat fabric cover for storage of instruction manual. safety: take note WARNING: A CHILDS SAFETY IS YOUR RESPONSIBILITY This child car seat has been approved for mass group 1, 2 & 3 which is suitable for transportation in cars of children from 9kg (approximately 9 months old) up to 36 kg (approximately 11 years old). WARNING: After an accident the child car seat should be replaced. WARNING: NEVER use this child car seat on side facing vehicle seat. WARNING: NEVER use this child car seat on passenger seat fitted with active airbag. WARNING: NEVER leave your child unattended, even for the shortest time. WARNING: ALWAYS secure your child with the safety harness when using this child car seat. WARNING: DO NOT attempt to dismantle, modify or add to any part of the child car seat or change the way your vehicle seat belts are made or used. WARNING: Any rigid items and plastic parts of the child car seat must be so located and installed that they are not liable, during everyday use of the vehicle, to become trapped by a movable seat or in a door of vehicle. WARNING: If any load bearing points other than those described in the instructions are used, this can significantly reduce the protection factor of the child car seat. WARNING: DO NOT use the child car seat in the home. It has not been designed for home use and should only be used in your car. The child car seat must always be placed in a forward facing position. Always make sure that the child car seat harness and vehicle belt are correctly tensioned to ensure maximum protection for your child. The buckle has been designed to be released quickly in an emergency. IT IS NOT CHILD PROOF. More inquisitive children might learn to undo the buckle. Children should be told never to play with it or any other part of the child car seat. Never use any replacement parts other than those that are approved by Cosatto. The lap belt must be used well down in such a way as to properly secure the pelvis of the child. Never use the child car seat without its fabric cover because the seat cover constitutes as an integral part of the child car seat performance. The seat cover should not be replaced with any other than the ones recommended by Cosatto. Safely secure any luggage and other objects that might cause injury to the occupant of the child car seat in the event of a crash. After an accident, replace your child car seat and the vehicle seat belts. Although they may look undamaged, they may not protect your child as well as they should.

3 Cosatto advise that child car seats should not be brought or sold second-hand. Many seats sold through local advertising and car-boot sales have been found to be dangerous. Prevent harness/vehicle belt from getting trapped between car doors or rubbing against sharp parts of the seat or body. If the harness/vehicle belts becomes cut or frayed, replace it before travelling. If the vehicle has been left in the sun for a long time, check the seat cover and make sure it is not too hot before placing the child in the child car seat. Security is only guaranteed if the child car seat is fitted in accordance with these instructions. Failure to comply with the above instructions will automatically void the warranty and exempt Cosatto from any liability. storage of instruction manual The instruction manual should be kept safely with child car seat for its life period: There is a pocket on the back of the seat fabric cover for storage of instruction manual. notice: 1 This is a Universal child restraint.it is approved to Regulation No.44,04 series of amendments, for general use in vehicles and it will fit most, but not all, car seats. 2 A correct fit is likely if the vehicle manufacturer has declared in the vehicle handbook that the vehicle is capable of accepting a Universal child restraint for this age group. 3 This child restraint has been classified as Universal under more stringent conditions as those which applied to earlier designs which do not carry this notice. 4 This child restraint is only suitable if the vehicle is fitted with a type approved lap/3 point/static/ with retractor safety belt, in compliance with standard UN / ECE Regulation No.16 or other equivalent standards. 5 lf in doubt, consult either the child restraint manufacturer or retailer.

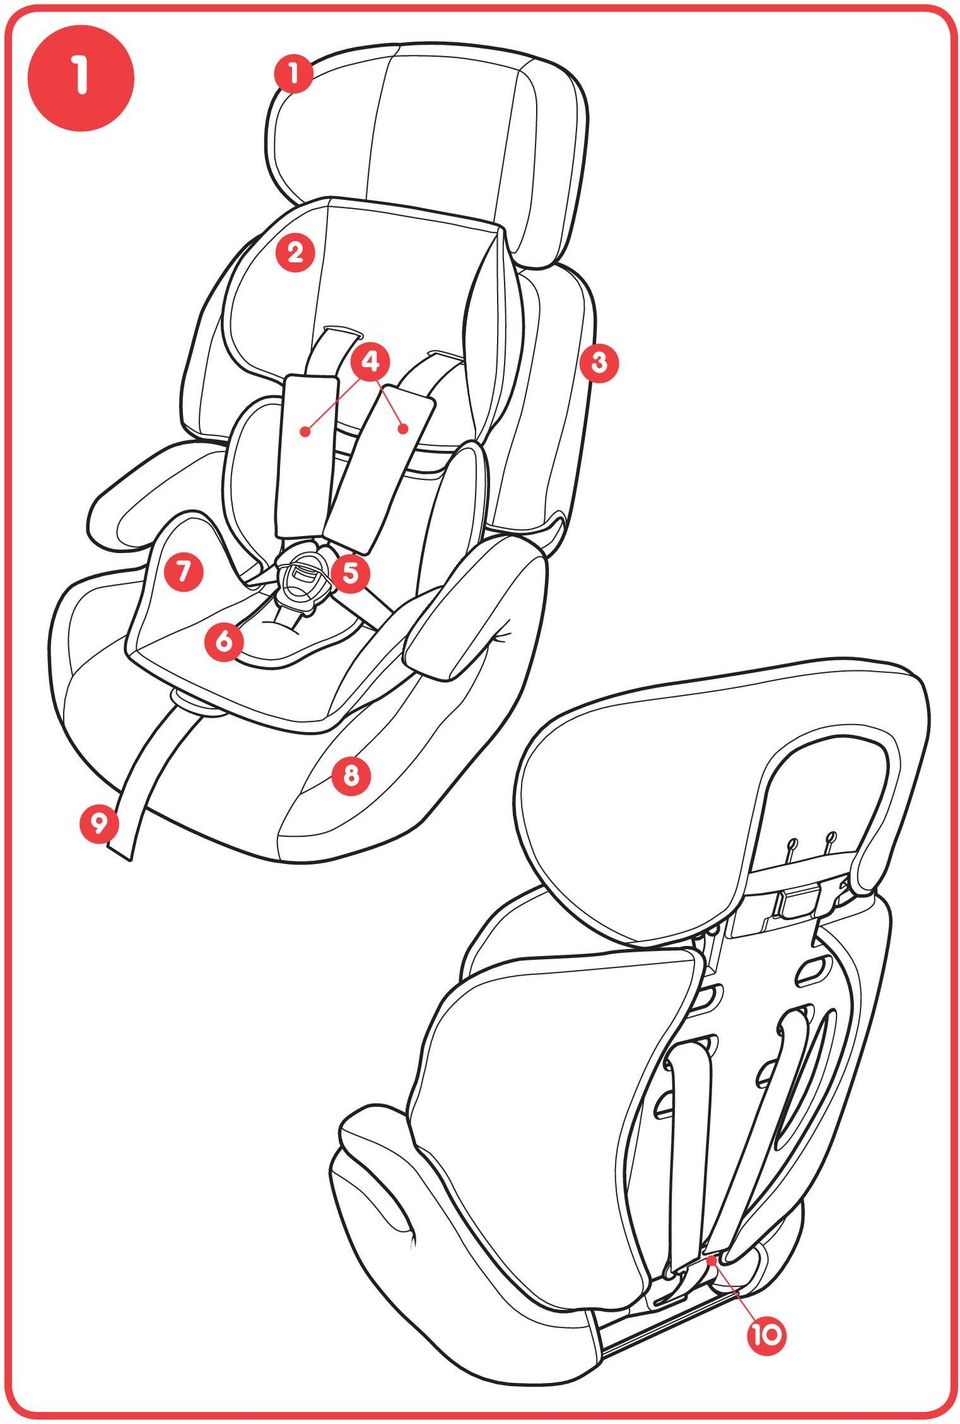
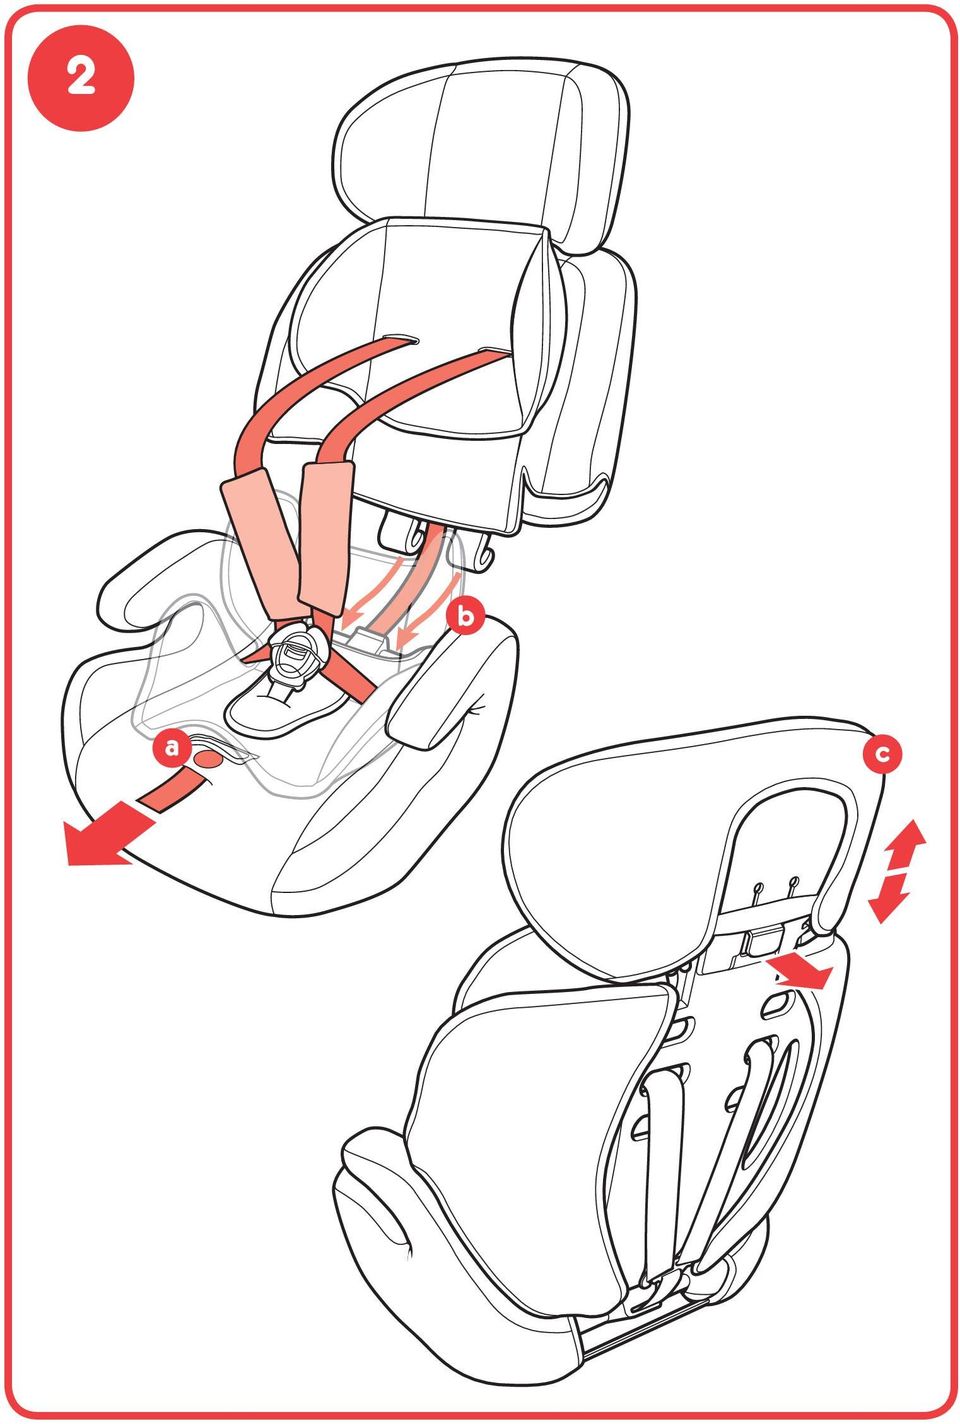
4 operation: 1 - list of parts Your child car seat is supplied in one carton and contains: 1. Head rest 2. Head cushion 3. Upper seat liner 4. Chest pad x2 5. Safety harness 6. Crotch pad 7. Lower seat liner 8. Booster seat 9. Adjustment strap 10. Harness connector 2 - child car seat assembly Push the adjuster button (a) located under the seat cover flap then pull the harness adjuster strap until the back rest is in line with the booster seat. Clip the back rest onto the booster seat (b). The head rest can be adjust by pulling the lever (c) on the head rest out then lift to raise or push down to lower the head rest to the desired height. 3 - approved seat belt requirement WARNING: Your child car seat can only be installed forward facing using a three point lap and diagonal belt in the front or rear passenger seats of the car. 4 - harness adjustment The shoulder straps must be threaded through the slots in the head cushion, cover and seat nearest the top of the child shoulders. If in any doubt always use the slot above the shoulder rather than below it. However, once you reach the top slots your child may continue to use the seat until their eye line is above the top of the seat shell or their weight exceeds 18Kg. To move the shoulder strap from one slot to another loosen the harness by pushing the adjuster button (a) in as you pull the shoulder straps forward as much as possible (b). At the back of the seat, unclip the shoulder straps from the connector (c). Feed the strap ends through the seat until they are clear of the cover (d). Re-thread the shoulder strap back through your chosen shoulder slot in the seat (e). Make sure it is not twisted. Repeat on the other shoulder strap. Hook the shoulder straps back onto the connector (f). Pull the adjustment strap forward to remove any slack (g). 5 - installation of the car seat 9-18kg (approx 9 months-4 years old) Note: The illustrations show with cushions ghosted. Place the child car seat in the forward facing position on the car seat. Pull the vehicle seat belt and thread the diagonal belt through the red fabric seat belt slot (a) and the lap strap under the seat belt guide (b). The seat belt slot is marked by a red arrow on a tag. At the back of the seat feed the seat belt under the harness and through the other seat belt slot (c). Pass the seat belt under the other seat belt guide (d) then fasten the seat belt. Locate the seat belt in the slot under the headrest (e). The headrest slot is marked by a red arrow on a tag. Carefully kneel on the child car seat to push it into the seat of the vehicle. Pull the seat belt at (f) to tighten the lap section of the belt then pull the diagonal section of the seat belt tight at (g). The child car seat should now be secure. IMPORTANT: The position of the seat belt/lap strap buckle can affect the stability of the child car seat. In an accident this could stop the child car seat from protecting your child as well as it should. If, when the seat belt/lap strap belt is properly tightened, the buckle lies in the position marked then try fitting the child car seat in another seating position in your vehicle.
. The head rest can be adjust by pulling the lever (c) on the head rest out then lift to raise or push down to lower the head rest to the desired height.")
5 6 - seating your child into the car seat harness Loosen the harness by pushing the adjuster button (a) in as you pull the shoulder straps (b) forward as much as possible. Unfasten the harness buckle by pressing the red button (c) and releasing the shoulder straps (d). Place your child in the seat. Fit the harness around your child and fasten the harness buckle by joining the shoulder straps (e) and pushing them both into the buckle (f). Check that the harness is not twisted and pull the harness up (g) to tighten the lap sections which is designed to fit low down on your child s body. Pull the adjuster strap forward (h) making sure the harness is a comfortable but FIRM fit around your child. Finally, pull both chest pads down (i) from your childs shoulders onto their chest. Note: The chest pads are an important safety feature. Never use the child car seat without them. 7 - installing the child car seat (without child car seat harness) 15-25kg (approx 4-6 years old) Remove the shoulder straps, crotch strap and lap strap. Unclip the shoulder and harness straps as described in section 4. Unclip the crotch strap and lap straps from the underside of the booster seat and remove them. Press the harness adjuster button and working from the back of the seat pull the adjuster strap out of the seat. Adjust the head rest to the required height by pulling the lever on the head rest out then pull to raise or push down to lower the head rest to the desired height. Release the lever to secure in position. Ensure the child is comfortable by adjusting the height of the headrest accordingly. The headrest will click between height levels. Place the child car seat on the vehicles seat ensuring that it is firmly pressed against the vehicles seat back rest. Place the child in the child car seat. Fasten the seat belt, ensuring that the diagonal belt threads through the seat belt guide and both sections of the seat belt go under the armrests as shown. Check the seat belt has not become twisted and tighten the seat belt by pulling the diagonal strap upwards. To release the child simply unfasten the seat belt in the normal way. For the safety of the child please check: The diagonal belt section runs through the seat belt guide located on the head rest and the lap strap fits under the arm rests on both sides. The straps are tightened and not twisted. The vehicle seat belt buckle does not rest between or on the arm rest of the seat cushion. Always make sure that your car seat belts are correctly tensioned to ensure maximum protection for your child. Anchorage Group 2 (15-25kg) The lap belt must go under the armrests. The shoulder belt must cling to the child s shoulder and chest and pass under one of the two armrests
 to tighten the lap sections which is designed to fit low down on your child s body.")
6 8 - installing the child car seat in booster seat mode (22-36kg) (approx 6-11 years old) Remove the shoulder straps, crotch strap and lap strap. Unclip the shoulder and harness straps as described in section 4. Unclip the crotch strap and lap straps from the underside of the booster seat and remove them. Press the harness adjuster button and working from the back of the seat pull the adjuster strap out of the seat. Unclip the back rest from the booster seat. The back rest now should be free from the booster seat. Place the booster seat onto the car seat. Place the child on the seat and fasten the seat belt around the child. Please ensure you fit the seat belt correctly according to the age and weight of the child Anchorage Group 3 (22-36kg) The lap belt must go under the armrests. The shoulder belt must cling to the child s shoulder and chest and pass under one of the two armrests When anchoring the booster seat, make sure the car belt is not twisted, in addition, the car seat belt must be appropriately tensioned and placed around the child s body to ensure that the booster seat is properly anchored. Always make sure that your car seat belts are correctly tensioned to ensure maximum protection for your child. 9 - removing the covers Unclip the back rest from the booster seat as described in section 8. Undo the elastic straps holding the seat cover onto the seat unit on the back rest and booster seat. Gently pull the cover off from the head rest, back rest and seat unit. To refit the cover simply reverse the above instructions. IMPORTANT: The cover is a safety feature. NEVER use the car seat without it. Cleaning the covers: Please read the labels on the covers for washing instructions. The seat covers can be removed easily for washing. The cover can be machine-washed with a mild detergent, at 30 o C. Don t wring, spin, or iron the seat covers. Clean plastic shell of the booster seat by wiping it with, a damp cloth.

7 care Your child car seat has been designed to meet safety standards and with correct use and maintenance will give many years of trouble free performance. Storing a damp child car seat will encourage mildew to form. After exposure to damp conditions, dry off with a soft cloth and allow to dry thoroughly before storing. Store your child car seat in a dry, safe place. Do not leave the child car seat in sunlight for prolonged periods - some fabrics may fade. maintenance This child car seat requires regular maintenance by the user. DO NOT take apart, or attempt to take apart, any of the harness when cleaning the harness and seat. It is unnecessary and dangerous to do so. Food and drink may find their way inside the buckle of the harness. This can stop it working properly. Clean the harness buckle with mild hand soap and water. Rinse thoroughly with warm water. Latch and unlatch the tongues of the buckle several times until a strong click is heard. If you cannot hear a strong click run it under warm water to rinse again. If the harness/ vehicle belts becomes cut or frayed, replace it before travelling. cleaning The harness may be cleaned by sponging lightly using warm water and a mild detergent. Plastic and metal parts may be sponged clean with warm water and a mild detergent. Never clean with abrasive, ammonia based, bleach based or spirit type cleaners. replacement parts The replacement parts listed below are available for your product. In the event that you require any of these parts, please contact your local store or contact us at spares@cosatto.com Head cover Upper seat liner Chest pads Back cover Crotch pad Lower seat liner Harness Base cover

8 E Guía del usuario IMPORTANTE: LEA ATENTAMENTE ESTAS INSTRUCCIONES ANTES DE UTILIZAR EL PRODUCTO Y CONSÉRVELAS PARA FUTURA REFERENCIA. EN CASO DE NO SEGUIR ESTAS INSTRUCCIONES, LA SEGURIDAD DE SU HIJO PODRÍA VERSE AFECTADA. Gracias por escoger un producto Cosatto. Le recomendamos que lea atentamente las notas importantes relativas a la seguridad descritas a continuación. Esto le garantizará un uso seguro y duradero del producto. Guarde el manual de instrucciones junto al asiento para coches, en un lugar seguro y durante la totalidad de su vida útil; en la parte posterior de la funda de tejido del asiento encontrará un bolsillo para guardar el manual de instrucciones. Ṡeguridad: Le rogamos tenga en cuenta lo siguiente ADVERTENCIA: LA SEGURIDAD DE SU HIJO ES RESPONSABILIDAD SUYA Este asiento para coches ha sido aprobado para niños pertenecientes a los grupos 1, 2 y 3, lo que lo convierte en adecuado para el transporte de niños en coches desde que presentan 9 Kg de peso (lo que aproximadamente equivale a 9 meses de edad) hasta que alcancen 36 Kg de peso (lo que aproximadamente equivale a 11 años de edad). ADVERTENCIA: Después de un accidente, el asiento para coches deberá reemplazarse por otro. ADVERTENCIA: No use NUNCA este asiento para coches en posición lateral, orientado hacia el cinturón de seguridad. ADVERTENCIA: No use NUNCA este asiento para coches en un asiento de pasajeros que esté equipado con un airbag activado. ADVERTENCIA: Asegúrese de que el niño esté SIEMPRE y en todo momento bajo supervisión de un adulto. ADVERTENCIA: Asegure SIEMPRE a su hijo a este asiento para coches utilizando el arnés de seguridad. ADVERTENCIA: NO intente desmontar, modificar ni añadir partes ni piezas a este asiento para coches, así como tampoco cambiar el modo en que se utilizan y han sido fabricados los cinturones de seguridad de su vehículo. ADVERTENCIA: Cualquier elemento rígido y pieza de plástico perteneciente al asiento para coches deberá ubicarse e instalarse de manera que no puedan quedar atrapadas por un asiento móvil o por la puerta del vehículo durante el uso diario del vehículo. ADVERTENCIA: La utilización de puntos de soporte de carga que no sean los descritos en las instrucciones reducirá considerablemente el factor de protección del asiento para coches. ADVERTENCIA: NO use el asiento de niños para coches en su hogar, ya que no ha sido diseñado para ello y, por lo tanto, solo deberá usarse en el interior de su coche. El asiento para coches deberá siempre colocarse orientado en dirección hacia delante. Asegúrese siempre de que el arnés del asiento para coches y el cinturón de seguridad del vehículo estén correctamente tensados a fin de garantizar la máxima protección para su hijo. La hebilla ha sido diseñada para poderse desabrochar con rapidez en un caso de emergencia. NO HA SIDO FABRICADA A PRUEBA DE NIÑOS. Los niños más curiosos podrían aprender a desabrochar la hebilla. Por ese motivo, será de suma importancia que explique a su hijo que jamás deberá jugar ni con la hebilla ni con ninguna otra pieza del asiento para coches. No utilice nunca recambios que no hayan recibido la autorización de Cosatto. La correa que pasa por encima de la falda deberá colocarse de manera que asegure la pelvis del niño de forma adecuada.

9 No use nunca el asiento para coches sin su funda de tejido ya que la funda del asiento con tribuye de forma activa al rendimiento integral del asiento. La funda del asiento no deberá cam biarse por ninguna otra funda que Cosatto no haya recomendado. Asegure cualquier pieza de equipaje u otro tipo de bulto a fin de que no puedan causar lesiones al ocupante del asiento para coches en caso de accidente. Después de un accidente, tanto los cinturones de seguridad de su vehículo como el mismo asiento para coches deberán reemplazarse. Aunque no hayan sufrido ningún tipo de daño aparente, es muy posible que no gocen del mismo nivel de protección que antes poseían. Cosatto recomienda no comprar ni vender asientos de niños para coches de segunda mano. Muchos de los asientos que se venden a través de anuncios locales de particulares o en mercadillos son peligrosos. Evite que el arnés/los cinturones de seguridad de su vehículo puedan quedar atrapados entre las puertas de los coches o bien que rocen continuamente contra piezas afiladas del asiento o de cualquier otro objeto. Si el arnés/los cinturones de seguridad de su vehículo sufrieran cortes o se agrietaran, reemplácelos inmediatamente antes de viajar. Si el vehículo ha permanecido expuesto al sol durante un largo período de tiempo, antes de colocar a su hijo en el asiento para coches asegúrese de que la funda del asiento no esté a una alta temperatura. Sólo se garantizará la seguridad si el asiento para coches ha sido instalado siguiendo estas instrucciones. En caso de no cumplir con las instrucciones aquí detalladas, la garantía quedará anulada y Cosatto se eximirá de cualquier responsabilidad. Tenga en cuenta que: 1 Este asiento de seguridad para niños solo será adecuado si el vehículo cuenta con un cinturón de seguridad homologado que pase por encima de la falda del pasajero/de 3 puntos de fijación/estático/ retráctil que cumpla con la Normativa estándar UN / ECE Nº 16 u otra normativa equivalente. 2 Si el fabricante del vehículo afirma en su manual del vehículo que el vehículo acepta asientos de seguridad Universales para niños de estas edades, entonces será probable que el asiento se ajuste perfectamente al asiento del vehículo. 3 Este asiento de seguridad para niños está clasificado como Universal bajo condiciones más exigentes de las se aplicaban a diseños anteriores, los cuales no llevaban esta notificación. 4 Este asiento de seguridad para niños solo será adecuado si el vehículo cuenta con un cinturón de seguridad retráctil estático de tres puntos que pase por encima de la falda del pasajero y que haya sido debidamente homologado de conformidad con la Normativa estándar UN / ECE Nº 16 u otra normativa equivalente. 5 En caso de duda, consulte con el fabricante o el distribuidor de la silla de seguridad.

10 funcionamiento: 1 - lista de piezas El asiento para coches se suministra embalado en una caja de cartón y contiene: 1. Reposacabezas 2. Cojín para la cabeza 3. Forro del asiento superior 4. 2 almohadillas para el pecho 5. Arnés se seguridad 6. Almohadilla para la entrepierna 7. Forro del asiento inferior 8. Asiento elevado de seguridad 9. Correa de ajuste 10. Conector del arnés 2 - conjunto de asiento de niños para coches Presione el botón de ajuste (a) ubicado debajo de la solapa de la funda del asiento y, a continuación, estire de la correa del ajustador del arnés hasta que el respaldo esté debidamente alineado con el asiento elevado de seguridad. Acople el respaldo al asiento elevado de seguridad (b). El reposacabezas puede ajustarse a través de estirar hacia fuera la palanca (c) ubicada en el reposacabezas y elevando o presionando hacia abajo la palanca para levantar o bajar respectivamente el reposacabezas a la altura deseada. 3 - requisito de cinturón de seguridad homologado ADVERTENCIA: El asiento para coches de su hijo solo podrá instalarse orientado hacia delante en el asiento de pasajeros de delante o de atrás del vehículo, mediante un cinturón de seguridad diagonal que pase por encima de la cintura del pasajero y que esté dotado de tres puntos de fijación. 4 - ajuste del arnés Las correas de los hombros deberán pasarse a través de las ranuras del cojín para la cabeza, de la funda y del asiento, situadas lo más cerca posible de los hombros del niño. En caso de duda, utilice siempre la ranura situada por encima de los hombros en vez de la situada por debajo de los mismos. No obstante, una vez que haya alcanzado las ranuras superiores, su hijo podrá continuar utilizando el asiento hasta que sus ojos estén por encima de la parte superior de la carcasa del asiento o hasta que el niño exceda un peso de 18 Kg. Para mover las correas de los hombros de una ranura a otra, deberá aflojar el arnés presionando el botón de ajuste (a) hacia dentro, al mismo tiempo que estira las correas de los hombros hacia delante lo máximo posible. En la parte posterior del asiento, desabroche las correas de los hombros del conector (c). Pase los extremos de la correa a través del asiento hasta que hayan salido de la funda (d). Vuelva a pasar la correa de los hombros a través de las ranura del asiento que haya previamente seleccionado (e). Asegúrese de que la correa no esté retorcida ni girada. Repita el mismo procedimiento para la otra correa de los hombros. Vuelva a enganchar las correas de los hombros al conector (f). Estire la correa de ajuste hacia delante para evitar que quede holgada (g). 5 - instalación del asiento para coches, para niños de 9 a 18 Kg. de peso (aprox. equivalente a niños de entre 9 meses y 4 años de edad) Atención: Los cojines se muestran sombreados en estas ilustraciones. Coloque el asiento para coches orientado hacia delante en el asiento del vehículo. Estire el cinturón de seguridad del vehículo y pase la sección diagonal del mismo a través de la ranura de tela roja (a); a continuación, pase la sección que pasa por encima de la falda del pasajero por debajo de la guía del cinturón de seguridad (b). La ranura del cinturón de seguridad está marcada con una flecha roja en una etiqueta. En la parte posterior del asiento, pase el cinturón de seguridad por debajo del arnés y a través de la otra ranura del cinturón (c).
.")
11 Pase el cinturón diagonal de seguridad del vehículo por debajo de la otra guía del cinturón (d) y, a continuación, abroche el cinturón. Coloque el cinturón de seguridad en la ranura situada debajo del reposacabezas (e). La ranura del reposacabezas está marcada con una flecha roja en una etiqueta. Arrodíllese con cuidado sobre el asiento para coches de su hijo a fin de presionarlo y colocarlo debidamente en el asiento del vehículo. Estire del cinturón de seguridad en (f) a fin de ceñir la sección del cinturón que pasa por encima de la falda y, a continuación, estire de la sección diagonal del cinturón de seguridad en (g) para que quede ceñida. El asiento para coches ya está ahora bien asegurado. IMPORTANTE: La posición del cinturón de seguridad del vehículo/hebilla de la correa de la falda puede afectar la estabilidad del asiento para coches. En caso de accidente, esto podría evitar que el asiento para coches protegiera a su hijo como debería hacerlo. Si, una vez que el cinturón de seguridad/correa de fijación sobre la falda está bien ceñido, la hebilla está en la posición marcada entonces deberá intentar instalar el asiento para coches en otra posición diferente dentro del vehículo. 6 - ubicación del niño en el arnés del asiento para coches Afloje el arnés presionando el botón de ajuste (a) hacia dentro, al mismo tiempo que estira las correas de los hombros (b) hacia delante lo máximo posible. Desabroche la hebilla del arnés presionando el botón rojo (c) y soltando las correas de los hombros (d). Coloque a su hijo en el asiento. Coloque el arnés alrededor de su hijo y abroche la hebilla del arnés a través de unir las correas de los hombros (e) e introducirlas a presión en la hebilla (f). Compruebe que el arnés no esté retorcido y estírelo hacia arriba (g) a fin de ceñir las secciones de la falda, las cuales han sido diseñadas para quedar situadas en la parte inferior del cuerpo de su hijo. Estire la correa de ajuste hacia delante (h) asegurándose de que el arnés se adapte cómodamente, pero con FIRMEZA, al niño. Por último, estire hacia bajo las dos almohadillas para el pecho (i) y bájelas de los hombros hasta el pecho del niño. Atención: las almohadillas para el pecho son un aspecto esencial para la seguridad. No use nunca el asiento para coches sin ellas. 7 - iinstalación del asiento para coches (sin el arnés de asiento para coches), para niños de 15 a 25 Kg. de peso (aprox. equivalente a niños de entre 4 y 6 años de edad) Retire las correas de los hombros, la correa de la entrepierna y la correa de la falda. Desenganche las correas de los hombros y el arnés tal y como se describe en la sección 4. Desabroche las correas de los hombros y de la falda desde la parte inferior del asiento elevado y extráigalas. Presione el botón de ajuste del arnés y, empezando desde la parte posterior del asiento, estire la correa de ajuste hasta extraerla totalmente del asiento. Ajuste el reposacabezas a la altura necesaria estirando hacia fuera la palanca ubicada en el mismo reposacabezas, elevándola o presionándola hacia bajo para levantar o bajar respectivamente el reposacabezas a la altura deseada. Suelte la palanca para asegurarla en la posición deseada. Asegúrese de que el niño se sienta cómodo, ajustando la altura del reposacabezas. El reposacabezas hará clic entre los niveles de altura. Coloque el asiento para coches en el asiento del vehículo, asegurándose de que esté bien ubicado y presionado contra el respaldo del asiento del vehículo. Coloque a su hijo en el asiento para coches. Abroche el cinturón de seguridad, asegurándose de que la sección diagonal del cinturón pase a
 a fin de ceñir la sección del cinturón que pasa por encima de la falda y, a continuación, estire de la sección diagonal del cinturón de seguridad en (g) para")
12 través de la guía de mismo y de que ambas secciones del cinturón pasen por debajo de los reposabrazos tal y como se muestra en la ilustración. Asegúrese de que el cinturón de seguridad no esté retorcido ni girado y cíñalo estirando de la sección diagonal hacia arriba. Para permitir que el niño pueda bajar del asiento simplemente tendrá que desabrochar el cinturón de seguridad. Para garantizar la seguridad de su hijo, le rogamos compruebe lo siguiente: La sección diagonal del cinturón de seguridad del vehículo pasa a través de la guía del cinturón, ubicada en el reposacabezas, y la sección de la correa de la falda pasa por debajo de ambos reposabrazos. Las correas no están retorcidas ni giradas. La hebilla del cinturón de seguridad del vehículo no está situada entre o sobre el reposabrazos del cojín del asiento. Asegúrese siempre de que los cinturones del asiento para coches estén correctamente tensados a fin de garantizar la máxima protección para su hijo. Anclaje Grupo 2 (15 a 25 Kg.) El cinturón de la falda deberá pasar por debajo de los reposabrazos. El cinturón del hombro deberá ajustarse al hombro y al pecho del niño y pasar por debajo de uno de los reposabrazos 8 - iinstalación del asiento para coches en modo asiento elevado para niños de 22 a 36 Kg. de peso (aprox. equivalente a niños de entre 6 a 11 años de edad) Retire las correas de los hombros, la correa de la entrepierna y la correa de la falda. Desenganche las correas de los hombros y el arnés tal y como se describe en la sección 4. Desabroche las correas de los hombros y de la falda desde la parte inferior del asiento elevado y extráigalas. Presione el botón de ajuste del arnés y, empezando desde la parte posterior del asiento, estire la correa de ajuste hasta extraerla totalmente del asiento. Desacople el respaldo del asiento elevado de seguridad. El respaldo deberá haber quedado totalmente suelto y desacoplado del asiento elevado de seguridad. Coloque el asiento elevado sobre el asiento del vehículo. Siente al niño en el asiento elevado y abroche el cinturón de seguridad después de haberlo pasado alrededor del niño. Asegúrese de haber instalado el cinturón de seguridad correctamente según la edad y el peso de su hijo. Anclaje Grupo 3 (22 a 36 Kg.) El cinturón de la falda deberá pasar por debajo de los reposabrazos. El cinturón del hombro deberá ajustarse al hombro y al pecho del niño y pasar por debajo de uno de los reposabrazos Cuando ancle el asiento elevado, asegúrese de que el cinturón de seguridad del vehículo no haya quedado retorcido ni girado; además, el cinturón de seguridad del vehículo deberá estar debidamente tensado y haberse pasado alrededor del cuerpo del niño a fin de garantizar que el asiento elevado quede adecuadamente anclado. Asegúrese siempre de que los cinturones del asiento para coches estén correctamente tensados a fin de garantizar la máxima protección para su hijo. 9 - extracción de las fundas Desacople el respaldo del asiento elevado de seguridad tal y como se describe en la sección 8. Desabroche las correas elásticas que sujetan la funda del asiento al asiento en el respaldo y en el asiento elevado. Retire la funda del reposacabezas, del respaldo y del asiento con cuidado.

13 Para volver a colocar la funda realice el procedimiento anterior a la inversa. IMPORTANTE: la funda es un aspecto esencial para la seguridad. No use nunca el asiento para coches sin ella. Limpieza de las fundas: Por favor, lea las etiquetas con las instrucciones de lavado situadas en las fundas. Las fundas del asiento pueden extraerse con facilidad para ser lavadas. La funda puede lavarse con un detergente de dureza mínima a 30º C. No escurra, centrifugue ni planche las fundas del asiento. Limpie el plástico del asiento elevado con un paño húmedo. cuidado Este asiento para coches ha sido diseñado según las normativas vigentes de seguridad. Un uso y mantenimiento adecuados le permitirán disfrutar de un rendimiento óptimo del producto durante un largo período de tiempo. Si almacena el asiento para coches cuando está mojado podría crearse moho en el mismo. Después de haber estado expuesto a condiciones húmedas, seque el producto con un paño de tacto suave y permita que se seque antes de guardarlo. Guarde el asiento para coches en un lugar seco y seguro. No deje el asiento para coches expuesto a los rayos solares durante períodos prolongados ya que algunos tejidos podrían desteñirse. mantenimiento Este asiento para coches precisa un mantenimiento periódico por parte del usuario. NO desmonte, ni intente desmontar, ninguno de los arneses del producto cuando se disponga a limpiar el arnés y el asiento. Hacerlo será innecesario y peligroso. Es posible que los restos de comida y líquido se introduzcan en la hebilla del arnés, causando que el producto deje de funcionar adecuadamente. Limpie la hebilla del arnés con agua y un jabón de manos blando. Lávela bien con agua tibia. Enganche y desenganche las lengüetas de la hebilla varias veces hasta que oiga un clic firme. Si no oye un clic firme, colóquela bajo agua tibia y vuelva a lavarla. Si el arnés/los cinturones de seguridad de su vehículo sufrieran cortes o se agrietaran, reemplácelos inmediatamente antes de viajar. limpieza El arnés deberá limpiarse con una esponja suave, agua tibia y un detergente de dureza mínima. Las piezas y partes de plástico y de metal deberán limpiarse con una esponja suave, agua tibia y un detergente de dureza mínima. No limpie nunca la unidad con limpiadores abrasivos, o basados en amoníaco, lejía o alcoholes

14 recambios Disponemos de todos los recambios listados a continuación para su producto. En caso de que necesite cualquiera de estas piezas, póngase en contacto con el distribuidor o establecimiento de su zona, o directamente con nosotros en spares@cosatto.com Funda de la sección superior Forro del asiento superior Funda de la sección posterior Almohadillas para el pecho Almohadilla para la entrepierna Arnés Forro del asiento inferior Funda de la base

15
16 2 b a c
17 3

18 4 b c d a e f g

19 5 c a b g e d f

20 6 b c d a e f g i h

21 7
22 8
23 9
24 Cosatto Ltd, Bentinck Mill, Bentinck Street, Farnworth, Bolton, Lancashire, BL4 7EP, England. Tel: +44(0) For up to date information and manuals for all cosatto products visit
ZooMI CaR SEaT InSTRUCTIonS
 ZooMI CaR SEaT InSTRUCTIonS E Instrucciones del asiento de coche del Zoomi GUaRanTEE E Garantía de 4 años válida sólo en Reino Unido e Irlanda GB IMPORTANT: RETAIN FOR FUTURE REFERENCE. READ CAREFULLY.
car seat ...www.cosatto.com Secret Softie
 well-adjusted adventureer Secret Softie ZOOMI car seat...www.cosatto.com Cosatto Ltd, Bentinck Mill, Bentinck Street, Farnworth, Bolton, BL4 7EP, England Tel: +44 0800 014 9252* Fax: +44 0871 977 3910
car seat ...www.cosatto.com happy chap... mighty pushchair
 easy-going tough guy happy chap... MOOVA car seat mighty pushchair...www.cosatto.com Cosatto Ltd, Bentinck Mill, Bentinck Street, Farnworth, Bolton, BL4 7EP, England Tel: +44 0800 014 9252* Fax: +44 0871
Alva. 9-36 kg. Manual de uso. Apto para
 Alva 2 1 3 Apto para 9-36 kg. ES Manual de uso 1 2 A B C L D H E F G I N M N K J P Q O P B R 4 ALVA 3.1 3.2 3.3 3.4 P 3.5 3.6 N N www.babyauto.com 5 3.7 3.8 N 4.1 4.2 4.3 4.4 6 ALVA 5.1 1 2 3 5.2 5.3 5.4
INSTRUCCIONES DE USO INSTRUCTIONS FOR USE
 INSTRUCCIONES DE USO INSTRUCTIONS FOR USE super confort www.zoeandjoe.com MADE ON EARTH INSTRUCCIONES DE INSTALACIÓN AVISO 1. Este es un asiento Universal para niños aprobado por la Norma ECE 44/04, para
BU7049 MANUAL DE INSTRUCCIONES
 MANUAL DE INSTRUCCIONES BU7049 Advertencia / Cuidados Sistema y uso Instrucciones generales Problemas y soluciones / Mantenimiento Cátulo Castillo 2437 - C.A.B.A. - Argentina Tel.: (011) 4943-0600 y líneas
ME-MO Car SEaT InSTruCTIOnS
 ME-MO Car SEaT InSTruCTIOnS E Instrucciones del asiento de coche del me-mo GuaranTEE E Garantía de 4 años válida sólo en reino unido e Irlanda IMPORTANT: READ THESE INSTRUCTIONS CAREFULLY GB BEFORE USE
Manual de Instrucciónes LB 717
 PRECAUCIONES: Manual de Instrucciónes LB 717 Guarde el manual en un lugar seguro para futuras referencias La butaca para autos no garantiza absoluta protección en todos los casos de daño. Sin embargo asegura
INSTRUCCIONES DE USO
 INSTRUCCIONES DE USO SILLA INFANTIL PARA AUTOMÓVIL GRUPO Ⅰ+II+III Modelos: BARI y CATANIA VÁLIDO PARA PESOS ENTRE 9 Y 36KGS. AVISO 1. Se trata de un asiento de seguridad universal, según se aprueba en
you re avin a... car seat
 flexible lightweight fantastic you re avin a... GIGGLE car seat...www.cosatto.com Cosatto Ltd, Bentinck Mill, Bentinck Street, Farnworth, Bolton, BL4 7EP, England Tel: +44(0)871 977 3900 Fax: +44(0)871
ES EN. Manual de uso Instruction for use. Sistema de retención infantil. Child safety seat. KEL123 LB517. Apto para Suitable for
 Sistema de retención infantil. Child safety seat. Manual de uso Instruction for use ES EN KEL123 LB517 Apto para Suitable for IMPORTANTE Si desea el manual en otro idioma, visite nuestra pagina web: IMPORTANT
manual del usuario izi Modular: a contra marcha y en el sentido de la marcha izi Modular (RF): solo a contra marcha
: solo a contra marcha") a f d e b c i manual del usuario g h 4 > 5 cm izi Modular: a contra marcha y en el sentido de la marcha izi Modular (RF): solo a contra marcha 5 Altura a contra marcha: desde 6 cm hasta 05 cm Altura en
a f d e b c i manual del usuario g h 4 > 5 cm izi Modular: a contra marcha y en el sentido de la marcha izi Modular (RF): solo a contra marcha 5 Altura a contra marcha: desde 6 cm hasta 05 cm Altura en
Multimax. Apto para 0-36 kg. Manual de uso
 Multimax 1 2 3 0+ Apto para 0-36 kg. ES Manual de uso 1 2 A B C D G L E P F I H J K M N R Q R S S T O 4 MULTIMAX 3.1 3.2 3.3 3.4 3.5 3.6 R M www.babyauto.com 5 3.7 3.8 R 10 mm 3.9 3.10 3.11 3.12 K 6 MULTIMAX
Orientado en el sentido de la marcha Manual del
 Orientado en el sentido de la marcha Manual del usuario ECE R44 04 Grupo Peso Edad 2-3 de 15 a 36 kg 4-12 a 1 ! Gracias por adquirir el asiento infantil izi Up FIX de BeSafe BeSafe ha desarrollado este
happy safari travel cot cuna de viaje happy safari guía para el usuario importante. retenga para referencia futura - lea con cuidado.
 happy safari travel cot user guide important. retain for future reference - read carefully cuna de viaje happy safari guía para el usuario importante. retenga para referencia futura - lea con cuidado.
Pocket Snack. Owner's Manual Manual del propietario
 Read all instructions BEFORE assembly and USE of product. KEEP INSTRUCTIONS FOR FUTURE USE. Lea todas las instrucciones ANTES de armar y USAR este producto. CONSERVE LAS INSTRUCCIONES PARA USO FUTURO.
Moova Car SEaT InSTruCTIonS
 Moova Car SEaT InSTruCTIonS E Instrucciones del asiento de coche del Moova GuaranTEE E Garantía de 4 años válida sólo en reino unido e Irlanda IMPORTANT: READ THESE INSTRUCTIONS CAREFULLY GB BEFORE USE
FCC Information : Warning: RF warning statement:
 FCC Information : This device complies with Part 15 of the FCC Rules. Operation is subject to the following two conditions: (1) This device may not cause harmful interference, and (2) This device must
orientado hacia adelante Manual del usuario Grupo Peso Edad 1 9-18 kg 9m-4a
 orientado hacia adelante Manual del usuario ECE R44 04 Grupo Peso Edad 1 9-18 kg 9m-4a 1 ! Gracias por elegir BeSafe izi Comfort. BeSafe ha desarrollado este asiento con mucho cuidado, para proteger a
GRACIAS POR PREFERIR COCHES MOMA INDICE. Advertencias. Configuración. Abrir Coche. Ensamble rueda delantera. Ensamble ruedas traseras.
 GRACIAS POR PREFERIR COCHES MOMA INDICE Advertencias 1 Felicitaciones y gracias por preferir Configuración 2 un coche MOMA. Por favor lea prim- Abrir Coche 3 Ensamble rueda delantera 4 Ensamble ruedas
Read all instructions BEFORE assembly and USE of product. KEEP INSTRUCTIONS FOR FUTURE USE.
 Read all instructions BEFORE assembly and USE of product. KEEP INSTRUCTIONS FOR FUTURE USE. Lea todas las instrucciones ANTES de armar y USAR este producto. GUARDE LAS INSTRUCCIONES PARA USO FUTURO. 2013
ST7155 Discovery Plus
 MANUAL DE INSTRUCCIONES ST7155 Discovery Plus Advertencia / Cuidados Sistema y uso Problemas y soluciones / Mantenimiento Cátulo Castillo 2437 - C.A.B.A. - Argentina Tel.: (011) 4943-0600 y líneas rotativas
Learning Masters. Early: Force and Motion
 Learning Masters Early: Force and Motion WhatILearned What important things did you learn in this theme? I learned that I learned that I learned that 22 Force and Motion Learning Masters How I Learned
car seat adapter adaptador del asiento de automóvil CXBEX/MAXI COSI/NUNA babyjogger.com ASSEMBLY INSTRUCTIONS INSTRUCCIONES DEL ENSAMBLAJE PD349778A
 CXBEX/MAXI COSI/NUNA car seat adapter adaptador del asiento de automóvil PD349778A babyjogger.com ASSEMBLY INSTRUCTIONS INSTRUCCIONES DEL ENSAMBLAJE CITY PREMIER CITY SELECT CITY SELECT LUX 1 2 CLICK 3
Maneje Seguro. Viaje Seguro en un Asiento Infantil Mirando hacia Adelante. Abrocharse el cinturón cada pasajero, cada viaje!
 Maneje Seguro Asiento de Seguridad Pasajero Niño/a Nro. 3 Agencia de Salud y Recursos Humanos del Condado de San Benito División de Salud Pública 439 Fourth Street Hollister, CA 95023 (831) 637-5367 http://www.sanbenitoco.org
Sierra Security System
 Using Your SpreadNet Accessories With Your Sierra Security System Uso de Sus Accesorios SpreadNet Con Su Sistema de Seguridad Sierra SN990-KEYPAD SN961-KEYFOB SN991-REMOTE 1 SN990-KEYPAD The SN990-KEYPAD
Importador: ARGENTRADE S.R.L. CALLE 514 NO. 2050, (1901) RINGUELET LA PLATA, BUENOS AIRES, ARGENTINA
 RINGUELET LA PLATA, BUENOS AIRES, ARGENTINA") Importador: ARGENTRADE S.R.L. CALLE 514 NO. 2050, (1901) RINGUELET LA PLATA, BUENOS AIRES, ARGENTINA Nº de Importador : 22582/6-1 Cuit No.: 30-66010157-4 ATENCIÓN: Por favor, asegúrese de observar estrictamente
Importador: ARGENTRADE S.R.L. CALLE 514 NO. 2050, (1901) RINGUELET LA PLATA, BUENOS AIRES, ARGENTINA Nº de Importador : 22582/6-1 Cuit No.: 30-66010157-4 ATENCIÓN: Por favor, asegúrese de observar estrictamente
Base ISOFIX. Guía del usuario
 Base ISOFIX. Guía del usuario ECE R44/04 ISOFIX Clase E Grupo 0+ Hasta 13kg Idioma: Español Importante - Conserve estas instrucciones para poderlas consultar más adelante. 4 Tabla de contenidos. 01/ Información
Instructivo de uso y cuidado del Aplicador de Implantes Lapisa. Productos Destacados
 Instructivo de uso y cuidado del Aplicador de Implantes Lapisa Productos Destacados Diseño ergonómico Producido con materiales de larga duración para asegurar una vidá útil prolongada Espacio para aguja
MANUAL EASYCHAIR. A) Ingresar su nombre de usuario y password, si ya tiene una cuenta registrada Ó
 Ingresar su nombre de usuario y password, si ya tiene una cuenta registrada Ó") MANUAL EASYCHAIR La URL para enviar su propuesta a la convocatoria es: https://easychair.org/conferences/?conf=genconciencia2015 Donde aparece la siguiente pantalla: Se encuentran dos opciones: A) Ingresar
MANUAL EASYCHAIR La URL para enviar su propuesta a la convocatoria es: https://easychair.org/conferences/?conf=genconciencia2015 Donde aparece la siguiente pantalla: Se encuentran dos opciones: A) Ingresar
Car Seat Adapter Adaptador de la silla para el coche
 CHICCO/PEG-PEREGO Car Seat Adapter Adaptador de la silla para el coche PD348997B babyjogger.com ASSEMBLY INSTRUCTIONS INSTRUCCIONES DEL ENSAMBLAJE CITY PREMIER CITY SELECT PEG-PEREGO 1 A B 2 3 CLICK 4
Installation Instructions Front Floor Liner
 Installation Instructions Front Floor Vehicle Application Jeep Wrangler (TJ) 1997-2006 Part Number: 51509 Jeep Wrangler (CJ / YJ) 1976-1995 Part Number: 51511 INSTALLATION TIME SKILL LEVEL 1/2 Hour 1 -
DOSSIER PRESENTACIÓN. 1 Kiddy Bus Harness
 DOSSIER PRESENTACIÓN 1 Kiddy Bus Harness Índice Introducción 3 1-Características técnicas 4-7 1.1-Elementos de contacto con el niño 4 1.2-Sistema de sujeción del niño 4-6 1.2.1-Correas 5 1.2.2-Sistema
Invacare Verso II. BARANDILLAS LATERALES SOLO PARA CAMAS Invacare ALEGIOTM SCAN BEDTM ETUDETM SONATATM
 Invacare Verso II BARANDILLAS LATERALES SOLO PARA CAMAS Invacare ALEGIOTM SCAN BEDTM ETUDETM SONATATM EN 1970-A1 & EN 60601-2-52 (Certificado por TÜV) Gracias por elegir la barandilla lateral abatible
LEA ESTE INSTRUCTIVO ANTES DE ARMAR LA CARRIOLA USE ESTAS INSTRUCCIONES PARA LA CARRIOLA MOD. K23
 LEA ESTE INSTRUCTIVO ANTES DE ARMAR LA CARRIOLA USE ESTAS INSTRUCCIONES PARA LA CARRIOLA MOD. K23 CONTENIDO PARTES DE LA CARRIOLA Estructura de metal, plástico y textil (cuerpo). Asiento con respaldo y
PRODUCT ASSEMBLY INSTRUCTIONS
 PRODUCT ASSEMBLY INSTRUCTIONS KARLSEN SWIVEL GLIDER RECLINER SAM S CLUB #402411 BERKLINE #4160061 PLEASE READ THIS BOOKLET CONTAINS IMPORTANT INFORMATION. KEEP FOR FUTURE REFERENCE. Page (Pagina) 1 of
Guía de Usuario. ECE R44/04 EN 1888:2012 Grupo 0+ Hasta los 13Kg Idioma Castellano. Importante - Conserve estas instrucciones para futuras consultas
 50262715 Guía de Usuario ECE R44/04 EN 1888:2012 Grupo 0+ Hasta los 13Kg Idioma Castellano Importante - Conserve estas instrucciones para futuras consultas 4 Tabla de contenidos. 01/ Información importante
Conditioning Exercises: Standing
 Conditioning Exercises: Standing Do all these exercises slowly. Do not hold your breath during these exercises. If unusual pain occurs in your joints or muscles while you are exercising, do not continue
1. Sign in to the website, http://www.asisonline.org / Iniciar sesión en el sitio, http://www.asisonline.org
 Steps to Download Standards & Guidelines from the ASIS International Website / Pasos para Descargar los Standards & Guidelines de la Página Web de ASIS International 1. Sign in to the website, http://www.asisonline.org
RTA-B002 DIMENSIONS MAXIMUM WEIGHT CAPACITIES. Highest position. Lowest position. Product Size: 22"W x 16"D x 30.5~46.5"H
 MODEL RTA - B002 Thanks for purchasing one of our products. Please read carefully the assembly instructions before the installation. Please save this manual for future reference. MODEL RTA-B002 MODELO
TOUCH MATH. Students will only use Touch Math on math facts that are not memorized.
 TOUCH MATH What is it and why is my child learning this? Memorizing math facts is an important skill for students to learn. Some students have difficulty memorizing these facts, even though they are doing
PRODUCT ASSEMBLY INSTRUCTIONS
 PRODUCT ASSEMBLY INSTRUCTIONS HAUGEN SOFA SAM S CLUB # 610256 BERKLINE #2450438 PLEASE READ THIS BOOKLET CONTAINS IMPORTANT INFORMATION. KEEP FOR FUTURE REFERENCE. Page 1 of 10 CUSTOMER SERVICE INFORMATION
orientado hacia atrás Manual del usuario CEE R66 06 0+/1/2 de 0 a 25 kg 6 m - 5 a
 1 20 21 2 5 3 4 orientado hacia atrás Manual del usuario 7 8 9 6 10 11 12 13 14 22 23 15 16 17 24 25 18 19 CEE R66 06 Grupo Peso edad 0+/1/2 de 0 a 25 kg 6 m - 5 a 26 27 28 29 30 31 35 34 36 32 33 37 38
MANUAL DE INSTRUCCIONES
 MANUAL DE INSTRUCCIONES MODELO SP2014 1 ÍNDICE SOUP MASTER Seguridad eléctrica Seguridad durante el uso Conozca su Soup Master Consejos de Uso Modo de Uso Limpieza y mantenimiento pag. 3 pag. 4 pag. 5
El niño viaja seguro. también
 El niño viaja seguro también www.dgt.es www.jcyl.es Por qué son necesarios los sistemas de retención infantiles en el automóvil? Cada año, en España, más de 4.000 niños resultan muertos o heridos cuando
Teeeny teeeny tiny little pieces of rocks. Anncr: But to her two year-old son, exploring the world around him, she makes perfect sense.
 Below you will find the National Radio PSA Scripts. To listen to the radio spots, please go to: http://online.unitedway.org/bornlearning Born Learning Radio :60 At the Beach Ocean sounds Over there? Over
Process Control Work Instructions Control de Procesos Instrucciones de Trabajo. for / para
 Process Control Work Instructions Control de Procesos Instrucciones de Trabajo for / para 629096898 VFCB Kit Relay Cable Harness Assy Ensamblar el Kit del Arnés de Cables del Relevador Publication Number:
Dossier técnico y manual de utilización. www.euraslog.com
 Dossier técnico y manual de utilización www.euraslog.com Introducción El arnés que protege al pequeño viajero El KIDYBUS HARNESS es un sistema de sujeción infantil para el transporte de niños en las butacas
A W. Product Label Identification. Etiqueta de identificación del producto. Andersen
 Product Label Identification Etiqueta de identificación for Andersen Windows and Patio Doors para puertas para patio y ventanas de Andersen Use this document to locate product identification () of your
Creating your Single Sign-On Account for the PowerSchool Parent Portal
 Creating your Single Sign-On Account for the PowerSchool Parent Portal Welcome to the Parent Single Sign-On. What does that mean? Parent Single Sign-On offers a number of benefits, including access to
Instruction Manual Wallaboo baby sling
 Baby Sling Original Wear it. Love it. Instruction Manual Wallaboo baby sling Porte bébe - Draagdoek - Babytrage - Portabebé www.wallaboo.com Baby Sling - Draagdoek - Porte bébe - Babytrage - Portabebé
El niño viaja seguro. también. www.dgt.es
 El niño viaja seguro también www.dgt.es Por qué son necesarios los sistemas de retención infantiles en el automóvil? Los datos estadísticos demuestran el elevado número de niños/as menores de 12 años que
DIAMOND Gear Company, LTD. an ERIKS Company. Installation, Maintenance, & Operation Manual DECLUTCHABLE WORM GEAR
 DIAMOND Gear Company, LTD. an ERIKS Company Installation, Maintenance, & Operation Manual 2013 INSTRUCTIONS This is an instructional manual which provides general installation, operation, and maintenance
Fundación Gonzalo Rodríguez Sistemas de Retención Infantil (SRI)
") Ref. Nº: 290/2013 Fundación Gonzalo Rodríguez Sistemas de Retención Infantil (SRI) Aseguradoras Montevideo, Octubre 2013 tiva: En el mes de diciembre del 2012 fue aprobada la Ley 19.061 1 que consigna
Ref. Nº: 290/2013 Fundación Gonzalo Rodríguez Sistemas de Retención Infantil (SRI) Aseguradoras Montevideo, Octubre 2013 tiva: En el mes de diciembre del 2012 fue aprobada la Ley 19.061 1 que consigna
BEL123 LB kg MANUAL DE USO INSTRUCTION FOR USE. Apto para Suitable for
 BEL123 LB517 Apto para Suitable for 9-35 kg MANUAL DE USO INSTRUCTION FOR USE Instrucciones de uso - Sistema de retención infantil Grupo 1/2/3 de 9 a 36 kg. (de 9 meses a 12 años aprox.) ES BEL123 Instrucciones
Fácil reparación de Packard Bell
 Fácil reparación de Packard Bell Unidad CD-ROM / DVD Importantes instrucciones de comprobación de seguridad Tiene que leer todas las instrucciones con cuidado antes de que comience a trabajar y cumplir
INSTALLATION INSTRUCTIONS
 Brix Ratio Check Instructions for ColdFusion and Flavor Overload Units INSTALLATION INSTRUCTIONS Brix Ratio Check Instructions For Coldfusion, Flavorfusion and Flavor Overload Units Kit P/N 629096865 SAFETY
Preparación de la Piel para la Cirugía
 Skin Prep for Surgery Patient identification label Preparación de la Piel para la Cirugía Esta preparación de la piel antes de la cirugía puede ayudar a reducir el riesgo de infección. Lea estos 12 pasos
ES 1 097 480 U ESPAÑA 11. Número de publicación: 1 097 480. Número de solicitud: 201331388 A47G 29/00 (2006.01) 03.12.2013
 03.12.2013") 19 OFICINA ESPAÑOLA DE PATENTES Y MARCAS ESPAÑA 11 21 Número de publicación: 1 097 480 Número de solicitud: 1331388 1 Int. CI.: A47G 29/00 (06.01) 12 SOLICITUD DE MODELO DE UTILIDAD U 22 Fecha de presentación:
19 OFICINA ESPAÑOLA DE PATENTES Y MARCAS ESPAÑA 11 21 Número de publicación: 1 097 480 Número de solicitud: 1331388 1 Int. CI.: A47G 29/00 (06.01) 12 SOLICITUD DE MODELO DE UTILIDAD U 22 Fecha de presentación:
A B R Ó C H A T E E L C I N T U R Ó N D E S E G U R I D A D PARA CRECER: UNA ETAPA A LA VEZ
 etapa 3 etapa 4 etapa 1 etapa 2 A B R Ó C H A T E E L C I N T U R Ó N D E S E G U R I D A D PARA CRECER: UNA ETAPA A LA VEZ INFORMACIÓN SOBRE LOS ASIENTOS INFANTILES DE SEGURIDAD DE AUTOMÓVILES Los choques
IMPORTANTE! CONSERVE LAS INSTRUCCIONES PARA UTILIZARLAS EN EL FUTURO.
 Visítenos en nuestro sitio web www.infantino.com para: Videos de instrucción Manuales en otros idiomas Más información del producto Transportador Union Instrucciones del manual del propietario IMPORTANTE!
WOW SECOND SKIN INSTALLATION GUIDE. Steps and recommendations to install and enhance your Second Skin product. WOW SECOND SKIN GUÍA DE INSTALACIÓN
 WOW SECOND SKIN INSTALLATION GUIDE Steps and recommendations to install and enhance your Second Skin product. WOW SECOND SKIN GUÍA DE INSTALACIÓN Pasos y recomendaciones para instalar y ensalzar Second
BW kg MANUAL DE USO INSTRUCTION FOR USE. Apto para Suitable for
 BW012 Apto para Suitable for 0-25 kg MANUAL DE USO INSTRUCTION FOR USE BW012 Instrucciones de uso Sistema de retención infantil Grupo 0 + /1/2 de 0 a 25 kg. (de 0 meses a 6 años aprox.) Instruction for
HOLD. car seat. ...
 strong, sturdy, safe HOLD car seat...www.cosatto.com Cosatto Ltd Bentinck Mill Bentinck Street Farnworth Bolton Lancashire BL4 7EP England T: +44(0)800 014 9252 Calls from BT landlines are free but mobile
Lump Sum Final Check Contribution to Deferred Compensation
 Memo To: ERF Members The Employees Retirement Fund has been asked by Deferred Compensation to provide everyone that has signed up to retire with the attached information. Please read the information from
Seguridad Vial Infantil. Página 1 de 6
 Seguridad Vial Infantil Página 1 de 6 Página 2 de 6 Seguridad Vial Infantil: Tú mejor regalo. Los futuros padres normalmente hacen los últimos preparativos para recibir a sus bebés durante los meses previos
1. Título: 2. Objetivos: 3. Contenidos de la propuesta: 4. Relación con los temas transversales: 5. Sesiones de trabajo: Preventing back injuires.
 1. Título: Preventing back injuires. 2. Objetivos: a) Adquirir vocabulario inglés básico relacionado con la prevención de riesgos por manipulación de cargas. b) Estudiar las formas gramaticales más apropiadas
Manual de instrucciones Performance SPORT
 Asientos de seguridad para niños Manual de instrucciones Performance SPORT Sistema de retención infantil combinado para instalación mirando hacia adelante conforme a la Norma Federal de Seguridad de Vehículos
10 Suplemento del Manual de Vuelo-Barquillas Ultramagic de Pasajeros Discapacitados
 MV04 Rev. 22 ULT RA MA GI C, S.A P á g in a 1 de 12 10 Suplemento del Manual de Vuelo-Barquillas Ultramagic de Pasajeros Discapacitados 10.1 Información General Este suplemento detalla las instrucciones
orientado hacia atrás y hacia adelante Manual del usuario ECE R44 04 Grupo Peso Edad 0+/1 0-18 kg 6m-4a
 orientado hacia atrás y hacia adelante Manual del usuario ECE R44 04 Grupo Peso Edad 0+/1 0-18 kg 6m-4a 1 Gracias por elegir BeSafe izi Combi. BeSafe ha desarrollado este asiento con mucho cuidado, para
Manual de Instrucciones
 3626H-Spanish_Manuals 7/6/10 1:00 PM Page 1 Nivel Láser para Baldosas y Pisos Modelo N.º 40-6616 Manual de Instrucciones Lo felicitamos por haber elegido este Nivel Láser para Baldosas y Pisos. Le sugerimos
Food can take some crazy twists and turns through. Food can take some crazy twists and turns through your operation, so it s your
 Let It Flow Food can take some crazy twists and turns through Food can take some crazy twists and turns through your operation, so it s your responsibility your operation, to make sure so it does it s
Puedes descargar los archivos de instalación de Windows SteadyState en el Centro de descarga Microsoft.
 Windows SteadyState Resumen Windows SteadyState es una utilidad de Microsoft que facilita el trabajo a quienes se encargan de la configuración y mantenimiento de equipos compartidos, de manera que todo
INSTRUCCIONES DE INSTALACIÓN Panel de ducha
 INSTRUCCIONES DE INSTALACIÓN 3866M 3872M Panel de ducha ANTES DE COMENZAR Toda la información contenida en las instrucciones está basada en la información más reciente del producto disponible al momento
Varioguard. Instrucciones de manejo B1, C. ECE R44/04 Gr. 0 + / I - 18 kg
 Varioguard ECE R44/04 Gr. 0 + / I - 18 kg Instrucciones de manejo i B1, C isofix E El equipamiento de su Varioguard (Grupo 0 + / I) A Base de asiento B Elemento de asiento C Forro de asiento C1 Inserto
Accesorio para el brazo del teclado con altura ajustable para LCD de Styleview (SV4X)
") User's Guide Accesorio para el brazo del teclado con altura ajustable para LCD de Styleview (SV4X) User's Guide - English Guía del usuario - Español Manuel de l utilisateur - Français Gebruikersgids -
User's Guide Accesorio para el brazo del teclado con altura ajustable para LCD de Styleview (SV4X) User's Guide - English Guía del usuario - Español Manuel de l utilisateur - Français Gebruikersgids -
MICRODRIVE CON CUBIERTA TRANSPARENTE. MEMORIA USB.
 MICRODRIVE CON CUBIERTA TRANSPARENTE. MEMORIA USB. Estimado Cliente; Gracias por comprar este producto. Su Microdrive Transparente es la consecuencia de muchos meses de investigación. El resultado es un
GARAGE DOOR OPENER CONNECTIVITY HUB QUICK START GUIDE
 GARAGE DOOR OPENER CONNECTIVITY HUB QUICK START GUIDE Thank you for purchasing a Craftsman garage door opener Connectivity Hub enabled with AssureLink technology. Once you have created your account and
Creando Cuentas Nuevas para Padres / Alumnos en el
 Creando Cuentas Nuevas para Padres / Alumnos en el Portal de Internet Aeries de YCJUSD El portal de Internet Aeries proporciona una manera segura para acceder a información sobre la asistencia y el progreso
Manual de Instrucciones para el autoasiento Infantil / Booster
 Manual de Instrucciones para el autoasiento Infantil / Booster Autoasiento infantil Autoasiento booster Certificado para uso en vehículos automotores Reúne o supera todos los requerimientos aplicables
Wear It Right Wearing your elastomeric full face, 4 strap respirator
 Wear It Right Wearing your elastomeric full face, strap respirator. Fully loosen all four head straps. Pull hair back with one hand. Bring facepiece up to face with other hand. Check the seal of your elastomeric
Hoja de Revisiones. Hoja de revisiones
 Manual del Usuario Maticat Alberdi 330 (1672) - Villa Lynch Provincia de Buenos Aires Argentina www.maticat.com info@maticat.com Tel: +54 11 4519-6355 2015 TeP S.A. Hoja de Revisiones Hoja de revisiones
Vamos a Multiplicar Al estilo maya!
 Vamos a Multiplicar Al estilo maya! Resumen de la actividad Esta lección le permite a los estudiantes realizar multiplicación al estilo maya como una actividad de seguimiento a la herramienta interactiva
TUTORIAL: Cómo puedo instalar el Renault Media Nav Toolbox? TUTORIAL: Cómo puedo crear una "huella digital" del dispositivo en un dispositivo de
 TUTORIAL: Cómo puedo instalar el Renault Media Nav Toolbox? TUTORIAL: Cómo puedo crear una "huella digital" del dispositivo en un dispositivo de almacenamiento USB? TUTORIAL: Cómo puedo empezar a utilizar
Coda Infant Carrier. Owner's Manual Manual del propietario
 Read all instructions BEFORE assembly and USE of product. KEEP INSTRUCTIONS FOR FUTURE USE. Lea todas las instrucciones ANTES de armar y USAR este producto. CONSERVE LAS INSTRUCCIONES PARA USO FUTURO.
Instalación y desinstalación de las unidades reemplazables in situ para Secure Access 6000
 Instalación y desinstalación de las unidades reemplazables in situ para Secure Access 6000 No. de pieza: 093-1691-000 Rev. B Esta guía contiene información sobre la instalación y desinstalación de las
Asador mixto (carbón y gas) Manual de instrucciones
 Manual de instrucciones") naturalmente, cocina Asador mixto (carbón y gas) Manual de instrucciones Índice Contenido Asador mixto 4 Primeros pasos (encendido con carbón) 6 Primeros pasos (encendido con gas) 6 Función guiso con olla
naturalmente, cocina Asador mixto (carbón y gas) Manual de instrucciones Índice Contenido Asador mixto 4 Primeros pasos (encendido con carbón) 6 Primeros pasos (encendido con gas) 6 Función guiso con olla
MANUAL DE USUARIO ITO
 MANUAL DE USUARIO ITO ÍNDICE INTRODUCCIÓN 3 INFORMACIÓN DE SEGURIDAD 4 ENSAMBLAJE DE LA ITO 5 PLEGADO DE LA ITO 6 AJUSTES 7 CAMBIO DE RUEDAS 10 MANTENIMIENTO Y CUIDADO 11 TRANSPORTE 12 DATOS TÉCNICOS 15
Steps to Understand Your Child s Behavior. Customizing the Flyer
 Steps to Understand Your Child s Behavior Customizing the Flyer Hello! Here is the PDF Form Template for use in advertising Steps to Understanding Your Child s Behavior (HDS Behavior Level 1B). Because
CALENTAMIENTO SOLAR DE PISCINA
 CALENTAMIENTO SOLAR DE PISCINA MANUAL DE INSTALACION PANELES SOLARES PARA CALENTAMIENTO DEL AGUA EN LA PISCINA A pesar de su simple instalación a través de unos pocos pasos, los paneles solares que han
Qué viva la Gráfica de Cien!
 Qué viva la Gráfica de Cien! La gráfica de cien consiste en números del 1 al 100 ordenados en cuadrilones de diez números en hileras. El resultado es que los estudiantes que utilizan estás gráficas pueden
Easy Repair de Packard Bell
 Easy Repair de Packard Bell Serie EasyNote MZ Instrucciones de reparación de la memoria 7429180004 7429180004 Versión de documento: 1.0 - Mayo 2007 www.packardbell.com Importantes instrucciones de comprobación
Smart Seat ALL-IN-ONE CARSEAT
 TM Smart Seat ALL-IN-ONE CARSEAT Child Restraint Owner s Manual READ THIS MANUAL. Do not install or use this child restraint until you read and understand the instructions in this manual. FAILURE TO PROPERLY
Car Seat/Booster Seat Owner s Manual Model 8486, 8490
 Car Seat/Booster Seat Owner s Manual Model 8486, 8490 READ THIS MANUAL. Do not install or use this car seat until you read and understand the instructions in this manual. FAILURE TO PROPERLY USE THIS CAR
Cuidado! Niños a bordo
 Cuidado! Niños a bordo Bolívar 1012 / CP 1066 Ciudad Autónoma de Buenos Aires - Argentina Tel.Fax: (54 11) 4361-4818 / 4986 / 4988 e-mail: info@isev.com.ar http:www.isev.com.ar Por María Eugenia Bertotti
TTS está orgulloso de ser parte de
 Garantía y Soporte Este producto incluye una garantía de un año que cubre problemas detectados durante un uso normal. Si hace un mal uso de Easi-Cars o abre la unidad, esta garantía quedará invalidada.
EM6053 Vídeo sobre UTP 200m
 EM6053 Vídeo sobre UTP 200m EM6053 Vídeo sobre UTP 200m 2 ESPAÑOL Contenidos Contenidos... 2 1.0 Introducción... 2 1.1 Functions and features... 2 1.2 Contenido del paquete... 3 2.0 Lo que necesita en
Some examples. I wash my clothes, I wash the dishes, I wash the car, I wash the windows. I wash my hands, I wash my hair, I wash my face.
 Reflexive verbs In this presentation, we are going to look at a special group of verbs called reflexives. Let s start out by thinking of the English verb wash. List several things that you can wash. Some
A-MIP 100 Manual de instalación y de funcionamiento
 100 A-MIP 100 Manual de instalación y de funcionamiento A-MIP 100 Índice Instalación Importante 4 Presentación de la vitrina Aivia 4 Etiqueta de identificación 4 Primera apertura 4 Fijación de la vitrina
Trademarks Third-Party Information
 Trademarks campus language training, clt and digital publishing are either registered trademarks or trademarks of digital publishing AG and may be registered in Germany or in other jurisdictions including