LAUNCH INSTRUCTIONS MANUAL -1-
|
|
|
- José Luis Montero Franco
- hace 8 años
- Vistas:
Transcripción
1 LAUNCH INSTRUCTIONS MANUAL -1-
2 INSTRUCTIONS MANUAL -2-

3 INSTRUCTIONS MANUAL INDEX INDEX... 3 INTRODUCTION... 5 CARE OF THE MANUAL... 5 CONDITIONS OF WARRANTY... 5 GENERAL INFORMATION... 6 END-OF-LIFE...6 BATTERY DISPOSAL... 6 SAFETY RULES... 6 PRECAUTIONS FOR HANDLING AND USE OF REFRIGERANT FLUIDS... 7 PRINCIPLES OF OPERATION... 7 SETUP... 7 THE MACHINE... 8 BASIC COMPONENTS... 8 CONTROLS AND CONTROL SYSTEM... 8 FUNCTION SELECTOR KEYBOARD... 8 ALARMS... 8 PRELIMINARY OPERATIONS... 9 PURGING NON-CONDENSABLE GASES... 9 AUTOMATIC PROCEDURE... 9 ASSISTED PROCEDURE RECOVERY AND RECYCLING VACUUM NEW OIL REINTEGRATION TRACER REINTEGRATION (if installed) CHARGING THE A/C SYSTEM ROUTINE MAINTENANCE FILLING THE MACHINE BOTTLE VACUUM PUMP...18 M.1) Oil top-up...18 M.2) Oil change...18 REPLACING THE DRYER FILTERS FILLING THE NEW OIL CONTAINER FILLING THE TRACER CONTAINER (if installed) REPLACING THE COLLAPSIBLE TRACER CARTRIDGE (if installed) EMPTYING THE USED OIL CONTAINER REPLACING THE PRINTER PAPER UNSCHEDULED MAINTENANCE / CALIBRATION
... 15 CHARGING THE A/C SYSTEM... 15 ROUTINE MAINTENANCE... 17 FILLING THE MACHINE BOTTLE... 17 VACUUM PUMP...18 M.1) Oil top-up.")
4 INSTRUCTIONS MANUAL CALIBRATING THE BOTTLE SCALE...20 BOTTLE DATA...21 CALIBRATING THE OIL SCALE...22 SETTINGS...23 LANGUAGE...23 UNITS OF MEASUREMENT...24 WEIGHT PRESSURE TEMPERATURE DATA...25 SERVICES...26 ENABLING TRACER FLUID INJECTION...26 COUNTERS...27 OPERATOR CODE:...28 ENABLING TRACER FLUID INJECTION...28 DATA AND TIME...28 VEHICLE PLATE...29 HEADING AND PRINTOUT CONFIGURATION...29 CUSTOMIZING THE DBA (DATABASE ADVANCED)...29 DATA ENTRY...29 USE...30 DELETION...30 CONTRAST...30 INSTALLING THE USB VIRTUAL COM DRIVE...30 SYSTEM CLEANING (OPTIONAL)...31 STATIC DIAGNOSIS (OPTIONAL)...31 BB-DIAG DIAGNOSIS (OPTIONAL)
...31 STATIC DIAGNOSIS (OPTIONAL)...31 BB-DIAG DIAGNOSIS (OPTIONAL)...31-4-")
5 INSTRUCTIONS MANUAL INTRODUCTION This manual was drafted in accordance with the EEC Guidelines contained in Directive No. 392/89 as amended. This manual contains important information pertinent to operator safety. Read this manual through before beginning operation of the machine. The manufacturer reserves the right to modify this manual and the machine itself with no prior notice. We therefore recommend checking any updates. This manual must accompany the machine in case of sale or other transfer. CARE OF THE MANUAL This manual must be kept for the entire life of the machine and protected against humidity and excessive heat. Take care not to damage this manual in any way during consultation. CONDITIONS OF WARRANTY This product is warranted against any defect in materials and/or construction for a period of 1 (one) year from the date of delivery. The warranty consists of free-of-charge replacement or repair of defective component parts considered same by the Manufacturer. Reference to the machine serial number must be included in any requests for spare parts. If the serial number is not available, contact the manufacturer immediately with valid proof of purchase (invoice or other valid fiscal document). This warranty does not cover defects arising from normal wear, incorrect or improper installation, or phenomena not inherent to normal use and operation of the product. The manufacturer guarantees the perfect suitability of the materials used for packing, in terms both of composition and mechanical strength/resistance. The guarantee does not cover breakdowns attributable to damage suffered during shipping or warehousing or caused by the use of accessories not meeting manufacturer s specifications, or to tampering with or repair of the product by unauthorized personnel. It is of utmost importance that the crates containing the machine be carefully inspected, upon delivery, in the presence of the shipping agent. We recommend performing inspection with extreme care, since damages to the crates due to shocks or dropping are not always immediately visible thanks to the shockabsorbing capacity of today s composite packing materials. The apparent integrity of the packing materials does not exclude possible damage to the goods, despite the due care taken by the manufacturer in packing them. NOTE: Regarding the above, the Manufacturer reminds the Customer that according to international and national laws and regulations in force the goods are shipped at the sole risk of the latter and, unless otherwise specified in the confirmation of order phase, the goods are shipped uninsured. The Manufacturer therefore declines any and all responsibility in merit of CLAIMS for damages due to shipping, loading and unloading, and unpacking. A product for which repair under guarantee is requested must be shipped to the manufacturer under the customer s exclusive responsibility and at the customer s exclusive expense and risk. In order to avoid damage during shipping for repairs, the manufacturer s original packing must always be used. The manufacturer declines any and all responsibility for damage to vehicles on which recovery/recycling and recharging are performed if said damage is the result of unskillful handling by the operator or of failure to observe the basic safety rules set forth in the instruction manual. This warranty replaces and excludes any other warranty or guarantee that the seller is required to provide under law or contract and defines all the customer s rights in regard of faults and defects and/or scarce quality in the products as purchased. The warranty will expire automatically at the end of the twelve-month period or whenever even one of the following occurs: failure to perform maintenance or erroneous maintenance procedures, use of unsuitable lubricants and/or tracer fluids, inept or improper use, repairs performed by unauthorized personnel and/or with non-original spare parts, damage caused by shocks, fires, or other accidental events. -5-

6 GENERAL INFORMATION INSTRUCTIONS MANUAL Machine identification information is printed on the data plate on the rear of the machine (see Figures 1 and 2). Overall machine dimensions: Height: 1060 mm Width: 500 mm Depth: 520 mm Weight: 90 kg Like any equipment with moving parts, the machine inevitably produces noise. The construction system, paneling, and special provisions adopted by the Manufacturer are such that during work the average noise level of the machine is not in excess of 70 db (A). END-OF-LIFE The symbol on the right indicates that in accordance with Directive 2002/96/EC the machine may not be disposed of as ordinary municipal waste but must be delivered to a specialized center for separation and disposal of WEEE (Waste Electrical and Electronic Equipment) or be returned to the dealer in case of purchase of a new machine. Current legislation provides severe sanctions in the case of disposal of WEEE into the environment. If improperly used or disposed of into the environment, electrical and electronic equipment can release substances dangerous for the environment and for human health. BATTERY DISPOSAL The machine uses an electronics card containing a Nickel-metal hydride (NiMH) battery (ref.: bt, see Fig.12). When discharged, it must be removed by expert personnel trained in machine demolition. SAFETY RULES The MACHINE is designed for use in recovering the R134a refrigerant fluid used in the airconditioning (A/C) systems of motor vehicles. The MACHINE is designed to be used by qualified personnel only; moreover, it can be used correctly only if the operator has read this manual and is aware of the basic safety information contained in this manual, including the following. Wear protective gloves and goggles. Do not expose the machine to direct sunlight or rain. Use only in well-ventilated work areas. Before performing any operation, check the vehicle use and maintenance manual for the type of refrigerant fluid used by the A/C system. Do not smoke in proximity to the machine while it is in operation. Do not use the MACHINE in proximity to sources of heat, open flames, or sparks. Check whenever the engine is turned off that the ignition key is turned to the full OFF position. Always close all the valves on the MACHINE before connecting it to the A/C system of the vehicle. Connect only the machine hose supplied with the RED quick-connect coupling to the highpressure branch of the A/C system. Connect only the machine hose supplied with the BLUE quick-connect coupling to the low-pressure branch of the A/C system. Keep the connection hoses away from moving parts and rotating elements such as cooling fans, alternators, etc. Keep the connection hoses away from hot objects and elements such as engine exhaust pipes, radiators, etc. Fill the A/C system only with the quantity of refrigerant recommended by the manufacturer. Never exceed said quantity. Check the oil levels at the beginning of each operation. Always top up with the correct quantity of oil. Before connecting the MACHINE to the electrical supply, check that voltage and frequency match the values shown into the CE label. Never fill the bottle to more than 80% of maximum capacity in order to leave an expansion chamber for absorbing any pressure increases. Never touch the valves on the refrigerant bottle installed on-board the MACHINE. Dispose of the oil extracted from the A/C system and from the vacuum pump in suitable containers for used oils. Replace the filters punctually at the prescribed replacement times. Use only filters -6-

7 INSTRUCTIONS MANUAL recommended by the manufacturer. Take care never to use the vacuum pump oil in the A/C system, or vice-versa. Failure to observe any of the above safety precautions will invalidate all forms of warranty on the MACHINE. PRECAUTIONS FOR HANDLING AND USE OF REFRIGERANT FLUIDS Refrigerant fluids expand to the gaseous state in standard environmental conditions. In order that they may be shipped and used they must be compressed into suitable bottles. We therefore recommend observing all the general precautions applicable to handling of pressurized containers. In the case of R134a in particular, we suggest the following special precautions. Avoid inhaling highly concentrated vapors even for short periods of time, since such vapors can cause loss of consciousness or death. R134a is not flammable, but if the vapor is exposed to open flames or incandescent surfaces it may undergo thermal decomposition and form acid substances. The acrid and pungent odor of these products of decomposition is sufficient to signal their presence. We therefore recommend avoiding use of R134a near open flames and incandescent elements. There exists no evidence of risks deriving from transdermal absorption of R134a Nevertheless, due to the low boiling point of the liquid, it is advisable to wear protective garments such as to ensure that no jets of liquid or gas can come into contact with the skin. The use of goggles to avoid contact with the eyes is especially recommended, since the refrigerant liquid or gas can cause freezing of the ocular fluids. Moreover, we strongly advise users to avoid dispersing the R134a refrigerant fluid utilized in the machine since it is a substance that contributes to raising the temperature of the planet, with a global warming potential(gwp) of PRINCIPLES OF OPERATION In a single series of operations, the machine permits recovering and recycling refrigerant fluids with no risk of releasing the fluids into the environment, and also permits purging the A/C system of humidity and deposits contained in the oil. The machine is in fact equipped with a built-in evaporator/separator that removes oil and other impurities from the refrigerant fluid recovered from the A/C system and collects them in a container for that purpose. The fluid is then filtered and returned perfectly recycled to the bottle installed on the machine. The machine also permits running certain operational and seal tests on the A/C system. SETUP The machine is supplied fully assembled and tested. Referring to Figure 3, mount the hose with the BLUE quick-connect coupling on the male threaded connector indicated by the BLUE LOW PRESSURE symbol and the RED quick-connect coupling on the male threaded connector indicated by the RED HIGH PRESSURE symbol. Referring to Figure 4, remove the protection under the refrigerant scale as follows:: - Loosen the nut [2]. - Completely loosen the screw [1]. - Keep the screw [1], the nut [2], and the knurled washer [4] for possible future use. NOTE: in the event that the equipment has to be transported, the refrigerant bottle scale should be locked in place as follows: - Procure two size 10 wrenches. - Tighten the nut [2] almost completely onto the screw [1]. - Insert the knurled washer [4] onto the screw [1]. - Turn the screw [1] just a few times on the threaded bush [6]. - Switch the machine on. - Tighten the screw [1] until the display signals ZERO availability. - Tighten the nut [2] forcefully (using the second wrench to block the screw [1]). - Check that the screw [1] is actually locked, if necessary repeat the locking operation from the beginning. -7-

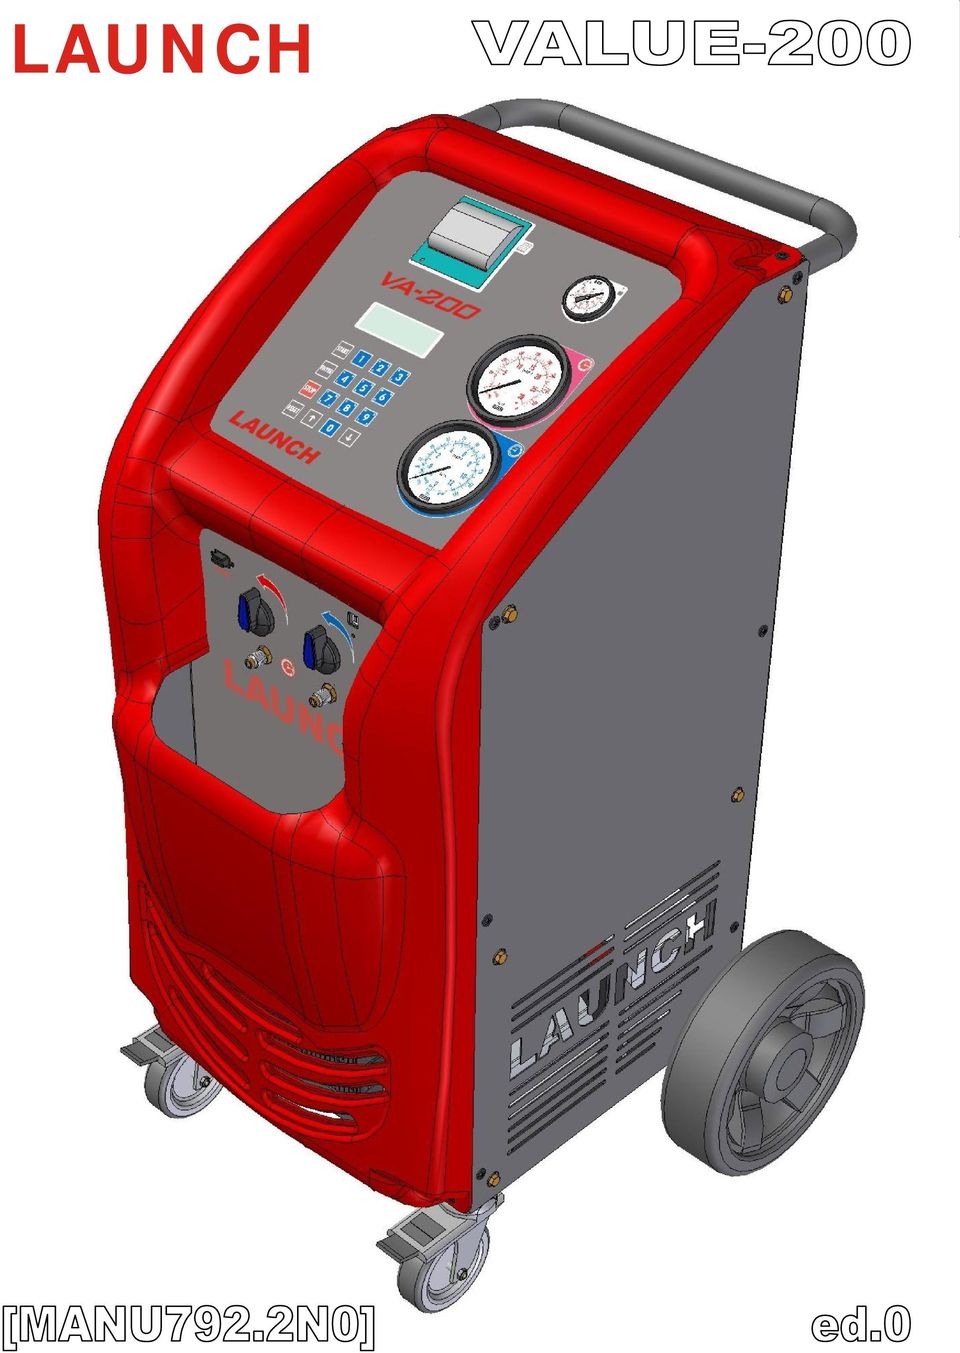
8 THE MACHINE INSTRUCTIONS MANUAL BASIC COMPONENTS Refer to Figures 5, 6, 7 and 8. z) Tracer bottle (if installed) a) Control consoles b) Taps h) Wheels l) High/Low Pressure threaded connectors m) Used oil tank n) New oil tank bi) Oil scale d) Bottle e) Drying filters o) Electronic scale r) Heating resistance ps) Serial port i) Main switch j) Socket for electrical supply plug k) Fuse c) Moisture indicator f) Vacuum pump u) USB port v) Air purge valve w) collapsible tracer cartridge (if installed) CONTROLS AND CONTROL SYSTEM Refer to Figure 9. A1) High pressure gauge A2) Low pressure gauge A3) Keyboard A4) Bottle pressure gauge A5) LCD: 4 lines, 20 characters A6) Printer FUNCTION SELECTOR KEYBOARD STOP: Press to interrupt the operation being performed in the case of the principal functions: recovery - oil discharge - vacuum/oil reintegration - charging). Press START to resume operation from the point of interruption. Pressing STOP during an alarm state, error state, or end-of-operation silences the audible alarm. RESET: Press to interrupt the operation being performed. The procedure may be restarted from the beginning. ENTER: Press to confirm the procedure or operation flashing on the LCD. : Press to move downward from one procedure or operation to another within a menu. : Press to move upward from one procedure or operation to another within a menu. START: Press to launch the procedure or operation shown on the display. ALARMS HIGH PRESSURE ALARM: Beeper and led advise when the pressure of the fluid in the circuit reaches 17.5 bar. The recovery operation is automatically interrupted. FULL BOTTLE ALARM: Beeper and led advise when the bottle is filled to more than 80% of maximum capacity; that is, 10 kg. The RECOVERY operation is automatically interrupted (to cancel this alarm, charge one or more A/C systems before recovering any more refrigerant). EMPTY BOTTLE ALARM: Beeper and led advise when the quantity of refrigerant fluid contained in the bottle is low. SERVICE ALARM: Beeper and led advise whenever the total recovered refrigerant amounts to 150 kg. To deactivate the alarm, replace the filters and the vacuum pump oil. A code for canceling the alarm is supplied with the spare filters. AIR PURGE ALARM: Beeper and led advise when there is air inside the bottle when the machine is switched on. To deactivate the alarm, purge the air from the bottle. INSUFFICIENT GAS ALARM: Beeper and LED advise when the charging quantity set exceeds the difference between availability and bottle minimum. -8-
 CONTROLS AND CONTROL SYSTEM Refer to Figure 9.")
9 PRELIMINARY OPERATIONS INSTRUCTIONS MANUAL Check that the main switch (i) is set to O. Check that all the MACHINE taps are closed. Connect the MACHINE to the electrical supply and switch on. Check that the vacuum pump oil level indicator shows at least one-half full. If the level is lower, add oil as explained in the MAINTENANCE section. Check that in the new oil container (n) there are at least 100 cc of the oil recommended by the manufacturer of the vehicle A/C system. Check that the oil level in tank (m) is < 200 cc. Check on the MACHINE display that there are at roughly 3 kg of refrigerant in the bottle. Should this not be the case, fill the on-board MACHINE bottle from an external bottle of appropriate refrigerant following the procedure described in the ROUTINE MAINTENANCE section. PURGING NON-CONDENSABLE GASES Before every use, check if there is air in the bottle: select the DATA MENU and read the bottle temperature. Compare the bottle pressure with the values given in the table; pull the ring of the safety valve until the bottle pressure reading corresponds to the values given in the table. Example: Bottle Temperature = 20 C. The bottle pressure must be brought to 5.2 bars. T ( C) P (bar) T ( C) P (bar) T ( C) P (bar) T ( C) P (bar) T ( C) P (bar) T ( C) P (bar) T ( C) P (bar) T ( C) P (bar) T ( C) P (bar) AUTOMATIC PROCEDURE In the automatic mode, all the operations are performed automatically: recovery and recycling, oil discharge, vacuum, new oil reintegration, and charging. The values for the quantity of gas recovered, quantity of oil recovered, vacuum time, quantity of oil reintegrated, and quantity of gas charged into the system are automatically printed at the end of each single operation. Connect the hoses to the A/C system with the quick-connect couplings bearing in mind that BLUE must be connected to the low-pressure side and RED to high pressure. If the A/C system is equipped with a single quick-connect coupling for high or low pressure, connect only the relative hose. Check that the high- and low-pressure taps are closed. Start the vehicle engine and switch on the air conditioner. Allow both to run for about 5 to 10 minutes with the passenger compartment fan at full speed. Switch off the vehicle engine. The machine is equipped with a 4-line LCD display, maximum 20 characters per line. On the menus the selected line flashes; in this manual it is enclosed in quotation marks. Select the automatic procedure; that is, press ENTER when Automatic Procedure flashes on the LCD. The following message will be displayed: ATTENTION USING PAG OIL OR TRACER IN HYBRID VEHICLES MAY DAMAGE THE COMPRESSOR. USE ONLY SUITABLE OIL WITH A SEPARATE DEVICE. Press ENTER to continue. -9-

10 <AUTOMATIC PROCEDURE> ASSISTED PROCEDURE NEXT MENU Gas avail xxxxx g INSTRUCTIONS MANUAL ENTER Type in the vacuum time or confirm the previous value. To simply confirm, press ENTER. To type in, use keys 0 to 9. <VACUUM xx min> AUTOMATIC OIL OIL xx CC FILLING xxxx g 2 0 After vacuum time has been confirmed, the Automatic Oil message will flash. To confirm, press ENTER <VACUUM 20 min> AUTOMATIC OIL OIL xx CC FILLING xxxx g ENTER If Automatic Oil is confirmed, when the vacuum operation is completed the system will automatically reintegrate with the same quantity of oil extracted during recovery. VACUUM 20 min <AUTOMATIC OIL> OIL xx CC FILLING xxxx g ENTER VACUUM xx min AUTOMATIC OIL OIL xx CC FILLING xxxx g <VACUUM 20 min> AUTOMATIC OIL OIL xx CC FILLING xxxx g VACUUM 20 min <AUTOMATIC OIL> OIL xx CC FILLING xxxx g VACUUM 20 min AUTOMATIC OIL <FILLING xxxx g> In order to reintegrate a quantity of oil different from that discharged following recovery, set as follows. After confirmation of the vacuum time, Automatic Oil will begin to flash. Press the down arrow ( ) key to move to Oil xx cc, then use the keys 0 to 9 to type the volume of oil to be automatically reintegrated after vacuum, and press ENTER VACUUM 20 min <AUTOMATIC OIL> OIL xx CC FILLING xxxx g VACUUM 20 min AUTOMATIC OIL <OIL xx CC> FILLING xxxx g 30 VACUUM 20 min AUTOMATIC OIL <OIL 30 CC> FILLING xxxx g ENTER VACUUM 20 min OIL 30 CC <FILLING xxxx g> After AUTOMATIC OIL or the quantity of oil to be reintegrated has been confirmed, Charging xxxx g will begin to flash. Set the quantity of fluid to be reintegrated as follows: -10-

11 INSTRUCTIONS MANUAL 1. MANUAL OPERATION: set the quantity of refrigerant in grams for the A/C system to be charged. For example, for 850g press key 8, key 5 and key 0, Charging 850 g. After setting the quantity, confirm by pressing the ENTER key. VACUUM 20 min AUTOMATIC OIL <FILLING xxxx g> ENTER Open high and low pressure, then press START. VACUUM 20 min OIL 30 CC <FILLING xxxx g> On most systems, the quantity of fluid to be reintegrated is given on the plate inside the engine compartment of the vehicle. If you do not know the correct quantity, consult the relevant manuals. 2. The DATABASE BASIC may be used if installed. Press the key. The following will appear on the display INSERT CODE CAR MODEL 000 Press ENTER to quit Find the relevant vehicle code on the table provided. Use the numerical keypad to enter the code. Then press the ENTER key to confirm. The following will appear on the display: VACUUM 20 min OIL 30 CC <FILLING wxyz g> where wxyz refers to the grams of refrigerant for the vehicle selected. The machine is now ready to enter the correct quantity of refrigerant. Confirm by pressing the ENTER key. Please contact your retailer if you wish to install the DATABASE BASIC (DBB). 3. The DATABASE ADVANCED (DBA) may be used if installed: Press the key, the following will appear on the display <ALFA ROMEO> AUDI BMW CHRYSLER/JEEP Use the arrow keys ( ) to select the required vehicle brand and press ENTER to confirm. The display will now show the various models (for example, if the brand chosen was FORD): * <COUGAR> ESCORT ESCORT D FIESTA Use the arrow keys ( ) to select the model required and press ENTER to confirm. The following will appear on the display: * -11-

12 INSTRUCTIONS MANUAL VACUUM 20 min OIL 30 CC <FILLING wxyz g> where wxyz refers to the grams of refrigerant for the vehicle selected. The machine will be ready to enter the correct quantity of refrigerant. Confirm by pressing the ENTER key. Please contact your retailer if you wish to install the DATABASE ADVANCED (DBA. Once the quantity of gas has been entered, the following message will appear on the display (only for machines with tracer function): TRACER NO TRACER XXcc Press ENTER With TRACER NO flashing, press ENTER to confirm that you do NOT want to inject the tracer or press the DOWN ARROW to move to TRACER. With TRACER flashing, enter the desired quantity and press ENTER to confirm. Open the high and low pressure taps on the machine and press the START key to begin the refrigerant recovery/recycling phase, which will be signaled on the LCD as Recovery/Recycling. Upon completion of recovery, the machine will stop and discharge, while automatically displaying the used oil extracted from the A/C system during the recovery phase. The oil discharge operation lasts 4 minutes. If any residual refrigerant in the A/C system should increase in pressure during this phase, the machine will automatically begin recovering the refrigerant. Upon completion of discharge, the machine automatically goes on to running the vacuum phase for the preset time. After the first 10 minutes of this phase, the machine will test for leaks in the A/C system (WARNING! If vacuum time < 10 minutes this test is excluded). If leaks are found, the machine will stop automatically and display the A/C SYSTEM LEAKS alarm. Detection of micro-leaks is not guaranteed. If the A/C system seal is good, the machine will continue with the vacuum phase. Upon completion of the vacuum phase, new oil will be automatically reintegrated: the volume will be equal to that of the used oil discharged or to the volume set by the operator. If the tracer function is installed, the quantity of tracer set by the operator will be automatically reintegrated. When completed, the system will go on to charging with the preset quantity of refrigerant. NOTE: Rarely, charging may not run to completion due to pressure balance. In this case, close the high pressure tap (leaving the low-pressure side open), and switch on the A/C system. When the charging phase is completed the machine will display: End of filling Procedure Press RESET Close the high- and low-pressure taps Start the vehicle engine and the A/C system and allow both to run for at least 3 minutes. At this point the system will be at steady state and it will be possible to check the high and low pressure values on the relative pressure gauges. Disconnect ONLY the high-pressure quick-connect coupling (if necessary, switch the engine off). Then, with the A/C system still running, open the high and low pressure taps to force the A/C system to draw up the refrigerant contained in the hoses. After about 1 minute, disconnect the low-pressure coupling of the machine from the vehicle A/C system and switch off the engine. Turn the main switch (i) to OFF (0). -12-

13 INSTRUCTIONS MANUAL N.B. The automatic procedure may be run even if the A/C system is empty. In this case the machine will begin with the vacuum phase. When working with A/C systems with a single high-pressure coupling, set the charging quantity at about 100g in excess of the required quantity, since in this case it will be impossible to recover the residual refrigerant from the hoses. NOTE: If STOP is pressed during recovery, the following screen will be displayed: Procedure paused. START to continue STOP to abort procedure Press START to restart the procedure. If STOP or RESET is pressed the following message will be displayed: ATTENTION STOPPING RECOVERY BEFORE OIL DISCHARGE MAY DAMAGE THE COMPRESSOR START TO CONTINUE Press START to restart the procedure; press STOP or RESET to return to the MAIN MENU. If RESET is pressed during recovery, the following message will be displayed: ATTENTION STOPPING RECOVERY BEFORE OIL DISCHARGE MAY DAMAGE THE COMPRESSOR START TO CONTINUE START PER CONTINUARE Press START to restart the procedure; press STOP or RESET to return to the MAIN MENU.. ASSISTED PROCEDURE In the assisted procedure mode, all the operations can be performed singly to the exception of the recovery/recycling phase, which is automatically followed by used oil discharge. The values for the quantity of gas recovered, quantity of oil recovered, vacuum time, quantity of oil reintegrated, and quantity of gas charged into the system are automatically printed at the end of each single operation. RECOVERY AND RECYCLING Connect the hoses to the A/C system with the quick-connect couplings, bearing in mind that BLUE must be connected to the low-pressure side and RED to high pressure. If the A/C system is equipped with a single quick-connect coupling for high or low pressure, connect only the relative hose. Check that the high- and low-pressure taps are closed. Start the vehicle engine and the air conditioner and allow both to run for 5 to 10 minutes with the passenger compartment fan at full speed. Switch off the vehicle engine. Select the assisted procedure by pressing ENTER when Assisted Procedure flashes on the LCD. Select recovery and recycling by pressing ENTER when Recovery/Recycling flashes on the LCD. Open the high and low pressure taps on the machine and press the START key to begin the refrigerant recovery/recycling phase, which will be signaled on the LCD as Recovery/Recycling. During this phase, the machine displays the quantity of refrigerant recovered, in grams (g). -13-

14 INSTRUCTIONS MANUAL Upon completion of recovery, the machine will stop and discharge while automatically displaying the used oil extracted from the A/C system during the recovery phase. The oil discharge operation lasts 4 minutes. If any residual refrigerant in the A/C system should increase in pressure during this phase, the machine will automatically begin recovering the refrigerant. NOTE: If STOP is pressed during recovery, the following screen will be displayed: Procedure paused. START to continue STOP to abort procedure Press START to restart the procedure. If STOP or RESET is pressed the following message will be displayed: ATTENTION STOPPING RECOVERY BEFORE OIL DISCHARGE MAY DAMAGE THE COMPRESSOR START TO CONTINUE Press START to restart the procedure; press STOP or RESET to return to the MAIN MENU. If RESET is pressed during recovery, the following message will be displayed: ATTENTION STOPPING RECOVERY BEFORE OIL DISCHARGE MAY DAMAGE THE COMPRESSOR START TO CONTINUE START PER CONTINUARE Press START to restart the procedure; press STOP or RESET to return to the MAIN MENU.. VACUUM Use the quick-connect couplings to connect the hoses to the A/C system, bearing in mind that BLUE must be connected to the low pressure side and RED to high pressure. If the system is equipped with a single quick-connect coupling for high or low pressure, connect only the relative hose. Select the assisted procedure by pressing ENTER when Assisted Procedure flashes on the LCD. Select the vacuum operation by pressing ENTER when the message Vacuum xx min. flashes on the LCD. Set the vacuum time only if different from that previously used. Press ENTER to confirm. Open the high- and low-pressure taps of the machine and press START. After the first 10 minutes of this phase, the machine will test for leaks in the A/C system (WARNING! If vacuum time < 10 minutes this test is excluded). If leaks are found, the machine will stop automatically and display the A/C SYSTEM LEAKS alarm. Detection of micro-leaks is not guaranteed. If the A/C system seal is good, the machine will continue with the vacuum phase. NEW OIL REINTEGRATION This operation can be carried out ONLY following a vacuum operation and before charging. Select the assisted procedure by pressing ENTER when the ASSISTED PROCEDURE message flashes on the LCD. Select the OIL by pressing ENTER when OIL XX CC flashes on the LCD. The following message will be displayed: -14-

15 INSTRUCTIONS MANUAL ATTENTION USING PAG OIL OR TRACER IN HYBRID VEHICLES MAY DAMAGE THE COMPRESSOR. USE ONLY SUITABLE OIL WITH A SEPARATE DEVICE. Press ENTER to continue. Set the volume of new oil to be reintegrated, in cc. Press ENTER to confirm. Open the highand low-pressure taps (if the A/C system is equipped with a single quick-connect coupling for high or low pressure, open only the relative tap) of the machine and press START. TRACER REINTEGRATION (if installed) This operation can be carried out only following a vacuum procedure and before charging. Select the assisted procedure when the ASSISTED PROCEDURE" message flashes on the LCD, and press ENTER. Select OIL AND TRACER. When Oil xx cc flashes, select TRACER xx CC and set the volume of tracer to be reintegrated, in cc. Press ENTER to confirm. The following message will be displayed: ATTENTION USING PAG OIL OR TRACER IN HYBRID VEHICLES MAY DAMAGE THE COMPRESSOR. USE ONLY SUITABLE OIL WITH A SEPARATE DEVICE. Press ENTER to continue. Open the high- and low-pressure taps (in the case of an A/C system with only one pressure coupling high or low open only the relative tap) on the machine and press START. CHARGING THE A/C SYSTEM Select the ASSISTED PROCEDURE by pressing ENTER when the Assisted Procedure message flashes on the LCD. Select charging by pressing ENTER when CHARGING XXXX G flashes on the LCD. Set the quantity of fluid to be reintegrated as explained below. 1. MANUAL OPERATION: set the quantity of refrigerant in grams for the A/C system to be charged. For example, for 850g press key 8, key 5, and key 0, Charging 850 g. After setting the quantity, pressing ENTER to confirm. On most systems the quantity of fluid to be reintegrated is given on the plate inside the engine compartment of the vehicle. If you do not know the correct quantity, consult the relevant manuals. 2. The DATABASE BASIC ( DBB) may be used if installed. Press the key; the following will appear on the display: INSERT CODE CAR MODEL 000 Press ENTER to quit Find the relevant vehicle code on the table provided. Use the numerical keypad to enter the code. Then press the ENTER key to confirm. The following will appear on the display: -15-
 This operation can be carried out only following a vacuum procedure and before charging.")
16 INSTRUCTIONS MANUAL VACUUM 20 min OIL 30 CC <FILLING wxyz g> where wxyz refers to the grams of refrigerant for the vehicle selected. The machine will be ready to enter the correct quantity of refrigerant. Confirm by pressing the ENTER key. Please contact your retailer if you wish to install the DATABASE BASIC (DBB).. 3. The DATABASE ADVANCED (DBA) may be used if installed: Press the key; the following will appear on the display: <ALFA ROMEO> AUDI BMW CHRYSLER/JEEP Use the arrow keys ( ) to select the required vehicle brand and press ENTER to confirm. The display will now show the various models (for example, if the brand chosen was FORD): <COUGAR> ESCORT ESCORT D FIESTA Use the arrow keys ( ) to select the model required and press ENTER to confirm. The following will appear on the display: VACUUM 20 min OIL 30 CC <FILLING wxyz g> where wxyz refers to the grams of refrigerant for the vehicle selected. The machine will be ready to enter the correct quantity of refrigerant. Confirm by pressing the ENTER key. Please contact your retailer if you wish to install the DATABASE ADVANCED (DBA). Open the high-pressure tap on the machine and press the START key (in the case of an A/C system with a single high- or low-pressure coupling, open only the relative tap on the machine). NOTE: Rarely, charging may not run to completion due to pressure balance. In this case, close the high pressure tap (leaving the low-pressure side open), and switch on the A/C system When the charging phase is completed the machine will display: End of filling Procedure Press RESET Close the high- and low-pressure taps. Start the vehicle engine and switch on the A/C system, allowing both to run for at least 3 (three) minutes. At this point the system will be at steady state and it will be possible to check the high and low pressure values on the relative pressure gages. Disconnect ONLY the high-pressure quick-connect coupling (if necessary, switch the engine off). Then, with the A/C system still running, open the high- and low-pressure taps to force the A/C system to draw up the refrigerant contained in the hoses. Allow about one minute, then remove the low pressure coupling of the machine from the vehicle A/C system and switch the engine off. Turn the main switch (i) to OFF (0). N.B. - The automatic procedure may be run even if the A/C system is empty. In this case the machine will begin with the vacuum phase. When working with A/C systems with a single -16-

17 INSTRUCTIONS MANUAL high-pressure coupling, set the charging quantity ate about 100g in excess of the required quantity, since in this case it will be impossible to recover the residual refrigerant from the hoses. ROUTINE MAINTENANCE FILLING THE MACHINE BOTTLE This operation must be performed whenever the available refrigerant fluid in the bottle is less than 3 kg and must in any case be performed when the empty bottle alarm is displayed. Procure a bottle of R134a gas and connect the liquid side coupling of the external bottle to the high pressure hose (if the external bottle is not supplied with a liquid side coupling, upend it to recover liquid refrigerant). Open the tap of the external bottle and the high-pressure tap of the machine. If the external bottle is not supplied with a suction device, turn it upside down to obtain a higher delivery rate. Switch the machine on. The MAIN MENU will appear after a few seconds: AUTOMATIC PROCEDURE ASSISTED PROCEDURE NEXT MENU Gas avail XXXX g Select NEXT MENU: CALIBRATION DATA AND CONFIGURAT. SERVICE ALARM <BOTTLE FILLING> Select BOTTLE FILLING:* BOTTLE FILLING Quantity xx kg Min: x max: xx kg Press START Set the quantity of refrigerant to be transferred to the machine bottle (the quantity must be between the limit values suggested by the machine) and press START to confirm:* Use the HP hose to connect external bottle and press START. Press START: Open external bottle tap, open HP tap, and press START. Press START: -17-

18 INSTRUCTIONS MANUAL FILLING BOTTLE 0 g The machine will now fill the machine bottle with the preset quantity ± 500g. When the quantity minus 500 grams is reached, the machine will stop and display: FILLING BOTTLE Close external bottle tap Press Start Close the bottle tap and press START. The machine will stop automatically after having recovered the residual refrigerant from the hoses. Close the high-pressure tap. Disconnect the external bottle. Switch the machine off. VACUUM PUMP Perform the operations listed below on a routine basis in order to ensure good operation of the vacuum pump: M1) Oil top-up. M2) Oil change. When topping-up or replacing the pump oil, use only the oil recommended by the manufacturer. Contact your retailer for information concerning the correct type of oil. M.1) Oil top-up This operation must be performed when the level of the oil falls to less than half on the indicator (4) (refer to Figure 10). NOTE: in order to correctly check the oil level, run the pump for at least 1 minute (running a vacuum procedure in the hose for 1 minute) so that the oil fluidifies. Check the oil level when the pump stops. To refill the oil, perform the steps listed below in the order given. Disconnect the MACHINE from the mains supply. Locate the oil cap (2) and screw it completely off. The oil must be added through the hole in which the oil cap was lodged (2). Add oil a little at a time, waiting for the level to rise before each successive addition, until the oil level is about ½ cm above the red mark on the indicator (4). Replace the oil cap (2) and tighten down. M.2) Oil change The vacuum pump oil must be replaced every 150 working hours and in any case every time the refrigerant filters are replaced. The oil must also be replaced whenever it changes color due to absorption of humidity. Before beginning the oil change procedure, procure a container of at least 500 cc capacity in which to collect the used oil. The pump contains about 500 cc of oil. Use only the oils recommended by the manufacturer (consult your retailer). 1) Disconnect the machine from the mains supply. 2) Unscrew the filling cap 2 (refer to Fig. 10). 3) Unscrew the drain cap 3. 4) Allow all the oil to run out into a disposal container (with height < 10 cm). 5) Close the drain cap 3. 6) Pour in new oil through the filling hole, opened previously, until the level rises to the midpoint on the indicator 4. 7) Replace the oil cap 2 and tighten. REPLACING THE DRYER FILTERS Replace the filters whenever the machine gives the service alarm during the first ten seconds of operation or whenever the humidity gage ( c in Fig. 6) signals the presence of humidity in -18-
 Oil top-up. M2) Oil change.")
19 INSTRUCTIONS MANUAL the circuit (inner circle yellow). Before performing any operation, check that the replacement filters are the same types as those installed on the machine. Then proceed as described below (refer to Fig. 11): 1) Disconnect the machine from the electrical supply 2) Wear protective gloves and glasses 3) Remove the rear plastic cover from the machine. 4) Close the taps on the bottle. 5) Close the tap (1) on the filter (4). 6) Connect the low pressure quick-connect coupling to the male connector (2) of the filter (4). 7) Connect the machine to the electrical supply. 8) Carry out a recovery operation (note: the low pressure tap should be open). 9) When zero bar is reached, immediately close the tap (3) on the filter (5) and press Stop or Reset. 10) Disconnect the machine from the electrical supply. 11) Disconnect the low pressure quick-connect coupling from the connector (2) on the filter (4). 12) Remove the used filters and install new ones, respecting the direction of the arrows. IMPORTANT: Filter replacement must be performed as quickly as possible in order to avoid possible contamination by moisture in the ambient air. 13) Open the tap (1) under the filter (4) and the tap (3) on the filter (5). 14) Open the taps on the bottle. NOTE: If possible, check the seal on the couplings of the new filters, using an electronic leak tester. 15) Replace the rear plastic cover on the machine. 16) Reconnect the machine to the electrical supply and switch on. 17) Select NEXT MENU, and enter SERVICE ALARM. 18) Key in the filter code to cancel the alarm. If the filter code is not available, call the Service Center. 19) Recover about 500g of gas to charge the machine circuit. 20) Switch the machine off. 21) Disconnect the machine from the electrical supply. FILLING THE NEW OIL CONTAINER It is good practice to fill the oil container whenever the oil level falls below 100 cc in order to guarantee that there will be sufficient oil for topping up during successive operations. Types of oil: use only synthetic (polyester) oils or the oils recommended by the manufacturer. Always refer to the information provided by the A/C system manufacturer. Procedure: remove the container from its lodging. Hold the cap and unscrew the container. Fill the container with the correct quantity of oil for compressors, of suitable type and grade. Screw the container back into the cap while holding the latter in place. Replace the container, taking care not to exert pressure on the scale in order not to damage it. FILLING THE TRACER CONTAINER (if installed) It is good practice to refill the tracer container whenever the level drops below 50 cc, in order to have a sufficient reserve of tracer for carrying out subsequent fillings. Procedure: Lift the tracer container out of its lodging. Unscrew the container while holding the cap in place and fill the container with the required quantity of tracer for compressors. Screw the container back onto the cap and return to its lodging, taking great care not to exert pressure on the scale in order not to damage it. N.B.: Using tracers not recommended by the manufacturer will invalidate the warranty. REPLACING THE COLLAPSIBLE TRACER CARTRIDGE (if installed) We recommend replacing the tracer cartridge when tracer level is low (a few ccs) in order to always have sufficient reserves for use. -19-
 Connect the machine to the electrical supply. 8) Carry out a recovery operation (note: the low pressure tap should be open).")
20 INSTRUCTIONS MANUAL Refer to collapsible tracer cartridge precautions [MANU008.ATS]. EMPTYING THE USED OIL CONTAINER This operation must be performed whenever the oil level exceeds 200 cc. Procedure: remove the container from its lodging very carefully and without exerting pressure on the scale. Unscrew the container while holding the cap in place; empty the used oil into a suitable container for used oils. Screw the container back on while holding the cap in place. Carefully replace the container in its lodging without exerting pressure on the scale. N.B.: In order to avoid damage to the oil scale, never exert pressure on it either from above or from below. REPLACING THE PRINTER PAPER Use only heat-sensitive paper of the type described below. Paper width: 58 mm Maximum paper roll diameter: 40mm UNSCHEDULED MAINTENANCE / CALIBRATION Perform this operation whenever the values displayed on the LCD do not correspond to real values. WARNING: The operations listed below must be performed with maximum attention and care. In particular, always observe the following precautions. Always place the weights at the center of the scale plate. Never exert pressure on the oil scale. Always recover the gas in the high- and low-pressure hoses before beginning calibration of the transducers. To enter the CALIBRATION MENU: Switch the machine on. The MAIN MENU will appear after a few seconds: AUTOMATIC PROCEDURE ASSISTED PROCEDURE NEXT MENU Gas Avail xxxxx G Select NEXT MENU: <CALIBRATION> DATA AND CONFIGURAT. SERVICE ALARM BOTTLE FILLING Now select CALIBRATION from the menu: To enter calibration insert code... And press ENTER Type the code 0791 and press ENTER to confirm. CALIBRATING THE BOTTLE SCALE Disconnect the machine from the electrical supply. Procure a known reference weight from 16 to 18 kg. Remove the plastic cover on the rear of the machine to access the machine bottle. Close the blue and red taps on the bottle. Unscrew the bottle lock nut (3 Fig. 4). Separate the heating coil (r Fig. 8) from the bottle (do not touch or disconnect the wires of the resistance coil). Remove the bottle (d Fig. 8) from its lodging, leaving the resistance around the scale plate. Set the bottle on a stand at least 40 cm in height. Access the CALIBRATION MENU as explained above. The following will be displayed: -20-

INSTRUCTIONS MANUAL -1-
 INSTRUCTIONS MANUAL -1- INSTRUCTIONS MANUAL -2- INSTRUCTIONS MANUAL INDEX INDEX... 3 INTRODUCTION... 5 CARE OF THE MANUAL... 5 CONDITIONS OF WARRANTY... 5 GENERAL INFORMATION... 6 END-OF-LIFE... 6 BATTERY
RECOVERY/RECYCLE/RECHARGE
 RECOVERY/RECYCLE/RECHARGE 69789-220 Operating Instructions INSTRUCTIONS MANUAL -2- INSTRUCTIONS MANUAL INDEX INDEX... 3 INTRODUCTION... 5 CARE OF THE MANUAL... 5 CONDITIONS OF WARRANTY... 6 GENERAL INFORMATION...
WAC 1200 PLUS Bedienungsanleitung
 WAC 1200 PLUS Bedienungsanleitung [MANUK5S.0BW] ed.3 GB FR DE IT ES PT Instructions manual Manuel d'instructions Gebrauchsanleitung Manuale d'uso Manual de instrucciones Manual de instruções pag.2-3/31/2015
INSTRUCTIONS MANUAL -1-
 INSTRUCTIONS MANUAL -1- INSTRUCTIONS MANUAL -2- INSTRUCTIONS MANUAL INDEX INDEX... 3 INTRODUCTION... 5 CARE OF THE MANUAL... 5 CONDITIONS OF WARRANTY... 5 GENERAL INFORMATION... 6 END-OF-LIFE... 6 BATTERY
INSTALLATION INSTRUCTIONS
 Brix Ratio Check Instructions for ColdFusion and Flavor Overload Units INSTALLATION INSTRUCTIONS Brix Ratio Check Instructions For Coldfusion, Flavorfusion and Flavor Overload Units Kit P/N 629096865 SAFETY
WAC 2200 Bedienungsanleitung
 WAC 2200 Bedienungsanleitung [MANUK5U.0BW] ed.3 GB FR DE IT ES PT Instructions manual Manuel d'instructions Gebrauchsanleitung Manuale d'uso Manual de instrucciones Manual de instruções INSTRUCTIONS MANUAL
Save Money 2-up Single Doorhanger Set OH payday advance edition, 4 different doorhangers, Spanish
 Save Money 2-up Single Doorhanger Set OH payday advance edition, 4 different doorhangers, Spanish PACKAGE CONTENTS How to Customize 4-color doorhanger, Editable PDF (50% OFF first loan) 1-color (black)
Nueva confirmación de pedido de compra con cambios: proveedor ES
 Ayuda de trabajo Nueva confirmación de pedido de compra con cambios: proveedor ES Step 1. This Supplier portal activity lists the steps necessary for confirming a new purchase order with changes on price,
T R A N S TECHNICAL SPECIFICATIONS:
 A R P O L T R A N S TECHNICAL SPECIFICATIONS: 1, or - look casing Specially designed rubber gasket (various models) Steps of up tc 8 mm between outside diameters Working pressures up to bar F l e x i b
Video Server. Quick Installation Guide. English, Español
 Video Server Quick Installation Guide English, Español 2 Video Server NOTES Quick Installation Guide 3 Video Server Quick Installation Guide To get your Video Server up and running on an Ethernet network,
RECOVERY/RECYCLE/RECHARGE RECUPERACIÓN/RECICLAJE/RECARGA
 RECOVERY/RECYCLE/RECHARGE RECUPERACIÓN/RECICLAJE/RECARGA Operating Instructions Instrucciones para el Uso WARNING!! Do not stop the recovery process. Permanent damage will occur that could void the warranty.
Agustiniano Ciudad Salitre School Computer Science Support Guide - 2015 Second grade First term
 Agustiniano Ciudad Salitre School Computer Science Support Guide - 2015 Second grade First term UNIDAD TEMATICA: INTERFAZ DE WINDOWS LOGRO: Reconoce la interfaz de Windows para ubicar y acceder a los programas,
RECOVERY/RECYCLE/RECHARGE RECUPERACIÓN/RECICLAJE/RECARGA
 RECOVERY/RECYCLE/RECHARGE RECUPERACIÓN/RECICLAJE/RECARGA Operating Instructions Instrucciones para el Uso WARNING!! Do not stop the recovery process. Permanent damage will occur that could void the warranty.
Installation Guide. Green momit
 Installation Guide Green momit 2015 www.momit.com momit Deviceses Gateway: Model 1 and 2 Wall option The momit Gateway allows your thermostat to be connected to the Internet. It s included in the Starter
manual de servicio nissan murano z51
 manual de servicio nissan murano z51 Reference Manual To understand featuring to use and how to totally exploit manual de servicio nissan murano z51 to your great advantage, there are several sources of
DIAMOND Gear Company, LTD. an ERIKS Company. Installation, Maintenance, & Operation Manual DECLUTCHABLE WORM GEAR
 DIAMOND Gear Company, LTD. an ERIKS Company Installation, Maintenance, & Operation Manual 2013 INSTRUCTIONS This is an instructional manual which provides general installation, operation, and maintenance
NEXUS 3001XLM-IMP Brinell hardness tester
 FULLY-AUTOMATIC SYSTEM with fully automatic indent video measuring system, equipped with a automatic motorized turret/revolver (indentor/objective positions). Optical system with high quality objective.
AUTOMATISMOS PRÁCTICAS DE PROGRAMACIÓN S7300 EN LENGUAJE DE CONTACTOS KOP
 AUTOMATISMOS 5º Ingeniero de Telecomunicación Curso 2003/2004 PRÁCTICAS DE PROGRAMACIÓN S7300 EN LENGUAJE DE CONTACTOS KOP 1. Control de motores 2. Control de Válvulas 3. Guía de selección de temporizadores
SFD-200-N-B DESPERTADOR-PROYECTOR-CON VOZ. Manual de instrucciones
 SFD-200-N-B DESPERTADOR-PROYECTOR-CON VOZ Manual de instrucciones Funciones: - Proyección de la hora - Proyección controlada por sonidos y vibraciones (palmada, etc.) - Pantalla retroiluminada azul - Hora
www.totalspanishsimulator.com
 I ) Instalación / Installation Pg. 2 II ) Conexión del cableado / Plug in the connectors Pg. 4 III ) Cambiar Posición Imán / Change Magnet Position Pg. 6 IV ) Configuración de Software Pg. 7 IV ) Software
Conditioning Exercises: Standing
 Conditioning Exercises: Standing Do all these exercises slowly. Do not hold your breath during these exercises. If unusual pain occurs in your joints or muscles while you are exercising, do not continue
Brief Introduction to Docking and Virtual Screening with Autodock4 and Autodock Tools
 Brief Introduction to Docking and Virtual Screening with Autodock4 and Autodock Tools Environment set up Launch AutoDock Tools Gui. Aplicaciones --> MGLTools-1.5.4 --> AutoDockTools-1.5.4 You should see
MANUAL DE INSTRUCCIONES CAJA FUERTE CF-4333
 MANUAL DE INSTRUCCIONES CAJA FUERTE CF-4333 ESTIMADO CLIENTE Con el fin de que obtenga el mayor desempeño de su producto, por favor lea este manual de instrucciones cuidadosamente antes de comenzar a utilizarlo,
Creating your Single Sign-On Account for the PowerSchool Parent Portal
 Creating your Single Sign-On Account for the PowerSchool Parent Portal Welcome to the Parent Single Sign-On. What does that mean? Parent Single Sign-On offers a number of benefits, including access to
Part No: KTI (Page 1-13) (Pagina 14-26) K-Tool International Wixom, MI 48393
 (Pagina 14-26) K-Tool International Wixom, MI 48393") Part No: KTI-70099 (Page 1-13) (Pagina 14-26) K-Tool International Wixom, MI 48393 (800) 762-6002 www.ktoolinternational.com support@ktoolinternational.com The KTool Walkie-Talkie can use a NiMH rechargeable
Part No: KTI-70099 (Page 1-13) (Pagina 14-26) K-Tool International Wixom, MI 48393 (800) 762-6002 www.ktoolinternational.com support@ktoolinternational.com The KTool Walkie-Talkie can use a NiMH rechargeable
FlexCage. User Manual MB975SP-B. 5 HDD Slots in 3 Device Bay. Tray-Less SATA Backplane Module
 FlexCage MB975SP-B 5 HDD Slots in 3 Device Bay Tray-Less SATA Backplane Module User Manual English Package Contents Front Panel Information HDD3 POWER BUTTON POWER / ACCESS LED INDICATOR HDD2 POWER BUTTON
Flashcards Series 3 El Aeropuerto
 Flashcards Series 3 El Aeropuerto Flashcards are one of the quickest and easiest ways to test yourself on Spanish vocabulary, no matter where you are! Test yourself on just these flashcards at first. Then,
Schindler 7000 Planning parameters of high-rise elevators.
 Schindler 7000 Planning parameters of high-rise elevators. The journey to the top. From outline to skyline. You and Schindler share the same objective: a well-elevatored building, which ensures that people
MANUAL EASYCHAIR. A) Ingresar su nombre de usuario y password, si ya tiene una cuenta registrada Ó
 Ingresar su nombre de usuario y password, si ya tiene una cuenta registrada Ó") MANUAL EASYCHAIR La URL para enviar su propuesta a la convocatoria es: https://easychair.org/conferences/?conf=genconciencia2015 Donde aparece la siguiente pantalla: Se encuentran dos opciones: A) Ingresar
MANUAL EASYCHAIR La URL para enviar su propuesta a la convocatoria es: https://easychair.org/conferences/?conf=genconciencia2015 Donde aparece la siguiente pantalla: Se encuentran dos opciones: A) Ingresar
 sistema modular de vacío modular vacuum system L-VAC Cartón Cajas Laminados Madera Piedra Plancha Plástico Cardboard Boxes Laminated Wood Stone Sheet metal Plastic EL VACÍO, AHORA MÁS FÁCIL L-VAC es la
www.jbctools.com Page English 2 Español 8 Stands
 Page English 2 Español 8 Stands Packing List The following items should be included: All these stands can be connected to the following JBC Control units: DI, DDE, DME. Stand... 1 unit See references on
Pneumatic Desoldering Module
 Page English 2 Español 6 Pneumatic Desoldering Module Packing List Features The following items should be included: Pneumatic Desoldering Module... 1 unit 50 Filter Box... 1 unit 10 Cotton Filters... 1
Steps to Understand Your Child s Behavior. Customizing the Flyer
 Steps to Understand Your Child s Behavior Customizing the Flyer Hello! Here is the PDF Form Template for use in advertising Steps to Understanding Your Child s Behavior (HDS Behavior Level 1B). Because
appkbws03 Wireless Multimedia Keyboard Set Black
 appkbws03 Wireless Multimedia Keyboard Set Black Español 01 English 06 Capítulo 1. Introducción y descripción del producto Gracias por elegir el teclado inalámbrico APPKBWS03. Descripción del producto
Art.: Válvula Reductora de Presión a Pistón con Filtro Piston Pressure Reducer Valve with Filter
 Art.: 3322-3324 Válvula Reductora de Presión a Pistón con Filtro Piston Pressure Reducer Valve with Filter Características Técnicas 1. Presión máx. de funcionamiento (PN) 16 bar. 2. Campo de regulación
IE12_ CONSOLIDACIÓN Y DESARROLLO DE NUEVAS TÉCNICAS DE EVALUACIÓN INTENSIVAS ON-LINE YA IMPLEMENTADAS POR EL GIE E4
 IE12_13-03001 - CONSOLIDACIÓN Y DESARROLLO DE NUEVAS TÉCNICAS DE EVALUACIÓN Departamento de Estructuras de la Edificación Escuela Técnica Superior de Arquitectura de Madrid Universidad Politécnica de Madrid
HEAD START MEDICATION ADMINISTRATION
 HEAD START MEDICATION ADMINISTRATION Dear Parents/Guardians: It is the policy of Head Start to cooperate with each Head Start child's parent/guardian and his/her physician by administering and providing
DECLARACION DE CONFORMIDAD DECLARATION OF CONFORMITY
 DECLARACION DE CONFORMIDAD DECLARATION OF CONFORMITY La Empresa: BASOR ELECTRIC, S.A. The Company: BASOR ELECTRIC, S.A. Declara que el producto: Declares that the product: Instalado de acuerdo con las
Product / Producto: SPIDER ROBOT KIT / KIT DE ARAÑA CON CONTROL REMOTO Model / Modelo: K-665 Brand / Marca: Steren
 Product / Producto: SPIDER ROBOT KIT / KIT DE ARAÑA CON CONTROL REMOTO Model / Modelo: K-665 Brand / Marca: Steren Call Center / Centro de Atención a Clientes del Interior 01 800 500 9000 Mexico City /
ENKVM-USBB. 2-Port USB KVM switch with Easy Switch and Cable. User Guide
 ENKVM-USBB 2-Port USB KVM switch with Easy Switch and Cable User Guide i Package Contents 1 ENKVM-USBB 2-Port USB KVM Switch with Easy Switch and Cable 1 User Guide Requirements Console A VGA, SVGA, XGA,
Como desempacar el Time Attendant Además de ésta guía, el empaque debe incluír lo siguiente: Time Attendant Quick Install Reference Guide
 Como desempacar el Time Attendant Además de ésta guía, el empaque debe incluír lo siguiente: Terminal para colectar datos Cable de comunicación Adaptador de 25 a 9-DB CD con Software Adaptador de Corriente
GUÍA DE USUARIO PC-331117. Bienvenidos al mundo Perfect Choice. Antes de comenzar a usar el producto es importante que leas esta guía.
 GUÍA DE USUARIO PC-331117 Bienvenidos al mundo Perfect Choice Antes de comenzar a usar el producto es importante que leas esta guía. Conexión 1. Inserta el transmisor en el conector para encendedor de
2008 Series Hemodialysis Machine Operator s Manuals Addendum for Concentrate Connection
 2008 Series Hemodialysis Machine Operator s Manuals Addendum for Concentrate Connection Caution: Federal (US) law restricts this device to sale only by or on the order of a physician. This is an addendum
Vidrio Industrial POBEL, S.A.
 Destilador de agua Water distiller HYDR 0041 MANUAL DE INSTRUCCIONES INSTRUCTIONS MANUAL C/ Luis I, s/n Almacén 12 Pol. Ind. Vallecas IV 28031 Madrid (ESPAÑA) Tel. (34) 91 380 33 18 Fax (34) 91 380 32
INSTRUCCIONES PARA ENVIAR SU PELICULA PARA LA VIDEOLIBRERIA
 For English version, please scroll down to page 11 (eleven) INSTRUCCIONES PARA ENVIAR SU PELICULA PARA LA VIDEOLIBRERIA Especificaciones técnicas Container format:.mp4 / tamaño de archivo no superior a
Quick Installation Guide TU2-DVIV H/W: V1.0R
 Quick Installation Guide TU2-DVIV H/W: V1.0R Table Table of Contents of Contents Español... 1. Antes de iniciar... 2. Cómo se instala... 1 1 3 Troubleshooting... 6 Version 06.27.2008 1. Antes de iniciar
GENERADORES DE ELECTRICIDAD
 GENERADORES DE ELECTRICIDAD DIESEL y BENCINA Generador STE 5000 D - DIESEL VALOR : $ 830.000 + IVA Power Generator STE 5000 D This power station supplies energy and provides security. Power will be available
Zune 8GB/4GB Start. Iniciar.
 Zune 8GB/4GB Start. Iniciar. SETUP 1 Visit www.zune.net/setup to install the Zune software. 2 When installation is complete, connect your Zune to your PC to start syncing. Your Zune charges whenever
FCC Information : Warning: RF warning statement:
 FCC Information : This device complies with Part 15 of the FCC Rules. Operation is subject to the following two conditions: (1) This device may not cause harmful interference, and (2) This device must
Sierra Security System
 Using Your SpreadNet Accessories With Your Sierra Security System Uso de Sus Accesorios SpreadNet Con Su Sistema de Seguridad Sierra SN990-KEYPAD SN961-KEYFOB SN991-REMOTE 1 SN990-KEYPAD The SN990-KEYPAD
LAB 2: Circuitos de Corriente Directa (DC) PARTE I OBJECTIVES
 PARTE I OBJECTIVES") LAB : Circuitos de Corriente Directa (DC) PARTE I OBJECTIVES To learn to design and construct simple circuits using batteries, bulbs, wires and switches. To draw circuit diagrams using symbols To understand
LAB : Circuitos de Corriente Directa (DC) PARTE I OBJECTIVES To learn to design and construct simple circuits using batteries, bulbs, wires and switches. To draw circuit diagrams using symbols To understand
ROCK N STEREO SOUND DESK
 Read and save these instructions ROCK N STEREO SOUND DESK RTA-M1102-BK INSTRUCTIONS TABLE OF CONTENTS PACKAGE INCLUDES Package Includes... 2 Specifications... 2 Product Parts List... 3 1 2 3 Product Details...
Sistema de retención para mangueras de presión
 Sistema de retención para mangueras de presión productos Ingeniería en conducción de fluidos ISO 9001:2000 productos P15 SECURITY HOSES STOPflex SISTEMA DE RETENCION PARA MANGUERAS A PRESION SISTEMA DE
CONTROLADORA PARA PIXELS CONPIX
 The LedEdit Software Instructions 1, Install the software to PC and open English version: When we installed The LedEdit Software, on the desktop we can see following icon: Please Double-click it, then
Connecting Cloudino Connector to FIWARE IoT
 Hoja 1 DE 9 Connecting Cloudino Connector to FIWARE IoT 1. What is FIWARE IoT FIWARE is an open software ecosystem provided by the FIWARE Community (htttp://www.fiware.org). FIWARE exposes to developers
Condiciones y Reglas de la presentación de Declaración Sumaria de Salida (EXS)
") C/ Santa María Magdalena 16, 28016 Madrid ECS Sistema de Control de Exportaciones Condiciones y Reglas de la presentación de Declaración Sumaria de Salida (EXS) Autor: S.G.A.A Fecha: 06/06/2011 Versión:
C/ Santa María Magdalena 16, 28016 Madrid ECS Sistema de Control de Exportaciones Condiciones y Reglas de la presentación de Declaración Sumaria de Salida (EXS) Autor: S.G.A.A Fecha: 06/06/2011 Versión:
 Limited TWO-YEAR Warranty SENSIO Inc. hereby warrants that for a period of TWO YEARS from the date of purchase, this product will be free from mechanical defects in material and workmanship, and for 90
M DJ SERIES. User Manual/Manual de Uso
 M DJ SERIES User Manual/Manual de Uso User Manual Installation 1. In order to enhance the cast function of listening to space sound, it is appropriate to set the center part of tweeter right to the position
PLAN DE MANTENIMIENTO DE BOMBAS DOLL S.A.U. DOLL S.A.U. PUMPS MAINTENANCE PLANNING.
 PLAN DE MANTENIMIENTO DE BOMBAS DOLL S.A.U. DOLL S.A.U. PUMPS MAINTENANCE PLANNING. RODETE IMPELLER BRIDA CIERRE MECÁNICO CLAMP CIERRE MECÁNICO APLICACIÓN DE LAS OPERACIONES DE MANTENIMIENTO PARA BOMBAS
Puede pagar facturas y gastos periódicos como el alquiler, el gas, la electricidad, el agua y el teléfono y también otros gastos del hogar.
 SPANISH Centrepay Qué es Centrepay? Centrepay es la manera sencilla de pagar sus facturas y gastos. Centrepay es un servicio de pago de facturas voluntario y gratuito para clientes de Centrelink. Utilice
ARTICULO: Indicador entrada programable Multi input indicator
 ARTICULO: 8070 Indicador entrada programable Multi input indicator Características Descripción: Tipo de señal de entrada: ma, mv, V, Rt. 2 alarmas de salida, ajuste libre, Capacidad de Rele: AC 250V/1A.
Sesión 3: PL 2b: Sistema para la adquisición de señales analógicas.
 Sesión 3: PL 2b: Sistema para la adquisición de señales analógicas. 1 Objetivo... 3 Signal Logging Basics... 3 Configure File Scope (xpc) Blocks... 3 File Scope Usage... 4 Create File Scopes Using xpc
Extension Cords Extensiones Eléctricas We light your world
 We light your world 07.14.1 Household Domésticas 3 outlet indoor cords allow use of up to three items in one small place. This provides flexibility, while allowing multiple devices to be use without the
BAI-220 AURICULAR INALÁMBRICO
 BAI-220 AURICULAR INALÁMBRICO Manual de usuario ESPECIFICACIONES TÉCNICAS EMISOR Frecuencia: 86 ± 0.5 MHz Modulación: FM Distancia de emisión: 30 m. Recepción de cualquier equipo de audio y video con salida
EN United in diversity EN A8-0204/83. Amendment
 27.6.2018 A8-0204/83 83 Recital 2 (2) So far, and unless otherwise provided for in national law, the rules on access to the occupation of road transport operator do not apply to undertakings engaged in
KAISSA Manual Rápido De Usuario. Rev 1.0
 KAISSA Manual Rápido De Usuario Rev 1.0 Ante todo gracias por adquirir el innovador reloj de ajedrez KAISSA, diseñado bajo la filosofía del Diseño Para Todos. KAISSA tiene dos modos de funcionamiento principales
MANUAL DE INSTRUCCIONES TECLADO PARA TABLETA ACC-5188TKB
 MANUAL DE INSTRUCCIONES TECLADO PARA TABLETA ACC-5188TKB ESTIMADO CLIENTE Con el fin de que obtenga el mayor desempeño de su producto, por favor lea este manual de instrucciones cuidadosamente antes de
Table of Contents. Español... 1. Antes de iniciar... 2. Cómo conectar... 3. Cómo utilizar el conmutador... Troubleshooting... Version 10.13.
 Quick Installation Guide TE100-S800i TE100-S810Fi Table of Contents Español... 1. Antes de iniciar... 2. Cómo conectar... 3. Cómo utilizar el conmutador... Troubleshooting... 1 1 2 3 5 Version 10.13.05
2. Under user name, use your Panther ID (Same as Maximo) Use el Panther ID en la seccion que dice User Name (El mismo de Maximo)
 Use el Panther ID en la seccion que dice User Name (El mismo de Maximo)") 1. After opening the application the screen should always look like this one: Despues de abrir la aplicacion, la pantalla deberia de lucir exactamente de la siguiente manera: (Note: If you see a green
1. After opening the application the screen should always look like this one: Despues de abrir la aplicacion, la pantalla deberia de lucir exactamente de la siguiente manera: (Note: If you see a green
El teclado viene pre-cargado de fábrica pero es recomendable cargarlo completamente la primera vez que lo utilices.
 PC-200680 Bienvenidos al mundo Perfect Choice Antes de comenzar a usar el producto es importante que leas esta guía. Carga del teclado El teclado viene pre-cargado de fábrica pero es recomendable cargarlo
SIGUIENDO LOS REQUISITOS ESTABLECIDOS EN LA NORMA ISO 14001 Y CONOCIENDO LAS CARACTERISTICAS DE LA EMPRESA CARTONAJES MIGUEL Y MATEO EL ALUMNO DEBERA
 SIGUIENDO LOS REQUISITOS ESTABLECIDOS EN LA NORMA ISO 14001 Y CONOCIENDO LAS CARACTERISTICAS DE LA EMPRESA CARTONAJES MIGUEL Y MATEO EL ALUMNO DEBERA ELABORAR LA POLITICA AMBIENTAL PDF File: Siguiendo
TERMÓMETRO DIGITAL / DIGITAL THERMOMETER / THERMOMÉTRE DIGITAL TERMÓMETRO DIGITAL
 TERMÓMETRO DIGITAL / DIGITAL THERMOMETER / THERMOMÉTRE DIGITAL TERMÓMETRO DIGITAL DIGITAL THERMOMETER PARTS OF THERMOMETER 1. LCD Display 2. ON/OFF Switch: The ON/OFF key turns the thermometer on or off.
Vermont Mini-Lessons: Leaving A Voicemail
 Vermont Mini-Lessons: Leaving A Voicemail Leaving a Voice Mail Message Learning Objective 1) When to leave a message 2) How to leave a message Materials: 1) Voice Mail Template blanks & samples 2) Phone
LOW SPEED RIGHT ANGLE CUT-OFF TOOL
 LOW SPEED RIGHT ANGLE CUT-OFF TOOL Model GETTING STARTED OPERATION Low Speed Right Angle Cut-Off Tool Owner s Manual Model Free Speed (RPM) Wheel Diameter Horsepower (HP) Air Inlet (NPT) Hose Size (Inch)
Hard Disk Drive Duplicator Dock USB 3.0 to SATA HDD Duplicator. StarTech ID: SATDOCK22RU3
 Hard Disk Drive Duplicator Dock USB 3.0 to SATA HDD Duplicator StarTech ID: SATDOCK22RU3 The SATDOCK22RU3 USB 3.0 to SATA Hard Drive Duplicator Dock can be used as a standalone SATA hard drive duplicator,
SIERRA PARA LADRILLOS / BRICKS CUT - OFF SAW
 SIERRA PARA LADRILLOS / BRICKS CUT - OFF SAW CARACTERÍSTICAS TÉCNICAS - CAPACIDAD... 355 mm - DIMENSIONES DEL DISCO...... 355 x 3 x 25,4 mm - MOTOR.....1650 W (230 V / 50 Hz ó 110 V / 60 Hz) - CAPACIDAD
Sistemas de impresión y tamaños mínimos Printing Systems and minimum sizes
 Sistemas de impresión y tamaños mínimos Printing Systems and minimum sizes Para la reproducción del Logotipo, deberán seguirse los lineamientos que se presentan a continuación y que servirán como guía
Process Control Work Instructions Control de Procesos Instrucciones de Trabajo. for / para
 Process Control Work Instructions Control de Procesos Instrucciones de Trabajo for / para 629096898 VFCB Kit Relay Cable Harness Assy Ensamblar el Kit del Arnés de Cables del Relevador Publication Number:
Product Renewer for PrestaShop - Renew your products! - Renueve sus productos!
 http://envato.com/wp-content/themes/envato/images/favicon.ico Product Renewer for PrestaShop - Renew your products! - Renueve sus productos! Product Renewer lets you decide if any of your products are
FLEXO URANO INSTRUCCIONES INSTRUCTIONS
 FLEXO URANO INSTRUCCIONES INSTRUCTIONS 1 ATENCIÓN! Desconectar la conexión a red antes de ser manipulada y realizar el cambio de producto sólo cuando se haya enfriado la fuente existente. WARNING! Disconnect
With temperature switch Cover for protection against high surface temperatures
 Descripción The BW 156 braking is designed for drives with frequency converters of small to medium output. Installation in and outside the control cabinet is possible. In addition to the high protection
Lump Sum Final Check Contribution to Deferred Compensation
 Memo To: ERF Members The Employees Retirement Fund has been asked by Deferred Compensation to provide everyone that has signed up to retire with the attached information. Please read the information from
MINI INDUSTRIAL DUTY DIE GRINDER
 MINI INDUSTRIAL DUTY DIE GRINDER Model GETTING STARTED OPERATION Mini Industrial Duty Die Grinder Owner s Manual GETTING STARTED OPERATION Model Free Speed (RPM) Collet Size (Inch) Horsepower (HP) Air
Nitroglycerin. If you use tablets:
 Nitroglycerin Nitroglycerin is a medicine used to treat chest pain called angina. Take nitroglycerin as directed by your doctor. If you are pregnant or breastfeeding, talk to your doctor before using this
PRO DIMMER DMX 24V. Instrucciones de instalación Installation instructions IMT-110 V.01
 PRO DIMMER DMX 24V Instrucciones de instalación Installation instructions IMT-110 V.01 INDICE INDEX 1. Producto y Accesorios Product and Accessories 04 2. Datos Técnicos Technical Data 04 3. Montaje Mounting
Litio-Solar: Small Solar Home System and Portable Power supply User Manual
 Litio-Solar: Small Solar Home System and Portable Power supply User Manual Litio-Solar is a highly integrated 12V DC Solar Power storage device with plug and play functionality, advanced user interface
TX MULTI MANUAL TX MULTI. Mando copiador multifrecuencia 1. PASOS PARA COPIAR UN MANDO CÓDIGO FIJO Y ROLLING ESTÁNDAR:
 MANUAL TX MULTI Mando copiador multifrecuencia 1. PASOS PARA COPIAR UN MANDO CÓDIGO FIJO Y ROLLING ESTÁNDAR: 1. Situar el mando original que desea copiar junto al TX Multi, en torno a 2-4 centímetros de
This is a foldable that you can use with your k-2 grades. Just choose the parts that you need, choose English or Spanish.
 This is a foldable that you can use with your k-2 grades. Just choose the parts that you need, choose English or Spanish. The first page can be used for two students. It has 16 objects to recycle. The
WebForms con LeadTools
 WebForms con LeadTools 21.01.2007 Danysoft Con la aparición de la version 15 de LEADTOOLS, LEAD ha incluido un control.net para la gestión de formularios en la Web. A continuación le incluimos unas instrucciones
Workers Compensation Non-Subscriber Form
 Workers Compensation Non-Subscriber Form Texas is unique in one very important respect: It s the only state in which employers have the choice to carry workers compensation insurance or not. There are
KMR SCA-05 Mounting Instructions Instrucción de Montaje Instruções de Montagem 0899.4897
 0899.4897 KMR SCA-05 Mounting Instructions Instrucción de Montaje Instruções de Montagem 0899.4897 KMR SCA-05 Mounting Instructions Instrucción de Montaje Instruções de Montagem The KMR SCA-05 kit is a
Recordatorio de inicio de sesión Iniciar sesión Finalizar sesión
 Instructions ENGLISH Instrucciones ESPAÑOL This document is to help consumers in understanding basic functionality in their own language. Should you have any difficulty using any of the functions please
A I RTRONIC. Manual de usuario User Manual.
 A I RTRONIC Manual de usuario User Manual AIRTRONIC Partes que incluye Parts inlcuded 1 Goldeneye Airtonic Unit 1 Power supply Input: 100-240 V ~ 50-60 Hz Output: 12 VDC, max. 1000 ma 12 W max. 1 Dermograph
Learning Masters. Early: Force and Motion
 Learning Masters Early: Force and Motion WhatILearned What important things did you learn in this theme? I learned that I learned that I learned that 22 Force and Motion Learning Masters How I Learned
Quick Installation Guide TU-S9
 Quick Installation Guide TU-S9 Table of of Contents Contents Español... 1 1. Antes de iniciar... 1 2. Instalación del Hardware... 2 Troubleshooting... 5 Version 11.08.2007 1. Antes de iniciar Contenidos
PANEL PC PPC17TS GUÍA RÁPIDA
 PANEL PC PPC17TS GUÍA RÁPIDA COMPONENTES En la caja del panel PC encontrará los siguientes componentes: Panel PC completamente ensamblado. Soportes metálicos. ESPAÑOL Bandas anti-polvo. Cable de red. Guía
Matemáticas Muestra Cuadernillo de Examen
 Matemáticas Muestra Cuadernillo de Examen Papel-Lápiz Formato Estudiante Español Versión, Grados 3-5 Mathematics Sample Test Booklet Paper-Pencil Format Student Spanish Version, Grades 3 5 Este cuadernillo
QUICK CHANGE REVERSIBLE AIR DRILL KIT
 QUICK CHANGE REVERSIBLE AIR DRILL KIT Model GETTING STARTED OPERATION Quick Change Reversible Air Drill Kit Owner s Manual GETTING STARTED OPERATION Model Free Speed (RPM) Chuck Size Horsepower (HP) Air
S4 / S8 SIVACON. English. Español
 SIVACON Armario de distribución de energía homologado S4/S8 Transporte y almacenamiento de armarios eléctricos/ Type-tested Power Distribution Board S4 / S8 Transport and Storage of Switchboards S4 / S8
Maquina laminadora automática y semi-automática tipo flauta
 Maquina laminadora automática y semi-automática tipo flauta Cantidad mínima: 1 Pieza Tipo de pago: 30% al colocar la orden, 40% al envío del BL y 30% al instalar el equipo en su planta de trabajo. Incluye