SP-U. Soporte colgado universal para JK26 / JK10 / JK10MA / JK12 / JK12MA / JK15 / KEY10 / KEY12 / KEY15
|
|
|
- Ana Isabel Mora Ramos
- hace 8 años
- Vistas:
Transcripción
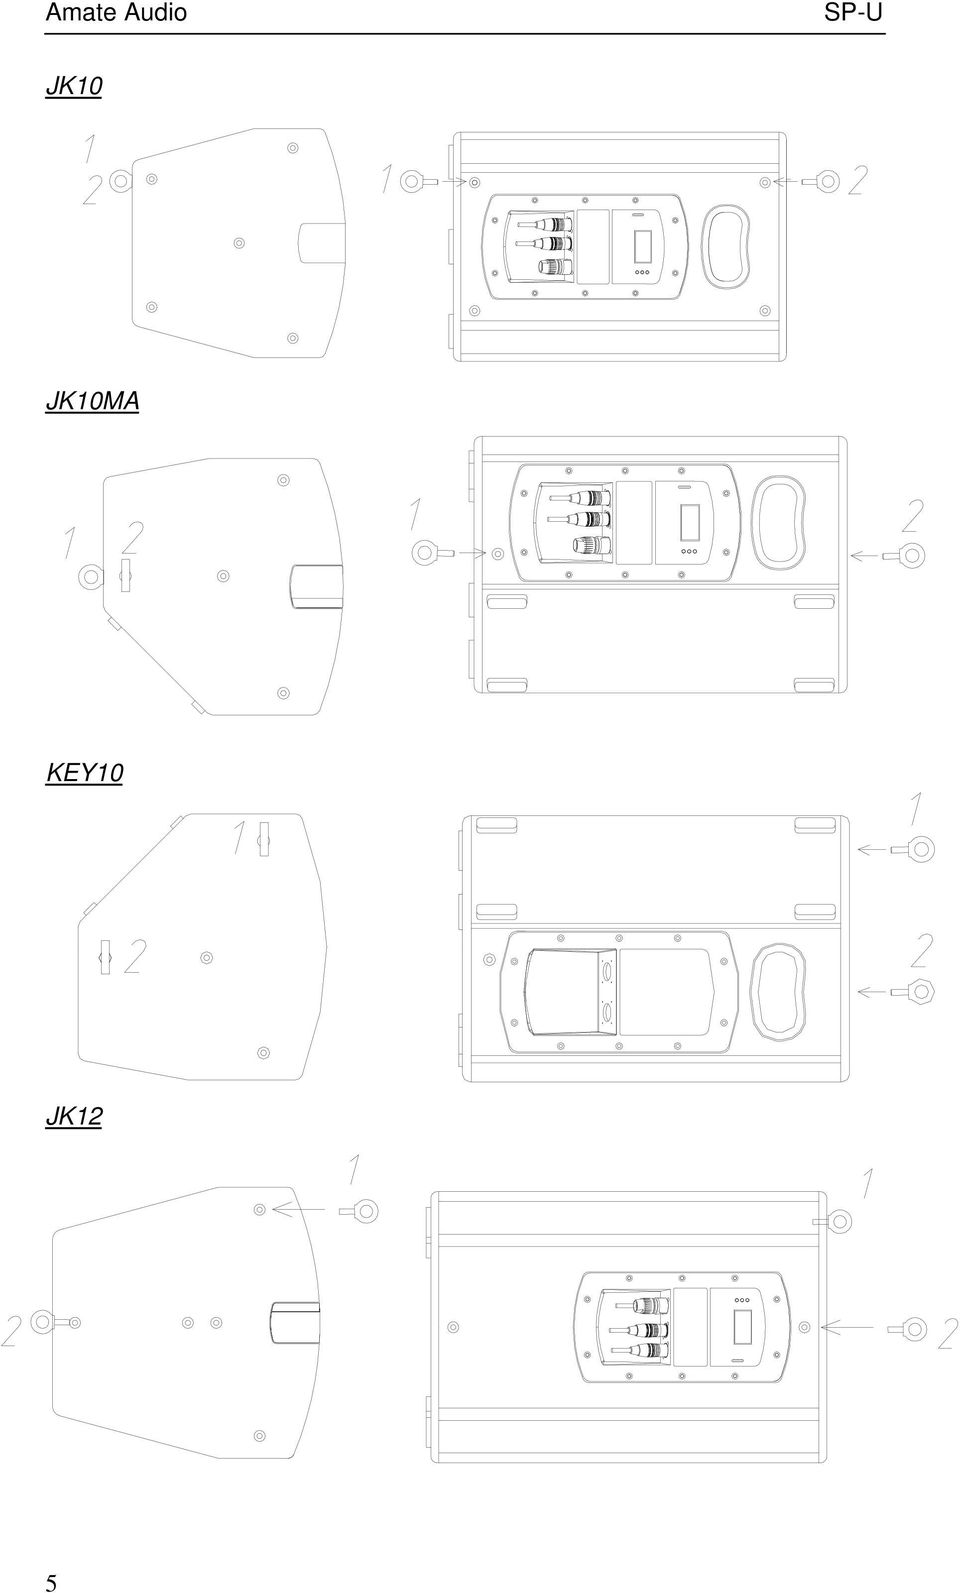
1 Soporte colgado universal para JK26 / JK10 / JK10MA / JK12 / JK12MA / JK15 / KEY10 / KEY12 / KEY15 Universal U-bracket for JK26 / JK10 / JK10MA / JK12 / JK12MA / JK15 / KEY10 / KEY12 / KEY15 Copyright 2015 All rights reserved Pol.Ind.Norte-Perpinyà, TERRASSA (Barcelona-SPAIN) info@amateaudio.com Jan15
 info@amateaudio.com www.")
2 El es un accesorio para el colgado en pared (horizontal) o colgado en truss (horizontal) de la JK26 / JK10 / JK10MA / JK12 / JK12MA / JK15 / KEY10 / KEY12 / KEY15. Para colgado en truss es necesario el accesorio opcional GT-50 (garfio para truss). The is a U-bracket accessory for wall (horizontal orientation) and truss mounting (horizontal orientation) of the JK26 / JK10 / JK10MA / JK12 / JK12MA / JK15 / KEY10 / KEY12 / KEY15. For truss mounting, GT-50 truss hook is neededl. A) JK26 / JK10 / JK12 / JK15 / JK10MA / JK12MA / KEY10 / KEY12 / KEY15 1- Quite la base para trípode situada en la parte inferior de la caja y coloque la base ciega con rosca de M8. Remove the cabinet s top hat and set the M8 round plate. JK26 JK10 JK10MA KEY10 JK12 KEY12 JK15 KEY15 2

3 2- Coloque los dos pomos de M8 en los dos puntos de fijación de la parte superior e inferior de la caja. Asegúrese que las arandelas de goma queden entre el pomo y la caja Set both M8 knobs on the cabinet s top & bottom fixing points. The rubber washers should be placed between the knob and the cabinet. JK26 JK10 JK10MA KEY10 JK12 KEY12 3

4 JK15 KEY15 3- Coloque las dos anillas ACRM8 en dos puntos de fijación de la caja (1,2) para posteriormente, pasar la eslinga de seguridad (sólo en caso de disponer del kit opcional de seguridad SC15) Set both ACRM8 eyebolts on the cabinet s M8 (1,2) fixing points (only if you have the SC15 security kit). JK26 4
 fixing points (only if you have the SC15 security kit).")
5 JK10 JK10MA KEY10 JK12 5
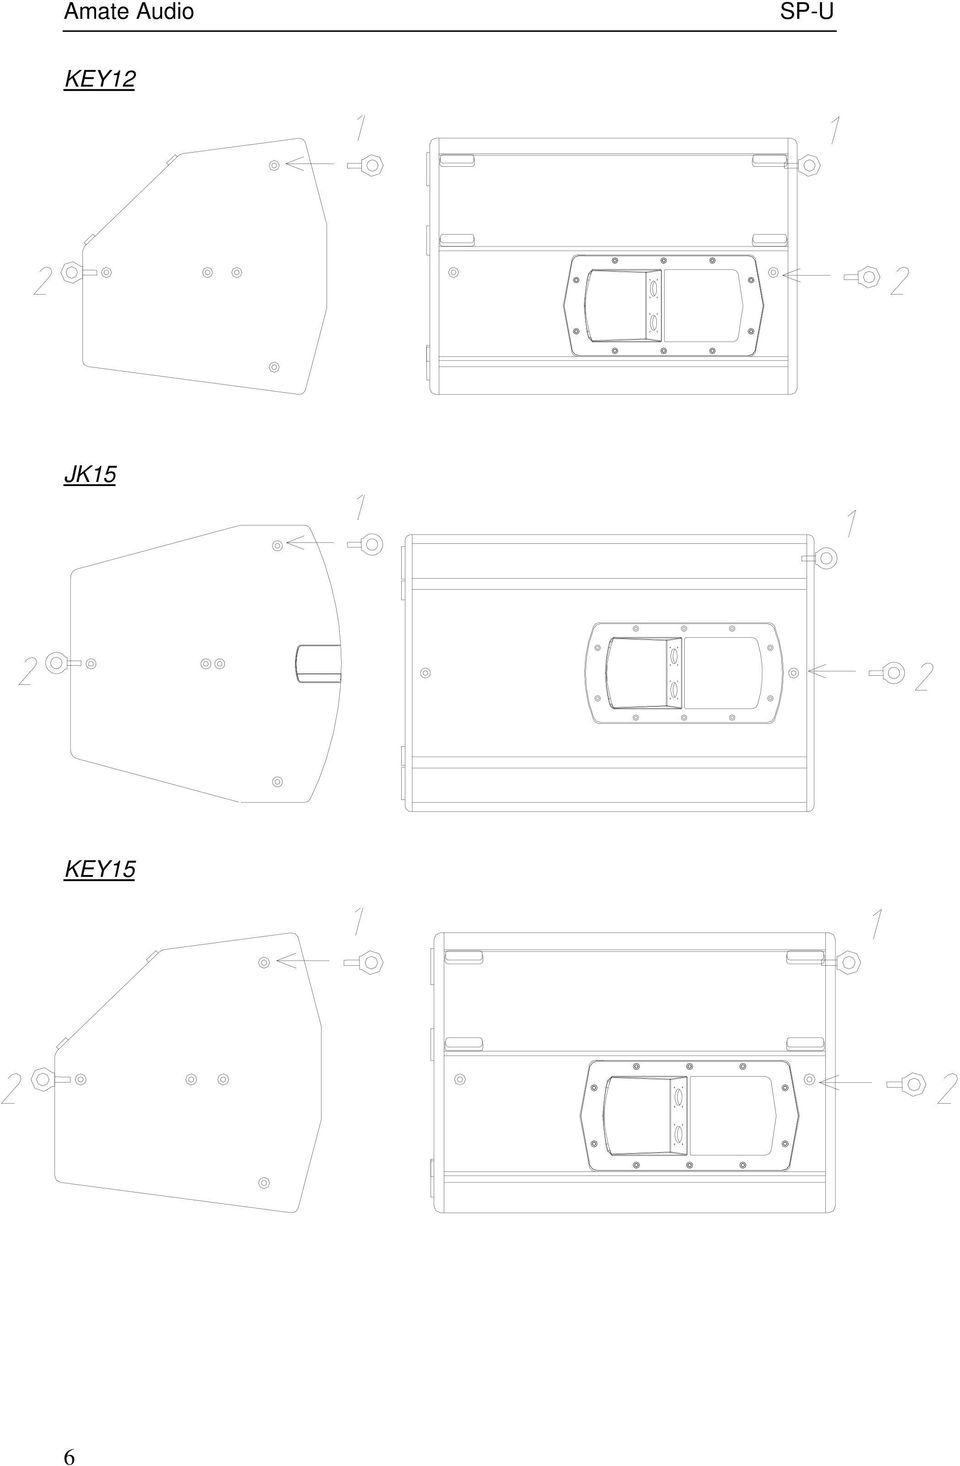
6 KEY12 JK15 KEY15 6
7 4- Escoja la posición correcta del soporte dependiendo del modelo que quiera colgar. Bloque los dos puntos con los tornillos + arandela + tuerca suministrados en el kit. Choose the correct position of the bracket, depending on the model you want to fly. Block both points with the screws, washers and nuts supplied in the kit. MONTAJE EN PARED / WALL MOUNTING 5- Sitúe el soporte cerca de la pared donde vaya a colgar la caja y marque la localización de los cuatro puntos de soporte. Place the bracket in front of the mounting surface, so you can mark the locations of the four mounting holes. 7

8 6- Realice los taladros en la pared y cuelgue el soporte con tornillería adecuada y de alta resistencia (tacos M6 y tornillos DIN7505B 5x40 suministrados en el kit ). Drill some corresponding pilot holes on the wall and fix the bracket using the wall plugs and the four DIN7505B 5x40 screws supplied in the kit. 7- Coloque la caja entre el soporte y la pared y fíjela con los dos pomos de M8 (1). Las arandelas de goma deben quedar situadas entre el soporte y la caja. Set the cabinet on the bracket and fix it with both M8 knobs (1). The rubber washers must be placed between the bracket and the cabinet. 8
.")
9 8- Dar la inclinación necesaria y blocar con los pomos laterales. Choose the desired tilt angle and block the cabinet with the M8 lateral knobs. 9- Puede usar la eslinga como medida de seguridad adicional, colocándola por el interior de las anillas ACRM8. En este caso, la eslinga debe fijarse a un punto externo de carga. You can use the safety cable around the ACRM8 eyebolts. In this case, fix the safety cable on a secondary external point. MONTAJE EN TRUSS / TRUSS MOUNTING 5- Colocar en el soporte el accesorio opcional GT-50 (garfio para colgado). Blocar correctamente con una tuerca autoblocante. Usar el punto central indicado con una flecha. Set the optional accessory GT-50 (hook clamp) on the bracket. Block it with a self-locking nut. Use the central hole (marked with an arrow). 9
. Blocar correctamente con una tuerca autoblocante.")
10 6- Colocar el soporte en la caja. Fijar ambos laterales por los pomos de M8.Asegúrese que las arandelas de goma queden entre el soporte y la caja Set the bracket onto the cabinet. Block both laterals with the M8 knobs. The rubber washers should be placed between the bracket and the cabinet. 7- Fijar todo el sistema en la estructura de colgado. Asegurar el garfio. Dar la inclinación necesaria y blocar con los pomos laterales. Place all the system on the Truss bar. Block the hook clamp. Choose the desired tilt angle and block the cabinet with the M8 lateral knobs. 10

11 8- Puede usar la eslinga como medida de seguridad adicional, colocándola por el interior de las anillas ACRM8. En este caso, la eslinga debe fijarse a la barra del Truss. You can use the safety cable around the ACRM8 eyebolts. In this case, fix the safety cable on the truss bar. B) JK12MA 1- Escoja la posición correcta del soporte dependiendo del modelo que quiera colgar. Bloque los dos puntos con los tornillos + arandela + tuerca suministrados en el kit. Choose the correct position of the bracket, depending on the model you want to fly. Block both points with the screws, washers and nuts supplied in the kit. MONTAJE EN PARED / WALL MOUNTING 2- Sitúe el soporte cerca de la pared donde vaya a colgar la caja y marque la localización de los puntos de soporte. Place the bracket in front of the mounting surface, so you can mark the locations of the mounting holes. 11

12 3- Realice los taladros en la pared y cuelgue el soporte con tornillería adecuada y de alta resistencia (tacos M6 y tornillos DIN7505B 5x40 suministrados en el kit ). Drill some corresponding pilot holes on the wall and fix the bracket using the wall plugs and the four DIN7505B 5x40 screws supplied in the kit. 4- Colocar la caja en el suelo o en una posición cómoda de trabajo. Quitar los dos tornillos de M8 situados en la parte lateral. Place the box on the floor or in a comfortable working position. Unscrew two of the M8 lateral screws. 12

13 5- Coloque los dos pomos de M8 en los dos puntos de fijación de los laterales de la caja. Asegúrese que las arandelas de goma queden entre el pomo y la caja Set both M8 knobs on the cabinet s lateral fixing points. The rubber washers should be placed between the knob and the cabinet. 6- Coloque la anilla ACRM8 en un punto de fijación de la caja para posteriormente, pasar la eslinga de seguridad (sólo en caso de disponer del kit opcional de seguridad SC15) Set one ACRM8 eyebolt on the cabinet s M8 fixing point (only if you have the SC15 security kit). 7- Coloque la caja entre el soporte y la pared y fíjela con los dos pomos de M8. Las arandelas de goma deben quedar situadas entre el soporte y la caja. Set the cabinet on the bracket and fix it with both M8 knobs. The rubber washers must be placed between the bracket and the cabinet. 13
. 7- Coloque la caja entre el soporte y la pared y fíjela con los dos pomos de M8.")
14 8- Dar la inclinación necesaria y blocar con los pomos laterales. Choose the desired tilt angle and block the cabinet with the M8 lateral knobs. 9- Puede usar la eslinga como medida de seguridad adicional, colocándola por el interior de la anilla ACRM8. En este caso, la eslinga debe fijarse a un punto externo de carga. You can use the safety cable around the ACRM8 eyebolt. In this case, fix the safety cable on a secondary external point. MONTAJE EN TRUSS / TRUSS MOUNTING 2- Coloque la anilla ACRM8 en un punto de fijación de la caja para posteriormente, pasar la eslinga de seguridad (sólo en caso de disponer del kit opcional de seguridad SC15) Set one ACRM8 eyebolt on the cabinet s M8 fixing point (only if you have the SC15 security kit). 14

15 3- Colocar en el soporte el accesorio opcional GT-50 (garfio para colgado). Blocar correctamente con una tuerca autoblocante. Usar el punto central indicado con una flecha. Set the optional accessory GT-50 (hook clamp) on the bracket. Block it with a self-locking nut. Use the central hole (marked with an arrow). 4- Colocar el soporte en la caja. Fijar ambos laterales por los pomos de M8.Asegúrese que las arandelas de goma queden entre el soporte y la caja. Set the bracket onto the cabinet. Block both laterals with the M8 knobs. The rubber washers should be placed between the bracket and the cabinet. 5- Fijar todo el sistema en la estructura de colgado. Asegurar el garfio. Place all the system on the Truss bar. Block the hook clamp. 15

16 6- Dar la inclinación necesaria y blocar con los pomos laterales. Choose the desired tilt angle and block the cabinet with the M8 lateral knobs. 7- Puede usar la eslinga como medida de seguridad adicional, colocándola por el interior de la anilla ACRM8. En este caso, la eslinga debe fijarse a la barra del Truss. You can use the safety cable around the ACRM8 eyebolt. In this case, fix the safety cable on the truss bar. 16

HR Perfil colgado para JK12 / JK12A / JK15 / JK15A / X15LTE / X15LTP Flying bar for JK12 / JK12A / JK15 / JK15A / X15LTE / X15LTP
 Perfil colgado para JK12 / JK12A / JK15 / JK15A / X15LTE / X15LTP Flying bar for JK12 / JK12A / JK15 / JK15A / X15LTE / X15LTP Pol.Ind.Norte-Perpinyà,25 08226 TERRASSA (Barcelona-SPAIN) Copyright 2013
Steel Workbench Frame
 INSTRUCTIONS Adjustable Height and Length Steel Workbench Frame LENGTH ADJUSTABLE FOR 4', 5', 6' WORK SURFACES 29" - 41" ADJUSTABLE HEIGHT (1" INCREMENTS) WORK SURFACE NOT INCLUDED USE 4', 5', 6' LONG
Model :RFBW01014 Model :RFBE Model :RFBG 01014
 Model :RFBW01014 Model :RFBE 01014 Model :RFBG 01014 Wall Cabinet Operators Manual Manual de Operadora del Gabinete de pared Inspect product prior to installation. Contact info@runfinegroups.com prior
SYSTEM INSTALLATION MANUAL MANUAL DE INSTALACIÓN
 SYSTEM INSTALLATION MANUAL MANUAL DE INSTALACIÓN Measuring Tape Cinta métrica Ø 8 mm twist drill (wood) Broca espiral Ø 8 mm (para madera) Ø 14 mm stone drill (brick) Broca para piedra Ø14 mm (ladrillo)
BUILT-IN TRIM KIT INSTALLATION INSTRUCTION
 BUILT-IN TRIM KIT INSTALLATION INSTRUCTION FOR KENMORE TRIM-KIT MODEL - 30 : 63002, 63004, 63009, 64003 27 : 63012, 63014, 63019, 63013 FOR USE WITH KENMORE MICROWAVE OVEN MODEL: 721.62462200, 721.62463200,
INSTRUCCIONES DE ENSAMBLAJE.
 English MULTI-FUNCTIONAL COMPUTER TABLE ASSEMBLY INSTRUCTION MODEL RTA - S06 IMPORTANT: Surfaces must be cleaned with a solution of a smooth soap and water, then cleared with a dry towel. Do not use solvents
Installation Guide. Green momit
 Installation Guide Green momit 2015 www.momit.com momit Deviceses Gateway: Model 1 and 2 Wall option The momit Gateway allows your thermostat to be connected to the Internet. It s included in the Starter
LIRIC SERIE MODEL LIRIC 8 / LIRIC 6 / LIRIC 5
 LIRIC SERIE MODEL LIRIC 8 / LIRIC 6 / LIRIC 5 ENGLISH INSTALLATION manual INSTALLATION INSTRUCTION FOR SURFACE MOUNT BOX TYPE SPEAKER MODEL: LIRIC 5 / LIRIC 6 / LIRIC 8 1) When mounting speakers, use the
You and Me Designed by Antoni Pallejà Office USER S MANUAL MANUAL DEL USUARIO
 You and Me Designed by Antoni Pallejà Office USER S MANUAL MANUAL DEL USUARIO PIECES & TOOLS PIECE A: 2 UNITS PIEZA A PIECE B: 2 UNITS PIEZA B NET RED NET BRACKET: 2 UNITS SOPORTE RED TOOLS / HERRAMIENTAS
Retrofit Brake Activation Assembly on Empath Recliner
 Retrofit Brake Activation Assembly on Empath Recliner 1/8 & 5/32 ALLEN WRENCH 3/8 & 7/16 If you have a problem, question, or request, call your local dealer, or Steelcase Line 1 at 888.STEELCASE (888.783.3522)
Stem Glass Holder (SGH36U)
") THESE INSTRUCTIONS SHOULD ONLY BE PRINTED USING ADOBE ACROBAT AND SHOULD NOT BE FAXED OR REPRODUCED ON A DIGITAL COPIER. AMERICAN WOODMARK CORPORATION PROVIDES THESE INSTRUCTIONS ON AN AS IS BASIS AND
THESE INSTRUCTIONS SHOULD ONLY BE PRINTED USING ADOBE ACROBAT AND SHOULD NOT BE FAXED OR REPRODUCED ON A DIGITAL COPIER. AMERICAN WOODMARK CORPORATION PROVIDES THESE INSTRUCTIONS ON AN AS IS BASIS AND
dash LED Light Luz LED dash INTEGRATED & SOTO RAILS RIELES INTEGRADOS Y SOTO
 dash LED Light Luz LED dash INTEGRATED & SOTO RAILS RIELES INTEGRADOS Y SOTO M HEX LLAVE HEX M b e a c d SIDE VIEW VISTA LATERAL FREESTANDING BASE BASE AUTÓNOMA ON OFF ON OFF If you have a problem, question,
E - Electrical disposal Ficha (1) F - Tie Road Tensor (4) L (black) N (white) BALAST
 F - Tie Road Tensor (4) L (black) N (white) BALAST") ox contains Contenido de la caja: - Lampshade Tulipa (1) - rame Soporte (1) C - Screws Tornillos (4) D- Wall Plugs Tacos (4) - lectrical disposal icha (1) - Tie Road Tensor (4) ref. KT04 Suitable for indoor
ox contains Contenido de la caja: - Lampshade Tulipa (1) - rame Soporte (1) C - Screws Tornillos (4) D- Wall Plugs Tacos (4) - lectrical disposal icha (1) - Tie Road Tensor (4) ref. KT04 Suitable for indoor
ASSEMBLY DRAWING / SPARE PARTS
 ASSEMBLY DRAWING / SPARE PARTS Flush button with Lock Nut C7715-6.4 N7714TL Toilet Lid Flush Valve C7715-6 BSB Kit - C7715-1 Fluidmaster Seal Seal - C7715-2 Fill Valve C7715-7 Ceramic tank Air Tube - C7715-3
Kit de Soporte Rígido para Poste. Rigid Pole Grip Kit. Applicable for Kits: PK-E04A. Aplica para Kits: PK-E04A INSTRUCCIONES DE ENSAMBLE
 Rigid Pole Grip Kit Applicable for Kits: PK-E04A PK-E04B Kit de Soporte Rígido para Poste Aplica para Kits: PK-E04A PK-E04B ASSEMBLY INSTRUCTIONS INSTRUCCIONES DE ENSAMBLE Detail for Accessory on Ladder
INSTALLATION INSTRUCTIONS FOR PART APPLICATIONS. Scion xa xb tc xd
 KIT FEATURES INSTALLATION INSTRUCTIONS FOR PART 99-8230 DIN head unit provision with pocket ISO DIN head unit provision with pocket KIT COMPONENTS A 99-8230 B APPLICATIONS Scion xa 2004-2006 xb 2004-2011
INSTALLATION INSTRUCTIONS FOR PART APPLICATIONS. Scion xa up. tc WIRING & ANTENNA CONNECTIONS (sold separately)
") KIT FEATURES INSTALLATION INSTRUCTIONS FOR PART 99-8209 DIN radio provision with pocket ISO mount radio provision with pocket KIT COMPONENTS 99-8209 A APPLICATIONS Scion xa 2004-2006 xb 2004-up tc 2005-2010
KIT FEATURES INSTALLATION INSTRUCTIONS FOR PART 99-8209 DIN radio provision with pocket ISO mount radio provision with pocket KIT COMPONENTS 99-8209 A APPLICATIONS Scion xa 2004-2006 xb 2004-up tc 2005-2010
Model/Modelo: SR42UBEVS
 SmartRack Assembly Instructions Instrucciones de Ensamble del SmartRack Model/Modelo: SRUBEVS West 35th Street, Chicago, IL 60609 USA www.tripplite.com/support Copyright 03 Tripp Lite. All trademarks are
MANUAL DE INSTRUCCIONES SOPORTE PARA TV LED/LCD (23 42 ) WM-5293
 WM-5293") MANUAL DE INSTRUCCIONES SOPORTE PARA TV LED/LCD (23 42 ) WM-5293 ESTIMADO CLIENTE Con el fin de que obtenga el mayor desempeño de su producto, por favor lea este manual de instrucciones cuidadosamente
MANUAL DE INSTRUCCIONES SOPORTE PARA TV LED/LCD (23 42 ) WM-5293 ESTIMADO CLIENTE Con el fin de que obtenga el mayor desempeño de su producto, por favor lea este manual de instrucciones cuidadosamente
RTA-B002 DIMENSIONS MAXIMUM WEIGHT CAPACITIES. Highest position. Lowest position. Product Size: 22"W x 16"D x 30.5~46.5"H
 MODEL RTA - B002 Thanks for purchasing one of our products. Please read carefully the assembly instructions before the installation. Please save this manual for future reference. MODEL RTA-B002 MODELO
Sierra Security System
 Using Your SpreadNet Accessories With Your Sierra Security System Uso de Sus Accesorios SpreadNet Con Su Sistema de Seguridad Sierra SN990-KEYPAD SN961-KEYFOB SN991-REMOTE 1 SN990-KEYPAD The SN990-KEYPAD
Organization in 3 Easy Steps
 Organization in 3 Easy Steps Pasos 3 sencillos para una mejor organización STEP 1: Choose your system. PASO 1: Es un proceso sencillo seleccionar. STEP 2: Plan your space. PASO 2: Planeamiento su espacio.
8 BIN WOODEN STORAGE ORGANIZER ORGANIZADOR DE 8 CAJONES DE TELA
 MODEL: 11223768V / MODELO: 11223768V 8 BIN WOODEN STORAGE ORGANIZER ORGANIZADOR DE 8 CAJONES DE TELA PARTS LIST AND HARDWARE LISTA DE PARTES Y ACCESORIOS NO A B C D E F G H1 H2 I J K L M N O HARDWARE LIST
SOPORTE ORIENTABLE E INCLINABLE (PLASMA Y LCD)
") SOPORTE ORIENTABLE E INCLINABLE (PLASMA Y LCD) 3 Lista de elementos: El aspecto y la cantidad de piezas puede ser diferente al de la ilustración de más abajo. Vijile antes de instalar el soporte que no
SOPORTE ORIENTABLE E INCLINABLE (PLASMA Y LCD) 3 Lista de elementos: El aspecto y la cantidad de piezas puede ser diferente al de la ilustración de más abajo. Vijile antes de instalar el soporte que no
8. REPAIRS 8. REPARACIONES
 8. REPAIRS 8. REPARACIONES 49 8.1 CHANGE OF LIGHT BULB CAMBIO DE BOMBILLA 1 Open the access sluice gate. Abrir la puerta de acceso. 2 With the help of a screwdriver, pull to disengage the glass. Be careful
Peninsula Island Base Installation
 THESE INSTRUCTIONS SHOULD ONLY BE PRINTED USING ADOBE ACROBAT AND SHOULD NOT BE FAXED OR REPRODUCED ON A DIGITAL COPIER. AMERICAN WOODMARK CORPORATION PROVIDES THESE INSTRUCTIONS ON AN AS IS BASIS AND
Instrucciones de montaje del rótulo luminoso Kymco SMD
 Instrucciones de montaje del rótulo luminoso Kymco SMD Español Lista de componentes 1 X 1 Papel para marcar la posición de los puntos de anclaje 2 X 2 Panel principal 3 X 1 Caja de luz 4 X 1 Soporte SMD
DIAMOND Gear Company, LTD. an ERIKS Company. Installation, Maintenance, & Operation Manual DECLUTCHABLE WORM GEAR
 DIAMOND Gear Company, LTD. an ERIKS Company Installation, Maintenance, & Operation Manual 2013 INSTRUCTIONS This is an instructional manual which provides general installation, operation, and maintenance
Art Caja Final Carrera con Detector Inductivo
 Art.5964 02 Caja Final Carrera con Detector Inductivo UArt.5964 02 Limit Switch Box with Inductive Detector CARACTERÍSTICAS Estas cajas están hechas bajo normas NAMUR (VDI / VDE 3845) Las cajas cumplen
Net.Media Center PRODUCT MANUAL. Structured Cabling Solutions. PremiumProducts ProvenPerformance CompetitivePrices
 msr_0444_net_media_center:layout 1 3/7/2008 3:23 PM Page 1 Net.Media Center PRODUCT MANUAL Structured Cabling Solutions PremiumProducts ProvenPerformance CompetitivePrices ICRESDC14E ICRESDC21E ICRESDC28E
FIG S.L. Sistemas de fijación para paneles solares. Fastening systems for solar panels
 FIG S.L. Sistemas de fijación para paneles solares Fastening systems for solar panels 1 Sistemas de fijación para paneles solares PERFILES PERFIL EN ALUMINIO ALUMINIUM CHANNEL HO1.003.000024 H01.003.000023
Universal aftermarket speaker installation kit
 INSTALLATION INSTRUCTIONS FOR PART 82-4600 APPLICATIONS Universal aftermarket speaker installation kit 82-4600 KIT FEATURES Provides spacing for 6-1/2 aftermarket speaker installation. KIT COMPONENTS A)
Installation Instructions - Advertensa WA-25
 Installation Instructions - Advertensa WA-25 8/30/2007 WARNING YOU MUST READ THESE WARNINGS PRIOR TO ATTEMPTING AN INSTALLATION OF THE SECURMOUNT PRODUCT Do not install this product without carefully reading
VALVAC. Valvac System, S.L. Caja Finales de Carrera para Válvulas y Actuadores Neumáticos Limit Switch Box for Pneumatic Actuators and Valves
 VALVAC Caja Finales de Carrera para Válvulas y Actuadores Neumáticos Limit Switch Box for Pneumatic Actuators and Valves Características / Characteristics Características Generales / General Characteristics
ROCK N STEREO SOUND DESK
 Read and save these instructions ROCK N STEREO SOUND DESK RTA-M1102-BK INSTRUCTIONS TABLE OF CONTENTS PACKAGE INCLUDES Package Includes... 2 Specifications... 2 Product Parts List... 3 1 2 3 Product Details...
English language / Idioma Español AK90-E. Leaflet No. / No. de folleto rev 00
 English language / Idioma Español AK90-E Leaflet No. / No. de folleto 466295 rev 00 Read through ALL instructions before commencing installation. If you have any questions about this product or issues
RTA-2706A DIMENSIONS
 MODEL RTA - 706A Thanks for purchasing one of our products. Please read carefully the assembly instructions before the installation. Please save this manual for future reference. MODEL RTA-706A MODELO
Soporte giratorio GUÍA DE INSTALACIÓN
 Soporte giratorio GUÍA DE INSTALACIÓN Modelo: BST-2 Tamaño del televisor: 10-32 Ángulo ajustable Función de corrección Máxima capacidad de carga: 25 kg Fácil instalación: deslice y empotre. Importante:
ELEMENTOS DE FIJACIÓN
 ELEMENTOS DE FIJACIÓN 8 9 10 11 12 13 14 15 16 17 Tuerca cabeza martillo Acero zincado / Inox Hammer head nut Zinc plated steel / Stainless INOX 52014 M4 0,007 52015 M5 0,007 52016 M6 0,007 52018 M8 0,006
Ready-To-Finish Fire Pit Cabinet Assembly Instructions
 Ready-To-Finish Fire Pit Cabinet Assembly Instructions For Part Numbers: RTF-S36 RTF-S42 RTF-S48 RTF-S60 Top Panel with Burner Cutout Templates Adjustable Burner Frame Back Panel Side Panel Pre-Drilled
Pana40 Plus2D / 3D. Guía de instalación. Instalación del detector. Notas de instalación 2D / 3D. Fijación para 3D. Ref. Num. 740 850E Versión 3
 Pana40 Plus2D / 3D Guía de instalación Ref. Num. 740 850E Versión 3 Instalación del detector Los detectores Pana40 Plus (2D) han sido diseñados para que se monten alineados con el borde de la puerta o
MYLEX CORNER DESK ESCRITORIO DE ESQUINA IMPORTANT IMPORTANTE
 MYLEX 09 CORNER DESK ESCRITORIO DE ESQUINA IMPORTANT IMPORTANTE TO OUR CUSTOMERS: A NUESTROS CLIENTES: THIS PRODUCT HAS BEEN CAREFULLY ESTE PRODUCTO HA SIDO RIGUROSAMENTE QUALITY CONTROLLED, HOWEVER HUMAN
Jan 14 User s manual / Manual usuario
 KEY8 / KEY12 / KEY15 / KEY18W Copyright 2014 All rights reserved Pol.Ind.Norte-Perpinyà,25 08226 TERRASSA (Barcelona-SPAIN) info@master-audio.com www.master-audio.com Jan 14 User s manual / Manual usuario
π H-2888 RECYCLED PLASTIC BENCH WITH BACK parts 1-800-295-5510 uline.com TOols NEEDED
 π H-2888 RECYCLED PLASTIC BENCH WITH BACK uline.com Para Español, vea páginas 3-4. Pour le français, consulter les pages 5-6. TOols NEEDED 7/16" Socket Wrench or 7/16" Drill and Socket Bit parts Single
Package Contents. Hardware Package. Tools Needed
 Reverso en español HWGWTR-1 REAR REGISTER KIT INSTALLATION INSTRUCTIONS INSTRUCTIONS MUST BE LEFT WITH THE OWNER FOR FUTURE REFERENCE AFTER INSTALLATION. Package Contents REGISTER BOOT REGISTER WITH DAMPER
Cajas industriales Industrial enclosures
 CAJAS Y TOMAS DE CORRIENTES INDUSTRIALES INDUSTRIAL ENCLOSURES AND INDUSTRIAL PLUGS/SOCKETS Cajas industriales Industrial enclosures PROTECCIÓN / PROTECTION 16 Admite cualquier toma del mercado sin necesidad
MONTAJE EN CUBIERTA PLANA F2S4
 MONTAJE EN CUBIERTA PLANA F2S4 Instrucciones de montaje /04/2008 /7 Sistemas de energía solar térmica Requisitos para la instalación Preparativos generales Este conjunto para montaje al aire libre está
GALA TREATMENT / TRATAMIENTOS COLLEZIONE
 GALA COLLEZIONE Modern and functional lines, rigorous and essential: the uncompromising quality Moderno y funcional dentro de las lineas esenciales: calidad total Hinge interior view with adjustment /
www.totalspanishsimulator.com
 I ) Instalación / Installation Pg. 2 II ) Conexión del cableado / Plug in the connectors Pg. 4 III ) Cambiar Posición Imán / Change Magnet Position Pg. 6 IV ) Configuración de Software Pg. 7 IV ) Software
Emotron FDU/VFX 2.0 Panel de control externo
 Emotron FDU/VFX 2.0 Panel de control externo Manual de instrucciones Español Panel de control externo para Emotron FDU 2.0 y VFX 2.0 Figura 1 Panel control liso, kit completo Figura 2 Panel de control,
MODEL: N / MODELO: N GAZEBO / GAZEBO
 MODEL: 5046N / MODELO: 5046N GAZEBO / GAZEBO Precautions:. Check all parts and hardware listed on the part list.. It is recommended to have people for assembly.. Step stool is also recommended during the
RTA-3325 DIMENSIONS MAXIMUM WEIGHT CAPACITIES. Product Size: 60"W x 23.5"D x 35"H
 MODEL RTA-3325 MODELO RTA - 3325 Gracias por comprar uno de nuestros productos. Por favor lea cuidadosamente las instrucciones de ensamblaje antes de instalar la unidad. Por favor guarde este manual para
Process Control Work Instructions Control de Procesos Instrucciones de Trabajo. for / para
 Process Control Work Instructions Control de Procesos Instrucciones de Trabajo for / para 629096898 VFCB Kit Relay Cable Harness Assy Ensamblar el Kit del Arnés de Cables del Relevador Publication Number:
Door Stop Kit, 316 SS Compas de porte, 316 SS Tope para puerta, 316 SS
 Door Stop Kit, 316 SS Compas de porte, 316 SS Tope para puerta, 316 SS Rev. E 2018 Hoffman Enclosures Inc. PH 763 422 2211 nvent.com/hoffman P/N 87798474 87798663 NOTE: Door stop kit is not intended for
Deluxe 6ft Drawer Kit
 Thanks for shopping with Improvements! Deluxe 6ft Drawer Kit Item #461567 To order, call 1-800-642-2112 West Chester, OH 45069 0114 If you have questions regarding this product, call 1-800-642-2112 Mon.-Fri.
OVAL DOOR MEDICINE CABINET BOTIQUÍN CON PUERTA OVALADA
 OVAL DOOR MEDICINE CABINET BOTIQUÍN CON PUERTA OVALADA INSTALLATION INSTRUCTION INSTRUCCIONES DE INSTALACIÓN UNPACKING Care should be taken when you unpack your medicine cabinet. DESEMPACAR Debe tener
PERFILES DE ALUMINIO ALUMINIUM PROFILES
 16 PERFILES DE ALUMINIO ALUMINIUM PROFILES > COPETES Y ACCESORIOS / UPSTANDS AND ACCESSORIES PAG. 18 > ZÓCALOS Y ACCESORIOS / BASEBOARDS AND ACCESSORIES PAG. 22 > PERFIL CANTO DE PUERTA / CABINET FRAME
Add Counterweights for Opus Bedside Tables - HT18MAL and HT18MBL
 HEALTH Add Counterweights for Opus Bedside Tables - HT18MAL and HT18MBL CAUTION FAILURE TO FOLLOW THESE INSTRUCTIONS COULD RESULT IN PROPERTY DAMAGE OR PERSONAL INJURY. Read the entire Assembly Direction
Art Caja Final Carrera con microelectromecánico. Art Caja Final Carrera con Detector Inductivo
 C/ Pedrosa A, 46-48 EDIFICIO Art.5986 02 Caja Final Carrera con microelectromecánico UArt.5986 02 Limit Switch Box with microswitch Art.5963 02 Caja Final Carrera con Detector Inductivo UArt.5963 02 Limit
Preassembled Rail Instructions
 Preassembled Rail Instructions Prior to installing railing: Please consult local zoning laws in regards to load requirements and bottom space requirements for rails. All supporting structures must be in
Ø 5/16" Ø 1/8" (8 mm) (3 mm) 3
 (3 mm) 3") TARVA 2 AA-1936489-3 Ø 5/16" Ø 1/8" (8 mm) (3 mm) 3 1 100712 100037 109049 118331 112996 100214 109570 101350 110630 100001 14x 4x 3x 14x 13x 14x 1x 16x 100347 24x 4x 4x 100854 4x 104859 1x 101225 110470
TARVA 2 AA-1936489-3 Ø 5/16" Ø 1/8" (8 mm) (3 mm) 3 1 100712 100037 109049 118331 112996 100214 109570 101350 110630 100001 14x 4x 3x 14x 13x 14x 1x 16x 100347 24x 4x 4x 100854 4x 104859 1x 101225 110470
ELEMENTOS DE FIJACIÓN
 8 ELEMENTOS DE FIJACIÓN 9 10 11 12 13 14 15 16 FASTENING ELEMENTS Tuerca cabeza martillo Acero zincado Hammer head nut Zinc plated steel 52014 M4 0,007 52015 M5 0,007 52016 M6 0,007 52018 M8 0,006 Para
Ø 5/16" Ø 1/8" (8 mm) (3 mm) 3
 (3 mm) 3") HEMNES 2 AA-1925608-3 Ø 5/16" Ø 1/8" (8 mm) (3 mm) 3 1 118331 112996 7 Design and Quality IKEA of Sweden 326454 109048 121714 IKEA of Sweden AB SE-343 81 Älmhult 1x 1x 107967 100823 109049 1x 2x 1x 326454
HEMNES 2 AA-1925608-3 Ø 5/16" Ø 1/8" (8 mm) (3 mm) 3 1 118331 112996 7 Design and Quality IKEA of Sweden 326454 109048 121714 IKEA of Sweden AB SE-343 81 Älmhult 1x 1x 107967 100823 109049 1x 2x 1x 326454
Ø 5/16" Ø 1/8" (8 mm) (3 mm) 3
 (3 mm) 3") HEMNES 2 AA-1922828-3 Ø 5/16" Ø 1/8" (8 mm) (3 mm) 3 1 118331 112996 7 Design and Quality IKEA of Sweden 326454 109048 121714 IKEA of Sweden AB SE-343 81 Älmhult 1x 1x 107967 100823 109049 1x 2x 1x 326454
HEMNES 2 AA-1922828-3 Ø 5/16" Ø 1/8" (8 mm) (3 mm) 3 1 118331 112996 7 Design and Quality IKEA of Sweden 326454 109048 121714 IKEA of Sweden AB SE-343 81 Älmhult 1x 1x 107967 100823 109049 1x 2x 1x 326454
Ø 5/16" Ø 1/8" (8 mm) (3 mm) 3
 (3 mm) 3") HEMNES 2 AA-1923538-3 Ø 5/16" Ø 1/8" (8 mm) (3 mm) 3 24x 7 109048 121714 Design and Quality IKEA of Sweden IKEA of Sweden AB SE-343 81 Älmhult 1x 1x 107967 100823 109049 1x 2x 1x 326454 4 AA-1923538-3
HEMNES 2 AA-1923538-3 Ø 5/16" Ø 1/8" (8 mm) (3 mm) 3 24x 7 109048 121714 Design and Quality IKEA of Sweden IKEA of Sweden AB SE-343 81 Älmhult 1x 1x 107967 100823 109049 1x 2x 1x 326454 4 AA-1923538-3
BI-VIEW MEDICINE CABINET BOTIQUÍN DE DOBLE ESPEJO INSTALLATION INSTRUCTION INSTRUCCIONES DE INSTALACIÓN
 BI-VIEW MEDICINE CABINET BOTIQUÍN DE DOBLE ESPEJO INSTALLATION INSTRUCTION INSTRUCCIONES DE INSTALACIÓN UNPACKING Care should be taken when you unpack your medicine cabinet. DESEMPACAR Debe tener cuidado
Ø 5/16" Ø 1/8" (8 mm) (3 mm) 3
 (3 mm) 3") HEMNES 2 AA-1925608-6 Ø 5/16" Ø 1/8" (8 mm) (3 mm) 3 1 118331 112996 157876 157877 158569 158570 7 1x 109048 1x 121714 Design and Quality IKEA of Sweden IKEA of Sweden AB SE-343 81 Älmhult 1x 107967 2x
HEMNES 2 AA-1925608-6 Ø 5/16" Ø 1/8" (8 mm) (3 mm) 3 1 118331 112996 157876 157877 158569 158570 7 1x 109048 1x 121714 Design and Quality IKEA of Sweden IKEA of Sweden AB SE-343 81 Älmhult 1x 107967 2x
SINGLE DOOR MEDICINE CABINET BOTIQUÍN DE UNA PUERTA
 SINGLE DOOR MEDICINE CABINET BOTIQUÍN DE UNA PUERTA INSTALLATION INSTRUCTION INSTRUCCIONES DE INSTALACIÓN UNPACKING Care should be taken when you unpack your medicine cabinet. DESEMPACAR Debe tener cuidado
MULTI-FUNCTIONAL COMPUTER TABLE
 English MULTI-FUNCTIONAL COMPUTER TABLE ASSEMBLY INSTRUCTION IMPORTANT: Surfaces must be cleaned with a solution of a smooth soap and water, then cleared with a dry towel. Do not use solvents over surfaces
π H-3905 PUSH FOAMING SOAP DISPENSER INSTALLATION 1-800-295-5510 uline.com MOUNTING INSTRUCTIONS APPLYING DISPENSER LABEL TOOLS NEEDED TAPE MOUNTING
 π H-3905 PUSH FOAMING SOAP DISPENSER 1-800-295-5510 uline.com Para Español, vea páginas 4-6. TOOLS NEEDED Phillips Screwdriver Electric Drill INSTALLATION APPLYING DISPENSER LABEL 1. Peel label from backing.
MANUAL DE INSTRUCCIONES PARRILLA BARBACOA (18 ) ED-4047BQ
 ED-4047BQ") MANUAL DE INSTRUCCIONES PARRILLA BARBACOA (18 ) ED-4047BQ ESTIMADO CLIENTE Con el fin de que obtenga el mayor desempeño de su producto, por favor lea este manual de instrucciones cuidadosamente antes de
MANUAL DE INSTRUCCIONES PARRILLA BARBACOA (18 ) ED-4047BQ ESTIMADO CLIENTE Con el fin de que obtenga el mayor desempeño de su producto, por favor lea este manual de instrucciones cuidadosamente antes de
P/N INSTALLING HD3000 SERIES HANDLE SET : INSTALL LATCH / DEADBOLT STRIKERS:
 INSTALLING HD3000 SERIES HANDLE SET : A: Drill the 1/8" diameter handle hole ( third from the top of the door, on the room side ) to a 5/16" diameter. B: Slide the inside handle into its base. Tighten
KAWASAKI VERSYS
 Montaje para Soporte de exploradora. Nota: No apriete todos los tornillos hasta que no estén completamente alineadas todas las perforaciones con respecto a los puntos de sujeción. y las piezas esten completas.
Customer Service Kits for Pocket
 HEALTH Customer Service Kits for Pocket 2.5mm & 5mm Hex 9/16 If you have a problem, question, or request, call your local dealer, or Steelcase Line 1 at 888.STEELCASE (888.783.3522) for immediate action
INSTALLATION INSTALACIÓN
 INSTALLATION INSTALAIÓN 1 Unpack and inspect fan carefully to be certain all contents are included. Quite el envoltorio e inspeccione detenidamente el ventilador para verificar que todas las piezas estén
INSTRUCTION MANUAL Smart Security Light
 SPL06-07A1W1-BKT-K1 INSTRUCTION MANUAL Smart Security Light Questions, problems, or missing parts? Before returning to the store, call MAXIMUS customer service at 1-866-897-2098, Monday Friday, 9:30am
Desk End Panel (DEP) For Supporting One or Both Ends of a Countertop
 For Supporting One or Both Ends of a Countertop") THESE INSTRUCTIONS SHOULD ONLY BE PRINTED USING ADOBE ACROBAT AND SHOULD NOT BE FAXED OR REPRODUCED ON A DIGITAL COPIER. AMERICAN WOODMARK CORPORATION PROVIDES THESE INSTRUCTIONS ON AN AS IS BASIS AND
THESE INSTRUCTIONS SHOULD ONLY BE PRINTED USING ADOBE ACROBAT AND SHOULD NOT BE FAXED OR REPRODUCED ON A DIGITAL COPIER. AMERICAN WOODMARK CORPORATION PROVIDES THESE INSTRUCTIONS ON AN AS IS BASIS AND
Closet / Modelo CL738 Contamos con personal calificado para su instalacion
 Closet / Modelo CL Contamos con personal calificado para su instalacion V00 Herrajes / Hardware pzs pzs pzs 0 pzs T 0 0 pzs T pzs pzs pzs 0 pzs T 0 pz 0 pzs INDUSTIAS.T.A., S.A. de C.V. Av. Poniente No.
Hyundai 1995-2006 95-7309
 INSTALLATION INSTRUCTIONS FOR PART 95-7309 APPLICATIONS Hyundai 1995-2006 95-7309 KIT FEATURES Double DIN head unit provision Stacked ISO DIN head unit provision KIT COMPONENTS A) Double DIN trim plate
These instructions should only be printed using Adobe Acrobat and should not be faxed or reproduced on a digital copier.
 These instructions should only be printed using Adobe Acrobat and should not be faxed or reproduced on a digital copier. American Woodmark Corporation provides these instructions on an AS IS basis and
Soporte para televisor de pantalla plana. Soporte multifuncional de doble sujeción GUÍA DE INSTALACIÓN. Modelo: BST-6
 Soporte para televisor de pantalla plana Soporte multifuncional de doble sujeción GUÍA DE INSTALACIÓN Modelo: BST-6 Fácil instalación: simplemente colgando la pantalla. Seguridad: anclaje asegurado en
INSTRUCTIONS, ME2 BACKUP BAR KIT
 LIFT CORPORATION Sht. 1 of 16 DSG# M-16-27 Rev. A Date: 03/03/17 INSTRUCTIONS, ME2 BACKUP BAR KIT KIT P/N 296845-01 KIT P/N 296845-01G (GALVANIZED) FORD F-150 (2014-2016), F-250/F-350 (2014 & 2017 MODELS)
Hydro-Probe II Consejos para la instalación
 Hydro-Probe II Consejos para la instalación Para concreto y agregados 1 Contenido Introducción Cable y cableado Flujo de material y colocación Material pegajoso Montaje en el cuello Protección y posicionamiento
REVISED INSTRUCTIONS- USE THESE INSTRUCTIONS FOR ASSEMBLY, DISCARD THE INSTRUCTIONS PRINTED ON WHITE PAPER.
 REVISED INSTRUTIONS- USE THESE INSTRUTIONS FOR ASSEMBLY, DISARD THE INSTRUTIONS PRINTED ON WHITE PAPER. Dresser (5155) - Assembly and Operation Manual ongratulations on purchasing a MDB Family product.
MODEL: F / MODELO: F END TABLE WITH MEDIA STAND & MAGAZINE HOLDER MESA RINCONERA CON ESTANTE & REVISTERO
 MODEL: 11225479F / MODELO: 11225479F END TABLE WITH MEDIA STAND & MAGAZINE HOLDER MESA RINCONERA CON ESTANTE & REVISTERO NO A B C D E F G H I J K L PARTS LIST AND HARDWARE PARTES Y ACCESORIOS PARTS LIST
Car Seat Adapter Adaptador de la silla para el coche
 CHICCO/PEG-PEREGO Car Seat Adapter Adaptador de la silla para el coche PD348997B babyjogger.com ASSEMBLY INSTRUCTIONS INSTRUCCIONES DEL ENSAMBLAJE CITY PREMIER CITY SELECT PEG-PEREGO 1 A B 2 3 CLICK 4
Installation Instruction - Instrucciones WR-20
 Installation Instruction - Instrucciones WR-20 8/30/2007 WARNING YOU MUST READ THESE WARNINGS PRIOR TO ATTEMPTING AN INSTALLATION OF THE SECURMOUNT PRODUCT Do not install this product without carefully
KMR SCA-05 Mounting Instructions Instrucción de Montaje Instruções de Montagem 0899.4897
 0899.4897 KMR SCA-05 Mounting Instructions Instrucción de Montaje Instruções de Montagem 0899.4897 KMR SCA-05 Mounting Instructions Instrucción de Montaje Instruções de Montagem The KMR SCA-05 kit is a
CONTROLADORA PARA PIXELS CONPIX
 The LedEdit Software Instructions 1, Install the software to PC and open English version: When we installed The LedEdit Software, on the desktop we can see following icon: Please Double-click it, then
TRIVIEW MEDICINE CABINET BOTIQUÍN DE TRES PUERTAS INSTALLATION INSTRUCTION INSTRUCCIONES DE INSTALACIÓN
 TRIVIEW MEDICINE CABINET BOTIQUÍN DE TRES PUERTAS INSTALLATION INSTRUCTION INSTRUCCIONES DE INSTALACIÓN UNPACKING Care should be taken when you unpack your medicine cabinet. DESEMPACAR Debe tener cuidado
FRAMED DOOR MEDICINE CABINET BOTIQUÍN CON PUERTA ENMARCAR
 FRAMED DOOR MEDICINE CABINET BOTIQUÍN CON PUERTA ENMARCAR INSTALLATION INSTRUCTION INSTRUCCIONES DE INSTALACIÓN UNPACKING Care should be taken when you unpack your medicine cabinet. DESEMPACAR Debe tener
FRAMED DOOR MEDICINE CABINET BOTIQUÍN CON PUERTA ENMARCAR
 FRAMED DOOR MEDICINE CABINET BOTIQUÍN CON PUERTA ENMARCAR INSTALLATION INSTRUCTION INSTRUCCIONES DE INSTALACIÓN UNPACKING Care should be taken when you unpack your medicine cabinet. DESEMPACAR Debe tener
INSTRUCTIONS FOR MODEL 4632
 Quality Products for the way you live INSTRUCTIONS FOR MODEL 4632 IMPORTANT: PLEASE KEEP FOR FUTURE REFERENCE! For helpful tips and instructions, please visit our website: www.northstatesind.com or contact
WALL MOUNTING REQUIRED
 WALL MOUNTING REQUIRED LOCATING HEATER: This heater is designed to be mounted on a wall only. It will not operate as a freestanding heater and should not be modified to do so. For convenience and efficiency,
D L (black) N (white) G (green)
 N (white) G (green)") ASSMBLY INSTRUCTIONS INSTRUCCIONS D MONTAJ Box contains Contenido de la caja: A - Lampshade Tulipa (1) B - Screws Tornillos (7) C - Wall plugs Tacos (7) D - lectrical disposal Ficha (3) - Frame Soporte
ASSMBLY INSTRUCTIONS INSTRUCCIONS D MONTAJ Box contains Contenido de la caja: A - Lampshade Tulipa (1) B - Screws Tornillos (7) C - Wall plugs Tacos (7) D - lectrical disposal Ficha (3) - Frame Soporte
These instructions should only be printed using Adobe Acrobat and should not be faxed or reproduced on a digital copier.
 These instructions should only be printed using Adobe Acrobat and should not be faxed or reproduced on a digital copier. American Woodmark Corporation provides these instructions on an AS IS basis and
PREPARING FOR INSTALLATION ANTES DE LA INSTALACIÓN
 UL_industrial_J 5/23/05 9:57 AM Page 4 PREPARING FOR INSTALLATION ANTES DE LA INSTALACIÓN 1 2 Unpack Turn off and power inspect at fuse fan box carefully to avoid to be possible certain electrical all