Windows Installation Guide
|
|
|
- Eugenio Salazar Caballero
- hace 8 años
- Vistas:
Transcripción
1 ADSL USB Modem Quick Installation Guide Windows Installation Guide English Deutsch Français Italiano Español Português Model #9000 R

2

3 Table of Contents English Installation Overview & System Requir equirements ements... 5 What You Need to Know Before You Begin... 5 Computer Requirements... 5 ADSL Network Requirements... 5 Power Requirements... 6 Step 1. Connect Microfilters (If Necessary)... 7 Connect Microfilters to Telephone Devices... 7 Step 2. Insert the Installation CD-ROM... 8 Step 3. Connect the Cables Connect the Telephone Cable Connect the USB Cable Step 4. Install the Modem and Software Step 5. Restart Your Computer Step 6. Install Software from ISP Step 7. Establish a Dial-up Connection U.S. Robotics SureConnect ADSL Utility Troubleshooting Troubleshooting Checklist Status LEDs Manual Configuration Troubleshooting Tips Technical Support Regulatory Information U.S. Robotics Corporation Limited Warr arranty anty... 29

4 Deutsch Überblick über Installation und Systemanfor ystemanforderungen Folgende Informationen müssen Sie parat haben Anforderungen an den Computer Anforderungen an das ADSL-Netzwerk Anforderungen an die Stromversorgung Schritt 1. Anschlieâen des Mikrofilters (bei Bedarf ) Anschließen von Mikrofiltern an telefonische Geräte Schritt 2. Einlegen der Installations-CD-ROM Schritt 3. Anschließen der Kabel Anschließen des Telefonkabels Anschließen des USB-Kabels Schritt 4. Installieren en von Modem und Software Schritt 5. Neustart des Computers Schritt 6. Installieren en der Software des ISP Schritt 7. Aufbauen einer DFÜ-Verbindung U.S. Robotics SureConnect ADSL-Dienstprogramm amm Fehlerbehebung Checkliste zur Fehlerbehebung Status-LEDs Manuelle Konfiguration Tipps zur Fehlerbehebung Technische Unterstützung Hinweise zu Vorschriften Beschränkte Gar arantie antie der U.S. Robotics Corporation... 59

5 Français Configuration requise et informations générales sur l installation Ce que vous devez savoir avant de commencer Configuration requise pour l ordinateur Configuration réseau requise pour l ADSL Alimentation Etape 1. Connexion de microfiltres (si nécessaire) e) Connexion des microfiltres aux appareils téléphoniques Etape 2. Insertion du CD-ROM d installation Etape 3. Branchement des câbles Branchement du cordon téléphonique Branchement du câble USB Etape 4. Installation du modem et du logiciel Etape 5. Redémarr edémarrage age de l ordinateur Etape 6. Installation du logiciel du FAI Etape 7. Etablissement d une connexion commutée Utilitaire U.S. Robotics SureConnect ADSL Dépannage Liste de dépannage DEL de statut Configuration manuelle Conseils de dépannage Assistance technique Informations légales Gar arantie antie limitée de U.S. Robotics Corporation... 89

6 Italiano Introduzione all installazione e requisiti di sistema Elementi necessari per iniziare Requisiti del computer Requisiti di rete ADSL Requisiti di alimentazione Passo 1. Collegare e i microfiltri (se necessario) Collegare i microfiltri a dispositivi telefonici Passo 2. Inserire e il CD-ROM di installazione Passo 3. Collegare e i cavi Collegare i cavi telefonici Collegare il cavo USB Passo 4. Installare il modem e il software Passo 5. Riavviare il computer Passo 6. Installare il software dall ISP Passo 7. Impostare una connessione remota Utilitâ U.S. Robotics SureConnect ADSL Risoluzione di problemi Lista di controllo per la risoluzione di problemi LED di stato Configurazione manuale Consigli per la risoluzione dei problemi Supporto tecnico Informazioni di conformità Gar aranzia anzia limitata U.S. Robotics Corporation

7 Español Generalidades relativas a la instalaciòn y requisitos del sistema Lo que necesita saber antes de proceder a la instalaciòn Requisitos del equipo Requisitos de la red ADSL Requisitos de alimentaciòn Paso 1. Conexiòn de los microfiltros (si es necesario) Conexiòn de los microfiltros a los dispositivos telefònicos Paso 2. Introducciòn del CD-ROM de instalaciòn Paso 3. Conexiòn de los cables Conexiòn del cable telefònico Conexiòn del cable USB Paso 4. Instalaciòn del mòdem y el software Paso 5. Reinicio del equipo Paso 6. Instalaciòn del software del ISP Paso 7. Establecimiento de una conexiòn telefònica Progr rograma U.S. Robotics SureConnect ADSL Soluciòn de problemas Lista de comprobaciòn para la soluciòn de problemas LED de estado Configuraciòn manual Sugerencias para la soluciòn de problemas Soporte técnico Informaciòn normativa Gar arantía antía limitada de U.S. Robotics...146

8 Português Perspectiva geral da instalação e Requisitos do sistema O que precisa de saber antes de começar Requisitos do computador Requisitos da rede ADSL Requisitos de alimentação Passo 1. Ligar os microfiltros (se necessário) Ligar microfiltros aos dispositivos telefónicos Passo 2. Inserir o CD-ROM de Instalação Passo 3. Ligar os cabos Ligar o cabo do telefone Ligar o cabo USB Passo 4. Instalar o modem e o software Passo 5. Reiniciar o computador Passo 6. Instalar software do ISP Passo 7. Estabelecer uma ligação de acesso telefónico Utilitário ADSL U.S. Robotics SureConnect Executar um teste Resolução de problemas Lista de verificação de Resolução de problemas LEDs de estado Configuração manual Sugestões para resolução de problemas Suporte técnico Informações sobre e regulamentação Gar arantia antia limitada da U.S. Robotics Corporation...175

9

10 U.S. Robotics Corporation 935 National Parkway Schaumburg, Illinois USA No part of this documentation may be reproduced in any form or by any means or used to make any derivative work (such as translation, transformation, or adaptation) without written permission from U.S. Robotics Corporation. U.S. Robotics Corporation reserves the right to revise this documentation and to make changes in the products and/or content of this document from time to time without obligation to provide notification of such revision or change. U.S. Robotics Corporation provides this documentation without warranty of any kind, either implied or expressed, including, but not limited to, implied warranties of merchantability and fitness for a particular purpose. If there is any software on removable media described in this documentation, it is furnished under a license agreement included with the product as a separate document, in the hard copy documentation, or on the removable media in a directory file named LICENSE.TXT or!license.txt. If you are unable to locate a copy, please contact U.S. Robotics and a copy will be provided to you. UNITED STATES GOVERNMENT LEGEND If you are a United States government agency, then this documentation and the software described herein are provided to you subject to the following: All technical data and computer software are commercial in nature and developed solely at private expense. Software is delivered as Commercial Computer Software as defined in DFARS (June 1995) or as a commercial item as defined in FAR 2.101(a) and as such is provided with only such rights as are provided in U.S. Robotics standard commercial license for the Software. Technical data is provided with limited rights only as provided in DFAR (Nov 1995) or FAR (June 1987) whichever is applicable. You agree not to remove or deface any portion of any legend provided on any licensed program or documentation contained in, or delivered to you in conjunction with, this Quick Installation Guide. Copyright 2002 U.S. Robotics Corporation. All rights reserved. U.S. Robotics, the U.S. Robotics logo, and U.S. Robotics SureConnect are registered trademarks of U.S. Robotics Corporation. Other product names are for identification purposes only and may be trademarks of their respective companies. Product specifications subject to change without notice.

11 Thank you for purchasing the U.S. Robotics SureConnect ADSL USB Modem, Model The following instructions will walk you through the installation of the modem and the U.S. Robotics SureConnect ADSL utility. After the installation is complete, you will have installed the following items: U.S. Robotics SureConnect ADSL USB Modem and drivers U.S. Robotics SureConnect ADSL Utility Before you plug the modem into the computer, you must first install the software contained on the enclosed CD-ROM. It is very important that you have your serial number written down for future reference. If you ever need to call our Technical Support department, you will need this number to receive assistance. You can find your 12- character serial number on a bar code sticker located on the bottom of the modem and also on the box. Write your serial number in the space provided below. Serial Number You can also locate your serial number within the U.S. Robotics SureConnect ADSL utility once the modem is installed. Our Technical Support department will also need your model number, which is Model 9000, in order to provide you with the best service possible. 2

12 Installation Overview & System Requir equirements ements What You Need to Know Before You Begin Who your Internet Service Provider (ISP) is Your User name and Password assigned by your ISP Your ISP may provide the following values if manual configuration is required: VPI/VCI Values Encapsulation mode -RFC 1483 IP over ATM Bridged LLC/SNAP -RFC 1483 IP over ATM Bridged VCMux -RFC 1483 IP over ATM Routed LLC/SNAP -RFC 1483 IP over ATM Routed VC/Mux -RFC 2364 WAN-PPP over ATM LLC/SNAP -RFC 2364 WAN-PPP over ATM VCMux -RFC 2516 PPP over Ethernet LLC/SNAP -RFC 2516 PPP over Ethernet VCMux -RFC 2364 PPP over ATM LLC/SNAP -RFC 2364 PPP over ATM VCMux Modulation -G.dmt -G.lite -T Auto-Sensing Computer Requirements A computer running Windows 98, 2000, Me, or XP equipped with a USB port 32 MB of RAM (64 MB of RAM recommended) and 10 MB of hard disk space (memory intensive applications may require more RAM) Pentium 200 MHz (minimum) A host computer that has an open Universal Serial Bus (USB) port ADSL Network Requirements ADSL service from your local telephone company, local ISP or access to an ADSL DSLAM (Digital Subscriber Line Access Multiplexer.) 3

13 Power Requirements The U.S. Robotics SureConnect ADSL USB Modem is a bus-powered device, which means a power adapter is not needed as it derives its operating power from the USB connection on your computer. This U.S. Robotics SureConnect ADSL USB package includes the following items: U.S. Robotics SureConnect USB Modem, Model 9000 TM ADSL 3 ft USB cable, modem-to-computer (Type B to Type A) Standard 7ft RJ-11 telephone cable (6 ft RJ-45 cable for Germany) Quick Installation Guide Installation CD-ROM with User Guide and drivers Registration Card (U.S. Residents only) Optional Components In some models there may be a microfilter(s) included in the box, or this may be supplied by your ISP. Check with your ISP to see if a microfilter is needed. If you are required to install a microfilter, the next section discusses the installation. 4

14 Step tep 1. Connect Microfilters (If Necessary) If there were no microfilters included in your package and your ISP did not provide any, skip to Step 2 of these installation instructions. If microfilters are required, install one on each telephone device (telephones, answering machines, and fax machines) that shares the same phone line (phone number) as the ADSL signal. A microfilter is a small device used to lessen the amount of interference between ADSL signals and telephone signals. Microfilters only need to be used if the ADSL modem and a telephone device are sharing the same phone line (phone number). If microfilters are not used, background noise may be experienced on your telephone while data is being transmitted. Data transmissions may experience interruption by telephone calls if a microfilter is not used. Connect Microfilters to Telephone Devices To install the microfilter, plug the telephone into the microfilter, and then plug the microfilter into the telephone wall jack. Do not install a microfilter on the cable that connects your modem to the telephone wall jack. Before you plug the modem into the computer, you must first install the software. Make sure that your computer is on. You should have your operating system CD-ROM readily available. 5
.")
15 Step tep 2. Insert the Installation CD-ROM To install your new modem s software, insert the Installation CD-ROM into the CD-ROM drive of your computer. If the installation does not start automatically, go to your desktop and double-click My y Computer, double-click the drive letter associated with your CD-ROM drive, and double-click Setup. The U.S. Robotics SureConnect ADSL Modem Installer window will display; click Next to continue installing your ADSL USB Modem. Read the License Agreement and click Yes to accept the terms. If you do not accept the terms of the agreement, click No and the installation will be terminated. 6

16 You will then be prompted to select a location to install the files. The default location is C:\Program Files\U.S. Robotics\SureConnect ADSL Modem. If you would like to change the default location, click the Browse button to select a new directory. If you accept the default location, click Next. A qualification test will run to verify that your system meets the minimum requirements for installation. The Results screen will display those items in your configuration that passed with a green flag and the ones that failed with a red flag. If your system passed the qualification, click Next. 7

17 If you are notified that your system has failed the qualification test, click the View Report button to identify which component(s) failed. Once you have identified which component(s) failed, refer to the Troubleshooting section of this Quick Installation Guide for further instructions. The necessary files will be copied to your system. Select your Internet Service Provider (ISP) from the list and click Next. If your ISP is not listed, select the Not Listed option and click Next. You will then have to manually configure the settings to match your ISP. Refer to the Troubleshooting section of this Quick Installation Guide to assist you with the manual configuration. Windo indows ws 2000, Me, & XP Users Windo indows 2000 and Me A Digital Signature Not Found screen may appear. Click Yes to continue with the rest of the installation. Windo indows XP A software installation warning will display stating that the software your are installing has not passed Windows logo testing. Click the Continue Anyway button. U.S. Robotics has thoroughly tested this driver in conjunction with the supported hardware and has verified compatibility with Windows 2000, XP, and Me. 8

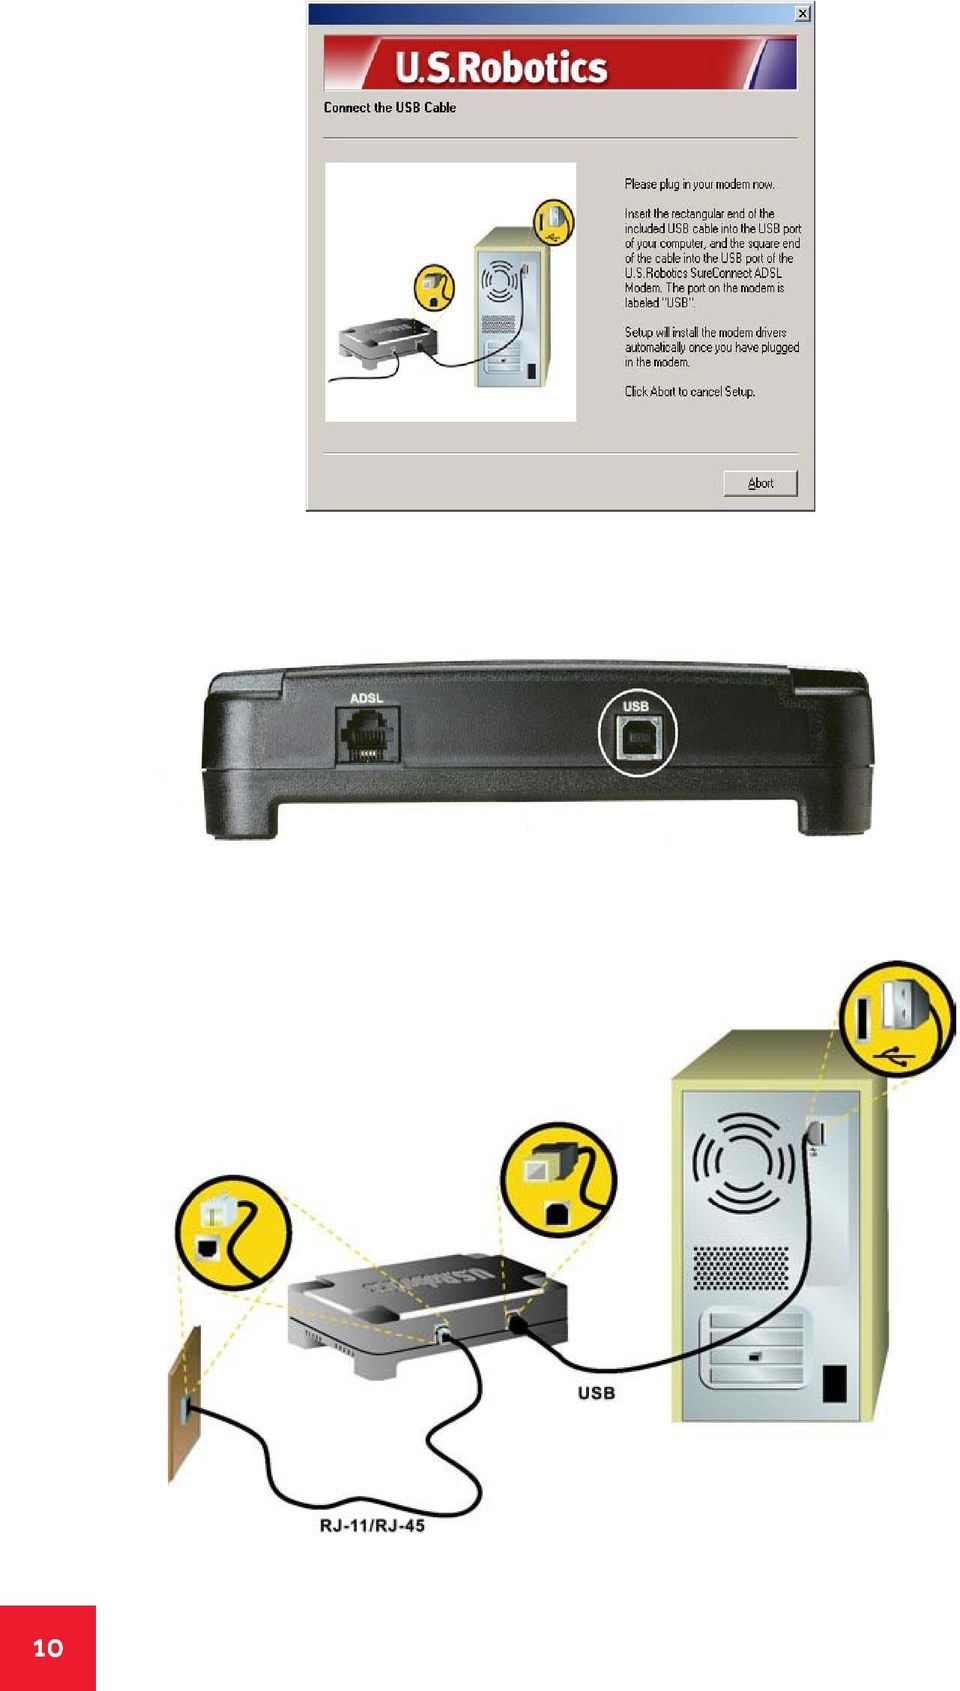
18 Step tep 3. Connect the Cables Once the files have been installed on your system, you will be prompted to plug in the telephone and USB cables. Connect the Telephone Cable Connect one end of the included telephone cable to the telephone port on the back of your modem labeled ADSL and connect the other end into the telephone jack on the wall. Click Next. Connect the USB Cable Insert the rectangular end of the included USB cable into the USB port of your computer, and the square end of the cable into the USB port of the U.S. Robotics SureConnect ADSL USB Modem. The port on the modem is labeled USB. 9

19 10
20 Step tep 4. Install the Modem and Software Once the cables have been secured, Windows will begin installing the new hardware using the New Hardware Wizard. If the New Hardware Wizard does not display, refer to the Troubleshooting section of this Quick Installation Guide. Windows XP Users A Found New Hardware Wizard screen for both the Loader and the Adapter will display. Select the Install Software e Automatically option and click Next. Windo indows 2000, Me, & XP Users Windo indows 2000 and Me A Digital Signature Not Found screen may appear. Click Yes to continue with the rest of the installation. Windo indows XP A software installation warning will display stating that the software your are installing has not passed Windows logo testing. Click the Continue Anyway button. U.S. Robotics has thoroughly tested this driver in conjunction with the supported hardware and has verified compatibility with Windows 2000, XP, and Me. Windows 2000 and XP Users A screen will confirm when each device has been installed. Click Finish to continue to install the software required to operate the modem. 11

21 Step tep 5. Restart Your our Computer You will then be prompted to restart your computer. Select Yes, I want to restart my computer now, and click Finish. After your computer restarts, you will be notified that the U.S. Robotics SureConnect ADSL USB Modem has been installed. Click Next to begin installing the U.S. Robotics SureConnect ADSL utility. Setup will begin to install the U.S. Robotics SureConnect ADSL utility. This utility will help monitor the status of your modem as well as the connection. Step 6. Install Software from ISP If your ISP gave you software to install, do so at this time. Be sure to read and follow all of the installation instructions provided. Once the software is installed, you must establish a dial-up connection in order to access the Internet. 12
22 Step tep 7. Establish a Dial-up Connection Double-click the dial-up networking icon that has just been created. It will be located on your desktop. If the networking icon is not available on your desktop follow the instructions below for your operating system. Windows Windows 98 and Windows Me Windows XP Click S tar t, select S etting s, and then double- click N etwork and Dial-up Connection s. Double-click M y Comput er and then double- c lick Dial Up Networking. Click S tar t, click C ontrol Pane l, and then double-click N etwork Connection s. 1. Look for your ISP s dial-up connection icon and double-click it. 2. In the Dial-up Connection screen, enter your User name and Passwor assword. Your ISP should have supplied your User name and Password to you. The Save Passwor assword option remembers your Password so you won t have to enter it every time you initiate your dial-up connection. The characters in the Dial text field are the VPI/VCI values. The VPI/VCI values will automatically display and you should not need to change them unless instructed to do so by your ISP. 3. Click the Dial button to initiate your connection. Congratulations! The installation of the U.S. Robotics SureConnect ADSL USB Modem is complete. Remove the CD-ROM from the CD-ROM drive of your computer and test your connection. You can test your connection by registering your modem. Click Yes es to register your modem, and you will be brought to the U.S. Robotics Web site. If the Registration screen does not display, go to the Troubleshooting section of this Quick Installation Guide and review the Troubleshooting Checklist. 13
23 U.S. Robotics SureConnect ADSL Utility The U.S. Robotics SureConnect ADSL utility displays information regarding the ADSL connection and will assist in troubleshooting if there is a problem with the modem or the connection. To display the U.S. Robotics SureConnect ADSL utility, click the U.S. Robotics SureConnect ADSL utility icon located on the Task Bar in the lower, right-hand corner of your screen. Run A Test To run a test on the modem, open the U.S. Robotics SureConnect ADSL utility and go to the Test est tab. Click the Test est button and the utility will verify the status of the modem. It will also verify the connection to the telephone company and to the Internet. If one of these tests fails, follow the on-screen instructions to help identify and solve the problem. More information about the U.S. Robotics SureConnect ADSL utility is available by clicking the Help button located within the utility as well as in the User Guide located on the included CD-ROM. 14
24 Troubleshooting Troubleshooting Checklist To help diagnose the problem, use the checklist below to help troubleshoot. Confirm that you have secured the telephone cable to the telephone wall jack and to the modem. Confirm that you have secured the USB cable to the USB port on the computer and to the modem. Have you contacted your Internet Service Provider to order ADSL service to your home? If you have yet to contact your ISP, you must do so as the modem will be inoperable without acquiring proper service from an ISP. Verify that you are installing your ADSL equipment AFTER the Service Completion Date given to you when you ordered your ADSL Internet Service. If you have yet to contact your ISP, you must do so as the modem will be inoperable without acquiring proper service from an ISP. Confirm you do not have a microfilter connected to the same telephone cable that your ADSL modem is connected to. If you do, remove it. Are your VPI/VCI, Encapsulation Mode, and Modulation correct for your ISP? If your ISP was not listed in the choices during the installation or if you selected the wrong ISP, you may need to manually configure your modem. Go to the instructions located in the Manual Configuration section of this Quick Installation Guide. If you were given software by your ISP to install, you need to install it. If your ISP did not give you any software, you will need to connect using the dial-up connection on the desktop. Run a test using the U.S. Robotics SureConnect ADSL utility to identify any possible problems. For more information about how to run a test refer to the U.S. Robotics SureConnect section of this Quick Installation Guide. 15
25 Status LEDs The U.S. Robotics SureConnect ADSL USB Modem contains three LEDs on the front of the modem. The first from the left is the PWR LED, the second is the data transfer USB LED, and the third is the ADSL LED. The operational status of the modem is indicated by the LED conditions listed below. L ED S tatu s Descriptio n PW WR US SB On Green Indicates that power is computer (USB bus). detected from the host O ff Green No power is detected or the modem is not installed. F lashing Green Data traffic is flowing. O ff Green No data traffic is flowing through the Ethernet link. O n Green Indicates that a DSL link has been established. ADS DSL F lashing Green Indicates that a DSL link is being negotiated. O ff Green The DSL link has failed. Manual Configuration In order to manually configure your U.S. Robotics SureConnect ADSL USB Modem either during installation or after installation you need to contact your ISP to obtain the following information: VPI/VCI Values Encapsulation mode -RFC 1483 IP over ATM Bridged LLC/SNAP -RFC 1483 IP over ATM Bridged VCMux -RFC 1483 IP over ATM Routed LLC/SNAP -RFC 1483 IP over ATM Routed VC/Mux -RFC 2364 WAN-PPP over ATM LLC/SNAP -RFC 2364 WAN-PPP over ATM VCMux -RFC 2516 PPP over Ethernet LLC/SNAP -RFC 2516 PPP over Ethernet VCMux -RFC 2364 PPP over ATM LLC/SNAP -RFC 2364 PPP over ATM VCMux Modulation -G.dmt -G.lite -T Auto-Sensing You can confirm your VPI/VCI settings with your ISP by going to the Configuration tab of the U.S. Robotics SureConnect ADSL utility. 16
26 During the Installation If your ISP is not listed, select the Not Listed option and click Next. The Manual Configuration screen displays, which will allow you to set the ISP s VPI/VCI settings, Encapsulation Mode, and Modulation. Once you have entered the correct settings, click Next. A screen will display the settings you entered. If the settings are correct click Next. If they are still incorrect, click the Modify Settings button to return to the Manual Configuration screen. 17
27 After the Installation If you have already installed your modem and find that you need to alter the Internet Service Provider settings, you will need to modify your installation. Windows 98, 2000, and Me 1. Click the Start button, select Settings, and then click Control Panel anel. 2. From the Control Panel, double-click Add/Remo emove ve Progr rograms ams. 3. The Add/Remove Programs screen will display all the programs you currently have installed. Locate and select the U.S. Robotics SureConnect ADSL Modem. 4. Click the Add/Remo emove ve button. In Windows 2000 click the Change/Remo emove ve button. 5. The Modify, Reinstall or Uninstall screen will display. Click the Modify option and then click Next. 6. You will return to the Internet Service Provider Selection screen. Select one of the listed ISPs or choose the Not Listed option to manually configure your ISP s settings. Follow the on-screen instructions to complete the modification of the ISP settings. 18
28 Windows XP 1. Click the Start button and then click Control Panel anel. 2. From the Control Panel, double-click Add/Remo emove ve Progr rograms. 3. The Add/Remove Programs screen will display all the programs you currently have installed. Locate and select the U.S. Robotics SureConnect ADSL Modem. 4. Click the Change/Remo emove ve button. 5. The Modify, Reinstall or Uninstall screen will display. Click the Modify option and then click Next. 6. You will return to the Internet Service Provider Selection screen. Select one of the listed ISPs or choose the Not Listed option to manually configure your ISP s settings. Follow the on-screen instructions to complete the modification of the ISP settings. Troubleshooting Tips My computer failed the system qualification test. The setup verifies that your computer has the minimum system requirements for several resources including hard drive space, RAM, operating system level, and processor speed. If any of these resources are under the required value, the Results screen will identify which resources did not meet the requirement. In a case of a resource being under the required value, update your computer to the recommended resource level. When I plugged in my modem the New Hardwar dware Wizar izard d did not display. Review the Troubleshooting Checklist at the beginning of this section. If a second USB port is available on your computer, try connecting the USB cable into that USB port. If the USB device is not recognized, check the computer manufacturer s documentation. If applicable, confirm that the USB cable is plugged into a powered USB port. Powered USB ports are normally located directly on the back panel of the computer and not on the keyboard. 19
29 I ran a test using the U.S. Robotics SureConnect ADSL utility and the Modem test failed. The Modem test will fail if the computer is unable to communicate with the modem or if the modem does not successfully complete the self-test. Take the following steps to ensure your computer can communicate with the modem: Confirm that the USB cable is securely attached to a USB port on the computer and to the USB port on the modem. Unplug the USB cable from your modem and then plug it in again. Plug the USB cable into another available USB port on the computer, as the current port may not be a powered USB port. Uninstall and reinstall the device drivers. Refer to the instructions for uninstalling the modem located in the Troubleshooting Tips section this Quick Installation Guide. If the Modem test still fails, contact your ISP to verify the operational status of the modem. I ran a test using the U.S. Robotics SureConnect ADSL utility and the Line test failed. Either the modem is unable to communicate with the telephone company or the router located at the central office of the telephone company is unable to communicate with your modem. In technical terms, the modem was not able to confirm a physical connection to the Digital Subscriber Line Access Multiplexer (DSLAM) located in the telephone company s central office or the DSLAM is receiving data but the router is unable to forward it. Confirm that the telephone cable is securely plugged into the modem and to an active telephone wall jack. If there is a microfilter on the same telephone cable that the modem is attached to, remove it. Reset the telephone line by unplugging all devices that share that phone number from their respective telephone wall jacks. Once they are all unplugged, plug them back in. I ran a test using the U.S. Robotics SureConnect ADSL utility, and the Internet Connection Test failed. The modem was able to connect to the telephone company but was unable to reach the Internet Service Provider (ISP). There may be a 20
30 problem connecting to the Domain Name Service (DNS) maintained by the Internet Service Provider. Try disconnecting the dial-up connection and dialing it again. If the test still fails, call your ISP for assistance. If you are using a firewall confirm that the SureConnect utility has permission to access the Internet. The installation failed How to uninstall the modem. You will need to uninstall the failed installation. Click Windows Start tart, select Settings and click Control Panel anel. Click Add/Remo emove Progr rograms ams. Locate and select the U.S. Robotics ADSL USB Modem. You may have to scroll down to locate this program. Click Add/Remo emove or Change/Remo emove in Windows When the setup is launched, click Uninstall and select Yes if asked to confirm the uninstall. Unplug the USB cable when the drivers are completely removed. Then try to reinstall the modem. When I complete my installation the Test tab of the U.S. Robotics SureConnect ADSL utility displays and I can t surf the Internet. Click the Test button in the Test tab to initiate a test on the modem. The cause of the failure will be identified in the lower half of the screen. While trying to surf the Internet, I received a Page Not Found or similar error. Your computer may not have acquired an IP address from your provider s DHCP server when you established the dial-up connection. Disconnect your dial-up connection, and then reconnect it to force a new request. The drivers are e installed, the PWR WR LED D is on, the phone line is connected, but the ADSL LED D is off or keeps flashing. Review the Troubleshooting Checklist at the beginning of this section. Unplug the USB cable from the modem for two to three minutes, but leave the phone line connected. Plug the USB cable back into the modem. This should cause the modem to reconnect. Open up the U.S. Robotics SureConnect ADSL utility by clicking the icon on the Task Bar. Go to the Monitor tab and press the Reset button once. The modem will re-establish the connection; this may take a moment. Open up the U.S. Robotics SureConnect ADSL utility by clicking the icon on the Task Bar. Go to the Test tab and run a test on the modem in order to identify the cause of failure. Call the ISP. 21
FCC Information : Warning: RF warning statement:
 FCC Information : This device complies with Part 15 of the FCC Rules. Operation is subject to the following two conditions: (1) This device may not cause harmful interference, and (2) This device must
Quick Installation Guide TU2-DVIV H/W: V1.0R
 Quick Installation Guide TU2-DVIV H/W: V1.0R Table Table of Contents of Contents Español... 1. Antes de iniciar... 2. Cómo se instala... 1 1 3 Troubleshooting... 6 Version 06.27.2008 1. Antes de iniciar
150Mbps Micro Wireless N USB Adapter
 150Mbps Micro Wireless N USB Adapter TEW-648UBM ŸGuía de instalación rápida (1) ŸTroubleshooting (5) 1.11 1. Antes de iniciar Contenidos del paquete ŸTEW-648UBM ŸCD-ROM (herramienta y guía del usuario)
Quick Installation Guide TEW-624UB H/W:B1.1R
 Quick Installation Guide TEW-624UB H/W:B1.1R Table of of Contents Contents Español... 1. Antes de iniciar... 2. Cómo se instala... 3. Configuración inalámbrica... Troubleshooting... 1 1 2 3 5 Version 02.29.2008
Quick Installation Guide TU-S9
 Quick Installation Guide TU-S9 Table of of Contents Contents Español... 1 1. Antes de iniciar... 1 2. Instalación del Hardware... 2 Troubleshooting... 5 Version 11.08.2007 1. Antes de iniciar Contenidos
Guía de instalación rápida TFM-561U
 Guía de instalación rápida TFM-561U V1 Table of Contents Español 1 1. Antes de iniciar 1 2. Cómo se instala 2 Troubleshooting 5 Version 08.25.2010 1. Antes de iniciar Contenidos del paquete TFM-561U CD-ROM
Quick Installation Guide TEW-623PI
 Quick Installation Guide TEW-623PI Table of of Contents Contents... 1 1. Antes de iniciar... 1 2. Cómo se instala... 2 3. Cómo usar el adaptador inalámbrico... 5 Troubleshooting... 6 Version 07.21.2006
Video Server. Quick Installation Guide. English, Español
 Video Server Quick Installation Guide English, Español 2 Video Server NOTES Quick Installation Guide 3 Video Server Quick Installation Guide To get your Video Server up and running on an Ethernet network,
Super Mini Retractable Mouse
 Super Mini Retractable Mouse Instruction Manual 98820 www.jascoproducts.com 98820-1 2/10 Package Contents Super Mini Retractable Mouse Instruction Manual System Requirements Windows 2000, XP, Vista, Windows
Guía de instalación rápida TEG-PCITXR TEG-PCITXRL 3.02
 Guía de instalación rápida TEG-PCITXR TEG-PCITXRL 3.02 Table of Contents Español 1 1. Antes de iniciar 1 2. Cómo se instala 2 Troubleshooting 5 Version 03.18.2010 1. Antes de iniciar ENGLISH Contenidos
Guía de instalación rápida TE100-P1U
 Guía de instalación rápida TE100-P1U V2 Table of Contents Español 1 1. Antes de iniciar 1 2. Cómo se instala 2 3. Configuración del servidor de impresora 3 4. Añadir la impresora a su PC 5 Troubleshooting
Agustiniano Ciudad Salitre School Computer Science Support Guide - 2015 Second grade First term
 Agustiniano Ciudad Salitre School Computer Science Support Guide - 2015 Second grade First term UNIDAD TEMATICA: INTERFAZ DE WINDOWS LOGRO: Reconoce la interfaz de Windows para ubicar y acceder a los programas,
Quick Installation Guide TU-P1284
 Quick Installation Guide TU-P1284 Table of of Contents Contents Español... 1 1. Antes de iniciar... 1 2. Instalación del Hardware... 2 3. Instalación del controlador... 3 Troubleshooting... 6 Version 11.21.2007
Table of Contents. Español... 1. Antes de iniciar... 2. Cómo conectar... 3. Cómo utilizar el conmutador... Troubleshooting... Version 10.13.
 Quick Installation Guide TE100-S800i TE100-S810Fi Table of Contents Español... 1. Antes de iniciar... 2. Cómo conectar... 3. Cómo utilizar el conmutador... Troubleshooting... 1 1 2 3 5 Version 10.13.05
Quick Installation Guide TW100-BRV304
 Quick Installation Guide TW100-BRV304 Table Table of Contents of Contents Español... 1 1. Antes de iniciar... 1 2. Instalación del Hardware... 2 3. Configuración del enrutador... 3 Troubleshooting... 5
Quick Installation Guide TE100-P11 TEW-P11G H/W: V1
 Quick Installation Guide TE100-P11 TEW-P11G H/W: V1 Table Table of Contents of Contents... 1. Antes de iniciar... 2. Cómo se instala... 3. Configuración del servidor de impresora... Troubleshooting...
Xperia TX TV Dock DK22 Xperia T TV Dock DK23
 Guía del usuario Xperia TX TV Dock DK22 Xperia T TV Dock DK23 Contenido Introducción...3 Descripción general de TV Dock...3 Primeros pasos...4 Conexión inteligente...4 Actualización de Conexión inteligente...4
Guía del usuario. Xperia P TV Dock DK21
 Guía del usuario Xperia P TV Dock DK21 Contenido Introducción...3 Descripción general de la parte posterior de TV Dock...3 Primeros pasos...4 Gestor de LiveWare...4 Actualización de Gestor de LiveWare...4
Guía de instalación rápida TE100-P21 3.01
 Guía de instalación rápida TE100-P21 3.01 Table of Contents Español 1 1. Antes de iniciar 1 2. Cómo se instala 2 3. Configuración del servidor de impresora 3 4. Agregue la impresora a su computadora 5
Guía de instalación rápida TEG-160WS TEG-240WS
 Guía de instalación rápida TEG-160WS TEG-240WS C2 Table of Contents Español 1 1. Antes de iniciar 1 2. Instalación del Hardware 2 3. Herramienta de gestión Web 3 Troubleshooting 6 Version 02.02.2010 1.
Guía de instalación rápida TPL-303E TPL-303E2K 1.01
 Guía de instalación rápida TPL-303E TPL-303E2K 1.01 Table of Contents Español 1 1. Antes de iniciar 1 2. Cómo se instala 2 Troubleshooting 6 Version 02.19.2010 1. Antes de iniciar Contenidos del paquete
24-Port 10/100Mbps Web Smart PoE Switch with 4 Gigabit Ports and 2 Mini-GBIC Slots TPE-224WS
 24-Port 10/100Mbps Web Smart PoE Switch with 4 Gigabit Ports and 2 Mini-GBIC Slots TPE-224WS ŸGuía de instalación rápida (1) ŸTroubleshooting (3) 1.12 1. Antes de iniciar Contenidos del Paquete ŸTPE-224WS
Quick Installation Guide TEG-160WS TEG-240WS H/W: C1
 Quick Installation Guide TEG-160WS TEG-240WS H/W: C1 Table Table of Contents of Contents Español... 1. Antes de iniciar... 2. Instalación del Hardware... 3. Herramienta de gestión Web... Troubleshooting...
Guía de instalación rápida TV-IP512WN 1.31
 Guía de instalación rápida TV-IP512WN 1.31 Table of Contents Español 1 1. Antes de iniciar 1 2. Inslatación y configuración del Hardware 2 Troubleshooting 8 Version 02.08.2010 1. Antes de iniciar Contenidos
ENKVM-USBB. 2-Port USB KVM switch with Easy Switch and Cable. User Guide
 ENKVM-USBB 2-Port USB KVM switch with Easy Switch and Cable User Guide i Package Contents 1 ENKVM-USBB 2-Port USB KVM Switch with Easy Switch and Cable 1 User Guide Requirements Console A VGA, SVGA, XGA,
 Limited TWO-YEAR Warranty SENSIO Inc. hereby warrants that for a period of TWO YEARS from the date of purchase, this product will be free from mechanical defects in material and workmanship, and for 90
Quick Installation Guide TE100-P1U
 Quick Installation Guide TE100-P1U Table of of Contents Contents... 1. Antes de iniciar... 2. Cómo se instala... 3. Configuración del servidor de impresora... 4. Añadir la impresora de red a su PC... 1
Quick Installation Guide TBW-103UB
 Quick Installation Guide TBW-103UB Table of Contents... 1. Antes de iniciar... 2. Cómo se instala... 3. Cómo usar el adaptador inalámbrico... 4. Cómo usar el adaptador Bluetooth... 1 1 2 7 8 Troubleshooting...
Guía del usuario. Funda con batería CP12
 Guía del usuario Funda con batería CP12 Contenido Introducción...3 La carga más sencilla...3 Especificaciones...3 Uso de la funda con batería...4 Carga del teléfono...4 Información legal...6 2 Introducción
Quick Installation Guide. TEG-224WSplus
 Quick Installation Guide TEG-224WSplus Table of of Contents Contents... 1. Antes de iniciar... 2. Instalación del Hardware... 3. Herramienta de gestión Web... Troubleshooting... 1 1 2 3 6 Version 04.28.2006
Quick Installation Guide TPE-224WS
 Quick Installation Guide TPE-224WS Table of of Contents Contents... 1. Antes de iniciar... 2. Instalación del Hardware... 3. Herramienta de gestión Web... Troubleshooting... 1 1 2 3 6 Version 03.13.2006
Quick Installation Guide TE100-PCIFC 1.01
 Quick Installation Guide TE100-PCIFC 1.01 Table of of Contents Español... 1. Antes de iniciar... 2. Cómo se instala... Troubleshooting... 1 1 2 5 Version 06.11.2009 1. Antes de iniciar Contenidos del paquete
User s Guide TK-207K
 User s Guide TK-207K Table of of Contents Contents Español... 1. Antes de iniciar... 2. Cómo conectar... 3. Operación... Troubleshooting... 1 1 2 4 5 Version 04.262006 1. Antes de iniciar Contenidos del
Guía de instalación rápida TFM-PCIV92A B1.21
 Guía de instalación rápida TFM-PCIV92A B1.21 Table of Contents Español 1 1. Antes de iniciar 1 2. Cómo se instala 2 Troubleshooting 6 Version 05.11.2011 1. Antes de iniciar Contenidos del paquete ŸTFM-PCIV92A
Quick Installation Guide TEW-631BRP
 Quick Installation Guide TEW-631BRP Table of of Contents Contents... 1. Antes de iniciar... 2. I nstalación del enrutador... 3. Añadir el enturador a una red 192.168.1.x existente... Troubleshooting...
Quick Installation Guide TEW-435BRM
 Quick Installation Guide TEW-435BRM Table of of Contents Contents Español... 1 1. Antes de iniciar... 1 2. Instalación del Hardware... 2 3. Configurar el Modem... 3 4. Configuración de encriptación...
Quick Start Guide USB 3.0 Multi-Card Reader / Writer
 Quick Start Guide USB 3.0 Multi-Card Reader / Writer Guide de démarrage rapide Lecteur de cartes multiples USB 3.0 Guía de configuración rápide USB 3.0 Varias Tarjetas lector / Escritor GFR309 PART NO.
Quick Installation Guide TE100-MP1UN H/W: V1.0R
 Quick Installation Guide TE100-MP1UN H/W: V1.0R Table of Contents... 1. Antes de iniciar... 2. Cómo se instala... 3. Impresión... 4. Para enviar un Fax... 5. Escanear... Troubleshooting... 1 1 2 7 8 9
Guía de instalación rápida TV-IP512P 1.31
 Guía de instalación rápida TV-IP512P 1.31 Table of Contents Español 1 1. Antes de iniciar 1 2. Inslatación y configuración del Hardware 2 3. Instalación Power over Ethernet (PoE) 7 Troubleshooting 9 Version
Quick Installation Guide TV-IP400 TV-IP400W
 Quick Installation Guide TV-IP400 TV-IP400W Table of of Contents Contents Español... 1. Antes de iniciar... 2. Instalación del Hardware... 3. Configuración de la cámara Internet... Troubleshooting... 1
Guía de instalación rápida TBW-107UB 1.01
 Guía de instalación rápida TBW-107UB 1.01 Table of Contents Español 1 1. Antes de iniciar 1 2. Cómo se instala 2 3. Configuración del adaptador Bluetooth 5 Troubleshooting 7 Version 02.25.2010 1. Antes
Quick Installation Guide TVP-SP3
 Quick Installation Guide TVP-SP3 Table of of Contents Contents Español... 1. Antes de iniciar... 2. Cómo se instala... 3. Hoja de consulta rápida... Troubleshooting... 1 1 2 4 5 Version 08.16.2006 1. Antes
Quick Installation Guide TVP-SP4BK
 Quick Installation Guide TVP-SP4BK Table of of Contents Contents... 1. Antes de iniciar... 2. Cómo se instala... 3. Cómo utilizar el teléfono para conferencias Bluetooth VoIP ClearSky... 1 1 2 8 Troubleshooting...
Guía de instalación rápida TU2-PCLINK TU2-PMLINK 1.01
 Guía de instalación rápida TU2-PCLINK TU2-PMLINK 1.01 Table of Contents Español 1 1. Antes de iniciar 1 2. Cómo se instala 3 3. Uso de la herramienta 4 4. Guía de referencia rápida 6 Technical Specifications
Quick Installation Guide Internet Setup
 CBR-970 Wireless-N Broadband Router www.cnet.com.tw Established in California, U.S.A. since 1987 Quick Installation Guide Internet Setup What s included in the box CBR-970 Wireless N Broadband Router Quick
Guía de instalación rápida TDM-C500 TDM-C504 1.01
 Guía de instalación rápida TDM-C500 TDM-C504 1.01 Table of Contents Español 1 1. Antes de iniciar 1 2. Instalación del Hardware 3 3. Configuración del Módem 4 Troubleshooting 7 Version 10.22.2010 1. Antes
Nueva confirmación de pedido de compra con cambios: proveedor ES
 Ayuda de trabajo Nueva confirmación de pedido de compra con cambios: proveedor ES Step 1. This Supplier portal activity lists the steps necessary for confirming a new purchase order with changes on price,
Quick Installation Guide TEW-P1PG
 Quick Installation Guide TEW-P1PG Table of of Contents Contents... 1. Antes de iniciar... 2. Cómo se instala... 3. Configuración del servidor de impresora... 4. Añadir la impresora de red a su PC... 1
Quick Installation Guide Internet Setup
 www.cnet.com.tw Established in California, U.S.A. since 1987 CBR-971 Wireless-N 3.5G Broadband Router Quick Installation Guide Internet Setup What s included in the box CBR-971 Wireless N 3.5G Broadband
Quick Installation Guide TEW-632BRP
 Quick Installation Guide TEW-632BRP Table of of Contents Contents... 1. Antes de iniciar... 2. I nstalación del enrutador... 3. Añadir el enrutador por detrás del enrutador existente... Troubleshooting...
Quick Installation Guide TV-IP301 TV-IP301W
 Quick Installation Guide TV-IP301 TV-IP301W Table of of Contents Contents Español... 1. Antes de iniciar... 2. Instalación del Hardware... 3. Configuración de la cámara Internet... Troubleshooting... 1
TEW-610APB. TRENDnet. Quick Installation Guide. Version 8.19.2005. TRENDware, USA What's Next in Networking
 TEW-610APB Quick Installation Guide Version 8.19.2005 TRENDnet TRENDware, USA What's Next in Networking Copyright 200 5. All Rights Reserved. TRENDware International, Inc. Table of Contents Español...
Cargador rápido para coche AN420
 Guía del usuario Cargador rápido para coche AN420 Contenido Introducción...3 La carga más sencilla...3 Uso del Cargador rápido para coche...4 Carga de dispositivos...4 Información legal...5 Declaration
Guía del usuario. Cargador rápido para coche AN420
 Guía del usuario Cargador rápido para coche AN420 Contenido Introducción... 3 La carga más sencilla...3 Uso del Cargador rápido para coche...4 Carga de dispositivos... 4 Información legal... 5 Declaration
Save Money 2-up Single Doorhanger Set OH payday advance edition, 4 different doorhangers, Spanish
 Save Money 2-up Single Doorhanger Set OH payday advance edition, 4 different doorhangers, Spanish PACKAGE CONTENTS How to Customize 4-color doorhanger, Editable PDF (50% OFF first loan) 1-color (black)
Quick Installation Guide TE100-P1P
 Quick Installation Guide TE100-P1P Table of of Contents Contents... 1 1. Antes de iniciar... 1 2. Cómo se instala... 2 3. Configuración del servidor de impresora... 3 4. Añadir la impresora a su PC...
Quick Installation Guide TMR-121EC H/W: V1.0R
 Quick Installation Guide TMR-121EC H/W: V1.0R Table Table of Contents of Contents Español... 1. Antes de iniciar... 2. Cómo se instala... 1 1 3 Troubleshooting... 5 Version 07.09.2008 1. Antes de iniciar
Software TRENDnetVIEW Pro. Guía de instalación rápida de TRENDnetVIEW Pro (1)
") Software TRENDnetVIEW Pro Guía de instalación rápida de TRENDnetVIEW Pro (1) TRENDnetVIEW Pro/10.08.2013 Índice Requisitos del software de gestión TRENDnetVIEW Pro... 19 Instalación de TRENDnetVIEW Pro...
Software TRENDnetVIEW Pro Guía de instalación rápida de TRENDnetVIEW Pro (1) TRENDnetVIEW Pro/10.08.2013 Índice Requisitos del software de gestión TRENDnetVIEW Pro... 19 Instalación de TRENDnetVIEW Pro...
Guía de instalación rápida TEW-639GR 2.01
 Guía de instalación rápida TEW-639GR 2.01 Table of Contents Español 1 1. Antes de iniciar 2. Instalación del Hardware 1 2 3. Configuración del enrutador inalámbrico 3 Troubleshooting 5 Version 03.04.2010
Part No: KTI (Page 1-13) (Pagina 14-26) K-Tool International Wixom, MI 48393
 (Pagina 14-26) K-Tool International Wixom, MI 48393") Part No: KTI-70099 (Page 1-13) (Pagina 14-26) K-Tool International Wixom, MI 48393 (800) 762-6002 www.ktoolinternational.com support@ktoolinternational.com The KTool Walkie-Talkie can use a NiMH rechargeable
Part No: KTI-70099 (Page 1-13) (Pagina 14-26) K-Tool International Wixom, MI 48393 (800) 762-6002 www.ktoolinternational.com support@ktoolinternational.com The KTool Walkie-Talkie can use a NiMH rechargeable
Quick Installation Guide TWG-BRF114
 Quick Installation Guide TWG-BRF114 Table of of Contents Contents Español... 1 1. Antes de iniciar... 1 2. Instalación del Hardware... 2 3. Configuración del enrutador... 3 Troubleshooting... 5 Version
Quick Installation Guide TEW-421PC TEW-423PI
 Quick Installation Guide TEW-421PC TEW-423PI Table of of Contents Contents Español... 1. Antes de iniciar... 2. Cómo se instala... 3. Cómo usar el adaptador inalámbrico... Troubleshooting... 1 1 2 4 5
Quick Installation Guide TEW-638APB H/W: V1.0R
 Quick Installation Guide TEW-638APB H/W: V1.0R Table Table of Contents of Contents... 1. Antes de iniciar... 2. Instalación del Hardware... 1 1 2 Troubleshooting... 8 Version 09.10.2008 1. Antes de iniciar
Quick Installation Guide TEG-424WS H/W: V1
 Quick Installation Guide TEG-424WS H/W: V1 Table of of Contents Contents Español... 1. Antes de iniciar... 2. Instalación del Hardware... 3. Herramienta de gestión para conmutador Web Smart... Troubleshooting...
manual de servicio nissan murano z51
 manual de servicio nissan murano z51 Reference Manual To understand featuring to use and how to totally exploit manual de servicio nissan murano z51 to your great advantage, there are several sources of
Quick Installation Guide TEW-430APB
 Quick Installation Guide TEW-430APB Table of of Contents Contents Español... 1. Antes de iniciar... 2. Instalación del Hardware... 3. Configuración del Punto de Acceso... 1 1 2 3 Troubleshooting... 6 Version
Quick Installation Guide TK-207K TK-407K
 Quick Installation Guide TK-207K TK-407K Table of of Contents Contents Español... 1 1. Antes de iniciar... 1 2. Cómo se instala... 2 3. Operación... 4 Troubleshooting... 5 Version 03.09.2006 1. Antes de
Quick Installation Guide TEG-448WS
 Quick Installation Guide TEG-448WS Table of of Contents Contents Español... 1. Antes de iniciar... 2. Instalación del Hardware... 3. Herramienta de gestión Web... Troubleshooting... 1 1 2 3 6 Version 01.10.2007
Guía de instalación rápida TEW-691GR 1.01
 Guía de instalación rápida TEW-691GR 1.01 Table of Contents Español 1 1. Antes de iniciar 1 2. Instalación del Hardware 2 3. Configuración del enrutador inalámbrico 3 Troubleshooting 5 Version 05.11.2010
Guía de instalación rápida TU2-HDMI 1.01
 Guía de instalación rápida TU2-HDMI 1.01 Table of Contents Español 1 1. Antes de iniciar 1 2. Cómo se instala 2 3. Configuración de los parámetros de imagen 4 Troubleshooting 6 Version 02.16.2011 1. Antes
EP-2906 Manual de instalación
 EP-2906 Manual de instalación Con el botón situado a la izquierda se configura en el modo de cliente y de la derecha es el modo de Punto de acceso AP (nota: El USB es sólo para la función de fuente de
Extension Cords Extensiones Eléctricas We light your world
 We light your world 07.14.1 Household Domésticas 3 outlet indoor cords allow use of up to three items in one small place. This provides flexibility, while allowing multiple devices to be use without the
Quick Installation Guide TEW-641PC TEW-643PI H/W: V1.0R
 Quick Installation Guide TEW-641PC TEW-643PI H/W: V1.0R Table of of Contents Contents... 1. Antes de iniciar... 2. Cómo se instala... 3. Cómo usar el adaptador inalámbrico... Troubleshooting... 1 1 2 6
FOR INFORMATION PURPOSES ONLY Terms of this presentation
 Protección de la Inversión a Través del Tiempo Christian Jaramillo TECNOAV Sesión en Español FOR INFORMATION PURPOSES ONLY Terms of this presentation This presentation was based on current information
Quick Installation Guide TW100-BRV324
 Quick Installation Guide TW100-BRV324 Table of of Contents Contents Español... 1 1. Antes de iniciar... 1 2. Instalación del Hardware... 2 3. Configuración del enrutador... 3 Troubleshooting... 4 Version
Protección modo común
 MADE IN FRANCE 1 Protección modo común DPS - CLASE I - Descripción Técnica CONFORMIDAD DE PRODUCTO CON IEC 61643-11 DPS - CLASE I - Descripción Técnica Clase según IEC61643-11 Forma Constructiva No. Polos
Guía de instalación rápida TEW-623PI 3.02
 Guía de instalación rápida TEW-623PI 3.02 Table of Contents Español 1 1. Antes de iniciar 2. Cómo se instala 1 2 3. Cómo usar el adaptador inalámbrico 4 Troubleshooting 5 Version 02.05.2010 1. Antes de
Quick Installation Guide TEW-429UB
 Quick Installation Guide TEW-429UB Table of Contents... 1. Antes de iniciar... 2. Uso del detector de Hot Spot (punto de alto tráfico)... 3. Cómo se instala... 4. Configuración inalámbrica... 1 1 2 5 7
app ADSL2V1 COMMUNICATIONS LINE www.printyourideas.com
 app ADSL2V1 COMMUNICATIONS LINE www.printyourideas.com 1. CONECTAR EL ROUTER Antes de conectar el dispositivo asegúrese de que el servicio de banda ancha (ADSL), suministrado por su proveedor ISP, se encuentra
CESVA USB DRIVER. M_CUD_v0001_20130226_ESP_ENG
 CESVA USB DRIVER M_CUD_v0001_20130226_ESP_ENG CESVA USB DRIVER ESPAÑOL CONTENIDO 1. Instalación del CESVA USB Driver... 2 2. Conocer el puerto COM asignado para la comunicación con el PC... 2 2.1. Windows
GARAGE DOOR OPENER CONNECTIVITY HUB QUICK START GUIDE
 GARAGE DOOR OPENER CONNECTIVITY HUB QUICK START GUIDE Thank you for purchasing a Craftsman garage door opener Connectivity Hub enabled with AssureLink technology. Once you have created your account and
Creating your Single Sign-On Account for the PowerSchool Parent Portal
 Creating your Single Sign-On Account for the PowerSchool Parent Portal Welcome to the Parent Single Sign-On. What does that mean? Parent Single Sign-On offers a number of benefits, including access to
Guía de Instalación Rápida TPA-311 1.01
 Guía de Instalación Rápida TPA-311 1.01 Table of Contents Español 1 1. Antes de iniciar 1 2. Cómo se instala 2 Technical Specifications 3 Troubleshooting 4 Version 09.17.2009 1. Antes de iniciar ENGLISH
Quick Installation Guide TW100-BRM504
 Quick Installation Guide TW100-BRM504 Table of of Contents Contents... 1. Antes de iniciar... 2. Instalación del Hardware... 3. Configuración del Módem... 1 1 3 4 Troubleshooting... 7 Version 08.30.2006
TFM-560X. Guia Rápido de Instalação Rápida Modem. Version 07.07.2006
 TFM-560X Guia Rápido de Instalação Rápida Modem Version 07.07.2006 Copyright 200 7. All Rights Reserved. TRENDware International, Inc. Table of Contents Español... 1 1. Preparación para la instalación...
Quick Installation Guide TV-IP422 TV-IP422W H/W: A1.0R
 Quick Installation Guide TV-IP422 TV-IP422W H/W: A1.0R Table Table of Contents of Contents... 1. Antes de iniciar... 2. Instalación del Hardware... 3. Configuración de la cámara Internet... Troubleshooting...
Quick Installation Guide TEW-450APB
 Quick Installation Guide TEW-450APB Table of of Contents Contents Español... 1. Antes de iniciar... 2. Instalación del Hardware... 3. Configuración del Punto de Acceso... 1 1 2 3 Troubleshooting... 6 Version
Assembly Instructions. Tools required for assembly: Small wrench. Operating Instructions. Cleaning Your KaZAM Bicycle WARNING: WARNING:
 A Assembly Instructions WARNING: WARNING: Tools required for assembly: Small wrench Operating Instructions - Cleaning Your KaZAM Bicycle Limited Warranty - two THIS WARRANTY DOES NOT COVER NORMAL WEAR
Quick Installation Guide TV-IP201 TV-IP201W
 Quick Installation Guide TV-IP201 TV-IP201W Table of of Contents Contents Español... 1. Antes de iniciar... 2. Cómo realizar la conexión... 3. Configuración de la cámara Internet... 4. Cómo utilizar la
Guía del usuario. MHL to HDMI Adapter IM750
 Guía del usuario MHL to HDMI Adapter IM750 Contenido Introducción...3 Descripción general de MHL to HDMI Adapter...3 Primeros pasos...4 Conexión inteligente...4 Actualización de Conexión inteligente...4
Guía de instalación rápida TU-S9
 Guía de instalación rápida TU-S9 V1 Table of Contents Español 1 1. Antes de iniciar 1 2. Cómo se instala 2 Troubleshooting 7 Version 06.24.2010 1. Antes de iniciar Contenidos del paquete TU-S9 CD-ROM del
Adobe Acrobat Reader X: Manual to Verify the Digital Certification of a Document
 dobe crobat Reader X: Manual de verificación de Certificación Digital de un documento dobe crobat Reader X: Manual to Verify the Digital Certification of a Document support@bioesign.com Desarrollado por:
Guía de instalación rápida TK-V201S TK-V401S 1.01
 Guía de instalación rápida TK-V201S TK-V401S 1.01 Table of Contents Español 1 1. Antes de iniciar 1 2. Cómo se instala 2 Technical Specifications 8 Troubleshooting 9 Version 05.12.2010 1. Antes de iniciar
Fiber Converters TFC-1000 Series. ŸGuía de instalación rápida (1)
") Fiber Converters TFC-1000 Series ŸGuía de instalación rápida (1) 1. Antes de iniciar Contenidos del paquete ŸConvertidor de fibra ŸGuía de instalación rápida multilingüe ŸAlimentación eléctrica de CA Si
Fiber Converters TFC-1000 Series ŸGuía de instalación rápida (1) 1. Antes de iniciar Contenidos del paquete ŸConvertidor de fibra ŸGuía de instalación rápida multilingüe ŸAlimentación eléctrica de CA Si
Quick Installation Guide TU-S9 H/W: V1
 Quick Installation Guide TU-S9 H/W: V1 Table Table of Contents of Contents Español... 1. Antes de iniciar... 2. Cómo seinstala... 1 1 2 Troubleshooting... 7 Version 02.18.2009 1. Antes de iniciar Contenidos
Quick Installation Guide TV-IP110 TV-IP110W H/W: A1.0R
 Quick Installation Guide TV-IP110 TV-IP110W H/W: A1.0R Table Table of Contents of Contents... 1. Antes de iniciar... 2. Instalación del Hardware... 3. Configuración de la cámara Internet... Troubleshooting...
MANUAL EASYCHAIR. A) Ingresar su nombre de usuario y password, si ya tiene una cuenta registrada Ó
 Ingresar su nombre de usuario y password, si ya tiene una cuenta registrada Ó") MANUAL EASYCHAIR La URL para enviar su propuesta a la convocatoria es: https://easychair.org/conferences/?conf=genconciencia2015 Donde aparece la siguiente pantalla: Se encuentran dos opciones: A) Ingresar
MANUAL EASYCHAIR La URL para enviar su propuesta a la convocatoria es: https://easychair.org/conferences/?conf=genconciencia2015 Donde aparece la siguiente pantalla: Se encuentran dos opciones: A) Ingresar
SIGUIENDO LOS REQUISITOS ESTABLECIDOS EN LA NORMA ISO 14001 Y CONOCIENDO LAS CARACTERISTICAS DE LA EMPRESA CARTONAJES MIGUEL Y MATEO EL ALUMNO DEBERA
 SIGUIENDO LOS REQUISITOS ESTABLECIDOS EN LA NORMA ISO 14001 Y CONOCIENDO LAS CARACTERISTICAS DE LA EMPRESA CARTONAJES MIGUEL Y MATEO EL ALUMNO DEBERA ELABORAR LA POLITICA AMBIENTAL PDF File: Siguiendo
Quick Installation Guide TEW-639GR H/W: V1.0R
 Quick Installation Guide TEW-639GR H/W: V1.0R Table of of Contents Contents Español... 1. Antes de iniciar... 2. Instalación del Hardware... 3. Configuración del enrutador inalámbrico... Troubleshooting...
Quick Installation Guide TV-IP410 TV-IP410W H/W: A1.0R
 Quick Installation Guide TV-IP410 TV-IP410W H/W: A1.0R Table Table of Contents of Contents... 1. Antes de iniciar... 2. Instalación del Hardware... 3. Configuración de la cámara Internet... Troubleshooting...