J5933 H9499 L1907.
|
|
|
- Esther Macías Ortiz
- hace 6 años
- Vistas:
Transcripción

1 J5933 H9499 L1907
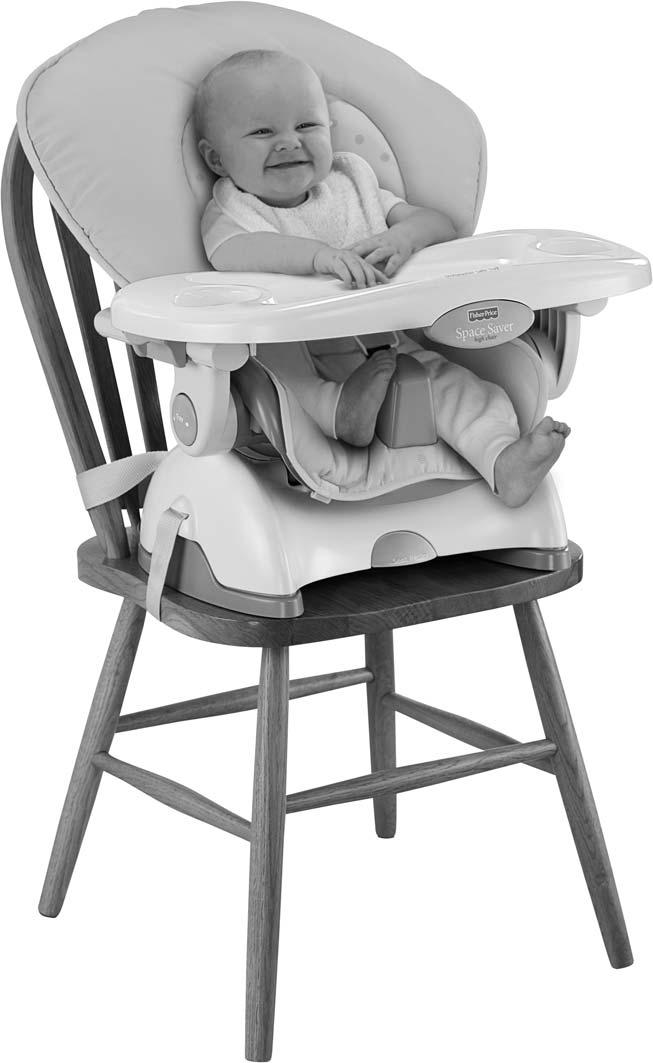
2 Consumer Information Renseignements pour les consommateurs Información para el consumidor WARNING AVERTISSEMENT ADVERTENCIA Prevent serious injury or death from falls or sliding out: Always secure child with the restraint belts until child is able to get in and out of the product without help (about 2 1 /2 years old). The tray is not designed to hold child in the product. Never leave child unattended. Always secure the product on a chair using the bottom and back attachment straps. Never use the product on a stool or bench that does not have a seat back. Only use upright position when child is capable of sitting upright unassisted. Prévenir les blessures graves ou la mort qui pourraient survenir si l enfant tombait ou glissait hors de la chaise haute : Toujours attacher les ceintures de sécurité une fois que l enfant est dans le produit, et ce, jusqu à ce qu il puisse s asseoir dans le produit ou en sortir tout seul (environ 2 ans et demi). Le plateau n est pas conçu pour retenir l enfant dans le produit. Ne jamais laisser un enfant sans surveillance. Toujours fixer le produit sur une chaise à l aide de la courroie du dessous et celle de l arrière. Ne jamais utiliser le produit sur un tabouret ou sur un banc qui n a pas de dossier. Utiliser seulement la position redressée quand l enfant est capable de s asseoir sans aide. Evitar lesiones serias o la muerte como resultado de caídas: Siempre asegurar al niño con los cinturones de sujeción hasta que el niño pueda sentarse y levantarse en el producto por sí solo (aprox. 2 1 /2 años). La bandeja no está diseñada para asegurar al niño en el producto. No dejar al niño fuera de su alcance. Siempre asegurar el producto en la silla, usando las cintas de sujeción inferior y posterior. No usar el producto sobre un taburete o banco sin respaldo. Solo usar la posición vertical cuando el niño pueda sentarse derecho sin ayuda. 2
3 Consumer Information Renseignements pour les consommateurs Información para el consumidor Parts Pièces Piezas IMPORTANT! Please keep these instructions for future reference. Please read these instructions before assembly and use of this product. Adult assembly and setup is required. No tools needed for assembly or setup. IMPORTANT! Before assembly and each use, inspect this product for damaged hardware, loose joints, missing parts or sharp edges. DO NOT use if any parts are missing or broken. Contact Fisher-Price for replacement parts and instructions if needed. Never substitute parts. Product features and decorations may vary from photos. IMPORTANT! Conserver ces instructions pour s'y référer en cas de besoin. Lire toutes les instructions avant l'assemblage et d utiliser le produit. Doit être assemblé et installé par un adulte. Aucun outil requis pour l assemblage et l installation. IMPORTANT! Avant l'assemblage et chaque utilisation, vérifier que ce produit ne comporte pas de pièces endommagées ou manquantes, de joints lâches ou de bords tranchants. NE PAS l utiliser si des pièces manquent ou sont endommagées. Communiquer avec Fisher-Price pour obtenir des pièces de rechange et des instructions au besoin. N utiliser que des pièces du fabricant. Les caractéristiques du produit et les décorations peuvent varier par rapport à l'illustration. IMPORTANTE! Guardar para futura referencìa. Leer estas instrucciones antes al montaje y de usar este producto. Requiere montaje y preparación por un adulto. No es necesario usar herramientas. IMPORTANTE! Previo al montaje y al uso de la silla, revisar que este producto no tenga hardware dañado, conexiones sueltas, piezas faltantes o bordes filosos. NO usar el producto si falta o está rota alguna pieza. Póngase en contacto con la oficina Fisher-Price más próxima a su localidad para obtener piezas de repuesto e instrucciones, en caso de ser necesarias. No usar piezas de terceros. Las características y decoración del producto pueden variar de las mostradas. Tray Plateau Bandeja Pad Coussin Almohadilla Seat Back with Restraint System Dossier avec système de retenue Respaldo con sistema de sujeción Seat with Restraint System and Attachment Straps Siège avec système de retenue et courroies d attache Silla con sistema de sujeción y cinturones de seguridad 3
4 Assembly Assemblage Montaje Seat Back Dossier Respaldo Tab Patte Lengüeta Slot Fente Ranura Large Tab Patte large Lengüeta grande Tab Patte Lengüeta Slot Fente Ranura Pad Coussin Almohadilla 1 Seat Siège Asiento Fit the seat back tabs into the slots in the top of the seat. Push the top of the seat back so that the large tab snaps into place in the seat. Insérer les pattes du dossier du siège dans les fentes sur le dessus du siège. Appuyer sur le haut du dossier de façon que la patte large s emboîte dans le siège. Ajustar las lengüetas del respaldo en las ranuras de la parte de arriba de la silla. Empujar la parte de arriba del respaldo de modo que la lengüeta grande se encaje en su lugar en la silla. 2 Fit the pad onto the seat. Glisser le coussin sur le siège. Ajustar la almohadilla en la silla. 4
5 Assembly Assemblage Montaje Lowest Slots Fentes du bas Ranuras inferiores Waist Belts Courroies abdominales Cinturones de la cintura 3 Crotch Belt Courroie d entrejambe Cinturón de la entrepierna Fit the waist belts on the seat through the lowest slots in the pad. Make sure the waist belts are not twisted. Fit the crotch belt on the seat through the large slot in the pad. Make sure the crotch belt is not twisted. Glisser les courroies abdominales dans les fentes du bas du coussin. S assurer qu elles ne sont pas tortillées. Insérer la courroie d entrejambe dans la fente large du coussin. S assurer qu elle n est pas tortillée. Ajustar los cinturones de la cintura en las ranuras inferiores de la almohadilla. Asegurarse que los cinturones de la cintura no estén torcidos. Ajustar el cinturón de la entrepierna de la silla en la ranura grande de la almohadilla. Asegurarse que el cinturón de la entrepierna no esté torcido. 4 Hooks Attaches Ganchos Fasten the hooks on bottom of the pad to the front edge of the seat. Fixer les attaches dans le bas du coussin à l avant du siège. Ajustar los ganchos de la parte de abajo de la almohadilla en el borde delantero de la silla. 5
6 Assembly Assemblage Montaje Adjuster Régleur Ajustador Shoulder Belt Courroie d épaule Cinturón del hombro Slot Fente Ranura 6 5 Upper Slots Fentes supérieures Ranuras superiores Lower Slots Fentes inférieures Ranuras inferiores Insert the shoulder belts through the slots in the pad. - Use the lower shoulder belt slots for a smaller baby. - Use the upper shoulder belt slots for a larger baby. Make sure the shoulder belts are not twisted. Glisser les courroies d épaule dans les fentes du coussin. - Utiliser les fentes du bas pour un petit enfant. - Utiliser les fentes du haut pour un enfant plus grand. S assurer que les courroies d épaule ne sont pas tortillées. Introducir los cinturones de los hombros en las ranuras de la almohadilla. - Usar las ranuras inferiores del cinturón del hombro para bebés pequeños. - Usar las ranuras superiores del cinturón del hombro para bebés grandes. Asegurarse que los cinturones de los hombros no estén torcidos. Locate the longer portion of the shoulder belt, underneath the adjuster. Fit the end of this longer portion through the slot in the top of the waist belt. Hint: If the end does not fit at all through the slot, you are probably inserting the wrong end. Make sure you insert the longer portion of the belt through the slot. Repeat this procedure to attach the other shoulder belt to the other waist belt. Repérer la portion la plus longue de la courroie d épaule, sous le régleur. Faire passer l extrémité de la portion plus longue dans la fente dans le haut de la courroie abdominale. Remarque : Si l extrémité ne peut pas être glissée dans la fente, il s agit probablement de la mauvaise extrémité. S assurer de glisser la portion la plus longue dans la fente. Répéter ce procédé pour fixer l autre courroie d épaule à l autre courroie abdominale. Localizar la parte más larga del cinturón del hombro debajo del ajustador. Introducir el extremo de esta parte más larga en la ranura de la parte de arriba del cinturón de la cintura. Atención: si el extremo no cabe en la ranura, significa que está introduciendo el extremo equivocado. Cerciorarse de introducir en la ranura el extremo más largo del cinturón. Repetir este procedimiento para ajustar el otro cinturón del hombro en el otro cinturón de la cintura. 6
7 Adjusting the Seat Height Pour régler la hauteur du siège d appoint Ajustar la altura de la silla Attaching to a Chair Pour fixer le siège d appoint à une chaise Ajustar a una silla Latches Loquets Seguros While squeezing the latches together with one hand, lift or lower the base. Release the latches to lock the base in place. Hint: This will require some force. You may want to pull one latch and lift or lower Base Bas Base Base Bas Base Side View Vue du côté Vista lateral one side of the base. Then repeat this procedure to lift or lower the other side of the base. While adjusting seat height, you may accidentally pull the base completely off of the seat bottom. If this should happen, simply squeeze the latches together and fit the base back onto the seat bottom. Presser les verrous l un contre l autre d une main et lever ou baisser la base de l autre. Lâcher les loquets pour verrouiller la bas en place. Remarque : Ceci demande de la force. Il peut être préférable de tirer un verrou et de lever ou baisser un côté de la base puis de répéter ce procédé pour lever ou baisser l autre côté. Il est possible que la base sorte complètement du bas du siège pendant qu on règle la hauteur du siège. Si c est le cas, il suffit de presser les verrous l un contre l autre et de remettre la base dans le bas du siège. Mientras mantiene apretados ambos seguros con una mano, levantar o bajar la base. Soltar los seguros para fijar la base en su lugar. Atención: esto requiere un poco de fuerza. Quizá le resulte más fácil jalar un seguro y levantar o bajar un lado de la base. Luego, repetir este procedimiento para levantar o bajar el otro lado de la base. Mientras ajusta la altura de la silla, quizá jale accidentalmente la base separándola de la silla. Si esto llega a suceder, simplemente unir los seguros y ajustar la base en la silla. WARNING AVERTISSEMENT ADVERTENCIA Prevent serious injury or death from falls or sliding out: Always secure the product on a chair using bottom and back attachment straps. Never use the product on a stool or bench that does not have a seat back. Prévenir les blessures graves ou la mort qui pourraient survenir si l enfant tombait ou glissait hors de la chaise haute : Toujours fixer le produit sur une chaise à l aide de la courroie du dessous et celle de l arrière. Ne jamais utiliser le produit sur un tabouret ou sur un banc qui n a pas de dossier. Evitar lesiones serias o la muerte como resultado de caídas: Siempre asegurar el producto en la silla, usando las cintas de sujeción inferior y posterior. No usar el producto sobre un taburete o banco sin respaldo. 7
8 Attaching to a Chair Pour fixer le siège d appoint à une chaise Ajustar a una silla D D 1 A Bottom Straps Courroies du dessous Cinturones inferior Place the seat on a chair. Wrap the bottom straps around the bottom of the chair A. Buckle the straps B. Make sure you hear a "click." Pull the free end of the strap to tighten on the chair C. Placer le siège sur une chaise. Faire passer les courroies du dessous sous la chaise A. Attacher les courroies B. S assurer d entendre un «clic». Tirer l extrémité libre de la courroie pour la serrer sur la chaise C. Colocar la silla en una silla. Enrollar los cinturones inferiores alrededor de la parte inferior de la silla A. Asegurar los cinturones B. Cerciorarse de oír un "clic". Jalar el extremo libre del cinturón para ajustarlo en la silla C. B B C C 2 Back Straps Courroies arrière Cinturones trasero Wrap the back straps around the back of the chair D. Buckle the straps E. Make sure you hear a "click." Pull the free end of the strap to tighten on the chair F. Faire passer les courroies arrière autour du dossier de la chaise D. Attacher les courroies E. S assurer d entendre un «clic». Tirer l extrémité libre de la courroie pour la serrer sur la chaise F. Enrollar los cinturones traseros alrededor del dorso de la silla D. Asegurar los cinturones E. Cerciorarse de oír un "clic". Jalar el extremo libre del cinturón para ajustarlo en la silla F. F E 8
9 Adjust Seat Recline Réglage d inclinaison du siège Ajustar el respaldo WARNING AVERTISSEMENT ADVERTENCIA A PUSH POUSSER EMPUJAR Prevent serious injury or death from falls or sliding out: Only use upright position when child is capable of sitting upright unassisted. Prévenir les blessures graves ou la mort qui pourraient survenir si l'enfant tombait ou glissait hors de la chaise haute : Utiliser seulement la position redressée quand l enfant est capable de s asseoir sans aide. Evitar lesiones serias o la muerte como resultado de caídas: Solo usar la posición vertical cuando el niño pueda sentarse derecho sin ayuda. B PUSH POUSSER EMPUJAR PULL PIRER JALAR Seat Recline Latch Bouton d inclinaison Seguro del respaldo While pulling the seat recline latch, push the top of the seat back to lower in the desired position A. Or, while pulling the seat recline latch, push the bottom of the seat to lift in the desired position B. Release the seat recline latch. Push on the seat back to be sure the seat is secure. Hint: You may not be able to fully recline this product on some kitchen chairs. Upright Redressée Vertical Recline Inclinée Reclinada Semi-Recline Semi-inclinée Semireclinada En tirant sur le bouton d inclinaison du siège, pousser sur le dessus du dossier pour le baisser dans la position désirée A. Ou, en tirant sur le bouton d inclinaison du siège, pousser le bas du siège pour relever le siège dans la position désirée B. Relâcher le bouton. Pousser sur le dossier du siège pour s assurer que le siège est verrouillé en position. Remarque : Il se peut que le produit ne s incline pas complètement sur certaines chaises de salle à manger. Mientras jala el seguro del respaldo, empujar la parte de arriba del respaldo para reclinarlo a la posición deseada A. O bien, mientras jala el seguro del respaldo, empujar la parte de abajo de la silla para subir el respaldo a la posición deseada B. Soltar el seguro del respaldo. Empujar el respaldo para asegurarse que la silla está segura. Atención: quizá no sea posible reclinar totalmente este producto en algunas sillas de cocina. 9
10 Adjust Armrests Régler les accoudoirs Ajustar reposabrazos PRESS APPUYAR PRESIONAR Upright Seating Siège en position relevée Posición vertical While pressing the armrest button, rotate the armrest forward or backward to the desired position. Repeat this procedure to adjust the other armrest. En appuyant sur le bouton de l accoudoir, faire glisser l accoudoir vers l avant ou vers l arrière dans la position désirée. Répéter ce procédé pour régler l autre accoudoir. Mientras presiona el botón del reposabrazos, girar el reposabrazos hacia adelante o atrás a la posición deseada. Repetir este procedimiento para ajustar el otro reposabrazos. Semi-Recline Seating Siège en position semi-inclinée Posición semireclinada Recline Seating Siège en position inclinée Posición reclinada 10
11 Secure Child Pour installer l enfant Asegurar al niño WARNING AVERTISSEMENT ADVERTENCIA Prevent serious injury or death from falls or sliding out: Always secure child with the restraint belts until child is able to get in and out of the product without help (about 2 1 /2 years old). The tray is not designed to hold child in the product. Never leave child unattended. Waist Belt Courroie de retenue Cinturón de seguridad Waist Belt Courroie de retenue Cinturón de seguridad Prévenir les blessures graves ou la mort qui pourraient survenir si l enfant tombait ou glissait hors de la chaise haute : Toujours attacher les ceintures de sécurité une fois que l enfant est dans le siège, et ce, jusqu à ce qu il puisse s asseoir dans le produit ou en sortir tout seul (environ 2 ans et demi). Le plateau n est pas conçu pour retenir l enfant dans le produit. Ne jamais laisser un enfant sans surveillance. Evitar lesiones serias o la muerte como resultado de caídas: Siempre asegurar al niño con los cinturones de sujeción hasta que el niño pueda sentarse y levantarse de el producto por sí solo (aprox. 2 1 /2 años). La bandeja no está diseñada para asegurar al niño en el producto. No dejar al niño fuera de su alcance. ecrotch Belt fcourroie d entrejambe SCinturón de la entrepierna Place your child in the seat. Position the crotch belt between your child s legs. Buckle the restraint belts to the crotch belt. Make sure you hear a "click" on both sides. Check to be sure the restraint system is securely attached by pulling it away from your child. The restraint system should remain attached. Mettre l enfant dans le siège. Glisser la courroie d entrejambe entre ses jambes. Fixer les courroies de retenue à la courroie d entrejambe. S assurer d entendre un «clic» de chaque côté. Tirer sur le système de retenue pour s assurer qu il est bien attaché. Il doit résister. Sentar al niño en la silla. Colocar el cinturón de la entrepierna entre las piernas del niño. Asegurar los cinturones de seguridad al cinturón de la entrepierna. Cerciorarse de oír un "clic" en ambos lados. Verificar que el sistema de sujeción está bien seguro, jalándolo en dirección opuesta al niño. El sistema de sujeción debe permanecer ajustado. 11
12 Secure Child Pour installer l enfant Asegurar al niño Adjuster Régleur Ajustador Adjuster Régleur Ajustador Anchored End Extrémité fixe Extremo fijo C Anchored End Extrémité fixe Extremo fijo C A B B A Free End Extrémité libra Extremo libre TIGHTEN SERRER AJUSTAR Free End Extrémité libra Extremo libre LOOSEN DESERRER DESAJUSTAR To tighten the waist belts: Feed the anchored end of the waist belt up through the buckle to form a loop. Pull the free end of the waist belt To tighten the shoulder belts: Hold the adjuster and pull the front shoulder strap down. Pour serrer les courroies de abdominales : Glisser une portion de l extrémité fixe de la courroie abdominal vers le haut dans le passant de façon à former une boucle. Tirer sur l extrémité libre de la courroie. Pour serrer la courroie d'épaule : Tenir le régleur et tirer l'avant de la courroie d'épaule ver le bas. Para ajustar los cinturones de la cintura: Introducir el extremo fijo del cinturón de la cintura en la hebilla para formar una onda. Jalar el extremo libre del cinturón de la cintura. Para ajustar los cinturones del hombro: sujetar el ajustador y jalar para abajo el cinturón anterior del hombro. To loosen the waist belts: Feed the free end of the waist belt up through the buckle to form a loop. Enlarge the loop by pulling on the end of the loop toward the buckle. Pull the anchored end of the waist belt to shorten the free end of the waist belt. To loosen the shoulder belts: Lift the adjuster. Note: After adjusting the restraint system to fit your child, make sure you pull on it to be sure it is securely fastened Pour desserrer les courroies de abdominales : Glisser une portion de l extrémité libre de la courroie abdominal dans le passant de façon à former une boucle. Agrandir la boucle en tirant dessus vers le passant. Tirer sur l extrémité fixe de la courroie de retenue pour raccourcir l extrémité libre de la courroie de abdominal. Pour desserrer les courroies d épaule : Remonter le régleur. Remarque: Après avoir réglé le système de retenue, tirer dessus pour s'assurer qu'il résiste bien. Para desajustar los cinturones de la cintura: Introducir el extremo libre del cinturón de la cintura en la hebilla para formar una onda. Agrandar la onda jalando el extremo de la onda hacia la hebilla. Jalar el extremo fijo del cinturón de seguridad para achicar el extremo libre del cinturón de la cintura. Para desajustar los cinturones de los hombros: levantar el ajustador. Nota: después de ajustar el sistema de sujeción a la medida del niño, jalar del mismo para cerciorarse que está seguro. 12
13 Tray Use Pour utiliser le plateau Uso de la bandeja WARNING AVERTISSEMENT ADVERTENCIA Tray Plateau Bandeja Prevent serious injury or death from falls or sliding out: Always secure child with the belts until child is able to get in and out of the product without help (about 2 1 /2 years old). The tray is not designed to hold child in the product. Prévenir les blessures graves ou la mort qui pourraient survenir si l enfant tombait ou glissait hors de la chaise haute : Toujours attacher les ceintures de sécurité une fois que l enfant est dans le produit, et ce, jusqu à ce qu il puisse s asseoir dans le siège ou en sortir tout seul (environ 2 ans et demi). Le plateau n est pas conçu pour retenir l enfant dans le produit. Evitar lesiones serias o la muerte como resultado de caídas: Siempre asegurar al niño con los cinturones de sujeción hasta que el niño pueda sentarse y levantarse en el producto por sí solo (aprox. 2 1 /2 años). La bandeja no está diseñada para asegurar al niño en el producto. 1 Armrests Accoudoirs Reposabrazos Hint: Before first time use, wash the tray thoroughly with soap and water. Fit the tray onto the armrests. Push down until the tray snaps into place. Note: The tray is not microwave safe. Remarque : Avant la première utilisation, bien laver le plateau à l eau savonneuse. Fixer le plateau aux accoudoirs. Pousser dessus jusqu à ce que le plateau s emboîte. Noter : Le plateau est ne passe pas au four à micro-ondes sûr. Atención: antes de usar la bandeja por primera vez, lavarla con agua y detergente. Ajustar la bandeja en los reposabrazos. Empujar hacia abajo hasta que la bandeja se ajuste en su lugar. Nota: La bandeja no es la microonda segura. 13
14 Tray Use Pour utiliser le plateau Uso de la bandeja B B A 2 Tray Latches Verrous du plateau Seguros de la bandeja 3 Tray Latches Verrous du plateau Seguros de la bandeja You can adjust the tray forward or backward. - While pressing the button on the front of the tray, push or pull the tray forward or backward A. - While squeezing both latches underneath the tray, push or pull the tray forward or backward B. Il est possible de déplacer le plateau vers l avant ou vers l arrière. - En appuyant sur le bouton sur le devant du plateau, déplacer celui-ci vers l avant ou vers l arrière A. - En tirant l un vers l autre les verrous sous le plateau, déplacer celui-ci vers l avant ou vers l arrière B. While squeezing both latches underneath the tray, pull to remove. En tirant l un vers l autre les deux verrous sous le plateau, lever le plateau pour le retirer. Mientras aprieta ambos seguros debajo de la bandeja, jalar para desprender la bandeja. La bandeja se puede ajustar hacia adelante o atrás. - Mientras presiona el botón del frente de la bandeja, empujar o jalar la bandeja hacia adelante o atrás. A - Mientras aprieta ambos seguros debajo de la bandeja, empujar o jalar la bandeja hacia delante o atrás B. 14

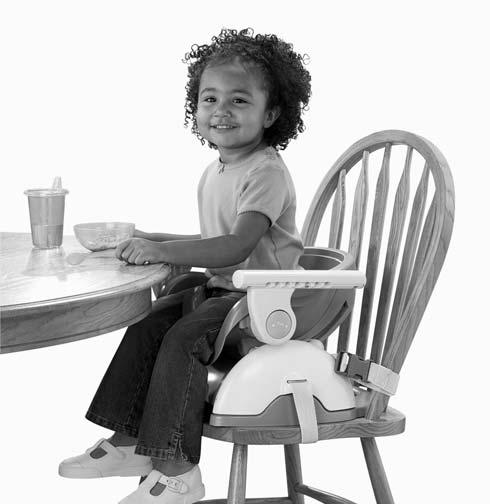
15 Convert to Booster Seat Transformer la chaise haute en siège d appoint Convertir en silla de aprendizaje This high chair easily converts to a booster high chair for toddlers. Cette chaise haute se transforme facilement en siège d appoint pour les tout-petits. Esta silla alta se convierte fácilmente en silla alta de aprendizaje para niños pequeños. Shoulder Belts Courroies d épaule Cinturones de los hombros 1 Push to remove the shoulder belts from the waist restraint buckle slots. Appuyer pour retirer les courroies d épaule des fentes des courroies abdominales. Presionar para soltar los cinturones de los hombros de la hebilla de sujeción de la cintura. 15
16 Convert to Booster Seat Transformer la chaise haute en siège d appoint Convertir en silla de aprendizaje Shoulder Belts Courroies d épaule Cinturones de los hombros 2 3 Hooks Attaches Ganchos Fit the shoulder belts back through the slots in the pad. Lift the top of the pad off of the seat back. Glisser les courroies d épaule dans les fentes du coussin. Enlever le haut du coussin du dossier du siège. Volver a introducir los cinturones de los hombros en las ranuras de la almohadilla. Levantar la parte de arriba de la almohadilla del respaldo de la silla. Unfasten the pad hooks from the front edge of the seat. Unbuckle the waist belts from the crotch belt. Détacher les attaches du coussin du devant du siège. Détacher les courroies abdominales de la courroie d entrejambe. Desajustar los ganchos de la almohadilla del borde delantero de la silla. Soltar los cinturones de la cintura del cinturón de la entrepierna. 16
17 Convert to Booster Seat Transformer la chaise haute en siège d appoint Convertir en silla de aprendizaje Waist Belts Courroies abdominales Cinturones de la cintura LIFT LEVER LEVANTAR PULL TIRER JALAR Crotch Belt Courroie d entrejambe Cinturón de la entrepierna 5 Pull the tab on the seat back. Lift to remove the seat back from the seat. Store the seat back, pad and shoulder belts in a safe place for future use. Tirer sur la patte du dossier. Lever le dossier pour l enlever. Ranger le dossier, le coussin et les courroies d épaule dans un endroit sûr pour utilisation ultérieure. 4 Jalar la lengüeta del respaldo. Levantar el respaldo para retirarlo de la silla. Guardar el respaldo, almohadilla y cinturones de los hombros en un lugar seguro para uso futuro. Fit the crotch belt down through the slot in the pad. Fit the waist belts back through the slots in the pad. Remove the pad from the seat. Glisser la courroie d entrejambe dans la fente du coussin. Glisser les courroies d épaule dans les fentes du coussin. Retirer le coussin du siège. Introducir el cinturón de la entrepierna en la ranura de la almohadilla. Ajustar los cinturones de la cintura en las ranuras de la almohadilla. Retirar la almohadilla de la silla. 17
18 Care Entretien Mantenimiento The pad, seat, seat back and straps may be wiped clean using a mild cleaning solution and damp cloth. Do not use bleach. Do not use harsh or abrasive cleansers. Rinse clean with water to remove residue. The tray is top rack dishwasher safe (or use the bottom rack - without using the drying cycle). To remove the pad: Push to remove the shoulder straps from the slots on the waist restraint buckle. Lift the top of the pad off of the seat back. Fit the shoulder belts back through the slots in the pad. Unfasten the pad hooks from the front edge of the seat. Unbuckle the waist belts from the crotch belt. Fit the crotch belt down through the slot in the pad. Fit the waist belts back through the slots in the pad. Remove the pad from the seat. To replace the pad: refer to Assembly steps 2-6. IMPORTANT! Never use this product without the restraint system. Replace the crotch, waist and shoulder belts for high chair use; replace the crotch and waist belts for booster seat use. Le coussin, le siège, le dossier et les courroies peuvent être nettoyés avec un linge humide et une solution savonneuse douce. Ne pas utiliser d eau de Javel. Ne pas utiliser de nettoyants puissants ou abrasifs. Rincer pour éliminer les résidus de savon. Le plateau est résistant au lave-vaisselle, dans le panier supérieur. Il peut être placé dans le panier inférieur quand le cycle de séchage chaud n est pas sélectionné. Pour retirer le coussin : Appuyer pour retirer les courroies d épaule des fentes des courroies abdominales. Enlever le haut du coussin du dossier du siège. Glisser les courroies d épaule dans les fentes du coussin. Détacher les attaches du coussin du devant du siège. Détacher les courroies abdominales de la courroie d entrejambe. Glisser la courroie d entrejambe dans la fente du coussin. Glisser les courroies abdominales dans les fentes du coussin. Retirer le coussin du siège. Pour replacer le coussin, se référer aux étapes 2 à 6 de l assemblage. IMPORTANT! Ne jamais utiliser ce produit sans le système de retenue. Pour utiliser le produit comme chaise haute, replacer les courroies d entrejambe, d épaule et abdominales; pour l utiliser comme siège d appoint, replacer les courroies d entrejambe et abdominales. La almohadilla, silla, respaldo y cinturones se pueden limpiar con un paño humedecido en una solución de agua y jabón neutro. No usar lejía. No usar limpiadores ásperos o abrasivos. Enjuagar con agua para eliminar residuo. La bandeja se puede lavar en la parte de arriba de la lavaplatos (o en la parte de abajo, sin usar el ciclo de secado). Para desprender la almohadilla: Presionar para desprender los cinturones de los hombros de la hebilla de la sujeción de la cintura. Levantar la parte de arriba de la almohadilla del respaldo. Ajustar los cinturones de los hombros en las ranuras de la almohadilla. Desajustar los ganchos de la almohadilla del borde delantero de la silla. Soltar los cinturones de la cintura del cinturón de la entrepierna. Introducir el cinturón de la entrepierna en la ranura de la almohadilla. Introducir los cinturones de la cintura en las ranuras de la almohadilla. Retirar la almohadilla de la silla. Para ajustar la almohadilla en su lugar, consultar los pasos de montaje 2-6. IMPORTANTE! No usar este producto sin el sistema de sujeción. Para la silla alta, siempre usar los cinturones de la entrepierna, cintura y hombros; para la silla alta de aprendizaje, usar los cinturones de la entrepierna y de la cintura. 18
19 19
 59-05-51-00 Ext.")
20 Questions? Des questions? Preguntas? If you are missing parts or need assistance, we can help! Pour commander des pièces ou obtenir de l aide, nous sommes là! Si le falta alguna pieza o necesita ayuda, póngase en contacto con nosotros! (US & Canada) Ext ó (México) (Brasil) United States: Fisher-Price Consumer Relations, 636 Girard Avenue, East Aurora, New York Canada: Mattel Canada Inc., 6155 Freemont Blvd., Mississauga, Ontario L5R 3W2. México: Importado y distribuido por Mattel de Mexico, S.A. de C.V., Insurgentes Sur # 3579, Torre 3, Oficina 601, Col. Tlalpan, Delegación Tlalpan, C.P , México, D.F. MME NB3. Chile: Mattel Chile, S.A., Avenida Américo Vespucio 501-B, Quilicura, Santiago, Chile. Venezuela: Mattel de Venezuela, C.A., Ave. Mara, C.C. Macaracuay Plaza, Torre B, Piso 8, Colinas de la California, Caracas Argentina: Mattel Argentina, S.A., Curupaytí 1186, (1607) Villa Adelina, Buenos Aires. Colombia: Mattel Colombia, S.A., calle 123#7-07 P.5, Bogotá. Brasil: Mattel do Brasil Ltda. - CNPJ : / Av. Tamboré, 1400/1440 Quadra A de 02 a Barueri - SP. Great Britain: Telephone Australia: Mattel Australia Pty. Ltd., 658 Church Street, Locked Bag #870, Richmond, Victoria 3121 Australia. Consumer Advisory Service New Zealand: William Pickering Drive, Albany 1331, Auckland. Asia: Mattel East Asia Ltd, Room 1106, South Tower, World Finance Centre, Harbour City, Tsimshatsui, HK, China. Fisher-Price, Inc., a subsidiary of Mattel, Inc., East Aurora, New York 14052, U.S.A Mattel, Inc. All Rights Reserved. and designate U.S. trademarks of Mattel, Inc. Fisher-Price, Inc., une filiale de Mattel, Inc., East Aurora, New York 14052, É. -U Mattel, Inc. Tous droits réservés. PRINTED IN CHINA/IMPRIMÉ EN CHINE et désignent des marques déposées de Mattel, Inc. aux É.-U. J5933c-0720
fisher-price.com W4120, W9262, W9472, W9473, W9474, W9475, W9476, X1465, X2533, X7326, X7332, X7333, X7336, BBD60, BBD61, BCK62
 W4120, W9262, W9472, W9473, W9474, W9475, W9476, X1465, X2533, X7326, X7332, X7333, X7336, BBD60, BBD61, BCK62 IMPORTANT! Please keep these instructions for future reference. Please read these instructions
V8638
 www.fisher-price.com V8638 Consumer Information Información para el consumidor Service à la cliéntèle WARNING ADVERTENCIA AVERTISSEMENT Prevent serious injury or death from falls or sliding out: Always
X7309. fisher-price.com
 X7309 Please read these instructions before use of this product. Keep this instruction sheet, as it contains important information. Leer estas instrucciones antes de usar este producto. Guardar estas instrucciones
CJT22. fisher-price.com
 CJT22 Newborn Recién nacido Infant Bebé Toddler Niño pequeño IMPORTANT! Please keep these instructions for future reference. Please read these instructions before assembly and use of this product. Adult
BMB79. fisher-price.com
 BMB79 Please read these instructions before assembly and use of this product. Keep this instruction sheet, as it contains important information. Adult assembly required. No tools necessary for assembly.
W4120 W9262 W9472 W9473 W9474 W9475 W9476 X1465 X2533
 W4120 W9262 W9472 W9473 W9474 W9475 W9476 X1465 X2533 Newborn Recién nacido Nouveau-né Infant Bebé Bébé Toddler Niño pequeño Jeune enfant www.fisher-price.com WARNING ADVERTENCIA AVERTISSEMENT Prevent
W9432. fisher-price.com
 W943 Please read these instructions before assembly and use of this product. Keep this instruction sheet, as it contains important information. Adult assembly is required. No tools are needed for assembly.
B7275 L6436. www.fisher-price.com
 B7275 L6436 www.fisher-price.com Consumer Information Información para el consumidor Service à la cliéntèle WARNING ADVERTENCIA AVERTISSEMENT Prevent serious injury or death from falls or sliding out:
V3393 V9144 V9464 W2082 W9481 X7329. fisher-price.com
 V3393 V9144 V9464 W2082 W9481 X7329 fisher-price.com 1 Consumer Information Información al consumidor WARNING Prevent serious injury or death from falls or sliding out: The child should be secured in the
BDY84. fisher-price.com
 BDY84 Please read these instructions before assembly and use of this product. Keep this instruction sheet, as it contains important information. No assembly is required. IMPORTANT! Before assembly and
fisher-price.com CMR51, CMR53 DKR72, DVM43 DYH25
 CMR51, CMR53 DKR72, DVM43 DYH25 Full-Size High Chair Silla alta grande SpaceSaver High Chair Silla alta compacta Booster Seat Silla de aprendizaje Youth Chair Silla para niño pequeño IMPORTANT! Please
sher-price.com
 www.fisher-price.com Consumer Information Renseignements aux consommateurs Información para el consumidor WARNING AVERTISSEMENT ADVERTENCIA Prevent serious injury or death from falls or sliding out: The
I. J. (a) (b) H J G
 (b) H J G") 1. 2. H.. F D. 5 PS 1 P D. 1 P 1 P 3. 4. J G. F. I 1 P 1 PIR G. H. (a) 5. 5/16 x3/4 3 PS I. J. 2 PS (b) 3 PS 1 P 08-016/1 Remark: Fix the (a) screws firstly, then fix the (b) screw L-HPM4201/HPM4202/HPT4201
1. 2. H.. F D. 5 PS 1 P D. 1 P 1 P 3. 4. J G. F. I 1 P 1 PIR G. H. (a) 5. 5/16 x3/4 3 PS I. J. 2 PS (b) 3 PS 1 P 08-016/1 Remark: Fix the (a) screws firstly, then fix the (b) screw L-HPM4201/HPM4202/HPT4201
fisher-price.com BGB26, BGB27, BJV38, BJX67, BJX68, BLL26, BMM98, CBL47, CBL48
 G26, G27, JV38, JX67, JX68, LL26, MM98, CL47, CL48 Newborn Recién nacido Infant ebé IMPORTNT! Please keep these instructions for future reference. IMPORTNT! efore assembly and each use, inspect this product
Smart Seat Buckle Replacement Guide
 Smart Seat Buckle Replacement Guide 2014 Graco PD272023A 2/14 To Remove Existing Harness Tongues and Buckle and Attach Replacement Buckle 1 2 Remove seat from base. Loosen straps by lifting lever and pull
X7036. fisher-price.com
 X7036 IMPORTANT! Please keep these instructions for future reference. Please read these instructions before assembly and use of this product. Adult assembly is required. Assembly instructions on back side
Cradle Rocker Seat. Model Numbers: 79152, 79251, 79252, 79253, 79273, 79274, 79375, 79377
 Cradle Rocker Seat Model Numbers: 79152, 79251, 79252, 79253, 79273, 79274, 79375, 79377 Please keep these instructions for future reference. Adult assembly is required. Your Fisher-Price Cradle Rocker
BFB07. fisher-price.com
 BFB07 IMPORTANT! Please keep these instructions for future reference. Please read these instructions before assembly and use of this product. Adult assembly is required. No tools required for assembly.
B A I I L K L G E M H
 ... 5PS 4PS J.... H. 2PS. 6PS D... J. 4PS 2PS H 4PS D odel:-4119 / -4159 anufactured for/ Hecho para/ abriqué pour lera / ssendant o. One Parkway North, Deerfield, 60015 2016 ssendant o. ade in/ Hecho
car seat adapter adaptador del asiento de automóvil CXBEX/MAXI COSI/NUNA babyjogger.com ASSEMBLY INSTRUCTIONS INSTRUCCIONES DEL ENSAMBLAJE PD349778A
 CXBEX/MAXI COSI/NUNA car seat adapter adaptador del asiento de automóvil PD349778A babyjogger.com ASSEMBLY INSTRUCTIONS INSTRUCCIONES DEL ENSAMBLAJE CITY PREMIER CITY SELECT CITY SELECT LUX 1 2 CLICK 3
Continental Bed Rails Assembly Instructions. Instructions d'assemblage pour traverses de lit Continental
 Continental Bed Rails Assembly Instructions Instructions d'assemblage pour traverses de lit Continental Instrucciones de montaje de travesaños Continental Q010 Parts: A 2x Bed Rails C 14 x Wood Screw B
Owner s Manual Manual del propietario
 www.gracobaby.com Soufflé TM Owner s Manual Manual del propietario 2014 Graco PD284046D 12/14 Failure to follow these warnings and the assembly instructions could result in serious injury or death. PLEASE
IMPORTANT! CONSERVER POUR UNE UTILISATION ULTÉRIEURE LIRE SOIGNEUSEMENT IMPORTANT - KEEP FOR FUTURE REFERENCE - READ CAREFULLY WARNING AVERTISSEMENT!
 PATRULL KLÄMMA ENGLISH IMPORTANT - KEEP FOR FUTURE REFERENCE - READ CAREFULLY This gate or enclosure is designed for doorways and stair openings from 73 cm (28 3/4") to 87 cm (34 1/4") for children from
Owners Manual Manual del propietario
 www.gracobaby.com Swivi Seat TM Owners Manual Manual del propietario 2014 Graco PD279579C 10/14 Failure to follow these warnings and the assembly instructions could result in serious injury or death. PLEASE
Pocket Snack. Owner's Manual Manual del propietario
 Read all instructions BEFORE assembly and USE of product. KEEP INSTRUCTIONS FOR FUTURE USE. Lea todas las instrucciones ANTES de armar y USAR este producto. CONSERVE LAS INSTRUCCIONES PARA USO FUTURO.
Owners Manual Manual del propietario
 www.gracobaby.com Slim Snacker TM Owners Manual Manual del propietario 2014 Graco PD284070B 10/14 Failure to follow these warnings and the assembly instructions could result in serious injury or death.
Silla Musical Aprende Conmigo
 H7173 Instrucciones Silla Musical Aprende Conmigo con mesita de actividades Guardar estas instrucciones para futura referencia, ya que contienen información de importancia acerca de este producto. Funciona
X Meijer.com
 W9442 X2532 X3840 X3841 www.fisher-price.com Consumer Information Información al consumidor WARNING ADVERTENCIA Failure to follow these warnings and the instructions could result in serious injury or death.
GUARDAR ESTAS INSTRUCCIONES PARA FUTURE REFERENCE. piezas que pueden entrar en contacto Toy tray is not dishwasher safe.
 X7323 KEEP INSTRUCTIONS FOR GUARDAR ESTAS INSTRUCCIONES PARA FUTURE REFERENCE. FUTURA REFERENCIA. Please read these instructions before Leer estas instrucciones antes de assembly and use of this product.
K2927.
 K2927 www.fisher-price.com WARNING AVERTISSEMENT ADVERTENCIA Prevent serious injury or death from falls or sliding out: The child should be secured in the high chair at all times by the restraining system,
Car Seat Adapter Adaptador de la silla para el coche
 CHICCO/PEG-PEREGO Car Seat Adapter Adaptador de la silla para el coche PD348997B babyjogger.com ASSEMBLY INSTRUCTIONS INSTRUCCIONES DEL ENSAMBLAJE CITY PREMIER CITY SELECT PEG-PEREGO 1 A B 2 3 CLICK 4
Stack 3-Stage Multichair
 Read all instructions BEFORE assembly and USE of product. KEEP INSTRUCTIONS FOR FUTURE USE. Lea todas las instrucciones ANTES de armar y USAR este producto. CONSERVE LAS INSTRUCCIONES PARA USO FUTURO.
elements enviro Owner s Manual Manuel du propriétaire Manual del usuario ecofriendly solutions organizing
 enviro elements TM ecofriendly solutions organizing Made with 50% recycled resin Fait de 50 % de résine recyclée Hecho en un 50% con resina reciclada Owner s Manual Manuel du propriétaire Manual del usuario
Assembly instructions Instructions d assemblage Instrucciones de Ensamblaje /14
 2016.9.12 www.potterybarn.com 1/14 Hawthorne Slipcovered English Sofa Sofa anglais avec housse Hawthorne Sofá inglés con funda Hawthorne 2016.9.12 www.potterybarn.com 2/14 ENGLISH Do not fully tighten
Owners Manual Manual del propietario
 www.gracobaby.com Swivi Seat 3-in-1 Booster Owners Manual Manual del propietario 2014 Graco PD283577F 10/14 This product can be used in the following modes: Este producto puede usarse en los siguientes
Polly Progres5 Relax 5-in-1 Multichair
 Read all instructions BEFORE assembly and USE of product. KEEP INSTRUCTIONS FOR FUTURE USE. Lea todas las instrucciones ANTES de armar y USAR este producto. CONSERVE LAS INSTRUCCIONES PARA USO FUTURO.
N3429 P Infant Bebé Bébé. Toddler Niño pequeño Tout-petit
 N3429 P9438 1 Infant Bebé Bébé 2 Toddler Niño pequeño Tout-petit www.fisher-price.com Consumer Information Información para el consumidor Renseignements pour les consommateurs WARNING DROWNING HAZARD Babies
(A) LX STROLLER: ASSEMBLY INSTRUCTIONS ADULT ASSEMBLY REQUIRED. Styles and colors may vary Los estilos y colores pueden varia
 LX STROLLER: ASSEMBLY INSTRUCTIONS ADULT ASSEMBLY REQUIRED. Styles and colors may vary Los estilos y colores pueden varia") LX STROLLER: ASSEMBLY INSTRUCTIONS ADULT ASSEMBLY REQUIRED INSTRUCCIONES DE ENSAMBLAJE DEBE SER ENSAMBLADO POR UN ADULTO Styles and colors may vary Los estilos y colores pueden varia Customer Care Tel.
LX STROLLER: ASSEMBLY INSTRUCTIONS ADULT ASSEMBLY REQUIRED INSTRUCCIONES DE ENSAMBLAJE DEBE SER ENSAMBLADO POR UN ADULTO Styles and colors may vary Los estilos y colores pueden varia Customer Care Tel.
H Newborn Nouveau-né Recién nacido. 2 Infant Bébé Bebé. 3 Older Baby Plus vieux Bébé Bebé más grande.
 H9486 1 Newborn Nouveau-né Recién nacido Note: Use the hammock (connected to all four corners of the bathtub) only for a baby that weighs up to 10 lbs (4.54 kg). Remarque : Utiliser seulement le hamac
Assembly instructions Instructions d assemblage Instrucciones de Ensamblaje /18
 2016.11.12 www.potterybarn.com 1/18 Brady Slope Slipcovered Sleeper Sofa Sofa-lit avec housse Brady Sofá cama con funda Brady Slope 2016.11.12 www.potterybarn.com 2/18 ENGLISH Do not fully tighten bolts
Stack 3-Stage Multichair
 Read all instructions BEFORE assembly and USE of product. KEEP INSTRUCTIONS FOR FUTURE USE. Lea todas las instrucciones ANTES de armar y USAR este producto. CONSERVE LAS INSTRUCCIONES PARA USO FUTURO.
Renseignements pour les consommateurs. Directives d'installation WARNING. Kit Parts CAUTION. Instructions Peg Covers Installation
 5 d'installation Garnitures de protection Répéter ce procédé pour fi xer l'autre jeu de garnitures de protection à l'autre patte arrière. Renseignements pour les consommateurs Au Canada : pour toute question
DuoDiner TM 2009 Graco PD115794A 9 09
 www.gracobaby.com DuoDiner TM 009 Graco PD115794A 9 09 This product can be used in the following modes: Ce produit peut être utilisé selon les modes suivants : Este producto se puede usar en los siguientes
N3429 P9438 X Infant 0-6 months and up to 20 lbs (9 kg) Bebé 0-6 meses y hasta 9 kg
 Bebé 0-6 meses y hasta 9 kg") N3429 P9438 X3422 Infant 0-6 months and up to 20 lbs (9 kg) Bebé 0-6 meses y hasta 9 kg Bébé De 0 à 6 mois, et pesant moins de 9 kg (20 lb) Toddler 6 months+ and up to 25 lbs (11 kg) Niño pequeño 6 meses
N3429 P9438 X3422 Infant 0-6 months and up to 20 lbs (9 kg) Bebé 0-6 meses y hasta 9 kg Bébé De 0 à 6 mois, et pesant moins de 9 kg (20 lb) Toddler 6 months+ and up to 25 lbs (11 kg) Niño pequeño 6 meses
Table2Table. Owner s Manual Manual du propriétaire 2017 PD349227K 2/17
 Table2Table Owner s Manual Manual du propriétaire Owner s Manual Manual del Manual propietario del propietario 2017 PD349227K 2/17 1 WARNING MISE EN GARDE ADVERTENCIA 2 Features Caractéristiques Características
Smart Seat Buckle Replacement Guide
 Smart Seat Buckle Replacement Guide 2014 Graco PD272023C 5/14 www.gracobaby.com To Remove Existing Harness Tongues and Buckle and Attach Replacement Buckle 1 2 You will receive ONE of these Graco approved
Pocket Snack Owner's Manual Manual del propietario IS0113.1ES 2017 Artsana USA, INC. 06/17
 Read all instructions BEFORE assembly and USE of product. KEEP INSTRUCTIONS FOR FUTURE USE. Lea todas las instrucciones ANTES de armar y USAR este producto. CONSERVE LAS INSTRUCCIONES PARA USO FUTURO.
Television Bench Meuble TV Soporte de televisor
 Limited Warranty Television Bench Meuble TV Soporte de televisor La Garantie Limitée Garantía 12 Read this assembly manual carefully, and verify that you have all the parts listed before you begin. Keep
2-in-1 Learning Kitchen. Kit Parts
 Instructions Faucet and Clock Removal and Installation 2-in-1 Learning Kitchen Model Number L5067 WARNING CHOKING HAZARD The The faucet may break into into small pieces and and the the clock hands may
Lea todas las instrucciones detenidamente antes de usarlo y guárdelas como referencia futura.
 / Cochecito www.urbinibaby.com Owner s Manual / Manual del Usuario Read all instructions before use and keep them for future reference. Lea todas las instrucciones detenidamente antes de usarlo y guárdelas
STOP ALTO. Instruction Manual Manual de Instrucciones
 Read all instructions BEFORE assembly and USE of product. KEEP INSTRUCTIONS FOR FUTURE USE. Lea todas las instrucciones ANTES de armar y USAR el producto. CONSERVE LAS INSTRUCCIONES PARA USO FUTURO. STOP
Infant Insert 3-6 months and up to 20 lb (9 kg) maximum. Tope para bebé 3 a 6 meses y hasta 9 kg
 maximum. Tope para bebé 3 a 6 meses y hasta 9 kg") Newborn Sling 0-3 months and up to 15 lb (6,8 kg) maximum Hamaca para recién nacido 0 a 3 meses y hasta 6,8 kg DLH01 FBM96 IMPORTANT! Keep these instructions for future reference, as they contain important
Newborn Sling 0-3 months and up to 15 lb (6,8 kg) maximum Hamaca para recién nacido 0 a 3 meses y hasta 6,8 kg DLH01 FBM96 IMPORTANT! Keep these instructions for future reference, as they contain important
DuoDiner TM 2012 Graco PD202866A 4 12
 www.gracobaby.com DuoDiner TM 2012 Graco PD202866A 4 12 This product can be used in the following modes: Ce produit peut être utilisé selon les modes suivants : Este producto se puede usar en los siguientes
BCF41. fisher-price.com. Newborn 0-6 months and up to 20 lbs (9 kg) Recién nacido 0-6 meses y hasta 9 kg
 Recién nacido 0-6 meses y hasta 9 kg") BCF41 Newborn 0-6 months and up to 20 lbs (9 kg) Recién nacido 0-6 meses y hasta 9 kg Older Baby 6 months+ and up to 25 lbs (11,3 kg) Niño pequeño 6 meses en adelante y hasta 11,3 kg IMPORTANT! Please
BCF41 Newborn 0-6 months and up to 20 lbs (9 kg) Recién nacido 0-6 meses y hasta 9 kg Older Baby 6 months+ and up to 25 lbs (11,3 kg) Niño pequeño 6 meses en adelante y hasta 11,3 kg IMPORTANT! Please
ProMaster B-Pillar Grab Handle
 ProMaster B-Pillar Grab Handle www.mopar.com Call Out Description Quantity Service Part Part Number (Y/N) Handle Reinforcement Bracket N Right B-Pillar Handle N Drilling Template N Handle Spacer N Handle
H Infant Bébé Bebé. 3 Older Baby Plus vieux Bébé Bebé más grande. Newborn Nouveau-né Recién nacido.
 H9486 1 Newborn Nouveau-né Recién nacido Note: Use the hammock (connected to all four corners of the bathtub) only for a baby that weighs up to 10 lbs (4.54 kg). Remarque : Utiliser seulement le hamac
Television Bench Meuble TV Soporte de televisor
 Warranty Television Bench Meuble TV Soporte de televisor Garantie Garantía 12 Read this assembly manual carefully, and verify that you have all the parts listed before you begin. Keep your assembly manual
WARRANTY GARANTIA PC11 / PC12 Portable Chair Instruction Manual Manual de Instrucciones
 WARRANTY DO NOT RETURN YOUR PRODUCT TO THE STORE. PLEASE CONTACT BABY TREND FOR REPLACEMENT PARTS, SERVICE AND REPAIR. The Baby Trend warranty covers workmanship defects within the first 180 days of purchase.
WARRANTY GARANTIA PC11 Portable Chair Instruction Manual Manual de Instrucciones
 WARRANTY DO NOT RETURN YOUR PRODUCT TO THE STORE. PLEASE CONTACT BABY TREND FOR REPLACEMENT PARTS, SERVICE AND REPAIR. The Baby Trend warranty covers workmanship defects within the first 180 days of purchase.
Polly Progres5 Relax 5-in-1 Multichair
 Read all instructions BEFORE assembly and USE of product. KEEP INSTRUCTIONS FOR FUTURE USE. Lea todas las instrucciones ANTES de armar y USAR este producto. CONSERVE LAS INSTRUCCIONES PARA USO FUTURO.
P/N INSTALLING HD3000 SERIES HANDLE SET : INSTALL LATCH / DEADBOLT STRIKERS:
 INSTALLING HD3000 SERIES HANDLE SET : A: Drill the 1/8" diameter handle hole ( third from the top of the door, on the room side ) to a 5/16" diameter. B: Slide the inside handle into its base. Tighten
DuoDiner TM 2016 Graco PD349069C 3 16
 www.gracobaby.com DuoDiner TM 2016 Graco PD349069C 3 16 This product can be used in the following modes: Ce produit peut être utilisé selon les modes suivants : Este producto se puede usar en los siguientes
R6070 R6070 V9102 V9102 V9196 V9196 V9197 V9197 X2661 X2661
 R6070 V9102 V9196 V9197 X2661 www.fisher-price.com Consumer Information Información al consumidor Renseignements pour les consommateurs WARNING ADVERTENCIA Failure to follow these warnings and the instructions
BOHANDL30 Handle Installation Instructions
 BOHANDL30 Handle Installation Instructions Tools and Parts Included Attaching Handles Only attach the handles once the appliance has been positioned in its installation location and has been leveled (see
Cocina Parlante de Dora
 K8004 Instrucciones www.fisher-price.com/mx Guardar estas instrucciones para futura referencia, ya que contienen información de importancia acerca de este producto. LEA LAS INSTRUCCIONES ANTES DE USAR
Toddler Booster
 www.gracobaby.com Toddler Booster 2009 Graco PD121056A 10 09 This product can be used in the following modes: Ce produit peut être utilisé selon les modes suivants : Este producto puede usarse en los siguientes
MODEL: F / MODELO: F END TABLE WITH MEDIA STAND & MAGAZINE HOLDER MESA RINCONERA CON ESTANTE & REVISTERO
 MODEL: 11225479F / MODELO: 11225479F END TABLE WITH MEDIA STAND & MAGAZINE HOLDER MESA RINCONERA CON ESTANTE & REVISTERO NO A B C D E F G H I J K L PARTS LIST AND HARDWARE PARTES Y ACCESORIOS PARTS LIST
RocketBox AVISO IMPORTANTE ROCKETBOX PRO (1X) KEY (2X) CLÉ (X 2) LLAVES (2X) Part # Rev.C C-1/13
 KEY (2X) CLÉ (X 2) LLAVES (2X) Part # Rev.C C-1/13") RocketBox ROCKETBOX PRO 11, ROCKETBOX PRO 12, ROCKETBOX PRO 14 ROCKETBOX PRO (1X) KEY (2X) CLÉ (X 2) LLAVES (2X) IMPORTANT WARNING IT IS CRITICAL THAT ALL YAKIMA RACKS AND ACCESSORIES BE PROPERLY AND SECURELY
RocketBox ROCKETBOX PRO 11, ROCKETBOX PRO 12, ROCKETBOX PRO 14 ROCKETBOX PRO (1X) KEY (2X) CLÉ (X 2) LLAVES (2X) IMPORTANT WARNING IT IS CRITICAL THAT ALL YAKIMA RACKS AND ACCESSORIES BE PROPERLY AND SECURELY
K2927. www.fisher-price.com
 K2927 www.fisher-price.com WARNING AVERTISSEMENT ADVERTENCIA Prevent serious injury or death from falls or sliding out: The child should be secured in the high chair at all times by the restraining system,
e Instructions e f Model Number: C1384 f Instructions Numéros de modèle : C1384 S Instrucciones Números de modelo: C1384
 e Instructions Model Number: C1384 f Instructions Numéros de modèle : C1384 S Instrucciones Números de modelo: C1384 e f S Product features and decorations may vary from picture above. Les caractéristiques
BEFORE ASSEMBLING YOUR 5-POINT HARNESS TO YOUR SWING, REMOVE DISCARD
 BEFORE ASSEMBLING YOUR 5-POINT HARNESS TO YOUR SWING, you will need to REMOVE and DISCARD the existing seat pad, head support and seat belt. AVANT D'INSTALLER LE HARNAIS EN 5 POINTS À VOTRE BALANÇOIRE,
e Instructions e f Model Number: C1383, C4934, C4643 f Instructions Numéros de modèle : C1383, C4934, C4643 S Instrucciones
 e Instructions Model Number: C1383, C4934, C4643 f Instructions Numéros de modèle : C1383, C4934, C4643 S Instrucciones Números de modelo: C1383, C4934, C4643 e f Product features and decorations may vary
Installation Guide F. Shower Arms
 Installation Guide Shower Arms K-9511 K-9512 M product numbers are for Mexico (i.e. K-12345M) Los números de productos seguidos de M corresponden a México (Ej. K-12345M) Français, page Français-1 Español,
User Manual Manual del usuario
 User Manual Manual del usuario bed assist rail Baranda de ayuda para la cama English...3 Español...11 Contents Safety...4 Instructions...4 Safety SAFETY This unit is not meant to support full body weight
(x1) (x1) (x1) (x2) (x1) (x1) 1/ (x2) (x1)
 (x1) (x1) (x2) (x1) (x1) 1/ (x2) (x1)") 53.0915299 (x1) 54.0917199 (x1) 54.0915399 (x1) 54.0915499 (x1) 54.0915599 (x1) 54.0918299 (x1) 49.0910399 (x1) 54.0915699 (x1) 54.0918099 (x1) 53.0915199 (x2) 53.0915099 (x1) 44.0891599 (x1) 1/4.0517999
53.0915299 (x1) 54.0917199 (x1) 54.0915399 (x1) 54.0915499 (x1) 54.0915599 (x1) 54.0918299 (x1) 49.0910399 (x1) 54.0915699 (x1) 54.0918099 (x1) 53.0915199 (x2) 53.0915099 (x1) 44.0891599 (x1) 1/4.0517999
ASSEMBLY INSTRUCTIONS INSTRUCCIONES DE MONTAJE
 ASSEMBLY INSTRUCTIONS INSTRUCCIONES DE MONTAJE 4 PC PATIO CONVERSATION SET JUEGO DE PATIO C/ MESA, 2 SILLAS Y UN SILLÓN 250559R /250559T/250559G PLEASE NOTED / POR FAVOR A TENER EN CUENTA: THIS SET OF
Lea todas las instrucciones detenidamente antes de usarlo y guárdelas como referencia futura.
 Swiftli / Cochecito www.urbinibaby.com Owner s Manual / Manual del Usuario Read all instructions carefully before use and keep them for future reference. Lea todas las instrucciones detenidamente antes
Stainless Steel Miracle 360 cup Vaso Miracle 360 de Acero Inoxidable Acier inoxydable Gobelet Miracle 360
 Stainless Steel Miracle 60 cup Vaso Miracle 60 de Acero Inoxidable Acier inoxydable Gobelet Miracle 60 0 oz capacity (96 ml) Capacidad de 0 oz (96 ml) Capacité de 96 ml KEEP FOR FUTURE REFERENCE GUARDE
π H x 6' DRY ERASE BOARD/PARTITION PARTS uline.com TOOL INCLUDED
 π H-5861 4 x 6' DRY ERASE BOARD/PARTITION 1-800-295-5510 uline.com Para Español, vea páginas 3-4. Pour le français, consulter les pages 5-6. TOOL INCLUDED Allen Wrench PARTS 3/8 x 1½" Screw x 2 Locking
V Newborn Recién nacido Nouveau-né. Sitting Baby Bebé sentado Bébé en position assise
 V3392 1 Newborn Recién nacido Nouveau-né 2 Sitting Baby Bebé sentado Bébé en position assise www.fisher-price.com Consumer Information Información para el consumidor Renseignements pour les consommateurs
π H-4039 SPILL CONTAINMENT WORKSTATION CONNECTORS ASSEMBLY 1-800-295-5510 uline.com TOOL NEEDED
 π H-4039 SPILL CONTAINMENT WORKSTATION CONNECTORS uline.com Para Español, vea páginas 3-4. Pour le français, consulter les pages 5-6. TOOL NEEDED Plastic or Rubber Mallet ASSEMBLY 1. Locate one of the
K7203.
 K7203 www.fisher-price.com WARNING AVERTISSEMENT ADVERTENCIA To prevent serious injury or death from falls and being strangled in the restraint system: Always use the restraint system. Never use with an
Cozy Dinette TM 2012 Graco PD202878A 4/12
 www.gracobaby.com Cozy Dinette TM 2012 Graco PD202878A 4/12 Failure to follow these warnings and the assembly instructions could result in serious injury or death. PLEASE SAVE OWNER S MANUAL FOR FUTURE
CAUTION! IMPORTANT SAFETY INSTRUCTIONS CAUTION CAUTION! WARNING ENGLISH ENGLISH. Strangulation hazard. Hang out of reach of young children.
 FINFIN ENGLISH IMPORTANT SAFETY INSTRUCTIONS For indoor use only. Regularly check the cord, the transformer and all other parts for damage. If any part is damaged the product should not be used. Important
Lea todas las instrucciones detenidamente antes de usarlo y guárdelas como referencia futura.
 Touri / Cochecito www.urbinibaby.com Owner s Manual / Manual del Usuario Read all instructions before use and keep them for future reference. Lea todas las instrucciones detenidamente antes de usarlo y
Blossom TM 2014 Graco PD202869D 10/14
 www.gracobaby.com Blossom TM 2014 Graco PD202869D 10/14 This product can be used in the following modes: Ce produit peut être utilisé selon les modes suivants : Este producto puede usarse en los siguientes
STOP WARNING. Contempo Futon - Charcoal-HN. Weight Limit: 300Lbs \ 136 Kgs. or access our website. Date of Purchase / /
 0 9986 355 6 35596 Contempo Futon - Charcoal-HN Weight Limit: 300Lbs \ 36 Kgs STOP O NOT RETURN PROUCT TO THE STORE Individual stores do not stock parts. If a part is missing or damaged, call our toll-free
LANDING PAD 8. Crossbar spread fixed at 33 inches. INCLUDED Tool: 5 mm Allen wrench
 LANDING PAD 8 Crossbar spread fixed at 33 inches INCLUDED Tool: 5 mm Allen wrench Refer to YAKIMA SkyLine or Control Tower instructions for important warning and load limitations, and YAKIMA s limited
M7590.
 M7590 www.fisher-price.com Consumer Information Renseignements pour les consommateurs Información para el consumidor WARNING AVERTISSEMENT ADVERTENCIA To prevent serious injury or death from falls and
 (for some optional presser feet) 2 1. Raise needle and presser foot. 2. Remove the needle. 3. Loosen presser foot screw (1) and remove presser foot with shank (2), guiding it toward you and to the right.
One Drawer Nightstand Table de chevet de tiroir Mesilla de noche con 1 cajone
 Assembly Instructions Instructions de montage Instrucciones de armado One Drawer Nightstand Table de chevet de tiroir Mesilla de noche con 1 cajone DATE STAMP Nightstand Hardware / Quincaillerie de la
Cozy Dinette TM 2008 Graco ISPH039AB 10/08
 www.gracobaby.com Cozy Dinette TM 2008 Graco ISPH039AB 10/08 Failure to follow these warnings and the assembly instructions could result in serious injury or death. PLEASE SAVE OWNER S MANUAL FOR FUTURE
Blair Storage Bed / Lit avec Rangement / Cama con Almacenamiento - Queen, King
 English This page lists the contents included in the box. Please take time to identify the hardware as well as the individual components of the product. s you unpack and prepare for assembly, place the
Infant Insert 3-6 months and up to 9 kg (20 lb) maximum. Tope para bebé 3 a 6 meses y hasta 9 kg
 maximum. Tope para bebé 3 a 6 meses y hasta 9 kg") BDY86 Newborn Sling 0-3 months and up to 6,8 kg (15 lb) maximum Hamaca para recién nacido 0 a 3 meses y hasta 6,8 kg Hamac pour nouveau-né De 0 à 3 mois et jusqu à 6,8 kg (15 lb) maximum Infant Insert
BDY86 Newborn Sling 0-3 months and up to 6,8 kg (15 lb) maximum Hamaca para recién nacido 0 a 3 meses y hasta 6,8 kg Hamac pour nouveau-né De 0 à 3 mois et jusqu à 6,8 kg (15 lb) maximum Infant Insert
M6709.
 M6709 www.fisher-price.com Consumer Information Service à la clientèle Información para el consumidor WARNING AVERTISSEMENT ADVERTENCIA To prevent serious injury or death from falls and being strangled
e Instructions e f Model Number: H2134 f Instrucciones Numéro de modèle : H2134 S Instructions Número de modelo: H2134
 e Instructions Model Number: H2134 f Instrucciones Numéro de modèle : H2134 S Instructions Número de modelo: H2134 e f Product features and decorations may vary from picture above. Les caractéristiques
Blossom TM 2012 Graco PD202869C 11 12
 www.gracobaby.com Blossom TM 2012 Graco PD202869C 11 12 This product can be used in the following modes: Ce produit peut être utilisé selon les modes suivants : Este producto puede usarse en los siguientes
Meijer.com
 Meijer.com www.gracobaby.com 2010 Graco ISPH038AB 7 10 Meijer.com This product can be used in the following modes: Ce produit peut être utilisé selon les modes suivants : Este producto puede usarse en
Infant Insert 3-6 months and up to 20 lb (9 kg) maximum. Tope para bebé 3 a 6 meses y hasta 9 kg
 maximum. Tope para bebé 3 a 6 meses y hasta 9 kg") FBM94 IMPORTANT! Read these instructions before use of this product. Keep these instructions for future reference. IMPORTANTE! Leer estas instrucciones antes de usar este producto. Guardar estas instrucciones
FBM94 IMPORTANT! Read these instructions before use of this product. Keep these instructions for future reference. IMPORTANTE! Leer estas instrucciones antes de usar este producto. Guardar estas instrucciones
How to Use Prevail Bladder Control Pads (Liner or absorbent pad worn inside your own underwear)
") How to Use Prevail Bladder Control Pads (Liner or absorbent pad worn inside your own underwear) 1. Open and unfold the product. 2. Peel off the sticky strip on the back. 3. Put the skinnier part of the
How to Use Prevail Bladder Control Pads (Liner or absorbent pad worn inside your own underwear) 1. Open and unfold the product. 2. Peel off the sticky strip on the back. 3. Put the skinnier part of the