ENGLISH 6 ESPAÑOL 10 CITY LINE
|
|
|
- María del Rosario Espejo Pinto
- hace 5 años
- Vistas:
Transcripción
1 City Line
2
3
4 4
5 ENGLISH 6 ESPAÑOL CITY LINE
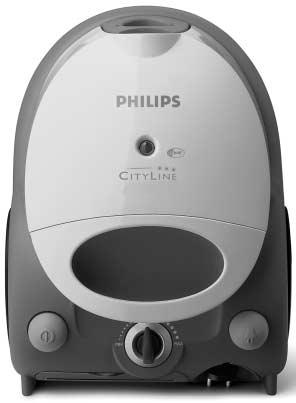
6 6 ENGLISH Important Read these instructions for use carefully before using the appliance and save them for future reference. Check if the voltage indicated on the appliance corresponds to the local mains voltage before you connect the appliance. Do not use the appliance if the plug, the cord or the appliance itself is damaged. If the mains cord is damaged, it must be replaced by Philips, a service centre authorised by Philips or similarly qualified persons in order to avoid a hazard. Keep the appliance out of the reach of children. Never suck up water or any other liquid. Never suck up flammable substances and do not suck up ashes until they are cold. Do not point the hose at the eyes or ears nor put it in your mouth when the vacuum cleaner is switched on and the hose is connected to the vacuum cleaner. When the vacuum cleaner is used to suck up fine dust, the pores of the dustbag may become clogged, causing the passage of air through the dustbag to become obstructed.as a result, the dustbag-full indicator will indicate that the dustbag needs to be replaced, even though the dustbag is not full at all (see chapter 'Replacing the dustbag'). Never use the appliance without the Motor Protection Filter.This could damage the motor and shorten the life of the appliance. Only use Philips s-bag` double-layer paper dustbags. Preparing for use Connecting accessories Hose To connect the hose to the appliance, push it into the appliance and turn it clockwise (fig. ). To disconnect the hose from the appliance, turn it anticlockwise and pull it out of the appliance. Tube Conical coupling (specific types only) To connect the tube to the handgrip, insert the narrow section into the wider section while turning it a little (fig. ). To disconnect the tube, pull while turning it a little. Use the same methods to connect the accessories to or to disconnect them from the tube or handgrip. Button coupling (specific types only) Connect the tube to the handgrip ('click') (fig. 3). To disconnect the tube from the handgrip, push the lock button and pull the tube out of the handgrip (fig. 4). Use the same methods to connect the accessories to or to disconnect them from the tube or handgrip. Telescopic tube (specific types only) Adjust the tube to the length you find most comfortable during vacuum cleaning (fig. 5).
7 ENGLISH 7 Nozzle Convertible nozzle (specific types only) The convertible nozzle can be used on either carpets or hard floors. Connect the convertible nozzle to the tube. Push the rocker switch on top of the convertible nozzle with your foot to make the brush strip for cleaning hard floors come out of the nozzle housing (fig. 6). 3 Push the rocker switch again to make the brush strip disappear into the convertible nozzle housing (fig. 7). Reach & Clean nozzle (specific types only) The Reach & Clean nozzle can be used on either carpets or hard floors.the nozzle can be turned 360 degrees to 4 different positions, allowing you to also vacuum clean hard-to-reach places in an easy way.when the nozzle is positioned lengthwise, the suction power is concentrated at the front side of the nozzle (fig. 8). To adjust the nozzle to the type of floor and the area to be cleaned, put your foot on the indicated spot and then turn the tube until the nozzle is in the required position (fig. 9). Connect the Reach & Clean nozzle to the tube. With the nozzle positioned breadthwise and the brush strip folded out, you can clean large hard floor areas.turn the tube until the brush strip pops out of the nozzle housing and the nozzle is positioned breadthwise (fig. 0). 3 With the nozzle positioned lengthwise and the brush strip folded out, you can vacuum clean small hard floor areas.turn the tube 90 degrees anti-clockwise until it is positioned lengthwise with the brush strip still folded out of the nozzle housing (fig. ). 4 With the nozzle positioned breadthwise and the brush strip folded in, you can vacuum clean large soft floor areas.turn the tube 90 degrees anti-clockwise again to position the nozzle breadthwise and to make the brush strip disappear into the nozzle housing (fig. ). 5 With the nozzle positioned lengthwise and the brush strip folded in, you can vacuum clean small soft floor areas.turn the tube 90 degrees anti-clockwise again until it is positioned lengthwise with the brush strip still folded in (fig. 3). Crevice tool, small nozzle and small brush (specific types only) Connect the crevice tool, small nozzle or small brush directly to the handgrip or to the tube. Accessory clip (specific types only) The accessory clip can simply be snapped onto the tube. The crevice tool and the small nozzle can be snapped onto the clip (fig. 4). Using the appliance Vacuum cleaning Pull the cord out of the appliance and put the mains plug in the wall socket (fig. 5). Switch the appliance on by pushing the on/off button on top of the appliance with your foot. 3 The appliance can be carried in two ways: You can carry the vacuum cleaner vertically by the handle on the front of the appliance (fig. 6). You can carry the vacuum cleaner horizontally by the handle on top of the appliance.
8 8 ENGLISH Adjusting suction power You can adjust the suction power while vacuum cleaning. Adjust the suction power by means of the electronic suction power knob (fig. 7). Turn the knob to MAX for maximum suction power (fig. 8). Use maximum suction power for vacuum cleaning very dirty carpets and hard floors. 3 Turn the knob to MIN for minimum suction power. Use minimum suction power for vacuum cleaning curtains, table carpets, etc. Storage Switch the appliance off and remove the mains plug from the wall socket. Rewind the mains cord by pressing the cord rewind button (fig. 9). 3 Put the appliance in upright position and attach the nozzle to the appliance by inserting the ridge on the nozzle into the slot (fig. 0). Replacing the dustbag Replace the dustbag as soon as the dustbag-full indicator has changed colour permanently, i.e. even when the nozzle is not placed on the floor (fig. ). Switch the appliance off and open the cover (fig. ). Push the dustbag holder backwards (fig. 3). 3 Remove the full dustbag from the holder by pulling it up by the cardboard tag, which will cause the dustbag to be sealed (fig. 4). 4 Slide the cardboard front of the new dustbag into the two grooves of the dustbag holder. Press it down as far as possible (fig. 5). 5 Pull the dustbag holder forwards ('click') (fig. 6). You cannot close the cover if no dustbag has been inserted. Ordering dustbags Philips Classic s-bag` paper dustbags are available under type number FC80. Replacing filters Motor Protection Filter Replace the Motor Protection Filter once a year. Switch the appliance off and open the cover. Remove the filter. Insert a new filter into the holder with the white side pointing towards the dustbag compartment (fig. 7). Super Clean Air Filter (specific types only) Replace the Super Clean Air Filter every 6 months. Open the grille at the back of the appliance and remove it (fig. 8). Remove the old filter and place the sides and the bottom edge of the new filter properly behind the ridges of the holder on the inside of the grille.
9 ENGLISH 9 3 Put the grille back into the vacuum cleaner by first hooking the bottom edge of the grille into the appliance () and then pushing the grille towards the appliance () until it snaps home (fig. 9). Super Clean Air HEPA Filter (specific types only) Instead of the Super Clean Air Filter, some types are equipped with the special Super Clean Air HEPA Filter.This filter not only removes household dust, but also harmful microscopic vermin. Replace the Super Clean Air HEPA Filter every 6 months. Open the filter grille and remove the Super Clean Air HEPA Filter. Place the new filter behind the brackets. Make sure that the Philips logo on the filter is visible in the bottom right-hand corner (fig. 30). 3 Close the filter grille. Ordering filters Two Super Clean Air Filters and one Motor Protection Filter are available under type number FC803. Super Clean Air HEPA Filters are available under type number FC8044. Troubleshooting Insufficient suction power Check if the dustbag needs to be replaced. Check if the filters need to be replaced. 3 Check if the electronic suction power knob is in maximum position. 4 Check if the nozzle, tube or hose is blocked up. 5 To remove the obstruction, disconnect the blocked-up item and connect it (as far as possible) in reverse position (fig. 3). 6 Switch the vacuum cleaner on to force the air through the blocked-up item in opposite direction. Make the airflow suck the obstructing material out of the blocked-up item. Guarantee & service If you need information or if you have a problem, please visit the Philips website at or contact the Philips Customer Care Centre in your country (you will find its phone number in the worldwide guarantee leaflet). If there is no Customer Care Centre in your country, turn to your local Philips dealer or contact the Service Department of Philips Domestic Appliances and Personal Care BV.
10 0 Importante Lea atentamente estas instrucciones antes de empezar a utilizar el aparato y consérvelas por si necesitara consultarlas en el futuro. Antes de conectar el aparato, compruebe que el voltaje indicado en el aparato se corresponde con el voltaje de red local. ESPAÑOL No utilice el aparato si la clavija, el cable o el mismo aparato estuvieran deteriorados. Si el cable de red estuviera deteriorado, sólo deberá ser sustituido por Philips, un centro de servicio autorizado por Philips o personal cualificado, con el fin de evitar situaciones de peligro. Mantenga el aparato fuera del alcance de los niños. No aspire nunca agua ni cualquier otro líquido. No aspire nunca sustancias inflamables ni cenizas hasta que no estén frías. Cuando el aspirador esté conectado y la manguera esté montada en el aparato, no apunte nunca con ésta a los ojos, los oídos o la boca. Cuando el aspirador se usa para aspirar polvo fino, los poros de la bolsa del polvo pueden obturarse, dando lugar a que se obstruya el paso del aire a través de la bolsa. Como resultado de ello, el indicador de "bolsa llena" avisará de que la bolsa necesita ser cambiada, incluso aunque la bolsa del polvo no esté completamente llena (consulte el apartado "Cómo sustituir la bolsa del polvo"). No use nunca el aparato sin el filtro protector del motor, ya que esto podría deteriorar el motor y acortar la vida útil del aparato. Utilice únicamente bolsas Philips s-bag` de doble capa de papel. Cómo preparar el aparato Cómo conectar los accesorios Manguera Para conectar la manguera al aparato, presiónela en el aparato y gírela en el sentido de las agujas del reloj (fig. ). Para desconectar la manguera del aparato, gírela en sentido contrario al de las agujas del reloj y sáquela del aparato. Tubo Acoplamiento cónico (sólo en modelos específicos) Para conectar el tubo al mango, inserte la sección estrecha en la sección ancha a la vez que lo gira un poco (fig. ). Para desconectar el tubo, tire de él a la vez que lo gira un poco. Use el mismo método para conectar y desconectar los accesorios del tubo o del mango. Botón de acoplamiento (sólo en modelos específicos) Conecte el tubo al mango (oirá un 'clic') (fig. 3). Para desconectar el tubo del mango, apriete el botón de bloqueo y tire del tubo para sacarlo del mango (fig. 4). Use el mismo método para conectar y desconectar los accesorios del tubo o del mango. Tubo telescópico (sólo para modelos específicos) Ajuste el tubo a la longitud que considere más cómoda mientras aspira (fig. 5).
11 ESPAÑOL Boquilla Cepillo convertible (sólo en modelos específicos) El cepillo convertible se puede usar tanto sobre alfombras como sobre suelos duros. Conecte el cepillo convertible al tubo. Para que la tira de cepillo para limpiar suelos duros salga de la carcasa del cepillo convertible, presione con el pie el conmutador situado sobre el cepillo convertible (fig. 6). 3 Para que la tira de cepillo vuelva a desaparecer en la carcasa del cepillo convertible, vuelva a presionar el conmutador (fig. 7). Cepillo Reach & Clean (Alcanza y Limpia) (Sólo en modelos específicos) El cepillo Reach & Clean puede utilizarse tanto sobre alfombra como sobre suelo duro. El cepillo se puede girar 360 grados y tiene 4 posiciones distintas, lo que le permite limpiar fácilmente lugares de difícil acceso. Cuando el cepillo está colocado a lo largo, la potencia de succión se concentra en la parte delantera del mismo (fig. 8). Para ajustar el cepillo al tipo de suelo y a la zona que se va a limpiar, coloque el pie sobre el punto indicado y luego gire el tubo hasta que el cepillo quede en la posición deseada (fig. 9). Conecte el cepillo Reach & Clean al tubo. Con el cepillo colocado a lo ancho y la tira de cepillo desplegada, puede limpiar amplias zonas de suelo duro. Gire el tubo hasta que salga la tira de cepillo de la carcasa y el cepillo esté colocado a lo ancho (fig. 0). 3 Con el cepillo colocado a lo largo y la tira de cepillo desplegada, puede limpiar zonas pequeñas de suelo duro. Gire de nuevo el tubo 90 grados en sentido contrario a las agujas del reloj para colocar el cepillo a lo largo con la tira de cepillo aún desplegada (fig. ). 4 Con el cepillo colocado a lo ancho y la tira de cepillo plegada, puede limpiar amplias zonas de suelo blando. Gire de nuevo el tubo 90 grados en sentido contrario a las agujas del reloj para colocar el cepillo a lo ancho y para que la tira de cepillo desaparezca en la carcasa (fig. ). 5 Con el cepillo colocado a lo largo y la tira de cepillo plegada, puede limpiar zonas pequeñas de suelo blando. Gire de nuevo el tubo 90 grados en sentido contrario a las agujas del reloj hasta que el cepillo se coloque a lo largo con la tira de cepillo aún plegada (fig. 3). Boquilla estrecha, boquilla pequeña y cepillo pequeño (sólo modelos específicos) Conecte la boquilla estrecha, la boquilla pequeña o el cepillo pequeño directamente al mango o al tubo. Brida (sólo modelos específicos) La brida puede encajarse de forma sencilla en el tubo. La boquilla estrecha y la boquilla pequeña se pueden encajar en la brida (fig. 4). Cómo usar el aparato Cómo aspirar Saque el cable del aparato y enchúfelo a la red (fig. 5). Conecte el aparato presionando, con el pie, el interruptor de encendido/apagado (On/Off) situado en la parte superior del aparato. 3 Puede transportar el aparato de dos formas:
12 ESPAÑOL Puede transportar el aspirador de forma vertical utilizando para ello el mango situado en la parte frontal del aparato (fig. 6). Puede transportar el aspirador de forma horizontal utilizando para ello el mango situado en la parte superior del aparato. Cómo ajustar la potencia de succión Mientras aspira puede ajustar la potencia de succión. Ajuste la potencia de succión con el control electrónico de potencia de succión (fig. 7). Coloque el botón en MAX para utilizar la máxima potencia de succión (fig. 8). Use la máxima potencia de succión para aspirar alfombras y suelos duros muy sucios. 3 Coloque el botón en MIN para una utilizar la mínima potencia de succión. Use la mínima potencia de succión para aspirar cortinas, tapetes, etc. Cómo guardar el aparato Apague el aparato y desenchúfelo de la red. Presionando el pedal del recogecable, recoja el cable de red (fig. 9). 3 Coloque el aparato en posición vertical y acople el cepillo en el aparato insertando el saliente del cepillo en la ranura (fig. 0). Cómo sustituir la bolsa del polvo Cambie la bolsa en cuanto el indicador de "bolsa llena" cambie de color permanentemente, incluso cuando el cepillo no esté sobre el suelo (fig. ). Apague el aparato y abra la tapa (fig. ). Presione el soporte de la bolsa del polvo hacia atrás (fig. 3). 3 Saque la bolsa llena del soporte tirando del asa de cartón.al hacer esto, la bolsa se sellará automáticamente (fig. 4). 4 Deslice la parte frontal de cartón de la nueva bolsa del polvo en las dos ranuras del soporte. Presione hacia abajo todo lo que sea posible (fig. 5). 5 Presione hacia adelante del soporte de la bolsa del polvo (oirá un 'clic') (fig. 6). Si no se ha introducido una bolsa, no se podrá cerrar la cubierta. Cómo pedir bolsas para el polvo Las bolsas de papel de Philips Classic s-bag` están disponibles con el número de modelo FC80. Cómo sustituir el filtro Filtro protector del motor Cambie el filtro protector del motor una vez al año. Apague el aparato y abra la tapa. Saque el filtro. Inserte un filtro nuevo en el soporte con el lateral blanco mirando hacia el compartimento de la bolsa del polvo (fig. 7).
13 ESPAÑOL 3 Filtro Super Clean Air (sólo modelos específicos) Sustituya el filtro Super Clean Air cada 6 meses. Abra la rejilla situada en la parte posterior del aparato y sáquela (fig. 8). Quite el filtro viejo y coloque los laterales y los extremos inferiores del filtro nuevo detrás de los salientes del soporte en la parte interior de la rejilla. 3 Vuelva a colocar la rejilla en el aspirador enganchando primero el extremo inferior de la rejilla en el aparato () y luego empujando la rejilla hacia el aparato () hasta que encaje (fig. 9). Filtro HEPA Super Clean Air (sólo para modelos específicos) En vez del filtro Super Clean Air, algunos modelos incorporan el filtro especial HEPA Super Clean Air. Este filtro no sólo elimina el polvo de la casa, sino también los parásitos microscópicos perjudiciales para la salud. Sustituya el filtro HEPA Super Clean Air cada 6 meses. Abra la rejilla del filtro y saque el filtro HEPA Super Clean Air. Coloque el filtro nuevo detrás de los soportes.asegúrese de que el logo de Philips del filtro se puede ver en la esquina inferior derecha (fig. 30). 3 Cierre la rejilla del filtro. Cómo pedir filtros Dos filtros Super Clean Air y un filtro Motor Protection están disponibles con el número de modelo FC803. Los filtros HEPA Super Clean Air están disponibles con el número de modelo FC8044. Guía de resolución de problemas Potencia de succión insuficiente Compruebe si hay que sustituir la bolsa para el polvo. Compruebe si hay que cambiar los filtros. 3 Compruebe si el control electrónico de potencia de succión está en su posición máxima. 4 Compruebe si el cepillo, el tubo o la manguera están bloqueados. 5 Para eliminar la obstrucción, desconecte la pieza obstruida y conéctela al revés (todo lo que pueda) (fig. 3). 6 Ponga en marcha el aspirador para forzar que el aire pase a través de la pieza obstruida en dirección opuesta. Intente que el aire absorba el material atascado para sacarlo de la pieza obstruida. Garantía y servicio Si necesita información o si tiene algún problema, visite la página web de Philips en o póngase en contacto con el Servicio Philips de Atención al Cliente de su país (encontrará el número de teléfono en el folleto de la Garantía Mundial). Si en su país no hay Servicio Philips de Atención al Cliente, diríjase a su distribuidor local Philips o póngase en contacto con el Service Department of Philips Domestic Appliances and Personal Care BV.
14 4 ` 3
15
16
17
18 8 `
19 9
20 0 `

21
22
23 3
24 u
ENGLISH 6 ESPAÑOL 9 IMPACT EXCEL
 Impact Excel 3 3 4 5 6 7 8 9 0 3 4 5 6 7 8 9 0 4 ENGLISH 6 ESPAÑOL 9 5 IMPACT EXCEL 6 ENGLISH Important Read these instructions for use carefully before using the appliance and save them for future reference.
ENGLISH 6 ESPAÑOL
 2 3 1 2 3 4 5 6 7 8 9 10 11 12 13 14 15 16 17 18 19 20 4 ENGLISH 6 ESPAÑOL 9 12 16 6 ENGLISH Important Read these instructions for use carefully before using the appliance and save them for future reference.
Mods. A 303. Clave de color N Negro V Verde R Rojo B Blanco. Cantidad. Clave de Precio
 Mods. A 303 Listado de componentes Clave de color N Negro V Verde R Rojo B Blanco Referencia Color Denominación Cantidad Clave de Precio Referencia Color Denominación Cantidad Clave de precio 303101 Bolsa
Chage Record No. Change content
 Model Language Page 8 Material Weight 100g Date Part No. Chage Record No. Change content Color(cover/body) Size(W*H) Designer Description ECO No. Date Designer Confirm 1 add tbe model name ACTT802863 08.06.18
Brilliance FC6688, FC6687, FC6686, FC6685
 Brilliance FC6688, FC6687, FC6686, FC6685 3 ENGLISH 4 ESPAÑOL 10 FC6688, 6687, 6686, 6666 4 ENGLISH Important Read these instructions carefully and look at the illustrations before you start using the
Installation Guide. Green momit
 Installation Guide Green momit 2015 www.momit.com momit Deviceses Gateway: Model 1 and 2 Wall option The momit Gateway allows your thermostat to be connected to the Internet. It s included in the Starter
MANUAL DE INSTRUCCIONES / USER'S GUIDE VD31
 MANUAL DE INSTRUCCIONES / USER'S GUIDE VD31 ESP AJUSTE DE LA POSICIÓN DE LA HORA DUAL - Después de configurar o de cambiar la batería, antes de configurar la hora, verifique si la aguja de hora dual está
happy safari travel cot cuna de viaje happy safari guía para el usuario importante. retenga para referencia futura - lea con cuidado.
 happy safari travel cot user guide important. retain for future reference - read carefully cuna de viaje happy safari guía para el usuario importante. retenga para referencia futura - lea con cuidado.
MANUAL DE INSTRUCCIONES ASPIRADOR POLVO KRA41. Lea Lea cuidadosamente este manual y y guárdelo en en un un lugar seguro para futuras consultas.
 MANUAL DE INSTRUCCIONES ASPIRADOR POLVO KRA41 Lea Lea cuidadosamente este manual y y guárdelo en en un un lugar seguro para futuras consultas. Cleaning Machines, S.L. Pol. Agustinos, C/G Parcela B2 31013
RTA-B002 DIMENSIONS MAXIMUM WEIGHT CAPACITIES. Highest position. Lowest position. Product Size: 22"W x 16"D x 30.5~46.5"H
 MODEL RTA - B002 Thanks for purchasing one of our products. Please read carefully the assembly instructions before the installation. Please save this manual for future reference. MODEL RTA-B002 MODELO
Aspiradora K-VC14D M ANUA L DE USUARIO
 Aspiradora K-VC14D M AN U AL D E USUAR I O Instrucciones Por favor conserve estas instrucciones. Lea este manual de usuario cuidadosamente para que se familiarice completamente con su nueva ASPIRADORA
VACUUM CLEANER OWNER'S MANUAL
 VACUUM CLEANER OWNER'S MANUAL SPECIFICATIONS Model ASPRCC153 Rating 220V~50Hz Watts MAX 1600W Weights(net) 5.0kg Dimension (LxWxH) 440x283x293mm Cord lengh 5m DESCRIPTION AND OPERATION HOSE CONNECTION
VACUUM CLEANER OWNER'S MANUAL. SPECIFICATION Model ASPRCL381 Rating 220V/50Hz. Weifhts(net) 4.7kg Dimension (LxWxH) 383 X 268 X 265mm Cord length 5m
 4.7kg Dimension (LxWxH) 383 X 268 X 265mm Cord length 5m") VACUUM CLEANER OWNER'S MANUAL SPECIFICATION Model ASPRCL381 Rating 220V/50Hz Watts MAX 2000W Weifhts(net) 4.7kg Dimension (LxWxH) 383 X 268 X 265mm Cord length 5m DESCRIPTION AND OPERATION HOSE CONNECTION
VACUUM CLEANER OWNER'S MANUAL SPECIFICATION Model ASPRCL381 Rating 220V/50Hz Watts MAX 2000W Weifhts(net) 4.7kg Dimension (LxWxH) 383 X 268 X 265mm Cord length 5m DESCRIPTION AND OPERATION HOSE CONNECTION
MANUAL DE INSTRUCCIONES
 ASPIRADORA MANUAL DE INSTRUCCIONES Modelo AJ 750 Para un correcto funcionamiento de esta unidad, antes de su uso por favor lea las instrucciones cuidadosamente y consérvelas en un lugar seguro para su
HUMIDIFICADOR ULTRASÓNICO
 HUMIDIFICADOR ULTRASÓNICO ULTRASONIC HUMIDIFIER Modelo/Model MJS 318 Manual de instrucciones Instructions manual IMPORTANTE: Para habilitar la garantia: Registre su Producto ingresando a: ww w.sanup.com.ar
FLEXO MERCURIO INSTRUCCIONES INSTRUCTIONS
 FLEXO MERCURIO INSTRUCCIONES INSTRUCTIONS 1 ATENCIÓN! Desconectar la conexión a red antes de ser manipulada y realizar el cambio de producto sólo cuando se haya enfriado la fuente existente. WARNING! Disconnect
FlexCage. User Manual MB975SP-B. 5 HDD Slots in 3 Device Bay. Tray-Less SATA Backplane Module
 FlexCage MB975SP-B 5 HDD Slots in 3 Device Bay Tray-Less SATA Backplane Module User Manual English Package Contents Front Panel Information HDD3 POWER BUTTON POWER / ACCESS LED INDICATOR HDD2 POWER BUTTON
MANUAL DE INSTRUCCIONES ASPIRADORA AS-4474
 MANUAL DE INSTRUCCIONES ASPIRADORA AS-4474 ESTIMADO CLIENTE Con el fin de que obtenga el mayor desempeño de su producto, por favor lea este manual de instrucciones cuidadosamente antes de comenzar a utilizarlo,
4 DRAWER ORGANIZER ORGANIZADOR DE 4 CAJONES
 MODEL: 11210913 / MODELO: 11210913 DRAWER ORGANIZER ORGANIZADOR DE CAJONES NO N o 1 2 3 NO N o A B C D E PARTS LIST AND HARDWARE LISTA DE ACCESORIOS Y PARTES HARDWARE LIST / LISTA DE ACCESORIOS SCREW /
MANUAL DE INSTRUCCIONES / USER'S GUIDE VD53
 MANUAL DE INSTRUCCIONES / USER'S GUIDE VD53 ESP AJUSTAR LA POSICIÓN DE LAS MANECILLAS DEL CRONÓMETRO - Antes de fijar la hora, compruebe que todas las manecillas del cronógrafo - segundos, minutos - estén
Aspiradora TWD018010YL
 Aspiradora Aspiradora MANUAL DE INSTRUCCIONES ESTE APARATO ES PARA USO DE HOGAR SOLAMENTE 2 Aspiradora TVC020110YL MANTENIMIENTO Gracias por comprar este producto. Por favor lea las instrucciones del manual
Urine Sample-Female (Clean Catch)
") Urine Sample-Female (Clean Catch) This test is done to check for bladder or urinary tract infections. Follow these steps: 1. Wash your hands with soap and water. Rinse and dry your hands well. 2. Use the
Urine Sample-Female (Clean Catch) This test is done to check for bladder or urinary tract infections. Follow these steps: 1. Wash your hands with soap and water. Rinse and dry your hands well. 2. Use the
CONTROLADORA PARA PIXELS CONPIX
 The LedEdit Software Instructions 1, Install the software to PC and open English version: When we installed The LedEdit Software, on the desktop we can see following icon: Please Double-click it, then
car seat adapter adaptador del asiento de automóvil CXBEX/MAXI COSI/NUNA babyjogger.com ASSEMBLY INSTRUCTIONS INSTRUCCIONES DEL ENSAMBLAJE PD349778A
 CXBEX/MAXI COSI/NUNA car seat adapter adaptador del asiento de automóvil PD349778A babyjogger.com ASSEMBLY INSTRUCTIONS INSTRUCCIONES DEL ENSAMBLAJE CITY PREMIER CITY SELECT CITY SELECT LUX 1 2 CLICK 3
ÍNDICE / INDEX A.- INSTRUCCIONES DE MONTAJE / ASSEMBLY INSTRUCTIONS B.- INSTRUCCIONES DE DESMONTAJE / DRAWER DISMANTLING INSTRUCTIONS
 ÍNDICE / INDEX A.- INSTRUCCIONES DE MONTAJE / ASSEMBLY INSTRUCTIONS A.1.- Montaje del Cajón al Módulo / Drawer Assembly into the Carcass (pulsar/press) pag. 1-6 A.2.- Montaje del Frontal / Drawer Front
INSTRUCCIONES DE ENSAMBLAJE.
 English MULTI-FUNCTIONAL COMPUTER TABLE ASSEMBLY INSTRUCTION MODEL RTA - 3806 IMPORTANT: Surfaces must be cleaned with a solution of a smooth soap and water, then cleared with a dry towel. Do not use solvents
USER MANUAL MANUAL DE USUARIO
 USER MANUAL MANUAL DE USUARIO THEATRE SPOT 1000 PC TR-PC 1000 Read kindly this user manual before using the machine Lea atentamente manual antes de utilizar el aparato USER MANUAL THEATRE SPOT 1000PC TR-PC
FLEXO URANO INSTRUCCIONES INSTRUCTIONS
 FLEXO URANO INSTRUCCIONES INSTRUCTIONS 1 ATENCIÓN! Desconectar la conexión a red antes de ser manipulada y realizar el cambio de producto sólo cuando se haya enfriado la fuente existente. WARNING! Disconnect
ASPIRADORA. Modelo ATH 200 MANUAL DE INSTRUCCIONES
 MANUAL DE INSTRUCCIONES ASPIRADORA Modelo ATH 200 Para un correcto funcionamiento de esta unidad, por favor lea las instrucciones cuidadosamente antes de su uso y consérvelas en un lugar seguro para su
Auto Rain Lawn Gear LA
 Auto Rain Lawn Gear LA01-5006 For LA02 and LA03 Same Basic Layout Description List Spigot (water source) 18315 100 Roll 3/4 Poly Pipe 1436-007 IXMP 3/4" Insert Male Adapter 9-1602 Brass 3/4" NHT X 1/2"
STAUBSAUGER ZIEHEN Aspiradora arrastre
 STAUBSAUGER ZIEHEN Aspiradora arrastre MANUAL DE USUARIO Y LETRA DE GARANTÍA Manual de Instrucciones ASPIRADORA UT-SILENT1804 220V-240V, 50/60HZ, 1800W Importantes instrucciones de seguridad Al electrodomésticos,
MANUAL DE INSTRUCCIONES TECLADO PARA TABLETA ACC-5188TKB
 MANUAL DE INSTRUCCIONES TECLADO PARA TABLETA ACC-5188TKB ESTIMADO CLIENTE Con el fin de que obtenga el mayor desempeño de su producto, por favor lea este manual de instrucciones cuidadosamente antes de
T R A N S TECHNICAL SPECIFICATIONS:
 A R P O L T R A N S TECHNICAL SPECIFICATIONS: 1, or - look casing Specially designed rubber gasket (various models) Steps of up tc 8 mm between outside diameters Working pressures up to bar F l e x i b
Car Seat Adapter Adaptador de la silla para el coche
 CHICCO/PEG-PEREGO Car Seat Adapter Adaptador de la silla para el coche PD348997B babyjogger.com ASSEMBLY INSTRUCTIONS INSTRUCCIONES DEL ENSAMBLAJE CITY PREMIER CITY SELECT PEG-PEREGO 1 A B 2 3 CLICK 4
A I RTRONIC. Manual de usuario User Manual.
 A I RTRONIC Manual de usuario User Manual AIRTRONIC Partes que incluye Parts inlcuded 1 Goldeneye Airtonic Unit 1 Power supply Input: 100-240 V ~ 50-60 Hz Output: 12 VDC, max. 1000 ma 12 W max. 1 Dermograph
Aspiradora AQUA PK-8002
 Aspiradora AQUA PK-8002 Manual de operación ENGLISH WARNING: THE UNIT MUST ONLY BE USED WITH WATER IN THE TANK. NEVER EXCEED FILLING THE TANK WITH WATER ABOVE THE MAX. FILL LINE. 2. CAUTION: Read and follow
Guía de instalación rápida TFM-561U
 Guía de instalación rápida TFM-561U V1 Table of Contents Español 1 1. Antes de iniciar 1 2. Cómo se instala 2 Troubleshooting 5 Version 08.25.2010 1. Antes de iniciar Contenidos del paquete TFM-561U CD-ROM
Process Control Work Instructions Control de Procesos Instrucciones de Trabajo. for / para
 Process Control Work Instructions Control de Procesos Instrucciones de Trabajo for / para 629096898 VFCB Kit Relay Cable Harness Assy Ensamblar el Kit del Arnés de Cables del Relevador Publication Number:
Flashcards Series 2 Las Necesidades de la Vida
 Flashcards Series 2 Las Necesidades de la Vida Flashcards are one of the quickest and easiest ways to test yourself on Spanish vocabulary, no matter where you are! Test yourself on just these flashcards
OWNER'S MANUAL MANUAL DEL PROPIETARIO
 Read all instructions BEFORE assembly and USE of product. KEEP INSTRUCTIONS FOR FUTURE USE. Lea todas las instrucciones ANTES de armar y USAR el producto. GUARDE LAS INSTRUCCIONES PARA USO FUTURO. www.gracobaby.com
COMPUTER DESK ESCRITORIO DE COMPUTADORA
 MODEL: 11222327F / MODELO: 11222327F COMPUTER DESK ESCRITORIO DE COMPUTADORA NO A B C D E F G H I J PARTS AND HARDWARE LISTA DE PARTES Y HARDWARE TOP PANEL PANEL SUPERIOR KEYBOARD PANEL PANEL DE TECLADO
1
 PARTS AND ACCESSORIES COLOR OF PIECES MAY VARY PARTES Y ACCESORIOS EL COLOR DE LAS PIEZAS PUEDE VARIAR 5 x 7 x IMPORTANT PRE-BUILD STEPS PREVIA IMPORTANTE PASOS DE COMPILACIÓN STEP PASO SEPARATE AND COUNT
Flashcards Series 4 El Hotel
 Flashcards Series 4 El Hotel Flashcards are one of the quickest and easiest ways to test yourself on Spanish vocabulary, no matter where you are! Test yourself on just these flashcards at first. Then,
EFFICIENT DUSTER XD5512B
 ASPIRADORA EFFICIENT DUSTER XD5512B MANUAL DE INSTRUCCIONES Por favor, antes de usar por primera vez lea cuidadosamente todas las instrucciones contenidas en este manual. Conserve este manual como material
TETERA TTE017920GF INSTRUCCIONES GENERALES DE SEGURIDAD
 TETERA TETERA INSTRUCCIONES GENERALES DE SEGURIDAD Antes de poner en servicio este hervidor, lea atentamente el manual de instrucciones. Por favor, guarde el manual de instrucciones, el certificado de
SUSTITUCIÓN DE TUBOS FLUORESCENTES POR TUBOS DE LEDs CHANGING FLUORESCENT TO LED TUBES
 SUSTITUCIÓN DE TUBOS FLUORESCENTES POR TUBOS DE LEDs CHANGING FLUORESCENT TO LED TUBES 1 ES En las instalaciones convencionales de tubos fluorescentes se precisaban tanto cebadores, principalmente utilizados
Flashcards Series 5 El Agua
 Flashcards Series 5 El Agua Flashcards are one of the quickest and easiest ways to test yourself on Spanish vocabulary, no matter where you are! Test yourself on just these flashcards at first. Then, as
ASPIRADORA. Modelo ATH 100 MANUAL DE INSTRUCCIONES
 MANUAL DE INSTRUCCIONES ASPIRADORA Modelo ATH 100 Para un correcto funcionamiento de esta unidad, por favor lea las instrucciones cuidadosamente antes de su uso y consérvelas en un lugar seguro para su
STAUBSAUGER ZIEHEN Aspiradora arrastre
 STAUBSAUGER ZIEHEN Aspiradora arrastre MANUAL DE USUARIO Y LETRA DE GARANTÍA Manual de Instrucciones STAUBSAUGER ZIEHEN UT-SILENT1603 220V-240V, 50/60HZ, 1600W Importantes instrucciones de seguridad Al
Airless Paint Sprayer Kit
 Airless Paint Sprayer Kit Quick Start Guide A READ AND UNDERSTAND USER MANUAL BEFORE USE. B Features A. Handle B. On/Off (not shown) C. Pressure Control Knob D. Spray Hose Outlet E. Prime/Spray Switch
8 BIN WOODEN STORAGE ORGANIZER ORGANIZADOR DE 8 CAJONES DE TELA
 MODEL: 11223768V / MODELO: 11223768V 8 BIN WOODEN STORAGE ORGANIZER ORGANIZADOR DE 8 CAJONES DE TELA PARTS LIST AND HARDWARE LISTA DE PARTES Y ACCESORIOS NO A B C D E F G H1 H2 I J K L M N O HARDWARE LIST
MODEL: F / MODELO: F END TABLE WITH MEDIA STAND & MAGAZINE HOLDER MESA RINCONERA CON ESTANTE & REVISTERO
 MODEL: 11225479F / MODELO: 11225479F END TABLE WITH MEDIA STAND & MAGAZINE HOLDER MESA RINCONERA CON ESTANTE & REVISTERO NO A B C D E F G H I J K L PARTS LIST AND HARDWARE PARTES Y ACCESORIOS PARTS LIST
TRONIC PRO MONTAJE / ASSEMBLY
 MONTAJE / ASSEMBLY 2 www.keya.cat www.keya.cat 5 6 www.keya.cat www.keya.cat 7 8 www.keya.cat www.keya.cat 9 10 www.keya.cat www.keya.cat 11 FAQ s Preguntas más frecuentes / Frequently asked questions
Aspiradora TVC020110YL
 MANUAL DE INSTRUCCIONES ESTE APARATO ES PARA USO DE HOGAR SOLAMENTE 3 PRECAUCIÓN No tire del cable para desenchufarlo. Cuando desee volver a conectar el cable, sujete el enchufe y luego presione el botón
1. Conecte el transmisor FM al dispositivo encendedor del coche o a una fuente de alimentación.
 INSTRUCCIONES PARA EL USO DEL TRANSMISOR FM: 1. Conecte el transmisor FM al dispositivo encendedor del coche o a una fuente de alimentación. 2. Sintonice la radio en la frecuencia FM que desee y haga coincidir
Los números. 0 cero 1 uno / un 2 dos 3 tres 4 cuatro. 6 seis 7 siete 8 ocho 9 nueve 10 diez 5 cinco
 53 31 16 0 cero 1 uno / un 2 dos 3 tres 4 cuatro 6 seis 7 siete 8 ocho 9 nueve 10 diez 5 cinco 11 - once 12 - doce 13 - trece 14 - catorce 17 - diecisiete 18 - dieciocho 19 - diecinueve 20 - veinte 15
Instruction Manual. Safety Warning and Precautions
 Art# GAZ201490/5055 Instruction Manual Save this Manual for future reference. Your Gazebo requires assembly prior to use. It is important that you read the entire manual to become familiar with the unit
Manual. de usuario ASPIRADORA MULTI-CYCLON PE-AS16
 Manual de usuario ASPIRADORA MULTI-CYCLON PE-AS16 1 2 CONTENIDOS INSTRUCCIONES DE SEGURIDAD IMPORTANTE 4 DESCRIPCIÓN 5 USO DEL ARTEFACTO 5 MANTENIMIENTO Y PROTECCIÓN 6 3 INSTRUCCIONES DE SEGURIDAD IMPORTANTES
NG17 9GU, UK. Teléfono gratuito: Fax gratuito:
 Garantía y Soporte Este producto incluye una garantía de un año que cubre problemas detectados durante un uso normal. Si hace un mal uso deeasi-speak docking stationo abre la unidad, esta garantía quedará
User Manual Manual del usuario POP-UP LED LANTERNS. Faroles LED retráctiles. Español..7
 User Manual Manual del usuario POP-UP LED LANTERNS Faroles LED retráctiles English 3 Español..7 Contents Parts list... 3 Contents... 3 User instructions... 4 Cleaning and maintenance... 5 Technical specifications...
exy neon fl flexy neon
 flexy neon flexy neon LED NEON led neon Led neon es un producto innovador que combina una tira de led con cubierta de silicona. Esto permite una luz uniforme sin puntos y una gran flexibilidad para colocarlo
PC USER GUIDE. Read this user guide carefully before using this device. Overview. Battery status indicator
 PC-240860 USER GUIDE Read this user guide carefully before using this device. Overview Battery status indicator Press ON/OFF button to check the battery capacity, battery status indicators as following:
Guía de instalación rápida TFM-PCIV92A B1.21
 Guía de instalación rápida TFM-PCIV92A B1.21 Table of Contents Español 1 1. Antes de iniciar 1 2. Cómo se instala 2 Troubleshooting 6 Version 05.11.2011 1. Antes de iniciar Contenidos del paquete ŸTFM-PCIV92A
PARTS Piezas Parties
 PARTS Piezas Parties Repair Parts RIDGID 10 Gallon / 37 liters Stainless Steel Wet/Dry vac Model Numbers WD10500 / WD10600 RIDGID parts are available on-line at www.ridgidparts.com Always order by Part
Manual. de usuario ASPIRADORA MULTI-CYCLON PE-AS20. Manual Aspiradora PEAS20 sept15.indd 1 11/09/15 18:24
 Manual de usuario ASPIRADORA MULTI-CYCLON PE-AS20 1 Manual Aspiradora PEAS20 sept15.indd 1 11/09/15 18:24 2 Manual Aspiradora PEAS20 sept15.indd 2 11/09/15 18:24 CONTENIDOS INSTRUCCIONES DE SEGURIDAD IMPORTANTES
MANUAL DE INSTRUCCIONES ASPIRADORA AS-4480
 MANUAL DE INSTRUCCIONES ASPIRADORA AS-4480 ESTIMADO CLIENTE Con el fin de que obtenga el mayor desempeño de su producto, por favor lea este manual de instrucciones cuidadosamente antes de comenzar a utilizarlo,
ASSEMBLY INSTRUCTIONS INSTRUCCIONES DE MONTAJE
 ASSEMBLY INSTRUCTIONS INSTRUCCIONES DE MONTAJE 4 PC PATIO CONVERSATION SET JUEGO DE PATIO C/ MESA, 2 SILLAS Y UN SILLÓN 250559R /250559T/250559G PLEASE NOTED / POR FAVOR A TENER EN CUENTA: THIS SET OF
LAPTOP DESK WITH 3 BINS MESA PARA COMPUTADORA PERSONAL CON 3 CONTENEDORES
 MODEL: 11222775R / MODELO: 11222775R LAPTOP DESK WITH 3 BINS MESA PARA COMPUTADORA PERSONAL CON 3 CONTENEDORES NO A B C D E F G H 1 2 3 4 5 6 7 8 9 PARTS AND HARDWARE LISTA DE PARTES Y HARDWARE TOP PANEL
FLEXO LUPO INSTRUCCIONES INSTRUCTIONS
 FLEXO LUPO INSTRUCCIONES INSTRUCTIONS 1 ATENCIÓN! Desconectar la conexión a red antes de ser manipulada y realizar el cambio de producto sólo cuando se haya enfriado la fuente existente. WARNING! Disconnect
dash LED Light Luz LED dash INTEGRATED & SOTO RAILS RIELES INTEGRADOS Y SOTO
 dash LED Light Luz LED dash INTEGRATED & SOTO RAILS RIELES INTEGRADOS Y SOTO M HEX LLAVE HEX M b e a c d SIDE VIEW VISTA LATERAL FREESTANDING BASE BASE AUTÓNOMA ON OFF ON OFF If you have a problem, question,
FLEXO NEPTUNO INSTRUCCIONES INSTRUCTIONS
 FLEXO NEPTUNO INSTRUCCIONES INSTRUCTIONS 1 ATENCIÓN! Desconectar la conexión a red antes de ser manipulada y realizar el cambio de producto sólo cuando se haya enfriado la fuente existente. WARNING! Disconnect
MANUAL DE INSTRUCCIONES. Aspiradora THOR DUAL STAND PRO
 MANUAL DE INSTRUCCIONES Aspiradora THOR DUAL STAND PRO LIMPIEZA DEL CEPILLO PARA PISO TURBO BRUSH Si nota que su aspiradora está perdiendo poder de succión, proceda a limpiar el cepillo turbo brush. Antes
MANUAL DE INSTRUCCIONES INSTRUCTION MANUAL
 MANUAL DE INSTRUCCIONES INSTRUCTION MANUAL EA-DY-CI ES Sustitución de Tubos Fluorescentes circulares por Tubos LED circulares EN Replacing Circular Fluorescent Tubes with Circular LED Tubes 1 ES - En las
STAUBSAUGER ZIEHEN Aspiradora arrastre
 STAUBSAUGER ZIEHEN Aspiradora arrastre MANUAL DE USUARIO Y LETRA DE GARANTÍA Manual de Instrucciones STAUBSAUGER ZIEHEN UT-KRAFT2206 Lea cuidadosamente este manual antes de usarlo y guardelo para consultas
SAVE THESE INSTRUCTIONS. one way; if the plug does not fit fully into the outlet, reverse the plug.
 Do not use can opener for other than intended use or leave unattended Do not open cans of flammable liquids such as lighter fluids. Do not open pressurized (aerosol-type) cans. Do not let the cord hang
IMPORTANT! Must be attached to a R cabinet or a GT storage unit or side-byside or anchored to the wall.
 Locker / Storage Unit R Line Assembly Guide Guía de montaje Ligne R All required hardware is included. Please check the contents with your packing slip. Read instructions carefully. Two people are required
ENERGíA DE FUTURO: LA SALUD EN TUS MANOS CON LA ENERGíA BI QUIX D'FU (SPANISH EDITION) BY SALVADOR LIZANA BARBA
 BY SALVADOR LIZANA BARBA") Read Online and Download Ebook ENERGíA DE FUTURO: LA SALUD EN TUS MANOS CON LA ENERGíA BI QUIX D'FU (SPANISH EDITION) BY SALVADOR LIZANA BARBA DOWNLOAD EBOOK : ENERGíA DE FUTURO: LA SALUD EN TUS MANOS
Read Online and Download Ebook ENERGíA DE FUTURO: LA SALUD EN TUS MANOS CON LA ENERGíA BI QUIX D'FU (SPANISH EDITION) BY SALVADOR LIZANA BARBA DOWNLOAD EBOOK : ENERGíA DE FUTURO: LA SALUD EN TUS MANOS
RTA-2706A DIMENSIONS
 MODEL RTA - 706A Thanks for purchasing one of our products. Please read carefully the assembly instructions before the installation. Please save this manual for future reference. MODEL RTA-706A MODELO
1. Encendido / apagado 6. Auriculares 11. LED de Carga 2. Volumen + 7. Micro SD 12. MIC 3. Volumen - 8. Micro USB 13. Sensor de luz 4.
 25.65 32GB 2GB 2 3 1. Encendido / apagado 6. Auriculares 11. LED de Carga 2. Volumen + 7. Micro SD 12. MIC 3. Volumen - 8. Micro USB 13. Sensor de luz 4. Tecla windows 9. Corriente continua 14. Cámara
_961. perfiles_profiles. secret. fichatécnica_datasheet N8313 N N N8326 N8316 N8317 N8314.
 7059 proyector/spot max. 1500 7059 960 314 10,3W. 1.405 136,4lm/W. spot 3.000 7059 960 324 10,3W. 1.405 136,4lm/W. medium 3.000 7059 960 338 10,3W. 1.405 136,4lm/W. flood 3.000 7059 960 414 10,3W. 1.486
INSTRUCCIONES IMPORTANTES DE SEGURIDAD
 MANUAL DE USO Y MANTENIMIENTO ASPIRADORA Modelo: KV-1600 LEA DETENIDAMENTE ESTE MANUAL ANTES DE CONECTAR Y HACER FUNCIONAR ESTE PRODUCTO. GUARDE EL MANUAL EN UN LUGAR SEGURO PARA FUTURAS REFERENCIAS. INSTRUCCIONES
Hairdryer. Register your product and get support at. HP4935/00. Manual del usuario
 Register your product and get support at www.philips.com/welcome Hairdryer HP4935/00 Manual del usuario Español Le felicitamos por su compra y le damos la bienvenida a Philips. Para poder beneficiarse
Pneumatic Desoldering Module
 Page English 2 Español 6 Pneumatic Desoldering Module Packing List Features The following items should be included: Pneumatic Desoldering Module... 1 unit 50 Filter Box... 1 unit 10 Cotton Filters... 1
Fully assemble before operating. Operate vacuum only at voltage specified on data label on bottom of cleaner. Do not leave appliance when plugged in.
 Fully assemble before operating. Operate vacuum only at voltage specified on data label on bottom of cleaner. Do not leave appliance when plugged in. Unplug from outlet when not in use and before cleaning
Meijer.com A
 English MOBILE LAPTOP CART STORAGE ASSEMBLY INSTRUCTION MODEL RTA - B00 IMPORTANT: Surfaces must be cleaned with a solution of a smooth soap and water, then cleared with a dry towel. Do not use solvents
MANUAL DE INSTRUCCIONES INSTRUCTION MANUAL
 MANUAL DE INSTRUCCIONES INSTRUCTION MANUAL CPS-RG3-2G11 ES Sustitución de Tubos Fluorescentes 2G11 por Tubos LED 2G11 EN Replacing 2G11 Fluorescent Tubes With 2G11 LED Tubes 1 ES - En las instalaciones
MANUAL DE INSTRUCCIONES
 MANUAL DE INSTRUCCIONES ASPIRADORA MODELO: SL-VC870216 www.smartlife.com.uy Importado, distribuido y garantizado por Visuar Uruguay S.A. Ruta 101 Km. 28.600, Canelones, Uruguay RUT N 216175440017 Importantes
ASPIRADORA OCEANO/PLUS BA-560
 ASPIRADORA OCEANO/PLUS BA-560 MANUAL DE INSTRUCCIONES Estimado Cliente Electron Felicitaciones por escoger un producto Electron. Al hacer esta elección de calidad, usted se ha asegurado un uso libre de
Bienvenidos. Seguridad
 MANUAL DEUSUARI O AS PI RADORC I C L ÓN I C O SY AS110 Bienvenidos Estimado Cliente, Bienvenidos a Sytech! Gracias por la compra de la aspiradora SY-AS110. Por favor lea el manual de instrucciones atentamente
Scion IQ 2012-up
 INSTALLATION INSTRUCTIONS FOR PART 99-8234 APPLICATIONS Scion IQ 2012-up 99-8234 KIT FEATURES DIN head unit provision with pocket ISO DIN head unit provision with pocket KIT COMPONENTS A) Radio Housing
CE23841 MODELO: INSTRUCTION MANUAL WAFLERA MANUAL DEL USUARIO WAFFLE MAKER MODEL: CE23841
 MODELO: CE23841 INSTRUCTION MANUAL WAFFLE MAKER MODEL: CE23841 WAFLERA MANUAL DEL USUARIO IMPORTANT SAFEGUARDS When using electrical appliances, especially when children are present, basic safety precautions
Instructions For Use. STEP 1 Locate the area on your horse that you wish to patch.
 AcuLife Instructions Instrucciones Instructions For Use You don t need to be a veterinarian or a pain expert to use AcuLife. Simply follow these instructions for patching your horse and be sure to monitor
TOCADISCOS BTC-402 MANUAL DE INSTRUCCIONES
 TOCADISCOS BTC-402 MANUAL DE INSTRUCCIONES SITUACIÓN DE LOS CONTROLES 1) TAPA PROTECTORA 2) ALTAVOZ IZQUIERDO 3) CONTROL DE VOLUMEN 4) BOTÓN DE ENCENDIDO/APAGADO 5) LED INDICADOR DE ALIMENTACIÓN 6) ALTAVOZ
Taking a Temperature
 Taking a Temperature Body heat is measured by taking a temperature with a thermometer. An increase in temperature, called a fever, may be a sign of infection. The common scale used to measure body temperature
flexy neon LED NEON 170 qbo 2017 all rights reserved VR1017
 flexy neon 9 flexy neon LED NEON 170 led neon Innovador producto que combina una tira de LED con cubierta de silicona. Aporta una luz completamente uniforme y una gran flexibilidad permitiendo su colocación
Delivery & Installation Pointer
 DP-035 August 2009 R8178785 Delivery & Installation Pointer ISSUE: August 2009 Whirlpool 27 French Door with IDI Models: GI7FVCXWA, GI7FVCXWB, GI7FVCXWQ, GI7FVCXWY Supplemental Information Accessing Door
ENTERTAINMENT CENTER / BOOKSHELF ESTANTE PARA LIBROS / ESTANTE PARA TV
 MODEL: 11223726 / MODELO: 11223726 ENTERTAINMENT CENTER / BOOKSHELF ESTANTE PARA LIBROS / ESTANTE PARA TV PARTS LIST AND HARDWARE LISTA DE PARTES Y ACCESORIOS NO A B C D 2-1 3 4 5 6 7 HARDWARE LIST LISTA