1
|
|
|
- Samuel Piñeiro Martínez
- hace 7 años
- Vistas:
Transcripción

1
2 Parts and Accessories Color of pieces may vary Partes y Accesorios El color de las piezas puede variar 8 x 7 x 6 x 8 x assorted colors colores surtidos x 5 x 0 x 4 7 x 4 88 x assorted colors colores surtidos x 4 x 5 x x 60 0 x 7 6 x x 4 x 87 x assorted colors colores surtidos x 4 4 x assorted colors colores surtidos assorted colors colores surtidos 5 x assorted colors colores surtidos x assorted colors colores surtidos 8 x 84 x 7 x 6 DECORATIVE CARDS TARJETAS DECORATIVAS x 8

3 5 x x 0 x 8 x 4 x 0 x 6 assorted colors colores surtidos 58 x 55 x 8 x 4 assorted colors colores surtidos 5 x assorted colors colores surtidos 70 x 6 86 x 48 x 4 x 7 x 8 4 x 47 x x x assorted colors colores surtidos
 size battery, (not included). Engrane máquina requiere AA (UM/LR6) tamaño la batería, (no incluida). ON Button botón de encendido.5v AG LR44.")
4 GETTING STARTED BATTERY INFORMATION FOR PARENTS AND KIDS INICIO INFORMACIÓN DE LAS BATERÍAS PARA PADRES Y NIÑOS on demand button butón de movimiento ON Button botón de encendido Motorized gear uses AA (UM/LR6) size battery, (not included). Engrane máquina requiere AA (UM/LR6) tamaño la batería, (no incluida). ON Button botón de encendido.5v AG LR44.5V AG LR44 flashing light use button cell batteries (AG or LR44), included. Las luces intermitente requiere baterías tipo botón (AG o LR44), incluidas. Light Luz.5V AG LR44.5V AG LR44.5V AG LR44 flashing light with sound use button cell batteries (AG or LR44), included. Las luces intermitente con sonido requiere baterías tipo botón (AG o LR44), incluidas. on/off switch interruptor de encendido/apagado BATTERY INSTALLATION: Make sure the toy is switched OFF. Remove the battery cover at the bottom of the toy. Use a screwdriver to open the battery cover. Install the required batteries according to the diagram inside the battery compartment. Alkaline batteries are recommended. Replace and secure the battery cover. After inserting the batteries, switch the toy ON. Batteries must be installed and replaced by an adult. NOTICE CONCERNING BATTERIES: Do not use rechargeable batteries. Non-rechargeable batteries are not to be recharged. Do not mix old and new batteries. Batteries should be removed and replaced by adults only. Do not mix alkaline, standard (carbon zinc) or rechargeable (nickel cadmium) batteries. Only batteries of the same or equivalent type as recommended are to be used. Batteries are to be inserted according to the correct polarity (+ and -). Incorrect insertion can damage the unit, provoke fire or cause the batteries to explode. Exhausted batteries are to be removed from the unit. Remove batteries when the unit is not to be used for a long period of time. Do not throw batteries into a fire. Do not attempt to open normal or rechargeable batteries. The supply terminals are not to be short-circuited. Batteries are harmful if swallowed, so keep them away from young children. Never leave button-cell batteries within reach of young children. Motorized gear OPERATING INSTRUCTIONS: ) After batteries have been installed properly, replace and secure the battery cover. ) To activate, switch the on/off switch for continous play or press the on demand button for immediate play. ) When not using your unit for an extended period of time please be sure to remove the batteries from the mechanism. flashing light with sound OPERATING INSTRUCTIONS: To activate the flashing LED light with sound, simply press the On Button. The fun light will blink for approximately one minute before turning itself off. INSTALACIÓN DE LAS BATERÍAS: Asegúrese de que el juguete esté APAGADO. Quite la cubierta de las baterías en la parte inferior del juguete. Use un desarmador para abrir la cubierta de las baterías. Instale las baterías requeridas de acuerdo con el diagrama dentro del compartimiento para las baterías. Se recomienda usar baterías alcalinas. Vuelva a colocar y asegure la cubierta de las baterías. Después de colocar las baterías, ENCIENDA el juguete. Las baterías deben ser instaladas y cambiadas por un adulto. AVISO SOBRE LAS BATERÍAS: No use baterías recargables. No recargue las baterías que no son recargables. No mezcle baterías usadas y nuevas. Únicamente un adulto debe sacar y cambiar las baterías. No mezcle baterías alcalinas, estándar (carbón-zinc) o recargables (níquel-cadmio). Sólo se deben usar baterías del mismo tipo o su equivalente, como se recomienda. Las baterías deben ser inserta das de acuerdo con la polaridad correcta (+ o -). La colocación incorrecta puede dañar la unidad, causar un incendio o que las baterías exploten. Debe sacar las baterías usadas de la unidad. Saque las baterías cuando no vaya a utilizar la unidad por un largo periodo de tiempo. No tire las baterías en fuego. No intente abrir las baterías normales o recargables. No debe causar cortos circuitos en las terminales de alimentación. Las baterías son dañinas si se tragan, por lo que debe conservarlas fuera del alcance de niños pequeñ Nunca deje las baterías de botón dentro del alcance de niños pequeños. Engranaje máquina INSTRUCCIONES DE OPERACIÓN: ) Después de que las baterías se han instalado vuelva a colocar y asegure la tapa de las baterías. ) Para activar la unidad, presione el botón de encendido/apagado para el uso continuo o el botón de movimiento para uso inmediato. ) Si la unidad no va a ser utilizada por un período largo de tiempo, quite las baterías y guárdelas en un lugar fresco. Las luces intermitente con sonido INSTRUCCIONES DE OPERACIÓN: Para activar la Luz LED Intermitente con sonido, simplemente presiona el Botón de Encendido. La luz parpadeará por un minuto aproximadamente antes de que se apague automáticamente.

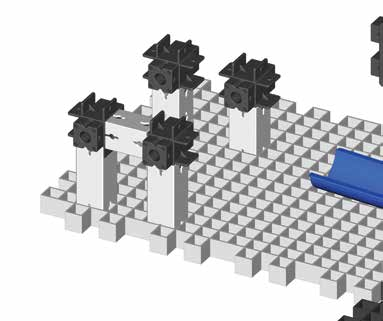
5 Step paso Separate and count all your pieces carefully. Separar y contar todas las piezas con cuidado. important PRE-BUILD STEPS previa importante pasos de compilación Step paso Familiarize yourself with the parts. Familiarícese con las partes. Step paso To ensure a proper build, only use exact part numbers listed. Para asegurar una construcción adecuada, utilice sólo el número exacto de la pieza detallada. 0 x x 0 x 4

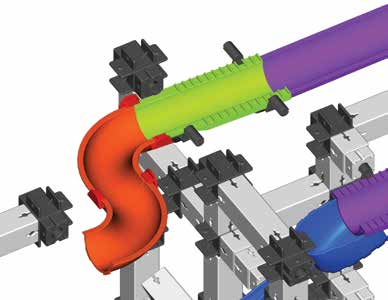
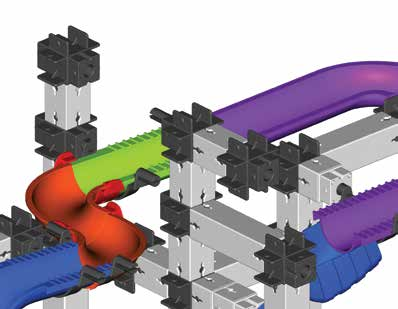
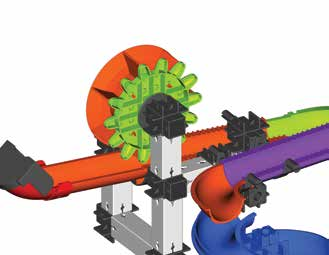
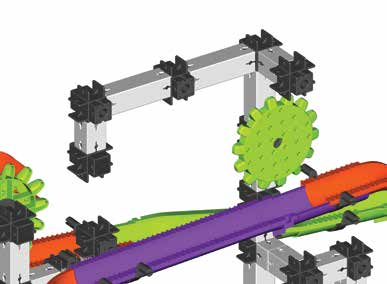
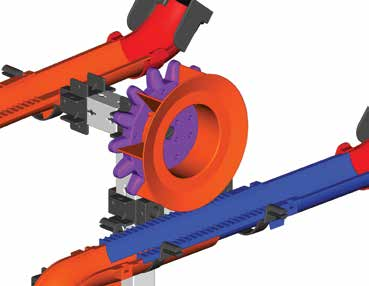
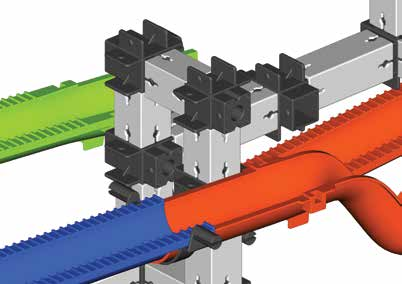
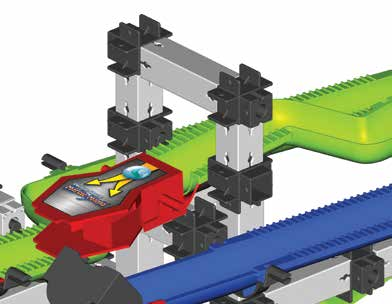
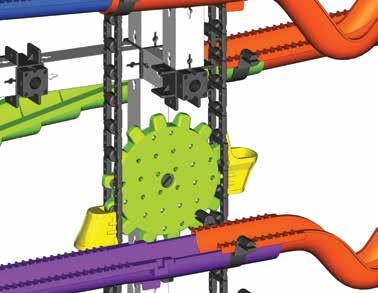
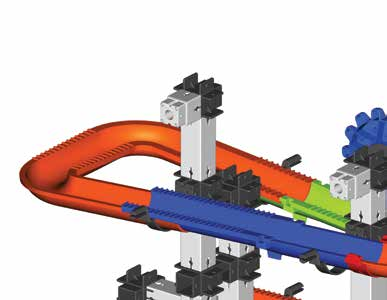
6 Helpful Hints Consejos Útiles Part 7 Step : Attach part 7 by first clipping it to one side of the connecting channels. Parte 7 Paso : Fije la parte 7 insertándola primero en uno de los extremos de los canales de conexión. If the chain is loose the motor will not work properly. Straighten the build structure to ensure proper alignment. Si la cadena está floja, el motor no funcionará correctamente. Endereza la estructura de construcción para asegurar una alineación correcta. Remove part by snapping it off at an angle as shown. Quite la parte al zafarla en ángulo como se muestra. Step : Snap the other end of part 7 to secure the other side of the connecting channels. Paso : Inserte el otro extremo de la parte 7 para asegurar el otro lado de los canales de conexión. Press to ensure alignment between two connectors. Presione para asegurarse que los conectores están bien alineados. Press to ensure alignment between two connectors. Presione para asegurarse que los conectores están bien alineados. For further detailed instructions, please visit us at View a detailed D animation of this Techno Gears Marble Mania build and others. Para instrucciones màs detalladas, visìtenos en: Ve una animaciòn en D detallada de esta construcciòn de Techno Gears Marble Mania y otras màs. NOW LET S Start BUILDING! Ahora vamos empezar a construir! 5

7 . Make sure all base plates are facing the same direction. Base plates direction is labeled on the reverse side.. Asegurese que todas las platáformas de la base hayan sido colocadas hacia la misma dirección.. Use below diagram and color paint marks to place connectors in proper location on base plates, ensuring proper operation.. Usa el siguiente diagrama y marcadores de color para colocar los conectores en el lugar correcto en las placas base, aegurando así su operación correcta. Building Marble Mania Construye el Marble Mania. Make sure unit is built on a flat surface.. Asegúrese de que la estructura es construida en una superficie plana way connectors (part ) have multiple connecting ends. Make sure part is placed onto Techno Gears Marble Mania correctly as illustrated in each specific image step. 4. Los conectores de 6 entradas (parte ) tienen múltiples puntos de conexión. Asegúrese de que la parte haya sido colocada correctamente sobre Techno Gears Marble Mania tal y como se muestra en cada una de las ilustraciones. Front side Lado frontal Back side Lado trasero Note: When specific placement of the 6 way connector is required, blue and red dots will be shown in the instructions, indicating the required direction of the front and/or back of the 6 way connector. Nota: Cuando se requiere la colocación específica del conector de 6 vías, aparecerán puntos azules y rojos en las instrucciones indicando la dirección requerida de la parte frontal y/o trasera del conector de 6 vías. Note: A compass icon on the page indicates the current direction of the base. The red arrow always indicates the top edge of the base (as shown above). Nota: El icono de una brújula en la página indica la dirección actual de la base. La flecha roja siempre indica la orilla superior de la base (como se indica arriba). Note: A compass icon with circular black arrows indicates that the build needs to be turned around 80 degrees. Nota: El icono de una brújula con dos flechas circulares negras indica que la construcción debe ser girada 80 grados. Note: An exclamation mark on the page indicates to take note. The note could be a direction change, specific areas where parts need to be connected or a clip position on a track. For example, indicates the third slot position is required for a part placement. Nota: Un signo de exclamaciòn en la pàgina indica que se debe tomar nota. La nota puede ser un cambio de direcciòn, àreas especìficas donde se necesita conectar las partes, la posiciòn de un clip en un riel. Por ejemplo, el indica que se requiere la posición del tercer agujero para la colocación de una parte. x 6

8 x 5 4 x x

9 x 4 x 4 x 5 x 4 8

10 7 x x x 7 4

11 6 87 x x 4 x 5 x 8 x 7 x 6 x

12 x 5 4 x x

13 4 0 x 4 4 x x 0 x x x 4 4
14 x x

15 70 8 x 70 x 4 x 7 x x

16 x 5

17 4 70 x 4 x 7 x x

18 x x 7

19 4 x 4 4 x 0 x x

20 8 0 x 0 x 8 x x 4

21 0 0 x 8 4 x x 4 0 x x

22 0 4 x 5 4 x x 0 x x 5 4

23 x 4 x x 0 x x

24 x 4 4 x x 0 x x

25 x 4 4 x x 0 x x

26 x 0 x x 86 x

27 x 8 4 x x 0 x x x

28 0 x 7 x 0 x x x

29 5 5 x x

30 70 70 x 4 x 7 x x
31 x 0

32 7 x x 7 x 7 x 0 x 4 x
33 x x x 4

34 x x

35 x x 4

36 4 x 58 x 8 x 7 x 7 x 7 x x
37 6

38 0 4 0 x 5 4 x x 0 x 48 x 47 x

39 0 x 7 x 0 x x x

40 0 x 4 x 8 x 70 x 7 x 7 x 7 x x

41 40
42 x 6 x 6 4

43 6 87 x 6 x
44 x 5 x x x 4
45 x x 0 x 0 x 4 x 7 x 7 x 7 x x
46 4 45

47 0 x 4 x x 0 x x
48 x 6 x

49 0 0 x 6 x 0 x x x

50 x 7 4 x x 0 x x x

51 0 x 5 x 7 x 7 x x

52 0 x 4 x 7 x 7 x 7 x x

53 5

54 x 4 x 0 x x 0 5
55 x x 54

56 x x 0 x x

57 55 x 58 x 0 x x 5 x

58 57
59 x x x

60 x 5 x 0 x x

61 8 x 70 x 7 x 7 x x

62 x 6 6

63 87 x 8 x 6 x x 4 x x
64 84 x 6

65 64
66 x 4 x x
67 8 x 6 x
68 x 4 x 5 x 6 x

69 88 x
70 6 x

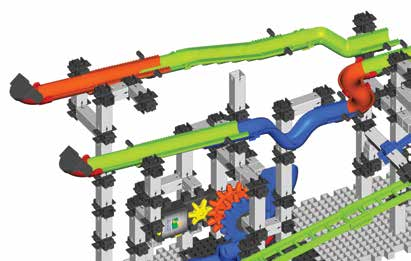
71 6 x 6 6 Congratulations! Now add some marbles and let s play. Felicitaciones! Ahora coloca las canicas y vamosa jugar. OUR WEBSITE Please visit to see more exciting Marble Mania Mine Shaft.0 construction plans. NUESTRA PÁGINA WEB Favor de visitar para poder ver mayor información relacionada a las instrucciones de construcción de excitantes diseños con el Laberinto de la Diversión Mine Shaft
72
1
 PARTS AND ACCESSORIES COLOR OF PIECES MAY VARY PARTES Y ACCESORIOS EL COLOR DE LAS PIEZAS PUEDE VARIAR 5 x 7 x IMPORTANT PRE-BUILD STEPS PREVIA IMPORTANTE PASOS DE COMPILACIÓN STEP PASO SEPARATE AND COUNT
1
 GETTING STARTED BATTERY INFORMATION FOR PARENTS AND KIDS INICIO INFORMACIÓN DE LAS BATERÍAS PARA PADRES Y NIÑOS Motorized gear uses AA (UM/LR6) size battery, (not included). Engrane máquina requiere AA
1
 PARTS AND ACCESSORIES COLOR OF PIECES MAY VARY PARTES Y ACCESORIOS EL COLOR DE LAS PIEZAS PUEDE VARIAR 7 x 8 x 6 x 4 x 8 x 8 x 0 x 7 x 0 x 7 7 x 84 x 5 x 5 x 4 ASSORTED COLORS COLORES SURTIDOS 87 x 4 6
What s Inside Qué Hay Dentro
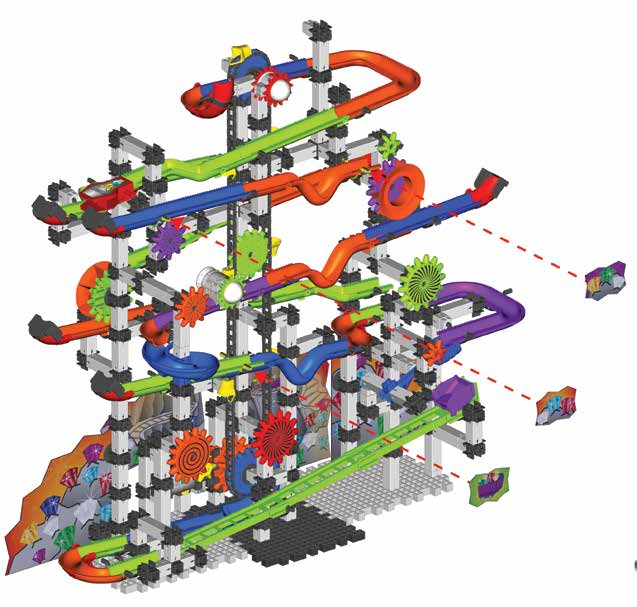
 Thank you for your purchase of Techno Gears Marble Mania Mine Shaft! Included in this instruction manual you will find the following: A list of components A step by step guide on how to assemble Techno
PREMIER WRIST BLOOD PRESSURE MONITOR UB ) Install the batteries to your blood pressure monitor. LR03 or AAA batteries only.
 Install the batteries to your blood pressure monitor. LR03 or AAA batteries only.") PREMIER WRIST BLOOD PRESSURE MONITOR UB-543 1) Install the batteries to your blood pressure monitor. LR03 or AAA batteries only Battery cover Used batteries New batteries 2) (Optional) Set the Built-in
PREMIER WRIST BLOOD PRESSURE MONITOR UB-543 1) Install the batteries to your blood pressure monitor. LR03 or AAA batteries only Battery cover Used batteries New batteries 2) (Optional) Set the Built-in
Installation Guide. Green momit
 Installation Guide Green momit 2015 www.momit.com momit Deviceses Gateway: Model 1 and 2 Wall option The momit Gateway allows your thermostat to be connected to the Internet. It s included in the Starter
User Manual Manual del usuario POP-UP LED LANTERNS. Faroles LED retráctiles. Español..7
 User Manual Manual del usuario POP-UP LED LANTERNS Faroles LED retráctiles English 3 Español..7 Contents Parts list... 3 Contents... 3 User instructions... 4 Cleaning and maintenance... 5 Technical specifications...
INSTRUCCIONES DE ENSAMBLAJE.
 English MULTI-FUNCTIONAL COMPUTER TABLE ASSEMBLY INSTRUCTION MODEL RTA - 3806 IMPORTANT: Surfaces must be cleaned with a solution of a smooth soap and water, then cleared with a dry towel. Do not use solvents
Añadir para firmar digitalmente documentos EDE. Add digital signatures to EDE documents
 Añadir para firmar digitalmente documentos EDE Add digital signatures to EDE documents Desarrollado por: DTE, LLC Versión: 01.2017 Developed by: DTE, LLC Revisado en: 27 de Marzo de 201 support@dtellcpr.com
Process Control Work Instructions Control de Procesos Instrucciones de Trabajo. for / para
 Process Control Work Instructions Control de Procesos Instrucciones de Trabajo for / para 629096898 VFCB Kit Relay Cable Harness Assy Ensamblar el Kit del Arnés de Cables del Relevador Publication Number:
Car Seat Adapter Adaptador de la silla para el coche
 CHICCO/PEG-PEREGO Car Seat Adapter Adaptador de la silla para el coche PD348997B babyjogger.com ASSEMBLY INSTRUCTIONS INSTRUCCIONES DEL ENSAMBLAJE CITY PREMIER CITY SELECT PEG-PEREGO 1 A B 2 3 CLICK 4
RTA-B002 DIMENSIONS MAXIMUM WEIGHT CAPACITIES. Highest position. Lowest position. Product Size: 22"W x 16"D x 30.5~46.5"H
 MODEL RTA - B002 Thanks for purchasing one of our products. Please read carefully the assembly instructions before the installation. Please save this manual for future reference. MODEL RTA-B002 MODELO
TX MULTI MANUAL TX MULTI. Mando copiador multifrecuencia 1. PASOS PARA COPIAR UN MANDO CÓDIGO FIJO Y ROLLING ESTÁNDAR:
 MANUAL TX MULTI Mando copiador multifrecuencia 1. PASOS PARA COPIAR UN MANDO CÓDIGO FIJO Y ROLLING ESTÁNDAR: 1. Situar el mando original que desea copiar junto al TX Multi, en torno a 2-4 centímetros de
FlexCage. User Manual MB975SP-B. 5 HDD Slots in 3 Device Bay. Tray-Less SATA Backplane Module
 FlexCage MB975SP-B 5 HDD Slots in 3 Device Bay Tray-Less SATA Backplane Module User Manual English Package Contents Front Panel Information HDD3 POWER BUTTON POWER / ACCESS LED INDICATOR HDD2 POWER BUTTON
MODEL: F / MODELO: F END TABLE WITH MEDIA STAND & MAGAZINE HOLDER MESA RINCONERA CON ESTANTE & REVISTERO
 MODEL: 11225479F / MODELO: 11225479F END TABLE WITH MEDIA STAND & MAGAZINE HOLDER MESA RINCONERA CON ESTANTE & REVISTERO NO A B C D E F G H I J K L PARTS LIST AND HARDWARE PARTES Y ACCESORIOS PARTS LIST
CONTROLADORA PARA PIXELS CONPIX
 The LedEdit Software Instructions 1, Install the software to PC and open English version: When we installed The LedEdit Software, on the desktop we can see following icon: Please Double-click it, then
Manual para Cambio de Apariencia en Acrobat Reader DC. Change of Appearance in Acrobat Reader DC
 Manual para Cambio de Apariencia en Acrobat Reader DC Change of Appearance in Acrobat Reader DC Desarrollado por: DTE, LLC Versión: 02.2016 Developed by: DTE, LLC Revisado en:25 de Octubre de 2016 support@dtellcpr.com
2011 Honda CR-Z
 INSTALLATION INSTRUCTIONS FOR PART 99-7879 APPLICATIONS 2011 Honda CR-Z 99-7879 KIT FEATURES ISO radio mount provision with pocket KIT COMPONENTS A) Radio housing B) ISO brackets C) Pocket D) (11) #8 x
FLEXO URANO INSTRUCCIONES INSTRUCTIONS
 FLEXO URANO INSTRUCCIONES INSTRUCTIONS 1 ATENCIÓN! Desconectar la conexión a red antes de ser manipulada y realizar el cambio de producto sólo cuando se haya enfriado la fuente existente. WARNING! Disconnect
Retirar los soportes izquierdo y derecho. Remove left and right supports. Retirar las piezas de plástico y la varilla de acero
 Flipper door - Mechanism Puerta retráctil - Mecanismo R Line ssembly Guide Guía de montaje Línea R ll required hardware is included. Please check the contents with your packing slip. Read instructions
Manual de Instrucciones Operation Manual. (Evita Pink Press)
") Manual de Instrucciones Operation Manual (Evita Pink Press) EN ES Datos Técnicos / Technical Parameters Modelo/Model NO Medidas/Machine Size Área de trabajo/work area Voltaje/Voltage Poténcia/Power Rango
Manual de Instrucciones Operation Manual (Evita Pink Press) EN ES Datos Técnicos / Technical Parameters Modelo/Model NO Medidas/Machine Size Área de trabajo/work area Voltaje/Voltage Poténcia/Power Rango
FLEXO MERCURIO INSTRUCCIONES INSTRUCTIONS
 FLEXO MERCURIO INSTRUCCIONES INSTRUCTIONS 1 ATENCIÓN! Desconectar la conexión a red antes de ser manipulada y realizar el cambio de producto sólo cuando se haya enfriado la fuente existente. WARNING! Disconnect
Preassembled Rail Instructions
 Preassembled Rail Instructions Prior to installing railing: Please consult local zoning laws in regards to load requirements and bottom space requirements for rails. All supporting structures must be in
Bluebeam Digital Certification Manual
 Manual Certificación Digital en Bluebeam Revu Bluebeam Digital Certification Manual Desarrollado por: DTE, LLC support@dtellcpr.com Developed by: DTE, LLC Revisado en: 20 de julio de 2016. Ver. 1.101.0720
ENKVM-USBB. 2-Port USB KVM switch with Easy Switch and Cable. User Guide
 ENKVM-USBB 2-Port USB KVM switch with Easy Switch and Cable User Guide i Package Contents 1 ENKVM-USBB 2-Port USB KVM Switch with Easy Switch and Cable 1 User Guide Requirements Console A VGA, SVGA, XGA,
Delivery & Installation Pointer
 DP-035 August 2009 R8178785 Delivery & Installation Pointer ISSUE: August 2009 Whirlpool 27 French Door with IDI Models: GI7FVCXWA, GI7FVCXWB, GI7FVCXWQ, GI7FVCXWY Supplemental Information Accessing Door
RX MULTI MANUAL RX MULTI 433 A 868 MHz
 1. Esquema RX Multi RX MULTI MANUAL RX MULTI 433 A 868 2. Selector de marca Con el selector de 8 DIPs, el usuario puede realizar diferentes combinaciones para las diferentes marcas de mandos. La selección
Meijer.com A
 English MOBILE LAPTOP CART STORAGE ASSEMBLY INSTRUCTION MODEL RTA - B00 IMPORTANT: Surfaces must be cleaned with a solution of a smooth soap and water, then cleared with a dry towel. Do not use solvents
Cambridge Pre-Packaged / Pre-Cut MaytRx Wall Patio and Pub Bistro Table
 Cambridge Pre-Cortado Kit de Mesa para uso Afuerra de MaytRx Pared Layer Reference Guide: Guía de Referencia: Layer 9 Layer 8 Layer 7 Layer 6 Layer 5 Finished Grade (7 1/4 Above Top of Foundation) Grado
USER GUIDE Weather Station Clock Functions: Display time Calendar (date, week, year year display: 2003 to 2052) Alarm & Snooze Temperature
 Alarm & Snooze Temperature") USER GUIDE Weather Station Clock Functions: Display time Calendar (date, week, year year display: 2003 to 2052) Alarm & Snooze Temperature (Fahrenheit/Centigrade: 0 to 50 or 32 to 122 Humidity: 20% to
USER GUIDE Weather Station Clock Functions: Display time Calendar (date, week, year year display: 2003 to 2052) Alarm & Snooze Temperature (Fahrenheit/Centigrade: 0 to 50 or 32 to 122 Humidity: 20% to
Package Contents. Hardware Package. Tools Needed
 Reverso en español HWGWTR-1 REAR REGISTER KIT INSTALLATION INSTRUCTIONS INSTRUCTIONS MUST BE LEFT WITH THE OWNER FOR FUTURE REFERENCE AFTER INSTALLATION. Package Contents REGISTER BOOT REGISTER WITH DAMPER
ADULT ASSEMBLY REQUIRED
 HORIZONTAL BOOKCASE White Espresso Gray ADULT ASSEMBLY REQUIRED This product requires assembly by an adult because of small parts. Care should be taken in unpacking and assembling this item to keep small
FLEXO LUPO INSTRUCCIONES INSTRUCTIONS
 FLEXO LUPO INSTRUCCIONES INSTRUCTIONS 1 ATENCIÓN! Desconectar la conexión a red antes de ser manipulada y realizar el cambio de producto sólo cuando se haya enfriado la fuente existente. WARNING! Disconnect
BASE & WALL EASY REACH CABINET 170º Hinge Replacement
 These instructions should only be printed using Adobe Acrobat and should not be faxed or reproduced on a digital copier. American Woodmark Corporation provides these instructions on an AS IS basis and
BUILT-IN TRIM KIT INSTALLATION INSTRUCTION
 BUILT-IN TRIM KIT INSTALLATION INSTRUCTION FOR KENMORE TRIM-KIT MODEL - 30 : 63002, 63004, 63009, 64003 27 : 63012, 63014, 63019, 63013 FOR USE WITH KENMORE MICROWAVE OVEN MODEL: 721.62462200, 721.62463200,
BAT KT7 (USA) BAT KT8 (International) Charger for PockeTalker 2.0
 BAT KT8 (International) Charger for PockeTalker 2.0") BAT KT7 (USA) BAT KT8 (International) Charger for PockeTalker 2.0 QUICK SETUP guide BAT KT7 (Power Supply & Cable) BAT KT8 (BAT KT7 + 3 Adapters) MAN 200B BAT KT7, BAT KT8 Charger for Pocketalker 2.0 Power
BAT KT7 (USA) BAT KT8 (International) Charger for PockeTalker 2.0 QUICK SETUP guide BAT KT7 (Power Supply & Cable) BAT KT8 (BAT KT7 + 3 Adapters) MAN 200B BAT KT7, BAT KT8 Charger for Pocketalker 2.0 Power
LAPTOP DESK WITH 3 BINS MESA PARA COMPUTADORA PERSONAL CON 3 CONTENEDORES
 MODEL: 11222775R / MODELO: 11222775R LAPTOP DESK WITH 3 BINS MESA PARA COMPUTADORA PERSONAL CON 3 CONTENEDORES NO A B C D E F G H 1 2 3 4 5 6 7 8 9 PARTS AND HARDWARE LISTA DE PARTES Y HARDWARE TOP PANEL
4 DRAWER ORGANIZER ORGANIZADOR DE 4 CAJONES
 MODEL: 11210913 / MODELO: 11210913 DRAWER ORGANIZER ORGANIZADOR DE CAJONES NO N o 1 2 3 NO N o A B C D E PARTS LIST AND HARDWARE LISTA DE ACCESORIOS Y PARTES HARDWARE LIST / LISTA DE ACCESORIOS SCREW /
AIR CONDITIONER OWNER S MANUAL. Please read this manual carefully before operating your set and retain it for future reference.
 OWNER S MANUAL AIR CONDITIONER Please read this manual carefully before operating your set and retain it for future reference. TYPE:WINDOW MODELS:LW1211ER P/NO:MFL67020201 www.lgappliances.com UNIT
STOP WARNING. Contempo Futon - Charcoal-HN. Weight Limit: 300Lbs \ 136 Kgs. or access our website. Date of Purchase / /
 0 9986 355 6 35596 Contempo Futon - Charcoal-HN Weight Limit: 300Lbs \ 36 Kgs STOP O NOT RETURN PROUCT TO THE STORE Individual stores do not stock parts. If a part is missing or damaged, call our toll-free
A I RTRONIC. Manual de usuario User Manual.
 A I RTRONIC Manual de usuario User Manual AIRTRONIC Partes que incluye Parts inlcuded 1 Goldeneye Airtonic Unit 1 Power supply Input: 100-240 V ~ 50-60 Hz Output: 12 VDC, max. 1000 ma 12 W max. 1 Dermograph
Kia Sedona 2015-up B
 Installation instructions for part 95-7365B KIT FEATURES Double DIN radio provision Painted matte black Kia Sedona 2015-up 95-7365B Table of Contents Dash Disassembly. Kia Sedona 2015-up... 2 Kit Assembly.
Tiding with a double nut all together.
 Instrucciones para el material de práctica y uso del Reloj y La Hora para utilizarse en centros. 1. Imprima todo el material siguiente en cartonite tamaño 8.5 x 11 y corte las tarjetas en las líneas continuas
PART QTY HARDWARE PART QTY HARDWARE
 JUSTBL B Page 1 of 3 xamine all packaging material for small parts that may have come loose during shipment. Periodic checks are recommended to insure that all components are in proper position, tight
BZ User Manual Manual del Usuario
 BZ-4060 User Manual Manual del Usuario BZ-4060 RECHARGEABLE SPEAKER User s Guide Thank you for purchasing BZ-4060 Panacom s Rechargeable Speaker. Please read the manual carefully before operating. PACKING
RX MULTI. MANUAL RX MULTI 433 A 868 MHz
 1. Esquema RX Multi RX MULTI MANUAL RX MULTI 433 A 868 2. Selector de marca Con el selector de 8 DIPs, el usuario puede realizar diferentes combinaciones para las diferentes marcas de mandos. La selección
GUÍA RÁPIDA QUICK GUIDE
 GUÍA RÁPIDA QUICK GUIDE GUÍA RÁPIDA - VINCULACIÓN Medidor de potencia VINCULACIÓN AUTOMÁTICA ES Asegúrese de que está al menos 10 metros alejado de cualquier otro sensor ANT+TM y siga los siguientes pasos.
USER MANUAL Manual de Usuario
 USER MANUAL Manual de Usuario MV 100 Wireless Microphone INTRODUCTION EN We really appreciate that you purchase the product of this model. Before using the machine, please read this user manual carefully
1. Encendido / apagado 6. Auriculares 11. LED de Carga 2. Volumen + 7. Micro SD 12. MIC 3. Volumen - 8. Micro USB 13. Sensor de luz 4.
 25.65 32GB 2GB 2 3 1. Encendido / apagado 6. Auriculares 11. LED de Carga 2. Volumen + 7. Micro SD 12. MIC 3. Volumen - 8. Micro USB 13. Sensor de luz 4. Tecla windows 9. Corriente continua 14. Cámara
MANUAL DE INSTRUCCIONES INSTRUCTION MANUAL
 MANUAL DE INSTRUCCIONES INSTRUCTION MANUAL CPS-RG3-2G11 ES Sustitución de Tubos Fluorescentes 2G11 por Tubos LED 2G11 EN Replacing 2G11 Fluorescent Tubes With 2G11 LED Tubes 1 ES - En las instalaciones
SUSTITUCIÓN DE TUBOS FLUORESCENTES POR TUBOS DE LEDs CHANGING FLUORESCENT TO LED TUBES
 SUSTITUCIÓN DE TUBOS FLUORESCENTES POR TUBOS DE LEDs CHANGING FLUORESCENT TO LED TUBES 1 ES En las instalaciones convencionales de tubos fluorescentes se precisaban tanto cebadores, principalmente utilizados
BT-861 RADIO AM/FM MANUAL DE INSTRUCCIONES
 BT-861 RADIO AM/FM MANUAL DE INSTRUCCIONES USO DE LA RADIO INSTALACIÓN DE LA BATERÍA Abra la tapa de las pilas e inserte 2 x AAA / UM4 baterías de acuerdo con el diagrama de polaridad impresas en el compartimiento
This is a foldable that you can use with your k-2 grades. Just choose the parts that you need, choose English or Spanish.
 This is a foldable that you can use with your k-2 grades. Just choose the parts that you need, choose English or Spanish. The first page can be used for two students. It has 16 objects to recycle. The
Kia Forte 2014-up B Dash Disassembly Kia Forte 2014-up... 2 Kit Assembly Double DIN radio provision... 3.
 INSTALLATION INSTRUCTIONS FOR PART 95-7356B KIT FEATURES Double DIN radio provision Painted matte black APPLICATIONS Kia Forte 2014-up Table of Contents 95-7356B Dash Disassembly Kia Forte 2014-up... 2
Do Now Question 1: Pregunta 1
 Do Now Question 1: What do you predict Scratch Cat will do according to this block of code? Write your response in your journal. Pregunta 1: Qué predices el gato hará de acuerdo con este bloque de código?
MT442 MT642 U S E R S M A N U A L
 T I L T S L I M M O U N T Display Size: 24-55 Maximum load: 70 lbs / 32 kg VESA Patterns: 75 x 75 to 400 x 400 Display Size: 30-65 Maximum load: 75 lbs / 34 kg VESA Patterns: 75 x 75 to 600 x 400 MT442
Microsoft Office Word
 Designed by:mary Luz Roa M. Microsoft Office Word Cinta Diseño de Página Márgenes Orientación Tamaño de página Cinta Insertar Imágenes Tablas Formas Agustiniano Salitre School 2017 Autor: Valor Creativo
T R A N S TECHNICAL SPECIFICATIONS:
 A R P O L T R A N S TECHNICAL SPECIFICATIONS: 1, or - look casing Specially designed rubber gasket (various models) Steps of up tc 8 mm between outside diameters Working pressures up to bar F l e x i b
Instructions For Use. STEP 1 Locate the area on your horse that you wish to patch.
 AcuLife Instructions Instrucciones Instructions For Use You don t need to be a veterinarian or a pain expert to use AcuLife. Simply follow these instructions for patching your horse and be sure to monitor
INSTRUCCIONES DE ENSAMBLAJE.
 English MULTI-FUNCTIONAL COMPUTER TABLE ASSEMBLY INSTRUCTION MODEL RTA - S06 IMPORTANT: Surfaces must be cleaned with a solution of a smooth soap and water, then cleared with a dry towel. Do not use solvents
Cambridge Pre-Packeged / Pre-Cut Olde English Wall Patio Pub & Bistro Table Kit
 Cambridge Pre-Packeged / Pre-Cut Olde English Wall Patio Pub & Bistro Table Kit Cambridge Pre-Cortado Kit de Mesa para uso Afuerra de Olde Inglés Pared Layer Reference Guide: Guía de Referencia: Layer
Level 1 Spanish, 2012
 90908 909080 1SUPERVISOR S Level 1 Spanish, 2012 90908 Demonstrate understanding of a variety of spoken Spanish texts on areas of most immediate relevance 9.30 am Tuesday 4 December 2012 Credits: Five
Creating New Parent Accounts on SDUHSD Information Portal
 Creating New Parent Accounts on SDUHSD Information Portal Open your internet browser. Type in the URL address my.sduhsd.net Click on CREATE NEW ACCOUNT located on the bottom. In order to create an account,
Kia Forte 2014-up B
 INSTALLATION INSTRUCTIONS FOR PART 99-7356B U.S. PATENT # D725,095 KIT FEATURES ISO DIN radio provision with pocket Painted matte black APPLICATIONS Kia Forte 2014-up 99-7356B Table of Contents Dash Disassembly.
Los números. 0 cero 1 uno / un 2 dos 3 tres 4 cuatro. 6 seis 7 siete 8 ocho 9 nueve 10 diez 5 cinco
 53 31 16 0 cero 1 uno / un 2 dos 3 tres 4 cuatro 6 seis 7 siete 8 ocho 9 nueve 10 diez 5 cinco 11 - once 12 - doce 13 - trece 14 - catorce 17 - diecisiete 18 - dieciocho 19 - diecinueve 20 - veinte 15
LAB 2: Circuitos de Corriente Directa (DC) PARTE I OBJECTIVES
 PARTE I OBJECTIVES") LAB : Circuitos de Corriente Directa (DC) PARTE I OBJECTIVES To learn to design and construct simple circuits using batteries, bulbs, wires and switches. To draw circuit diagrams using symbols To understand
LAB : Circuitos de Corriente Directa (DC) PARTE I OBJECTIVES To learn to design and construct simple circuits using batteries, bulbs, wires and switches. To draw circuit diagrams using symbols To understand
MANUAL DE INSTRUCCIONES / USER'S GUIDE VD31
 MANUAL DE INSTRUCCIONES / USER'S GUIDE VD31 ESP AJUSTE DE LA POSICIÓN DE LA HORA DUAL - Después de configurar o de cambiar la batería, antes de configurar la hora, verifique si la aguja de hora dual está
OWNER'S MANUAL MANUAL DEL PROPIETARIO
 Read all instructions BEFORE assembly and USE of product. KEEP INSTRUCTIONS FOR FUTURE USE. Lea todas las instrucciones ANTES de armar y USAR el producto. GUARDE LAS INSTRUCCIONES PARA USO FUTURO. www.gracobaby.com
Bluebeam Change Digital Certification Appearance Manual. Manual Cambio de Apariencia en Bluebeam Revu
 Manual Cambio de Apariencia en Bluebeam Revu Bluebeam Change Digital Certification Appearance Manual Desarrollado por: DTE, LLC support@dtellcpr.com Developed by: DTE, LLC Revisado en: 21 de julio de 2016.
car seat adapter adaptador del asiento de automóvil CXBEX/MAXI COSI/NUNA babyjogger.com ASSEMBLY INSTRUCTIONS INSTRUCCIONES DEL ENSAMBLAJE PD349778A
 CXBEX/MAXI COSI/NUNA car seat adapter adaptador del asiento de automóvil PD349778A babyjogger.com ASSEMBLY INSTRUCTIONS INSTRUCCIONES DEL ENSAMBLAJE CITY PREMIER CITY SELECT CITY SELECT LUX 1 2 CLICK 3
Go to: Select Tickets Festival Passes. Ir a la página:
 For The BPM Festival, PayPal is the only option for EARLY BIRD FESTIVAL PASSES PayPal es la única opción de compra para brazaletes EARLY BIRD de The BPM Festival Go to: www.thebpmfestival.com/tickets Select
INSTA RAIL. Assembly Instruction
 INSTA RAIL Assembly Instruction Local building codes vary. Please consult with your local officials for specific requirements. Los códigos de construcción locales pueden variar. Por favor, consulte con
Ford/Lincoln/Mazda/Mercury
 INSTALLATION INSTRUCTIONS FOR PART 99-5600 APPLICATIONS Ford/Lincoln/Mazda/Mercury 1995-2011 99-5600 KIT FEATURES Shaft and DIN unit provision Equalizer provision Rear support provision KIT COMPONENTS
Manual para Cambio de Apariencia en Adobe Acrobat Pro. Change of Appearance in Adobe Acrobat Pro.
 Manual para Cambio de Apariencia en Adobe Acrobat Pro Change of Appearance in Adobe Acrobat Pro support@dtellcpr.com Desarrollado por: DTE, LLC Revisado en: 22 de Febrero de 2016 Versión: 01.2014 NOTA
Do Now! Question 1: Pregunta 1
 Do Now! Question 1: What do you predict Scratch Cat will do according to this block of code? Write your response in your journal. Pregunta 1 : Qué predices el gato hará de acuerdo con este bloque de código?
INSTALLATION INSTRUCTIONS FOR PART APPLICATIONS BMW 3 SERIES (Not for models with Factory Navigation)
") INSTALLATION INSTRUCTIONS FOR PART 98-9306 KIT FEATURES KIT COMPONENTS APPLICATIONS BMW 3 SERIES 2006-2010 (Not for models with Factory Navigation) 98-9306 (Used For Heated Seat Models When Using The 95-9306B)
INSTALLATION INSTRUCTIONS FOR PART 98-9306 KIT FEATURES KIT COMPONENTS APPLICATIONS BMW 3 SERIES 2006-2010 (Not for models with Factory Navigation) 98-9306 (Used For Heated Seat Models When Using The 95-9306B)
Hyundai Azera
 INSTALLATION INSTRUCTIONS FOR PART 95-7322 APPLICATIONS 95-7322 KIT FEATURES Double DIN radio provision Stacked ISO unit provision KIT COMPONENTS A) Double DIN trim plate B) Double DIN brackets A B WIRING
Remove left and right supports Retirar los soportes izquierdo y derecho Front / Frente each side cada lado Interior side view Vista del interior Remov
 Flipper door - Mechanism Puerta retráctil - Mecanismo SH Line ssembly Guide Guía de montaje Línea SH ll required hardware is included. Please check the contents with your packing slip. Read instructions
KM-9738 KARAOKE MIC WITH SPEAKER WIRELESS BT. KM-9738 User Manual KM-9738 Manual del Usuario MICRÓFONO INALÁMBRICO CON PARLANTE BT
 KM-9738 KARAOKE MIC WITH SPEAKER WIRELESS BT KM-9738 User Manual KM-9738 Manual del Usuario MICRÓFONO INALÁMBRICO CON PARLANTE BT KM-9738 - USER MANUAL Thanks for purchasing PANACOM KM-9738. Please read
3 PIECE BAR SET JUEGO DE BAR DE 3 PIEZAS
 MODEL: 11222152VW / MODELO: 11222152VW 3 PIECE BAR SET JUEGO DE BAR DE 3 PIEZAS NO A B C D E F G H I J K L M N O P1 P2 Q PARTS LIST AND HARDWARE LISTA DE PARTES Y ACCESORIOS HARDWARE LIST LISTA DE ACCESORIOS
Manual de Exportación de Certificados Digitales
 Manual de Exportación de Certificados Digitales Desarrollado por: DTE, LLC Revisado en: 25 de abril de 2016 Versión: 1.160425 support@dtellcpr.com Este manual es para aquellos que quieran llevar su Certificado
Fashion Bluetooth Headset
 Fashion Bluetooth Headset 22008 The headset consists of the following parts: 1.Indicator light 2.Answer/End button 3.Charger jack 4.Ear hook 5.Microphone 6.Receiver 7.Charging cable(for stereo series headsets)
WOODEN MAGAZINE TABLE MESA REVISTERO DE MADERA
 ODEL: 11224545V / ODELO: 11224545V WOODEN AGAZINE TABLE ESA REVISTERO DE ADERA NO A B C D E F G H I J L N PARTS AND HARDWARE LISTA DE PARTES Y HARDWARE HARDWARE LIST LISTA DE HARDWARE LEFT BAC SIDE PANEL
Hand out a dry cell, wire, and bulb to each team of students.
 ELETRIAL IRUITS OUTOME: Students learn the components of a simple electrical circuit. Simple materials combine to be used to complete what seems to be a simple task, to get the bulb to light. Students
INTRODUCING DECORATIVE INTERIOR SLIDING DOOR HARDWARE
 FAQ Do the kits include the door and header board? No, door and header board are purchased separately. What size header board is required? A 2 x 6 header board is recommended, however, a 1 x 6 header board
Ford multi-kit
 INSTALLATION INSTRUCTIONS FOR PART 95-5026 APPLICATIONS See application list inside Ford multi-kit 2001-2006 95-5026 KIT FEATURES Double DIN head unit provision Stacked ISO DIN head unit provision KIT
Flashcards Series 4 El Hotel
 Flashcards Series 4 El Hotel Flashcards are one of the quickest and easiest ways to test yourself on Spanish vocabulary, no matter where you are! Test yourself on just these flashcards at first. Then,
MODEL: N / MODELO: N GAZEBO / GAZEBO
 MODEL: 5046N / MODELO: 5046N GAZEBO / GAZEBO Precautions:. Check all parts and hardware listed on the part list.. It is recommended to have people for assembly.. Step stool is also recommended during the
Mazda MPV
 INSTALLATION INSTRUCTIONS FOR PART 95-7502 KIT FEATURES Double DIN head unit provision Painted Matte Black APPLICATIONS Mazda MPV 2000-2006 95-7502 Table of Contents Dash Disassembly. Mazda MPV 200-2006...
Salaried/Exempt Time Reporting
 Salaried/Exempt Time Reporting GOAL: Exempt Employees able to report: 1.Benefits Time 2.Positive Time Objetivo: Los empleados que NO reciben un sueldo por hora, pueden reportar lo siguiente: 1.Tiempo en
JOHN LOUIS HOME STANDARD CLOSET SYSTEM
 JOHN LOUIS HOME STANDARD CLOSET SYSTEM Parts List / Lista De Piezas / Liste Des Piéces IMPORTANT: DO NOT RETURN TO STORE! For missing parts, damaged parts, technical and assembly questions please call
3PCS 20 DERECHO. Right. Left
 PARTS LIST LISTA DE PARTES 1 2 3 4 CPU Left Panel CPU Right Panel Studs CPU Bottom Panel Panel Izquierdo del porta CPU Panel derecho del porta CPU Patas Panel Inferior del Porta CPU 5 6 7 8 CPU Back Panel
Kia Soul 2014-up (Models without Navigation only) B
 B") INSTALLATION INSTRUCTIONS FOR PART 95-7360B KIT FEATURES ISO DDIN radio provision Painted matte black to match factory finish APPLICATIONS Kia Soul 2014-up (Models without Navigation only) 95-7360B Table
INSTALLATION INSTRUCTIONS FOR PART 95-7360B KIT FEATURES ISO DDIN radio provision Painted matte black to match factory finish APPLICATIONS Kia Soul 2014-up (Models without Navigation only) 95-7360B Table
dash LED Light Luz LED dash INTEGRATED & SOTO RAILS RIELES INTEGRADOS Y SOTO
 dash LED Light Luz LED dash INTEGRATED & SOTO RAILS RIELES INTEGRADOS Y SOTO M HEX LLAVE HEX M b e a c d SIDE VIEW VISTA LATERAL FREESTANDING BASE BASE AUTÓNOMA ON OFF ON OFF If you have a problem, question,
ASSEMBLY INSTRUCTIONS
 ASSEMBLY INSTRUCTIONS 3-Shelf Corner Cabinet WHITE ESPRESSO ADULT ASSEMBLY REQUIRED This product requires assembly by an adult because of small parts. Care should be taken in unpacking and assembling this
IE12_ CONSOLIDACIÓN Y DESARROLLO DE NUEVAS TÉCNICAS DE EVALUACIÓN INTENSIVAS ON-LINE YA IMPLEMENTADAS POR EL GIE E4
 IE12_13-03001 - CONSOLIDACIÓN Y DESARROLLO DE NUEVAS TÉCNICAS DE EVALUACIÓN Departamento de Estructuras de la Edificación Escuela Técnica Superior de Arquitectura de Madrid Universidad Politécnica de Madrid
These instructions should only be printed using Adobe Acrobat and should not be faxed or reproduced on a digital copier.
 These instructions should only be printed using Adobe Acrobat and should not be faxed or reproduced on a digital copier. American Woodmark Corporation provides these instructions on an AS IS basis and