ISTRUZIONI PER L USO OPERATING INSTRUCTIONS GEBRAUCHSANWEISUNG MODE D EMPLOI INSTRUCCIONES DE USO GEBRUIKSAANWIJZING INSTRUCÇOES E MODO DE EMPREGO
|
|
|
- Juan Quintero Ávila
- hace 8 años
- Vistas:
Transcripción
1 ISTRUZIONI PER L USO OPERATING INSTRUCTIONS GEBRAUCHSANWEISUNG MODE D EMPLOI INSTRUCCIONES DE USO GEBRUIKSAANWIJZING INSTRUCÇOES E MODO DE EMPREGO SYNCRONY LOGIC

2 Congratulazioni! Ci congratuliamo con voi per l acquisto di questa macchina per caffè espresso, di qualità superiore, e vi ringraziamo per la fiducia accordataci. Prima di mettere in funzione la macchina, vi consigliamo di leggere attentamente le istruzioni per l uso che vi spiegano come utilizzarla, pulirla e mantenerla in perfetta efficienza. Se avete altre domande, rivolgetevi al rivenditore o direttamente alla nostra casa. Saremo lieti di darvi tutti i chiarimenti desiderati. Congratulations! Congratulations on choosing this top-quality espresso machine and many thanks you for you confidence in our products. Before operating the machine, we reccomend you read the following instructions thoroughly which explain how to use, clean and maintain the machine. For any other information, please contact the leader or our company directly. We will be glad to provide you with any explanations you may need. Félicitations! Nous vous felicitons de l achat de cette machine pour café express de qialité superieure et Vous remencions pour Votre préférence. Avant de mettre la machine en marche, nous Vous recommandons de lire attentivement ces instructions d emploi qui expliquent comment employer, nettoyer et conserver la machine en parfait état de functionnement. Si Vous avez des questions à poser, nous Vous prions de contacter le détaillant ou directement notre maison. Nous Vous donnerons avec plaisir toutes les informations nécessaires. Wir gratulieren Jhnen Kauf dieser Espressomaschine höchster Qualität und danken Ihnen für Ihr Vertrauen. Vor der Inbetribnahme der Maschine empfehlen wir, diese Bedienung sanleitung sorgfaltig durchzulesen, die Anweisungen über den Gebrauch, die Reinigung und die Pflege der Maschine gibt. Wenn Sie weitere Fragen haben, werden Sie sich bitte an den Handler oder direkt an uns. Wir werden Ihnen gerne alle notwendigen Erklärungen geben. Felicidades! Congratulándonos con Ud por haber comprado esta máquina para café expreso, de calidad superior, Le agradecemos la confianza depositada en nuestros productos. Antes de poner en marcha el aparado Le aconsejamos lea atentamente las intrucciones de empleo que explican como utilizarla, limpiarla y mantenerla correctamente. En caso tenga más cuestiones, acuda al revendedor o directamente a nuestra casa. Será un placer darle las informaciones deseadas. Parabéns! Obrigado por ter adquirido esta máquina de café expresso de qualidade superior e pela confiança demonstrada. Antes de utilizar a máquina é aconselhável ler atentamente o manual de instruções, no qual explicamos como utilizá-la, limpá-la e mantê-la em perfeitas condições. Caso existam outras dúvidas é aconselhável contatar o revendedor ou o fabricante diretamente. Estaremos à disposição para todos os esclarecimentos necessários. Gefeliciteerd! Wij feliciteren u met het feit dat u dit espresso-apparaat van topkwaliteit gekocht heeft en wij danken u voor het in ons gestelde vertrouwen. Voordat u het apparaat in gebruik neemt, adviseren wij u deze instructies aandachtig te lezen. In deze gebruiksaanwijzing wordt namelijk uitgelegd hoe u het apparaat het beste kunt gebruiken, schoonmaken en onderhouden zodat het apparaat lang meegaat.

3 3

4 4

5 5

6 6 PRECAUZIONI IMPORTANTI Durante l utilizzo di elettrodomestici, è consigliabile prendere alcune precauzioni per limitare il rischio di incendi, scosse elettriche e/o incidenti. 1 Leggere attentamente tutte le istruzioni ed informazioni riportate in questo manuale e in qualsiasi altro opuscolo contenuto nell imballo prima di avviare od utilizzare la macchina espresso. 2 Non toccare superfici calde. 3 Non immergere cavo, spine o il corpo della macchina in acqua o altro liquido per evitare incendi, scosse elettriche o incidenti. 4 Fare particolare attenzione durante l utilizzo della macchina espresso in presenza di bambini. 5 Togliere la spina dalla presa se la macchina non viene utilizzata o durante la pulizia. Farla raffreddare prima di inserire o rimuovere pezzi e prima di procedere alla sua pulizia. 6 Non utilizzare la macchina con cavo o spina danneggiati o in caso di guasti o rotture. Far controllare o riparare l apparecchio presso il centro di assistenza più vicino. 7 L utilizzo di accessori non consigliati dal produttore possono causare danni a cose e persone. 8 Non utilizzare la macchina espresso all aperto. 9 Evitare che il cavo penda dal tavolo o che tocchi superfici calde. 10 Tenere la macchina espresso lontano da fonti di calore. 11 Controllare che la macchina espresso sia in posizione Spento prima di inserire la spina nella presa. Per spegnerla, posizionarla su Spento e rimuovere quindi la spina dalla presa. 12 Utilizzare la macchina unicamente per uso domestico. 13 Fare estrema attenzione durante l utilizzo del vapore. CONSERVARE QUESTE ISTRUZIONI AVVERTENZA La macchina espresso è stata studiata unicamente per uso domestico. Qualsiasi intrvento di assistenza, fatta eccezione per le operazioni di pulizia e di normale manutenzione, dovrà essere prestato da un centro di assistenza autorizzato. Non immergere la macchina in acqua. Qualsiasi riparazione dovrà essere effettuata unicamente dal centro di assistenza autorizzato. 1 Controllare che il voltaggio indicato sulla targhetta corrisponda al vostro. 2 Non utilizzate mai acqua tiepida o calda per riempire il serbatoio dell acqua. Utilizzate unicamente acqua fredda. 3 Non toccate con le mani le parti calde della macchina ed il cavo di alimentazione durante il funzionamento. 4 Non pulire mai con detersivi corrosivi o utensili che graffiano, è sufficiente un panno morbido inumidito con acqua. 5 Per evitare la formazione di calcare, si può utilizzare acqua minerale naturale. A B C ISTRUZIONI SUL CAVO ELETTRICO Viene fornito un cavo elettrico abbastanza corto per evitare che si attorcigli o che vi inciampiate. Si possono utilizzare, con molta attenzione, delle prolunghe. Qualora venga utilizzata una prolunga, verificare: 1 che il voltaggio riportato sulla prolunga sia perlomeno, uguale al voltaggio elettrico dell elettrodomestico; 2 che sia munito di una spina a tre pin con messa a terra (qualora il cavo dell elettrodomestico sia di questo tipo); 3 che il cavo non penda dal tavolo per evitare di inciamparvi.

7 GENERALITÀ - DATI TECNICI 1 GENERALITÀ La macchina da caffè è indicata per la preparazione di caffè espresso impiegando sia caffè in grani sia caffè macinato ed è dotata di un dispositivo per l erogazione del vapore e dell acqua calda. Il corpo della macchina dall elegante design è stato progettato per uso domestico e non è indicato per un funzionamento continuo di tipo professionale. Attenzione. Non si assumono responsabilità per eventuali danni in caso di: impiego errato e non conforme agli scopi previsti; riparazioni non eseguite presso i centri d assistenza autorizzati; manomissione del cavo di alimentazione; manomissione di qualsiasi componente della macchina; impiego di pezzi di ricambio ed accessori non originali. In questi casi viene a decadere la garanzia. 1.1 Per facilitare la lettura Il triangolo d avvertimento indica tutte le istruzioni importanti per la sicurezza dell utente. Attenersi scrupolosamente a tali indicazioni per evitare ferimenti gravi! Il riferimento ad illustrazioni, parti della macchina ed organi di comando avviene mediante numeri e lettere, come da esempio, il riferimento all illustrazione 2 di questo paragrafo. Questo simbolo evidenzia le informazioni da tenere in maggiore considerazione, per un migliore utilizzo della macchina. Le illustrazioni corrispondenti al testo si trovano nel risvolto di copertina. Tenere questa pagina aperta durante la lettura delle istruzioni per l uso. 1.2 Impiego di queste istruzioni per l uso Conservare queste istruzioni per l uso in un luogo 7 sicuro ed allegarle alla macchina per caffè qualora un altra persona dovesse utilizzarla. Per ulteriori informazioni o nel caso di problemi, non trattati del tutto o soltanto insufficientemente nelle presenti istruzioni, rivolgetevi ai Centri di Assistenza Autorizzati. 2 DATI TECNICI Tensione nominale Vedi targhetta posta sull apparecchio Potenza nominale Vedi targhetta posta sull apparecchio Materiale corpo Termoplastico Dimensioni (l x a x p) (mm) 390 x 380 x 330 Peso (Kg) 8,7 Lunghezza cavo (mm) 1200 Pannello comandi Frontale Serbatoio acqua Estraibile Alimentazione Vedi targhetta posta sull apparecchio Serbatoio acqua (lt.) 1,7 Capacità contenitore caffè (gr) 350 di caffè in grani Pressione pompa (bar) Caldaia Alluminio Dispositivi di sicurezza Valvola di sicurezza pressione caldaia; termostato di sicurezza. Con riserva di modifiche di costruzione ed esecuzione dovute al progresso tecnologico. Macchina conforme alla Direttiva Europea 89/336/ CEE (Decreto legislativo 476 del 04/12/92), relativa all eliminazione dei disturbi radiotelevisivi.

8 8 NORME DI SICUREZZA misure in millimetri

9 NORME DI SICUREZZA 3 NORME DI SICUREZZA Mai mettere a contatto dell acqua le parti sotto corrente: pericolo di cortocircuito! Il vapore surriscaldato e l acqua calda possono provocare scottature! Mai dirigere il getto di vapore o dell acqua calda verso parti del corpo, toccare con precauzione il beccuccio vapore / acqua calda: pericolo di scottature! Destinazione d uso La macchina per caffè è prevista esclusivamente per l impiego domestico. È vietato apportare modifiche tecniche e ogni impiego illecito, a causa dei rischi che essi comportano! La macchina per caffè deve essere utilizzata solo da adulti in condizioni psico-fisiche non alterate. Alimentazione di corrente Allacciare la macchina per caffè soltanto ad una presa di corrente adeguata. La tensione deve corrispondere a quella indicata sulla targhetta dell apparecchio. Cavo d alimentazione Mai usare la macchina per caffè se il cavo d alimentazione è difettoso. Se il cavo d alimentazione è danneggiato, deve essere cambiato dal produttore o dal suo servizio assistenza clienti. Non far passare il cavo d alimentazione per angoli e su spigoli vivi, sopra oggetti molto caldi e proteggerlo dall olio. Non portare o tirare la macchina per caffè tenendola per il cavo. Non estrarre la spina tirandola per il cavo oppure toccarla con le mani bagnate. Evitare che il cavo d alimentazione cada liberamente da tavoli o scaffali. Protezione d altre persone Assicurarsi che nessun bambino abbia la possibilità di giocare con la macchina per caffè. I bambini non si rendono conto del pericolo connesso agli elettrodomestici. 9 Pericolo d ustioni Evitare di dirigere contro se stessi e/o altri il getto di vapore surriscaldato e/o d acqua calda: pericolo di scottature! Usare sempre le apposite maniglie o manopole. Ubicazione Sistemare la macchina per caffè in un posto sicuro, dove nessuno può rovesciarla o venirne ferito. Non usare la macchina per caffè all aperto. Non posare la macchina su superfici molto calde e nelle vicinanze di fiamme aperte per evitare che la carcassa fonda o comunque si danneggi. Pulizia Prima di pulire la macchina, è indispensabile posizionare l interruttore generale (7) su -0- e poi staccare la spina dalla presa di corrente. Inoltre, aspettare che la macchina si raffreddi. Mai immergere la macchina nell acqua! È severamente vietato cercare d intervenire all interno della macchina. Spazio per l uso e la manutenzione Per il corretto e buon funzionamento della macchina per caffè si consiglia quanto segue: Scegliere un piano d appoggio ben livellato; Scegliere un ambiente sufficientemente illuminato, igienico e con presa di corrente facilmente accessibile; Prevedere una distanza minima dalle pareti della macchina come indicato in figura. Custodia della macchina Quando la macchina rimane inutilizzata per un periodo prolungato, spegnere la macchina e staccare la spina dalla presa. Custodirla in luogo asciutto e non accessibile ai bambini. Proteggerla dalla polvere e dallo sporco. Riparazioni / Manutenzione Nel caso di guasti, difetti o sospetto di difetto dopo una caduta, staccare subito la spina dalla presa. Mai mettere in funzione una macchina difettosa. Soltanto i Centri di Assistenza Autorizzati possono effettuare interventi e riparazioni. Le riparazioni vanno eseguite unicamente da un

10 10 NORME DI SICUREZZA - INSTALLAZIONE centro di assistenza autorizzato. Nel caso di interventi non eseguiti a regola d arte, si declina ogni responsabilità per eventuali danni. Antincendio In caso di incendio utilizzare estintori ad anidride carbonica (CO 2 ). Non utilizzare acqua o estintori a polvere. Legenda componenti macchina Contenitore caffè in grani Coperchio contenitore caffè in grani Pomello regolazione macinatura Pomello regolazione dose Coperchio dosatore caffè macinato Piano appoggia-tazze Interruttore generale (ON/OFF) Coperchio serbatoio acqua Serbatoio acqua Cassetto raccoglifondi Cavo alimentazione Vasca raccogligocce + griglia Galleggiante livello vasca raccogligocce Erogatore caffè regolabile in altezza Tubo vapore/acqua calda Sportello anteriore Pomello erogazione vapore Gruppo erogatore caffè Chiave gruppo erogatore caffè Spazzolino per pulizia Misurino caffè macinato Pannello comandi Pomello regolazione quantità caffè in tazza Pulsante erogazione caffè Led pronto temperatura / funzione caffè Pulsante selezione caffè macinato Led selezione caffè macinato Pulsante selezione funzione vapore Led temperatura funzione vapore Led macchina accesa Led segnalazione allarmi 4 INSTALLAZIONE Per la propria sicurezza e quella di terzi attenersi scrupolosamente alle Norme di sicurezza riportate nel cap Imballaggio L imballo originale è stato progettato e realizzato per proteggere la macchina durante la spedizione. Si consiglia di conservarlo per un eventuale trasporto futuro. 4.2 Operazioni preliminari Prelevare dall imballo la vasca raccogligocce (12) con griglia. Prelevare dall imballo la macchina da caffè e posizionarla in un luogo idoneo rispondente ai requisiti richiesti e descritti nelle norme di sicurezza (cap.3). Inserire la vasca raccogligocce (12) nell apposita sede sulla macchina; assicurarsi che la vasca stessa, il cassetto fondi (10) ed il gruppo erogatore caffè (18) siano inseriti correttamente e che lo sportello anteriore (16) sia chiuso. Posizionare il coperchio contenitore caffè in grani (2) sul contenitore caffè in grani (1). Conservare a portata di mano lo spazzolino per la pulizia (20), la chiave gruppo erogatore caffè (19) ed il misurino per il caffè macinato (21). Prima di inserire la spina nella presa di corrente, assicurarsi che l interruttore generale (7) sia in posizione -0-. Se all accensione della macchina il led rosso (30) lampeggia, significa che una delle parti sopra descritte non è stata posizionata correttamente. Nota importante: É importante leggere quanto riportato nel Capitolo 14, ove viene spiegato in dettaglio il significato di tutte le segnalazioni che la macchina fornisce all utilizzatore, mediante le luci posizionate sul pannello comandi. 4.3 Prima accensione Estrarre il serbatoio acqua (9) sollevandolo e togliere il coperchio (8). Sciacquarlo e riempirlo con acqua fresca; si consiglia di non riempire il serbatoio in modo eccessivo. Reinserire il serbatoio nella sede apposita e riposizionare il coperchio (8) sopra ad esso.
 Coperchio serbatoio acqua Serbatoio acqua Cassetto raccoglifondi Cavo alimentazione Vasca raccogligocce + griglia Galleggiante livello vasca")
11 INSTALLAZIONE - MACINACAFFE' - REGOLAZIONE DOSE CAFFE' 11 Immettere nel serbatoio (9) sempre e soltanto acqua fresca non gassata. Acqua calda nonché altri liquidi possono danneggiare il serbatoio e/o la macchina. Non mettere in funzione la macchina senza acqua: accertarsi che ve ne sia a sufficienza all interno del serbatoio. Togliere il coperchio (2) ed immettere caffè in grani nel contenitore (1). Immettere nel contenitore (1) sempre e soltanto caffè in grani. Caffè macinato, liofilizzato, nonché altri oggetti danneggiano la macchina. Riposizionare il coperchio (2) nel contenitore caffè (1). Inserire la spina (11) in una presa adeguata. La macchina si presenta con l interruttore generale (7) in posizione -0-; per accenderla è sufficiente premere il pulsante (7); si illumina il led (29) del pannello comandi. Per caricare il circuito, dirigere il tubo vapore (15) sulla vasca raccogligocce; ruotare il pomello (17) in senso antiorario ed attendere fino a quando fuoriesce acqua in modo regolare dal tubo vapore; per interrompere l erogazione di acqua, ruotare il pomello (17) in senso orario. Nota: Prima di procedere alla prima messa in funzione, in caso di prolungata inattività o se il serbatoio acqua è stato vuotato completamente, è consigliabile caricare il circuito. Terminate le operazioni di cui sopra, la macchina è predisposta per l uso. Per erogare caffè, acqua calda o vapore, ed utilizzare correttamente la macchina, seguire attentamente le istruzioni che seguono. 5 MACINACAFFÈ Attenzione! La manopola di regolazione della macinatura, posta all interno del contenitore caffè, deve essere ruotata solo quando il macinacaffè è in funzione. Non inserire caffè macinato e/o liofilizzato nel contenitore caffè in grani. È vietato introdurre qualsiasi materiale che non sia caffè in grani. Il macinacaffè contiene organi in movimento che possono essere pericolosi; vietato introdurre le dita e/o altri oggetti. Prima di intervenire, per qualsiasi motivo, all interno del contenitore caffè, disinserire l interruttore generale e staccare la spina dalla presa di corrente. Non immettere caffè in grani quando il macinacaffè è in funzione. La qualità ed il gusto del caffè dipendono, oltre che dalla miscela utilizzata anche dal grado di macinatura. La macchina è dotata di un pomello (3) per la regolazione del grado di macinatura. Per variare il grado di macinatura ruotare il pomello graduato quando il macinacaffè è in funzione; le cifre riportate sulla manopola indicano il grado di macinatura. Ogni apparecchio è regolato, in fabbrica, su un grado di macinatura medio: se la macinatura risulta essere troppo fine è necessario ruotare la manopola verso valori più alti; se la macinatura risulta essere troppo grossa è necessario ruotare la manopola verso valori più bassi. La variazione del grado di macinatura si noterà soltanto dopo l erogazione di tre/quattro caffè. Usare miscele di caffè in grani per macchine espresso. Evitare di utilizzare gradi di macinatura in posizioni estreme (Es.1 16); in questi casi utilizzare miscele di caffè differenti. Conservare il caffè al fresco, in un contenitore chiuso ermeticamente. La macinatura deve essere regolata nel caso in cui il caffè venga erogato in modo non ottimale: Erogazione troppo veloce = macinatura troppo grossa > Regolare la manopola su numeri più bassi; Erogazione a gocce e/o assente = macinatura troppo fine > Regolare la manopola su numeri più alti. 6 REGOLAZIONE DOSE CAFFÈ Nella macchina è possibile regolare la quantità del caffè (dose) che si desidera macinare. La dose viene impostata, dal costruttore, su un valore medio che soddisfa la maggior parte delle esigenze; tacca (A) in corrispondenza del riferimento (B). Ruotando il pomello (4), situato all interno del
 nel contenitore caffè (1). Inserire la spina (11) in una presa adeguata.")
12 12 EROGAZIONE CAFFE' contenitore caffè, in senso antiorario si aumenta la dose di caffè macinato; ruotando il pomello in senso orario si diminuisce la dose di caffè macinato. La regolazione della dose deve essere effettuata prima di premere il pulsante di erogazione caffè. Questo sistema permette di ottenere un erogazione ottimale con tutti i tipi di caffè presenti in commercio. 7 EROGAZIONE CAFFÉ Nota: Nel caso in cui la macchina non eroghi caffè, verificare che il serbatoio acqua contenga acqua; nel lato sinistro della macchina si può verificare il livello dell acqua nel serbatoio. Prima di erogare caffè verificare che il led verde di pronto temperatura (24) sia acceso fisso, che il serbatoio acqua e che il serbatoio caffè siano pieni. Posizionare 1 o 2 tazze sotto ai beccucci dell erogatore (14); potete regolare l altezza dell erogatore in modo che si adatti alle vostre tazzine. L erogatore può essere spostato per consentire l utilizzo di tazze grandi. Per utilizzare tazze di grandi dimensioni occorre spingere manualmente l erogatore verso la macchina fino a battuta (in questo caso utilizzare solo una tazza alla volta); per sistemare l erogatore nella posizione ideale all utilizzo delle tazzine, occorre tirare l erogatore nella posizione più esterna assicurandosi che sia bloccato. Regolare la quantità di caffè che si desidera nella tazzina mediante il pomello (22): ruotandolo in senso orario si aumenta la quantità di caffè che viene erogato; ruotandolo in senso antiorario si diminuisce la quantità di caffè che viene erogato. Nota: quando il galleggiante livello (13) si solleva è consigliato vuotare la vasca recupero acqua. 7.1 Erogazione con caffè in grani Per erogare il caffè occorre premere il pulsante (23), successivamente si avvia il ciclo di erogazione: per erogare 1 caffè premere una sola volta il pulsante (23); per erogare 2 caffè premere 2 volte di seguito il pulsante (23). In questa modalità di funzionamento, la macchina provvede automaticamente a macinare e dosare la giusta quantità di caffè; la preparazione di due caffè richiedere due cicli di macinatura e due cicli di erogazione gestiti automaticamente dalla macchina. Dopo aver compiuto il ciclo di preinfusione, il caffè comincerà a fuoriuscire dal beccuccio erogatore (14). L erogazione del caffè si fermerà automaticamente quando viene raggiunto il livello impostato con il pomello (22); è comunque possibile interrompere l erogazione del caffè premendo il pulsante (23). 7.2 Erogazione con caffè macinato Inserire nel dosatore (5) solo caffè macinato per macchine espresso; caffè in grani, liofilizzato, ed altri materiali danneggiano la macchina. È vietato inserire le dita all interno del dosatore caffè macinato, vi sono degli organi in movimento. Per prelevare la giusta quantità, di caffè macinato, da inserire nel dosatore, utilizzare solo il misurino (21) in dotazione alla macchina Inserire un solo misurino, di caffè macinato, alla volta; per ottenere due caffè è obbligatorio effettuare due cicli separati in successione l uno all altro. Premere il pulsante (25) per selezionare la funzione; il led (26) si accende. Sollevare il coperchio dosatore caffè macinato (5). Prelevare, con il misurino (21), una dose di caffè; togliere la quantità eccessiva di caffè macinato presente nel misurino. Vuotare il caffè macinato all interno del dosatore. Chiudere il coperchio (5). Per erogare il caffè occorre premere il pulsante (23), successivamente si avvia il ciclo di erogazione.

13 EROGAZIONE ACQUA CALDA - EROGAZIONE VAPORE 13 Dopo aver compiuto il ciclo di preinfusione, il caffè comincerà a fuoriuscire dal beccuccio erogatore (14). L erogazione del caffè si fermerà automaticamente quando viene raggiunto il livello impostato con il pomello (22); è comunque possibile interrompere l erogazione del caffè premendo il pulsante (23). Successivamente la macchina si riporta automaticamente nel modo di funzionamento normale (vedi par. 7.1). 8 EROGAZIONE ACQUA CALDA Attenzione: all inizio possono verificarsi brevi spruzzi di acqua calda: pericolo di scottature. Il tubo di erogazione dell acqua calda può raggiungere temperature elevate: evitare di toccarlo direttamente con le mani. Prima d'erogare acqua calda verificare che la luce verde di pronto temperatura (24) sia accesa. Con la macchina pronta per l erogazione del caffè, procedere nel seguente modo: Mettere una tazza e/o un recipiente sotto al tubo acqua calda/vapore (15). Aprire in senso antiorario il pomello (17). Prelevare la quantità desiderata di acqua calda; per fermare l erogazione dell acqua calda ruotare in senso orario il pomello (17). La macchina si riporta nel funzionamento normale. 9 EROGAZIONE VAPORE/PREPA- RAZIONE DEL CAPPUCCINO Il vapore può essere utilizzato per montare il latte per il cappuccino ma anche per il riscaldamento delle bevande. Pericolo di scottature! All inizio dell erogazione possono verificarsi brevi spruzzi di acqua calda. Il tubo di erogazione può raggiungere temperature elevate: evitare di toccarlo direttamente con le mani. Con la macchina pronta per erogare caffè, premere il pulsante (27). La macchina necessita di un tempo di preriscaldamento. Prima di erogare vapore attendere che la luce verde di pronto temperatura (28) si sia accesa. Dirigere il tubo vapore (15) sopra la vasca raccogligocce, aprire il pomello (17) Acqua calda/ vapore per qualche istante, in modo da far uscire l acqua residua dal tubo vapore; in breve tempo comincerà ad uscire solo vapore. Chiudere il pomello (17). Riempire con latte freddo 1/3 del contenitore che si desidera utilizzare per preparare il cappuccino. Per garantire un miglior risultato nella preparazione del cappuccino, il latte e la tazza utilizzata debbono essere freddi. Immergere il tubo vapore nel latte da riscaldare ed aprire il pomello (17); far ruotare il recipiente con lenti movimenti dal basso verso l alto per rendere uniforme la formazione di schiuma. Dopo aver utilizzato il vapore per il tempo desiderato chiudere il pomello (17). Lo stesso sistema può essere utilizzato per il riscaldamento di altre bevande. Pulire, dopo questa operazione il tubo vapore con un panno umido. 9.1 Passaggio da vapore a caffè Per poter erogare caffè è necessario premere il pulsante (27). Nel passaggio da erogazione vapore a erogazione caffè, i led (24) e (28) lampeggiano contemporaneamente indicando che la macchina è in sovratemperatura e non può erogare caffè. Per potere erogare caffè, è necessario scaricare dell acqua ruotando il pomello Vapore (17) fino a quando non rimane accesa in modo fisso solo il led di pronto temperatura (24). 10 PULIZIA E MANUTENZIONE Pulizia generica La manutenzione e la pulizia possono essere effettuate soltanto quando la macchina è fredda e scollegata dalla rete elettrica. Non immergere la macchina nell acqua e non inserire i componenti nella lavastoviglie.

14 14 PULIZIA E MANUTENZIONE - DECALCIFICAZIONE Non utilizzare oggetti acuminati o prodotti chimici aggressivi (solventi) per la pulizia. Si consiglia di pulire quotidianamente il serbatoio dell acqua: - Estrarre il filtro (C) posto all interno del serbatoio e pulirlo con acqua corrente potabile. - Riposizionare il filtro (C) nel suo alloggiamento esercitando una leggera pressione combinata ad una leggera rotazione. - Riempire il serbatoio con acqua fresca potabile. Pulire quotidianamente, se utilizzato, il dosatore caffè macinato: - Prendere il pennello in dotazione e pulire il dosatore. Per la pulizia dell apparecchio utilizzare un panno morbido inumidito con acqua. Non asciugare la macchina e/o i suoi componenti utilizzando un forno a microonde e/o un forno convenzionale. Pulire il vano di servizio ed il gruppo erogatore, raccomandiamo di vuotare ogni giorno il cassetto raccoglifondi (10). L erogatore caffè (14) può essere tolto per la pulizia; risciacquare accuratamente i canali di erogazione con acqua calda Gruppo erogatore Il gruppo erogatore (18) deve essere pulito ogni volta che si riempie il contenitore di caffè in polvere o, in ogni caso, almeno una volta alla settimana. Spegnere la macchina premendo l interruttore (7) in posizione -0- ed estrarre la spina dalla presa di corrente. Togliere quindi il cassetto raccoglifondi (10) e la vasca raccogli-gocce (12), successivamente aprire lo sportello di servizio (16). Estrarre il gruppo erogatore (18) tenendolo per l apposita maniglia e premendo sul tasto «PRESS». Il gruppo erogatore può essere lavato solo con acqua calda senza detergente. Assicurarsi che i due filtri in acciaio siano liberi da ogni residuo di caffè. Il filtro superiore si può togliere svitando, in senso antiorario, il perno di plastica con l apposita chiave in dotazione (19). Lavare ed asciugare accuratamente tutte le parti del gruppo erogatore. Rimontare il filtro e riavvitare con cura il perno in plastica servendosi dell apposita chiave. Pulire accuratamente il vano. Tenendolo per l apposita maniglia, introdurre di nuovo il gruppo erogatore nell apposito vano fino ad ottenerne l aggancio. Chiudere quindi lo sportello, inserire il cassetto raccoglifondi e la vasca raccogligocce. 11 DECALCIFICAZIONE La formazione del calcare avviene con l uso dell apparecchio; la decalcificazione è necessaria ogni 3-4 mesi o quando si osserva una riduzione della portata dell acqua. Qualora si voglia eseguirla personalmente, si può utilizzare un prodotto decalcificante per macchine da caffè di tipo non tossico e/o nocivo, comunemente reperibile in commercio. Attenzione! Non utilizzare in nessun caso l aceto come decalcificante. Miscelare il decalcificante con acqua come specificato sulla confezione del prodotto decalcificante e riempire il serbatoio dell acqua. Accendere la macchina con l interruttore generale (7). Dirigere il tubo vapore (15) sulla vasca raccogli gocce. Prelevare ad intervalli (una tazza per volta) l intero contenuto del serbatoio dell acqua ruotando il pomello vapore (17) in senso antiorario; per fermare l erogazione ruotare il pomello (17) in senso orario. Durante i singoli intervalli si deve lasciare agire per circa minuti, scollegando la macchina con l interruttore generale (7) su -0-. Terminata la soluzione decalcificante, sciacquare il serbatoio dell acqua e riempirlo con acqua fresca. Accendere la macchina con l interruttore generale. Vuotare 2/3 del contenuto del serbatoio dell acqua ruotando il pomello vapore (17) in senso antiorario; per fermare l erogazione ruotare il pomello (17) in senso orario.

15 INFORMAZIONI CARATTERE GIURIDICO - SMALTIMENTO 15 Lasciare riscaldare la macchina e vuotare il rimanente contenuto del serbatoio dell acqua ruotando il pomello vapore (17) in senso antiorario; per fermare l erogazione ruotare il pomello (17) in senso orario. Qualora si utilizzi un prodotto diverso da quello consigliato si raccomanda di rispettare comunque le istruzioni della casa produttrice riportate sulla confezione del prodotto decalcificante. 13 SMALTIMENTO Rendere inutilizzabile gli apparecchi non più in uso. Staccare la spina dalla presa e tagliare il cavo elettrico. Consegnare gli apparecchi fuori uso a un centro di raccolta idoneo. 12 INFORMAZIONI DI CARATTERE GIURIDICO Le presenti istruzioni per l uso contengono le informazioni necessarie per l impiego corretto, per le funzioni operative e la manutenzione accurata dell apparecchio. Queste conoscenze e l osservanza delle presenti istruzioni, rappresentano la premessa per un uso senza pericolo nel pieno rispetto della sicurezza in caso di funzionamento e manutenzione dell apparecchio. Se si desiderano ulteriori informazioni, o se dovessero subentrare particolari problemi che si ritiene nelle presenti istruzioni d uso non siano stati spiegati con sufficiente chiarezza, preghiamo di rivolgersi al rivenditore o direttamente alla ditta costruttrice. Inoltre facciamo notare che il contenuto di queste istruzioni d uso non è parte di una convenzione precedente o già esistente, di un accordo o di un contratto legale e che non ne cambiano la sostanza. Tutti gli obblighi del costruttore si basano sul relativo contratto di compravendita che contiene anche il regolamento completo ed esclusivo riguardo alle prestazioni di garanzia. Le norme di garanzia contrattuali non vengono né limitate né estese in base alle presenti spiegazioni. Le istruzioni per l uso contengono informazioni protette dal diritto d autore. Non è permesso fotocopiarle o tradurle in un altra lingua senza previo accordo scritto da parte del Costruttore.

16 16 SPIE PANNELLO COMANDI 14 SPIE PANNELLO COMANDI Segnalazioni Cause Rimedi Luce verde (29) Luce verde (24) fissa Luce verde (24) lampeggiante Luce verde (26) fissa Luce verde (28) fissa Luce verde (28) lampeggiante Luce verde (24) lampeggiante Luce verde (28) lampeggiante contemporaneamente Luce rossa (30) fissa Luce rossa (30) lampeggiante Macchina accesa Macchina in temperatura pronta: - per l erogazione del caffè; - per l erogazione dell acqua calda. Macchina in fase di riscaldamento per l erogazione caffè ed acqua calda Macchina in erogazione con caffè macinato Macchina in temperatura pronta per l erogazione del vapore Macchina in fase di riscaldamento per l erogazione vapore Macchina in sovratemperatura; in questa modalità la macchina non può erogare caffè. Quantità d acqua insufficiente nel serbatoio. Serbatoio caffè vuoto. Gruppo erogatore, cassetto fondi, vasca raccogli gocce, sportello anteriore non in posizione corretta per il funzionamento della macchina. È necessario scaricare dell acqua nella vasca raccogligocce ruotando il pomello Vapore (17) fino a quando la luce verde di pronto temperatura (24) non rimane accesa in modo fisso e si spegne la luce verde (28). Riempire il serbatoio con acqua fresca potabile, caricare il circuito e d i n i z i a r e n u o v a m e n t e l a procedura. Riempire il serbatoio con caffè in grani ed iniziare nuovamente la procedura. Per spegnere la luce rossa fissa, verificare che tutti i componenti siano inseriti o chiusi in modo corretto.

17 PROBLEMI - CAUSE - RIMEDI 17 Problemi Cause Rimedi La macchina non si accende La macchina non è collegata alla rete elettrica Lo sportello di servizio è aperto Collegare la macchina alla rete elettrica Chiudere lo sportello Il caffè non è abbastanza caldo Le tazzine sono fredde Scaldare le tazzine Non fuoriesce acqua calda o vapore Il caffè ha poca crema La macchina impiega troppo tempo per scaldarsi o la quantità di acqua che fuoriesce dal tubo è limitata Il gruppo erogatore non può essere estratto Il foro del tubo vapore è otturato La miscela non è adatta o il caffè non è fresco di torrefazione oppure è macinato troppo grosso Il circuito della macchina è intasata dal calcare Gruppo erogatore fuori posizione Cassetto raccoglifondi inserito Pulire il foro del tubo vapore con uno spillo Cambiare miscela di caffè o regolare la macinatura come al par.5 Aumentare la dose par.6 Decalcificare la macchina Accendere la macchina. Chiudere lo sportello di servizio. Il gruppo erogatore ritorna automaticamente nella posizione iniziale Estrarre il cassetto raccoglifondi prima di estrarre il gruppo di erogazione Caffè non fuoriesce Manca Acqua Riempire il serbatoio dell acqua e ricaricare il circuito (Par.4.3) Gruppo sporco Dose alta Circuito non carico P u l i r e i l g r u p p o e r o g a t o r e (Par.10.1) Diminuire la dose (Par.6) Ricaricare il circuito (Par.4.3) Caffè fuoriesce lentamente Dose alta Diminuire la dose (Par.6) Caffè fuoriesce all esterno dell erogatore Caffè troppo fine Circuito non carico Gruppo erogatore sporco Erogatore non in posizione corretta Cambiare miscela di caffè o regolare la macinatura come al par.5 Diminuire la dose par.6 Ricaricare il circuito (Par.4.3) P u l i r e i l g r u p p o e r o g a t o r e (Par.10.1) Rimettere in posizione l erogatore Erogatore otturato Pulire l erogatore ed i suoi fori d uscita Per i guasti non contemplati dalla suddetta tabella o in caso che i rimedi suggeriti non li risolvano, rivolgersi ad un centro assistenza.

18 18 IMPORTANT SAFEGUARDS When using electrical appliances, basic safety precautions should always be followed to reduce the risk of fire, electric shock, and/or injury to persons, including the following: 1 Read all instructions and information in this instruction book and any other literature included in this carton referring to this product before operating or using this appliance. 2 Do not touch hot surfaces. Use handles or knobs. 3 To protect against fire, electric shock and personal injury do not immerse cord, plugs or appliance in water or other liquid. 4 Close supervision is necessary when any appliance is used by or near children. 5 Unplug from outlet when not in use and before cleaning. Allow to cool before putting on or taking off parts, and before cleaning the appliance. 6 Do not operate any appliance with a damaged cord or plug or after the appliance malfunctions or has been damaged in any way. Return appliance to the nearest authorized service centre for examination, repair or adjustment. 7 The use of accessory attachments not recommended by the appliance manufacturer may result in fire, electric shock or personal injury. 8 Do not use outdoors. 9 Do not let cord hang over edge of table or counter, or touch hot surfaces. 10 Do not place on or near a hot gas or electric burner, or in a heated oven. 11 Always turn appliance OFF, then plug cord into the wall outlet. To disconnect, turn switch to OFF, then remove plug from wall outlet. 12 Do not use appliance for other then intended household use. 13 Use extreme caution when using hot steam. SAVE THESE INSTRUCTIONS CAUTION This appliance is for household use. Any servicing, other than cleaning and user maintenance, should be performed by an authorized service centre. Do not immerse base in water. To reduce the risk of fire or electric shock, do not disassemble the base. There are no user serviceable parts inside. Repair should be done by authorized service personnel only. 1 Check voltage to be sure that the voltage indicated on the nameplate agrees with your voltage. 2 Never use warm or hot water to fill the water tank. Use cold water only. 3 Keep your hands and the cord away from hot parts of the appliance during operation. 4 Never clean with scouring powders or hard implements. Simply use a soft cloth dampened with water. 5 To avoid your coffee maker scaling up, use purified or bottled water. A B C INSTRUCTIONS FOR THE POWER SUPPLY CORD A short power-supply cord is provided to reduce risks of getting tangled up or tripping over a longer cord. Longer extension cords are available and may be used if care is exercised in their use. If a long extension cord is used: 1 cthe marked electrical rating of the extension cord should be at least as great as the electrical rating of the appliance. 2 if the appliance is of the grounded type, the extension cord should be a grounding type 3 the cable does not hang from the table to avoid the risk of getting caught up in it.

19 GENERAL INFORMATION - TECHNICAL SPECIFICATIONS 19 1 GENERAL INFORMATION This coffee machine is ideal for preparing espresso coffee using either coffee beans or ground coffee, and is equipped with a device for dispensing steam and hot water. The elegantly styled machine is designed for normal home use only, and is not suitable for continuous professional use. Caution. The manufacturer accepts no liability for damage or injury caused by: improper use outside the defined operating parameters; repairs carried out by anyone other than authorized service centers; tampering with the power cable; tampering with any component of the machine; use of non-original spare parts and accessories. In such cases the warranty shall be null and void. 1.1 To facilitate interpretation A warning triangle indicates all the instructions that are important for user safety. Follow these directions scrupulously to avoid serious injury!! Illustrations, parts of the machine and control functions are referred to by number or letter, e.g. illustration 2 in this paragraph. This symbol identifies the most important information for ensuring optimal use of the machine. The illustrations corresponding to the text may be found on the inside cover flap. Keep this page open while reading the operating instructions. 1.2 How to use these operating instructions Keep these operating instructions in a safe place and make them available to anyone else who should use the coffee machine. For more information, or should you meet with any problems not completely or sufficiently explained in these instructions, contact your Authorized Service Center. 2 TECHNICAL SPECIFICATIONS Rated voltage See rating plate on machine Rated power See rating plate on machine Casing material Thermoplastic Dimensions (w x h x d) (mm) 390 x 380 x 330 Weight (Kg) 8,7 Cable length (mm) 1200 Control panel Front Water container Extractable Power supply See rating plate on machine Water container (lt.) 1.7 Coffee container capacity (gr) 350 of coffee beans Pump pressure (bar) Boiler Aluminium Safety features Boiler pressure safety valve; safety thermostat. The manufacturer reserves the right to change the machine s specifications in line with technological progress. The machine conforms to European Directive 89/336/ EEC (Legislative Decree 476 of 04/12/92), regarding the elimination of radio-television interference.

20 20 SAFETY RULES sizes in millimeter
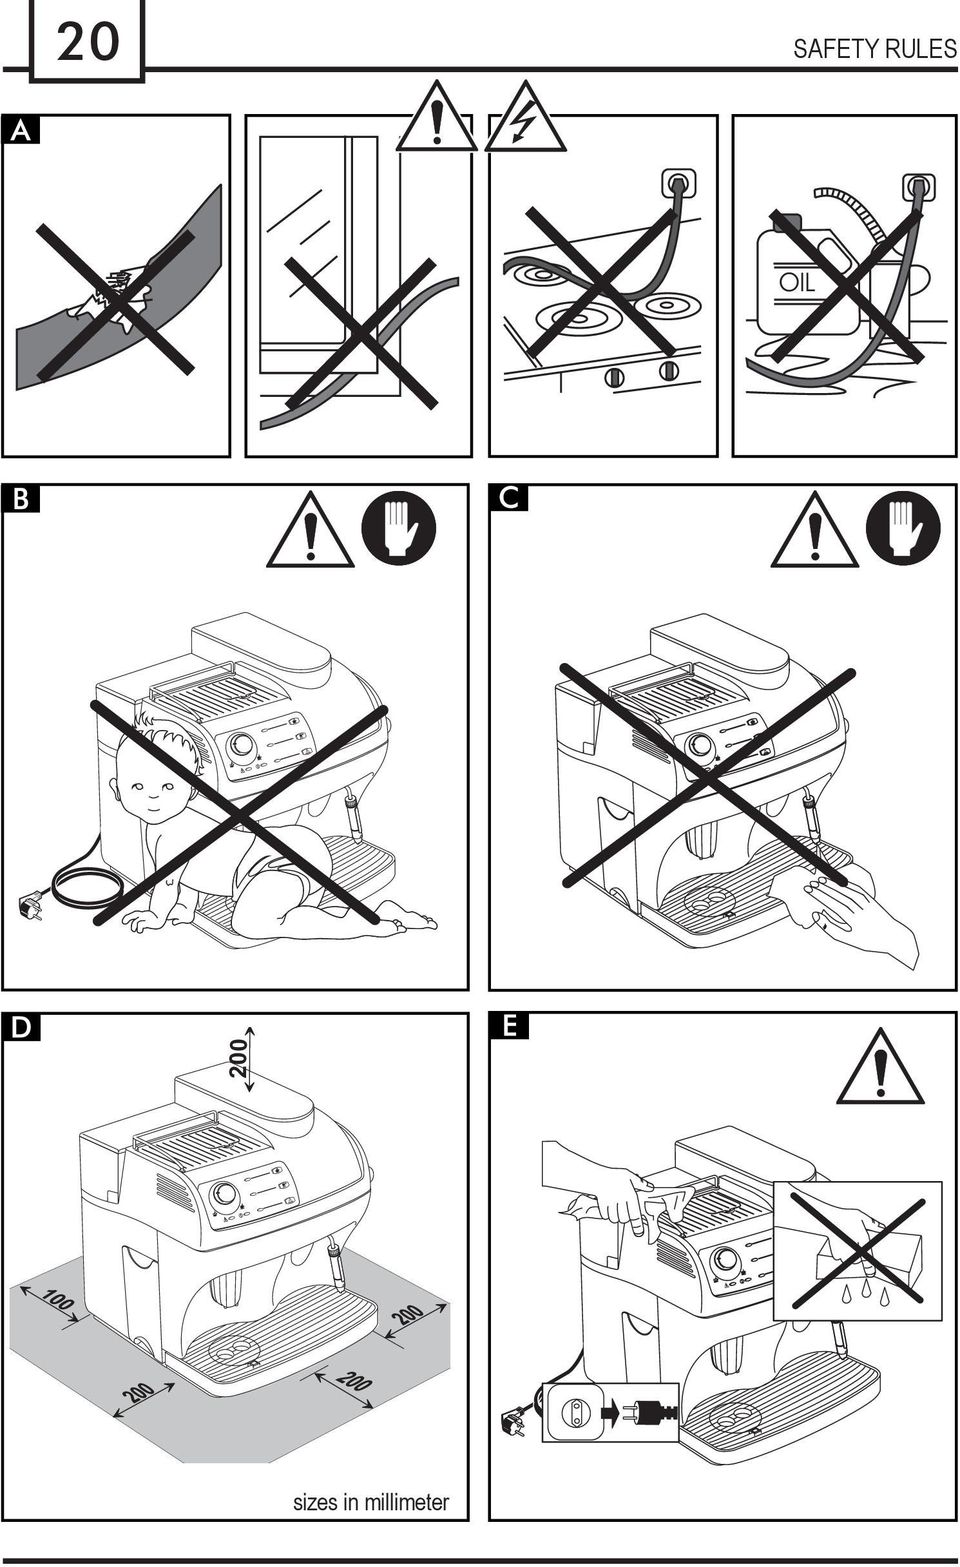
21 SAFETY RULES 3 SAFETY RULES Never place electrical parts in contact with water: danger of short-circuit! The superheated steam and hot water may cause scalding! Never aim the steam or hot water flow towards parts of your body, use caution when touching the steam / hot water nozzle: danger of scalding! Intended use The coffee machine is designed for home use only. To avoid risks, do not make any technical changes or use the machine for purposes other than those stated!! The coffee machine must be used exclusively by adults in good psychological and physical condition. Power supply Plug the coffee machine into a suitable mains outlet. The voltage must correspond to the value indicated on the rating plate. Power cable Never use the coffee machine if the power cable is defective. Should the power cable be damaged, it must be replaced by the manufacturer or his customer service department. Do not pass the cable around corners, over sharp edges or over hot objects and keep it away from oil. Do not use the cable to carry or pull the coffee machine. Do not remove the plug by tugging on the cable or touch it with wet hands. Make sure the cable cannot drop freely from tables or shelves. Protecting others Do not allow children to play with the coffee machine. Children are not aware of the dangers connected with household appliances. Danger of burns Avoid aiming the superheated steam and/or hot water flow at yourself and/or at others: danger of scalding! Always use the handles or knobs provided. 21 Siting Place the coffee machine in a safe place where no one can tip it over or be injured by it. Never use the coffee machine outdoors. To prevent melting or damage to the casing, do not rest the machine on very hot surfaces or near open flames. Cleaning Before cleaning the machine, you must set the main switch (7) to -0- and remove the plug from the mains outlet. Also wait for the machine to cool down. Never immerge the machine in water! It is strictly forbidden to tamper with internal machine parts. Space for use and maintenance To ensure that the coffee machine works properly and efficiently, we recommend that you: Rest it on a perfectly level surface; Place it in an adequately lit, hygienic site with an electric outlet within easy reach; Ensure a minimum clearance between the machine and the walls as shown in the figure. Storing the machine If the machine is to remain out of use for a lengthy period, turn it off and pull out the plug. Store it in a dry place out of children s reach. Keep it away from dust and dirt. Repairs / Maintenance In the event of a breakdown, fault or suspected damage after a fall, unplug the machine immediately. Never operate a faulty machine. Maintenance and repairs are to be carried out exclusively by Authorized Service Centers. The manufacturer will accept no liability for any damage caused by unauthorized servicing. Fire safety In the event of fire, use carbon dioxide (CO 2 ) extinguishers. Do not use water or powder extinguishers.
22 22 INSTALLATION Key to machine components Coffee bean container Coffee bean container lid Grinder adjustment knob Dose adjustment knob Ground coffee dispenser lid Cup shelf Power switch (ON/OFF) Water container lid Water container Dregs box Power cable Water tray + grill Water tray level float Height-adjustable coffee dispenser Steam/hot water tube Front door Steam knob Coffee dispenser unit Coffee dispenser unit wrench Cleaning brush Ground coffee measuring spoon Control panel Knob for regulating the quantity of coffee dispensed in one cup Coffee dispensing button Coffee temperature / function ready light Ground coffee selector button Ground coffee light Steam selector button Steam temperature light Machine ON light Warning light 4 INSTALLATION For your own safety and the safety of others, you must strictly comply with the Safety Rules described in chap Package The original packaging was designed and made to protect the machine during shipping. We recommend keeping it for future transport purposes. 4.2 Preliminary operations Remove the water tray (12) with grating from the packaging materials. Take the coffee machine out of its packing and position it in a suitable place that meets the requirements described in the safety rules (chap.3.). Insert the water tray (12) into the slot provided on the machine; make sure that the tray, the dregs box (10) and the coffee dispensing unit (18) are correctly fitted and that the front door (16) is closed. Fit the coffee bean container lid (2) onto the coffee bean container (1). Store the cleaning brush (20), the coffee dispensing unit wrench (19) and ground coffee measuring spoon (21) in a safe and convenient place. Before plugging in the machine, make sure the power switch (7) is set to -0-. If the red light (30) flashes when you turn on the machine, it means that one of the above-described parts has not been correctly fitted in place. Important note: It is important to read the contents of Chapter 14, which explains in detail the meaning of all machine signals provided to the user by the lights on the control panel. 4.3 Turning on for the first time Lift out the water container (9) and remove the lid (8). Rinse it out and fill it with fresh drinking water, making sure you do overfill it. Lower the container back into place inside the machine and replace the lid (8). Fill the container (9) only with cool, still water. Hot water or other liquids may damage the container and/or the machine. Always make sure there is enough water inside the container before starting the machine.
23 INSTALLATION - COFFEE GRINDER - DOSE ADJUSTMENT 23 Take off the lid (2) and fill the container with coffee beans (1). Fit the lid of the coffee container (1) back into place. Ground or freeze-dried coffee or any other objects will damage the machine. Replace the lid (2) on the coffee container (1). Insert the plug (11) into a suitable outlet. The power switch (7) is set to -0-. Simply press the button (7) to turn on the machine; the green pilot light (29) will go on. To load the circuit, position the steam tube (15) over the drip tray. Turn the knob (17) counterclockwise and wait until water flows out smoothly from the steam tube; to cut off flow, turn the knob (17) clockwise. Note: Before starting up for the first time, if the machine has been inoperative for a lengthy period or the water container has been completely emptied, it is advisable to load the circuit. Once you have completed the above operations, the machine is ready for use. Carefully follow the directions below to dispense coffee, hot water, or steam, and ensure proper use of the machine. 5 COFFEE GRINDER Warning! The grinder adjustment knob inside the coffee container must be turned only while the coffee grinder is operating. Do not introduce ground and/or freeze-dried coffee into the coffee bean container. It is strictly forbidden to introduce any material other than coffee beans. The coffee grinder contains moving parts that may be hazardous; do not place your fingers and/or other objects inside the grinder. Before performing any kind of operation inside the coffee container, switch off the machine and unplug it. Do not add coffee beans while the grinder is operating. The quality and flavour of your coffee will depend not only on the blend you use but also on how finely you grind it. The machine has a knob (3) for adjusting the grind. To adjust the grind, turn the graduated knob while the grinder is operating; the numbers on the knob indicate the fineness of the grind. Every machine is factory-regulated to a medium-sized grind; turn the knob to higher numbers to obtain a coarser grind, turn the knob to lower numbers to obtain a finer grind. The variation in the fineness of the grind will be noted only after three or four coffees have been dispensed. Use blends of coffee beans specifically for espresso machines. Avoid using extreme grinding settings (e.g. 1-16); if you do use them, also use different blends of coffee. Store coffee in an airtight container in a cool, dry place. You should adjust the fineness of the grind when the coffee is not dispensed properly: Coffee pours out too fast = excessively coarse grind > Set the knob on lower numbers; Coffee drips out slowly and/or not at all = excessively fine grind > Set the knob on higher numbers. 6 DOSE ADJUSTMENT The machine allows you to adjust the amount of coffee (dose) to be ground according to your requirements. The manufacturer has set a standard dose that satisfies most needs: notch (A) corresponding to reference point (B). Turn the knob (4) inside the coffee container counterclockwise to increase the dose of ground coffee; turn it clockwise to reduce the dose of ground coffee. The dose must be adjusted before pressing the button to dispense coffee. This system makes it possible to obtain optimal coffee with all types of commercially available coffee.
24 24 DISPENSING COFFEE - DISPENSING HOT WATER 7 DISPENSING COFFEE Note: If the machine fails to dispense coffee, make sure the water container contains water; you may check the water level in the container on the left-hand side of the machine. Before dispensing coffee, make sure that the green temperature ready light (24) remains lit, and that both the water and coffee containers are full. Place 1 or 2 cups beneath the dispenser nozzles (14); you may adjust the height of the dispenser to suit your cups. The dispenser may be moved so that you may use large cups. In this case you must manually push the dispensing unit towards the machine as far as it will go (allowing dispensing into only one cup t a time); to set the dispenser in the ideal position for small cups, pull it all the way outward and make sure it is locked in place. Use the knob (22) to adjust the amount of coffee in the cup: turn it clockwise to increase the amount of coffee dispensed; turn it counterclockwise to reduce the amount of coffee dispensed. Note: we recommend emptying the water tray when the level float (13) rises. 7.1 Dispensing with coffee beans To dispense coffee, press the button (23) to begin the dispensing cycle: press the button (23) once to dispense 1 cup; press it twice in succession to dispense 2 cups. In this operating mode, the machine automatically grinds and dispenses the correct amount of coffee; it takes two automatic grinding cycles and two automatic dispensing cycles to prepare two coffees. After completing the pre-brewing cycle, the coffee will begin to flow from the dispensing nozzle (14). The machine will automatically stop dispensing coffee when it reaches the level set with the knob (22); you may however stop flow at any time by pressing the button (23). 7.2 Dispensing with ground coffee Fill the dispenser (5) only with coffee ground specifically for espresso machines; coffee beans, freeze-dried coffee, and other materials will damage the machine. It is prohibited to insert your fingers into the ground coffee dispenser, which contains hazardous moving parts. Use only the measuring spoon (21) provided with the machine to measure out the correct amount of ground coffee to place in the dispenser. Add only one measuring spoonful of ground coffee at a time. To make two coffees, you must carry out two separate consecutive cycles. Press the button (25) to select the function; the pilot light (26) will light. Lift the ground coffee dispenser lid (5). Use the measuring spoon (21) to measure out a dose of coffee, removing any excess coffee powder from the measuring spoon. Empty the ground coffee into the dispenser. Close the lid (5). To dispense coffee, press the button (23) to begin the dispensing cycle. After completing the pre-brewing cycle, the coffee will begin to flow from the dispensing nozzle (14). The machine will automatically stop dispensing coffee when it reaches the level set with the knob (22); you may however stop flow at any time by pressing the button (23). Then the machine automatically returns to the normal operating mode (see para. 7.1). 8 DISPENSING HOT WATER Warning: The steam may be preceded by brief sprays of hot water: danger of scalding! The dispensing tube can reach very high temperatures: avoid touching it directly with your hands.
ISTRUZIONI PER L USO OPERATING INSTRUCTIONS GEBRAUCHSANWEISUNG MODE D EMPLOI INSTRUCCIONES DE USO GEBRUIKSAANWIJZING INSTRUCÇOES E MODO DE EMPREGO
 ISTRUZIONI PER L USO OPERATING INSTRUCTIONS GEBRAUCHSANWEISUNG MODE D EMPLOI INSTRUCCIONES DE USO GEBRUIKSAANWIJZING INSTRUCÇOES E MODO DE EMPREGO SYNCRONY COMPACT CT Gaggia-Syncrony-cod 165892000 rev.01.pmd
CE23841 MODELO: INSTRUCTION MANUAL WAFLERA MANUAL DEL USUARIO WAFFLE MAKER MODEL: CE23841
 MODELO: CE23841 INSTRUCTION MANUAL WAFFLE MAKER MODEL: CE23841 WAFLERA MANUAL DEL USUARIO IMPORTANT SAFEGUARDS When using electrical appliances, especially when children are present, basic safety precautions
FOR HOUSEHOLD USE ONLY
 ISTRUZIONI PER L USO OPERATING INSTRUCTIONS GEBRAUCHSANWEISUNG MODE D EMPLOI INSTRUCCIONES DE USO GEBRUIKSAANWIJZING INSTRUCÇOES E MODO DE EMPREGO SYNCRONY LOGIC FOR HOUSEHOLD USE ONLY Congratulazioni!
ESPRESSO & COFFEE CENTRE
 Gebruiksaanwijzing Instructions for use Mode d emploi Anleitung Manuel de instrucciones Istruzione d uso Instruções de utilização mod. 242154 ESPRESSO & COFFEE CENTRE Ci congratuliamo per la vostra scelta!
ISTRUZIONI PER L USO OPERATING INSTRUCTIONS GEBRAUCHSANWEISUNG MODE D EMPLOI INSTRUCCIONES DE USO GEBRUIKSAANWIJZING INSTRUCÇOES E MODO DE EMPREGO
 ISTRUZIONI PER L USO OPERATING INSTRUCTIONS GEBRAUCHSANWEISUNG MODE D EMPLOI INSTRUCCIONES DE USO GEBRUIKSAANWIJZING INSTRUCÇOES E MODO DE EMPREGO TITANIUM PLUS Ci congratuliamo per la vostra scelta! Grazie
FOR HOUSEHOLD USE ONLY
 Type SUP025MYR ISTRUZIONI PER L'USO OPERATING INSTRUCTIONS MODE D EMPLOI BEDIENUNGSANLEITUNG INSTRUCCIONES DE USO INSTRUÇÕES PARA USO GEBRUIKSAANWIJZING PER LA VOSTRA SICUREZZA LEGGERE ATTENTAMENTE LE
FOR HOUSEHOLD USE ONLY
 Type SUP025PY ISTRUZIONI PER L'USO OPERATING INSTRUCTIONS MODE D EMPLOI BEDIENUNGSANLEITUNG INSTRUCCIONES DE USO INSTRUÇÕES PARA USO GEBRUIKSAANWIJZING PER LA VOSTRA SICUREZZA LEGGERE ATTENTAMENTE LE ISTRUZIONI
ISTRUZIONI PER L USO OPERATING INSTRUCTIONS GEBRAUCHSANWEISUNG MODE D EMPLOI INSTRUCCIONES DE USO GEBRUIKSAANWIJZING INSTRUCÇOES E MODO DE EMPREGO
 ISTRUZIONI PER L USO OPERATING INSTRUCTIONS GEBRAUCHSANWEISUNG MODE D EMPLOI INSTRUCCIONES DE USO GEBRUIKSAANWIJZING INSTRUCÇOES E MODO DE EMPREGO TITANIUM Ci congratuliamo per la vostra scelta! Grazie
INSTALLATION INSTRUCTIONS
 Brix Ratio Check Instructions for ColdFusion and Flavor Overload Units INSTALLATION INSTRUCTIONS Brix Ratio Check Instructions For Coldfusion, Flavorfusion and Flavor Overload Units Kit P/N 629096865 SAFETY
ISTRUZIONI PER L USO OPERATING INSTRUCTIONS GEBRAUCHSANWEISUNG MODE D EMPLOI INSTRUCCIONES DE USO GEBRUIKSAANWIJZING INSTRUCÇOES E MODO DE EMPREGO
 ISTRUZIONI PER L USO OPERATING INSTRUCTIONS GEBRAUCHSANWEISUNG MODE D EMPLOI INSTRUCCIONES DE USO GEBRUIKSAANWIJZING INSTRUCÇOES E MODO DE EMPREGO TITANIUM Ci congratuliamo per la vostra scelta! Grazie
DIAMOND Gear Company, LTD. an ERIKS Company. Installation, Maintenance, & Operation Manual DECLUTCHABLE WORM GEAR
 DIAMOND Gear Company, LTD. an ERIKS Company Installation, Maintenance, & Operation Manual 2013 INSTRUCTIONS This is an instructional manual which provides general installation, operation, and maintenance
ISTRUZIONI PER L USO OPERATING INSTRUCTIONS MODE D EMPLOI GEBRAUCHSANWEISUNG INSTRUCCIONES DE USO INSTRUCÇOES E MODO DE EMPREGO GEBRUIKSAANWIJZING
 Type Sup 018m ISTRUZIONI PER L USO OPERATING INSTRUCTIONS MODE D EMPLOI GEBRAUCHSANWEISUNG INSTRUCCIONES DE USO INSTRUCÇOES E MODO DE EMPREGO GEBRUIKSAANWIJZING Congratulazioni! Ci congratuliamo con voi
TECHNICAL MANUALE TECNICO MANUAL TÉCNICO MANUAL 080403 E RS232
 IT MANUALE TECNICO EN TECHNICAL MANUAL ES MANUAL TÉCNICO 080403 E RS VERSIONE PLUG ERS Specifiche PRESA RJ Specifiche PRESA RJ MORSETTI DI COLLEGAMENTO MORSETTI DI COLLEGAMENTO ERS Morsetto Funzione Morsetto
MANUAL HR RXUNICOM 433-868.
 MANUAL HR RXUNICOM 433-868. 1. The Definitions of the RXUNICOM 2. Brand selector / Selector de Marcas / Selezione marca With 8 bits dip switch, the user can make difference combination for difference remote
ISTRUZIONI PER L USO OPERATING INSTRUCTIONS GEBRAUCHSANWEISUNG MODE D EMPLOI INSTRUCCIONES DE USO GEBRUIKSAANWIJZING INSTRUCÇOES E MODO DE EMPREGO
 ISTRUZIONI PER L USO OPERATING INSTRUCTIONS GEBRAUCHSANWEISUNG MODE D EMPLOI INSTRUCCIONES DE USO GEBRUIKSAANWIJZING INSTRUCÇOES E MODO DE EMPREGO SYNCRONY COMPACT CT DIGITAL Ci congratuliamo per la vostra
Extension Cords Extensiones Eléctricas We light your world
 We light your world 07.14.1 Household Domésticas 3 outlet indoor cords allow use of up to three items in one small place. This provides flexibility, while allowing multiple devices to be use without the
ISTRUZIONI PER L USO OPERATING INSTRUCTIONS GEBRAUCHSANWEISUNG MODE D EMPLOI INSTRUCCIONES DE USO GEBRUIKSAANWIJZING INSTRUCÇOES E MODO DE EMPREGO
 ISTRUZIONI PER L USO OPERATING INSTRUCTIONS GEBRAUCHSANWEISUNG MODE D EMPLOI INSTRUCCIONES DE USO GEBRUIKSAANWIJZING INSTRUCÇOES E MODO DE EMPREGO SYNCRONY COMPACT CT DIGITAL Ci congratuliamo per la vostra
ENKVM-USBB. 2-Port USB KVM switch with Easy Switch and Cable. User Guide
 ENKVM-USBB 2-Port USB KVM switch with Easy Switch and Cable User Guide i Package Contents 1 ENKVM-USBB 2-Port USB KVM Switch with Easy Switch and Cable 1 User Guide Requirements Console A VGA, SVGA, XGA,
ISTRUZIONI PER L USO OPERATING INSTRUCTIONS GEBRAUCHSANWEISUNG MODE D EMPLOI INSTRUCCIONES DE USO GEBRUIKSAANWIJZING INSTRUCÇOES E MODO DE EMPREGO
 ISTRUZIONI PER L USO OPERATING INSTRUCTIONS GEBRAUCHSANWEISUNG MODE D EMPLOI INSTRUCCIONES DE USO GEBRUIKSAANWIJZING INSTRUCÇOES E MODO DE EMPREGO SYNCRONY DIGITAL Ci congratuliamo per la vostra scelta!
Installation Guide. Green momit
 Installation Guide Green momit 2015 www.momit.com momit Deviceses Gateway: Model 1 and 2 Wall option The momit Gateway allows your thermostat to be connected to the Internet. It s included in the Starter
Type: SIN 042 GM Type: SIN 042 GP
 Français Deutsch Español Português English Italiano Type: SIN 042 GM Type: SIN 042 GP ISTRUZIONI PER L'USO OPERATING INSTRUCTIONS BEDIENUNGSANLEITUNG MODE D'EMPLOI INSTRUCCIONES DE USO INSTRUÇÕES DE USO
- - Introduzione - - - 1 -
 - - Introduzione - - IT - Avvertenze generali - Leggere attentamente le avvertenze contenute nelle presenti istruzioni in quanto forniscono importanti indicazioni riguardanti la sicurezza di installazione,
Quick Installation Guide TU2-DVIV H/W: V1.0R
 Quick Installation Guide TU2-DVIV H/W: V1.0R Table Table of Contents of Contents Español... 1. Antes de iniciar... 2. Cómo se instala... 1 1 3 Troubleshooting... 6 Version 06.27.2008 1. Antes de iniciar
Lump Sum Final Check Contribution to Deferred Compensation
 Memo To: ERF Members The Employees Retirement Fund has been asked by Deferred Compensation to provide everyone that has signed up to retire with the attached information. Please read the information from
NL Instrucciones de instalación p. 3. IT Istruzioni d installazione p. 5. Vision _10521_V01_MB1
 NL Instrucciones de instalación p. 3 IT Istruzioni d installazione p. 5 Vision 7838-7839 7848-7849 7858-7859 7838_10521_V01_MB1 1 2 10x10x 2x 2x 2x 3 4 5 6 7 INFORMACIÓN GENERAL Generalidades Estas son
Save Money 2-up Single Doorhanger Set OH payday advance edition, 4 different doorhangers, Spanish
 Save Money 2-up Single Doorhanger Set OH payday advance edition, 4 different doorhangers, Spanish PACKAGE CONTENTS How to Customize 4-color doorhanger, Editable PDF (50% OFF first loan) 1-color (black)
MODELO BRD-887 RADIO RELOJ DESPERTADOR CON DOBLE ALARMA
 AVISO SOBRE SALPICADURAS Y VENTILACIÓN MODELO BRD-887 RADIO RELOJ DESPERTADOR CON DOBLE ALARMA MEDIDAS DE SEGURIDAD ESTE APARATO NO DEBE QUEDAR EXPUESTO A GOTAS NI A SALPICADURAS. TAMPOCO DEBERÁ COLOCAR
ESSENZA MANUAL. Manual de Instrucciones Istruzione per l uso
 ESSENZA MANUAL Manual de Instrucciones Istruzione per l uso Lea estas instrucciones y las indicaciones de seguridad antes de poner en funcionamiento el aparato! Leggere le istruzioni (e indicazioni) di
USO E MANUTENZIONE IDEA
 Macchina automatica per caffè espresso Automatische Espressomaschine Máquina automática para café exprés Automatische espressomachine Machine automatique à café expresso Máquina automática para café espresso
BAI-220 AURICULAR INALÁMBRICO
 BAI-220 AURICULAR INALÁMBRICO Manual de usuario ESPECIFICACIONES TÉCNICAS EMISOR Frecuencia: 86 ± 0.5 MHz Modulación: FM Distancia de emisión: 30 m. Recepción de cualquier equipo de audio y video con salida
FlexCage. User Manual MB975SP-B. 5 HDD Slots in 3 Device Bay. Tray-Less SATA Backplane Module
 FlexCage MB975SP-B 5 HDD Slots in 3 Device Bay Tray-Less SATA Backplane Module User Manual English Package Contents Front Panel Information HDD3 POWER BUTTON POWER / ACCESS LED INDICATOR HDD2 POWER BUTTON
FCC Information : Warning: RF warning statement:
 FCC Information : This device complies with Part 15 of the FCC Rules. Operation is subject to the following two conditions: (1) This device may not cause harmful interference, and (2) This device must
START INICIAR - DÉMARRAGE - INIZIO - INICIAR - INICIO
 START INICIAR - DÉMARRAGE - INIZIO - INICIAR - INICIO ENG: Microsoft wireless mouse PTB: Mouse sem fio da Microsoft FRA: Souris sans fil Microsoft ITA: Mouse senza fili Microsoft PTG: Rato sem fios Microsoft
M DJ SERIES. User Manual/Manual de Uso
 M DJ SERIES User Manual/Manual de Uso User Manual Installation 1. In order to enhance the cast function of listening to space sound, it is appropriate to set the center part of tweeter right to the position
TECHNICAL MANUALE TECNICO MANUAL TÉCNICO MANUAL 080209 ED 5IS
 IT MANUALE TECNICO EN TECHNICAL MANUAL ES MANUAL TÉCNICO 080209 ED 5IS ED 5IS DIGITAL TBD 5I-40 IN + 24V SN CS SCEN 5 CS SCEN 4 CS SCEN 3 CS SCEN 2 CS SCEN 1 G V B I5 I4 I3 I2 I1 V OUT 24 V verde ( bus
FOR HOUSEHOLD USE ONLY
 ITALIANO ISTRUZIONI PER L USO Leggere attentamente queste istruzioni d uso prima di utilizzare la macchina OPERATING INSTRUCTIONS Read these operating instructions carefully before using the machine BEDIENUNGSANLEITUNG
MODEL: 11222895 / MODELO: 11222895 COMPUTER DESK ESCRITORIO DE COMPUTADORA
 MODEL: 222895 / MODELO: 222895 COMPUTER DESK ESCRITORIO DE COMPUTADORA NO 2 3 4 5 6 7 8 9 PARTS LIST AND HARDWARE LISTA DE PARTES Y ACCESORIOS HARDWARE LIST LISTA DE PARTES Y ACCESORIOS CHIPBOARD SCREW
Conditioning Exercises: Standing
 Conditioning Exercises: Standing Do all these exercises slowly. Do not hold your breath during these exercises. If unusual pain occurs in your joints or muscles while you are exercising, do not continue
Modbus RTU - RS-485 Kit. Kit Modbus RTU / RS-485. Kit Modbus RTU / RS-485. SSW-07 / SSW-08 English / Español / Português Document: 0899.
 Modbus RTU - RS-485 Kit Kit Modbus RTU / RS-485 Kit Modbus RTU / RS-485 Installation Guide SSW-07 / SSW-08 English / Español / Português Document: 0899.5711 / 03 Guia de Instalación Guia de Instalação
GUÍA DE USUARIO USER GUIDE 2.1 Multimedia Speaker System Design Line APPSP2102
 GUÍA DE USUARIO USER GUIDE 2.1 Multimedia Speaker System Design Line APPSP2102 Gracias por adquirir los Altavoces Multimedia 2.1 de Approx. Podrá conectar sus altavoces a cualquier ordenador, walkman,
FOR HOUSEHOLD USE ONLY
 ITALIANO ISTRUZIONI PER L USO Leggere attentamente queste istruzioni d uso prima di utilizzare la macchina OPERATING INSTRUCTIONS Read these operating instructions carefully before using the machine BEDIENUNGSANLEITUNG
DECLARACION DE CONFORMIDAD DECLARATION OF CONFORMITY
 DECLARACION DE CONFORMIDAD DECLARATION OF CONFORMITY La Empresa: BASOR ELECTRIC, S.A. The Company: BASOR ELECTRIC, S.A. Declara que el producto: Declares that the product: Instalado de acuerdo con las
Table of Contents. Español... 1. Antes de iniciar... 2. Cómo conectar... 3. Cómo utilizar el conmutador... Troubleshooting... Version 10.13.
 Quick Installation Guide TE100-S800i TE100-S810Fi Table of Contents Español... 1. Antes de iniciar... 2. Cómo conectar... 3. Cómo utilizar el conmutador... Troubleshooting... 1 1 2 3 5 Version 10.13.05
DESDE 1926 GRUPO ZAPATA ENVASE SANIT ARIO S A NIT A R Y FOOD CAN S
 DESDE 1926 GRUPO ZAPATA ENVASE SANIT ARIO S A NIT A R Y FOOD CAN S STRAIGHT-SIDED BODY SANITARY ROUND CONTAINER INCHES (") MILIMETERS (MM) BODY WALL HEIGHT HEIGHT HEIGHT STRAIGHT BEADED 114 114/16 48 204
BeSMART WiFi Thermostat. IT Guida Rapida. ES Guia rápida
 BeSMART WiFi Thermostat IT Guida Rapida ES Guia rápida 1 L installazione viene fatta in 3 fasi La instalación se realiza en tres fases A B C Installa il termostato BeSMART Instalar el thermostato BeSMART
Steps to Understand Your Child s Behavior. Customizing the Flyer
 Steps to Understand Your Child s Behavior Customizing the Flyer Hello! Here is the PDF Form Template for use in advertising Steps to Understanding Your Child s Behavior (HDS Behavior Level 1B). Because
MANUAL EASYCHAIR. A) Ingresar su nombre de usuario y password, si ya tiene una cuenta registrada Ó
 Ingresar su nombre de usuario y password, si ya tiene una cuenta registrada Ó") MANUAL EASYCHAIR La URL para enviar su propuesta a la convocatoria es: https://easychair.org/conferences/?conf=genconciencia2015 Donde aparece la siguiente pantalla: Se encuentran dos opciones: A) Ingresar
MANUAL EASYCHAIR La URL para enviar su propuesta a la convocatoria es: https://easychair.org/conferences/?conf=genconciencia2015 Donde aparece la siguiente pantalla: Se encuentran dos opciones: A) Ingresar
Agustiniano Ciudad Salitre School Computer Science Support Guide - 2015 Second grade First term
 Agustiniano Ciudad Salitre School Computer Science Support Guide - 2015 Second grade First term UNIDAD TEMATICA: INTERFAZ DE WINDOWS LOGRO: Reconoce la interfaz de Windows para ubicar y acceder a los programas,
T R A N S TECHNICAL SPECIFICATIONS:
 A R P O L T R A N S TECHNICAL SPECIFICATIONS: 1, or - look casing Specially designed rubber gasket (various models) Steps of up tc 8 mm between outside diameters Working pressures up to bar F l e x i b
FLEXO URANO INSTRUCCIONES INSTRUCTIONS
 FLEXO URANO INSTRUCCIONES INSTRUCTIONS 1 ATENCIÓN! Desconectar la conexión a red antes de ser manipulada y realizar el cambio de producto sólo cuando se haya enfriado la fuente existente. WARNING! Disconnect
ROCK N STEREO SOUND DESK
 Read and save these instructions ROCK N STEREO SOUND DESK RTA-M1102-BK INSTRUCTIONS TABLE OF CONTENTS PACKAGE INCLUDES Package Includes... 2 Specifications... 2 Product Parts List... 3 1 2 3 Product Details...
SIGUIENDO LOS REQUISITOS ESTABLECIDOS EN LA NORMA ISO 14001 Y CONOCIENDO LAS CARACTERISTICAS DE LA EMPRESA CARTONAJES MIGUEL Y MATEO EL ALUMNO DEBERA
 SIGUIENDO LOS REQUISITOS ESTABLECIDOS EN LA NORMA ISO 14001 Y CONOCIENDO LAS CARACTERISTICAS DE LA EMPRESA CARTONAJES MIGUEL Y MATEO EL ALUMNO DEBERA ELABORAR LA POLITICA AMBIENTAL PDF File: Siguiendo
Vidrio Industrial POBEL, S.A.
 Destilador de agua Water distiller HYDR 0041 MANUAL DE INSTRUCCIONES INSTRUCTIONS MANUAL C/ Luis I, s/n Almacén 12 Pol. Ind. Vallecas IV 28031 Madrid (ESPAÑA) Tel. (34) 91 380 33 18 Fax (34) 91 380 32
RTA-B002 DIMENSIONS MAXIMUM WEIGHT CAPACITIES. Highest position. Lowest position. Product Size: 22"W x 16"D x 30.5~46.5"H
 MODEL RTA - B002 Thanks for purchasing one of our products. Please read carefully the assembly instructions before the installation. Please save this manual for future reference. MODEL RTA-B002 MODELO
GARAGE DOOR OPENER CONNECTIVITY HUB QUICK START GUIDE
 GARAGE DOOR OPENER CONNECTIVITY HUB QUICK START GUIDE Thank you for purchasing a Craftsman garage door opener Connectivity Hub enabled with AssureLink technology. Once you have created your account and
Matemáticas Muestra Cuadernillo de Examen
 Matemáticas Muestra Cuadernillo de Examen Papel-Lápiz Formato Estudiante Español Versión, Grados 3-5 Mathematics Sample Test Booklet Paper-Pencil Format Student Spanish Version, Grades 3 5 Este cuadernillo
FLEXO MERCURIO INSTRUCCIONES INSTRUCTIONS
 FLEXO MERCURIO INSTRUCCIONES INSTRUCTIONS 1 ATENCIÓN! Desconectar la conexión a red antes de ser manipulada y realizar el cambio de producto sólo cuando se haya enfriado la fuente existente. WARNING! Disconnect
FUSIBLES CILÍNDRICOS MT PARA APLICACIONES DE ALUMBRADO MV CYLINDRICAL FUSE-LINKS FOR LIGHTING PURPOSES
 FUSIBLES CILÍNDRICOS MT PARA APLICACIONES DE ALUMBRADO MV CYLINDRICAL FUSE-LINKS FOR LIGHTING PURPOSES DF, S.A C/. Silici, 67-69 08940 CORNELLA DEL LLOBREGAT BARCELONA (SPAIN) www.df-sa.es Telf.: +34-93
MANUAL DE INSTRUCCIONES CAJA FUERTE CF-4333
 MANUAL DE INSTRUCCIONES CAJA FUERTE CF-4333 ESTIMADO CLIENTE Con el fin de que obtenga el mayor desempeño de su producto, por favor lea este manual de instrucciones cuidadosamente antes de comenzar a utilizarlo,
Assembly Instructions. Tools required for assembly: Small wrench. Operating Instructions. Cleaning Your KaZAM Bicycle WARNING: WARNING:
 A Assembly Instructions WARNING: WARNING: Tools required for assembly: Small wrench Operating Instructions - Cleaning Your KaZAM Bicycle Limited Warranty - two THIS WARRANTY DOES NOT COVER NORMAL WEAR
PARLED 56 PARLED 64 PARLED 56/PARLED 64. User Manual/Manual de Uso
 PARLED 56 PARLED 64 PARLED 56/PARLED 64 User Manual/Manual de Uso EN Thanks for purchasing this product. For your own safety, please, read this user manual carefully before you initially start-up. SAFETY
FOR HOUSEHOLD USE ONLY
 ITALIANO ISTRUZIONI PER L USO Leggere attentamente queste istruzioni d uso prima di utilizzare la macchina INSTRUÇÕES PARA USO Ler atentamente estas instruções de uso antes de utilizar a máquina GEBRUIKSAANWIJZING
Quick Installation Guide TU-S9
 Quick Installation Guide TU-S9 Table of of Contents Contents Español... 1 1. Antes de iniciar... 1 2. Instalación del Hardware... 2 Troubleshooting... 5 Version 11.08.2007 1. Antes de iniciar Contenidos
TECHNICAL MANUALE TECNICO MANUAL TÉCNICO MANUAL E DALI/DMX
 IT MANUALE TECNICO EN TECHNICAL MANUAL ES MANUAL TÉCNICO 080414 E /DMX Morsetto VCC BUS B (RX) A (TX) PWR1 1 2 PWR2 MORSETTI DI COLLEGAMENTO Funzione Negativo alimentazione BUS +24Vdc alimentazione BUS
Learning Masters. Early: Force and Motion
 Learning Masters Early: Force and Motion WhatILearned What important things did you learn in this theme? I learned that I learned that I learned that 22 Force and Motion Learning Masters How I Learned
Vedi foto 4. See photo 4. Voir photo 4. Ver foto 4
 MARCA MAKE FAIRE - HACER MODELLO MODEL MODÈLE - MODELO REV. 00 HYUNDAI TUCSON 15 Funzione - Function SCHEDA TECNICA DI INSTALLAZIONE PER SISTEMI DI ALLARME CAN CAN ALARM SYSTEM FITTING INSTRUCTIONS SCHEMA
1. Título: 2. Objetivos: 3. Contenidos de la propuesta: 4. Relación con los temas transversales: 5. Sesiones de trabajo: Preventing back injuires.
 1. Título: Preventing back injuires. 2. Objetivos: a) Adquirir vocabulario inglés básico relacionado con la prevención de riesgos por manipulación de cargas. b) Estudiar las formas gramaticales más apropiadas
TECHNICAL MANUALE TECNICO MANUAL TÉCNICO MANUAL 080409 E BRIDGE
 IT MANUALE TECNICO EN TECHNICAL MANUAL ES MANUAL TÉCNICO 080409 E BRIDGE ' 12 11 10 9 8 7 6 5 4 3 2 1 13 14 15 16 MORSETTI DI COLLEGAMENTO Morsetto Funzione 1 Negativo alimentazione BUS 2 +24Vdc alimentazione
SIERRA PARA LADRILLOS / BRICKS CUT - OFF SAW
 SIERRA PARA LADRILLOS / BRICKS CUT - OFF SAW CARACTERÍSTICAS TÉCNICAS - CAPACIDAD... 355 mm - DIMENSIONES DEL DISCO...... 355 x 3 x 25,4 mm - MOTOR.....1650 W (230 V / 50 Hz ó 110 V / 60 Hz) - CAPACIDAD
Sierra Security System
 Using Your SpreadNet Accessories With Your Sierra Security System Uso de Sus Accesorios SpreadNet Con Su Sistema de Seguridad Sierra SN990-KEYPAD SN961-KEYFOB SN991-REMOTE 1 SN990-KEYPAD The SN990-KEYPAD
Single Burner. Eléctrica. Hornilla. User Manual. Manual de Uso. Model: CE23309 CE Modelo:
 Hornilla Eléctrica Manual de Uso Modelo: CE23309 Model: CE23309 User Manual Single Burner IMPORTANT SAFEGUARDS When using electrical appliances, basic safety precautions should always be followed to reduce
ESTRATTORE DI SUCCO. Istruzioni per l uso Instrucciones para el uso. IT pagina 1 ES página 10 ESTRATTORE DI SUCCO EXTRACTOR DE ZUMOS TYPE N1201
 MI001848 Istruzioni per l uso Instrucciones para el uso IT pagina 1 ES página 10 ESTRATTORE DI SUCCO ESTRATTORE DI SUCCO EXTRACTOR DE ZUMOS www. imetec.com Tenacta Group S.p.A. Via Piemonte 5/11 24052
Vedi foto 4. See photo 4. Voir photo 4. Ver foto 4
 MARCA MAKE FAIRE - HACER MODELLO MODEL MODÈLE - MODELO REV. 00 JEEP GRAND CHEROKEE 14 Funzione - Function SCHEDA TECNICA DI INSTALLAZIONE PER SISTEMI DI ALLARME CAN CAN ALARM SYSTEM FITTING INSTRUCTIONS
Learning Masters. Fluent: Wind, Water, and Sunlight
 Learning Masters Fluent: Wind, Water, and Sunlight What I Learned List the three most important things you learned in this theme. Tell why you listed each one. 1. 2. 3. 22 Wind, Water, and Sunlight Learning
ASSEMBLY DRAWING / SPARE PARTS
 ASSEMBLY DRAWING / SPARE PARTS Flush button with Lock Nut C7715-6.4 N7714TL Toilet Lid Flush Valve C7715-6 BSB Kit - C7715-1 Fluidmaster Seal Seal - C7715-2 Fill Valve C7715-7 Ceramic tank Air Tube - C7715-3
Speak Up! In Spanish. Young s Language Consulting. Young's Language Consulting. Lesson 1 Meeting and Greeting People.
 Buenos días Good morning Buenos días Good afternoon Buenas tardes Good evening Buenas tardes Good night Buenas noches Sir Señor Ma am/mrs. Señora Miss Señorita Buenas tardes Culture Note: When greeting
FOR HOUSEHOLD USE ONLY
 ITALIANO ISTRUZIONI PER L USO Leggere attentamente queste istruzioni d uso prima di utilizzare la macchina OPERATING INSTRUCTIONS Read these operating instructions carefully before using the machine BEDIENUNGSANLEITUNG
IE12_ CONSOLIDACIÓN Y DESARROLLO DE NUEVAS TÉCNICAS DE EVALUACIÓN INTENSIVAS ON-LINE YA IMPLEMENTADAS POR EL GIE E4
 IE12_13-03001 - CONSOLIDACIÓN Y DESARROLLO DE NUEVAS TÉCNICAS DE EVALUACIÓN Departamento de Estructuras de la Edificación Escuela Técnica Superior de Arquitectura de Madrid Universidad Politécnica de Madrid
CP43679 MODELO: MANUAL DE INSTRUCCIONES. Digital Coffee. Maker. Digital. Cafetera INSTRUCTION MANUAL MODEL: CP43679
 MODEL: CP43679 INSTRUCTION MANUAL Cafetera Digital Maker Digital Coffee MANUAL DE INSTRUCCIONES MODELO: CP43679 INSTRUCTIONS When you use this electrical equipment, please follow these necessary safety
INSTRUCTION MANUAL Smart Security Light
 SPL06-07A1W1-BKT-K1 INSTRUCTION MANUAL Smart Security Light Questions, problems, or missing parts? Before returning to the store, call MAXIMUS customer service at 1-866-897-2098, Monday Friday, 9:30am
FOR HOUSEHOLD USE ONLY
 Type Sin017LN ISTRUZIONI PER L'USO OPERATING INSTRUCTIONS MODE D EMPLOI BEDIENUNGSANLEITUNG INSTRUÇÕES PARA O USO INSTRUCCIONES PARA EL USO GEBRUIKSAANWIJZING LEGGERE ATTENTAMENTE QUESTE ISTRUZIONI D'USO
MANUAL DE INSTRUCCIONES TECLADO PARA TABLETA ACC-5188TKB
 MANUAL DE INSTRUCCIONES TECLADO PARA TABLETA ACC-5188TKB ESTIMADO CLIENTE Con el fin de que obtenga el mayor desempeño de su producto, por favor lea este manual de instrucciones cuidadosamente antes de
TYPE COM 004 A FOR HOUSEHOLD USE ONLY
 TYPE COM 004 A ISTRUZIONI PER L'USO OPERATING INSTRUCTIONS MODE D EMPLOI BEDIENUNGSANLEITUNG INSTRUCCIONES DE USO INSTRUÇÕES PARA USO GEBRUIKSAANWIJZING PER LA VOSTRA SICUREZZA LEGGERE ATTENTAMENTE LE
 sistema modular de vacío modular vacuum system L-VAC Cartón Cajas Laminados Madera Piedra Plancha Plástico Cardboard Boxes Laminated Wood Stone Sheet metal Plastic EL VACÍO, AHORA MÁS FÁCIL L-VAC es la
MOD. 1338-1339. COD. 4035101300 REV. 0 del 18/12/2012
 MOD 1338-1339 COD 4035101300 REV 0 del 18/12/2012 DeÆ Longhi Appliances Srl Divisione Commerciale Ariete Via San Quirico, 300 50013 Campi Bisenzio (FI) E-Mail: info@arietenet Internet: wwwarietenet 827070
Modbus RTU - RS-232 Kit. Kit Modbus RTU / RS-232. Kit Modbus RTU / RS-232. Installation Guide. Guia de Instalación. Guia de Instalação
 Modbus RTU - RS-232 Kit Kit Modbus RTU / RS-232 Kit Modbus RTU / RS-232 Installation Guide Guia de Instalación Guia de Instalação 1. DESCRIPTION OF THE KIT Contents: Table 1 - Contents of the Kit SSW-07
CAUTION: Hot Surface, use handles or control knobs.
 When using electrical appliances, basic safety precautions should always be followed, including the following: WARNING: A risk of fire and electric shock exists in all electrical appliances and may cause
COD REV
 TYPE sup 018m COD. 1.6.593.43.00 REV. 02 DEL 28/01/99 ISTRUZIONI PER L'USO OPERATING INSTRUCTIONS INSTRUCTIONS D EMPLOI DIENUNGSANLEITUNG INSTRUCCIONES DE USO INSTRUÇÕES PARA USO GEBRUIKSAANWIJZING PER
Manual de Instrucciones Operation Manual. (Evita Pink Press)
") Manual de Instrucciones Operation Manual (Evita Pink Press) EN ES Datos Técnicos / Technical Parameters Modelo/Model NO Medidas/Machine Size Área de trabajo/work area Voltaje/Voltage Poténcia/Power Rango
Manual de Instrucciones Operation Manual (Evita Pink Press) EN ES Datos Técnicos / Technical Parameters Modelo/Model NO Medidas/Machine Size Área de trabajo/work area Voltaje/Voltage Poténcia/Power Rango
FOR HOUSEHOLD USE ONLY
 ITALIANO TYPE SUP021 YDR ENGLISH ISTRUZIONI PER L USO Leggere attentamente queste istruzioni d uso prima di utilizzare la macchina OPERATING INSTRUCTIONS Read these operating instructions carefully before
FOR HOUSEHOLD USE ONLY
 Type SIN024X ISTRUZIONI PER L'USO OPERATING INSTRUCTIONS MODE D EMPLOI BEDIENUNGSANLEITUNG INSTRUÇÕES PARA O USO INSTRUCCIONES PARA EL USO GEBRUIKSAANWIJZING LEGGERE ATTENTAMENTE QUESTE ISTRUZIONI D'USO
Flashcards Series 3 El Aeropuerto
 Flashcards Series 3 El Aeropuerto Flashcards are one of the quickest and easiest ways to test yourself on Spanish vocabulary, no matter where you are! Test yourself on just these flashcards at first. Then,
FUSIBLES CILINDRICOS INDUSTRIALES am INDUSTRIAL CYLINDRICAL am FUSE-LINKS
 FICHA TÉCNICA / TECHNICAL DATA SHEET am DF, S.A C/. Silici, 67-69 08940 CORNELLA DEL LLOBREGAT BARCELONA (SPAIN) www.df-sa.es Telf.: +34 93 377 85 85 Fax: +34 93 377 8 8 ISO9001 DESCRIPCIÓN DEL PRODUCTO
MINI corniche. Istruzioni di montaggio Installation instructions Instructions de montage Montageanleitung Instrucciones de montaje. www.platek.
 MINI corniche Istruzioni di montaggio Installation instructions Instructions de montage Montageanleitung Instrucciones de montaje www.platek.eu I Sicurezza e avvertenze per l installazione: L installazione
TYPE SIN 013A FOR HOUSEHOLD USE ONLY
 TYPE SIN 013A ISTRUZIONI PER L'USO OPERATING INSTRUCTIONS MODE D EMPLOI BEDIENUNGSANLEITUNG INSTRUCCIONES DE USO INSTRUÇÕES PARA USO GEBRUIKSAANWIJZING LEGGERE ATTENTAMENTE QUESTE ISTRUZIONI D'USO PRIMA
LOW SPEED RIGHT ANGLE CUT-OFF TOOL
 LOW SPEED RIGHT ANGLE CUT-OFF TOOL Model GETTING STARTED OPERATION Low Speed Right Angle Cut-Off Tool Owner s Manual Model Free Speed (RPM) Wheel Diameter Horsepower (HP) Air Inlet (NPT) Hose Size (Inch)
SAVE THESE INSTRUCTIONS. one way; if the plug does not fit fully into the outlet, reverse the plug.
 Do not use can opener for other than intended use or leave unattended Do not open cans of flammable liquids such as lighter fluids. Do not open pressurized (aerosol-type) cans. Do not let the cord hang