SmartPropoPlus Cable for square Futaba plug.
|
|
|
- Alejandro Quintero Rojo
- hace 6 años
- Vistas:
Transcripción
1 MANUAL DE INSTALACION DE CABLE Y APLICATIVO PARA SIMULADOR. Objetivo: Explicar la forma mas eficiente de configurar el aplicativo PPJoy y Smartpropo para que funcione de una forma correcta en el PC a través del conector de audio o del puerto IN de audio. Esta Es una adaptación y conjunción de varias paginas con el fin de hacer mas fácil el trabajo, respeto el derecho de autor de cada uno de las paginas donde he tomado la información, lo mas importante es la configuración de Aerofly, la cual me ha tomado buen tiempo. Utilidades: Es necesario bajar de Internet, los drivers de instalación Ppjoy: Smartpropo: n.ethz.ch/student/mmoeller/fms/alpha/smartpropoplus.zip CONFIGURACION DEL CABLE SmartPropoPlus Cable for square Futaba plug. Identifying your R/C Transmitter and the trainer socket: The socket usually resides at the rear of the R/C Transmitter. Do not confuse it with the charger (DC) socket. Find the socket with the six small holes inside a rectangular area with a notch, as in Figure Error! Marcador no definido.:
2 Figure Error! Marcador no definido. Six-pin rectangular socket What you will need: 1. Six-pin plug that fits into the trainer socket. 2. One 3.5mm audio (mono) jack that fits into the your soundcard s audio input (e.g. Microphone). As in Figure Error! Marcador no definido. 3. About 2 meters of cable by which you will connect your R/C Transmitter to the soundcard. The cable should consist of 2 or more electrical wires. It is preferable that the wires will be coated with insulators of different colors so you can distinguish between the two. 4. Soldering equipment. Figure Error! Marcador no definido. 3.5mm mono jack Soldering: Use Figure Error! Marcador no definido. to guide you in your work. The plug is viewed from behind the plug, the way you see it while soldering. The signal line (red) connects pin 3 to the central tab of the audio jack. The ground line (black) connects pin 2 to the external tab of the audio jack. Connect pin 4 to pin 5. Figure Error! Marcador no definido. Six-pin rectangular plug cable SmartPropoPlus Cable for 6-pin DIN plug (Futaba). Identifying your R/C Transmitter and the trainer socket: The socket usually resides at the rear of the R/C Transmitter. Do not confuse it with the charger (DC) socket. Find the socket with the six small holes inside a round area with a notch, as in Figure Error! Marcador no definido.:
3 Figure Error! Marcador no definido. Six-pin DIN socket What you will need: 1. Six-pin plug that fits into the trainer socket. 2. One 3.5mm audio (mono) jack that fits into the your soundcard s audio input (e.g. Microphone). As in Figure Error! Marcador no definido. 3. About 2 meters of cable by which you will connect your R/C Transmitter to the soundcard. The cable should consist of 2 or more electrical wires. It is preferable that the wires will be coated with insulators of different colors so you can distinguish between the two. 4. Soldering equipment. Figure Error! Marcador no definido. 3.5mm mono jack Soldering: Use Figure Error! Marcador no definido. to guide you in your work. The DIN plug is viewed from behind the plug, the way you see it while soldering. The signal line (red) connects pin 2 to the central tab of the audio jack. The ground line (black) connects the plugs metallic shield to the external tab of the audio jack. Connect pin 4 to pin 5. Figure Error! Marcador no definido. Six-pin DIN plug cable
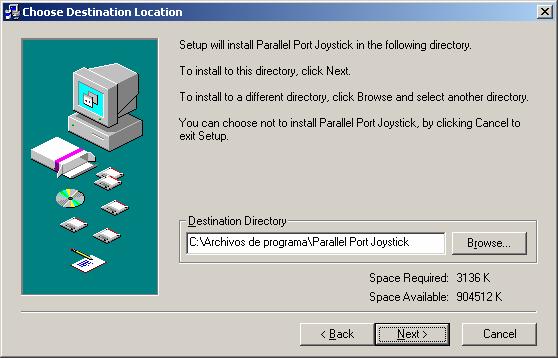
4 En el CD buscar la siguiente carpeta: Ejecutar Setup Dar clic sobre este recuadro Click en Next
5 Click Next
6
7 Esperar que la instalación llegue al final
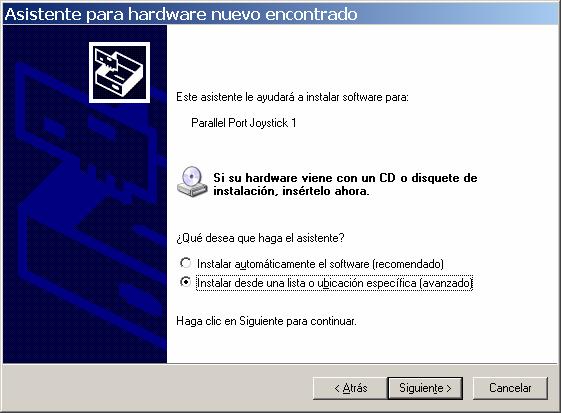
8 Dar clic en continuar Se agregará el Driver al sistema operativo
9
10
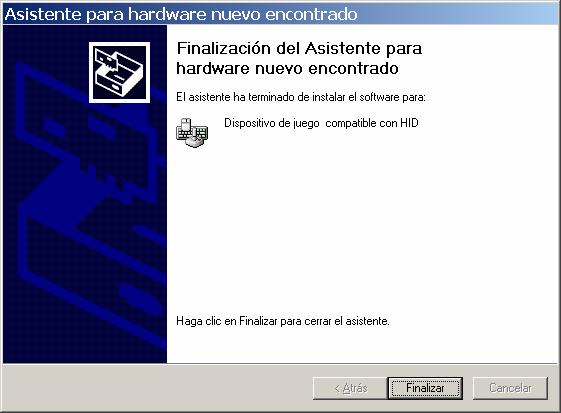
11 Clic en close cuando finalice En el panel de control encontrará Parallel Port Joysticks Configuración del PPJOY(Parallel Port Joystick)
12 Start: Abrir Panel Control Doble-click en Parallel Port Joysticks Add a new joystick Click en Add boton Usted Encontrara un cuadro de dialogos con los siguientes parametros
13 Change to settings Cambiar Parallel port a Virtual joysticks. Cambiar Controller number a Controller 1. Click en boton Add. Added Ya el virtual joystick fue adicionado
14 Iniciar Mapeo Seleccione PPJoy Virtual joystick 1 Click en boton Mapping Seleccionar los siguientes campos
15 Define axes Seleccione de acuerdo al numero de canales de su equipo
16 Map axes
17 Buttons Wizard Done Done OK finalizar y ya está listo el PPJOY
18 Click en DONE VALIDACION DEL PUERTO EN EL PC En el Panel de Control en dispositivos de juego seleccionar
19 Seguir los siguientes pasos para calibrar el equipo
20 CONFIGURACION DEL SMARTPROPO Smart Propo permite habilitar diferentes dispositivos de salida y entrada del equipo para conectarlo con PPJOY Buscar en el CD la siguiente carpeta Copiarlo en una carpeta en su equipo y ejecutar siempre antes de cargar el equipo SPPConsole
21 Configurar el Smartpropo de acuerdo al tipo de radio que tenga, PPM o PCM
22 Configuración en el Juego: Ingresar por Controls / escoger Joystick y dar click en properties Escoger los controles de acuerdo al siguiente pantallazo
23 Entrar por la opción CALIBRATE y calibrar los controles, LISTO PARA VOLAR
24 Derechos de Autor de Paginas y Utilidades Usadas: Cables Making Copyright Shaul Eizikovich PPJoy Version 0.83 (C) Deon van der Westhuysen SMARTPROPO
25 MANUAL DE INSTALACION DE CABLE Y APLICATIVO PARA SIMULADOR. Objetivo: Explicar la forma mas eficiente de configurar el aplicativo PPJoy y Smartpropo para que funcione de una forma correcta en el PC a través del conector de audio o del puerto IN de audio. Esta Es una adaptación y conjunción de varias paginas con el fin de hacer mas fácil el trabajo, respeto el derecho de autor de cada uno de las paginas donde he tomado la información, lo mas importante es la configuración de Aerofly, la cual me ha tomado buen tiempo. Utilidades: Es necesario bajar de Internet, los drivers de instalación Ppjoy: Smartpropo: n.ethz.ch/student/mmoeller/fms/alpha/smartpropoplus.zip CONFIGURACION DEL CABLE SmartPropoPlus Cable for square Futaba plug. Identifying your R/C Transmitter and the trainer socket: The socket usually resides at the rear of the R/C Transmitter. Do not confuse it with the charger (DC) socket. Find the socket with the six small holes inside a rectangular area with a notch, as in Figure Error! Marcador no definido.:
26 Figure Error! Marcador no definido. Six-pin rectangular socket What you will need: 1. Six-pin plug that fits into the trainer socket. 2. One 3.5mm audio (mono) jack that fits into the your soundcard s audio input (e.g. Microphone). As in Figure Error! Marcador no definido. 3. About 2 meters of cable by which you will connect your R/C Transmitter to the soundcard. The cable should consist of 2 or more electrical wires. It is preferable that the wires will be coated with insulators of different colors so you can distinguish between the two. 4. Soldering equipment. Figure Error! Marcador no definido. 3.5mm mono jack Soldering: Use Figure Error! Marcador no definido. to guide you in your work. The plug is viewed from behind the plug, the way you see it while soldering. The signal line (red) connects pin 3 to the central tab of the audio jack. The ground line (black) connects pin 2 to the external tab of the audio jack. Connect pin 4 to pin 5. Figure Error! Marcador no definido. Six-pin rectangular plug cable SmartPropoPlus Cable for 6-pin DIN plug (Futaba). Identifying your R/C Transmitter and the trainer socket: The socket usually resides at the rear of the R/C Transmitter. Do not confuse it with the charger (DC) socket. Find the socket with the six small holes inside a round area with a notch, as in Figure Error! Marcador no definido.:
27 Figure Error! Marcador no definido. Six-pin DIN socket What you will need: 1. Six-pin plug that fits into the trainer socket. 2. One 3.5mm audio (mono) jack that fits into the your soundcard s audio input (e.g. Microphone). As in Figure Error! Marcador no definido. 3. About 2 meters of cable by which you will connect your R/C Transmitter to the soundcard. The cable should consist of 2 or more electrical wires. It is preferable that the wires will be coated with insulators of different colors so you can distinguish between the two. 4. Soldering equipment. Figure Error! Marcador no definido. 3.5mm mono jack Soldering: Use Figure Error! Marcador no definido. to guide you in your work. The DIN plug is viewed from behind the plug, the way you see it while soldering. The signal line (red) connects pin 2 to the central tab of the audio jack. The ground line (black) connects the plugs metallic shield to the external tab of the audio jack. Connect pin 4 to pin 5. Figure Error! Marcador no definido. Six-pin DIN plug cable

28 En el CD buscar la siguiente carpeta: Ejecutar Setup Dar clic sobre este recuadro Click en Next


29 Click Next

30

31 Esperar que la instalación llegue al final

32 Dar clic en continuar Se agregará el Driver al sistema operativo

33

34


35 Clic en close cuando finalice En el panel de control encontrará Parallel Port Joysticks Configuración del PPJOY(Parallel Port Joystick)

36 Start: Abrir Panel Control Doble-click en Parallel Port Joysticks Add a new joystick Click en Add boton Usted Encontrara un cuadro de dialogos con los siguientes parametros

37 Change to settings Cambiar Parallel port a Virtual joysticks. Cambiar Controller number a Controller 1. Click en boton Add. Added Ya el virtual joystick fue adicionado

38 Iniciar Mapeo Seleccione PPJoy Virtual joystick 1 Click en boton Mapping Seleccionar los siguientes campos

39 Define axes Seleccione de acuerdo al numero de canales de su equipo


40 Map axes


41 Buttons Wizard Done Done OK finalizar y ya está listo el PPJOY

42 Click en DONE VALIDACION DEL PUERTO EN EL PC En el Panel de Control en dispositivos de juego seleccionar

43 Seguir los siguientes pasos para calibrar el equipo

44 CONFIGURACION DEL SMARTPROPO Smart Propo permite habilitar diferentes dispositivos de salida y entrada del equipo para conectarlo con PPJOY Buscar en el CD la siguiente carpeta Copiarlo en una carpeta en su equipo y ejecutar siempre antes de cargar el equipo SPPConsole

45 Configurar el Smartpropo de acuerdo al tipo de radio que tenga, PPM o PCM

46 Configuración en el Juego: Ingresar por Controls / escoger Joystick y dar click en properties Escoger los controles de acuerdo al siguiente pantallazo

47 Entrar por la opción CALIBRATE y calibrar los controles, LISTO PARA VOLAR
48 Derechos de Autor de Paginas y Utilidades Usadas: Cables Making Copyright Shaul Eizikovich PPJoy Version 0.83 (C) Deon van der Westhuysen SMARTPROPO
Adaptado Por: Alexander Chaverra Instructivo Configuración PPjoy Y SmartPropo Para Aerofly
 MANUAL DE INSTALACION DE CABLE Y APLICATIVO PARA SIMULADOR. Objetivo: Explicar la forma mas eficiente de configurar el aplicativo PPJoy y Smartpropo para que funcione de una forma correcta en el PC a través
CONTROLADORA PARA PIXELS CONPIX
 The LedEdit Software Instructions 1, Install the software to PC and open English version: When we installed The LedEdit Software, on the desktop we can see following icon: Please Double-click it, then
EP-2906 Manual de instalación
 EP-2906 Manual de instalación Con el botón situado a la izquierda se configura en el modo de cliente y de la derecha es el modo de Punto de acceso AP (nota: El USB es sólo para la función de fuente de
Guía de instalación rápida TU-S9
 Guía de instalación rápida TU-S9 V1 Table of Contents Español 1 1. Antes de iniciar 1 2. Cómo se instala 2 Troubleshooting 7 Version 06.24.2010 1. Antes de iniciar Contenidos del paquete TU-S9 CD-ROM del
Agustiniano Ciudad Salitre School Computer Science Support Guide - 2015 Second grade First term
 Agustiniano Ciudad Salitre School Computer Science Support Guide - 2015 Second grade First term UNIDAD TEMATICA: INTERFAZ DE WINDOWS LOGRO: Reconoce la interfaz de Windows para ubicar y acceder a los programas,
Guía de instalación rápida TU3-S
 Guía de instalación rápida TU3-S25 1.01 Table of Contents Español 1 1. Antes de iniciar 1 2. Instalación del Hardware 2 3. Cómo acceder a los dispositivos de almacenamiento TU3-S25 4 Troubleshooting 5
www.totalspanishsimulator.com
 I ) Instalación / Installation Pg. 2 II ) Conexión del cableado / Plug in the connectors Pg. 4 III ) Cambiar Posición Imán / Change Magnet Position Pg. 6 IV ) Configuración de Software Pg. 7 IV ) Software
CESVA USB DRIVER. M_CUD_v0001_20130226_ESP_ENG
 CESVA USB DRIVER M_CUD_v0001_20130226_ESP_ENG CESVA USB DRIVER ESPAÑOL CONTENIDO 1. Instalación del CESVA USB Driver... 2 2. Conocer el puerto COM asignado para la comunicación con el PC... 2 2.1. Windows
SERVIDOR DE IMPRESORA USB 2.0
 SERVIDOR DE IMPRESORA USB 2.0 Guía de Instalación Rápida DN-13006-1 Antes de empezar, debería preparar los siguientes elementos: Un PC basado en Windows con el CD de configuración del servidor de impresora
MINI GUIA: CONEXIÓN SEPAM CON USB WINDOWS - XP
 MINI GUIA: CONEXIÓN SEPAM CON USB 1 Actualmente los equipos SEPAM se suministran con puerto USB en el panel frontal. ------------------------ 2 Es obligatorio el uso de SFT2841 en su versión 14.0 o superior.
Creating your Single Sign-On Account for the PowerSchool Parent Portal
 Creating your Single Sign-On Account for the PowerSchool Parent Portal Welcome to the Parent Single Sign-On. What does that mean? Parent Single Sign-On offers a number of benefits, including access to
Guía de instalación rápida TE100-P1U
 Guía de instalación rápida TE100-P1U V2 Table of Contents Español 1 1. Antes de iniciar 1 2. Cómo se instala 2 3. Configuración del servidor de impresora 3 4. Añadir la impresora a su PC 5 Troubleshooting
Instalación Pico 2000
 Instalación Pico 2000 Busque y ejecute el programa Setup.exe de la carpeta del CD de la placa Pico 2000. Haga click en NEXT dos veces para llegar a la siguiente pantalla: 1) Pico2000_104 Pal: Una placa,
MANUAL EASYCHAIR. A) Ingresar su nombre de usuario y password, si ya tiene una cuenta registrada Ó
 Ingresar su nombre de usuario y password, si ya tiene una cuenta registrada Ó") MANUAL EASYCHAIR La URL para enviar su propuesta a la convocatoria es: https://easychair.org/conferences/?conf=genconciencia2015 Donde aparece la siguiente pantalla: Se encuentran dos opciones: A) Ingresar
MANUAL EASYCHAIR La URL para enviar su propuesta a la convocatoria es: https://easychair.org/conferences/?conf=genconciencia2015 Donde aparece la siguiente pantalla: Se encuentran dos opciones: A) Ingresar
app ADSL2V1 COMMUNICATIONS LINE www.printyourideas.com
 app ADSL2V1 COMMUNICATIONS LINE www.printyourideas.com 1. CONECTAR EL ROUTER Antes de conectar el dispositivo asegúrese de que el servicio de banda ancha (ADSL), suministrado por su proveedor ISP, se encuentra
How to connect a PC drive to a Sanyo Wavy (Spanish and english version) External connection of 3" drive to SVI 738
 External connection of 3 drive to SVI 738") How to connect a PC drive to a Sanyo Wavy (Spanish and english version) External connection of 3" drive to SVI 738 Ivan (Ivisoft) Converted to PDF by HansO, 2003 How to connect a PC drive to a Sanyo Wavy
How to connect a PC drive to a Sanyo Wavy (Spanish and english version) External connection of 3" drive to SVI 738 Ivan (Ivisoft) Converted to PDF by HansO, 2003 How to connect a PC drive to a Sanyo Wavy
Quick Installation Guide Internet Setup
 CBR-970 Wireless-N Broadband Router www.cnet.com.tw Established in California, U.S.A. since 1987 Quick Installation Guide Internet Setup What s included in the box CBR-970 Wireless N Broadband Router Quick
Conversor USB a cctalk
 Conversor USB a cctalk Manual de Usuario AMPASA Version 2.0 Tabla de contenidos 1 Interfaz USB para cctalk... 2 1.1 Diagramas de alimentación... 3 2 Instalar los drivers de la Interfaz USB para cctalk...
Manual para Cambio de Apariencia en Acrobat Reader DC. Change of Appearance in Acrobat Reader DC
 Manual para Cambio de Apariencia en Acrobat Reader DC Change of Appearance in Acrobat Reader DC Desarrollado por: DTE, LLC Versión: 02.2016 Developed by: DTE, LLC Revisado en:25 de Octubre de 2016 support@dtellcpr.com
BAI-220 AURICULAR INALÁMBRICO
 BAI-220 AURICULAR INALÁMBRICO Manual de usuario ESPECIFICACIONES TÉCNICAS EMISOR Frecuencia: 86 ± 0.5 MHz Modulación: FM Distancia de emisión: 30 m. Recepción de cualquier equipo de audio y video con salida
Manual de usuario. Instalación de Dispositivos y Firma de Documentos. PDF con JSingPDF SECURITY DATA SEGURIDAD EN DATOS Y FIRMA DIGITAL, S.A.
 Manual de usuario Instalación Documentos PDF con JSingPDF SECURITY DATA SEGURIDAD EN DATOS Y FIRMA DIGITAL, S.A. La Concepción - Río Palora OE2-7 Av. Amazonas Telf.: (59-2) 28 911 Fax: (59-2) 2250 271
Guía Rápida de Instalación
 Guía Rápida de Instalación TL-WPS510U Servidor de Impresión Inalámbrico Tamaño Bolsill Rev:1.0.0 7106500631 1. Antes de comenzar, debe preparar los siguientes elementos: Ordenador Windows 2000/XP/2003/Vista
Quick Installation Guide TU-S9
 Quick Installation Guide TU-S9 Table of of Contents Contents Español... 1 1. Antes de iniciar... 1 2. Instalación del Hardware... 2 Troubleshooting... 5 Version 11.08.2007 1. Antes de iniciar Contenidos
Shortcut to Informal Spanish Conversations Level 2 Lesson 1
 Shortcut to Informal Spanish Conversations Level 2 Lesson 1 These lessons extend on the ideas from Shortcut to Informal Spanish Conversations Level 1 http://www.informalspanish.com and Shortcut to Spanish
Guía Rápida de Instalación
 Guía Rápida de Instalación TL-PS110U Servidor de Impresión Fast Ethernet de un Puerto USB2.0 TL-PS110P Servidor de Impresión Fast Ethernet para un Puerto Paralelo Rev:1.0.0 7106500640 A Antes de comenzar,
Cómo comprar en la tienda en línea de UDP y cómo inscribirse a los módulos UDP
 Cómo comprar en la tienda en línea de UDP y cómo inscribirse a los módulos UDP Sistema de registro y pago Este sistema está dividido en dos etapas diferentes*. Por favor, haga clic en la liga de la etapa
Este servicio se presta en todas las webs que poseen este icono:
 En el proceso de mejora continua que la SEPR lleva a cabo en nuestra web (www.sepr.es), para conseguir un servicio de información de PR cada día más útil para los socios, hemos instalado una nueva aplicación,
Conversor. Merlín Full. Manual de Usuario
 Conversor USB RS-232C (COM Serial PC) Merlín Full Gracias por adquirir el conversor USB a RS-232C (COM serial de PC) Merlín Full. El mismo ha sido diseñado con la tecnología más avanzada disponible para
Brushless Gimbal. Mejor controlador Brushless gimbal de código abierto. Brushlessgimbal.de
 Brushless Gimbal Mejor controlador Brushless gimbal de código abierto Brushlessgimbal.de Cuando reciba cualquier controlador Brushless Gimbal que se ejecute en proyecto de código abierto, usted podría
FIRE RED FUZZ. Bill Of Materials
 FIRE RED FUZZ FIRE RED FUZZ We hope you enjoy your new FIRE RED FUZZ! In this manual, you will find documentation and guidelines helpful to build either your Kit or PuzzleKit. For any further information,
Guía de instalación rápida TPL-303E TPL-303E2K 1.01
 Guía de instalación rápida TPL-303E TPL-303E2K 1.01 Table of Contents Español 1 1. Antes de iniciar 1 2. Cómo se instala 2 Troubleshooting 6 Version 02.19.2010 1. Antes de iniciar Contenidos del paquete
Guía de instalación rápida TE100-P21 3.01
 Guía de instalación rápida TE100-P21 3.01 Table of Contents Español 1 1. Antes de iniciar 1 2. Cómo se instala 2 3. Configuración del servidor de impresora 3 4. Agregue la impresora a su computadora 5
Quick Installation Guide TU2-DVIV H/W: V1.0R
 Quick Installation Guide TU2-DVIV H/W: V1.0R Table Table of Contents of Contents Español... 1. Antes de iniciar... 2. Cómo se instala... 1 1 3 Troubleshooting... 6 Version 06.27.2008 1. Antes de iniciar
Microsoft Live Meeting 2007 Guía del Usuario Para los Controles de Audio
 CONFERENCIAS Y COLABORACIÓN G U Í A D E L A D M I N I S T R A D O R Microsoft Live Meeting 2007 Guía del Usuario Para los Controles de Audio Integración de Audio con Reservationless-Plus de InterCall Los
ROCK N STEREO SOUND DESK
 Read and save these instructions ROCK N STEREO SOUND DESK RTA-M1102-BK INSTRUCTIONS TABLE OF CONTENTS PACKAGE INCLUDES Package Includes... 2 Specifications... 2 Product Parts List... 3 1 2 3 Product Details...
Manual de Usuario. HISMINSA Sistema de Gestión Asistencial (Versión Offline para XP) Ministerio de Salud del Perú Todos los Derechos Reservados
 Ministerio de Salud del Perú Todos los Derechos Reservados") Manual de Usuario HISMINSA Sistema de Gestión Asistencial (Versión Offline para XP) Ministerio de Salud del Perú 2015 - Todos los Derechos Reservados Introducción El Ministerio de Salud del Perú a través
Manual de Usuario HISMINSA Sistema de Gestión Asistencial (Versión Offline para XP) Ministerio de Salud del Perú 2015 - Todos los Derechos Reservados Introducción El Ministerio de Salud del Perú a través
Manual de instalación de PVR-TV USB2.0
 Manual de instalación de PVR-TV USB2.0 Contenido Ver2.1 Capítulo 1 : Instalación del hardware de PVR-TV USB2.0...2 1.1 Contenido del paquete...2 Requisitos del sistema...2 1.3 Instalación del hardware...2
GUÍA DE USUARIO USER GUIDE 2.1 Multimedia Speaker System Design Line APPSP2102
 GUÍA DE USUARIO USER GUIDE 2.1 Multimedia Speaker System Design Line APPSP2102 Gracias por adquirir los Altavoces Multimedia 2.1 de Approx. Podrá conectar sus altavoces a cualquier ordenador, walkman,
Manual de Configuración de Router Cisco 871W
 Manual de Configuración de Router Cisco 871W Requisitos Contar con Internet Explorer versión 7.0 Instalar el programa Cisco System SDM 1. Verificar que la conexión de área local este configurada para que
PANEL PC PPC17TS GUÍA RÁPIDA
 PANEL PC PPC17TS GUÍA RÁPIDA COMPONENTES En la caja del panel PC encontrará los siguientes componentes: Panel PC completamente ensamblado. Soportes metálicos. ESPAÑOL Bandas anti-polvo. Cable de red. Guía
Ready. Set. Go. Vonage Box. Quick Start Guide
 Ready. Set. Go. TM Vonage Box Quick Start Guide Start here. Congratulations and welcome to Vonage! Now that you have your Vonage Box TM, it s time to enjoy exceptional home phone service, including a wide
Instructivo de Instalación del Sistema BAPIN II
 Requisitos previos Antes de comenzar con la instalación del Sistema deberá efectuar las siguientes verificaciones, con el fin de obtener una instalación exitosa: 1. La PC de destino deberá poseer acceso
Guía de instalación rápida TEW-639GR 2.01
 Guía de instalación rápida TEW-639GR 2.01 Table of Contents Español 1 1. Antes de iniciar 2. Instalación del Hardware 1 2 3. Configuración del enrutador inalámbrico 3 Troubleshooting 5 Version 03.04.2010
Welcome to lesson 2 of the The Spanish Cat Home learning Spanish course.
 Welcome to lesson 2 of the The Spanish Cat Home learning Spanish course. Bienvenidos a la lección dos. The first part of this lesson consists in this audio lesson, and then we have some grammar for you
TARJETA DE INTERFAZ PCI DE PUERTO PARALELO
 Introducción TARJETA DE INTERFAZ PCI DE PUERTO PARALELO Guía de instalación rápida Gracias por comprar la tarjeta de interfaz PCI IEEE1284. Esta tarjeta permite a los usuarios añadir uno o dos puertos
INSTRUCTION MANUAL MODEL: PBX-2100
 INSTRUCTION MANUAL MODEL: PBX-2100 FRONT PANEL BUTTONS FUNCTION PLAY/PAULSE Under USB, TF or Bluetooth mode, press this button to PAULSE and resume playing. Under AUX, press this button to mute playing.
Implementación de Exchange Server 2003 - Procedimientos de Configuración Configuración de Perfil Microsoft Outlook 2003 para utilizar RPC over HTTP.
 Implementación de Exchange Server 2003 - Procedimientos de Configuración Configuración de Perfil Microsoft Outlook 2003 para utilizar RPC over HTTP. Secretaría de Finanzas y Planeación del Gobierno del
1.- Conecta la cámara web a un puerto USB disponible, tu sistema la detectará y comenzara la instalación de los controladores
 Antes de comenzar a usar el producto es importante que leas este manual. MANUAL DE USUARIO PC-320425 Contenido Cámara para computadora 1 pieza Guía de usuario 1 pieza Instalación 1.- Conecta la cámara
ENKVM-USBB. 2-Port USB KVM switch with Easy Switch and Cable. User Guide
 ENKVM-USBB 2-Port USB KVM switch with Easy Switch and Cable User Guide i Package Contents 1 ENKVM-USBB 2-Port USB KVM Switch with Easy Switch and Cable 1 User Guide Requirements Console A VGA, SVGA, XGA,
Cómo puede SmartMonitor Instalar la Base de Datos en. el dispositivo NAS a través de iscsi?
 Cómo puede SmartMonitor Instalar la Base de Datos en el dispositivo NAS a través de iscsi? Prólogo SCSI (Small Computer System Interface) ofrece una interfaz de transmisión de datos con alta velocidad
Requerimientos de Configuración de Internet
 Requerimientos de Configuración de Internet Para poder conectar tu Punto de Acceso al Manager de PA, necesitará los siguientes parámetros de configuración para configurar los ajustes del TCP/IP de su ordenador.
1) Through the left navigation on the A Sweet Surprise mini- site. Launch A Sweet Surprise Inicia Una dulce sorpresa 2016
 Through the left navigation on the A Sweet Surprise mini- site. Launch A Sweet Surprise Inicia Una dulce sorpresa 2016") [[Version One (The user has not registered and is not logged in) Inicia Una dulce sorpresa 2016 To launch the Global Siddha Yoga Satsang for New Year s Day 2016, A Sweet Surprise, enter your username and
[[Version One (The user has not registered and is not logged in) Inicia Una dulce sorpresa 2016 To launch the Global Siddha Yoga Satsang for New Year s Day 2016, A Sweet Surprise, enter your username and
The power to control diabetes is in your hands.
 The power to control diabetes is in your hands. Lots of people with diabetes test their own blood sugar regularly. This helps them know if the things they do to control diabetes are working. Then, they
GUÍA DE USUARIO PC-331117. Bienvenidos al mundo Perfect Choice. Antes de comenzar a usar el producto es importante que leas esta guía.
 GUÍA DE USUARIO PC-331117 Bienvenidos al mundo Perfect Choice Antes de comenzar a usar el producto es importante que leas esta guía. Conexión 1. Inserta el transmisor en el conector para encendedor de
CONFIGURACIONES PREVIAS
 CONFIGURACIONES PREVIAS Para que la aplicación de solicitud de certificados pueda funcionar correctamente, se deberán realizar algunas configuraciones previas en el navegador Internet Explorer, para esto
Quick Installation Guide TW100-BRV304
 Quick Installation Guide TW100-BRV304 Table Table of Contents of Contents Español... 1 1. Antes de iniciar... 1 2. Instalación del Hardware... 2 3. Configuración del enrutador... 3 Troubleshooting... 5
Quick Installation Guide TE100-P11 TEW-P11G H/W: V1
 Quick Installation Guide TE100-P11 TEW-P11G H/W: V1 Table Table of Contents of Contents... 1. Antes de iniciar... 2. Cómo se instala... 3. Configuración del servidor de impresora... Troubleshooting...
Zune 8GB/4GB Start. Iniciar.
 Zune 8GB/4GB Start. Iniciar. SETUP 1 Visit www.zune.net/setup to install the Zune software. 2 When installation is complete, connect your Zune to your PC to start syncing. Your Zune charges whenever
EN / ES Airtribune Live tracking Instructions
 Airtribune Live tracking Instructions 1. Activate the desired service plan: Personal GSM live tracking with pilots devices Personal GSM & satellite tracking GSM tracking with rented of own tracker set.
M DJ SERIES. User Manual/Manual de Uso
 M DJ SERIES User Manual/Manual de Uso User Manual Installation 1. In order to enhance the cast function of listening to space sound, it is appropriate to set the center part of tweeter right to the position
Sistema Operativo Windows Server 2003/R2, Windows Server 2008, Windows XP / Vista / Seven. Instalador Aplicativo SafeNet Authentication Client
 Introducción Este manual de usuario describe el procedimiento para descargar, instalar y usar el aplicativo SafeNet Authentication Client que le permite acceder a su dispositivo TOKEN Aladdin etoken Pro
Guía de instalación rápida TEW-691GR 1.01
 Guía de instalación rápida TEW-691GR 1.01 Table of Contents Español 1 1. Antes de iniciar 1 2. Instalación del Hardware 2 3. Configuración del enrutador inalámbrico 3 Troubleshooting 5 Version 05.11.2010
1Guía de configuración de redes inalámbricas
 1Guía de configuración de redes inalámbricas Impresoras multifunción KODAK ESP Configurar una conexión inalámbrica Antes de realizar la conexión, necesita: Tener un router inalámbrico. Determinar si el
150Mbps Micro Wireless N USB Adapter
 150Mbps Micro Wireless N USB Adapter TEW-648UBM ŸGuía de instalación rápida (1) ŸTroubleshooting (5) 1.11 1. Antes de iniciar Contenidos del paquete ŸTEW-648UBM ŸCD-ROM (herramienta y guía del usuario)
Instalación de Software CACI
 Instalación de Software CACI Control y Administración de Cafés Internet Requerimientos del Sistema En el equipo Administrador se requiere una partición D:\ y el software de Java, Windows Steady State,
Vimar By-phone. Your home on your mobile phone.
 Vimar By-phone. Your home on your mobile phone. 1 4 GHI 5 JKL 7 PQRS 8 TUV 0 2 ABC DEF MNO WXYZ 3 6 9 Simple and immediate communication. With Vimar By-phone software, remote communication with your home
Fun with infinitives
 Fun with infinitives Fun with Infinitives Infinitives in Spanish are unassigned actions that when translated into English always start with the word to. Spanish- CANTAR English- to sing Fun with Infinitives
Manual de instalación de DVD MAKER PCI
 Manual de instalación de DVD MAKER PCI Contenido Ver2.0 Capítulo1 : Instalación del hardware de DVD MAKER PCI...2 1.1 Contenido del paquete...2 1.2 Requisitos del sistema...2 1.3 Instalación del hardware...2
GEMINI CDMP-2700 CONFIGURACIÓN VIRTUAL DJ SALIDA DE AUDIO (PC):
:") GEMINI CDMP-2700 CONFIGURACIÓN VIRTUAL DJ * Si tienes intención de conectar varios CDMP-2700 en modo MIDI se recomienda usar un hub USB. Antes de empezar, por favor asegurarse de lo siguiente: Descripción
GEMINI CDMP-2700 CONFIGURACIÓN VIRTUAL DJ * Si tienes intención de conectar varios CDMP-2700 en modo MIDI se recomienda usar un hub USB. Antes de empezar, por favor asegurarse de lo siguiente: Descripción
STUA SAPPORO JESUS GASCA 1998
 STUA SAPPORO JESUS GASCA 1998 WIDE RANGE MODULAR STORAGE SYSTEM SAPPORO AT HOME BOOKCASE IN HOME OFFICE SAPPORO AS TV-STAND SAPPORO WITH WALNUT DOORS 4 INDIVIDUAL SAPPORO LOAD IT! SAPPORO PROJECTS ARISTA,
Video Server. Quick Installation Guide. English, Español
 Video Server Quick Installation Guide English, Español 2 Video Server NOTES Quick Installation Guide 3 Video Server Quick Installation Guide To get your Video Server up and running on an Ethernet network,
Wi-Fi HD Camera Quick Setup Guide
 Wi-Fi HD Camera Quick Setup Guide What s Included First Alert HD IP Camera Unit Power Cord Ethernet Cable Camera Software CD Removable Antenna Mounting Bracket and Hardware Quick Setup Guide Initial Camera
CÁMARA IP INALÁMBRICA HD 720p VISIÓN NOCTURNA, AUDIO Y FUNCIÓN DE GRABACIÓN
 CÁMARA IP INALÁMBRICA HD 720p VISIÓN NOCTURNA, AUDIO Y FUNCIÓN DE GRABACIÓN VTA-83700 Gracias por adquirir nuestra CÁMARA! Antes de instalar y operar el producto, se recomienda tener en cuenta las instrucciones
Instalación X-Lite. Autor: Airsat 05-Abr-2010 Versión: 1.0
 I N S T R U C T I V O Instalación X-Lite Autor: Airsat 05-Abr-2010 Versión: 1.0 1. OBJETIVO Detallar los pasos para la instalación del producto X-Lite (softphone) Describe X-Lite (softphone) installation
Como desempacar el Time Attendant Además de ésta guía, el empaque debe incluír lo siguiente: Time Attendant Quick Install Reference Guide
 Como desempacar el Time Attendant Además de ésta guía, el empaque debe incluír lo siguiente: Terminal para colectar datos Cable de comunicación Adaptador de 25 a 9-DB CD con Software Adaptador de Corriente
Instructivo para instalación de QMS en PC (Windows)
") Instructivo para instalación de QMS en PC (Windows) Por favor lea completamente este instructivo antes de iniciar el proceso de instalación y verificación, y asegúrese de tener acceso a este instructivo
Instructivo para instalación de QMS en PC (Windows) Por favor lea completamente este instructivo antes de iniciar el proceso de instalación y verificación, y asegúrese de tener acceso a este instructivo
Modo de empleo Teléfono USB
 Modo de empleo Teléfono USB I. Función: Compatible con Skype, SJ-Phone, X-Lite, MSN, Net2Phone. Compatible con Win2000, XP. Compatible con USB 2.0/1.1 Tarjeta de sonido incorporada 16 Bit Alarma llamada
Por que utilizar DHCP
 DHCP, DNS, WNS Por que utilizar DHCP Cómo el DHCP asigna direcciones IP? Cómo funciona el proceso DHCP Lease Generation? Cómo funciona el proceso DHCP Lease Renewal? Para agregar el servicio DHCP Server
CONFIGURACIONES PREVIAS
 CONFIGURACIONES PREVIAS Para que la aplicación de solicitud de certificados pueda funcionar correctamente, se deberán realizar algunas configuraciones previas en el navegador Internet Explorer, para esto
Guía de instalación rápida TDM-C500 TDM-C504 1.01
 Guía de instalación rápida TDM-C500 TDM-C504 1.01 Table of Contents Español 1 1. Antes de iniciar 1 2. Instalación del Hardware 3 3. Configuración del Módem 4 Troubleshooting 7 Version 10.22.2010 1. Antes
Printer Driver. Esta guía describe la instalación del controlador de la impresora en Windows Vista, Windows XP y Windows 2000.
 4-129-722-51 (1) Printer Driver Guía de instalación Esta guía describe la instalación del controlador de la impresora en Windows Vista, Windows XP y Windows 2000. Antes de utilizar este software Antes
1 Procedimiento de instalación general en español de Conecta Disney
 1 2 1 Procedimiento de instalación general en español de Conecta Disney 1. El usuario realiza la instalación estándar por Internet de Conecta Disney. El sistema muestra el primer panel de Conecta Disney.
Validación De Certificados - Autoridad De Registro 01/ Configuraciones Previas:
 Validación De Certificados - Autoridad De Registro 1. Configuraciones Previas: Para que la aplicación de solicitud de certificados pueda funcionar correctamente, se deberán realizar algunas configuraciones
Small Flat Panel Digital Antenna User s Manual
 33681 Small Flat Panel Digital Antenna User s Manual Version 1 Introduction: The 33681 Small Flat Panel Antenna is specially designed to receive digital and analog terrestrial broadcasted TV signals. The
Paso 2: Descargar la app Wattio SmartHome Crear reglas en la app. Wattio SmartHo Guía rápida - Quick starting guide
 Guía rápida - Quick starting guide Paso 1: Abrir el pack Step 1: Open the pack Paso 2: Descargar la app Wattio SmartHome Crear reglas en la app. Wattio SmartHo Step 2: Download the Wattio SmartHome app
Guía de instalación rápida TV-IP512P 1.31
 Guía de instalación rápida TV-IP512P 1.31 Table of Contents Español 1 1. Antes de iniciar 1 2. Inslatación y configuración del Hardware 2 3. Instalación Power over Ethernet (PoE) 7 Troubleshooting 9 Version
Puede pagar facturas y gastos periódicos como el alquiler, el gas, la electricidad, el agua y el teléfono y también otros gastos del hogar.
 SPANISH Centrepay Qué es Centrepay? Centrepay es la manera sencilla de pagar sus facturas y gastos. Centrepay es un servicio de pago de facturas voluntario y gratuito para clientes de Centrelink. Utilice
https://firmadigital.scba.gov.ar
 CONFIGURACIONES PREVIAS Para que la aplicación de solicitud de certificados pueda funcionar correctamente, se deberán realizar algunas configuraciones previas en el navegador Internet Explorer, para esto
Conectar el Victron al ordenador con el programa de configuración VE Bus Quick Configure
 Conectar el Victron al ordenador con el programa de configuración VE Bus Quick Configure Para conectar un Victron a un ordenador es imprescindible asegurarse de algunos requisitos. Solamente modelos con
Trabajando con documentos
 Trabajando con documentos Continuando con la asociación de objetos GeneXus a las tareas del diagrama de validación de la reserva, seguiremos con las tareas interactivas Add customer information required
WL1003 NEW AUTOMÁTICO
 WL1003 NEW AUTOMÁTICO Acaba de adquirir un equipo de conmutación de euroconectores y le damos las gracias por su elección. Para una utilización óptima de este aparato, le recomendamos que lea este manual
IMPORTANTE: Antes de conectar el cable a su PC debe instalar el controlador tal como se explica en los siguientes pasos
 GUIA PARA LA INSTALACION Y CONFIGURACION DEL CABLE USB PARA ESTACION TOTAL IMPORTANTE: Antes de conectar el cable a su PC debe instalar el controlador tal como se explica en los siguientes pasos 1. Junto
6.8.3.9 Práctica de laboratorio: Configuración de un router inalámbrico en Windows Vista
 IT Essentials 5.0 6.8.3.9 Práctica de laboratorio: Configuración de un router inalámbrico en Windows Vista Introducción Imprima y complete esta práctica de laboratorio. En esta práctica de laboratorio,
Referencia Técnica Preguntas y Respuestas TSD-QA89 (2011/11)
") Referencia Técnica Preguntas y Respuestas TSD-QA89 (2011/11) 1. P: Cómo puedo activar la función 3D en un sistema ASRock Vision 3D e ION3D? R: Diferente monitor / TV / contenido / software de reproducción
Referencia Técnica Preguntas y Respuestas TSD-QA89 (2011/11) 1. P: Cómo puedo activar la función 3D en un sistema ASRock Vision 3D e ION3D? R: Diferente monitor / TV / contenido / software de reproducción
+ + PLOT LABEL. Instalación de la impresora térmica Rolly 1000 en Windows XP
 l año p s E 07 I 06 S AR O AH RA L A I M PR E SO R A NO CO NE CT Introducir el CD en el ordenador. Esperar algunos segundos. El procedimiento de instalación iniciará automáticamente. Instalación de la
2. INSTALACIÓN DEL ADAPTADOR USB-Bluetooth EN EL PC. 3. INSTALACIÓN DEL ADAPTADOR RS232C-Bluetooth Promi
 INDICE 1. INTRODUCCIÓN 2. INSTALACIÓN DEL ADAPTADOR USB-Bluetooth EN EL PC 3. INSTALACIÓN DEL ADAPTADOR RS232C-Bluetooth Promi 4. ENLACE PROMI CON DISPOSITIVO Bluetooth DEL PC 5. CONFIGURACIÓN DEL PUERTO
Guía de instalación rápida TEG-PCITXR TEG-PCITXRL 3.02
 Guía de instalación rápida TEG-PCITXR TEG-PCITXRL 3.02 Table of Contents Español 1 1. Antes de iniciar 1 2. Cómo se instala 2 Troubleshooting 5 Version 03.18.2010 1. Antes de iniciar ENGLISH Contenidos
CONFIGURACIÓN DE VIDEO, SONIDO Y AUDIO DE WINDOWS VISTA Y SKYPE
 CONFIGURACIÓN DE VIDEO, SONIDO Y AUDIO DE WINDOWS VISTA Y SKYPE CONFIGURACIÓN DE SONIDO Y AUDIO Para aprovechar todo el potencial de Skype, sigue estas instrucciones. Importante: ten en cuenta que las
Procedimiento para Instalar Sistema en Windows 7
 Procedimiento para Instalar Sistema en Windows 7 Para poder instalar nuestro sistema en Windows 7 debe seguir los siguientes pasos: 1. Desactivar el control de cuentas de usuarios 2. Instalar el sistema
IRS DATA RETRIEVAL NOTIFICATION DEPENDENT STUDENT ESTIMATOR
 IRS DATA RETRIEVAL NOTIFICATION DEPENDENT STUDENT ESTIMATOR Subject: Important Updates Needed for Your FAFSA Dear [Applicant], When you completed your 2012-2013 Free Application for Federal Student Aid