Bluetooth Wireless Headset Auricular inalámbrico Bluetooth. User Manual / Manual del Usuario (GBE211)
|
|
|
- Francisco Javier Cabrera Villalba
- hace 8 años
- Vistas:
Transcripción
1 Bluetooth Wireless Headset Auricular inalámbrico Bluetooth User Manual / Manual del Usuario (GBE211)

2 2006 IOGEAR. All Rights Reserved. PKG-M30141ES IOGEAR, the IOGEAR logo, are trademarks or registered trademarks of IOGEAR, Inc. Microsoft and Windows are registered trademarks of Microsoft Corporation. IBM is a registered trademark of International Business Machines, Inc. Macintosh, G3/G4 and imac are registered trademarks of Apple Computer, Inc. All other brand and product names are trademarks or registered trademarks of their respective holders. IOGEAR makes no warranty of any kind with regards to the information presented in this document. All information furnished here is for informational purposes only and is subject to change without notice. IOGEAR, Inc. assumes no responsibility for any inaccuracies or errors that may appear in this document.

3 Table of Contents Introduction 06 Pairing with a Bluetooth Phone 12 How to use the headset 14 Making a call 14 Ending a call 15 Answering a call 16 Connecting the Headset to PC/laptop 18 Technical Support 27 Limited Warranty 28

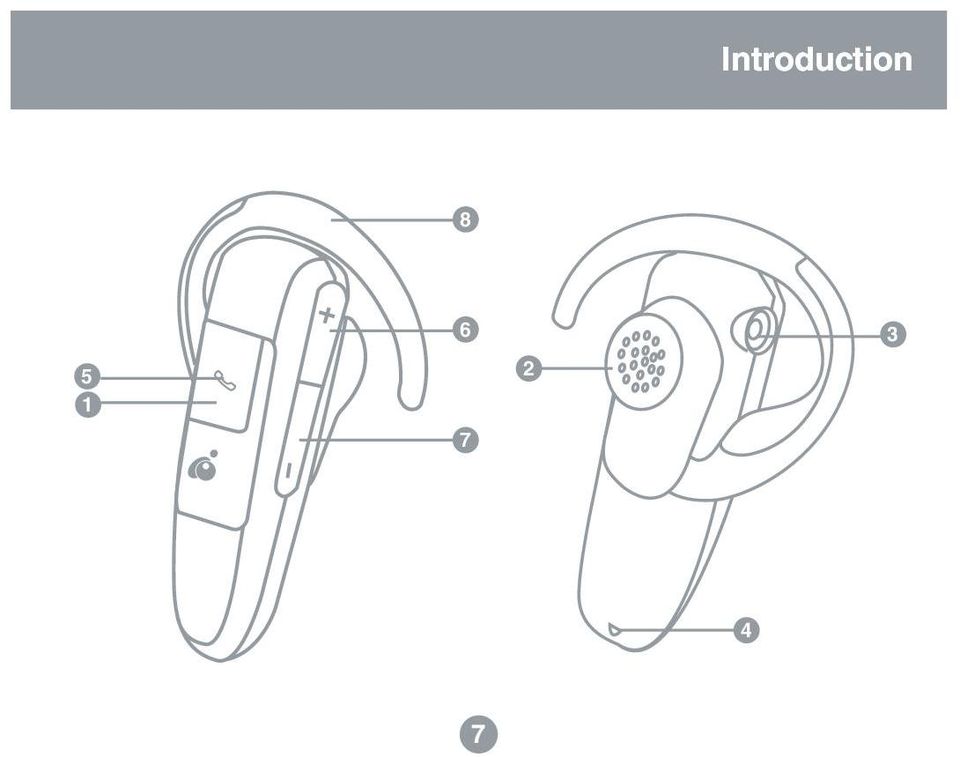
4 Introduction Please refer to the picture on the next page 1. Multi-function button used to turn headset ON/OFF, activate in discovery mode for pairing, and answer/terminate calls 2. Speaker this is the speaker for incoming voice calls 3. Power jack insert power cable to charge internal battery 4. Microphone this is the microphone for outgoing voice calls 5. LED window displays red and blue LEDs 6. Volume up increase the volume on the headset 7. Volume down decrease the volume on the headset 8. Ear hook - reversible 6

5 Introduction
6 Introduction LED Indicator lights Blue LED: Flashes approximately every four (4) seconds when the headset is ON (standby mode) Double flashes every 4 seconds when the headset is connected. Red LED: Remains ON while headset is charging and also when in discovery mode Flashes when the headset battery is low. Discovery Mode: Blue and red light flashes very rapidly when in discovery mode to pair with your Bluetooth phone Turn ON the headset 1. Press and hold the multi-function button for about seven (7) seconds; the blue LED will flash quickly four (4) times. Thereafter, it will flash once every seven (7) seconds. Turn OFF the headset 1. Press and hold the multi-function button for about seven (7) seconds; the red LED will flash four (4) times and then turn off. 8
 seconds; the blue LED will flash quickly four (4) times. Thereafter, it will flash once every seven (7) seconds.")
7 Introduction Charging the Battery You must charge the internal battery of the Bluetooth headset before your first use. Thereafter, the glimmering red LED will flash when the battery is low and emit a warning sound. To charge the battery, follow the procedure below: 1. Turn OFF the headset 2. Connect AC adapter into the power jack of the Bluetooth headset 3. The Red LED will remain ON while the headset is charging. Once the headset is fully charged, the red LED will turn OFF. It takesabout 2 hours to fully charge the headset. A fully-charged battery will give you approximately 7 hours of talk time, or 170 hours stand-by time. 9

8 Introduction Attaching ear hook 1. Position the headset with the speaker pointing inward 2. Position the ear hook with the clip-on facing down 3. Snap the ear hook onto the neck of the speaker TIP: To use the headset on the other ear, insert the ear hook from the ooposite side. (for left ear) (for right ear) 10

9 Introduction Placing headset on your ear 1. Wrap the ear hook around your ear 2. Insert the speaker piece into your ear 11

10 Pairing to Bluetooth Phone Pairing Procedure Pairing is a Bluetooth function that enables Bluetooth devices to remain permanently linked to each other. By pairing devices, you only need to authenticate and authorize communication between your devices once. During the pairing procedure, a PIN code is required for secure authentication. Thereafter, communication between your two Bluetooth devices is done automatically without requiring authentication or confirmation. For the procedure below, you will need to know how to use your cell phone s Bluetooth feature for discovering, connecting, and pairing to other Bluetooth devices. If you re not sure how to do this, please consult your cell phone user manual. To pair the IOGEAR Bluetooth headset with your Bluetooth phone, follow the procedure below: 1. Turn headset ON (see page 8 under Introduction) 2. Press and hold the Volume-Up (+) button for more than four (4) seconds; the red LED will turn ON and the blue LED will start rapidly flashing; the headset is now in pairing mode. NOTE: If only the blue LED is on, the headset is in stand-by mode; repeat the step again and make sure 12

11 Pairing to Bluetooth Phone the red LED is on and blue LED is blinking. The Bluetooth headset will remain in pairing mode for approximately five minutes. If no pairing takes place during that time interval, it will switch to stand-by mode. 3. Follow your cell phone s instructions to search for Bluetooth devices. The IOGEAR Bluetooth headset will show up as IOGEAR BT Headset. If the headset is not found on your first attempt, try again as it may take a few tries the first time you search for the device. 4. Select the Bluetooth headset ( IOGEAR BT Headset ) and select the pairing option. If you are prompted for a PIN code, enter You are now paired to the headset! The instructions will vary depending on the brand/ model of phone that you have. If you still have problems using the Bluetooth functionaity of your phone, please consult your cell phone s user manual. 13
 and select the pairing option. If you are prompted for a PIN code, enter 0000 5. You are now paired to the headset!")
12 How to use headset Before proceeding, please check the following: First, make sure that you have already paired the Bluetooth headset with your cell phone. Otherwise, you will be prompted to authorize the connection every time the Bluetooth headset communicates with your phone. Please refer to the section Pairing to Bluetooth Phone for additional information. Making a call 1. Put on the Bluetooth headset (make sure that it s turned on). 2. Dial the desired number using your phone s keypads 3. Press the connect/send button to initiate the call 4. The call should automatically be transferred to the Bluetooth headset. NOTE: If the phone call is not automatically transferred to the Bluetooth headset, press the multi-function button once to transfer the call to the headset. Your phone may prompt you if you wish to accept the connection from the Bluetooth headset; simply click Yes/OK. If you still cannot get your phone to transfer calls to the Bluetooth headset, we suggest you to consult your cell phone s user manual for instructions on configuring your phone to use with a headset. 14

13 How to use headset Ending a call If you wish to terminate a call while using the Bluetooth headset, please do the following: 1. Press the multi-function button once to hang up 2. You should now hear a beep sound from the headset indicating call has terminated Alternatively, you can terminate the phone call in the usual way using your cell phone s keypads. Redial a number If you wish to redial the last number using the Bluetooth headset, please follow the procedure below: 1. Press and hold any of the volume buttons (volume up or volume down) for approximately 3-5 seconds. Note: If your phone has not previously used the headset, this may take longer as the phone will ask for confirmation to use the Bluetooth headset 2. Your cell phone will start redialing the last number 15
 for approximately 3-5 seconds.")
14 How to use headset Answering a call Before proceeding, make sure you have already paired your Bluetooth phone and headset. 1. Put on the Bluetooth headset (make sure that it s turned on). 2. When you hear the ring tone on the headset, simply press the multifunction button once to pick up the call. Note: If the call is being transferred to your cell phone directly instead of the Bluetooth headset, press the multi-function button once on the headset to force your phone to use the headset. If you still cannot get your phone to transfer calls to the Bluetooth headset, we suggest you to consult your cell phone s user manual for instructions on configuring your phone to use with a headset. Reject a call To reject a call using the headset, do the following: 1. You will hear the ringing tone on your Bluetooth headset 2. Press and hold the multi-function button for 3 seconds until your phone stops ringing 16

15 Connecting Headset to PC/Laptop The IOGEAR Bluetooth headset can also be used on your PC/Laptop. Why would you want to use your headset on your computer? The answer is simple: Voice Over IP Please note that in order for this to work, the Bluetooth software on your PC/Laptop, must support the Headset profile. For the examples shown below, we used the WIDCOMM Bluetooth software v3.0.x which supports Headset profile. If you re not sure what profiles your Bluetooth software supports, please check with the vendor of your Bluetooth device/software. 17

16 Connecting Headset to PC/Laptop 1. Open My Bluetooth Places and click on Search for devices in range. The headset will be displayed as IOGEAR BT Headset 2. Right-click on the icon representing the IOGEAR headset, and select Pair Device. When prompted for a PIN code, enter

17 Connecting Headset to PC/Laptop 3. To access the services offered by the headset, double-click the IOGEAR headset icon. Now, right click on the icon displayed below and select Connect Headset. 4. Upon successful connection, the icon will turn green and it will say connected as shown below. Also note that the Bluetooth icon on your tray bar will turn green. 5. If you hear a long-beep sound on the headset, click the multi-function button once to transfer the audio on your computer to the headset. 19

18 Connecting Headset to PC/Laptop Voice Over IP With Voice-Over-IP programs, you can use your Internet connection to make calls to your family/friends over the Internet. Examples of these are chat programs that let you have voice conversations such as MSN messenger, yahoo messenger, etc. The instructions below are provided as an example, but they should work for most Voice-Over-IP programs, with minor configuration necessary. Here we show two examples of Voice-OVER-IP programs: - SKYPE - MSN Instant Messenger Bluetooth Audio Drivers Before proceeding, you need to check that your Bluetooth software has properly installed all Audio drivers necessary; otherwise, you will not be able to use the Bluetooth headset as an audio device. To verify this, go to Control Panel and look under Sound, video and game controllers, as shown below. In our example, you can see that the Bluetooth audio drivers have been added to our system and appear as Bluetooth Audio Device (the name and location might vary in your case). If your system does not show any Bluetooth audio drivers that you can see, 20

19 Connecting Headset to PC/Laptop please consult your Bluetooth software manual or check with your device vendor. 21

20 Connecting Headset to PC/Laptop SKYPE Configure software Before you can use the Bluetooth headset with your Voice-Over-IP program, you need to first specify the headset as the source for Audio-IN and Audio-OUT. 1. First, click on the File menu and select Options 22

21 Connecting Headset to PC/Laptop 2. Now go to the Hand/Headsets tab. As you see below, the sound device specified is the Windows default device (most likely your PC/Laptop speakers). Change both Audio In and Audio Out to the Bluetooth Audio option. 23
22 Connecting Headset to PC/Laptop MSN Messenger Voice chat Configure software Before you can use the Bluetooth headset with your Voice-Over-IP program, you need to first specify the headset as the source for Audio-IN and Audio-OUT. 1. First, click on the Tools menu and select Audio Tuning Wizard 24
23 Connecting Headset to PC/Laptop 2. When prompted to specify your Audio device, make sure to select Bluetooth Audio, and then click Next. NOTE: The name of the audio device shown here is what was displayed in Control Panel under the Sound, video and game controllers section. 25
24 Connecting Headset to PC/Laptop 3. Once the wizard has completed, click on Actions > Start a Voice Conversation, and select the person you want to invite to your conversation. 26
25 Technical Support If you need technical support, please check out our IOGEAR Tech Info Library (T.I.L.) at for the latest tips, tricks, and troubleshooting. The IOGEAR T.I.L. was designed to provide you with the latest technical information about our products. Most of the answers to your questions can be found here, so please try it out before contacting technical support. Technical support is available Monday through Friday from 8:00 am to 5:00 pm PST and can be reached at IOGEAR or
26 Limited Warranty IN NO EVENT SHALL THE DIRECT VENDOR S LIABILITY FOR DIRECT, INDIRECT, SPECIAL, INCIDENTAL OR CONSEQUENTIAL DAMAGES RESULTING FROM THE USE OF THE PRODUCT, DISK OR ITS DOCUMENTATION EXCEED THE PRICE PAID FOR THE PRODUCT. The direct vendor makes no warranty or representation, expressed, implied, or statutory with respect to the contents or use of this documentation, and especially disclaims its quality, performance, merchantability, or fitness for any particular purpose. The direct vendor also reserves the right to revise or update the device or documentation without obligation to notify any individual or entity of such revisions, or updates. For further inquires please contact your direct vendor. 28
27
28 2006 IOGEAR. All Rights Reserved. PKG-M030141ES IOGEAR, the IOGEAR logo, are trademarks or registered trademarks of IOGEAR, Inc. Microsoft and Windows are registered trademarks of Microsoft Corporation. IBM is a registered trademark of International Business Machines, Inc. Macintosh, G3/G4 and imac are registered trademarks of Apple Computer, Inc. All other brand and product names are trademarks or registered trademarks of their respective holders. IOGEAR makes no warranty of any kind with regards to the information presented in this document. All information furnished here is for informational purposes only and is subject to change without notice. IOGEAR, Inc. assumes no responsibility for any inaccuracies or errors that may appear in this document.
29 Tabla de contenido Introducción 32 Asociar a un teléfono Bluetooth 38 Cómo utilizar el auricular 40 Realizar una llamada 40 Terminar una llamada 41 Responder a una llamada 42 Conectar Auricular con su PC/Laptop 43 Soporte técnico 53 Garantía 54 31
30 Introducción 1. Botón principal 2. Parlante 3. Enchufe the corriente 4. Micrófono 5. Luces (rojo y azul) 6. Elevar el volumen 7. Bajar el volumen 8. soporte reversible para la oreja 32
31 Introduction
32 Introducción Luces de los indicadores LED LED de color azul: Parpadea aproximadamente cada cuatro (4) segundos cuando el auricular está encen dido en el modo de espera Parpadea doblemente cada cuatro (4) segundos cuando el auricular esta conectado al teléfono. LED de color rojo: Permanece encendido mientras el auricular se carga y cuando está en el modo de detección Parpadea cuando la carga de la batería del auricular es baja. Descubrimiento Parpadea muy rápido en el modo de detección cundo intenta establecer la asociación con un teléfono Bluetooth Encender el auricular 1. Mantenga presionado el botón principal durante unos siete (7) segundos; el indicador LED de color azul parpadeará rápidamente cuatro (4) veces. A partir de entonces, parpadeará una vez cada cuatro (4) segundos. 34
33 Introducción Apagar el auricular 1. Mantenga presionado el botón principal durante unos siete (7) segundos; el indicador LED de color rojo parpadeará cuatro (4) veces y, a continuación, se apagará. Cargar la batería Debe cargar la batería interna del auricular Bluetooth antes de utilizarla por primera vez. A partir de entonces, el indicador LED de color rojo débil parpadeará cuando la carga de la batería sea baja y advertencia. Para cargar la batería, siga el procedimiento que se describe a continuación: 1. Apague el auricular 2. Enchufe el cable cargador USB o el adaptador de CA al conector hembra de alimentación del auricular Bluetooth 3. El indicador LED de color rojo permanecerá encendido mientras el auricular se esté cargando. Cuando el auricular esté completamente cargado, el indicador LED de color rojo se apagará. El auricular tarda en cargarse completamente alrededor de 2 horas. Una batería totalmente cargada proporciona una autonomía de unas 7 horas de conver sación y 100 horas en el modo de espera. 35
34 Introducción Acoplar el soporte para la oreja 1. Coloque el auricular con el altavoz orientado hacia la parte interior 2. Coloque el soporte del auricular con el elemento de sujeción hacia abajo 3. Cierre el soporte del auricular por el cuello del altavoz Sugerencia: para utilizar el auricular en la oreja izquierda, siga los mismos pasos descritos anteriormente, pero coloque el roporte a la oreja al lado opuesto. (for left ear) (for right ear) 36
35 Introducción Colocar el auricular en la oreja 1. Rodee la oreja con el auricular 2. Inserte la pieza del altavoz en la oreja 37
36 Asociar a un teléfono Bluetooth La asociación es pairing una función Bluetooth que permite a dispositivos Bluetooth permanecer continuamente conectados. Con la asociación de dispositivos, sólo es necesario autenticar y autorizar la comunicación entre los dispositivos una única vez. Durante el procedimiento de asociación es necesario un código NIP para garantizar la autenticación. A partir de entonces, la comunicación entre los dispositivos Bluetooth se realiza automáticamente sin necesidad de autenticación ni confirmación. Para el procedimiento descrito a continuación, es necesario saber utilizar la función Bluetooth del teléfono para detectar, conectarse y asociarse con otros dispositivos Bluetooth. Si no está seguro de cómo realizar esta operación, consulte el manual del usuario del teléfono móvil. Procedimiento de asociación Para asociar el auricular Bluetooth de IOGEAR con su teléfono Bluetooth, siga el procedimiento que se describe a continuación: 1. Asegúrese que el auricular Bluetooth de IOGEAR este prendido. 2. Mantenga presionado el botón de subir el volumén (+) durante mas de cuatro (4) segundos; el indicador LED de color rojo se iluminará y el indicador LED de color azul comenzará a parpadear rápidamente; el auricular se encuentra ahora en el modo de asociación. Nota: si sólo se ilumina el indicador LED de color azul, el auricular se encuentra en el modo de espera; repita el paso y asegúrese de que el indicador LED rojo está iluminado y el de color azul parpadea. 38
37 Asociar a un teléfono Bluetooth El auricular Bluetooth permanecerá en el modo de asociación durante cinco minutos, aproximadamente. Si no tiene lugar ninguna asociación durante ese período de tiempo, el dispositivo pasará al modo de espera. 3. Siga las instrucciones del teléfono móvil para buscar dispositivos Bluetooth. El auricular Bluetooth de IOGEAR mostrará el mensaje AURICULAR BT DE IOGEAR [IOGEAR BT HEADSET]. Si el auricular no se detecta al primer intento, vuelva a intentarlo ya que puede ser necesario repetir la operación la primera vez que busca el dispositivo. 4. Seleccione el auricular Bluetooth ( AURICULAR BT DE IOGEAR [IOGEAR BT HEAD SET]) y elija la opción de asociación. Si se le solicita un número NIP, inserte Acaba de establecer la asociación con el auricular! Las instrucciones variarán en función de la marca y modelo del teléfono que tenga. Si sigue teniendo problemas cuando utilice la funcionalidad Bluetooth de su teléfono, consulte el manual del usuario del teléfono 39
38 Cómo utilizar el auricular Antes de continuar, compruebe lo siguiente: En primer lugar, asegúrese de que ya ha asociado el auricular Bluetooth al teléfono móvil. Si no es así, se le solicitará que autorice la conexión cada vez que el auricular Bluetooth se comunique con el teléfono. Consulte la sección Asociar a un teléfono Bluetooth para obtener más información. Realizar una llamada 1. Póngase el auricular Bluetooth (asegúrese de que está encendido) 2. Marque el número que desee mediante el teclado numérico del teléfono 3. Presione el botón de conexión y envío para iniciar la llamada 4. La llamada se debe transferir automáticamente al auricular Bluetooth NOTA: si la llamada telefónica no se transfiere inmediatamente al auricular Bluetooth, presione el botón principal una vez para transferir la llamada al auricular. El teléfono puede preguntarle si desea aceptar la conexión del auricular Bluetooth; simplemente haga clic en Sí/Aceptar [Yes/OK]. Si el teléfono sigue sin transferir las llamadas al auricular Bluetooth, es recomendable que consulte el manual de instrucciones del teléfono móvil para obtener instrucciones sobre el modo de configurar el teléfono para utilizarlo con un auricular. 40
39 Cómo utilizar el auricular Terminar una llamada Si desea terminar una llamada mientras utiliza el auricular Bluetooth, realice el siguiente procedimiento: 1. Presione el botón principal una vez para colgar 2. Debe escuchar un pitido procedente del auricular que indica que la llamada ha terminado Alternativamente, puede terminar la llamada telefónica de la forma normal mediante el teclado del teléfono móvil. Volver a marcar un número Si desea marcar de nuevo el último número mediante el auricular Bluetooth, siga el procedimiento que se describe a continuación: 1. Mantenga presionado botón principal durante 3 a 5 segundos aproximadamente. Nota: si el teléfono no ha utilizado anteriormente el auricular, esta operación puede tardar algo más ya que el teléfono móvil solicitará confirmación para utilizar el auricular Bluetooth 2. El teléfono móvil comenzará a marcar de nuevo el último número 41
40 Cómo utilizar el auricular Responder a una llamada Antes de continuar, asegúrese de que ha asociado el teléfono y el auricular Bluetooth. 1. Póngase el auricular Bluetooth (asegúrese de que está encendido). 2. Cuando oiga el tono de llamada en el auricular, simplemente presione el botón principal una vez para aceptar la llamada. Nota: si la llamada se transfiere directamente al teléfono móvil, en lugar de al auricular Bluetooth, presione una vez el botón principal del auricular para obligar al teléfono a utilizar dicho auricular. Si el teléfono sigue sin transferir las llamadas al auricular Bluetooth, es recomendable que consulte el manual de instrucciones del teléfono móvil para obtener instrucciones sobre el modo de configurar el teléfono para utilizarlo con un auricular. Rechazar una llamada Para rechazar una llamada mediante el auricular, realice el siguiente procedimiento: 1. Escuche el tono de llamada en el auricular Bluetooth 2. Mantenga presionado el botón principal durante 3 segundos hasta que el teléfono deje de emitir el tono 42
41 Conectar el auricular a un equipo de sobremesa o portátil El auricular Bluetooth de IOGEAR también se puede utilizar en un equipo de sobremesa o portátil. Por qué querría utilizar el auricular en su PC? La respuesta es sencilla: Tenga en cuenta que para que ésto funcione, el software Bluetooth del equipo de sobremesa o portátil debe ser compatible con el perfil de auricular. En el caso de los ejemplos mostrados anteriormente, se utilizó el software Bluetooth WIDCOMM v3.0.x que admite dicho perfil. Si no está seguro de los perfiles que admite el software Bluetooth que utiliza, consulte al proveedor del dispositivo y software Bluetooth. 43
42 Conectar el auricular a un equipo de sobremesa o portátil Procedimiento de asociación 1. Abra Mis lugares Bluetooth [My Bluetooth Places] y haga clic en Buscar dispositivos dentro del alcance de cobertura [ Search for devices in range]. El auricular se mostrará como AURICULAR BT DE IOGEAR [IOGEAR BT HEADSET] 2. Haga clic con el botón secundario en el icono que representa al auricular de IOGEAR y seleccione Asociar dispositivo [Pair Device]. Si se le solicita un número NIP, inserte
43 Conectar el auricular a un equipo de sobremesa o portátil 3. Para acceder a los servicios ofrecidos por el auricular, haga doble clic en el icono del auricular IOGEAR. Ahora, haga clic con el botón secundario en el icono que aparece a continuación y seleccione Conectar auricular [Connect Headset]. 4. Cuando la conexión se realice correctamente, el icono se iluminará en color verde y aparecerá el texto Conectado [Connected] tal y como se muestra a continuación. Asimismo tenga en cuenta que el icono Bluetooth de la barra de la bandeja se mostrará en color verde. 45
44 Conectar el auricular a un equipo de sobremesa o portátil 5. Si escucha un pitido prolongado en el auricular, haga clic en el botón principal una vez para transferir el audio del equipo al auricular. Voz sobre IP Con programas de voz sobre IP, puede utilizar la conexión a Internet para realizar llamadas a sus familiares y amigos a través de Internet. Las instrucciones siguientes se proporcionan como ejemplo, pero deben ser válidas para la mayoría de los programas de voz sobre IP, con una mínima configuración. A continuación se muestran dos ejemplos de programas de voz sobre IP: SKYPE MSN Instant Messenger Controladores de audio Bluetooth Antes de continuar, es necesario comprobar que el software Bluetooth ha instalado correctamente todos los controladores de audio necesarios; en caso contrario, no podrá utilizar el auricular Bluetooth como dispositivo de audio. Para comprobarlo, vaya al Administrador de dispositivos [Device Manager] y seleccione Dispositivos de sonido vídeo y juegos [ Sound, video and game controllers] tal y como se muestra a continuación. En nuestro ejemplo, puede ver que los controladores de audio Bluetooth se han agregado a nuestro sistema y que aparecen como Dispositivo de audio Bluetooth [Blue- 46
45 Conectar el auricular a un equipo de sobremesa o portátil tooth Audio Device] (el nombre y la ubicación pueden variar en su caso). Si el sistema no muestra ningún controlador de audio Bluetooth, consulte el manual de software Bluetooth o póngase en contacto con el proveedor del dispositivo. 47
46 Conectar el auricular a un equipo de sobremesa o portátil SKYPE Configurar el software Para poder utilizar el auricular Bluetooth con el programa de voz sobre IP, primero debe establecer el auricular como la fuente de entrada y salida de audio. 1. En primer lugar, haga clic en el menú Archivo [File] y seleccione Opciones [Options]. 48
47 Conectar el auricular a un equipo de sobremesa o portátil 2. Ahora seleccione la ficha Manos/Auriculares [Hand/ Headsets]. Como puede ver a continuación, el dispositivo de sonido especificado es el dispositivo predeterminado de Windows (los altavoces del equipo de sobremesa o portátil, lo más probable). 49
48 Conectar el auricular a un equipo de sobremesa o portátil Conversación de voz con MSN Messenger Configurar el software Para poder utilizar el auricular Bluetooth con el programa de voz sobre IP, primero debe establecer el auricular como la fuente de entrada y salida de audio. 1. En primer lugar, haga clic en el menú Herramientas [Tools] y seleccione Asistente para ajuste de audio [Audio Tuning Wizard]. 50
49 Conectar el auricular a un equipo de sobremesa o portátil 2. Cuando se le solicite que especifique un dispositivo de audio, asegúrese de seleccionar Audio Bluetooth [Bluetooth Audio] y, a continuación, haga clic en Siguiente [Next]. NOTA: el nombre del dispositivo de audio aquí mostrado es lo que aparece en el Administrador de dispositivos en la sección Dispositivos de sonido vídeo y juegos [ Sound, video and game controllers]. 51
50 Conectar el auricular a un equipo de sobremesa o portátil 3. Cuando el asistente se haya completado, haga clic en Acciones [Actions] > Iniciar una conversación de voz [Start a Voice Conversation] y seleccione la persona que desea invitar a la conversión.skype 52
51 Soporte técnico Si necesita soporte técnico, consulte nuestra Biblioteca de información técnica de IOGEAR (T.I.L., Tech Info Library) en la dirección Web para obtener los consejos, los trucos y la solución de problemas más recientes. La biblioteca TIL se diseñó para proporcionar la información técnica más reciente sobre nuestros productos. Aquí podrá encontrar la mayoría de las respuestas a sus preguntas, por tanto, consulte esta referencia antes de ponerse en contacto en el servicio de soporte técnico. El servicio de soporte técnico está disponible de lunes a viernes de 08:00 a 17:00 (hora estándar del Pacífico) llamando a nuestro teléfono gratuito IOGEAR ( ). Para llamadas internacionales puede ser necesario utilizar el número También puede obtener ayuda enviándonos un correo electrónico a support@iogear.com. 53
52 Garantía EN NINGÚN CASO, EL PROVEEDOR DIRECTO SERÁ RESPONSABLE DE NINGÚN DAÑO DIRECTO, INDIRECTO, ESPECIAL, INCIDENTAL O CONSECUENTE RESUL- TANTE DEL USO DEL PRODUCTO, DISCO O SU DOCUMENTACIÓN, SUPERIOR AL PRECIO PAGADO POR EL PRODUCTO. El proveedor directo no representa ni otorga ninguna garantía expresa, implícita o legal respecto al contenido o uso de esta documentación, y renuncia expresamente a su calidad, rendimiento, comerciabilidad o idoneidad para ningún fin determinado. El proveedor directo también se reserva el derecho a revisar o actualizar el dispositivo o documentación sin tener la obligación de notificar a ningún individuo o entidad tales revisiones o actualizaciones. Si tiene alguna pregunta no dude en ponerse en contacto con su proveedor directo. 54
53
54 Contact Info. Hubble Irvine, CA (P) (F)
GUÍA RÁPIDA DE. Instalación de Nokia Connectivity Cable Drivers
 GUÍA RÁPIDA DE Instalación de Nokia Connectivity Cable Drivers Contenido 1. Introducción...1 2. Requisitos...1 3. Instalación de Nokia Connectivity Cable Drivers...2 3.1 Antes de la instalación...2 3.2
GUÍA RÁPIDA DE. Instalación de los Controladores para cable de conectividad Nokia
 GUÍA RÁPIDA DE Instalación de los Controladores para cable de conectividad Nokia Contenido 1. Introducción...1 2. Requisitos...1 3. Instalación De Los Controladores Para Cable De Conectividad Nokia...2
La Video conferencia con Live Meeting
 Página 1 INSTRUCCIONES PARA TRABAJAR CON LIVE MEETING.- PREVIO. Para que tenga sentido la videoconferencia es conveniente que tengamos sonido (no suele ser problemático) y que tengamos vídeo. Si el ordenador
INSTALACIÓN DE NOKIA CONNECTIVITY CABLE DRIVERS
 GUÍA RÁPIDA DE INSTALACIÓN DE NOKIA CONNECTIVITY CABLE DRIVERS 1/6 Copyright 2003-2004 Nokia. Reservados todos los derechos. Contenido 1. INTRODUCCIÓN...3 2. REQUISITOS DEL SISTEMA...3 3. INSTALACIÓN DE
Guía de instalación rápida TBW-107UB 1.01
 Guía de instalación rápida TBW-107UB 1.01 Table of Contents Español 1 1. Antes de iniciar 1 2. Cómo se instala 2 3. Configuración del adaptador Bluetooth 5 Troubleshooting 7 Version 02.25.2010 1. Antes
Guía de instalación rápida TEG-160WS TEG-240WS
 Guía de instalación rápida TEG-160WS TEG-240WS C2 Table of Contents Español 1 1. Antes de iniciar 1 2. Instalación del Hardware 2 3. Herramienta de gestión Web 3 Troubleshooting 6 Version 02.02.2010 1.
150Mbps Micro Wireless N USB Adapter
 150Mbps Micro Wireless N USB Adapter TEW-648UBM ŸGuía de instalación rápida (1) ŸTroubleshooting (5) 1.11 1. Antes de iniciar Contenidos del paquete ŸTEW-648UBM ŸCD-ROM (herramienta y guía del usuario)
TUTORIAL: Cómo puedo instalar el Renault Media Nav Toolbox? TUTORIAL: Cómo puedo crear una "huella digital" del dispositivo en un dispositivo de
 TUTORIAL: Cómo puedo instalar el Renault Media Nav Toolbox? TUTORIAL: Cómo puedo crear una "huella digital" del dispositivo en un dispositivo de almacenamiento USB? TUTORIAL: Cómo puedo empezar a utilizar
Creating your Single Sign-On Account for the PowerSchool Parent Portal
 Creating your Single Sign-On Account for the PowerSchool Parent Portal Welcome to the Parent Single Sign-On. What does that mean? Parent Single Sign-On offers a number of benefits, including access to
Guía de instalación rápida TEW-639GR 2.01
 Guía de instalación rápida TEW-639GR 2.01 Table of Contents Español 1 1. Antes de iniciar 2. Instalación del Hardware 1 2 3. Configuración del enrutador inalámbrico 3 Troubleshooting 5 Version 03.04.2010
Guía de instalación rápida TEW-691GR 1.01
 Guía de instalación rápida TEW-691GR 1.01 Table of Contents Español 1 1. Antes de iniciar 1 2. Instalación del Hardware 2 3. Configuración del enrutador inalámbrico 3 Troubleshooting 5 Version 05.11.2010
Zune 8GB/4GB Start. Iniciar.
 Zune 8GB/4GB Start. Iniciar. SETUP 1 Visit www.zune.net/setup to install the Zune software. 2 When installation is complete, connect your Zune to your PC to start syncing. Your Zune charges whenever
Puede pagar facturas y gastos periódicos como el alquiler, el gas, la electricidad, el agua y el teléfono y también otros gastos del hogar.
 SPANISH Centrepay Qué es Centrepay? Centrepay es la manera sencilla de pagar sus facturas y gastos. Centrepay es un servicio de pago de facturas voluntario y gratuito para clientes de Centrelink. Utilice
MANUAL EASYCHAIR. A) Ingresar su nombre de usuario y password, si ya tiene una cuenta registrada Ó
 Ingresar su nombre de usuario y password, si ya tiene una cuenta registrada Ó") MANUAL EASYCHAIR La URL para enviar su propuesta a la convocatoria es: https://easychair.org/conferences/?conf=genconciencia2015 Donde aparece la siguiente pantalla: Se encuentran dos opciones: A) Ingresar
MANUAL EASYCHAIR La URL para enviar su propuesta a la convocatoria es: https://easychair.org/conferences/?conf=genconciencia2015 Donde aparece la siguiente pantalla: Se encuentran dos opciones: A) Ingresar
24-Port 10/100Mbps Web Smart PoE Switch with 4 Gigabit Ports and 2 Mini-GBIC Slots TPE-224WS
 24-Port 10/100Mbps Web Smart PoE Switch with 4 Gigabit Ports and 2 Mini-GBIC Slots TPE-224WS ŸGuía de instalación rápida (1) ŸTroubleshooting (3) 1.12 1. Antes de iniciar Contenidos del Paquete ŸTPE-224WS
Sierra Security System
 Using Your SpreadNet Accessories With Your Sierra Security System Uso de Sus Accesorios SpreadNet Con Su Sistema de Seguridad Sierra SN990-KEYPAD SN961-KEYFOB SN991-REMOTE 1 SN990-KEYPAD The SN990-KEYPAD
ESPAÑOL. Manual del usuario de BT-02N
 Manual del usuario de BT-02N 1 Índice 1. Resumen...3 2. Para empezar...5 3. Cómo conectar su auricular Bluetooth...5 4. Cómo usar su auricular Bluetooth...9 5. Ficha técnica...9 2 1. Resumen 1-1 Contenidos
EP-2906 Manual de instalación
 EP-2906 Manual de instalación Con el botón situado a la izquierda se configura en el modo de cliente y de la derecha es el modo de Punto de acceso AP (nota: El USB es sólo para la función de fuente de
MANUAL LL-380. Manual de instrucciones Bluetooth 3.0 LL-380
 MANUAL LL-380 Manual de instrucciones Bluetooth 3.0 LL-380 Guía de inicio rápido LL-380 Bluetooth HEADSE Introducción Con la tecnología inalámbrica Bluetooth, LL-380 le da la forma conveniente inalámbrica
Printer Driver. Esta guía describe la instalación del controlador de la impresora en Windows Vista, Windows XP y Windows 2000.
 4-129-722-51 (1) Printer Driver Guía de instalación Esta guía describe la instalación del controlador de la impresora en Windows Vista, Windows XP y Windows 2000. Antes de utilizar este software Antes
Printer Driver. Guía de instalación. Esta guía describe la instalación del controlador de la impresora en Windows Vista.
 3-876-168-51 (1) Printer Driver Guía de instalación Esta guía describe la instalación del controlador de la impresora en Windows Vista. Antes de utilizar el software Antes de utilizar el controlador de
Guía de instalación rápida TE100-P1U
 Guía de instalación rápida TE100-P1U V2 Table of Contents Español 1 1. Antes de iniciar 1 2. Cómo se instala 2 3. Configuración del servidor de impresora 3 4. Añadir la impresora a su PC 5 Troubleshooting
VCM II inalámbrico Manual del usuario
 VCM II inalámbrico Manual del usuario Publicación: 20 de marzo de 2012 CONTENIDO Introducción... 3 Descargue e instale el software de IDS... 3 Prepare la COMPUTADORA para un VCM II inalámbrico... 3 Configurar
EW3590/91/92 Cascos Bluetooth con micrófono
 EW3590/91/92 Cascos Bluetooth con micrófono Cascos Bluetooth con micrófono EW3590/91/92 2 ESPAÑOL Contenidos 1.0 Introducción... 2 1.1 Contenido del paquete... 2 2.0 Conectar a un dispositivo Bluetooth...
CESVA USB DRIVER. M_CUD_v0001_20130226_ESP_ENG
 CESVA USB DRIVER M_CUD_v0001_20130226_ESP_ENG CESVA USB DRIVER ESPAÑOL CONTENIDO 1. Instalación del CESVA USB Driver... 2 2. Conocer el puerto COM asignado para la comunicación con el PC... 2 2.1. Windows
Calisto P240. Microteléfono con USB GUÍA DEL USUARIO
 Calisto P240 Microteléfono con USB GUÍA DEL USUARIO Bienvenido Enhorabuena por la compra de este producto de Plantronics. Esta guía contiene instrucciones para configurar y utilizar el microteléfono con
Servidor de impresión USB. Manual del usuario (GMFPSU01)
") Servidor de impresión USB Manual del usuario (GMFPSU01) Bienvenido Gracias por adquirir este Servidor de impresión multifunción USB de 1 puerto que permite a cualquier equipo conectado en red compartir
Servidor de impresión USB Manual del usuario (GMFPSU01) Bienvenido Gracias por adquirir este Servidor de impresión multifunción USB de 1 puerto que permite a cualquier equipo conectado en red compartir
GUÍA DE INSTALACIÓN DE NOKIA NETWORK BRIDGE. Copyright 2002-2004 Nokia. Reservados todos los derechos. 1/6
 1/6 GUÍA DE INSTALACIÓN DE NOKIA NETWORK BRIDGE Copyright 2002-2004 Nokia. Reservados todos los derechos. Aviso legal Copyright 2004 Nokia. Reservados todos los derechos. Queda prohibida la reproducción,
Agustiniano Ciudad Salitre School Computer Science Support Guide - 2015 Second grade First term
 Agustiniano Ciudad Salitre School Computer Science Support Guide - 2015 Second grade First term UNIDAD TEMATICA: INTERFAZ DE WINDOWS LOGRO: Reconoce la interfaz de Windows para ubicar y acceder a los programas,
Guía de instalación rápida TU2-HDMI 1.01
 Guía de instalación rápida TU2-HDMI 1.01 Table of Contents Español 1 1. Antes de iniciar 1 2. Cómo se instala 2 3. Configuración de los parámetros de imagen 4 Troubleshooting 6 Version 02.16.2011 1. Antes
1. Sign in to the website, http://www.asisonline.org / Iniciar sesión en el sitio, http://www.asisonline.org
 Steps to Download Standards & Guidelines from the ASIS International Website / Pasos para Descargar los Standards & Guidelines de la Página Web de ASIS International 1. Sign in to the website, http://www.asisonline.org
ROCK N STEREO SOUND DESK
 Read and save these instructions ROCK N STEREO SOUND DESK RTA-M1102-BK INSTRUCTIONS TABLE OF CONTENTS PACKAGE INCLUDES Package Includes... 2 Specifications... 2 Product Parts List... 3 1 2 3 Product Details...
Guía de instalación rápida TFM-561U
 Guía de instalación rápida TFM-561U V1 Table of Contents Español 1 1. Antes de iniciar 1 2. Cómo se instala 2 Troubleshooting 5 Version 08.25.2010 1. Antes de iniciar Contenidos del paquete TFM-561U CD-ROM
Crear alarma GATE. Aparecerá una ventana emergente para crear alarma.
 Crear alarma GATE Para crear una alarma, accede a través del menú principal de myhome.wattio.com a Seguridad, posteriormente arriba a la derecha haz click en Alarmas. En esta pantalla, en el menú izquierdo,
Versión Española. Introducción. Drivers y software. Instalación. BT211 Sweex Bluetooth 2.0 Class 1 Adapter USB
 BT211 Sweex Bluetooth 2.0 Class 1 Adapter USB Introducción No exponga el Sweex Bluetooth 2.0 Class 1 Adapter USB a temperaturas extremas. No sitúe el reproductor bajo la luz solar directa o cerca de elementos
CHAT de Jabra - PARA PC
 CHAT de Jabra - PARA PC Manual de usuario www.jabra.com Contenido BIENVENIDO...3 Descripción general del producto...3 Instalación...4 conexión...4 CONFIGURACIÓN...4 funciones de llamada...4 Cómo obtener
ENKVM-USBB. 2-Port USB KVM switch with Easy Switch and Cable. User Guide
 ENKVM-USBB 2-Port USB KVM switch with Easy Switch and Cable User Guide i Package Contents 1 ENKVM-USBB 2-Port USB KVM Switch with Easy Switch and Cable 1 User Guide Requirements Console A VGA, SVGA, XGA,
Procedimientos iniciales
 Procedimientos iniciales Instalar, conectar y utilizar su dispositivo Intelligent NAS 2014/7 Contenido Creación de RAID automática y capacidad de la unidad...3 Guía de instalación rápida...4 Instalar Intelligent
Calisto P240-M. Microteléfono con USB GUÍA DEL USUARIO
 TM Calisto P240-M Microteléfono con USB GUÍA DEL USUARIO Bienvenido Enhorabuena por la compra de este producto de Plantronics. Esta guía contiene instrucciones para configurar y utilizar el microteléfono
EM1037 Conmnutador KVM de 2 puertos USB
 EM1037 Conmnutador KVM de 2 puertos USB Cómo se conecta a los Puertos USB: El teclado se debe enchufar en el puerto USB superior. El ratón se debe enchufar en el puerto USB inferior. 2 ESPAÑOL EM1037 -
BWATCH-BT1 SMARTWATCH BLUETOOTH. Manual de Instrucciones
 BWATCH-BT1 SMARTWATCH BLUETOOTH Manual de Instrucciones FUNCIONES Y CONTROLES 1. Altavoz 2. Encendido/Apagado 3. Entrada USB/Auriculares 4. Atrás 5. Botón Home 6. Botón Llamada 7. Micrófono 8. Botón RESET:
Phone Manager Compatibilidad con aplicaciones OCTOBER 2014 DOCUMENT RELEASE 4.1 COMPATIBILIDAD CON APLICACIONES
 Phone Manager Compatibilidad con aplicaciones OCTOBER 2014 DOCUMENT RELEASE 4.1 COMPATIBILIDAD CON APLICACIONES Sage CRM NOTICE The information contained in this document is believed to be accurate in
Manual de Usuario. Subida de imágenes a FTP ante alarma
 Manual de Usuario Subida de imágenes a FTP ante alarma ÍNDICE 1 CONEXIÓN FÍSICA... 3 2 CONFIGURACIONES... 4 2.1 CONFIGURACIÓN DEL FTP... 4 2.2 CONFIGURACIÓN DE LA ENTRADA DE ALARMA... 7 1 CONEXIÓN FÍSICA
Versión Española. Introducción. Instalación del software con Windows 98SE. WC004 - Nightvision Chatcam
 WC004 - Nightvision Chatcam Introducción No exponga la Sweex Nightvision Chatcam a temperaturas extremas. No sitúe el reproductor bajo la luz solar directa o cerca de elementos térmicos. No utilice la
Software TRENDnetVIEW Pro. Guía de instalación rápida de TRENDnetVIEW Pro (1)
") Software TRENDnetVIEW Pro Guía de instalación rápida de TRENDnetVIEW Pro (1) TRENDnetVIEW Pro/10.08.2013 Índice Requisitos del software de gestión TRENDnetVIEW Pro... 19 Instalación de TRENDnetVIEW Pro...
Software TRENDnetVIEW Pro Guía de instalación rápida de TRENDnetVIEW Pro (1) TRENDnetVIEW Pro/10.08.2013 Índice Requisitos del software de gestión TRENDnetVIEW Pro... 19 Instalación de TRENDnetVIEW Pro...
Quick Installation Guide TU2-DVIV H/W: V1.0R
 Quick Installation Guide TU2-DVIV H/W: V1.0R Table Table of Contents of Contents Español... 1. Antes de iniciar... 2. Cómo se instala... 1 1 3 Troubleshooting... 6 Version 06.27.2008 1. Antes de iniciar
Phone Manager Compatibilidad con aplicaciones OCTOBER 2014 DOCUMENT RELEASE 4.1 COMPATIBILIDAD CON APLICACIONES
 Phone Manager Compatibilidad con aplicaciones OCTOBER 2014 DOCUMENT RELEASE 4.1 COMPATIBILIDAD CON APLICACIONES SalesLogix NOTICE The information contained in this document is believed to be accurate in
Plantronics Blackwire C610 Blackwire C620
 Plantronics Blackwire C610 Blackwire C60 MANUAL DEL USUARIO BIENVENIDO Bienvenido a la familia de productos de audífonos de Plantronics. Plantronics ofrece una amplia gama de productos, desde productos
MobiShow para Android TM Manual del usuario
 MobiShow para Android TM Manual del usuario Aviso importante Todos los comunicados, información técnica y recomendaciones relacionados con los productos de 3M se basan en información que se considera confiable,
Guía de instalación rápida TE100-P21 3.01
 Guía de instalación rápida TE100-P21 3.01 Table of Contents Español 1 1. Antes de iniciar 1 2. Cómo se instala 2 3. Configuración del servidor de impresora 3 4. Agregue la impresora a su computadora 5
Plantronics Blackwire C610 Blackwire C620
 Plantronics Blackwire C610 Blackwire C60 GUÍA DEL USUARIO BIENVENIDO Bienvenido a la línea de productos de auriculares de Plantronics. Plantronics le ofrece una amplia gama de productos que abarcan desde
EW1051 Lector de tarjetas inteligentes USB
 EW1051 Lector de tarjetas inteligentes USB 2 ESPAÑOL EW1051 Lector de tarjetas USB Contenidos 1.1 Funciones y características... 2 1.2 Contenido del paquete... 2 2.0 Instalar el dispositivo EW1051 mediante
Guía del usuario de KIP sobre el estado de la impresora Instalación y guía del usuario de KIP sobre el estado de la impresora
 Instalación y guía del usuario de KIP sobre el estado de la impresora - 1 - Contenido 1 Introducción... 3 2 Instalación y configuración... 4 3 Funcionalidad del estado de la impresora KIP... 6 4 Uso del
P á g i n a 1 / 15. M A N U A L I N S T A L A C I Ó N C o p y r i g h t 2 0 1 3 P r i v a t e P l a n e t L t d.
 Copyright 2013 Private Planet Ltd. Private Planet is a registered trademark of Private Planet Ltd. Some applications are not available in all areas. Application availability is subject to change. Other
GARAGE DOOR OPENER CONNECTIVITY HUB QUICK START GUIDE
 GARAGE DOOR OPENER CONNECTIVITY HUB QUICK START GUIDE Thank you for purchasing a Craftsman garage door opener Connectivity Hub enabled with AssureLink technology. Once you have created your account and
MobiShow para Apple iphone Manual del usuario
 MobiShow para Apple iphone Manual del usuario Aviso importante Todos los comunicados, información técnica y recomendaciones relacionados con los productos de 3M se basan en información que se considera
JABRA STYLE. Manual de instrucciones. jabra.com/style
 JABRA STYLE Manual de instrucciones jabra.com/style Índice 1. Bienvenido... 3 2. VISTA GENERAL del auricular... 4 3. cómo se coloca... 5 3.1 Cómo cambiar el eargel 4. Cómo cargar la batería... 6 5. cómo
Guía de Aplicación del Servidor de Impresión. Esta guía aplica para los siguientes modelos.
 Guía de Aplicación del Servidor de Impresión Esta guía aplica para los siguientes modelos. TL-WR842ND TL-WR1042ND TL-WR1043ND TL-WR2543ND TL-WDR4300 CONTENIDO Capítulo 1. Descripción General...1 Capítulo
BAI-220 AURICULAR INALÁMBRICO
 BAI-220 AURICULAR INALÁMBRICO Manual de usuario ESPECIFICACIONES TÉCNICAS EMISOR Frecuencia: 86 ± 0.5 MHz Modulación: FM Distancia de emisión: 30 m. Recepción de cualquier equipo de audio y video con salida
Jabra SPEAK 410. Manual de usuario. www.jabra.com
 Jabra SPEAK 410 Manual de usuario www.jabra.com Contenido BIENVENIDO...3 Descripción general del producto...3 Instalación...4 conexión...4 CONFIGURACIÓN...4 funciones de llamada...4 Cómo obtener ayuda...6
Manual de Instrucciones
 BSPORT-10-N-R-V-A PULSERA DEPORTIVA-BLUETOOTH Manual de Instrucciones FUNCIONES Y CONTROLES Pulsar el botón de encendido durante 3 segundos para encender el dispositivo. BATERÍA El dispositivo cuenta con
Instalador de aplicaciones adicionadas para la ClassPad
 Para la ClassPad 300/ClassPad 300 PLUS S Instalador de aplicaciones adicionadas para la ClassPad Guía del usuario RJA510188-4 http://world.casio.com/edu/ http://classpad.net/ Instalador de aplicaciones
Phone Manager Compatibilidad con aplicaciones OCTOBER 2014 DOCUMENT RELEASE 4.1 COMPATIBILIDAD CON APLICACIONES
 Phone Manager Compatibilidad con aplicaciones OCTOBER 2014 DOCUMENT RELEASE 4.1 COMPATIBILIDAD CON APLICACIONES Salesforce NOTICE The information contained in this document is believed to be accurate in
ALTAVOZ INALÁMBRICO. Guía de inicio. Voir au verso pour les instructions en français SP251 FS QSG 00
 ALTAVOZ INALÁMBRICO Guía de inicio rápido Voir au verso pour les instructions en français SP251 FS QSG 00 Lo que usted debe saber sobre Bluetooth Bluetooth inalámbrico es una forma rápida y fácil de conectar
1. Instalación de una Unidad de Disco Duro (HDD) Pág. 1. 1.1. Instalación de un HDD IDE Pág. 2 1.2. Instalación de un HDD SATA Pág.
 Pág. 1. 1.1. Instalación de un HDD IDE Pág. 2 1.2. Instalación de un HDD SATA Pág.") Índice de Contenidos 1. Instalación de una Unidad de Disco Duro (HDD) Pág. 1 1.1. Instalación de un HDD IDE Pág. 2 1.2. Instalación de un HDD SATA Pág. 7 2. Formateo de la Unidad de Disco Duro (HDD) Pág.
Índice de Contenidos 1. Instalación de una Unidad de Disco Duro (HDD) Pág. 1 1.1. Instalación de un HDD IDE Pág. 2 1.2. Instalación de un HDD SATA Pág. 7 2. Formateo de la Unidad de Disco Duro (HDD) Pág.
mobile PhoneTools Manual de instrucciones
 mobile PhoneTools Manual de instrucciones Índice Requisitos...2 Antes de la instalación...3 Instalación mobile PhoneTools...4 Instalación y configuración del móvil...5 Registro en línea...7 Desinstalación
mobile PhoneTools Guía de inicio rápido
 mobile PhoneTools Guía de inicio rápido Contenido Requisitos mínimos...2 Antes de la instalación...3 Instalación de mobile PhoneTools...4 Instalación y configuración del dispositivo móvil...5 Registro
Copyright 2014 Axess Products Corporation. All Rights Reserved
 SPBT1031 Manual Para un funcionamiento correcto, lea atentamente este manual antes de usar. Por favor, tenga en cuenta que cualquier revisión de contenidos no serán declarados, y no somos responsables
Bluetooth Pairing Guide For iphone
 Bluetooth Pairing Guide For iphone Pairing your phone 1 is the first step in connecting with your Toyota for hands-free calling and for audio streaming via Bluetooth 2. This pairing process is quick and
Guía de instalación rápida TPL-303E TPL-303E2K 1.01
 Guía de instalación rápida TPL-303E TPL-303E2K 1.01 Table of Contents Español 1 1. Antes de iniciar 1 2. Cómo se instala 2 Troubleshooting 6 Version 02.19.2010 1. Antes de iniciar Contenidos del paquete
USER S MANUAL FEATURING NEAR FIELD AUDIO TECHNOLOGY
 USER S MANUAL FEATURING NEAR FIELD AUDIO TECHNOLOGY by 1. INTRODUCTION The Boost speaker uses patent pending NearFA technology. Simply place a mobile device such as an iphone on top of the Boost speaker
EM4590R1 Repetidor Wi-Fi universal con WPS
 EM4590R1 Repetidor Wi-Fi universal con WPS 2 ESPAÑOL EM4590R1 - Repetidor Wi-Fi universal con WPS Contenidos 1.0 Introducción... 2 1.1 Contenido del paquete... 2 2.0 Dónde colocar el repetidor WPS inalámbrico
Creando Cuentas Nuevas para Padres / Alumnos en el
 Creando Cuentas Nuevas para Padres / Alumnos en el Portal de Internet Aeries de YCJUSD El portal de Internet Aeries proporciona una manera segura para acceder a información sobre la asistencia y el progreso
School Preference through the Infinite Campus Parent Portal
 School Preference through the Infinite Campus Parent Portal Welcome New and Returning Families! Enrollment for new families or families returning to RUSD after being gone longer than one year is easy.
Manual de Operación Teléfono IP AVAYA 1603
 PRESENTACIÓN Esta guía ha sido diseñada por el Grupo Organización y Sistemas, para facilitar la consulta de las funciones del Teléfono IP 1603, por parte de los diferentes funcionarios de la Universidad
Procesador de audio DA80 de Plantronics. Guía del usuario
 Procesador de audio DA80 de Plantronics Guía del usuario Índice Bienvenido 3 Encendido 4 Software Spokes de Plantronics 5 Instalación de Plantronics Hub 5 Inicie el Hub 5 Pestañas del Hub 5 Uso de los
Preguntas y respuestas
 Autodesk Revit Autodesk Revit Architecture Autodesk Revit MEP Autodesk Revit Structure Autodesk Revit LT Preguntas y respuestas Este documento proporciona preguntas y respuestas sobre el uso del software
Router Wi-Fi N150 (N150R)
") Easy, Reliable & Secure Guía de instalación Router Wi-Fi N150 (N150R) Marcas comerciales Las marcas y nombres de productos son marcas comerciales o marcas comerciales registradas por sus respectivos titulares.
Easy, Reliable & Secure Guía de instalación Router Wi-Fi N150 (N150R) Marcas comerciales Las marcas y nombres de productos son marcas comerciales o marcas comerciales registradas por sus respectivos titulares.
Welcome to lesson 2 of the The Spanish Cat Home learning Spanish course.
 Welcome to lesson 2 of the The Spanish Cat Home learning Spanish course. Bienvenidos a la lección dos. The first part of this lesson consists in this audio lesson, and then we have some grammar for you
EMC SourceOne TM para Microsoft SharePoint 7.0 Búsqueda de archivo Tarjeta de referencia rápida
 EMC SourceOne TM para Microsoft SharePoint 7.0 Búsqueda de archivo Tarjeta de referencia rápida Utilice la búsqueda de archivo para buscar y restaurar contenido de SharePoint que se encuentre archivado
USB 2.0 SERVIDOR ETHERNET DE IMPRESORA
 USB 2.0 SERVIDOR ETHERNET DE IMPRESORA DN-13014-3 DN-13003-1 Guía de Instalación Rápida DN-13014-3 Y DN-13003-1 Antes de empezar, debería preparar los siguientes elementos: Ordenador Windows 2000/XP/2003/Vista/7
INSTRUCCIONES PARA ENVIAR SU PELICULA PARA LA VIDEOLIBRERIA
 For English version, please scroll down to page 11 (eleven) INSTRUCCIONES PARA ENVIAR SU PELICULA PARA LA VIDEOLIBRERIA Especificaciones técnicas Container format:.mp4 / tamaño de archivo no superior a
Guía de inicio rápido de Laplink FileMover
 Guía de inicio rápido de Laplink FileMover MN-FileMover-QSG-ES-01 (REV.01/07) Información de contacto de Laplink Software, Inc. Si tiene problemas o preguntas de asistencia técnica, visite: www.laplink.com/es/support/individual.asp
WIRELESS G ROUTER DIR-280. Guía de Instalación Rápida+
 WIRELESS G ROUTER DIR-280 Guía de Instalación Rápida+ Este producto puede ser instalado usando cualquier navegador web disponible actualmente: Internet Explorer 6 o Firefox 1.5 DIR-280 Wireless G Router
Guía del propietario. Owner s Guide. December 6, 2010 NSOG-1.0-100
 Guía del propietario Owner s Guide December 6, 2010 NSOG-1.0-100 Legal 2 2 Información legal Copyright 2011 Google Inc. Todos los derechos reservados. Copyright 2010 Google Inc. All rights reserved. Google,
appkbws03 Wireless Multimedia Keyboard Set Black
 appkbws03 Wireless Multimedia Keyboard Set Black Español 01 English 06 Capítulo 1. Introducción y descripción del producto Gracias por elegir el teclado inalámbrico APPKBWS03. Descripción del producto
Table of Contents. Español... 1. Antes de iniciar... 2. Cómo conectar... 3. Cómo utilizar el conmutador... Troubleshooting... Version 10.13.
 Quick Installation Guide TE100-S800i TE100-S810Fi Table of Contents Español... 1. Antes de iniciar... 2. Cómo conectar... 3. Cómo utilizar el conmutador... Troubleshooting... 1 1 2 3 5 Version 10.13.05
Ready. Set. Go. Vonage Box. Quick Start Guide
 Ready. Set. Go. TM Vonage Box Quick Start Guide Start here. Congratulations and welcome to Vonage! Now that you have your Vonage Box TM, it s time to enjoy exceptional home phone service, including a wide
Quick Installation Guide TU-S9
 Quick Installation Guide TU-S9 Table of of Contents Contents Español... 1 1. Antes de iniciar... 1 2. Instalación del Hardware... 2 Troubleshooting... 5 Version 11.08.2007 1. Antes de iniciar Contenidos
Guía de uso del Teléfono 3COM. Modelo 3102 Business
 Guía de uso del Teléfono 3COM Modelo 3102 Business Octubre 2007 Página 1 de 11 1.- Opciones de menú.- Permite seleccionar las opciones que son desplegadas en la pantalla o panel del teléfono. Los botones
Manual de Palm BlueChat 2.0
 Manual de Palm BlueChat 2.0 Copyright 2002 Palm, Inc. Todos los derechos reservados. Graffiti, HotSync y Palm OS son marcas registradas de Palm, Inc. El logotipo de HotSync, Palm y el logotipo de Palm
Uso del casco telefónico Bluetooth con el concentrador inalámbrico Logitech
 Uso del casco telefónico Bluetooth con el concentrador inalámbrico Logitech 2003 Logitech, Inc. Índice Introducción 3 Compatibilidad de productos 3 Acerca de este manual 4 Conéctese 6 Conexión del casco
Setting Up an Apple ID for your Student
 Setting Up an Apple ID for your Student You will receive an email from Apple with the subject heading of AppleID for Students Parent/Guardian Information Open the email. Look for two important items in
Quick Installation Guide Internet Setup
 CBR-970 Wireless-N Broadband Router www.cnet.com.tw Established in California, U.S.A. since 1987 Quick Installation Guide Internet Setup What s included in the box CBR-970 Wireless N Broadband Router Quick
SFD-200-N-B DESPERTADOR-PROYECTOR-CON VOZ. Manual de instrucciones
 SFD-200-N-B DESPERTADOR-PROYECTOR-CON VOZ Manual de instrucciones Funciones: - Proyección de la hora - Proyección controlada por sonidos y vibraciones (palmada, etc.) - Pantalla retroiluminada azul - Hora
SchoolMessenger Activación de la Cuenta para los Padres del Distrito
 Usted necesitará una computadora con acceso a correo electrónico, el número de identificacion del estudiane y el codigo de activatión (que se encuenta en esta carta) para completar este proceso paso a
cómo instalar los controladores USB
 cómo instalar los controladores USB La referencia en comunicaciones móviles vía satélite instalación de los controladores USB Antes de instalar las herramientas de sincronización de contactos y de actualización
Unidad base No use otro adaptador CA que no sea Panasonic PQLV203CE. Router. Cable de línea telefónica A la red del teléfono
 Modelo n BB-GT1500SP/BB-GT1520SP BB-GT1540SP Guía rápida Instalación Unidad base No use otro adaptador CA que no sea Panasonic PQLV203CE. Clic Pulse el enchufe con firmeza. TEL LAN Gancho C Adaptador de
OSCILLATION 512 (LM 3R)
") Application Note The following application note allows to locate the LM series devices (LM3E, LM3R, LM4 and LM5) within network and check its connection information: Name, MAC, dynamic IP address and static
Application Note The following application note allows to locate the LM series devices (LM3E, LM3R, LM4 and LM5) within network and check its connection information: Name, MAC, dynamic IP address and static
Jabra BT2045 MANUAL DE USUARIO JABRA BT2045
 Jabra BT2045 MANUAL DE USUARIO 1 CONTENIDO GRACIAS...2 ACERCA DE SU...2 QUÉ PUEDE HACER CON SU AURICULAR...3 PARA EMPEZAR...3 CARGA DE SU AURICULAR...4 ENCENDIDO Y APAGADO DEL AURICULAR...4 EMPAREJAMIENTO