User s Guide/ Manual de instrucciones
|
|
|
- Elena Araya Cano
- hace 8 años
- Vistas:
Transcripción
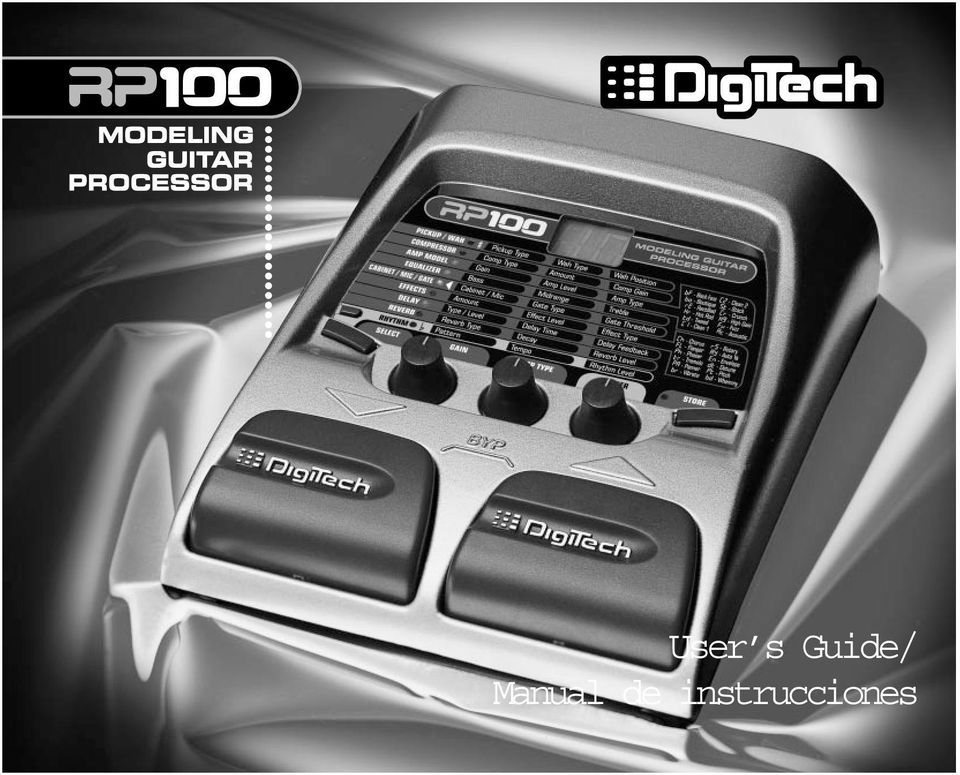
1 User s Guide/ Manual de instrucciones
2 Warning For your protection, please read the following: These symbols are internationally accepted symbols that warn of potential hazards with electrical products.the lightning flash means that there are dangerous voltages present within the unit.the exclamation point indicates that it is necessary for the user to refer to the owners manual. These symbols warn that there are no user serviceable parts inside the unit. Do not open the unit. Do not attempt to service the unit yourself. Refer all servicing to qualified personnel. Opening the chassis for any reason will void the manufacturer s warranty. Do not get the unit wet. If liquid is spilled on the unit, shut it off immediately and take it to a dealer for service. Disconnect the unit during storms to prevent damage. Electromagnetic Compatibility Operation is subject to the following conditions: This device may not cause harmful interference. This device must accept any interference received, including interference that may cause undesired operation. Use only shielded interconnecting cables. Operation of this unit within significant electromagnetic fields should be avoided. Water and Moisture: Appliances should not be used near water (e.g. near a bathtub, washbowl, kitchen sink, laundry tub, in a wet basement, or near a swimming pool, etc.) Care should be taken so that objects do not fall and liquids are not spilled into the enclosure through openings. Power Sources: The appliance should be connected to a power supply only of the type described in the operating instructions or as marked on the appliance. Grounding or Polarization: Precautions should be taken so that the grounding or polarization means of an appliance is not defeated. Power Cord Protection: Power supply cords should be routed so that they are not likely to be walked on or pinched by items placed upon or against them, paying particular attention to cords at plugs, convenience receptacles, and the point where they exit from the appliance. Servicing: To reduce the risk of fire or electrical shock, the user should not attempt to service the appliance beyond that described in the operating instructions.all other servicing should be referred to qualified service personnel. For units equipped with externally accessible fuse receptacle: Replace fuse with same type and rating only. ADVERTENCIA PARA SU SEGURIDAD Y PROTECCION, LEA LO SIGUIENTE: AGUA Y HUMEDAD: No utilice este aparato demasiado cerca del agua (p.e. cerca de una piscina, fregadero, lavadora o en un sótano húmedo). Evite que pueda caer ningún objeto o líquidos dentro de la carcasa a través de las aberturas. FUENTE DE ALIMENTACION: Este aparato debe ser conectado a una toma de alimentación solo del tipo descrito en este manual o marcado en la propia unidad. Los símbolos de aquí arriba están reconocidos internacionalmente como de advertencia de los riesgos potenciales con aparatos eléctricos. El rayo dentro de un triángulo equilátero implica que dentro de la unidad existen voltajes peligrosos. El símbolo de exclamación dentro del triángulo equilátero indica que es necesario que el usuario lea el manual de instrucciones de la unidad. Estos símbolos también le advierten que dentro de la unidad no hay ninguna pieza que pueda ser reparada por el propio usuario. No abra el aparato. Nunca intente hacer ningún tipo de reparación por sus propios medios. Consulte cualquier posible reparación únicamente a un Servicio Técnico cualificado. La apertura del chasis por cualquier razón anulará la garantía del fabricante. No permita que la unidad se humedezca. Si cae algún líquido en el aparato, apáguelo inmediatamente y llévelo al distribuidor o servicio técnico. Desconecte la unidad durante las tormentas para evitar daños. TOMA DE TIERRA O POLARIZACION: Tome las precauciones necesarias para que la toma de tierra o polarización del aparato no queden anuladas. PROTECCION DEL CABLE DE ALIMENTACION: Coloque los cables de alimentación de tal forma que no puedan ser pisados y que queden enganchados o aplastados por cosas colocadas sobre o contra ellos, con un cuidado especial en los receptáculos de entrada y conectores, y en el punto en el que los cables salen de las unidades. REPARACIONES: Para reducir el riesgo de incendios o descargas eléctricas, el usuario nunca debe tratar de hacer reparaciones en la unidad fuera de lo descrito en las instrucciones. Debe dirigir cualquier otra reparación al servicio técnico cualificado. PARA LAS UNIDADES EQUIPADAS CON RECEPTACULO DE FUSIBLE ACCESIBLE DESDE EL EXTERIOR: Sustituya el fusible solo por otro del mismo tipo y características eléctricas. COMPATIBILIDAD ELECTROMAGNETICA Esta unidad cumple con las Especificaciones de producto indicada en la Declaración de Conformidad. Esto hace que la unidad esté sujeta a las dos condiciones siguientes: esta unidad no puede producir interferencias molestas ni dañinas, y esta unidad debe recibir cualquier interferencia recibida, incluyendo las que puedan causar errores no deseados. Debe tratar de evitar el uso de esta unidad dentro decampos electromagnéticos significativos. utilice solo cables de interconexión con blindaje.

3 DECLARATION OF CONFORMITY Manufacturer s Name: DigiTech Manufacturer s Address: 8760 S. Sandy Parkway Sandy, Utah 84070, USA declares that the product: Product name: RP100 Note: Product name may be suffixed by the letters EX, EU, JA, and UK. Product option: all (requires Class II power adapter that conforms to the requirements of EN60065, EN60742, or equivalent.) conforms to the following Product Specifications: Safety: EN (1993) IEC65 (1985) with Amendments 1, 2, 3 EMC: EN (1990) EN (1991) Supplementary Information: The product herewith complies with the requirements of the Low Voltage Directive 72/23/EEC and the EMC Directive 89/336/EEC as amended by Directive 93/68/EEC. DigiTech / Johnson Vice-President of Engineering 8760 S. Sandy Parkway Sandy, Utah 84070, USA Date: August 11,2000 European Contact: Your local DigiTech / Johnson Sales and Service Office or Harman Music Group 8760 South Sandy Parkway Sandy, Utah USA Ph: (801) Fax: (801) DECLARACION DE CONFORMIDAD Nombre del fabricante: DigiTech Dirección del fabricante: 8760 S. Sandy Parkway Sandy, Utah 84070, USA declara que el producto: Nombre de producto: RP100 Nota: El nombre del producto puede venir precedido por las letras EX, EU, JA y UK. Opciones del producto: todas (necesita un adaptador de corriente de Clase II que cumpla con los requisitos de EN60065, EN60742 o equivalente.) cumple con las siguientes Especificaciones de Producto: Seguridad: EN (1993) IEC65 (1985) con las enmiendas 1, 2, 3 EMC: EN (1990) EN (1991) Información complementaria: El producto citado anteriormente cumple con los requisitos de la Directiva de Bajo Voltaje 72/23/EEC y la Directiva EMC 89/336/EEC tal como quedó enmendada por la Directiva 93/68/EEC. DigiTech / Johnson Vicepresidente de producción 8760 S. Sandy Parkway Sandy, Utah 84070, USA Fecha: 11 de agosto de 2000 Contacto en Europa: Su distribuidor o servicio técnico DigiTech / Johnson local o Harman Music Group 8760 South Sandy Parkway Sandy, Utah USA Teléfono: (801) Fax: (801)
 conforms to the following Product Specifications: Safety: EN 60065 (1993) IEC65 (1985) with Amendments 1, 2, 3 EMC: EN 55013 (1990) EN 55020 (1991) Supplementary Information: The product herewith")
4 Warranty We at DigiTech are very proud of our products and back-up each one we sell with the following warranty: 1.The warranty registration card must be mailed within ten days after purchase date to validate this warranty. 2. Digitech warrants this product, when used solely within the U.S., to be free from defects in materials and workmanship under normal use and service. 3. Digitech liability under this warranty is limited to repairing or replacing defective materials that show evidence of defect, provided the product is returned to Digitech WITH RETURN AUTHORIZATION, where all parts and labor will be covered up to a period of one year. A Return Authorization number may be obtained from Digitech by telephone.the company shall not be liable for any consequential damage as a result of the product's use in any circuit or assembly. 4. Proof-of-purchase is considered to be the burden of the consumer. 5. Digitech reserves the right to make changes in design, or make additions to, or improvements upon this product without incurring any obligation to install the same on products previously manufactured. 6.The consumer forfeits the benefits of this warranty if the product's main assembly is opened and tampered with by anyone other than a certified Digitech technician or, if the product is used with AC voltages outside of the range suggested by the manufacturer. 7.The foregoing is in lieu of all other warranties, expressed or implied, and Digitech neither assumes nor authorizes any person to assume any obligation or liability in connection with the sale of this product. In no event shall Digitech or its dealers be liable for special or consequential damages or from any delay in the performance of this warranty due to causes beyond their control. NOTE:The information contained in this manual is subject to change at any time without notification. Some information contained in this manual may also be inaccurate due to undocumented changes in the product or operating system since this version of the manual was completed. The information contained in this version of the owner's manual supersedes all previous version. Garantía En DigiTech estamos muy orgullosos de todos los aparatos que fabricamos y por ello los vendemos con la garantía siguiente: 1. Para validar esta garantía deberá rellenar y devolvernos por correo la tarjeta de garantía en los diez días siguientes a la fecha de compra. 2. Digitech garantiza que este producto, sólo cuando se use dentro de EE.UU., está libre de defectos en materiales y mano de obra bajo condiciones de uso y mantenimiento normales. 3. La responsabilidad de Digitech por esta garantía queda limitada a la reparación o sustitución de los materiales que muestren evidencias de fallos, asumiendo que el producto sea devuelto a Digitech con AUTORIZACION DE DEVOLUCION, en cuyo caso quedarán cubiertas todas las piezas y mano de obra durante un periodo de un año. Para obtener un número de Autorización póngase en contacto con Digitech por teléfono. la compañía no será responsable de ningún daño emergente producido por el uso del producto en cualquier circuito o montaje. 4. La prueba de compra se considera responsabilidad del comprador. 5. Digitech se reserva el derecho a realizar cambios en el diseño, adiciones o mejoras en este producto sin por ello incurrir en ninguna obligación de realizar lo mismo en los productos fabricados previamente. 6. El consumidor pierde los beneficios de esta garantía si el producto es abierto y modificado por cualquier persona que no sea un técnico certificado por Digitech o si el producto es utilizado con voltajes de CA que estén fuera del rango sugerido por el fabricante. 7. Lo anterior invalida cualquier otra garantía, expresa o implícita, y Digitech ni asume ni autoriza a nadie a asumir ninguna obligación o responsabilidad en relación con la venta de este producto. En ningún caso Digitech o sus vendedores serán responsables de los daños emergentes especiales o de cualquier retraso en la ejecución de esta garantía debido a causas más allá de su control.. NOTA: La información contenida en este manual está sujeta a cambios en cualquier momento sin notificación previa.también es posible que alguna parte de la información de este manual no sea correcta debido a cambios no documentados en el aparato o en su sistema operativo desde el momento de finalizar esta versión del manual. La información contenida en esta versión del manual de instrucciones sustituye a la de versiones anteriores.

5 Table of Contents Safety Information I Declaration of Conformity II Table of Contents III Section One - Introduction Getting Acquainted1 Included Items 1 A Guided Tour 2 Front Panel 2 Rear Panel 4 Getting Started 5 Making Connections 5 Mono Operation 6 Stereo Operation 7 Applying Power 8 Battery Power 8 AC Power 9 About the RP Performance Mode 10 Bypass Mode 10 Tuner Mode 11 Section Two - Editing Functions Editing/Creating a Preset 12 The Matrix 13 Storing/Copying 14 Section Three - Effects and Parameters About the Effects 15 Effect Definitions 15 Pickup/Wah 16 Compressor 16 Amp Modeling 17 EQ. 17 Cabinet/Gate 18 Effects. 19 Chorus. 19 Flange 20 Phaser 20 Tremolo 20 Panner. 21 Vibrato 21 Rotary 21 Auto Yah 22 Envelope 22 Pitch 22 Detune 23 Whammy 23 Delay 24 Rever 24 Section Four - Other Functions Expression Pedal 25 Rhythm Trainer 25 Factory Reset1 26 Section Five - Appendix Functions Specifications 27 Preset List 28 Indice Información de seguridad 1 Declaración de Conformidad II Indice III Sección uno - Introducción Presentaciones Elementos incluidos 1 Un recorrido guiado 2 Panel Frontal 2 Panel trasero 4 Arranque 5 Conexiones 5 Funcionamiento Mono 6 Funcionamiento Stereo 7 Encendido 8 Alimentación a pilas 8 Alimentación con corriente 9 Acerca del RP Modo de ejecución 10 Modo de anulación o bypass10 Modo de afinador 11 Sección dos - Funciones de edición Edición/Creación de un Preset 12 La Matriz 13 Almacenamiento/Copia 14 Sección tres - Efectos y Parámetros Acerca de los efectos 15 Definiciones de los efectos 15 Pastilla/Wah 16 Compresor 16 Modelado de amplificador 17 Ecualizador. 17 Recinto acústico/puerta 18 Efectos. 19 Chorus. 19 Flanger 20 Modulador de fase 20 Tremolo 20 Panorama. 21 Vibrato 21 Altavoz giratorio 21 Auto Yah 22 Envolvente 22 Tono 22 Desafnación 23 Whammy 23 Retardo 24 Reverb 24 Sección cuatro - Otras funciones Pedal de expresión 25 Entrenador rítmico 25 Reinicialización a valores de fábrica 26 Seección cinco - Apéndices Especificaciones técnicas 27 Listado de presets 28

6 Section-1 Introduction Getting Acquainted Congratulations on your wise choice in purchasing the RP100. Thanks to the continuous advances in musical technology, you have the flexibility, power, and capability of producing sonic creations never before thought possible. Although the RP100 is so user friendly you may not even need to read this manual, we recommend that you become better acquainted with us, and what we have to offer by going through this User s Guide with your RP100 in front of you. It is your key to unlocking the potential within the RP100. Included Items Before you get started, please make sure that the following items have been included: RP100 User s Guide Warranty Card The utmost care was taken while your RP100 was being manufactured. Everything should be included and in perfect working order. If anything is missing, contact the factory at once. Please help us become acquainted with you and your needs by completing your warranty card. It is your safeguard should a problem arise with your RP100. Sección-1 Introducción Presentaciones Enhorabuena por la compra de su RP100!. Gracias a los continuos avances en la tecnología de la música, ahora cuenta con la flexibilidad, potencia y capacidad para crear sonidos que jamás podía haber imaginado. Aunque el manejo del RP100 es tan intuitivo que puede ser que no necesite leer este manual para poder utilizarlo, le recomendemos que se familiarice con él y la mejor manera de hacerlo es a través del manual de instrucciones de su RP100. Es la clave para sacarle el máximo partido a su aparato. Elementos incluidos Antes de empezar a utilizar la unidad, asegúrese de que los siguientes elementos hayan sido incluidos: RP100 Manual de instrucciones Tarjeta de garantía Su RP100 ha sido fabricado con sumo cuidado. Todos estos elementos deberían haber sido incluidos y deberían funcionar perfectamente. Si falta alguno de ellos, contacte con fábrica. Ayúdenos a conocerle y saber sus necesidades rellenando la tarjeta de garantía. Será su salvavidas si tiene algún problema con su RP100. 1

7 2 A Guided Tour of the RP100 The Front Panel/ Un recorrido guiado por el RP100 El panel frontal

8 1. Footswitches - These 2 Footswitches are used to select Presets, access the Tuner, or bypass the RP100. The Footswitch on the right will increase, and the Footswitch on the left will decrease the selected Preset. Pressing both Footswitches together will bypass the currently selected Preset. Pressing and holding both Footswitches will access the Tuner. 2. Parameter Knobs - The Parameter knobs perform various functions depending on which mode is currently active in the RP100. In performance mode, these knobs control the Gain,Amp Type, and Master Level. In Edit mode, these knobs adjust the Parameter values listed directly above each knob for the selected effect. In Rhythm Trainer, these knobs control the Pattern, Tempo, and Level. In Tuner mode, these knobs are used to select the desired tuning reference. 3. Select Button - This button is used to enter the Edit mode, and to select individual effect to be edited. Successive presses of this button will advance through all available Effects. 4. Rhythm - The Rhythm button is used to turn on and off the Rhythm Trainer drum loop.when the Rhythm feature is active, the Rhythm LED lights and the selected drum pattern plays continuously. 5. Matrix - The matrix provides information regarding the current Preset, and Parameter edit functions. In performance mode, the 9 LEDs running down the left side of the Matrix will provide a visual indication of which effects are in use for the currently selected Preset. In Edit mode, the LEDs indicate the Effect currently selected for editing. In Tuner mode, the LEDs indicate whether the note played is sharp, flat, or in tune. 1. Pedales de disparo - Estos dos pedales de disparo sirven para elegir presets, acceder al afinador o anular el RP100. El pedal de disparo de la derecha aumenta el preset elegido y el de la izquierda lo disminuye. Si pulsa ambos pedales a la vez anulará el preset elegido entonces. Para acceder al afinador mantenga pulsados ambos pe-dales. 2. Mandos de parámetro - Los mandos de parámetro realizan distintos tipos de funciones dependiendo del modo que esté activo en el RP100. En el modo de ejecución, estos mandos controlan la ganancia, el tipo de amplificador y el nivel Master. En el de edición, estos mandos ajustan los valores de los parámetros que aparecen debajo de cada mando para el efecto elegido. En el modo de entrenador rítmico, estos mandos controlan el patrón, el tempo y el nivel. En el modo del afinador, estos mandos sirven para elegir la referencia que quiera para la afinación. 3. Botón Select - Este botón sirve para acceder al modo de edición y para elegir el efecto individual a ser editado. Las pulsaciones sucesivas de este botón harán que vaya avanzando a través de todos los efectos disponibles. 4. Botón Rhythm - El botón de ritmo sirve para activar y desactivar el bucle de batería del entrenador rítmico. Cuando esté activado este botón, su piloto estará encendido y el patrón de batería elegido será reproducido de forma continua. 5. Matriz - La matriz le suministra información sobre el preset activo y las funciones de edición de parámetros. En el modo de ejecución, los 9 LEDs que hay debajo de la parte izquierda de la matriz le dan una indicación visual de los efectos en uso para el preset elegido entonces. En el modo de edición, los pilotos indican el efecto activo para la edición. En el modo del afinador, los LEDs le indican si la nota está sostenida, bemolada o en su tono. 3

9 6. Display - The Display provides information for different functions depending on the mode that has been selected. In Performance mode, the Display will show the currently selected Preset number. In Edit mode, the Display will show the value of the parameter being adjusted. In Tuner mode, the Display will show the note played. 7. Store - The Store button is used to save your custom edits to the user Presets. Rear Panel 6. Pantalla - La pantalla le informa acerca de distintas funciones dependiendo del modo elegido. En el modo de ejecución, la pantalla le mostrará el número de preset elegido entonces.en el modo de edición, la pantalla le mostrará el valor del parámetro que esté siendo ajustado. En el modo del afinador, en pantalla aparecerá la nota que esté siendo reproducida. 7. Botón Store - Sirve para grabar sus ediciones personalizadas en los presets de usuario. Panel trasero 1. Input - Connect your instrument to this jack. 2. Output - This is a stereo TRS jack. Connect from this jack to the input of a single amplifier for mono applications, or use a TRS stereo Y cord to connect to the inputs of 2 amplifiers for stereo applications. 1. Input - Conecte su instrumento a esta toma. 2. Output - Es un conector TRS stereo. Para aplicaciones mono, conecte esta clavija a la entrada de un único amplificador, y en aplicaciones stereo, utilice un cable stereo TRS en Y para conectarlo a las entradas de dos amplificadores. 4

10 3. Control In - Connect an expression pedal or volume pedal to this jack for the purpose of controlling Volume, Wah, or Whammy in the RP Headphones - Connect a pair of stereo headphones to this jack. 5. Power Input - Connect only the optional DigiTech PS0913B power supply to this jack. 3. Control In - Conecte a esta clavija un pedal de expresión o el pedal de volumen para poder controlar con él el volumen, Wah o Whammy del RP Auriculares - Conecte a esta clavija unos auriculares stereo. 5. Entrada de alimentación - Conecte a esta clavija solo la fuente de alimentación opcional PS0913B de DigiTech. Getting Started Making Connections There are several different connection options available when using the RP100.The following diagrams show the connections for some of these options. Before connecting the RP100, make sure that the power to your amplifier is turned off, and that the power to the RP100 is disconnected. There is no power switch on the RP100.To turn the RP100 on or off, connect or disconnect your instrument to the Input Jack (for battery power) or connect the optional PS0913B power supply from the Power Jack to an AC outlet (for AC power). Mono Operation Connect your guitar to the Input of the RP100. Connect a single mono instrument cable from the Stereo Output of the RP100 to the instrument input on your amplifier, or to the line input of a power amp. Arranque Conexiones Hay diferentes posibilidades de conexión del RP100. Los diagramas que incluimos a continuación le muestran las conexiones para alguna de estas opciones. Antes de conectar el RP100, asegúrese que tanto su amplificador como el RP100 estén apagados. En el RP100 no hay ningún interruptor de encendido. Para encender y apagar esta unidad, conecte o desconecte su instrumento a la toma Input (si va a usar la unidad con pilas) o conecte la fuente de alimentación opcional PS0913B a la toma de alimentación y a un enchufe de salida de corriente (para una alimentación con corriente eléctrica). Funcionamiento Mono Conecte su guitarra a la toma Input del RP100. Conecte un único cable de instrumento mono desde la salida stereo del RP100 a la entrada de instrumento de su amplificador, o la entrada de una etapa de potencia. 5

11 Guitar Amp Input/Effect Return Sortie Entrée Entrada/retorno efectos amplificador guitarra Salida Entrada NOTE: When using a guitar amp, it may be best to connect the guitar to the input of the RP100 and the Output of the RP100 to the effect return of the amplifier. NOTA: Cuando utilice un amplificador de guitarra, le recomendamos que conecte la guitarra a la entrada del RP100 y la salida del RP100 al retorno de efectos del amplificador. 6

12 Stereo Operation For stereo operation connect the guitar to the Input of the RP100. Connect a TRS stereo Y cord to the RP100 s Stereo Output. Connect one end of the Y cord to the input of one amplifier, channel of a mixer, or power amp. Connect the second end of the Y cord to a second amplifier, second channel of a mixer, or power amp. If connecting to a mixing console, set the pan controls of the mixer hard left and right in order to retain stereo separation and be sure to engage the RP100 s Cabinet Emulator. See page 18 for more on selecting the Cabinet Emulator. Stereo Operation Para aplicaciones stereo, conecte la guitarra a la entrada del RP100. Conecte un cable stereo TRS en Y a la salida stereo del RP100. Conecte uno de los extremos del cable en Y a la entrada de un amplificador, al canal de una mezcladora o a una etapa de potencia. Conecte el otro extremo a un segundo amplificador, canal o etapa de potencia. Si conecta el cable a una mesa de mezclas, ajuste los controles de panorama de la mezcladora totalmente a la izquierda y a la derecha para mantener la separación stereo y asegúrese de activar el simulador de recinto acústico del RP100. Para más información sobre el proceso de elección del simulador, vea la página 18. Guitar Amp Input/Effect Return Entrada/retorno de efecto de amplificador de guitarra Stereo "Y" Cord / Cable Stereo en "Y" Stereo Output Salida Stereo Instrument Input Entrada de instrumento 7

13 Applying Power There are two options for powering the RP100: battery power, and AC power. Before applying power to anything, set your amp(s) to a clean tone and set the tone controls to a flat EQ response (on most amps, this would be 0 or 5 on the tone controls).then follow the steps listed below. Battery Power The RP100 can be run for about 8 hours on 6 AA batteries.the battery compartment is located on the bottom of the RP100. The following diagram shows the correct polarity for battery installation. Encendido El RP 100 tiene dos posibles modos de alimentación: a pilas o con corriente.antes de encender nada, ajuste su(s) amplificador(es) para un sonido limpio y ajuste los controles de tono a una respuesta del ecualizador plana (en la mayoría de los amplificadores, esto supone ajustar los controles de tono a 0 o 5).Después siga los pasos que le comentamos a continuación. Alimentación a pilas El RP100 puede funcionar unas 8 horas con 6 pilas de tipo AA. El compartimento para las pilas está situado en la parte inferior del RP100. El diagrama siguiente le muestra la polaridad correcta para la instalación de las pilas. Connecting your instrument to the Input of the RP100 will engage the battery power and disconnecting your instrument from the Input of the RP100 will disengage the battery power. Once the connections have been made, and the RP100 is powered (indicated by numbers appearing in the Display), turn the RP100 s Master Level (far right knob) all the way down.turn your amplifier(s) power switch to the on position and adjust the volume(s) to a normal playing level. Gradually increase the RP100 Master Level to achieve the desired volume. To prolong the battery life, disconnect your instrument from the RP100 s Input when not in use. Si conecta su insturmento a la entrada del RP100 será activada la alimentación a pilas y si lo desconecta de esta entrada la alimentación a pilas será desactivada. Una vez que haya hecho las conexiones y encendido el RP100 (empezarán a aparecer números en pantalla), gire totalmente hacia abajo el mando de nivel master (el mando de la derecha). En su amplificador coloque el interruptor de alimentación en la posición de encendido y ajuste el volumen(es) a un nivel de reproducción normal. Suba gradualmente el nivel master del RP100 hasta alcanzar el volumen deseado. Para que las pilas le duren más, desconecte su instrumento de la entrada del RP100 cuando no lo use. 8

14 AC Power The RP100 can also be powered with the optional PS0913B power supply. Once the audio connections have been made, turn the RP100 s Master Level (far right knob) all the way down. Connect the plug of the PS0913B power supply to the power jack on the rear panel of the RP100. Connect the other end of the PS0913B power supply to an AC outlet.turn the power of your amplifier(s) to the on position and adjust the volume(s)to a normal playing level. Gradually increase the RP100 Master Level to achieve the desired volume. Alimentación con corriente eléctrica El RP100 también puede recibir corriente eléctrica desde la fuente de alimentación opcional PS0913. Una vez que ya haya hecho las conexiones audio, gire totalmente hacia abajo el mando de volumen master (el control que está más a la derecha). Conecte la fuente de alimentación PS0913B a la entrada de alimentación del panel trasero del RP100. Conecte a una salida de corriente el otro extremo de la fuente de alimentación PS0913B. Encienda el amplificador(es) y ajuste el volumen(es) a un nivel de reproducción normal. Suba gradualmente el nivel master hasta alcanzar el volumen que quiera. 9

15 About the RP100 The Presets Presets are numbered locations of programmed sounds which reside in the RP100. Presets are recalled with the Footswitches. The active effects in each Preset will be indicated by the lighted LEDs in the Effect Matrix.The RP100 comes with 40 User Presets (Presets 1-40) and 40 Factory Presets (Presets 41-80).The User Presets are locations where your creations may be stored.the Factory Presets will not allow you to store any changes to them. From the factory, the 40 User Presets are exact duplicates of the 40 Factory Presets.This allows you to make your own Presets without the worry of losing any of the sounds that the RP100 came with. Performance Mode When you first apply power to the RP100, it will power up in Performance mode. Performance mode provides access to all of the Presets within the RP100 via the Right and Left Footswitches.The Parameter 1 (left) knob will adjust the Amp Gain (distortion), the Parameter 2 (middle) knob will select the Amp Type, and the Parameter 3 (right) knob will adjust the Master Level (volume). Bypass Mode The RP100 Presets can be bypassed for a clean, unprocessed guitar tone. To bypass the RP100, press both Footswitches simultaneously. The Display will read By indicating the Preset is bypassed. Pressing both Footswitches simultaneously again will exit Bypass and return the RP100 to the last Preset used. Acerca del RP100 Los presets Los presets son posiciones numeradas de sonidos programados almacenados en el RP100. Estos presets son cargados por medio de los Pedales de disparo. Los efectos activos para cada preset son indicados por los pilotos que estén encendidos en la matriz de efectos. El RP100 dispone de 40 presets de usuario (presets 1-40) y de 40 de fábrica (presets 41-80). Los presets de usuario son posiciones en las puede grabar sus creaciones. Los presets de fábrica no son modificables. Cuando el aparato sale de fábrica, los 40 presets de usuario son réplicas exactas de los 40 presets de fábrica. Esto le permite crear sus propios presets sin tener que preocuparse de perder alguno de los sonidos con los que venía de fábrica el RP100. Modo de ejecución Cuando encienda el RP100, este entrará en el modo de ejecución. El modo de ejecución le da acceso a todos los presets del RP100 a través de los pedales de disparo derecho e izquierdo. El mando Parameter 1 (izquierda) ajusta la ganancia del amplificador (distorsión), Parameter 2 (en el centro) sirve para elegir el tipo de amplificación, mientras que Parameter 3 (derecha) ajusta el nivel global (volumen). Modo de anulación o bypass Los presets del RP100 pueden ser anulados para obtener un sonido de guitarra limpio y sin procesar. Para anular el RP100, pulse simultáneamente ambos pedales de disparo. En pantalla aparecerán los caracteres By para indicarle que el preset ha sido anulado. Para salir del modo de anulación y volver al último preset utilizado por el RP100, pulse a la vez ambos pedales de disparo. 10

16 Tuner Mode The Tuner in the RP100 allows you to quickly tune or check the tuning on your guitar. Enter Tuner mode by pressing and holding both Footswitches simultaneously. The Display will briefly show tu indicating that you are in Tuner mode. To begin tuning, play a note on your guitar (a harmonic at the 12th fret usually works best).the Display shows the note being played.the Matrix LEDs indicate whether you are sharp or flat.the top 4 Red LEDs indicate the note is sharp and should be tuned down. The bottom 4 Red LEDs indicate the note is flat and should be tuned up.the center Green LED indicates the note is in tune. The output is muted in Tuner mode. Modo de afinador Este modo le permite afinar rápidamente su guitarra o comprobar su afinación. Para acceder al modo del afinador, mantenga pulsados simultáneamente ambospedales de disparo.en pantalla aparecerán durante unos instantes los caracteres tu para indicarle que está en el modo de afinador. Para empezar la afinación, toque con su guitarra una nota (lo mejor suele ser un armónico en el 12avo traste). La pantalla le mostrará la nota que esté siendo tocada. Los pilotos de la matriz le indicarán si la nota está sostenida o bemolada.los 4 LEDs rojos superiores le indicarán si la nota está sostenida y que debe bajar el tono.los 4 pilotos rojos inferiores le indican que la nota está bemolada y que debe aumentar su tono. Los LEDs verdes centrales le indican que la nota está afinada.en el modo de afinador, la salida es anulada. / / / / In Tuner mode, you can change your tuning reference. The default factory setting is A=440 Hz. (displayed as 40). Rotating the Parameter 1 knob will select alternate dropped tunings.alternate tunings are A = Ab (displayed as Ab), A = G (displayed as g), and A = Gb (displayed as gb).the display window will briefly flash the currently selected tuning preference. Exit tuner mode by pressing both Footswitches simultaneously. En el modo de afinador, puede cambiar la referencia de afinación. El valor de fábrica por defecto es A=440 Hz (en pantalla aparece como 4). Para elegir afinaciones alternativas, gire el mando Parameter 1. Las afinaciones alternativas son A = Ab (Ab),A = G ( g) y A = Gb ( gb). En la ventana de la pantalla parpadeará instantáneamente la referencia de afinación activa entonces. Para salir del modo de afinador, pulse simultáneamente ambos pedales de disparo. 11

17 Section Two - Editing Functions Editing/Creating Presets Creating your own signature sound with the RP100 is easy and intuitive.the RP100 lets you create your own Presets, or fine tune existing Presets to suit your needs. When creating or editing a sound, you must first start with one of the User or Factory Presets. It is not possible to start with a completely empty Preset. The Preset number does not necessarily need to be the location which you intend to have it reside, as you can save your creation to any User Preset location during the store process. To edit or create a Preset: 1. Use the Footswitches to select a Preset which will be your starting point. 2. Once you have found a Preset that you wish to edit, press the Select button once.this will take you into the Editing mode. 3. Use the Select button in conjunction with the Matrix to choose the effect you wish to edit. 4. Use the 3 Knobs to change parameter values to achieve the desired sound. Sección dos - Funciones de edición Edición/creación de un preset En el RP100 es muy fácil e intuitivo crear sus propios sonidos personales. El RP100 le permite crear sus propios presets o retocar de un modo preciso presets ya existentes para adecuarlos a sus necesidades. Cuando vaya a crear o editar un sonido, deberá empezar con uno de los presets de usuario o de fábrica. No es posible empezar con un preset completamente vacío. El número del preset no tiene por qué ser necesariamente la posición en la que quiera colocarlo, ya que durante el proceso de almacenamiento podrá grabarlo en cualquier preset de usuario. Para editar o crear un preset: 1. Use los pedales de disparo para elegir el preset que quiera usar como punto de partida. 2. Una vez que haya encontrado un preset que quiera editar, pulse una vez el botón Select. De este modo accederá al modo de edición. 3. Utilice el botón Select junto con la Matriz para elegir el efecto que quiera editar. 4. Use los tres mandos giratorios para modificar los valores de los parámetros hasta conseguir el sonido que quiera. 12

18 The Matrix The Matrix is where all Effects and Parameters are selected for editing. In Edit mode, successive presses of the Select button will advance to the next Effect row.the LED will light indicating which Effect group has been selected. Each Effect will have up to 3 Parameters which can be modified. The Knob under each column of Parameters is used to change the value for the corresponding Parameter of the selected Effect. As a Knob is rotated, the Parameter value or status will be shown in the Display. La matriz La matriz es el lugar en el que son elegidos todos los efectos y parámetros que vaya a editar. En el modo de edición, con cada pulsación del botón Select avanzará hasta la siguiente fila de efectos. El LED se encenderá para indicarle el grupo de efectos que haya sido elegido. Cada efecto podrá tener hasta 3 parámetros que podrán ser modificados. El mando que hay debajo de cada columna de parámetros sirve para modificar el valor del parámetro correspondiente del efecto elegido. Al girar un mando, en pantalla aparecerá el valor o el estado del parámetro. / / / / When the stored value of a Parameter is changed, the Store LED will light indicating that you need to store the changes. Changing Presets, or turning the power off before storing any changes will erase any changes made and revert to the stored values for the Preset. Cuando modifique el valor grabado de un parámetro, se encenderá el piloto Store para recordarle que debe guardar las modificaciones. Si cambia de preset o apaga la unidad sin grabar los cambios, perderá todas las modificaciones y el preset volverá a su estado original. 13

19 Storing/Copying a Preset Once the Preset has been modified to your liking, you may store your settings to any of the 40 User Preset locations (Presets 1-40). The following steps outline the procedure for storing changes to a Preset or copying a Preset to a different location: Almacenamiento/Copia de un Preset Una vez que haya modificado el preset a su gusto, puede almacenar sus ajustes en cualquiera de las 40 posiciones de preset de usuario (Presets 1-40). Los pasos siguientes le describen el proceso para guardar cambios en un preset o la copia de un preset a una posición distinta: / / / 1. Press the Store button once and the current Preset location will flash in the Display. This is asking you to select a User Preset location where your new sound will reside. 2. Select the User Preset location using the Footswitches. 3 Press the Store button again to save the changes. The procedure for copying one Preset to another Preset location is the same. Simply use the Footswitches to select the Preset that you want to copy, then follow the steps listed above. 1. Pulse una vez el botón Store y la posición activa del preset parpadeará en pantalla. Esto le estará pidiendo una posición de preset de usuario en la que almacenar su nuevo sonido. 2. Elija la posición de preset de usuario usando los Pedales de disparo. 3 Pulse de nuevo el botón Store para guardar los cambios. El proceso para la copia de un preset en otra posición es el mismo. Simplemente use los Pedales para elegir el preset que quiera copiar y después repita los pasos anteriores. 14

20 Section Three - Effects and Parameters About the Effects The RP100 can be thought of as several different virtual amplifiers, and individual, hi-tech stomp boxes.with stomp boxes, the order in which they are connected can make a big difference in how good the overall sound is. The following diagram shows the order of the effects contained in the RP100. Sección Tres - Efectos y Parámetros Acerca de los Efectos Puede imaginarse el RP100 como varios amplificadores virtuales distintos y pedales de efectos individuales de alta tecnología. Con los pedales de efectos, el orden en el que los conecte puede producir una gran diferencia en el sonido final. El diagrama siguiente le muestra el orden en que están colocados los efectos en el RP100. Effect Definitions Each Effect within the RP100 can be programmed to suit your personal tastes and application. Understanding how these Effects will alter the sound, and how each Parameter will alter the Effect will help you achieve the sound you are looking for. The following overview of the RP100 s effects outlines what each Effect and Parameter does. Definiciones de los efectos Cada efecto del RP100 puede ser programado para adaptarlo a sus gustos y aplicaciones particulares. El comprender cómo afectarán estos efectos al sonido y la forma en que cada parámetro afecta al efecto le ayudará a conseguir los sonidos que busca. El siguiente resumen de los efectos del RP100 describe lo que hace cada uno de ellos y sus parámetros. 15

21 Pickup/Wah The Pickup Simulator lets you get the thick tone of a humbucker pickup from a guitar with single coil pickups, or the bright edgy sound of a single coil pickup from a guitar with a humbucker.this allows you to have the best of both worlds without having to change guitars during a performance. Wah is an effect controlled by an Expression Pedal making the guitar sound as if it s saying Wah. Pickup Type - The Parameter 1 knob selects the Pick Up type which will be simulated. of - Turns the Pickup Simulator off. hb - Gives a single coil pick up the warm tone of a humbucker. sc - Gives a humbucker the unique sound of a single coil. Wah Type - The Parameter 2 knob selects the Wah Type. of - Turns the Wah Effect off. cr - Cry Wah is a traditional sounding Wah. bt - Boutique Wah is a wider sweeping Wah with a more modern sound. fr - Full Range Wah sweeps the entire spec trum of audible frequencies. Wah Position - The Parameter 3 knob adjusts the Wah Pedal Position. Ranges from 0 (toe up) to 99 (toe down). Compressor A Compressor is used to increase sustain, tighten up guitars, and prevent the signal from clipping the input of other effects. It sets a maximum boundary for the strength of a signal. Comp Type - The Parameter 1 knob selects the Compressor Type (Attack). of - Turns the Compressor off. 1 to 3 - Controls the length of time it takes for the Compressor to respond to a signal exceeding the boundary. Pastilla/Wah El Simulador de pastilla le permite conseguir el sonido grueso de una pastilla doble con una guitarra con pastillas simples, o el sonido brillante de una pastilla sencilla con una guitarra que tenga una humbucker. Esto hace que tenga lo mejor de los dos mundo sin tener que cambiar de guitarras durante su actuación. El Wah es un efecto controlado por un pedal de expresión que hace que el sonido de la guitarra haga Wah. Tipo pastilla - El mando Parameter 1 elige el tipo de pastilla simulada. of - Desactiva el simulador de pastillas. hb - Hace que una pastilla sencilla tenga el sonido cálido de una humbucker. sc - Le da a las pastillas dobles el sonido único de una pastilla sencilla. Tipo de wah - El mando Parameter 2 elige el tipo de wah. of - Desactiva el efecto de wah. cr - Este Cry Wah es el efecto wah tradicional. bt - El Boutique Wah tiene un barrido más amplio con un sonido más moderno. fr - El wah de rango amplio barre todo el espectro de frecuencias audibles. Posición wah - El mando Parameter 3 ajusta la posición del pedal de wah. El rango va desde 0 (puntera arriba) a 99 (puntera abajo). Compresor Un compresor se usa para aumentar el sustain, fortalecer las guitarras y evitar que la señal sature la entrada de otros efectos. Ajusta el límite máximo de fuerza de la señal. Tipo compresor - El mando Parameter 1 elige el tipo de compresor (Ataque). of - Desactiva el compresor. 1 a 3 - Controla la longitud de tiempo que tarda el compresor en responder a una señal que sobrepase el límite. 16
22 Amount - The Parameter 2 knob adjusts the Amount of Compression (ratio and sustain) and ranges from 1 (slight compression) through 20 (maximum sustain). Gain - The Parameter 3 knob adjusts the Output Gain from the Compressor. Ranges from 0 to 6. Amp Modeling Amp Modeling is a technology which applies the tone of several popular modern and vintage amps. Amp Modeling also includes an acoustic guitar simulation. Amp Gain - The Parameter 1 knob adjusts the Gain (distortion) for the selected Amp Model (not available for Acoustic). The Gain parameter ranges from 0 to 99. Amp Level - The Parameter 2 knob adjusts the Level (volume) of the selected Amp Model. The Level parameter ranges from 0 to 99. Amp Type - The Parameter 3 knob selects the 12 types of Amp Models. bf - Based on a 65 Fender Twin Reverb bo - Based on a Matchless DC30 re - Based on a Mesa Dual Rectifier hr - Based on a Mesa Boogie Mark II C td - Based on a 57 Fender Tweed Deluxe C1 - Based on a Vox AC30 top boost C2 - A clean tube combo setting St - Based on a Marshall JCM900 Cr - A nice crunchy combo Hg - Based on the Johnson JM150 High Gain Fu - A vintage fuzz distortion AC - A flat top acoustic guitar Marshall is a registered trademark of Marshall Amplification Plc. Vox is a registered trademark of Korg UK. Fender, Matchless, and Mesa Boogie, are trademarks of their respective companies and are in no way associated with DigiTech. EQ Equalization is an extremely useful tool used to further shape the tonal response of your guitar signal.the EQ in the RP100 is similar to the tone knobs on an amplifier. All three EQ parameters range from - 12dB to +12 db. Cantidad - El mando Parameter 2 ajusta la cantidad de compresión (ratio y sustain) y su rango va desde 1 (compresión suave) a 20 (sustain máximo). Ganancia - El mando Parameter 3 ajusta la ganancia de salida del compresor. Su rango va de 0 a 6. Modelado de amplificador El Amp Modeling es una tecnología que aplica el sonido de conocidos amplificadores tradicionales y modernos. Este modelado también incluye una simulación de guitarra acústica. Ganancia Amp - Parameter 1 ajusta la ganancia (distorsión) del modelo elegido (no disponible para Acoustic). El rango de este parámetro va de 0 a 99. Nivel Amp - El mando Parameter 2 ajusta el nivel (volumen) del modelo de amplificador elegido. El rango del parámetro de nivel va de 0 a 99. Tipo Amp - El mando Parameter 3 elige uno de los 12 tipos de modelo de amplificador. bf - Basado en un Fender Twin Reverb del 65 bo - Basado en un Matchless DC30 re - Basado en un Mesa Dual Rectifier hr - Basado en un Mesa Boogie Mark II C td - Basado en un Fender Tweed Deluxe del 57 C1 - Basado en un Vox AC30 con realce de agudos C2 - Un combo a válvulas limpio St - Basado en un Marshall JCM900 Cr - Un combo algo distorsionado Hg - Basado en el Johnson JM150 High Gain Fu - Una distorsión fuzz tradicional AC - Guitarra acústica con agudos planos Marshall es una marca registrada de Marshall Amplification Plc. Vox es una marca registrada de Korg UK. Fender, Matchless y Mesa Boogie son marcas registradas de sus propietarios respectivos y no están asociados en forma alguna con DigiTech. EQ La Equalization es una herramienta muy útil usada para dar más forma a la respuesta tonal de su señal de guitarra. El EQ del RP100 es similar a los mandos de tono de un amplificador. Los tres parámetros de la EQ cubren un rango de -12 db a +12 db. 17
23 Bass - The Parameter 1 knob adjusts the amount of low end enhancement (Bass). Mid - The Parameter 2 knob adjusts the amount of mid range enhancement. Treble - The Parameter 3 knob adjusts the amount of high end enhancement (Treble). Cabinet/Gate The Cabinet Modeling simulates different types of miked speaker cabinets.you have your choice of 3 Cabinet Types and 4 Mic Placements in relationship to the speaker cabinet. A Noise Gate is designed to eliminate noise while you are not playing. Cabinet/Mic - The Parameter 1 knob selects the type of simulated Speaker cabinet and mic placement in relation to the speaker. Bajos - El mando Parameter 1 ajusta la cantidad de realce de graves (Bajos). Medios - El mando Parameter 2 ajusta la cantidad de realce del rango medio. Agudos - El mando Parameter 3 ajusta la cantidad de realce de altas frecuencias (agudos). Recinto acústico/puerta El Modelado de recinto simula distintos tipos de altavoces captados por micros.tiene para elegir 3 tipos de recintos y 4 posiciones de micro en relación con el altavoz. Las Puertas de ruidos han sido diseñadas para eliminar los ruidos mientras no está tocando. Recinto/Micro - El mando Parameter 1 elige el tipo de recinto acústico simulado y colocación de micro en relación con el altavoz. Of - Cabinet Modeling off b3 - Warm 4x12 Mic 3 A1 - Dark 4x12 Mic 1 b4 - Warm 4x12 Mic 4 A2 - Dark 4x12 Mic 2 C1 - Bright 2x12 Mic 1 A3 - Dark 4x12 Mic 3 C2 - Bright 2x12 Mic 2 A4 - Dark 4x12 Mic 4 C3 - Bright 2x12 Mic 3 b1 - Warm 4x12 Mic 1 C4 - Bright 2x12 Mic 4 b2 - Warm 4x12 Mic 2 Gate Type - The Parameter 2 knob selects between the Silencer Noise Gate, or the Auto Swell volume swell effect. Of - Modelado de recinto off b3 - Cálido 4x12 Mic 3 A1 - Oscuro 4x12 Mic 1 b4 - Cálido 4x12 Mic 4 A2 - Oscuro 4x12 Mic 2 C1 - Brillante 2x12 Mic 1 A3 - Oscuro 4x12 Mic 3 C2 - Brillante 2x12 Mic 2 A4 - Oscuro 4x12 Mic 4 C3 - Brillante 2x12 Mic 3 b1 - Cálido 4x12 Mic 1 C4 - Brillante 2x12 Mic 4 b2 - Cálido 4x12 Mic 2 Tipo puerta - El mando Parameter 2 elige entre la puerta de ruidos de tipo Silencer, o el efecto de barrido automático de volumen. 18
24 Of - Turns the Noise Gate off. ng - Selects the Silencer Noise Gate. A1 to A9 - Selects the Auto Swell volume swell effect. These settings will automatically ramp up the volume from a 200 milliseconds volume fade in to 2 second volume fade in. Gate Thresh - The Parameter 3 knob sets the signal strength (Threshold) required to open or close the Noise Gate. The Gate Threshold parameter ranges from 1 (opens easily) to 40 (requiring strong signals to open). Effects The Effects row in the RP100 is a multi-function module, allowing you to select effects such as; Chorus, Flanger, Phaser,Tremolo, Panner, Rotary Speaker, Vibrato, AutoYah, Envelope, Pitch Shift, Detune, and Whammy effects. When the Effects row is selected, the Parameter 3 knob is used to choose the type of Effect to be used. Only one of the effects in this row can be used at a time. After selecting the type of effect in this module, the Parameter 1 and Parameter 2 knobs can then be used to adjust the individual parameters associated with the selected effect. The following list describes each Effect and their parameters in more detail: Chorus (CH) A Chorus adds a short delay to your signal. The delayed signal is modulated in and out of tune and then mixed back with the original signal to create a thicker sound. Amount - The Parameter 1 knob simultaneously adjusts the rate (Speed) and intensity (Depth) of the modulation. Ranges from 1 to 99. Level - The Parameter 2 knob controls the mix level of the Effect. Ranges from 0 to 99. Of - Desactiva la puerta de ruidos. ng - Elige la puerta de ruidos de tipo Silencer. A1 a A9 - Elige el efecto de barrido automático de volumen. Estos ajustes harán que el volumen aumente con un fundido de entrada que irá desde 200 millisegundos hasta uno de 2 segundos. Umbral puerta - El mando Parameter 3 ajusta la fuerza de señal (Umbral) necesaria para abrir o cerra la puerta de ruidos. Este parámetro tiene un rango que va desde 1 (se abre fácilmente) a 40 (solo la abrirán las señales más fuertes). Efectos La fila de efectos del RP100 es un módulo multifunción que le permite elegir efectos como; Chorus, Flanger, Modulador de fase, Tremolo, Panorama,Altavoz giratorio,vibrato,autoyah, Envolvente, Cambio de tono. Desafinación y Whammy. Cuando haya elegido esta fila, el mando Parameter 3 se usa para elegir el tipo de efectos a usar. Solo puede usar un efecto de esta fila a la vez.tras elegir el tipo de efecto en este módulos, podrá usar los mandos Parameter 1 y Parameter 2 para ajustar los parámetros individuales asociados con el efecto elegido. La lista siguiente describe con detalle cada uno de los efectos y sus parámetros asociados: Chorus (CH) Esto añade un pequeño retardo a su señal. La señal retardada es modulada en su tono y después mezclada con la señal original para crear un sonido más amplio. Cantidad - El mando Parameter 1 ajusta simultáneamente la rapidez (velocidad) y la intensidad (profundidad) de la modulación. Cubre un rango de 1 a 99. Nivel - El mando Parameter 2 controla el nivel de mezcla del efecto. El rango va de 0 a
Creating your Single Sign-On Account for the PowerSchool Parent Portal
 Creating your Single Sign-On Account for the PowerSchool Parent Portal Welcome to the Parent Single Sign-On. What does that mean? Parent Single Sign-On offers a number of benefits, including access to
MANUAL EASYCHAIR. A) Ingresar su nombre de usuario y password, si ya tiene una cuenta registrada Ó
 Ingresar su nombre de usuario y password, si ya tiene una cuenta registrada Ó") MANUAL EASYCHAIR La URL para enviar su propuesta a la convocatoria es: https://easychair.org/conferences/?conf=genconciencia2015 Donde aparece la siguiente pantalla: Se encuentran dos opciones: A) Ingresar
MANUAL EASYCHAIR La URL para enviar su propuesta a la convocatoria es: https://easychair.org/conferences/?conf=genconciencia2015 Donde aparece la siguiente pantalla: Se encuentran dos opciones: A) Ingresar
ENKVM-USBB. 2-Port USB KVM switch with Easy Switch and Cable. User Guide
 ENKVM-USBB 2-Port USB KVM switch with Easy Switch and Cable User Guide i Package Contents 1 ENKVM-USBB 2-Port USB KVM Switch with Easy Switch and Cable 1 User Guide Requirements Console A VGA, SVGA, XGA,
GUÍA DE USUARIO PC-331117. Bienvenidos al mundo Perfect Choice. Antes de comenzar a usar el producto es importante que leas esta guía.
 GUÍA DE USUARIO PC-331117 Bienvenidos al mundo Perfect Choice Antes de comenzar a usar el producto es importante que leas esta guía. Conexión 1. Inserta el transmisor en el conector para encendedor de
FCC Information : Warning: RF warning statement:
 FCC Information : This device complies with Part 15 of the FCC Rules. Operation is subject to the following two conditions: (1) This device may not cause harmful interference, and (2) This device must
PRECAUCIONES DE SEGURIDAD
 PRECAUCIONES DE SEGURIDAD SÍMBOLO DE PELIGRO SÍMBOLO DE ADVERTENCIA Este icono recuerda a los usuarios la existencia de voltaje peligroso. ADVERTENCIA: Este icono recuerda a los usuarios la importancia
ROCK N STEREO SOUND DESK
 Read and save these instructions ROCK N STEREO SOUND DESK RTA-M1102-BK INSTRUCTIONS TABLE OF CONTENTS PACKAGE INCLUDES Package Includes... 2 Specifications... 2 Product Parts List... 3 1 2 3 Product Details...
BAI-220 AURICULAR INALÁMBRICO
 BAI-220 AURICULAR INALÁMBRICO Manual de usuario ESPECIFICACIONES TÉCNICAS EMISOR Frecuencia: 86 ± 0.5 MHz Modulación: FM Distancia de emisión: 30 m. Recepción de cualquier equipo de audio y video con salida
KAISSA Manual Rápido De Usuario. Rev 1.0
 KAISSA Manual Rápido De Usuario Rev 1.0 Ante todo gracias por adquirir el innovador reloj de ajedrez KAISSA, diseñado bajo la filosofía del Diseño Para Todos. KAISSA tiene dos modos de funcionamiento principales
MP SERIES. Ver. 13.10.03
 MP SERIES Ver. 13.10.03 MP 12- AM/ MP 15- AM /MP 215 /MP 18-AM -1- PASSIVE SERIES MP 12 / 15 / 215 /18 MP 15 PROFESSIONAL LOUDSPEAKER -2- MP 12AM INPUT MIC OUTPUT 71 MP 15AM INPUT MASTER 6 POWERED LOUDSPEAKER
Crear alarma GATE. Aparecerá una ventana emergente para crear alarma.
 Crear alarma GATE Para crear una alarma, accede a través del menú principal de myhome.wattio.com a Seguridad, posteriormente arriba a la derecha haz click en Alarmas. En esta pantalla, en el menú izquierdo,
PROCESADOR DE MODELADO DE GUITARRA MANUAL DE INSTRUCCIONES
 PROCESADOR DE MODELADO DE GUITARRA MANUAL DE INSTRUCCIONES Precaución Para su seguridad, lea los siguientes puntos: Agua y humedad: No utilice este aparato cerca del aguda (p.e. cerca de un baño, lavadero,
 Control and Functions Guia de Funcionamiento Front View Configuración PAN/TILT 9 1 11 1 13 "Assign" 1 PROGRAM MUSIC/BKC MIDI/REC AUTO/DEL TAP/DISP 15~ BLACKOUT PAN TILT ASSIGN REVERSE MODE TILT PAN FINE
Controlador programable para efectos y dispositivos MIDI Manual de usuario
 Controlador programable para efectos y dispositivos MIDI Manual de usuario Servus!Pedale Würffelstr.7 21073 Hamburg, Germany www.servuspedale.com 1 Contenido CARACTERÍSTICAS...3 ALIMENTACIÓN...3 RECOMENDACIONES
PROLIGHT 400 P. Instrucciones de Usuario
 PROLIGHT 400 P Instrucciones de Usuario MANUAL DE FUNCIONAMIENTO INTRODUCCION: Este modelo es un programador dimmer de 4 canales, dispone de 7 modos de funcionamiento y 42 programas pregrabados, dispone
Versión Española. introducción. Contenidos del paquete. Conexiones. Tarjeta de sonido externa USB SC016 Sweex 7.1
 S P E A K E R S Versión Española Tarjeta de sonido externa USB SC016 Sweex 7.1 introducción No exponga la tarjeta de sonido externa USB de Sweex de 7.1" a temperaturas extremas. No coloque el dispositivo
Guía de inicio rápido. Español VTE-1016
 Guía de inicio rápido Español VTE-1016 7025690 1 Empecemos! Conexión del mando al sistema PlayStation TV Puedes utilizar el mando inalámbrico DUALSHOCK 3 o DUALSHOCK 4 con el sistema PS TV; basta con conectar
EP-2906 Manual de instalación
 EP-2906 Manual de instalación Con el botón situado a la izquierda se configura en el modo de cliente y de la derecha es el modo de Punto de acceso AP (nota: El USB es sólo para la función de fuente de
GARAGE DOOR OPENER CONNECTIVITY HUB QUICK START GUIDE
 GARAGE DOOR OPENER CONNECTIVITY HUB QUICK START GUIDE Thank you for purchasing a Craftsman garage door opener Connectivity Hub enabled with AssureLink technology. Once you have created your account and
SFD-200-N-B DESPERTADOR-PROYECTOR-CON VOZ. Manual de instrucciones
 SFD-200-N-B DESPERTADOR-PROYECTOR-CON VOZ Manual de instrucciones Funciones: - Proyección de la hora - Proyección controlada por sonidos y vibraciones (palmada, etc.) - Pantalla retroiluminada azul - Hora
Quick Installation Guide Internet Setup
 CBR-970 Wireless-N Broadband Router www.cnet.com.tw Established in California, U.S.A. since 1987 Quick Installation Guide Internet Setup What s included in the box CBR-970 Wireless N Broadband Router Quick
MODELO BRD-887 RADIO RELOJ DESPERTADOR CON DOBLE ALARMA
 AVISO SOBRE SALPICADURAS Y VENTILACIÓN MODELO BRD-887 RADIO RELOJ DESPERTADOR CON DOBLE ALARMA MEDIDAS DE SEGURIDAD ESTE APARATO NO DEBE QUEDAR EXPUESTO A GOTAS NI A SALPICADURAS. TAMPOCO DEBERÁ COLOCAR
Registro de Semilla y Material de Plantación
 Registro de Semilla y Material de Plantación Este registro es para documentar la semilla y material de plantación que usa, y su estatus. Mantenga las facturas y otra documentación pertinente con sus registros.
Puedes descargar los archivos de instalación de Windows SteadyState en el Centro de descarga Microsoft.
 Windows SteadyState Resumen Windows SteadyState es una utilidad de Microsoft que facilita el trabajo a quienes se encargan de la configuración y mantenimiento de equipos compartidos, de manera que todo
DT-210/DT-210L/DT-210V. E Revision 1
 DT-210/DT-210L/DT-210V E Revision 1 1 2 3 4 5 6 7 8 9 10 11 12 13 14 A B C D E F Controles Interruptor de selección estéreo/mono/ altavoz Botón de memoria Sintonización ascendente/descendente Conector
GUÍA DE USUARIO USER GUIDE 2.1 Multimedia Speaker System Design Line APPSP2102
 GUÍA DE USUARIO USER GUIDE 2.1 Multimedia Speaker System Design Line APPSP2102 Gracias por adquirir los Altavoces Multimedia 2.1 de Approx. Podrá conectar sus altavoces a cualquier ordenador, walkman,
Steps to Understand Your Child s Behavior. Customizing the Flyer
 Steps to Understand Your Child s Behavior Customizing the Flyer Hello! Here is the PDF Form Template for use in advertising Steps to Understanding Your Child s Behavior (HDS Behavior Level 1B). Because
NVR-919HC - 5.1 CINE EN CASA INSTRUCCIONES
 NVR-919HC - 5.1 CINE EN CASA INSTRUCCIONES Cine Digital Características del Cine Bienvenido a la utilización de nuestros productos. Antes de su utilización, por favor léase este manual cuidadosamente,
Agustiniano Ciudad Salitre School Computer Science Support Guide - 2015 Second grade First term
 Agustiniano Ciudad Salitre School Computer Science Support Guide - 2015 Second grade First term UNIDAD TEMATICA: INTERFAZ DE WINDOWS LOGRO: Reconoce la interfaz de Windows para ubicar y acceder a los programas,
OSCILLATION 512 (LM 3R)
") Application Note The following application note allows to locate the LM series devices (LM3E, LM3R, LM4 and LM5) within network and check its connection information: Name, MAC, dynamic IP address and static
Application Note The following application note allows to locate the LM series devices (LM3E, LM3R, LM4 and LM5) within network and check its connection information: Name, MAC, dynamic IP address and static
TYPE SUITABLE FOR INPUT VOLTAGE. 1 ~ 3 leds 1W 100-240 VAC 2-12 VDC 350 ma IP67 Blanco White FUSCC-4-350T TYPE POWER INPUT VOLTAGE.
 Nuestros distintos productos basados en los diodos leds no estarían completos sin una gama de drivers y fuentes de alimentación lo más completa posible. Hemos querido dotar a nuestros clientes del máximo
STAND BY SOUND BEAT FULL ON PROGRAM SPEED LATCH 5 LATCH 6 LATCH 7 LATCH
 STAND BY SOUND BEAT FULL ON PROGRAM SPEED LATCH 5 LATCH 6 LATCH 7 LATCH 8 88 88 POWER FLASH FLASH PROLIGHT 844 P Manual de Usuario Contenidos Características 1 Instrucciones Generales 2 1. Vista General
LED Strobe Panel - Manual
 PAG. 2 LED Strobe Panel - Manual SPECIFICATION Voltage: Power consumption: LED: Color temperature: Operation mode: Weight: Size: 3 00VAC 20VAC 05W (Max) 448* SMD5050 white LED 900K LED display 3.KGS *2.35*9.
Manual de Instrucciones
 BSPORT-10-N-R-V-A PULSERA DEPORTIVA-BLUETOOTH Manual de Instrucciones FUNCIONES Y CONTROLES Pulsar el botón de encendido durante 3 segundos para encender el dispositivo. BATERÍA El dispositivo cuenta con
Fuentes de alimentación DC. series TPR-3D y KPS
 Guía del Usuario AD INSTRUMENTS Fuentes de alimentación DC series TPR-3D y KPS Copyright AD INSTRUMENTS 2010 Reservados todos los derechos. La información de esta publicación reemplaza a toda la anterior
La central reproduce un sonido largo si los datos de configuración son almacenados de forma correcta, y dos sonidos cortos si hay un error.
 Programación Básica de Alarma GSM Última modificación: 15 de Octubre de 2013 Antes de nada, queremos darle las gracias por adquirir en zoominformatica.com este producto, esperamos que cubra todas sus expectativas
Race Manager by Master Timing Guía del usuario GUIA RACE MANAGER. Eventronic, SL
 GUIA RACE MANAGER Eventronic, SL DESCRIPCIÓN DEL PROGRAMA El Race Manager es un programa que se creó para facilitar el trabajo de la dirección de carrera de un evento durante y después de una carrera.
1. Sign in to the website, http://www.asisonline.org / Iniciar sesión en el sitio, http://www.asisonline.org
 Steps to Download Standards & Guidelines from the ASIS International Website / Pasos para Descargar los Standards & Guidelines de la Página Web de ASIS International 1. Sign in to the website, http://www.asisonline.org
Puede pagar facturas y gastos periódicos como el alquiler, el gas, la electricidad, el agua y el teléfono y también otros gastos del hogar.
 SPANISH Centrepay Qué es Centrepay? Centrepay es la manera sencilla de pagar sus facturas y gastos. Centrepay es un servicio de pago de facturas voluntario y gratuito para clientes de Centrelink. Utilice
www.gbrsoundlight.com
 www.gbrsoundlight.com FELICITACIONES POR SU COMPRA DEL MIXER ME-425FX Felicitaciones por la compra de equipos!! Esta consola de alta tecnología cuenta con una GARANTIA DE DOS AÑOS, salvo POTENCIOMETROS.
DS213 PROCESADOR DIGITAL DE ALTAVOCES
 DS213 PROCESADOR DIGITAL DE ALTAVOCES EDIT POWER 24-BIT DSP/48KHZ SAMPLE RATE PARAMETER RECALL MANUAL DEL USUARIO Información Importante Todos los productos STS de la línea de Procesadores Digitales han
Guía del usuario. Xperia P TV Dock DK21
 Guía del usuario Xperia P TV Dock DK21 Contenido Introducción...3 Descripción general de la parte posterior de TV Dock...3 Primeros pasos...4 Gestor de LiveWare...4 Actualización de Gestor de LiveWare...4
24-Port 10/100Mbps Web Smart PoE Switch with 4 Gigabit Ports and 2 Mini-GBIC Slots TPE-224WS
 24-Port 10/100Mbps Web Smart PoE Switch with 4 Gigabit Ports and 2 Mini-GBIC Slots TPE-224WS ŸGuía de instalación rápida (1) ŸTroubleshooting (3) 1.12 1. Antes de iniciar Contenidos del Paquete ŸTPE-224WS
MANUAL PANTALLAS LED atreef ILU+ V2.5
 MANUAL PANTALLAS LED atreef ILU+ V2.5 Puesta en marcha: 1. Conecte la pantalla de leds a la fuente de alimentación. 2. Conecte la fuente de alimentación a la corriente eléctrica 3. Ahora debe comprobar
Los bloques DLL (Figura A.1) externos permiten al usuario escribir su propio código y
 externos permiten al usuario escribir su propio código y") Apéndice A Bloques DLL Los bloques DLL (Figura A.1) externos permiten al usuario escribir su propio código y programarlo en lenguaje C, compilarlo dentro de un archivo DLL usando el Microsoft C/C++ o el
Apéndice A Bloques DLL Los bloques DLL (Figura A.1) externos permiten al usuario escribir su propio código y programarlo en lenguaje C, compilarlo dentro de un archivo DLL usando el Microsoft C/C++ o el
Sistemas de impresión y tamaños mínimos Printing Systems and minimum sizes
 Sistemas de impresión y tamaños mínimos Printing Systems and minimum sizes Para la reproducción del Logotipo, deberán seguirse los lineamientos que se presentan a continuación y que servirán como guía
www.gbrsoundlight.com
 www.gbrsoundlight.com SEGUINOS EN/ SIGN IN: /GBRSOUNDLIGHT //GBRSOUNDLIGHT @GBRSOUNDLIGHT FELICITACIONES POR SU COMPRA DEL MIXER 425FX ME- FELICITACIONES POR SU COMPRA DE LA MIXER Este EQUIPO de alta tecnología
LÁSER 40mW CON CONTROL REMOTO DMX O MASTER/SLAVE
 SRL-LB-20 DT LÁSER 40mW CON CONTROL REMOTO DMX O MASTER/SLAVE INTRODUCCIÓN Gracias por escoger el láser SRL-LB20DT de Pro Light. Usted acaba de adquirir un láser profesional controlado por DMX, automático,
Video Server. Quick Installation Guide. English, Español
 Video Server Quick Installation Guide English, Español 2 Video Server NOTES Quick Installation Guide 3 Video Server Quick Installation Guide To get your Video Server up and running on an Ethernet network,
ATENCIÓN: No deseche este producto junto con la basura común. Llévelo a un punto limpio de reciclaje de dispositivos electrónicos.
 Garantía y Soporte Este producto incluye una garantía de un año que cubre problemas detectados durante un uso normal. Si hace un mal uso de Attention Tracker o abre la unidad, esta garantía quedará invalidada.
User s Guide/ Manual de Instrucciones
 User s Guide/ Manual de Instrucciones Warning For your protection, please read the following: These symbols are internationally accepted symbols that warn of potential hazards with electrical products.the
Manual de instrucciones
 Manual de instrucciones Modelo:HP-560SB 2.1Ch Audio Sound Bar Lea todas estas instrucciones antes de usar y guarde para futuras consultas. Contenido Contenido --------------------------------------------------------------------------------------------------------
Software TRENDnetVIEW Pro. Guía de instalación rápida de TRENDnetVIEW Pro (1)
") Software TRENDnetVIEW Pro Guía de instalación rápida de TRENDnetVIEW Pro (1) TRENDnetVIEW Pro/10.08.2013 Índice Requisitos del software de gestión TRENDnetVIEW Pro... 19 Instalación de TRENDnetVIEW Pro...
Software TRENDnetVIEW Pro Guía de instalación rápida de TRENDnetVIEW Pro (1) TRENDnetVIEW Pro/10.08.2013 Índice Requisitos del software de gestión TRENDnetVIEW Pro... 19 Instalación de TRENDnetVIEW Pro...
Digital Indoor Antenna
 24700-2 Digital Indoor Antenna User s Manual Thank you on your purchase of the Digital Indoor Antenna. Before installation, please read this manual carefully and keep for future reference. INTRODUCTION
Xperia TX TV Dock DK22 Xperia T TV Dock DK23
 Guía del usuario Xperia TX TV Dock DK22 Xperia T TV Dock DK23 Contenido Introducción...3 Descripción general de TV Dock...3 Primeros pasos...4 Conexión inteligente...4 Actualización de Conexión inteligente...4
Cómo comprar en la tienda en línea de UDP y cómo inscribirse a los módulos UDP
 Cómo comprar en la tienda en línea de UDP y cómo inscribirse a los módulos UDP Sistema de registro y pago Este sistema está dividido en dos etapas diferentes*. Por favor, haga clic en la liga de la etapa
La Video conferencia con Live Meeting
 Página 1 INSTRUCCIONES PARA TRABAJAR CON LIVE MEETING.- PREVIO. Para que tenga sentido la videoconferencia es conveniente que tengamos sonido (no suele ser problemático) y que tengamos vídeo. Si el ordenador
Matemáticas Muestra Cuadernillo de Examen
 Matemáticas Muestra Cuadernillo de Examen Papel-Lápiz Formato Estudiante Español Versión, Grados 3-5 Mathematics Sample Test Booklet Paper-Pencil Format Student Spanish Version, Grades 3 5 Este cuadernillo
Instrucciones para el cuidado y funcionamiento
 Guía del usuario Instrucciones para el cuidado y funcionamiento La Banghó Guía del usuario 3 Contenido Contenido del empaque Una Un Teclado Un cable power describen Si alguno de ellos falta o se encuentra
Recomendaciones Importantes
 Recomendaciones Importantes 1 Lea las Instrucciones Todas las instrucciones de funcionamiento y seguridad deben ser leídas antes de que el equipo esté operativo. 2 Recuerde las instrucciones Por su seguridad
Procedimientos iniciales
 Procedimientos iniciales Instalar, conectar y utilizar su dispositivo Intelligent NAS 2014/7 Contenido Creación de RAID automática y capacidad de la unidad...3 Guía de instalación rápida...4 Instalar Intelligent
Modelo GSM1000 Manual Del Usuario
 Modelo GSM1000 Manual Del Usuario Índice Ventajas...3 Características...3 Contenido...4 Instalación...4 Inserción de la tarjeta SIM:...4 Manual del usuario cuando está conectado a una centralita....5 Desvío
Printer Driver. Esta guía describe la instalación del controlador de la impresora en Windows Vista, Windows XP y Windows 2000.
 4-129-722-51 (1) Printer Driver Guía de instalación Esta guía describe la instalación del controlador de la impresora en Windows Vista, Windows XP y Windows 2000. Antes de utilizar este software Antes
Guía de instalación rápida TEG-160WS TEG-240WS
 Guía de instalación rápida TEG-160WS TEG-240WS C2 Table of Contents Español 1 1. Antes de iniciar 1 2. Instalación del Hardware 2 3. Herramienta de gestión Web 3 Troubleshooting 6 Version 02.02.2010 1.
Contenidos de la caja. Lista de terminología. Powerline Adapter
 Powerline Adapter Atención! No exponga el Powerline Adapter a temperaturas extremas. No coloque el dispositivo bajo la luz solar directa o en proximidad de elementos calientes. No utilice el Powerline
TUTORIAL: Cómo puedo instalar el Renault Media Nav Toolbox? TUTORIAL: Cómo puedo crear una "huella digital" del dispositivo en un dispositivo de
 TUTORIAL: Cómo puedo instalar el Renault Media Nav Toolbox? TUTORIAL: Cómo puedo crear una "huella digital" del dispositivo en un dispositivo de almacenamiento USB? TUTORIAL: Cómo puedo empezar a utilizar
EMC SourceOne TM para Microsoft SharePoint 7.0 Búsqueda de archivo Tarjeta de referencia rápida
 EMC SourceOne TM para Microsoft SharePoint 7.0 Búsqueda de archivo Tarjeta de referencia rápida Utilice la búsqueda de archivo para buscar y restaurar contenido de SharePoint que se encuentre archivado
FIRE RED FUZZ. Bill Of Materials
 FIRE RED FUZZ FIRE RED FUZZ We hope you enjoy your new FIRE RED FUZZ! In this manual, you will find documentation and guidelines helpful to build either your Kit or PuzzleKit. For any further information,
Documentación WebDrive
 Documentación WebDrive A continuación se detallará la instalación, configuración y uso del WebDrive, el WebDrive es un programa que permite mapear como una unidad de red de tu equipo un servidor WebDAV,
TTS está orgulloso de ser parte de
 Garantía y Soporte Este producto incluye una garantía de un año que cubre problemas detectados durante un uso normal. Si hace un mal uso de Easi-Cars o abre la unidad, esta garantía quedará invalidada.
Guía del propietario. Owner s Guide. December 6, 2010 NSOG-1.0-100
 Guía del propietario Owner s Guide December 6, 2010 NSOG-1.0-100 Legal 2 2 Información legal Copyright 2011 Google Inc. Todos los derechos reservados. Copyright 2010 Google Inc. All rights reserved. Google,
Sierra Security System
 Using Your SpreadNet Accessories With Your Sierra Security System Uso de Sus Accesorios SpreadNet Con Su Sistema de Seguridad Sierra SN990-KEYPAD SN961-KEYFOB SN991-REMOTE 1 SN990-KEYPAD The SN990-KEYPAD
EM1037 Conmnutador KVM de 2 puertos USB
 EM1037 Conmnutador KVM de 2 puertos USB Cómo se conecta a los Puertos USB: El teclado se debe enchufar en el puerto USB superior. El ratón se debe enchufar en el puerto USB inferior. 2 ESPAÑOL EM1037 -
ES-S6A Sirena de interior. www.etiger.com
 ES-S6A Sirena de interior www.etiger.com ES Características La ES-S6A puede utilizarse como sirena adicional conectada a su sistema de alarma o como sirena independiente conectada a un mando a distancia
PAM - 480A AMPLIFICADOR modular 20310480
 MANUAL DE INSTRUCCIONES PAM - 480A AMPLIFICADOR modular 20310480 Desembalaje e instalación. A pesar de que es muy sencilla la instalación de este equipo, recomendamos dedique unos minutos de su tiempo
School Preference through the Infinite Campus Parent Portal
 School Preference through the Infinite Campus Parent Portal Welcome New and Returning Families! Enrollment for new families or families returning to RUSD after being gone longer than one year is easy.
manual de servicio nissan murano z51
 manual de servicio nissan murano z51 Reference Manual To understand featuring to use and how to totally exploit manual de servicio nissan murano z51 to your great advantage, there are several sources of
WL1003 NEW AUTOMÁTICO
 WL1003 NEW AUTOMÁTICO Acaba de adquirir un equipo de conmutación de euroconectores y le damos las gracias por su elección. Para una utilización óptima de este aparato, le recomendamos que lea este manual
INSTRUCCIONES PARA ENVIAR SU PELICULA PARA LA VIDEOLIBRERIA
 For English version, please scroll down to page 11 (eleven) INSTRUCCIONES PARA ENVIAR SU PELICULA PARA LA VIDEOLIBRERIA Especificaciones técnicas Container format:.mp4 / tamaño de archivo no superior a
Publicar y mapear una impresora a través de internet.
 Publicar y mapear una impresora a través de internet. En esta documentación se explicará de forma detallada la forma de compartir una impresora en internet a través de un Windows server y así poder imprimir
DESHUMIDIFICADOR MH 120 MANUAL DE INSTRUCCIONES. Gracias por haber elegido este producto. Por favor, lea este manual de instrucciones antes de usarlo.
 DESHUMIDIFICADOR MH 120 MANUAL DE INSTRUCCIONES Gracias por haber elegido este producto. Por favor, lea este manual de instrucciones antes de usarlo. INDICE Contenidos: Presentación del producto... 1 Instrucciones
EM6053 Vídeo sobre UTP 200m
 EM6053 Vídeo sobre UTP 200m EM6053 Vídeo sobre UTP 200m 2 ESPAÑOL Contenidos Contenidos... 2 1.0 Introducción... 2 1.1 Functions and features... 2 1.2 Contenido del paquete... 3 2.0 Lo que necesita en
Documentación PopGrabber
 Documentación PopGrabber En esta documentación se detallará el funcionamiento y configuración del programa PopGrabber. 1. Funcionamiento: Eclarsys PopGrabber es un programa que recupera e mails desde cuentas
GUÍA RÁPIDA DE. Instalación de los Controladores para cable de conectividad Nokia
 GUÍA RÁPIDA DE Instalación de los Controladores para cable de conectividad Nokia Contenido 1. Introducción...1 2. Requisitos...1 3. Instalación De Los Controladores Para Cable De Conectividad Nokia...2
Programa de encriptación WIFI.
 Programa de encriptación WIFI. En qué consiste la aplicación? Se trata de un programa que permite encriptar automáticamente la señal wifi del Cable MODEM router de ONO. Dónde se encuentra la aplicación?
J.N. Wagenaanweg 9,1422 AK Uithoorn, Netherlands
 MANUFACTURE This equipement fully conforms to the protection requirements of the following Council Directives. 2004/108/EC : Electromagnetic Compatibility CE EU REPRESENTATIVE : HOSHINO GAKKI CO., LTD.
5.4. Manual de usuario
 5.4. Manual de usuario En esta sección se procederá a explicar cada una de las posibles acciones que puede realizar un usuario, de forma que pueda utilizar todas las funcionalidades del simulador, sin
Manual del Usuario. Español
 Manual del Usuario Gracias por adquirir los auriculares Bluetooth EP605 de August. Este manual ha sido editado para que se familiarice con las características del producto. Por favor, lea detenidamente
LECTOR PROXIMIDAD 4K AUTONOMO STANDALONE 4K PROXIMITY READER REF: 507222 HI / 255 01/14
 LECTO POXIMIDAD 4K AUTONOMO STANDALONE 4K POXIMITY EADE EF: 507222 HI / 255 01/14 LECTO POXIMIDAD 4K AUTONOMO egistro de la maestra y para suprimir 1. Apagar el lector 2. Poner el dipswitch nº1 en posición
Cuadro eléctrico Gama ABS CP 151-254
 15975197ES (12/2014) Instrucciones de instalación y funcionamiento www.sulzer.com 2 Instrucciones de instalación y funcionamiento Cuadro eléctrico Gama ABS CP 151 153 253 254 Contenidos 1 General... 3
Theatrelight NOVA 24
 Apuntes Capacitación: Operación Básica Consola Theatrelight NOVA 24 1.- Características 1.1.- Acceso a 24 canales dimmer en forma directa. 1.2.- Capacidad para el registro de 80 escenas (10 páginas con
EW1051 Lector de tarjetas inteligentes USB
 EW1051 Lector de tarjetas inteligentes USB 2 ESPAÑOL EW1051 Lector de tarjetas USB Contenidos 1.1 Funciones y características... 2 1.2 Contenido del paquete... 2 2.0 Instalar el dispositivo EW1051 mediante
MANUAL DE INSTRUCCIONES AMPLIFICADOR DE VOZ PORTÁTIL C/RADIO Y MICRO SD RD-4956USDR
 MANUAL DE INSTRUCCIONES AMPLIFICADOR DE VOZ PORTÁTIL C/RADIO Y MICRO SD RD-4956USDR ESTIMADO CLIENTE Con el fin de que obtenga el mayor desempeño de su producto, por favor lea este manual de instrucciones
Contratación e Integración de Personal
 Contratación e Integración de Personal Bizagi Suite Contratación e Integración de Personal 1 Tabla de Contenido Contratación e Integración... 2 Elementos del proceso... 5 Viene de Selección y Reclutamiento?...
Manual de instrucciones
 AMPLIFICADOR DE GUITARRA ELÉCTRICA Manual de instrucciones Instrucciones importantes de seguridad INSTRUCCIONES DE SEGURIDAD ADVERTENCIA PARA LOS USUARIOS EN CASO DE QUE SU UNIDAD ESTÉ EQUIPADA CON UN
EW3590/91/92 Cascos Bluetooth con micrófono
 EW3590/91/92 Cascos Bluetooth con micrófono Cascos Bluetooth con micrófono EW3590/91/92 2 ESPAÑOL Contenidos 1.0 Introducción... 2 1.1 Contenido del paquete... 2 2.0 Conectar a un dispositivo Bluetooth...
Zune 8GB/4GB Start. Iniciar.
 Zune 8GB/4GB Start. Iniciar. SETUP 1 Visit www.zune.net/setup to install the Zune software. 2 When installation is complete, connect your Zune to your PC to start syncing. Your Zune charges whenever
Guía de referencia rápida / Quick reference guide Visor de Noticias Slider / NCS News Slider for SharePoint
 Guía de referencia rápida / Quick reference guide Visor de Noticias Slider / NCS News Slider for SharePoint Contenido ESPAÑOL... 3 Términos de Uso... 3 Soporte... 3 Look de la Aplicación... 3 Requisitos
Instrucciones de montaje
 Instrucciones de montaje Gracias por comprar mecanismo elevadot NELSON Por favor, coloque todos los componentes en una superficie acolchada / alfombra para evitar daños. Por razones de seguridad, se recomienda
appkbws03 Wireless Multimedia Keyboard Set Black
 appkbws03 Wireless Multimedia Keyboard Set Black Español 01 English 06 Capítulo 1. Introducción y descripción del producto Gracias por elegir el teclado inalámbrico APPKBWS03. Descripción del producto