Art. No AY 1500 PARED (18 L.)
|
|
|
- Manuela Vargas Rivas
- hace 8 años
- Vistas:
Transcripción
1 MANUAL DE INSTRUCCIONES DE ASPIRADORES PARA POLVO Y AGUA MODE D EMPLOI DES ASPIRATEURS DE POUSSIÈRE ET D EAU INSTRUCTION MANUAL FOR WET AND DRY VACUUM CLEANER Art. No AY 500 PARED (8 L.)

2 ES Gracias por comprar este aspirador para polvo y líquidos de Ayerbe. Tenga plena confianza de que con Ayerbe obtendrá un producto de alta calidad fabricado para un resultado óptimo. Este aspirador es capaz de absorber líquidos y materiales secos. POR SU SEGURIDAD: LEA ATENTAMENTE Y COMPRENDA TODAS LAS INSTRUCCIONES GARANTÍA Este producto de Ayerbe tiene una garantía limitada de dos (2) años contra defectos de fabricación o de materiales desde la fecha de compra en condiciones normales de uso doméstico. La garantía no se aplica a los defectos ocasionados por abuso directo o indirecto, negligencia, uso indebido, accidentes, reparaciones o modificaciones y falta de mantenimiento. Por favor, guarde su factura como prueba de compra. INSTRUCCIONES Y ADVERTENCIAS DE INSTRUCCIONES DE SEGURIDAD IMPORTANTES Lea y comprenda todas las instrucciones antes de usar el aspirador Lea y comprenda este manual de usuario y todas las etiquetas contenidas en el Aspirador para Polvo y Agua antes de empezar a utilizarlo. La seguridad es una mezcla de sentido común, permanecer en alerta y saber cómo funciona el aspirador. Utilice este Aspirador para Polvo y Agua únicamente como se describe en este manual. Para evitar el riesgo de sufrir daños personales o en su Aspirador para Polvo y Agua, utilice únicamente accesorios recomendados por Ayerbe. Sólo para Uso Doméstico. GUARDE ESTE MANUAL PARA FUTURAS REFERENCIAS. ADVERTENCIA: PARA EVITAR EL RIESGO DE INCENDIOS, DESCARGAS ELÉCTRICAS O DAÑOS PERSONALES: No deje el aspirador desatendido. No aspire ni utilice este Aspirador para Polvo y Agua cerca de líquidos inflamables, gases o gases explosivos como la gasolina u otros combustibles, combustibles ligeros, limpiadores, pinturas a base de aceite, gas natural, hidrógeno, o polvos explosivos como polvo de carbón, polvo de magnesio, polvo de granos o pólvora. Las chispas en el interior del motor pueden provocar la ignición de los gases o polvo inflamable. No aspire nada que esté quemándose o del que salga humo, como cigarros, cerillas o cenizas incandescentes. Mantenga el cable lejos de superficies calientes. No exponga el aparato a la lluvia. Guárdelo en un lugar cerrado. No desenchufe el aspirador tirando del cable. Para desenchufarlo, tire del enchufe, no del cable. No utilice el aparato con el cable, enchufe u otras piezas dañadas. Si su Aspirador para Polvo y Agua no funciona como debería, le faltan piezas, se ha caído o dañado, se ha guardado en el exterior o se ha caído al agua, llévelo a un centro de mantenimiento independiente has. No tire de ni coja el aparato por el cable, no use el cable como un tirador, no pille el cable con una puerta ni tire del cable alrededor de bordes o esquinas cortantes. No utilice el Aspirador para Polvo y Agua por encima del cable. No manipule el enchufe ni el Aspirador para Polvo y Agua con las manos mojadas. Para evitar riesgos para la salud por las sustancias de los gases o polvos, no aspire materiales tóxicos. 2

3 No utilice ni guarde el aparato cerca de materiales peligrosos. No utilice el Aspirador para Polvo y Agua con el filtro roto o sin el filtro instalado excepto para aspirar líquidos tal y como se describe en el apartado sobre funcionamiento en este manual. No permita que se utilice el aspirador como un juguete. Es necesario prestar una atención especial cuando lo utilicen los niños o se utilice cerca de los niños. Para evitar el riesgo de sufrir daños por activación accidental, desenchufe el cable de alimentación antes de cambiar o limpiar el filtro. No deje el aspirador sin supervisión cuando lo enchufe. Desenchúfelo de la toma de corriente cuando no lo utilice y antes de su mantenimiento. Apague el Aspirador para Polvo y Agua antes de desenchufarlo. No coloque ningún objeto dentro de las aberturas de ventilación. No aspire con cualquier abertura de ventilación obstruida; mantenga el aspirador libre de polvo, pelusas, pelos o cualquier cosa que pueda reducir el caudal de aire. Aleje el pelo, ropa, dedos y todas las partes del cuerpo de las piezas de abertura y móviles. Para evitar el riesgo de caídas, ponga especial atención cuando limpie las escaleras. Si el cable de alimentación está dañado, debe ser sustituido por parte del fabricante, su agente de mantenimiento u otras personas con una cualificación similar, a fin de evitar riesgos El uso de este aparato no está destinado a personas (incluyendo niños) con capacidad física, sensorial o mental reducida, o sin experiencia y conocimiento del aparato, a menos que una persona responsable de su seguridad les supervise o les dé instrucciones al respecto del uso del aparato. Debe vigilar que los niños no jueguen con el aparato. Para una protección adicional: Se recomienda el uso de este aspirador con un dispositivo de corriente residual (RCD) con una corriente residual nominal de 30mA o menos. Si se usa como soplador: Dirija la descarga de aire sólo a la zona de trabajo. No utilice el Aspirador para Polvo y Agua como pulverizador. No dirija el aire indiscriminadamente. Manténgase alejado de los niños. Utilice gafas de seguridad. INSTRUCCIONES DE DOBLE Este Aspirador para Polvo y Agua tiene doble aislamiento, eliminando la necesidad de un sistema de puesta a tierra independiente. Lea las instrucciones de Mantenimiento de Aspiradores para Polvo y Agua de Doble Aislamiento antes de proceder al mantenimiento. Utilice el Aspirador para Polvo y Agua tal y como se describe en el manual. Observe las siguientes advertencias que aparecen en la carcasa del motor del Aspirador para Polvo y Agua. DOBLE AISLAMIENTO NO REQUIERE CONEXIÓN A TIERRA UTILICE ÚNICAMENTE PIEZAS DE REPUESTO IDÉNTICAS PARA SU MANTENIMIENTO. ADVERTENCIA: PARA EVITAR EL RIESGO DE DESCARGA ELÉCTRICA NO LO EXPONGA A LA LLUVIA. GUÁRDELO EN UN LUGAR CERRADO. ADVERTENCIA: POR SU PROPIA SEGURIDAD, LEA Y COMPRENDA EL MANUAL DE INSTRUCCIONES. NO DEJE EL ASPIRADOR DESATENDIDO. NO ASPIRE CENIZAS INCANDESCENTES, CARBONES, MATERIALES TÓXICOS, INFLAMABLES NI OTROS MATERIALES PELIGROSOS, NO LO USE CERCA DE LÍQUIDOS O VAPORES EXPLOSIVOS. AVISO: No aspire el polvo producido por trabajos de mampostería, hollín o cenizas con el filtro estándar del Aspirador para Polvo y Agua. Se trata de un polvo muy fino que no puede ser capturado por el filtro y puede ocasionar daños en el motor. Cuando aspire polvo fino, utilice el filtro para polvo fino (se vende por separado). 3

4 ADVERTENCIA: MANTENIMIENTO DEL ASPIRADOR PARA POLVO Y AGUA DE DOBLE AISLAMIENTO CON UN ASPIRADOR PARA POLVO Y AGUA DE DOBLE AISLAMIENTO, SE PROPORCIONAN DOS SISTEMAS DE AISLAMIENTO EN LUGAR DE LA CONEXIÓN A TIERRA. NO SE PROPORCIONA NINGUN MEDIO DE CONEXIÓN A TIERRA EN UN APARATO CON DOBLE AISLAMIENTO, NI DEBEN AÑADIRSE MEDIOS DE CONEXIÓN A TIERRA. EL MANTENIMIENTO DE UN ASPIRADOR PARA POLVO Y AGUA DE DOBLE AISLAMIENTO REQUIERE UN CUIDADO EXTREMO Y CONOCIMIENTO DEL SISTEMA Y DEBE PRESTARSE ÚNICAMENTE POR PERSONAL CUALIFICADO DE MANTENIMIENTO. LAS PIEZAS DE RESPUESTO DE UN ASPIRADOR PARA POLVO Y AGUA DE DOBLE AISLAMIENTO DEBEN SER IDÉNTICAS A LAS PIEZAS QUE SUSTITUYEN. SU ASPIRADOR PARA POLVO Y AGUA DE DOBLE AISLAMIENTO ESTÁ MARCADO CON LAS PALABRAS DOBLE AISLAMIENTO Y EL SÍMBOLO (UN CUADRADO DENTRO DE OTRO) PUEDE APARECER GRABADO EN EL APARATO. NO utilice el aspirador sin los filtros en su lugar AVISO: PARA EVITAR EL RIESGO DE SUFRIR LESIONES OCASIONADAS POR LAS PARTES MÓVILES DESENCHUFE EL APARATO ANTES DE PROCEDER AL MANTENIMIENTO. ESPECIFICACIONES 8 Litros V ~ 50Hz.500 W Filtro Cartucho Filtro de Espuma DESEMBALAJE Y COMPROBACIÓN DEL Saque todos los contenidos de la caja de Compruebe cada elemento con la lista de contenidos. Key A B C D E F G H I J K L M N O P Q R S Description... Vac Assembly... Hose Holding Rod... Mounting Rack. 4m Hose. 3m Flex Hose Utility Nozzle.. Crevice Tool Round Dusting Brush.. Extension Wands... Car Nozzle Cartridge Filter.. Filter Retainer Air/Noise Diffuser... Side Tool Caddy... Remote Control Handle... Foam Filter. Screws Expansion Bolt.. Operator s Manual QTY

5 INSTRUCCIONES GENERALES DE MONTAJE 5
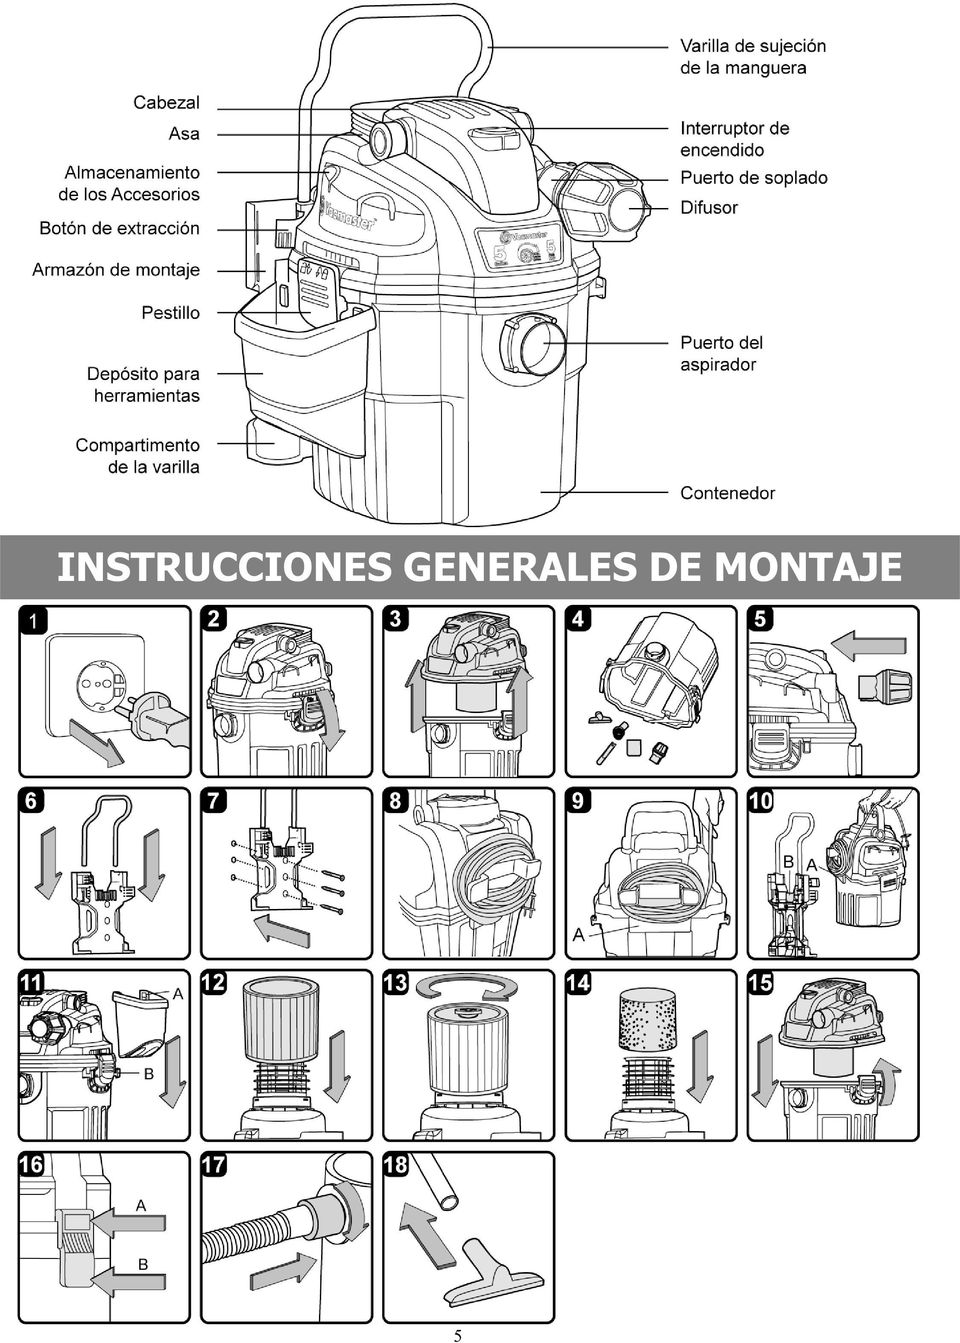
6 ADVERTENCIA: NO ENCHUFE EL CABLE A LA TOMA DE CORRIENTE, ASEGÚRESE DE QUE EL ENCHUFE ESTÁ DESCONECTADO ANTES DE MONTAR EL ASPIRADOR PARA POLVO Y AGUA DESEMBALAJE DEL ASPIRADOR PARA POLVO Y AGUA Y MONTAJE GENERAL. Compruebe que el cable de alimentación está desconectado de la toma. (fig. ) 2. Levante los pestillos. (fig. 2) 3. Retire el cabezal del contenedor. (fig. 3) 4. Retire el contenido del interior del contenedor, asegurándose de que están todos los accesorios listados en la página 4. (fig. 4) 5. Recoloque el cabezal en el contenedor e inserte el difusor acústico en el puerto de soplado. (fig. 5) MONTAJE DEL ARMAZÓN Y ALMACENAMIENTO IMPORTANTE! sólo para superficies de madera Monte el armazón de manera que cuando el aspirador esté ajustado la distancia entre el puerto de aspirado del aspirador y el suelo no supere los,5 m. No atornille el armazón sólo a la pared. Asegure los tornillos a un entramado. No se cuelgue ni se siente encima del armazón No supere el límite de peso máximo de 8 Kgr. 6. Introduzca la varilla de sujeción de la manguera en los dos agujeros ubicados en la parte superior del armazón. Asegúrese de que la curvatura de la varilla se orienta lejos de la pared. (fig. 6) 7. Seleccione una ubicación en un entramado de pared que no diste más de 5 metros de una toma eléctrica. 8. Alinee los tres agujeros de los tornillos de modo que estén por encima del entramado. Asegúrese de que el armazón está nivelado y haga las marcas. Realice un agujero guía de 3 mm de diámetro y 35~40 mm de profundidad en cada marca. Fije el armazón al entramado de pared con los tres tornillos proporcionados. (fig. 7) IMPORTANTE! (solo para las superficies de cemento) Monte el armazón de modo que cuando se inserte el aspirador la distancia entre el puerto de aspiración y el suelo no supere los,5 m. No atornille el armazón directamente a una pared de escayola. Asegúrelo a un entramado o pared de ladrillo. No se cuelgue ni se sienta encima del armazón No supere el límite de peso máximo de 8 Kgr. 9. Introduzca la varilla de sujeción de la manguera en los dos agujeros ubicados en la parte superior del armazón. Asegúrese de que la curvatura de la varilla se orienta lejos de la pared. (fig. 6) 0. Seleccione una ubicación en una pared que no diste más de 5 metros de una toma eléctrica.. Elija una pared sólida para colgar el armazón del aspirador. Coloque el armazón en la posición deseada de la pared. Asegúrese de que el armazón está nivelado y haga las marcas de los agujeros (x3). Realice un agujero guía de 0 mm de diámetro y 45~50 mm de profundidad en cada marca. (fig. 7) Para fijar un entramado de pared realice 3 agujeros guías y atornille el armazón de forma segura. Para las paredes de ladrillo perfore 3 agujeros de 3 x 0mm -40~45 mm en cada marca (fig.7) 6
 MONTAJE DEL ARMAZÓN Y ALMACENAMIENTO IMPORTANTE!")
7 CÓMO INSTALAR EL ARMAZÓN DE MONTAJE DEL ASPIRADOR *Expansion bolt including screw, washer, expansion tube, and nut. *El perno de expansión incluye tornillo, arandela, tubo de prolongación y tuerca.. Introduzca los tornillos en los agujeros del armazón. Añada una pequeña arandela y cubra el tornillo con el tubo de prolongación desde otro lado. (fig.) 2. Ponga la tuerca al final del tornillo. Ajuste los salientes de la tuerca en la ranura del tubo de prolongación. Gire la tuerca junto con el tubo de prolongación dos veces para asegurarse de que la tuerca no se afloja del tornillo. Al mismo tiempo, asegúrese de que el tubo de prolongación no se expande, de lo contrario será difícil insertarlo en la pared. (fig.2 & 3) 3. Introduzca los pernos de expansión en 3 agujeros de la pared sólida. Asegure el armazón a la pared apretando los pernos. (fig. 4) Notas: los agujeros deben taladrarse en los ladrillos de la pared, no en la argamasa. **Gire los pernos si el armazón se afloja después de utilizarlo frecuentemente. MONTAJE DEL ASPIRADOR EN EL ARMAZÓN. Mida la distancia desde el agujero del tornillo superior del armazón hasta la toma eléctrica más cercana y añada 500mm. Esta es la longitud de cable necesaria; enrolle el cable sobrante en el dispositivo de enrollado del cable ubicado en la parte posterior del aspirador. (fig. 8) 2. Asegúrese de que el cable de alimentación no está enrollado en el soporte. (fig.9 - A) 3. Monte el aspirador en el armazón alineando el gancho colgante del aspirador (A) con la ranura (B) en el armazón y deslícelo hacia delante hasta que se cierre. (fig. 0) 4. Coloque el compartimento para herramientas en los lados del aspirador con los ganchos proporcionados. (fig.) 5. Su aspirador está preparado para aspirar en seco. Si el filtro de cartucho no está instalado consulte en la página el apartado referente a la instalación del filtro. fig. 2 & 3 6. Para el aspirado de líquidos, instale el filtro de espuma proporcionado. (fig. 4) Consulte en la página la información referente a la instalación del filtro. 7. Coloque el cabezal nuevamente en el contenedor y asegúrelo utilizando los pestillos de los 2 laterales (fig. 5 & 6) 8. Introduzca el extremo de cierre de la manguera en el puerto del contenedor y fíjelo en su lugar. (fig. 7) 9. Elija los accesorios deseados y coloque el tubo de succión. (fig. 8) DESMONTAJE DEL ASPIRADOR DEL ARMAZÓN. Desconecte el cable de alimentación de la toma de corriente (fig. ) 2. Presione la palanca de extracción con la mano izquierda. (fig. 2) 3. Levante el aspirador hacia arriba y hacia fuera del armazón con la mano derecha. (fig. 3) 7
 3.")
8 OPERACIÓN DE ASPIRADO EN SECO ASPIRADO EN SECO ADVERTENCIA: ASEGÚRESE DE LEER, COMPRENDER Y APLICAR LA INFORMACIÓN CONTENIDA EN EL APARTADO INSTRUCCIONES Y ADVERTENCIAS DE SEGURIDAD. NO ASPIRE EN ENTORNOS CON GASES INFLAMABLES, VAPORES O POLVOS EXPLOSIVOS EN EL AIRE. LOS GASES O VAPORES INFLAMABLES INCLUYEN, PERO NO SE LIMITAN A: FLUIDOS LIGEROS, LIMPIADORES DE TIPO DISOLVENTE, PINTURAS A BASE DE ACEITE, GASOLINA, ALCOHOL O AEROSOLES. LOS POLVOS EXPLOSIVOS INCLUYEN, PERO NO SE LIMITAN A: CARBÓN, MAGNESIO, GRANO O PÓLVORA. PARA EVITAR RIESGOS PARA LA SALUD OCASIONADOS POR VAPORES O POLVO, NO ASPIRE MATERIALES TÓXICOS.. Compruebe que el cable de alimentación está desconectado de la toma de corriente (fig. ) 2. A fin de preparar su aspirador para el aspirado en seco, compruebe que el filtro de cartucho está ajustado con seguridad. Asegúrese de que el filtro está introducido al máximo en el cabezal. (fig. 2) (El Aspirador para Polvo y Agua cuenta con el filtro de cartucho preinstalado, de no ser así consulte las instrucciones de instalación en la página.) 3. Coloque el retén del filtro en la parte superior del filtro de cartucho y ajústelo girando la manivela del retén en el sentido de las agujas del reloj. (fig. 3) 4. Coloque el cabezal nuevamente en el contenedor alineando la parte superior con los pestillos y ciérrelo a presión. (fig. 4) INSTRUCCIONES DE FUNCIONAMIENTO: ASPIRADO EN SECO. Introduzca el extremo de cierre de la manguera en el puerto del contenedor y fíjelo en su lugar. Presione el accesorio requerido en el extremo libre de la maguera o extensión. (fig. 5) 6. Enchufe el cable de alimentación a la toma y coloque el aspirador en el armazón o úselo fuera del armazón. (fig. 6) 7. Accione el motor girando el interruptor del cabezal hasta la posición I ON. (fig. 7) Para usar el control remoto, coloque el interruptor de alimentación en la posición del control remoto y accione el aspirador pulsando el botón I ON del mando del control remoto durante al menos un segundo. (fig. 8 & 9). Una vez que haya terminado de aspirar, gire el interruptor hasta la posición O OFF o pulse el botón O OFF del control remoto durante al menos un segundo. O = OFF I = ON = Control Remoto NO UTILICE EL FILTRO DE CARTUCHO PARA ASPIRAR LÍQUIDOS. 8

9 OPERACIÓN DE ASPIRADO DE ASPIRADO DE LÍQUIDOS ADVERTENCIA: ASEGÚRESE DE LEER, COMPRENDER Y APLICAR LA INFORMACIÓN CONTENIDA EN EL APARTADO INSTRUCCIONES Y ADVERTENCIAS DE SEGURIDAD. NO ASPIRE EN ENTORNOS CON GASES INFLAMABLES, VAPORES O POLVOS EXPLOSIVOS EN EL AIRE. LOS GASES O VAPORES INFLAMABLES INCLUYEN, PERO NO SE LIMITAN A: FLUIDOS LIGEROS, LIMPIADORES DE TIPO DISOLVENTE, PINTURAS A BASE DE ACEITE, GASOLINA, ALCOHOL O AEROSOLES. LOS POLVOS EXPLOSIVOS INCLUYEN, PERO NO SE LIMITAN A: CARBÓN, MAGNESIO, GRANO O PÓLVORA. PARA EVITAR RIESGOS PARA LA SALUD OCASIONADOS POR VAPORES O POLVO, NO ASPIRE MATERIALES TÓXICOS. ADVERTENCIA: NO ENCHUFE EL CABLE DE ALIMENTACIÓN A LA TOMA ELÉCTRICA, ASEGÚRESE DE QUE EL ENCHUFE ESTÁ DESCONECTADO ANTES DE MONTAR EL ASPIRADOR PARA POLVO Y AGUA IMPORTANTE! Si desea aspirar grandes cantidades de líquidos, recomendamos que retire el aspirador del armazón de montaje y lo coloque en el suelo. El aspirador puede ser muy pesado cuando está lleno de líquido y puede ser difícil extraerlo del armazón.. Compruebe que el cable de alimentación está desconectado de la toma de corriente. Compruebe que el contenedor está limpio y libre de polvo y suciedad. (fig. ) 2. Retire el filtro de cartucho, instale con cuidado el filtro de espuma por encima del compartimento del filtro y coloque nuevamente el cabezal en el contenedor. (fig. 2) Consulte las instrucciones sobre la instalación de filtros en la página. NO UTILICE EL FILTRO DE CARTUCHO PARA EL ASPIRADO DE LÍQUIDOS. INSTRUCCIONES DE FUNCIONAMIENTO: ASPIRADO DE LÍQUIDOS 3. Ajuste la boquilla deseada en la maguera del aspirador. (fig. 3) 4. Compruebe que el interruptor está en posición O OFF antes de enchufar el cable de alimentación a la toma. (fig. 4) 5. Si desea aspirar grandes cantidades de líquidos, recomendamos que retire el aspirador del armazón de montaje y lo coloque en el suelo. Accione el motor girando el interruptor del cabezal hasta la posición I ON o gire el interruptor en la posición del Control Remoto y use el botón I ON del control remoto. (fig. 5 & 6) 6. Después de aspirar, apague el aparato y retire el enchufe del suministro eléctrico. Para evitar el riesgo de posible enmohecimiento, vacíe el contenedor, limpie y seque el interior y exterior del contenedor y extraiga el filtro de espuma permitiendo que se seque al aire antes de guardarlo. IMPORTANTE! Cuando aspire grandes cantidades de líquidos, no sumerja la boquilla completamente en el líquido, deje un espacio en la abertura de la boquilla para permitir la entrada de aire. El aparato está equipado con una válvula de flotación que detiene la succión cuando el contenedor alcanza su capacidad máxima. Notará un aumento de la velocidad del motor. Cuando esto ocurre, apague el aparato, desconéctelo del suministro eléctrico y vacíe el líquido en un recipiente adecuado o en un desagüe. Para continuar aspirando, reajuste el cabezal del contenedor. Después de aspirar líquidos, apague el aparato y retire el enchufe del suministro eléctrico. Para evitar el riesgo de posible enmohecimiento, vacíe el contenedor, limpie y seque el interior y exterior del contenedor y quite el filtro de espuma permitiendo que se seque al aire antes de guardarlo. RECUERDE! Debe quitar el filtro de espuma después de aspirar líquidos e instalar un filtro de cartucho antes de aspirar de nuevo en seco. 9

10 FUNCIONAMIENTO Este Aspirador para polvo y agua tiene función de soplado. Para usar la función de soplado siga las instrucciones indicadas. ADVERTENCIA: LLEVE SIEMPRE GAFAS DE SEGURIDAD QUE CUMPLAN LA NORMATIVA ANSI Z87. (O EN CANADÁ, CSAZ94.3) ANTES DE UTILIZAR EL SOPLADOR. ADVERTENCIA: MANTENGA AL PERSONAL AJENO ALEJADO DE LOS RESIDUOS PRODUCIDOS POR EL SOPLADO. ADVERTENCIA: UTILICE UNA MASCARILLA PARA PROTEGERSE DEL POLVO SI EL SOPLADO PRODUCE POLVO QUE PUEDE SER INHALADO.. Compruebe que el cable de alimentación está desconectado de la toma de corriente. (fig. ) 2. Asegúrese de que el contenedor está vacío antes de utilizarlo como soplador. 3. Quite el difusor acústico del puerto de soplado. (fig. 2) 4. Quite la manguera del puerto de aspirado e inserte el extremo de cierre de la manguera en el puerto de soplado del cabezal y ajústelo en posición. (fig. 3) 5. Ajuste el tubo de extensión o boquilla en el extremo libre de la maguera del aspirador. (fig. 4) 6. Asegúrese de que el interruptor está en posición de off y enchufe el aspirador al suministro eléctrico. (fig. 5) 7. Antes de activar el aspirador, agarre con firmeza el extremo suelto de la manguera. Accione el motor cambiando el interruptor a la posición I ON o utilice el aspirador con el interruptor configurado en el control remoto (fig. 6) MANTENIMIENTO. Compruebe que el cable de alimentación está desconectado de la toma eléctrica. (fig. ) 2. Desconecte la maguera del aspirador. (fig. 2) 3. Extraiga el aspirador del armazón de montaje. 4. Abra los pestillos y retire el cabezal del contenedor. (fig. 3) 5. Limpie toda la suciedad o residuos del contenedor y de la manguera. (fig. 4) 6. Limpie el filtro de espuma lavándolo con agua y jabón neutro. (fig. 5) 7. Compruebe que la manguera, los accesorios y cable de alimentación no están dañados. IMPORTANTE! Limpie o cambie el filtro de cartucho con regularidad para el mejor rendimiento. UTILICE SIEMPRE EL FILTRO DE CARTUCHO PARA EL ASPIRADO DE POLVO. Si se utiliza el 0

11 aparato sin el filtro de cartucho, el motor se quemará e invalidará la garantía. Tenga siempre filtros de recambio a mano. ATENCIÓN! Los filtros incluidos están fabricados con materiales de alta calidad diseñados para detener las pequeñas partículas de polvo. El filtro de cartucho deberá utilizarse para aspirar el polvo y pequeñas cantidades de líquido. Se necesita un filtro de cartucho seco para aspirar el polvo. Si el filtro de cartucho está húmedo, se obstruirá rápidamente y será difícil de limpiar. Manipule el filtro con cuidado cuando lo extraiga para limpiarlo y cambiarlo. Compruebe que no hay desgarros ni pequeños agujeros en el filtro, un pequeño agujero puede hacer que el polvo pase a través y por el limpiador. No utilice un filtro con desgarros o agujeros, cámbielo inmediatamente. ADVERTENCIA: DESCONECTE SIEMPRE EL ENCHUFE DE LA TOMA ELÉCTRICA ANTES DE RETIRAR EL CABEZAL DEL CONTENEDOR. INSTALACIÓN Y LIMPIEZA DEL FILTRO DE CARTUCHO Instalación del Filtro de Cartucho. Compruebe que el cable de alimentación está desconectado de la toma eléctrica. (fig.) 2. Quite el cabezal y colóquelo boca abajo. 3. Instale el filtro de cartucho encima del compartimento del filtro con el extremo plano del filtro orientado hacia al cabezal del aspirador. Presione el filtro con cuidado contra el cabezal hasta que llegue al tope. (fig. 2 & 3) 4. Coloque el retén del filtro en la parte superior del filtro por encima del borde en relieve y ajústelo girando la manivela del retén en el sentido de las agujas del reloj, sin apretar demasiado. (fig. 4 & 5) Extracción y limpieza del Filtro de Cartucho. Desbloquee y extraiga el retén del filtro girando el retén en el sentido contrario de las agujas del reloj. 2. Agarre y tire con cuidado del filtro hasta su extracción. (fig. 6) 3. Limpie el filtro de cartucho golpeándolo suavemente o eliminando la suciedad con un cepillo. No debe llevar a cabo la limpieza en interiores ni en áreas habitables. Se recomienda un nuevo filtro para un rendimiento óptimo. 4. Instale el filtro limpio o nuevo en su lugar tal y como se describe en los pasos 2 y 3 del apartado de Instalación del Filtro de Cartucho. 5. Debe extraer los filtros húmedos y dejar que se sequen al aire durante 24 horas antes de instalarlos en el compartimento del filtro. INSTALACIÓN Y LIMPIEZA DEL FILTRO DE ESPUMA Instalación del Filtro de Espuma. Compruebe que el cable de alimentación está desconectado de la toma eléctrica. (fig.) 2. Quite el cabezal y colóquelo boca abajo. Siga las instrucciones para retirar el filtro de tela.

12 3. Deslice el filtro de espuma hacia abajo con cuidado encima del compartimento del filtro asegurándose que tapa todo el compartimento. (fig. 2 & 3) 4. Vuelva a colocar el cabezal en el contenedor. Limpieza del Filtro de Espuma. Con el cabezal extraído en posición boca abajo, quite con cuidado el filtro de espuma. (fig. 4) 2. Use un jabón neutro y una solución acuosa para lavar el filtro de espuma y enjuáguelo con agua limpia. (fig. 5) 3. Deje que el filtro se seque al aire antes de instalarlo y utilizarlo de nuevo. RESTABLECIMIENTO DE LA CONFIGURACIÓN DEL CONTROL REMOTO Restablecimiento de la configuración del Control Remoto. Coloque el interruptor en la posición del control remoto. (fig. ) 2. Presione el botón RESET ubicado en el lateral del cabezal con la punta de un bolígrafo hasta que se encienda el indicador. (fig. 2) 3. Dentro del plazo de 5 segundos, pulse y mantenga pulsado el botón O o I del control remoto. Si no pulsa y mantiene pulsado el botón O o I durante 5 segundos, se cancelará el reajuste de la configuración. (fig. 3) 4. Cuando la luz parpadea 3 veces, significa que el control remoto está programado. O = OFF I = ON Cuando no utilice el aspirador, por favor, asegúrese de que * El interruptor se encuentra en la posición switch O * El cable de alimentación está desconectado de la toma eléctrica Para cambiar la pila, utilizar nicamente una pila de 2 V 23 AE. Utilizar un destornillador Phillps y quitar los tornillos del mando a distancia (fig. ) 2 Deslizar la tapa hasta que el triangulo blanco apunte hacia el simbolo (fig. 2&3) 3. Quitar la cubierta de el mango (fig. 4) 4. Quitar la cubierta de foam y sacar la pila gastada (fig. 5) 5. Introducir la nueva pila respetando los bornes y volver a cubrir con el foam (fig. 6 &7) 2
 2.")
13 6 Volver a colocar la cubierta alineando el triangulo hacia el simbolo (fig. 8) 7. Deslizar la cubierta hasta que el triangulo apunte hacia el simbolo (fig. 9&0) 8. Asegurar la cubierta aprentando los tornillos. No apretar en exceso (fig. ) SOLUCION DE PROBLEMAS ADVERTENCIA: PARA EVITAR EL RIESGO DE DESCARGA ELÉCTRICA DESENCHUFE EL APARATO ANTES DE SOLUCIONAR CUALQUIER PROBLEMA Síntoma Posibles Causas Acción Correctiva El aspirador no funciona ) No hay suministro eléctrico ) Compruebe el suministro eléctrico cable, interruptores, fusibles. Sale polvo de la cubierta del motor. Eficacia y vibración del motor/velocidad reducida. 2) Cable de alimentación defectuoso. 2) Desenchufe y compruebe el cable de alimentación. Si está dañado, solicite su reparación a un profesional. 3) El contenedor está lleno. 3) Vacíe el contenedor. 4) El interruptor está en posición incorrecta 4) Pulse el botón ON I del cabezal. ) El filtro de cartucho no está ) Coloque o cambie el filtro de insertado o está dañado. cartucho. ) Hay una obstrucción en la ) Compruebe la existencia de boquilla, en la manguera o en el obstrucciones en el interior de la interior del contenedor. El filtro de boquilla, manguera o contenedor. cartucho está obstruido por polvo Extraiga el filtro y límpielo. O instale fino. un nuevo filtro de cartucho. El mando no funciona ) La pila se ha agotado. ) Cambie la pila. 3
 No hay suministro eléctrico ) Compruebe el suministro eléctrico cable, interruptores, fusibles. Sale polvo de la cubierta del motor. Eficacia y vibración del motor/velocidad reducida.")
14 PLANO DE DESPIECE Y LISTA DE PIEZAS 4

15 DECLARACIÓN DE CONFORMIDAD EMPRESA: AYERBE INDUSTRIAL DE MOTORES S.A. DIRECCIÓN: C/ LERMANDABIDE VITORIA (ALAVA) CIF: A Afirma que el siguiente producto: ASPIRADOR PARA POLVO Y AGUA MARCA: AYERBE MODELO: Cumple con las siguientes directivas: - Baja Tensión 2006/95/CE - Compatibilidad Electromagnética 2004/08/CE - Directiva sobre residuos de aparatos eléctricos y electrónicos 2002/96/CE - Directiva sobre la restricción de determinadas sustancias peligrosas en aparatos eléctricos y electrónicos 2002/95/CE - EN /A3: EN /A2: EN 62233: EN5504-: EN5504-2/A:200 - EN : EN /A2:2005 Vitoria, a 5 de Abril de Adrián Mtz. de Albornoz Gerente 5

16 GB Thank you for purchasing this AYERBE wet/dry vacuum cleaner. Feel confident that with AYERBE you are obtaining a high quality product engineered for optimal performance. This vacuum is capable of picking up liquids and dry materials. FOR YOUR SAFETY: CAREFULLY READ AND UNDERSTAND ALL INSTRUCTIONS WARRANTY AYERBE takes pride in producing a high quality, durable product. This AYERBE product carries a limited two (2) year warranty against defects in workmanship and materials from date of purchase under normal household use. Warranty does not apply to defects due to direct or indirect abuse, negligence, misuse, accidents, repairs or alterations and lack of maintenance. Please keep you receipt as proof of purchase. 6
 year warranty against defects in workmanship and materials from date of purchase under normal household use.")
17 SAFETY INSTRUCTIONS & WARNINGS IMPORTANT SAFETY INSTRUCTIONS Read and understand all instructions before using this vacuum Read and understand this owner s manual and all labels on the Wet/Dry Vacuum cleaner before operating. Safety is a combination of common sense, staying alert and knowing how your vacuum works. Use this Wet/Dry Vac only as described in this manual. To reduce the risk of personal injury or damage to your Wet/Dry Vac, use only Vacmaster recommended accessories. For Household Use Only. SAVE THIS MANUAL FOR FUTURE REFERENCE. WARNING: TO REDUCE THE RISK OF FIRE, ELECTRIC SHOCK OR INJURY: Do not run vac unattended. Do not vacuum, or use this Wet/Dry Vac near flammable liquids, gases, or explosive vapors like gasoline or other fuels, lighter fluids, cleaners, oil-based paints, natural gas, hydrogen, or explosive dusts like coal dust, magnesium dust, grain dust, or gun power. Sparks inside the motor can ignite flammable vapors or dust. Do not vacuum anything that is burning or smoking, such as cigarettes, matches, or hot ashes. Keep cord away from heated surfaces. Do not expose to rain. Store indoors. Do not unplug by pulling on cord. To unplug, grasp the plug, not the cord. Do not use with damaged cord, plug or other parts. If your Wet/Dry Vac is not working as it should, has missing parts, has been dropped or damaged, left outdoors or dropped into water, return it to an independent service center. Do not pull or carry by cord, use cord as handle, close a door on cord, or pull cord around sharp edges or corners. Do not run Wet/Dry Vac over cord. Do not handle plug or the Wet/Dry Vac with wet hands. To reduce the risk of health hazards from vapors or dusts, do not vacuum toxic materials. Do not use or store near hazardous materials. Do not use this Wet/Dry Vac with a torn filter or without the filter installed except when vacuuming liquids as described in the operation section of this manual. Do not allow to be used as a toy. Close attention is necessary when used by or near children. To reduce the risk of injury from accidental starting, unplug power cord before changing or cleaning filter. Do not leave Wet/Dry Vac unattended when plugged in. Unplug from outlet when not in use and before servicing. Turn off Wet/Dry Vac before unplugging. Do not put any object into ventilation openings. Do not vacuum with any ventilation openings blocked; keep free of dust, lint, hair or anything that may reduce air flow. Keep hair, loose clothing, fingers, and all parts of body away from openings and moving parts. To reduce the risk of falls, use extra care when cleaning on stairs. If the supply cord is damaged, it must be replaced by the manufacturer, its service agent or similarly qualified persons in order to avoid a hazard. This appliance is not intended for use by persons (including children) with reduced physical, sensory or mental capabilities, or lack of experience and knowledge, unless they have been given supervision or instruction concerning use of the appliance by a person responsible for their safety. Children should be supervised to ensure that they do not play with the appliance. For additional protection: It is recommended that this vac be used in conjunction with a residual current device (RCD) with a rated residual current of 30mA or less. When using as blower: Direct air discharge only at work area. 7

18 Do not use Wet/Dry Vac as a sprayer. Do not direct air at bystanders. Keep children away when blowing. Wear safety goggles. DOUBLE INSULATION INSTRUCTIONS This Wet/Dry Vac is double-insulated, eliminating the need for a separate grounding system. Use only identical replacements parts. Read the instructions for Servicing Double-Insulated Wet/Dry Vacs before servicing. Use this Wet/Dry Vac as described in this manual. Observe the following warnings that appear on the motor housing of your Wet/Dry Vac. DOUBLE INSULATED - GROUNDING NOT REQUIRED - WHEN SERVICING USE ONLY IDENTICAL REPLACEMENT PARTS. WARNING: TO REDUCE THE RISK OF ELECTRIC SHOCK-DO NOT EXPOSE TO RAIN. STORE INDOORS. WARNING: FOR YOUR OWN SAFETY, READ AND UNDERSTAND OPERATOR S MANUAL. DO NOT RUN UNATTENDED. DO NOT PICK UP HOT ASHES, COALS, TOXIC, FLAMMABLE OR OTHER HAZARDOUS MATERIALS, DO NOT USE AROUND EXPLOSIVE LIQUIDS OR VAPORS. CAUTION: Do not vacuum drywall dust or fireplace soot or ash with standard Wet/Dry filter. This is very fine dust which will not be captured by the filter and may cause damage to motor. When vacuuming fine dust use a fine dust filter (sold separately). WARNING: SERVICING OF DOUBLE-INSULATED WET/DRY VACUUMM WITH A DOUBLE-INSULATED WET/DRY VACUUM, TWO SYSTEMS OF INSULATION ARE PROVIDED INSTEAD OF GROUNDING. NO GROUNDING MEANS IS PROVIDED ON A DOUBLE- INSULATED APPLIANCE, NOR SHOULD A MEANS FOR GROUNDING BE ADDED. SERVICING A DOUBLE INSULATED WET/DRY VACUUM REQUIRES EXTREME CARE AND KNOWLEDGE OF THE SYSTEM, AND SHOULD BE DONE ONLY BY QUALIFIED SERVICE PERSONNEL. REPLACEMENT PARTS FOR A DOUBLE-INSULATED WET/DRY VACUUM MUST BE IDENTICAL TO THE PARTS THEY REPLACE. YOUR DOUBLE-INSULATED WET/DRY VAC IS MARKED WITH THE WORDS DOUBLE INSULATED AND THE SYMBOL (SQUARE WITHIN A SQUARE) MAY ALSO BE MARKED ON THE APPLIANCE. DO NOT use without filters in place. CAUTION: TO REDUCE THE RISK OF INJURY FROM MOVING PARTS- UNPLUG BEFORE SERVICING. SPECIFICATIONS Container Motor Dry Filter Wet Filter 8L V ~ 50Hz 500W Cartridge Filter Foam Filter 8

19 UNPACKING AND CHECKING CARTON CONTENTS Carton contents lists Key Description... A Vac Assembly... B Hose Holding Rod... C Mounting Rack. D 4m Hose. E 3m Flex Hose F Utility Nozzle.. G Crevice Tool H Round Dusting Brush.. I Extension Wands... J Car Nozzle K Cartridge Filter.. L Filter Retainer M Air/Noise Diffuser... N Side Tool Caddy... O Remote Control Handle... P Foam Filter. Q Screws R Expansion Bolt.. S Operator s Manual QTY NOTE: The hose and accessories for this vacuum are 42 mm diameter. 9

20 GENERAL ASSEMBLY INSTRUCTIONS WARNING: DO NOT PLUG IN POWER CORD TO POWER OUTLET, MAKE SURE PLUG IS DISCONNECTED BEFORE ASSEMBLING THE WET/DRY VAC UNPACKING YOUR WET/DRY VACUUM & GENERAL ASSEMBLY. Verify that the power cord is disconnected from the outlet. (fig. ) 2. Undo the latches. (fig. 2) 3. Lift the power head off of the container. (fig. 3) 4. Remove the contents from inside the container, make sure you have all contents as listed on page 9. (fig. 4) 5. Replace the power head to the container and insert the noise diffuser into the blowing port. (fig. 5) MOUNTING RACK AND STORAGE ASSEMBLY IMPORTANT! only fit for timberwork house Mount the rack so that when the vac is fitted the distance between VAC sucking port and the floor is not over.5 m. Do not screw the rack to drywall only. Secure the screws to a stud. Do not hang from or sit on the mounting rack Do not exceed 8 KG of maximum weight limit. 6. Insert the hose holding rod into the two holes located on the top of the mounting rack. Make sure the 20
 MOUNTING RACK AND STORAGE ASSEMBLY IMPORTANT!")
21 bend of the rod is directed away from the wall. (fig. 6) 7. Select a location on a wall stud that is not more than 5 m away from an electrical outlet. 8. Align the three screw holes so that they are over a stud. Make sure the rack is level and mark the whole locations. Make a 3 mm diameter and 35~40mm depth pilot hole in each marked location. Secure the mounting rack to the wall stud with the three screws provided. (fig. 7) IMPORTANT! (only fit for concrete house ) Mount the rack so that when the vac is fitted the distance between VAC sucking port and the floor is not over.5 m. Do not screw the rack directly to plaster board wall. Secure it to a wall stud or brick wall. Do not hang from or sit on the mounting rack Do not exceed 8 kg of maximum weight limit. 9. Insert the hose holding rod into the two holes located on the top of the mounting rack. Make sure the bend of the rod is directed away from the wall. (fig. 6) 0. Select a location on a wall brick that is not more than 5 m away from an electrical outlet.. Choose a solid wall to hang the VAC mounting rack. Put the rake on the intend position of the wall. Make sure the rack is level and mark the holes location (x3). Make a 0mm diameter and 45~50mm depth pilot hole in each marked location. (fig. 7) To secure to a wall stud drill 3 pilot holes and screw the rack on securely. For brick walls drill 3 x 0mm -40~45mm deep holes in each location (fig.7) HOW TO INSTALLED VAC MOUNTING RACK *Expansion bolt including screw, washer, expansion tube, and nut.. Insert the screws into the rack holes. Add a small washer and cover the screw with expansion tube from another side. (fig.) 2. Put the nut on the end of the screw. Fit the projections on the nut into the slot of the expansion tube. Twist the nut together with the expansion tube about two circles to make sure the nut will not be loose from the screw. In the mean time, please make sure the expansion tube is not expanded, otherwise it will be difficult to insert into the wall. (fig.2 & 3) 3. Insert the expansion bolts into 3 holes on the solid wall. Secure the mounting rack to the wall brick with twisting the bolts tightly. (fig. 4) Notes: the holes should be drilled on the bricks of the wall, not into the mortar. **Twist the bolts if the rake seems loose after using frequently. MOUNTING THE VACUUM ON TO THE RACK. Measure the distance from the top screw hole of the mounting rack to the closest electrical outlet and add 500mm. This is the amount of cord needed; wind the excess power cord around the cord wrap area located on the rear of the vacuum. (fig. 8) 2. Make sure the power cord is not wound around the mount. (fig.9 - A) 3. Mount the vacuum onto the mounting rack by aligning the vac hanging hook (A) with slot (B) on the mounting rack and slide downward until it locks. (fig. 0) 4. Attach the tool caddy on either side of the vac onto the hooks provided. (fig.) 5. Your vacuum comes ready for dry vacuum cleaning. If the cartridge filter is not installed refer to page 25 for filter installation. fig. 2 & 3 2
22 6. For wet vacuum cleaning, install the supplied foam filter. (fig. 4) See page 26 for filter installation. 7. Place the power head back on the container, and secure into place using the 2 side latches. (fig. 5 & 6) 8. Insert the locking end of the hose into the port of the container and lock in to place. (fig. 7) 9. Choose the desired accessories and push onto the suction tube. (fig. 8) DISMOUNTING THE VACUUM FROM THE RACK. Disconnect the power cord form the electrical outlet. (fig. ) 2. Press the release lever with your left hand. (fig. 2) 3. Lift the vacuum up and out of the rack by the handle with your right hand. (fig. 3) DRY-VACUUM OPERATION DRY VACUUMING WARNING: BE SURE TO READ, UNDERSTAND, AND APPLY INFORMATION, ENTITLED SAFETY INSTRUCTIONS & WARNINGS. DO NOT VACUUM IN AREAS WITH FLAMMABLE GASES, VAPORS, OR EXPLOSIVE DUSTS IN THE AIR. FLAMMABLE GASES OR VAPORS INCLUDE BUT ARE NOT LIMITED TO; LIGHTER FLUID, SOLVENT TYPE CLEANERS, OIL-BASE PAINTS, GASOLINE, ALCOHOL OR AEROSOL SPRAYS. EXPLOSIVE DUSTS INCLUDE BUT ARE NOT LIMITED TO; COAL, MAGNESIUM, GRAIN OR GUN POWDER. TO REDUCE THE RISK OF HEALTH HAZARDS FROM VAPORS OR DUST, DO NOT VACUUM TOXIC MATERIALS.. Verify that the power cord is disconnected from the outlet. (fig. ) 2. In order to prepare your vacuum for dry vacuuming, verify that the cartridge filter is securely mounted. Make sure the filter is pushed in until it stops against the power head. (fig. 2) (Your Wet/Dry Vac comes with the cartridge filter pre-installed, if not see page 25 for installation instructions.) 3. Place filter retainer on top of cartridge filter and tighten down by turning the retainer handle clockwise. (fig. 3) 22
23 4. Place the power head back on the container, aligning the top section with the latches, and snap into place. (fig. 4) OPERATING INSTRUCTIONS: DRY VACUUMING 6. Insert the locking end of the hose into the vacuum port on the power head and lock in place. Push the required attachment onto the free end of the hose or extension. (fig. 5) 7. Plug in the power cord into the outlet and hang the vacuum onto the rack or use off the rack. (fig. 6) 8. Turn the motor on by flipping the switch to the I ON position. (fig. 7) For remote control use, set the power switch to remote control position and turn the vacuum on by pressing the I ON button on the remote control handle for at least one second. (fig. 8&9) 9. Once you have completed vacuuming, flip the switch to the O OFF position or press the O OFF button on the remote control at least one second. O = OFF I = ON = Remote Control DO NOT USE THE CARTRIDGE FILTER FOR LIQUID VACUUMING. LIQUID VACUUM OPERATION LIQUID VACUUMING WARNING: BE SURE TO READ, UNDERSTAND, AND APPLY INFORMATION, ENTITLED SAFETY INSTRUCTIONS & WARNINGS. DO NOT VACUUM IN AREAS WITH FLAMMABLE GASES, VAPORS, OR EXPLOSIVE DUSTS IN THE AIR. FLAMMABLE GASES OR VAPORS INCLUDE BUT ARE NOT LIMITED TO; LIGHTER FLUID, SOLVENT TYPE CLEANERS, OIL-BASE PAINTS, GASOLINE, ALCOHOL OR AEROSOL SPRAYS. EXPLOSIVE DUSTS INCLUDE BUT ARE NOT LIMITED TO; COAL, MAGNESIUM, GRAIN OR GUN POWDER. TO REDUCE THE RISK OF HEALTH HAZARDS FROM VAPORS OR DUST, DO NOT VACUUM TOXIC MATERIALS. WARNING: DO NOT PLUG IN POWER CORD TO POWER OUTLET, MAKE SURE PLUG IS DISCONNECTED BEFORE ASSEMBLING THE WET/DRY VAC IMPORTANT! When vacuuming large quantities of liquids, we recommend that you remove the vacuum from the mounting rack and put it on the floor. The vacuum can be heavy when full of liquids and may be difficult to remove from the rack.. Verify that the power cord is disconnected from the outlet. Verify that the container is clean and free of dust and dirt. (fig. ) 2. Remove cartridge filter, then carefully install the foam sleeve filter over the filter cage and place the power head back on the container. (fig. 2) See filter installing instructions on page 26. DO NOT USE THE CARTRIDGE FILTER FOR LIQUID VACUUMING. OPERATING INSTRUCTIONS WET VACUUMING 3. Fit the desired nozzle to the vacuum hose. (fig. 3) 4. Verify that the switch is in the O OFF position before plugging the power cord into the outlet. (fig. 4) 5. For large amounts of liquid vacuuming, it is recommended to place the vacuum on the floor. Turn the motor on by flipping the switch on the power head to the I ON position or flip the switch to the Remote Control Position and use the I ON button on the remote control. (fig. 5 & 6) CAUTION: DO NOT GET THE REMOTE CONTROL WET This will void its warranty. 23
24 6. After wet vacuuming, turn the machine off and remove plug from power supply. To prevent the risk of possible mildew, empty the container, clean and dry the inside and outside of the container, and remove the foam filter and allow to air dry before storage. IMPORTANT! When vacuuming large quantities of liquids, do not immerse the nozzle completely in the liquid; leave a gap at the tip of the nozzle opening to allow air inflow. The machine is fitted with a float valve that stops the suction action when the container reaches its maximum capacity. You will notice an increase in motor speed. When this happens, turn off the machine, disconnect from power supply, and empty the liquid into a suitable receptacle or drain. To continue vacuuming, refit the power head to the container. After wet vacuuming, turn the machine off and remove plug from power supply. To prevent the risk of possible mildew, empty the container, clean and dry the inside and outside of the container, and remove the foam filter and allow to air dry before storage. REMEMBER! The foam filter must be removed after wet vacuuming, and a cartridge filter must be installed before dry vacuuming again. OPERATION This Wet/Dry Vac has blowing capabilities. To use the blower feature follow the instructions listed. WARNING: ALWAYS WEAR SAFETY GOGGLES COMPLYING WITH ANSI Z87. (OR IN CANADA, CSAZ94.3) BEFORE USING BLOWER. WARNING: KEEP BYSTANDERS CLEAR FROM BLOWING DEBRIS. WARNING: WEAR A DUST MASK IF BLOWING CREATES DUST THAT MIGHT BE INHALED.. Verify that the power cord is disconnected from the outlet. (fig. ) 2. Make sure the container is empty before using as a blower. 3. Remove the noise diffuser from the blower port. (fig. 2) 4. Remove hose from the vacuum port and insert the locking end of the hose into the blowing port on the power head and lock into position. (fig. 3) 5. Fit the desired extension wand and or nozzle to the free end of the vacuum hose. (fig. 4) 6. Ensure the power switch is turned off and plug in the power supply. (fig. 5) 7. Before turning on the vac, firmly hold loose end of the hose. Turn the motor on by flipping the switch to the I ON position or use the vac with switch set to remote control setting and the remote control. (fig. 6) 24
25 MAINTENANCE. Verify that the power cord is disconnected from the outlet. (fig. ) 2. Disconnect the hose from the vacuum. (fig. 2) 3. Remove the vacuum from the mounting rack. 4. Undo the latches and remove the power head from the container. (fig. 3) 5. Clear all dirt or debris from the container and hose. (fig. 4) 6. Clean the foam filter by washing it with water and mild soap. (fig. 5) 7. Check the hose, attachments, and power cord to verify that they have not been damaged. IMPORTANT! Clean or change the cartridge filter regularly for best performance. ALWAYS USE CARTRIDGE FILTER FOR DRY VACUUMING. If the machine is used with out the cartridge filter, the motor will burn out and the warranty will be voided. Always keep spare filters on-hand. NOTICE! The filters included are made of high quality materials designed to stop small dust particles. The cartridge filter should be used for dry pick-up and small amounts of liquids. A dry cartridge filter is necessary to pick up dust. If the cartridge filter is wet, it will clog quickly and be difficult to clean. Handle the filter carefully when removing it for cleaning and replacing it. Check the filters for tears or small holes, a small hole can let dust pass through and out of the cleaner. Do not use a filter with holes or tears in it, replace it immediately. WARNING: ALWAYS DISCONNECT THE PLUG FROM THE POWER OUTLET BEFORE REMOVING THE POWER HEAD FROM THE CONTAINER. INSTALLING & CLEANING CARTRIDGE FILTER Installing Cartridge Filter. Verify that the power cord is disconnected from the outlet. (fig. ) 2. Remove power head and place in upside down position. 3. Install the cartridge filter over the filter cage with the flat end of the filter towards the vacuum power head.carefully push filter in until it stops against the power head. (fig. & ) 4. Place filter retainer on top of cartridge filter over the raise lip and tighten down by turning retainer handle Clockwise, do not over tighten. (fig. & ) Removing and Cleaning Cartridge Filter. Unlock and remove the filter retainer by turning retainer handle counter clockwise. 2. Carefully hold and pull the cartridge filter up for removal. (fig. ) 3. Clean the cartridge filter by gently tapping or brushing dirt off. Cleaning should not be done indoors in living areas. For optimal performance a new filter is recommended. 4. Install cleaned or new filter into place as instructed above in steps 2 and 3 of Installing Cartridge Filter. 5. Wet filters should be removed and allowed to air dry for 24 hours before installing onto the filter cage. 25
26 INSTALLING & CLEANING FOAM SLEEVE FILTER Installing Foam Sleeve Filter. Verify that the power cord is disconnected from the outlet. (fig. ) 2. Remove power head and place in upside down position. Follow instructions to remove cloth filter. 3. Carefully slide foam sleeve filter down over the filter cage making sure the whole cage is covered. (fig.2 & 3) 4. Replace the power head on to the container. Cleaning Foam Sleeve Filter. With the removed power head in the upside down position, carefully remove foam sleeve filter. (fig. ) 2. Use a mild soap and water solution to wash foam sleeve filter and rinse with clean water. (fig. ) 3. Allow filter to air dry before installing and using again. RESETTING THE REMOTE CONTROL Resetting The Remote Control. Set the power switch to remote control position. (fig. ) 2. Press the RESET button on the side of the power head with a pen tip until the indicator lights up. (fig. 2) 3. Within the 5 seconds, press and hold the O or I button on the remote control. If you didn t press and hold the O or I button within the 5 seconds, it will cancel this resetting. (fig. 3) 4. When the light blinks 3 times, this means the remote control is programmed. O = OFF I = ON When the vacuum is nonuse, pls make sure * The switch is on O off position * The power cord is disconnected from the outlet 26
27 Changing The Battery Replace Only With A 23AE 2V Alkaline Battery. Take a Phillips screwdriver and remove the screws on the remote control. (fig. ) 2. Slide back the remote cover so that the white triangle on the remote cover points to the unlock symbol. (fig. 2 & 3) 3. Remove the remote cover from the handle. (fig. 4) 4. Lift the foam cover to expose the battery and remove the old battery. (fig. 5) 5. Insert the new battery with the terminals in the direction shown and make sure to replace the foam cover. (fig. 6 & 7) 6. Replace the remote control by aligning the white triangle on the side cover to the unlock symbol on the handle. (fig. 8) 7. Slide the remote cover so that the white triangle is over the locked symbol. (fig. 9 & 0) 8. Secure the cover with the screws. Do not over tighten. (fig. ) TROUBLESHOOTING WARNING: TO REDUCE THE RISK OF ELECTRIC SHOCK-UNPLUG BEFORE TROUBLESHOOTING Symptom Possible Causes Corrective Action Vacuum will not operate ) No power supply. ) Check power supply cord, breakers, fuses. 2) Faulty power cord. 2) Unplug and check the power cord. If damaged, have it repaired by a professional. 3) Container full. 3) Empty container. 4) Switch in the wrong position 4) Press the ON I button on the power head. Dust comes out from motor cover. ) The cartridge filter is missing or ) Attach or replace cartridge filter. Reduced efficiency and motor/speed vibration. damaged. ) There is a blockage in the nozzle, hose, or the container inlet. The cartridge filter is clogged by fine dust. ) Check nozzle, hose and container inlets for blockage. Take off the filter and clean it. Or install new cartridge filter. Remote will not operate ) Battery is dead. ) Replace the battery. 27
MANUAL DE INSTRUCCIONES
 MANUAL DE INSTRUCCIONES MODELO SP2014 1 ÍNDICE SOUP MASTER Seguridad eléctrica Seguridad durante el uso Conozca su Soup Master Consejos de Uso Modo de Uso Limpieza y mantenimiento pag. 3 pag. 4 pag. 5
PARTS Piezas Parties
 PARTS Piezas Parties Repair Parts RIDGID 10 Gallon / 37 liters Stainless Steel Wet/Dry vac Model Numbers WD10500 / WD10600 RIDGID parts are available on-line at www.ridgidparts.com Always order by Part
Instrucciones de uso SECADOR DE PELO. SECADOR DE PELO ES página. Type M3001
 Instrucciones de uso SECADOR DE PELO SECADOR DE PELO ES página 1 Type M3001 GUÍA ILUSTRATIVA [A] 1 2 9 8 3 7 4 5 6 DATOS TÉCNICOS I Manual de instrucciones para el uso del secador de pelo Estimado cliente:
Instrucciones de uso SECADOR DE PELO. SECADOR DE PELO ES página. Type I6401
 Instrucciones de uso SECADOR DE PELO SECADOR DE PELO ES página 1 Type I6401 1 [A] 6B 6 6A 5 5A 4 3C 3 3B 1 3A 2 7B 7A 7 TYPE I6401 220-240 V 50/60 Hz 1680-2000 W Manual de instrucciones para el uso del
ASPIRADORA. Modelo AJ-950
 MANUAL DE INSTRUCCIONES ASPIRADORA Modelo AJ-950 Para un correcto funcionamiento de esta unidad, por favor lea las instrucciones cuidadosamente antes de su uso y consérvelas en un lugar seguro para su
ASSEMBLY DRAWING / SPARE PARTS
 ASSEMBLY DRAWING / SPARE PARTS Flush button with Lock Nut C7715-6.4 N7714TL Toilet Lid Flush Valve C7715-6 BSB Kit - C7715-1 Fluidmaster Seal Seal - C7715-2 Fill Valve C7715-7 Ceramic tank Air Tube - C7715-3
MANUAL DE INSTRUCCIONES
 ASPIRADORA MANUAL DE INSTRUCCIONES Modelo AJ 800 Para un correcto funcionamiento de esta unidad, antes de su uso por favor lea las instrucciones cuidadosamente y consérvelas en un lugar seguro para su
Manual de Instrucciones Campana Cilíndrica Isla de 35mm
 Manual de Instrucciones Campana Cilíndrica Isla de 35mm Model: 21-19AI-35I3288E1 CONTENIDO 1.Aviso 2.Precaución 3..Advertencia 5.. Operación 6 Mantenimiento 7 Anormalidades y soluciones AVISO Lea atentamente
Este símbolo significa que hay riesgo de lesiones a las personas Lea atentamente las instrucciones
 MANUAL DE USUARIO DE GENERADOR A GASOLINA INSTRUCCIONES DE SEGURIDAD Este símbolo significa que hay riesgo de lesiones a las personas Lea atentamente las instrucciones Atención! Este símbolo significa
MODEL: 11222895 / MODELO: 11222895 COMPUTER DESK ESCRITORIO DE COMPUTADORA
 MODEL: 222895 / MODELO: 222895 COMPUTER DESK ESCRITORIO DE COMPUTADORA NO 2 3 4 5 6 7 8 9 PARTS LIST AND HARDWARE LISTA DE PARTES Y ACCESORIOS HARDWARE LIST LISTA DE PARTES Y ACCESORIOS CHIPBOARD SCREW
Hairdryer. www.philips.com/welcome. Register your product and get support at HP8183 HP8182 HP8181 HP8180. Manual del usuario
 Register your product and get support at www.philips.com/welcome Hairdryer HP8183 HP8182 HP8181 HP8180 ES Manual del usuario Español Le felicitamos por su compra y le damos la bienvenida a Philips. Para
MANUAL DE INSTRUCCIONES
 FB/3-R MANUAL DE INSTRUCCIONES ATENCIÓN Lea detenidamente el manual de instrucciones general antes de realizar cualquier operación en la unidad, a fin de proteger al operador y evitar cualquier daño. ATTENCIÓN
INSTRUCCIONES DE INSTALACIÓN Panel de ducha
 INSTRUCCIONES DE INSTALACIÓN 3866M 3872M Panel de ducha ANTES DE COMENZAR Toda la información contenida en las instrucciones está basada en la información más reciente del producto disponible al momento
Process Control Work Instructions Control de Procesos Instrucciones de Trabajo. for / para
 Process Control Work Instructions Control de Procesos Instrucciones de Trabajo for / para 629096898 VFCB Kit Relay Cable Harness Assy Ensamblar el Kit del Arnés de Cables del Relevador Publication Number:
INSTALLATION INSTRUCTIONS
 Brix Ratio Check Instructions for ColdFusion and Flavor Overload Units INSTALLATION INSTRUCTIONS Brix Ratio Check Instructions For Coldfusion, Flavorfusion and Flavor Overload Units Kit P/N 629096865 SAFETY
GUÍA DEL USUARIO Y CONSEJOS PARA EL AHORRO DE ENERGÍA
 GUÍA DEL USUARIO Y CONSEJOS PARA EL AHORRO DE ENERGÍA Deshumidificador por rotor desecante Modelo: DD8062FW Lea esta guía En su interior encontrará muchos consejos útiles sobre cómo utilizar y mantener
INSTRUCTION MANUAL Smart Security Light
 SPL06-07A1W1-BKT-K1 INSTRUCTION MANUAL Smart Security Light Questions, problems, or missing parts? Before returning to the store, call MAXIMUS customer service at 1-866-897-2098, Monday Friday, 9:30am
Instrucciones para operar generadores a gasolina. GG-6 KvA
 Instrucciones para operar generadores a gasolina. GG-6 KvA Contenidos Seguridad en el uso del generador Partes y componentes Inspección inicial Arrancando el motor Servicio Parando el motor Mantenimiento
PRODUCT ASSEMBLY INSTRUCTIONS
 PRODUCT ASSEMBLY INSTRUCTIONS KARLSEN SWIVEL GLIDER RECLINER SAM S CLUB #402411 BERKLINE #4160061 PLEASE READ THIS BOOKLET CONTAINS IMPORTANT INFORMATION. KEEP FOR FUTURE REFERENCE. Page (Pagina) 1 of
PRODUCT ASSEMBLY INSTRUCTIONS
 PRODUCT ASSEMBLY INSTRUCTIONS HAUGEN SOFA SAM S CLUB # 610256 BERKLINE #2450438 PLEASE READ THIS BOOKLET CONTAINS IMPORTANT INFORMATION. KEEP FOR FUTURE REFERENCE. Page 1 of 10 CUSTOMER SERVICE INFORMATION
Disco duro ATA. Nota: Encontrarás instrucciones en línea en http://www.apple.com/support/doityourself/.
 Español Instrucciones para la sustitución Disco duro ATA AppleCare Sigue atentamente las instrucciones de este documento, de lo contrario podrías dañar tu equipo e invalidar la garantía. Nota: Encontrarás
DIAMOND Gear Company, LTD. an ERIKS Company. Installation, Maintenance, & Operation Manual DECLUTCHABLE WORM GEAR
 DIAMOND Gear Company, LTD. an ERIKS Company Installation, Maintenance, & Operation Manual 2013 INSTRUCTIONS This is an instructional manual which provides general installation, operation, and maintenance
happy safari travel cot cuna de viaje happy safari guía para el usuario importante. retenga para referencia futura - lea con cuidado.
 happy safari travel cot user guide important. retain for future reference - read carefully cuna de viaje happy safari guía para el usuario importante. retenga para referencia futura - lea con cuidado.
INSTRUCCIONES DE INSTALACIÓN Y RECARGA CISS HP CARTUCHO SERIE 1
 Antes de empezar Es muy importante que no realice ninguna acción hasta leer completamente las instrucciones. Léalas de forma detenida y completa!!! Es muy importante que compruebe que su impresora se encuentra
ROCK N STEREO SOUND DESK
 Read and save these instructions ROCK N STEREO SOUND DESK RTA-M1102-BK INSTRUCTIONS TABLE OF CONTENTS PACKAGE INCLUDES Package Includes... 2 Specifications... 2 Product Parts List... 3 1 2 3 Product Details...
Destructora de papel S7-CD de corte en tiras
 Destructora de papel S7-CD de corte en tiras Manual 91605 Gracias por comprar este producto de alta calidad. Por favor, lea detenidamente estas instrucciones de funcionamiento antes de utilizar este dispositivo
Fácil reparación de Packard Bell
 Fácil reparación de Packard Bell Unidad CD-ROM / DVD Importantes instrucciones de comprobación de seguridad Tiene que leer todas las instrucciones con cuidado antes de que comience a trabajar y cumplir
Hair Styler. www.philips.com/welcome. Register your product and get support at HP4698/22. Manual del usuario
 Register your product and get support at www.philips.com/welcome Hair Styler HP4698/22 ES Manual del usuario e f h g i j d c o p n m l b q k a r s t v u Español Le felicitamos por su compra y le damos
Instrucciones de uso. Secador de cabello
 Instrucciones de uso Secador de cabello E 8 1 7 6 2 3 4 5 2 E Secador de cabello Conexión a la red eléctrica Debe conectar este aparato solamente a una toma de tierra instalada según las normas en vigor.
Unidad de alimentación. Nota: Encontrarás instrucciones en línea en http://www.apple.com/support/doityourself/.
 Español Instrucciones para la sustitución Unidad de alimentación AppleCare Sigue atentamente las instrucciones de este documento, de lo contrario podrías dañar tu equipo e invalidar la garantía. Nota:
Hyundai Santa Fe 2007-up 99-7325
 INSTALLATION INSTRUCTIONS FOR PART 99-7325 APPLICATIONS Hyundai Santa Fe 2007-up 99-7325 (not for factory equipped NAV models) KIT FEATURES DIN radio provision with pocket ISO radio provision with pocket
Suzuki Grand Vitara 2006--up 95-7953
 INSTALLATION INSTRUCTIONS FOR PART 95-7953 APPLICATIONS Suzuki Grand Vitara 2006--up 95-7953 KIT FEATURES Double DIN radio provision Stacked ISO mount units provision KIT COMPONENTS A) Radio housing B)
IMPORTANT SAFEGUARDS
 IMPORTANT SAFEGUARDS When using electrical appliances,basic safety precautions should always be followed, including the following: 1. Read all instructions. 2. Make sure that your outlet voltage corresponds
ENKVM-USBB. 2-Port USB KVM switch with Easy Switch and Cable. User Guide
 ENKVM-USBB 2-Port USB KVM switch with Easy Switch and Cable User Guide i Package Contents 1 ENKVM-USBB 2-Port USB KVM Switch with Easy Switch and Cable 1 User Guide Requirements Console A VGA, SVGA, XGA,
Straightener. www.philips.com/welcome HP8309/00 HP8310/00. Register your product and get support at. Manual del usuario
 Register your product and get support at www.philips.com/welcome Straightener HP8309/00 HP8310/00 ES Manual del usuario d e c b a Español Le felicitamos por su compra y le damos la bienvenida a Philips.
Mantenimiento. Mantenimiento
 Mantenimiento Esta sección incluye: "Carga de tinta" en la página 7-32 "Vaciado de la bandeja de desechos" en la página 7-36 "Sustitución del kit de mantenimiento" en la página 7-39 "Limpieza de la cuchilla
DESHUMIDIFICADOR MH 120 MANUAL DE INSTRUCCIONES. Gracias por haber elegido este producto. Por favor, lea este manual de instrucciones antes de usarlo.
 DESHUMIDIFICADOR MH 120 MANUAL DE INSTRUCCIONES Gracias por haber elegido este producto. Por favor, lea este manual de instrucciones antes de usarlo. INDICE Contenidos: Presentación del producto... 1 Instrucciones
Alarma para cámara frigorífica con salida para 1 pulsador
 E AKO-52069 Alarma para cámara frigorífica con salida para 1 pulsador Instrucciones ALIM SUPPLY 1 2 3 4 5 6 7 8 9 10 ALIM SUPPLY 1 2 3 4 5 6 7 8 9 10 AKO Electromecànica, le agradece y felicita por la
C100 Manual de Instrucciones
 C100 Manual de Instrucciones Lea estas instrucciones y las indicaciones de seguridad antes de poner en funcionamiento el aparato! PRECAUCIONES DE SEGURIDAD IMPORTANTES Al utilizar aparatos eléctricos,
PRECAUCIONES IMPORTANTES
 Licuadora K-BL500G MANU AL DE USUAR IO Instrucciones Por favor conserve estas instrucciones. Lea este manual de usuario cuidadosamente para que se familiarice completamente con su nueva LICUADORA antes
Read all instructions BEFORE assembly and USE of product. KEEP INSTRUCTIONS FOR FUTURE USE.
 Read all instructions BEFORE assembly and USE of product. KEEP INSTRUCTIONS FOR FUTURE USE. Lea todas las instrucciones ANTES de armar y USAR este producto. GUARDE LAS INSTRUCCIONES PARA USO FUTURO. 2013
Artefacto de iluminación para exteriores
 Artefacto de iluminación para exteriores Owner s Guide and Installation Manual Manual De Propietario English Español Formulario# 43552-02 20140415 2014 Hunter Fan Co. Bienvenido Su nuevo artefacto de iluminación
ATX 2.3 POWER SUPPLY QP400
 ATX 2.3 POWER SUPPLY Handbuch Manual Manuel d utilisation Guia usario Manuale d istruzioni Gebruiksaanwijzing Guia usário Instukcja obstugi ユーザー マニュアル 使 用 手 冊 QP400 Índice 1. Características 3 2. Especificaciones
Hyundai Entourage 2007-2008 Kia Sedona 2006-2014 95-7323
 INSTALLATION INSTRUCTIONS FOR PART 95-7323 KIT FEATURES Double DIN radio provision Hyundai Entourage 2007-2008 Kia Sedona 2006-2014 95-7323 Table of Contents Dash Disassembly Hyundai Entourage 2007-2008...Kia
PRECAUCIONES DE SEGURIDAD
 PRECAUCIONES DE SEGURIDAD SÍMBOLO DE PELIGRO SÍMBOLO DE ADVERTENCIA Este icono recuerda a los usuarios la existencia de voltaje peligroso. ADVERTENCIA: Este icono recuerda a los usuarios la importancia
CALEFACTOR + ACONDICIONADOR PORTÁTIL EVAPORATIVO
 CALEFACTOR + ACONDICIONADOR PORTÁTIL EVAPORATIVO Contenidos Manual de instrucciones PRECAUCIONES..................... DESCRIPCIÓN........................ COMPONENTES...................... 2 FUNCIONES DEL
Sujetador de pantalla de vidrio clasificada para humedad
 Sujetador de pantalla de vidrio clasificada para humedad Manual de instalación Compatible con: 2xxxx tipos A - Z Ventiladores serie 51000-58999 Ventiladores serie 59500-59999 Ventiladores Casablanca selectos
1. Precauciones de seguridad
 Contenidos 1. Precauciones de seguridad 2. Información general 3. Cómo empezar 4. Funcionamiento 5. Especificaciones 6. Mantenimiento 7. Garantía y reclamaciones 8. Declaración de conformidad 2 1. Precauciones
Model/Modelo: SR42UBEVS
 SmartRack Assembly Instructions Instrucciones de Ensamble del SmartRack Model/Modelo: SRUBEVS West 35th Street, Chicago, IL 60609 USA www.tripplite.com/support Copyright 03 Tripp Lite. All trademarks are
BIENVENIDO. Contenido
 BIENVENIDO Estimado Cliente, Bienvenidos a Sytech! Gracias por la compra de la aspiradora SY-AS107. Por favor lea el manual de instrucciones atentamente y preste atención a las precauciones que se muestran
Bubble Master(BU-100)
") El manual de usuarios ESPAÑOL Bubble Master(BU-100) Version 1.0 ÍNDICE Advertencia 1 Precaución 4 Nota 4 Importante 4 Figura 1 Funciones de BU-100 5 Descripción 6 Estando Preparado 6 Preparación 7 Operación
El manual de usuarios ESPAÑOL Bubble Master(BU-100) Version 1.0 ÍNDICE Advertencia 1 Precaución 4 Nota 4 Importante 4 Figura 1 Funciones de BU-100 5 Descripción 6 Estando Preparado 6 Preparación 7 Operación
Installation Instructions Front Floor Liner
 Installation Instructions Front Floor Vehicle Application Jeep Wrangler (TJ) 1997-2006 Part Number: 51509 Jeep Wrangler (CJ / YJ) 1976-1995 Part Number: 51511 INSTALLATION TIME SKILL LEVEL 1/2 Hour 1 -
Easy Repair de Packard Bell
 Easy Repair de Packard Bell Serie EasyNote MZ Instrucciones de reparación de la memoria 7429180004 7429180004 Versión de documento: 1.0 - Mayo 2007 www.packardbell.com Importantes instrucciones de comprobación
Vidrio Industrial POBEL, S.A.
 Destilador de agua Water distiller HYDR 0041 MANUAL DE INSTRUCCIONES INSTRUCTIONS MANUAL C/ Luis I, s/n Almacén 12 Pol. Ind. Vallecas IV 28031 Madrid (ESPAÑA) Tel. (34) 91 380 33 18 Fax (34) 91 380 32
UTILIZACIÓN ADVERTENCIAS:
 UTILIZACIÓN ADVERTENCIAS: Cuando se enciende la placa por primera vez, o cuando ha permanecido apagada durante un largo periodo de tiempo, debe secarse durante 30 minutos con el mando en la posición n
ST8-U5. 8 Bay External Storage Enclosure
 ST8-U5 8 Bay External Storage Enclosure Prólogo Manual de usuario de STARDOM SOHOTANK Serie Acerca de este manual Gracias por haber adquirido los productos STARDOM. Este manual presenta los productos de
ADVERTENCIA: Instrucciones de seguridad importantes. Es importante para la seguridad de las personas seguir estas instrucciones. Consérvelas.
 Motores DOOYA Manual de operaciones Importador: A. D. Barbieri S. A. Luis M. Drago 1382, Parque Industrial Almte. Brown B1852LGP Burzaco, Pcia. de Buenos Aires Tel: (011) 4136-4000 ADVERTENCIA: Instrucciones
Manual de instrucciones
 Manual de instrucciones PLANCHA DE PELO CON PANTALLA LCD Modelo: MX- PP2325 ANTES DE SU USO LEA ATENTAMENTE ESTE MANUAL Una vez agotada la vida útil de este producto eléctrico, no lo tire a la basura doméstica.
Instrucciones para el uso SECADOR DE PELO. SECADOR DE PELO ES página. Type E2601. 00856.indd 1 13/04/12 20.5
 Instrucciones para el uso SECADOR DE PELO SECADOR DE PELO ES página 1 Type E2601 00856.indd 1 13/04/12 20.5 1 2 3 4 7 5 6 10 8 9 Type E2601 220-240 V ~ 50/60 Hz 1680-2000 W 00856.indd 1 13/04/12 20.5 Manual
Alarma para Puertas y Ventanas Con Llave de Seguro 49-424. Manual del Usuario Favor de leerlo antes de utilizar el equipo
 Alarma para Puertas y Ventanas Con Llave de Seguro 49-424 Manual del Usuario Favor de leerlo antes de utilizar el equipo CARACTERÍSTICAS Su Alarma para Puertas y Ventanas de RadioShack, es su Guardia Electrónico
12 Gallon Wet/Dry Vacuum
 Operator s Manual 12 Gallon Wet/Dry Vacuum Model No. 125.12006 CAUTION: Before using this product, read this manual and follow all its Safety Rules and Operating Instructions. Safety Assembly Operation
NOT 039534 PS205/207 9/04/03 16:14 Page 1 039534/08-02
 039534/08-02 C F B A E Mod.A = PS205 C D B A E G Mod.B = PS207 Español Leer atentamente y conservar 1 - DESCRIPCIÓN DEL APARATO E A. Plancha cilíndrica B. Palanca de la plancha cilíndrica C. Interruptor
INSTRUCCIONES IMPORTANTES DE SEGURIDAD
 Instrucciones importantes de seguridad INSTRUCCIONES IMPORTANTES DE SEGURIDAD ADVERTENCIA: Si las instrucciones recogidas en este manual no se siguen con exactitud, podría producirse un incendio o una
Instrucciones de montaje
 Instrucciones de montaje Gracias por comprar mecanismo elevadot NELSON Por favor, coloque todos los componentes en una superficie acolchada / alfombra para evitar daños. Por razones de seguridad, se recomienda
BEDIENUNGSALEITUNG MANUAL
 MANUAL MANUEL D UTILISATION BEDIENUNGSALEITUNG MANUAL Ventilator Ventilateur Ventilator Ventilador WV250 (722313615) GB IMPORTANT SAFETY INSTRUCTIONS: 1. Use fan only for purposes described in the instruction
Rejilla salida de aire Rejilla entrada de aire
 Calentador de Ambiente K-CAG20 MANU AL DE USUAR IO Instrucciones Por favor conserve estas instrucciones. Lea este manual de usuario cuidadosamente para que se familiarice completamente con su nuevo CALENTADOR
AVISO. Use tan solo del modo informado por el fabricante. Si tiene alguna pregunta, comuníquese con el fabricante.
 GE Iluminación Guía de Instalación Luminaria LED Albeo Iluminación Lineal (Serie ALC4) Características 5 años de garantía Clasificada para ambientes humedecidos ANTES DE EMPEZAR Lea estas instrucciones
Fully assemble before operating. Operate vacuum only at voltage specified on data label on bottom of cleaner. Do not leave appliance when plugged in.
 Fully assemble before operating. Operate vacuum only at voltage specified on data label on bottom of cleaner. Do not leave appliance when plugged in. Unplug from outlet when not in use and before cleaning
Manual Instalación Conexión Trifásica con instalación solar fotovoltaica Versión 1.0
 Manual Instalación Conexión Trifásica con instalación solar fotovoltaica Versión 1.0 Julio 2014 (Español), versión 1.0 2013-2014 Smappee NV. Todos los derechos reservados Las especificaciones están sujetas
MANUAL DE USO CAFETERA ELÉCTRICA PERCOLADORA Modelo HEJA203DH
 MANUAL DE USO CAFETERA ELÉCTRICA PERCOLADORA Modelo HEJA203DH Español Manual de Uso V2 Importantes medidas de seguridad Cuando se utilizan aparatos eléctricos, se deben respetar ciertas medidas de seguridad,
www.mediclinics.com SECADORA DE MANOS / HAND DRYERS / SÉCHE-MAINS / HÄNDETROCKNER / SECADOR DE MÃOS / ASCIUGAMANI / M12A / M12ACS
 SECADORA DE MANOS / HAND DRYERS / SÉCHE-MAINS / HÄNDETROCKNER / SECADOR DE MÃOS / ASCIUGAMANI / / / M12A / M12ACS MANUAL DE INSTALACIÓN Y UTILIZACIÓN INSTALLATION AND OPERATING MANUAL ερζuϋδνd IζSTρδδρTIηζΝϋTΝD
MANUAL DE INSTALACIÓN Y MANUAL DE USUARIO
 MANUAL DE INSTALACIÓN Y MANUAL DE USUARIO Mando por cable KC-01.2 Lea detenidamente este manual antes de utilizar el aire acondicionado y guárdelo para futuras consultas. Versión 1.0 ÍNDICE 1. Precauciones
Fácil reparación de Packard Bell
 Fácil reparación de Packard Bell Módem Importantes instrucciones de comprobación de seguridad Tiene que leer todas las instrucciones con cuidado antes de que comience a trabajar y cumplir con todos los
BOTONERA ELECTRÓNICA INSTRUCCIONES DE INSTALACIÓN PARA SERIES BASIC Y AUDITGARD
 BOTONERA ELECTRÓNICA INSTRUCCIONES DE INSTALACIÓN PARA SERIES BASIC Y AUDITGARD ÍNDICE INFORMACIÓN GENERAL 1 PLANTILLAS DE MONTAJE DE LA BOTONERA 3 BOTONERAS 3000 Y 3715 4 BOTONERAS REDONDAS 3035 Y 3125
HYUNDAI TUCSON (without 4.3 screen) 2010-UP 99-7341B
 2010-UP 99-7341B") Installation instructions for part 99-7341B HYUNDAI TUCSON (without 4.3 screen) 2010-UP 99-7341B KIT FEATURES ISO DIN Head Unit Provision With Pocket DDIN Head Unit Provision Painted Matte Black to match
Installation instructions for part 99-7341B HYUNDAI TUCSON (without 4.3 screen) 2010-UP 99-7341B KIT FEATURES ISO DIN Head Unit Provision With Pocket DDIN Head Unit Provision Painted Matte Black to match
Soporte de montaje de la unidad de disco duro Manual de instrucciones
 Soporte de montaje de la unidad de disco duro Manual de instrucciones CECH-ZCD1 7020229 Hardware compatible Sistema PlayStation 3 (serie CECH-400x) Precauciones Para garantizar el uso seguro de este producto,
GA-1 Dispositivo de alarma de aceite para separadores de grasa Instrucciones de instalación y manejo
 Labkotec Oy Myllyhaantie 6 FI-33960 PIRKKALA FINLANDIA Tel.: +358 29 006 260 Fax: +358 29 006 1260 19.1.2015 Internet: www.labkotec.com 1/11 GA-1 Dispositivo de alarma de aceite para separadores de grasa
INSTALLATION INSTRUCTIONS FOR PART 99-7341B APPLICATIONS 2010 HYUNDAI TUCSON
 INSTALLATION INSTRUCTIONS FOR PART 99-74B KIT FEATURES KIT COMPONENTS APPLICATIONS 00 HYUNDAI TUCSON 99-74B ISO DIN Head Unit Provision With Pocket DDIN Head Unit Provision Painted Matte Black To Match
MANUAL DE INSTRUCCIONES CEPILLO DENTAL RECARGABLE CON TEMPORIZADOR
 MANUAL DE INSTRUCCIONES CEPILLO DENTAL RECARGABLE CON TEMPORIZADOR MODELO: MX-HD2375 ANTES DE SU USO LEA ATENTAMENTE ESTE MANUAL INTRODUCCIÓN Con el cepillo dental MX ONDA modelo MX-HD2375 conseguirá una
MODELO BRD-887 RADIO RELOJ DESPERTADOR CON DOBLE ALARMA
 AVISO SOBRE SALPICADURAS Y VENTILACIÓN MODELO BRD-887 RADIO RELOJ DESPERTADOR CON DOBLE ALARMA MEDIDAS DE SEGURIDAD ESTE APARATO NO DEBE QUEDAR EXPUESTO A GOTAS NI A SALPICADURAS. TAMPOCO DEBERÁ COLOCAR
MANUAL DE INSTALACIÓN
 MANUAL DE INSTALACIÓN SENSOR VOLUMÉTRICO DE EXTERIOR SERIE FIT FTN-ST FTN-AM FTN-ST: Modelo standard con dos PIR FTN-AM: Igual que el FTN-ST pero con antimasking PRESTACIONES * Diseño compacto * Soporte
INFRA STRAIGHT MANUAL DE USUARIO
 INFRA STRAIGHT MANUAL DE USUARIO IMPORTANTES INSTRUCCIONES DE SEGURIDAD PARA ANTES DE USAR, LEA TODAS LAS INSTRUCCIONES Antes de poner en operación el aparato, sobre todo cuando hay niños en su entorno,
Precauciones de seguridad
 Precauciones de seguridad Este manual de instalación le indica cómo instalar el Control remoto con cable del ERV, el cual está conectado al ventilador. Para instalar otros accesorios opcionales, consulte
Manual de Instrucciones
 Filtradora de Aguas Residuales Fabricante: deconta GmbH Im Geer 20, D - 46419 Isselburg Denominación / Tipo: Tipo 539 Índice Página 1 Introducción 3 2 Indicaciones fundamentales de seguridad 4 2.1 Utilización
Manual de Instrucciones
 3626H-Spanish_Manuals 7/6/10 1:00 PM Page 1 Nivel Láser para Baldosas y Pisos Modelo N.º 40-6616 Manual de Instrucciones Lo felicitamos por haber elegido este Nivel Láser para Baldosas y Pisos. Le sugerimos
Extension Cords Extensiones Eléctricas We light your world
 We light your world 07.14.1 Household Domésticas 3 outlet indoor cords allow use of up to three items in one small place. This provides flexibility, while allowing multiple devices to be use without the
LÁSER 40mW CON CONTROL REMOTO DMX O MASTER/SLAVE
 SRL-LB-20 DT LÁSER 40mW CON CONTROL REMOTO DMX O MASTER/SLAVE INTRODUCCIÓN Gracias por escoger el láser SRL-LB20DT de Pro Light. Usted acaba de adquirir un láser profesional controlado por DMX, automático,
Hyundai Accent 2012-up 99-7347B
 INSTALLATION INSTRUCTIONS FOR PART 99-7347B APPLICATIONS Hyundai Accent 2012-up 99-7347B KIT FEATURES ISO DIN head unit provision with pocket Double DIN head unit provisions Painted Black to match factory
BAI-220 AURICULAR INALÁMBRICO
 BAI-220 AURICULAR INALÁMBRICO Manual de usuario ESPECIFICACIONES TÉCNICAS EMISOR Frecuencia: 86 ± 0.5 MHz Modulación: FM Distancia de emisión: 30 m. Recepción de cualquier equipo de audio y video con salida
Soporte para televisor de pantalla plana. Soporte multifuncional de doble sujeción GUÍA DE INSTALACIÓN. Modelo: BST-6
 Soporte para televisor de pantalla plana Soporte multifuncional de doble sujeción GUÍA DE INSTALACIÓN Modelo: BST-6 Fácil instalación: simplemente colgando la pantalla. Seguridad: anclaje asegurado en
Honda Fit 2015-up 95-7883HG
 INSTALLATION INSTRUCTIONS FOR PART 95-7883HG APPLICATIONS Honda Fit 2015-up 95-7883HG Table of Contents Dash Disassembly Honda Fit 2015-up... 2 KIT FEATURES Double DIN radio provision Painted high gloss
Hyundai Elantra 2011-2013 99-7346B
 Installation Instructions for 99-7346B Hyundai Elantra 2011-2013 99-7346B KIT FEATURES Double DIN radio provision ISO DIN radio provision with pocket Painted black to match factory finish Dash Disassembly
Epson SureColor F6070 Guía de instalación
 Epson SureColor F6070 Guía de instalación 2 Desembalaje y montaje de la impresora Lea todas estas instrucciones antes de utilizar la impresora. Siga todas las advertencias e instrucciones señaladas en
Conditioning Exercises: Standing
 Conditioning Exercises: Standing Do all these exercises slowly. Do not hold your breath during these exercises. If unusual pain occurs in your joints or muscles while you are exercising, do not continue
Unidad óptica. Aviso : A lo largo de este proceso, mantén las piezas pequeñas fuera del alcance de los niños.
 Español Instrucciones para la sustitución Unidad óptica AppleCare Sigue atentamente las instrucciones de este documento, de lo contrario podrías dañar tu equipo e invalidar la garantía. Nota: Encontrarás
KAPTIV-CS. Purga capacitiva electrónica 06/13
 Instrucciones de la instalación y mantenimiento KAPTIV-CS Purga capacitiva electrónica OPERACIÓN GENERAL 06/13 El KAPTIV-CS remueve todos tipos del condensado de los sistemas de aire comprimido hasta 100
MEDIDOR DE RESISTENCIA DE TIERRA
 MEDIDOR DE RESISTENCIA DE TIERRA T3V (Cód. M80410) MANUAL DE INSTRUCCIONES ( M981110010104A ) CIRCUTOR S.A. MEDIDOR DE RESISTENCIA DE TIERRA T3V Pag Nº 1 ÍNDICE ANALIZADOR T3V nº página 1. GENERALIDADES...2
CONTROL REMOTO DE AIRE ACONDICIONADO ORION. Instrucciones de Montaje,Instalación y Funcionamiento para el INSTALADOR y USUARIO
 CONTROL REMOTO DE AIRE ACONDICIONADO ORION ES Instrucciones de Montaje,Instalación y Funcionamiento para el INSTALADOR y USUARIO ÍNDICE INDICACIONES IMPORTANTES... 1 DESCRIPCIÓN DE BOTONES... 2 CONTROL
MICROMETRO DIGITAL RECOMENDACIONES
 MICROMETRO DIGITAL RECOMENDACIONES No desmonte ni modifique este instrumento, ya que eso podría dañar el documento. No utilice ni guarde el micrómetro en lugares donde se produzca cambios bruscos de temperatura.
MANUAL DEL USUARIO DE LA BOMBA CON FILTRO SUPERLIMPIO
 FP3-14-ESP(V1) MANUAL DEL USUARIO DE LA BOMBA CON FILTRO SUPERLIMPIO 3771E/3772E/3772F/3773E/3773F/3775E/3775F JL29P303G/JL29P303E/JL29P302G/JL29P302E/JL29P302F/ JL29P327G/JL29P327E/JL29P327F/JL29P301G/JL29P301E/JL29P301F