WB034 USER MANUAL 7 GEBRUIKERSHANDLEIDING 8 NOTICE D EMPLOI 10 MANUAL DEL USUARIO 11 BEDIENUNGSANLEITUNG 13 MANUAL DO UTILIZADOR 14
|
|
|
- Pilar Henríquez Ramírez
- hace 5 años
- Vistas:
Transcripción


1 EN FLAT PANEL WALL SUPPORT 17" - 40" NL MUURBEUGEL VOOR FLATSCREENS FR SUPPORT MURAL POUR ÉCRANS PLATS ES SOPORTE DE PARED PARA PANTALLAS PLANAS DE WANDHALTERUNG FÜR FLACHBILDSCHIRME PT SUPORTE DE PAREDE PARA ECRÃS PLANOS USER MANUAL 7 GEBRUIKERSHANDLEIDING 8 NOTICE D EMPLOI 10 MANUAL DEL USUARIO 11 BEDIENUNGSANLEITUNG 13 MANUAL DO UTILIZADOR 14
2 EN NL FR ES DE PT Package M Verpakking M Emballage M Embalaje M M-Packung Embalagem M WB034 EN NL FR ES DE PT Mounting hardware (not included) Bevestigingsmateriaal (niet meegeleverd) Matériel de montage (non fourni) Material de montaje (no incluido) Montagezubehör (nicht mitgeliefert) Acessórios de montagem (não incluído) 20/05/2014 2

3 1 WB034 2a 2b 20/05/2014 3

4 2c WB a 20/05/2014 4

5 4b WB034 5a 5b 20/05/2014 5

6 6 COPYRIGHT NOTICE This manual is copyrighted. The copyright to this manual is owned by Velleman nv. All worldwide rights reserved. No part of this manual may be copied, reproduced, translated or reduced to any electronic medium or otherwise without the prior written consent of the copyright holder. AUTEURSRECHT Velleman nv heeft het auteursrecht voor deze handleiding. Alle wereldwijde rechten voorbehouden. Het is niet toegestaan om deze handleiding of gedeelten ervan over te nemen, te kopiëren, te vertalen, te bewerken en op te slaan op een elektronisch medium zonder voorafgaande schriftelijke toestemming van de rechthebbende. DROITS D AUTEUR SA Velleman est l ayant droit des droits d auteur pour cette notice. Tous droits mondiaux réservés. Toute reproduction, traduction, copie ou diffusion, intégrale ou partielle, du contenu de cette notice par quelque procédé ou sur tout support électronique que se soit est interdite sans l accord préalable écrit de l ayant droit. DERECHOS DE AUTOR Velleman NV dispone de los derechos de autor para este manual del usuario. Todos los derechos mundiales reservados. Está estrictamente prohibido reproducir, traducir, copiar, editar y guardar este manual del usuario o partes de ello sin previo permiso escrito del derecho habiente. URHEBERRECHT Velleman NV besitzt das Urheberrecht für diese Bedienungsanleitung. Alle weltweiten Rechte vorbehalten. Ohne vorherige schriftliche Genehmigung des Urhebers ist es nicht gestattet, diese Bedienungsanleitung ganz oder in Teilen zu reproduzieren, zu kopieren, zu übersetzen, zu bearbeiten oder zu speichern. DIREITOS DE AUTOR A Velleman NV detem os direitos de autor deste manual do utilizador. Todos os direitos mundiais reservados. É estrictamente proíbido reproduzir, traduzir, copiar, editar e gravar este manual do utilizador ou partes deste sem prévia autorização escrita por parte da detentora dos direitos. 20/05/2014 6
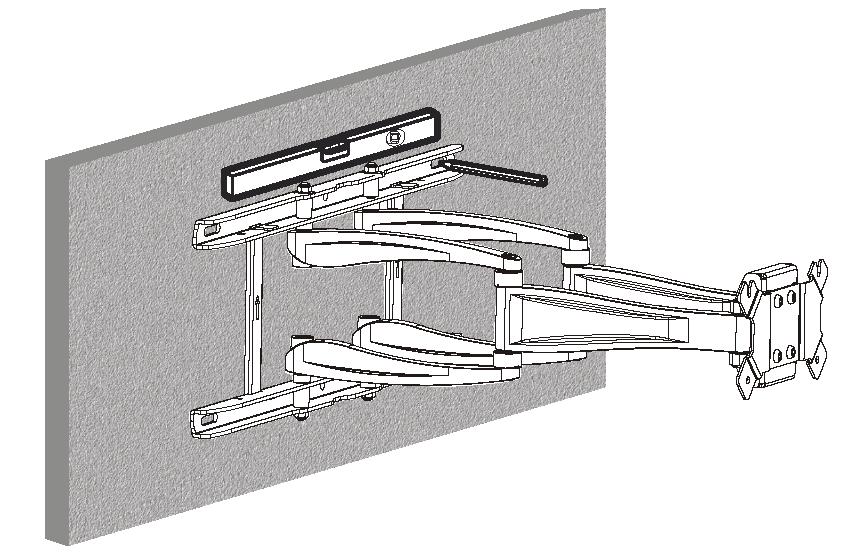
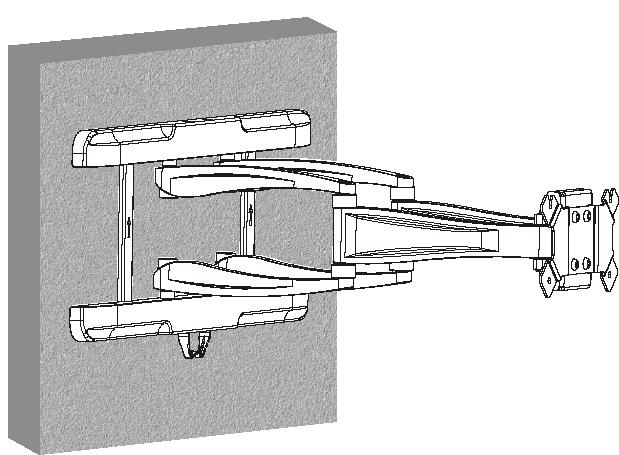
7 User manual 1. Introduction Thank you for choosing Velleman! Please read the manual thoroughly before bringing this device into service. If the device was damaged in transit, do not install or use it and contact your dealer. 2. Safety Instructions Damage caused by disregard of certain guidelines in this manual is not covered by the warranty and the dealer will not accept responsibility for any ensuing defects or problems. Damage caused by user modifications to the device is not covered by the warranty. Only use the device for its intended purpose. Using the device in an unauthorised way will void the warranty. Check the contents prior to assembly. Use proper tools and never use defective or deformed parts as an improper installation may cause serious injury. Respect the product s max. load specifications. Protect this device from shocks and abuse and avoid brute force when operating. Check the installation on a bimonthly basis. An adequate mounting is essential and falls outside the responsibility of Velleman nv. Respect all installation and operating directions of the device to be mounted/installed (LCD/plasma display). Only use the device at an indoor location, protected from rain, moisture, splashing and dripping liquids. Make sure the chosen location spot is able to support the weight of the bracket and screen. Keep fingers away from articulations to avoid injury. Keep the device out of reach of children and unauthorized users at all times. 3. General Guidelines Refer to the Velleman Service and Quality Warranty on the last pages of this manual. 4. Features for LED and slim LCD TVs according to: VESA standard 75x75/100x100/200x100/200x Installation Refer to the illustrations on page 2, 3, 4 and 5 of this manual. 1) Preparation Remove the plastic protection covers from the mounting bracket and lift the TV bracket from the wall bracket. To do this, release the screws at the back. 2a) Wooden Support Choose an installation spot able to support the weight of the bracket and the screen. It is important that the bracket be mounted on beams and not simply on a panel. Use the bracket as a template to mark the hole locations (see diagram 2a). Check for electric lines or pipes, or metal studs in wood battens. Make sure the holes are level. Pre-drill the holes (± 30mm deep) using a power drill and a 3mm wood bit. Fix the bracket to the wall using 4 lag bolts [W-A] and washers [W-C]. 2b+2c) Concrete or Brick Support Choose an installation spot able to support the weight of the bracket and the screen. Use the bracket as a template to mark the six hole locations (see diagram 2b). Check for electric lines or pipes. Make sure the holes are level. Drill the holes (± 60mm deep) using a power drill and a 10mm masonry bit. Insert a nylon plug [W-B] in each hole (see diagram 2c). Fix the bracket to the wall using six lag bolts [W-A] and washers [W-C]. 3) Covers Place the plastic covers back on the top and bottom of the wall plate. Install the cable guide on the bottom or top of the wall plate. 20/05/2014 7
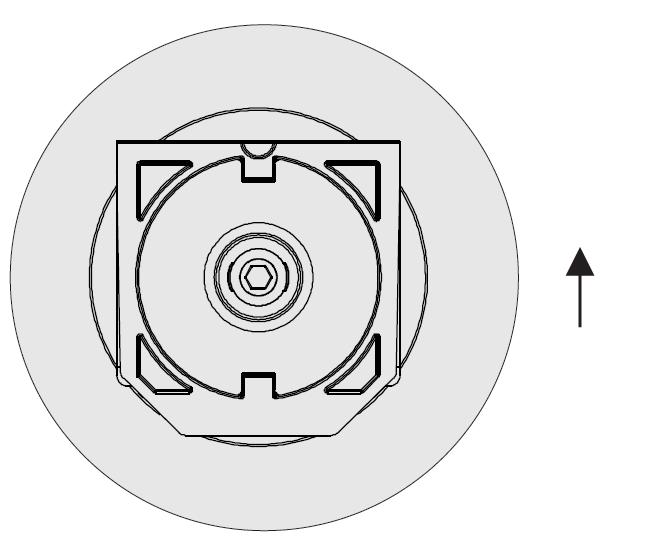
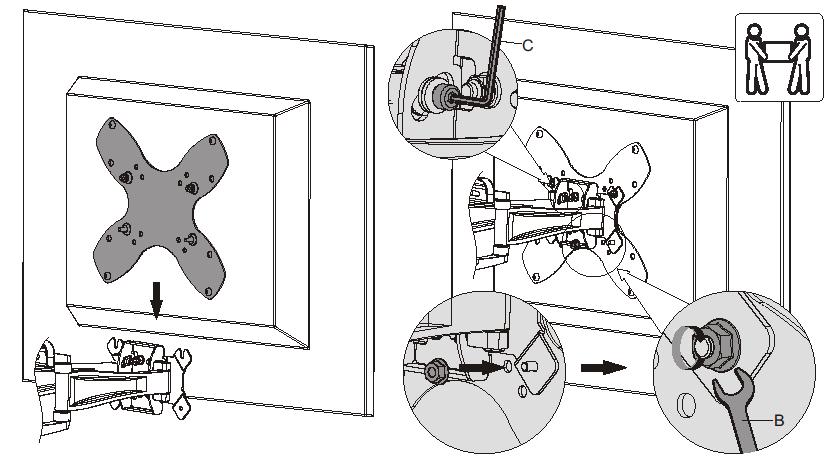
8 4) TV bracket Mount the TV bracket on the back of the TV, with the missing corners facing down (bottom edge of the TV). Depending on the TV screen, use the appropriate M4, M5, M6 or M8 screws and the appropriate washers (see diagram 4a & 4b). 5) Installing the display Hook the TV mounting bracket over the wall mounting bracket and secure it with two screws. Note: this operation should be done by 2 adult persons! Slightly release the hex screw with the hex wrench [M-J] and adjust the angle of the screen (see diagram 5b). Tighten the hex screw to secure the screen in the desired position. Note: check all screws and brackets regularly to ensure safe use. 6) Connection cables Guide the TV cables through the cable guide. 6. Technical specifications LCD/plasma size max. Load rotation TV to wall weight 17" - 40" (43 ~ 101cm) 25 kg / 55 lbs 15 up/down tilt, 100 left / right swivel, and 360 rotation min. 27mm, extendible to 360mm. ±3.2kg Use this device with original accessories only. Velleman nv cannot be held responsible in the event of damage or injury resulted from (incorrect) use of this device. For more info concerning this product and the latest version of this user manual, please visit our website The information in this manual is subject to change without prior notice. Gebruikershandleiding 1. Inleiding Dank u voor uw aankoop! Lees deze handleiding grondig voor u het toestel in gebruik neemt. Werd het toestel beschadigd tijdens het transport, installeer het dan niet en raadpleeg uw dealer. 2. Veiligheidsinstructies De garantie geldt niet voor schade door het negeren van bepaalde richtlijnen in deze handleiding en uw dealer zal de verantwoordelijkheid afwijzen voor defecten of problemen die hier rechtstreeks verband mee houden. Schade door wijzigingen die de gebruiker heeft aangebracht valt niet onder de garantie. Gebruik het toestel enkel waarvoor het gemaakt is. Bij onoordeelkundig gebruik vervalt de garantie. Gebruik geschikt gereedschap dat beschadigd of vervormd is. Overschrijd nooit de maximale draagkracht van de beugel. Bescherm de beugel tegen schokken. Vermijd brute kracht tijdens de bediening. Controleer de beugel elke twee maanden. De installatie valt volledig buiten de verantwoordelijkheid van Velleman nv. Volg de installatie- en gebruikersinstructies van zowel de beugel als het monteren toestel (lcd- of plasmascherm) zorgvuldig na. De beugel is enkel geschikt voor gebruik binnenshuis. Bescherm de beugel tegen regen, vochtigheid en opspattende vloeistoffen. Zorg ervoor dat het draagoppervlak het gewicht van de beugel en het toestel kan dragen. Houd vingers weg van scharnieren. Houd de beugel uit de buurt van kinderen en onbevoegden. 3. Algemene richtlijnen Raadpleeg de Velleman service- en kwaliteitsgarantie achteraan deze handleiding. 4. Eigenschappen ideaal voor LED en dunne LCD schermen conform: VESA standard 75x75/100x100/200x100/200x Installatie Raadpleeg de figuren op pagina s 2, 3, 4 en 5 van deze handleiding. 1) Voorbereiding 20/05/2014 8
9 Verwijder de plastic beschermkappen van de montagebeugel en schuif de TV-beugel uit de muurbeugel. Draai hiervoor de schroeven aan de achterzijde los. 2a) Hout Kies een geschikte montageplaats die het gewicht van de beugel en het scherm kan dragen. Het is belangrijk dat u de beugel bevestigt op de balken en niet op een paneel. Gebruik de beugel als patroon en markeer de gaten(zie diagram 2a). Controleer de ligging van eventuele leidingen of spijkers. Zorg ervoor dat de gaten mooi horizontaal liggen. Boor de gaten (± 30mm diep) met behulp van een elektrische boor en een houtboor van 3mm. Bevestig de beugel met behulp van vier schroefbouten [W-A] en ringen [W-C]. 2b+2c) Beton of baksteen Kies een geschikte montageplaats die het gewicht van de beugel en het scherm kan dragen. Gebruik de beugel als patroon en markeer de zes gaten (zie diagram 2b). Controleer de ligging van eventuele leidingen. Zorg ervoor dat de gaten mooi horizontaal liggen. Boor de gaten (± 60mm diep) met behulp van een elektrische boor en een betonboor van 10mm. Plaats een nylon plug [W-B] in elk gat (zie diagram 2c). Bevestig de beugel met behulp van zes schroefbouten [W-A] en ringen [W-C]. 3) Beschermkappen Plaats de plastic beschermkappen terug aan de bovenkant en onderkant van de muurplaat. Installeer de kabelgeleider op de onder- of bovenkant van de muurplaat. 4) Tv-beugel Monteer de tv-beugel op de achterzijde van het scherm, de ontbrekende hoeken naar onder gericht (onderrand van het scherm). Afhankelijk van het tv-scherm, gebruik de geschikte M4, M5, M6 of M8 schroeven en bijbehorende ringen (zie diagram 4a & 4b). 5) Het scherm installeren Hang de Tv-beugel over de muurbeugel en beveilig door de twee schroeven aan te draaien. Opmerking: dit kan best gebeuren door twee volwassen personen. Los de inbusbout een beetje met de inbussleutel [M-J] en stel de gewenste schermpositie in (zie diagram 5b). Draai de inbusbout aan om het scherm vast te zetten in de gekozen positie. Opmerking: controleer alle schroeven en beugels regelmatig om een veilig gebruik te verzekeren. 6) Verbindingskabels Leid de tv-kabels door de kabelgeleider. 6. Technische specificaties afmetingen lcd/plasma max. last rotatie afstand tot de muur gewicht 17" - 40" (43 ~ 101cm) 25 kg / 55 lbs 15 kantelbaar naar boven/onder, 100 draaibaar naar links/rechts, en 360 rotatie min. 27mm, tot max. 360mm ±3.2kg Gebruik dit toestel enkel met originele accessoires. Velleman nv is niet aansprakelijk voor schade of kwetsuren bij (verkeerd) gebruik van dit toestel. Voor meer informatie omtrent dit product en de meest recente versie van deze handleiding, zie De informatie in deze handleiding kan te allen tijde worden gewijzigd zonder voorafgaande kennisgeving. 20/05/2014 9
10 Notice d emploi 1. Introduction Nous vous remercions de votre achat! Lire la présente notice attentivement avant la mise en service de l appareil. Si l appareil a été endommagé pendant le transport, ne pas l installer et consulter votre revendeur. 2. Consignes de sécurité La garantie ne s applique pas aux dommages survenus en négligeant certaines directives de cette notice et votre revendeur déclinera toute responsabilité pour les problèmes et les défauts qui en résultent. Les dommages occasionnés par des modifications par le client ne tombent pas sous la garantie. N utiliser qu à sa fonction prévue. Un usage impropre annule d'office la garantie. Utiliser de l outillage approprié non endommagé et qui ne présente aucune déformation. Ne jamais excéder la charge maximale autorisée. Protéger contre les chocs et le traiter avec circonspection pendant l installation et l opération. Vérifier le bon état de l installation tous les deux mois. Assurer une installation conforme aux normes de sécurité et aux instructions mentionnées dans cette notice et dans celle de l écran à monter. L installation ne tombe pas sous la responsabilité de SA Velleman. Ce support ne convient que pour une utilisation à l intérieur. Protéger le support contre la pluie, l humidité et les projections d eau. S assurer que la surface portante puisse supporter le poids du support et de l écran. Tenir les doigts loin des articulations du support. Garder hors de la portée des enfants et des personnes non autorisées. 3. Directives générales Se référer à la garantie de service et de qualité Velleman à la dernière page de cette notice. 4. Caractéristiques idéal pour téléviseurs LED et LCD plats conforme : standard VESA 75x75/100x100/200x100/200x Installation Consulter les illustrations en pages 2, 3, 4 et 5 de cette notice. 1) Préparation Enlever les couvertures de protection en plastique du support de montage et déployer le support pour téléviseur du support mural. Pour cela, dévisser les vis au dos. 2a) Bois Choisir un endroit de montage pouvant supporter le poids du support et de l écran. Il est important que le support soit fixé sur des colombes et non simplement fixé à un panneau. Utiliser le support comme gabarit et marquer l emplacement des trous (voir ill. 2a). Vérifier la présence de lignes électriques, de conduites. S assurer que les trous soient alignés de manière horizontale. Percer les trous (± 30mm de profondeur) à l aide d une perceuse électrique équipée d un foret à bois de 3mm. Fixer le support à l aide des quatre tire-fonds [W-A] et des rondelles [W-C]. 2b+2c) Béton ou brique Choisir un endroit de montage pouvant supporter le poids du support et de l écran. Utiliser le support comme gabarit et marquer l emplacement des trous (voir ill. 2b). Vérifier la présence de lignes électriques ou de conduites. S assurer que les trous soient alignés de manière horizontale. Percer les trous (± 60mm de profondeur) à l aide d une perceuse électrique équipée d un foret à béton de 10mm. Insérer une cheville en nylon [W-B] dans chaque trou (voir ill. 2c). Fixer le support de montage avec des six tire-fonds [W-A] et des rondelles [W-C]. 3) Couvertures de protection Remettre les couvertures de protection en plastique au-dessus et en-dessous de la sablière. Installer le guide-câble en-dessous ou au-dessus de la sablière. 4) Support pour téléviseur 20/05/
11 Fixer le support pour téléviseur au dos de l écran, les coins manquants dirigés vers le bas (le bord inférieur de l écran). En fonction de la taille de l écran de télévision, utiliser les vis M4, M5, M6 ou M8 appropriées et les rondelles assorties (voir diagramme 4a & 4b). 5) Installer l écran Suspendre le support pour téléviseur au support de montage et sécuriser en serrant les deux vis. Remarque: préférablement par deux personnes adultes! Dévisser légèrement la vis à trou hexagonal avec la clé Allen [M-J] et ajuster l angle de l écran (voir diagramme 5b). Serrer la vis à trou hexagonal pour fixer l écran dans la position souhaitée. Remarque: vérifier fréquemment tous les vis et supports pour assurer un usage sécurisé. 6) Câbles de connexion Guider les câbles de télévision à travers le guide-câble. 6. Spécifications techniques dimensions LCD/plasma 17" - 40" (43 ~ 101cm) charge max. 25 kg / 55 lbs rotation inclinaison vers le haut/bas de 15º, tournant de 100 vers la droite/gauche et rotation de 360 de téléviseur à mur min. 27 mm, jusqu'à 360mm max. poids ±3.2kg N employer cet appareil qu avec des accessoires d origine. SA Velleman ne sera aucunement responsable de dommages ou lésions survenus à un usage (incorrect) de cet appareil. Pour plus d information concernant cet article et la version la plus récente de cette notice, visitez notre site web Toutes les informations présentées dans cette notice peuvent être modifiées sans notification préalable. Manual del usuario 1. Introducción Gracias por haber comprado el WB034! Lea atentamente las instrucciones del manual antes de usarlo. Si el aparato ha sufrido algún daño en el transporte no lo instale y póngase en contacto con su distribuidor. 2. Instrucciones de seguridad Los daños causados por descuido de las instrucciones de seguridad de este manual invalidarán su garantía y su distribuidor no será responsable de ningún daño u otros problemas resultantes. Los daños causados por modificaciones no autorizadas, no están cubiertos por la garantía. Utilice sólo el aparato para las aplicaciones descritas en este manual. Su uso incorrecto anula la garantía completamente. Utilice herramientas adecuadas no dañadas ni deformadas. Nunca sobrepase la carga máx. autorizada. No agite el aparato. Evite usar excesiva fuerza durante el manejo y la instalación. Controle el buen estado de la instalación cada dos meses. Asegúrese de que la instalación cumple con las normas de seguridad y las instrucciones mencionadas de este manual del usuario y el de la pantalla que quiere montar. Velleman NV no será responsable de la instalación. Este brazo sólo es apto para un uso en interiores. No lo exponga a lluvia, humedad ni a ningún tipo de salpicadura o goteo. Asegúrese de que la superficie portante pueda soportar el peso del soporte y la pantalla. Mantenga los dedos lejos de las bisagras. Mantenga el aparato lejos del alcance de personas no capacitadas y niños. 3. Normas generales Véase la Garantía de servicio y calidad Velleman de la última página de este manual del usuario. 4. Características ideal para televisores LED y LCD planos 20/05/
12 cumple con las normas: estándar VESA 75x75/100x100/200x100/200x Instalación Véase las figuras en la página 2, 3, 4 y 5 de este manual del usuario. 1) Preparación Saque las tapas protectoras de plástico del soporte de montaje y deslice el soporte de TV fuera del soporte de pared. Para esto, desatornille los tornillos de la parte trasera. 2a) Madera Seleccione un lugar de montaje que puede soportar el peso del soporte y la pantalla. Es importante que el soporte se fije en vigas y no sólo en un panel. Utilice el soporte como gálibo y marque la posición de los agujeros (véase fig. 2a). Verifique si hay líneas eléctricas o conductos. Asegúrese de que los agujeros estén alineados de manera horizontal. Taladre los agujeros (± 30mm de profundidad) con un taladro eléctrico equipado con una broca de madera de 3mm. Fije el soporte de montaje con 4 tornillos [W-A] y arandelas [W-C]. 2b+2c) Hormigón o ladrillo Seleccione un lugar de montaje que pueda soportar el peso del soporte y la pantalla. Utilice el soporte como gálibo y marque la posición de los agujeros (véase fig. 2b). Verifique si hay líneas eléctricas o conductos. Asegúrese de que los agujeros estén alineados de manera horizontal. Taladre los agujeros (± 60mm de profundidad) con un taladro eléctrico equipado con una broca de hormigón de 10mm. Introduzca un taco de nylon [W-B] en cada agujero (véase fig. 2c). Fije el soporte de montaje con 6 tornillos [W-A] y arandelas [W-C]. 3) Tapas protectoras Vuelva a instalar las tapas protectoras de plástico en la parte superior o la parte inferior de la placa de pared. Instale el protector de cable en la parte superior o la parte inferior de la placa de pared. 4) Soporte de TV Fije el soporte de TV a la parte trasera de la pantalla. Asegúrese de que las esquinas faltantes apunten hacia abajo (la parte inferior de la pantalla). Dependiendo de la pantalla TV, utilice los tornillos M4, M5, M6 o M8 y arandelas adecuados (véase 4a & 4b). 5) Instalar la pantalla Fije el soporte de TV al soporte de pared y atornille los dos tornillos. Observación: Son necesarios dos adultos para realizar el montaje. Desatornille el tornillo Allen un poco con la llave Allen [M-J] y mueva la pantalla hasta que alcance la posición deseada (véase 5b). Vuelva a atornillar el tornillo Allen para fijar la pantalla en la posición seleccionada. Observación: Controle todos los tornillos y soportes regularmente para garantizar un uso seguro. 6) Cables de conexión Guíe los cables de TV a través del protector de cables. 6. Especificaciones dimensiones LCD/plasma carga máx. rotación distancia a la pared peso 17" - 40" (43 ~ 101cm) 25 kg / 55 lbs ángulo de inclinación arriba/abajo: 15, ángulo giratorio izquierda/derecha: 100 y rotación: 360 mín. 27mm, extensible hasta 360mm ±3.2kg Utilice este aparato sólo con los accesorios originales. Velleman NV no será responsable de daños ni lesiones causados por un uso (indebido) de este aparato. Para más información sobre este producto y la versión más reciente de este manual del usuario, visite nuestra página Se pueden modificar las especificaciones y el contenido de este manual sin previo aviso. 20/05/
13 1. Einführung WB034 Bedienungsanleitung Wir bedanken uns für den Kauf der WB034! Lesen Sie diese Bedienungsanleitung vor Inbetriebnahme sorgfältig durch. Überprüfen Sie, ob Transportschäden vorliegen. Sollte dies der Fall sein, verwenden Sie das Gerät nicht und wenden Sie sich an Ihren Händler. 2. Sicherheitshinweise Bei Schäden, die durch Nichtbeachtung der Bedienungsanleitung verursacht werden, erlischt der Garantieanspruch. Für daraus resultierende Folgeschäden übernimmt der Hersteller keine Haftung. Bei Schäden verursacht durch eigenmächtige Änderungen erlischt der Garantieanspruch. Verwenden Sie das Gerät nur für Anwendungen beschrieben in dieser Bedienungsanleitung sonst erlischt der Garantieanspruch. Verwenden Sie geeignetes Werkzeug, das nicht beschädigt oder verformt ist. Überschreiten Sie nie die max. Tragkraft der Halterung. Vermeiden Sie Erschütterungen. Vermeiden Sie rohe Gewalt während der Installation und Bedienung des Gerätes. Kontrollieren Sie die Halterung jede zwei Monate. Velleman NV übernimmt keine Haftung für die Installation. Befolgen Sie sorgfältig die Installationsanweisungen der Halterung und des Gerätes, das Sie installieren möchten (LCD- oder Plasmaschirme). Das Gerät eignet sich nur für die Anwendung im Innenbereich. Schützen Sie das Gerät vor Regen und Feuchte und setzen Sie das Gerät keiner Flüssigkeit wie z.b. Tropf- oder Spritzwasser, aus. Beachten Sie, dass die Tragfläche das Gewicht der Halterung und des Gerätes tragen kann. Halten Sie die Finger von Scharnieren fern. Halten Sie Kinder und Unbefugte von der Halterung fern. 3. Allgemeine Richtlinien Siehe Velleman Service- und Qualitätsgarantie am Ende dieser Bedienungsanleitung. 4. Eigenschaften ideal für flache LED- und LCD-Fernseher gemäß: VESA Standard 75x75/100x100/200x100/200x Installation Siehe Abbildungen, Seite 2, 3, 4 und 5 dieser Bedienungsanleitung. 1) Vorbereitung Entfernen Sie die Plastik-Schutzkappen vom Montagebügel und schieben Sie die TV-Halterung aus der Wandhalterung. Lockern Sie hierfür die Schrauben auf der Rückseite. 2a) Holz Wählen Sie einen geeigneten Montageort aus, der das Gewicht des Bügels und des Bildschirms tragen kann. Verwenden Sie den Bügel als Schablone und markieren Sie die Löcher (siehe 2a). Überprüfen Sie die Position von eventuellen Leitungen oder Nägeln. Beachten Sie, dass die Löcher sich horizontal befinden. Bohren Sie die Löcher (± 30mm tief) mit einer elektrischen Bohrmaschine und dem geeigneten Holzbohrer (3mm). Befestigen Sie den Bügel mit den 4 Bolzen [W-A] und Dichtungsringen [W-C]. 2b+2c) Beton oder Backstein Wählen Sie einen geeigneten Montageort aus, der das Gewicht des Bügels und des Bildschirms tragen kann. Verwenden Sie den Bügel als Schablone und markieren Sie die Löcher (siehe 2b). Überprüfen Sie die Position von eventuellen Leitungen oder Nägeln. Beachten Sie, dass die Löcher sich horizontal befinden. Bohren Sie die Löcher (± 60mm tief) mit einer elektrischen Bohrmaschine und dem geeigneten Betonbohrer (10mm). Setzen Sie einen Nylondübel [W-B] in jedem Loch ein (siehe 2c). Befestigen Sie den Bügel mit den 6 Bolzen [W-A] und Dichtungsringen [W-C]. 3) Schutzkappen Befestigen Sie die Plastik-Schutzkappen wieder an der Ober- und Unterseite der Wandplatte. Befestigen Sie die Kabelführung an der Unter- oder Oberseite der Wandplatte. 20/05/
14 4) TV-Halterung Befestigen Sie die TV-Halterung an der Rückseite des Bildschirmes. Beachten Sie, dass die fehlenden Ecken nach unten gerichtet sind (Unterseite des Bildschirmes). Abhängig vom Bildschirm, verwenden Sie die geeigneten M4-, M5-, M6- oder M8-Schrauben und Dichtungsringe (siehe 4a & 4b). 5) Den Bildschirm installieren Befestigen Sie die TV-Halterung am Montagebügel und schrauben Sie die zwei Schrauben wieder fest. Bemerkung: Die Montage muss von zwei erwachsenen Personen durchgeführt werden. Lockern Sie die Sechskantschraube ein bisschen mit dem Sechskantschlüssel [M-J] und bewegen Sie den Schirm bis Sie die gewünschte Position erreicht haben (siehe 5b). Haben Sie die gewünschte Position erreicht, so drehen Sie die Sechskantschraube wieder fest. Bemerkung: Überprüfen Sie alle Schrauben und Halterungen regelmäßig, um einen sicheren Gebrauch zu gewährleisten. 6) Verbindungskabel Führen Sie die TV-Kabel durch die Kabelführung. 6. Technische Daten Abmessungen LCD/Plasma max. Last Rotation Wandabstand Gewicht 17" - 40" (43 ~ 101cm) 25 kg / 55 lbs 15 nach oben/ unten neigbar, 100 nach links/rechts schwenkbar und 360 drehbar min. 27mm, ausziehbar bis zu 360mm ±3.2kg Verwenden Sie dieses Gerät nur mit originellen Zubehörteilen. Velleman NV übernimmt keine Haftung für Schaden oder Verletzungen bei (falscher) Anwendung dieses Gerätes. Für mehr Informationen zu diesem Produkt und die neueste Version dieser Bedienungsanleitung, siehe Alle Änderungen ohne vorherige Ankündigung vorbehalten. Manual do utilizador 1. Introdução Obrigada por ter adquirido a WB034! Leia atentamente as instruções do manual antes de usarlode a usar. Caso o aparelho tenha sofrido algum dano durante o transporte não o instale e entre em contacto com o seu distribuidor. 2. Instruções de segurança Os danos causados pelo não cumprimento das normas de segurança referidas neste manual anulam a garantia e o seu distribuidor não será responsável por quaisquer danos ou outros problemas resultantes. Os danos causados por modificações não autorizadas, não estão cobertos pela garantia. Utilize o aparelho apenas para as aplicações descritas neste manual. O uso incorrecto anula a garantia completamente. Utilize ferramentas adequadas que não estejam danificadas ou deformadas. Nunca ultrapasse a carga máx. do suporte de montagem. Não abane o aparelho. Evite usar força excessiva durante o manuseamento e instalação. Verifique a instalação a cada dois meses. Certifique-se que a instalação cumpre com as normas de segurança e com as instruções mencionadas neste manual do utilizador e no manual do ecrã que pretende montar. Uma montagem correcta é fundamental e a mesma não é responsabilidade da Velleman NV. Este suporte destina-se a ser usado apenas em interiores. Não exponha o equipamento à chuva, humidade, ou qualquer tipo de salpicos. Certifique-se que a superficie onde pretende fazer a instalação suporta o peso do suporte e do ecrã. Mantenha os dedos sempre protegidos. Mantenha o aparelho fora do alcance de pessoas não capacitadas e crianças. 3. Normas gerais Consulte a Garantia de serviço e qualidade Velleman na parte final deste manual do utilizador. 4. Características 20/05/
15 ideal para televisores LED e LCD planos de acordo com as normas: VESA standard 75x75/100x100/200x100/200x Instalação Ver as figuras da página 2, 3, 4 e 5 deste manual. 1) Preparação Retire as tampas de protecção em plástico do suporte de montagem e faça deslizar o suporte de TV para fora do suporte de parede. Para tal, desaperte os parafusos na parte traseira. 2a) Madeira Seleccione um local de montagem que possa suportar o peso do suporte e o ecrã. É importante que o suporte seja fixado às vigas e não apenas a um painel. Utilize o suporte para marcar a posição dos furos (veja fig. 2a). Verifique a existência de cabos eléctricos ou condutas. Certifique-se que os furos estão alinhados na horizontal Faça os furos (± 30mm de profundidade) com um berbequim eléctrico equipado com uma broca para madeira de 3mm. Fixe o suporte de montagem usando os 4 parafuso [W-A] e as anilhas [W-C]. 2b+2c) Cimento ou ladrilho Seleccione um local de montagem que possa suportar o peso do suporte e o ecrã. Utilize o suporte para marcar a posição dos furos (veja fig. 2b). Verifique a existência de cabos eléctricos ou condutas. Certifique-se que os furos estão alinhados na horizontal. Faça os furos (± 60mm de profundidade) usando um berbequim eléctrico equipado com uma broca para cimento de 10mm. Introduza uma bucha de nylon [W-B] em cada furo (veja fig. 2c). Fixe o suporte de montagem usando os 6 parafusos [W-A] e as anilhas [W-C]. 3) Tampas protectoras Volte a colocar as tampas de protecção em plástico na parte superior ou inferior da placa de parede. Instale o protector de cabo na parte superior ou inferior da placa de rede. 4) Suporte de TV Fixe o suporte de TV à parte traseira do ecrã. Verifique se o cantos estão a apontar para baixo (a parte inferior do ecrã). Dependendo do ecrã de TV, utilize o parafusos M4, M5, M6 o M8 e as anilhas adequadas (ver 4a & 4b). 5) Instalar o ecrã Fixe o suporte de TV ao suporte de parede e aperte os parafusos. Observação: São necessárias duas pessoas adultas para fazer a instalação. Desaperte um pouco o parafuso Allen utilizando a chave Allen [M-J] e mova o ecrã até ficar na posição pretendida (ver 5b). Volte a apertar o parafuso Allen para fixar o ecrã na posição desejada. Observação: Verifique os parafusos e os suportes regularmente para garantir uma utilização segura. 6) Cabos de ligação Faça passar os cabos de TV através da protecção de cabos. 6. Especificações dimensões LCD/plasma 17" - 40" (43 ~ 101cm) carga máx. 25 kg / 55 lbs rotação ângulo de inclinação acima/abaixo: 15, ângulo giratório esquerda/direita: 100 e rotação: 360 distância da parede mín. 27mm, extensível até 360mm peso ±3.2kg Utilize este aparelho apenas com os acessórios originais. A Velleman NV não será responsável por quaisquer danos ou lesões causadas pelo uso (indevido) do aparelho. Para más información sobre este producto e para consultar a versão mais recente deste manual do utilizador, visite nuestra página Podem alterar-se as especificações e o conteúdo deste manual sem aviso prévio. 20/05/
16 Velleman Service and Quality Warranty Since its foundation in 1972, Velleman acquired extensive experience in the electronics world and currently distributes its products in over 85 countries. All our products fulfil strict quality requirements and legal stipulations in the EU. In order to ensure the quality, our products regularly go through an extra quality check, both by an internal quality department and by specialized external organisations. If, all precautionary measures notwithstanding, problems should occur, please make appeal to our warranty (see guarantee conditions). General Warranty Conditions Concerning Consumer Products (for EU): All consumer products are subject to a 24-month warranty on production flaws and defective material as from the original date of purchase. Velleman can decide to replace an article with an equivalent article, or to refund the retail value totally or partially when the complaint is valid and a free repair or replacement of the article is impossible, or if the expenses are out of proportion. You will be delivered a replacing article or a refund at the value of 100% of the purchase price in case of a flaw occurred in the first year after the date of purchase and delivery, or a replacing article at 50% of the purchase price or a refund at the value of 50% of the retail value in case of a flaw occurred in the second year after the date of purchase and delivery. Not covered by warranty: - all direct or indirect damage caused after delivery to the article (e.g. by oxidation, shocks, falls, dust, dirt, humidity...), and by the article, as well as its contents (e.g. data loss), compensation for loss of profits; - consumable goods, parts or accessories that are subject to an aging process during normal use, such as batteries (rechargeable, nonrechargeable, built-in or replaceable), lamps, rubber parts, drive belts... (unlimited list); - flaws resulting from fire, water damage, lightning, accident, natural disaster, etc. ; - flaws caused deliberately, negligently or resulting from improper handling, negligent maintenance, abusive use or use contrary to the manufacturer s instructions; - damage caused by a commercial, professional or collective use of the article (the warranty validity will be reduced to six (6) months when the article is used professionally); - damage resulting from an inappropriate packing and shipping of the article; - all damage caused by modification, repair or alteration performed by a third party without written permission by Velleman. Articles to be repaired must be delivered to your Velleman dealer, solidly packed (preferably in the original packaging), and be completed with the original receipt of purchase and a clear flaw description. Hint: In order to save on cost and time, please reread the manual and check if the flaw is caused by obvious causes prior to presenting the article for repair. Note that returning a non-defective article can also involve handling costs. Repairs occurring after warranty expiration are subject to shipping costs. The above conditions are without prejudice to all commercial warranties. The above enumeration is subject to modification according to the article (see article s manual). Velleman service- en kwaliteitsgarantie Velleman heeft sinds zijn oprichting in 1972 een ruime ervaring opgebouwd in de elektronicawereld en verdeelt op dit moment producten in meer dan 85 landen. Al onze producten beantwoorden aan strikte kwaliteitseisen en aan de wettelijke bepalingen geldig in de EU. Om de kwaliteit te waarborgen, ondergaan onze producten op regelmatige tijdstippen een extra kwaliteitscontrole, zowel door onze eigen kwaliteitsafdeling als door externe gespecialiseerde organisaties. Mocht er ondanks deze voorzorgen toch een probleem optreden, dan kunt u steeds een beroep doen op onze waarborg (zie waarborgvoorwaarden). Algemene waarborgvoorwaarden consumentengoederen (voor Europese Unie): Op alle consumentengoederen geldt een garantieperiode van 24 maanden op productie- en materiaalfouten en dit vanaf de oorspronkelijke aankoopdatum. Indien de klacht gegrond is en een gratis reparatie of vervanging van een artikel onmogelijk is of indien de kosten hiervoor buiten verhouding zijn, kan Velleman beslissen het desbetreffende artikel te vervangen door een gelijkwaardig artikel of de aankoopsom van het artikel gedeeltelijk of volledig terug te betalen. In dat geval krijgt u een vervangend product of terugbetaling ter waarde van 100% van de aankoopsom bij ontdekking van een gebrek tot één jaar na aankoop en levering, of een vervangend product tegen 50% van de kostprijs of terugbetaling van 50 % bij ontdekking na één jaar tot 2 jaar. Valt niet onder waarborg: - alle rechtstreekse of onrechtstreekse schade na de levering veroorzaakt aan het toestel (bv. door oxidatie, schokken, val, stof, vuil, vocht...), en door het toestel, alsook zijn inhoud (bv. verlies van data), vergoeding voor eventuele winstderving. - verbruiksgoederen, onderdelen of hulpstukken die onderhevig zijn aan veroudering door normaal gebruik zoals bv. batterijen (zowel oplaadbare als niet-oplaadbare, ingebouwd of vervangbaar), lampen, rubberen onderdelen, aandrijfriemen... (onbeperkte lijst). - defecten ten gevolge van brand, waterschade, bliksem, ongevallen, natuurrampen, enz. - defecten veroorzaakt door opzet, nalatigheid of door een onoordeelkundige behandeling, slecht onderhoud of abnormaal gebruik of gebruik van het toestel strijdig met de voorschriften van de fabrikant. - schade ten gevolge van een commercieel, professioneel of collectief gebruik van het apparaat (bij professioneel gebruik wordt de garantieperiode herleid tot 6 maand). - schade veroorzaakt door onvoldoende bescherming bij transport van het apparaat. - alle schade door wijzigingen, reparaties of modificaties uitgevoerd door derden zonder toestemming van Velleman. Toestellen dienen ter reparatie aangeboden te worden bij uw Velleman -verdeler. Het toestel dient vergezeld te zijn van het oorspronkelijke aankoopbewijs. Zorg voor een degelijke verpakking (bij voorkeur de originele verpakking) en voeg een duidelijke foutomschrijving bij. Tip: alvorens het toestel voor reparatie aan te bieden, kijk nog eens na of er geen voor de hand liggende reden is waarom het toestel niet naar behoren werkt (zie handleiding). Op deze wijze kunt u kosten en tijd besparen. Denk eraan dat er ook voor niet-defecte toestellen een kost voor controle aangerekend kan worden. Bij reparaties buiten de waarborgperiode zullen transportkosten aangerekend worden. Elke commerciële garantie laat deze rechten onverminderd. Bovenstaande opsomming kan eventueel aangepast worden naargelang de aard van het product (zie handleiding van het betreffende product). Garantie de service et de qualité Velleman Depuis 1972, Velleman a gagné une vaste expérience dans le secteur de l électronique et est actuellement distributeur dans plus de 85 pays. Tous nos produits répondent à des exigences de qualité rigoureuses et à des dispositions légales en vigueur dans l UE. Afin de garantir la qualité, nous soumettons régulièrement nos produits à des contrôles de qualité supplémentaires, tant par notre propre service qualité que par un service qualité externe. Dans le cas improbable d un défaut malgré toutes les précautions, il est possible d invoquer notre garantie (voir les conditions de garantie). Conditions générales concernant la garantie sur les produits grand public (pour l UE) : tout produit grand public est garanti 24 mois contre tout vice de production ou de matériaux à dater du jour d acquisition effective ; si la plainte est justifiée et que la réparation ou le remplacement d un article est jugé impossible, ou lorsque les coûts s avèrent disproportionnés, Velleman s autorise à remplacer ledit article par un article équivalent ou à rembourser la totalité ou une partie du prix d achat. Le cas échéant, il vous sera consenti un article de remplacement ou le remboursement complet du prix d achat lors d un défaut dans un délai de 1 an après l achat et la livraison, ou un article de remplacement moyennant 50% du prix d achat ou le remboursement de 50% du prix d achat lors d un défaut après 1 à 2 ans. sont par conséquent exclus : - tout dommage direct ou indirect survenu à l article après livraison (p.ex. dommage lié à l oxydation, choc, chute, poussière, sable, impureté ) et provoqué par l appareil, ainsi que son contenu (p.ex. perte de données) et une indemnisation éventuelle pour perte de revenus ; - toute pièce ou accessoire nécessitant un remplacement causé par un usage normal comme p.ex. piles (rechargeables comme non rechargeables, intégrées ou remplaçables), ampoules, pièces en caoutchouc, courroies (liste illimitée) ; - tout dommage qui résulte d un incendie, de la foudre, d un accident, d une catastrophe naturelle, etc. ; - out dommage provoqué par une négligence, volontaire ou non, une utilisation ou un entretien incorrect, ou une utilisation de l appareil contraire aux prescriptions du fabricant ; - tout dommage à cause d une utilisation commerciale, professionnelle ou collective de l appareil (la période de garantie sera réduite à 6 mois lors d une utilisation professionnelle) ; - tout dommage à l appareil qui résulte d une utilisation incorrecte ou différente que celle pour laquelle il a été initialement prévu comme décrit dans la notice ; - tout dommage engendré par un retour de l appareil emballé dans un conditionnement non ou insuffisamment protégé. - toute réparation ou modification effectuée par une tierce personne sans l autorisation explicite de SA Velleman ; - frais de transport de et vers Velleman si l appareil n est plus couvert sous la garantie. toute réparation sera fournie par l endroit de l achat. L appareil doit nécessairement être accompagné du bon d achat d origine et être dûment conditionné (de préférence dans l emballage d origine avec mention du défaut) ; tuyau : il est conseillé de consulter la notice et de contrôler câbles, piles, etc. avant de retourner l appareil. Un appareil retourné jugé défectueux qui s avère en bon état de marche pourra faire l objet d une note de frais à charge du consommateur ; une réparation effectuée en-dehors de la période de garantie fera l objet de frais de transport ; toute garantie commerciale ne porte pas atteinte aux conditions susmentionnées. La liste susmentionnée peut être sujette à une complémentation selon le type de l article et être mentionnée dans la notice d emploi. Garantía de servicio y calidad Velleman Desde su fundación en 1972 Velleman ha adquirido una amplia experiencia como distribuidor en el sector de la electrónica en más de 85 países. Todos nuestros productos responden a normas de calidad rigurosas y disposiciones legales vigentes en la UE. Para garantizar la calidad, sometemos nuestros productos regularmente a controles de calidad adicionales, tanto a través de nuestro propio servicio de calidad como de un servicio de calidad externo. En el caso improbable de que surgieran problemas a pesar de todas las precauciones, es posible recurrir a nuestra garantía (véase las condiciones de garantía). Condiciones generales referentes a la garantía sobre productos de venta al público (para la Unión Europea): Todos los productos de venta al público tienen un perìodo de garantìa de 24 meses contra errores de producción o errores en materiales desde la adquisición original; Si la queja está fundada y si la reparación o sustitución de un artículo no es posible, o si los gastos son desproporcionados, Velleman autoriza reemplazar el artículo por un artículo equivalente o reembolsar la totalidad o una parte del precio de compra. En este caso, usted recibirá un artículo de recambio o el reembolso completo del precio de compra si encuentra algún fallo hasta un año después de la compra y entrega, o un artículo de recambio al 50% del precio de compra o el reembolso del 50% del precio de compra si encuentra un fallo después de 1 año y hasta los 2 años después de la compra y entrega. Por consiguiente, están excluidos entre otras cosas: - todos los daños causados directa o indirectamente al aparato (p.ej. por oxidación, choques, caída,...) y a su contenido (p.ej. pérdida de datos) después de la entrega y causados por el aparato, y cualquier indemnización por posible pérdida de ganancias; - partes o accesorios, que estén expuestos al desgaste causado por un uso normal, como por ejemplo baterías (tanto recargables como no recargables, incorporadas o reemplazables), bombillas, partes de goma, etc. (lista ilimitada); - defectos causados por un incendio, daños causados por el agua, rayos, accidentes, catástrofes naturales, etc.; - defectos causados a conciencia, descuido o por malos tratos, un mantenimiento inapropiado o un uso anormal del aparato contrario a las instrucciones del fabricante;
17 - daños causados por un uso comercial, profesional o colectivo del aparato (el período de garantía se reducirá a 6 meses con uso profesional); - daños causados por un uso incorrecto o un uso ajeno al que está previsto el producto inicialmente como está descrito en el manual del usuario; - daños causados por una protección insuficiente al transportar el aparato. - daños causados por reparaciones o modificaciones efectuadas por una tercera persona sin la autorización explícita de Velleman ; - se calcula gastos de transporte de y a Velleman si el aparato ya no está cubierto por la garantía. Cualquier artìculo que tenga que ser reparado tendrá que ser devuelto a su distribuidor Velleman. Devuelva el aparato con la factura de compra original y transpórtelo en un embalaje sólido (preferentemente el embalaje original). Incluya también una buena descripción del fallo; Consejo: Lea el manual del usuario y controle los cables, las pilas, etc. antes de devolver el aparato. Si no se encuentra un defecto en el artículo los gastos podrían correr a cargo del cliente; Los gastos de transporte correrán a carga del cliente para una reparación efectuada fuera del período de garantía. Cualquier gesto comercial no disminuye estos derechos. La lista previamente mencionada puede ser adaptada según el tipo de artículo (véase el manual del usuario del artículo en cuestión). Velleman Service- und Qualitätsgarantie Seit der Gründung in 1972 hat Velleman sehr viel Erfahrung als Verteiler in der Elektronikwelt in über 85 Ländern aufgebaut. Alle Produkte entsprechen den strengen Qualitätsforderungen und gesetzlichen Anforderungen in der EU. Um die Qualität zu gewährleisten werden unsere Produkte regelmäßig einer zusätzlichen Qualitätskontrolle unterworfen, sowohl von unserer eigenen Qualitätsabteilung als auch von externen spezialisierten Organisationen. Sollten, trotz aller Vorsichtsmaßnahmen, Probleme auftreten, nehmen Sie bitte die Garantie in Anspruch (siehe Garantiebedingungen). Allgemeine Garantiebedingungen in Bezug auf Konsumgüter (für die Europäische Union): Alle Produkte haben für Material- oder Herstellungsfehler eine Garantieperiode von 24 Monaten ab Verkaufsdatum. Wenn die Klage berechtigt ist und falls eine kostenlose Reparatur oder ein Austausch des Gerätes unmöglich ist, oder wenn die Kosten dafür unverhältnismäßig sind, kann Velleman sich darüber entscheiden, dieses Produkt durch ein gleiches Produkt zu ersetzen oder die Kaufsumme ganz oder teilweise zurückzuzahlen. In diesem Fall erhalten Sie ein Ersatzprodukt oder eine Rückzahlung im Werte von 100% der Kaufsumme im Falle eines Defektes bis zu 1 Jahr nach Kauf oder Lieferung, oder Sie bekommen ein Ersatzprodukt im Werte von 50% der Kaufsumme oder eine Rückzahlung im Werte von 50 % im Falle eines Defektes im zweiten Jahr. Von der Garantie ausgeschlossen sind: - alle direkten oder indirekten Schäden, die nach Lieferung am Gerät und durch das Gerät verursacht werden (z.b. Oxidation, Stöße, Fall, Staub, Schmutz, Feuchtigkeit,...), sowie auch der Inhalt (z.b. Datenverlust), Entschädigung für eventuellen Gewinnausfall. - Verbrauchsgüter, Teile oder Zubehörteile, die durch normalen Gebrauch dem Verschleiß ausgesetzt sind, wie z.b. Batterien (nicht nur aufladbare, sondern auch nicht aufladbare, eingebaute oder ersetzbare), Lampen, Gummiteile, Treibriemen, usw. (unbeschränkte Liste). - Schäden verursacht durch Brandschaden, Wasserschaden, Blitz, Unfälle, Naturkatastrophen, usw. - Schäden verursacht durch absichtliche, nachlässige oder unsachgemäße Anwendung, schlechte Wartung, zweckentfremdete Anwendung oder Nichtbeachtung von Benutzerhinweisen in der Bedienungsanleitung. - Schäden infolge einer kommerziellen, professionellen oder kollektiven Anwendung des Gerätes (bei gewerblicher Anwendung wird die Garantieperiode auf 6 Monate zurückgeführt). - Schäden verursacht durch eine unsachgemäße Verpackung und unsachgemäßen Transport des Gerätes. - alle Schäden verursacht durch unautorisierte Änderungen, Reparaturen oder Modifikationen, die von einem Dritten ohne Erlaubnis von Velleman vorgenommen werden. Im Fall einer Reparatur, wenden Sie sich an Ihren Velleman -Verteiler. Legen Sie das Produkt ordnungsgemäß verpackt (vorzugsweise die Originalverpackung) und mit dem Original-Kaufbeleg vor. Fügen Sie eine deutliche Fehlerbeschreibung hinzu. Hinweis: Um Kosten und Zeit zu sparen, lesen Sie die Bedienungsanleitung nochmals und überprüfen Sie, ob es keinen auf de Hand liegenden Grund gibt, ehe Sie das Gerät zur Reparatur zurückschicken. Stellt sich bei der Überprüfung des Gerätes heraus, dass kein Geräteschaden vorliegt, könnte dem Kunden eine Untersuchungspauschale berechnet. Für Reparaturen nach Ablauf der Garantiefrist werden Transportkosten berechnet. Jede kommerzielle Garantie lässt diese Rechte unberührt. Die oben stehende Aufzählung kann eventuell angepasst werden gemäß der Art des Produktes (siehe Bedienungsanleitung des Gerätes). estão por consequência excluídos: - todos os danos directos ou indirectos depois da entrega do artigo (p.ex. danos ligados a oxidação, choques, quedas, poeiras, areias, impurezas ) e provocado pelo aparelho, como o seu conteúdo (p.ex. perca de dados) e uma indemnização eventual por perca de receitas; - consumíveis, peças ou acessórios sujeitos a desgaste causado por um uso normal, como p.ex. pilhas (recarregáveis, não recarregáveis, incorporadas ou substituìveis), lâmpadas, peças em borracha correias (lista ilimitada); - todos os danos que resultem de um incêndio, raios, de um acidente, de una catastrophe natural, etc.; - danos provocados por negligencia, voluntária ou não, uma utilização ou manutenção incorrecta, ou uma utilização do aparelho contrária as prescrições do fabricante; - todos os danos por causa de uma utilização comercial, profissional ou colectiva do aparelho ( o período de garantia será reduzido a 6 meses para uma utilização profissional); - todos os danos no aparelho resultando de uma utilização incorrecta ou diferente daquela inicialmente prevista e descrita no manual de utilização; - todos os danos depois de uma devolução não embalada ou mal protegida ao nível do acondicionamento. - todas as reparações ou modificações efectuadas por terceiros sem a autorização de SA Velleman ; - despesas de transporte de e para Velleman se o aparelho não estiver coberto pela garantia. qualquer reparação será fornecida pelo local de compra. O aparelho será obrigatoriamente acompanhado do talão ou factura de origem e bem acondicionado (de preferência dentro da embalagem de origem com indicação do defeito ou avaria); dica: aconselha-mos a consulta do manual e controlar cabos, pilhas, etc. antes de devolver o aparelho. Um aparelho devolvido que estiver em bom estado será cobrado despesas a cargo do consumidor; uma reparação efectuada fora da garantia, será cobrado despesas de transporte; qualquer garantia comercial não prevalece as condições aqui mencionadas. A lista pode ser sujeita a um complemento conforme o tipo de artigo e estar mencionada no manual de utilização. Garantia de serviço e de qualidade Velleman Desde a sua fundação em 1972 Velleman tem adquirido uma amplia experiencia no sector da eletrónica com uma distribuição em mais de 85 países. Todos os nossos produtos respondem a exigências rigorosas e a disposições legais em vigor na UE. Para garantir a qualidade, submetemos regularmente os nossos produtos a controles de qualidade suplementares, com o nosso próprio serviço qualidade como um serviço de qualidade externo. No caso improvável de um defeito mesmo com as nossas precauções, é possível invocar a nossa garantia. (ver as condições de garantia). Condições gerais com respeito a garantia sobre os produtos grande público (para a UE): qualquer produto grande público é garantido 24 mês contra qualquer vício de produção ou materiais a partir da data de aquisição efectiva; no caso da reclamação ser justificada e que a reparação ou substituição de um artigo é impossível, ou quando os custo são desproporcionados, Velleman autoriza-se a substituir o dito artigo por um artigo equivalente ou a devolver a totalidade ou parte do preço de compra. Em outro caso, será consentido um artigo de substituição ou devolução completa do preço de compra no caso de um defeito no prazo de 1 ano depois da data de compra e entrega, ou um artigo de substituição pagando o valor de 50% do preço de compra ou devolução de 50% do preço de compra para defeitos depois de 1 a 2 anos. Made in PRC Imported by Velleman nv Legen Heirweg 33, 9890 Gavere, Belgium
Double Door Enclosed Corkboard
 globalindustrial.ca Distribucion Industrial Globales S DE RL DE CF Assembly Instructions Instrucciones de Ensamblaje Directives d assemblage Customer Service US: -800-645-986 Servicio de atención al Cliente
QT120 LOG TROLLEY STEEKWAGEN VOOR HOUT CHARIOT À BOIS CARRETILLA DE MANO PARA LEÑA SACKKARRE FÜR HOLZ CARRINHO PARA LENHA
 EN NL FR ES DE PT LOG TROLLEY STEEKWAGEN VOOR HOUT CHARIOT À BOIS CARRETILLA DE MANO PARA LEÑA SACKKARRE FÜR HOLZ CARRINHO PARA LENHA USER MANUAL 3 GEBRUIKERSHANDLEIDING 3 MODE D EMPLOI 4 MANUAL DEL USUARIO
WB004 CONVERSION PLATE VERLOOPPLAAT PLAQUE D'AGRANDISSEMENT D'ATTACHE PLACA DE FIJACIÓN BEFESTIGUNGSPLATTE PLACA DE FIXAÇÃO
 WB004 CONVERSION PLATE VERLOOPPLAAT PLAQUE D'AGRANDISSEMENT D'ATTACHE PLACA DE FIJACIÓN BEFESTIGUNGSPLATTE PLACA DE FIXAÇÃO. USER MANUAL GEBRUIKERSHANDLEIDING NOTICE D EMPLOI MANUAL DEL USUARIO BEDIENUNGSANLEITUNG
Clapboard. Not included Non Inclus No Incuido
 English This page lists the contents included in the box. Please take time to identify the hardware as well as the individual components of the product. As you unpack and prepare for assembly, place the
FLAT PANEL WALL SUPPORT 13-23" / CM 360 ROTATING PLATE MAX. 15 KG MUURBEUGEL VOOR FLATSCREEN 13-23" / CM 360 DRAAIENDE BASIS MAX.
 WB036 FLAT PANEL WALL SUPPORT 13-23" / 33-58 CM 360 ROTATING PLATE MAX. 15 KG MUURBEUGEL VOOR FLATSCREEN 13-23" / 33-58 CM 360 DRAAIENDE BASIS MAX. 15 KG SUPPORT MURAL POUR ÉCRANS PLATS 13-23" / 33-58
WB008 ADJUSTABLE SWING ARM
 WB008 ADJUSTABLE SWING ARM 10"-15" / 25-38cm REGELBARE ARM VOOR FLATSCREENS 10"-15" / 25-38cm BRAS RÉGLABLE POUR ÉCRANS PLATS 10"-15" / 25-38cm BRAZO AJUSTABLE PARA PANTALLAS PLANAS 10"-15" / 25-38cm REGELBARER
Ø 5/16" Ø 1/8" (8 mm) (3 mm) 3
 (3 mm) 3") HEMNES 2 AA-1925608-3 Ø 5/16" Ø 1/8" (8 mm) (3 mm) 3 1 118331 112996 7 Design and Quality IKEA of Sweden 326454 109048 121714 IKEA of Sweden AB SE-343 81 Älmhult 1x 1x 107967 100823 109049 1x 2x 1x 326454
HEMNES 2 AA-1925608-3 Ø 5/16" Ø 1/8" (8 mm) (3 mm) 3 1 118331 112996 7 Design and Quality IKEA of Sweden 326454 109048 121714 IKEA of Sweden AB SE-343 81 Älmhult 1x 1x 107967 100823 109049 1x 2x 1x 326454
Ø 5/16" Ø 1/8" (8 mm) (3 mm) 3
 (3 mm) 3") HEMNES 2 AA-1922828-3 Ø 5/16" Ø 1/8" (8 mm) (3 mm) 3 1 118331 112996 7 Design and Quality IKEA of Sweden 326454 109048 121714 IKEA of Sweden AB SE-343 81 Älmhult 1x 1x 107967 100823 109049 1x 2x 1x 326454
HEMNES 2 AA-1922828-3 Ø 5/16" Ø 1/8" (8 mm) (3 mm) 3 1 118331 112996 7 Design and Quality IKEA of Sweden 326454 109048 121714 IKEA of Sweden AB SE-343 81 Älmhult 1x 1x 107967 100823 109049 1x 2x 1x 326454
Ø 5/16" Ø 1/8" (8 mm) (3 mm) 3
 (3 mm) 3") HEMNES 2 AA-1923538-3 Ø 5/16" Ø 1/8" (8 mm) (3 mm) 3 24x 7 109048 121714 Design and Quality IKEA of Sweden IKEA of Sweden AB SE-343 81 Älmhult 1x 1x 107967 100823 109049 1x 2x 1x 326454 4 AA-1923538-3
HEMNES 2 AA-1923538-3 Ø 5/16" Ø 1/8" (8 mm) (3 mm) 3 24x 7 109048 121714 Design and Quality IKEA of Sweden IKEA of Sweden AB SE-343 81 Älmhult 1x 1x 107967 100823 109049 1x 2x 1x 326454 4 AA-1923538-3
Ø 5/16" Ø 1/8" (8 mm) (3 mm) 3
 (3 mm) 3") HEMNES 2 AA-1925608-6 Ø 5/16" Ø 1/8" (8 mm) (3 mm) 3 1 118331 112996 157876 157877 158569 158570 7 1x 109048 1x 121714 Design and Quality IKEA of Sweden IKEA of Sweden AB SE-343 81 Älmhult 1x 107967 2x
HEMNES 2 AA-1925608-6 Ø 5/16" Ø 1/8" (8 mm) (3 mm) 3 1 118331 112996 157876 157877 158569 158570 7 1x 109048 1x 121714 Design and Quality IKEA of Sweden IKEA of Sweden AB SE-343 81 Älmhult 1x 107967 2x
Ø 5/16" Ø 1/8" (8 mm) (3 mm) 3
 (3 mm) 3") TARVA 2 AA-1936489-3 Ø 5/16" Ø 1/8" (8 mm) (3 mm) 3 1 100712 100037 109049 118331 112996 100214 109570 101350 110630 100001 14x 4x 3x 14x 13x 14x 1x 16x 100347 24x 4x 4x 100854 4x 104859 1x 101225 110470
TARVA 2 AA-1936489-3 Ø 5/16" Ø 1/8" (8 mm) (3 mm) 3 1 100712 100037 109049 118331 112996 100214 109570 101350 110630 100001 14x 4x 3x 14x 13x 14x 1x 16x 100347 24x 4x 4x 100854 4x 104859 1x 101225 110470
EBP04xxx POP-UP DESKTOP SOCKET POP-UP STEKKERBLOK BLOC MULTIPRISES ESCAMOTABLE REGLETA OCULTA VERSENKBARE STECKDOSENLEISTE TOMADA POP-UP DE SECRETÁRIA
 EBP02xxx/EBP03xxx/ EBP04xxx POP-UP DESKTOP SOCKET POP-UP STEKKERBLOK BLOC MULTIPRISES ESCAMOTABLE REGLETA OCULTA VERSENKBARE STECKDOSENLEISTE TOMADA POP-UP DE SECRETÁRIA USER MANUAL 3 HANDLEIDING 4 MODE
360 - max. 20kg SOPORTE
 FLAT PANEL WALLL SUPPORT 17-37" -360 ROTATING PLATE - max. 20kg MUURBEUGEL VOOR FLATSCREENS 17-37" "- 360 DRAAIENDE BASIS - max. 20kg SUPPORT MURAL POUR ÉCRANS PLATS 17-37"- BASE ROTATIF DE 360 - max.
Beckett 5 Shelf Bookcase / Bibliothéque 5 Étagéres / 5 Estantería Librero
 English This page lists the contents included in the box. Please take time to identify the hardware as well as the individual components of the product. As you unpack and prepare for assembly, place the
WB010 USER MANUAL 3 GEBRUIKERSHANDLEIDING 4 NOTICE D EMPLOI 5 MANUAL DEL USUARIO 7 BEDIENUNGSANLEITUNG 8 MANUAL DO UTILIZADOR 9 REV.
 WB010 FLAT PANEL WALL SUPPORT 13-27 - 30kg max. MUURBEUGEL VOOR FLATSCREEN 13-27 - 30 kg max. SUPPORT MURAL POUR ÉCRAN PLAT 13-27 - 30 kg max. SOPORTE DE PARED PARA PANTALLA PLANA 13-27 - 30kg máx. WANDHALTERUNG
Wall Mount Bracket [9A474]
![Wall Mount Bracket [9A474]](/thumbs/71/64957710.jpg "Wall Mount Bracket [9A474]") Wall Mount Bracket [9A474] Compatible with: Ritter 253 Exam Light Intended Use: To mount Ritter 253 exam light to wall. Equipment Alert The wall anchors supplied are designed for drywall. If your wall
Wall Mount Bracket [9A474] Compatible with: Ritter 253 Exam Light Intended Use: To mount Ritter 253 exam light to wall. Equipment Alert The wall anchors supplied are designed for drywall. If your wall
MANUAL DE INSTRUCCIONES SOPORTE PARA TV LED/LCD (26 55 ) WM-5376
 WM-5376") MANUAL DE INSTRUCCIONES SOPORTE PARA TV LED/LCD (26 55 ) WM-5376 ESTIMADO CLIENTE Con el fin de que obtenga el mayor desempeño de su producto, por favor lea este manual de instrucciones cuidadosamente
MANUAL DE INSTRUCCIONES SOPORTE PARA TV LED/LCD (26 55 ) WM-5376 ESTIMADO CLIENTE Con el fin de que obtenga el mayor desempeño de su producto, por favor lea este manual de instrucciones cuidadosamente
MT442 MT642 U S E R S M A N U A L
 T I L T S L I M M O U N T Display Size: 24-55 Maximum load: 70 lbs / 32 kg VESA Patterns: 75 x 75 to 400 x 400 Display Size: 30-65 Maximum load: 75 lbs / 34 kg VESA Patterns: 75 x 75 to 600 x 400 MT442
ASSEMBLY INSTRUCTIONS INSTRUCTIONS DE MONTAGE INSTRUCCIONES DE ENSAMBLAJE
 an LDI Company New Hope, MN 55428 www.safcoproducts.com ASSEMBLY INSTRUCTIONS INSTRUCTIONS DE MONTAGE INSTRUCCIONES DE ENSAMBLAE 8926 Impromptu Flat Panel TV Cart Charoit téléviseur à écran plat Carro
VDPL304LF/RC NOTICE D EMPLOI
 CONTROLLER FOR VDPL304LF CONTROLLER VOOR VDPL304LF CONTRÔLEUR POUR VDPL304LF CONTROLADOR PARA VDPL304LF CONTROLLER FÜR VDPL304LF USER MANUAL GEBRUIKERSHANDLEIDING NOTICE D EMPLOI MANUAL DEL USUARIO BEDIENUNGSHANDLEITUNG
CAR SAFE AUTOKLUIS COFFRE-FORT DE VOITURE CAJA FUERTE DE COCHE AUTOTRESOR COFRE PARA AUTOMÓVEL
 SCS01 CAR SAFE AUTOKLUIS COFFRE-FORT DE VOITURE CAJA FUERTE DE COCHE AUTOTRESOR COFRE PARA AUTOMÓVEL USER MANUAL NOTICE D EMPLOI GEBRUIKERSHANDLEIDING MANUAL DEL USUARIO BEDIENUNGSANLEITUNG MANUAL DO UTILIZADOR
ATS1 TYRE STAND VELGENBOOM PORTE-JANTES SOPORTE PARA NEUMÁTICOS FELGENBAUM SUPORTE PARA PNEUS
 ATS1 TYRE STAND VELGENBOOM PORTE-JANTES SOPORTE PARA NEUMÁTICOS FELGENBAUM SUPORTE PARA PNEUS USER MANUAL 3 GEBRUIKERSHANDLEIDING 4 MODE D'EMPLOI 5 MANUAL DEL USUARIO 6 BEDIENUNGSANLEITUNG 7 MANUAL DO
MET CON MIT 16:9 / 4:3 NOTICE D EMPLOI
 HIGH RESOLUTION DIGITAL TFT-LCD MONITOR WITH REMOTE CONTROL HI-RES DIGITALE TFT-LCD MONITOR MET AFSTANDSBEDIENING MONITEUR NUMÉRIQUE TFT-LCD HI-RES AVEC TÉLÉCOMMANDE MONITOR DIGITAL TFT-LCD DE ALTA RESOLUCIÓN
elements enviro Owner s Manual Manuel du propriétaire Manual del usuario ecofriendly solutions organizing
 enviro elements TM ecofriendly solutions organizing Made with 50% recycled resin Fait de 50 % de résine recyclée Hecho en un 50% con resina reciclada Owner s Manual Manuel du propriétaire Manual del usuario
RocketBox AVISO IMPORTANTE ROCKETBOX PRO (1X) KEY (2X) CLÉ (X 2) LLAVES (2X) Part # Rev.C C-1/13
 KEY (2X) CLÉ (X 2) LLAVES (2X) Part # Rev.C C-1/13") RocketBox ROCKETBOX PRO 11, ROCKETBOX PRO 12, ROCKETBOX PRO 14 ROCKETBOX PRO (1X) KEY (2X) CLÉ (X 2) LLAVES (2X) IMPORTANT WARNING IT IS CRITICAL THAT ALL YAKIMA RACKS AND ACCESSORIES BE PROPERLY AND SECURELY
RocketBox ROCKETBOX PRO 11, ROCKETBOX PRO 12, ROCKETBOX PRO 14 ROCKETBOX PRO (1X) KEY (2X) CLÉ (X 2) LLAVES (2X) IMPORTANT WARNING IT IS CRITICAL THAT ALL YAKIMA RACKS AND ACCESSORIES BE PROPERLY AND SECURELY
MF222 U S E R M A N U A L
 S L I M F L A T M O U N T Display Size: 10-40 Maximum load: 44 lbs / 20 kg VESA Patterns: 75 x 75 to 200 x 200 MF222 U S E R M A N U A L ATTENTION: BEFORE INSTALLING, READ ALL WARNINGS AND CAUTIONS ON
- SLANK SUPPORT SOPORTE SUPORTE PLANO WB023 (23"-37") WB024
 WB024") FLAT PANEL WALLL SUPPORT - SLIM DESIGN MUURBEUGEL VOOR FLATSCREEN - SLANK DESIGN SUPPORT MURAL POUR ÉCRAN PLAT - DESIGN ULTRAPLATT SOPORTE DE PARED PARAA PANTALLA PLANA - DISEÑO MUY PLANO WANDHALTERUNG
FLAT PANEL WALLL SUPPORT - SLIM DESIGN MUURBEUGEL VOOR FLATSCREEN - SLANK DESIGN SUPPORT MURAL POUR ÉCRAN PLAT - DESIGN ULTRAPLATT SOPORTE DE PARED PARAA PANTALLA PLANA - DISEÑO MUY PLANO WANDHALTERUNG
MURAL 10"-30" / 25-75cm
 WB019 FLAT PANEL WALLL SUPPORT 10"-30" / 25-75cm SUPPORT DE MONTAGE MURAL PLAT 10"-30" / 25-75 cm VLAKKE BEUGEL VOOR MUURMONTAGE 10"-30" / 25-75 cm FLACHE WANDHALTERUNG 10"-30" / 25-75cm SOPORTE PLANO
DEM800 DIGITAL MOISTURE TESTER VOCHTMETER HUMIDIMÈTRE MEDIDOR DE HUMEDAD FEUCHTIGKEITSTESTER WILGOTNOŚCIOMIERZ MEDIDOR DE HUMIDADE
 DIGITAL MOISTURE TESTER VOCHTMETER HUMIDIMÈTRE MEDIDOR DE HUMEDAD FEUCHTIGKEITSTESTER WILGOTNOŚCIOMIERZ MEDIDOR DE HUMIDADE USER MANUAL 3 GEBRUIKERSHANDLEIDING 6 MODE D'EMPLOI 9 MANUAL DEL USUARIO 12 BEDIENUNGSANLEITUNG
RTA-B002 DIMENSIONS MAXIMUM WEIGHT CAPACITIES. Highest position. Lowest position. Product Size: 22"W x 16"D x 30.5~46.5"H
 MODEL RTA - B002 Thanks for purchasing one of our products. Please read carefully the assembly instructions before the installation. Please save this manual for future reference. MODEL RTA-B002 MODELO
Sloane 25.5 Leaning Bookcase / Étagère Inclinée 25.5 (64.8cm) / Librero Inclinado 25.5 (64.8cm)
 / Librero Inclinado 25.5 (64.8cm)") Sloane 25.5 Leaning ookcase / Étagère Inclinée 25.5 (64.8cm) / Librero Inclinado 25.5 (64.8cm) English This page lists the contents included in the box. Please take time to identify the hardware as well
Sloane 25.5 Leaning ookcase / Étagère Inclinée 25.5 (64.8cm) / Librero Inclinado 25.5 (64.8cm) English This page lists the contents included in the box. Please take time to identify the hardware as well
WB032 USER MANUAL 7 GEBRUIKERSHANDLEIDING 9 MODE D'EMPLOI 11 MANUAL DEL USUARIO 13 BEDIENUNGSANLEITUNG 15 MANUAL DO UTILIZADOR 17
 FLAT PANEL TILTING WALL SUPPORT 32-60"/ 81-152 cm - SLIM DESIGN KANTELBARE MUURBEUGEL VOOR FLATSCREENS 32-60"/ 81-152 cm SLANK DESIGN SUPPORT MURAL INCLINABLE POUR ÉCRANS PLATS 32-60"/ 81-152 cm DESIGN
IMPORTANT SAFETY INSTRUCTIONS WARNING CAUTION! WARNING ENGLISH ENGLISH
 FORMAT ENGLISH IMPORTANT SAFETY INSTRUCTIONS For indoor use only. Regularly check the cord, the transformer and all other parts for damage. If any part is damaged the product should not be used. Important
Bryant Sideboard / Buffet Desserte / Aparador
 English This page lists the contents included in the box. Please take time to identify the hardware as well as the individual components of the product. As you unpack and prepare for assembly, place the
P/N INSTALLING HD3000 SERIES HANDLE SET : INSTALL LATCH / DEADBOLT STRIKERS:
 INSTALLING HD3000 SERIES HANDLE SET : A: Drill the 1/8" diameter handle hole ( third from the top of the door, on the room side ) to a 5/16" diameter. B: Slide the inside handle into its base. Tighten
H-212 Notice. Warranty. Second fan assembly
 H-212 EN H-212 Notice Please read this user s manual carefully before installation to get the cooler s best performance by optimized installation. NOX xtreme is not responsible for any damage to the product
" / 25-75cm SUPPORT SOPORTE SUPORTE USER MANUAL REV. 01 MANUAL DO
 WB018 CEILING BRACKET10"-30" " / 25-75cm PLAFONDMONTAGEBEUGEL 10"-30" / 25-75cm SUPPORT DE MONTAGE PLAFONNIER 10"-30" / 25-75cm SOPORTE PARA MONTAJE AL TECHO 10"-30" / 25-75cm DECKENHALTERUNG 10"-30" /
LIRIC SERIE MODEL LIRIC 8 / LIRIC 6 / LIRIC 5
 LIRIC SERIE MODEL LIRIC 8 / LIRIC 6 / LIRIC 5 ENGLISH INSTALLATION manual INSTALLATION INSTRUCTION FOR SURFACE MOUNT BOX TYPE SPEAKER MODEL: LIRIC 5 / LIRIC 6 / LIRIC 8 1) When mounting speakers, use the
CFANUSB USB MINI FAN MINI USB-VENTILATOR MINI VENTILATEUR USB MINI VENTILADOR - USB MINI-VENTILATOR - USB MINI VENTOINHA USB
 USB MINI FAN MINI USB-VENTILATOR MINI VENTILATEUR USB MINI VENTILADOR - USB MINI-VENTILATOR - USB MINI VENTOINHA USB USER MANUAL 3 HANDLEIDING 6 MODE D'EMPLOI 9 MANUAL DEL USUARIO 12 BEDIENUNGSANLEITUNG
Part No: KTI (Page 1-13) (Pagina 14-26) K-Tool International Wixom, MI 48393
 (Pagina 14-26) K-Tool International Wixom, MI 48393") Part No: KTI-70099 (Page 1-13) (Pagina 14-26) K-Tool International Wixom, MI 48393 (800) 762-6002 www.ktoolinternational.com support@ktoolinternational.com The KTool Walkie-Talkie can use a NiMH rechargeable
Part No: KTI-70099 (Page 1-13) (Pagina 14-26) K-Tool International Wixom, MI 48393 (800) 762-6002 www.ktoolinternational.com support@ktoolinternational.com The KTool Walkie-Talkie can use a NiMH rechargeable
CAR CREEPER ROLBED BRANCARD DE MONTAGE CAMILLA CON RUEDAS MONTAGEROLLBRETT ESTRADO COM RODAS
 CAR CREEPER ROLBED BRANCARD DE MONTAGE CAMILLA CON RUEDAS MONTAGEROLLBRETT ESTRADO COM RODAS USER MANUAL 3 HANDLEIDING 5 MODE D'EMPLOI 7 MANUAL DEL USUARIO 9 BEDIENUNGSANLEITUNG 11 MANUAL DO UTILIZADOR
HGG400N MANUAL GREASE GUN VETPOMP POMPE À GRAISSE PISTOLA ENGRASADORA FETTPRESSE BOMBA DE MASSA
 MANUAL GREASE GUN VETPOMP POMPE À GRAISSE PISTOLA ENGRASADORA FETTPRESSE BOMBA DE MASSA USER MANUAL 3 GEBRUIKERSHANDLEIDING 4 MODE D EMPLOI 6 MANUAL DEL USUARIO 7 BEDIENUNGSANLEITUNG 9 MANUAL DO UTILIZADOR
PORTABLE BENCH WITH BACK
 π PORTABLE BENCH WITH BACK -800-95-550 uline.com Para Español, vea páginas 3-4. Pour le français, consulter les pages 5-6. TOOL NEEDED /" Wrench PARTS 6 # DESCRIPTION QTY. /" Hex Head Bolts /" Washers
Model :RFBW01014 Model :RFBE Model :RFBG 01014
 Model :RFBW01014 Model :RFBE 01014 Model :RFBG 01014 Wall Cabinet Operators Manual Manual de Operadora del Gabinete de pared Inspect product prior to installation. Contact info@runfinegroups.com prior
Sawyer Leaning Wine Bar / Casier À Vin Incliné / Barra de Vios Inclinada
 Sawyer Leaning Wine ar / asier À Vin Incliné / arra de Vios Inclinada English This page lists the contents included in the box. Please take time to identify the hardware as well as the individual components
Quickstart Guide. WiPry 5x. 1) Connect antenna to the appropriate port. TM
 Connect antenna to the appropriate port. TM") Quickstart Guide ACCESSORY ANTENNA W A R N I N G DO NOT APPLY MORE THAN 20DBM TO THE ANTENNA WITHOUT EXTERNAL ATTENUATION CONNECT TO HOST DEVICE 1) Connect antenna to the appropriate port. TM 2) Download
Quickstart Guide ACCESSORY ANTENNA W A R N I N G DO NOT APPLY MORE THAN 20DBM TO THE ANTENNA WITHOUT EXTERNAL ATTENUATION CONNECT TO HOST DEVICE 1) Connect antenna to the appropriate port. TM 2) Download
SERVICES HELP LINE NUMBER: NUMÉRO DE L'ASSISTANCE CLIENT: NUMERO DE SERVICIO DE ATENCION AL CLIENTE:
 466979 rev00 STOP Read through ALL instructions before commencing installation. If you have any questions about this product or issues with installation contact the customer services help line before returning
1/3" HR SONY EFFIO DEL USUARIO MANUAL
 1/3" HR VARIFOCAL DOME CAMERAA 1/3" HR VARIFOCAL DOMECAMERAA CAMÉRAA DÔME HR VARIFOCAL 1/3" CÁMARAA DOMO DE ALTA RESOLUCIÓN VARIFOCAL 1/3 1/3" HOCHAUFLÖSENDE VARIFOKALE DOME-KAMERA - SONY EFFIO DSP USER
Sloane Leaning Wine Bar / Casier À Vin Incliné / Barra de Vios Inclinada
 English This page lists the contents included in the box. Please take time to identify the hardware as well as the individual components of the product. s you unpack and prepare for assembly, place the
V /06/ Velleman nv
 SOLAR POWER BANK CHARGER MOBIELE OPLADER OP ZONNE-ENERGIE CHARGEUR SOLAIRE CARGADOR CON BANCO DE ENERGÍA SOLAR SOLARLADEGERÄT PRZENOŚNE ŹRÓDŁO ZASILANIA NA ENERGIĘ SŁONECZNĄ CARREGADOR COM ACUMULADOR DE
PARTS INSTRUCTIONS uline.com TOOLS NEEDED H-6827, H-6828 H-6829 STAINLESS STEEL WALL-MOUNT SHELVING
 π H-6827, H-6828 H-6829 STAINLESS STEEL WALL-MOUNT SHELVING uline.com Para Español, vea páginas 3-4. Pour le français, consulter les pages 5-6. TOOLS NEEDED Cordless Drill (3/16" Drill Bit) Step Ladder
WB037 USER MANUAL 3 GEBRUIKERSHANDLEIDING 4 MODE D'EMPLOI 5 MANUAL DEL USUARIO 6 BEDIENUNGSANLEITUNG 7 MANUAL DO UTILIZADOR 8
 EN NL FR ES DE PT FLAT PANEL WALL SUPPORT MUURBEUGEL VOOR FLAT SCREEN SUPPORT MURAL POUR ÉCRAN PLAT SOPORTE DE PARED PARA PANTALLAS PLANAS WANDHALTERUNG FÜR FLACHBILDSCHIRME SUPORTE DE PAREDE ECRÃ PLANO
BASE & WALL EASY REACH CABINET 170º Hinge Replacement
 These instructions should only be printed using Adobe Acrobat and should not be faxed or reproduced on a digital copier. American Woodmark Corporation provides these instructions on an AS IS basis and
Door Stop Kit, 316 SS Compas de porte, 316 SS Tope para puerta, 316 SS
 Door Stop Kit, 316 SS Compas de porte, 316 SS Tope para puerta, 316 SS Rev. E 2018 Hoffman Enclosures Inc. PH 763 422 2211 nvent.com/hoffman P/N 87798474 87798663 NOTE: Door stop kit is not intended for
Continental Bed Rails Assembly Instructions. Instructions d'assemblage pour traverses de lit Continental
 Continental Bed Rails Assembly Instructions Instructions d'assemblage pour traverses de lit Continental Instrucciones de montaje de travesaños Continental Q010 Parts: A 2x Bed Rails C 14 x Wood Screw B
DEM501 MANUAL DEL USUARIO
 DIGITAL TEMPERATURE AND HUMIDITY METER MINI THERMO-/VOCHTIGHEIDSMETER MINI THERMO-/HUMIDIMÈTRE MEDIDOR DE TEMPERATURA Y HUMIDAD TEMPERATUR- UND FEUCHTIGKEITSMESSER MIERNIK TEMPERATURY I WILGOTNOŚCI MEDIDOR
SOPORTE UNIVERSAL TV SUPORTE UNIVERSAL TV TV UNIVERSAL MOUNT
 I REF. 50130 SOPORTE UNIVERSAL TV SUPORTE UNIVERSAL TV TV UNIVERSAL MOUNT 25kg 23-42 VESA 200x200 GRUPO EDM garantiza todos sus productos, declinando toda responsabilidad frente a daños originados por
FlexCage. User Manual MB975SP-B. 5 HDD Slots in 3 Device Bay. Tray-Less SATA Backplane Module
 FlexCage MB975SP-B 5 HDD Slots in 3 Device Bay Tray-Less SATA Backplane Module User Manual English Package Contents Front Panel Information HDD3 POWER BUTTON POWER / ACCESS LED INDICATOR HDD2 POWER BUTTON
MODEL: F / MODELO: F END TABLE WITH MEDIA STAND & MAGAZINE HOLDER MESA RINCONERA CON ESTANTE & REVISTERO
 MODEL: 11225479F / MODELO: 11225479F END TABLE WITH MEDIA STAND & MAGAZINE HOLDER MESA RINCONERA CON ESTANTE & REVISTERO NO A B C D E F G H I J K L PARTS LIST AND HARDWARE PARTES Y ACCESORIOS PARTS LIST
ASSEMBLY INSTRUCTIONS INSTRUCTIONS DE MONTAGE INSTRUCCIONES DE ENSAMBLAJE
 an LDI Company New Hope, MN 55428 www.safcoproducts.com ASSEMBLY INSTRUCTIONS INSTRUCTIONS DE MONTAGE INSTRUCCIONES DE ENSAMBLAE 8926 Impromptu Flat Panel TV Cart Charoit téléviseur à écran plat Carro
OWNER'S MANUAL MANUEL D'UTILISATEUR MANUAL DEL PROPIETARIO
 Read all instructions BEFORE assembly and USE of product. KEEP INSTRUCTIONS FOR FUTURE USE. Lire les instructions d assemblage soigneusement. GARDEZ CES INSTRUCTIONS POUR USAGE FUTUR. Lea todas las instrucciones
EUSS SOFTWARE UPDATE CHECKLIST COUNTERFEIT DETECTORS NEW 20 EURO BANKNOTE C32 C18 C07 C19 C20. English
 English NEW 20 EURO BANKNOTE SOFTWARE UPDATE CHECKLIST COUNTERFEIT DETECTORS Device New 20 Euro software version number Is this number displayed on your device during start-up? Yes Safescan 125 C32 No
Can we help you? difference
 Can we help you? difference QUALITY INNOVATION SERVICE VALUE IT S AS EASY AS 1,2,3 Assembly tips: 1. Read the instructions and become familiar with the parts. 2. Ensure this carton contains all parts,
MANUAL DE INSTRUCCIONES SOPORTE PARA TV LED/LCD (23 42 ) WM-5293
 WM-5293") MANUAL DE INSTRUCCIONES SOPORTE PARA TV LED/LCD (23 42 ) WM-5293 ESTIMADO CLIENTE Con el fin de que obtenga el mayor desempeño de su producto, por favor lea este manual de instrucciones cuidadosamente
MANUAL DE INSTRUCCIONES SOPORTE PARA TV LED/LCD (23 42 ) WM-5293 ESTIMADO CLIENTE Con el fin de que obtenga el mayor desempeño de su producto, por favor lea este manual de instrucciones cuidadosamente
WALL-MOUNT WIRE SHELVING
 Para Español, vea páginas 3-4. Pour le français, consulter les pages 5-6. WALL-MOUNT WIRE SHELVING TOOLS NEEDED Cordless Drill (3/16" Drill Bit) Step Ladder (Optional) Tape Measure Phillips Screwdriver
ALIMENTAÇÃO PARA LABORATÓRIO DC COM VISOR LCD - MODELO COMUTÁVEL PL ZASILACZ LABORATORYJNY DC Z WYŚWIETLACZEM LCD - MODEL IMPULSOWY
 EN NL FR ES DE PT DC LAB SWITCHING MODE POWER SUPPLY WITH LCD DISPLAY DC LAB SCHAKELENDE VOEDING MET LCD SCHERM ALIMENTATION À DÉCOUPAGE DC AVEC ECRAN LCD FUENTE DE ALIMENTACIÓN CONMUTADA DC PARA LABORATORIO
47" STOP ALTO. 10kg 22lbs. 30kg 66lbs. 119cm
 463207 rev 00 10kg 22lbs Per Shelf Por estante STOP Read through ALL instructions before commencing installation. If you have any questions about this product or issues with installation contact the customer
Clarke Secretary Desk / Secrétaire Bureau / Escritorio Para Secretaria
 English This page lists the contents included in the box. Please take time to identify the hardware as well as the individual components of the product. s you unpack and prepare for assembly, place the
EFANF60 USER MANUAL NOTICE D EMPLOI GEBRUIKERSHANDLEIDING MANUAL DEL USUARIO BEDIENUNGSANLEITUNG MANUAL DE INSTRUÇÕES
 EFANF60 HIGH-VELOCITY DRUM FAN - 24"/60cm VENTILATEUR INDUSTRIEL - 24"/60cm INDUSTRIËLE VENTILATOR - 24"/60cm VENTILADOR INDUSTRIAL - 24"/60cm INDUSTRIELLER VENTILATOR - 24"/60cm VENTOINHA INDUSTRIAL -
Package Contents. Hardware Package. Tools Needed
 Reverso en español HWGWTR-1 REAR REGISTER KIT INSTALLATION INSTRUCTIONS INSTRUCTIONS MUST BE LEFT WITH THE OWNER FOR FUTURE REFERENCE AFTER INSTALLATION. Package Contents REGISTER BOOT REGISTER WITH DAMPER
GRR02 USER MANUAL 2 GEBRUIKERSHANDLEIDING 4 MODE D EMPLOI 6 MANUAL DEL USUARIO 8 BEDIENUNGSANLEITUNG 10 MANUAL DO UTILIZADOR 12
 GRR02 SOLAR-POWERED GROUND RODENT REPELLER RÉPULSIF SOLAIRE ANTI-RONGEURS MOLLENVERDRIJVER OP ZONNE-ENERGIE REPELENTE PARA TOPOS CON ENERGÍA SOLAR SOLAR-MAULWURFSCHRECK REPELENTE ANTI TOUPEIRAS DE ENERGIA
Steel Workbench Frame
 INSTRUCTIONS Adjustable Height and Length Steel Workbench Frame LENGTH ADJUSTABLE FOR 4', 5', 6' WORK SURFACES 29" - 41" ADJUSTABLE HEIGHT (1" INCREMENTS) WORK SURFACE NOT INCLUDED USE 4', 5', 6' LONG
LEDA20NW USER MANUAL 3 GEBRUIKERSHANDLEIDING 4 MODE D EMPLOI 6 MANUAL DEL USUARIO 7 BEDIENUNGSANLEITUNG 9 MANUAL DO UTILIZADOR 11
 LED FIXTURE 15W - ROUND MODEL LEDARMATUUR 15W - ROND MODEL LUMINAIRE LED DE 15W - PANNEAU ROND ILUMINACIÓN LED DE 15W - PANEL REDONDO LED-BELEUCHTUNG 15W - RUND ILUMINAÇÃO LED DE 15W - REDONDA USER MANUAL
LEDA22NW USER MANUAL 3 GEBRUIKERSHANDLEIDING 4 MODE D EMPLOI 6 MANUAL DEL USUARIO 7 BEDIENUNGSANLEITUNG 9 MANUAL DO UTILIZADOR 11
 LED FIXTURE - RECTANGULAR MODEL LEDARMATUUR - RECHTHOEKIG MODEL LUMINAIRE LED - PANNEAU RECTANGLE ILUMINACIÓN LED - PANEL RECTANGULAR LED-BELEUCHTUNG - RECHTECKIG ILUMINAÇÃO LED - QUADRADA USER MANUAL
WTL6 USER MANUAL 2 GEBRUIKERSHANDLEIDING 4 MODE D'EMPLOI 6 MANUAL DEL USUARIO 8 BEDIENUNGSANLEITUNG 10 MANUAL DO UTILIZADOR 12
 DESK WORKING LAMP 3 X 14W WHITE BUREAULAMP 3 X 14W WIT LAMPE DE BUREAU 3 X 14W BLANC LÁMPARA DE ESCRITORIO 3 X 14W COLOR BLANCO SCHREIBTISCHLAMPE 3 X 14W WEIß CANDEEIRO DE ESCRITÓRIO 3 X 14W BRANCO USER
Warranty. Components description
 H-190 EN H-190 Important announcement Please read this user s manual carefully before installation to get the cooler s best performance by optimized installation. NOX xtreme is not responsible for any
M2.6 screws ( for mounting the bracket )
") Buzzer for RT322/OKIPOS 441 1. Parts : Use the following parts. Bracket Buzzer M3 screw M2.6 screws ( for mounting the bracket ) 2. Mounting procedures : Note : Ensure that power that is supplied to the
Buzzer for RT322/OKIPOS 441 1. Parts : Use the following parts. Bracket Buzzer M3 screw M2.6 screws ( for mounting the bracket ) 2. Mounting procedures : Note : Ensure that power that is supplied to the
Risque de blessures graves ou mortelles en cas de basculement du
 HEMNES WARNING Serious or fatal crushing injuries can occur from furniture tip-over. ALWAYS secure this furniture to the wall using tip-over restraints. To further reduce the risk of serious injury and
One Drawer Nightstand Table de chevet de tiroir Mesilla de noche con 1 cajone
 Assembly Instructions Instructions de montage Instrucciones de armado One Drawer Nightstand Table de chevet de tiroir Mesilla de noche con 1 cajone DATE STAMP Nightstand Hardware / Quincaillerie de la
EWL18/EWL19 EWL19 EWL18
 WORK LIGHT WITH TRIPOD - 36W ENERGY-SAVING LAMP WERKLAMP OP STATIEF - 36W SPAARLAMP PROJECTEUR DE CHANTIER SUR TRÉPIED - LAMPE FLUOCOMPACTE 36W LÁMPARA CON TRÍPODE - BOMBILLA DE BAJO CONSUMO 36W ARBEITSLEUCHTE
WB005. CAUTION: Do not exceed the maximum listed weight capacity. Serious injury or property damage may occur.
 WB005 FLAT PANEL WALL SUPPORT SUPPORT MURAL POUR ÉCRANS PLATS MUURBEUGEL VOOR FLATSCREENS WANDHALTERUNG FÜR FLACHBILDSCHIRME SOPORTE DE PARED PARA PANTALLA PLANA SUPORTE DE PAREDE ECRÃ PLANO CAUTION: Do
MS Porch Swing
 MS15-301-004-03 Porch Swing This product is intended for use on a covered porch or indoors. Make sure all parts are included. Phillips screwdriver required for assembly (Not Included). Attention: Proper
Cameo Media Stand / Meuble Audio-Vidéo / Estante Para Televisión y Accesorios
 English This page lists the contents included in the box. Please take time to identify the hardware as well as the individual components of the product. s you unpack and prepare for assembly, place the
INSTALLATION GUIDE MANUAL DE INSTALAÇÃO MANUAL DE INSTALACIÓN
 INSTALLATION GUIDE MANUAL DE INSTALAÇÃO MANUAL DE INSTALACIÓN 1/2U / 1U / 2U General Information/ Informações Gerais/ Información General Enables routing and accommodation of copper or optical cables horizontally;
KIT VW T4 VW T4 Lift Roof
 fiamma.com K VW T4 VW T4 Lift Roof für die Halterungen for brackets pattes Instrucciones de instalacion de los estribos staffe Fiamma F45 Fiamma F45 fiamma.com für die Halterungen for brackets pattes Instrucciones
ELS3W. FLOODLIGHT - 45 LEDs 3W PROJECTEUR - 45 LED 3 W SCHIJNWERPER 45 LEDS 3 W FOCO - 45 LEDs 3W SCHEINWERFER - 45 LEDs 3W FOCO LUMINOSO 45 LEDs 3W
 FLOODLIGHT - 45 LEDs 3W PROJECTEUR - 45 LED 3 W SCHIJNWERPER 45 LEDS 3 W FOCO - 45 LEDs 3W SCHEINWERFER - 45 LEDs 3W FOCO LUMINOSO 45 LEDs 3W USER MANUAL 3 NOTICE D EMPLOI 5 GEBRUIKERSHANDLEIDING 7 MANUAL
ELS3. FLOODLIGHT - 45 LEDs 3W PROJECTEUR - 45 LED 3 W SCHIJNWERPER 45 LEDS 3 W FOCO - 45 LEDs 3W SCHEINWERFER - 45 LEDs 3W FOCO LUMINOSO 45 LEDs 3W
 ELS3 FLOODLIGHT - 45 LEDs 3W PROJECTEUR - 45 LED 3 W SCHIJNWERPER 45 LEDS 3 W FOCO - 45 LEDs 3W SCHEINWERFER - 45 LEDs 3W FOCO LUMINOSO 45 LEDs 3W USER MANUAL 3 NOTICE D EMPLOI 5 GEBRUIKERSHANDLEIDING
Ready-To-Finish Fire Pit Cabinet Assembly Instructions
 Ready-To-Finish Fire Pit Cabinet Assembly Instructions For Part Numbers: RTF-S36 RTF-S42 RTF-S48 RTF-S60 Top Panel with Burner Cutout Templates Adjustable Burner Frame Back Panel Side Panel Pre-Drilled
GARDEZ CES INSTRUCTIONS POUR USAGE FUTUR.
 Read all instructions BEFORE assembly and USE of product. KEEP INSTRUCTIONS FOR FUTURE USE. Lire les instructions AVANT d'assembler et d'utiliser le produit. GARDEZ CES INSTRUCTIONS POUR USAGE FUTUR. Lea
EN USER MANUAL ES MANUAL DEL USUARIO NL HANDLEIDING DE BEDIENUNGSANLEITUNG FR MODE D'EMPLOI PT MANUAL DO UTILIZADOR
 EN USER MANUAL ES MANUAL DEL USUARIO NL HANDLEIDING DE BEDIENUNGSANLEITUNG FR MODE D'EMPLOI PT MANUAL DO UTILIZADOR VESA 200 x 200 400 x 200 300 x 300 400 x 400 600 x 400 EN Component Checklist ES Lista
COD BR: MANUAL DE MONTAGEM INSTRUCCIONES DE MONTAJE ASSEMBLY INSTRUCTIONS V : 00
 COD BR: 78900 MANUAL DE MONTAGEM INSTRUCCIONES DE MONTAJE ASSEMBLY INSTRUCTIONS 2 Sumário Resumen Summary Introdução Introducción Introduction 4 Antes de começar Antes de comenzar Before starting 5 Evite
Sawyer Leaning Media Stand/Meuble Audio-Vidéo Incliné/Estante Inclinado para Televisión y Accesorios
 Sawyer Leaning Media Stand/Meuble udio-vidéo Incliné/Estante Inclinado para Televisión y ccesorios English This page lists the contents included in the box. Please take time to identify the hardware as
VTTEST11N MIT TONGENERATOR KABELTESTER DETECTOR DE KABELFINDER USER MANUAL MODE D'EMPLOI
 CABLE TRACKER WITH TONE GENERATOR KABELTESTER MET TOONGENERATOR TESTEUR DE CÂBLE AVEC GÉNÉRATEUR DE TONALITÉ DETECTOR DE CABLES CON GENERADOR DE TONOS KABELFINDER MIT TONGENERATOR USER MANUAL GEBRUIKERSHANDLEIDING
PIR41 USER MANUAL 3 GEBRUIKERSHANDLEIDING 5 NOTICE D EMPLOI 7 MANUAL DEL USUARIO 10 BEDIENUNGSANLEITUNG 12 MANUAL DO UTILIZADOR 14
 PIR MOTION DETECTOR - BUILD IN PIR BEWEGINGSDETECTOR INBOUW CAPTEUR DE MOUVEMENT PIR À ENCASTRER DETECTOR DE MOVIMIENTOS PIR - PARA EMPOTRAR PIR-BEWEGUNGSMELDER - ZUM EINBAUEN SENSOR DE MOVIMENTOS PIR
VLE2. bad cell detection 5. Operation Insert the batterie. the appropriate way. or when charger is. exceed 500mA. dealer will not. notice.
 NIMH BATTERY CHARGER WITH USB OUTPUT LADER VOOR NIMH BATTERIJEN MET USB UITGANG CHARGEUR POUR PILES NIMH AVEC SORTIE USB CARGADOR PARA BATERÍAS NIMH CON SALIDA USB LADEGERÄT FÜR NIMH BATTERIEN MIT USB
GIK15N USER MANUAL 2 HANDLEIDING 4 MODE D'EMPLOI 7 MANUAL DEL USUARIO 9 BEDIENUNGSANLEITUNG 12 MANUAL DO UTILIZADOR 14
 GIK15N MINI ELECTRIC INSECT KILLER MINI ELEKTRISCHE INSECTENVERDELGER MINI TUE-INSECTES ÉLECTRIQUE MINI ELIMINADOR DE INSECTOS MINI-FLUGINSEKTENVERNICHTER MINI ELETROCUTOR DE INSETOS ELÉTRICO USER MANUAL