TABLE OF CONTENTS. Securing Child in Carrier Child Requirements...24 Changing Harness Height...25
|
|
|
- Rosa María Ponce Maidana
- hace 8 años
- Vistas:
Transcripción
1
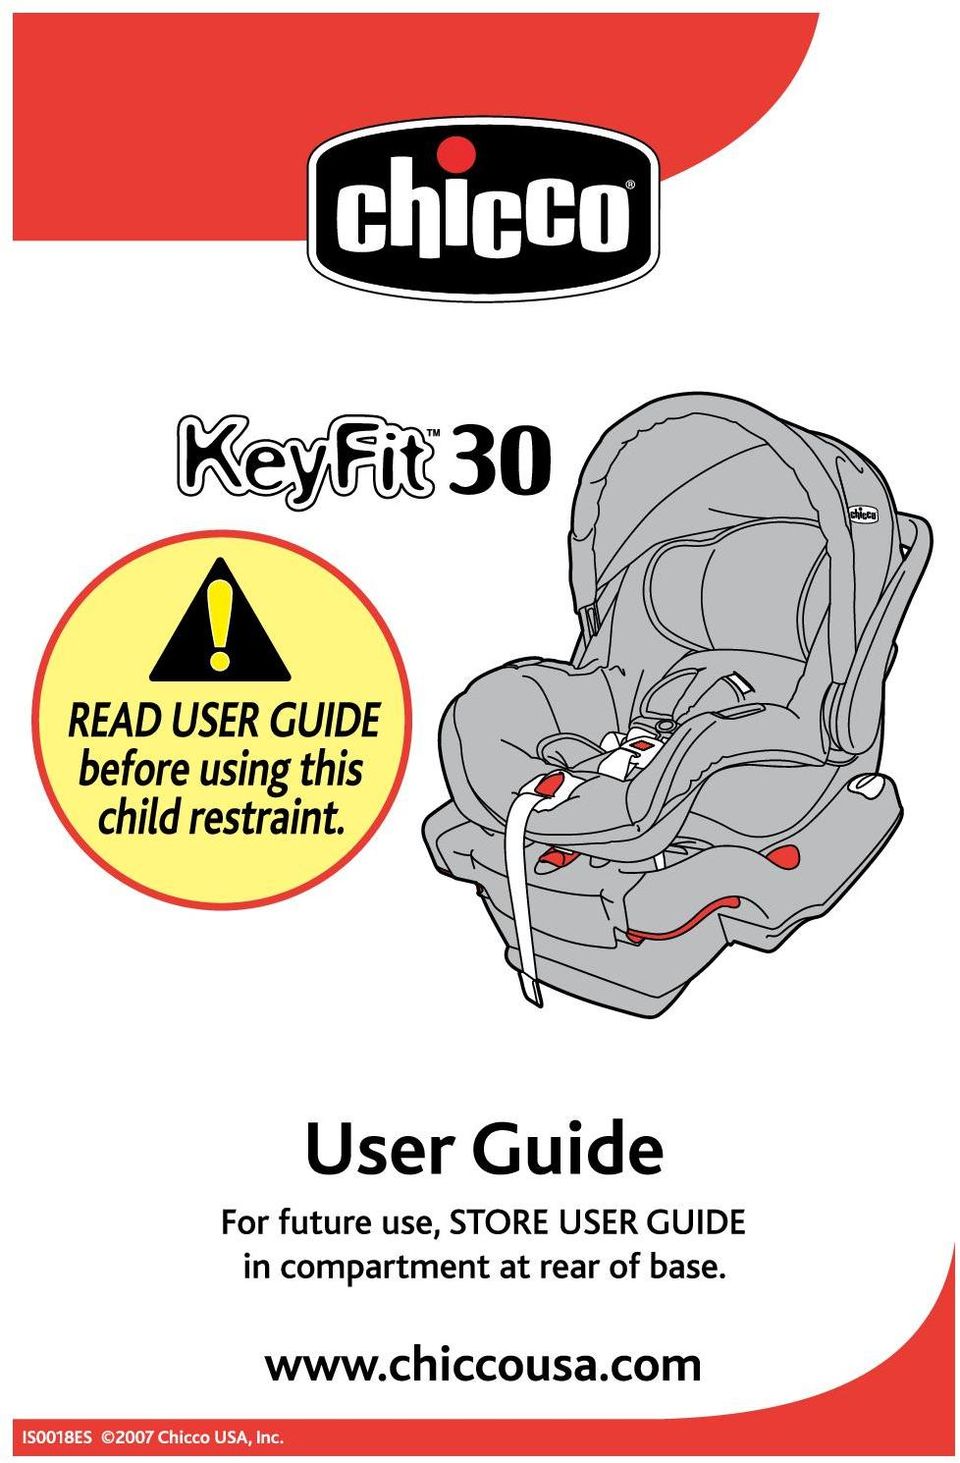
2 TABLE OF CONTENTS Safe Use Checklist...4 Registration & Recall...5 Assistance...5 Warnings...6 Base Features Base Overview... Storage Compartment...3 Recline Adjustment...3 LATCH Removal & Storage...4 Shoulder Belt Lockoff...5 Carrier Features Carrier Overview...6 Harness Buckle...8 Chest Clip...8 Harness Adjuster...8 Handle...9 Canopy...0 Newborn Insert... Head Support... Carrier/Base Attachment...3 Securing Child In Carrier Child Requirements...4 Changing Harness Height...5 Securing Child in Carrier...6 Safety Tips for Securing Child...8 Secure Child Checklist...9 Vehicle Information Unsafe Vehicle Belts...30 Installation Positions...3 Installation with Base LATCH or Vehicle Belt?...3 Installation Using Vehicle Belt...3 Installation Using LATCH...34 Uninstalling Base...33, 36 Installation without Base...37 Installation in Aircraft...38 Cleaning and Maintenance...39 Replacement Parts...40

3 SAFE USE CHECKLIST YOUR CHILD S SAFETY DEPENDS ON YOU! You MUST follow the detailed instructions in this User Guide to ensure the steps below are performed correctly! Install Child Restraint Rear-Facing forward facing vehicle seats only child faces towards rear of vehicle Install in Safe Location in Vehicle position with NO frontal airbag compatible vehicle belts 3 Ensure Child is in Size Range weight 4-30 lbs ( and 3.5 kg) height 30 inches or less (76cm) 4 Secure Child Properly in Carrier correct shoulder strap height harness snug and chest clip correct 5 Secure Restraint Properly in Vehicle vehicle belts tight and restraint secure Carrier securely attached to Base 6 Verify that Recline Angle is Correct Bubble between arrows Level Line on Carrier is level with ground REGISTRATION & RECALL Please complete the Registration Card that came with your Child Restraint and mail it promptly. Child Restraints could be recalled for safety reasons. You must register this restraint to be reached in a recall. Send your name, address, and the restraint s model number and manufacturing date to: Chicco USA, Inc. 835 Freedom Road Lancaster, PA 760 or call For recall information, call the U.S. Government s Vehicle Safety Hotline (TTY: ), or go to www. NHTSA.gov. Also check the Chicco Web site at com. NEED HELP? If you have any problems with your Chicco Child Restraint, or any questions regarding installation or use, please call: Chicco Customer Service Please have Model Number available when you call. The model number can be located on the bottom of the Child Restraint. 4 5
 height 30 inches or less (76cm) 4 Secure Child Properly in Carrier correct shoulder strap height harness snug and chest clip correct 5 Secure Restraint Properly in Vehicle vehicle belts tight")
4 WARNING Take Time to Read This User Guide Carefully read and understand all instructions and warnings in this User Guide. Your child s safety depends on you knowing how to setup, install and use this child restraint properly. Before installing this restraint in a vehicle, be sure to also check the vehicle owner s manual for information on child restraint installation. NEVER allow others to use this Child Restraint until they have read and understood all instructions in this User Guide. For future reference, keep this User Guide in storage door at rear of Base. Make Sure Child Fits This Restraint ONLY USE this Child Restraint with children who weigh between 4 and 30 pounds ( and 3.5 kg) and whose height is 30 inches (76 cm) or less. DO NOT use this child restraint if top of child s head is less than inch from top of restraint. ONLY USE the Newborn Insert for infants who weigh between 4 and pounds ( and 5 kg). DO NOT use Newborn Insert if child weighs more than pounds. WARNING Secure Child Properly Snugly adjust the harness around your child. A loose harness could cause the child to be ejected in a sudden stop or crash, resulting in serious injury or death. A snug strap should not allow any slack. It lies in a relatively straight line without sagging. It does not press on the child s flesh or push the child s body into an unnatural position. NEVER use clothing or blankets that interfere with fastening or tightening the harness. An unsecured child could be ejected in a sudden stop or crash! To keep child warm, place a blanket over child and restraint AFTER you have properly secured child in harness. ALWAYS check to make sure buckle is securely latched. If buckle separates, child could be killed or seriously injured. NEVER leave child unattended. ALWAYS keep child properly secured in harness whenever child is in carrier. 6 7

5 WARNING Install Restraint Correctly NEVER place this Child Restraint in a vehicle position that has a front airbag. An infant in a rear-facing child restraint could be killed by an airbag. Refer to vehicle owner s manual before installing this restraint in a seating position with side airbags. ALWAYS install rear-facing when using this Child Restraint in a vehicle. Your child could be killed or seriously injured if you install this restraint forward facing. Install this Child Restraint in a rear vehicle seat if possible. According to accident statistics, children are safer when properly restrained in the rear seating positions rather than in the front seating positions. ONLY install this child restraint in forward facing vehicle seats. NEVER install in rear facing or side facing vehicle seats. NEVER use restraint in a vehicle seating position where it can not be secured tightly. A loosely installed child restraint will not protect your child in a crash. WARNING Install Restraint Correctly ALWAYS secure this Child Restraint with the vehicle s child restraint anchorage system (LATCH) if available or with a vehicle belt. To ensure a correct installation of Child Restraint, you must follow the step by step instructions in this User Guide. BEFORE each use, ALWAYS check to make sure restraint is tightly secured in the vehicle seat. ALWAYS check for secure attachment of carrier each time you use this restraint. After latching Carrier into Base, lift up on Carrier to make sure that it is securely attached to Base. Child could be killed or seriously injured if Carrier is not securely latched to Base. NEVER travel with this Child Restraint unsecured in a vehicle, even when it is unoccupied. An unsecured child restraint could injure other occupants in a sudden stop or crash. ONLY use Chicco KeyFit infant child restraints with Chicco KeyFit bases. 8 9

6 WARNING Ensure Child s Safety When Using Carrier NEVER Leave Child Unattended! Suffocation Hazard: Infant carrier can roll over on soft surfaces and suffocate child. NEVER place carrier on beds, sofas or other soft surfaces. Strangulation Hazard: Child can strangle in loose restraint straps. ALWAYS use harness. NEVER leave child in carrier when straps are lose or undone. Fall Hazard: Child s movements can slide carrier. NEVER place carrier near edges of counter tops, tables, or other elevated surfaces. Child and carrier might fall. BE SURE handle is locked in the carry position before lifting carrier by handle. An unlocked handle could move unexpectedly, causing injury to child. NEVER place carrier in top of shopping cart. Carrier will not be secure and could fall causing injury to child. ALWAYS check buckle and other parts for hot surfaces. A hot surface could burn child! Cover unoccupied carrier with blanket when leaving in a vehicle exposed to sunlight. WARNING Check Condition of Restraint DO NOT use this Child Restraint if any of the Harness or LATCH straps are cut, frayed or damaged in any way. DO NOT use infant carrier if it is damaged or broken. Call to find out if the damaged part or parts can be replaced. NEVER modify or disassemble this Child Restraint except as instructed to in this User Guide. DO NOT use any accessories, pads or products supplied by other manufacturers with this Child Restraint. Items not tested with this restraint could injure your child. DO NOT use this Child Restraint if it is more than 6 years old. Check manufacturer s label on underside of Carrier and in recess of Base for the Do Not Use After date. YOU MUST replace this Child Restraint if it has been involved in a crash, even if you cannot see visible damage. A damaged child restraint may not protect your child in a future crash. 0

7 BASE OVERVIEW a Recline Foot b Recline Button c Recline Indicator d LATCH Connector e LATCH Release Lever f LATCH Pull Strap g Shoulder Belt Lockoff h Carrier Attachment Hook i Pull Strap Storage Pocket j Storage & User Guide BASE FEATURES Storage Compartment The Storage Compartment is at the rear of the Base. The User Guide is stored inside. DO NOT place heavy or sharp items in the Storage Compartment. They could fly out during a sudden stop or crash, and cause serious injury. j i c h f Recline Adjustment Recline angle may be adjusted by pushing Recline Buttons while lifting Base. b e Angle is correct when entire Bubble is between arrows. Vehicle MUST be on a level surface for the Bubble to indicate correctly. g a d 3

8 LATCH REMOVAL & STORAGE This Child Restraint can be safely installed using vehicle belts or LATCH. LATCH is a Child Restraint attachment system that is standard in most vehicles manufactured after September, 00. Refer to your vehicle owner s manual for details regarding LATCH use in your vehicle. Removing LATCH: Pull LATCH Connectors out of storage pockets while lifting up on LATCH Release Lever. Storing LATCH: Insert LATCH Connectors into storage pockets. 3 Pull LATCH Pull Strap to secure LATCH Connectors. 4 Roll LATCH Pull Strap and store in Pull Strap Storage Pocket. 3 4 SHOULDER BELT LOCKOFF The Shoulder Belt Lockoff is used when installing the Base using your vehicle belts. It locks the vehicle shoulder belt in place, ensuring a stable, secure Base installation. Do not put the shoulder belt in the locked mode. With vehicle belt tight, position the shoulder belt under the Shoulder Belt Lockoff that is on the opposite side of the buckle. 3 Firmly slide shoulder belt under the lockoff. (Optional: Once the base is installed tightly, the shoulder belt can be put in the locked mode. See vehicle owner s manual or label on seat belt for more information.) Refer to Installation Using Vehicle Belt on page 3 for detailed installation instructions. 3 When not using LATCH, the LATCH Connectors and Pull Strap MUST be stored properly to allow Carrier to attach securely to Base. 4 5

9 CARRIER OVERVIEW CARRIER OVERVIEW a Release Handle b Harness Strap c Splitter d Side Hook e Harness Adjuster Strap f Lower Slots f g Middle Slots h Upper Slots i Head Support Fastener Tabs g h a a Carry Handle b Canopy c Handle Button d Neck Pads e Harness Straps f Seat Pad g Adjuster Cover h Head Support i Harness Slots j Chest Clip k Adjuster Strap l Adjuster Button m Buckle n Newborn Insert o Canopy Mount p Easy-access belt path, to use the carrier without the base. a h i b c b d c p e f i n o e d g k l m p j 6 7

10 CARRIER HARNESS FEATURES Harness Buckle To release buckle tongues, firmly press red button on buckle. To fasten, insert each tongue into buckle, listen for a click and then tug to verify that it is latched. Check that buckle functions properly and is kept free of dirt. For cleaning instructions, see page 40. HANDLE Handle has 3 LOCKED positions. To rotate to a new position, press both buttons near pivot. BE SURE handle is LOCKED in CARRY position before lifting carrier by handle. An unlocked handle could move unexpectedly, causing injury to child. Carry Chest Clip To separate chest clip, push center button and pull apart. To fasten, push together until locked. a ALWAYS place handle in one of the LOCKED positions when using Child Restraint in vehicle. Store Position chest clip at center of child s chest, level with armpits. Harness Adjuster a To loosen harness, firmly press button while pulling out on both shoulder straps. b To tighten harness, slowly pull adjuster strap until harness is snug around child. Keep adjuster area clean and free of dirt. DO NOT attempt to remove adjuster cover or button. b NEVER hang toys or other objects from handle when using child restraint in vehicle. They could seriously injure a child in a sudden stop or crash. 8 9 Stand

11 CANOPY NEWBORN INSERT To Adjust Canopy, grab bow on both sides and rotate. Detach fastener tabs when rotating toward front of carrier. a To Remove Canopy Fabric, pull fabric away from Canopy Mount to expose button. Press button on canopy mount to release end of bow. Slide canopy fabric off bow and detach canopy from rear of pad. Release bow from canopy mount on opposite side of carrier if using carrier without canopy. To replace canopy, reverse previous steps. To extend/retract visor b To retract the visor, gently push it downward and allow it to pop up under the canopy. The canopy must be extended before attempting to retract the visor. c To extend the visor, gently pull it downward from underneath the canopy and allow it to pop up in its extended position. a b c Use Newborn Insert to provide additional support and ensure a secure harness fit for smaller infants. The harness height may have to be changed to fit your child. Before using insert, read the instructions on Changing Harness Height and Securing Child in Carrier To Install Insert in Carrier Pull End of Buckle through center slot in insert. Pull Both Harness Straps over and around side panels. Push insert firmly into bottom of carrier. Top of insert should always be BELOW the lower harness slots. 3 When properly installed, the Newborn Insert and harness should look like drawing. 3 ONLY USE Insert with infants who weigh between 4 and lbs. NEVER USE Insert if child weighs more than lbs! 0

12 HEAD SUPPORT CARRIER/BASE ATTACHMENT Use head support to provide additional support for a young infants head. a To secure carrier to base, align carrier with base and push firmly into base. Listen for a click. a Head support can be used with or without newborn insert. Pull up on Carrier to verify that it is securely latched. b To Install Head Support, pull Fastener Tabs through slots and then attach together on underside of carrier. Fastener Tabs must always connect through slots ABOVE the slots used for harness. b To release carrier from base, pull release handle while lifting carrier out of base. Be sure to hold carrier securely with both hands when removing. NEVER use head support with harness in upper slots. Head support could interfere with harness adjustment. 3

13 CHILD REQUIREMENTS CHANGING HARNESS HEIGHT Child Requirements Children should ride in a REAR-FACING Child Restraint until they re at least year old AND weigh at least 0 lbs. The Chicco KeyFit 30 Child Restraint can be used rear-facing up to 30 lbs. ONLY use this child restraint if the child meets all of the following requirements: Weight between 4 and 30 pounds.. ( and 3.5 kg). Height is less than 30 inches.. (76 cm). Top of head is at least inch.. below top of carrier. Use Newborn Insert for infants who weigh between 4 and pounds ( and 5 kg). With child firmly seated in carrier, identify correct slots for harness. Select closest slots AT or BELOW child s shoulders. With child removed and harness loosened, turn carrier over to expose splitter. Unhook one strap from splitter. 3 Pull end of loose strap out of pad and return it back through correct slot. Do not twist strap. 4 Re-attach strap to splitter. Connection to splitter should look like illustration. 5 Repeat for other strap. Straps must be free of twists and securely fastened to splitter. 6 Check that Harness is secure and working properly. 3 4 For premature infants, you must consult the infant s doctor before using this Child Restraint. A premature infant may have difficulty breathing or have other medical problems when placed in a seated position. NEVER remove Harness or harness components from Carrier. DO NOT USE Child Restraint if any part of harness is damaged. Call to order a replacement harness. 4 5

14 SECURING CHILD IN CARRIER SECURING CHILD IN CARRIER Loosen harness by firmly pressing adjuster button and pulling forward on both straps. Press button on buckle to release buckle tongues. 5 Insert buckle tongues into buckle. Listen for a click. Tug on tongues to verify that they are latched. Pull excess strap up through buckle tongues so that harness is snug around child s thighs. 5 3 Separate chest clip and spread straps apart. Place child in carrier in seated position. Child must be resting against back and bottom of carrier. 4 Pull harness straps over child s shoulders and around their waist. Make sure that harness slots are AT or BELOW top of child s shoulders. If harness straps are not AT or BELOW child s shoulders, you must move harness to proper slots. See Changing Harness Height on page Snap chest clip together and slide away from child s neck before tightening harness. 7 Tighten harness by pulling slowly on adjuster strap until harness is snug around child. 8 Make sure child is properly secured. a Harness must be snug. If you can pinch a fold in strap, harness is too loose. b Chest Clip must be positioned at center of child s chest, level with armpits. c Straps must be laying flat, free of twists and on top of child s shoulders CLICK! Read the Safety Tips for Securing Child and the Secure Child Checklist 6 7

15 SAFETY TIPS FOR SECURING CHILD SECURE CHILD CHECKLIST NEVER secure child in carrier with child dressed in bulky garments or heavy clothing. Heavy clothing can prevent harness from being properly tightened around child. If harness is not snug around your child, child could be ejected in a sudden stop or crash resulting in serious injury or death! To keep child warm, place a blanket over child AFTER you have properly secured and tightened harness around your child. 3 To ensure a better fit for smaller infants, use the Newborn Insert and Head Support provided with this Child Restraint. 3 Check Height of Harness Slots Harness straps should always.. be AT or BELOW child s shoulders. Check Position of Chest Clip Chest clip should be in center.. of child s chest, level with armpits. 3 Check Tightness of Harness Harness must be snug. Harness is snug when you cannot pinch a fold in the harness material. If you do not secure child properly, child could be ejected in a sudden stop or crash, resulting in serious injury or death. 3 NEVER use Insert if child weighs more than pounds! NEVER place extra padding under or behind the child. NEVER leave child unattended. ALWAYS keep child properly secured in harness whenever child is in carrier. 8 9

16 VEHICLE INFORMATION This Child Restraint can be securely installed in most vehicles using the vehicle seat belts or LATCH. BUT, there are some vehicle belts and installation positions that are UNSAFE for use with this Restraint. Refer to your Vehicle Owner s Manual for detailed information about vehicle belts, LATCH, and preferred Restraint installation positions. UNSAFE Vehicle Belts The following types of vehicle belts MUST NOT be used to install this Child Restraint: Motorized (automatic) vehicle belts. Door mounted vehicle belts. 3 INSTALLATION POSITIONS Accident statistics indicate that children are safer when properly restrained in rear seating positions than in front seating positions. Children and under should ride in rear seating positions. The BEST POSITION is one that: Is Recommended by Vehicle Owner s Manual. Results in Secure Installation of Restraint. ONLY install Child Restraint in forward facing vehicle seats. NEVER install in rear or side facing seats. 3 Lap/Shoulder Belts with retractors, (unless Lap Belt has a Lock Mode ). retractor tensions the Lap Belt and tensions the Shoulder Belt. 4 4 Non-Locking (ELR) Lap Belts. (Emergency Locking Retractors) These belts remain loose after installation and only lock during a sudden stop or crash. AIRBAG WARNING: NEVER install Child Restraint in a seat with a Frontal Airbag. DEATH or SERIOUS INJURY may occur. Refer to your Vehicle Owner s Manual for Side Airbag warnings and information. 30 3
 vehicle belts. Door mounted vehicle belts.")
17 INSTALLATION USING VEHICLE BELT INSTALLATION USING VEHICLE BELT LATCH or Vehicle Belt? This Child Restraint can be safely installed using Vehicle Belts or LATCH. Use the method that results in the MOST SECURE installation in your vehicle. Position Base in forward facing vehicle seat with Recline Foot against seat back. Adjust Base Angle by pushing Recline Buttons while lifting Base. Angle is correct when Bubble is between arrows. Vehicle must be on a level surface for the Bubble to indicate correctly. 3 Route Vehicle Belt through openings in Base and buckle the vehicle belt. (Do not put the shoulder belt in locked mode.) 4 Tighten Vehicle Belt while pushing Base firmly into vehicle seat. 5 Secure Vehicle Shoulder Belt firmly under Shoulder Belt Lockoff, while keeping tension on Belt. Only use the lockoff on the opposite side of the buckle If using Vehicle Lap Belt only (no Shoulder Belt), make sure that Lap Belt is LOCKED, and that free end of Lap Belt is neatly stored so it DOES NOT INTERFERE with attachment of Carrier to Base. 6 CHECK Installation: a Belts MUST be TIGHT. b Base MUST be STABLE. c Bubble MUST be.. between arrows. d Belts & Buckles MUST NOT.. INTERFERE with attachment.. of Carrier to Base. 7 Attach Carrier To Base after properly securing child in Carrier. ALWAYS lift up on Carrier to verify it is properly attached to the Base. Uninstalling Base: Remove Carrier from Base, unbuckle Vehicle Belt, and remove Base from vehicle. NEVER travel with Child Restraint unsecured in vehicle. Passengers may be injured during a sudden stop or crash
 4 Tighten Vehicle Belt while pushing Base firmly into vehicle seat.")
18 INSTALLATION USING LATCH INSTALLATION USING LATCH LATCH or Vehicle Belt? This Child Restraint can be safely installed using Vehicle Belts or LATCH. Use the method that results in the MOST SECURE installation in your vehicle. Remove LATCH Connectors from storage pockets while lifting up on LATCH Release Lever. Position Base in forward facing vehicle seat with Recline Foot against seat back. 3 Adjust Base Angle by pushing Recline Buttons while lifting Base. Angle is correct when Bubble is between arrows. Vehicle must be on a level surface for the Bubble to indicate correctly. 4 Attach LATCH Connectors by pushing them firmly onto vehicle LATCH Anchor Bars. Verify connection is secure by pulling firmly on LATCH straps. 3 4 CLICK! 5 Tighten LATCH Belts by pulling up firmly on LATCH Pull Strap while pressing Base firmly into vehicle seat. 6 Store LATCH Pull Strap neatly in Pull Strap Storage Pocket. 7 Check Installation a LATCH belts MUST be..... TIGHT b Base MUST be STABLE c Bubble MUST be.. between arrows d LATCH Pull Strap MUST.. NOT interfere with.. attachment of Carrier.. to Base. 8 Attach Carrier to Base after properly securing child in Carrier This child restraint base is designed to be used with lower LATCH anchors at the standard spacing ( inches) ONLY! Refer to vehicle owner s manual for information about LATCH and child restraint installation positions. ALWAYS lift up on Carrier to verify it is properly attached to the Base

19 INSTALLATION USING LATCH INSTALLATION WITHOUT BASE Uninstalling Base Remove Carrier from Base Loosen LATCH by lifting the LATCH Release Lever and pulling Base away from vehicle seat back. Detach LATCH Connectors by pressing the red button on each LATCH Connector, and remove Base from vehicle. Storing LATCH Insert LATCH Connectors into storage pockets. a Pull LATCH Pull Strap to secure LATCH Connectors. Roll LATCH Pull Strap and store in Pull Strap Storage Pocket. a a Position Carrier rear facing on vehicle seat, with child properly secured in Carrier. Route Vehicle Belt under both Belt Guides, and buckle the vehicle belt. 3 Tighten Vehicle Belt while pushing Carrier firmly into vehicle seat. A tightly rolled towel may be used under the front edge of the Carrier if needed for stable, secure installation. 4 Check Installation: a Level Line on Carrier MUST.. be LEVEL with ground. b Vehicle belt MUST be TIGHT. c Carrier MUST be STABLE.. and secure. 3 4 a b NEVER travel with CHILD RESTRAINT unsecured in vehicle. Passengers may be injured during a sudden stop or crash. When not using LATCH, the LATCH Connectors and Pull Strap MUST be stored properly. NEVER install CARRIER without Base using a non-locking ELR vehicle belt. The installation will NOT be secure. Refer to your vehicle owner s manual for detailed vehicle belt information

20 INSTALLATION IN AIRCRAFT This Child Restraint is certified for use in commercial aircraft. Be sure to contact your airline prior to travel, to discuss their Child Restraint policy. CLEANING & MAINTENANCE Fabrics may be spot-cleaned with mild soap and water, or machine washed in cold water on delicate cycle using mild detergent. Hang to dry. DO NOT USE BLEACH. Position Carrier rear facing in aircraft seat, with child properly secured in Carrier. Route Aircraft Lap Belt under both Belt Guides, and fasten the aircraft belt. 3 Tighten Aircraft Lap Belt while pushing Carrier firmly into aircraft seat. A tightly rolled airline blanket may be used under the front edge of the Carrier if needed for stable, secure installation. 4 Check Installation: a Level Line on Carrier MUST.. be LEVEL with ground. b Aircraft belt MUST be TIGHT. c Carrier MUST be STABLE.. and secure. 3 a 4 b Removing the Seat Pad Remove Harness Straps from Harness Slots as described in Changing Harness Height. Unhook elastic band attached around handle pivots, and disconnect chest clip and buckle. Carefully pull seat pad from under Adjuster Cover. ADJUSTER COVER MUST REMAIN IN PLACE. Guide harness assembly through slots in bottom of seat pad, while removing from Carrier. Installing the Seat Pad Reverse the removal instructions to reinstall the Seat Pad. Carefully follow instructions in Changing Harness Height to ensure the harness is properly routed and adjusted. NEVER use Carrier without the Seat Pad

21 CLEANING & MAINTENANCE NEVER remove Harness or harness components from Carrier. If harness is extremely soiled or damaged, Call Chicco to order a replacement. Cleaning Plastics Sponge clean using warm water and mild soap. Towel dry. DO NOT USE BLEACH, solvents, or household cleaners, as they may weaken the plastics. Cleaning Harness and LATCH Straps Sponge clean using warm water and mild soap. Air dry. DO NOT USE BLEACH, solvents, or household cleaners, as they may weaken the straps. Replacement Parts Many replacement parts are available for your Child Restraint. To order replacement parts, call: Chicco Customer Service Please have the Restraint model and serial numbers available to expedite service. Cleaning Buckle and LATCH Hardware Sponge clean, or rinse in cup of warm water. DO NOT USE ANY SOAPS OR LUBRICANTS on Buckle or LATCH Hardware. It may cause them to malfunction. 40
22
23 ÍNDICE Lista de verificación para el uso seguro...4 Registro y retiro del mercado...5 Asistencia...5 Advertencias...6 Características de la base Información general de la base... Compartimiento de almacenamiento...3 Ajuste de la reclinación...3 Remoción y almacenamiento del LATCH...4 Traba del cinturón del hombro...5 Características del portabebés Información general del portabebés...6 Hebilla del arnés...8 Presilla del pecho...8 Ajustador del arnés...8 Asidera...9 Cubierta...0 Accesorio para el recién nacido... Soporte de la cabeza... Accesorio de la base / portabebés...3 Cómo asegurar al niño en el portabebés Requisitos del niño...4 Cómo cambiar la altura del arnés...5 Cómo asegurar al niño en el portabebés...6 Sugerencias de seguridad para asegurar al niño...8 Lista de verificación de un niño seguro...9 Información del vehículo Cinturones inseguros del vehículo...30 Posiciones de la instalación...3 Instalación con la base LATCH o cinturón del vehículo?...3 Instalación usando el cinturón del vehículo...3 Instalación usando el LATCH...34 Desinstalación de la base...33, 36 Instalación sin la base...37 Instalación en un avión...38 Limpieza y mantenimiento...39 Piezas de repuesto...40
24 LISTA DE VERIFICACIÓN PARA EL USO SEGURO REGISTRO Y RETIRO DEL MERCADO LA SEGURIDAD DE SU NIÑO DEPENDE DE USTED! DEBE seguir las instrucciones detalladas de esta Guía del usuario para asegurar que se completen correctamente los pasos que siguen! Instale el sistema de seguridad para niños dando frente hacia atrás asientos del vehículo que dan frente hacia adelante solamente el niño mira hacia la parte trasera del vehículo Instálelo en un lugar seguro del vehículo posición SIN bolsas de aire delanteras cinturones compatibles del vehículo 3 Asegúrese de que el niño tenga el tamaño apropiado peso 4 a 30 libras ( y 3.5 kg) estatura 30 pulgadas o menos (76cm) 4 Asegure al niño correctamente en el portabebés altura correcta de la correa del hombro arnés tenso y presilla del pecho correcta 5 Asegure el sistema de seguridad correctamente en el vehículo 5 correas del vehículo tensas y sistema de seguridad asegurado portabebés conectado apretadamente a la base 6 Verifique que el ángulo de reclinación sea el correcto 6 burbuja entre las flechas la línea niveladora del portabebés es.. paralela al piso 3 4 Por favor, llene la tarjeta de registro que viene con su sistema de seguridad para niños y envíela inmediatamente. Los sistemas de seguridad para niños podrán ser retirados del mercado por cuestiones de seguridad. Debe registrar este sistema para que nos podamos comunicar con usted en dicho caso. Envíe su nombre, dirección y el número del modelo del sistema y la fecha de fabricación a: Chicco USA, Inc. 835 Freedom Road Lancaster, PA 760 o llame al Para obtener información sobre los retiros, llame a la línea telefónica sobre seguridad en vehículo del gobierno de EE. UU. al (TTY: ), o ingrese a Además, consulte el sitio Web de Chicco en NECESITA AYUDA? Si tiene problemas con el sistema de seguridad para niños Chicco, o alguna pregunta sobre la instalación o el uso, por favor llame a: Servicio al Cliente Chicco Por favor, tenga el número del modelo disponible cuando llame. El número del modelo puede estar ubicado en la parte inferior del sistema de seguridad para niños. 4 5
Asana 35 AP / Asana 35
 that s me! Asana 35 AP / Asana 35 Asiento de automóvil Guía del usuario Lea todas las instrucciones antes de usar este producto. Si no se observan estas instrucciones, podrían ponerse seriamente en peligro
A B R Ó C H A T E E L C I N T U R Ó N D E S E G U R I D A D PARA CRECER: UNA ETAPA A LA VEZ
 etapa 3 etapa 4 etapa 1 etapa 2 A B R Ó C H A T E E L C I N T U R Ó N D E S E G U R I D A D PARA CRECER: UNA ETAPA A LA VEZ INFORMACIÓN SOBRE LOS ASIENTOS INFANTILES DE SEGURIDAD DE AUTOMÓVILES Los choques
Manual de Instrucciónes LB 717
 PRECAUCIONES: Manual de Instrucciónes LB 717 Guarde el manual en un lugar seguro para futuras referencias La butaca para autos no garantiza absoluta protección en todos los casos de daño. Sin embargo asegura
Read all instructions BEFORE assembly and USE of product. KEEP INSTRUCTIONS FOR FUTURE USE.
 Read all instructions BEFORE assembly and USE of product. KEEP INSTRUCTIONS FOR FUTURE USE. Lea todas las instrucciones ANTES de armar y USAR este producto. GUARDE LAS INSTRUCCIONES PARA USO FUTURO. 2013
Conditioning Exercises: Standing
 Conditioning Exercises: Standing Do all these exercises slowly. Do not hold your breath during these exercises. If unusual pain occurs in your joints or muscles while you are exercising, do not continue
ATON Rear Facing Infant Car Seat / Base Owner s Manual Manual del Propietario
 English Español READ this Owner s Manual carefully before first use, and keep it for future reference. LEA este Manual del Propietario minuciosamente antes de usarlo y guarde para su futura referencia.
INSTALLATION INSTRUCTIONS
 Brix Ratio Check Instructions for ColdFusion and Flavor Overload Units INSTALLATION INSTRUCTIONS Brix Ratio Check Instructions For Coldfusion, Flavorfusion and Flavor Overload Units Kit P/N 629096865 SAFETY
Pocket Snack. Owner's Manual Manual del propietario
 Read all instructions BEFORE assembly and USE of product. KEEP INSTRUCTIONS FOR FUTURE USE. Lea todas las instrucciones ANTES de armar y USAR este producto. CONSERVE LAS INSTRUCCIONES PARA USO FUTURO.
Maneje Seguro. Viaje Seguro en un Asiento Infantil Mirando hacia Adelante. Abrocharse el cinturón cada pasajero, cada viaje!
 Maneje Seguro Asiento de Seguridad Pasajero Niño/a Nro. 3 Agencia de Salud y Recursos Humanos del Condado de San Benito División de Salud Pública 439 Fourth Street Hollister, CA 95023 (831) 637-5367 http://www.sanbenitoco.org
BU7049 MANUAL DE INSTRUCCIONES
 MANUAL DE INSTRUCCIONES BU7049 Advertencia / Cuidados Sistema y uso Instrucciones generales Problemas y soluciones / Mantenimiento Cátulo Castillo 2437 - C.A.B.A. - Argentina Tel.: (011) 4943-0600 y líneas
PARE. 1-800-328-7363 (8:00 a.m. a 4:30 p.m. Hora Estándar del Pacífico) Baby Trend, Inc. 1607 S. Campus Ave., Ontario, CA 91761. www.babytrend.
 Baby Trend, Inc. 1607 S. Campus Ave., Ontario, CA 91761. www.babytrend.") PARE Si experimenta alguna dificultad al usar este producto, solicite ayuda llamando a nuestro departamento de servicio al cliente al 1-800-328-7363 en el horario de 8:00 a.m. a 4:30 p.m., Hora Estándar
PARE Si experimenta alguna dificultad al usar este producto, solicite ayuda llamando a nuestro departamento de servicio al cliente al 1-800-328-7363 en el horario de 8:00 a.m. a 4:30 p.m., Hora Estándar
Smart Seat ALL-IN-ONE CARSEAT
 TM Smart Seat ALL-IN-ONE CARSEAT con Manual del propietario del sistema de seguridad para niños LEA ESTE MANUAL. No instale ni use este sistema de seguridad para niños hasta que haya leído y entendido
Car Seat/Booster Seat
 Car Seat/Booster Seat Owner s Manual READ THIS MANUAL. Do not install or use this car seat until you read and understand the instructions in this manual. FAILURE TO PROPERLY USE THIS CAR SEAT INCREASES
Switch : 2-in-1 Cart Cover Owners Manual Instructions
 TM Switch : 2-in-1 Cart Cover Owners Manual Instructions English IMPORTANT! KEEP INSTRUCTIONS FOR FUTURE USE. Read all instructions before assembling and using your carrier. Failure to follow each instruction
orientado hacia atrás Manual del usuario CEE R66 06 0+/1/2 de 0 a 25 kg 6 m - 5 a
 1 20 21 2 5 3 4 orientado hacia atrás Manual del usuario 7 8 9 6 10 11 12 13 14 22 23 15 16 17 24 25 18 19 CEE R66 06 Grupo Peso edad 0+/1/2 de 0 a 25 kg 6 m - 5 a 26 27 28 29 30 31 35 34 36 32 33 37 38
INSTRUCCIONES DE USO INSTRUCTIONS FOR USE
 INSTRUCCIONES DE USO INSTRUCTIONS FOR USE super confort www.zoeandjoe.com MADE ON EARTH INSTRUCCIONES DE INSTALACIÓN AVISO 1. Este es un asiento Universal para niños aprobado por la Norma ECE 44/04, para
ATON 2 OWNER S MANUAL MANUAL DEL PROPIETARIO
 ATON 2 OWNER S MANUAL MANUAL DEL PROPIETARIO English Español READ this Owner s Manual carefully before first use, and keep it for future reference. LEA este Manual del Propietario minuciosamente antes
Symphony ADVERTENCIA. Asiento infantil para el automóvil. MANUAL DEL USUARIO Guarde para uso futuro
 Symphony Asiento infantil para el automóvil MANUAL DEL USUARIO Guarde para uso futuro Requisitos del niño Peso: 2.3-49.8 kg (5-110 lbs) Estatura: 48 145 cm (19 57 pulg) ADVERTENCIA Para reducir el riesgo
Coda Infant Carrier. Owner's Manual Manual del propietario
 Read all instructions BEFORE assembly and USE of product. KEEP INSTRUCTIONS FOR FUTURE USE. Lea todas las instrucciones ANTES de armar y USAR este producto. CONSERVE LAS INSTRUCCIONES PARA USO FUTURO.
Car Seat/Booster Seat Owner s Manual Model 8486, 8490
 Car Seat/Booster Seat Owner s Manual Model 8486, 8490 READ THIS MANUAL. Do not install or use this car seat until you read and understand the instructions in this manual. FAILURE TO PROPERLY USE THIS CAR
LEA ESTE INSTRUCTIVO ANTES DE ARMAR LA CARRIOLA USE ESTAS INSTRUCCIONES PARA LA CARRIOLA MOD. K23
 LEA ESTE INSTRUCTIVO ANTES DE ARMAR LA CARRIOLA USE ESTAS INSTRUCCIONES PARA LA CARRIOLA MOD. K23 CONTENIDO PARTES DE LA CARRIOLA Estructura de metal, plástico y textil (cuerpo). Asiento con respaldo y
that s me! Stroller User Guide Read all instructions carefully before use and keep them for future reference.
 that s me! Qbit Stroller User Guide Read all instructions carefully before use and keep them for future reference. Guía del usuario del cochecito Lea todas las instrucciones detenidamente antes de usarlo
Smart Seat ALL-IN-ONE CARSEAT
 TM Smart Seat ALL-IN-ONE CARSEAT Child Restraint Owner s Manual READ THIS MANUAL. Do not install or use this child restraint until you read and understand the instructions in this manual. FAILURE TO PROPERLY
Car Seat & Base Asiento de Coche y Base. babyjogger.com
 Car Seat & Base Asiento de Coche y Base This child restraint system conforms to all applicable Federal motor vehicle and safety standards. This child restraint conforms to ASTM F05:3a and 6CFR5. Este sistema
happy safari travel cot cuna de viaje happy safari guía para el usuario importante. retenga para referencia futura - lea con cuidado.
 happy safari travel cot user guide important. retain for future reference - read carefully cuna de viaje happy safari guía para el usuario importante. retenga para referencia futura - lea con cuidado.
Alva. 9-36 kg. Manual de uso. Apto para
 Alva 2 1 3 Apto para 9-36 kg. ES Manual de uso 1 2 A B C L D H E F G I N M N K J P Q O P B R 4 ALVA 3.1 3.2 3.3 3.4 P 3.5 3.6 N N www.babyauto.com 5 3.7 3.8 N 4.1 4.2 4.3 4.4 6 ALVA 5.1 1 2 3 5.2 5.3 5.4
car seat adapter adaptador del asiento de automóvil CXBEX/MAXI COSI/NUNA babyjogger.com ASSEMBLY INSTRUCTIONS INSTRUCCIONES DEL ENSAMBLAJE PD349778A
 CXBEX/MAXI COSI/NUNA car seat adapter adaptador del asiento de automóvil PD349778A babyjogger.com ASSEMBLY INSTRUCTIONS INSTRUCCIONES DEL ENSAMBLAJE CITY PREMIER CITY SELECT CITY SELECT LUX 1 2 CLICK 3
orientado hacia adelante Manual del usuario Grupo Peso Edad 1 9-18 kg 9m-4a
 orientado hacia adelante Manual del usuario ECE R44 04 Grupo Peso Edad 1 9-18 kg 9m-4a 1 ! Gracias por elegir BeSafe izi Comfort. BeSafe ha desarrollado este asiento con mucho cuidado, para proteger a
ADVERTENCIA. Symphony 65 Sistema de asiento infantil para el automóvil. Manual del propietario Guarde para uso futuro. Orientado hacia atrás
 Symphony 65 Sistema de asiento infantil para el automóvil Manual del propietario Guarde para uso futuro. Orientado hacia atrás 2.3 a 18 kg (5 a 40 lb) 48 a 94 cm (19 a 37 pulg.) Orientado hacia adelante
Size4Me 70 Child Restraint Owner s Manual READ THIS MANUAL.
 www.gracobaby.com Size4Me 70 Child Restraint Owner s Manual READ THIS MANUAL. Do not install or use this child restraint until you read and understand the instructions in this manual. FAILURE TO PROPERLY
Guía para Padres para proteger a su bebé con un asiento de seguridad para el niño
 Recursos de Instalación del Asiento de Seguridad Para el Niño: Visite una de las estaciones de revisión de asientos de seguridad para el niño de Virginia para asistencia gratuita de un técnico certificado
Importador: ARGENTRADE S.R.L. CALLE 514 NO. 2050, (1901) RINGUELET LA PLATA, BUENOS AIRES, ARGENTINA
 RINGUELET LA PLATA, BUENOS AIRES, ARGENTINA") Importador: ARGENTRADE S.R.L. CALLE 514 NO. 2050, (1901) RINGUELET LA PLATA, BUENOS AIRES, ARGENTINA Nº de Importador : 22582/6-1 Cuit No.: 30-66010157-4 ATENCIÓN: Por favor, asegúrese de observar estrictamente
Importador: ARGENTRADE S.R.L. CALLE 514 NO. 2050, (1901) RINGUELET LA PLATA, BUENOS AIRES, ARGENTINA Nº de Importador : 22582/6-1 Cuit No.: 30-66010157-4 ATENCIÓN: Por favor, asegúrese de observar estrictamente
GRACIAS POR PREFERIR COCHES MOMA INDICE. Advertencias. Configuración. Abrir Coche. Ensamble rueda delantera. Ensamble ruedas traseras.
 GRACIAS POR PREFERIR COCHES MOMA INDICE Advertencias 1 Felicitaciones y gracias por preferir Configuración 2 un coche MOMA. Por favor lea prim- Abrir Coche 3 Ensamble rueda delantera 4 Ensamble ruedas
Child Restraint Owner s Manual READ THIS MANUAL.
 www.gracobaby.com Child Restraint Owner s Manual READ THIS MANUAL. Do not install or use this child restraint until you read and understand the instructions in this manual. FAILURE TO PROPERLY USE THIS
Infant Restraint/ Carrier
 Infant Restraint/ Carrier Owner s Manual READ THIS MANUAL KEEP INSTRUCTIONS FOR FUTURE USE. Do not install or use this infant restraint until you read and understand the instructions in this manual. FAILURE
Process Control Work Instructions Control de Procesos Instrucciones de Trabajo. for / para
 Process Control Work Instructions Control de Procesos Instrucciones de Trabajo for / para 629096898 VFCB Kit Relay Cable Harness Assy Ensamblar el Kit del Arnés de Cables del Relevador Publication Number:
INSTRUCTION MANUAL INFANT CAR SEAT. 2015 Ingenuity ingenuitybaby.com
 INSTRUCTION MANUAL INFANT CAR SEAT Keep this manual for future use. It is very important to read, understand, and follow this manual before using your infant car seat. Store this manual in your infant
Model/Modelo: SR42UBEVS
 SmartRack Assembly Instructions Instrucciones de Ensamble del SmartRack Model/Modelo: SRUBEVS West 35th Street, Chicago, IL 60609 USA www.tripplite.com/support Copyright 03 Tripp Lite. All trademarks are
Wear It Right Wearing your elastomeric full face, 4 strap respirator
 Wear It Right Wearing your elastomeric full face, strap respirator. Fully loosen all four head straps. Pull hair back with one hand. Bring facepiece up to face with other hand. Check the seal of your elastomeric
MODEL: 11222895 / MODELO: 11222895 COMPUTER DESK ESCRITORIO DE COMPUTADORA
 MODEL: 222895 / MODELO: 222895 COMPUTER DESK ESCRITORIO DE COMPUTADORA NO 2 3 4 5 6 7 8 9 PARTS LIST AND HARDWARE LISTA DE PARTES Y ACCESORIOS HARDWARE LIST LISTA DE PARTES Y ACCESORIOS CHIPBOARD SCREW
READ THIS MANUAL. Child Restraint/Booster Seat Owner s Manual
 READ THIS MANUAL Do not install or use this child restraint until you read and understand the instructions in this manual. FAILURE TO PROPERLY USE THIS CHILD RESTRAINT INCREASES THE RISK OF SERIOUS INJURY
A W. Product Label Identification. Etiqueta de identificación del producto. Andersen
 Product Label Identification Etiqueta de identificación for Andersen Windows and Patio Doors para puertas para patio y ventanas de Andersen Use this document to locate product identification () of your
Auto asiento Convertible Manual del Usuario
 Auto asiento Convertible Manual del Usuario Para futuras consultas, guarda el manual en el compartimento ubicado en la base. LEA EL MANUAL antes de que el niño lo utilice. IS004.E 0 Chicco USA, Inc. TABLA
B-SAFE User Guide Guía del usuario
 B-SAFE User Guide Guía del usuario IMPORTANT: Thoroughly read and follow all instructions. IMPORTANTE: Lea y siga cuidadosamente todas las instrucciones. Table of Contents Safety Information Warnings...2
Child Restraint Owner s Manual READ THIS MANUAL.
 www.gracobaby.com Child Restraint Owner s Manual READ THIS MANUAL. Do not install or use this child restraint until you read and understand the instructions in this manual. FAILURE TO PROPERLY USE THIS
Head Wise 70 featuring
 Head Wise 70 featuring www.gracobaby.com Child Restraint Owner s Manual READ THIS MANUAL. Do not install or use this child restraint until you read and understand the instructions in this manual. FAILURE
car seat instruction manual manual de instrucciones
 car seat instruction manual manual de instrucciones Thanks for choosing Nuna! Nuna designs distinctive, smart and exciting products. Enjoy your Infant Car Seat Contents English (EN) Information Warnings
READ THIS MANUAL. Child Restraint/Booster Seat Owner s Manual
 READ THIS MANUAL Do not install or use this child restraint until you read and understand the instructions in this manual. FAILURE TO PROPERLY USE THIS CHILD RESTRAINT INCREASES THE RISK OF SERIOUS INJURY
Multimax. Apto para 0-36 kg. Manual de uso
 Multimax 1 2 3 0+ Apto para 0-36 kg. ES Manual de uso 1 2 A B C D G L E P F I H J K M N R Q R S S T O 4 MULTIMAX 3.1 3.2 3.3 3.4 3.5 3.6 R M www.babyauto.com 5 3.7 3.8 R 10 mm 3.9 3.10 3.11 3.12 K 6 MULTIMAX
SnugRide Classic Connect
 www.gracobaby.com SnugRide Classic Connect Owner s Manual READ THIS MANUAL KEEP INSTRUCTIONS FOR FUTURE USE. FAILURE TO PROPERLY USE THIS INFANT RESTRAINT INCREASES THE RISK OF SERIOUS INJURY OR DEATH
Safety with Car Seats and Booster Seats
 Safety with Car Seats and Booster Seats Car crashes are the main cause of accidental death and serious injury of children. Correctly using a car or booster seat can save your child s life. Throughout the
2008 Series Hemodialysis Machine Operator s Manuals Addendum for Concentrate Connection
 2008 Series Hemodialysis Machine Operator s Manuals Addendum for Concentrate Connection Caution: Federal (US) law restricts this device to sale only by or on the order of a physician. This is an addendum
MANUAL EASYCHAIR. A) Ingresar su nombre de usuario y password, si ya tiene una cuenta registrada Ó
 Ingresar su nombre de usuario y password, si ya tiene una cuenta registrada Ó") MANUAL EASYCHAIR La URL para enviar su propuesta a la convocatoria es: https://easychair.org/conferences/?conf=genconciencia2015 Donde aparece la siguiente pantalla: Se encuentran dos opciones: A) Ingresar
MANUAL EASYCHAIR La URL para enviar su propuesta a la convocatoria es: https://easychair.org/conferences/?conf=genconciencia2015 Donde aparece la siguiente pantalla: Se encuentran dos opciones: A) Ingresar
SnugRide 35. Read this manual KEEP INSTRUCTIONS FOR FUTURE USE.
 SnugRide 35 Read this manual KEEP INSTRUCTIONS FOR FUTURE USE. Even if using this infant restraint seems easy to figure out on your own, it is very important to READ, UNDERSTAND AND FOLLOW THE OWNER S
Installation Instructions Front Floor Liner
 Installation Instructions Front Floor Vehicle Application Jeep Wrangler (TJ) 1997-2006 Part Number: 51509 Jeep Wrangler (CJ / YJ) 1976-1995 Part Number: 51511 INSTALLATION TIME SKILL LEVEL 1/2 Hour 1 -
Car Seat Adapter Adaptador de la silla para el coche
 CHICCO/PEG-PEREGO Car Seat Adapter Adaptador de la silla para el coche PD348997B babyjogger.com ASSEMBLY INSTRUCTIONS INSTRUCCIONES DEL ENSAMBLAJE CITY PREMIER CITY SELECT PEG-PEREGO 1 A B 2 3 CLICK 4
1. Sign in to the website, http://www.asisonline.org / Iniciar sesión en el sitio, http://www.asisonline.org
 Steps to Download Standards & Guidelines from the ASIS International Website / Pasos para Descargar los Standards & Guidelines de la Página Web de ASIS International 1. Sign in to the website, http://www.asisonline.org
IMPORTANTE! CONSERVE LAS INSTRUCCIONES PARA UTILIZARLAS EN EL FUTURO.
 Visítenos en nuestro sitio web www.infantino.com para: Videos de instrucción Manuales en otros idiomas Más información del producto Transportador Union Instrucciones del manual del propietario IMPORTANTE!
orientado hacia atrás y hacia adelante Manual del usuario ECE R44 04 Grupo Peso Edad 0+/1 0-18 kg 6m-4a
 orientado hacia atrás y hacia adelante Manual del usuario ECE R44 04 Grupo Peso Edad 0+/1 0-18 kg 6m-4a 1 Gracias por elegir BeSafe izi Combi. BeSafe ha desarrollado este asiento con mucho cuidado, para
Adjustable Infant Restraint Base
 Adjustable Infant Restraint Base You must read and understand both the owner s manual from the infant restraint and these instructions before using the infant restraint and base. Keep this sheet with the
ALTO. Silla de bebé para el automóvil
 ADVERTENCIA Cerciórese de leer con cuidado y comprender todas las instrucciones y advertencias de este manual. No usar debidamente esta silla de bebé para el automóvil aumentará el riesgo de LESIONES GRAVES
Bow Window without Head and Seat Boards Ventana panorámica en curva sin cabeceras ni bases
 Bow Window Rough Opening Sizes Tamaños de abertura no acabada de la ventana panorámica en curva for ndersen Casement CR, CN, C, CW, CX & CXW Windows para ventanas batientes ndersen CR, CN, C, CW, CX y
INSTRUCCIONES DE USO
 INSTRUCCIONES DE USO SILLA INFANTIL PARA AUTOMÓVIL GRUPO Ⅰ+II+III Modelos: BARI y CATANIA VÁLIDO PARA PESOS ENTRE 9 Y 36KGS. AVISO 1. Se trata de un asiento de seguridad universal, según se aprueba en
Booster Seat. Owner s Manual
 Booster Seat Owner s Manual READ THIS MANUAL. Do not install or use this car seat until you read and understand the instructions in this manual. FAILURE TO PROPERLY USE THIS CAR SEAT INCREASES THE RISK
Booster Seat. Owner s Manual
 Booster Seat Owner s Manual READ THIS MANUAL. Do not install or use this car seat until you read and understand the instructions in this manual. FAILURE TO PROPERLY USE THIS CAR SEAT INCREASES THE RISK
Instructivo de uso y cuidado del Aplicador de Implantes Lapisa. Productos Destacados
 Instructivo de uso y cuidado del Aplicador de Implantes Lapisa Productos Destacados Diseño ergonómico Producido con materiales de larga duración para asegurar una vidá útil prolongada Espacio para aguja
ST7155 Discovery Plus
 MANUAL DE INSTRUCCIONES ST7155 Discovery Plus Advertencia / Cuidados Sistema y uso Problemas y soluciones / Mantenimiento Cátulo Castillo 2437 - C.A.B.A. - Argentina Tel.: (011) 4943-0600 y líneas rotativas
Instructional Supplement for Full-Body Harness with High-Vis Vest. Section 1: Warnings. 2.3 - Leg Strap Stash Pouch. 2.
 Instructional Supplement for Full-Body Harness with High-Vis Vest Section 1: Warnings 1. Lift the harness by the back D-ring and untangle the straps, allowing the leg straps to hang free. 2. Don the vest
DEFENDER 360 3-IN-1 DELUXE CAR SEAT INSTRUCTION MANUAL
 DEFENDER 360 3-IN-1 DELUXE CAR SEAT INSTRUCTION MANUAL This child restraint is designed for use by children who meet the following requirements: WITH HARNESS: Weight: 22-65 lbs (10-29.5 kg) Height: 27-57
Preparación de la Piel para la Cirugía
 Skin Prep for Surgery Patient identification label Preparación de la Piel para la Cirugía Esta preparación de la piel antes de la cirugía puede ayudar a reducir el riesgo de infección. Lea estos 12 pasos
DIAMOND Gear Company, LTD. an ERIKS Company. Installation, Maintenance, & Operation Manual DECLUTCHABLE WORM GEAR
 DIAMOND Gear Company, LTD. an ERIKS Company Installation, Maintenance, & Operation Manual 2013 INSTRUCTIONS This is an instructional manual which provides general installation, operation, and maintenance
User Manual Manual del usuario
 User Manual Manual del usuario bed assist rail Baranda de ayuda para la cama English...3 Español...11 Contents Safety...4 Instructions...4 Safety SAFETY This unit is not meant to support full body weight
Sierra Security System
 Using Your SpreadNet Accessories With Your Sierra Security System Uso de Sus Accesorios SpreadNet Con Su Sistema de Seguridad Sierra SN990-KEYPAD SN961-KEYFOB SN991-REMOTE 1 SN990-KEYPAD The SN990-KEYPAD
MODEL: F / MODELO: F END TABLE WITH MEDIA STAND & MAGAZINE HOLDER MESA RINCONERA CON ESTANTE & REVISTERO
 MODEL: 11225479F / MODELO: 11225479F END TABLE WITH MEDIA STAND & MAGAZINE HOLDER MESA RINCONERA CON ESTANTE & REVISTERO NO A B C D E F G H I J K L PARTS LIST AND HARDWARE PARTES Y ACCESORIOS PARTS LIST
π H-3905 PUSH FOAMING SOAP DISPENSER INSTALLATION 1-800-295-5510 uline.com MOUNTING INSTRUCTIONS APPLYING DISPENSER LABEL TOOLS NEEDED TAPE MOUNTING
 π H-3905 PUSH FOAMING SOAP DISPENSER 1-800-295-5510 uline.com Para Español, vea páginas 4-6. TOOLS NEEDED Phillips Screwdriver Electric Drill INSTALLATION APPLYING DISPENSER LABEL 1. Peel label from backing.
Manual de Instrucciones para el autoasiento Infantil / Booster
 Manual de Instrucciones para el autoasiento Infantil / Booster Autoasiento infantil Autoasiento booster Certificado para uso en vehículos automotores Reúne o supera todos los requerimientos aplicables
AFFIX TM Booster Seat. Owner s Manual
 AFFIX TM Booster Seat Owner s Manual READ THIS MANUAL. Do not install or use this car seat until you read and understand the instructions in this manual. FAILURE TO PROPERLY USE THIS CAR SEAT INCREASES
PRIMO VIAGGIO SIP 30 30
 USA Istructions for use EN (LF) PRIMO VIAGGIO SIP 30 30 Side Impact Protection O W N E R S M A N U A L WARNING: Do not install or use this infant restraint until you read and understand all instructions
fisher-price.com W1664 W3139 BMG90 Newborn 0-3 months and up to 15 lb (6,8 kg) maximum Recién nacido 0-3 meses y hasta 6,8 kg
 maximum Recién nacido 0-3 meses y hasta 6,8 kg") W1664 W3139 BMG90 Newborn 0-3 months and up to 15 lb (6,8 kg) maximum Recién nacido 0-3 meses y hasta 6,8 kg Infant 3-6 months and up to 20 lb (9 kg) maximum Bebé 3-6 meses y hasta 9 kg IMPORTANT! Please
W1664 W3139 BMG90 Newborn 0-3 months and up to 15 lb (6,8 kg) maximum Recién nacido 0-3 meses y hasta 6,8 kg Infant 3-6 months and up to 20 lb (9 kg) maximum Bebé 3-6 meses y hasta 9 kg IMPORTANT! Please
Manual de instrucciones Performance SPORT
 Asientos de seguridad para niños Manual de instrucciones Performance SPORT Sistema de retención infantil combinado para instalación mirando hacia adelante conforme a la Norma Federal de Seguridad de Vehículos
Applying the PreFab LSO Brace
 Applying the PreFab LSO Brace Your doctor will tell you when to wear your brace during the day and for how long to wear it. Always wear a t-shirt under the brace to provide a barrier between your skin
Booster Seat. Owner s Manual
 Booster Seat Owner s Manual READ THIS MANUAL. Do not install or use this car seat until you read and understand the instructions in this manual. FAILURE TO PROPERLY USE THIS CAR SEAT INCREASES THE RISK
Learning Masters. Early: Force and Motion
 Learning Masters Early: Force and Motion WhatILearned What important things did you learn in this theme? I learned that I learned that I learned that 22 Force and Motion Learning Masters How I Learned
manual del usuario izi Modular: a contra marcha y en el sentido de la marcha izi Modular (RF): solo a contra marcha
: solo a contra marcha") a f d e b c i manual del usuario g h 4 > 5 cm izi Modular: a contra marcha y en el sentido de la marcha izi Modular (RF): solo a contra marcha 5 Altura a contra marcha: desde 6 cm hasta 05 cm Altura en
a f d e b c i manual del usuario g h 4 > 5 cm izi Modular: a contra marcha y en el sentido de la marcha izi Modular (RF): solo a contra marcha 5 Altura a contra marcha: desde 6 cm hasta 05 cm Altura en
IMPORTANTE! CONSERVE LAS INSTRUCCIONES PARA UTILIZARLAS EN EL FUTURO.
 Transportador Frente a Espalda Flip Instrucciones del manual del propietario Visítenos en nuestro sitio web www.infantino.com para: Videos de instrucción Manuales en otros idiomas Más información del producto
Instruction Manual. Avoid injury or death - Read and understand this manual!
 Instruction Manual Avoid injury or death - Read and understand this manual! ISPC099BA 5/06 US TABLE OF CONTENTS Instruction manual is for: ComfortSport 5-Point Newborn/Toddler Child Restraint ComfortSport
Portabebé para niños pequeños
 The Emily Center Portabebé para niños pequeños Car Seats for Small Infants Child Care/Health Promotion If you would like the English version of this handout, please ask your nurse or doctor. #730/492s
Fácil reparación de Packard Bell
 Fácil reparación de Packard Bell Unidad CD-ROM / DVD Importantes instrucciones de comprobación de seguridad Tiene que leer todas las instrucciones con cuidado antes de que comience a trabajar y cumplir
RTA-B002 DIMENSIONS MAXIMUM WEIGHT CAPACITIES. Highest position. Lowest position. Product Size: 22"W x 16"D x 30.5~46.5"H
 MODEL RTA - B002 Thanks for purchasing one of our products. Please read carefully the assembly instructions before the installation. Please save this manual for future reference. MODEL RTA-B002 MODELO
π H-3539 MONARCH 1130 ONE LINE LABEL GUN
 π H- MONARCH ONE LINE LABEL GUN --- uline.com Para Español, vea páginas -. INSTRUCTIONS Changing the ink roller. Pull the latches back and swing the cover open completely. You should hear a click. NOTE:
Instalación y desinstalación de las unidades reemplazables in situ para Secure Access 6000
 Instalación y desinstalación de las unidades reemplazables in situ para Secure Access 6000 No. de pieza: 093-1691-000 Rev. B Esta guía contiene información sobre la instalación y desinstalación de las
ROCK N STEREO SOUND DESK
 Read and save these instructions ROCK N STEREO SOUND DESK RTA-M1102-BK INSTRUCTIONS TABLE OF CONTENTS PACKAGE INCLUDES Package Includes... 2 Specifications... 2 Product Parts List... 3 1 2 3 Product Details...
INSTRUCCIONES DE INSTALACIÓN Panel de ducha
 INSTRUCCIONES DE INSTALACIÓN 3866M 3872M Panel de ducha ANTES DE COMENZAR Toda la información contenida en las instrucciones está basada en la información más reciente del producto disponible al momento
Creando Cuentas Nuevas para Padres / Alumnos en el
 Creando Cuentas Nuevas para Padres / Alumnos en el Portal de Internet Aeries de YCJUSD El portal de Internet Aeries proporciona una manera segura para acceder a información sobre la asistencia y el progreso
ENKVM-USBB. 2-Port USB KVM switch with Easy Switch and Cable. User Guide
 ENKVM-USBB 2-Port USB KVM switch with Easy Switch and Cable User Guide i Package Contents 1 ENKVM-USBB 2-Port USB KVM Switch with Easy Switch and Cable 1 User Guide Requirements Console A VGA, SVGA, XGA,
Rotator Cuff Exercises
 Rotator Cuff Exercises These exercises may be used after rotator cuff injury to the shoulder or for strengthening the shoulder. Do these exercises while lying face down on an exercise table or other sturdy
SYSTEM INSTALLATION MANUAL MANUAL DE INSTALACIÓN
 SYSTEM INSTALLATION MANUAL MANUAL DE INSTALACIÓN Measuring Tape Cinta métrica Ø 8 mm twist drill (wood) Broca espiral Ø 8 mm (para madera) Ø 14 mm stone drill (brick) Broca para piedra Ø14 mm (ladrillo)
Instruction Manual Wallaboo baby sling
 Baby Sling Original Wear it. Love it. Instruction Manual Wallaboo baby sling Porte bébe - Draagdoek - Babytrage - Portabebé www.wallaboo.com Baby Sling - Draagdoek - Porte bébe - Babytrage - Portabebé
Conditioning Exercises: Sitting
 Conditioning Exercises: Sitting All of these exercises are done sitting at the edge of the bed or in a chair. Bend your knees and keep your feet flat on the floor. Do only the exercises checked (4) below.
Neuvo. Owner's Manual Manual del propietario
 Read all instructions BEFORE assembly and USE of product. KEEP INSTRUCTIONS FOR FUTURE USE. Lea todas las instrucciones ANTES de armar y USAR este producto. CONSERVE LAS INSTRUCCIONES PARA USO FUTURO.