Light it Up Pro Basketball Set
|
|
|
- Gregorio Castro Gallego
- hace 6 años
- Vistas:
Transcripción
1 8426 Light it Up Pro Basketball Set For assistance or replacement parts please contact : The Step2 Company, LLC Aurora-Hudson Rd. Streetsboro, OH USA USA & Canada Only (330) Step2 UK LTD Great Bank Road Wingates Industrial Estate BOLTON BL5 3XU Uk freephone: Step2 UK website: DISPOSAL INSTRUCTIONS: 1. Disassemble so that no unreasonable hazards exist. Please recycle when possible. Disposal must be in compliance with all government regulations. IMPORTANT: Do not mix old and new batteries. Do not mix alkaline, standard (carbon-zinc), or rechargeable (nickel-cadmium) batteries. Do not recharge non-rechargeable batteries. Rechargeable batteries are to be removed from the toy before recharging. Rechargeable batteries are to be charged only under adult supervision. Batteries must be inserted with the correct polarity. Exhausted batteries are to be removed from the toy. The supply terminals are not to be short circuited. Intended for use by children from ages 2 and up. OBSERVE THE FOLLOWING STATEMENTS AND WARNINGS TO REDUCE THE LIKELIHOOD OF SERIOUS OR FATAL INJURY. SAVE THIS SHEET FOR FUTURE REFERENCE. WARNING Instruct children not to use product until properly assembled Do not use without sand or water in the base Holds 30 lbs. of sand or 2.5 gallons of water Use only the balls provided with this unit Never allow children to use the equipment in a manner other than intended, WARNING: STRANGULATION HAZARD- Serious injury or death can occur. Do not: - attach jump ropes, clothes lines, pet leashes or other loose hanging items not specifically designed for use with this equipment. INSTALLATION: 1. Create an obstacle-free site to reduce injury. Maintain a minimum distance of 6.5 feet (2 m) from structures or obstructions (examples: a fence, buildings, garages, houses, low hanging branches, tree stumps/roots, large rocks, bricks, concrete, laundry lines, or electrical wires) 2. Choose a level location for the equipment to reduce the likelihood of the play set tipping over 3. Provide enough room so that children can use equipment safely 4. Check to be sure all connections are tight. DO NOT allow children to play on the product until it is fully assembled. 5. Decal Application: Clean and dry area thoroughly. Center decal in area. Apply pressure from center to outer edge. OPERATION INSTRUCTIONS: 1. An adult should supervise play on this product for children of all ages. 2. Dress children appropriately, including wearing well-fitting shoes that fully protect feet. 3. Instruct children to remove articles, before playing on equipment, that create hazards when they get tangled and caught. Examples include: ponchos, scarves, and other loose-fitting clothing, bike or other sports helmets. 4. Never allow children to: - use the equipment in a manner other than intended, - Use equipment when it is snow-covered or wet. - use this product when temperatures fall below 32ºF (0ºC). Plastic materials may become brittle and crack. MAINTENANCE INSTRUCTIONS: 1. Inspect the product periodically for loose or damaged components. At the beginning of each season, re-install any plastic parts, that may have been removed and stored during the winter months. Check the following items at the beginning of each season at least twice monthly during the usage: - all connections for tightness, Tighten as required. - the condition of the equipment. Look for signs of wear and tear such as broken or missing components. Repair as necessary. Replace all damaged or worn parts as needed. For replacement parts, see Contact Information at the top of Page Cleaning Instructions: Electronic Components: Do not submerge in water or spray liquid directly on unit. Use mild detergent solution. Wipe with damp cloth. General Cleaning: Use mild soapy wate THIS DEVICE COMPLIES WITH PART 15 OF THE FCC RULES. OPERATION IS SUBJECT TO THE FOLLOWING TWO CONDITIONS: (1) THIS DEVICE MAY NOT CAUSE HARMFUL INTERFERENCE, AND (2) THIS DEVICE MUST ACCEPT ANY INTERFERENCE RECEIVED, INCLUDING INTERFERENCE THAT MAY CAUSE UNDESIRED OPERATION THIS CLASS B DIGITAL APPARATUS COMPLIES WITH CANADIAN ICES-003. WARNING: CHANGES OR MODIFICATIONS TO THIS UNIT NOT EXPRESSLY APPROVED BY THE PARTY RESPONSIBLE FOR COMPLIANCE COULD VOID THE USER S AUTHORITY TO OPERATE THE EQUIPMENT. NOTE: THIS EQUIPMENT HAS BEEN TESTED AND FOUND TO COMPLY WITH THE LIMITS FOR A CLASS B DIGI- TAL DEVICE, PURSUANT TO PART 15 OF THE FCC RULES. THESE LIMITS ARE DESIGNED TO PROVIDE REASON- ABLE PROTECTION AGAINST HARMFUL INTERFERENCE IN A RESIDENTIAL INSTALLATION. THIS EQUIPMENT GENERATES, USES, AND CAN RADIATE RADIO FREQUENCY ENERGY AND, IF NOT INSTALLED AND USED IN ACCORDANCE WITH THE INSTRUCTIONS, MAY CAUSE HARMFUL INTERFERENCE TO RADIO COMMUNICA- TIONS. HOWEVER, THERE IS NO GUARANTEE THAT INTERFERENCE WILL NOT OCCUR IN A PARTICULAR INSTALLATION. IF THIS EQUIPMENT DOES CAUSE HARMFUL INTERFERENCE TO RADIO OR TELEVISION RECEP- TION, WHICH CAN BE DETERMINED BY TURNING THE EQUIPMENT OFF AND ON, THE USER IS ENCOURAGED TO TRY TO CORRECT THE INTERFERENCE BY ONE OR MORE OF THE FOLLOWING MEASURES: - REORIENT OR RELOCATE THE RECEIVING ANTENNA. - INCREASE THE SEPARATION BETWEEN THE EQUIPMENT AND RECEIVER. - CONNECT THE EQUIPMENT INTO AN OUTLET ON A CIRCUIT DIFFERENT FROM THAT TO WHICH THE RECEIVER IS CONNECTED. - CONSULT THE DEALER OR AN EXPERIENCED RADIO/ TV TECHNICIAN FOR HELP. Thank you for purchasing the Step2 Light it Up Pro Basketball Set. We d appreciate a few minutes of your time to complete a brief survey so we can continue providing you with great products. To participate, please visit our website at: Thank you for your time, John Vresics CEO/President 01/ Conçu pour une utilisation par des enfants de 2 et plus. RESPECTEZ LES ÉNONCÉS ET AVERTISSEMENTS SUIVANTS POUR RÉDUIRE LA PROBABILITÉ DE BLESSURE GRAVE, VOIRE MORTELLE. CONSERVEZ CETTE FEUILLE POUR RÉFÉRENCE ULTÉRIEURE. MISE EN GARDE: DANGER D ÉTOUFFEMENT - Petite pièces. Points de Sharp. Assemblage par un adulte requis. MISE EN GARDE Dites aux enfants de ne pas utiliser le produit jusqu à ce qu il soit assemblé correctement. N utilisez pas le produit sans sable ni eau dans la base. De base peut contenir 13,6 kg (30 lb) de sable ou 9,5 l (2.5 gal.) de l eau N utilisez que les balles fournies avec ce produit. Ne laissez jamais les enfants utiliser l équipement de manière autre que celle prévue /13/14 1
2 MISE EN GARDE: RISQUE D ETRANGLEMENT - des blessures graves, voire mor telles, peuvent se produire. Ne pas : - attacher des cordes à sauter, des cordes à linge, des laisses pour animaux de compagnie ou autres objets mobiles suspendus qui ne sont pas spécifiquement conçus une utilisation avec cet équipement. INSTALLATION : 1. Créez un site sans obstacles pour réduire les blessures. Maintenez une distance minimum de 2 m avec toute structure ou tout obstacle (par exemple, une barrière, un bâtiment, des branches basses pendantes, des souches et/ou racines d arbres, de grandes roches, des briques, du béton, les garages, les maisons, ou fils électriques. 2. Choisissez pour l équipement un emplacement de niveau afin de réduire le risque de basculement de l ensemble. 3. Prévoyez suffisamment d espace pour que les enfants puissent utiliser l équipement en toute sécurité 4. Assurez-vous que toutes les connexions sont serrées. NE laissez PAS les enfants jouer sur le produit tant que ce dernier n est pas complètement installé. 5. Application des décalcomanies : Nettoyez et séchez soigneusement la zone. Centrez la décalcomanie dans la zone. Appliquez une pression du centre vers le bord extérieur. INSTRUCTIONS D UTILISATION : 1. Les enfants de tous âges doivent jouer sur ce produit sous la supervision d un adulte. 2. Les enfants doivent être vêtus de manière appropriée, y compris le port de chaussures bien ajustées qui protègent pleinement les pieds. 3. Dites aux enfants : - avant de jouer sur l équipement, enlevez les articles qui créent des dangers s ils s emmêlent et se prennent. Parmi les exemples figurent les ponchos, les foulards et autres vêtements amples, les casques de vélo ou autres de sport. 4. Ne laissez jamais les enfants : - utiliser l équipement de manière autre que celle prévue, - monter sur l équipement quand il est recouvert de neige ou humide, - utiliser ce produit lorsque les températures chutent en dessous 0 C (32 F). Les produits en plastique peuvent se casser et se fissurer. INSTRUCTIONS D ENTRETIEN : 1. Vérifiez régulièrement l état du produit afin de détecter toute pièce abîmée ou desserrée. Au début de chaque saison, remontez toute pièce en plastique enlevée durant l entreposage du produit durant les mois d hiver. Vérifiez les éléments suivants au début de chaque saison au moins deux fois par mois durant l utilisation : - la solidité de toutes les connexions. Resserrez-les si nécessaire. - l état de l équipement. Vérifiez qu il n existe aucun élément usé ou abîmé, par exemple des composants cassés ou manquants. Effectuez toute réparation nécessaire. Pour les pièces de rechange, reportez-vous aux informations de contact en haut de la page Instructions de nettoyage : Composants électroniques : Ne plongez pas l unité dans l eau et ne la vaporisez jamais directement de liquide. Essuyez avec un chiffon mouillé d une solution de détergent doux. Nettoyage général : Utilisez de l eau savonneuse douce. INSTRUCTIONS DE MISE AU REBUT: 1. Démontez afin d éliminer tout danger déraisonnable. Veuillez recycler dans la mesure du possible. La mise au rebut doit être effectuée conformément à toutes les lois nationales IMPORTANT : N utilisez pas à la fois des piles usagées et des piles neuves. N utilisez pas à la fois des piles alcalines et des piles standard (carbone-zinc) ou des piles rechargeables (nickel-cadmium). Ne rechargez pas des piles non rechargeables. Les piles rechargeables doivent être retirées du jouet avant d être rechargées. Les piles rechargeables ne doivent être rechargées qu en présence d un adulte. Les piles doivent être mises en place en respectant la polarité indiquée. Enlevez les piles usées du jouet. Les bornes d alimentation ne doivent pas être court-circuitées. CET APPAREIL NUMÉRIQUE DE LA CLASSE B EST CONFORME Á LA NORME NMB-003 DU CANADA Se recomienda el uso de este producto para niños mayores de 2 años. RESPETE LAS SIGUIENTES RECOMENDACIONES Y ADVERTENCIAS PARA DISMINUIR LA PROBABILIDAD DE SUFRIR LESIONES GRAVES O MORTALES. CONSERVE ESTA HOJA PARA SU CONSULTA EN EL FUTURO. ADVERTENCIA: RIESGO DE ASFIXIA: Contiene piezas pequeñas. Sharp puntos. Requiere montaje por parte de un adulto. ADVERTENCIA Asegúrese que los niños no utilicen este producto hasta que se haya finalizado su montaje. No lo use sin arena o agua en la base. Contiene 13,6 kg (30 lb) de arena o 9,5 l (2.5 gal.) de agua Úsese sólo con las pelotas incluidas en este juego. Nunca permita que los niños utilicen el equipo de una manera para la que no fue diseñado ADVERTENCIA: RIESGO DE ESTRANGULACIÓN- Pueden ocurrir lesiones graves o mortales. No: - ate cuerdas de saltar, tendederos, correas de animales u otros objetos que cuel guen, que no estén específi camente diseñados para usarse con este equipo. INSTALACIÓN: 1. Para reducir lesiones asegúrese que la zona se encuentre libre de obstáculos. Man tenga una distancia mínima de por lo menos 2 m de estructuras u obstrucciones tales como cercas, edificios, ramas bajas, tocones y/o raíces de árboles, rocas grandes, ladrillos, hormigón, garajes, casas, o cables eléctricos. 2. Elija un área nivelada para el equipo para reducir la probabilidad de que éste se vuelque 3. Proporcione suficiente espacio para que los niños utilicen el equipo de manera segura. 4. Asegúrese que todas las conexiones estén ajustadas. NO permita que los niños jueg uen en el producto hasta que no esté completamente montado. 5. Colocación de los adhesivos: Limpie y seque la superficie en profundidad. Sitúe la lámina en la posición correcta. Presione desde el centro hacia los bordes. INSTRUCCIONES DE FUNCIONAMIENTO: 1. Un adulto debe supervisar a niños de todas las edades cuando jueguen en este producto. 2. Vista a los niños adecuadamente, lo cual incluye zapatos que calcen bien y que protejan los pies completamente. 3. Asegúrese que los niños: - se quiten antes de jugar en el equipo, objetos que puedan suponer un riesgo al quedar enredados y enganchados. Tales objetos incluyen: ponchos, bufandas y otras prendas sueltas, también cascos que se utilizan para bicicleta o para otros deportes. 4. Nunca permita que los niños: - utilicen el equipo de una manera para la que no fue diseñado. - se suban al juego cuando esté húmedo o cubierto de nieve. - utilicen el equipo cuando las temperaturas sean inferiores a 0ºC (32ºF). Los mate riales plásticos pueden quebrarse y agrietarse. INSTRUCCIONES DE MANTENIMIENTO: 1. Examine el producto periódicamente por si hubiera componentes dañados o sueltos. Al principio de cada temporada vuelva a instalar cualquier pieza de plástico que haya quitado y guardado durante los meses de invierno. Al principio de cada temporada de uso y durante dicha temporada inspeccione lo siguiente por lo menos dos veces al mes: - todas las conexiones. Asegúrese que estén bien apretadas y apriételas según sea necesario. - la condición del equipo. Asegúrese que no haya indicaciones de desgaste tales como componentes que falten o estén dañados. Repárelos según sea necesario Para obtener piezas de repuesto, consulte la información de contacto en la parte superior de la página Instrucciones para la limpieza: Componentes electrónicos: No sumerja el producto en agua ni lo rocíe con líquido directamente. Hume dezca un paño con una solución de detergente suave para limpiarlo Limpieza general: Utilice una solución de agua y jabón suave. INTRUCCIONES PARA LA ELIMINACIÓN: 1. Desármelo para evitar riesgos innecesarios. Recicle los componentes si tiene la posi bilidad. La eliminación de este producto se debe realizar de conformidad con la normativa gubernamental. IMPORTANTE: No utilice pilas viejas y pilas nuevas al mismo tiempo. No mezcle pilas alcalinas, pilas comunes (de carbono-cinc) y pilas recargables entre sí (nickel-cadmium). No recargue pilas que no sean recargables. Retire las pilas recargables del juguete antes de recargarlas. Recargue las pilas siempre bajo la supervisión de un adulto. Instale las pilas con la polaridad correcta. Extraiga del juguete las pilas que estén descargadas. Compruebe que no se hayan producido cortocircuitos en las terminales de suministro. 2
3 Prodotto inteso per l uso da parte di bambini dai 2 anni in su. OSSERVARE LE SEGUENTI DICHIARAZIONI E AVVERTENZE PER RIDURRE IL RISCHIO DI INFORTUNI GRAVI O FATALI. CONSERVARE QUESTO FOGLIO PER FUTURO RIFERIMENTO. AVVERTENZE: RISCHIO DI SOFFOCAMENTO - Parti di dimensioni ridotte. Sharp punti. È necessario il montaggio da parte di adulti. ADVERTENCIA Insegnare ai bambini di non utilizzare il prodotto prima del montaggio. Non utilizzare senza sabbia o acqua nella base. La base può contenere fino a 13,6 kg (30 lb) di sabbia o a 9,5 l (2.5 gal.) di acqua Utilizzare esclusivamente le palle fornite con l unità. NON permettere MAI ai bambini di usare l attrezzatura in modo diverso da quanto previsto AVVERTENZE: RISCHIO DI STRANGOLAMENTO- Possono verificarsi lesioni personali gravi o morte. Non: - attaccare corde da salto, fili per il bucato, guinzagli o altri elementi pendenti non specificatamente progettati per l utilizzo con questo apparecchio. INSTALLAZIONE: 1. Creare uno spazio privo di ostacoli per ridurre il rischio di lesioni. Mantenere una distanza minima di 2 m da strutture o da ostacoli (per esempio: recinzione, edifici, rami bassi sovrastanti, radici/ceppi di alberi, massi, mattoni, garage, case, cemento, o cavi elettrici. 2. Per ridurre le probabilità di ribaltamento del set di gioco, scegliere una posizione in piano. 3. Dotare di spazio a sufficienza in modo che i bambini possano utilizzare l attrezzatura in modo sicuro 4. Verificare accuratamente che tutti i collegamenti siano ben saldi. NON permettere ai bambini di giocare con l attrezzatura prima che questa sia stata completamente as semblata. 5. Applicazione delle decalcomanie: Pulire e asciugare l area accuratamente. Posizionare la decalcomania al centro dell area. Premere la decalcomania dal centro verso l esterno ISTRUZIONI DI FUNZIONAMENTO: 1. È richiesta la presenza costante di un adulto durante il gioco per bambini di tutte le età. 2. Vestire i bambini in modo appropriato, incluso scarpe della misura appropriata che proteggano comple tamente i piedi. 3. Insegnare ai bambini: - rimuovere oggetti, prima di utilizzare il giocattolo, che possono creare pericoli se aggrovigliati e afferrati. Alcuni esempi: poncho, sciarpe e altri indumenti larghi, caschi per il ciclismo o per altri sport. 4. NON permettere MAI ai bambini di: - usare l attrezzatura in modo diverso da quanto previsto, - arrampicarsi sull attrezzatura quando è coperta di neve o bagnata. - utilizzare questo prodotto quando la temperatura è inferiore a 0ºC (32ºF). I mate riali di plastica potreb bero diventare fragili e spezzarsi. ISTRUZIONI PER LA MANUTENZIONE: 1. Ispezionare periodicamente il prodotto per verificare la presenza di componenti allentati o danneggiati. All inizio di ogni stagione, reinstallare le parti in plastica che potrebbero essere state rimosse e conservate nei mesi invernali. Controllare i seguenti elementi almeno due volte al mese durante l utilizzo e all inizio di ogni stagione: - tenuta di tutti i collegamenti. Serrare se necessario. - condizione dell attrezzatura. Verificare la presenza di segni di usura, quali componenti danneggiati o mancanti. Riparare se necessario. Per la sostituzione delle parti, vedere le Informazioni di contatto in alto alla Pagina Istruzioni per la pulizia: Componenti elettronici: Non immergere in acqua o liquido né spruzzare liquidi direttamente sull unità. Pulire con un panno umido utilizzando una soluzione detergente delicata. Pulizia generale: Utilizzare acqua con sapone delicato ISTRUZIONI PER LO SMALTIMENTO: 1. Smontare il prodotto in modo da impedire ogni pericolo. Riciclare quando possibile. Lo smaltimento deve essere effettuato in conformità con tutti i regolamenti previsti dal governo. IMPORTANTE: Non mescolare batterie scariche e nuove. Non mescolare batterie alcaline, standard (zinco-carbonio) o ricaricabili (nichel-cadmio). Non tentare di ricaricare batterie non ricaricabili. Rimuovere dal giocattolo le batterie ricaricabili prima di ricaricarle. Le batterie devono essere ricaricate sotto la supervisione di un adulto. Inserire le batterie con la polarità corretta Rimuovere dal giocattolo le batterie scariche. Non collegare in corto circuito i capicorda. Bestemd voor gebruik door kinderen van 2 jaren en ouder. NEEM DE VOLGENDE VERKLARINGEN EN WAARSCHUWINGEN IN ACHT OM WAARSCHIJNLIJK ERNSTIG OF FATAAL LETSEL TE VERMINDEREN. BEWAAR DIT BLAD VOOR TOEKOMSTIGE REFERENTIE. WAARSCHUWING: VERSTIKKINGSGEVAAR - Kleine onderdelen. Scherpe punten. Montage door volwassene vereist. WAARSCHUWING Instrueer kinderen het product niet te gebruiken tot het goed in elkaar is gezet. Niet gebruiken zonder zand of water in het voetstuk. De grondvesten kan 13,6 kg (30 lb) zand bevatten of voor 9,5 l (2.5 gal.) water Gebruik alleen de ballen die zijn meegeleverd met dit product. Laat kinderen nooit de uitrusting gebruiken op een andere wijze dan beoogd WAARSCHUWING: VERSTIKKINGSGEVAAR - Ernstig letsel of overlijden kan voorkomen. Niet: - springtouwen, waslijnen, leibanden of andere loshangende dingen bevestigen die niet specifiek ontworpen zijn voor gebruik met deze uitrusting. INSTALLATIE: 1. Creëer een obstakelvrije plaats om letsel te verminderen. Houd een minimale afstand van 2 m (6,5 feet) aan van structuren of obstructies (bijvoorbeeld: een hek, gebouwen, laaghangende takken, boomstom pen/wortels, grote stenen, bakstenen, beton, garages, huizen, of elektrische draden. 2. Kies een vlakke ondergrond voor de uitrusting om de kans te beperken dat het speeltoestel omvalt. 3. Zorg voor genoeg ruimte zodat kinderen de uitrusting veilig kunnen gebruiken 4. Controleer dat alle verbindingen goed vastzitten. Laat kinderen NIET spelen op het product totdat het volledig in elkaar is gezet. 5. Plakplaatje aanbrengen: Reinig en droog het gebied grondig. Centreer het plakplaatje in het gebied. Pas druk toe vanuit het midden naar de buitenrand. BEDIENINGSINSTRUCTIES: 1. Ee n volwassene dient toezicht te houden op spelen op dit product voor kinderen van alle leeftijden. 2. Kleed kinderen op gepast wijze aan, waaronder goedpassende schoenen dragen die de voeten volledig beschermen. 3. Draag kinderen op: - alvorens op het toestel te spelen, artikelen te verwijderen die gevaren vormen wanneer ze verstrikt raken en gevangen worden. Voorbeelden zijn onder meer: poncho s, sjaals en andere losse kleding, fiets- en andere sporthelmen. 4. Laat kinderen nooit: - de uitrusting gebruiken op een andere wijze dan beoogd. - op de uitrusting klimmen wanneer die bedekt is met sneeuw of nat is. - dit product gebruiken wanneer de temperatuur onder 0ºC valt. Plastic materiaal kan bros worden en scheuren. 3
4 ONDERHOUDSINSTRUCTIES: 1. Inspecteer het product periodiek op losse of beschadigde componenten. Installeer aan het begin van elk seizoen de plastic onderdelen die mogelijk zijn verwijderd en opgeslagen gedurende de wintermaanden opnieuw. Controleer de volgende zaken aan het begin van elk seizoen en ten minste tweemaal per maand tijdens het gebruiksseizoen: - dat alle verbindingen stevig vastzitten. Draai ze zo nodig aan. - de toestand van de uitrusting. Zoek naar tekenen van slijtage, zoals gebroken of ontbrekende onderdelen. Repareer zo nodig Zie voor vervangende onderdelen de con tactgegevens bovenaan pagina Reinigingsinstructies: Elektronische onderdelen: Niet in water onderdompelen of rechtstreek vloeistof op de eenheid sproeien. Met behulp van een mild wasmiddel en een vochtige doek afvegen. Algemene reiniging: Een mild sopje gebruiken. AFVOERINSTRUCTIES: 1. Demonteer zodat er geen onredelijke gevaren bestaan. Recyclen wanneer mogelijk. Afvoeren moet gebeuren in overeenstemming met alle overheidsvoorschriften. BELANGRIJK: Geen oude en nieuwe batterijen door elkaar gebruiken. Geen alkali-, standaard (koostofzink) of oplaadbare (nikkel-cadmium) batterijen door elkaar gebruiken. Niet oplaadbare batterijen niet opnieuw opladen. Oplaadbare batterijen dienen te worden verwijderd uit het speelgoed voordat ze opgeladen worden. Op laadbare batterijen mogen alleen worden opgeladen onder toezicht van een volwassene. Batterijen moeten met de juiste polariteit worden aangebracht. Lege batterijen dienen te worden verwijderd uit het speelgoed. De voedingspolen mogen niet worden kortgesloten. Destina-se a ser utilizado por crianças com 2 ou mais anos de idade RESPEITE AS SEGUINTES ADVERTÊNCIAS E AVISOS PARA REDUZIR A PROBABILIDADE DE UMA LESÃO GRAVE OU FATAL. GUARDA ESTA FOLHA PARA REFERÊNCIA FUTURA. AVISO: PERIGO DE SUFOCAMENTO Peças pequenas. Sharp pontos. Necessária a montagem por adultos. AVISO Instrua as Crianças para que não usem o produto até que esteja devidamente montado. Não utilizar sem areia ou água na base. A base su porta 13,6 kg (30 lb) de areia ou 4,7 l 9,5 l (2.5 gal.) de água Utilizar apenas as bolas fornecidas com esta unidade. Nunca permita que as crianças utilize o equipamento de uma forma diferente da prevista AVISO: PERIGO DE ESTRANGULAMENTO Podem ocorrer ferimentos graves ou a morte. Não: - ate cordas de saltar, cordas da roupa, trelas de animais de estimação ou outros objectos suspensos não concebidos especificamente para a utilização com este equipamento. INSTALAÇÃO: 1. Crie um local livre de obstáculo para reduzir a possibilidade de ferimentos. Man tenha uma distância mínima de 2 m de estruturas ou obstruções (exemplos: cercas, edifícios, árvores com ramos baixos, troncos/raízes de árvores, rochas de grandes dimensões, tijolos, betão, garagens, casas, garaże, dom, ou cabos eléctricos. 2. Escolha um local nivelado para o equipamento para reduzir as hipóteses de tombar. 3. Projecte espaço suficiente para que as crianças possam utilizar o equipamento em segurança 4. Verifique se todas as ligações estão apertadas. NÃO permita que as crianças brin quem no produto sem que esteja totalmente montado. 5. Aplicação da decalcomania: Limpar e secar a área cuidadosamente. Centrar a decalcomania na área. Pressionar a partir do centro para a zona exterior. ISTRUZIONI DI FUNZIONAMENTO: 1. È richiesta la presenza costante di un adulto durante il gioco per bambini di tutte le età. 2. Vestire i bambini in modo appropriato, incluso scarpe della misura appropriata che proteggano comple tamente i piedi. 3. Insegnare ai bambini: - rimuovere oggetti, prima di utilizzare il giocattolo, che possono creare pericoli se aggrovigliati e afferrati. Alcuni esempi: poncho, sciarpe e altri indumenti larghi, caschi per il ciclismo o per altri sport. 4. NON permettere MAI ai bambini di: - usare l attrezzatura in modo diverso da quanto previsto, - arrampicarsi sull attrezzatura quando è coperta di neve o bagnata. - utilizzare questo prodotto quando la temperatura è inferiore a 0ºC (32ºF). I mate riali di plastica potreb bero diventare fragili e spezzarsi. ISTRUZIONI PER LA MANUTENZIONE: 1. Inspecione periodicamente o produto quanto a componentes soltos ou danificados. No início de cada sessão, instale novamente as peças em plástico que possam ter sido retiradas e guardadas durante os mêses de inverno. Verifique os seguintes itens no início de cada época e, no mínimo, duas vezes por mês durante a utilização: - todas as ligações e parafusos quando ao aperto, aperte conforme necessário. - o estado do equipamento. Procure sinais de desgaste e danos, tais como componentes partidos ou em falta. Repare conforme necessário. Per la sostituzione delle parti, vedere le Informazioni di contatto in alto alla Pagina Instruções de Limpeza: Componentes Electrónicos: Não mergulhe em água ou deite líquido directamente sobre a unidade. Use um pano humedecido com solução de limpeza de detergente suave. Limpeza Geral: Utilize água ensaboada morna. ISTRUZIONI PER LO SMALTIMENTO: 1. Smontare il prodotto in modo da impedire ogni pericolo. Riciclare quando possibile. Lo smaltimento deve essere effettuato in conformità con tutti i regolamenti previsti dal governo. IMPORTANTE: Não misture pilhas novas com usadas. Não misture pilhas alcalinas, normais (carbono zinco), ou recarregáveis (níquel cádmio). Não recarregue pilhas não recarregáveis. As pilhas recarregáveis devem ser removidas do brincado antes de recarregar. As pilhas recarregáveis só devem ser carregadas sob a supervisão de um adulto. As pilhas devem ser inseridas com a polaridade correcta. As pilhas esgotadas devem ser retiradas do brinquedo. Os terminais de alimentação não devem ser sujeitos a curto-circuito. Produkt przeznaczony dla dzieci w wieku powyżej 2 lat. PRZESTRZEGANIE PONIŻSZYCH ZALECEŃ I OSTRZEŻEŃ ZMNIEJSZY PRAWDOPODOBIEŃSTWO ODNIESIE- NIA POWAŻNYCH LUB ŚMIERTELNYCH OBRAŻEŃ CIAŁA. ZACHOWAĆ TĘ INSTRUKCJĘ DO PÓŹNIEJSZYCH KONSULTACJI. OSTRZEŻENIE! RYZYKO ZADŁAWIENIA Małe części. Punktów Sharp. Montaż powinna wykonać osoba dorosła. WAARSCHUWING Polecić dzieciom, aby nie używały zabawki, dopóki nie zostanie odpowiednio zmontowana; Nie używać bez piasku lub wody w podstawie. Pojemność podstawę 13,6 kg (30 lb) piasku lub 9,5 l (2.5 gal.) woda Używać wyłącznie piłek dostarczonych wraz z zestawem. Nigdy nie wolno pozwalać dzieciom na używanie urządzeń w sposób niezgodny z ich przeznaczeniem OSTRZEŻENIE! RYZYKO UDUSZENIA Zagrożenie poważnymi obrażeniami ciała lub śmiercią. Nie wolno: - przywiązywać skakanek, sznurów na bieliznę, smyczy ani innych swobodnie zwisających przed miotów, które nie są specjalnie przeznaczone do użytku z tym urządzeniem 4


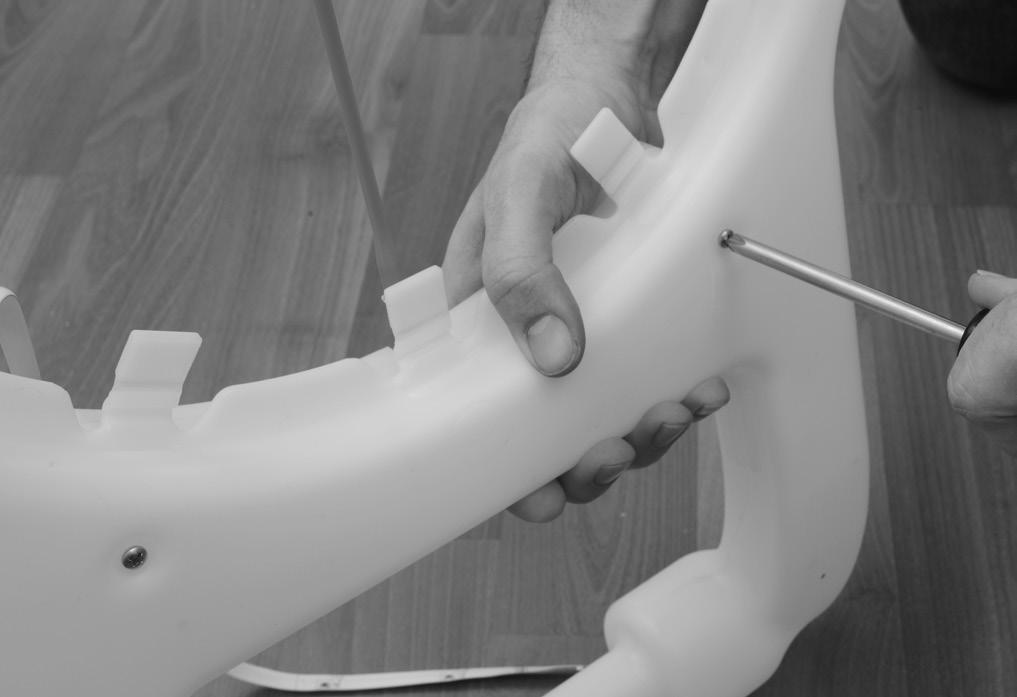
5 MONTAŻ: 1. Przygotować miejsce wolne od przeszkód, aby zmniejszyć ryzyko obrażeń. Zachować minimalną odległość 2 m od budynków i przeszkód (takich jak ogrodzenia, budynki, nisko zwisające gałęzie, pnie/ korzenie drzew, duże kamienie, cegły, beton, sznury na bieliznę i napowietrzne linie energetyczne. 2. Wybrać poziome podłoże do sprzętu w celu zmniejszenia prawdopodobieństwa przewrócenia się zestawu do gry 3. Zapewnić dość miejsca, aby dzieci mogły bezpiecznie korzystać z urządzenia 4. Upewnić się, że wszystkie połączenia są dokręcone. NIE pozwalać dzieciom na zabawę na produkcie przed zakończeniem jego montażu. 5. Umieszczanie naklejek: Należy dokładnie wyczyścić i wysuszyć powierzchnię. Umieścić naklejkę na środku. Dociskać od środka ku krańcom. A C E 1 ISTRUZIONI DI FUNZIONAMENTO: 1. Wszystkie dzieci bawiące się na produkcie, niezależnie od wieku, wymagają nad zoru osoby dorosłej. 2. Dzieci Dress odpowiednio, w tym odpowiednie buty rozmiar, które chronią nogi całkowicie. 3. Insegnare ai bambini: - przed użyciem należy usunąć wszelkie obiekty, które mogłyby się wplątać w urządzenie. Na przykład: peleryny, szaliki i inne luźne ubrania, kaski do jazdy na rowerze czy innych sportów 4. Nigdy nie wolno pozwalać dzieciom na: - używanie urządzeń w sposób niezgodny z ich przeznaczeniem; - wchodzenie na urządzenia pokryte śniegiem lub mokre; - używanie produktu przy temperaturze poniżej 0C ; materiały plastikowe stają się wtedy kruche i pękają. ISTRUZIONI PER LA MANUTENZIONE: 1. Produkt należy regularnie sprawdzać pod kątem poluzowanych lub uszkodzonych komponentów. Na początku każdego sezonu należy zamontować ponownie wszystkie części z tworzywa sztucznego, które na czas zimy zostały zdemontowane i przechowywane. Sprawdzić następujące elementy na początku oraz co najmniej dwa razy w miesiącu w sezonie użytkowania: - wszystkie połączenia pod kątem prawidłowego zamocowania. W razie potrzeby dokręcić. - stan sprzętu. Sprawdzić pod kątem oznak zużycia, takich jak pęknięcia lub brakujące elementy. W razie potrzeby naprawić. Wszystkie uszkodzone lub zużyte części należy odpowiednio wymieniać. Informacje na temat części zamien nych podano w informacjach kontaktowych na początku strony Instrukcja czyszczenia: Elementy elektroniczne: Nie zanurzać w wodzie ani nie rozpylać cieczy bezpośrednio na urządzenie. Wycierać szmatką zwilżoną łagodnym detergentem. Ogólne czyszczenie: Używać wody z dodatkiem mydła. INSTRUKCJA UTYLIZACJI: 1. Należy rozmontować, nie stwarzając niepotrzebnego zagrożenia. Jeśli to możliwe, utylizować. Utyl izowanie musi odbywać się zgod nie z wszelkimi przepisami krajowymi. WAŻNE! Nie łączyć starych i nowych baterii. Nie łączyć baterii alkalicznych, standardowych (węglowo-cynkowych) lub akumulatorków (NiCd). Nie wolno ładować baterii jednorazowych. Przed ładowaniem akumulatorów należy wyjąć je z zabawki. Akumulatorki należy ładować tylko pod nadzorem osób dorosłych. Podczas wkładania baterii należy zachować właściwą biegunowość. Zużyte baterie należy wyjąć z zabawki. Nie zwierać styków zasilania. B D G I J Required: 4 AAA batteries, (NOT INCLUDED) for light. Requis : 4 piles «AAA» (NON INCLUSES) pour le lumière Componentes necesarios: 4 pilas AAA (NO INCLUIDAS) para el luz. Funziona con: 4 batterie AAA (NON INCLUSE) per il luminoso. X 4 K H x 5 2 x 1-1/4 (3,18 cm) 10 x 3/8 (9,56 mm) F Vereist: 4 AAA batterijen, (NIET MEEGELEVERD) voor licht. Necessário: 4 Pilhas AAA (NÃO INCLUÍDAS) para o luz. Wymagane: 4 baterie AAA (NIE DOŁĄCZONO) do światło. AAA Fill the Base (C) with 2.5 gallons of water or 30 lbs of sand. Once filled, seal base with plug (H). Always use equipment with Base (C) weighted. UNSTABLE EQUIPMENT CAN CAUSE INJURY. Remplissez la base (C) avec 9,5 (2,5 gallon) d eau ou 13,6 kg (30 lb) de sable. Une fois que la base est remplie, fermez-la avec le bouchon (H). Utilisez toujours l équipement avec la base (C) alourdie. ÉQUIPEMENT INSTABLE. PEUT PROVOQUER DES BLESSURES. Llene la base (C) con 9,5 litros (2,5 galones) de agua o 13,6 Kg (30 libras) de arena. Una vez que esté llena, tape bien la base con el tapón (H). Siempre utilice el juego con la base (C) cargada. UNA ESTRUCTURA INESTABLE PUEDE PROVOCAR LESIONES. Riempire la base (C) con 9,5 litri di acqua o con 13,6 kg di sabbia. Dopo il riempimento, chiudere la base con il tappo (H). Utilizzare sempre l attrezzatura dopo aver riempito la base (C). UN ATTREZZATURA INSTABILE PUÒ CAUSARE DANNI. Vul het voetstuk (C) met 9,5 liter water of 13,6 kilogram zand. Als het voetstuk is gevuld, maakt u het dicht met de plug (H). Gebruik de uitrusting altijd terwijl het voetstuk (C) met ballast is gevuld. INSTABIELE UITRUSTING KAN LETSEL VEROORZAKEN. a Base (C) com 9,5 litros de água ou 13,6 kg de areia. Depois de encher, tape a base com a rolha (H). Utilize sempre o equipamento com a Base (C) cheia. O EQUIPAMENTO INSTÁVEL PODE PROVOCAR FERIMENTOS. Napełnić podstawę (C) 9,5 litrami wody lub około 13,6 kg piasku. Po napełnieniu uszczelnić podstawę za pomocą korka (H). Zawsze korzystać ze sprzętu z wyważoną podstawą (C). NIESTABILNY SPRZĘT MOŻE SPOWODOWAĆ OBRAŻENIA CIAŁA. 2 C H 5


6 3 B 4 5 B G 6a I b AAA AAA Insert correct battery type as shown in diagram inside battery compartment. Repeat to other side Insérez des piles du type correct comme indiqué dans le diagramme dans le compartiment des piles. Répétition à l autre côté Instale en el compartimiento el tipo correcto de pila tal y como se muestra en el diagrama. Repetición al otro lado Inserire un tipo di batterie corretto come mostrato nel diagramma all interno al compartimento delle batterie. Ripetizione all altro lato Breng de juiste batterijtypen in zoals afgebeeld in het schema in het batterijcompartiment. Herhaal aan de overkant Insira o tipo de pilhas correcto conforme indicado no diagrama no interior do compartimento das pilhas. Repetição ao outro lado Włożyć odpowiednie baterie zgodnie z rysunkiem w komorze baterii. Powtarzają do innego strona c 7 8 J 6


")

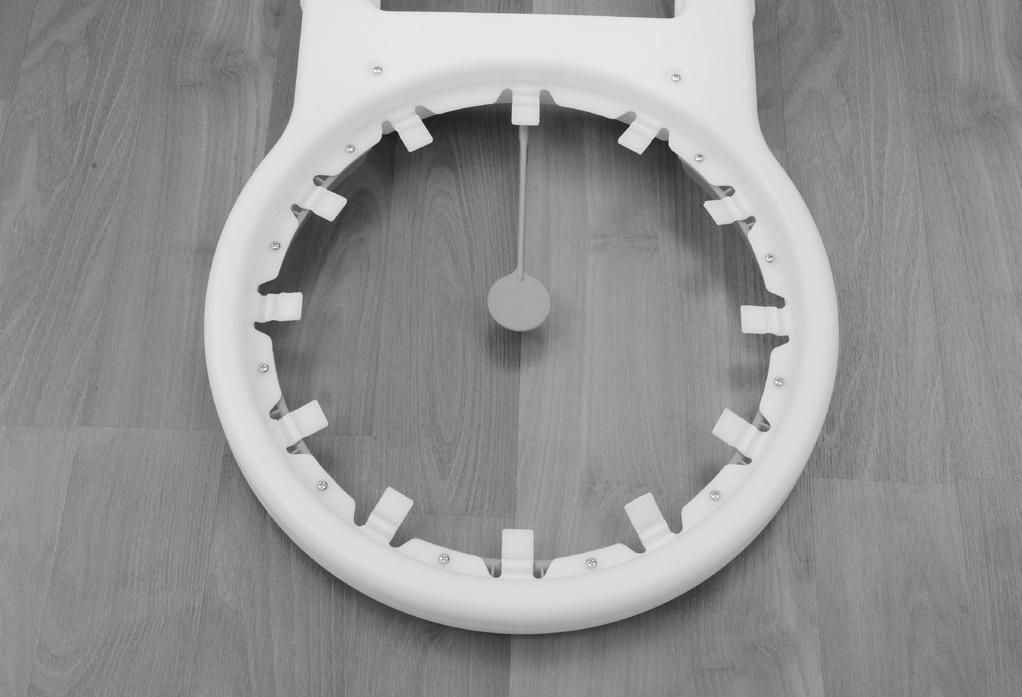
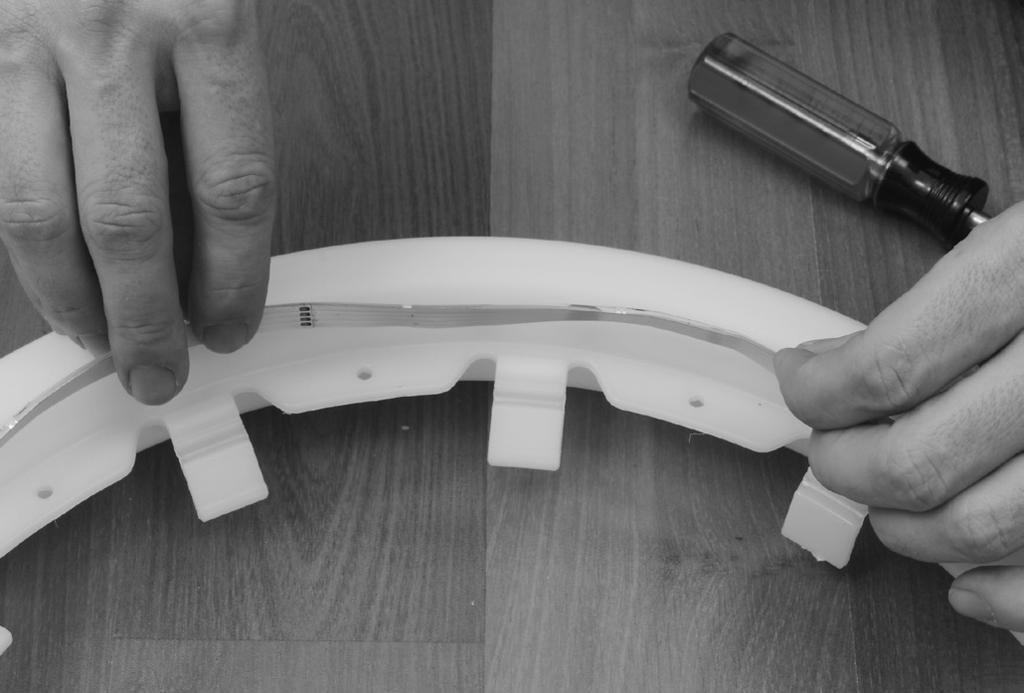
7 9 10 a 2 x 1-1/4 (3,18 cm) x5 b K c 2 x 3/8 (9,56 mm) 11 E A A 7


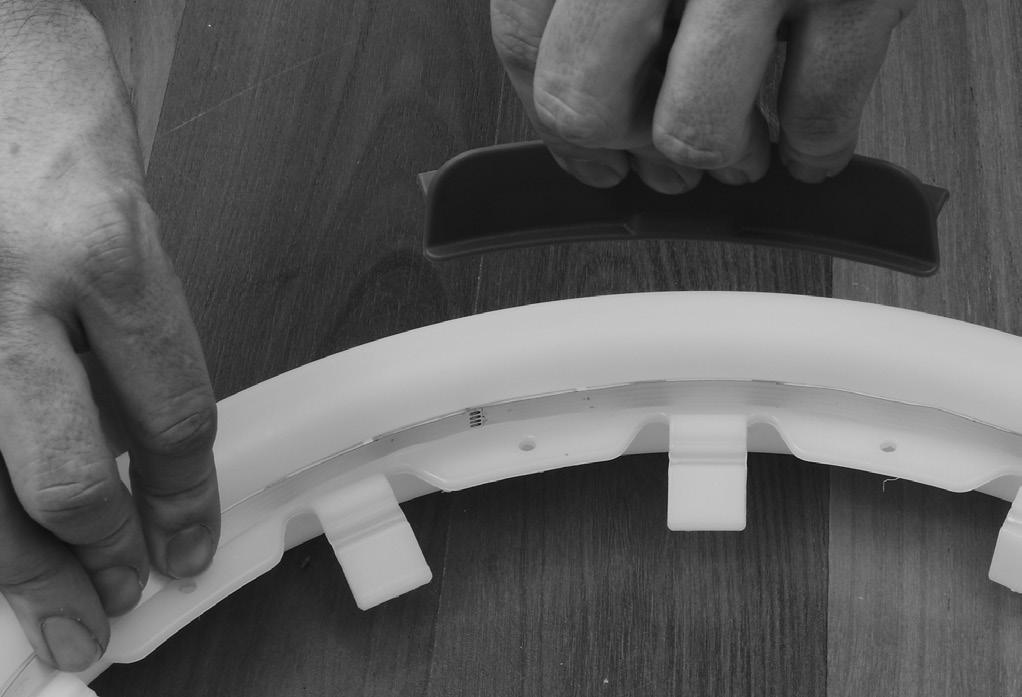
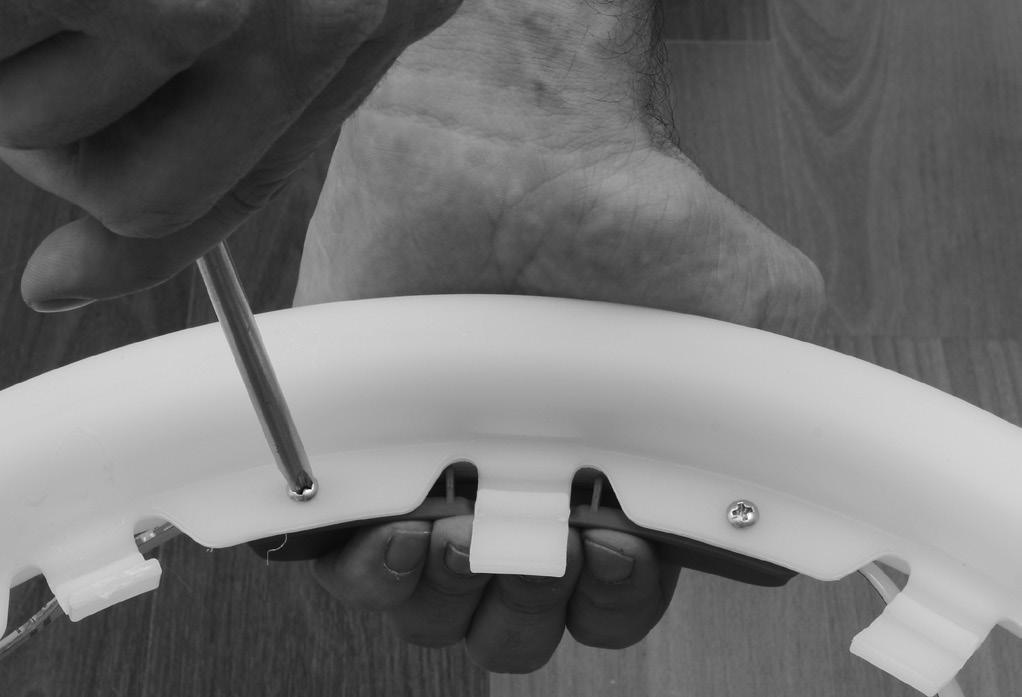
8 14 D F a 18 Decal Application Application des décalcomanies Colocación de los adhesivos Applicazione delle decalcomanie Plakplaatje aanbrengen Aplicação da decalcomania Umieszczanie naklejek x12 F b c 8

9 Ball Specifications/ Caractéristiques des ballon/ Especificaciones de las pelota. Specifiche palloni/ Specificaties voor sportcentrumballen/ Especificações da Bola/ Specyfikacje piłek. Note: New child safe may cause paint on balls to feel tacky. This is not a defect and will improve as part is exposed to air. Remarque: Le nouveau matériau «sans danger pour les enfants» peut sembler collant sur la peinture. Ce n est pas un défaut et cela s atténuera avec l exposition à l air de la partie peinte. Nota: El nuevo material seguro para niños puede hacer que la pintura en las pelotas se sienta pegajosa. Este no es un defecto y mejorará con la exposición al aire. Nota: Il nuovo sistema di sicurezza per i bambini potrebbe rendere appiccicosi i rivestimenti dei palloni. Non si tratta di un difetto e tali condizioni miglioreranno con l esposizione al sole. NB: Nieuw kindveilig kan veroorzaken dat de verf op de ballen kleverig aanvoelt. Dit is geen defect en wordt beter naarmate het onderdeel aan lucht wordt blootgesteld. Nota: As novas directrizes seguro para crianças podem fazer com que a tinta nas bolas pareça pegajosa. Isto não é um defeito e melhora à medida que a peça é exposta ao ar. Uwaga: Nowa opcja child safe (bezpieczeństwo dzieci) może sprawiać, że farba na piłkach może wydawać się lepka. Nie jest to błąd i z czasem zaniknie w wyniku wystawienia na działanie powietrza. To inflate: Use a standard bicycle pump with an inflating pin as shown. Locate inflation valve, insert pin and use pump to inflate. Inflate slowely and check ball dimensions frequently. Caution: Do not OVER-INFLATE! Over-inflation can stretch and permanently damage material or cause balls to burst. Pour gonfler : Utilisez une pompe à bicyclette standard dotée d une aiguille de gonflage comme indiqué. Repérez la valve de gonflage, insérez l aiguille et utilisez la pompe pour gonfler. Gonflez lentement et vérifiez les dimensions du ballon fréquemment. Attention : Ne pas SURGONFLER! Un surgonflage peut étirer le matériau ou provoquer l éclatement du ballon. Para inflarla: Utilice una bomba de bicicleta con aguja de inflado estándar tal y como se muestra. Localice la válvula de inflado, introduzca la aguja y utilice la bomba para inflarla. Infle la pelota lentamente verificando con frecuencia sus dimensiones. Precaución: No la INFLE DEMASIADO! El hacerlo puede estirar el material y estropearlo de manera permanente o hacer que la pelota se reviente. Per gonfiare il pallone: Usare una pompa standard per biciclette con ago come mostrato. Inserire l ago nella valvola per la gonfiatura e utilizzare la pompa per gonfiare il pallone. Gonfiare lentamente e controllare frequentemente le dimensioni del pallone. Attenzione: Non GONFIARE ECCESSIVAMENTE! Una gonfiatura eccessiva può tendere e danneggiare permanentemente il materiale del pallone oppure causarne lo scoppio. Vullen: Gebruik een gewone fietspomp met een vulpen zoals afgebeeld. Zoek de vulklep op, breng de pen in en gebruik de pomp om de bal te vullen. Vul langzaam en controleer de afmetingen van de bal vaak. Let op: Niet TE VER VULLEN! Te ver vullen kan het materiaal uitrekken en permanent beschadigen of ertoe leiden dat de ballen barsten. Para encher: Utilize uma bomba de bicicleta normal com um pipo de enchimento como se mostra. Localize a válvula de enchimento, introduza o pipo e utilize a bomba para encher. Encha lentamente e verifique as dimensões da bola frequentemente. Atenção: Não ENCHER DEMASIADO! Ao encher demasiado pode esticar e danificar permanentemente o material ou provocar a explosão das bolas. Aby napompować piłkę: Stosować standardową pompkę do roweru z igłą, jak pokazano na zdjęciu. Znaleźć zawór powietrzny dętki, umieścić igłę i napompować piłkę. Pompować powoli i regularnie sprawdzać rozmiary piłki. Uwaga: Nie NAPOMPOWYWAĆ ZBYT MOCNO POWIETRZEM! Zbyt mocne napompowanie powietrzem może rozciągnąć i trwale uszkodzić materiał lub spowodować rozsadzenie piłki. Basketball: Maximum Circumference: 6 Approximate Hoop Size: 13 (variances my occur with molding process.) Ballon de basket : Circonférence maximale 10 cm (6 po) Dimension approximative du cerceau : 33 cm (13 po) (peut varier en fonction du processus de moulage) Pelota de baloncesto: Circunferencia máxima: 15,24 cm (6 ) Tamaño aproximado del aro: 33 cm (13 ) (puede variar debido al proceso de moldeado.) Pallone da pallacanestro: Circonferenza massima: 15,24 cm (6 ) Dimensioni approssimative del cesto: 33 cm (13 )(le dimensioni potrebbero variare durante il processo di modellamento.) Basketbal: Maximumomtrek: 15,24 cm (6 inch) Afmeting van de ring bij benadering: 33 cm (13 inch) (verschillen kunnen optreden in het vormproces.) Bola de basquebol: Circunferência máxima: 6 Tamanho aproximado do cesto: 33 cm (podem ocorrer variações com o processo de moldagem.) Piłka koszykowa: Maksymalny obwód: 15,24 cm Przybliżony rozmiar obręczy: 33 cm (różnice mogą wystąpić w wyniku procesu formowania) 9
FCC Information : Warning: RF warning statement:
 FCC Information : This device complies with Part 15 of the FCC Rules. Operation is subject to the following two conditions: (1) This device may not cause harmful interference, and (2) This device must
Guía del usuario. MHL to HDMI Adapter IM750
 Guía del usuario MHL to HDMI Adapter IM750 Contenido Introducción...3 Descripción general de MHL to HDMI Adapter...3 Primeros pasos...4 Conexión inteligente...4 Actualización de Conexión inteligente...4
Guía del usuario. Xperia P TV Dock DK21
 Guía del usuario Xperia P TV Dock DK21 Contenido Introducción...3 Descripción general de la parte posterior de TV Dock...3 Primeros pasos...4 Gestor de LiveWare...4 Actualización de Gestor de LiveWare...4
Xperia TX TV Dock DK22 Xperia T TV Dock DK23
 Guía del usuario Xperia TX TV Dock DK22 Xperia T TV Dock DK23 Contenido Introducción...3 Descripción general de TV Dock...3 Primeros pasos...4 Conexión inteligente...4 Actualización de Conexión inteligente...4
Guía del usuario. Funda con batería CP12
 Guía del usuario Funda con batería CP12 Contenido Introducción...3 La carga más sencilla...3 Especificaciones...3 Uso de la funda con batería...4 Carga del teléfono...4 Información legal...6 2 Introducción
Room Organizer. WARNING: CHOKING HAZARD - Small parts. Sharp points. Adult assembly required.
 8240 For assistance or replacement parts please contact : The Step2 Company, LLC. 10010 Aurora-Hudson Rd. Streetsboro, OH 44241 USA 1-800-347-8372 USA & Canada Only (330)656-0440 www.step2.com Step2 UK
Super Mini Retractable Mouse
 Super Mini Retractable Mouse Instruction Manual 98820 www.jascoproducts.com 98820-1 2/10 Package Contents Super Mini Retractable Mouse Instruction Manual System Requirements Windows 2000, XP, Vista, Windows
Instalación. Características
 Instalación Instrucciones de instalación: Windows XP/Vista/Win7/Win8 1. Descargue el instalador del motor de macros HOST desde el sitio web oficial de IABYTE. 2. Ejecute el instalador y siga las instrucciones
5F5E29A Home Depot Big Builder s Workshop
 5F5E29A Home Depot ig uilder s Workshop For assistance or replacement parts please contact : The Step2 ompany, LL. 10010 Aurora-Hudson Rd. Streetsboro, OH 44241 USA 1-800-347-8372 USA & anada Only (330)656-0440
Neat & Tidy Cottage tm
 7353/7887/ 8805/8891 Neat & Tidy Cottage tm For assistance or replacement parts please contact : The Step2 Company, LLC. 10010 Aurora-Hudson Rd. Streetsboro, OH 44241 USA 1-800-347-8372 USA & Canada Only
GARAGE DOOR OPENER CONNECTIVITY HUB QUICK START GUIDE
 GARAGE DOOR OPENER CONNECTIVITY HUB QUICK START GUIDE Thank you for purchasing a Craftsman garage door opener Connectivity Hub enabled with AssureLink technology. Once you have created your account and
START INICIAR - DÉMARRAGE - INIZIO - INICIAR - INICIO
 START INICIAR - DÉMARRAGE - INIZIO - INICIAR - INICIO ENG: Microsoft wireless mouse PTB: Mouse sem fio da Microsoft FRA: Souris sans fil Microsoft ITA: Mouse senza fili Microsoft PTG: Rato sem fios Microsoft
Guía de instalación Manual de instrucciones ADAPTADOR PARA TV 2
 Guía de instalación Manual de instrucciones ADAPTADOR PARA TV 2 2 Índice Precauciones generales 6 Introducción 8 Generalidades del Adaptador para TV 2 9 Instalación 11 Cómo activar el Adaptador para TV
VH110 Guía del usuario
 VH110 Guía del usuario Contenido Descripción general del auricular...5 Introducción...6 Carga...7 Encendido y apagado...8 Asociación del auricular...9 Cómo asociar del auricular con un teléfono...9 Encender
Whisper Ride Buggy 7079/7080. WARNING: CHOKING HAZARD - Small parts. Sharp points. Adult assembly required. WARNING: To avoid serious injury.
 7079/7080 Whisper Ride Buggy For assistance or replacement parts please contact : The Step2 Company, LLC. 10010 Aurora-Hudson Rd. Streetsboro, OH 44241 USA 1-800-347-8372 USA & Canada Only (330)656-0440
INSTALLATION INSTRUCTIONS ECLIPSE FUEL DOOR PART # MZ313512
 INSTALLATION INSTRUCTIONS ECLIPSE FUEL DOOR PART # MZ313512 APPLICATION Mitsubishi Eclipse TOOLS REQUIRED Socket Wrench with extension and 10 mm socket Small Screwdriver Soft Cloth Cleaning Solution BILL
HD Media Tower / Tour Hi-Fi / Medios de Torre
 English This page lists the contents included in the box. Please take time to identify the hardware as well as the individual components of the product. s you unpack and prepare for assembly, place the
Quick Installation Guide TU2-DVIV H/W: V1.0R
 Quick Installation Guide TU2-DVIV H/W: V1.0R Table Table of Contents of Contents Español... 1. Antes de iniciar... 2. Cómo se instala... 1 1 3 Troubleshooting... 6 Version 06.27.2008 1. Antes de iniciar
Sheridan Kitchen Cart / Cuisine Panier / Cocina Cesta
 English This page lists the contents included in the box. Please take time to identify the hardware as well as the individual components of the product. s you unpack and prepare for assembly, place the
1 # 80 981 DE SW Tat pod_v14.indd 1 9/17/13 11:41 AM
 1 # 80 981 DE SW Tat pod_v14.indd 1 9/17/13 11:41 AM X2 X1 5 x30 x30 x30 5 2 DE SW Tat pod_v14.indd 2 9/17/13 11:41 AM x2 x2 3 DE SW Tat pod_v14.indd 3 9/17/13 11:41 AM x4 4 DE SW Tat pod_v14.indd 4 9/17/13
# Octo Adv. Instr_V4.indd 1 5/15/14 9:23 AM
 # 80 960 Octo Adv. Instr_V4.indd 1 5/15/14 9:23 AM Octo Adv. Instr_V4.indd 2 5/15/14 9:23 AM Octo Adv. Instr_V4.indd 3 5/15/14 9:23 AM x2 x200 Octo Adv. Instr_V4.indd 4 x4 5/15/14 9:23 AM ± 2 cm Octo Adv.
Quick Start Guide USB 3.0 Multi-Card Reader / Writer
 Quick Start Guide USB 3.0 Multi-Card Reader / Writer Guide de démarrage rapide Lecteur de cartes multiples USB 3.0 Guía de configuración rápide USB 3.0 Varias Tarjetas lector / Escritor GFR309 PART NO.
Contenido. Requisitos. Mac OS X Software... 39. Desempaque. Conectando Su Pantalla... 45 Asistencia Técnica... 46 Información de Garantía...
 Contenido Requisitos... 38 Desempacar... 38 Mac OS X Software... 39 Instalación... 41 Conectando Su Pantalla... 45 Asistencia Técnica... 46 Información de Garantía... 46 RMA...46 Comunidad Virtual EVGA...
microsoft.com/hardware/support
 2015 Microsoft microsoft.com/hardware/support X20-43694-01 Back Cover Front Cover K65 Set up Note: You can wirelessly connect Wi-Fi CERTIFIED Miracast enabled devices to a TV or monitor (available HDMI
KMR SCA-05 Mounting Instructions Instrucción de Montaje Instruções de Montagem 0899.4897
 0899.4897 KMR SCA-05 Mounting Instructions Instrucción de Montaje Instruções de Montagem 0899.4897 KMR SCA-05 Mounting Instructions Instrucción de Montaje Instruções de Montagem The KMR SCA-05 kit is a
MISE EN GARDE: DANGER D ÉTOUFFEMENT - Petite pièces. Assemblage par un adulte requis.
 8409 Great Outdoors Playhouse TM For assistance or replacement parts please contact : The Step2 Company, LLC. 10010 Aurora-Hudson Rd. Streetsboro, OH 44241 USA 1-800-347-8372 USA & Canada Only (330)656-0440
Guía del usuario. Miracast Wireless Display IM10
 Guía del usuario Miracast Wireless Display IM10 Contenido Guía de usuario de Miracast Wireless Display...3 Configuración de Miracast Wireless Display...4 Descripción general de hardware...4 Activación
Front Porch Playhouse 7941/7958 Maisonnette de jeux à véranda Casita de Juego con Porche
 Front Porch Playhouse 7941/7958 Maisonnette de jeux à véranda Casita de Juego con Porche The Step2 Company, LLC. 10010 Aurora-Hudson Rd. Streetsboro, OH 44241 USA 1-800-347-8372 Valid only in U.S.A. and
Guía del usuario. Mono Bluetooth Headset MBH20
 Guía del usuario Mono Bluetooth Headset MBH20 Contenido Introducción...3 Descripción general de las funciones...3 Descripción general de los accesorios...3 Conceptos básicos...4 Carga del terminal...4
Software TRENDnetVIEW Pro. Guía de instalación rápida de TRENDnetVIEW Pro (1)
") Software TRENDnetVIEW Pro Guía de instalación rápida de TRENDnetVIEW Pro (1) TRENDnetVIEW Pro/10.08.2013 Índice Requisitos del software de gestión TRENDnetVIEW Pro... 19 Instalación de TRENDnetVIEW Pro...
Software TRENDnetVIEW Pro Guía de instalación rápida de TRENDnetVIEW Pro (1) TRENDnetVIEW Pro/10.08.2013 Índice Requisitos del software de gestión TRENDnetVIEW Pro... 19 Instalación de TRENDnetVIEW Pro...
# seabattle_instr_v5.indd 1 1/2/12 1:49 PM
 # 80 891 seabattle_instr_v5.indd 1 1/2/12 1:49 PM x250 seabattle_instr_v5.indd 2 1/2/12 1:49 PM seabattle_instr_v5.indd 3 1/2/12 1:49 PM seabattle_instr_v5.indd 4 1/2/12 1:49 PM 1. 2. 3. 4. seabattle_instr_v5.indd
Light Package Switches Interruptores ligeros del Paquete
 Hoffman Enclosures Inc. 2100 Hoffman Way Anoka, MN 55303 1745 (763) 422 2211 www.hoffmanonline.com Light Package Switches Interruptores ligeros del Paquete Rev. B 111550 2004 Hoffman Enclosures Inc. P/N
LA NUBE/THE CLOUD/LE NUAGE/NUVEN
 1/7 Fijación a tierra / Fix on the floor Fixation au sol/fixação ao solo 1. Poste / post / poteau / poste 2. Superficie juego / playing surface / surface de jeu / piso de jogo 3. Cemento / concret / scellement
π H-4039 SPILL CONTAINMENT WORKSTATION CONNECTORS ASSEMBLY 1-800-295-5510 uline.com TOOL NEEDED
 π H-4039 SPILL CONTAINMENT WORKSTATION CONNECTORS uline.com Para Español, vea páginas 3-4. Pour le français, consulter les pages 5-6. TOOL NEEDED Plastic or Rubber Mallet ASSEMBLY 1. Locate one of the
series série GOOMBA COLLECT ALL 7! COLLECTIONNEZ LES 7!* 1 Figure/Figura Building Worlds Kids Love
 5 series 38009 série GOOMBA TM COLLECT ALL 7! COLLECTIONNEZ LES 7!* 1 Figure/Figura Building Worlds Kids Love TM & 2014 Nintendo. 2014 K NEX Limited Partnership Group, P.O. Box 700, Hatfield, PA 19440-0700;
Table of Contents. Español... 1. Antes de iniciar... 2. Cómo conectar... 3. Cómo utilizar el conmutador... Troubleshooting... Version 10.13.
 Quick Installation Guide TE100-S800i TE100-S810Fi Table of Contents Español... 1. Antes de iniciar... 2. Cómo conectar... 3. Cómo utilizar el conmutador... Troubleshooting... 1 1 2 3 5 Version 10.13.05
Sirena Interior Inalámbrica
 Sirena Interior Inalámbrica Instrucciones de Instalación y Programación Índice Introducción... 4 Funciones... 4 Indicación de Alarma / Tamper...4 Indicación de Batería Baja...4 Supervisión...4 Indicación
BAI-220 AURICULAR INALÁMBRICO
 BAI-220 AURICULAR INALÁMBRICO Manual de usuario ESPECIFICACIONES TÉCNICAS EMISOR Frecuencia: 86 ± 0.5 MHz Modulación: FM Distancia de emisión: 30 m. Recepción de cualquier equipo de audio y video con salida
DIAMOND Gear Company, LTD. an ERIKS Company. Installation, Maintenance, & Operation Manual DECLUTCHABLE WORM GEAR
 DIAMOND Gear Company, LTD. an ERIKS Company Installation, Maintenance, & Operation Manual 2013 INSTRUCTIONS This is an instructional manual which provides general installation, operation, and maintenance
Read all instructions BEFORE assembly and USE of product. KEEP INSTRUCTIONS FOR FUTURE USE.
 Read all instructions BEFORE assembly and USE of product. KEEP INSTRUCTIONS FOR FUTURE USE. Lea todas las instrucciones ANTES de armar y USAR este producto. GUARDE LAS INSTRUCCIONES PARA USO FUTURO. 2013
 Instalación rápida Antes de proceder con la instalación, es importante que sepa: Una instalación completa incluye "Drivers" y "Programa", ambos elementos se pueden instalar fácilmente desde el CD del software.
Quick Installation Guide TU-S9
 Quick Installation Guide TU-S9 Table of of Contents Contents Español... 1 1. Antes de iniciar... 1 2. Instalación del Hardware... 2 Troubleshooting... 5 Version 11.08.2007 1. Antes de iniciar Contenidos
FICHA TÉCNICA / TECHNICAL DATA SHEET
 FUSIBLES NH PARA LA PROTECCIÓN DE BATERIAS NH FUSE-LINKS FOR BATTERY PROTECTION FICHA TÉCNICA / TECHNICAL DATA SHEET NH gs 440/ DF, S.A C/. Silici, 67-69 08940 CORNELLA DEL LLOBREGAT BARCELONA (SPAIN)
WARNING: CHOKING HAZARD - Small parts. Sharp points. Adult assembly required. WARNING: STRANGULATION HAZARD- Serious injury or death can occur.
 8000 8221 Play Up Double Slide Climber For assistance or replacement parts please contact : The Step2 Company, LLC. 10010 Aurora-Hudson Rd. Streetsboro, OH 44241 USA 1-800-347-8372 USA & Canada Only (330)656-0440
WARNING: CHOKING HAZARD - Small parts. Sharp points. Adult assembly required. WARNING: MISE EN GARDE:
 5F610C3 Sizzle and Smoke Grill For assistance or replacement parts please contact : The Step2 Company, LLC. 10010 Aurora-Hudson Rd. Streetsboro, OH 44241 USA 1-800-347-8372 USA & Canada Only (330)656-0440
Extension Cords Extensiones Eléctricas We light your world
 We light your world 07.14.1 Household Domésticas 3 outlet indoor cords allow use of up to three items in one small place. This provides flexibility, while allowing multiple devices to be use without the
Quick Installation Guide TEW-AO12O
 Quick Installation Guide TEW-AO12O Table of of Contents Contents Español... 1 1. Antes de iniciar... 1 2. Instalación del Hardware... 2 3. Montaje... 4 Troubleshooting... 6 Version 10.04.2007 1. Antes
pipe line clothing rack support à vêtements pipe line pipe line perchero
 ! Do not throw away packaging materials until assembly is complete.! Assemble this item on a soft surface, such as cardboard or carpet, to protect finish.! Proper assembly of this item requires 2 people
MANUAL DE INSTRUÇÕES (PORTUGUÊS) MANUAL DE INSTRUCCIONES (ESPAÑOL)
 MANUAL DE INSTRUCCIONES (ESPAÑOL)") MANUAL DE INSTRUÇÕES (PORTUGUÊS) MANUAL DE INSTRUCCIONES (ESPAÑOL) PKS915 Versão/version 02/2013 ÍNDICE/ ÍNDICE 01/ MANUAL DE INSTRUÇÕES (PORTUGUÊS) P.5 02/ MANUAL DE INSTRUCCIONES (ESPAÑOL) P.9 MANUAL
MANUAL DE INSTRUÇÕES (PORTUGUÊS) MANUAL DE INSTRUCCIONES (ESPAÑOL) PKS915 Versão/version 02/2013 ÍNDICE/ ÍNDICE 01/ MANUAL DE INSTRUÇÕES (PORTUGUÊS) P.5 02/ MANUAL DE INSTRUCCIONES (ESPAÑOL) P.9 MANUAL
Transmisor Bluetooth DigiMemo para teléfonos Smartphone
 Transmisor Bluetooth DigiMemo para teléfonos Smartphone Guía de usuario BTX-100 Preparación... 1 Enlace con el transmisor Bluetooth... 1 Instalación del software DigiMemo Express en su teléfono... 1 Encendido
B R O A D B A N D R O U T E R W I R E L E S S 3 0 0 N 3 0 0 M B P S
 B R O A D B A N D R O U T E R W I R E L E S S 3 0 0 N 3 0 0 M B P S m a n u a l N I - 7 0 7 5 3 4 E S PA Ñ O L C o n t e n i d o d e l pa q u e t e 5 E s p e c i f i c a c i o n e s t é c n i c a s 5 A
ENKVM-USBB. 2-Port USB KVM switch with Easy Switch and Cable. User Guide
 ENKVM-USBB 2-Port USB KVM switch with Easy Switch and Cable User Guide i Package Contents 1 ENKVM-USBB 2-Port USB KVM Switch with Easy Switch and Cable 1 User Guide Requirements Console A VGA, SVGA, XGA,
2008 Series Hemodialysis Machine Operator s Manuals Addendum for Concentrate Connection
 2008 Series Hemodialysis Machine Operator s Manuals Addendum for Concentrate Connection Caution: Federal (US) law restricts this device to sale only by or on the order of a physician. This is an addendum
Sistemas de impresión y tamaños mínimos Printing Systems and minimum sizes
 Sistemas de impresión y tamaños mínimos Printing Systems and minimum sizes Para la reproducción del Logotipo, deberán seguirse los lineamientos que se presentan a continuación y que servirán como guía
CONTROLADORA PARA PIXELS CONPIX
 The LedEdit Software Instructions 1, Install the software to PC and open English version: When we installed The LedEdit Software, on the desktop we can see following icon: Please Double-click it, then
THERMAL SWITCH AND SOLENOID VALVE INSTALLATION INSTRUCTIONS INSTRUCCIONES PARA LA INSTALACIÓN DE LA VÁLVULA SOLENOIDE Y DEL INTERRUPTOR TÉRMICO
 THERMAL SWITCH AND SOLENOID VALVE INSTALLATION INSTRUCTIONS INSTRUCCIONES PARA LA INSTALACIÓN DE LA VÁLVULA SOLENOIDE Y DEL INTERRUPTOR TÉRMICO INTRODUCTION... 4 General Information... 4 PRE-INSTALLATION...
INSTALLATION INSTRUCTIONS
 Brix Ratio Check Instructions for ColdFusion and Flavor Overload Units INSTALLATION INSTRUCTIONS Brix Ratio Check Instructions For Coldfusion, Flavorfusion and Flavor Overload Units Kit P/N 629096865 SAFETY
INSTALLATION INSTRUCTION Vogue WS-3120
 WS-3120 WARNING IMPORTANT: NEVER attempt any work without shutting off the electricity. - Read all instructions before installing. - System is intended for installation by a qualified electrician in accordance
Battery Backup and LED Flashlight for iphone, ipod and other USB Mobile Devices USER MANUAL
 Battery Backup and LED Flashlight for iphone, ipod and other USB Mobile Devices USER MANUAL IN 5V OUT 5V Input How To Charge Attach a USB cable to the "OUT 5V" port on the power bank and the other end
Ratón láser para juegos ASUS GX800 Manual del usuario
 Ratón láser para juegos ASUS GX800 1 6 Manual del usuario 15G06S001000 S5761 Primera Edición (V1) Abril 2010 Copyright 2010 ASUSTeK COMPUTER INC. Reservados todos los derechos. Queda prohibida la reproducción,
Flashcards Series 5 El Agua
 Flashcards Series 5 El Agua Flashcards are one of the quickest and easiest ways to test yourself on Spanish vocabulary, no matter where you are! Test yourself on just these flashcards at first. Then, as
www.microsoft.com/hardware
 www.microsoft.com/hardware english - EN ESPAÑOL (LATINOAMERICANO) - XX PORTUGUÊS (BRASIL) - XC FRANÇAIS CANADIEN - XD 1 2 www.microsoft.com/hardware/productguide 3 www.microsoft.com/hardware/downloads
PLAFÓN LED SUPERFICIE REGULABLE
 LED LED COLGANTE 3 Ambientes en uno 0633 A-2 36W 2800 65x40x8 cm 0633 A-3 54W 4300 90x40x8 cm LUZ AMBIENTAL ATMOSPHERE LIGHT 4 Ambientes de luz / 4 atmospheres of light 06338619-65 36W 2800 65x40x8 cm
300 BPS WiFI N 2.0 USB ADAPter. User's guide. Manuel d'utilisation Guia del usario
 300 BPS WiFI N 2.0 USB ADAPter User's guide Manuel d'utilisation Guia del usario WIRELESS N USB ADAPTER MODEL # WUB-1900R Quick Install Guide 2. INSTALLATION: This section provides instructions on how
Installation Guide 1052943-2-C. Lavatory Drains
 Installation Guide Lavatory Drains K-7127 K-7128 M product numbers are for Mexico (i.e. K-12345M) Los números de productos seguidos de M corresponden a México (Ej. K-12345M) Français, page Français-1 Español,
Quick Installation Guide TW100-BRV304
 Quick Installation Guide TW100-BRV304 Table Table of Contents of Contents Español... 1 1. Antes de iniciar... 1 2. Instalación del Hardware... 2 3. Configuración del enrutador... 3 Troubleshooting... 5
Instructions For Use. STEP 1 Locate the area on your horse that you wish to patch.
 AcuLife Instructions Instrucciones Instructions For Use You don t need to be a veterinarian or a pain expert to use AcuLife. Simply follow these instructions for patching your horse and be sure to monitor
Cambiador HUBLOT. Instrucciones de montaje 04/08 HUB-PAL-10
 Cambiador HUBLOT Instrucciones de montaje Cambiador: HUBLOT N. de lote:? Debe montarse únicamente en el mueble multifunción (HUB-MEUEV- 10) FNAC EVEIL & JEUX 78112 FOURQUEUX IMPORTANTE: INSTRUCCIONES DE
EASY RAIN. Registered trademark of Rain Bird Sprinkler Mfg. Corp. P/N 635006
 Registered trademark of Rain Bird Sprinkler Mfg. Corp. P/N 635006 This equipment has been tested and found to comply with the limits for a Class B digital device, pursuant to part 15 of the FCC Rules.
Synology Remote. Manual del usuario
 Synology Remote Manual del usuario Remote08312010 Índice 3 Bienvenido 4 Synology Remote de un vistazo 5 Contenido del embalaje 6 Primeros pasos 8 Disfrute de su música con Synology Remote 11 Especificaciones
Quick Installation Guide TMR-121EC H/W: V1.0R
 Quick Installation Guide TMR-121EC H/W: V1.0R Table Table of Contents of Contents Español... 1. Antes de iniciar... 2. Cómo se instala... 1 1 3 Troubleshooting... 5 Version 07.09.2008 1. Antes de iniciar
TECHNICAL MANUALE TECNICO MANUAL TÉCNICO MANUAL 080403 E RS232
 IT MANUALE TECNICO EN TECHNICAL MANUAL ES MANUAL TÉCNICO 080403 E RS VERSIONE PLUG ERS Specifiche PRESA RJ Specifiche PRESA RJ MORSETTI DI COLLEGAMENTO MORSETTI DI COLLEGAMENTO ERS Morsetto Funzione Morsetto
G I G A B I T R O U T E R W I R E L E S S 3 0 0 N 3 0 0 M B P S W I T H U S B P O R T. m a n u a l N I - 7 0 7 5 3 3
 G I G A B I T R O U T E R W I R E L E S S 3 0 0 N 3 0 0 M B P S W I T H U S B P O R T m a n u a l N I - 7 0 7 5 3 3 1 E S PA Ñ O L C o n t e n i d o d e l pa q u e t e 5 E s p e c i f i c a c i o n e s
ASI HABLO ZARATUSTRA UN LIBRO PARA TODOS Y PARA NADIE SPANISH EDITION
 ASI HABLO ZARATUSTRA UN LIBRO PARA TODOS Y PARA NADIE SPANISH EDITION READ ONLINE AND DOWNLOAD EBOOK : ASI HABLO ZARATUSTRA UN LIBRO PARA TODOS Y PARA NADIE SPANISH EDITION PDF Click button to download
MODEL: 11222895 / MODELO: 11222895 COMPUTER DESK ESCRITORIO DE COMPUTADORA
 MODEL: 222895 / MODELO: 222895 COMPUTER DESK ESCRITORIO DE COMPUTADORA NO 2 3 4 5 6 7 8 9 PARTS LIST AND HARDWARE LISTA DE PARTES Y ACCESORIOS HARDWARE LIST LISTA DE PARTES Y ACCESORIOS CHIPBOARD SCREW
1-800-295-5510 uline.com TECHNICAL DATA MODEL H-2051. Alkaline MN21 12V. (1 Second) Button Life Approx. 100,000 Push Button Presses 0.125 lbs. (2 oz.
 Button Life Approx. 100,000 Push Button Presses 0.125 lbs. (2 oz.") π H-2051 TAKE-A-NUMBER SYSTEM WIRELESS REMOTE uline.com Para Español, vea páginas 3-4. Pour le français, consulter les pages 5-6. TECHNICAL DATA MODEL H-2051 Frequency RF Power Output 433.92 MHz (+/ Max.
π H-2051 TAKE-A-NUMBER SYSTEM WIRELESS REMOTE uline.com Para Español, vea páginas 3-4. Pour le français, consulter les pages 5-6. TECHNICAL DATA MODEL H-2051 Frequency RF Power Output 433.92 MHz (+/ Max.
Utilizar como sistema de viaje
 Utilizar como sistema de viaje Consulte las instrucciones de funcionamiento suministradas con el cochecito. El portabebés se puede utilizar como un sistema de viaje en todos los chasis de cochecito equipados
GETTING STARTED. EN Tap power button to check battery Fuel Gauge. EN Connect cable to micro USB port to charge.
 QUICK START GUIDE GETTING STARTED EN Connect cable to micro USB port to charge. FR Branchez le câble au port micro USB pour charger le casque. ES Conecte el cable al puerto USB micro para cargar. PT Conectar
VISIT UP.JAWBONE.COM FROM YOUR PHONE TO DOWNLOAD THE APP
 VISIT UP.JAWBONE.COM FROM YOUR PHONE TO DOWNLOAD THE APP LEARN MORE Go to menu > help within the UP app or visit us online. Discover how the UP band and app work together to help you learn more about yourself
Quick Installation Guide TEG-160WS TEG-240WS H/W: C1
 Quick Installation Guide TEG-160WS TEG-240WS H/W: C1 Table Table of Contents of Contents Español... 1. Antes de iniciar... 2. Instalación del Hardware... 3. Herramienta de gestión Web... Troubleshooting...
PLAN DE MANTENIMIENTO DE BOMBAS DOLL S.A.U. DOLL S.A.U. PUMPS MAINTENANCE PLANNING.
 PLAN DE MANTENIMIENTO DE BOMBAS DOLL S.A.U. DOLL S.A.U. PUMPS MAINTENANCE PLANNING. RODETE IMPELLER BRIDA CIERRE MECÁNICO CLAMP CIERRE MECÁNICO APLICACIÓN DE LAS OPERACIONES DE MANTENIMIENTO PARA BOMBAS
Setting Up an Apple ID for your Student
 Setting Up an Apple ID for your Student You will receive an email from Apple with the subject heading of AppleID for Students Parent/Guardian Information Open the email. Look for two important items in
VISIT UP.JAWBONE.COM FROM YOUR PHONE TO DOWNLOAD THE APP
 VISIT UP.JAWBONE.COM FROM YOUR PHONE TO DOWNLOAD THE APP LEARN MORE Go to menu > help within the UP app or visit us online. Discover how the UP band and app work together to help you learn more about yourself
DECLARACION DE CONFORMIDAD DECLARATION OF CONFORMITY
 DECLARACION DE CONFORMIDAD DECLARATION OF CONFORMITY La Empresa: BASOR ELECTRIC, S.A. The Company: BASOR ELECTRIC, S.A. Declara que el producto: Declares that the product: Instalado de acuerdo con las
ENA. POWERLOGIC Enercept Network Adapter Adaptador de red Enercept (instructionnes en español: página 5) ENGLISH INTRODUCTION INSTALLING THE ENA
 ENGLISH INTRODUCTION INSTALLING THE ENA") Instruction Bulletin Boletín de instrucciones ENGLISH Bulletin No. 63230-216-203/A2 4/2000 POWERLOGIC Enercept Network Adapter Adaptador de red Enercept (instructionnes en español: página 5) INTRODUCTION
Instruction Bulletin Boletín de instrucciones ENGLISH Bulletin No. 63230-216-203/A2 4/2000 POWERLOGIC Enercept Network Adapter Adaptador de red Enercept (instructionnes en español: página 5) INTRODUCTION
Modbus RTU - RS-485 Kit. Kit Modbus RTU / RS-485. Kit Modbus RTU / RS-485. SSW-07 / SSW-08 English / Español / Português Document: 0899.
 Modbus RTU - RS-485 Kit Kit Modbus RTU / RS-485 Kit Modbus RTU / RS-485 Installation Guide SSW-07 / SSW-08 English / Español / Português Document: 0899.5711 / 03 Guia de Instalación Guia de Instalação
Vedi foto 4. See photo 4. Voir photo 4. Ver foto 4
 MARCA MAKE FAIRE - HACER MODELLO MODEL MODÈLE - MODELO REV. 00 HYUNDAI TUCSON 15 Funzione - Function SCHEDA TECNICA DI INSTALLAZIONE PER SISTEMI DI ALLARME CAN CAN ALARM SYSTEM FITTING INSTRUCTIONS SCHEMA
Drying Rack Soporte de Secado Égouttoir
 User Instructions / Instrucciones para el usuario / Mode d emploi Handi-Craft Company St. Louis, Missouri 63116 USA www.handi-craft.com 1-800-778-9001 Made in China. Fabricado en China. Fabriqué en Chine.
LAPTOP DESK WITH 3 BINS MESA PARA COMPUTADORA PERSONAL CON 3 CONTENEDORES
 MODEL: 11222775R / MODELO: 11222775R LAPTOP DESK WITH 3 BINS MESA PARA COMPUTADORA PERSONAL CON 3 CONTENEDORES NO A B C D E F G H 1 2 3 4 5 6 7 8 9 PARTS AND HARDWARE LISTA DE PARTES Y HARDWARE TOP PANEL
THE RACING RULES OF SAILING FOR 2009 2012
 THE RACING RULES OF SAILING FOR 2009 2012 Changes effective from 1 January 2010 Cambios con efecto desde el 1 de Enero de 2010 As a result of actions taken by the ISAF Racing Rules Committee and the ISAF
flat bar storage desk buffet de rangement plat escritorio de barras planas para almacenaje Parts
 ! Tools required:! Do not throw away packaging materials until assembly is complete.! ssemble this item on a soft surface, such as cardboard or carpet, to protect finish.! Proper assembly of this item
Cambridge Pre-Packeged / Pre-Cut Olde English Wall Patio Pub & Bistro Table Kit
 Cambridge Pre-Packeged / Pre-Cut Olde English Wall Patio Pub & Bistro Table Kit Cambridge Pre-Cortado Kit de Mesa para uso Afuerra de Olde Inglés Pared Layer Reference Guide: Guía de Referencia: Layer
MANUAL EASYCHAIR. A) Ingresar su nombre de usuario y password, si ya tiene una cuenta registrada Ó
 Ingresar su nombre de usuario y password, si ya tiene una cuenta registrada Ó") MANUAL EASYCHAIR La URL para enviar su propuesta a la convocatoria es: https://easychair.org/conferences/?conf=genconciencia2015 Donde aparece la siguiente pantalla: Se encuentran dos opciones: A) Ingresar
MANUAL EASYCHAIR La URL para enviar su propuesta a la convocatoria es: https://easychair.org/conferences/?conf=genconciencia2015 Donde aparece la siguiente pantalla: Se encuentran dos opciones: A) Ingresar
appkbws03 Wireless Multimedia Keyboard Set Black
 appkbws03 Wireless Multimedia Keyboard Set Black Español 01 English 06 Capítulo 1. Introducción y descripción del producto Gracias por elegir el teclado inalámbrico APPKBWS03. Descripción del producto
TIPS: Understanding Overspray
 TIPS: Understanding Overspray In any pneumatic spray application, overspray is an area of concern that should be addressed early on. Fortunately if it does occur, it s easily remedied through the use of
Video Server. Quick Installation Guide. English, Español
 Video Server Quick Installation Guide English, Español 2 Video Server NOTES Quick Installation Guide 3 Video Server Quick Installation Guide To get your Video Server up and running on an Ethernet network,
GET THE APP Connect your band. Start living better. Visit up.jawbone.com
 GET THE APP Connect your band. Start living better. Visit up.jawbone.com GET THE APP Go to up.jawbone.com Already using UP? Make sure you have the latest version of the app. If you see a icon in the top
A B C D E F. h WH, additional
 Product data sheet (in accordance with EU regulation no. 811/2013, 812/2013) 1 Brand name Vaillant 2 Models A B C D E F MAG ES 11-4/0 ETe BP MAG ES 11-4/0 ETe H MAG PT 11-4/0 ETe BP MAG PT 11-4/0 ETe H
Push Pull Installation Procedure
 Push Pull Installation Procedure IMPORTANT SAFETY INSTRUCTIONS READ AND FOLLOW ALL INSTRUCTIONS SAVE THESE INSTRUCTIONS WARNING Before installing this product, read and follow all warning notices and instructions
CROSSOVER PRODUCT ENGLISH...2 POST WRAP INSTALLATION INSTRUCTIONS FRANÇAIS...9 INSTRUCTIONS D INSTALLATION DE L ENVELOPPEMENT DE POTEAU
 CROSSOVER PRODUCT ENGLISH...2 POST WRAP INSTALLATION INSTRUCTIONS FRANÇAIS...9 INSTRUCTIONS D INSTALLATION DE L ENVELOPPEMENT DE POTEAU ESPAÑOL...18 INSTRUCCIONES DE INSTALACIÓN PARA FORROS DE POSTE Compatible