dlan 500 WiFi Installation The Network Innovation
|
|
|
- José Luis Castilla Sevilla
- hace 6 años
- Vistas:
Transcripción


1 dlan 500 WiFi Installation The Network Innovation
2 SAT-TV
3 Erste Schritte: Ihre vorhandene dlan -Verbindung. First steps: Your existing dlan connection. Premiers pas: Votre connexion dlan existante. Eerste stappen: Uw bestaande dlan -verbinding. Primeros pasos: Su conexión dlan existente. Primeiros passos: A sua ligação dlan existente. Primi passi: La connessione dlan disponibile.
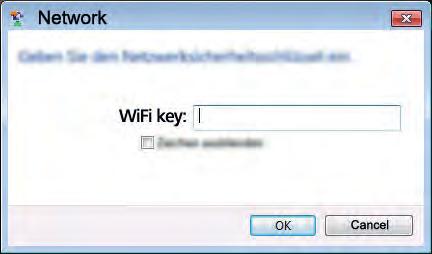
4 1 dlan 500 WiFi WiFi key: WiFi key: XXXX:XXXX:XXXX:XXXX
5 Erste Schritte / Sichern Sie Ihr dlan -Netzwerk (Verschlüsselung): Notieren Sie sich den WiFi Schlüssel von der Rückseite Ihres neuen dlan 500 WiFi Adapters. First steps / Secure your dlan network (encryption): Note the Wi-Fi key on the back of the dlan 500 WiFi adapter. Premiers pas / Sécurisez votre réseau dlan (cryptage) : Notez la clé Wi-Fi figurant au dos de l adaptateur dlan 500 WiFi. Eerste stappen / Beveilig uw dlan -netwerk (beveiliging): Noteer de WiFi code zoals vermeld op de achterzijde van de dlan 500 WiFi adapter. Primeros pasos / Asegure su red dlan (codificación): Apunte la clave Wi-Fi situada en la parte trasera del adaptador dlan 500 WiFi. Primeiros passos / proteja a sua rede dlan (codificação): Anote o código Wi-Fi que se encontra no lado de trás do adaptador dlan 500 WiFi. Primi passi / Mettere al sicuro la rete dlan (crittografia): Annotarsi la password WiFi presente sul retro dell adattatore dlan 500 WiFi.
6 2 New/2nd dlan 500 WiFi 45 sec.
7 Erste Schritte / Sichern Sie Ihr dlan -Netzwerk (Verschlüsselung): Stecken Sie den neuen bzw. zweiten dlan 500 WiFi Adapter in eine freie Wandsteckdose und warten Sie bis die LED leuchtet (ca. 45 Sekunden). First steps / Secure your dlan network (encryption): Plug the new or second dlan 500 WiFi adapter into an available power socket and wait until the lights up (approx. 45 seconds). LED Premiers pas / Sécurisez votre réseau dlan (cryptage) : Insérez le nouveau / deuxième adaptateur dlan 500 WiFi dans une prise de courant murale libre et attendez que la DEL s allume (env. 45 secondes). Eerste stappen / Beveilig uw dlan -netwerk (beveiliging): Steek de nieuwe, resp. tweede dlan 500 WiFi adapter in een vrij stopcontact en wacht tot (ca. 45 seconden). LED brandt Primeros pasos / Asegure su red dlan (codificación): Enchufe el nuevo o el segundo adaptador dlan 500 WiFi en una toma de corriente eléctrica que esté libre y espere hasta que el LED se encienda (aprox. 45 segundos). Primeiros passos / proteja a sua rede dlan (codificação): Introduza o novo ou o segundo adaptador dlan 500 WiFi numa tomada de parede livre e aguarde até que o LED acenda (aprox. 45 segundos). Primi passi / Mettere al sicuro la rete dlan (crittografia): Inserire il nuovo o secondo adattatore dlan 500 WiFi in una presa elettrica libera e attendere fino a quando il LED non s illumina (ca. 45 secondi).
8 3 o
9 Erste Schritte / Sichern Sie Ihr dlan -Netzwerk (Verschlüsselung): Drücken Sie den - / Verschlüsselungsknopf an einem Adapter Ihrer bereits bestehenden dlan Installation. First steps / Secure your dlan network (encryption): Press the / encryption button on one of the adapters in your existing dlan installation. Premiers pas / Sécurisez votre réseau dlan (cryptage): Appuyez sur le bouton de / maison sur un adaptateur de votre installation dlan déjà en place. Eerste stappen / Beveilig uw dlan -netwerk (beveiliging): Druk op de / codeerknop op een adapter van uw reeds bestaande dlan installatie. Primeros pasos / Asegure su red dlan (codificación): Pulse el botón de encriptación o el del en un adaptador de su instalación dlan ya operativa. Primeiros passos / proteja a sua rede dlan (codificação): Prima o botão / Codificação num adaptador já existente da sua instalação dlan. Primi passi / Mettere al sicuro la rete dlan (crittografia): Premere il pulsante di crittografia / sull adattatore di un installazione dlan già esistente.
10 4 o New/2nd dlan 500 WiFi 2 min.
11 Erste Schritte / Sichern Sie Ihr dlan -Netzwerk (Verschlüsselung): Drücken Sie, innerhalb von 2 Minuten, den - Knopf an Ihrem neuen dlan 500 WiFi Adapter. First steps / Secure your dlan network (encryption): Within 2 minutes, press the button on your new dlan 500 WiFi adapter. Premiers pas / Sécurisez votre réseau dlan (cryptage) : Dans un délai de 2 minutes, appuyez sur le bouton de votre nouveau adaptateur dlan 500 WiFi. Eerste stappen / Beveilig uw dlan -netwerk (beveiliging): Druk binnen 2 minuten, op de knop op uw nieuwe dlan 500 WiFi adapter. Primeros pasos / Asegure su red dlan (codificación): En un intervalo de 2 minutos, pulse el botón de su nuevo adaptador dlan 500 WiFi. Primeiros passos / proteja a sua rede dlan (codificação): No espaço de 2 minutos, prima o botão no seu novo adaptador dlan 500 WiFi. Primi passi / Mettere al sicuro la rete dlan (crittografia): Premere entro due minuti il pulsante del nuovo adattatore adattatore dlan 500 WiFi.


12 5a WiFi key:
13 Verbinden Sie Ihre WLAN-Geräte mit dem Internet: Richten Sie die WLAN-Verbindung auf Ihrem Smartphone und/oder Tablet ein... Connect your Wi-Fi device to the Internet: Set up the Wi-Fi connection on your smartphone and/or tablet... Connectez vos appareils Wi-Fi à Internet: Configurez la connexion Wi-Fi sur votre smartphone et/ou votre tablette... Verbindt uw Wi-Fi-apparaten met het internet: Configureer de Wi-Fi-verbinding op uw smartphone en/of tablet... Conecte sus dispositivos Wi-Fi a Internet: Configure la conexión Wi-Fi en su smartphone o tablet... Ligue os seus dispositivos Wi-Fi à Internet: Instale a ligação Wi-Fi no seu smartphone e/ou tablet... Conecte sus dispositivos Wi-Fi a Internet: Configure la conexión Wi-Fi en su smartphone o tablet...

14 5b WiFi key:
15 Verbinden Sie Ihre WLAN-Geräte mit dem Internet:...oder richten Sie die WLAN-Verbindung auf Ihrem Laptop ein. Connect your Wi-Fi device to the Internet:...or set up the Wi-Fi connection on your laptop. Connectez vos appareils Wi-Fi à Internet:...ou configurez la connexion Wi-Fi sur votre ordinateur portable. Verbindt uw Wi-Fi-apparaten met het internet:...of configureer de Wi-Fi-verbinding op uw laptop. Conecte sus dispositivos Wi-Fi a Internet:...o configure la conexión Wi-Fi en su portátil. Ligue os seus dispositivos Wi-Fi à Internet:...ou instale a ligação Wi-Fi no seu portátil. Collegamento a internet degli apparecchi Wi-Fi:...oppure sul proprio laptop.
16 Fertig! That s it! Terminé! Klaar!

17 Y listo! E pronto! È tutto! SAT-TV


18 Use the devolo Cockpit software for a simple monitoring of your dlan home network.
19 Use the devolo Cockpit App for a simple monitoring of your dlan home network. devolo Cockpit devolo Cockpit App
20 WiFi Clone >>>WiFi-NAME>>>PASSWORD>>>WiFi-NAME>>>PASSWORD>>> >>>WiFi-NAME>>>PASSWORD>>>
21 Mit WiFi Clone können Sie Ihr WLAN-Signal des Routers mit den dlan 500 WiFi vereinfachen und erweitern. Hierbei werden die WLAN-Zugangsdaten per Knopfdruck sicher vom WLAN-Router auf den dlan 500 WiFi übertragen. Das WLAN ist so in jedem Raum in bester Qualität verfügbar. WiFi Clone lets you simplify and expand your router s Wi-Fi signal with the dlan 500 WiFi. While doing this, the Wi-Fi access data will be securely transferred from the Wi-Fi router to the dlan 500 WiFi at the touch of a button. The Wi-Fi is then available in any room in the highest quality. WiFi Clone permet l extension de votre signal Wi-Fi du routeur facilement au moyen des dlan 500 WiFi. Les données d accès Wi-Fi sont transmises du routeur Wi-Fi à l adaptateur dlan 500 WiFi en toute sécurité par simple pression de bouton. Le Wi-Fi est ensuite disponible dans chaque pièce en qualité maximale. Met WiFi Clone kunt u uw Wi-Fi-signaal van de router met de dlan 500 WiFi vereenvoudigen en uitbreiden. Hierbij worden de Wi-Fi-toegangsgegevens met een druk op de knop veilig van de Wi-Firouter naar de dlan 500 WiFi overgedragen. De Wi-Fi is zo in elke kamer met optimale kwaliteit beschikbaar. Con WiFi Clone puede simplificar y ampliar la señal Wi-Fi del router mediante el dlan 500 WiFi. Con él, los datos de acceso Wi-Fi se transfieren de forma segura del router Wi-Fi al dlan 500 WiFi con solo pulsar un botón. Así, el Wi-Fi estará disponible en cualquier estancia con la mejor calidad. V Com WiFi Clone pode simplificar e expandir o seu sinal Wi-Fi do router com o dlan 500 WiFi. Nesta situação, os dados de acesso Wi-Fi são transmitidos de forma segura, por pressão de botão, do router Wi-Fi para o dlan 500 WiFi. O Wi-Fi está assim disponível na melhor qualidade em todas as divisões. WiFi Clone consente di semplificare e di potenziare il segnale Wi-Fi del router con il dlan 500 WiFi. Premendo il pulsante, i dati di accesso al Wi-Fi verranno trasferiti in tutta sicurezza dal router Wi-Fi al dlan 500 WiFi, rendendo così disponibile il Wi-Fi in ogni ambiente e nella migliore qualità.
22 1 max. 10 m 45 sec.
23 Richten Sie WiFi Clone ein: Nehmen Sie den dlan 500 WiFi Adapter, stecken Sie ihn in eine freie Wandsteckdose in der Nähe Ihres Routers (max. 10 Meter Entfernung) und warten Sie dann ca. 45 Sekunden bis die LED leuchtet. Set up WiFi Clone: Take the dlan 500 WiFi adapter, plug it into an available power socket near your router (max. distance of 10 metres) and then wait approx. 45 seconds until the LED lights up. Configurez WiFi Clone: Prenez l adaptateur dlan 500 WiFi et insérez-le dans une prise de courant murale à proximité de votre routeur (à 10 mètres maxi) et attendez env. 45 secondes jusqu à ce que la DEL s allume. Configureer de WiFi Clone: Neem de dlan 500 WiFi adapter, steek deze in een beschikbaar stopcontact in de buurt van uw router (op max. 10 m afstand) en wacht dan ca. 45 seconden tot de LED brandt. Configure WiFi Clone: Tome el adaptador dlan 500 WiFi, enchúfelo en una toma de corriente eléctrica que esté libre cerca del router (como máx. a 10 metros de distancia) y espere unos 45 segundos hasta que el LED se encienda. V Instale o WiFi Clone: Pegue no adaptador dlan 500 WiFi, introduza-o numa tomada de parede livre próximo do seu router (no máx. a uma distância de 10 metros) e aguarde, em seguida, aprox. 45 segundos até o LED acender. Installazione di WiFi Clone: Prendere l adattatore dlan 500 WiFi, inserirlo in una presa elettrica libera, posta nelle vicinanze del router (distanza max. 10 metri) e attendere per ca. 45 secondi fino a quando il LED non s illumina.
24 2
25 Richten Sie WiFi Clone ein: Drücken Sie den Knopf an Ihrem dlan 500 WiFi Adapter. Set up WiFi Clone: Press the button on your dlan 500 WiFi adapter. Configurez WiFi Clone: Appuyez sur le bouton de votre adaptateur dlan 500 WiFi. Configureer de WiFi Clone: Druk op de knop op uw dlan 500 WiFi adapter. Configure WiFi Clone: Pulse el botón de su adaptador dlan 500 WiFi. Instale o WiFi Clone: Prima o botão no seu adaptador dlan 500 WiFi. Installazione di WiFi Clone: Premere il pulsante dell adattatore dlan 500 WiFi.
26 3 WPS 2 min.
27 Richten Sie WiFi Clone ein: Drücken Sie die WPS-Taste innerhalb von 2 Minuten auf Ihrem Router. Set up WiFi Clone: Press the WPS key on your router within 2 minutes. Configurez WiFi Clone: Dans un délai de 2 minutes, appuyez sur le bouton WPS de votre routeur. Configureer de WiFi Clone: Druk binnen 2 minuten op de WPS-toets op uw router. Configure WiFi Clone: En un intervalo de 2 minutos, pulse la tecla WPS de su router. Instale o WiFi Clone: Prima a tecla WPS no espaço de 2 minutos no seu router. Installazione di WiFi Clone: Premere il tasto WPS del proprio router, entro due minuti.
28 4 Modem Router
29 Richten Sie den WiFi Clone ein: Sie dürfen Ihren dlan 500 WiFi Adapter nun ausstecken und an den von Ihnen gewünschten Ort platzieren. Set up WiFi Clone: You can now unplug your dlan 500 WiFi adapter and place it at your desired location. Configurez WiFi Clone: Débranchez maintenant votre adaptateur dlan 500 WiFi et mettez-le en place à l endroit souhaité où vous voulez l utiliser. Configureer de WiFi Clone: U kunt uw dlan 500 WiFi adapter nu uit het stopcontact halen en dan op de door u gewenste plek plaatsen. Configure WiFi Clone: A continuación, puede desenchufar su adaptador dlan 500 WiFi y colocarlo en el lugar que quiera. Instale o WiFi Clone: Pode agora retirar o seu adaptador dlan 500 WiFi e colocá-lo no local por si pretendido. Installazione di WiFi Clone: Ora è possibile staccare l adattatore dlan 500 WiFi e collocarlo nel luogo che desiderate.
30 >>>WiFi-NAME>>>PASSWORD>>>WiFi-NAME>>>PASSWORD Fertig! That s it! Terminé! Klaar! WiFi-Name: ABC Password: 12345
31 Y listo! E pronto! È tutto! >>> >>>WiFi-NAME>>>PASSWORD>>> WiFi-Name: ABC Password: WiFi-Name: ABC Password: V
32 Garantie: 3 Jahre Wenden Sie sich bei einem Defekt innerhalb der Garantiezeit bitte an die Service Hotline. Die vollständigen Garantiebedingungen finden Sie auf unserer Webseite Eine Annahme Ihres Gerätes ohne RMA-Nummer sowie eine Annahme unfrei eingesandter Sendungen ist nicht möglich! Garantie: 3 Jahre Ist Ihr devolo-gerät bei der ersten Inbetriebnahme oder innerhalb der Garantiezeit defekt, wenden Sie sich bitte an Ihren Lieferanten, bei dem Sie das devolo-produkt gekauft haben. Dieser wird den Umtausch bzw. die Reparatur bei devolo für Sie erledigen. Die vollständigen Garantiebedingungen finden Sie auf unserer Webseite
33 Garantie: 3 ans Si votre appareil devolo présente un défaut lors de la première mise en service ou pendant la période de garantie, veuillez vous adresser au fournisseur chez lequel vous avez acheté le produit devolo. Celui-ci se chargera pour vous du remplacement ou de la réparation auprès de devolo. Vous trouverez l ensemble des conditions de garantie sur notre site Internet Warranty: 3 years If your devolo device is found to be defective during initial installation or within the warranty period, please contact the vendor who sold you the product. The vendor will take care of the repair or warranty claim for you. The complete warranty conditions can be found at
34 Garanzia: 3 anni Se l apparecchio devolo alla prima messa in funzione è guasto o si guasta durante il periodo di garanzia, rivolgersi al fornitore presso il quale si è acquistato il prodotto. Questi si occuperà poi della sostituzione o della riparazione presso devolo. Potete trovare le condizioni di garanzia complete sul nostro sito Garantie: 3 jaar Is uw devolo-product bij de eerste ingebruikname (DOA) of in de garantietermijn defect geraakt, neem dan contact op met uw leverancier waar u het devolo product heeft gekocht. Deze zal het product omruilen, of laten repareren bij devolo. De volledige garantievoorwaarden vindt u op onze website
35 Garantia: 3 años Si su dispositivo devolo presenta algún defecto en la primera puesta en marcha o durante el período de garantía, póngase en contacto con el distribuidor donde adquirió el producto. Éste se encargará de la sustitución o reparación del producto devolo. Encontrará las condiciones para la garantía completas en nuestra página web Garantia: 3 anos Se o seu dispositivo devolo apresentar um defeito na primeira colocação em funcionamento ou dentro do período de garantia, dirija-se ao fornecedor onde adquiriu o produto devolo. Este irá, em seu nome, solicitar à devolo que efectue a troca ou reparação do equipamento. Poderá encontrar as condições de garantia completas na nossa página web:
36 Support Deutschland Österreich Schweiz/Suisse/Svizzera Great Britain France Italia España Portugal Nederlands Belgien/Belgique/Belgie Sweden Other countries
37 notes:
38 notes:
39 notes:
40 devolo AG Charlottenburger Allee Aachen Germany Engineered in Germany The Network Innovation 43749/0617
dlan 650 triple+ The Network Innovation
 dlan 650 triple+ Installation The Network Innovation 1 2 dlan 650+ adapter 3 4 dlan 650 triple+ adapter 5 6 TV TV 7 8 TV TV 9 10 within 2 min TV dlan 650+ adapter dlan 650 triple+ adapter TV www.devolo.com/dlan650triple+
Base Satellite
 installation Base Satellite 1 02 03 1 Satellite 2 04 05 2 3 Base Satellite 2 06 07 4 Satellite 1 Base Satellite 2 08 09 5a WiFi key WiFi key wwwwww Satellite 2 10 11 5b WPS 1 min. Satellite 2 12 13 Download
dlan 550 WiFi Installation
 dlan 550 WiFi Network Kit Installation 1 dlan 550 duo+ DE Erste Schritte: Stecken Sie den dlan 550 duo+ in die Steckdose und verbinden Sie ihn mit dem beiliegenden LAN-Kabel mit Ihrem Router. GB First
devolo WiFi Repeater Installation The Network Innovation
 devolo WiFi Repeater Installation The Network Innovation Installations-Voraussetzungen: Ihr Router bietet eine WPA/WPA2- Verschlüsselung Ihr Router bietet einen Push-Button Ihr WLAN muss sichtbar sein
devolo WiFi Stick ac Installation
 devolo WiFi Stick ac Installation 1 Stecken Sie den devolo WiFi Stick ac in einen freien USB-Anschluss an Ihrem Notebook oder PC. Stellen Sie sicher, dass Ihr Gerät mit dem Internet verbunden ist. Plug
1. DESCARGA DEL SOFTWARE DE BLUETOOTH EN EL SMARTPHONE
 MANUAL DEL USUARIO PARA BLUETOOTH ES 1. DESCARGA DEL SOFTWARE DE BLUETOOTH EN EL SMARTPHONE Entre en Apple Store o Google Play y busque: - BH Premium BH Premium 2. FIJACIÓN DEL MÓDULO BLUETOOTH Fije el
EUSS SOFTWARE UPDATE CHECKLIST COUNTERFEIT DETECTORS NEW 20 EURO BANKNOTE C32 C18 C07 C19 C20. English
 English NEW 20 EURO BANKNOTE SOFTWARE UPDATE CHECKLIST COUNTERFEIT DETECTORS Device New 20 Euro software version number Is this number displayed on your device during start-up? Yes Safescan 125 C32 No
devolo WiFi Stick ac Installation
 devolo WiFi Stick ac Installation 1 Installation steps for Windows systems DE Erste Schritte: Stecken Sie den devolo WiFi Stick ac in einen freien USB-Anschluss an Ihrem Notebook oder PC. Stellen Sie sicher,
microsoft.com/hardware/support
 2015 Microsoft microsoft.com/hardware/support X20-43694-01 Back Cover Front Cover K65 Set up Note: You can wirelessly connect Wi-Fi CERTIFIED Miracast enabled devices to a TV or monitor (available HDMI
www.microsoft.com/hardware
 www.microsoft.com/hardware english - EN ESPAÑOL (LATINOAMERICANO) - XX PORTUGUÊS (BRASIL) - XC FRANÇAIS CANADIEN - XD 1 2 www.microsoft.com/hardware/productguide 3 www.microsoft.com/hardware/downloads
42.5" (1080 mm) 5.6" (143 mm) 13.1" (333 mm) 23.8" (603 mm) 1 of W-00 rev.b 02/13
 5.6 (143 mm) 13.1 (333 mm) 23.8 (603 mm) 1 of W-00 rev.b 02/13") Task Light for StyleView Carts ASSEMBLY INSTRUCTIONS Instrucciones de instalación Notice d assemlage Montageanleitungen Installatie instructies Manuali d Istruzione 取扱い説明書설치안내 42.5" (1080 mm) 5.6" (143
Task Light for StyleView Carts ASSEMBLY INSTRUCTIONS Instrucciones de instalación Notice d assemlage Montageanleitungen Installatie instructies Manuali d Istruzione 取扱い説明書설치안내 42.5" (1080 mm) 5.6" (143
START INICIAR - DÉMARRAGE - INIZIO - INICIAR - INICIO
 START INICIAR - DÉMARRAGE - INIZIO - INICIAR - INICIO ENG: Microsoft wireless mouse PTB: Mouse sem fio da Microsoft FRA: Souris sans fil Microsoft ITA: Mouse senza fili Microsoft PTG: Rato sem fios Microsoft
English - EN Français - FR Deutsch - DE Italiano - IT Português - PT Español - ES
 English - EN Français - FR Deutsch - DE Italiano - IT Português - PT Español - ES Push upward to open battery door, insert batteries as shown. Pair your mouse with your Windows device: A. On the underside
Quick Installation Guide Internet Setup
 CBR-970 Wireless-N Broadband Router www.cnet.com.tw Established in California, U.S.A. since 1987 Quick Installation Guide Internet Setup What s included in the box CBR-970 Wireless N Broadband Router Quick
Bedienungsanleitung. grün/rot. I Taster
 Deutschland Bedienungsanleitung Handy laden - Die Lampe ist ausgeschaltet und voll aufgeladen. - Das Handy-Ladekabel (A) (USB-Seite) mit dem DC-Spannungswandler (B) und dann mit dem Single-Adapter (C)
PORTABLE KEYBOARD CASE FPO
 PORTABLE KEYBOARD CASE FPO Delivering the best typing experience. Enjoy! Pour une frappe optimale. Profitez-en! Brindándole la mejor experiencia al teclear Disfrute! Product Overview Vue d ensemble du
LOGITECH CONFERENCECAM KIT with Intel NUC
 LOGITECH CONFERENCECAM KIT with Intel NUC CONTENTS SOMMAIRE English............... 2 Français.............. 5 CONTENIDO CONTEÚDO Español...............8 Português............. 11 LOGITECH CONFERENCECAM
Boxed Intel Celeron Processor Installation Notes
 Boxed Intel Celeron Processor Installation Notes Before installing the processor, please consider integration issues found in the installation notes available on the World Wide Web. Avant d effectuer l
EP-2906 Manual de instalación
 EP-2906 Manual de instalación Con el botón situado a la izquierda se configura en el modo de cliente y de la derecha es el modo de Punto de acceso AP (nota: El USB es sólo para la función de fuente de
PC / Mac. Installation guide. www.sitecom.com/warranty. Register within 3 weeks of purchase and get a free 10 year warranty
 Register within 3 weeks of purchase and get a free 10 year warranty Registreer je product binnen drie weken na aankoop en je ontvangt een gratis garantie van 10 jaar Registrieren Sie das Produkt innerhalb
Roomba 900. Quick Start Guide Guide de Démarrage Rapide Guía de Inicio Rápido
 Roomba 900 Quick Start Guide Guide de Démarrage Rapide Guía de Inicio Rápido To get started, you will need the robot, Home Base, line cord and your smart device. For a full list of box contents refer
beatsbydre.com facebook.com/beatsbydre @beatsbydre QUICK START GUIDE
 QUICK START GUIDE GETTING STARTED EN To turn on your Pill XL TM, press power button. FR Pour allumer le Pill XL TM, appuyez sur le bouton d alimentation. ES Para encender su Pill XL TM, presione el botón
PROTOCOLO DE R E HABILITACIÓN
 Orteq_rehab_booklet_ES 31/10/08 15:12 Page 1 Rehabilitation protocol in other languages can be downloaded from the website www.orteq.com or can be ordered at Orteq via your physician. Het rehabilitatieprotocol
PC / Mac. Installation guide. www.sitecom.com/warranty. Register within 3 weeks of purchase and get a free 10 year warranty
 Register within 3 weeks of purchase and get a free 10 year warranty Registreer je product binnen drie weken na aankoop en je ontvangt een gratis garantie van 10 jaar Registrieren Sie das Produkt innerhalb
Start. Démarrer. Iniciar.
 Zune CABLE Pack câble de synchronisation Zune cable de sincronizacíon Zune Start. Démarrer. Iniciar. To sync and charge, connect the sync cable to your Zune and your PC. Just need to charge? Connect your
Quick Installation Guide Guide d Installation Rapide Kurzanleitung Guida rapida all installazione Guía de instalación rápida
 Thecus Technology Corporation Thecus N5200 / N5200 RouStor TM IP Storage Server Quick Installation Guide Guide d Installation Rapide Kurzanleitung Guida rapida all installazione Guía de instalación rápida
 + 5.Instrucciones de Uso 5.1 Conexión del Reproductor Conecte el dispositivo como se muestra en las imágenes, encienda el reproductor y siga los siguientes pasos: 1. Si quiere usar el modo de video A/V
Quick Installation Guide. FR Guide d installation ES Guía de instalación DE Installationsanleitung IT Guida all installazione
 Quick Installation Guide FR Guide d installation ES Guía de instalación DE Installationsanleitung IT Guida all installazione 1 Thank you for choosing the Withings Pulse Merci d avoir choisi le Withings
U 4405 Dongle Free X TV
 U 4405 Dongle Free X TV MANUAL DE INSTRUCCIONES MANUAL OF INSTRUCCIONS MANUEL D INSTRUCTIONS BEDIENUNGSANLEITUNG MANUALE DELLE INSTRUCCIONI MÀNUAL DE INSTALAÇÃO Instalación del Dongle FREE X-TV Este dispositivo
PC380 Web Cam. User s Guide Version 1.1
 PC380 Web Cam User s Guide Version 1.1 Web Camera User s Guide System Requirements Microsoft Windows 98SE, Windows Me, Windows 2000, Windows XP. Software Installation Attention: Make sure to install
Quick Installation Guide Internet Setup
 www.cnet.com.tw Established in California, U.S.A. since 1987 CBR-971 Wireless-N 3.5G Broadband Router Quick Installation Guide Internet Setup What s included in the box CBR-971 Wireless N 3.5G Broadband
English - EN Español (América Latina) - XX Português (Brasil) - XC Français (Canadá) - XD
 - XX Português (Brasil) - XC Français (Canadá) - XD") English - EN Español (América Latina) - XX Português (Brasil) - XC Français (Canadá) - XD Push upward to open battery door Insert batteries as shown Pair your mouse with your Windows device: A. On the
English - EN Español (América Latina) - XX Português (Brasil) - XC Français (Canadá) - XD Push upward to open battery door Insert batteries as shown Pair your mouse with your Windows device: A. On the
What is Real Dial Size? Qu est-ce qui le Real Dial Size fait? Real Dial Size OFF (Désactivé) Real Dial Size ON (Activé) All characters are measured fr
 Real Dial Size ON (Activé) All characters are measured fr") Contents Table des Matières Indice Inhalt English What is Real Dial Size?... 7 Icon Gallery... 9 Contact Us... 52 Français Qu est-ce qui le Real Dial Size fait?................ 7 Galerie d Icônes...............................
Contents Table des Matières Indice Inhalt English What is Real Dial Size?... 7 Icon Gallery... 9 Contact Us... 52 Français Qu est-ce qui le Real Dial Size fait?................ 7 Galerie d Icônes...............................
devolo WiFi Repeater ac Installation
 devolo WiFi Repeater ac Installation 1a DE Erste Schritte Methode A Konfiguration mit WPS-Knopf (Seite 4-9). Methode B Konfiguration im Webbrowser (Seite 10-19). Das WLAN (SSID) Ihres Routers muss sichtbar
Guía de instalación rápida TEW-691GR 1.01
 Guía de instalación rápida TEW-691GR 1.01 Table of Contents Español 1 1. Antes de iniciar 1 2. Instalación del Hardware 2 3. Configuración del enrutador inalámbrico 3 Troubleshooting 5 Version 05.11.2010
Matrox M-Series. Getting Started Guide Guide de mise en route Erste Schritte- Handbuch Guida introduttiva Guía de introducción
 Matrox M-Series Getting Started Guide Guide de mise en route Erste Schritte- Handbuch Guida introduttiva Guía de introducción 20071-G50-0220 FMSR-BKT22I Install your graphics hardware Choose a PCI Express
YourType FOLIO + KEYBOARD
 YourType FOLIO + KEYBOARD Delivering the best typing experience. Enjoy! Pour une frappe optimale. Profitez-en! Brindándole la mejor experiencia al teclear Disfrute! Product Overview Vue d ensemble du produit
apprp01v3 300 Mbps Wireless WiFi-N Extender VERSION 1.0
 apprp01v3 300 Mbps Wireless WiFi-N Extender VERSION 1.0 Español 01 English 09 Française 17 Capítulo 1. Introducción y descripción del producto Gracias por elegir el WiFi-N Extender 300Mbps apprp01v3 de
Pag.2 Italiano Configurazione minima PC per l utilizzo del software GIOTTO MobilCAD
 Pag.2 Italiano Configurazione minima PC per l utilizzo del software GIOTTO MobilCAD Pag.3 English Minimum PC requirements for GIOTTO MobilCAD Pag.4 Português Requisitos mínimos do sistema para GIOTTO MobilCAD
Guía de instalación rápida TEW-639GR 2.01
 Guía de instalación rápida TEW-639GR 2.01 Table of Contents Español 1 1. Antes de iniciar 2. Instalación del Hardware 1 2 3. Configuración del enrutador inalámbrico 3 Troubleshooting 5 Version 03.04.2010
Quick Start Guide. EHS Advanced. Wireless-Headset Adapter
 Quick Start Guide HS dvanced Wireless-Headset dapter snom technology G snom rance SRL Wittestr. 0 G Parc des fontenelles 0 erlin, eutschland 0 ailly, rance Tel. + 0-0 Tel. + 0 a + 0 a + 0 info@snom.com,
Calibre-Caliber-Kaliber-Calibre 9238/1970 (WITH ALL THE FUNCTIONS) 9231/1890 (WITHOUT 24-HOUR / SECOND TIME ZONE) 9238/1960 (WITHOUT DAY)
 9231/1890 (WITHOUT 24-HOUR / SECOND TIME ZONE) 9238/1960 (WITHOUT DAY)") JOUR, DATE, 24-HEURES / DEUXIÈME FUSEAU HORAIRE DAY, DATE, 24-HOUR / SECOND TIME ZONE TAG, DATUM, 24-STUNDEN / ZWEITE ZEITZONE DIA, FECHA, 24-HORAS / SEGUNDA ZONA HORARIA Calibre-Caliber-Kaliber-Calibre
JOUR, DATE, 24-HEURES / DEUXIÈME FUSEAU HORAIRE DAY, DATE, 24-HOUR / SECOND TIME ZONE TAG, DATUM, 24-STUNDEN / ZWEITE ZEITZONE DIA, FECHA, 24-HORAS / SEGUNDA ZONA HORARIA Calibre-Caliber-Kaliber-Calibre
24-Port 10/100Mbps Web Smart PoE Switch with 4 Gigabit Ports and 2 Mini-GBIC Slots TPE-224WS
 24-Port 10/100Mbps Web Smart PoE Switch with 4 Gigabit Ports and 2 Mini-GBIC Slots TPE-224WS ŸGuía de instalación rápida (1) ŸTroubleshooting (3) 1.12 1. Antes de iniciar Contenidos del Paquete ŸTPE-224WS
Matrox Epica Series 20162-G50-0110 FEP2-BKT11I
 Matrox Epica Series Epica TC20+ Epica TC48 Getting Started Guide Guide de mise en route Erste Schritte- Handbuch Guida introduttiva Guía de introducción 20162-G50-0110 FEP2-BKT11I Install your graphics
1) Through the left navigation on the A Sweet Surprise mini- site. Launch A Sweet Surprise Inicia Una dulce sorpresa 2016
 Through the left navigation on the A Sweet Surprise mini- site. Launch A Sweet Surprise Inicia Una dulce sorpresa 2016") [[Version One (The user has not registered and is not logged in) Inicia Una dulce sorpresa 2016 To launch the Global Siddha Yoga Satsang for New Year s Day 2016, A Sweet Surprise, enter your username and
[[Version One (The user has not registered and is not logged in) Inicia Una dulce sorpresa 2016 To launch the Global Siddha Yoga Satsang for New Year s Day 2016, A Sweet Surprise, enter your username and
File naming. Dateibenennung. Nommage de fichiers. Nomenclatura de archivo. 3shape. Release. Version. Version. Version. Software CAD.
 ENGLISH DEUTSCH FRANÇAIS ESPAÑOL DESS-3SHAPE LIBRARIES Download and installation instructions of dess interfaces (titan bases, gap cemented 0.09mm diameter) 3shape libraries. Download der Bibliotheken
Table of Contents ACT LABS GS Addendum
 GS Addendum Table of Contents ACT LABS GS Addendum English --------------------------------------------------------------- 4 Français ------------------------------------------------------------- 5 Deutsche
Voice Bridge. Guía de inicio rápido Guida rapida all uso
 Voice Bridge Guía de inicio rápido Guida rapida all uso Bienvenido Voice Bridge Sus llamadas del teléfono fijo en su móvil. Enhorabuena! You are one step away to use your landline on your smartphone. Descargar
1) Install the included batteries into your blood pressure monitor (BPM).
 Install the included batteries into your blood pressure monitor (BPM).") DELUXE CONNECTED BLOOD PRESSURE ONITOR UA-651BLE 1) Install the included batteries into your blood pressure monitor (BP). 2) Insert the air connector plug into the air socket. 3) Download the free A&D
DELUXE CONNECTED BLOOD PRESSURE ONITOR UA-651BLE 1) Install the included batteries into your blood pressure monitor (BP). 2) Insert the air connector plug into the air socket. 3) Download the free A&D
El teclado viene pre-cargado de fábrica pero es recomendable cargarlo completamente la primera vez que lo utilices.
 PC-200680 Bienvenidos al mundo Perfect Choice Antes de comenzar a usar el producto es importante que leas esta guía. Carga del teclado El teclado viene pre-cargado de fábrica pero es recomendable cargarlo
HOJA ADICIONAL PATCH CB-077
 HOJA ADICIONAL PATCH CB-077 IMPORTANTE: Debido a una mejora en la tecnología de fabricación del pack CB-077, después de la instalación del nuevo pack (código 0 PI0283) en el medidor, se ha de enviar un
app ADSL2V1 COMMUNICATIONS LINE www.printyourideas.com
 app ADSL2V1 COMMUNICATIONS LINE www.printyourideas.com 1. CONECTAR EL ROUTER Antes de conectar el dispositivo asegúrese de que el servicio de banda ancha (ADSL), suministrado por su proveedor ISP, se encuentra
Zune Car Pack trousse Pour l auto Zune Paquete para auto Zune Start. Démarrer. Iniciar.
 Zune Car Pack trousse Pour l auto Zune Paquete para auto Zune Start. Démarrer. Iniciar. FM Transmitter Tune Down/ AutoSeek Tune Up/ AutoSeek Preset 1 Charger Preset 2 Light 1 Plug the charger into your
Ready. Set. Go. Vonage Box. Quick Start Guide
 Ready. Set. Go. TM Vonage Box Quick Start Guide Start here. Congratulations and welcome to Vonage! Now that you have your Vonage Box TM, it s time to enjoy exceptional home phone service, including a wide
ZERTIFIKAT. Die Zertifizierungsstelle der Swiss TS Technical Services AG bescheinigt, dass die Firma
 ZERTIFIKAT Die Zertifizierungsstelle der Swiss TS Technical Services AG bescheinigt, dass die Firma für den Geltungsbereich: Entwicklung, Herstellung und Vermarktung von dekorativen Platten und Halbfabrikaten
ENKVM-USBB. 2-Port USB KVM switch with Easy Switch and Cable. User Guide
 ENKVM-USBB 2-Port USB KVM switch with Easy Switch and Cable User Guide i Package Contents 1 ENKVM-USBB 2-Port USB KVM Switch with Easy Switch and Cable 1 User Guide Requirements Console A VGA, SVGA, XGA,
Blair Storage Bed / Lit avec Rangement / Cama con Almacenamiento - Queen, King
 English This page lists the contents included in the box. Please take time to identify the hardware as well as the individual components of the product. s you unpack and prepare for assembly, place the
apprp01v4 300Mbps Wireless WiFi-N Extender Version 1.0
 apprp01v4 300Mbps Wireless WiFi-N Extender Version 1.0 Español 01 English 09 Française 17 Capítulo 1. Introducción y descripción del producto Gracias por elegir el WiFi-N Extender 300Mbps apprp01v4 de
DECLARATION of CONFORMITY
 Issued: 22/10/2010 Revised: Page: 1 of 1 DECLARATION of CONFORMITY Application of Council Directive: Standard to which Conformity is Declared: As directed in 2009/278/EC to EuP 2010 criteria Manufactured
BAI-220 AURICULAR INALÁMBRICO
 BAI-220 AURICULAR INALÁMBRICO Manual de usuario ESPECIFICACIONES TÉCNICAS EMISOR Frecuencia: 86 ± 0.5 MHz Modulación: FM Distancia de emisión: 30 m. Recepción de cualquier equipo de audio y video con salida
2.4 GHz Wireless Mouse Souris sans fil 2,4 GHz Ratón inalámbrico de 2,4 GHz
 2.4 GHz Wireless Mouse Souris sans fil 2,4 GHz Ratón inalámbrico de 2,4 GHz User s Manual Manuel de l'utilisateur Manual del usuario 2.4 GHz Wireless Mouse User manual English Thank you for purchasing
Bluetooth Keyboard And Stand Combo For ipad
 Model: 50915 Bluetooth Keyboard And Stand Combo For ipad User s Manual Please read this User Manual carefully before you start to use the keyboard. 1. Package contents: 78 keys Bluetooth keyboard 1 pcs
MISE A JOUR EZEE TAB 10D11M
 MISE A JOUR EZEE TAB 10D11M 1. Téléchargez le fichier de mise à jour à l adresse suivante : http://www.storex.fr/download/fw/ezeetab_10d11m.zip 2. Une fois le fichier télécharger, décompressez le puis
USB 2.0 INTERNAL MEMORY CARD READER/WRITER USER MANUAL CRW-UINB
 USB 2.0 INTERNAL MEMORY CARD READER/WRITER USER MANUAL CRW-UINB FEATURES HARDWARE INTRODUCTION 1 USB port for plugging into any USB device 2 Slot for SD, MMC and RS-MMC cards 3 Slot for Memory Stick, Memory
MANUALE D ISTRUZIONI INSTRUCTION MANUAL MANUEL D INSTRUCTIONS HANDBUCH ANWEISUNGEN MANUAL DE INSTRUCCIONES MANUAL DE INSTRUÇÕES CORNETTA PER CELLULARE
 MANUALE D ISTRUZIONI INSTRUCTION MANUAL MANUEL D INSTRUCTIONS HANDBUCH ANWEISUNGEN MANUAL DE INSTRUCCIONES MANUAL DE INSTRUÇÕES CORNETTA PER CELLULARE 2Italiano manuale d istruzioni ISTRUZIONI D USO Inserisci
Guía de instalación rápida TEG-160WS TEG-240WS
 Guía de instalación rápida TEG-160WS TEG-240WS C2 Table of Contents Español 1 1. Antes de iniciar 1 2. Instalación del Hardware 2 3. Herramienta de gestión Web 3 Troubleshooting 6 Version 02.02.2010 1.
CPNP200IS. Snelstartgids. Gefeliciteerd met uw nieuwe Conceptronic Powerline Adapter
 NEDERLANDS CPNP200IS Snelstartgids Gefeliciteerd met uw nieuwe Conceptronic Powerline Adapter In deze snelstartgids vindt u stap-voor-stap instructies voor installatie en gebruik van het Conceptronic Powerline
MARQUE: WITHINGS REFERENCE: WS-30 CODIC:
 MARQUE: WITHINGS REFERENCE: WS-30 CODIC: 3757390 Wireless Scale WS-30 Balance connectée WS-30 Online-Waage WS-30 Báscula conectada WS-30 Bilancia wireless WS-30 Quick Installation Guide FR Guide d installation
Sierra Security System
 Using Your SpreadNet Accessories With Your Sierra Security System Uso de Sus Accesorios SpreadNet Con Su Sistema de Seguridad Sierra SN990-KEYPAD SN961-KEYFOB SN991-REMOTE 1 SN990-KEYPAD The SN990-KEYPAD
TCO REFERENCE: PACK BALANCE WS-30 + PULSE O2 CODIC:
 TCO MARQUE: WITHINGS REFERENCE: PACK BALANCE WS-30 + PULSE O2 CODIC: 4077261 Wireless Scale WS-30 Balance connectée WS-30 Online-Waage WS-30 Báscula conectada WS-30 Bilancia wireless WS-30 Quick Installation
Quick Installation Guide TW100-BRV304
 Quick Installation Guide TW100-BRV304 Table Table of Contents of Contents Español... 1 1. Antes de iniciar... 1 2. Instalación del Hardware... 2 3. Configuración del enrutador... 3 Troubleshooting... 5
Schnellinstallationsanleitung
 Schnellinstallationsanleitung TL-WR340G/TL-WR340GD/TL-WR541G/ TL-WR542G/TL-WR641G/TL-WR642G Drahtloser 54M/108M-Router Rev: 1.0.0 1 Konfiguration des Computers 1) Verbinden Sie den drahtlosen Router wie
DeviceNet Kit. Kit DeviceNet. Kit DeviceNet. Installation Guide. Guia de Instalación. Guia de Instalação SSW-07/SSW-08
 DeviceNet Kit Kit DeviceNet Kit DeviceNet Installation Guide Guia de Instalación Guia de Instalação SSW-07/SSW-08 1. DESCRIPTION OF THE KIT Contents: Table 1 - Contents of the kit SSW-07/SSW-08 DeviceNet
Register this product online within 3 weeks of purchase and get a free 10 year warranty. Installation guide. www.sitecom.
 Register this product online within 3 weeks of purchase and get a free 10 year warranty Installation guide www.sitecom.com/warranty Wi-Fi modem router N300 Package content UK NL IT DE ES PT FR RU Full
GETTING STARTED. EN Tap power button to check battery Fuel Gauge. EN Connect cable to micro USB port to charge.
 QUICK START GUIDE GETTING STARTED EN Connect cable to micro USB port to charge. FR Branchez le câble au port micro USB pour charger le casque. ES Conecte el cable al puerto USB micro para cargar. PT Conectar
 Instalación rápida Antes de proceder con la instalación, es importante que sepa: Una instalación completa incluye "Drivers" y "Programa", ambos elementos se pueden instalar fácilmente desde el CD del software.
Quick Installation Guide. To connect a DSR switch. Plug in the keyboard, monitor and mouse for your local connection.
 Quick Installation Guide DSR 1024 Switch The Power of Being There The following instructions will help you to connect your DSR switch. To connect a DSR switch Should you require further assistance, please
Contents Table des Matières Indice Inhalt
 Contents Table des Matières Indice Inhalt English What is Real Dial Size?... 3 Icon Gallery... 5 Contact Us...17 Français Qu est-ce qui le Real Dial Size fait?... 3 Galerie d Icônes... 5 Contactez-nous....
MISE A JOUR EZEE TAB 7D12-S
 MISE A JOUR EZEE TAB 7D12-S 1. Téléchargez le fichier de mise à jour à l adresse suivante : http://www.storex.fr/download/fw/7d12-s.rar 2. Une fois le fichier télécharger, décompressez le puis installez
Paso 2: Descargar la app Wattio SmartHome Crear reglas en la app. Wattio SmartHo Guía rápida - Quick starting guide
 Guía rápida - Quick starting guide Paso 1: Abrir el pack Step 1: Open the pack Paso 2: Descargar la app Wattio SmartHome Crear reglas en la app. Wattio SmartHo Step 2: Download the Wattio SmartHome app
Network & Systems Presenta: Sistema TMI. Introducción, Instalación Programacion y Reparación
 Network & Systems Presenta: Sistema TMI Introducción, Instalación Programacion y Reparación Overview: Conociéndo el sistema TMI Veremos los diferentes Modelos del sistema TMI de telefonía Inalámbrica Conoceremos
Quick Installation Guide TV-IP400 TV-IP400W
 Quick Installation Guide TV-IP400 TV-IP400W Table of of Contents Contents Español... 1. Antes de iniciar... 2. Instalación del Hardware... 3. Configuración de la cámara Internet... Troubleshooting... 1
MANUAL EASYCHAIR. A) Ingresar su nombre de usuario y password, si ya tiene una cuenta registrada Ó
 Ingresar su nombre de usuario y password, si ya tiene una cuenta registrada Ó") MANUAL EASYCHAIR La URL para enviar su propuesta a la convocatoria es: https://easychair.org/conferences/?conf=genconciencia2015 Donde aparece la siguiente pantalla: Se encuentran dos opciones: A) Ingresar
MANUAL EASYCHAIR La URL para enviar su propuesta a la convocatoria es: https://easychair.org/conferences/?conf=genconciencia2015 Donde aparece la siguiente pantalla: Se encuentran dos opciones: A) Ingresar
KMR SCA-05 Mounting Instructions Instrucción de Montaje Instruções de Montagem 0899.4897
 0899.4897 KMR SCA-05 Mounting Instructions Instrucción de Montaje Instruções de Montagem 0899.4897 KMR SCA-05 Mounting Instructions Instrucción de Montaje Instruções de Montagem The KMR SCA-05 kit is a
Wireless Blood Pressure Monitor
 Wireless Blood Pressure Monitor Tensiomètre sans fil Kabelloses Blutdruckmessgerät Tensiometro de Withings sin hilos Tensiometro di Withings senza fili Quick Installation Guide FR Guide d installation
Beckett 5 Shelf Bookcase / Bibliothéque 5 Étagéres / 5 Estantería Librero
 English This page lists the contents included in the box. Please take time to identify the hardware as well as the individual components of the product. As you unpack and prepare for assembly, place the
DECLARATION of CONFORMITY
 Issued: 23/02/2009 Revised: Page: 1 of 1 DECLARATION of CONFORMITY Application of Council Directive: Standard to which Conformity is Declared: EN 55022:1998 (CISPR 22) Information Technology Equipment:
Quick Installation Guide TEW-638APB H/W: V1.0R
 Quick Installation Guide TEW-638APB H/W: V1.0R Table Table of Contents of Contents... 1. Antes de iniciar... 2. Instalación del Hardware... 1 1 2 Troubleshooting... 8 Version 09.10.2008 1. Antes de iniciar
Quick Installation Guide. FR Guide d installation ES Guía de instalación DE Installationsanleitung IT Guida all installazione
 Wireless Blood Pressure Monitor Tensiomètre sans fil Kabelloses Blutdruckmessgerät Tensiometro de Withings sin hilos Tensiometro di Withings senza fili Quick Installation Guide FR Guide d installation
MANUAL DE INSTRUCCIONES TECLADO PARA TABLETA ACC-5188TKB
 MANUAL DE INSTRUCCIONES TECLADO PARA TABLETA ACC-5188TKB ESTIMADO CLIENTE Con el fin de que obtenga el mayor desempeño de su producto, por favor lea este manual de instrucciones cuidadosamente antes de
DESS-DENTAL WINGS LIBRARIES
 ENGLISH DEUTSCH FRANÇAIS ESPAÑOL DESS-DENTAL WINGS LIBRARIES Download and installation instructions for DESS interfaces (titan bases, initial gap cemented 0.03mm diameter) for DENTAL WINGS libraries. Download
Router Wi-Fi N300 (N300R)
") Easy, Reliable & Secure Guía de instalación Router Wi-Fi N300 (N300R) Marcas comerciales Las marcas y nombres de productos son marcas comerciales o marcas comerciales registradas por sus respectivos titulares.
Easy, Reliable & Secure Guía de instalación Router Wi-Fi N300 (N300R) Marcas comerciales Las marcas y nombres de productos son marcas comerciales o marcas comerciales registradas por sus respectivos titulares.
WL1003 NEW AUTOMÁTICO
 WL1003 NEW AUTOMÁTICO Acaba de adquirir un equipo de conmutación de euroconectores y le damos las gracias por su elección. Para una utilización óptima de este aparato, le recomendamos que lea este manual
V-Belt pulleys for taper bush Keilriemenscheiben für spannbuchsen
 V-Belt pulleys for taper bush Keilriemenscheiben für spannbuchsen Select a product in the list below, by making a "left-click" Bitte wählen sie ein rodukt in der Liste, mit der linken Maustaste. SZ/1 SZ/2
appkbws03 Wireless Multimedia Keyboard Set Black
 appkbws03 Wireless Multimedia Keyboard Set Black Español 01 English 06 Capítulo 1. Introducción y descripción del producto Gracias por elegir el teclado inalámbrico APPKBWS03. Descripción del producto
Exclusive Benefits with our Best Available Rate
 English Exclusive Benefits with our Best Available Rate Confirming your booking with our Best Available Rate will provide you exclusive benefits that will make your visit a delightful experience. Please
Vedi foto 4. See photo 4. Voir photo 4. Ver foto 4
 MARCA MAKE FAIRE - HACER MODELLO MODEL MODÈLE - MODELO REV. 00 HYUNDAI TUCSON 15 Funzione - Function SCHEDA TECNICA DI INSTALLAZIONE PER SISTEMI DI ALLARME CAN CAN ALARM SYSTEM FITTING INSTRUCTIONS SCHEMA
CPNP200 (v3.0) Snelstartgids. Gefeliciteerd met uw nieuwe Conceptronic Powerline adapter
 Snelstartgids. Gefeliciteerd met uw nieuwe Conceptronic Powerline adapter") NEDERLANDS CPNP200 (v3.0) Snelstartgids Gefeliciteerd met uw nieuwe Conceptronic Powerline adapter In deze snelstartgids vindt u stap-voor-stap instructies voor installatie en gebruik van de Conceptronic
NEDERLANDS CPNP200 (v3.0) Snelstartgids Gefeliciteerd met uw nieuwe Conceptronic Powerline adapter In deze snelstartgids vindt u stap-voor-stap instructies voor installatie en gebruik van de Conceptronic
english - EN français - FR deutsch - DE italiano - IT português - PT español - ES
 english EN français FR deutsch DE italiano IT português PT español ES wwwmicrosoftcomhardware F F F F F F F F F F F F F F F F F F F F F F F F Fn wwwmicrosoftcomhardwareproductguide F F Press the battery
Name: Klasse: Standardisierte kompetenzorientierte schriftliche Reifeprüfung AHS. 24. September Spanisch. Hören. öffentliches Dokument
 Name: Klasse: Standardisierte kompetenzorientierte schriftliche Reifeprüfung AHS 24. September 2015 Spanisch (B1) Hören Hinweise zum Beantworten der Fragen Sehr geehrte Kandidatin, sehr geehrter Kandidat!