BUILDING BASICS BASES DE LA CONSTRUCTION
|
|
|
- Alfredo Robles Vidal
- hace 6 años
- Vistas:
Transcripción


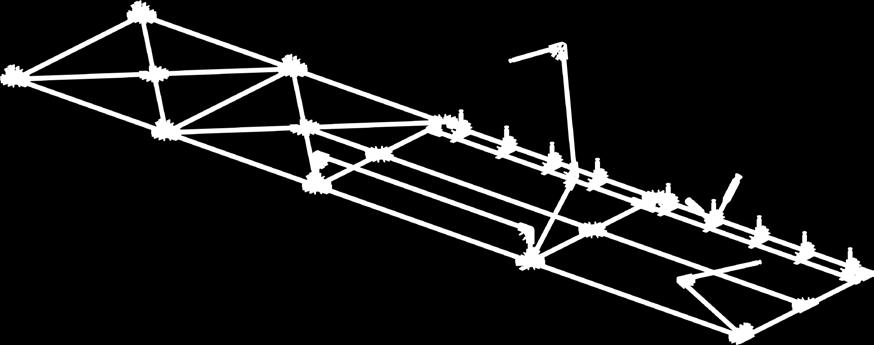
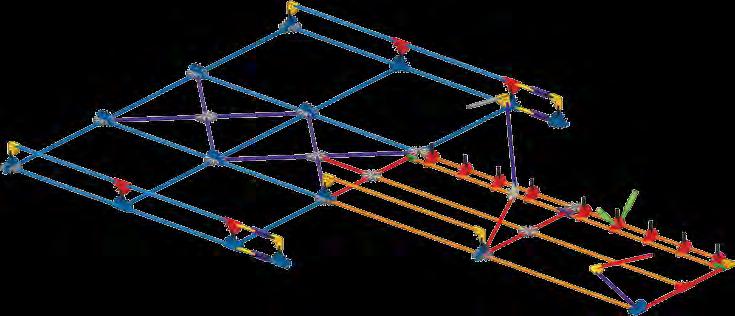
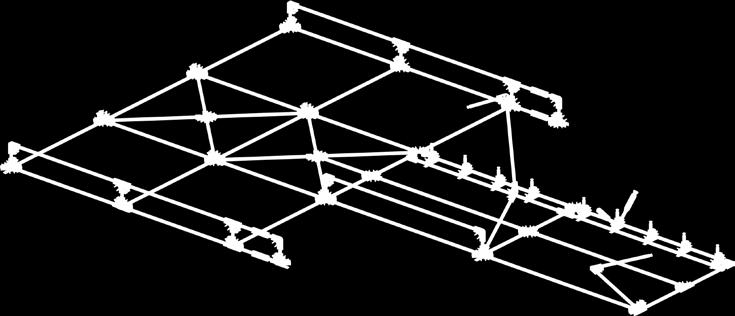
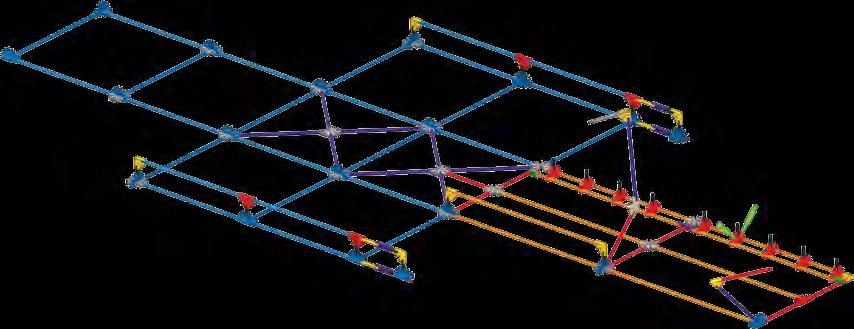
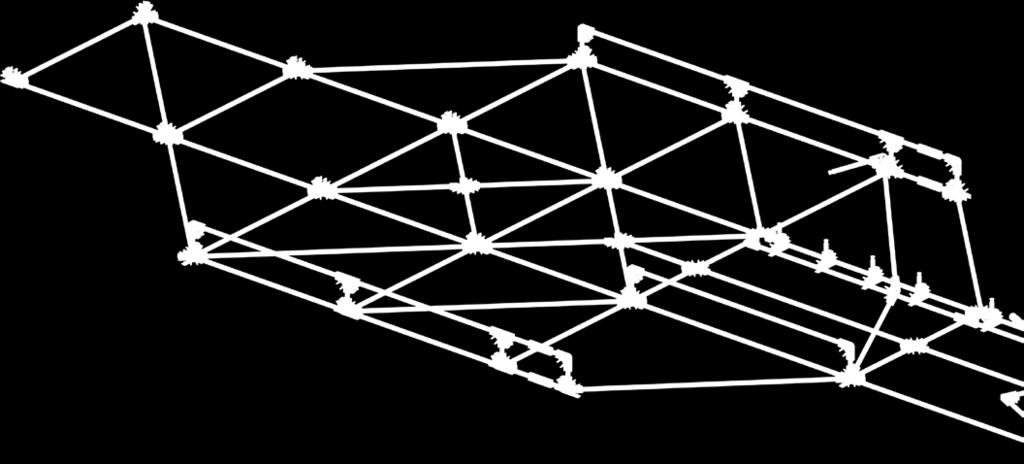
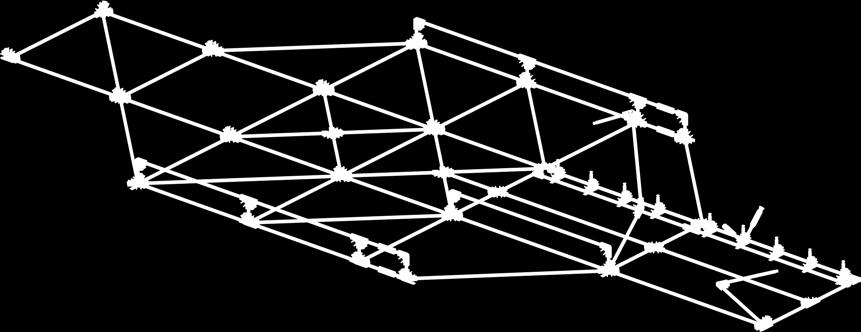
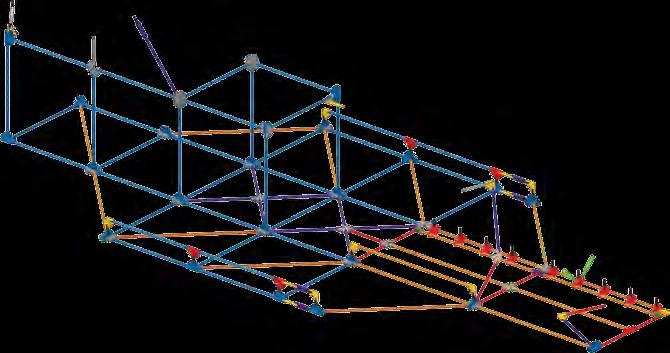
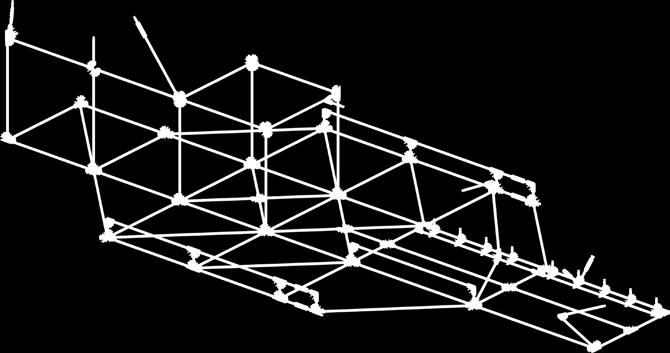
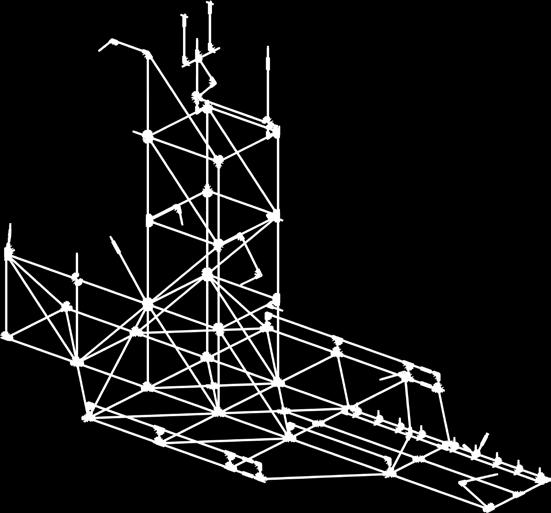
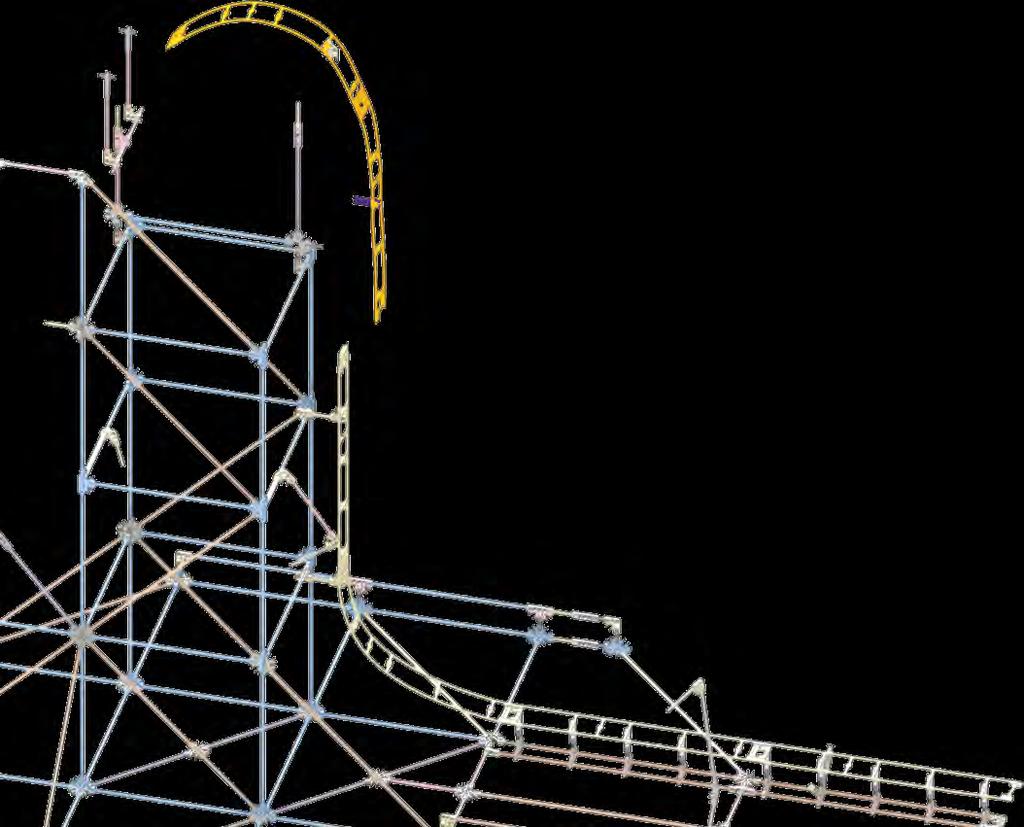
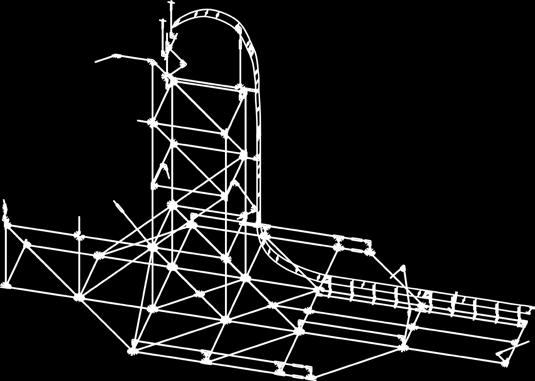
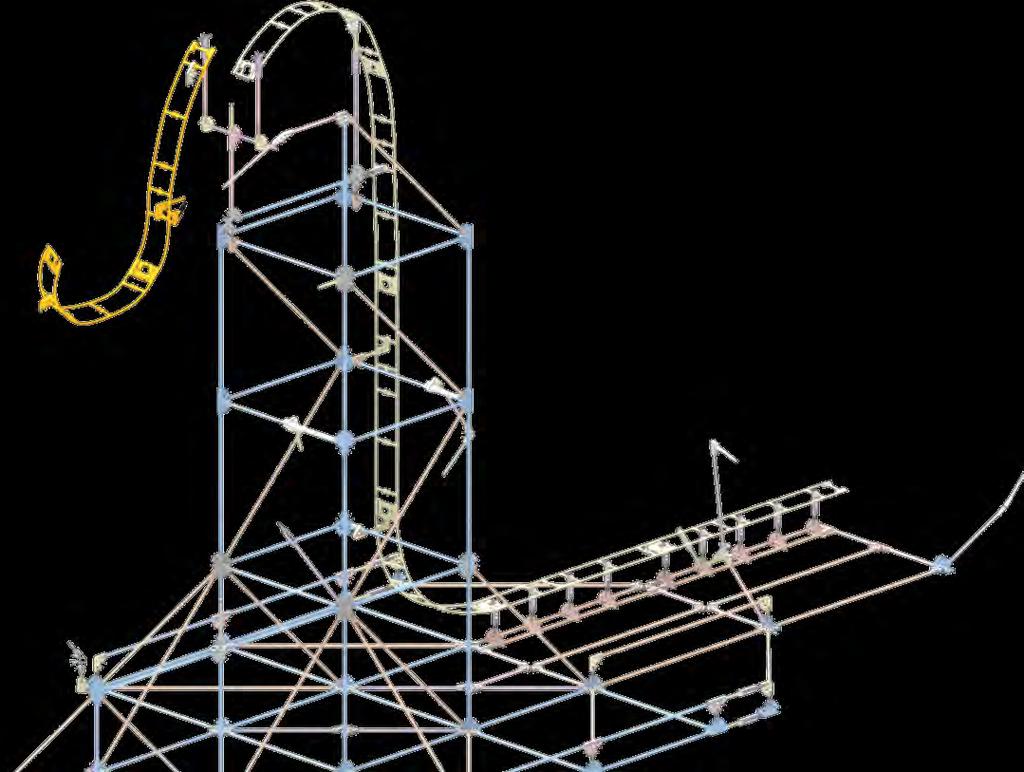
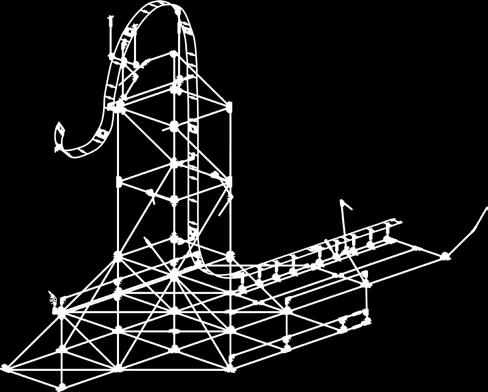
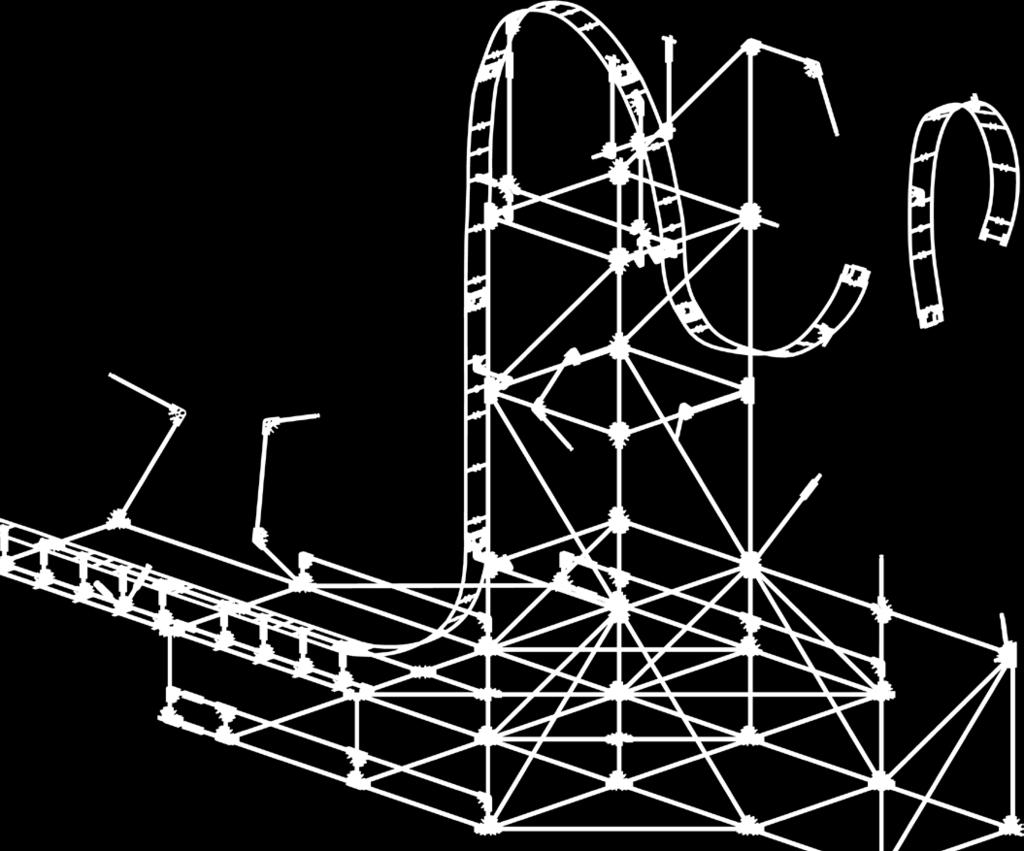
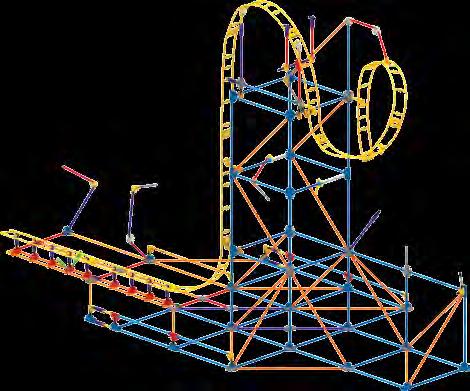
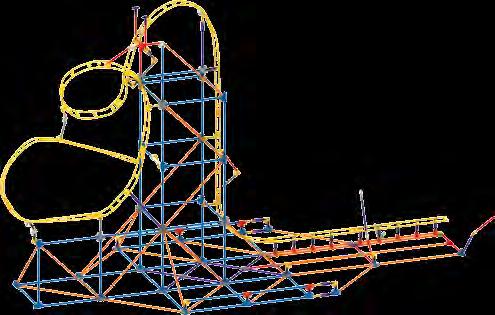
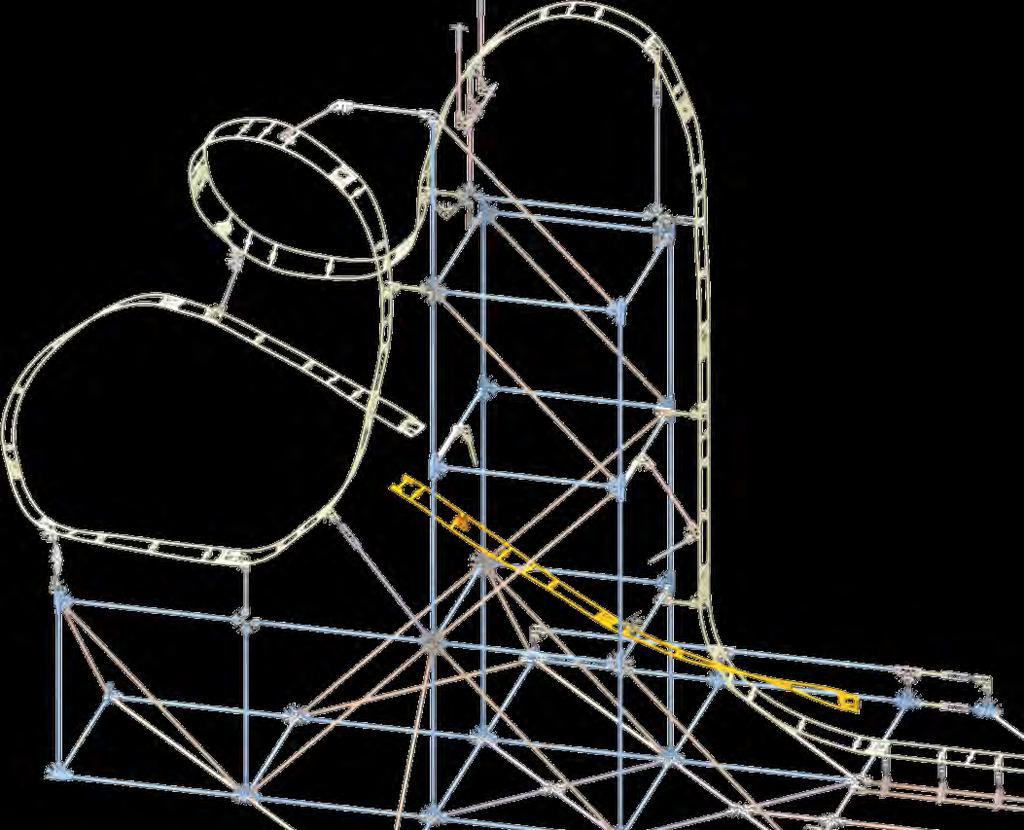
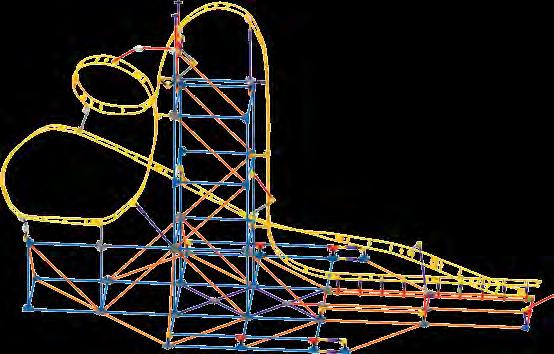
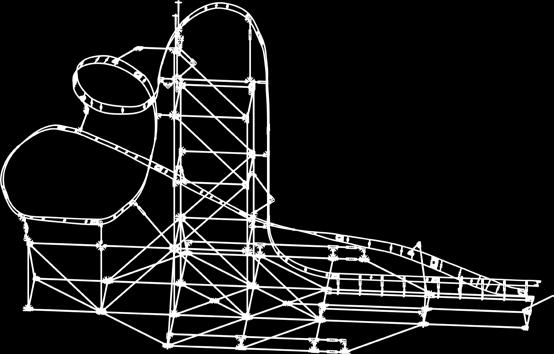
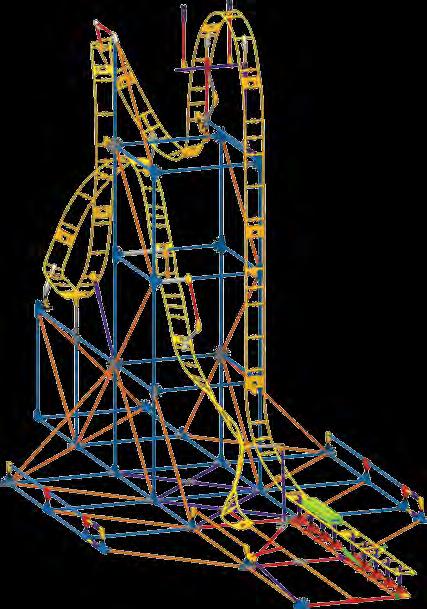
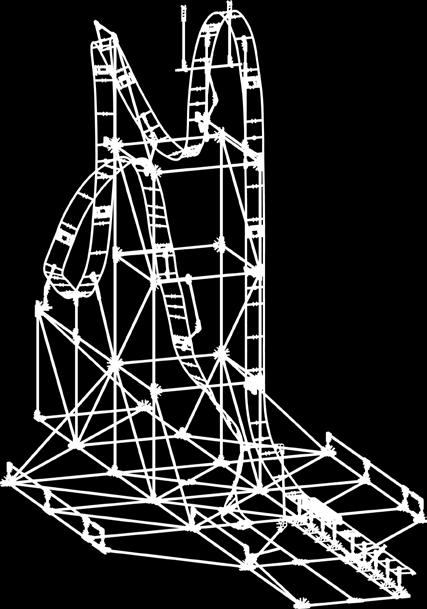
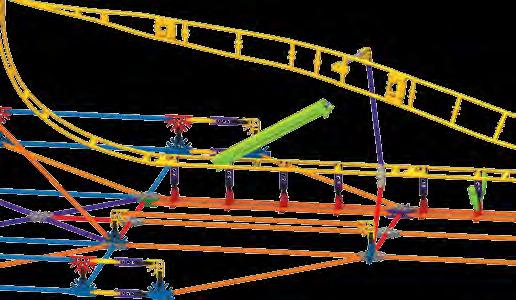
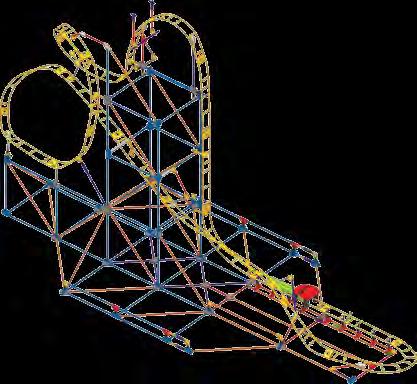
1 MECHA BITE Roller Coaster Building Set MORDRE DE MECHA Montagnes Russes Jeu de construction. ft 66 cm Ages


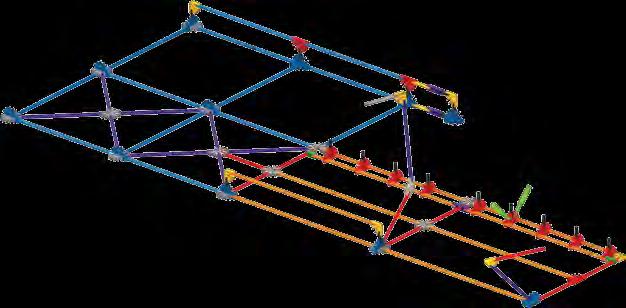
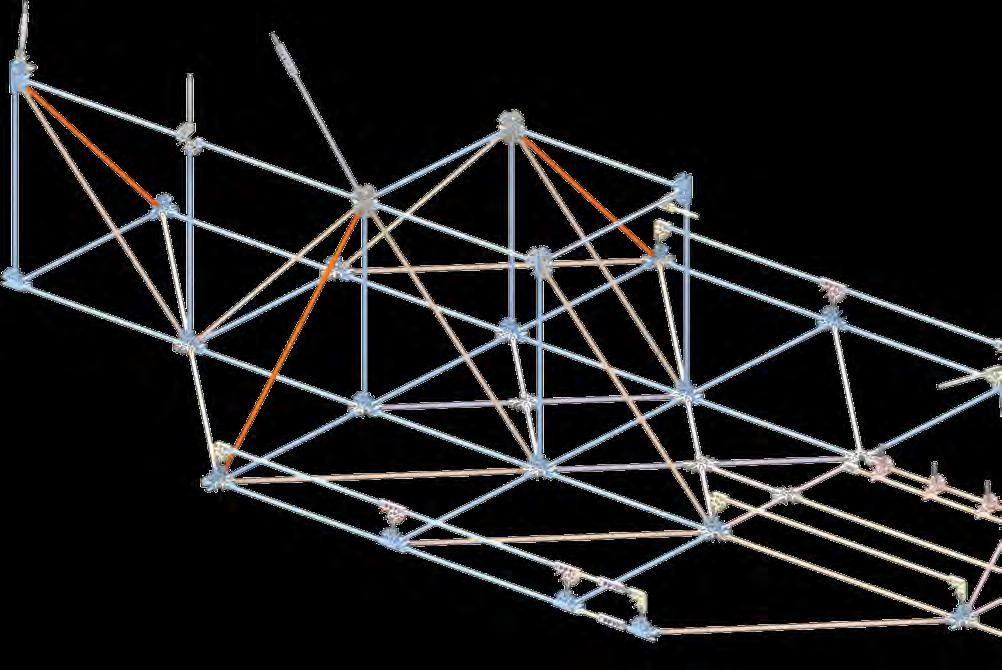
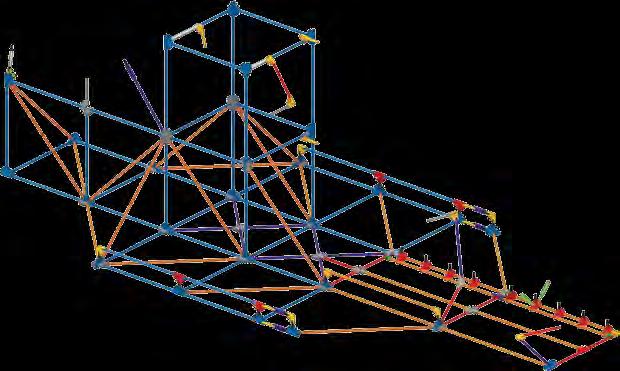
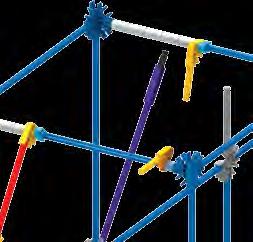
2 (EN) English Keep this important information for future reference WARNING: CHOKING HAZARD Small parts. Not for children under 3 years. CAUTION: Keep hands, face, hair and clothing away from all moving parts. CAUTION: Be careful not to tip the model over. Model should be placed on a flat and hard surface. Do not obstruct track with objects or any part of your body. CAUTION: Rubber Bands can cause injury from snapback, breaking, or loss of control. While assembling models shown in instructions, hold rubber band tightly, and do not overstretch. Use Rubber Bands only as shown in these instructions. DO NOT USE FRAYED OR TORN RUBBER BANDS. CAUTION: Keep Rubber Bands away from face and eyes. (FR) Français Gardez précieusement cette notice pour vous y référer ultérieurement ATTENTION : RISQUE D ÉTOUFFEMENT Pièces de petite taille. Ne convient pas aux enfants de moins de 3 ans. ATTENTION : Garde les cheveux, les doigts, le visage et les vêtements à l écart de toutes les pièces mobiles. ATTENTION : Faire attention de ne pas renverser le modèle. Le modèle devrait être placé sur une surface plate et dure. Do not obstruct track with objects or any part of your body. BUILDING BASICS BASES DE LA CONSTRUCTION Start Building To begin your model, find the and follow the numbers. Each piece has its own shape and color. Just look at the pictures, find the pieces in your set that match and then connect them together. Try to face your model in the same direction as the instructions while you build. The arrows show you where the parts connect, but not all connections points have arrows. Faded colors show you this section is already built. Démarre ta Construction Pour commencer le modèle, cherche l étape numéro et suis les numéros dans l ordre. Chaque pièce a sa propre forme et sa propre couleur. Regarde les illustrations, trouve les pièces qui y correspondent et les assemble-les. Pour te faciliter la tâche, oriente le modèle dans le même sens que les instructions. Les flèches indiquent où les pièces s assemblent, mais les points de raccorde ment n ont pas tous des flèches. Les pièces ayant une couleur estompée sont celles déjà assemblées. ATTENTION : Les élastiques peuvent causer des blessures en claquant, en se brisant ou quand on les manipule imprudemment. Tenez fermement les élastiques lors de l assemblage du modèle en veillant à ne pas trop les tendre. Utilisez les élastiques que selon les instructions comme indique. N UTILISEZ PAS D ÉLASTIQUES DISTENDUS OU ABIMÉS. ATTENTION : Tenez les élastiques à l écart du visage et des yeux. Connectors You can slide these special connectors together. Push tightly until you hear a click. Pay close attention to the instructions and position them horizontally or vertically exactly as they are shown. Connecteurs Tu peux assembler ces connecteurs spéciaux en les faisant glisser l un dans l autre. Pousse fort jusqu à entendre un «clic». Lis attentivement les instructions et positionne-les horizontalement ou verticalement, en suivant exactement les illustrations. 3 Spacers There are places in your model where you need to add spacers. Be sure to use the correct number of spacers shown in the instructions. - Séparateurs Il y a des endroits sur le modèle où des séparateurs sont nécessaires. Assure-toi d utiliser la bonne couleur et le nombre de séparateurs, comme indiqué sur les instructions.


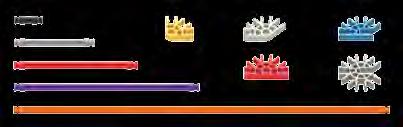
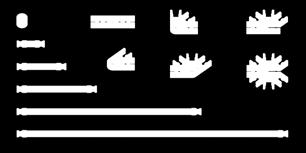
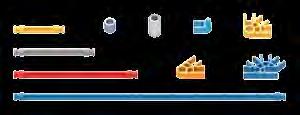
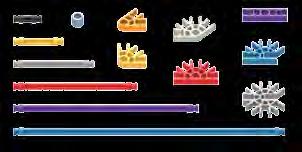
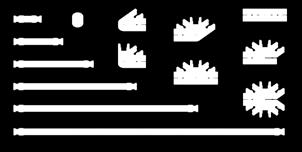
3 Parts List Before you start building, be sure to compare the parts in your set with the parts list here. If anything is missing, call or write to us using the information on the back cover. We are here to help you! Liste des Pièces Avant de commencer à construire, assure-toi de comparer les pièces dans ta boîte à la liste de pièces fournie ici. S il manque quelque chose, téléphone-nous ou écris-nous en te servant des informations figurant au verso de la notice. Nous sommes là pour t aider! Graphic Panels Panneaux Graphiques 3


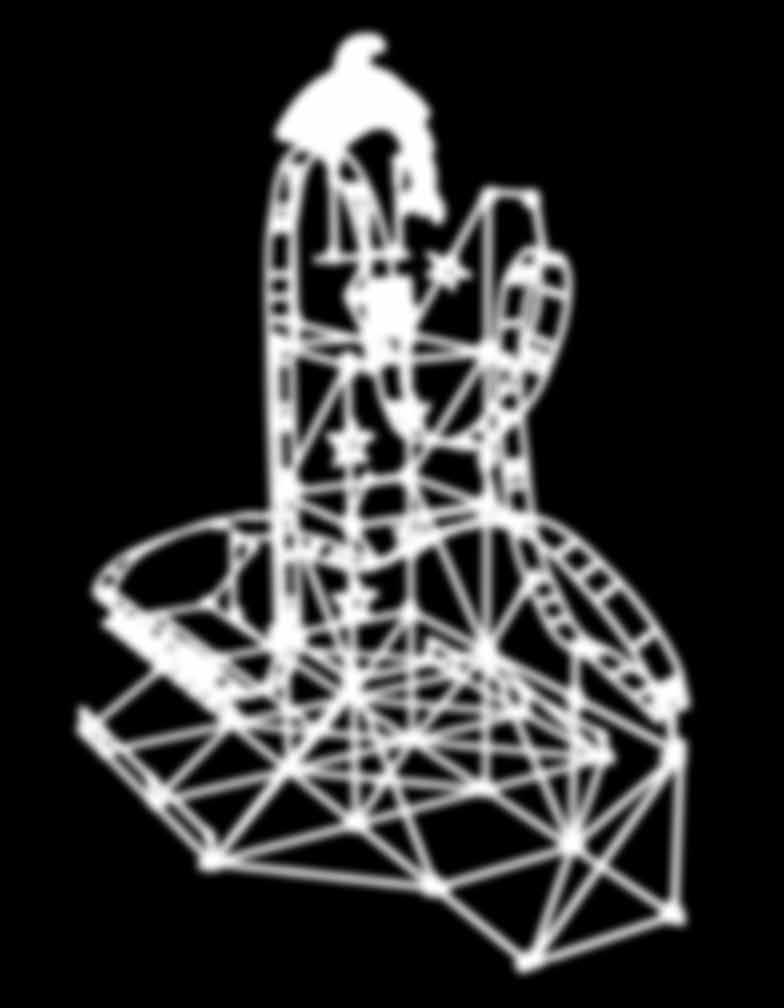
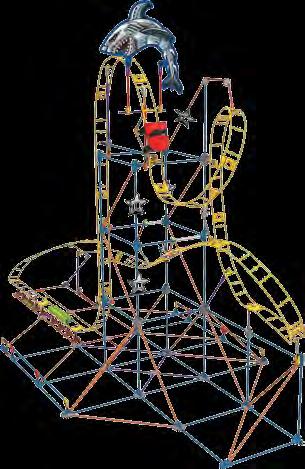
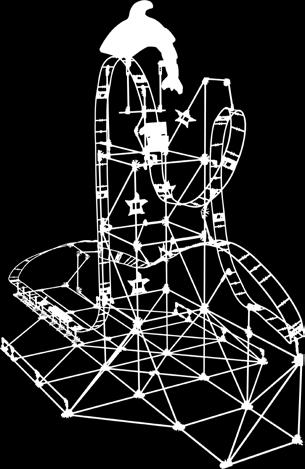

4 MECHA BITE Roller Coaster MORDRE DE MECHA Montagnes Russes 4 4 4
5 5 5-5


6

7

8

9

10
11


12

13
14


15

16

17

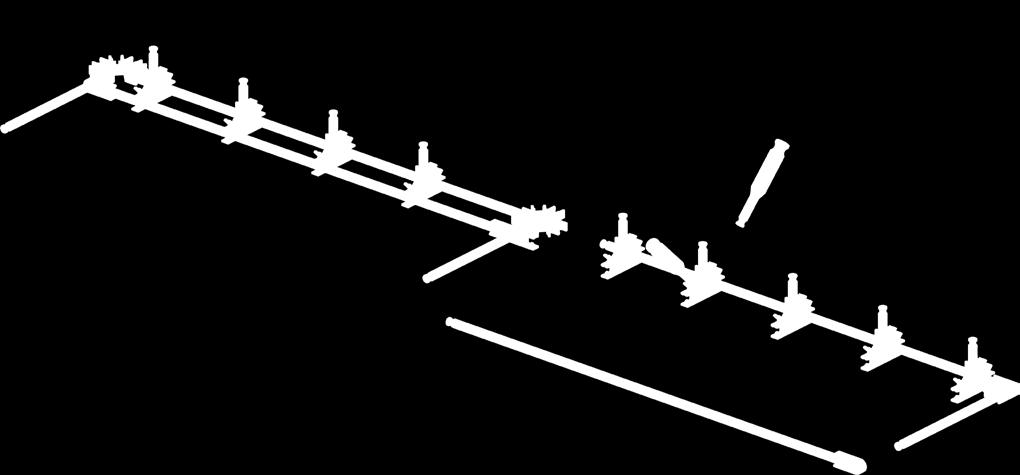
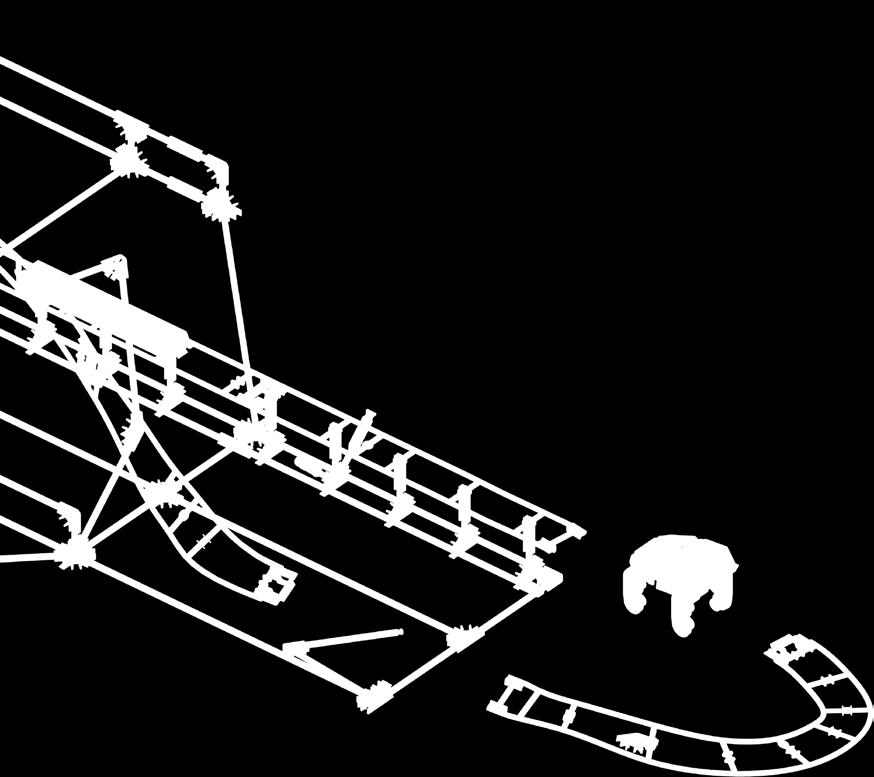
18 5 Be sure to push the connectors on firmly until they click. Pousse bien les connecteurs jusqu à ce qu ils «cliquent» Start Commencer Empezar Anfängst Cominciare Começo Begint


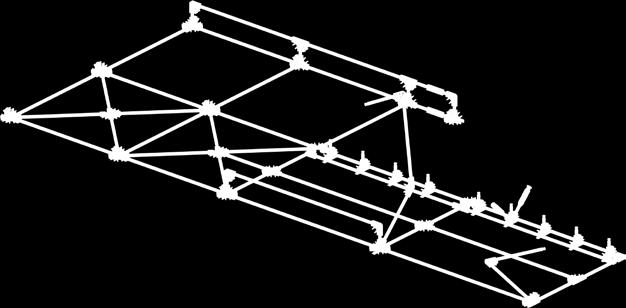
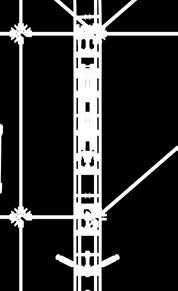
19 7 8-8 Always join this end of the track to the previous track piece first, then connect the rest of the track to the tower. Toujours joindre à cette extrémité de la voie à la pièce de la piste précédente, puis connecter le reste de la piste à la tour. 9
20


21 -
22 3 4-4
23

24
25
26

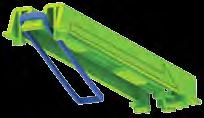


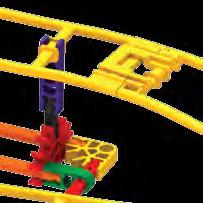
27 SLINGSHOT LAUNCHER 33 PROPULSEUR LANCE-PIERRE


28


 A B (FR) A B A old the model")

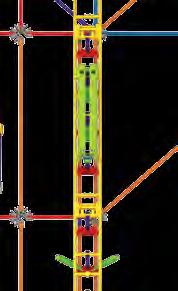
29 40 NOTE: These graphic panels can be attached to the model at any location. REMARQUE : Ces panneaux graphiques peut être attaché au modèle à n importe quel endroit. MECHA BITE Roller Coaster MORDRE DE MECHA Montagnes Russes - 40 How to Launch Car Lancement du wagon B (EN) A B (FR) A B A old the model steady here. H Pull the car back to the green rods then release. Keep your hands away from the track when launching. aintenez le modèle d équilibre ici. M Tirez la voiture jusqu au les tiges vertes puis relâchez. Gardez vos mains loin de la piste lors du lancement. 9
30 (ES) Español (Página ) Guarde esta información importante para futuras referencias ADVERTENCIA: PELIGRO DE ASFIXIA Piezas pequeñas. No para niños menores de 3 años. PRECAUCIÓN: Mantén el cabello, los dedos, la cara y la ropa alejada de las piezas móviles. PRECAUCIÓN: Tenga cuidado de no inclinar el modelo. El modelo debe colocarse sobre una superficie plana y dura. No obstruyas la pista con objetos o cualquier parte de tu cuerpo. PRECAUCIÓN: Las gomas pueden causar daños si se sueltan con fuerza, se rompen o se pierde su control. Al construir los modelos que se muestran en las instrucciones, sujetar bien la goma y no estirarla demasiado. Las gomas deben usarse únicamente como se indica en las instrucciones. NO USAR GOMAS QUE ESTÉN DESGASTADAS NI ASGADAS. PRECAUCIÓN: Mantenga las gomas elásticas alejadas de la cara y los ojos. BÁSICOS DE CONSTRUCCIÓN Empieza a construir Para comenzar tu modelo, busca el y sigue los números. Cada pieza tiene su propia forma y color. Simplemente mira los dibujos, busca las piezas correspondientes en tu juego y después conéctalas. Mientras construyes, trata de colocar tu modelo en la misma dirección que se muestra en las instrucciones. Los colores desteñidos muestran que esta sección ya está construida. Conecta las nuevas secciones en los lugares señalados por las flechas. Las nuevas piezas que agregues estarán en colores vivos. Conectores Usted puede deslizar estos conectores especiales juntos. Empuje firmemente hasta que oiga un clic. Preste atención a las instrucciones y la posición horizontal o verticalmente, exactamente como se muestran. Espaciadores Hay lugares en su modelo donde usted necesita utilizar espaciadores. Asegúrese de usar el color correcto y el número de espaciadores que se muestra en las instrucciones. (Página 3) Lista de Piezas Antes de empezar con la construcción, asegúrate de comparar las piezas en tu conjunto con la lista de las piezas aquí. Si faltan algunas, llámanos o escríbenos siguiendo las instrucciones en la página trasera. Estamos aquí para ayudarte. Paneles Gráficos (Página 8) Empuja los conectores hacia adentro hasta que oigas un clic. (Página 9) Siempre unirse a este extremo de la pista a la pieza primera pista anterior, a continuación, conecte el resto de la pista a la torre. (Página 7) Lanzador Tirabete (Página 9) NOTA: Estos paneles gráficos puede ser conectado al modelo en cualquier ubicación. Cómo iniciar coches A Sostenga el modelo constante aquí. B Tire el coche de vuelta a las varillas verde y luego soltar. Mantenga las manos lejos de la pista en el lanzamiento. (DE) Deutsch (Seite ) Halten Sie diese wichtigen Informationen für die Zukunft ACHTUNG: ERSTICKUNGSGEFAHR Kleinteile. Nicht geeignet für Kinder unter 3 Jahren. VORSICHT: Haare, Finger, Gesicht und Kleidungsstücke nicht mit beweglichen Teilen in Berührung kommen lassen. VORSICHT: Sei vorsichtig, das Modell nicht zu betreiben. Das Modell sollte auf eine flache und harte Oberfläche gestellt werden. Die Schienen dürfen nicht blockiert oder mit dem Körper verdeckt werden. VORSICHT: Gummibänder können Verletzungen hervorrufen, wenn sie reißen, zurückspringen oder wenn sie nicht vorsichtig gehandhabt werden. Halten Sie die Gummibänder während des Zusammenbaus der Modelle fest, ohne sie jedoch zu überdehnen. Verwenden Sie die Gummibänder gemäß den Anweisungen. VERWENDEN SIE NIEMALS AUSGEFRANSTE ODER ZERRISSENE GUMMIBÄNDER. 30 VORSICHT: Halten Sie Gummibänder weg von Gesicht und Augen. GRUNDLEGENDE BAUANLEITUNGEN Los geht s mit dem Bauen Um mit dem Bauen deines Modells zu beginnen, suche die Nummer und folge den laufenden Nummern. Jedes Teil hat seine eigene Form und Farbe. Schau dir einfach die Abbildungen an, such die Teile in deinem Bausatz, die so aussehen wie das, was du auf der Abbildung siehst und steck sie ineinander. Versuche, dein Modell beim Zusammenbauen so zu orientieren, dass es in die gleiche Richtung weist, wie es in den Anleitungen beschrieben und gezeigt wird. Blasse Farben weisen darauf hin, dass dieser Streckenabschnitt bereits zusammengebaut ist. Verbindungsstücke Verbindungsstücke haben besonders lange Schlitze. Wie du auf der Abbildung sehen kannst, lassen sie sich ineinander schieben. Achte beim Aneinanderfügen dieser Teile darauf, dass du ein Klickgeräusch hörst. Erst dann sind die Teile fest miteinander verbunden. Abstandsstücke An manchen Stellen in deinem Modell musst du Abstandsstücke einbauen. Achte darauf, die richtige Farbe und Anzahl von Abstandsstücken wie in der Anleitung gezeigt zu verwenden. (Seite 3) Teileliste Bevor du mit dem Bauen anfängst, solltest du prüfen, ob die Teile in deinem Bausatz mit denen auf dieser Teileliste übereinstimmen. Falls etwas fehlt, rufe uns an oder schreibe uns (siehe Rückseite). Wir sind für dich da! Graphiken (Seite 8) Achten Sie darauf, die Anschlüsse auf fest drücken, bis sie Klick. (Seite 9) Immer beitreten dieses Ende der Strecke zum vorherigen Track Stück zuerst, dann treten der Rest der Strecke auf den Turm. (Seite 7) Schleuder-Startvorrichtung (Seite 9) HINWEIS: Diese Grafik-Panels können an dem Modell an jeder beliebigen Stelle angebracht werden. Wagen starten A Halten Sie das Modell stetigen hier. B Ziehen Sie das Auto wieder auf die grünen Stangen dann loslassen. Halten Sie Ihre Hände weg von der Spur beim Start. (IT) Italiano (Pagina ) Conservare queste importanti informazioni per riferimento futuro AVVISO: PERICOLO DI SOFFOCARE Pezzi piccoli. Non adatto per bambini sotto 3 anni. ATTENZIONE: Tenere i capelli, le dita, il viso e i vestiti lontano da tutte le parti in movimento. ATTENZIONE: Fare attenzione a non inclinare il modello sopra. Modello deve essere collocato su una superficie piana e dura. Non ostruire la pista con gli oggetti o qualsiasi parte del vostro corpo. ATTENZIONE: Elastici può causare lesioni da snap-back, rottura, o perdita di controllo. Durante il montaggio dei modelli indicati nelle istruzioni, tenere ben elastico, e non tirare troppo. Utilizzare Elastici solo come indicato in queste istruzioni. NON USARE SFILACCIATI O STRAPPATI ELASTICI. ATTENZIONE: Mantenga gli elastici a partire dal fronte e dagli occhi. ISTRUZIONI DI BASE PER COSTRUIRE CON K NEX Comincia a costruire Per iniziare il modello, cerca il numero e segui i numeri. Ogni pezzo ha una sua forma e un suo colore. Guarda la figura, trova i pezzi corrispondenti nel set e mettili insieme. Cerca di tenere il modello nella stessa direzione della figura e in tal modo sarà più semplice attaccare i pezzi nei posti giusti. I colori spenti ti dicono che questa sezione è già stata costruita. Dovrai collegare la nuova sezione al punto indicato dalla punta della freccia. Connettori Poi scorrere questi speciale connettori insieme. Spingi con forza finche senti un clic. Fare molto attenzione al istruzione e posizionare questi orizzontale o in verticale esattamente come sono mostrati. Spaziatori Ci sono punti nel tuo modello a cui dovrai aggiungere spessori. Accertati che usate il colore corretto e il numero di spessori mostrati nel istruzioni.
31 (Pagina 3) Elenco delle parti Prima di cominciare a costruire, accertati di confrontare le parti che sono nel tuo set con l elenco delle parti qui. Se ne manca una chiamaci o scrivici usando le informazioni che sono nella retrocopertina. Noi siamo qui per aiutarti! Carte Grafici (Pagina 8) Premi i connettori saldamente fino a che si fissano con uno scatto. (Pagina 9) Sempre partecipare a questo fine della traccia per traccia del pezzo precedente, poi collegare il resto della pista alla torre. (Pagina 7) Lancio al Fionda (Pagina 9) NOTA: Questi pannelli grafici possono essere collegati al modello in qualsiasi posizione. Come avviare car A Tenere il modello costante qui. B Ritirare la macchina all aste verdi e poi rilasciare Tenere le mani lontano dalla pista al momento del lancio. (PT) Português (Página ) Manter esta informação importante para referência futura AVISO: PERIGO DE SUFOCAÇÃO Peças pequenas. Não se destina a crianças com menos de 3 anos de idade. CUIDADO: Mantém o cabelo, os dedos, a cara e a roupa afastados de todas as peças móveis. CUIDADO: Tenha cuidado para não derrubar o modelo. O modelo deve ser colocado sobre uma superfície plana e dura. Não obstruir a trilha com objetos ou qualquer parte de seu corpo. CUIDADO: As borrachas poderão causar ferimentos ao serem esticadas, ao quebrarem ou ao perderem controlo. Ao montar os modelos mostrados nas instruções, segure bem a borracha e não a estique demasiado. Utilize as borrachas apenas da forma exemplificada nestas instruções. NÃO UTILIZE BORRACHAS CORROÍDAS OU QUEBRADAS. CUIDADO: Mantenha as faixas de borracha longe da cara e dos olhos. PONTOS BÁSICOS PARA A CONSTRUCÃO K NEX Inicia a construção Para começar o teu modelo, procura o e segue os números. Cada peça tem a sua própria forma definida e cor. Basta simplesmente olhares para a ilustração, procurar as peças do teu jogo correspondentes às que estás a ver e, em seguida, conectar umas nas outras. Enquanto estás a montar as peças, tenta manter o teu modelo na mesma direcção, conforme mostrado na ilustração, para assim ligares as peças correctamente. As cores desbotadas indicam que esta secção já está montada. Passarás então a fazer a conexão da nova secção no local indicado pelas setas. Conectores É muito importante que posiciones os conectores numa direcção específica. Junta as partes simultaneamente e com firmeza até ouvires um estalido. Presta muita atenção às instruções e coloca estes conectores horizontal ou verticalmente, exactamente conforme se mostra nas ilustrações. Espaçadores Existirão certos pontos no teu modelo que necessitam a colocação de espaçadores. Assegura-te que os contas cuidadosamente. (Página 3) Lista de peças Antes de iniciares a construção, certifica-te de que comparas as peças do teu conjunto com a lista das peças aqui. Se faltar alguma peça telefona ou escreve-nos usando as informações indicadas na contracapa. Estamos aqui para te ajudar! Painéis Gráficos (Página 8) Faz avançar os conectores firmemente até encaixarem com um estalido. (Página 7) Fisga Launcher (Página 9) NOTA: Estes painéis de gráfico pode ser anexada ao modelo em qualquer local. Como lançar o carro A Segure o modelo constante aqui. B Puxe o carro de volta para as hastes verdes e solte. Mantenha suas mãos longe da pista quando do lançamento. (NL) Nederlands (Bladzijde ) Houd deze belangrijke informatie voor toekomstige referentie WAARSCHUWING: VERSTIKKINGSGEVAAR Kleine onderdelen. Niet geschikt voor kinderen jonder dan 3 jaar. OPGEPAST: Hou het haar, de vingers, het gezicht en kledij verwijderd van alle bewegende onderdelen. OPGEPAST: Zorg ervoor dat het model niet te kantelen. Model moet op een vlak en hard oppervlak geplaatst. Het spoor niet versperren met objecten of met een deel van je lichaam. LET OP: Elastiekjes kunnen letsel veroorzaken als ze wegschieten, kapotgaan of als er achteloos mee wordt omgegaan. Houd elastiekjes goed vast als je modellen bouwt volgens de instructies. Rek ze niet te ver uit. Gebruik elastiekjes uitsluitend zoals in de instructies beschreven staat. GEBRUIK GEEN GERAFELDE OF GESCHEURDE ELASTIEKJES. LET OP: Houd elastiekjes uit de buurt van het gezicht en de ogen. BASISSTAPPEN Begin te bouwen Om met je model te beginnen, vind eerst het nummer en volg de nummers. Elk stuk heeft zijn eigen vorm en kleur. Kijk gewoonweg naar de afbeeldingen, vind de overeenstemmende stukken terug in je geheel en maak ze aan mekaar vast. Tracht je model in dezelfde richting te plaatsen als de aanwijzingen terwijl je bouwt en monteert. De vervaagde kleuren duiden aan dat dit deel reeds is opgebouwd. Gelieve het nieuwe deel vast te koppelen op de plaats aangeduid door de pijlen. Verbindingsstukken Je kunt deze speciale verbindingsstukken in elkaar steken. Duw ze stevig tegen elkaar aan tot je een klik hoort. Let goed op de instructies en plaats ze horizontaal en verticaal, precies zoals wordt getoond. Afstandhouders Op bepaalde plekken van je model moet je afstandhouders gebruiken. Zorg dat je het juiste aantal afstandhouders gebruikt, zoals wordt getoond in de instructies. (Bladzijde 3) Lijst met Onderdelen Controleer aan de hand van deze lijst of je set alle onderdelen bevat voordat je begint te bouwen. Als er een onderdeel ontbreekt, obel of schrijf ons dan. Je vindt onze gegevens op de achterkant. We helpen je graag! Grafische Panelen (Bladzijde 8) Druk de koppelstukken goed erin tot ze klikken. (Bladzijde 9) Altijd deelnemen aan deze eind van het spoor naar de vorige track stuk eerst, dan komen de rest van de track naar de toren. (Bladzijde 7) Katapult-lanceerder (Bladzijde 9) OPMERKING: Deze grafische panelen kunnen worden gekoppeld aan het model op elke locatie. De auto lanceren A Hou het model gestage hier. B Trek de auto terug naar de groene staafjes en laat vervolgens los. Houd uw handen uit de buurt van het spoor bij de lancering. (Página 9) Sempre aderir a este final da trilha para a peça faixa anterior primeiro, e depois conectar o restante da trilha para a torre. 3


 El cliente que no vive en EE.UU.")

 K NEX est une marque déposée Thrill Rides et Steamagination sont une marque de K NEX Limited Partnership Group.")
 Product & colors may vary. Most models can be built one at a time. (FR) Le produit et ses couleurs peuvent varier.")
 Produkte und Farben können abweichen.")
32 INSPIRED PLAY LE JEU INSPIRÉ DE MECHA BITE Roller Coaster Building Set MORDRE DE MECHA Montagnes Russes Jeu de construction facebook.com/kne STEAMAGINATION SCIENCE/SCIENCE TECHNOLOGY/TECHNOLOGIE ENGINEERING/INGÉNIERIE ART & DESIGN/CONCEPTION & D ART MATH/MATHÉMATIQUES # * Download Our App Téléchargez notre application Descargue nuestra aplicación Lade unser App Scarica il nostro App Faça o download do nosso aplicativo Download onze app Juego inspirado Inspiriertes Spiel Ha ispirato il gioco Inspirou o jogo Geïnspireerd spel # Ciencia/Wissenschaft/ Scienza/Ciência/Wetenschap Tecnología/Technologie/ Tecnologia/Tecnologia/ Technologie Ingenieria/Ingenieurwesen/ Ingegneria/Engenharia/ Bouwkunde Arte Y Diseño/Kunstdesign/ Arte E Design/Design de arte/ kunst En Ontwerp Matemáticas/Mathematik/ Matematica/Matemática/ Wiskunde MECHA STRIKE Roller Coaster Building Set GREVE DE MECHA Montagnes Russes Jeu de Construction MECHA CLAW Roller Coaster Building Set GRIFFE DE MECHA Montagnes Russes Jeu de Construction * * *Sold separately Vendus séparément Se venden por separado Separat erhältlich Venduti separatamente Vendidos separadamente Afzonderlijk verkrijgbaar MECHA SLASH Ferris Wheel Building Set SABRER DE MECHA Grande Roue Jeu de Construction 07 K NEX Limited Partnership Group, P.O. Box 700, Hatfield, PA ; -800-KID-KNEX (USA/Canada/États-Unis/EE.UU.); @knex.com; knex.com. K NEX UK Ltd, 00 Brook Drive, Green Park, Reading, RG6 UB England; K NEX France, 4 rue du Quatre Septembre, 7500 Paris, France. For customers outside the USA/Canada please contact your local distributor at (FR) Pour les clients en dehors du Canada et des États-Unis, veuillez contacter votre distributeur local que vous pouvez trouver sur (ES) El cliente que no vive en EE.UU./Canadá se pone en contacto con el distribuidor local. Encuentre la información para el distribuidor local en (EN) K NEX is a registered trademark Thrills Rides and Steamagination are trademarks of K NEX Limited Partnership Group. (FR) K NEX est une marque déposée Thrill Rides et Steamagination sont une marque de K NEX Limited Partnership Group. (ES) K NEX es una marca registrada Thrill Rides y Steamagination son marcas de K NEX Limited Partnership Group. (EN) Product & colors may vary. Most models can be built one at a time. (FR) Le produit et ses couleurs peuvent varier. Les différents modèles ne peuvent être construits qu un par un. (ES) El producto y los colores pueden variar. La mayoría de los modelos se pueden construir uno a la vez. (DE) Produkte und Farben können abweichen. Die meisten Modelle können immer nur einzeln gebaut werden. (IT) Prodotti e colori possono differire. La maggior parte dei modelli si può costruire autonomamente. Istruzioni accluse. (PT) O produto e as cores podem variar. A maioria dos modelos pode ser montado um de cada vez. (NL) Product en kleuren kunnen variëren. De meeste modellen kunnen uitsluitend een voor een worden gebouwd. [] Motore [] No se incluyen Nicht enthalten Non incluse Não estão incluídas Niet inberepen 3446-V-4/7
series série8 BOWSER COLLECT ALL 7! COLLECTIONNEZ LES 7! * 1 Figure/Figura Building Worlds Kids Love
 series série8 38057 BOWSER COLLECT ALL 7! COLLECTIONNEZ LES 7! * 1 Figure/Figura Building Worlds Kids Love TM & 2016 Nintendo. WARNING: CHOKING HAZARD Small parts. Not for children under 3 years. ATTENTION
series série GOOMBA COLLECT ALL 7! COLLECTIONNEZ LES 7!* 1 Figure/Figura Building Worlds Kids Love
 5 series 38009 série GOOMBA TM COLLECT ALL 7! COLLECTIONNEZ LES 7!* 1 Figure/Figura Building Worlds Kids Love TM & 2014 Nintendo. 2014 K NEX Limited Partnership Group, P.O. Box 700, Hatfield, PA 19440-0700;
(EN) CONTENTS TIC-TAC-TOE... TRUCK... TRUMPET... CRAB... SHUTTLE... OWL... GIRAFFE, FENCE & TREE... MONKEY & GYM...0 MOTORCYCLE... DRAGSTER... SWING R
 CONTENTS TIC-TAC-TOE... TRUCK... TRUMPET... CRAB... SHUTTLE... OWL... GIRAFFE, FENCE & TREE... MONKEY & GYM...0 MOTORCYCLE... DRAGSTER... SWING R") TM BUILDER BASICS Building Set ELÉMENTS ESSENTIELS DE CONSTRUCTION Jeu de construction BUILDS MODÈLES* Ages - 00 WARNING: CHOKING HAZARD Small parts. Not for children under years. ATTENTION : RISQUE D
TM BUILDER BASICS Building Set ELÉMENTS ESSENTIELS DE CONSTRUCTION Jeu de construction BUILDS MODÈLES* Ages - 00 WARNING: CHOKING HAZARD Small parts. Not for children under years. ATTENTION : RISQUE D
(EN) CONTENTS SAILBOAT... RAIN CLOUD... PORCUPINE... GUITAR... DOLPHIN... UNICORN... WIND TURBINE... 0 PUPPY... BRIDGE... LIZARD... 7 SWING RIDE... 0
 CONTENTS SAILBOAT... RAIN CLOUD... PORCUPINE... GUITAR... DOLPHIN... UNICORN... WIND TURBINE... 0 PUPPY... BRIDGE... LIZARD... 7 SWING RIDE... 0") TM IMAGINATION MAKERS Building Set COFFRET IMAGINATION Jeu de construction 0 BUILDS MODÈLES* Ages -0 WARNING: CHOKING HAZARD Small parts. Not for children under years. ATTENTION : RISQUE D ÉTOUFFEMENT
TM IMAGINATION MAKERS Building Set COFFRET IMAGINATION Jeu de construction 0 BUILDS MODÈLES* Ages -0 WARNING: CHOKING HAZARD Small parts. Not for children under years. ATTENTION : RISQUE D ÉTOUFFEMENT
7-12. SUPER VALUE TUB Building Set. MEGA BOX Jeu de construction. WARNING: CHOKING HAZARD Toy contains small parts. Not for children under 3 years.
 TM SUPER VALUE TUB Building Set MEGA BOX Jeu de construction 35 BUILDS MODÈLES Ages 7-12 12575 WARNING: CHOKING HAZARD Toy contains small parts. Not for children under 3 years. ATTENTION : RISQUE D ÉTOUFFEMENT
Sold separately. Vendus séparément. Se venden por separado. Separat erhältlich. Venduti separatamente. Vendidos separadamente. Afzonderlijk verkocht.
 Sold separately. Vendus séparément. Se venden por separado. Separat erhältlich. Venduti separatamente. Vendidos separadamente. Afzonderlijk verkocht. 2016 K NEX Limited Partnership Group, P.O. Box 700,
8 + CAT MARIO MARIO CHAT KAT MARIO. Building Worlds Kids Love 38635/38635ML BUILDING SET JEU DE CONSTRUCTION KATZE MARIO BAUSATZ BOUWSET
 Building Worlds Kids Love CAT MARIO BUILDING SET MARIO CHAT JEU DE CONSTRUCTION KATZE MARIO BAUSATZ KAT MARIO BOUWSET CLEAR WARP PIPE! TUYAU TRANSLUCIDE! DURCHSICHTIGE WARP-RÖHRE! TRANSPARANTE WARPBUIS!
8 + Building Worlds Kids Love MILITIA OGRE TITAN BUILDING SET JEU DE CONSTRUCTION
 8 + Building Worlds Kids Love 69504 MILITIA OGRE TITAN BUILDING SET JEU DE CONSTRUCTION (EN) Keep this important information for future reference. (FR) Garde précieusement cette notice pour vous y référer
1 MODEL PER WEEK! 7 + MODEL BUILDING SET MODÉLE JEU DE CONSTRUCTION MODÉLE PAR SEMAINE!
 MODÉLE PAR SEMAINE! MODEL PER WEEK! 5 MODEL BUILDING SET MODÉLE JEU DE CONSTRUCTION 7 + 65 Hummingbird...6 Camel...6 Praying Mantis...7 Centipede...7 Windmill...8 Butterfly...9 AMERICAN MADE PARTS CONTENTS
8 + Jouet de Construction d'ameriquemc GHOST HOUSE BUILDING SET MAISON FANTÔME MC JEU DE CONSTRUCTION. Building Worlds Kids Love
 Building Worlds Kids Love GHOST HOUSE BUILDING SET MAISON FANTÔME MC JEU DE CONSTRUCTION BOOMERANG MARIO STAR COIN BIG BOO LIMITED EDITION! ÉDITION LIMITÉE! 8 + 38529 Jouet de Construction d'amerique d'ameriquemc
# seabattle_instr_v5.indd 1 1/2/12 1:49 PM
 # 80 891 seabattle_instr_v5.indd 1 1/2/12 1:49 PM x250 seabattle_instr_v5.indd 2 1/2/12 1:49 PM seabattle_instr_v5.indd 3 1/2/12 1:49 PM seabattle_instr_v5.indd 4 1/2/12 1:49 PM 1. 2. 3. 4. seabattle_instr_v5.indd
8 + FLYING CLOUD BUILDING SET VOLANT NUAGE MC JEU DE CONSTRUCTION. Jouet de Construction d'ameriquemc. Building Worlds Kids Love
 Building Worlds Kids Love FLYING CLOUD BUILDING SET VOLANT NUAGE MC JEU DE CONSTRUCTION PROPELLER BOX ITEM BOX TAIL GOOMBA LIMITED EDITION! ÉDITION LIMITÉE! 8 + 38528 Jouet de Construction d'amerique d'ameriquemc
# Octo Adv. Instr_V4.indd 1 5/15/14 9:23 AM
 # 80 960 Octo Adv. Instr_V4.indd 1 5/15/14 9:23 AM Octo Adv. Instr_V4.indd 2 5/15/14 9:23 AM Octo Adv. Instr_V4.indd 3 5/15/14 9:23 AM x2 x200 Octo Adv. Instr_V4.indd 4 x4 5/15/14 9:23 AM ± 2 cm Octo Adv.
EUSS SOFTWARE UPDATE CHECKLIST COUNTERFEIT DETECTORS NEW 20 EURO BANKNOTE C32 C18 C07 C19 C20. English
 English NEW 20 EURO BANKNOTE SOFTWARE UPDATE CHECKLIST COUNTERFEIT DETECTORS Device New 20 Euro software version number Is this number displayed on your device during start-up? Yes Safescan 125 C32 No
1 # 80 981 DE SW Tat pod_v14.indd 1 9/17/13 11:41 AM
 1 # 80 981 DE SW Tat pod_v14.indd 1 9/17/13 11:41 AM X2 X1 5 x30 x30 x30 5 2 DE SW Tat pod_v14.indd 2 9/17/13 11:41 AM x2 x2 3 DE SW Tat pod_v14.indd 3 9/17/13 11:41 AM x4 4 DE SW Tat pod_v14.indd 4 9/17/13
KidKraft is here to help! En KidKraft estamos para ayudarle! KidKraft est là pour vous aider! KidKraft hilft Ihnen gerne! KidKraft helpt u graag!
 KidKraft is here to help! If you have any issues with your item or need any assistance, please contact us. Email us with the item number, description of the problem, part number and batch code. (Your batch
Quickstart Guide. WiPry 5x. 1) Connect antenna to the appropriate port. TM
 Connect antenna to the appropriate port. TM") Quickstart Guide ACCESSORY ANTENNA W A R N I N G DO NOT APPLY MORE THAN 20DBM TO THE ANTENNA WITHOUT EXTERNAL ATTENUATION CONNECT TO HOST DEVICE 1) Connect antenna to the appropriate port. TM 2) Download
Quickstart Guide ACCESSORY ANTENNA W A R N I N G DO NOT APPLY MORE THAN 20DBM TO THE ANTENNA WITHOUT EXTERNAL ATTENUATION CONNECT TO HOST DEVICE 1) Connect antenna to the appropriate port. TM 2) Download
ROBO-CROC BUILDING SET JEU DE CONSTRUCTION. 2 X Not included MOTOR MOTEUR. Building Worlds Kids Love BUILDS CONSTRUIRE ** Motore
 Building Worlds Kids Love ROBO-CROC BUILDING SET JEU DE CONSTRUCTION BUILDS À 3À CONSTRUIRE ** 7 + 307 X Not included AA (LR6) Pas inclus No se incluyen Nicht enthalten Non incluse Não estão incluídas
MODEL: F / MODELO: F END TABLE WITH MEDIA STAND & MAGAZINE HOLDER MESA RINCONERA CON ESTANTE & REVISTERO
 MODEL: 11225479F / MODELO: 11225479F END TABLE WITH MEDIA STAND & MAGAZINE HOLDER MESA RINCONERA CON ESTANTE & REVISTERO NO A B C D E F G H I J K L PARTS LIST AND HARDWARE PARTES Y ACCESORIOS PARTS LIST
elements enviro Owner s Manual Manuel du propriétaire Manual del usuario ecofriendly solutions organizing
 enviro elements TM ecofriendly solutions organizing Made with 50% recycled resin Fait de 50 % de résine recyclée Hecho en un 50% con resina reciclada Owner s Manual Manuel du propriétaire Manual del usuario
Spacers There are places in your model where you need to use spacers. Be sure to use the correct number of spacers shown in the instructions.
 (EN) English Install batteries before building models. Keep hands, face, hair and clothing away from all moving parts. Keep this important information for future reference. Battery Information How to Insert
1
 PARTS AND ACCESSORIES COLOR OF PIECES MAY VARY PARTES Y ACCESORIOS EL COLOR DE LAS PIEZAS PUEDE VARIAR 5 x 7 x IMPORTANT PRE-BUILD STEPS PREVIA IMPORTANTE PASOS DE COMPILACIÓN STEP PASO SEPARATE AND COUNT
English - EN Español (Latinoamérica) - XX Português (Brasil) - XC Français (Canada) - XD.
 - XX Português (Brasil) - XC Français (Canada) - XD.") English - EN Español (Latinoamérica) - XX Português (Brasil) - XC Français (Canada) - XD www.microsoft.com/hardware 1 Insert the two AAA alkaline batteries and turn on the mouse. To connect the mouse to
English - EN Español (Latinoamérica) - XX Português (Brasil) - XC Français (Canada) - XD www.microsoft.com/hardware 1 Insert the two AAA alkaline batteries and turn on the mouse. To connect the mouse to
X Not included MOTOR MOTEUR * TURBO JET 2-IN-1 BUILDING SET TURBORÉACTEUR 2 EN 1 JEU DE CONSTRUCTION BUILDS CONSTRUIRE **
 Building Worlds Kids Love TURBO JET -IN- BUILDING SET TURBORÉACTEUR EN JEU DE CONSTRUCTION 7 + 7 + 600 X Not included AA (LR6) Pas inclus No se incluyen Nicht enthalten Non incluse Não estão incluídas
** Not included. CAUTION: To Avoid Battery Leakage
 (EN) English CONTENTS K NEX Building Basics...4 Parts List...5 Rattlesnake Rampage...5 Viper s Venom Roller Coaster...6 Tips and Troubleshooting... 29 Keep this important information for future reference
KIT VW T4 VW T4 Lift Roof
 fiamma.com K VW T4 VW T4 Lift Roof für die Halterungen for brackets pattes Instrucciones de instalacion de los estribos staffe Fiamma F45 Fiamma F45 fiamma.com für die Halterungen for brackets pattes Instrucciones
1. DESCARGA DEL SOFTWARE DE BLUETOOTH EN EL SMARTPHONE
 MANUAL DEL USUARIO PARA BLUETOOTH ES 1. DESCARGA DEL SOFTWARE DE BLUETOOTH EN EL SMARTPHONE Entre en Apple Store o Google Play y busque: - BH Premium BH Premium 2. FIJACIÓN DEL MÓDULO BLUETOOTH Fije el
Bank Gothic BT medium
 El logotipo - Das Logo - The logo - Le logo - Il Logo El logotipo no debe tener un tamaño inferior a 12 mm. Das Logo darf nie kleiner als 12 mm sein. The logo must never be smaller than 12mm. Le logo ne
 Table of Contents Part Replacement Instructions Instructions pour le remplacement des pièces Instructies voor het vervangen van onderdelen Anleitung für den Austausch von Bauteilen Instrucciones para el
TRI-STEGO BUILDING SET JEU DE CONSTRUCTION
 Building Worlds Kids Love TRI-STEGO BUILDING SET JEU DE CONSTRUCTION BUILDS RUIT CON**ST LES 7 + LR ) A ( A X Not included Non incluses No se incluyen Nicht enthalten Non incluse Não estão incluídas Niet
COMPUTER DESK ESCRITORIO DE COMPUTADORA
 MODEL: 11222327F / MODELO: 11222327F COMPUTER DESK ESCRITORIO DE COMPUTADORA NO A B C D E F G H I J PARTS AND HARDWARE LISTA DE PARTES Y HARDWARE TOP PANEL PANEL SUPERIOR KEYBOARD PANEL PANEL DE TECLADO
627129-161 1. English. Português. Español
 English IMPORTANT: Follow these part replacement instructions: Match the part you received to the illustration on the next page. Go to the page number indicated ( #) for that part. 3 Complete only the
batteries. (LR14) into the compartment with the correct polarity (+/-) as shown here. Install batteries before building models.
 into the compartment with the correct polarity (+/-) as shown here. Install batteries before building models.") (EN) English CONTENTS K NEX Building Basics...6 Parts List...7 Meteor Madness...7 Hyperspeed Hangtime Roller Coaster...8 Tips and Troubleshooting... 38 Keep this important information for future reference
(EN) English CONTENTS K NEX Building Basics...6 Parts List...7 Meteor Madness...7 Hyperspeed Hangtime Roller Coaster...8 Tips and Troubleshooting... 38 Keep this important information for future reference
english - EN português do Brasil - XC français - FR español - ES
 english - EN português do Brasil - XC français - FR español - ES www.microsoft.com/hardware 1 1 Insert two AAA alkaline batteries. Slide the power switch to the on position. To connect the keyboard to
ASSEMBLY INSTRUCTIONS INSTRUCCIONES DE MONTAJE
 ASSEMBLY INSTRUCTIONS INSTRUCCIONES DE MONTAJE 4 PC PATIO CONVERSATION SET JUEGO DE PATIO C/ MESA, 2 SILLAS Y UN SILLÓN 250559R /250559T/250559G PLEASE NOTED / POR FAVOR A TENER EN CUENTA: THIS SET OF
CARACTERÍSTICAS AGUJA DE DÍAS MINUTERO AGUJA DE HORAS SEGUNDERO CORONA N 1 2
 VX7PE CARACTERÍSTICAS AGUJA DE DÍAS MINUTERO AGUJA DE HORAS SEGUNDERO CORONA AGUJA DE FECHA Corona N : Posición normal 1 : Primera posición de clic 2 : Segunda posición de clic 3 Cómo ajustar la hora
G233 PRODIGY. Setup Guide Guide d installation Guía de configuración
 G233 PRODIGY Wired Gaming Headset Casque gaming filaire Auriculares inalámbricos con micrófono para juegos Setup Guide Guide d installation Guía de configuración Contents English.................. 3 Français.................
CAUTION! IMPORTANT SAFETY INSTRUCTIONS CAUTION CAUTION! WARNING ENGLISH ENGLISH. Strangulation hazard. Hang out of reach of young children.
 FINFIN ENGLISH IMPORTANT SAFETY INSTRUCTIONS For indoor use only. Regularly check the cord, the transformer and all other parts for damage. If any part is damaged the product should not be used. Important
SIMATIC. SIMATIC S7 Easy Motion Control V12. Welcome Tour. Totally Integrated Automation PORTAL
 SIMATIC S7 Easy Motion Control V12 Welcome Tour Totally Integrated Automation www.siemens.com/tia-portal-welcometour Totally Integrated Automation PORTAL www.siemens.com/easy-motion-control SIMATIC Siemens
ALLOWS REMOTE ACCESS TO YOUR
 WI-FI ADAPTER The Schlage Sense Wi-Fi Adapter works with your Schlage Sense Smart Deadbolt. After setting up the Wi-Fi Adapter, you can use the Schlage Sense app to control your lock from anywhere. El
Guapo Using Ser and Tener to Describe People
 Guapo Using Ser and Tener to Describe People This document teaches the central piece of grammar in Guapo how to describe people using the verbs ser and tener as seen in these lyrics: Soy guapo. Tiene ojos
microsoft.com/hardware/support
 2015 Microsoft microsoft.com/hardware/support X20-43694-01 Back Cover Front Cover K65 Set up Note: You can wirelessly connect Wi-Fi CERTIFIED Miracast enabled devices to a TV or monitor (available HDMI
ENTERTAINMENT CENTER / BOOKSHELF ESTANTE PARA LIBROS / ESTANTE PARA TV
 MODEL: 11223726 / MODELO: 11223726 ENTERTAINMENT CENTER / BOOKSHELF ESTANTE PARA LIBROS / ESTANTE PARA TV PARTS LIST AND HARDWARE LISTA DE PARTES Y ACCESORIOS NO A B C D 2-1 3 4 5 6 7 HARDWARE LIST LISTA
CONTROLADORA PARA PIXELS CONPIX
 The LedEdit Software Instructions 1, Install the software to PC and open English version: When we installed The LedEdit Software, on the desktop we can see following icon: Please Double-click it, then
LISEZ CECI AVANT DE COMMENCER
 KIT 1230 8123010200 ABRAMS M1A1 TANK READ THIS BEFORE YOU BEGIN LISEZ CECI AVANT DE COMMENCER LEA ESTO ANTES DE EMPEZAR * Caution: Position all parts in this kit carefully. Parts will only snap together
Blair Storage Bed / Lit avec Rangement / Cama con Almacenamiento - Queen, King
 English This page lists the contents included in the box. Please take time to identify the hardware as well as the individual components of the product. s you unpack and prepare for assembly, place the
Installation Guide C. Countertop
 Installation Guide Countertop K-2447, K-14027, K-14028, K-14029, K-14031, K-14032, K-14033 M product numbers are for Mexico (i.e. K-12345M) Los números de productos seguidos de M corresponden a México
Clapboard. Not included Non Inclus No Incuido
 English This page lists the contents included in the box. Please take time to identify the hardware as well as the individual components of the product. As you unpack and prepare for assembly, place the
G433. Setup Guide Guide d installation Guía de configuración
 G433 7.1 Wired Surround Gaming Headset Casque gaming filaire 7.1 surround Auriculares con cable y sonido envolvente 7.1 para juegos Setup Guide Guide d installation Guía de configuración Contents English..................
You and Me Designed by Antoni Pallejà Office USER S MANUAL MANUAL DEL USUARIO
 You and Me Designed by Antoni Pallejà Office USER S MANUAL MANUAL DEL USUARIO PIECES & TOOLS PIECE A: 2 UNITS PIEZA A PIECE B: 2 UNITS PIEZA B NET RED NET BRACKET: 2 UNITS SOPORTE RED TOOLS / HERRAMIENTAS
MINILAND S.A ONIL
 PENTOMINO El juego consta de 12 piezas de forma diferente, pero que tienen exactamente la misma superficie. Esto se comprueba el siguiente gráfico. Observa que cada figura se compone de 5 cuadrantes y
MANUAL DE INSTRUCCIONES / USER'S GUIDE VD31
 MANUAL DE INSTRUCCIONES / USER'S GUIDE VD31 ESP AJUSTE DE LA POSICIÓN DE LA HORA DUAL - Después de configurar o de cambiar la batería, antes de configurar la hora, verifique si la aguja de hora dual está
 E Dependiendo de la versión y el año, una parte del paragolpes puede ser necesariamente recortada. La información proporcionada por nosotros para el recorte del paragolpes es sólo una ayuda no vinculante.
english - EN Español (Latinoamérica) - XX Português (Brasil) - XC Français (Canadá) - XD
 - XX Português (Brasil) - XC Français (Canadá) - XD") english - EN Español (Latinoamérica) - XX Português (Brasil) - XC Français (Canadá) - XD www.microsoft.com/hardware 1 4 Pair your mouse with your Device Step 1: Step 2: Step 3: Step 4: Step 5: On the bottom
english - EN Español (Latinoamérica) - XX Português (Brasil) - XC Français (Canadá) - XD www.microsoft.com/hardware 1 4 Pair your mouse with your Device Step 1: Step 2: Step 3: Step 4: Step 5: On the bottom
STOP WARNING. Contempo Futon - Charcoal-HN. Weight Limit: 300Lbs \ 136 Kgs. or access our website. Date of Purchase / /
 0 9986 355 6 35596 Contempo Futon - Charcoal-HN Weight Limit: 300Lbs \ 36 Kgs STOP O NOT RETURN PROUCT TO THE STORE Individual stores do not stock parts. If a part is missing or damaged, call our toll-free
Boxed Intel Celeron Processor Installation Notes
 Boxed Intel Celeron Processor Installation Notes Before installing the processor, please consider integration issues found in the installation notes available on the World Wide Web. Avant d effectuer l
INSTRUCCIONES DE ENSAMBLAJE.
 English MULTI-FUNCTIONAL COMPUTER TABLE ASSEMBLY INSTRUCTION MODEL RTA - 3806 IMPORTANT: Surfaces must be cleaned with a solution of a smooth soap and water, then cleared with a dry towel. Do not use solvents
Instrucao de Montagem
 nstructions of assembly nstrucciones de montaje/ nstrucao de Montagem ama 1,4m 1540 1130 ama 1,6m 1740 1130 abeceira box OLON www.rudnick.com.br Móveis de Qualidade Orientaciones/orientation/orientacao
WOODEN MAGAZINE TABLE MESA REVISTERO DE MADERA
 ODEL: 11224545V / ODELO: 11224545V WOODEN AGAZINE TABLE ESA REVISTERO DE ADERA NO A B C D E F G H I J L N PARTS AND HARDWARE LISTA DE PARTES Y HARDWARE HARDWARE LIST LISTA DE HARDWARE LEFT BAC SIDE PANEL
MODEL: / MODELO: BATHROOM CABINET MUEBLE DE BAÑO
 MODEL: 227 / MODELO: 227 BATHROOM CABINET MUEBLE DE BAÑO NO A B C D E F G H 2 3 PARTS AND HARDWARE LISTA DE PARTES Y HARDWARE RIGHT FRAME MARCO DERECHO LEFT FRAME MARCO IZQUIERDO TOP PANEL PANEL SUPERIOR
Television Bench Meuble TV Soporte de televisor
 Limited Warranty Television Bench Meuble TV Soporte de televisor La Garantie Limitée Garantía 12 Read this assembly manual carefully, and verify that you have all the parts listed before you begin. Keep
MANUALE D ISTRUZIONI INSTRUCTION MANUAL MANUEL D INSTRUCTIONS HANDBUCH ANWEISUNGEN MANUAL DE INSTRUCCIONES MANUAL DE INSTRUÇÕES CORNETTA PER CELLULARE
 MANUALE D ISTRUZIONI INSTRUCTION MANUAL MANUEL D INSTRUCTIONS HANDBUCH ANWEISUNGEN MANUAL DE INSTRUCCIONES MANUAL DE INSTRUÇÕES CORNETTA PER CELLULARE 2Italiano manuale d istruzioni ISTRUZIONI D USO Inserisci
42.5" (1080 mm) 5.6" (143 mm) 13.1" (333 mm) 23.8" (603 mm) 1 of W-00 rev.b 02/13
 5.6 (143 mm) 13.1 (333 mm) 23.8 (603 mm) 1 of W-00 rev.b 02/13") Task Light for StyleView Carts ASSEMBLY INSTRUCTIONS Instrucciones de instalación Notice d assemlage Montageanleitungen Installatie instructies Manuali d Istruzione 取扱い説明書설치안내 42.5" (1080 mm) 5.6" (143
Task Light for StyleView Carts ASSEMBLY INSTRUCTIONS Instrucciones de instalación Notice d assemlage Montageanleitungen Installatie instructies Manuali d Istruzione 取扱い説明書설치안내 42.5" (1080 mm) 5.6" (143
 Instalación rápida Antes de proceder con la instalación, es importante que sepa: Una instalación completa incluye "Drivers" y "Programa", ambos elementos se pueden instalar fácilmente desde el CD del software.
PC380 Web Cam. User s Guide Version 1.1
 PC380 Web Cam User s Guide Version 1.1 Web Camera User s Guide System Requirements Microsoft Windows 98SE, Windows Me, Windows 2000, Windows XP. Software Installation Attention: Make sure to install
POWER SWITCH AND DWELL TIME PUSH THE POWER BUTTON TO TURN ON THE POWER, GREEN LED LIGHT APPEARS
 8 CHANNELS VIDEO AUTO SWITCHER WITH AUDIO INSTRUCTION MANUAL POWER SWITCH AND DWELL TIME PUSH THE POWER BUTTON TO TURN ON THE POWER, GREEN LED LIGHT APPEARS WHILE THE POWER IS "ON" ; TURN CLOCKWISE MORE,
www.microsoft.com/hardware
 www.microsoft.com/hardware english - EN ESPAÑOL (LATINOAMERICANO) - XX PORTUGUÊS (BRASIL) - XC FRANÇAIS CANADIEN - XD 1 2 www.microsoft.com/hardware/productguide 3 www.microsoft.com/hardware/downloads
Installation Guide. Green momit
 Installation Guide Green momit 2015 www.momit.com momit Deviceses Gateway: Model 1 and 2 Wall option The momit Gateway allows your thermostat to be connected to the Internet. It s included in the Starter
 Instrucciones Paso 1 Una (L) con (A) usando 3 y 5. Una (R) con (B) usando 3 y 5. Paso 2 Una (D) con (H) usando 4; Una (G) con (H) usando 7; una 8 con (H) donde se muestra. Una (G) con (A,B) usando 1, 11
RocketBox AVISO IMPORTANTE ROCKETBOX PRO (1X) KEY (2X) CLÉ (X 2) LLAVES (2X) Part # Rev.C C-1/13
 KEY (2X) CLÉ (X 2) LLAVES (2X) Part # Rev.C C-1/13") RocketBox ROCKETBOX PRO 11, ROCKETBOX PRO 12, ROCKETBOX PRO 14 ROCKETBOX PRO (1X) KEY (2X) CLÉ (X 2) LLAVES (2X) IMPORTANT WARNING IT IS CRITICAL THAT ALL YAKIMA RACKS AND ACCESSORIES BE PROPERLY AND SECURELY
RocketBox ROCKETBOX PRO 11, ROCKETBOX PRO 12, ROCKETBOX PRO 14 ROCKETBOX PRO (1X) KEY (2X) CLÉ (X 2) LLAVES (2X) IMPORTANT WARNING IT IS CRITICAL THAT ALL YAKIMA RACKS AND ACCESSORIES BE PROPERLY AND SECURELY
DES 1003B. F Notice de montage. G Assembly instructions. 3 Manual de instalación. 1 Istruzioni di montaggio. N Montagehandleiding
 F Notice de montage G ssembly instructions 3 Manual de instalación 1 Istruzioni di montaggio N Montagehandleiding d Installationshinweise 2 3 X1 si montage en niche X2 si montage en angle RMP05 F Les quantités
Electrode Placement Guide
 La Guía De Colocación De Los Electrodos Guide De Placement Des électrodes English Español Français Français Español English Stimulation Position: Position yourself comfortably in the position as shown
car seat adapter adaptador del asiento de automóvil CXBEX/MAXI COSI/NUNA babyjogger.com ASSEMBLY INSTRUCTIONS INSTRUCCIONES DEL ENSAMBLAJE PD349778A
 CXBEX/MAXI COSI/NUNA car seat adapter adaptador del asiento de automóvil PD349778A babyjogger.com ASSEMBLY INSTRUCTIONS INSTRUCCIONES DEL ENSAMBLAJE CITY PREMIER CITY SELECT CITY SELECT LUX 1 2 CLICK 3
START INICIAR - DÉMARRAGE - INIZIO - INICIAR - INICIO
 START INICIAR - DÉMARRAGE - INIZIO - INICIAR - INICIO ENG: Microsoft wireless mouse PTB: Mouse sem fio da Microsoft FRA: Souris sans fil Microsoft ITA: Mouse senza fili Microsoft PTG: Rato sem fios Microsoft
WELCOME KIT - SOFTWARE KIT DE BIENVENUE - LOGICIEL KIT DE BIENVENIDA PROGRAMA
 WELCOME KIT - SOFTWARE KIT DE BIENVENUE - LOGICIEL KIT DE BIENVENIDA PROGRAMA ENGLISH FRANÇAIS ESPAÑOL TIMEZERO WELCOME KIT Welcome and thank you for choosing our products! This quick guide will take you
Quick Start Guide. EHS Advanced. Wireless-Headset Adapter
 Quick Start Guide HS dvanced Wireless-Headset dapter snom technology G snom rance SRL Wittestr. 0 G Parc des fontenelles 0 erlin, eutschland 0 ailly, rance Tel. + 0-0 Tel. + 0 a + 0 a + 0 info@snom.com,
LAPTOP DESK WITH 3 BINS MESA PARA COMPUTADORA PERSONAL CON 3 CONTENEDORES
 MODEL: 11222775R / MODELO: 11222775R LAPTOP DESK WITH 3 BINS MESA PARA COMPUTADORA PERSONAL CON 3 CONTENEDORES NO A B C D E F G H 1 2 3 4 5 6 7 8 9 PARTS AND HARDWARE LISTA DE PARTES Y HARDWARE TOP PANEL
BUILDING BASICS. Start Building
 2 Parts List Before you start building, be sure to compare the parts in your set with the parts list here. If anything is missing, call or write to us using the information on the back cover. We are here
1990/1991 Tango Nesting Table Base Base de Table Tabla Base
 an DI Spaces Company inneapolis, N 55428 www.safcoproducts.com Instructions INSTRUCTIONS INSTRUCCIONES 1990/1991 Tango Nesting Table ase ase de Table Tabla ase PRODUCT WARRANTY REISTRATION is available
MÓDULO 1 DOCKS. Romero Vallejo MÓDULO 1 MODULE 1 PESO. WEIGHT. GEWICHT. PESO. POIDS MODUL 1. Estructura. Frame. Profil. Struttura. Structure MODULO 1
 MÓDULO 1 DOCKS 24 10 98 39 98 39 MÓDULO 1 Fabricada con perfilería de aluminio anodizado o termolacado. Anodizado Anodized Eloxiert Anodizzato Anodisé Silver Blanco White Weib Bianco Blanc Arena Sabbia
DISPLAY, THE EASY WAY
 DISPLAY, THE EASY WAY DISPLAY, THE EASY WAY Disponible en cualquier tamaño: hasta 1 x 1,50m. Se instala sin herramientas y en menos de un minuto Estándar o personalizado a todo color Reposicionable PosterFix
Flashcards Series 3 El Aeropuerto
 Flashcards Series 3 El Aeropuerto Flashcards are one of the quickest and easiest ways to test yourself on Spanish vocabulary, no matter where you are! Test yourself on just these flashcards at first. Then,
Television Bench Meuble TV Soporte de televisor
 Warranty Television Bench Meuble TV Soporte de televisor Garantie Garantía 12 Read this assembly manual carefully, and verify that you have all the parts listed before you begin. Keep your assembly manual
Manual para Cambio de Apariencia en Acrobat Reader DC. Change of Appearance in Acrobat Reader DC
 Manual para Cambio de Apariencia en Acrobat Reader DC Change of Appearance in Acrobat Reader DC Desarrollado por: DTE, LLC Versión: 02.2016 Developed by: DTE, LLC Revisado en:25 de Octubre de 2016 support@dtellcpr.com
English - EN Français - FR Deutsch - DE Italiano - IT Português - PT Español - ES
 English - EN Français - FR Deutsch - DE Italiano - IT Português - PT Español - ES Push upward to open battery door, insert batteries as shown. Pair your mouse with your Windows device: A. On the underside
Car Seat Adapter Adaptador de la silla para el coche
 CHICCO/PEG-PEREGO Car Seat Adapter Adaptador de la silla para el coche PD348997B babyjogger.com ASSEMBLY INSTRUCTIONS INSTRUCCIONES DEL ENSAMBLAJE CITY PREMIER CITY SELECT PEG-PEREGO 1 A B 2 3 CLICK 4
DE MARI PASTA DIES. We Shape the World
 DE MARI PASTA DIES We Shape the World DE MARI PASTA DIES We Shape the World DE MARI is a leading manufacturer in extrusion dies and equipment for the food industry. DE MARI s state of the art manufacturing
File naming. Dateibenennung. Nommage de fichiers. Nomenclatura de archivo. 3shape. Release. Version. Version. Version. Software CAD.
 ENGLISH DEUTSCH FRANÇAIS ESPAÑOL DESS-3SHAPE LIBRARIES Download and installation instructions of dess interfaces (titan bases, gap cemented 0.09mm diameter) 3shape libraries. Download der Bibliotheken
5819 ClawZord ZordLangosta Zord Homard Klauenzord Kreeftenzord Zord aragosta ClawZord
 5819 ClawZord ZordLangosta Zord Homard Klauenzord Kreeftenzord Zord aragosta ClawZord D058191.indd 1 12-04-23 1:44 PM AM19484ARG AS05700417 AS05700610 AS05700117 AS05700317 AS05700217 4X AM15258ARG MA1086APG
Instruction Manual. Safety Warning and Precautions
 Art# GAZ201490/5055 Instruction Manual Save this Manual for future reference. Your Gazebo requires assembly prior to use. It is important that you read the entire manual to become familiar with the unit
What is Real Dial Size? Qu est-ce qui le Real Dial Size fait? Real Dial Size OFF (Désactivé) Real Dial Size ON (Activé) All characters are measured fr
 Real Dial Size ON (Activé) All characters are measured fr") Contents Table des Matières Indice Inhalt English What is Real Dial Size?... 7 Icon Gallery... 9 Contact Us... 52 Français Qu est-ce qui le Real Dial Size fait?................ 7 Galerie d Icônes...............................
Contents Table des Matières Indice Inhalt English What is Real Dial Size?... 7 Icon Gallery... 9 Contact Us... 52 Français Qu est-ce qui le Real Dial Size fait?................ 7 Galerie d Icônes...............................
Flashcards Series 5 El Agua
 Flashcards Series 5 El Agua Flashcards are one of the quickest and easiest ways to test yourself on Spanish vocabulary, no matter where you are! Test yourself on just these flashcards at first. Then, as
Arm Theraband Exercises: Standing
 Arm Theraband Exercises: Standing Do these exercises while standing. You will hold one end of the theraband in the hand of the arm you are to exercise. The other end of the band will most often be anchored
π H-4039 SPILL CONTAINMENT WORKSTATION CONNECTORS ASSEMBLY 1-800-295-5510 uline.com TOOL NEEDED
 π H-4039 SPILL CONTAINMENT WORKSTATION CONNECTORS uline.com Para Español, vea páginas 3-4. Pour le français, consulter les pages 5-6. TOOL NEEDED Plastic or Rubber Mallet ASSEMBLY 1. Locate one of the
Start. Démarrer. Iniciar.
 Zune CABLE Pack câble de synchronisation Zune cable de sincronizacíon Zune Start. Démarrer. Iniciar. To sync and charge, connect the sync cable to your Zune and your PC. Just need to charge? Connect your
Indirect Object Pronouns
 Indirect Object Pronouns We ve seen three types of pronouns so far: Subject: yo, tú, él Reflexive: me, te, se Direct object: me, te, lo, la In this slide show, we are going to look at one more type: indirect
english - EN français - FR deutsch - DE italiano - IT português - PT español - ES
 glish - EN français - FR deutsch - DE italiano - IT português - PT español - ES www.microsoft.com/hardware Insert two AAA alkaline batteries. Slide the power switch to the on position. To connect the keyboard
Cher client, Toute l équipe COMMENCAL vous remercie d avoir effectué votre commande.
 Cher client, Toute l équipe COMMENCAL vous remercie d avoir effectué votre commande. Vous avez fait le choix du paiement par virement bancaire. Afin de réaliser ce dernier, merci de bien vouloir respecter
MODEL: / MODELO: SPACE SAVER CABINET GABINETE PARA EL BAÑO
 MODEL: 125675 / MODELO: 125675 SPACE SAVER CABINET GABINETE PARA EL BAÑO NO A B C D E F G H I J K L M PARTS AND HARDWARE LISTA DE PARTES Y HARDWARE LEFT FRAME MARCO IZQUIERDO RIGHT FRAME MARCO DERECHO
Agustiniano Ciudad Salitre School Computer Science Support Guide - 2015 Second grade First term
 Agustiniano Ciudad Salitre School Computer Science Support Guide - 2015 Second grade First term UNIDAD TEMATICA: INTERFAZ DE WINDOWS LOGRO: Reconoce la interfaz de Windows para ubicar y acceder a los programas,