MET ONE 3400: 3413, 3415, 3423, 3425, 3445
|
|
|
- Magdalena Velázquez Cuenca
- hace 8 años
- Vistas:
Transcripción
1 DOC MET ONE 3400: 3413, 3415, 3423, 3425, /2012, Edition 4, Firmware version 4.06.xx Basic User Manual Manuel d'utilisation de base Manual básico del usuario Manual Básico do Usuário

2 English...3 Français...19 Español...36 Português

3 Table of Contents Specifications on page 3 Operation on page 14 General information on page 5 Maintenance on page 16 Installation on page 7 Diagnostics and Troubleshooting on page 17 Particle counter navigation on page 13 Specifications Specifications are subject to change without notice. Instrument specifications Specification Power requirement Detail Adapter (included in the ship kit): VAC, 2.5 A, Hz Instrument: 24 VDC, 75 W maximum Installation category Protection class I III Pollution degree 2 Altitude Light source Pump type Count display Interface 2000 m (6562 ft) Long Life Laser diode with 10-year Mean Time To Failure (MTTF), Class 3B Laser, 810 to 852 nm, 50 mw maximum Air vacuum, rated for continuous use Color ¼ VGA TFT touch screen Windows CE -based Maximum count shown 9,999,999 Delay time 00:00:06 to 23:59:59 Sample and hold times Sample: 00:00:01 to 23:59:59 Hold: 00:00:00 to 23:59:59 Count alarms Data storage Count cycles 1 to 9,999,999 counts 50 to 5000 samples, scrollable on Historical Data review screen 3000 is the default value Up to 100 while in automatic mode Locations Up to 999 Exhaust port Outputs 3/8-in. NPT thread Ethernet 10Base-T/100Base-TX RS485 Serial RS232 Serial Optional wireless b/g compatible USB Client (Version 1.1) USB Host (Version 1.1) English 3
 Long Life Laser")
4 Specification Manifold Enclosure material Weight without battery Detail Supports A3432, 32-port manifold system (available on 1 CFM units only) Stainless steel 3413 and kg (16.6 lb) 3423 and kg (18.3 lb) kg (19.0 lb) Size (W x D x H) Environment, operation Environment, storage 31.8 x 25.4 x 20.3 cm (12.5 x 10 x 8 in.) 0 to 40 C (32 to 104 F); 10 to 90% relative humidity, non-condensing 40 to 50 C ( 40 to 122 F); 0 to 98% relative humidity, non-condensing Sample measurement specifications Sampling Number of size ranges Standard 6, 8 Particle size ranges and standard channels Models 3413 and , 0.5, 1.0, 3.0, 5.0, 10.0 µm Models 3415 and , 1.0, 2.0, 3.0, 5.0 and 10.0 or 25.0 µm Models , 1.0, 2.0, 3.0, 5.0, 10.0 µm Flow rate Models 3413 and L/min (1.00 cfm) ± 5% (Default factory setting) Models 3423 and L/min (1.77 cfm) ± 5% (Default factory setting) Model L/min (3.53 cfm) ± 5% (Default factory setting) Zero count Conforms to JIS B count or less in 5 minutes, 95% confidence level Coincidence loss Models 3413 and % at 20,000,000 particles/m 3 (566,570 particles/ft 3 ) Models 3423 and % at 10,000,000 particles/m 3 (283,280 particles/ft 3 ) Model % at 5,000,000 particles/m3 (141,640 particles/ft 3 ) Count efficiency Models 3413 and % ± 20 % for 0.3 µm, (100% ± 10% at 1.5 times the minimum sensitivity). Fully complies with ISO Models 3415, 3425 and % ± 20% for 0.5 µm, (100% ± 10% at 1.5 times the minimum sensitivity). Fully complies with ISO Battery specifications Specification Battery type Detail Lithium ion smart battery; can be charged, ejected and changed without disruption to the system. Quantity included One (two batteries are provided with the 3445) Battery life during operation Models 3413 and hours Models 3423 and hours Model hours Battery recharge time Power Battery weight 6.75 hours minimum, 10 hours maximum 14.4 VDC, 6.6 Ah (2x) 0.66 kg (1.45 lb) 4 English

5 General information In no event will the manufacturer be liable for direct, indirect, special, incidental or consequential damages resulting from any defect or omission in this manual. The manufacturer reserves the right to make changes in this manual and the products it describes at any time, without notice or obligation. Revised editions are found on the manufacturer s website. Expanded manual version For additional information, refer to the expanded version of this manual, which is available online. Safety information N O T I C E The manufacturer is not responsible for any damages due to misapplication or misuse of this product including, without limitation, direct, incidental and consequential damages, and disclaims such damages to the full extent permitted under applicable law. The user is solely responsible to identify critical application risks and install appropriate mechanisms to protect processes during a possible equipment malfunction. Please read this entire manual before unpacking, setting up or operating this equipment. Pay attention to all danger and caution statements. Failure to do so could result in serious injury to the operator or damage to the equipment. Make sure that the protection provided by this equipment is not impaired. Do not use or install this equipment in any manner other than that specified in this manual. Use of hazard information D A N G E R Indicates a potentially or imminently hazardous situation which, if not avoided, will result in death or serious injury. W A R N I N G Indicates a potentially or imminently hazardous situation which, if not avoided, could result in death or serious injury. C A U T I O N Indicates a potentially hazardous situation that may result in minor or moderate injury. N O T I C E Indicates a situation which, if not avoided, may cause damage to the instrument. Information that requires special emphasis. Precautionary labels Read all labels and tags attached to the instrument. Personal injury or damage to the instrument could occur if not observed. A symbol on the instrument is referenced in the manual with a precautionary statement. This symbol, if noted on the instrument, references the instruction manual for operation and/or safety information. This symbol, when noted on a product enclosure or barrier, indicates that a risk of electrical shock and/or electrocution exists. Delicate internal electronic components can be damaged by static electricity, resulting in degraded performance or eventual failure. English 5

6 This symbol indicates a laser device is used in the equipment. This symbol identifies the location of a fuse or current limiting device. Electrical equipment marked with this symbol may not be disposed of in European public disposal systems after 12 August of In conformity with European local and national regulations (EU Directive 2002/96/EC), European electrical equipment users must now return old or end-of-life equipment to the Producer for disposal at no charge to the user. Note: For return for recycling, please contact the equipment producer or supplier for instructions on how to return end-of-life equipment, producer-supplied electrical accessories, and all auxillary items for proper disposal. Compliance This symbol indicates that the instrument is a Class 1 LASER product. This product complies with IEC/EN :2007 and 21 CFR except for deviations pursuant to Laser Notice No. 50, dated June 24, FDA accession number: This product is also CE compliant. Contact the manufacturer for complete compliance details. Country-specific approval for Wi-Fi devices C A U T I O N Electromagnetic radiation hazard. Make sure that the antenna is kept at a minimum distance of 20 cm (7.9 in.) from all personnel in normal use. The antenna cannot be co-located or operated in conjunction with any other antenna or transmitters. Products with the wireless option contain a modular RF Wi-Fi device that operates in the 2.4 GHz range. United States FCC ID: R68WIPORTG Canada IC ID: 3867A-WIPORTG Country ISO31662 letter code Country ISO31662 letter code Austria AT Poland PL Belgium BA Portugal PT Denmark DK Spain ES Finland FI Sweden SE France FR United Kingdom GB Germany DE Iceland IS Greece GR Norway NO Hungary HU Switzerland CH Ireland IE Turkey TR Italy IT Netherlands NL Mexico MX Regulatory RF device approvals 6 English

7 FCC: Approved as a Modular Device under a TCB Grant of Authorization. FCC ID: R68WIPORTG IC: Approved as a Modular Device under Certificat D'Acceptabilite' Technique C-REL ID : 3867A- WIPORTG Opinion: Compliant under the R&TTE Directive 1999/5/EC to the essentials requirements of Article 3.2 according to the assessment procedures in Article 10(5) and Annex IV for (class-2 equipment) and marked as CE1177. Certification The device complies with Part 15 of the FCC Rules and Industry Canada license-exempt RSS standard(s). Operation is subject to the following conditions: 1. The equipment may not cause harmful interference. 2. The equipment must accept any interference received, including interference that may cause undesired operation. Changes or modifications to this wireless communication equipment not expressly approved by the party responsible for compliance could void the user's authority to operate the equipment. Any change to the equipment will void the Industry Canada certification and FCC grant. General product information This manual describes the use of the MET ONE 3400 Series Particle Counter. The MET ONE 3400 Series Particle Counter counts and measures the size of airborne particles in cleanroom environments. Refer to Table 1. Table 1 MET ONE 3400 Series particle counter model numbers Model number Flow rate Minimum particle size channel (µm) L/min Ft 3 /min Installation W A R N I N G Multiple hazards. Only qualified personnel must conduct the tasks described in this section of the document. Unpack the instrument Remove all items from the shipping container and inspect for damage. If any items are missing or damaged, contact the manufacturer. Refer to Figure 1. English 7
. Operation is subject to the following conditions: 1.")
8 Figure 1 MET ONE 3400 components Series Particle Counter 8 Extension tube for isokinetic probe 2 Rechargeable battery ( ) 9 Zero count filter 3 AC-to-DC power supply ( ) 10 RS485 connector assembly 4 Power cord (US) 11 USB Flash drive 5 Power cord (EU) 12 Intake cleaning brush 6 Thermal paper rolls for printer (2x) 13 Wireless antenna for Wi-Fi 7 Isokinetic probe 14 Stylus for touchscreen interface Wiring safety information W A R N I N G Electrocution hazard. Make sure that there is easy access to the local power disconnect. N O T I C E Always disconnect power to the instrument before electrical connections are made. Obey all safety statements while connections are made to the instrument. Electrostatic discharge (ESD) considerations N O T I C E Potential Instrument Damage. Delicate internal electronic components can be damaged by static electricity, resulting in degraded performance or eventual failure. Refer to the steps in this procedure to prevent ESD damage to the instrument: 8 English

9 Touch an earth-grounded metal surface such as the chassis of an instrument, a metal conduit or pipe to discharge static electricity from the body. Avoid excessive movement. Transport static-sensitive components in anti-static containers or packages. Wear a wrist strap connected by a wire to earth ground. Work in a static-safe area with anti-static floor pads and work bench pads. Electrical connections Connect probes, external power, cables and USB devices as shown in Figure 2 and Figure 3. Figure 2 Back view 1 Exhaust port 4 Manifold controller connector or standard RS232 port (available on 1 CFM units only) 2 Serial communications RS485 connector 5 Battery ports 3 Auxiliary I/O port for the filter scan probe 6 Supplemental feet English 9

10 Figure 3 Front and side view 1 Sample intake nozzle 8 USB host connector 2 Touchscreen 9 USB client connector 3 Power button 10 Relative humidity and temperature probe connector 4 Battery status indicator 11 Air velocity probe connector 5 Ethernet connector 12 Handle 6 Handle 13 Wireless antenna connector 7 Printer 14 Power connector Note: For best results, use USB flash drives supplied by the manufacturer. Contact Customer Service for additional support at or Install the batteries W A R N I N G Explosion hazard. To avoid fire and/or explosion, use only the battery type and power supply/charger specified by the manufacturer. For part numbers, refer to Figure 1 on page English

11 English 11
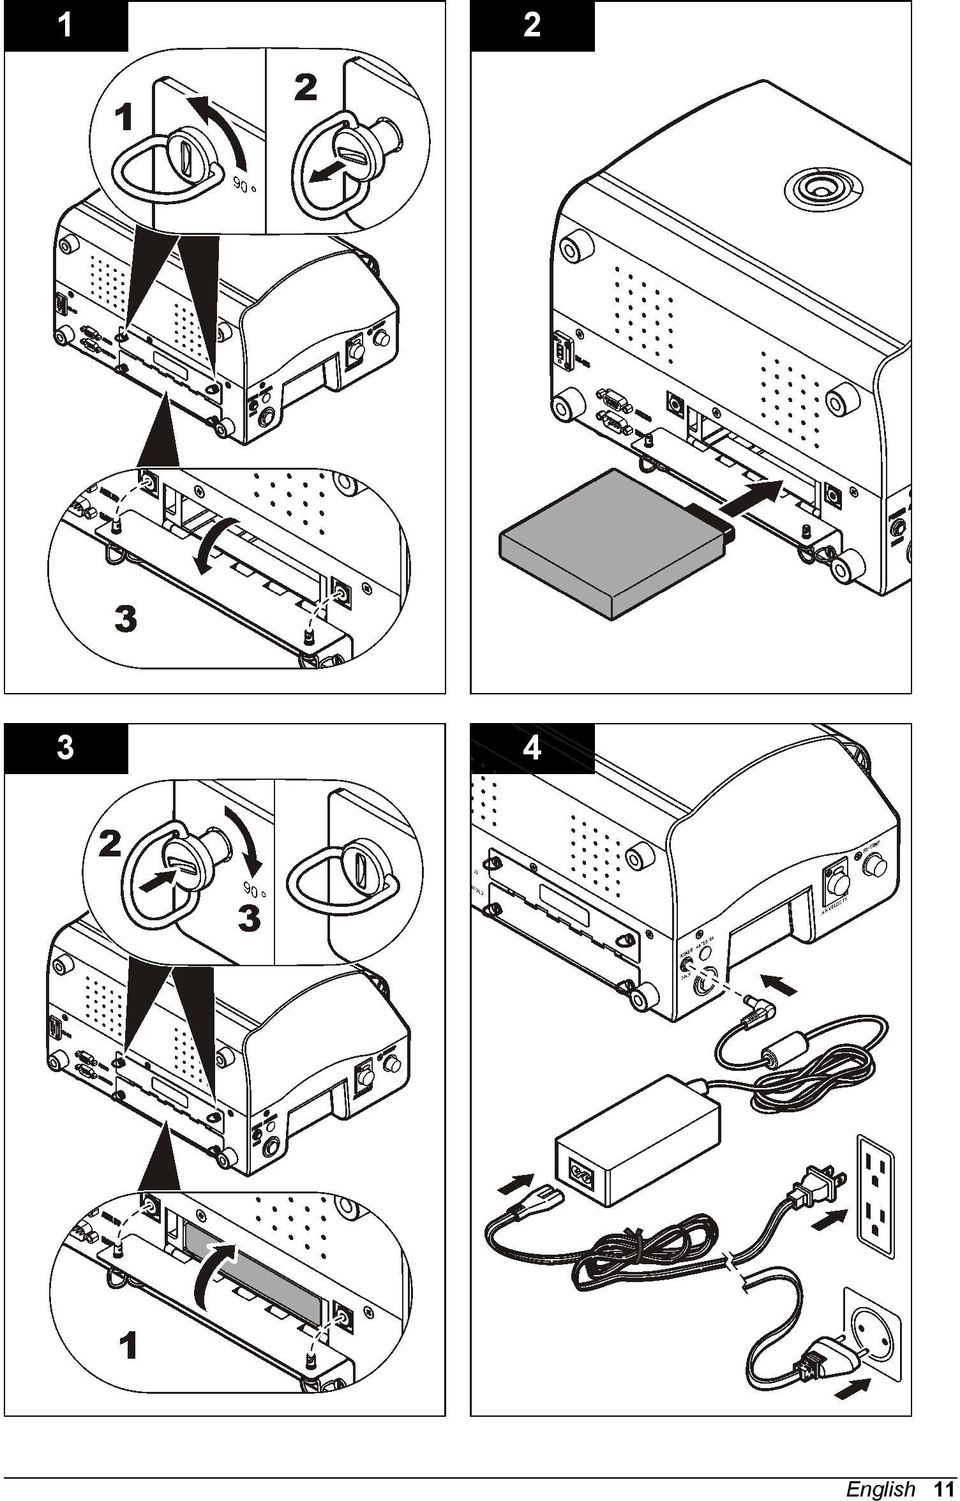
12 Assemble the particle counter system Figure 4 shows the setup of the particle counter system. Figure 4 Particle counter assembly 12 English

13 Install the printer paper To prevent damage to the printer, always operate the particle counter with the recommended thermal paper installed in the printer. If the particle counter must be used without paper, set the print mode to "None". To install a roll of thermal printing paper, refer to Figure 5. Figure 5 Printer paper installation Particle counter navigation The functions of the particle counter are accessed from the Counter Navigation screen. Table 2 shows the functions that are accessible through the navigation screen. Icon Function Description Table 2 Screen icon descriptions Sample Measure particle counts. Refer to Measure particle counts on page 14. Historical Review measurement results in the buffer; print, export or filter data. Refer to the CD for information. Export Output file as comma separated value (CSV), tab separated, or PortAll files. Refer to the CD for information. English 13

14 Icon Function Description Table 2 Screen icon descriptions (continued) Printer Print sample data as hard-copy. Refer to How to use the Print Center on page 15. Locations Add/edit/remove areas; copy location settings, edit locations settings; edit alarms for specific locations. Refer to the CD for information. Group Load/add/edit a group; delete a group. Refer to the CD for information. System Sizes Time/Date; Sleep time/backlight timeout; set logon requirements; set sounds for alarms; manage users; set the units for flow rates; manage the data buffer. Refer to the CD for more information. Refer to the CD for information. Add/edit/delete a size (optional). Refer to the CD for information. Test wizard Test and report wizard for ISO, EU-GMP, FS or BS classification compliance. Refer to the CD for information. Return Return to the previous screen or menu. Operation Log on to the particle counter Prerequisites Start the system. 1. Activate the backlight with a finger or stylus if needed. 2. Push the LOCK icon to log out a previous user. Push LOCK again to see the logon screen. 3. Enter the user name and password. Confirm. Note: Push the ALT key to access special characters. Measure particle counts After a complete particle count measurement, the number of particles measured will show on the screen and be stored as data. Other configured parameters, such as relative humidity, temperature and air velocity will be shown and stored in data. 1. Remove the protective cap from the inlet tube on the counter. 2. On the Counter Navigation screen, push SAMPLE. 3. To start the particle count, push the RUN button. The RUN button will change to a STOP button while the count is measured. Note: Push STOP to end the test before the count is complete. Incomplete particle count data will not be stored or printed. 4. When the count measurement is complete, the test will stop automatically. 14 English

15 Change the particle count location There are two methods to change the location for a particle count. On the Sample screen, push the location name. Select the new location name and confirm. On the Sample screen, push the PLUS button to increment the location, or push the MINUS button to decrement the location. See settings during the particle count Location and group settings can be seen at any time during the particle count cycle. On the Sample screen, select the Settings tab on the right side of the screen. See historical data during the particle count Historical sample data can be seen at any time during the particle count cycle. 1. On the Sample screen, select the ARROW button. 2. Select the HISTORICAL DATA icon to see the data. Use the filter scan probe N O T I C E The filter scan probe function applies to 1 CFM and 50 LPM units only. 1. On the Counter Navigation screen, push SAMPLE. 2. In the Test screen, push the FILTER icon. 3. To start the test, push START FILTER PROBE TEST. 4. To end the test, push STOP FILTER PROBE TEST. 5. Push PRINTER to generate a brief report of the last completed test. How to use the Print Center About the Print Center N O T I C E To avoid damage to the printer, do not operate the printer without paper. If the particle counter must be used without paper, be sure to set the print mode to "None". The particle counter has a built-in printer. The Print Center screen is accessible from the: Counter Navigation screen Historical screen System Diagnostics screen Test/Report Wizard screen Area/Location Setup screen On the Print Center screen the user can: Set automatic print functions Print buffer records or count averages Note: Filtered data is printed from the Historical screen. English 15

16 Print records manually The buffer holds 5000 records maximum. The Print Center can print the entire buffer or the average of count cycles. To print records manually: 1. On the counter Navigation screen, push PRINTER. 2. On the Print Center screen, select the print option for the data. 3. The data will begin to print. To cancel the print job, push CANCEL PRINT. To return to Counter Navigation, push RETURN. Set automatic print functions Note: If the sample period is very brief and the hold time is zero, some sample data may be skipped. 1. On the Counter Navigation screen, push PRINTER. 2. On the Print Center screen, select the Sample Print Mode field. Select an option for automatic printing. Option None Alarms Cycles All Description No data will print automatically Prints results when a count alarm is exceeded Prints the results of the first count cycle and multiples of the programmed count cycle Prints results after each count cycle is finished 3. Push ENTER to confirm. Maintenance W A R N I N G Multiple hazards. Do not disassemble the instrument for maintenance or service. If the internal components must be cleaned or repaired, contact the manufacturer. C A U T I O N Personal injury hazard. Only qualified personnel should conduct the tasks described in this section of the manual. Clean the instrument exterior The instrument exterior can be cleaned as needed. To avoid human exposure to potentially dangerous chemicals, make sure to clean the touchscreen immediately after contact with chemicals. N O T I C E Do not leave visible moisture on the instrument or touchscreen. Moisture can penetrate the touchscreen and damage electronics inside. 1. Put the cap on the sample air intake nozzle. 2. Spray a mild cleaning solution on a soft cloth. Wipe the outside of the instrument carefully. 3. Use a soft, dry cloth to wipe the touchscreen surface. If needed, moisten the soft cloth with a mild cleaning solution. 16 English

17 Set the count to zero Do this procedure after unexpectedly high particle counts. This procedure will verify that the particle counter works correctly and will remove residual particles. 1. Put the zero-count filter on the intake tube. Refer to Figure 1 on page Turn on the unit and log in if needed. 3. Push SAMPLE. 4. Push RUN. 5. Repeat the process until the particle counts return to zero. Charge the batteries in the particle counter Batteries in the 3400 will begin to charge when the AC power cord is connected. A complete charge in the instrument takes approximately 10 hours. The battery is considered to be fully charged when they display shows the charge between 95% and 100%. Prerequisite: Install the batteries in the instrument. Refer to Install the batteries on page 10. N O T I C E Discard the used batteries according to local regulations or contact the manufacturer. Do not put exhausted batteries in the domestic waste. 1. Attach the power supply to the unit. Refer to Figure 3 on page Connect the unit power supply to the external power through the AC power adapter. The battery status light will show the level of power in the battery. Refer to Table 3. Table 3 Battery LED color indications LED state LED color Battery status Charge status Flashing Orange Low power Not charging Flashing Green Low power Charging Solid Green Charged Charging Diagnostics and Troubleshooting The Diagnostics screen shows information that may be needed for troubleshooting. Table 4 shows an example of a failure notification on the Diagnostics screen. Table 4 System Diagnostics screen example - Clock battery failure Signal Value Status Calibration 0.00 VDC OFF Flow 0.00 VDC OFF Clock battery 0.00 VDC FAIL Battery 1 (bottom) VDC PASS Battery 2 (top) VDC PASS Laser current N/A For troubleshooting that involves technical support from the manufacturer, the user may need to fax a system status printout to technical support. 1. On the Counter Navigation screen, push DIAGNOSTICS. 2. Go to the Counter tab to see information about the system, such as serial number, model and calibration date. English 17

18 3. Go to the Calibration tab to see current calibration information. 4. On the Diagnostics screen, push PRINT. The printout will show the serial number, date and time and other data about the system. 18 English

19 Table des matières Caractéristiques à la page 19 Fonctionnement à la page 31 Généralités à la page 21 Maintenance à la page 33 Installation à la page 24 Diagnostics et dépannage à la page 34 Navigation du compteur de particules à la page 30 Caractéristiques Les caractéristiques techniques peuvent être modifiées sans préavis. Spécifications de l'appareil Caractéristique Exigences électriques Détails Adaptateur (inclus dans le kit d'expédition V ca, 2,5 A, Hz Appareil : 24 VCC, 75 W maximum Catégorie d installation Classe de protection I III Niveau de pollution 2 Altitude Source lumineuse Type de pompe m (6 562 ft) Diode Long Life Laser avec un temps moyen de fonctionnement avant défaillance (MTTF) de 10 ans, laser de classe 3B, 810 à 852 nm, 50 mw maximum A vide d'air, classé pour une utilisation continue Affichage du comptage Écran tactile couleur ¼ VGA TFT Interface Basé sur Windows CE Comptage maximum affiché 9,999,999 Temps de retard 00:00:06 à 23:59:59 Temps d'échantillonnage et de pause Échantillonnage : 00:00:01 à 23:59:59 Pause : 00:00:00 à 23:59:59 Alarmes de comptage Stockage des données Cycles de comptage 1 à comptages 50 à échantillons, défilement sur l'écran d'aperçu des Données historiques La valeur par défaut est Jusqu'à 100 en mode automatique Emplacements Jusqu'à 999 Port d'évacuation 3/8-in. Filetage NPT Français 19
 Diode Long Life Laser avec un temps moyen de fonctionnement avant défaillance")
20 Caractéristique Sorties Détails Ethernet 10Base-T/100Base-TX Série RS485 Série RS232 Sans fil en option b/g compatible Client USB (Version 1.1) USB Hôte (Version 1.1) Collecteur Matériau du boîtier Poids sans batterie Supports A3432, système de collecteur 32 ports (disponible sur des unités 1 CFM uniquement) Acier inoxydable 3413 et ,55 kg 3423 et ,33 kg ,65 kg Taille (l x P x H) Environnement, fonctionnement Environnement, stockage 31,8 x 25,4 x 20,3 cm (12,5 x 10 x 8 pouces) 0 à 40 C (32 à 104 F) ; 10 à 90 % d'humidité relative sans condensation 40 à 50 C ( 40 à 122 F) ; 0 à 98 % d'humidité relative sans condensation Spécifications de mesure de l'échantillon Échantillonnage Nombre de gammes de taille Gammes de taille des particules et canaux standards Débit Standard 6, 8 Modèles 3413 et ,3, 0,5, 1,0, 3,0, 5,0, 10,0 µm Modèles 3415 et ,5, 1,0, 2,0, 3,0, 5,0 et 10,0 ou 25,0 µm Modèles ,5, 1,0, 2,0, 3,0, 5,0, 10,0 µm Modèles 3413 et ,3 l/min (1,00 cfm) ± 5 % (réglage d'usine par défaut) Modèles 3423 et l/min (1,77 cfm) ± 5 % (réglage d'usine par défaut) Modèles l/min (3,53 cfm) ± 5% (réglage d'usine par défaut) Comptage à zéro Conforme à JIS B comptage ou moins en 5 minutes, niveau de fiabilité à 95% Erreur de coïncidences Modèles 3413 et % à particules/m 3 ( particules/ft 3 ) Modèles 3423 et % à particules/m 3 ( particules/ft 3 ) Modèle % à particules/m3 ( particules/ft 3 ) Efficacité du comptage Modèles 3413 et % ± 20 % pour 0,3 µm, (100 % ± 10 % à 1,5 fois la sensibilité minimum). Totalement conforme à la norme ISO Modèles 3415 et % ± 20 % pour 0,5 µm, (100 % ± 10 % à 1,5 fois la sensibilité minimum). Totalement conforme à la norme ISO Français
 ; 0 à 98 % d'humidité relative sans condensation Spécifications de mesure de l'échantillon Échantillonnage Nombre de gammes de taille Gammes de taille des")
21 Spécification des batteries Caractéristique Type de batterie Quantité incluse Durée de vie de la batterie en fonctionnement Détails Batterie intelligente au lithium-ion : peut être chargée, éjectée et remplacée sans interrompre le système. Une (le 3445 est fourni avec deux batteries) Modèles 3413 et heures Modèles 3423 et heures Modèle ,5 heures Temps de recharge de la batterie Alimentation Poids de la batterie 6,75 heures minimum, 10 heures maximum 14,4 V cc, 6,6 Ah (2x) 0,66 kg (1,45 lb) Généralités En aucun cas le constructeur ne saurait être responsable des dommages directs, indirects, spéciaux, accessoires ou consécutifs résultant d'un défaut ou d'une omission dans ce manuel. Le constructeur se réserve le droit d'apporter des modifications à ce manuel et aux produits décrits à tout moment, sans avertissement ni obligation. Les éditions révisées se trouvent sur le site Internet du fabricant. Version enrichie de ce manuel Pour en savoir plus, consultez la version complète de ce manuel, disponible en ligne. Consignes de sécurité A V I S Le fabricant décline toute responsabilité quant aux dégâts liés à une application ou un usage inappropriés de ce produit, y compris, sans toutefois s'y limiter, des dommages directs ou indirects, ainsi que des dommages consécutifs, et rejette toute responsabilité quant à ces dommages dans la mesure où la loi applicable le permet. L'utilisateur est seul responsable de la vérification des risques d'application critiques et de la mise en place de mécanismes de protection des processus en cas de défaillance de l'équipement. Veuillez lire l'ensemble du manuel avant le déballage, la configuration ou la mise en fonctionnement de cet appareil. Respectez toutes les déclarations de prudence et d'attention. Le non-respect de cette procédure peut conduire à des blessures graves de l'opérateur ou à des dégâts sur le matériel. Assurez-vous que la protection fournie avec cet appareil n'est pas défaillante. N'utilisez ni n'installez cet appareil d'une façon différente de celle décrite dans ce manuel. Interprétation des indications de risques D A N G E R Indique une situation de danger potentiel ou imminent qui, si elle n'est pas évitée, entraîne des blessures graves, voire mortelles. A V E R T I S S E M E N T Indique une situation de danger potentiel ou imminent qui, si elle n'est pas évitée, peut entraîner des blessures graves, voire mortelles. A T T E N T I O N Indique une situation de danger potentiel qui peut entraîner des blessures mineures ou légères. Français 21
22 A V I S Indique une situation qui, si elle n'est pas évitée, peut occasionner l'endommagement du matériel. Informations nécessitant une attention particulière. Étiquettes de mise en garde Lisez toutes les informations et toutes les étiquettes apposées sur l appareil. Des personnes peuvent se blesser et le matériel peut être endommagé si ces instructions ne sont pas respectées. Un symbole sur l'appareil est désigné dans le manuel avec une instruction de mise en garde. Si l'appareil comporte ce symbole, reportez-vous au manuel d'utilisation pour consulter les informations de fonctionnement et de sécurité. S'il se trouve sur l emballage d'un produit ou une barrière, ce symbole indique la présence d un danger de choc électrique et/ou d électrocution. Les composants électroniques internes de l'appareil peuvent être endommagés par l'électricité statique, qui risque d'altérer ses performances et son fonctionnement. Ce symbole indique qu'un dispositif laser est utilisé dans l'équipement. Ce symbole indique l emplacement d un fusible ou de tout dispositif de protection contre les surintensités de courant. En Europe, depuis le 12 août 2005, les appareils électriques comportant ce symbole ne doivent pas être jetés avec les autres déchets. Conformément à la réglementation nationale et européenne (Directive 2002/96/CE), les appareils électriques doivent désormais être, à la fin de leur service, renvoyés par les utilisateurs au fabricant, qui se chargera de les éliminer à ses frais. Remarque : Pour le retour à des fins de recyclage, veuillez contactez le fabricant ou le fournisseur d'équipement afin d'obtenir les instructions sur la façon de renvoyer l'équipement usé, les accessoires électriques fournis par le fabricant, et tous les articles auxiliaires pour une mise au rebut appropriée. Conformité Ce symbole indique que l'appareil est un produit LASER de classe 1. Ce produit est conforme aux normes IEC/EN :2007 et 21 CFR , à l'exception des différences faisant suite à la notice Laser n 50 datée du 24 juin Numéro d'accession FDA : Ce produit est également certifié conforme CE. Contactez le fabricant pour avoir tous les détails sur la conformité. Agrément spécifique par pays pour les dispositifs Wi-Fi A T T E N T I O N Risque lié au rayonnement électromagnétique. Assurez-vous que l'antenne se trouve à une distance minimum de 20 cm (7,9 pouces) de l'ensemble du personnel dans des conditions d'utilisation dites normales. L'antenne ne peut pas être colocalisée ou utilisée en combinaison avec une autre antenne ou d'autres transmetteurs. 22 Français
23 Les produits avec l'option sans fil contiennent un dispositif Wi-Fi modulaire RF fonctionnant dans une gamme de 2,4 GHz. Etats-Unis FCC ID : R68WIPORTG Canada IC ID : 3867A-WIPORT Pays Code à lettres ISO Pays Code à lettres ISO Autriche AT Pologne PL Belgique BA Portugal PT Danemark DK Espagne ES Finlande FI Suède SE France FR Royaume Uni GB Allemagne DE Islande IS Grèce GR Norvège NO Hongrie HU Suisse CH Irlande IE Turquie TR Italie IT Pays-Bas NL Mexique MX Agréments des dispositifs de contrôle RF FCC : Approuvé comme dispositif modulaire l'accord de droit TCB. FCC ID : R68WIPORTG IC: Approuvé comme dispositif modulaire sous le Certificat D'Acceptabilité' TechniqueC-REL ID: 3867A-WIPORT Opinion : Conforme à la directive R&TTE 1999/5/EC sur les exigences essentielles de l' Article 3.2 conformément aux procédures de l' Article 10(5) et Annexe IV for (class-2 équipement) et indiqué comme CE1177. Certification Le produit répond aux exigences de la section 15 de la réglementation FCC et aux normes RSS d'industrie Canada. Le fonctionnement est soumis aux conditions suivantes : 1. Cet équipement ne peut pas causer d'interférence nuisible. 2. Cet équipement doit accepter toutes les interférences reçues, y compris celles qui pourraient entraîner un fonctionnement inattendu. Les modifications de cet équipement de communication sans fil qui n ont pas été expressément approuvées par le responsable de la conformité aux limites pourraient annuler l autorité dont l utilisateur dispose pour utiliser cet équipement. Tout changement apporté à l'équipement annulera la certification d'industrie Canada et l'autorisation FCC. Informations générales sur le produit Ce manuel décrit l'utilisation des Compteurs de particules MET ONE Série Le Compteur de particules MET ONE Série 3400 compte et mesure la dimension des particules en suspension dans les environnements de salle blanche. Voir Tableau 1. Français 23
FCC Information : Warning: RF warning statement:
 FCC Information : This device complies with Part 15 of the FCC Rules. Operation is subject to the following two conditions: (1) This device may not cause harmful interference, and (2) This device must
IMPORTANT SAFETY INSTRUCTIONS WARNING CAUTION! WARNING ENGLISH ENGLISH
 FORMAT ENGLISH IMPORTANT SAFETY INSTRUCTIONS For indoor use only. Regularly check the cord, the transformer and all other parts for damage. If any part is damaged the product should not be used. Important
MET ONE 3400: 3413, 3415, 3423, 3425, 3445
 DOC026.97.80202 MET ONE 3400: 3413, 3415, 3423, 3425, 3445 05/2011, Edition 1, Firmware version 4.05.16 Basic User Manual Manuel d'utilisation de base Manual básico del usuario Manual Básico do Usuário
Quick Installation Guide TU2-DVIV H/W: V1.0R
 Quick Installation Guide TU2-DVIV H/W: V1.0R Table Table of Contents of Contents Español... 1. Antes de iniciar... 2. Cómo se instala... 1 1 3 Troubleshooting... 6 Version 06.27.2008 1. Antes de iniciar
ENKVM-USBB. 2-Port USB KVM switch with Easy Switch and Cable. User Guide
 ENKVM-USBB 2-Port USB KVM switch with Easy Switch and Cable User Guide i Package Contents 1 ENKVM-USBB 2-Port USB KVM Switch with Easy Switch and Cable 1 User Guide Requirements Console A VGA, SVGA, XGA,
Quick Start Guide USB 3.0 Multi-Card Reader / Writer
 Quick Start Guide USB 3.0 Multi-Card Reader / Writer Guide de démarrage rapide Lecteur de cartes multiples USB 3.0 Guía de configuración rápide USB 3.0 Varias Tarjetas lector / Escritor GFR309 PART NO.
Quick start guide. www.hd.philips.com
 For product support, visit Para obtener asistencia técnica, visite Pour en savoir plus sur l assistance sur les produits, visitez le site www.hd.philips.com HTL5110 Quick start guide EN For Product recycling
1-800-295-5510 uline.com TECHNICAL DATA MODEL H-2051. Alkaline MN21 12V. (1 Second) Button Life Approx. 100,000 Push Button Presses 0.125 lbs. (2 oz.
 Button Life Approx. 100,000 Push Button Presses 0.125 lbs. (2 oz.") π H-2051 TAKE-A-NUMBER SYSTEM WIRELESS REMOTE uline.com Para Español, vea páginas 3-4. Pour le français, consulter les pages 5-6. TECHNICAL DATA MODEL H-2051 Frequency RF Power Output 433.92 MHz (+/ Max.
π H-2051 TAKE-A-NUMBER SYSTEM WIRELESS REMOTE uline.com Para Español, vea páginas 3-4. Pour le français, consulter les pages 5-6. TECHNICAL DATA MODEL H-2051 Frequency RF Power Output 433.92 MHz (+/ Max.
Battery Backup and LED Flashlight for iphone, ipod and other USB Mobile Devices USER MANUAL
 Battery Backup and LED Flashlight for iphone, ipod and other USB Mobile Devices USER MANUAL IN 5V OUT 5V Input How To Charge Attach a USB cable to the "OUT 5V" port on the power bank and the other end
Guía del usuario. Funda con batería CP12
 Guía del usuario Funda con batería CP12 Contenido Introducción...3 La carga más sencilla...3 Especificaciones...3 Uso de la funda con batería...4 Carga del teléfono...4 Información legal...6 2 Introducción
Xperia TX TV Dock DK22 Xperia T TV Dock DK23
 Guía del usuario Xperia TX TV Dock DK22 Xperia T TV Dock DK23 Contenido Introducción...3 Descripción general de TV Dock...3 Primeros pasos...4 Conexión inteligente...4 Actualización de Conexión inteligente...4
microsoft.com/hardware/support
 2015 Microsoft microsoft.com/hardware/support X20-43694-01 Back Cover Front Cover K65 Set up Note: You can wirelessly connect Wi-Fi CERTIFIED Miracast enabled devices to a TV or monitor (available HDMI
Guía del usuario. Xperia P TV Dock DK21
 Guía del usuario Xperia P TV Dock DK21 Contenido Introducción...3 Descripción general de la parte posterior de TV Dock...3 Primeros pasos...4 Gestor de LiveWare...4 Actualización de Gestor de LiveWare...4
Software TRENDnetVIEW Pro. Guía de instalación rápida de TRENDnetVIEW Pro (1)
") Software TRENDnetVIEW Pro Guía de instalación rápida de TRENDnetVIEW Pro (1) TRENDnetVIEW Pro/10.08.2013 Índice Requisitos del software de gestión TRENDnetVIEW Pro... 19 Instalación de TRENDnetVIEW Pro...
Software TRENDnetVIEW Pro Guía de instalación rápida de TRENDnetVIEW Pro (1) TRENDnetVIEW Pro/10.08.2013 Índice Requisitos del software de gestión TRENDnetVIEW Pro... 19 Instalación de TRENDnetVIEW Pro...
GARAGE DOOR OPENER CONNECTIVITY HUB QUICK START GUIDE
 GARAGE DOOR OPENER CONNECTIVITY HUB QUICK START GUIDE Thank you for purchasing a Craftsman garage door opener Connectivity Hub enabled with AssureLink technology. Once you have created your account and
EP-2906 Manual de instalación
 EP-2906 Manual de instalación Con el botón situado a la izquierda se configura en el modo de cliente y de la derecha es el modo de Punto de acceso AP (nota: El USB es sólo para la función de fuente de
Bluetooth Keyboard And Stand Combo For ipad
 Model: 50915 Bluetooth Keyboard And Stand Combo For ipad User s Manual Please read this User Manual carefully before you start to use the keyboard. 1. Package contents: 78 keys Bluetooth keyboard 1 pcs
300 BPS WiFI N 2.0 USB ADAPter. User's guide. Manuel d'utilisation Guia del usario
 300 BPS WiFI N 2.0 USB ADAPter User's guide Manuel d'utilisation Guia del usario WIRELESS N USB ADAPTER MODEL # WUB-1900R Quick Install Guide 2. INSTALLATION: This section provides instructions on how
Rev. A 2012 Pentair Technical Products PH hoffmanonline.com P/N
 Rev. A 2012 Pentair Technical Products PH 763 422 2211 hoffmanonline.com P/N 89089280 89089380 To avoid electric shock and equipment damage, disconnect any power supplies to the enclosure before installing
Video Server. Quick Installation Guide. English, Español
 Video Server Quick Installation Guide English, Español 2 Video Server NOTES Quick Installation Guide 3 Video Server Quick Installation Guide To get your Video Server up and running on an Ethernet network,
LED Strobe Panel - Manual
 PAG. 2 LED Strobe Panel - Manual SPECIFICATION Voltage: Power consumption: LED: Color temperature: Operation mode: Weight: Size: 3 00VAC 20VAC 05W (Max) 448* SMD5050 white LED 900K LED display 3.KGS *2.35*9.
Start. Démarrer. Iniciar.
 Zune CABLE Pack câble de synchronisation Zune cable de sincronizacíon Zune Start. Démarrer. Iniciar. To sync and charge, connect the sync cable to your Zune and your PC. Just need to charge? Connect your
 DISTRIBUIDORES FI IF SPLITTERS REPARTITEURS BIS SERIE 906 SERIES CÓDIGO-CODE-CODE MODELO-MODEL-MODELE Conector Connector Connecteur Salidas Outputs Sorties Rango de frecuencia Frequency range Gamme de
HD Media Tower / Tour Hi-Fi / Medios de Torre
 English This page lists the contents included in the box. Please take time to identify the hardware as well as the individual components of the product. s you unpack and prepare for assembly, place the
CESVA USB DRIVER. M_CUD_v0001_20130226_ESP_ENG
 CESVA USB DRIVER M_CUD_v0001_20130226_ESP_ENG CESVA USB DRIVER ESPAÑOL CONTENIDO 1. Instalación del CESVA USB Driver... 2 2. Conocer el puerto COM asignado para la comunicación con el PC... 2 2.1. Windows
Quick Installation Guide TU-S9
 Quick Installation Guide TU-S9 Table of of Contents Contents Español... 1 1. Antes de iniciar... 1 2. Instalación del Hardware... 2 Troubleshooting... 5 Version 11.08.2007 1. Antes de iniciar Contenidos
SFD-200-N-B DESPERTADOR-PROYECTOR-CON VOZ. Manual de instrucciones
 SFD-200-N-B DESPERTADOR-PROYECTOR-CON VOZ Manual de instrucciones Funciones: - Proyección de la hora - Proyección controlada por sonidos y vibraciones (palmada, etc.) - Pantalla retroiluminada azul - Hora
Manual de Instrucciones
 BSPORT-10-N-R-V-A PULSERA DEPORTIVA-BLUETOOTH Manual de Instrucciones FUNCIONES Y CONTROLES Pulsar el botón de encendido durante 3 segundos para encender el dispositivo. BATERÍA El dispositivo cuenta con
Danger Peligro Danger
 Busbar adapter Adaptador de barra colectora Adaptateur de jeu de barres Item: 8US113-4AQ01 8US113-4AQ03 8US113-4AH00 For Use With CG (VL,,,, Para Usar Con CG (VL,,,, Installation Instructions / Instructivo
MANUAL EASYCHAIR. A) Ingresar su nombre de usuario y password, si ya tiene una cuenta registrada Ó
 Ingresar su nombre de usuario y password, si ya tiene una cuenta registrada Ó") MANUAL EASYCHAIR La URL para enviar su propuesta a la convocatoria es: https://easychair.org/conferences/?conf=genconciencia2015 Donde aparece la siguiente pantalla: Se encuentran dos opciones: A) Ingresar
MANUAL EASYCHAIR La URL para enviar su propuesta a la convocatoria es: https://easychair.org/conferences/?conf=genconciencia2015 Donde aparece la siguiente pantalla: Se encuentran dos opciones: A) Ingresar
Roomba 900. Quick Start Guide Guide de Démarrage Rapide Guía de Inicio Rápido
 Roomba 900 Quick Start Guide Guide de Démarrage Rapide Guía de Inicio Rápido To get started, you will need the robot, Home Base, line cord and your smart device. For a full list of box contents refer
Rev. A 2011 Pentair Technical Products PH hoffmanonline.com P/N
 Rev. A 2011 Pentair Technical Products PH 763 422 2211 hoffmanonline.com P/N 89076659 89076658 WARNING AVERTISSEMENT PRECAUCION To avoid electric shock and equipment damage, disconnect any power supplies
ENGLISH FRANÇAIS ESPAÑOL
 ENGLISH FRANÇAIS ESPAÑOL 4 5 6 ENGLISH 4 Designation of use: Maximum static pressure: Minimum working pressure: Maximum working pressure Recommended working pressure (hot & cold): Max hot water temperature:
Quick Installation Guide Internet Setup
 CBR-970 Wireless-N Broadband Router www.cnet.com.tw Established in California, U.S.A. since 1987 Quick Installation Guide Internet Setup What s included in the box CBR-970 Wireless N Broadband Router Quick
Creating your Single Sign-On Account for the PowerSchool Parent Portal
 Creating your Single Sign-On Account for the PowerSchool Parent Portal Welcome to the Parent Single Sign-On. What does that mean? Parent Single Sign-On offers a number of benefits, including access to
Save Money 2-up Single Doorhanger Set OH payday advance edition, 4 different doorhangers, Spanish
 Save Money 2-up Single Doorhanger Set OH payday advance edition, 4 different doorhangers, Spanish PACKAGE CONTENTS How to Customize 4-color doorhanger, Editable PDF (50% OFF first loan) 1-color (black)
Extension Cords Extensiones Eléctricas We light your world
 We light your world 07.14.1 Household Domésticas 3 outlet indoor cords allow use of up to three items in one small place. This provides flexibility, while allowing multiple devices to be use without the
Table of Contents. Español... 1. Antes de iniciar... 2. Cómo conectar... 3. Cómo utilizar el conmutador... Troubleshooting... Version 10.13.
 Quick Installation Guide TE100-S800i TE100-S810Fi Table of Contents Español... 1. Antes de iniciar... 2. Cómo conectar... 3. Cómo utilizar el conmutador... Troubleshooting... 1 1 2 3 5 Version 10.13.05
Guía de inicio rápido de ASUS Transformer Pad
 S7210 Guía de inicio rápido de ASUS Transformer Pad Administrador de conexión 3G TF300TG Instalar la tarjeta SIM 1. Utilice un clip de papel enderezado para presionar el botón de expulsión de la bandeja
Sistemas de impresión y tamaños mínimos Printing Systems and minimum sizes
 Sistemas de impresión y tamaños mínimos Printing Systems and minimum sizes Para la reproducción del Logotipo, deberán seguirse los lineamientos que se presentan a continuación y que servirán como guía
BAI-220 AURICULAR INALÁMBRICO
 BAI-220 AURICULAR INALÁMBRICO Manual de usuario ESPECIFICACIONES TÉCNICAS EMISOR Frecuencia: 86 ± 0.5 MHz Modulación: FM Distancia de emisión: 30 m. Recepción de cualquier equipo de audio y video con salida
FUSIBLES CILÍNDRICOS MT PARA APLICACIONES DE ALUMBRADO MV CYLINDRICAL FUSE-LINKS FOR LIGHTING PURPOSES
 FUSIBLES CILÍNDRICOS MT PARA APLICACIONES DE ALUMBRADO MV CYLINDRICAL FUSE-LINKS FOR LIGHTING PURPOSES DF, S.A C/. Silici, 67-69 08940 CORNELLA DEL LLOBREGAT BARCELONA (SPAIN) www.df-sa.es Telf.: +34-93
A I RTRONIC. Manual de usuario User Manual.
 A I RTRONIC Manual de usuario User Manual AIRTRONIC Partes que incluye Parts inlcuded 1 Goldeneye Airtonic Unit 1 Power supply Input: 100-240 V ~ 50-60 Hz Output: 12 VDC, max. 1000 ma 12 W max. 1 Dermograph
USB 2.0 SERVIDOR ETHERNET DE IMPRESORA
 USB 2.0 SERVIDOR ETHERNET DE IMPRESORA DN-13014-3 DN-13003-1 Guía de Instalación Rápida DN-13014-3 Y DN-13003-1 Antes de empezar, debería preparar los siguientes elementos: Ordenador Windows 2000/XP/2003/Vista/7
INFORMACIÓN TÉCNICA SEMAFOROS TIPO LED
 INFORMACIÓN TÉCNICA SEMAFOROS TIPO LED UPSISTEL DEL CAFE es una empresa que fabrica, importa y comercializa equipos electrónicos en las áreas de ENERGIA, SISTEMAS, TELECOMUNICACIONES, PUBLICIDAD EQUIPOS
24-Port 10/100Mbps Web Smart PoE Switch with 4 Gigabit Ports and 2 Mini-GBIC Slots TPE-224WS
 24-Port 10/100Mbps Web Smart PoE Switch with 4 Gigabit Ports and 2 Mini-GBIC Slots TPE-224WS ŸGuía de instalación rápida (1) ŸTroubleshooting (3) 1.12 1. Antes de iniciar Contenidos del Paquete ŸTPE-224WS
INSTALLATION INSTRUCTIONS SLM14 SLM22 SLM24 SLM- LED SLIM PANEL
 INSTALLATION INSTRUCTIONS SLM14 SLM22 SLM24 SLM- LED SLIM PANEL SAFETY PRECAUTION: IMPORTANT: READ INSTUCTIONS CAREFULLY BEFORE INSTALLING. KEEP THESE INSTRUCTIONS FOR FUTURE REFERENCE. Fixtures must be
Declaración de conformidad
 Declaración de conformidad Declaración de conformidad con las normas de la UE La declaración de conformidad puede consultarse en www.kobo.com/userguides Este dispositivo puede funcionar en: El funcionamiento
FUSIBLES CILINDRICOS INDUSTRIALES am INDUSTRIAL CYLINDRICAL am FUSE-LINKS
 FICHA TÉCNICA / TECHNICAL DATA SHEET am DF, S.A C/. Silici, 67-69 08940 CORNELLA DEL LLOBREGAT BARCELONA (SPAIN) www.df-sa.es Telf.: +34 93 377 85 85 Fax: +34 93 377 8 8 ISO9001 DESCRIPCIÓN DEL PRODUCTO
Rev. E 2018 Pentair Equipment Protection PH pentairprotect.com P/N
 Rev. E 2018 Pentair Equipment Protection PH 763 422 2211 pentairprotect.com P/N 89106729 89106274 To avoid electric shock and equipment damage, disconnect any power supplies to the enclosure before installing
Agustiniano Ciudad Salitre School Computer Science Support Guide - 2015 Second grade First term
 Agustiniano Ciudad Salitre School Computer Science Support Guide - 2015 Second grade First term UNIDAD TEMATICA: INTERFAZ DE WINDOWS LOGRO: Reconoce la interfaz de Windows para ubicar y acceder a los programas,
Cher client, Toute l équipe COMMENCAL vous remercie d avoir effectué votre commande.
 Cher client, Toute l équipe COMMENCAL vous remercie d avoir effectué votre commande. Vous avez fait le choix du paiement par virement bancaire. Afin de réaliser ce dernier, merci de bien vouloir respecter
Quick Installation Guide TEW-624UB H/W:B1.1R
 Quick Installation Guide TEW-624UB H/W:B1.1R Table of of Contents Contents Español... 1. Antes de iniciar... 2. Cómo se instala... 3. Configuración inalámbrica... Troubleshooting... 1 1 2 3 5 Version 02.29.2008
 Instalación rápida Antes de proceder con la instalación, es importante que sepa: Una instalación completa incluye "Drivers" y "Programa", ambos elementos se pueden instalar fácilmente desde el CD del software.
 ACCESORIOS ACCESSORIES ACCESSOIRES 9730066 HERRAMIENTA PARA VERIFICACIÓN DE TELECÁMARA-MONITOR Equipo que, en instalaciones de videoportero con cable coaxial, permite verificar en la propia instalación
Portal para Padres CPS - Parent Portal. Walter L. Newberry Math & Science Academy Linda Foley-Acevedo, Principal Ed Collins, Asst.
 Portal para Padres CPS - Parent Portal Walter L. Newberry Math & Science Academy Linda Foley-Acevedo, Principal Ed Collins, Asst. Principal (773) 534-8000 Formando su cuenta - Setting up your account Oprima
RGM-300 User s Manual Manuel de l'utilisateur Manual del usuario
 Wired Optical Gaming Mouse Souris de jeu optique câblée Ratón óptico cableado para juegos User s Manual Manuel de l'utilisateur Manual del usuario Gaming Mouse User manual English Thank you for purchasing
FlexCage. User Manual MB975SP-B. 5 HDD Slots in 3 Device Bay. Tray-Less SATA Backplane Module
 FlexCage MB975SP-B 5 HDD Slots in 3 Device Bay Tray-Less SATA Backplane Module User Manual English Package Contents Front Panel Information HDD3 POWER BUTTON POWER / ACCESS LED INDICATOR HDD2 POWER BUTTON
Guía Rápida de Instalación
 Guía Rápida de Instalación TL-WPS510U Servidor de Impresión Inalámbrico Tamaño Bolsill Rev:1.0.0 7106500631 1. Antes de comenzar, debe preparar los siguientes elementos: Ordenador Windows 2000/XP/2003/Vista
The ADE Direct Certification User Guide is a tool for authorized ADE and school district personnel to use in conjunction with the ADE Direct
 The ADE Direct Certification User Guide is a tool for authorized ADE and school district personnel to use in conjunction with the ADE Direct Certification website. 1 This User Guide is a reference guide
Clapboard. Not included Non Inclus No Incuido
 English This page lists the contents included in the box. Please take time to identify the hardware as well as the individual components of the product. As you unpack and prepare for assembly, place the
Product Specifications
 Reset English Dell Managed Rack Power Distribution Unit (PDU) G756N Product Specifications English Français Español 1 2 3 Product Specifications The Dell Managed Rack PDU distributes power to the devices
Quick Installation Guide TV-IP301 TV-IP301W
 Quick Installation Guide TV-IP301 TV-IP301W Table of of Contents Contents Español... 1. Antes de iniciar... 2. Instalación del Hardware... 3. Configuración de la cámara Internet... Troubleshooting... 1
ENGLISH FRANÇAIS ESPAÑOL
 STORJORM ENGLISH The assembly should be carried out by a qualified person due to the fact that wrong assembly can lead to that the furniture/object topples or falls resulting in personal injury or damage.
IntesisBox MD-AC-xxx-yy AC indoor unit compatibilities
 IntesisBox MD-AC-xxx-yy AC indoor unit compatibilities In this document the compatible Midea Air conditioner indoor units models with the following IntesisBox AC interfaces are described: / En éste documento
JEEP PATRIOT Fog Lamp Kit
 JEEP PATRIOT Fog Lamp Kit 1of11 2of11 3of11 4of11 5of11 2007MY Jeep Patriot 6of11 2007MY Jeep Patriot 7of11 2008MY Jeep Patriot Vehicle VIN must be updated with the sales code of the added accessory in
Sierra Security System
 Using Your SpreadNet Accessories With Your Sierra Security System Uso de Sus Accesorios SpreadNet Con Su Sistema de Seguridad Sierra SN990-KEYPAD SN961-KEYFOB SN991-REMOTE 1 SN990-KEYPAD The SN990-KEYPAD
EUROPEAN DIRECTIVE EC/78/2009
 EUROPEAN DIRECTIVE EC/78/2009 REGULATION EC/78/2009 EC Type Approval Certificate Certificato d omologazione Europea Certifié d homologation Européenne EC Approved Ø 63mm Frontal System Protezione Anteriore
app ADSL2V1 COMMUNICATIONS LINE www.printyourideas.com
 app ADSL2V1 COMMUNICATIONS LINE www.printyourideas.com 1. CONECTAR EL ROUTER Antes de conectar el dispositivo asegúrese de que el servicio de banda ancha (ADSL), suministrado por su proveedor ISP, se encuentra
Quick Installation Guide TV-IP400 TV-IP400W
 Quick Installation Guide TV-IP400 TV-IP400W Table of of Contents Contents Español... 1. Antes de iniciar... 2. Instalación del Hardware... 3. Configuración de la cámara Internet... Troubleshooting... 1
Litio-Solar: Small Solar Home System and Portable Power supply User Manual
 Litio-Solar: Small Solar Home System and Portable Power supply User Manual Litio-Solar is a highly integrated 12V DC Solar Power storage device with plug and play functionality, advanced user interface
Registro de Semilla y Material de Plantación
 Registro de Semilla y Material de Plantación Este registro es para documentar la semilla y material de plantación que usa, y su estatus. Mantenga las facturas y otra documentación pertinente con sus registros.
Presenter SNP6000. Register your product and get support at Manual del usuario
 Register your product and get support at www.philips.com/welcome Presenter SNP6000 ES Manual del usuario 1 a b c d e 2 3 4 Federal Communication Commission Interference Statement This equipment has been
All-in-1 USB 3.0 Card Reader
 All-in-1 USB 3.0 Card Reader User Guide Guide de l'utilisateur Guía del usuario Supported Card Types/Types de cartes prises en charge/ Tipos de tarjeta compatibles CompactFlash, Microdrive, Smart Media,
INSTALLATION INSTRUCTIONS
 Brix Ratio Check Instructions for ColdFusion and Flavor Overload Units INSTALLATION INSTRUCTIONS Brix Ratio Check Instructions For Coldfusion, Flavorfusion and Flavor Overload Units Kit P/N 629096865 SAFETY
IntesisBox PA-RC2-xxx-1 Panasonic compatibilities
 IntesisBox PA-RC2-xxx-1 Panasonic compatibilities In this document the compatible Panasonic models with the following IntesisBox RC2 interfaces are listed: / En éste documento se listan los modelos PANASONIC
Betta Global Systems Sistema de Aduanas
 Betta Global Systems Sistema de Aduanas Configuración M.A.I.N. Versión 7.1 Revisado el 5 de Noviembre del 2004 Manual M.A.I.N. Versión 7.1 Pagina 1 de 25 La información en este documento es proporcionada
Quick Installation Guide TEW-623PI
 Quick Installation Guide TEW-623PI Table of of Contents Contents... 1 1. Antes de iniciar... 1 2. Cómo se instala... 2 3. Cómo usar el adaptador inalámbrico... 5 Troubleshooting... 6 Version 07.21.2006
USER MANUAL. Rechargeable Battery Pack
 USER MANUAL Rechargeable Battery Pack USER MANUAL Rechargeable Battery Pack Input ON 5V 100V 70V 30V IN 5V OUT digital cameras, cell phones, PDAs, and MP3 players digital cameras, cell phones, PDAs, and
PUB. DIM-1012-000. Transfer Utility. Installation Guide. Guide d Installation. Guía de instalación
 PUB. DIM-1012-000 Transfer Utility Installation Guide Guide d Installation Guía de instalación Jp En Fr Es Jp 02 Windows users only: The supplied software offers a convenient way to save your movies to
Puede pagar facturas y gastos periódicos como el alquiler, el gas, la electricidad, el agua y el teléfono y también otros gastos del hogar.
 SPANISH Centrepay Qué es Centrepay? Centrepay es la manera sencilla de pagar sus facturas y gastos. Centrepay es un servicio de pago de facturas voluntario y gratuito para clientes de Centrelink. Utilice
BLACKOUT BUDDY QUICK START GUIDE GUÍA DE INICIO RÁPIDO GUIDE DE DEMARRAGE RAPIDE
 BLACKOUT BUDDY QUICK START GUIDE GUÍA DE INICIO RÁPIDO GUIDE DE DEMARRAGE RAPIDE EN English ES Español FR Français 1 To use as a flashlight, press the power button Para usar como una linterna, presione
SHOCK BLOCKER AMORTIGUADOR DE PULSACIONES JUEGO DE AJUSTE AUTOMÁTICO DEL AIR TAMER
 MANUAL DEL OPERARIO SHOCK BLOCKER AMORTIGUADOR DE PULSACIONES JUEGO DE AJUSTE AUTOMÁTICO DEL AIR TAMER 66700X X LIBERADO/ DECHARGE: 4 9 92 REVISADO/ REVISE: 4 22 96 (REV. D) LEA CUIDADOSAMENTE ESTE MANUAL
PORTABLE KEYBOARD CASE FPO
 PORTABLE KEYBOARD CASE FPO Delivering the best typing experience. Enjoy! Pour une frappe optimale. Profitez-en! Brindándole la mejor experiencia al teclear Disfrute! Product Overview Vue d ensemble du
Guía de instalación rápida TU2-HDMI 1.01
 Guía de instalación rápida TU2-HDMI 1.01 Table of Contents Español 1 1. Antes de iniciar 1 2. Cómo se instala 2 3. Configuración de los parámetros de imagen 4 Troubleshooting 6 Version 02.16.2011 1. Antes
GUÍA DE USUARIO PC-331117. Bienvenidos al mundo Perfect Choice. Antes de comenzar a usar el producto es importante que leas esta guía.
 GUÍA DE USUARIO PC-331117 Bienvenidos al mundo Perfect Choice Antes de comenzar a usar el producto es importante que leas esta guía. Conexión 1. Inserta el transmisor en el conector para encendedor de
MANUAL DE INSTRUCCIONES DATALOGGER MICRATECH ET-175
 MANUAL DE INSTRUCCIONES DATALOGGER MICRATECH ET-175 DCL metrología S.L. Portal de Gamarra 7, Pab.25 01013 Vitoria-Gasteiz comercial@dclmetrologia.es Tel: 945298084 www.instrumentacion-metrologia.es MODELO:
Quick Installation Guide TEW-638APB H/W: V1.0R
 Quick Installation Guide TEW-638APB H/W: V1.0R Table Table of Contents of Contents... 1. Antes de iniciar... 2. Instalación del Hardware... 1 1 2 Troubleshooting... 8 Version 09.10.2008 1. Antes de iniciar
Contenido. Parte I Introduccion. Parte II Catalogos. Parte III Salidas MANUAL MAINX30. ... 3 3 Métodos de entrada. 2 Catálogo de partes
 I Contenido Parte I Introduccion 1 Parte II Catalogos 1 1 Empresas para... 1 facturación 2 Catálogo de partes... 3 3 Métodos de entrada... 7 4 Agentes Aduanales... 9 Parte III Salidas 11 1 Defaults US
2.4 GHz Wireless Mouse Souris sans fil 2,4 GHz Ratón inalámbrico de 2,4 GHz
 2.4 GHz Wireless Mouse Souris sans fil 2,4 GHz Ratón inalámbrico de 2,4 GHz User s Manual Manuel de l'utilisateur Manual del usuario 2.4 GHz Wireless Mouse User manual English Thank you for purchasing
A B C D E F. h WH, additional
 Product data sheet (in accordance with EU regulation no. 811/2013, 812/2013) 1 Brand name Vaillant 2 Models A B C D E F MAG ES 11-4/0 ETe BP MAG ES 11-4/0 ETe H MAG PT 11-4/0 ETe BP MAG PT 11-4/0 ETe H
WARNING AVERTISSEMENT ADVERTENCIA. Selecting Disney characters Sélection des personnages Disney Seleccionando caracteres Disney
 WARNING AVERTISSEMENT ADVERTENCIA The embroidery patterns which are pre-programmed into this sewing machine are for personal, private use only. Any commercial or business use is strictly forbidden by copyright
Base eléctrica USB DisplayKEY. Instrucciones de instalación
 Base eléctrica USB DisplayKEY Instrucciones de instalación i 10102895P1-01, Rev A, ES Índice Introducción 1 Requisitos del Sistema 1 Instalación de Software y Conexión con la Base 1 Modificación de su
Súper Link Adaptador USB 300H con doble antena de 5dBi USB 300H with 5dBi doublé antenna Adapter
 Súper Link Adaptador USB 300H con doble antena de 5dBi USB 300H with 5dBi doublé antenna Adapter Especificaciones comerciales: - Lleva el alcance y velocidad de tu conexión al extremo - Detecta cualquier
KAISSA Manual Rápido De Usuario. Rev 1.0
 KAISSA Manual Rápido De Usuario Rev 1.0 Ante todo gracias por adquirir el innovador reloj de ajedrez KAISSA, diseñado bajo la filosofía del Diseño Para Todos. KAISSA tiene dos modos de funcionamiento principales
Download and install Sengled Element Home app on your mobile device. Connect your IOS or Android device to your 2.4GHz Wi-Fi network.
 EN LED + Smart Control Quick Start Guide Sengled Element Home Download and install Sengled Element Home app on your mobile device. Connect your IOS or Android device to your 2.4GHz Wi-Fi network. Connect
KMR SCA-05 Mounting Instructions Instrucción de Montaje Instruções de Montagem 0899.4897
 0899.4897 KMR SCA-05 Mounting Instructions Instrucción de Montaje Instruções de Montagem 0899.4897 KMR SCA-05 Mounting Instructions Instrucción de Montaje Instruções de Montagem The KMR SCA-05 kit is a
Quick Start Guide. GFR305SD PART NO. Q1240
 Quick Start Guide Compact USB 3.0 SDXC/MicroSDXC Card Reader / Writer Compact USB 3.0 Lecteur de Carte SDXC/MicroSDXC Compact USB 3.0 Lector / Escritor de Tarjetas SDXC/MicroSDXC GFR305SD PART NO. Q1240