UNIDAD ELECTRÓNICA ELECTRONIC MONITOR UNITÉ ÉLECTRONIQUE ELEKTRONIKEINHEIT UNIDADE ELECTRÓNICA IMPIANTO ELETTRONICO ELEKTRONISCHER MONITOR G6473
|
|
|
- José Manuel Miguélez González
- hace 8 años
- Vistas:
Transcripción
1 UNIDAD ELECTRÓNICA ELECTRONIC MONITOR UNITÉ ÉLECTRONIQUE ELEKTRONIKEINHEIT UNIDADE ELECTRÓNICA IMPIANTO ELETTRONICO ELEKTRONISCHER MONITOR G6473

2 Fig.1 Fig.2 Fig.3 Fig.4 2
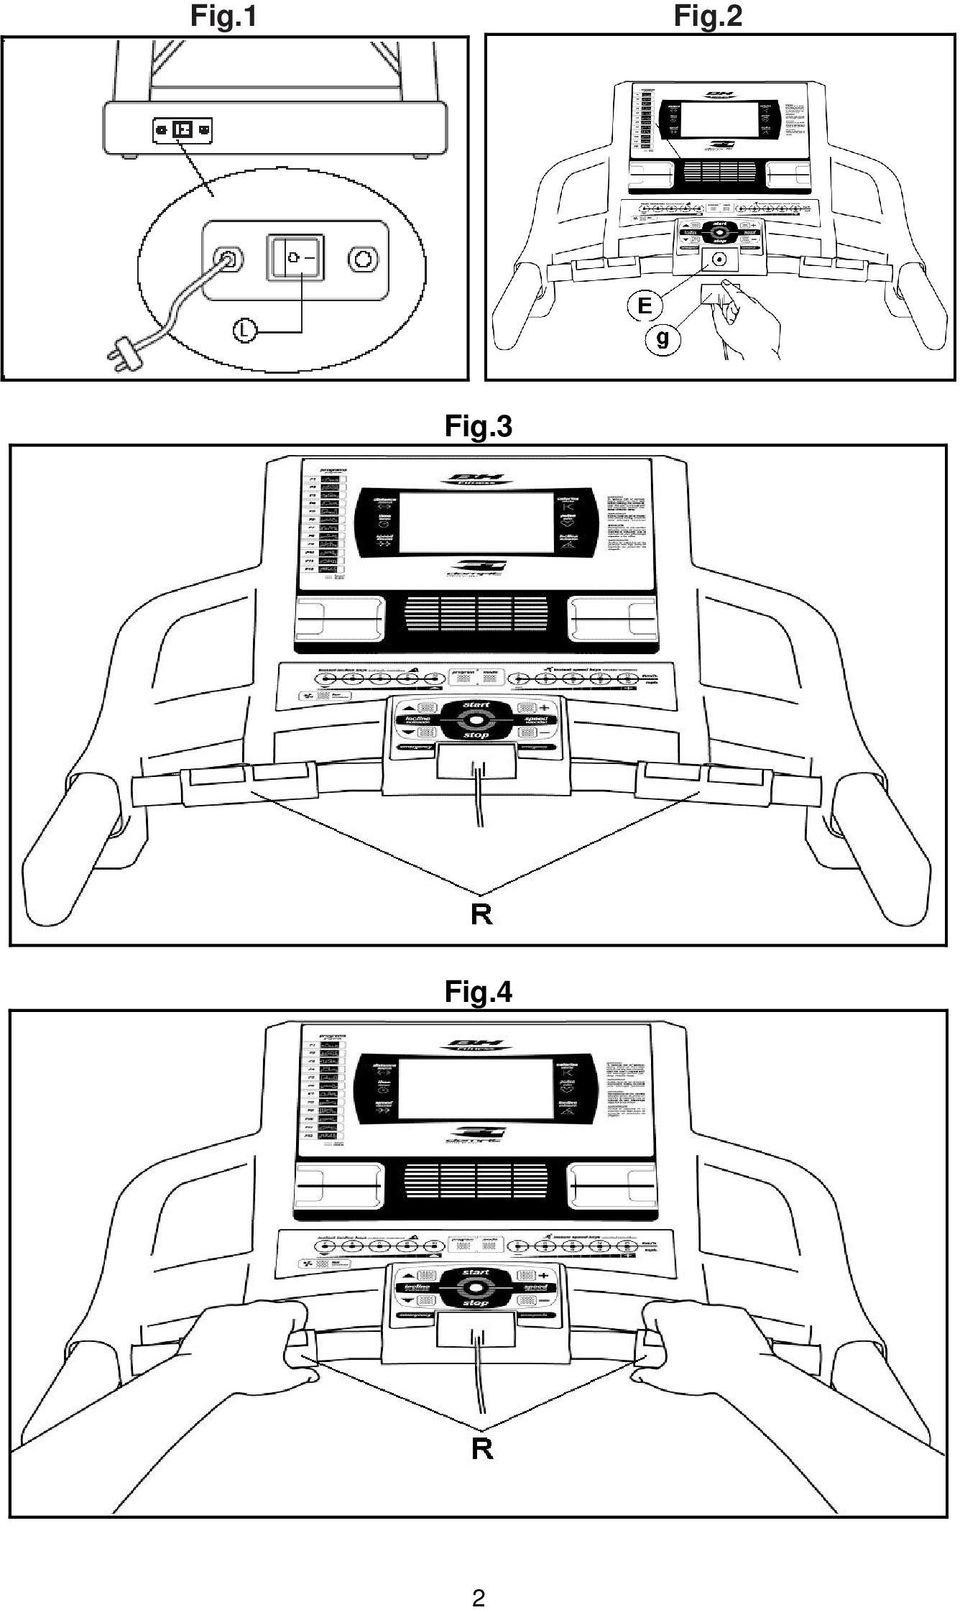
3 Español ELEMENTOS DEL MONITOR.- A: En este display se muestran simultáneamente Inclinación; Tiempo; Programas; Velocidad; Distancia; Pulso y Calorías. B: Pulsadores o teclas de acceso rápido a inclinación ( ). C : Este electrónico (Monitor) dispone de 7 pulsadores o teclas: PROGRAM; MODE; INCLINACIÓN ; START/ STOP; VELOCIDAD Km/h (+ -). D: Ventilador. E: Alojamiento de llave de seguridad. F: Pulsadores o teclas de acceso rápido a la velocidad ( Km/h). g: Llave de seguridad. H: Tecla ECO PUESTA EN MARCHA.- Conecte la unidad a un enchufe provisto de terminal TIERRA ponga el interruptor (L) en posición (1). Fig.1. La llave de seguridad (g) deberá estar colocada en su alojamiento (E) Fig.2. En caso contrario la máquina no se pondrá en marcha. Al colocar la llave de seguridad (g) en su lugar (E), sonará un pitido y todos los displays mostrarán el valor 00:00, lo que significa que la máquina esta en posición de marcha (READY). 3
 en posición (1). Fig.1. La llave de seguridad (g) deberá estar colocada en su alojamiento (E) Fig.2.")
4 CAMBIO DE KILÓMETROS A MILLAS.- La velocidad de esta máquina tiene la opción de mostrársela en Km/h o en Millas. La velocidad de la máquina viene predefinida en Km/h. Para cambiar de Km/h a Millas siga los pasos siguientes: Retire la llave de seguridad. Pulse a la vez las teclas PROGRAM y MODE durante 5 segundos aproximadamente y le aparecerá en la ventana (A) M corresponde a Millas /h y coloque la llave de seguridad (g) en su alojamiento. INSTRUCCIONES DE FUNCIONAMIENTO.- MODO MANUAL. Este monitor dispone del programa (MANUAL). Dentro del programa MANUAL se puede programar el Tiempo de duración del ejercicio entre (5 y 99 Minutos), o la distancia entre (1 y 99,9) o las calorías entre (5 y 999). Pulsando la tecla START/STOP, y la máquina se pondrá en marcha, transcurridos 3 segundos, indicados en forma descendente en el display de tiempo (A), con una velocidad de 1.0 Km/h. Estando en el modo manual usted puede aumentar o disminuir la velocidad pulsando las teclas SPEED (+ -) entre los valores de Km/h. Pulsando la tecla START/STOP o quitando la LLAVE DE SEGURIDAD la máquina se parará. Pulsando la tecla MODE durante más de 5 segundos el tiempo se reseteará a 0. MODO PROGRAMAS.- Este monitor dispone de 15 programas (MANUAL; P01; P02; P03; P04; P05; P06; P07; P08; P09; P10; P11; P12; BODY-FAT, HRC). Dentro de los programas del P01 al P12 se puede programar el Tiempo de duración del ejercicio entre (5 y 99 Minutos). Gráficos de programas del P1 al P12. Ver páginas finales.- Estando la máquina preparada, pulse la tecla PROGRAM y le aparecerá en el display P01, pulsando la tecla PROGRAM accede a los programas del (P1 al P12; BODY-FAT), y le parpadeará el display de TIME (Tiempo). Para programar la duración del tiempo en el programa elegido pulse las teclas SPEED (+ -) (5 99 minutos). El monitor tiene un tiempo predefinido de 30 minutos para la duración del programa. Pulse la tecla START/STOP y la máquina se pondrá en funcionamiento transcurridos 3 segundos, indicados en forma descendente en el display central de acuerdo con los valores que haya introducido. Usted puede variar en cualquier momento del programa, la velocidad, pulsando las teclas SPEED (+ -) y la inclinación, pulsando las teclas INCLINE del monitor. FUNCIÓN ECO.- Pulse este botón en modo programas o modo manual para entrar en modo económico. La máquina cambiará la inclinación y la configuración para disminuir el consumo eléctrico y en la ventana de tiempo se alternará el tiempo con la palabra ECO. Pulse de nuevo el botón ECO para salir de esta función. 4
.")
5 PROGRAMA DE GRASA CORPORAL.- BODY-FAT. El programa (01 F BODY-FAT) esta diseñado para calcular el porcentaje de grasa corporal del usuario. Pulse la tecla Programa (01 F BODY- FAT), seguido pulse la tecla MODE y pulsando las teclas seleccione el Sexo (Hombre 01 Mujer 02), pulse MODE para confirmar, seleccione con las teclas su Edad (AGE años) pulse MODE para confirmar, seleccione con las teclas su Peso (WEIGHT Kg), pulse MODE para confirmar, seleccione con las teclas la Altura (HEIGHT cm), pulse MODE para confirmar. Coloque las manos sobre los sensores (R) de pulso (hand-grip) como muestra la Fig.4 y al cabo de unos segundos le dará el resultado en el display el valor. FAT. (Body fat). La función de grasa corporal tiene como fin ayudarle a evaluar el valor de su grasa corporal. TABLA DE REF.: PORCENTAJE GRASA CORPORAL % (BODY FAT) SEXO / BAJO BAJO / MEDIO ALTO GRASA% MEDIO HOMBRE <13% 13%- 26%- >30% 25,8% MUJER <23% 23%- 35,8% 30% 36%- 40% >40% TABLA DE REF.: TIPOS DE CUERPO / BODY TIPE: Hay 9 tipos de cuerpo divididos según el porcentaje de grasa calculado. TIPO 1 TIPO 2 TIPO 3 TIPO 4 (5%-9%) Varón muy deportista (10%-14%) Varón deportista ideal (15%-19%) Muy esbelto (20%-24%) Deportista TIPO 5 TIPO 6 TIPO 7 TIPO 8 TIPO 9 (25%-29%) Salud ideal (30%-34%) Esbelto (35%-39%) Demasiado obeso (40%-44%) Obeso (45%-50%) Ultra obeso En la pantalla principal le dará el tipo de perfi l para su tipo de cuerpo. Posicione bien las manos sobre los sensores de pulso (R) de la Fig.4. PARADA DE EMERGENCIA.- Para dar máxima seguridad al usuario, esta unidad dispone de una llave de seguridad (g) y de un botón de START/STOP. La llave de seguridad (g) deberá estar colocada en su alojamiento (E), ver Fig.2. En caso contrario, la máquina no se pondrá en marcha. Cuando haga uso de la máquina, fije la llave de seguridad a la ropa mediante el clip. Con un tirón, la llave de seguridad saldrá de su alojamiento y la máquina se parará de forma instantánea. Para ponerla de nuevo en marcha, vuelva a colocar la llave en su alojamiento. Quite la llave de seguridad (g) si esta no va a ser usada y guárdela fuera del alcance de los niños. Pulsando el botón rojo de START/STOP la unidad se parará inmediatamente. Para ponerla de nuevo en marcha pulsar el botón START/STOP. INCLINACIÓN.- La inclinación es una función independiente a todas las funciones. Cada vez que ponga el interruptor general (L) en la posición I, como se indica en la puesta en marcha, Fig.1. En el display de inclinación aparecerá el valor de inclinación que usted ha dejado. 5
 de pulso (hand-grip) como muestra la Fig.4 y al cabo de unos segundos le dará el resultado en el display el valor. FAT. (Body fat).")
6 Para bajar la inclinación a cero con la unidad parada pulse la tecla START/STOP durante cinco segundos. Si la inclinación no está a cero cuando comienza el ejercicio con la tecla START/STOP, ésta irá a cero mientras la máquina se pone en funcionamiento. Pulsando los botones INCLINE o INCLINE, usted podrá ajustar la inclinación de su unidad desde el nivel 0 hasta el nivel 15 según a la inclinación a la que desee hacer el ejercicio. Importante. No cambie la inclinación de su cinta de correr poniendo objetos debajo de la banda. IMPORTANTE: LA INCLINACIÓN DEBE ESTAR EN SU NIVEL MAS BAJO ANTES DE PONER LA MÁQUINA DE ANDAR EN SU POSICIÓN DE PLEGADO. MEDICIÓN DEL PULSO.- El pulso se mide mediante la colocación de ambas manos en los sensores de pulso (R) que están en la unidad electrónica. La medida de pulso aparece después de unos segundos. El símbolo del corazón al lado de la cifra de pulso parpadea al ritmo de su pulso, Fig.4. IMPORTANTE. Este no es un aparato médico y por tanto la información del ritmo cardiaco es orientativa. BH SE RESERVA EL DERECHO A MODIFICAR LAS ESPECIFICACIO- NES DE SUS PRODUCTOS SIN PREVIO AVISO. 6

7 LOCALIZACIÓN DE FALLOS O AVERIAS SÍNTOMAS COMPROBACIONES SOLUCIONES 1. No se enciende el monitor. 2. Se enciende el monitor y no funciona el motor. 3. Tirones al andar encima de la banda. 4. La máqunia se para (salta el limitador de corriente). 5. La barandilla da calambres en las manos. 6. La banda se descentra. 1) Asegúrese de que la máquina está enchufada a la red, el interruptor general en posición 1 y la llave de seguridad puesta. 2) Comprobar que el limitador de corriente esté hacia dentro. 3.a) Comprobar lubricación banda 3.b) Comprobar tensión banda deslizamiento 3.c) Comprobar tensión correa de transmisión 1) Enchufe el cable a la red. Coloque el interruptor en posición 1 y ponga la llave de seguridad. 2) Desconectar la máquina y pulsar el limitador de corriente. Lubricar la banda. 3.a) Lubricar la banda de deslizamiento. 3.b) Tensar la banda de deslizamiento. 3.c) Tensar la correa de transmisión. 4) Comprobar lubricación banda 4) Pulsar el limitador de corriente con el interruptor en 0 y lubricar la banda de deslizamiento. 5) Comprobar que el enchufe donde está conectada tiene toma tierra 6.a) Comprobar nivelación del suelo. 6.b) Comprobar la cojera de la máquina. 5) Enchufar la máquina en enchufe con toma de tierra. ERRORES DE LA MÁQUINA Pantalla de monitor E1 Posible fallo de comunicación Conecte el cable correctamente entre el controlador superior y el controlador inferior Pantalla de monitor E2 Pantalla de monitor E3 Pantalla de monitor E5 Pantalla de monitor E7 Posible voltaje incorrecto Sin señal del sensor de velocidad Posible sobrecarga del motor Llave de seguridad Funcionamiento con voltaje no correcto; conecte de nuevo el cable del motor. Sustituya la luz del sensor del controlador inferior o el sensor de velocidad. Lubrique la cinta. Coloque la llave de seguridad en su alojamiento. Para cualquier consulta, no dude en ponerse en contacto con el (S.A.T).Servicio de Asistencia Técnica, llamando al teléfono de atención al cliente (ver página final del presente manual). 7
 Comprobar lubricación banda 3.b) Comprobar tensión banda deslizamiento 3.c) Comprobar tensión correa de transmisión 1) Enchufe el cable a la red.")
8 English ELEMENTS OF THE MONITOR.- A: This display gives a simultaneous readout of Time; Programs; Speed; Distance; Incline; Pulse rate and Calories. B: Incline function quick access keys or buttons ( ). C: The electronic monitor has 7 push buttons or keys; PROGRAM; MODE; INCLINE ; START/STOP; SPEED Km/h (+ -). D: Fan. E: Slot for safety key. g: Safety key. H: ECO key START/STOPING.- Plug the unit into a wall socket with an EARTH terminal and set switch (L) to position (1), Fig.1. The safety key (g) must be inserted into its spot (E) Fig.2, otherwise the machine will not operate. As soon as the safety key (g) is in place, the machine will beep and all of the displays will show a [00:00] value, indicating that the machine is READY to be used. F: Speed function quick access keys or buttons ( Km/h). 8
 must be inserted into its spot (E) Fig.2, otherwise the machine will not operate.")
9 CHANGING FROM KILOMETRES TO MILES.- This machine has the option to display speed in km/h or mph. The factory setting for the machine is km/h. To change from km/h to mph follow these steps: Remove the safety key. Press and hold the PROGRAM and MODE keys at the same time for 5 approximately seconds. The speed display (A) M corresponds to miles per hour and insert the safety key (g) into its slot. OPERATING INSTRUCTIONS.- MANUAL MODE This monitor has program (MANUAL). For programs MANUAL you can specify the duration of the exercise between (5 to 99) minutes, distance between (1 to 99.9) and calories between (5 to 999). Pressing the START/STOP key will light the MANUAL and the machine will start within 3 seconds, shown by a countdown on the TIME display, at a speed of 1.0km/h. You can increase or decrease the speed setting in MANUAL mode by pressing the SPEED (+ -) keys, between km/h. The machine will stop if you press the START/STOP key or if you remove the SAFETY KEY. Time will be reseted if you press the MODE key for more than 5 seconds. PROGRAM MODE.- This monitor has 15 programs (MANUAL, P01; P02; P03; P04; P05; P06; P07; P08; P09; P10; P11; P12; BODY-FAT, HRC). For programs P1 to P12 you can specify the duration of the exercise between (10 to 99) minutes. Program graphics for P1 to P12. See end pages.- With the machine ready, press the PROGRAM key and P01 will appear on the display, by pressing the PROGRAM key you can access the programs (P1 al P12: BODY-FAT), and the word TIME will begin to flash. Use the SPEED (+ -) keys to specify the duration of the program (5 99 minutes). The monitor has a default program setting of 30 minutes. Press the START/STOP key and the machine will start to operate after 3 seconds, shown by the countdown on the central display, based on the values it has been given. You can change the speed settings at any time during the exercise by pressing the SPEED (+ -) keys, and the inclination settings by pressing the INCLINE keys. ECO FUNCTION.- Press this button when in manual or program mode to enter into economic mode. The machine will change the incline and configuration to reduce power consumption and the time window will alternate time with the word ECO. Press the ECO button again to exit this function. BODY FAT PROGRAM.- The (01 F BODY-FAT) program is designed to calculate the user s body fat percentage. 9
 minutes, distance between (1 to 99.9) and calories between (5 to 999).")
10 Press the (01 F BODY-FAT) program key, then press the MODE key and by using the keys to select SEX (Male01 Female 02), press the MODE key to confirm, use the keys select your AGE (10 99) press the MODE key to confirm, use the keys to select your WEIGHT (20 120Kg), press the MODE key to confirm, use the keys to select HEIGHT ( cm), press the MODE key to confirm. Place your hands on the handgrip sensors (R), as shown in Fig.4, and after a few seconds the screen will display the result. FAT. (Body fat). The body fat function helps you to calculate your body fat percentage. REF. TABLE: BODY FAT PERCENTAGE % SEX / FAT% LOW LOW / AVE RAGE AVE RAGE MALE < 13% 13%- 26%- 25,8% FEMALE <23% 23%- 35,8% 30% 36%- 40% HIGH >30% >40% BODY TYPE There are 9 body types based on the percentage of fat calculated. TYPE 1 (5%-9%) Extremely athletic TYPE 2 (10%-14%) Ideal sportsman TYPE 3 (15%-19%) Very slender TYPE 4 (20%-24%) Sportsman TYPE 5 (25%-29%) Ideal health TYPE 6 (30%-34%) Slender TYPE 7 (35%-39%) Very overweight TYPE 8 (40%-44%) Overweight TYPE 9 (45%-50%) Extremely obese The main screen will display the type of profile for your body type. Position your hands correctly on the pulse sensors (R), Fig.4. EMERGENCY STOP.- For the user s maximum safety, this unit is equipped with a safety key (g) and a STOP button. The safety key (g) must be slotted into its housing (E), Fig.2, otherwise the machine will not start. When you are using the machine always clip the cord on the safety key to your clothing. Tugging on the cord will pull the safety key out of its slot and the machine will stop immediately. To restart the machine simply put the key back into the key slot. Remove the safety key (g) whenever the machine is not being used and keep it out of children s reach. Pressing the red button marked STOP will also stop the unit immediately. To restart it, press the button marked START/STOP again. ELEVATION.- The inclination function operates independently of all other functions. Each time that you set switch (L) to position I, as described in the Starting section, Fig.1. the inclination level that was last used will be displayed. To lower the inclination to zero with the unit stopped, press and hold the STOP key for 5 seconds. If inclination is not at zero when the START/STOP key is used to begin exercising, the machine will zero itself while it is starting. You can adjust the elevation level by pressing the INCLINE or INCLINE keys to specify a value of 0 to 15, depending on how you would like to do the exercise. Important: Do not change the inclination level of your treadmill by propping it up on objects. 10

11 IMPORTANT: THE INCLINATION LEVEL MUST BE AT ITS LOWEST SETTING BEFORE ATTEMPTING TO PUT THE TREADMILL INTO THE FOLDED POSITION. PULSE MEASUREMENT.- Your pulse rate is measured by placing both hands on pulse sensors (R) with which the electronic unitis equipped. The pulse rate readout will appear after a few seconds. The heart symbol beside the pulse rate value will flash in time with your heart rate, Fig.4. IMPORTANT: This is not a medical appliance and therefore the heart rate shown is merely for guideline purposes. BH RESERVES THE RIGHT TO MODIFY THE SPECIFICATIONS OF ITS PRODUCTS WITHOUT PRIOR NOTICE. 11

12 FAULT FINDING CHART PROBLEM CHECKS SOLUTIONS 1.The monitor does not switch on. 2.The monitor switches on but the motor fails to start. 3.Walking motion is jerky on the treadmill. 4.The machine stops (the breaker trips). 5.Electrical shocks through the handrail. 6.The treadmill belt skews off centre. ERROR CODES 1) Make sure that the machine is plugged in, the ON/OFF switch in position 1 and that the safety key is inserted. 2) Check that the current limiter is pressed in. 3.a) Check that the belt is lubricated. 3.b) Check the tension on the sliding belt. 3.c) Check the tension on the drive belt. 4) Check that the band is lubricated. 5) Check that the machine is plugged into an earthed mains socket. 6.a) Check that the machine is level on the floor. 6.b) Check that the machine does not wobble. 1) Plug the machine into the mains supply. Set the switch to position 1 and insert the safety key. 2) Switch the machine off and press the circuit breaker in. Lubricate the treadmill band. 3.a) Lubricate the sliding belt. 3.b) Adjust the belt tension. 3.c) Adjust the drive belt tension. 4) Reset the overload button with the On /Off switch at 0 and lubricate the treadmill band. 5) Plug the machine into an earthed mains socket. Monitor screen display E1 Monitor screen display E2 Monitor screen display E3 Monitor screen display E5 Monitor screen display E7 Possible cable fault. Burst clash. No speed sensor signal Possible motor overload. Safety key. Connect the wire well between top controller and bottom controller Operating with incorrect voltage; Connect the motor wire again. Replace the sensor light on the bottom controller or speed sensor. Lubricate the belt. Insert the safety key. Do not hesitate to get touch with the Technical Assistance Service if you have any queries by phoning customer services (see last page in manual). 12
 Check that the belt is lubricated. 3.b) Check the tension on the sliding belt. 3.c) Check the tension on the drive belt. 4) Check that the band is lubricated.")
13 Français MONITEUR.- A: Ce display affiche simultanément la Durée; Les Programmes; La Vitesse; La Distance; L inclinaison; Le Pólux; et Les Calories. B: Boutons ou touches d accès rapide à l inclinaison ( ). C: Ce moniteur dispose de 7 boutons ou touches: PROGRAM; MODE, INCLINE ( ); START/STOP; VITESSE Km/h (+ -). D: Ventilateur. E: Logement de la clé de sécurité. F: Boutons ou touches d accès rapide à la vitesse ( Km/h). g: Clé de sécurité. H: Bouton ECO MISE EN MARCHE.- Connectez le moniteur à une prise munie d une mise à la TERRE. Placez l interrupteur (L) sur la position (1). Fig.1. La clé de sécurité (g) doit être introduite dans son logement (E) Fig.2, faute de quoi, la machine ne se mettra pas en marche. Dès que la clé de sécurité (g) sera située à sa place (E), un signal sonore retentira et tous les écrans afficheront la valeur 00:00 ce qui voudra dire que lamachine se trouve sur la position marche (READY). 13
 sur la position (1). Fig.1. La clé de sécurité (g) doit être introduite dans son logement (E) Fig.")
14 PASSER DES KILOMÈTRES AUX MILLES.- La vitesse de cette machine peut être affichée en km/h ou en milles. À la sortie d usine de la machine la vitesse est indiquée en km/h. Pour passer des km/h aux milles faire comme indiqué ci-après: Enlever la clé de sécurité. Appuyer 5 secondes environ et en même temps sur les touches PROGRAM et MODE Et le chiffre (A) M s affichera dans la fenêtre de la vitesse et placer la clé de sécurité (g) dans son logement. FONCTIONNEMENT.- MODE MANUEL Ce moniteur dispose de programme (MANUEL). Dans del programme de MANUEL il est possible de programmer la Durée de l exercice entre (5 et 99 Minutes), la distance de (1 à 99,9) et les calories, de (5 à 999). En appuyant sur la touche START/ STOP, s allumera et la machine se mettra en marche dans les 3 secondes qui suivent, indiquées de manière décroissante au display de la durée (A) et à une vitesse de 1.0km/h. En étant dans le mode manuel, vous pourrez augmenter ou réduire la vitesse en appuyant sur les touches SPEED (+ -) de km/h. En appuyant sur la touche START/STOP ou en retirant la CLÉ DE SÉCURITÉ, la machine s arrête. MODE PROGRAMMES.- Ce moniteur dispose de 15 programmes (MANUEL P0; P01; P02; P03; P04; P05; P06; P07; P08; P09; P10; P11; P12; BODY-FAT, HRC). Dans les programmes de P1 à P12 il est possible de programmer la Durée de l exercice entre (10 et 99Minutes). Graphiques des programmes du P1 au P12. Voir les dernières pages.- Avec la machine prête, appuyer sur la touche PROGRAM et P01 s affichera au display. En appuyant sur la touche PROGRAM vous pourrez accéder aux programmes (P1 à P12; BODY-FAT), et le display TIME (Durée) clignotera. Pour programmer la durée dans le programme choisi, appuyer sur les touches SPEED (+ -) (5 99 minutes). Le temps prédéfini dans le moniteur pour la durée du programme est de 30 minutes. Appuyer sur la touche START/STOP et la machine démarrera dans les 3 secondes, indiquées de façon dégressive au display central selon les valeurs entrées par l utilisateur. Quelle que soit la phase de l exercice, vous pouvez modifier la vitesse et l inclinaison en appuyant sur le touches SPEED (+ -) et l inclinaison en appuyant sur les touches INCLINE du moniteur. ECO FONCTION.- Appuyez sur ce bouton en mode manuel ou d'un programme pour passer en mode économique. La machine va changer l'inclinaison et la configuration de réduire la consommation d'énergie et la fenêtre de temps en alternance avec le mot ECO. Appuyez sur la touche ECO pour quitter cette fonction. 14
.")
15 PROGRAMME GRAISSE CORPORELLE.- BODY-FAT.- Le programme (01 F BODY-FAT) a été spécialement conçu pour calculer le taux de graisse corporelle de l'utilisateur. Appuyer sur la touche Programme de graisse (01 F BODY-FAT), puis sur la touche MODE et tout en appuyant sur les touches sélectionner le Sexe (Homme 01 Femme 02), appuyer sur MODE pour confirmer. Avec les touches sélectionner votre Âge (AGE 10 99ans), appuyer sur MODE pour confirmer. Avec les touches sélectionner votre Poids (WIGHT kg), appuyer sur MODE pour confirmer. Avec les touches sélectionner votre Taille (HEIGHT cm), appuyer sur MODE pour confirmer. Poser les mains sur les détecteurs (R) de pouls (hand-grip) comme indiqué dans la Fig.4. Dans les secondes suivantes, le résultat sera affiché sur les écran. FAT. (Body fat). La fonction de graisse corporelle est de vous permettre d évaluer la valeur de votre graisse corporelle. TABLEAU DE RÉF. TAUX DE GRAISSE CORPORELLE % (Body Fat) SEXE / GRAISSE % FAIBLE FAIBLE / MOYEN MOYEN ÉLEVÉ HOMME < 13% 13%- 25,8% FEMME <23% 23%- 35,8% 26%- 30% 36%- 40% >30% >40% TABLEAU DE RÉF. TYPES DE PHYSIQUE/ BODY TIPE: Les physiques classés selon le taux de graisse calculé, sont au nombre de 9, à savoir: TYPE 1 (5%-9%) Homme très sportif TYPE 2 (10%-14%) Homme sportif idéal TYPE 3 (15%-19%) Très svelte TYPE 4 (20%-24%) Sportif TYPE 5 (25%-29%) Santé idéale TYPE 6 (30%-34%) Svelte TYPE 7 (35%-39%) Trop obèse TYPE 8 (40%-44%) Obèse TYPE 9 (45%-50%) Super obèse Le profil répondant le mieux à votre type de physique sera affiché à l'écran principal. Il faudra alors poser correctement les mains sur les détecteurs de pouls (R) de la Fig.4. ARRÊT D URGENCE.- Pour que l utilisateur puisse faire ses exercices en toute sécurité, chaque unité dispose d une clé de sécurité (g) et d un bouton START/STOP. La clé de sécurité (g) doit être placée dans son logement (E), voir Fig.2, faute de quoi la machine ne se mettra pas en marche. Durant les exercices effectués sur cette machine, l utilisateur doit attacher la clé de sécurité à l un des vêtements qu il porte, par l intermédiaire d un clip. Toute secousse fera sortir la clé de son logement et la machine s arrêtera instantanément. Pour la remettre en marche placez à nouveau la clé dans son logement. Si vous n allez pas utiliser la machine, retirez la clé de sécurité (g) et gardezla hors de la portée des enfants. 15
, appuyer sur MODE pour confirmer. Poser les mains sur les détecteurs (R) de pouls (hand-grip) comme indiqué dans la Fig.4.")
16 En appuyant sur le bouton rouge STOP, l unité s arrête immédiatement. Pour la remettre en marche, appuyez sur le bouton START/STOP. INCLINAISON.- L inclinaison est une fonction indépendante de toutes les autres. À chaque fois que L interrupteur général (L) sera placé sur la position I, comme indiqué dans la mise en marche, Fig.1, la valeur de l inclinaison introduite par vos soins sera affichée au display. Pour mettre l inclinaison à zéro avec l unité arrêtée, appuyer cinq secondes sur la touche START/STOP. Si l inclinaison n est pas sur zéro quand l exercice commence avec la touche START/STOP, celle-ci se rendra sur zéro pendant que la machine se met en marche. En appuyant sur les boutons INCLINE ou INCLINE, vous pourrez régler l inclinaison de l unité et ce, depuis le niveau 0 jusqu au niveau 15 selon l inclinaison sur laquelle vous souhaitez réaliser l exercice. Remarque importante: Ne pas modifier l inclinaison du tapis de course en plaçant des objets sous le tapis. IMPORTANT: AVANT DE PLACER LE TAPIS DE COURSE SUR LA POSITION DE PLIAGE, L INCLINAISON DE LA MACHINE DOIT SE TROUVER AU NIVEAU LE PLUS BAS. MESURE DU POULS.- Pour mesurer le pouls, placez les deux mains sur les senseurs de pouls (R) qui se trouvent sur l unité électronique. La mesure du pouls est affichée dans les secondes qui suivent. Le symbole du cœur qui se trouve près du chiffre u pouls clignotera à la cadence de votre pouls, Fig.4. REMARQUE: Cette machine n est pas un appareil médical et par conséquent l information relative à la fréquence cardiaque doit être entendue comme une information donnée à titre indicatif. BH SE RÉSERVE LE DROIT DE MODIFIER LES CARACTÉRISTI- QUES DE SES PRODUITS SANS PRÉAVIS. 16

17 DÉFAILLANCES OU PANNES SYMPTÔMES VÉRIFICATIONS SOLUTIONS 1.Le moniteur ne s'allume pas. 2.Le moniteur s'allume bien cependant le moteur ne fonctionne pas. 3.Tiraillements en marchant sur le tapis. 4.La machine s'arrête (le limiteur de courant saute). 5.Coups de bourre sur les mains quand elles touchent la main courrante. 6.Le tapis se décentre. 1) Vérifiez si la machine est branchée au courant électrique, si l'interrupteur général se trouve sur la position 1 et si la clé de sécurité est bien en place. 2) Vérifiez si le limiteur de courant se trouve vers l'interieur. 3.a) Vérifiez la lubrification du tapis. 3.b) Vérifiez la tension du tapis de glissement. 3.c) Vérifiez la tension de la courroie de transmission. 1) Branchez le câble à la prise de courrant. Placez l'interrupteur sur la position 1 et la clé de securité à sa place. 2) Déconnectez la machine et appuyez sur le limiteur de courant. Graisser la bande. 3.a) Lubrifiez le tapis de glissement. 3.b) Tendre la tapis de glissement. 3.c) Tendre la courroie de transmission. 4) Vérifiez la lubrification du tapis. 4) Placez le limiteur de courant avec l'interrupteur sur 0 et graissez la bande de glissement. 5) Vérifiez si la prise de courant dispose d'une mise à la terre. 6.a) Vérifiez le nivellement du sol. 6.b) Vérifiez si la machine n'est pas bancale. 5) Branchez la machine à une prise dotée d'une mise à la terre. ERREURS DE LA MACHINE Écran du moniteur E1 Possible message de panne Connecter le câble correctement entre le contrôleur supérieur et le contrôleur inférieur Écran du moniteur E2 Écran du moniteur E3 Écran du moniteur E5 Écran du moniteur E7 Éteint Aucun signal du senseur de la vitesse Possible surcharge du moteur. Clé de sécurité. Fonctionnement avec la faux tension; connecter à nouveau le câble du moteur Remplacer la lumière du senseur controleur inférieur ou le senseur de la vitesse. Lubrifier le tapis. Clé de securité à sa place. Pour toute information complémentaire et en cas de doute sur le bon état de l une quelconque partie de la machine, l hésitez pas à appeler le Service d Assistance Technique (SAT) au numéro de téléphone d Assistance Clientèle qui figure à la dernière page de cette notice. 17
 Vérifiez si le limiteur de courant se trouve vers l'interieur. 3.a) Vérifiez la lubrification du tapis. 3.b) Vérifiez la tension du tapis de glissement. 3.c) Vérifiez la tension de la courroie de transmission.")
18 Deutsch ELEMENTE DES MONITORS.- A: Auf diesem Display werden gleichzeitig Dauer; Programme; Geschwindigkeit; Strecke; Steigung; Puls; Angezeigt und Kalorien. B: Drucktasten oder Schnelltasten für die Steigungseinstellung ( ). C: Diese Elektronikeinheit (Monitor) verfügt über 7 Tasten: PROGRAM; MODE; STEIGUNG ; START/STOP; GES-CHWINDIGKEIT Km/h (+ -). D: Ventilator. E: Aufnahme des Sicherheitsschlüssels. g: Sicherheitsschlüssel. H: ECO-Taste EINSCHALTEN.- Schließen Sie das Gerät an einen GEERDETEN Stecker. Stellen Sie den Schalter (L) auf Position [1] Fig.1. Der Sicherheitsschlüssel (g) muss in seiner Aufnahme (E) Fig.2 stecken, damit das Gerät gestartet werden kann. Beim Einstecken des Sicherheitsschlüssels (e) ertönt ein akustisches Signal und alle Displays zeigen den Wert [00:00]; dies bedeutet dass sich die Maschine in betriebsbereitem Zustand (READY) befindet. F: Drucktasten oder Schnelltasten für Geschwindigkeit ( Km/h). 18
 auf Position [1]")
19 WECHSEL VON KILOMETERN AUF MEILEN.- Es besteht die Möglichkeit, die Geschwindigkeit dieser Maschine in Km/h oder Meilen anzuzeigen. Fabrikmäßig ist die Geschwindigkeit in Km/h eingestellt. Um von Km/h auf Meilen umzustellen, folgen Sie diesen Schritten: Ziehen Sie den Sicherheitsschlüssel. Drücken Sie die Tasten PROGRAM und MODE 5 Sekunden lang und auf der Geschwindigkeitsanzeige erscheint die (A) M entspricht und stecken Sie den Sicherheitsschlüssel an seinen Platz. BEDIENUNGSHINWEISE.- HANDBETRIEB. Dieser Monitor verfügt über Programme (MANUELL). Innerhalb der Programme von MANUELL kann die Dauer der Übungen zwischen (5 und 99 Minuten), die Entfernung zwischen (1 und 99,9) und die Kalorien zwischen (5 und 999) eingestellt werden. Bei Betätigen der START/STOP-Taste auf und die Maschine geht nach 3 Sekunden bei einer Geschwindigkeit von 1Km/h in Betrieb. Diese drei Sekunden werden in Countdown - Anzeige auf dem TIME- Display angezeigt (A). Im HANDBETRIEB kann die Geschwindigkeit durch Betätigen der SPEED-Tasten (+ -) im Bereich von 1.0 bis 18km/h eingestellt werden. Durch Betätigen der Taste START/STOP oder Herauszie hen des SICHERHEITS-SCHLÜSSELS wird das Gerätangehalten. MODUS PROGRAMME.- Dieser Monitor verfügt über 15 Programme (MANUELL; P01; P02; P03; P04; P05; P06; P07; P08; P09; P10; P11; P12; BODY-FAT, HRC). Innerhalb der Programme von P01 bis P12 kann die Dauer der Übungen zwischen (10 und 99 Minuten), die Entfernung zwischen (0,5 und 99,9). Grafiken der Programme P2 bis P10. Siehe letzte Seiten.- Ist die Maschine vorbereitet, drücken Sie die Taste PROGRAM und auf dem Display erscheint P01. Drücken Sie PROGRAM, um Zugriff auf die Programme von (P1 bis P12; BODY- FAT) und die Anzeige TIME blinkt. Um die Dauer im gewählten Programm zu programmieren drücken Sie die Tasten SPEED (+ -) zwischen 5 und - 99 Minuten). Der Monitor hat eine vordefinierte Zeit von 30 Minuten für die Dauer des Programms. Drücken Sie die Taste START/STOP und die Maschine beginnt nach 3 Sekunden gemäß den Werten, die Sie eingegeben haben, zu funktionieren, wobei auf dem zentralen Display die Werte in absteigender Folge angezeigt werden. Sie können zu jedem Zeitpunkt der Übung die Geschwindigkeit und die Neigung verändern, indem Sie die Tasten SPEED(+ -) bzw. INCLINE des Monitors drücken. FUNKTION ECO.- Drücken Sie diese Taste, wenn im manuellen Modus oder das Programm in wirtschaftliche Modus zu gelangen. 19
.")
20 Die Maschine wird die Steigung ändern und Konfiguration, um den Stromverbrauch und das Zeitfenster wechselt Zeit mit dem Wort ECO reduzieren. Drücken Sie die Taste erneut, ECO, um diese Funktion zu verlassen. KÖRPERFETT-PROGRAMM.- BODY-FAT.- Das (01 F BODY-FAT) Programm berechnet den Prozentsatz des Körperfetts des Benutzers. Betätigen Sie die Taste Fett- Programm (01 F BODY-FAT) und anschließend MODE. Mit den Tasten stellen Sie Ihr Geschlecht (Mann 01- Frau 02) ein und bestätigen Sie erneut mit MODE. Geben Sie dann mit den Tasten stellen Sie Ihr Alter (AGE Jahre) ein und bestätigen den Wert mit MODE. Stellen Sie dann mit den Tasten Ihr Körpergewicht ein (WEIGHT kg) und bestätigen sie erneut mit MODE. Mit den Tasten geben Sie dann Ihre Körpergröße ein (HEIGHT cm), die Sie auch wieder mit MODE bestätigen. Legen die Hände auf die Pulssensoren (R) (Hand-grip) Fig.4. Nach einigen Sekunden erscheinen die Werte auf den Display. FAT. (Körperfett). Ziel der Funktion Körperfett ist es, Ihnen zu helfen, den Wert Ihres Körperfetts zu bewerten. REFERENZTABELLE KÖRPERFETT IN PROZENT % (Body Fat) GESCHL./ FETT % NIEDRIG NIEDRIG/ MITTEL MITTEL HOCH MÄNNER < 13% 13%- 25,8% FRAUEN <23% 23%- 35,8% 26%- 30% 36%- 40% >30% >40% 20 KÖRPERTYPEN / BODY TYPE: Nach dem berechneten Fettprozentsatz unterscheidet man 9 verschiedene Körpertypen. TYP 1 (5%-9%) Sehr sportlicher Mann TYP 2 (10%-14%) Idealer männl. Sportler TYP 3 (15%-19%) Sehr schlank TYP 4 (20%-24%) Sportler TYP 5 (25%-29%) Ideale Gesundheit TYP 6 (30%-34%) Schlank TYP 7 (35%-39%) Zu übergewichtig TYP 8 (40%-44%) Übergewichtig TYP 9 (45%-50%) Stark übergewichtig Auf dem Hauptbildschirm wird der Profiltyp für Ihren Körpertyp angezeigt. Positionieren Sie Ihre Hände korrekt auf den Pulssensoren (R) Fig.4. NOTAUS.- Zur optimalen Sicherheit des Benutzers verfügt dieses Gerät über einen Sicherheitsschlüssel (g) und eine START/STOP-Taste. Der Sicherheitsschlüssel (g) muss in seine Aufna- hme (E) gesteckt werden Fig.2. Anderenfalls kann das Gerät nicht gestartet werden. Wenn Sie das Gerät benutzen, befestigen Sie den Sicherheitsschlüssel mit einem Clip an Ihrer Kleidung. Durch kräftiges Ziehen kann der Schlüssel so aus der Aufnahme gezogen werden und das Gerät bleibt sofort stehen. Um es erneut zu starten, stecken Sie den Schlüssel einfach wieder in die Aufnahme. Wenn das Gerät nicht benutzt wird, ziehen Sie bitte den Sicherheitsschlüssel ab und bewahren Sie ihn außerhalb der Reichweite von Kindern auf. Durch Betätigen der roten START/STOP Taste wird das Gerät sofort angehalten. Um es erneut in Betrieb zu nehmen, betätigen Sie bitte die START/STOP- Taste.
 ein und bestätigen den Wert mit MODE.")
UNIDAD ELECTRÓNICA ELECTRONIC MONITOR UNITÉ ÉLECTRONIQUE ELEKTRONIKEINHEIT UNIDADE ELECTRÓNICA IMPIANTO ELETTRONICO ELEKTRONISCHER MONITOR G6324
 UNIDAD ELECTRÓNICA ELECTRONIC MONITOR UNITÉ ÉLECTRONIQUE ELEKTRONIKEINHEIT UNIDADE ELECTRÓNICA IMPIANTO ELETTRONICO ELEKTRONISCHER MONITOR G6324 Fig.1 Fig.2 Fig.3 Fig.4 2 Español ELEMENTOS DEL MONITOR.-
1. DESCARGA DEL SOFTWARE DE BLUETOOTH EN EL SMARTPHONE
 MANUAL DEL USUARIO PARA BLUETOOTH ES 1. DESCARGA DEL SOFTWARE DE BLUETOOTH EN EL SMARTPHONE Entre en Apple Store o Google Play y busque: - BH Premium BH Premium 2. FIJACIÓN DEL MÓDULO BLUETOOTH Fije el
KMR SCA-05 Mounting Instructions Instrucción de Montaje Instruções de Montagem 0899.4897
 0899.4897 KMR SCA-05 Mounting Instructions Instrucción de Montaje Instruções de Montagem 0899.4897 KMR SCA-05 Mounting Instructions Instrucción de Montaje Instruções de Montagem The KMR SCA-05 kit is a
English - EN Français - FR Deutsch - DE Italiano - IT Português - PT Español - ES
 English - EN Français - FR Deutsch - DE Italiano - IT Português - PT Español - ES Push upward to open battery door, insert batteries as shown. Pair your mouse with your Windows device: A. On the underside
START INICIAR - DÉMARRAGE - INIZIO - INICIAR - INICIO
 START INICIAR - DÉMARRAGE - INIZIO - INICIAR - INICIO ENG: Microsoft wireless mouse PTB: Mouse sem fio da Microsoft FRA: Souris sans fil Microsoft ITA: Mouse senza fili Microsoft PTG: Rato sem fios Microsoft
Bedienungsanleitung. grün/rot. I Taster
 Deutschland Bedienungsanleitung Handy laden - Die Lampe ist ausgeschaltet und voll aufgeladen. - Das Handy-Ladekabel (A) (USB-Seite) mit dem DC-Spannungswandler (B) und dann mit dem Single-Adapter (C)
UNIDAD ELECTRÓNICA ELECTRONIC MONITOR UNITÉ ÉLECTRONIQUE ELEKTRONIKEINHEIT UNIDADE ELECTRÓNICA IMPIANTO ELETTRONICO ELEKTRONISCHER MONITOR G6130
 UNIDAD ELECTRÓNICA ELECTRONIC MONITOR UNITÉ ÉLECTRONIQUE ELEKTRONIKEINHEIT UNIDADE ELECTRÓNICA IMPIANTO ELETTRONICO ELEKTRONISCHER MONITOR G6130 Fig.1 Fig.2 Fig.3 Fig.4 Español ELEMENTOS DEL MONITOR.-
UNIDAD ELECTRÓNICA ELECTRONIC MONITOR UNITÉ ÉLECTRONIQUE ELEKTRONIKEINHEIT UNIDADE ELECTRÓNICA IMPIANTO ELETTRONICO ELEKTRONISCHER MONITOR G6424O
 UNIDAD ELECTRÓNICA ELECTRONIC MONITOR UNITÉ ÉLECTRONIQUE ELEKTRONIKEINHEIT UNIDADE ELECTRÓNICA IMPIANTO ELETTRONICO ELEKTRONISCHER MONITOR G6424O Fig.1 Fig.2 Fig.3 Fig.4 2 Español ELEMENTOS DEL MONITOR.-
UNIDAD ELECTRÓNICA ELECTRONIC MONITOR UNITÉ ÉLECTRONIQUE ELEKTRONIKEINHEIT UNIDADE ELECTRÓNICA IMPIANTO ELETTRONICO ELEKTRONISCHER MONITOR G6439
 UNIDAD ELECTRÓNICA ELECTRONIC MONITOR UNITÉ ÉLECTRONIQUE ELEKTRONIKEINHEIT UNIDADE ELECTRÓNICA IMPIANTO ELETTRONICO ELEKTRONISCHER MONITOR G6439 Fig.1 Fig.2 Fig.3 Fig.4 2 Español ELEMENTOS DEL MONITOR.-
www.microsoft.com/hardware
 www.microsoft.com/hardware english - EN ESPAÑOL (LATINOAMERICANO) - XX PORTUGUÊS (BRASIL) - XC FRANÇAIS CANADIEN - XD 1 2 www.microsoft.com/hardware/productguide 3 www.microsoft.com/hardware/downloads
G6484N UNIDAD ELECTRÓNICA ELECTRONIC MONITOR UNITÉ ÉLECTRONIQUE ELEKTRONIKEINHEIT UNIDADE ELECTRÓNICA IMPIANTO ELETTRONICO ELEKTRONISCHER MONITOR
 G6484N UNIDAD ELECTRÓNICA ELECTRONIC MONITOR UNITÉ ÉLECTRONIQUE ELEKTRONIKEINHEIT UNIDADE ELECTRÓNICA IMPIANTO ELETTRONICO ELEKTRONISCHER MONITOR 1 Fig.1 Fig.2 Fig.3 2 Español ELEMENTOS DEL MONITOR.- A:
UNIDAD ELECTRÓNICA ELECTRONIC MONITOR UNITÉ ÉLECTRONIQUE ELEKTRONIKEINHEIT UNIDADE ELECTRÓNICA IMPIANTO ELETTRONICO ELEKTRONISCHER MONITOR G6432
 UNIDAD ELECTRÓNICA ELECTRONIC MONITOR UNITÉ ÉLECTRONIQUE ELEKTRONIKEINHEIT UNIDADE ELECTRÓNICA IMPIANTO ELETTRONICO ELEKTRONISCHER MONITOR G6432 Fig.1 Fig.2 Fig.3 Fig.4 2 Español ELEMENTOS DEL MONITOR.-
UNIDAD ELECTRÓNICA ELECTRONIC MONITOR UNITÉ ÉLECTRONIQUE ELEKTRONIKEINHEIT UNIDADE ELECTRÓNICA IMPIANTO ELETTRONICO ELEKTRONISCHER MONITOR G6350
 UNIDAD ELECTRÓNICA ELECTRONIC MONITOR UNITÉ ÉLECTRONIQUE ELEKTRONIKEINHEIT UNIDADE ELECTRÓNICA IMPIANTO ELETTRONICO ELEKTRONISCHER MONITOR G6350 Fig.1 Fig.2 Fig.3 2 Español ELEMENTOS DEL MONITOR.- A: En
UNIDAD ELECTRÓNICA ELECTRONIC MONITOR UNITÉ ÉLECTRONIQUE ELEKTRONIKEINHEIT UNIDADE ELECTRÓNICA IMPIANTO ELETTRONICO ELEKTRONISCHER MONITOR
 G6145RF UNIDAD ELECTRÓNICA ELECTRONIC MONITOR UNITÉ ÉLECTRONIQUE ELEKTRONIKEINHEIT UNIDADE ELECTRÓNICA IMPIANTO ELETTRONICO ELEKTRONISCHER MONITOR 1 Fig.1 Fig.2 Fig.3 2 Español ELEMENTOS DEL MONITOR.-
UNIDAD ELECTRÓNICA ELECTRONIC MONITOR UNITÉ ÉLECTRONIQUE ELEKTRONIKEINHEIT UNIDADE ELECTRÓNICA IMPIANTO ELETTRONICO ELEKTRONISCHER MONITOR
 UNIDAD ELECTRÓNICA ELECTRONIC MONITOR UNITÉ ÉLECTRONIQUE ELEKTRONIKEINHEIT UNIDADE ELECTRÓNICA IMPIANTO ELETTRONICO ELEKTRONISCHER MONITOR G2336U-G2351 Fig. 1 Fig. 2 Fig. 3 Fig. 4 Fig. 5 Fig. 6 Español
π H-4694, H-4695 RIPACK HEAT GUN EXTENSION ATTACH EXTENSION 1-800-295-5510 uline.com
 π H-4694, H-4695 RIPACK HEAT GUN EXTENSION uline.com Para Español, vea páginas 3-4. Pour le français, consulter les pages 5-6. ATTACH EXTENSION 1. In order to use a Ripack Heat Gun Extension, you must
SFD-200-N-B DESPERTADOR-PROYECTOR-CON VOZ. Manual de instrucciones
 SFD-200-N-B DESPERTADOR-PROYECTOR-CON VOZ Manual de instrucciones Funciones: - Proyección de la hora - Proyección controlada por sonidos y vibraciones (palmada, etc.) - Pantalla retroiluminada azul - Hora
Creating your Single Sign-On Account for the PowerSchool Parent Portal
 Creating your Single Sign-On Account for the PowerSchool Parent Portal Welcome to the Parent Single Sign-On. What does that mean? Parent Single Sign-On offers a number of benefits, including access to
MISE A JOUR EZEE TAB 10D11M
 MISE A JOUR EZEE TAB 10D11M 1. Téléchargez le fichier de mise à jour à l adresse suivante : http://www.storex.fr/download/fw/ezeetab_10d11m.zip 2. Une fois le fichier télécharger, décompressez le puis
ENKVM-USBB. 2-Port USB KVM switch with Easy Switch and Cable. User Guide
 ENKVM-USBB 2-Port USB KVM switch with Easy Switch and Cable User Guide i Package Contents 1 ENKVM-USBB 2-Port USB KVM Switch with Easy Switch and Cable 1 User Guide Requirements Console A VGA, SVGA, XGA,
G6426 UNIDAD ELECTRÓNICA ELECTRONIC MONITOR UNITÉ ÉLECTRONIQUE ELEKTRONIKEINHEIT UNIDADE ELECTRÓNICA IMPIANTO ELETTRONICO ELEKTRONISCHER MONITOR
 G6426 UNIDAD ELECTRÓNICA ELECTRONIC MONITOR UNITÉ ÉLECTRONIQUE ELEKTRONIKEINHEIT UNIDADE ELECTRÓNICA IMPIANTO ELETTRONICO ELEKTRONISCHER MONITOR 1 Fig.1 Fig.2 Fig.3 Fig.4 2 Español ELEMENTOS DEL MONITOR.-
MISE A JOUR EZEE TAB 7D12-S
 MISE A JOUR EZEE TAB 7D12-S 1. Téléchargez le fichier de mise à jour à l adresse suivante : http://www.storex.fr/download/fw/7d12-s.rar 2. Une fois le fichier télécharger, décompressez le puis installez
Sierra Security System
 Using Your SpreadNet Accessories With Your Sierra Security System Uso de Sus Accesorios SpreadNet Con Su Sistema de Seguridad Sierra SN990-KEYPAD SN961-KEYFOB SN991-REMOTE 1 SN990-KEYPAD The SN990-KEYPAD
G6156 UNIDAD ELECTRÓNICA ELECTRONIC MONITOR UNITÉ ÉLECTRONIQUE ELEKTRONIKEINHEIT UNIDADE ELECTRÓNICA IMPIANTO ELETTRONICO ELEKTRONISCHER MONITOR
 G6156 UNIDAD ELECTRÓNICA ELECTRONIC MONITOR UNITÉ ÉLECTRONIQUE ELEKTRONIKEINHEIT UNIDADE ELECTRÓNICA IMPIANTO ELETTRONICO ELEKTRONISCHER MONITOR 1 Fig.1 Fig.2 Fig.3 Fig.4 2 Español ELEMENTOS DEL MONITOR.-
UNIDAD ELECTRÓNICA ELECTRONIC MONITOR UNITÉ ÉLECTRONIQUE ELEKTRONIKEINHEIT UNIDADE ELECTRÓNICA IMPIANTO ELETTRONICO ELEKTRONISCHER MONITOR
 G6484 UNIDAD ELECTRÓNICA ELECTRONIC MONITOR UNITÉ ÉLECTRONIQUE ELEKTRONIKEINHEIT UNIDADE ELECTRÓNICA IMPIANTO ELETTRONICO ELEKTRONISCHER MONITOR 1 Fig.1 Fig.2 Fig.3 2 Español ELEMENTOS DEL MONITOR.- A:
2.4GHz Wireless BlueTrace Mouse w/nano Receiver
 2.4GHz Wireless BlueTrace Mouse w/nano Receiver USER'S GUIDE Ver.:1.00 Model CCS51301 CAUTION: To use this product properly, please read the user's guide before installing. Functional Introduction 1. Left
G6522 UNIDAD ELECTRÓNICA ELECTRONIC MONITOR UNITÉ ÉLECTRONIQUE ELEKTRONIKEINHEIT UNIDADE ELECTRÓNICA IMPIANTO ELETTRONICO ELEKTRONISCHER MONITOR
 G6522 UNIDAD ELECTRÓNICA ELECTRONIC MONITOR UNITÉ ÉLECTRONIQUE ELEKTRONIKEINHEIT UNIDADE ELECTRÓNICA IMPIANTO ELETTRONICO ELEKTRONISCHER MONITOR 1 Fig.1 Fig.2 Fig.3 Fig.4 2 Español ELEMENTOS DEL MONITOR.-
G6496FB UNIDAD ELECTRÓNICA ELECTRONIC MONITOR UNITÉ ÉLECTRONIQUE ELEKTRONIKEINHEIT UNIDADE ELECTRÓNICA IMPIANTO ELETTRONICO ELEKTRONISCHER MONITOR
 G6496FB UNIDAD ELECTRÓNICA ELECTRONIC MONITOR UNITÉ ÉLECTRONIQUE ELEKTRONIKEINHEIT UNIDADE ELECTRÓNICA IMPIANTO ELETTRONICO ELEKTRONISCHER MONITOR 1 Fig.1 Fig.2 Fig.3 Fig.4 2 Español ELEMENTOS DEL MONITOR.-
UNIDAD ELECTRÓNICA ELECTRONIC MONITOR UNITÉ ÉLECTRONIQUE ELEKTRONIKEINHEIT UNIDADE ELECTRÓNICA IMPIANTO ELETTRONICO ELEKTRONISCHER MONITOR G6474
 UNIDAD ELECTRÓNICA ELECTRONIC MONITOR UNITÉ ÉLECTRONIQUE ELEKTRONIKEINHEIT UNIDADE ELECTRÓNICA IMPIANTO ELETTRONICO ELEKTRONISCHER MONITOR G6474 Fig.1 Fig.2 Fig.3 Fig.4 2 Español ELEMENTOS DEL MONITOR.-
USB 2.0 INTERNAL MEMORY CARD READER/WRITER USER MANUAL CRW-UINB
 USB 2.0 INTERNAL MEMORY CARD READER/WRITER USER MANUAL CRW-UINB FEATURES HARDWARE INTRODUCTION 1 USB port for plugging into any USB device 2 Slot for SD, MMC and RS-MMC cards 3 Slot for Memory Stick, Memory
UNIDAD ELECTRÓNICA ELECTRONIC MONITOR UNITÉ ÉLECTRONIQUE ELEKTRONIKEINHEIT UNIDADE ELECTRÓNICA IMPIANTO ELETTRONICO ELEKTRONISCHER MONITOR G6424
 UNIDAD ELECTRÓNICA ELECTRONIC MONITOR UNITÉ ÉLECTRONIQUE ELEKTRONIKEINHEIT UNIDADE ELECTRÓNICA IMPIANTO ELETTRONICO ELEKTRONISCHER MONITOR G6424 Fig.1 Fig.2 Fig.3 Fig.4 2 Español ELEMENTOS DEL MONITOR.-
UNIDAD ELECTRÓNICA ELECTRONIC MONITOR UNITÉ ÉLECTRONIQUE ELEKTRONIKEINHEIT UNIDADE ELECTRÓNICA IMPIANTO ELETTRONICO ELEKTRONISCHER MONITOR
 UNIDAD ELECTRÓNICA ELECTRONIC MONITOR UNITÉ ÉLECTRONIQUE ELEKTRONIKEINHEIT UNIDADE ELECTRÓNICA IMPIANTO ELETTRONICO ELEKTRONISCHER MONITOR G6162i-G6164i Fig.1 Fig.2 Fig.3 2 Español ELEMENTOS DEL MONITOR.-
GUÍA DEL USUARIO DE LA CONSOLA TITANIUM TC1.0/TX1.0
 es TITANIUM TC1.0/TX1.0 ORDENADOR TITANIUM TC1.0/TX1.0 MANEJO DE LOS BOTON MANDO DRIVE Gire el mando i-drive para ajustar los valores de los parámetros o los niveles de resistencia. Gírelo hacia la derecha
1-800-295-5510 uline.com TECHNICAL DATA MODEL H-2051. Alkaline MN21 12V. (1 Second) Button Life Approx. 100,000 Push Button Presses 0.125 lbs. (2 oz.
 Button Life Approx. 100,000 Push Button Presses 0.125 lbs. (2 oz.") π H-2051 TAKE-A-NUMBER SYSTEM WIRELESS REMOTE uline.com Para Español, vea páginas 3-4. Pour le français, consulter les pages 5-6. TECHNICAL DATA MODEL H-2051 Frequency RF Power Output 433.92 MHz (+/ Max.
π H-2051 TAKE-A-NUMBER SYSTEM WIRELESS REMOTE uline.com Para Español, vea páginas 3-4. Pour le français, consulter les pages 5-6. TECHNICAL DATA MODEL H-2051 Frequency RF Power Output 433.92 MHz (+/ Max.
UNIDAD ELECTRÓNICA ELECTRONIC MONITOR UNITÉ ÉLECTRONIQUE ELEKTRONIKEINHEIT UNIDADE ELECTRÓNICA IMPIANTO ELETTRONICO ELEKTRONISCHER MONITOR G6164
 UNIDAD ELECTRÓNICA ELECTRONIC MONITOR UNITÉ ÉLECTRONIQUE ELEKTRONIKEINHEIT UNIDADE ELECTRÓNICA IMPIANTO ELETTRONICO ELEKTRONISCHER MONITOR G6164 Fig.1 Fig.2 Fig.3 Fig.4 2 Español ELEMENTOS DEL MONITOR.-
UNIDAD ELECTRÓNICA ELECTRONIC MONITOR UNITÉ ÉLECTRONIQUE ELEKTRONIKEINHEIT UNIDADE ELECTRÓNICA IMPIANTO ELETTRONICO ELEKTRONISCHER MONITOR G6162
 UNIDAD ELECTRÓNICA ELECTRONIC MONITOR UNITÉ ÉLECTRONIQUE ELEKTRONIKEINHEIT UNIDADE ELECTRÓNICA IMPIANTO ELETTRONICO ELEKTRONISCHER MONITOR G6162 Fig.1 Fig.2 Fig.3 Fig.4 2 Español ELEMENTOS DEL MONITOR.-
MANUAL EASYCHAIR. A) Ingresar su nombre de usuario y password, si ya tiene una cuenta registrada Ó
 Ingresar su nombre de usuario y password, si ya tiene una cuenta registrada Ó") MANUAL EASYCHAIR La URL para enviar su propuesta a la convocatoria es: https://easychair.org/conferences/?conf=genconciencia2015 Donde aparece la siguiente pantalla: Se encuentran dos opciones: A) Ingresar
MANUAL EASYCHAIR La URL para enviar su propuesta a la convocatoria es: https://easychair.org/conferences/?conf=genconciencia2015 Donde aparece la siguiente pantalla: Se encuentran dos opciones: A) Ingresar
BAI-220 AURICULAR INALÁMBRICO
 BAI-220 AURICULAR INALÁMBRICO Manual de usuario ESPECIFICACIONES TÉCNICAS EMISOR Frecuencia: 86 ± 0.5 MHz Modulación: FM Distancia de emisión: 30 m. Recepción de cualquier equipo de audio y video con salida
UNIDAD ELECTRÓNICA ELECTRONIC MONITOR UNITÉ ÉLECTRONIQUE ELEKTRONIKEINHEIT UNIDADE ELECTRÓNICA IMPIANTO ELETTRONICO ELEKTRONISCHER MONITOR
 G6180 UNIDAD ELECTRÓNICA ELECTRONIC MONITOR UNITÉ ÉLECTRONIQUE ELEKTRONIKEINHEIT UNIDADE ELECTRÓNICA IMPIANTO ELETTRONICO ELEKTRONISCHER MONITOR 1 Fig.1 Fig.2 Fig.3 Fig.4 2 Español ELEMENTOS DEL MONITOR.-
G6520FB UNIDAD ELECTRÓNICA ELECTRONIC MONITOR UNITÉ ÉLECTRONIQUE ELEKTRONIKEINHEIT UNIDADE ELECTRÓNICA IMPIANTO ELETTRONICO ELEKTRONISCHER MONITOR
 G6520FB UNIDAD ELECTRÓNICA ELECTRONIC MONITOR UNITÉ ÉLECTRONIQUE ELEKTRONIKEINHEIT UNIDADE ELECTRÓNICA IMPIANTO ELETTRONICO ELEKTRONISCHER MONITOR 1 Fig.1 Fig.2 Fig.3 Fig.4 2 Español ELEMENTOS DEL MONITOR.-
UNIDAD ELECTRÓNICA ELECTRONIC MONITOR UNITÉ ÉLECTRONIQUE ELEKTRONIKEINHEIT UNIDADE ELECTRÓNICA IMPIANTO ELETTRONICO ELEKTRONISCHER MONITOR
 G6180i-G6182i UNIDAD ELECTRÓNICA ELECTRONIC MONITOR UNITÉ ÉLECTRONIQUE ELEKTRONIKEINHEIT UNIDADE ELECTRÓNICA IMPIANTO ELETTRONICO ELEKTRONISCHER MONITOR 1 Fig.1 Fig.2 Fig.3 Fig.4 2 Español ELEMENTOS DEL
UNIDAD ELECTRÓNICA ELECTRONIC MONITOR UNITÉ ÉLECTRONIQUE ELEKTRONIKEINHEIT UNIDADE ELECTRÓNICA IMPIANTO ELETTRONICO ELEKTRONISCHE MONITOR H872N
 UNIDAD ELECTRÓNICA ELECTRONIC MONITOR UNITÉ ÉLECTRONIQUE ELEKTRONIKEINHEIT UNIDADE ELECTRÓNICA IMPIANTO ELETTRONICO ELEKTRONISCHE MONITOR H872N Fig 2 Fig 3 Fig 4 Español MONITOR ELECTRÓNICO Al conectar
UNIDAD ELECTRÓNICA ELECTRONIC MONITOR UNITÉ ÉLECTRONIQUE ELEKTRONIKEINHEIT UNIDADE ELECTRÓNICA IMPIANTO ELETTRONICO ELEKTRONISCHER MONITOR G6354
 UNIDAD ELECTRÓNICA ELECTRONIC MONITOR UNITÉ ÉLECTRONIQUE ELEKTRONIKEINHEIT UNIDADE ELECTRÓNICA IMPIANTO ELETTRONICO ELEKTRONISCHER MONITOR G6354 Fig.1 Fig.2 Fig.3 Fig.4 2 Español ELEMENTOS DEL MONITOR.-
Video Server. Quick Installation Guide. English, Español
 Video Server Quick Installation Guide English, Español 2 Video Server NOTES Quick Installation Guide 3 Video Server Quick Installation Guide To get your Video Server up and running on an Ethernet network,
G6172 UNIDAD ELECTRÓNICA ELECTRONIC MONITOR UNITÉ ÉLECTRONIQUE ELEKTRONIKEINHEIT UNIDADE ELECTRÓNICA IMPIANTO ELETTRONICO ELEKTRONISCHER MONITOR
 G6172 UNIDAD ELECTRÓNICA ELECTRONIC MONITOR UNITÉ ÉLECTRONIQUE ELEKTRONIKEINHEIT UNIDADE ELECTRÓNICA IMPIANTO ELETTRONICO ELEKTRONISCHER MONITOR 1 Fig.1 Fig.2 Fig.3 Fig.4 2 Español ELEMENTOS DEL MONITOR.-
Bluetooth Keyboard And Stand Combo For ipad
 Model: 50915 Bluetooth Keyboard And Stand Combo For ipad User s Manual Please read this User Manual carefully before you start to use the keyboard. 1. Package contents: 78 keys Bluetooth keyboard 1 pcs
G6429 UNIDAD ELECTRÓNICA ELECTRONIC MONITOR UNITÉ ÉLECTRONIQUE ELEKTRONIKEINHEIT UNIDADE ELECTRÓNICA IMPIANTO ELETTRONICO ELEKTRONISCHER MONITOR
 G6429 UNIDAD ELECTRÓNICA ELECTRONIC MONITOR UNITÉ ÉLECTRONIQUE ELEKTRONIKEINHEIT UNIDADE ELECTRÓNICA IMPIANTO ELETTRONICO ELEKTRONISCHER MONITOR 1 Fig.1 Fig.2 Fig.3 Fig.4 2 Español ELEMENTOS DEL MONITOR.-
Quick start guide. www.hd.philips.com
 For product support, visit Para obtener asistencia técnica, visite Pour en savoir plus sur l assistance sur les produits, visitez le site www.hd.philips.com HTL5110 Quick start guide EN For Product recycling
Quickstart Guide. WiPry 5x. 1) Connect antenna to the appropriate port. TM
 Connect antenna to the appropriate port. TM") Quickstart Guide ACCESSORY ANTENNA W A R N I N G DO NOT APPLY MORE THAN 20DBM TO THE ANTENNA WITHOUT EXTERNAL ATTENUATION CONNECT TO HOST DEVICE 1) Connect antenna to the appropriate port. TM 2) Download
Quickstart Guide ACCESSORY ANTENNA W A R N I N G DO NOT APPLY MORE THAN 20DBM TO THE ANTENNA WITHOUT EXTERNAL ATTENUATION CONNECT TO HOST DEVICE 1) Connect antenna to the appropriate port. TM 2) Download
Mission Berlin. Deutsch lernen und unterrichten Arbeitsmaterialien. EPISODIO 26 Contrarreloj
 EPISODIO 26 Contrarreloj Ya en 2006, Anna decide bloquear blockieren la máquina. Para ello necesitan un código que desconocen. Anna sigue la música, pero aparece la mujer de rojo. Frustrará ésta los planes
Start. Démarrer. Iniciar.
 Zune CABLE Pack câble de synchronisation Zune cable de sincronizacíon Zune Start. Démarrer. Iniciar. To sync and charge, connect the sync cable to your Zune and your PC. Just need to charge? Connect your
Battery Backup and LED Flashlight for iphone, ipod and other USB Mobile Devices USER MANUAL
 Battery Backup and LED Flashlight for iphone, ipod and other USB Mobile Devices USER MANUAL IN 5V OUT 5V Input How To Charge Attach a USB cable to the "OUT 5V" port on the power bank and the other end
beatsbydre.com facebook.com/beatsbydre @beatsbydre QUICK START GUIDE
 QUICK START GUIDE GETTING STARTED EN To turn on your Pill XL TM, press power button. FR Pour allumer le Pill XL TM, appuyez sur le bouton d alimentation. ES Para encender su Pill XL TM, presione el botón
 Table of Contents Part Replacement Instructions Instructions pour le remplacement des pièces Instructies voor het vervangen van onderdelen Anleitung für den Austausch von Bauteilen Instrucciones para el
 Control and Functions Guia de Funcionamiento Front View Configuración PAN/TILT 9 1 11 1 13 "Assign" 1 PROGRAM MUSIC/BKC MIDI/REC AUTO/DEL TAP/DISP 15~ BLACKOUT PAN TILT ASSIGN REVERSE MODE TILT PAN FINE
Crear alarma GATE. Aparecerá una ventana emergente para crear alarma.
 Crear alarma GATE Para crear una alarma, accede a través del menú principal de myhome.wattio.com a Seguridad, posteriormente arriba a la derecha haz click en Alarmas. En esta pantalla, en el menú izquierdo,
Matrox M-Series. Getting Started Guide Guide de mise en route Erste Schritte- Handbuch Guida introduttiva Guía de introducción
 Matrox M-Series Getting Started Guide Guide de mise en route Erste Schritte- Handbuch Guida introduttiva Guía de introducción 20071-G50-0220 FMSR-BKT22I Install your graphics hardware Choose a PCI Express
UNIDAD ELECTRÓNICA ELECTRONIC MONITOR UNITÉ ÉLECTRONIQUE ELEKTRONIKEINHEIT UNIDADE ELECTRÓNICA IMPIANTO ELETTRONICO ELEKTRONISCHER MONITOR
 UNIDAD ELECTRÓNICA ELECTRONIC MONITOR UNITÉ ÉLECTRONIQUE ELEKTRONIKEINHEIT UNIDADE ELECTRÓNICA IMPIANTO ELETTRONICO ELEKTRONISCHER MONITOR G6414i-G6473i Fig.1 Fig.2 Fig.3 Fig.4 2 Español ELEMENTOS DEL
G6426N UNIDAD ELECTRÓNICA ELECTRONIC MONITOR UNITÉ ÉLECTRONIQUE ELEKTRONIKEINHEIT UNIDADE ELECTRÓNICA IMPIANTO ELETTRONICO ELEKTRONISCHER MONITOR
 G6426N UNIDAD ELECTRÓNICA ELECTRONIC MONITOR UNITÉ ÉLECTRONIQUE ELEKTRONIKEINHEIT UNIDADE ELECTRÓNICA IMPIANTO ELETTRONICO ELEKTRONISCHER MONITOR 1 Fig.1 Fig.2 Fig.3 Fig.4 2 Español ELEMENTOS DEL MONITOR.-
MANUALE D ISTRUZIONI INSTRUCTION MANUAL MANUEL D INSTRUCTIONS HANDBUCH ANWEISUNGEN MANUAL DE INSTRUCCIONES MANUAL DE INSTRUÇÕES CORNETTA PER CELLULARE
 MANUALE D ISTRUZIONI INSTRUCTION MANUAL MANUEL D INSTRUCTIONS HANDBUCH ANWEISUNGEN MANUAL DE INSTRUCCIONES MANUAL DE INSTRUÇÕES CORNETTA PER CELLULARE 2Italiano manuale d istruzioni ISTRUZIONI D USO Inserisci
UNIDAD ELECTRÓNICA ELECTRONIC MONITOR UNITÉ ÉLECTRONIQUE ELEKTRONIKEINHEIT UNIDADE ELECTRÓNICA IMPIANTO ELETTRONICO ELEKTRONISCHER MONITOR
 UNIDAD ELECTRÓNICA ELECTRONIC MONITOR UNITÉ ÉLECTRONIQUE ELEKTRONIKEINHEIT UNIDADE ELECTRÓNICA IMPIANTO ELETTRONICO ELEKTRONISCHER MONITOR G2382U-G2385U Fig. 1 Fig. 2 Fig. 3 Fig. 4 Fig. 5 Fig. 6 Fig. 7
ROCK N STEREO SOUND DESK
 Read and save these instructions ROCK N STEREO SOUND DESK RTA-M1102-BK INSTRUCTIONS TABLE OF CONTENTS PACKAGE INCLUDES Package Includes... 2 Specifications... 2 Product Parts List... 3 1 2 3 Product Details...
150Mbps N Wireless USB Adapter Quick Installation Guide
 LevelOne WUA-0604 150Mbps N Wireless USB Adapter Quick Installation Guide Português Español Idiomas Português... 3 Español... 10 Este guia cobre apenas as situações mais comuns. Toda a informação detalhada
Matrox Epica Series 20162-G50-0110 FEP2-BKT11I
 Matrox Epica Series Epica TC20+ Epica TC48 Getting Started Guide Guide de mise en route Erste Schritte- Handbuch Guida introduttiva Guía de introducción 20162-G50-0110 FEP2-BKT11I Install your graphics
OSCILLATION 512 (LM 3R)
") Application Note The following application note allows to locate the LM series devices (LM3E, LM3R, LM4 and LM5) within network and check its connection information: Name, MAC, dynamic IP address and static
Application Note The following application note allows to locate the LM series devices (LM3E, LM3R, LM4 and LM5) within network and check its connection information: Name, MAC, dynamic IP address and static
english - EN português do Brasil - XC français - FR español - ES
 english - EN português do Brasil - XC français - FR español - ES www.microsoft.com/hardware 1 1 Insert two AAA alkaline batteries. Slide the power switch to the on position. To connect the keyboard to
English - EN Español (Latinoamérica) - XX Português (Brasil) - XC Français (Canada) - XD.
 - XX Português (Brasil) - XC Français (Canada) - XD.") English - EN Español (Latinoamérica) - XX Português (Brasil) - XC Français (Canada) - XD www.microsoft.com/hardware 1 Insert the two AAA alkaline batteries and turn on the mouse. To connect the mouse to
English - EN Español (Latinoamérica) - XX Português (Brasil) - XC Français (Canada) - XD www.microsoft.com/hardware 1 Insert the two AAA alkaline batteries and turn on the mouse. To connect the mouse to
HOW TO USE THE TARE FEATURE
 Thank you for purchasing the San Jamar Arti Digital Scale! Please read the following operation information to ensure the proper function of your new scale. HOW TO WEIGH 1. Press the POWER key. All display
Quick Installation Guide Internet Setup
 CBR-970 Wireless-N Broadband Router www.cnet.com.tw Established in California, U.S.A. since 1987 Quick Installation Guide Internet Setup What s included in the box CBR-970 Wireless N Broadband Router Quick
UNIDAD ELECTRÓNICA ELECTRONIC MONITOR UNITÉ ÉLECTRONIQUE ELEKTRONIKEINHEIT UNIDADE ELECTRÓNICA IMPIANTO ELETTRONICO ELEKTRONISCHER MONITOR
 UNIDAD ELECTRÓNICA ELECTRONIC MONITOR UNITÉ ÉLECTRONIQUE ELEKTRONIKEINHEIT UNIDADE ELECTRÓNICA IMPIANTO ELETTRONICO ELEKTRONISCHER MONITOR G6527TU / G6520R Fig.1 Fig.2 Fig.3 Fig.4 Español ELEMENTOS DEL
2010 Encore Electronics, Inc. All rights reserved.cover
 2010 Encore Electronics, Inc. All rights reserved.cover 2012 Encore Electronics, Inc. Product specifications, size, and shape are subject to change without notice, and actual product appearance may differ
Manual de instrucciones PE108N
 Manual de instrucciones PE108N SPANISH 1 Contenidos: 1. Listo en solo 3 pasos 3 2. Introducción 4 3. Como usar correctamente el podómetro. 5 4. Seleccionando una función(mode): 6 4.1 Reloj (TIME) 6 4.2
EUSS SOFTWARE UPDATE CHECKLIST COUNTERFEIT DETECTORS NEW 20 EURO BANKNOTE C32 C18 C07 C19 C20. English
 English NEW 20 EURO BANKNOTE SOFTWARE UPDATE CHECKLIST COUNTERFEIT DETECTORS Device New 20 Euro software version number Is this number displayed on your device during start-up? Yes Safescan 125 C32 No
EP-2906 Manual de instalación
 EP-2906 Manual de instalación Con el botón situado a la izquierda se configura en el modo de cliente y de la derecha es el modo de Punto de acceso AP (nota: El USB es sólo para la función de fuente de
GUÍA DE USUARIO PC-331117. Bienvenidos al mundo Perfect Choice. Antes de comenzar a usar el producto es importante que leas esta guía.
 GUÍA DE USUARIO PC-331117 Bienvenidos al mundo Perfect Choice Antes de comenzar a usar el producto es importante que leas esta guía. Conexión 1. Inserta el transmisor en el conector para encendedor de
Balanza electrónica de peso
 Balanza electrónica de peso KWD 1000 Pantalla negra de 1" con 6 teclas de función: Manual de funcionamiento 1 I. Antes de utilizar la balanza: 5. Ponga la balanza en una superficie estable. Regule las
La Video conferencia con Live Meeting
 Página 1 INSTRUCCIONES PARA TRABAJAR CON LIVE MEETING.- PREVIO. Para que tenga sentido la videoconferencia es conveniente que tengamos sonido (no suele ser problemático) y que tengamos vídeo. Si el ordenador
LED Strobe Panel - Manual
 PAG. 2 LED Strobe Panel - Manual SPECIFICATION Voltage: Power consumption: LED: Color temperature: Operation mode: Weight: Size: 3 00VAC 20VAC 05W (Max) 448* SMD5050 white LED 900K LED display 3.KGS *2.35*9.
UNIDAD ELECTRÓNICA ELECTRONIC MONITOR UNITÉ ÉLECTRONIQUE ELEKTRONIKEINHEIT UNIDADE ELECTRÓNICA IMPIANTO ELETTRONICO ELEKTRONISCHER MONITOR G6463
 UNIDAD ELECTRÓNICA ELECTRONIC MONITOR UNITÉ ÉLECTRONIQUE ELEKTRONIKEINHEIT UNIDADE ELECTRÓNICA IMPIANTO ELETTRONICO ELEKTRONISCHER MONITOR G6463 Fig.1 Fig.2 Fig.3 Fig.4 Español ELEMENTOS DEL MONITOR.-
Nr Taste Funktion Entspricht Taste am PS3 Controller 1 Öffnet das PS3 Menü zum Beenden des Films PS3 Home Taste 2 Quit Öffnet das PS3 Menü zum
 2 Nr Taste Funktion Entspricht Taste am PS3 Controller 1 Öffnet das PS3 Menü zum Beenden des Films PS3 Home Taste 2 Quit Öffnet das PS3 Menü zum Beenden des Films 3 Display Info Zeigt die Informationen
UNIDAD ELECTRÓNICA ELECTRONIC MONITOR UNITÉ ÉLECTRONIQUE ELEKTRONIKEINHEIT UNIDADE ELECTRÓNICA IMPIANTO ELETTRONICO ELEKTRONISCHER MONITOR H930U
 UNIDAD ELECTRÓNICA ELECTRONIC MONITOR UNITÉ ÉLECTRONIQUE ELEKTRONIKEINHEIT UNIDADE ELECTRÓNICA IMPIANTO ELETTRONICO ELEKTRONISCHER MONITOR H930U Fig. 1 Fig. 2 Fig. 3 Fig. 4 Fig.5 Español PUESTA EN MARCHA.-
CONSERVAR ESTE DOCUMENTO COMO REFERENCIA EN LUGAR SEGURO
 CONSERVAR ESTE DOCUMENTO COMO REFERENCIA EN LUGAR SEGURO Montaje e Instrucciones de Funcionamiento de los Presostatos Electr nicos 33D 33D Ð Funcionamiento y ajustes 1. Ajustes standard (MENU Setup) EL
KAISSA Manual Rápido De Usuario. Rev 1.0
 KAISSA Manual Rápido De Usuario Rev 1.0 Ante todo gracias por adquirir el innovador reloj de ajedrez KAISSA, diseñado bajo la filosofía del Diseño Para Todos. KAISSA tiene dos modos de funcionamiento principales
Race Manager by Master Timing Guía del usuario GUIA RACE MANAGER. Eventronic, SL
 GUIA RACE MANAGER Eventronic, SL DESCRIPCIÓN DEL PROGRAMA El Race Manager es un programa que se creó para facilitar el trabajo de la dirección de carrera de un evento durante y después de una carrera.
Zune Car Pack trousse Pour l auto Zune Paquete para auto Zune Start. Démarrer. Iniciar.
 Zune Car Pack trousse Pour l auto Zune Paquete para auto Zune Start. Démarrer. Iniciar. FM Transmitter Tune Down/ AutoSeek Tune Up/ AutoSeek Preset 1 Charger Preset 2 Light 1 Plug the charger into your
english - EN Español (Latinoamérica) - XX Português (Brasil) - XC Français (Canadá) - XD
 - XX Português (Brasil) - XC Français (Canadá) - XD") english - EN Español (Latinoamérica) - XX Português (Brasil) - XC Français (Canadá) - XD www.microsoft.com/hardware 1 4 Pair your mouse with your Device Step 1: Step 2: Step 3: Step 4: Step 5: On the bottom
english - EN Español (Latinoamérica) - XX Português (Brasil) - XC Français (Canadá) - XD www.microsoft.com/hardware 1 4 Pair your mouse with your Device Step 1: Step 2: Step 3: Step 4: Step 5: On the bottom
Manual de instrucciones. Opción en línea
 Manual de instrucciones Opción en línea Generalidades...3 El PowerControl con la opción en línea...3 El software SRM de la opción en línea...4 La pestaña Mode...5 La pestaña Main Chart...5 La pestaña Predefined
TELEMANDO TELEFONICO I-207.2
 TELEMANDO TELEFONICO CARACTERISTICAS TECNICAS Alimentación 12 V cc. Consumo máximo 150 ma. Salidas reles / Carga máxima 230 Vca / 3A max Peso neto 78 grs Dimensiones 87 x 72 x 27 mm Temperatura trabajo
Emax DOC. N. 1SDH000460R L3633
 Emax DOC. N. 1SDH000460R0629 - L3633 Contatti ausiliari supplementari dditional auxiliary contacts Zusätzliche Hilfsschalter Contacts auxiliaires supplémentaires Contacto auxiliares suplementarios In aggiunta
1. Información general del Sistema de Monitorización y Gestión de VOLTA Smart Energy... 2. 2. Instalar el gate (Smart Gate)... 4
... 4") Manual del Usuario 1. Información general del Sistema de Monitorización y Gestión de VOLTA Smart Energy... 2 2. Instalar el gate (Smart Gate)... 4 3. Instalar un medidor (Smart Meter) y sincronizarlo con
Manual del Usuario 1. Información general del Sistema de Monitorización y Gestión de VOLTA Smart Energy... 2 2. Instalar el gate (Smart Gate)... 4 3. Instalar un medidor (Smart Meter) y sincronizarlo con
Table of Contents ACT LABS GS Addendum
 GS Addendum Table of Contents ACT LABS GS Addendum English --------------------------------------------------------------- 4 Français ------------------------------------------------------------- 5 Deutsche
PC380 Web Cam. User s Guide Version 1.1
 PC380 Web Cam User s Guide Version 1.1 Web Camera User s Guide System Requirements Microsoft Windows 98SE, Windows Me, Windows 2000, Windows XP. Software Installation Attention: Make sure to install