CHAT. 50 Personal Speaker Phone QUICK START GUIDE
|
|
|
- César Cuenca Maestre
- hace 8 años
- Vistas:
Transcripción
1 CHAT 50 Personal Speaker Phone QUICK START GUIDE

2 CHAT 50 Personal Speaker Phone INSTALLING CHAT 50 SOFTWARE 1. Insert the Chat 50 CD into your computer s CD-ROM/DVD drive. INSTALLATION DER CHAT 50 SOFTWARE 1. Legen Sie die Chat 50-CD ins CD-ROM/DVD-Laufwerk Ihres PCs ein. INSTALLATION DU LOGICIEL CHAT Insérez le CD Chat 50 dans votre lecteur CD-ROM/DVD. INSTALACIÓN DEL SOFTWARE CHAT Inserte el CD de Chat 50 en la unidad de CD-ROM/DVD de su computadora. INSTALAÇÃO DO SOFTWARE DO CHAT Insira o CD do Chat 50 na unidade de CD-ROM/DVD do computador. INSTALLAZIONE DEL SOFTWARE DEL CHAT Inserire il CD del Chat 50 nell unità CD-ROM del computer.

3 QUICK START GUIDE 2. Follow the instructions in the Setup Wizard to complete installation of the Chat 50 software. 2. Installieren Sie die Chat 50-Software entsprechend der Anleitungen des Setup-Assistenten. 2. Suivez les instructions de l Assistant d installation afin de procéder à l installation du logiciel Chat Siga las instrucciones en el Asistente de configuración para completar la instalación del software Chat Siga as instruções no Wizard de configuração para completar a instalação do software Chat Seguire le istruzioni della Configurazione guidata per eseguire l installazione del software del Chat 50.

4 CHAT 50 Personal Speaker Phone CONFIGURING AND TESTING YOUR CHAT Using the included USB 2.0 cable, connect the Chat 50 to your PC as shown in the picture to the right. KONFIGURATION UND PRÜFUNG IHRES CHAT Verbinden Sie Chat 50 mit dem beigefügten USB 2.0 Kabel am PC, wie in der Abbildung rechts gezeigt. CONFIGURATION ET ESSAI DE VOTRE CHAT À l aide du câble USB 2.0 fourni, reliez Chat 50 à votre PC en suivant l illustration ci-contre. CONFIGURACIÓN Y PRUEBA DE SU CHAT Use el cable USB 2.0 incluido y conecte el Chat 50 a su PC como se muestra en la imagen a la derecha. CONFIGURAÇÃO E TESTE DO CHAT Utilizando o cabo USB 2.0 que o acompanha, conecte o Chat 50 ao PC conforme indicado na ilustração à direita. CONFIGURAZIONE E PROVA DEL CHAT Collegare il Chat 50 al proprio PC con il cavo USB 2.0 incluso come illustrato nella figura a destra.

5 QUICK START GUIDE

6 CHAT 50 Personal Speaker Phone 2. Start the Chat 50 configuration software by doubleclicking the Clearone Chat icon on your desktop. 2. Starten Sie die Chat 50 Konfigurations-Software durch doppelklicken auf den Clearone Chat-Icon auf der Benutzeroberfläche. 2. Démarrez le logiciel de configuration de Chat 50 en cliquant deux fois sur l icône Clearone Chat se trouvant sur le Bureau. 2. Inicie el software de configuración Chat 50 al hacer clic en el icono de Clearone Chat en su escritorio. 2. Inicie o software de configuração do Chat 50 clicando duas vezes no ícone do Clearone Chat na área de trabalho. 2. Avviare la configurazione del software del Chat 50 facendo doppio clic sull icona Clearone Chat sul desktop.

7 QUICK START GUIDE 3. Click the Device Setup button. 3. Klicken Sie auf die Schaltfläche Device Setup. 3. Cliquez sur le bouton Device Setup. 3. Haga clic en el botón Device Setup. 3. Clique no botão Device Setup. 3. Fare clic sul pulsante Device Setup.

8 CHAT 50 Personal Speaker Phone 4. Click the type of device you are using with your Chat 50 (see the picture to the right). 4. Klicken Sie auf das Gerät, das Sie mit Ihrem Chat 50 verwenden (siehe Bild rechts). 4. Sélectionnez le type d appareil utilisé avec votre Chat 50 (voir illustration ci-contre). 4. Haga clic en el tipo de dispositivo que está usando con su Chat 50 (vea la imagen a la derecha). 4. Clique no tipo de dispositivo que está utilizando com o Chat 50 (veja ilustração à direita). 4. Fare clic sul tipo di dispositivo che si sta utilizzando insieme al proprio Chat 50 (vedere figura a destra).
. 4.")
9 QUICK START GUIDE

10 CHAT 50 Personal Speaker Phone 5. Click the manufacturer of your device; click Generic, if not listed (see the picture to the right). 5. Klicken Sie auf den Hersteller Ihres Geräts. Sollte er nicht aufgeführt sein, klicken Sie auf Generic (siehe Bild rechts). 5. Sélectionnez le fabricant de l appareil. Cliquez sur Generic si ce dernier ne figure pas dans la liste (voir illustration ci-contre). 5. Haga clic en el fabricante de su dispositivo; haga clic en Generic, si no está listado (vea la imagen a la derecha). 5. Clique no nome do fabricante do dispositivo; clique em Generic se o fabricante não estiver alistado (veja ilustração à direita). 5. Fare clic sul nome del produttore del dispositivo o su Generic se il nome non è compreso nell elenco (vedere figura a destra).
. 5.")
11 QUICK START GUIDE
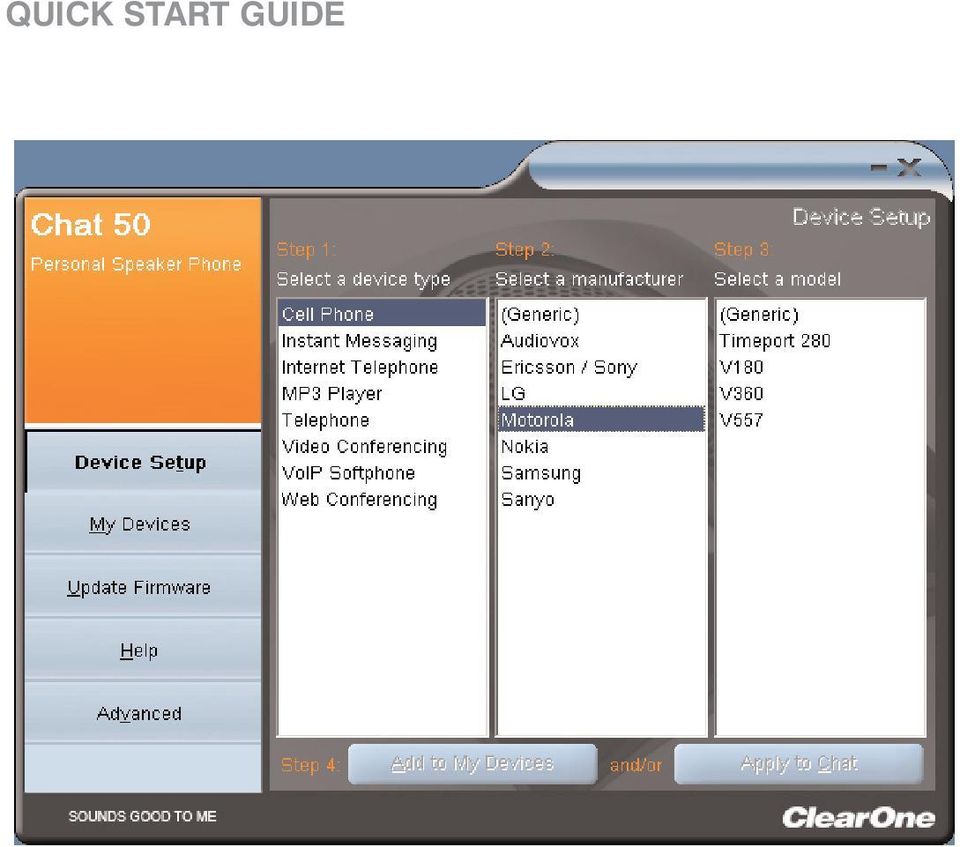
12 CHAT 50 Personal Speaker Phone 6. Click the model of your device; click Generic, if not listed (see the picture to the right). 6. Klicken Sie auf das Modell ihres Geräts. Sollte es nicht aufgeführt sein, klicken Sie auf Generic (siehe Bild rechts). 6. Sélectionnez le modèle de l appareil. Cliquez sur Generic si ce dernier ne figure pas dans la liste (voir illustration ci-contre). 6. Haga clic en el modelo de su dispositivo; haga clic en Generic, si no está listado (vea la imagen a la derecha). 6. Clique no modelo do dispositivo; clique em Generic, se não estiver alistado (veja ilustração à direita). 6. Fare clic sul modello del proprio dispositivo o su Generic se il modello non è compreso nell elenco (vedere figura a destra).
. 6.")
13 QUICK START GUIDE
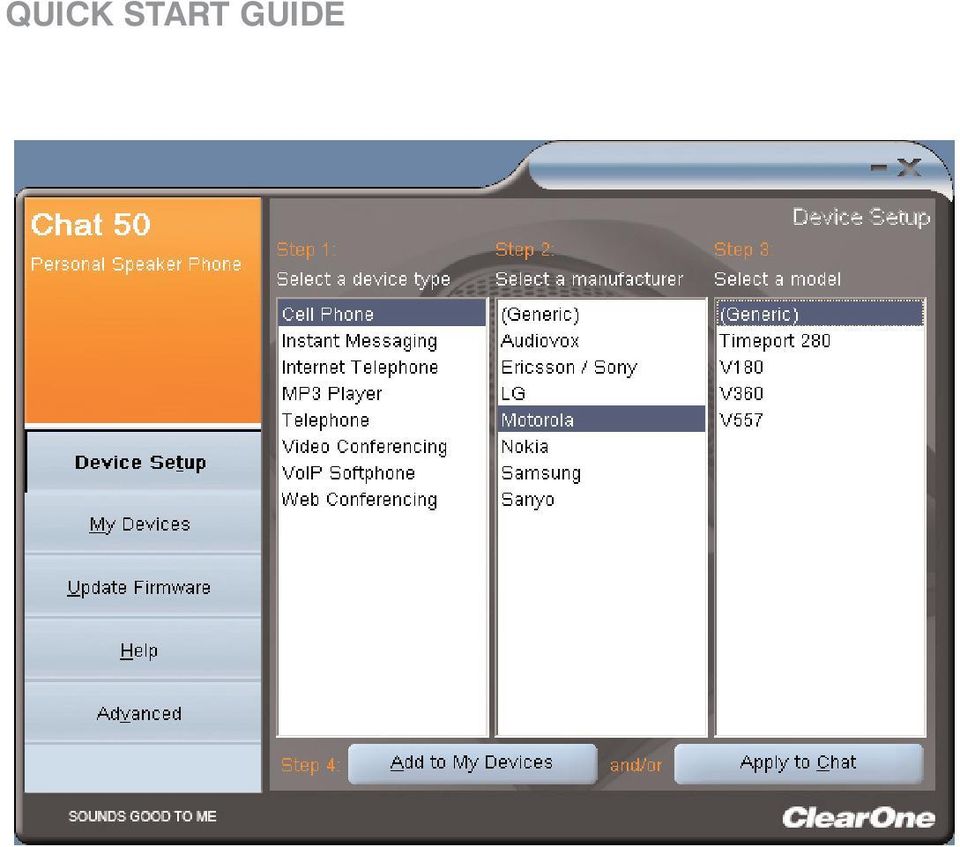
14 CHAT 50 Personal Speaker Phone 7. Click the Apply to Chat button to apply these audio settings to your Chat Klicken Sie auf die Schaltfläche Apply to Chat, um diese Audio-Einstellungen auf Ihr Chat 50 anzuwenden. 7. Cliquez sur le bouton Apply to Chat pour appliquer ces paramètres audio à votre Chat Haga clic en Apply to Chat para aplicar estos ajustes de audio a su Chat Clique no botão Apply to Chat para aplicar essas configurações de áudio ao Chat Fare clic sul pulsante Apply to Chat per applicare queste impostazioni audio al proprio Chat Connect your Chat 50 to the device you just set up (see the specific connection picture in the following paragraphs for the connection). NOTE: When connecting to an analog device, you can leave the Chat 50 connected to your PC if you wish. (If you do, then you do not need to connect the power supply because the Chat 50 is being powered through the USB 2.0 cable.) 8. Verbinden Sie Ihr Chat 50 mit dem Gerät, das Sie soeben eingerichtet haben (siehe Abbildung der speziellen Verbindung in den folgenden Paragrafen für die Verbindung). HINWEIS: Wenn Sie ein Analog-Gerät anschließen, können Sie Chat 50 an Ihrem PC angeschlossen lassen. (In diesem Fall braucht das Netzgerät nicht angeschlossen werden, weil Chat 50 durch das USB 2.0 Kabel mit Strom versorgt wird.)
.")
15 QUICK START GUIDE 8. Reliez votre Chat 50 à l appareil que vous venez de configurer (consultez le schéma de raccordement présenté plus bas). REMARQUE : Lorsque vous reliez le dispositif à un périphérique analogique, Chat 50 peut rester connecté à votre PC si vous le souhaitez. (Dans ce cas, vous ne devez pas débrancher le câble d alimentation car Chat 50 sera alimenté par le câble USB 2.0.) 8. Conecte su Chat 50 al dispositivo que acaba de configurar (vea la imagen de conexión en los siguientes párrafos para la conexión). NOTA: cuando se conecte a un dispositivo análogo, usted podrá dejar el Chat 50 conectado a su PC si lo desea. (Si lo hace, entonces no necesitará conectar el suministro eléctrico debido a que el Chat 50 está siendo energizado por el cable USB 2.0.) 8. Conecte o Chat 50 ao dispositivo que acabou de configurar (veja a ilustração da conexão nos parágrafos a seguir para fazer a conexão). OBSERVAÇÃO: quando conectar a um dispositivo análogo, você poderá deixar o Chat 50 conectado ao PC, se quiser. (Se fizer assim, não será necessário conectar a fonte de alimentação porque o Chat 50 receberá alimentação por meio do cabo USB 2.0.) 8. Collegare il Chat 50 al dispositivo appena configurato (per le modalità di connessione vedere l illustrazione relativa alla connessione specifica nei paragrafi seguenti). NOTA: quando si effettua il collegamento con un dispositivo analogico si può anche lasciare il Chat 50 collegato al PC (in questo caso non sarà necessario collegare l alimentazione elettrica, poiché il Chat 50 viene alimentato mediante il cavo USB 2.0.)
.")
16 CHAT 50 Personal Speaker Phone 9. Use the device and note the superior audio quality of the Chat Verwenden Sie ihr Gerät und beachten Sie die überlegene Audioqualität des Chat Utilisez l appareil et notez la qualité audio supérieure du Chat Use el dispositivo y observe la calidad de audio superior del Chat Use o dispositivo e observe a qualidade superior de áudio do Chat Usare il dispositivo e notare la qualità audio superiore del Chat 50.

17 QUICK START GUIDE 10. If you wish to further adjust the Chat 50 audio settings for this device, refer to the Chat 50 User s Manual for more information. 10. Falls Sie die Chat 50 Audio-Einstellungen für dieses Gerät noch weiter einstellen möchten, finden Sie weitere Informationen in der Chat 50 Bedienungsanleitung. 10. Si vous souhaitez paramétrer les options audio de Chat 50 pour le périphérique utilisé, consultez le Guide de l utilisateur de Chat 50 pour de plus amples informations. 10. Si desea ajustar más aun los ajustes de audio del Chat 50 para este dispositivo, refiérase al Manual del usuario del Chat 50 para obtener más información. 10. Se quiser fazer mais ajustes às configurações de áudio do Chat 50, consulte o Manual do usuário do Chat 50 para obter mais informações. 10. Se si vogliono effettuare ulteriori regolazioni sulle impostazioni del Chat 50 per questo dispositivo, consultare il Manuale per l utente del Chat 50 per altre informazioni.

18 CHAT 50 Personal Speaker Phone CONNECTING YOUR CHAT 50 The following paragraphs show how to connect your Chat 50 to a number of different devices: CONNECTING CHAT 50 TO A TELEPHONE 1. Using the included power supply (USB Plus only), connect the Chat 50 to a power outlet as shown in the picture to the right. SCHLIEßEN SIE IHR CHAT 50 AN Die folgenden Paragrafen zeigen Ihnen, wie Sie Ihr Chat 50 an eine Reihe verschiedener Geräte anschließen: ANSCHLUSS DES CHAT 50 AN EIN TELEFON 1. Verbinden Sie Chat 50 mit dem beigefügten Netzteil (nur USB Plus) mit einer Steckdose, wie in der Abbildung rechts gezeigt. CONNEXION DE VOTRE CHAT 50 Les paragraphes suivants indiquent comment relier votre Chat 50 à un certain nombre de périphériques : CONNEXION DE CHAT 50 À UN TÉLÉPHONE 1. À l aide du câble d alimentation fourni (USB Plus uniquement), reliez Chat 50 à une prise électrique en suivant l illustration ci-contre. CONEXIÓN A SU CHAT 50 Los siguientes párrafos muestran cómo conectar su Chat 50 a varios dispositivos diferentes: CONEXIÓN DEL CHAT 50 A UN TELÉFONO 1. Al usar el suministro eléctrico incluido (sólo USB Plus), conecte el Chat 50 a un enchufe de energía como se muestra en la imagen.
 mit einer Steckdose, wie in der Abbildung rechts gezeigt.")
19 QUICK START GUIDE CONEXÃO DO CHAT 50 Os parágrafos a seguir mostram como conectar o Chat 50 a vários dispositivos diferentes: CONEXÃO DO CHAT 50 A UM TELEFONE 1. Utilizando a fonte de alimentação incluída (somente USB Plus), conecte o Chat 50 a uma tomada elétrica conforme ilustrado na figura. COME COLLEGARE IL CHAT 50 I paragrafi seguenti mostrano come è possibile collegare il proprio Chat 50 a numerosi dispositivi diversi: COLLEGARE IL CHAT 50 CON UN TELEFONO 1. Usando l alimentatore elettrico incluso (solo per il modello USB Plus), collegare il Chat 50 ad una presa elettrica come illustrato nella figura.

20 CHAT 50 Personal Speaker Phone 2. Using a ClearOne telephone connection cable (available separately), connect the Chat 50 to your telephone s headset jack (or 2.5mm jack) as shown in the picture to the right. DO NOT plug the cable into the telephone s line jack as damage to the telephone and/or Chat 50 might occur. 2. Verbinden Sie Chat 50 mit einem ClearOne Telefonkabel (separat erhältlich) am Kopf-höreranschluss (oder 2,5 mm-anschluss) Ihres Telefons, wie in der Abbildung rechts gezeigt. Stecken Sie das Kabel NICHT in den Anschluss für das Telefonkabel, da dies zu Schäden am Telefon und/oder Chat 50 führen kann. 2. À l aide d un câble téléphonique ClearOne (fourni séparément), reliez Chat 50 à la prise casque de votre téléphone (prise 2,5 mm) en suivant l illustration ci-contre. NE branchez PAS le câble dans l entrée ligne du téléphone car cela pourrait endommager le téléphone ou le Chat Al usar un cable de conexión telefónica ClearOne (disponible por separado), conecte el Chat 50 al conector del enchufe de su teléfono (o al enchufe de 2.5 mm) como se muestra en la imagen a la derecha. NO conecte el cable en el enchufe de línea telefónica debido a que podrá ocurrir daño a su teléfono o al Chat Utilizando um cabo para conexão de telefone ClearOne (disponível separadamente), conect o Chat 50 à tomada do telefone (ou tomada de 2,5 mm) conforme ilustrado na figura à direita. NÃO conecte o cabo à tomada de linha do telefone porque isso pode causar danos ao telefone e/ou ao Chat 50.

21 QUICK START GUIDE 2. Con un cavo di connessione telefonica ClearOne (disponibile separatamente), collegare il Chat 50 alla presa cuffia da 2,5mm del proprio telefono come illustrato nella figura. NON collegare il cavo nella presa linea del telefono, poiché ciò potrebbe danneggiare il telefono e/o il Chat 50.
22 CHAT 50 Personal Speaker Phone CONNECTING CHAT 50 TO A CELLPHONE 1. Using the included power supply (USB Plus only), connect the Chat 50 to a power outlet as shown in the picture to the right. ANSCHLUSS DES CHAT 50 AN EIN HANDY 1. Verbinden Sie Chat 50 mit dem beigefügten Netzteil (nur USB Plus) mit einer Steckdose, wie in der Abbildung rechts gezeigt. CONNEXION DE CHAT 50 À UN TÉLÉPHONE MOBILE 1. À l aide du câble d alimentation fourni (USB Plus uniquement), reliez Chat 50 à une prise électrique en suivant l illustration ci-contre. CONEXIÓN DEL CHAT 50 A UN TELÉFONO CELULAR 1. Al usar el suministro eléctrico incluido (Sólo USB Plus), conecte el Chat 50 a un tomacorriente de energía como se muestra en la imagen a la derecha. CONEXÃO DO CHAT 50 A UM TELEFONE CELULAR 1. Utilizando a fonte de alimentação incluída (somente USB Plus), conecte o Chat 50 a uma tomada elétrica conforme ilustrado na figura à direita. COLLEGARE IL CHAT 50 CON UN TELEFONO CELLULARE 1. Usando l alimentatore elettrico incluso (solo per il modello USB Plus), collegare il Chat 50 ad una presa elettrica come illustrato nella figura a destra.
23 QUICK START GUIDE 3.5mm 2.5mm
24 CHAT 50 Personal Speaker Phone 2. Using the included 2.5mm-3.5mm cellphone connection cable, connect the Chat 50 to your cellphone s headset jack (or 2.5mm jack)as shown in the picture to the right. 2. Verbinden Sie Chat 50 mit dem beigefügten 2,5-3,5mm Handy- Verbindungskabel am Kopfhöreranschluss (oder 2,5 mm- Anschluss) Ihres Handys, wie in der Abbildung rechts gezeigt. 2. À l aide du câble de 2,5-3,5 mm pour téléphone mobile, reliez Chat 50 à la prise casque de votre téléphone mobile (ou à la prise 2,5 mm) en suivant l illustration ci-contre. 2. Al usar el cable de conexión para teléfono celular de 2.5 mm a 3.5 mm, conecte el Chat 50 al enchufe para auriculares de su teléfono celular (o al enchufe de 2.5 mm) como se muestra en la imagen a la derecha. 2. Utilizando o cabo de 2,5 mm-3,5 mm para conexão de telefone celular, conecte o Chat 50 à tomada do telefone celular (ou tomada de 2,5 mm) conforme ilustrado na figura à direita. 2. Usando il cavo di connessione per telefono cellulare 2,5mm-3,5mm incluso, collegare il Chat 50 alla presa cuffia da 2,5mm del proprio telefono cellulare come illustrato nella figura a destra.
25 QUICK START GUIDE 3.5mm 2.5mm
26 CHAT 50 Personal Speaker Phone CONNECTING CHAT 50 TO AN MP3 PLAYER 1. Using the included power supply (USB Plus only), connect the Chat 50 to a power outlet as shown in the picture to the right. ANSCHLUSS DES CHAT 50 AN EINEN MP3-SPIELER 1. Verbinden Sie Chat 50 mit dem beigefügten Netzteil (nur USB Plus) mit einer Steckdose, wie in der Abbildung rechts gezeigt. CONNEXION DE CHAT 50 À UN LECTEUR MP3 1. À l aide du câble d alimentation fourni (USB Plus uniquement), reliez Chat 50 à une prise électrique en suivant l illustration ci-contre. CONEXIÓN DEL CHAT 50 A UN REPRODUCTOR MP3 1. Al usar el suministro eléctrico incluido (Sólo USB Plus), conecte el Chat 50 a un tomacorriente de energía como se muestra en la imagen a la derecha. CONEXÃO DO CHAT 50 A UM REPRODUTOR MP3 1. Utilizando a fonte de alimentação incluída (somente USB Plus), conecte o Chat 50 a uma tomada elétrica conforme ilustrado na figura à direita. COLLEGARE IL CHAT 50 CON UN RIPRODUTTORE MP3 1. Usando l alimentatore elettrico incluso (solo per il modello USB Plus), collegare il Chat 50 ad una presa elettrica come illustrato nella figura a destra.
27 QUICK START GUIDE
28 CHAT 50 Personal Speaker Phone 2. Using a ClearOne MP3 connection cable (available separately), connect the Chat 50 to your MP3 player s headset jack (or 2.5mm jack)as shown in the picture to the right. 2. Verbinden Sie Chat 50 mit einem ClearOne MP3-Kabel (separat erhältlich) am Kopfhöreranschluss (oder 2,5 mm-anschluss) Ihres MP3-Spielers, wie in der Abbildung rechts gezeigt. 2. À l aide d un câble MP3 ClearOne (fourni séparément), reliez Chat 50 à la prise casque de votre téléphone (prise 2,5 mm) en suivant l illustration ci-contre. 2. Al usar un cable de conexión MP3 de ClearOne (disponible por separado), conecte el Chat 50 al enchufe para auriculares de su reproductor MP3 (o a un enchufe de 2.5 mm) como se muestra en la imagen a la derecha. 2. Utilizando um cabo de conexão ClearOne MP3 (disponível separadamente), conecte o Chat 50 à tomada do reprodutor MP3 (ou tomada de 2,5 mm) conforme ilustrado na figura à direita. 2. Con un cavo ClearOne di connessione MP3 (disponibile separatamente), collegare il Chat 50 alla presa cuffia da 2,5mm del proprio riproduttore MP3 come illustrato nella figura a destra.
29 QUICK START GUIDE
30 CHAT 50 Personal Speakerphone CONNECTING CHAT 50 TO A DESKTOP VIDEO CONFERENCING DEVICE 1. Using the included power supply, connect the Chat 50 to a power outlet as shown in the picture to the right. ANSCHLUSS DES CHAT 50 AN EINE DESKTOP-VIDEO-KONFERENZANLAGE 1. Verbinden Sie Chat 50 mit dem beigefügten Netzteil mit einer Steckdose, wie in der Abbildung rechts gezeigt. CONNEXION DE CHAT 50 À UN SYSTÈME DE VISIOCONFÉRENCE 1. À l aide du câble d alimentation fourni, reliez Chat 50 à une prise électrique en suivant l illustration ci-contre. CONEXIÓN DEL CHAT 50 A UN DISPOSITIVO DE ESCRITORIO PARA VIDEO CONFERENCIA 1. Al usar el suministro eléctrico incluido, conecte el Chat 50 a un tomacorriente de energía como se muestra en la imagen a la derecha. CONEXÃO DO CHAT 50 A UM DISPOSITIVO DE MESA PARA CONFERÊNCIA COM VÍDEO 1. Utilizando o fonte de alimentação incluída, conecte o Chat 50 a uma tomada elétrica conforme ilustrado na figura à direita. COLLEGARE IL CHAT 50 CON UN SISTEMA PER VIDEOCONFERENZE 1. Usando l alimentatore elettrico incluso, collegare il Chat 50 ad una presa elettrica come illustrato nella figura a destra.
31 QUICK START GUIDE
32 CHAT 50 Personal Speaker Phone 2. Using a ClearOne desktop video conferencing device connection cable (available separately), connect the Chat 50 to your desktop video conferencing device s headset jack (or 2.5mm jack)as shown in the picture to the right. 2. Verbinden Sie Chat 50 mit einem ClearOne Kabel für Video- Konferenzanlagen (separat erhältlich) am Kopfhöreranschluss (oder 2,5 mm-anschluss) Ihrer Desktop-Videokonferenzanlage, wie in der Abbildung rechts gezeigt. 2. À l aide d un câble ClearOne pour système de visioconférence (fourni séparément), reliez Chat 50 à la prise casque de votre système de visioconférence (ou à la prise 2,5 mm) en suivant l illustration ci-contre. 2. Al usar un cable de conexión para un dispositivo de escritorio para video conferencia de ClearOne (disponible por separado), conecte el Chat 50 al enchufe para auriculares de su dispositivo de escritorio para video conferencia (o a un conector de 2.5 mm) como se muestra en la imagen a la derecha. 2. Utilizando um cabo de conexão para dispositivo de mesa para conferência com vídeo (disponível separadamente), conecte o Chat 50 à tomada do dispositivo de mesa para conferência com vídeo (ou tomada 2,5 mm) conforme ilustrado na figura à direita. 2. Con un cavo ClearOne di connessione per sistemi desktop da videoconferenza (disponibile separatamente), collegare il Chat 50 alla presa cuffia da 2,5mm del dispositivo desktop per videoconferenza come illustrato nella figura a destra.
33 QUICK START GUIDE
34 CHAT 50 Personal Speaker Phone USING THE CHAT 50 POWER LED INDICATOR The power LED indicator lights blue when the Chat 50 is connected to a PC via the USB 2.0 cable or when the power supply is plugged in. The indicator lights red when the Chat 50 microphone mute function is active. SO FUNKTIONIERT CHAT 50 LED-STROMANZEIGE Die LED-Stromanzeige leuchtet blau auf, wenn Chat 50 mit dem USB 2.0 Kabel an einem PC angeschlossen ist oder wenn das Netzgerät eingesteckt ist. Die Anzeige leuchtet rot auf, wenn die Stummschaltung des Chat 50 Mikrofons aktiv ist. UTILISATION DE VOTRE CHAT 50 VOYANT D ALIMENTATION Le voyant d alimentation est bleu lorsque Chat 50 est relié au PC par un câble USB 2.0 ou lorsque le cordon d alimentation est branché. Le voyant clignote en rouge lorsque Chat 50 est en mode Sourdine (mute). USO DEL CHAT 50 INDICADOR DEL LED DE ENERGÍA El indicador del LED de energía se ilumina a azul cuando el Chat 50 se conecta a una PC a través de un cable USB 2.0 o cuando se enchufa al suministro de energía. El indicador se ilumina a rojo cuando está activa la función para silenciar el micrófono del Chat 50.
35 QUICK START GUIDE UTILIZAÇÃO DO CHAT 50 INDICADOR LED DE ALIMENTAÇÃO O indicador LED de alimentação acende em azul quando o Chat 50 é conectado a um PC por meio do cabo USB 2.0 ou quando a fonte de alimentação é conectada. O indicador acende em vermelho quando a função silenciadora (mute) do microfone do Chat 50 está ativa. USO DEL CHAT 50 INDICATORE LED DI ALIMENTAZIONE L indicatore LED di alimentazione si illumina in blu quando il Chat 50 è collegato ad un PC mediante il cavo USB 2.0 o quando l alimentatore elettrico è collegato. L indicatore diventa rosso quando è attiva la funzione mute del microfono del Chat 50.
36 CHAT 50 Personal Speakerphone VOLUME UP/DOWN & MUTE BUTTONS Use the Volume Up/Down buttons to adjust the volume level of the Chat 50. Use the Mute button to mute the Chat 50 s microphone until the Mute button is pressed again. If you are using the Chat 50 with a PC, you can also use the Volume Control in Windows to make these adjustments. DIE LAUTSTÄRKEREGELUNG & MUTE (STUMMSCHALTUNG) Stellen Sie die Lautstärke des Chat 50 mit den Lautstärketasten (Volume Up/Down) ein. Die Mute-Taste schaltet das Mikrofon des Chat 50 stumm, bis Sie die Taste wieder drücken, um die Stummschaltung aufzuheben. Wenn Sie Chat 50 mit einem PC verwenden, können Sie die Lautstärke auch mit der Lautstärkenregelung in Windows einstellen. BOUTONS DE CONTRÔLE DU VOLUME ET BOUTON MUTE Vous pouvez utiliser les boutons Haut et Bas pour ajuster le volume de Chat 50. Utilisez le bouton Mute pour couper le microphone de Chat 50 jusqu à ce que vous appuyiez à nouveau sur le bouton Mute. Si vous utilisez Chat 50 avec un PC, vous pouvez aussi utiliser le Contrôle du volume de Windows.
37 QUICK START GUIDE BOTONES PARA SUBIR O BAJAR VOLUMEN Y PARA SILENCIAR Use los botones para subir o bajar volumen para ajustar el nivel del volumen del Chat 50. Use el botón para silenciar el micrófono del Chat 50 hasta que el botón para silenciar se presione otra vez. Si usted está usando el Chat 50 con una PC, también puede usar el control de volumen en Windows para hacer estos ajustes. BOTÕES DE VOLUME UP/DOWN (AUMENTAR/DIMINUIR) E MUTE (SILENCIAR) Use os botões de volume Up/Down para ajustar o nível do volume do Chat 50. Use o botão Mute para silenciar o microfone do Chat 50 até que esse botão seja novamente pressionado. Se estiver utilizando o Chat 50 com um PC, você poderá também utilizar o Controle de volume do Windows para fazer esses ajustes. TASTI VOLUME SU/GIÙ E MUTE Utilizzare i pulsanti Su/Giù per regolare il livello del volume del Chat 50. Usare il tasto MUTE per silenziare il microfono del Chat 50 fin quando il tasto Mute non viene nuovamente premuto. Se si sta utilizzando il Chat 50 insieme ad un PC, per queste regolazioni è possibile anche utilizzare il Controllo volume di Windows.
38 CHAT 50 Personal Speakerphone
39 QUICK START GUIDE
40 CHAT 50 Personal Speakerphone
41 QUICK START GUIDE
42 CHAT 50 Personal Speakerphone
43 QUICK START GUIDE
44 CHAT 50 Personal Speakerphone
45 QUICK START GUIDE
46 CHAT 50 Personal Speakerphone
47 QUICK START GUIDE
48 CHAT 50 Personal Speakerphone
49 QUICK START GUIDE
50 CHAT 50 Personal Speakerphone
51 QUICK START GUIDE
52 CHAT 50 Personal Speakerphone
53 QUICK START GUIDE
54 CHAT 50 Personal Speakerphone
55 QUICK START GUIDE
56 CHAT 50 Personal Speakerphone
57 QUICK START GUIDE
58 CHAT 50 Personal Speakerphone
59 QUICK START GUIDE 3.5mm 2.5mm
60 CHAT 50 Personal Speakerphone
61 QUICK START GUIDE 3.5mm 2.5mm
62 CHAT 50 Personal Speakerphone
63 QUICK START GUIDE
64 CHAT 50 Personal Speakerphone
65 QUICK START GUIDE
66 CHAT 50 Personal Speakerphone
67 QUICK START GUIDE
68 CHAT 50 Personal Speakerphone
69 QUICK START GUIDE
70 CHAT 50 Personal Speakerphone
71 QUICK START GUIDE
72 CHAT 50 Personal Speakerphone
73 QUICK START GUIDE
74 Caution: Read the Safety Information in the instruction manual TECHNICAL SUPPORT TELEPHONE FAX ClearOne Communications, Inc. All rights reserved. Information in this document is subject to change without notice Rev. 1.0.
Start. Démarrer. Iniciar.
 Zune CABLE Pack câble de synchronisation Zune cable de sincronizacíon Zune Start. Démarrer. Iniciar. To sync and charge, connect the sync cable to your Zune and your PC. Just need to charge? Connect your
1. DESCARGA DEL SOFTWARE DE BLUETOOTH EN EL SMARTPHONE
 MANUAL DEL USUARIO PARA BLUETOOTH ES 1. DESCARGA DEL SOFTWARE DE BLUETOOTH EN EL SMARTPHONE Entre en Apple Store o Google Play y busque: - BH Premium BH Premium 2. FIJACIÓN DEL MÓDULO BLUETOOTH Fije el
START INICIAR - DÉMARRAGE - INIZIO - INICIAR - INICIO
 START INICIAR - DÉMARRAGE - INIZIO - INICIAR - INICIO ENG: Microsoft wireless mouse PTB: Mouse sem fio da Microsoft FRA: Souris sans fil Microsoft ITA: Mouse senza fili Microsoft PTG: Rato sem fios Microsoft
150Mbps N Wireless USB Adapter Quick Installation Guide
 LevelOne WUA-0604 150Mbps N Wireless USB Adapter Quick Installation Guide Português Español Idiomas Português... 3 Español... 10 Este guia cobre apenas as situações mais comuns. Toda a informação detalhada
Modo de empleo Teléfono USB
 Modo de empleo Teléfono USB I. Función: Compatible con Skype, SJ-Phone, X-Lite, MSN, Net2Phone. Compatible con Win2000, XP. Compatible con USB 2.0/1.1 Tarjeta de sonido incorporada 16 Bit Alarma llamada
beatsbydre.com facebook.com/beatsbydre @beatsbydre QUICK START GUIDE
 QUICK START GUIDE GETTING STARTED EN To turn on your Pill XL TM, press power button. FR Pour allumer le Pill XL TM, appuyez sur le bouton d alimentation. ES Para encender su Pill XL TM, presione el botón
Quick Start Guide. EHS Advanced. Wireless-Headset Adapter
 Quick Start Guide HS dvanced Wireless-Headset dapter snom technology G snom rance SRL Wittestr. 0 G Parc des fontenelles 0 erlin, eutschland 0 ailly, rance Tel. + 0-0 Tel. + 0 a + 0 a + 0 info@snom.com,
Quickstart Guide. WiPry 5x. 1) Connect antenna to the appropriate port. TM
 Connect antenna to the appropriate port. TM") Quickstart Guide ACCESSORY ANTENNA W A R N I N G DO NOT APPLY MORE THAN 20DBM TO THE ANTENNA WITHOUT EXTERNAL ATTENUATION CONNECT TO HOST DEVICE 1) Connect antenna to the appropriate port. TM 2) Download
Quickstart Guide ACCESSORY ANTENNA W A R N I N G DO NOT APPLY MORE THAN 20DBM TO THE ANTENNA WITHOUT EXTERNAL ATTENUATION CONNECT TO HOST DEVICE 1) Connect antenna to the appropriate port. TM 2) Download
PC380 Web Cam. User s Guide Version 1.1
 PC380 Web Cam User s Guide Version 1.1 Web Camera User s Guide System Requirements Microsoft Windows 98SE, Windows Me, Windows 2000, Windows XP. Software Installation Attention: Make sure to install
Quick start guide. www.hd.philips.com
 For product support, visit Para obtener asistencia técnica, visite Pour en savoir plus sur l assistance sur les produits, visitez le site www.hd.philips.com HTL5110 Quick start guide EN For Product recycling
PUB. DIM-1012-000. Transfer Utility. Installation Guide. Guide d Installation. Guía de instalación
 PUB. DIM-1012-000 Transfer Utility Installation Guide Guide d Installation Guía de instalación Jp En Fr Es Jp 02 Windows users only: The supplied software offers a convenient way to save your movies to
Bedienungsanleitung. grün/rot. I Taster
 Deutschland Bedienungsanleitung Handy laden - Die Lampe ist ausgeschaltet und voll aufgeladen. - Das Handy-Ladekabel (A) (USB-Seite) mit dem DC-Spannungswandler (B) und dann mit dem Single-Adapter (C)
English - EN Español (Latinoamérica) - XX Português (Brasil) - XC Français (Canada) - XD.
 - XX Português (Brasil) - XC Français (Canada) - XD.") English - EN Español (Latinoamérica) - XX Português (Brasil) - XC Français (Canada) - XD www.microsoft.com/hardware 1 Insert the two AAA alkaline batteries and turn on the mouse. To connect the mouse to
English - EN Español (Latinoamérica) - XX Português (Brasil) - XC Français (Canada) - XD www.microsoft.com/hardware 1 Insert the two AAA alkaline batteries and turn on the mouse. To connect the mouse to
 Instalación rápida Antes de proceder con la instalación, es importante que sepa: Una instalación completa incluye "Drivers" y "Programa", ambos elementos se pueden instalar fácilmente desde el CD del software.
english - EN português do Brasil - XC français - FR español - ES
 english - EN português do Brasil - XC français - FR español - ES www.microsoft.com/hardware 1 1 Insert two AAA alkaline batteries. Slide the power switch to the on position. To connect the keyboard to
2010 Encore Electronics, Inc. All rights reserved.cover
 2010 Encore Electronics, Inc. All rights reserved.cover 2012 Encore Electronics, Inc. Product specifications, size, and shape are subject to change without notice, and actual product appearance may differ
English - EN Français - FR Deutsch - DE Italiano - IT Português - PT Español - ES
 English - EN Français - FR Deutsch - DE Italiano - IT Português - PT Español - ES Push upward to open battery door, insert batteries as shown. Pair your mouse with your Windows device: A. On the underside
EP-2906 Manual de instalación
 EP-2906 Manual de instalación Con el botón situado a la izquierda se configura en el modo de cliente y de la derecha es el modo de Punto de acceso AP (nota: El USB es sólo para la función de fuente de
ROCK N STEREO SOUND DESK
 Read and save these instructions ROCK N STEREO SOUND DESK RTA-M1102-BK INSTRUCTIONS TABLE OF CONTENTS PACKAGE INCLUDES Package Includes... 2 Specifications... 2 Product Parts List... 3 1 2 3 Product Details...
Matrox M-Series. Getting Started Guide Guide de mise en route Erste Schritte- Handbuch Guida introduttiva Guía de introducción
 Matrox M-Series Getting Started Guide Guide de mise en route Erste Schritte- Handbuch Guida introduttiva Guía de introducción 20071-G50-0220 FMSR-BKT22I Install your graphics hardware Choose a PCI Express
Microsoft Live Meeting 2007 Guía del Usuario Para los Controles de Audio
 CONFERENCIAS Y COLABORACIÓN G U Í A D E L A D M I N I S T R A D O R Microsoft Live Meeting 2007 Guía del Usuario Para los Controles de Audio Integración de Audio con Reservationless-Plus de InterCall Los
Matrox Epica Series 20162-G50-0110 FEP2-BKT11I
 Matrox Epica Series Epica TC20+ Epica TC48 Getting Started Guide Guide de mise en route Erste Schritte- Handbuch Guida introduttiva Guía de introducción 20162-G50-0110 FEP2-BKT11I Install your graphics
www.microsoft.com/hardware
 www.microsoft.com/hardware english - EN ESPAÑOL (LATINOAMERICANO) - XX PORTUGUÊS (BRASIL) - XC FRANÇAIS CANADIEN - XD 1 2 www.microsoft.com/hardware/productguide 3 www.microsoft.com/hardware/downloads
Guía de instalación rápida TEG-160WS TEG-240WS
 Guía de instalación rápida TEG-160WS TEG-240WS C2 Table of Contents Español 1 1. Antes de iniciar 1 2. Instalación del Hardware 2 3. Herramienta de gestión Web 3 Troubleshooting 6 Version 02.02.2010 1.
english - EN français - FR deutsch - DE italiano - IT português - PT español - ES
 glish - EN français - FR deutsch - DE italiano - IT português - PT español - ES www.microsoft.com/hardware Insert two AAA alkaline batteries. Slide the power switch to the on position. To connect the keyboard
Important Update! USB Connection for Windows 98 Users. English
 Important Update! English USB Connection for Windows 98 Users If you are connecting more than one device at the same time, you may encounter problems installing the HP DeskJet 990C Series printer. Follow
GETTING STARTED. EN Tap power button to check battery Fuel Gauge. EN Connect cable to micro USB port to charge.
 QUICK START GUIDE GETTING STARTED EN Connect cable to micro USB port to charge. FR Branchez le câble au port micro USB pour charger le casque. ES Conecte el cable al puerto USB micro para cargar. PT Conectar
Quick Installation Guide. To connect a DSR switch. Plug in the keyboard, monitor and mouse for your local connection.
 Quick Installation Guide DSR 1024 Switch The Power of Being There The following instructions will help you to connect your DSR switch. To connect a DSR switch Should you require further assistance, please
300 BPS WiFI N 2.0 USB ADAPter. User's guide. Manuel d'utilisation Guia del usario
 300 BPS WiFI N 2.0 USB ADAPter User's guide Manuel d'utilisation Guia del usario WIRELESS N USB ADAPTER MODEL # WUB-1900R Quick Install Guide 2. INSTALLATION: This section provides instructions on how
Utilização de um adaptador para rede local sem fio (WLAN)
") Utilização de um adaptador para rede local sem fio (WLAN) O modelo do seu notebook pode incluir um adaptador para rede local sem fio (WLAN). O adaptador WLAN permite ao notebook se conectar a um ponto
Utilização de um adaptador para rede local sem fio (WLAN) O modelo do seu notebook pode incluir um adaptador para rede local sem fio (WLAN). O adaptador WLAN permite ao notebook se conectar a um ponto
SIMATIC. SIMATIC S7 Easy Motion Control V12. Welcome Tour. Totally Integrated Automation PORTAL
 SIMATIC S7 Easy Motion Control V12 Welcome Tour Totally Integrated Automation www.siemens.com/tia-portal-welcometour Totally Integrated Automation PORTAL www.siemens.com/easy-motion-control SIMATIC Siemens
USB 2.0 INTERNAL MEMORY CARD READER/WRITER USER MANUAL CRW-UINB
 USB 2.0 INTERNAL MEMORY CARD READER/WRITER USER MANUAL CRW-UINB FEATURES HARDWARE INTRODUCTION 1 USB port for plugging into any USB device 2 Slot for SD, MMC and RS-MMC cards 3 Slot for Memory Stick, Memory
Adaptado Por: Alexander Chaverra Instructivo Configuración PPjoy Y SmartPropo Para Aerofly
 MANUAL DE INSTALACION DE CABLE Y APLICATIVO PARA SIMULADOR. Objetivo: Explicar la forma mas eficiente de configurar el aplicativo PPJoy y Smartpropo para que funcione de una forma correcta en el PC a través
Guía de instalación rápida TBW-107UB 1.01
 Guía de instalación rápida TBW-107UB 1.01 Table of Contents Español 1 1. Antes de iniciar 1 2. Cómo se instala 2 3. Configuración del adaptador Bluetooth 5 Troubleshooting 7 Version 02.25.2010 1. Antes
Guía de instalación rápida TFM-561U
 Guía de instalación rápida TFM-561U V1 Table of Contents Español 1 1. Antes de iniciar 1 2. Cómo se instala 2 Troubleshooting 5 Version 08.25.2010 1. Antes de iniciar Contenidos del paquete TFM-561U CD-ROM
Quick Installation Guide Guide d Installation Rapide Kurzanleitung Guida rapida all installazione Guía de instalación rápida
 Thecus Technology Corporation Thecus N5200 / N5200 RouStor TM IP Storage Server Quick Installation Guide Guide d Installation Rapide Kurzanleitung Guida rapida all installazione Guía de instalación rápida
Versión Española. Introducción. Instalación del software con Windows 98SE. WC004 - Nightvision Chatcam
 WC004 - Nightvision Chatcam Introducción No exponga la Sweex Nightvision Chatcam a temperaturas extremas. No sitúe el reproductor bajo la luz solar directa o cerca de elementos térmicos. No utilice la
MISE A JOUR EZEETAB 973
 MISE A JOUR EZEETAB 973 Veuillez télécharger le dossier de mise à jour selon le lien suivant : www.storex.eu/download/ezee'tab973_fw+ps.zip Une fenêtre s ouvre sélectionner «Enregistrer le fichier» de
Logitech Multimedia Speaker System z333 Logitech Système de haut-parleurs multimédia z333 Product Manual Manuel du produit
 Logitech Multimedia Speaker System z Logitech Système de haut-parleurs multimédia z Product Manual Manuel du produit English................... Français...................7 Español.................. 11
Bluetooth Keyboard And Stand Combo For ipad
 Model: 50915 Bluetooth Keyboard And Stand Combo For ipad User s Manual Please read this User Manual carefully before you start to use the keyboard. 1. Package contents: 78 keys Bluetooth keyboard 1 pcs
Schnell-Installationsanleitung Guide d installation rapide Guida di installazione rapida Guía de instalación rápida
 Quick Installation Guide Schnell-Installationsanleitung Guide d installation rapide Guida di installazione rapida Guía de instalación rápida 15-060060060 Synology USB Station Packing List / Packliste /
U 4405 Dongle Free X TV
 U 4405 Dongle Free X TV MANUAL DE INSTRUCCIONES MANUAL OF INSTRUCCIONS MANUEL D INSTRUCTIONS BEDIENUNGSANLEITUNG MANUALE DELLE INSTRUCCIONI MÀNUAL DE INSTALAÇÃO Instalación del Dongle FREE X-TV Este dispositivo
CHAT de Jabra - PARA PC
 CHAT de Jabra - PARA PC Manual de usuario www.jabra.com Contenido BIENVENIDO...3 Descripción general del producto...3 Instalación...4 conexión...4 CONFIGURACIÓN...4 funciones de llamada...4 Cómo obtener
Technische Alternative elektronische Steuerungsgerätegesellschaft mbh. A-3872 Amaliendorf, Langestr. 124 Tel +43 (0)2862 53635 mail@ta.co.
2862 53635 mail@ta.co.") Technische Alternative elektronische Steuerungsgerätegesellschaft mbh. A-3872 Amaliendorf, Langestr. 124 Tel +43 (0)2862 53635 mail@ta.co.at USB-Treiber Vers. 2.2 ES Controladores USB Índice de contenidos
Technische Alternative elektronische Steuerungsgerätegesellschaft mbh. A-3872 Amaliendorf, Langestr. 124 Tel +43 (0)2862 53635 mail@ta.co.at USB-Treiber Vers. 2.2 ES Controladores USB Índice de contenidos
G233 PRODIGY. Setup Guide Guide d installation Guía de configuración
 G233 PRODIGY Wired Gaming Headset Casque gaming filaire Auriculares inalámbricos con micrófono para juegos Setup Guide Guide d installation Guía de configuración Contents English.................. 3 Français.................
GUÍA DE USUARIO PC-331117. Bienvenidos al mundo Perfect Choice. Antes de comenzar a usar el producto es importante que leas esta guía.
 GUÍA DE USUARIO PC-331117 Bienvenidos al mundo Perfect Choice Antes de comenzar a usar el producto es importante que leas esta guía. Conexión 1. Inserta el transmisor en el conector para encendedor de
Zune Car Pack trousse Pour l auto Zune Paquete para auto Zune Start. Démarrer. Iniciar.
 Zune Car Pack trousse Pour l auto Zune Paquete para auto Zune Start. Démarrer. Iniciar. FM Transmitter Tune Down/ AutoSeek Tune Up/ AutoSeek Preset 1 Charger Preset 2 Light 1 Plug the charger into your
G433. Setup Guide Guide d installation Guía de configuración
 G433 7.1 Wired Surround Gaming Headset Casque gaming filaire 7.1 surround Auriculares con cable y sonido envolvente 7.1 para juegos Setup Guide Guide d installation Guía de configuración Contents English..................
 www.microsoft.com/hardware english - EN ESPAÑOL (LATINOAMERICANO) XX PORTUGUÊS (BRASIL) - XC FRANÇAIS CANADIEN XD 1 2 3 www.microsoft.com/hardware/productguide note 4 www.microsoft.com/hardware/downloads
appkbws03 Wireless Multimedia Keyboard Set Black
 appkbws03 Wireless Multimedia Keyboard Set Black Español 01 English 06 Capítulo 1. Introducción y descripción del producto Gracias por elegir el teclado inalámbrico APPKBWS03. Descripción del producto
ENKVM-USBB. 2-Port USB KVM switch with Easy Switch and Cable. User Guide
 ENKVM-USBB 2-Port USB KVM switch with Easy Switch and Cable User Guide i Package Contents 1 ENKVM-USBB 2-Port USB KVM Switch with Easy Switch and Cable 1 User Guide Requirements Console A VGA, SVGA, XGA,
7000 series 6000 series. Quick start guide
 7000 series 6000 series Quick start guide 313912542541_6-7000_QSG_LA_20120117.indd 1 1/17/2012 10:47:39 AM Before using your product, read all accompanying safety information Antes de usar o produto, leia
File naming. Dateibenennung. Nommage de fichiers. Nomenclatura de archivo. 3shape. Release. Version. Version. Version. Software CAD.
 ENGLISH DEUTSCH FRANÇAIS ESPAÑOL DESS-3SHAPE LIBRARIES Download and installation instructions of dess interfaces (titan bases, gap cemented 0.09mm diameter) 3shape libraries. Download der Bibliotheken
24-Port 10/100Mbps Web Smart PoE Switch with 4 Gigabit Ports and 2 Mini-GBIC Slots TPE-224WS
 24-Port 10/100Mbps Web Smart PoE Switch with 4 Gigabit Ports and 2 Mini-GBIC Slots TPE-224WS ŸGuía de instalación rápida (1) ŸTroubleshooting (3) 1.12 1. Antes de iniciar Contenidos del Paquete ŸTPE-224WS
Power Windows Leve-glace Electrique Elektrische Fensterheber Elevalunas Electricos Alzacristalli Elettrici. Suzuki Santana 410. Suzuki Santana 413
 Power Windows Leve-glace Electrique Elektrische Fensterheber Elevalunas Electricos Alzacristalli Elettrici 2 doors - 2 portes - 2 türen - 2 puertas - 2 porte 82012 Suzuki Santana 410 Suzuki Santana 413
Quick Installation Guide Internet Setup
 CBR-970 Wireless-N Broadband Router www.cnet.com.tw Established in California, U.S.A. since 1987 Quick Installation Guide Internet Setup What s included in the box CBR-970 Wireless N Broadband Router Quick
La Video conferencia con Live Meeting
 Página 1 INSTRUCCIONES PARA TRABAJAR CON LIVE MEETING.- PREVIO. Para que tenga sentido la videoconferencia es conveniente que tengamos sonido (no suele ser problemático) y que tengamos vídeo. Si el ordenador
MANUALE D ISTRUZIONI INSTRUCTION MANUAL MANUEL D INSTRUCTIONS HANDBUCH ANWEISUNGEN MANUAL DE INSTRUCCIONES MANUAL DE INSTRUÇÕES CORNETTA PER CELLULARE
 MANUALE D ISTRUZIONI INSTRUCTION MANUAL MANUEL D INSTRUCTIONS HANDBUCH ANWEISUNGEN MANUAL DE INSTRUCCIONES MANUAL DE INSTRUÇÕES CORNETTA PER CELLULARE 2Italiano manuale d istruzioni ISTRUZIONI D USO Inserisci
G560. Setup Guide Guide d installation
 G560 Setup Guide Guide d installation English................ 3 Français............... 9 Español............... 15 Português.............. 21 G560 Setup Guide Setup Guide WHAT S IN THE BOX 1. Two satellite
english - EN Español (Latinoamérica) - XX Português (Brasil) - XC Français (Canadá) - XD
 - XX Português (Brasil) - XC Français (Canadá) - XD") english - EN Español (Latinoamérica) - XX Português (Brasil) - XC Français (Canadá) - XD www.microsoft.com/hardware 1 4 Pair your mouse with your Device Step 1: Step 2: Step 3: Step 4: Step 5: On the bottom
english - EN Español (Latinoamérica) - XX Português (Brasil) - XC Français (Canadá) - XD www.microsoft.com/hardware 1 4 Pair your mouse with your Device Step 1: Step 2: Step 3: Step 4: Step 5: On the bottom
app ADSL2V1 COMMUNICATIONS LINE www.printyourideas.com
 app ADSL2V1 COMMUNICATIONS LINE www.printyourideas.com 1. CONECTAR EL ROUTER Antes de conectar el dispositivo asegúrese de que el servicio de banda ancha (ADSL), suministrado por su proveedor ISP, se encuentra
BAI-220 AURICULAR INALÁMBRICO
 BAI-220 AURICULAR INALÁMBRICO Manual de usuario ESPECIFICACIONES TÉCNICAS EMISOR Frecuencia: 86 ± 0.5 MHz Modulación: FM Distancia de emisión: 30 m. Recepción de cualquier equipo de audio y video con salida
6000 series 5000 series. Quick start guide
 6000 series 5000 series Quick start guide 313912542551_5-6000_QSG_LA_20120117.indd 1 1/17/2012 11:35:25 AM Before using your product, read all accompanying safety information Antes de usar o produto, leia
CONV-USB OPERATION MANUAL GUIDA UTENTE MANUAL DE INSTRUCCIONES OPTIKA MICROSCOPES - ITALY
 Ver. 2.0.0 CONV-USB OPERATION MANUAL GUIDA UTENTE MANUAL DE INSTRUCCIONES OPTIKA MICROSCOPES - ITALY www.optikamicroscopes.com - info@optikamicroscopes.com QUICK SOFTWARE GUIDE FOR CONV-USB Together with
SpeedTouchTM 190 ved. DSL35819660 eser Thomson 2004. All rights r
 Need more help? Additional help is available online at http://www.speedtouch.com. Thomson 2004. All rights reserved. DSL35819660 SpeedTouch TM 190 Analog Telephone Adapter Quick installation guide 1 2
MINI corniche. Istruzioni di montaggio Installation instructions Instructions de montage Montageanleitung Instrucciones de montaje. www.platek.
 MINI corniche Istruzioni di montaggio Installation instructions Instructions de montage Montageanleitung Instrucciones de montaje www.platek.eu I Sicurezza e avvertenze per l installazione: L installazione
Video Server. Quick Installation Guide. English, Español
 Video Server Quick Installation Guide English, Español 2 Video Server NOTES Quick Installation Guide 3 Video Server Quick Installation Guide To get your Video Server up and running on an Ethernet network,
Quick Installation Guide TU2-DVIV H/W: V1.0R
 Quick Installation Guide TU2-DVIV H/W: V1.0R Table Table of Contents of Contents Español... 1. Antes de iniciar... 2. Cómo se instala... 1 1 3 Troubleshooting... 6 Version 06.27.2008 1. Antes de iniciar
Quick Installation Guide TU-S9
 Quick Installation Guide TU-S9 Table of of Contents Contents Español... 1 1. Antes de iniciar... 1 2. Instalación del Hardware... 2 Troubleshooting... 5 Version 11.08.2007 1. Antes de iniciar Contenidos
Jabra CHAT - FOR PC. User Manual. www.jabra.com
 Jabra CHAT - FOR PC User Manual www.jabra.com USER MANUAL - LANGUAGES ENGLISH - NORTH AMERICA (Click here for manual)...3 FRANÇAIS - NORTH AMERICA (Cliquez ici pour le manuel)...7 PORTUGUÊS - NORTH AMERICA
SERVIDOR DE IMPRESORA USB 2.0
 SERVIDOR DE IMPRESORA USB 2.0 Guía de Instalación Rápida DN-13006-1 Antes de empezar, debería preparar los siguientes elementos: Un PC basado en Windows con el CD de configuración del servidor de impresora
Manual de instalación del PLUS TV ANALOG USB STICK
 Manual de instalación del PLUS TV ANALOG USB STICK Contenido V1.3 Capítulo 1: Instalación del hardware PLUS TV ANALOG USB STICK...2 1.1 Contenido del paquete...2 1.2 Requisitos del sistema...2 1.3 Instalación
Quick Start Guide USB 3.0 Multi-Card Reader / Writer
 Quick Start Guide USB 3.0 Multi-Card Reader / Writer Guide de démarrage rapide Lecteur de cartes multiples USB 3.0 Guía de configuración rápide USB 3.0 Varias Tarjetas lector / Escritor GFR309 PART NO.
PCTV USB / Pro USB. Quick Start Guide Guide de démarrage rapide Guía de inicio rápido Guia de Início Rápido. Pinnacle Systems GmbH 41006933
 PCTV USB / Pro USB Quick Start Guide Guide de démarrage rapide Guía de inicio rápido Guia de Início Rápido Pinnacle Systems GmbH 41006933 Installation / Instalación / Instalação I. USB TV II. Audio IN
USB 2.0 SERVIDOR ETHERNET DE IMPRESORA
 USB 2.0 SERVIDOR ETHERNET DE IMPRESORA DN-13014-3 DN-13003-1 Guía de Instalación Rápida DN-13014-3 Y DN-13003-1 Antes de empezar, debería preparar los siguientes elementos: Ordenador Windows 2000/XP/2003/Vista/7
Calisto P240-M. Microteléfono con USB GUÍA DEL USUARIO
 TM Calisto P240-M Microteléfono con USB GUÍA DEL USUARIO Bienvenido Enhorabuena por la compra de este producto de Plantronics. Esta guía contiene instrucciones para configurar y utilizar el microteléfono
microsoft.com/hardware/support
 2015 Microsoft microsoft.com/hardware/support X20-43694-01 Back Cover Front Cover K65 Set up Note: You can wirelessly connect Wi-Fi CERTIFIED Miracast enabled devices to a TV or monitor (available HDMI
KMR SCA-05 Mounting Instructions Instrucción de Montaje Instruções de Montagem 0899.4897
 0899.4897 KMR SCA-05 Mounting Instructions Instrucción de Montaje Instruções de Montagem 0899.4897 KMR SCA-05 Mounting Instructions Instrucción de Montaje Instruções de Montagem The KMR SCA-05 kit is a
Quick start guide ewon Flexy 205
 Quick start guide ewon Flexy 205 1 ewon Flexy uses a default fixed IP address (10.0.0.53, Mask: 255.255.255.0). To change it for network compatibility, follow the steps on reverse side. L ewon Flexy utilise
Boxed Intel Celeron Processor Installation Notes
 Boxed Intel Celeron Processor Installation Notes Before installing the processor, please consider integration issues found in the installation notes available on the World Wide Web. Avant d effectuer l
Wireless G Notebook Card Carte G sans fil pour ordinateur de bureau Tarjeta Wireless G para computadora de escritorio
 Wireless G Notebook Card Carte G sans fil pour ordinateur de bureau Tarjeta Wireless G para computadora de escritorio www.ativasupport.com Ativa Tech Support US: 1-866-91-ATIVA (1-866-912-8482) 2006 Ativa.
Ready. Set. Go. Vonage Box. Quick Start Guide
 Ready. Set. Go. TM Vonage Box Quick Start Guide Start here. Congratulations and welcome to Vonage! Now that you have your Vonage Box TM, it s time to enjoy exceptional home phone service, including a wide
DX-M110-Combo.fm Page 1 Tuesday, July 5, 2005 5:12 PM. PCI Modem. Modem PCI Módem PCI DX-M110 USER GUIDE GUIDE DE L UTILISATEUR GUÍA DEL USUARIO
 DX-M110-Combo.fm Page 1 Tuesday, July 5, 2005 5:12 PM PCI Modem Modem PCI Módem PCI DX-M110 USER GUIDE GUIDE DE L UTILISATEUR GUÍA DEL USUARIO DX-M110-Combo.fm Page 2 Tuesday, July 5, 2005 5:12 PM 2 DX-M110
Guía de instalación rápida TPL-303E TPL-303E2K 1.01
 Guía de instalación rápida TPL-303E TPL-303E2K 1.01 Table of Contents Español 1 1. Antes de iniciar 1 2. Cómo se instala 2 Troubleshooting 6 Version 02.19.2010 1. Antes de iniciar Contenidos del paquete
Guía de instalación rápida TEW-639GR 2.01
 Guía de instalación rápida TEW-639GR 2.01 Table of Contents Español 1 1. Antes de iniciar 2. Instalación del Hardware 1 2 3. Configuración del enrutador inalámbrico 3 Troubleshooting 5 Version 03.04.2010
Serie Servidor de Red USB Multifunción
 Serie Servidor de Red USB Multifunción Guía de instalación rápida Introducción Este documento describe los pasos para la instalación y configuración del Servidor de Red USB Multifunción como un servidor
Schnellinstallationsanleitung
 Schnellinstallationsanleitung TL-WR340G/TL-WR340GD/TL-WR541G/ TL-WR542G/TL-WR641G/TL-WR642G Drahtloser 54M/108M-Router Rev: 1.0.0 1 Konfiguration des Computers 1) Verbinden Sie den drahtlosen Router wie
MANUAL EASYCHAIR. A) Ingresar su nombre de usuario y password, si ya tiene una cuenta registrada Ó
 Ingresar su nombre de usuario y password, si ya tiene una cuenta registrada Ó") MANUAL EASYCHAIR La URL para enviar su propuesta a la convocatoria es: https://easychair.org/conferences/?conf=genconciencia2015 Donde aparece la siguiente pantalla: Se encuentran dos opciones: A) Ingresar
MANUAL EASYCHAIR La URL para enviar su propuesta a la convocatoria es: https://easychair.org/conferences/?conf=genconciencia2015 Donde aparece la siguiente pantalla: Se encuentran dos opciones: A) Ingresar
Guía Rápida de Instalación
 Guía Rápida de Instalación TL-PS110U Servidor de Impresión Fast Ethernet de un Puerto USB2.0 TL-PS110P Servidor de Impresión Fast Ethernet para un Puerto Paralelo Rev:1.0.0 7106500640 A Antes de comenzar,
WEBINARS - GUÍA DE USO PARA PARTICIPANTES
 intergraph Cadworx & analysis Solutions WEBINARS - GUÍA DE USO PARA PARTICIPANTES WebinaRS - Guía Rápida de Uso para Participantes Herramienta GoToWebinar Intergraph utiliza la herramienta GoToWebinar
Versión Española. Introducción. Instalación del software con Windows 98SE. WC055 Sweex Hi-Def 1.3M Zoom Trackcam USB 2.0
 WC055 Sweex Hi-Def 1.3M Zoom Trackcam USB 2.0 Introducción Para disfrutar plenamente de la cámara Web de Sweex, es importante tener en cuenta los siguientes aspectos: No exponga la cámara Web de Sweex
WC053 - Foldable Hi-Def 1.3M Trackcam USB 2.0. Importante! Instale el driver antes de conectar la Sweex Foldable Hi-Def 1.3M Trackcam USB 2!
 WC053 - Foldable Hi-Def 1.3M Trackcam USB 2.0 Introducción No exponga la Sweex Foldable Hi-Def 1.3M Trackcam USB 2. a temperaturas extremas. No sitúe el reproductor bajo la luz solar directa o cerca de
Guía cámara WEBCAM D-LINK DSB-C110 para Windows XP
 Guía cámara WEBCAM D-LINK DSB-C110 para Windows XP D-Link ha desarrollado una completa solución de comunicación visual y de audio a través de Internet. Las WebCam s están diseñadas para ser conectadas
EUSS SOFTWARE UPDATE CHECKLIST COUNTERFEIT DETECTORS NEW 20 EURO BANKNOTE C32 C18 C07 C19 C20. English
 English NEW 20 EURO BANKNOTE SOFTWARE UPDATE CHECKLIST COUNTERFEIT DETECTORS Device New 20 Euro software version number Is this number displayed on your device during start-up? Yes Safescan 125 C32 No
English - EN Español (América Latina) - XX Português (Brasil) - XC Français (Canadá) - XD
 - XX Português (Brasil) - XC Français (Canadá) - XD") English - EN Español (América Latina) - XX Português (Brasil) - XC Français (Canadá) - XD Push upward to open battery door Insert batteries as shown Pair your mouse with your Windows device: A. On the
English - EN Español (América Latina) - XX Português (Brasil) - XC Français (Canadá) - XD Push upward to open battery door Insert batteries as shown Pair your mouse with your Windows device: A. On the
Quick Installation Guide Internet Setup
 www.cnet.com.tw Established in California, U.S.A. since 1987 CBR-971 Wireless-N 3.5G Broadband Router Quick Installation Guide Internet Setup What s included in the box CBR-971 Wireless N 3.5G Broadband
Teléfono personal con altoparlante CHAT 50 MANUAL DEL USUARIO
 Teléfono personal con altoparlante CHAT 50 MANUAL DEL USUARIO LISTA DE CONTENIDO TELÉFONO +1.800.283.5936 +1.801.974.3760 FAX +1.801.977.0087 CORREO ELECTRÓNICO tech.support@clearone.com MANUAL DEL USUARIO
Guía de instalación rápida TEW-691GR 1.01
 Guía de instalación rápida TEW-691GR 1.01 Table of Contents Español 1 1. Antes de iniciar 1 2. Instalación del Hardware 2 3. Configuración del enrutador inalámbrico 3 Troubleshooting 5 Version 05.11.2010
Dichiarazione di Conformitа CE ( Dichiarazione del costruttore )
") CODICE MODELLO Dichiarazione di Conformitа CE ( Dichiarazione del costruttore ) DATA Il costruttore: DICHIARA CHE L'APPARECCHIATURA DESTINATA AD ESSERE INSERITA IN MACCHINE E NON FUNZIONANTE IN MODO INDIPENDENTE
CODICE MODELLO Dichiarazione di Conformitа CE ( Dichiarazione del costruttore ) DATA Il costruttore: DICHIARA CHE L'APPARECCHIATURA DESTINATA AD ESSERE INSERITA IN MACCHINE E NON FUNZIONANTE IN MODO INDIPENDENTE
CESVA USB DRIVER. M_CUD_v0001_20130226_ESP_ENG
 CESVA USB DRIVER M_CUD_v0001_20130226_ESP_ENG CESVA USB DRIVER ESPAÑOL CONTENIDO 1. Instalación del CESVA USB Driver... 2 2. Conocer el puerto COM asignado para la comunicación con el PC... 2 2.1. Windows