Cambridge Pre-Packaged / Pre-Cut Olde English Round Waterfall Kit Instruction Manual
|
|
|
- Vicenta Fuentes Montero
- hace 6 años
- Vistas:
Transcripción
1 Instruction Manual Manual de Instrucciones para la Cascada de Cambridge Olde Ingles Pared Pre-Empaquetado

2 Layer Reference Guide: Guía de Referencia: Layer 10 Layer 9 Layer 8 Layer 7 Layer 6 Layer 5 Layer 4 Layer 3 Layer 2 Layer 1 1
3 Tools Required or Waterfall Kit Installation: Safety Goggles Ear Protection Dust Mask Gloves Shovels (digging & flat) Metal cutters for banding on cubes Mason Hammer (Chipping, hammer) Hacksaw Road Stone Rake Tamper (Hand or Mechanical) Wheelbarrow Level (2 and 6 recommended) Speed Square Caulk Gun 10 oz. or 28 oz. depending on what size adhesive is purchased Rubber Mallet 14 Demo saw with diamond blade Tape Measure Marking Device (pencil, soap stone etc) Chalk Line Hand Broom Las herramientas requerido ara terminar la instalación del juego de cascada: Anteojos de Seguridad Protección de Oreja Máscara de Polvo Guantes Palas (cavando & plano) Cortedores Metálicos para atar los cubos Martillo de Mason (Desportillando, martillo) Sierra de metales Rastrillo de Piedra de Camino Manipula (Mano o Mecánico) Carretilla Nivel (2 y 6 recomendó) Cuadrado de Velocidad Calafatea el usil 10oz. o 28 oz. que dependiendo de lo que calibra adhesivo es comprador Mazo de Caucho 14 Demostración vio con la hoja del diamante Cinta de Mide Mark Dispositivo (lápiz, piedra de jabón etc) Línea de Tiza Escoba de Mano Items Included In The Waterfall Kit: 24 -Color changing light (16 Colors) 33 gallon basin Remote Control TW2400 Tidal Wave 2 Pump 10 of 1 ¼ lexible PVC Pipe Kit Includes Splash Mat, Pump Discharge, Glue, Cleaner, Thread Sealant, Color Waterfall, Brush and ittings Artículos Incluidos en el juego de cascada: 24 Luz de Colores para Cascada y Lavabo de - 33 galones Teledirigido 2 Bombas de TW2400 Tidal Wave 10 1 ¼ pipa flexible del PVC Juego Incluye Estera de Salpicadura, Descarga de Bomba, Pegamento, Limpiador, Sellador de Hilo, Luz de colores, Cepillo y guarniciones 2
4 Cut Stones Included In The Kit: Los cortes totales de pared de Olde English: 4 3 1/2 C Cut Stone (1 Pieces) A Cut Stone (4 Pieces) B Cut Stone (2 Pieces) 5 1/ /4 Radius ull Stone (30 Pieces) Cut Stone (13 Pieces) E Cut Stone (4 Pieces) D Cut Stone (4 Pieces) 8 Base Preparation: Excavate an area 84 long by 40 wide by 4 deep. Compact the sub-base with a vibratory compactor. Add approximately 1250 lbs of ¾ clean crushed stone. Compact and level the stone. Preparación despreciable: 12 ull Olde English Wall Stones (61 Pieces) Excava un área 84 largo por 40 ancho por 4 profundo. Comprima el sub base con un compactor vibratorio.agregue aproximadamente 1250 lbs de ¾ piedra limpia aplastada. Comprima y nivele la piedra. 3

5 Run the pump extension cord through this opening Cuerda de la bomba aqui D Cut Stone D Cut Stone Layer 1: Piece Count = (6) Wall Stones, (1) C Cut Stone, (8) Radius Wall Stones, (2) D Cut Stones Install wall stones, radius wall stones, and cut stone on top of your leveled base course as shown in the photo. Once all the wall stones are laid, install the water basin as shown. Refer to details A and B on page 5. Capa 1: Numero de Piezas = (6) Piedras de pared, (1) Pieza cortada C, (8) Piedras de Radio, (2) Piezas cortada D Instale las piedras de la pared y Piedras de Radio y corte la piedra encima de su curso bajo nivelado según las indicaciones de la foto. Una vez que se ponen todas las piedras de la pared, instale el lavabo del agua como se muestra. Refiera a los detalles A y B en la página 5. 4


6 Run the pump extension cord through here Cuerda de la bomba va aqui 5

7 Layer 2: Piece Count = (6) Wall Stones, (2) A Cut Stones, (7) Radius Wall Stones, (2) E Cut Stones Apply concrete adhesive and install wall stones, radius wall stones, and cut stones as shown in the photo, keeping all lines straight. Capa 2: Numero de Piezas = (6) Piedras de pared, (2) Piezas cortadas A, (7) Piedras de radio, (2) Piezas cortadas E Aplique el pegamento concreto e instale las piedras de la pared y corte las piedras según las indicaciones de la foto, manteniendo todas las líneas rectas. 6
8 D Cut Stone D Cut Stone Layer 3: Piece Count = (7) Wall Stones, (8) Radius Wall Stones, (2) D Cut Stones Apply concrete adhesive and install wall stones, radius wall stones, and cut stones as shown in the photo, keeping all lines straight. Capa 3: Numero de Piezas = (7) Piedras de pared, (8) Piedras de radio, (2) Piezas cortadas D Aplique el pegamento concreto e instale las piedras de la pared y corte las piedras según las indicaciones de la foto, manteniendo todas las líneas rectas. 7

9 Layer 4: Piece Count = (6) Wall Stones, (2) A Cut Stones, (7) Radius Wall Stones, (2) E Cut Stones Apply concrete adhesive and install wall stones radius wall stones, and cut stones as shown in the photo, keeping all lines straight. Capa 4: Numero de Piezas = (6) Piedras de pared, (2) Piezas cortada A, (7) Piedras de radio, (2) Piezas cortadas E Aplique el pegamento concreto e instale las piedras de la pared y corte las piedras según las indicaciones de la foto, manteniendo todas las líneas rectas y las esquinas ajustan. 8
10 Cambridge Pre-Packaged / Pre-Cut Detail 5A 3 Overhang Layer 5: Piece Count = (7) Wall Stones, (13) Cut Stones Apply concrete adhesive and install wall stones, and cut stones as shown in the photo above. Make sure you have the proper overhang around the basin. There is a 3 overhang around the front of the basin. See Detail 5A above. Capa 5: Numero de Piezas = (7) Piedras de pared, (13) Piezas cortadas Aplique el pegamento concreto e instale las piedras de la pared según las indicaciones de la foto arriba. Aségurese que tiene el alero apropiado en todos los lados. deben tener un proyección 3 sobre la orilla delantera del lavabo. Vea Detalle 5- A 9


11 2 Overhang 2 Overhang Detail 6A 6 2 Layer 6: Piece Count = (8) Wall Stones Apply concrete adhesive and install wall stones as shown in the photo above. Make sure to spin the two end wall stones as shown with the proper 2 overhang. See Detail 6A above. Capa 6: Numero de Piezas = (8) Piezas de pared Aplique el pegamento concreto e instale las piedras de la pared según las indicaciones de la foto arriba. Cerciórese de dal la vuelta hay las dos piedras de la pared de extremo como se muestra con la proyección los 2 apropiados. Vea el detalle 6A abajo. 10

12 6 6 2 Overhang 2 Overhang Layer 7: Piece Count = (7) Wall Stones Apply concrete adhesive and install wall stones as shown in the photo. Make sure to spin the two end wall stones as shown with the proper 2 overhang and 6 set back. Capa 7: Numero de Piezas = (7) Piezas de pared Aplique el pegamento concreto e instale las piedras de la pared según las indicaciones de la foto. Cerciórese de dal la vuelta hay las dos piedras de la pared de extremo como se muestra con los 2 apropiados sobresalen por y 6 fijados detrás. 11
13 6 6 2 Overhang 2 Overhang Layer 8: Piece Count = (4) Wall Stones, (2) B Cut Stones The (2) B cut stones should be positioned as follows: The 3 1/2 machine (tumbled) face should face forward. The cut face should face upward toward the sky as shown in Detail 8A on page 13. Apply concrete adhesive and install wall stones and cut stones as shown in the photo. Make sure to spin the two end wall stones as shown with the proper 2 overhand and 6 set back. Capa 8: Numero de Piezas = (4) Piezas de pared, (2) Piedras cortadas B (2) piedras del corte B deben ser colocadas como sigue: Cara de la 31/2 máquina (caída) debe hacer frente adelante. La cara del corte debe estar mirando para arriba para el cielo según las indicaciones del detalle 8A en la página 13. Aplique el pegamento concreto e instale las piedras de la pared y corte las piedras según las indicaciones de la foto. Cerciórese de dal vuelta hay las dos piedras de la pared de extremo como se muestra con los 2 apropiados por todo lo alto y 6 fijados detrás. 12

 debe hacer frente adelante.")
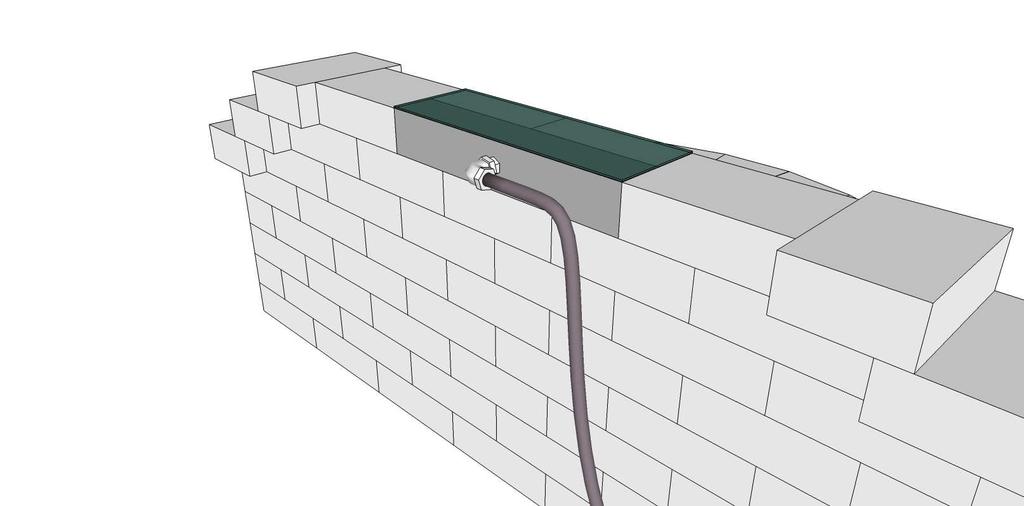
14 Detail 8A C u t a c e B C u t a c e B Detail 8A-8B: The two B cut faces should be positioned as follows: The 3 ½ machine (tumbled) face should face forward. The cut face should face upward toward the sky as shown in Detail 8A. Before final placement of waterfall, attach the pressure hose to the back as per manufacturer s instructions see Detail 8B. Once the hose is attached, place the water fall on top of the B cuts as shown in Details 8C & 8D on page 14. Do not glue the color fall to the wall stones. Capa 8A-8B: Las dos caras del corte B deben ser colocadas como sigue: Cara de la 31/2 máquina (caída) debe hacer frente adelante. La cara del corte debe mira para arriba para el cielo según las indicaciones del detalle 8A. Antes de la colocación final de la cascada, ponga la manguera de la presión a la parte posterior según las instrucciones del fabricante ven el detalle 8B. Una vez que la manguera, esta puesta ponga la Cascada luz de coloress encima de los cortes B según las indicaciones del & de los detalles 8C & 8D en la página 14. NO APLIQUE PEGAMIENTO A LA CASCADA LUZ DE COLORES A LA PIEDRAS DE PARED. 13

15 Detail 8C Detail 8D 14

16 6 6 2 Overhang 2 Overhang Layer 9: Piece Count = (5) Wall Stones Apply concrete adhesive and install wall stones as shown in the photo. Make sure to spin the two end wall stones as shown with the proper 2 overhang and 6 set back. Do not glue the color fall unit to the wall stones. Capa 9: Numero de Piezas = (5) Piedras de pared Aplique el pegamento concreto e instale las piedras de la pared según las indicaciones de la foto. Cerciórese de hacer girar las dos piedras de la pared de extremo como se muestra con los 2 apropiados sobresalen por y 6 fijados detrás. No pegue la unidad de color de la cascada hay las piedras de la pared. 15
17 2 Overhang 2 Overhang Layer 10: Piece Count = (5) Wall Stones Apply concrete adhesive and install wall stones as shown in the photo. Make sure to set the proper 2 overhang on all wall stones. You can add a planter or fill with decorative stones if you so desire. Add water then plug in the unit and be proud of the Cambridge waterfall you just built. Thank you, Cambridge Pavers, Inc. Capa 10: Numero de Piezas = (5) Piedras de pared Aplique el pegamento concreto e instale las piedras de la pared según las indicaciones de la foto. Cerciórese de fijar la proyección los 2 apropiados en todas las piedras de la pared. Usted puede agregar un plantador o llenar de las piedras decorativas si usted desea tan. Agregue el agua después enchufe la unidad y sea orgulloso de tu cascada de Cambridge que usted acaba de construir. Gracias, Cambridge Pavers, Inc. 16
18 VIEWS RONT RIGHT BACK LET 17
Cambridge Pre-Packaged / Pre-Cut OldeEnglishWallWaterfall Kit Instruction Manual
 OldeEnglishWallWaterfall Kit Instruction Manual Manual de Instrucciones para la Cascada de Cambridge Olde Ingles Pared Pre-Empaquetado Layer Reference Guide: Guía de Referencia: Layer 10 Layer 9 Layer
Cambridge Pre-Packaged Waterfall Kit
 Page 1 Layer Reference Guide Guía de Referencia Estimated man hours for construction of the waterfall will be 2 hours based on a 2 man crew with moderate experience. Las horas de trabajo estimadas para
Cambridge Fully Assembled Olde English Wall Grand Column with Mailbox
 Olde English Wall Grand Column with Mailbox Layer Reference Guide: Guía de Referencia: Finished Grade 4 Above Foundation 4 Compacted 3/4 stone 8 Concrete slab (4000 PSI) 1 Tools Required For Grand Column
Cambridge Pre-Packaged / Pre-Cut Olde English Wall Firewood Box (Left Hand)
") Olde English Wall Firewood Box (Left Hand) NOTE: Woodbox may be installed on either side of the fireplace. These instructions are for a left side woodbox. For a right side woodbox, reverse the placement
Olde English Wall Firewood Box (Left Hand) NOTE: Woodbox may be installed on either side of the fireplace. These instructions are for a left side woodbox. For a right side woodbox, reverse the placement
Cambridge Pre-Packaged Olde English Paver Firewood Box (Left Hand)
") Cambridge Pre-Packaged Olde English Paver Firewood Box (Left Hand) Note: Woodbox may be installed on either side of the fireplace. Instructions shown are for the left side woodbox. Reverse the placement
Cambridge Pre-Packaged Olde English Paver Firewood Box (Left Hand) Note: Woodbox may be installed on either side of the fireplace. Instructions shown are for the left side woodbox. Reverse the placement
Cambridge Pre- Empaquetado / Pre-Cortado Manual de Instrucciones para la Prilla de MaytRx Pared
 Cambridge Pre- Empaquetado / Pre-Cortado Manual de Instrucciones para la Prilla de MaytRx Pared Layer Reference Guide: Guía de Referencia: Finished Grade 2 3/8 above foundation Layer 8 Layer 7 Layer 6
Cambridge Pre-Packeged / Pre-Cut Olde English Wall Patio Pub & Bistro Table Kit
 Cambridge Pre-Packeged / Pre-Cut Olde English Wall Patio Pub & Bistro Table Kit Cambridge Pre-Cortado Kit de Mesa para uso Afuerra de Olde Inglés Pared Layer Reference Guide: Guía de Referencia: Layer
Cambridge Pre-Packaged / Pre-Cut MaytRx Wall Patio and Pub Bistro Table
 Cambridge Pre-Cortado Kit de Mesa para uso Afuerra de MaytRx Pared Layer Reference Guide: Guía de Referencia: Layer 9 Layer 8 Layer 7 Layer 6 Layer 5 Finished Grade (7 1/4 Above Top of Foundation) Grado
Cambridge Pre-Packaged / Pre-Cut Olde English Wall Mailbox
 Note: Cap layer is not included in the kit and is sold separately. Nota: La capa del casquillo no se incluye en el kit y se vende por separado. Cambridge Pre-Envasados / Pre-Cortadas Olde Inglés Buzón
Cambridge Pre-Packaged / Pre-Cut MaytRx Wall Mailbox
 Note: Cap layer(s) is not included in the kit and is sold separately. Nota: La capa del casquillo no se incluye en el kit y se vende por separado. Cambridge Pre-Envasados / Pre-Cortadas Buzón de Maytrx
Cambridge Pre- Empaquetado / Pre-Cortado Manual de Instrucciones para la Prilla de MaytRx Pared
 Cambridge Pre- Empaquetado / Pre-Cortado Manual de Instrucciones para la Prilla de MaytRx Pared Layer Reference Guide: Guía de Referencia: Finished Grade 2 3/8 above foundation Layer 8 Layer 7 Layer 6
Cambridge Fully Assembled Outdoor Fireplace Instruction Manual
 Instruction Manual Cambridge Montado Completamente Manual de Instrucciones Chimenea al Aire Libre Layer Reference Guide: Guía de Referencia: Fireplace Dimensions: 59 7/8 Long 55 7/8 Deep 101 1/2 High Fireplace
Cambridge Fully Assembled Outdoor Fireplace Instruction Manual
 Instruction Manual Cambridge Montado Completamente Manual de Instrucciones Chimenea al Aire Libre 1 Layer Reference Guide: Guía de Referencia: Fireplace Dimensions: 4 11 7/8 Long 4 7 7/8 Deep 8 5 1/2 High
Cambridge Fully Assembled Outdoor Veneer Fireplace Instruction Manual
 Instruction Manual Cambridge Montado Completamente Manual de Instrucciones Chimenea al Aire Libre 1 Layer Reference Guide: Guía de Referencia: Fireplace Dimensions: 59 7/8 Long 55 7/8 Deep 101 1/2 High
WALKWAY INSTALLATION GUIDE ENGLISH ESPAÑOL PAGE 2 PÁGINA 4
 WALKWAY INSTALLATION GUIDE ENGLISH PAGE 2 ESPAÑOL PÁGINA 4 PRECAUTIONS TO BE TAKEN BEFORE ANY FORM OF INSTALLATION Always call before you dig. It is important to contact all telecommunication and utility
Cambridge Pre-Envasados / Pre-Cortado Olde Inglés Kit de Pared de la Chimenea al Aire Libre
 Cambridge Pre-Envasados / Pre-Cortado Olde Inglés Kit de Pared de la Chimenea al Aire Libre Layer Reference Guide: Guía de Referencia: 28 Finished Grade 27 26 25 24 23 22 21 20 19 18 17 16 15 14 13 12
Cambridge Pre-Packaged / Pre-Cut MaytRx Fireplace Kit (with Deluxe Cast Stone Surround)
") Cambridge Pre-Packaged / Pre-Cut (with Deluxe Cast Stone Surround) Cambridge Pre-Envasados/Pre-Cortado MaytRx Kit Pared de la Chimenea al Aire Libre( anillo de piedra echado de lujo) Layer Reference Guide:
Cambridge Pre-Packaged / Pre-Cut (with Deluxe Cast Stone Surround) Cambridge Pre-Envasados/Pre-Cortado MaytRx Kit Pared de la Chimenea al Aire Libre( anillo de piedra echado de lujo) Layer Reference Guide:
Package Contents. Hardware Package. Tools Needed
 Reverso en español HWGWTR-1 REAR REGISTER KIT INSTALLATION INSTRUCTIONS INSTRUCTIONS MUST BE LEFT WITH THE OWNER FOR FUTURE REFERENCE AFTER INSTALLATION. Package Contents REGISTER BOOT REGISTER WITH DAMPER
Cambridge Pre-Packaged / Pre-Cut Olde English Wall Outdoor Fireplace Kit (with Deluxe Surround)
") Olde English Wall Outdoor Fireplace Kit (with Deluxe Surround) Cambridge Pre-Envasados / Pre-Cut Olde Inglés Kit de Pared de la Chimenea al Aire Libre (con sonido envolvente de lujo) Layer Reference Guide:
Olde English Wall Outdoor Fireplace Kit (with Deluxe Surround) Cambridge Pre-Envasados / Pre-Cut Olde Inglés Kit de Pared de la Chimenea al Aire Libre (con sonido envolvente de lujo) Layer Reference Guide:
ADHESIVE INSTALLATION GUIDE ENGLISH ESPAÑOL PAGE 2 PÁGINA 4
 ADHESIVE INSTALLATION GUIDE ENGLISH PAGE 2 ESPAÑOL PÁGINA 4 PRECAUTIONS TO BE TAKEN BEFORE ANY FORM OF INSTALLATION Always call before you dig. It is important to contact all telecommunication and utility
Cambridge Pre-Packaged / Pre-Cut MaytRx Fireplace Kit (with Cast Stone Surround)
") (with Cast Stone Surround) Cambridge Pre-Envasados/Pre-Cortado MaytRx Kit Pared de la Chimenea al Aire Libre( anillo de piedra echado) Layer Reference Guide: Guía de Referencia: Layer 21 Layer 20 Layer
(with Cast Stone Surround) Cambridge Pre-Envasados/Pre-Cortado MaytRx Kit Pared de la Chimenea al Aire Libre( anillo de piedra echado) Layer Reference Guide: Guía de Referencia: Layer 21 Layer 20 Layer
Cambridge Pre-Packaged Old English Paver Outdoor Fireplace Kit (Basic Surround) Instruction Manual
 Instruction Manual") Old English Paver Outdoor Fireplace Kit (Basic Surround) Instruction Manual Cambridge Prembaló Chimenea Al Aire Libre de Olde English Ladrillos (Anillo Básico) Manual de Instrucción Layer Reference Guide:
Old English Paver Outdoor Fireplace Kit (Basic Surround) Instruction Manual Cambridge Prembaló Chimenea Al Aire Libre de Olde English Ladrillos (Anillo Básico) Manual de Instrucción Layer Reference Guide:
Cambridge Pre-Packaged / Pre-Cut Olde English Wall Outdoor Fireplace Kit (with Deluxe Surround)
") Olde English Wall Outdoor Fireplace Kit (with Deluxe Surround) Cambridge Pre-Envasados / Pre-Cut Olde Inglés Kit de Pared de la Chimenea al Aire Libre (con sonido envolvente de lujo) Layer Reference Guide:
Olde English Wall Outdoor Fireplace Kit (with Deluxe Surround) Cambridge Pre-Envasados / Pre-Cut Olde Inglés Kit de Pared de la Chimenea al Aire Libre (con sonido envolvente de lujo) Layer Reference Guide:
Cambridge Pre-Packaged / Pre-Cut Olde English Wall Outdoor Fireplace Kit (with Surround)
") Olde English Wall Outdoor Fireplace Kit (with Surround) Cambridge Pre-Envasados / Pre-Cut Olde Inglés Kit de Pared de la Chimenea al Aire Libre (con Sonido Envolvente) Layer Reference Guide: Guía de Referencia:
Olde English Wall Outdoor Fireplace Kit (with Surround) Cambridge Pre-Envasados / Pre-Cut Olde Inglés Kit de Pared de la Chimenea al Aire Libre (con Sonido Envolvente) Layer Reference Guide: Guía de Referencia:
Cambridge Pre-Packaged Olde English Paver Outdoor Fireplace Kit (Deluxe Surround) Instruction Manual
 Instruction Manual") Olde English Paver Outdoor Fireplace Kit (Deluxe Surround) Instruction Manual Manual de Instrucciones Para La Chimenea Cambridge Olde Ingles Ladrillos (Anillo de Lujo) Pre- Empaquetado Para Uso Afuera
Olde English Paver Outdoor Fireplace Kit (Deluxe Surround) Instruction Manual Manual de Instrucciones Para La Chimenea Cambridge Olde Ingles Ladrillos (Anillo de Lujo) Pre- Empaquetado Para Uso Afuera
WOW SECOND SKIN INSTALLATION GUIDE. Steps and recommendations to install and enhance your Second Skin product. WOW SECOND SKIN GUÍA DE INSTALACIÓN
 WOW SECOND SKIN INSTALLATION GUIDE Steps and recommendations to install and enhance your Second Skin product. WOW SECOND SKIN GUÍA DE INSTALACIÓN Pasos y recomendaciones para instalar y ensalzar Second
Ready-To-Finish Fire Pit Cabinet Assembly Instructions
 Ready-To-Finish Fire Pit Cabinet Assembly Instructions For Part Numbers: RTF-S36 RTF-S42 RTF-S48 RTF-S60 Top Panel with Burner Cutout Templates Adjustable Burner Frame Back Panel Side Panel Pre-Drilled
MODEL: F / MODELO: F END TABLE WITH MEDIA STAND & MAGAZINE HOLDER MESA RINCONERA CON ESTANTE & REVISTERO
 MODEL: 11225479F / MODELO: 11225479F END TABLE WITH MEDIA STAND & MAGAZINE HOLDER MESA RINCONERA CON ESTANTE & REVISTERO NO A B C D E F G H I J K L PARTS LIST AND HARDWARE PARTES Y ACCESORIOS PARTS LIST
Manual de Instrucciones para la Chimenea de Cambridge Olde Ingles Ladrillos Pre-Empaquetado para Uso Afuera
 Olde English Paver Outdoor Fireplace Kit Instruction Manual Manual de Instrucciones para la Chimenea de Cambridge Olde Ingles Ladrillos Pre-Empaquetado para Uso Afuera Layer Reference Guide: Guía de Referencia:
Enkadrain. Installation Instructions Instrucciones para la Instalación. Toll Free / Línea Gratis: Web:
 Installation Instructions Instrucciones para la Instalación Toll Free / Línea Gratis: 800-365-7391 Web: www.colbond-usa.com Vertical Installation Instructions Instrucciones para la Instalación Vertical
Cambridge Pre-Packaged / Pre-Cut MaytRx Fireplace Kit Instruction Manual
 Cambridge Pre-Packaged / Pre-Cut Instruction Manual Cambridge Pre-Envasados/Pre-Cortado MaytRx Kit Pared de la Chimenea al Aire Libre Cambridge Pre-Packaged / Pre-Cut 2011 Layer Reference Guide: Guía de
RTA-B002 DIMENSIONS MAXIMUM WEIGHT CAPACITIES. Highest position. Lowest position. Product Size: 22"W x 16"D x 30.5~46.5"H
 MODEL RTA - B002 Thanks for purchasing one of our products. Please read carefully the assembly instructions before the installation. Please save this manual for future reference. MODEL RTA-B002 MODELO
Public Health Vocabulary. Key Terms For Your Brigade
 Public Health Vocabulary Key Terms For Your Brigade PUBLIC HEALTH BRIGADE VOCABULARY Tools : alambre wire alicate pliers arena sand balde bucket bloque cinder block bolsa de cemento cement bag concreto
BUILT-IN TRIM KIT INSTALLATION INSTRUCTION
 BUILT-IN TRIM KIT INSTALLATION INSTRUCTION FOR KENMORE TRIM-KIT MODEL - 30 : 63002, 63004, 63009, 64003 27 : 63012, 63014, 63019, 63013 FOR USE WITH KENMORE MICROWAVE OVEN MODEL: 721.62462200, 721.62463200,
4 DRAWER ORGANIZER ORGANIZADOR DE 4 CAJONES
 MODEL: 11210913 / MODELO: 11210913 DRAWER ORGANIZER ORGANIZADOR DE CAJONES NO N o 1 2 3 NO N o A B C D E PARTS LIST AND HARDWARE LISTA DE ACCESORIOS Y PARTES HARDWARE LIST / LISTA DE ACCESORIOS SCREW /
IMPORTANT! Must be attached to a R cabinet or a GT storage unit or side-byside or anchored to the wall.
 Locker / Storage Unit R Line Assembly Guide Guía de montaje Ligne R All required hardware is included. Please check the contents with your packing slip. Read instructions carefully. Two people are required
Cambridge Pre-Packaged / Pre-Cut MaytRx Wall Bar Module
 Cambridge Pre-Empaqueto / Pre-Cortado Barra de MaytRx Layer Reference Guide: Guía de Referencia: Layer Reference Layer 9 Layer 8 Layer 7 Layer 6 Layer 5 Layer 4 Layer 3 Layer 2 Layer 1 4 1/4 Above Foundation
INSTRUCCIONES DE ENSAMBLAJE.
 English MULTI-FUNCTIONAL COMPUTER TABLE ASSEMBLY INSTRUCTION MODEL RTA - 3806 IMPORTANT: Surfaces must be cleaned with a solution of a smooth soap and water, then cleared with a dry towel. Do not use solvents
Tiding with a double nut all together.
 Instrucciones para el material de práctica y uso del Reloj y La Hora para utilizarse en centros. 1. Imprima todo el material siguiente en cartonite tamaño 8.5 x 11 y corte las tarjetas en las líneas continuas
Desk End Panel (DEP) For Supporting One or Both Ends of a Countertop
 For Supporting One or Both Ends of a Countertop") THESE INSTRUCTIONS SHOULD ONLY BE PRINTED USING ADOBE ACROBAT AND SHOULD NOT BE FAXED OR REPRODUCED ON A DIGITAL COPIER. AMERICAN WOODMARK CORPORATION PROVIDES THESE INSTRUCTIONS ON AN AS IS BASIS AND
THESE INSTRUCTIONS SHOULD ONLY BE PRINTED USING ADOBE ACROBAT AND SHOULD NOT BE FAXED OR REPRODUCED ON A DIGITAL COPIER. AMERICAN WOODMARK CORPORATION PROVIDES THESE INSTRUCTIONS ON AN AS IS BASIS AND
END TABLE MODEL: P. Capacidad máxima del estante: 105 lbs. (47.6 kg) Capacidad máxima del estante: 43 lbs. (19.5 kg)
 Capacidad máxima del estante: 43 lbs. (19.5 kg)") Capacidad máxima del estante: 10 lbs. (47. kg) Capacidad máxima del estante: 4 lbs. (19. kg) Esta unidad está destinada sólo para su uso con los productos y pesos máximos indicados. Si usted utilize esta
Capacidad máxima del estante: 10 lbs. (47. kg) Capacidad máxima del estante: 4 lbs. (19. kg) Esta unidad está destinada sólo para su uso con los productos y pesos máximos indicados. Si usted utilize esta
LOW SPEED RIGHT ANGLE CUT-OFF TOOL
 LOW SPEED RIGHT ANGLE CUT-OFF TOOL Model GETTING STARTED OPERATION Low Speed Right Angle Cut-Off Tool Owner s Manual Model Free Speed (RPM) Wheel Diameter Horsepower (HP) Air Inlet (NPT) Hose Size (Inch)
1
 PARTS AND ACCESSORIES COLOR OF PIECES MAY VARY PARTES Y ACCESORIOS EL COLOR DE LAS PIEZAS PUEDE VARIAR 5 x 7 x IMPORTANT PRE-BUILD STEPS PREVIA IMPORTANTE PASOS DE COMPILACIÓN STEP PASO SEPARATE AND COUNT
Closet / Modelo CL738 Contamos con personal calificado para su instalacion
 Closet / Modelo CL Contamos con personal calificado para su instalacion V00 Herrajes / Hardware pzs pzs pzs 0 pzs T 0 0 pzs T pzs pzs pzs 0 pzs T 0 pz 0 pzs INDUSTIAS.T.A., S.A. de C.V. Av. Poniente No.
Process Control Work Instructions Control de Procesos Instrucciones de Trabajo. for / para
 Process Control Work Instructions Control de Procesos Instrucciones de Trabajo for / para 629096898 VFCB Kit Relay Cable Harness Assy Ensamblar el Kit del Arnés de Cables del Relevador Publication Number:
SOUTHWEST CEREMONIAL MASKS PK/25 MÁSCARAS CEREMONIALES DEL SUROESTE PK/25
 MORE IDEAS!... Más Ideas!... Item No. GP-808 Producto núm. GP-808 Age Group - 7 and up Edades: 7 años en adelante HS#9505.90.6000 MAD E IN CHINA Research the costumes and practices of Southwestern Native
Aluminum Clad Installation Instructions for a Single or Double Door Unit
 Aluminum Clad Installation Instructions for a Single or Double Door Unit For more information on Aluminum Clad, please visit reebfinish.com/aluminum-clad Components for Aluminum Clad A. B. E. D. C. C.
Cambridge Pre-Packaged / Pre-Cut Olde English Wall Bar Module Instruction Manual
 Instruction Manual Cambridge Pre-Embaló / Manual de Instrucción del Olde Ingles Pared Barra Layer Reference Guide: Guía de Referencia: Finished Grade Layer 11 Layer 10 Layer 9 Layer 8 Layer 7 Layer 6 Layer
NEXUS. Bañera acrílica Instrucciones de montaje. Acrylic bathtub Installation instructions. English. Español
 NEXUS Español English Bañera acrílica Instrucciones de montaje Acrylic bathtub Installation instructions NEXUS 2 BAÑERA ACRÍLICA - ACRYLIC BATHTUB Fig-1 NEXUS A B C D D 1700 800 300 605 565-605 1700 750
MODEL: P COFFEE TABLE
 Capacidad máxima del estante: 184 lbs. (83.4 kg) Capacidad máxima del estante: 87 lbs. (39.4 kg) Esta unidad está destinada sólo para su uso con los productos y pesos máximos indicados. Si usted utilize
SANTA LUZIA MOULDINGS INSTALLATION METHODS
 MOULDINGS SPECIALTY BOARDS Casa Cor SC 0 Arq. Isabela Faraco Image Rô Reitz Wall & Trim Chair Rails Guardasillas Door & Window Casings Contramarcos Appliques Plinth Blocks and Rosettes Zócalines y Rosetas
RTA-2706A DIMENSIONS
 MODEL RTA - 706A Thanks for purchasing one of our products. Please read carefully the assembly instructions before the installation. Please save this manual for future reference. MODEL RTA-706A MODELO
Cambridge Pre-Packaged / Pre-Cut MaytRx Grill Module Instruction Manual
 Instruction Manual Cambridge Pre- Empaquetado / Pre-Cortado Manual de Instrucciones para la Prilla de MaytRx Pared Layer Reference Guide: Guía de Referencia: Finished Grade Layer 8 Layer 7 Layer 6 Layer
Flashcards Series 5 El Agua
 Flashcards Series 5 El Agua Flashcards are one of the quickest and easiest ways to test yourself on Spanish vocabulary, no matter where you are! Test yourself on just these flashcards at first. Then, as
INSTRUCCIONES DE ENSAMBLAJE.
 English MULTI-FUNCTIONAL COMPUTER TABLE ASSEMBLY INSTRUCTION MODEL RTA - 3327 IMPORTANT: Surfaces must be cleaned with a solution of a smooth soap and water, then cleared with a dry towel. Do not use solvents
English language / Idioma Español AK90-E. Leaflet No. / No. de folleto rev 00
 English language / Idioma Español AK90-E Leaflet No. / No. de folleto 466295 rev 00 Read through ALL instructions before commencing installation. If you have any questions about this product or issues
exy neon fl flexy neon
 flexy neon flexy neon LED NEON led neon Led neon es un producto innovador que combina una tira de led con cubierta de silicona. Esto permite una luz uniforme sin puntos y una gran flexibilidad para colocarlo
Unidades del Paisaje. Oxnard 4575 E. Vineyard Avenue Oxnard, CA Tel: Fax:
 Rialto 3435 S. Riverside Avenue Rialto, CA 92316 Tel: 951.328.9115 Fax: 951.321.0115 Oxnard 4575 E. Vineyard Avenue Oxnard, CA 93036 Tel: 805.485.1137 Fax: 805.983.7697 Unidades del Paisaje www.angeluspavingstones.com
π H-3905 PUSH FOAMING SOAP DISPENSER INSTALLATION 1-800-295-5510 uline.com MOUNTING INSTRUCTIONS APPLYING DISPENSER LABEL TOOLS NEEDED TAPE MOUNTING
 π H-3905 PUSH FOAMING SOAP DISPENSER 1-800-295-5510 uline.com Para Español, vea páginas 4-6. TOOLS NEEDED Phillips Screwdriver Electric Drill INSTALLATION APPLYING DISPENSER LABEL 1. Peel label from backing.
8 BIN WOODEN STORAGE ORGANIZER ORGANIZADOR DE 8 CAJONES DE TELA
 MODEL: 11223768V / MODELO: 11223768V 8 BIN WOODEN STORAGE ORGANIZER ORGANIZADOR DE 8 CAJONES DE TELA PARTS LIST AND HARDWARE LISTA DE PARTES Y ACCESORIOS NO A B C D E F G H1 H2 I J K L M N O HARDWARE LIST
MINI INDUSTRIAL DUTY DIE GRINDER
 MINI INDUSTRIAL DUTY DIE GRINDER Model GETTING STARTED OPERATION Mini Industrial Duty Die Grinder Owner s Manual GETTING STARTED OPERATION Model Free Speed (RPM) Collet Size (Inch) Horsepower (HP) Air
Installation Guide F. Shower Arms
 Installation Guide Shower Arms K-9511 K-9512 M product numbers are for Mexico (i.e. K-12345M) Los números de productos seguidos de M corresponden a México (Ej. K-12345M) Français, page Français-1 Español,
Delivery & Installation Pointer
 DP-035 August 2009 R8178785 Delivery & Installation Pointer ISSUE: August 2009 Whirlpool 27 French Door with IDI Models: GI7FVCXWA, GI7FVCXWB, GI7FVCXWQ, GI7FVCXWY Supplemental Information Accessing Door
WOODEN MAGAZINE TABLE MESA REVISTERO DE MADERA
 ODEL: 11224545V / ODELO: 11224545V WOODEN AGAZINE TABLE ESA REVISTERO DE ADERA NO A B C D E F G H I J L N PARTS AND HARDWARE LISTA DE PARTES Y HARDWARE HARDWARE LIST LISTA DE HARDWARE LEFT BAC SIDE PANEL
Installation Instructions Instrucciones para la instalación
 Cast Stone Mailbox Post Poste para buzón de piedra moldeada Instrucciones para la instalación Model 50 PK40SSGS Model 50 PK40SSBS Modelo 50 PK40SSGS Modelo 50 PK40SSBS English Cast Stone Mailbox Post Congratulations
Cambridge Pre-Packaged / Pre-Cut Ledgestone Wall Grill Module Instruction Manual
 Instruction Manual Cambridge Pre-Cortado Parilla Para Uso Afuerra de Olde Inglés Pared Layer Reference Guide: Guía de Referencia: Layer 10 Finished Grade Layer 9 Layer 8 Layer 7 Layer 6 Layer 5 Layer 4
Guía de instalación rápida TFM-561U
 Guía de instalación rápida TFM-561U V1 Table of Contents Español 1 1. Antes de iniciar 1 2. Cómo se instala 2 Troubleshooting 5 Version 08.25.2010 1. Antes de iniciar Contenidos del paquete TFM-561U CD-ROM
Bow Window without Head and Seat Boards Ventana panorámica en curva sin cabeceras ni bases
 Bow Window Rough Opening Sizes Tamaños de abertura no acabada de la ventana panorámica en curva for ndersen Casement CR, CN, C, CW, CX & CXW Windows para ventanas batientes ndersen CR, CN, C, CW, CX y
Flashcards Series 2 Las Necesidades de la Vida
 Flashcards Series 2 Las Necesidades de la Vida Flashcards are one of the quickest and easiest ways to test yourself on Spanish vocabulary, no matter where you are! Test yourself on just these flashcards
CONTROLADORA PARA PIXELS CONPIX
 The LedEdit Software Instructions 1, Install the software to PC and open English version: When we installed The LedEdit Software, on the desktop we can see following icon: Please Double-click it, then
QUICK CHANGE REVERSIBLE AIR DRILL KIT
 QUICK CHANGE REVERSIBLE AIR DRILL KIT Model GETTING STARTED OPERATION Quick Change Reversible Air Drill Kit Owner s Manual GETTING STARTED OPERATION Model Free Speed (RPM) Chuck Size Horsepower (HP) Air
ENTERTAINMENT CENTER / BOOKSHELF ESTANTE PARA LIBROS / ESTANTE PARA TV
 MODEL: 11223726 / MODELO: 11223726 ENTERTAINMENT CENTER / BOOKSHELF ESTANTE PARA LIBROS / ESTANTE PARA TV PARTS LIST AND HARDWARE LISTA DE PARTES Y ACCESORIOS NO A B C D 2-1 3 4 5 6 7 HARDWARE LIST LISTA
Preassembled Rail Instructions
 Preassembled Rail Instructions Prior to installing railing: Please consult local zoning laws in regards to load requirements and bottom space requirements for rails. All supporting structures must be in
1-1/4 IN. FAUX WOOD COLONIAL SHUTTERS
 Shade and shutter THE FACTORY 1-1/4 IN. FAUX WOOD COLONIAL SHUTTERS Español p. 7 PACKAGE CONTENTS HARDWARE CONTENTS PC3 Part Description Quantity 2-1/2 in. Screw 4 2 in. Screw 4 1-1/8 in. Screw 2 Knob
Cambridge Large Bar (prototype) with Olde English Wall Outdoor Kitchen Kit (Right Hand)
 with Olde English Wall Outdoor Kitchen Kit (Right Hand)") (Right Hand) Instruction Manual Note: This is a prototype design. It has not been tested. The bar is shown as an attachment to the Olde English Kitchen kit. Special Kitchen Kit instructions are available
(Right Hand) Instruction Manual Note: This is a prototype design. It has not been tested. The bar is shown as an attachment to the Olde English Kitchen kit. Special Kitchen Kit instructions are available
Cambridge Fully Assembled Outdoor Grill Island Instruction Manual
 Outdoor Grill Island Instruction Manual Cambridge montado completamente Isla parrilla al aire libre Manual de instrucciones Layer Reference Guide: Grill Island Dimension: 751/4 Long 36 Deep 38 High Grill
INTRODUCING DECORATIVE INTERIOR SLIDING DOOR HARDWARE
 FAQ Do the kits include the door and header board? No, door and header board are purchased separately. What size header board is required? A 2 x 6 header board is recommended, however, a 1 x 6 header board
ADULT ASSEMBLY REQUIRED
 HORIZONTAL BOOKCASE White Espresso Gray ADULT ASSEMBLY REQUIRED This product requires assembly by an adult because of small parts. Care should be taken in unpacking and assembling this item to keep small
RIGHT ANGLE DIE GRINDER
 RIGHT ANGLE DIE GRINDER Model GETTING STARTED OPERATION Right Angle Die Grinder Owner s Manual GETTING STARTED OPERATION Model Free Speed (RPM) Collet Size (Inch) Horsepower (HP) Air Inlet (NPT) Hose Size
Cambridge Pre-Packaged / Pre-Cut MaytRx Pizza Oven Kit Instruction Manual
 MaytRx Pizza Oven Kit Instruction Manual Cambridge Pre-Cortado MaytRx Horno de Pizza Manual de Instrucciones Layer Reference Guide: Guía de Referencia: Layer 18 Layer 17 Layer 16 Layer 15 Layer 14 Layer
Parts Included / Partes incluidas (1) Instruction Guide / Guía de instrucciones (1-2) Remodel Bracket / Soporte de remodelación
 Instruction Guide / Guía de instrucciones (1-2) Remodel Bracket / Soporte de remodelación") Remodeling Bracket Installation Guide Guía de instalación del soporte de remodelación for Andersen A-Series Hinged Inswing Patio Doors and A-Series Hinged Inswing Patio Doors with Stormwatch Protection
Remodeling Bracket Installation Guide Guía de instalación del soporte de remodelación for Andersen A-Series Hinged Inswing Patio Doors and A-Series Hinged Inswing Patio Doors with Stormwatch Protection
Organización de Aviación Civil Internacional GRUPO DE EXPERTOS SOBRE MERCANCÍAS PELIGROSAS (DGP) VIGESIMOQUINTA REUNIÓN
 VIGESIMOQUINTA REUNIÓN") Organización de Aviación Civil Internacional NOTA DE ESTUDIO DGP/25-WP/33 1/9/15 GRUPO DE EXPERTOS SOBRE MERCANCÍAS PELIGROSAS (DGP) VIGESIMOQUINTA REUNIÓN Montreal, 19 30 de octubre de 2015 Cuestión 5
Organización de Aviación Civil Internacional NOTA DE ESTUDIO DGP/25-WP/33 1/9/15 GRUPO DE EXPERTOS SOBRE MERCANCÍAS PELIGROSAS (DGP) VIGESIMOQUINTA REUNIÓN Montreal, 19 30 de octubre de 2015 Cuestión 5
Cambridge Fully Assembled Outdoor Veneer Grill Island Instruction Manual
 Outdoor Veneer Grill Island Instruction Manual Cambridge montado completamente Isla parrilla al aire libre Manual de instrucciones Layer Reference Guide: Grill Island Dimension: 6 3 1/4 Long 3 Deep 3 2
Installation Guide. Green momit
 Installation Guide Green momit 2015 www.momit.com momit Deviceses Gateway: Model 1 and 2 Wall option The momit Gateway allows your thermostat to be connected to the Internet. It s included in the Starter
Cambridge Pre-Packaged / Pre-Cut Olde English Wall Grill Module Instruction Manual
 Instruction Manual Cambridge Pre-Cortado Parilla Para Uso Afuerra de Olde Inglés Pared Layer Reference Guide: Guía de Referencia: Finished Grade Layer 10 Layer 9 Layer 8 Layer 7 Layer 6 Layer 5 Layer 4
Work Place 1M. Count & Compare Butterflies. 1. Find a partner.
 Blackline WP 1M.1 Run back-to-back with WP 1M.2 Work Place 1M WORK PLACE GAMES & ACTIVITIES Count & Compare Butterflies This Work Place basket will need H 3 Count & Compare Butterflies gameboards H 3 sets
Catalog. Tel.(01442) Angel Omael El Arcangel Querétaro CP 76147
 Angel Omael El Arcangel Querétaro CP 76147") Catalog Tel.(01442)1994724 PINS Tel.(01442)199 47 24 www.conectividadindustriam PINS Tel. (01442) 199 4724 EJECTOR PINS Tel.(01442)199 4724 EJECTOR PINS Tel.(01442)199 4724 LEADER PINS Tel. (01442)1 994724
Catalog Tel.(01442)1994724 PINS Tel.(01442)199 47 24 www.conectividadindustriam PINS Tel. (01442) 199 4724 EJECTOR PINS Tel.(01442)199 4724 EJECTOR PINS Tel.(01442)199 4724 LEADER PINS Tel. (01442)1 994724
π H-4039 SPILL CONTAINMENT WORKSTATION CONNECTORS ASSEMBLY 1-800-295-5510 uline.com TOOL NEEDED
 π H-4039 SPILL CONTAINMENT WORKSTATION CONNECTORS uline.com Para Español, vea páginas 3-4. Pour le français, consulter les pages 5-6. TOOL NEEDED Plastic or Rubber Mallet ASSEMBLY 1. Locate one of the
MYLEX CORNER DESK ESCRITORIO DE ESQUINA IMPORTANT IMPORTANTE
 MYLEX 09 CORNER DESK ESCRITORIO DE ESQUINA IMPORTANT IMPORTANTE TO OUR CUSTOMERS: A NUESTROS CLIENTES: THIS PRODUCT HAS BEEN CAREFULLY ESTE PRODUCTO HA SIDO RIGUROSAMENTE QUALITY CONTROLLED, HOWEVER HUMAN
PISTOL NEEDLE SCALER KIT
 PISTOL NEEDLE SCALER KIT Model GETTING STARTED OPERATION Pistol Needle Scaler Kit Owner s Manual GETTING STARTED OPERATION Model Blows per Minute (BPM) Stroke Length Chisel Shank Size Air Inlet (NPT) Hose
Stem Glass Holder (SGH36U)
") THESE INSTRUCTIONS SHOULD ONLY BE PRINTED USING ADOBE ACROBAT AND SHOULD NOT BE FAXED OR REPRODUCED ON A DIGITAL COPIER. AMERICAN WOODMARK CORPORATION PROVIDES THESE INSTRUCTIONS ON AN AS IS BASIS AND
THESE INSTRUCTIONS SHOULD ONLY BE PRINTED USING ADOBE ACROBAT AND SHOULD NOT BE FAXED OR REPRODUCED ON A DIGITAL COPIER. AMERICAN WOODMARK CORPORATION PROVIDES THESE INSTRUCTIONS ON AN AS IS BASIS AND
WELCOME TO GI SCHOOL ONLINE PAYMENT GUIDELINE BIENVENIDOS A LA GUÍA DE PAGOS EN LÍNEA DEL GI SCHOOL
 WELCOME TO GI SCHOOL ONLINE PAYMENT GUIDELINE BIENVENIDOS A LA GUÍA DE PAGOS EN LÍNEA DEL GI SCHOOL WHAT DO I NEED? QUÉ NECESITO? Before beginning your online payment, make sure you have the following
Neutropenic Precautions
 Neutropenic Precautions (Special Precautions) Everyone must wash hands or use an alcohol-based hand rub when entering or leaving the patient s room. STOP! Special precautions must be taken prior to entering
Buenos días, Sr. Smith. Limpio el piso del edificio? Hola, Francisco. Sí, limpie usted el piso. Primero use la
 Limpiando la obra Francisco: Rick Smith: Buenos días, Sr. Smith. Limpio el piso del edificio? Hola, Francisco. Sí, limpie usted el piso. Primero use la pala para retirar toda la basura, y después use la
LAPTOP DESK WITH 3 BINS MESA PARA COMPUTADORA PERSONAL CON 3 CONTENEDORES
 MODEL: 11222775R / MODELO: 11222775R LAPTOP DESK WITH 3 BINS MESA PARA COMPUTADORA PERSONAL CON 3 CONTENEDORES NO A B C D E F G H 1 2 3 4 5 6 7 8 9 PARTS AND HARDWARE LISTA DE PARTES Y HARDWARE TOP PANEL
Español Inglés Español Inglés. 26. Llevo. Los colores. 27. blanco/a. 28. negro/a. 30. rojo/a. 31. gris. 32. azul. 33. verde. 35. marrón.
 Español Inglés Español Inglés La ropa 22. Los jeans 1. El suéter 23. Los pantalones cortos 2. Los pantalones 24. El traje de baño 3. El pijama 25. Qué llevas? 4. El traje 26. Llevo 5. La chaqueta 6. La
Shelf Under Cabinet (SUC36T)
") THESE INSTRUCTIONS SHOULD ONLY BE PRINTED USING ADOBE ACROBAT AND SHOULD NOT BE FAXED OR REPRODUCED ON A DIGITAL COPIER. AMERICAN WOODMARK CORPORATION PROVIDES THESE INSTRUCTIONS ON AN AS IS BASIS AND
THESE INSTRUCTIONS SHOULD ONLY BE PRINTED USING ADOBE ACROBAT AND SHOULD NOT BE FAXED OR REPRODUCED ON A DIGITAL COPIER. AMERICAN WOODMARK CORPORATION PROVIDES THESE INSTRUCTIONS ON AN AS IS BASIS AND