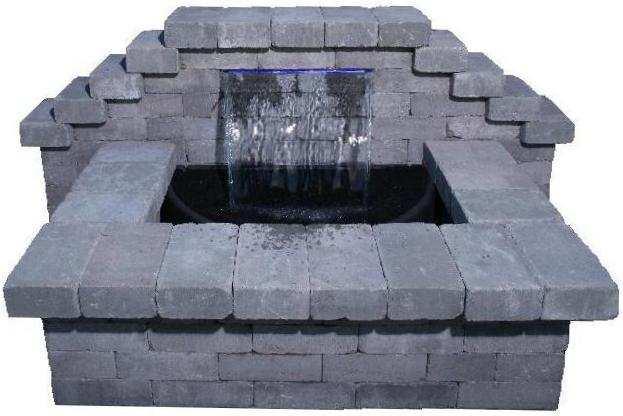
Cambridge Pre-Packaged Waterfall Kit
|
|
|
- Elisa María Carmen Farías Cáceres
- hace 6 años
- Vistas:
Transcripción
1 Page 1

2 Layer Reference Guide Guía de Referencia Estimated man hours for construction of the waterfall will be 2 hours based on a 2 man crew with moderate experience. Las horas de trabajo estimadas para la construcción de la cascada será 2 horas con 2 personas con experiencia moderada. Page 2
3 Waterfall Items included in the waterfall kit: 24 Color Waterfall & Basin 33 Gallon TW2400 Tidal Wave 2 Pump 10 of 1 ¼ Flexible PVC Pipe Kit Includes Splash Mat, Pump Discharge, Glue, Cleaner, Thread Sealant, Color Waterfall Brush and Fittings Tools required for waterfall kit installation: Safety Goggles Ear Protection Dust Mask Gloves Shovels (digging & flat) Metal cutters for banding on cubes Mason Hammer (Chipping, hammer) Hacksaw Road Stone Rake Tamper (Hand or Mechanical) Wheelbarrow Level (2 and 6 recommended) Speed Square Caulk Gun 10oz. or 28 oz. depending on what size adhesive is purchased Rubber Mallet 12 Demo saw with diamond blade Tape Measure Marking Device (pencil, soap stone etc) Chalk Line Hand Broom Page 3 Cambridge Pre-Packaged Cambridge Juego de Cascada Artículos Incluidos en el juego de cascada: 24 de Color Waterfall y Lavabo - 33 galones 2 Bombas de TW2400 Tidal Wave 10 ' pipa flexible del PVC de 1 ¼ Juego Incluye Estera de Salpicadura, Descarga de Bomba, el Pegamento, el Limpiador, Sellador de Hilo, Cepillo de Color Waterfall y Accesorio Las herramientas requerido para terminar la instalación del juego de cascada: Anteojos de Seguridad Protección de Oreja Máscara de Polvo Guantes Palas (cavando & plano) Cortedores Metálicos para atar los cubos Martillo de Mason (Desportillando, martillo) Sierra de metales Rastrillo de Piedra de Camino Manipula (Mano o Mecánico) Carretilla Nivel (2' y 6' recomendó) Cuadrado de Velocidad Calafatea el Fusil 10oz. o 28 oz. que dependiendo de lo que calibra adhesivo es comprado Mazo de Caucho 12 Demostración vio con la hoja del diamante Cinta de Mide Mark Dispositivo (lápiz, piedra de jabón etc) Línea de Tiza Escoba de Mano

4 Total cuts of Olde English wall needed to complete waterfall installation PLEASE PRE-CUT BEFORE STARTING CONSTRUCTION Los cortes totales de pared de Olde English que es necesitada para completar instalación de cascada POR FAVOR CORTE ANTES DE COMENZAR CONSTRUCCIÓN Name / Nombre A Cut / Corte A B Cut / Corte B C Cut / Corte C Dimensions / Dimensiones 8" x 6" x 4" 12" x 4" x 3 1/2" 8" x 9 1/2" Quantity needed / Cantidad necesario 10 pieces / piezas 2 pieces / piezas 1 piece / pieza Base Preparation Excavate an area 84 long by 40 wide by 4 deep. Compact the sub base with a vibratory compactor. Add approximately 1250 lbs of ¾ clean crushed stone. Compact and level the stone. Page 4 Preparación despreciable Excava un área 84 largo por 40 ancho por 4 profundo. Comprima el sub base con un compactor vibratorio. Agregue aproximadamente 1250 lbs de ¾" piedra limpia aplastada. Comprima y nivele la piedra.

5 Layer 1 On top of your leveled base course install 15 wall stones and one C cut piece as shown in the layer 1 detail. Once all the wall stones are laid install the water basin as shown. Refer to details A and B on page 6. Capa 1 Encima de su curso nivelado de base instala 15 piezas completas de la pared y una pieza de corte C como demostrado en el detalle de paso 1. Una vez que toda la pared es colocado instala el lavabo de agua como mostrado. Refiérase a detalles A y B en la página 6. Page 5


6 Page 6


7 Layer 2 Install 13 wall stones and five A cuts as shown in the layer 2 detail. Keeping all lines straight and corners square. Glue all wall stones to the previous layer. Capa 2 Instalan 13 piezas completas de la pared y las cinco piezas de corte A como demostrado en el detalle de paso 2. Pegue todas las piezas de la pared a la capa anterior. Manteniendo todas líneas rectas y los esquinas cuadradas. Pegue todas las piedras de la pared al plataforma de cemento. Page 7

8 Layer 3 Install 16 wall stones as shown in the layer 3 detail. Keeping all lines straight and corners square. Glue all wall stones to the previous layer. Capa 3 Instalan 16 piezas completas de la pared como demostrado en el detalle de paso 3. Pegue todas las piezas de la pared a la capa anterior. Manteniendo todas líneas rectas y los esquinas cuadradas. Pegue todas las piedras de la pared al plataforma de cemento. Page 8

9 Layer 4 Install 13 wall stones and five A cuts as shown in the layer 4 detail. Keeping all lines straight and corners square. Glue all wall stones to the previous layer. Capa 4 Instalan 13 piezas completas de la pared y las cinco piezas de corte A como demostrado en el detalle de paso 4. Pegue todas las piezas de la pared a la capa anterior. Manteniendo todas líneas rectas y los esquinas cuadradas. Pegue todas las piedras de la pared al plataforma de cemento. Page 9


10 Layer 5 Install 21 wall stones as shown in the layer 5 detail. Make sure you have the proper overhang on all sides. Left & right sides have a 2 overhang and front edge has a 3⅞ overhang. Glue all wall stones to the previous layer. See Detail 5-A Capa 5 Instale 21 piezas completas de la pared como demostrado en el detalle de paso 5. Aségurese que tiene el alero apropiado en todos los lados. Los lados izquierdos & derechos deben tener 2 sobre la orilla y la orilla delantera tiene un alero de 3⅞. Pegue todas las piedras de la pared al plataforma de cemento. Vea Detalle 5-A Page 10


11 Layer 6 Install 8 wall stones as shown in the layer 6 detail. Make sure to spin the two end wall stones as shown with the proper 2 overhang. Glue all wall stones to the previous layer. See Detail 6-A. Capa 6 Instalan 8 piezas completas de la pared como demostrado en el detalle de paso 6. Aségurese para girar las dos piezas finales como demostrado con el apropiado 2 sobre la orilla. Pegue todas las piezas de la pared a la capa anterior. Vea Detalle 6-A Page 11

12 Layer 7 Install 7 wall stones as shown in the layer 7 detail. Make sure to spin the two end wall stones as shown with the proper 2 overhang and 6 set back. Glue all wall stones to the previous layer. Capa 7 Instale 7 piezas completas de la pared como demostrado en el detalle de paso 7. Aségurese para girar las dos piezas finales como demostrado con el apropiado 2 sobre la orilla y 6 sobre la orilla atras. Pegue todas las piezas de la pared a la capa anterior. Page 12

13 Layer 8 Install 4 wall stones and two B cuts as shown in the layer 8 detail. Make sure to spin the two end wall stones as shown with the proper 2 overhang and 6 set back. Glue all wall stones to the previous layer. Capa 8 Instalan 4 piezas completas de la pared y las dos piezas de corte B como demostrado en el detalle de paso 8. Aségurese para girar las dos piezas finales como mostrado con el apropiado 2 sobre la orilla y 6 sobre la orilla atras. Pegue todas las piezas de la pared a la capa anterior. Page 13


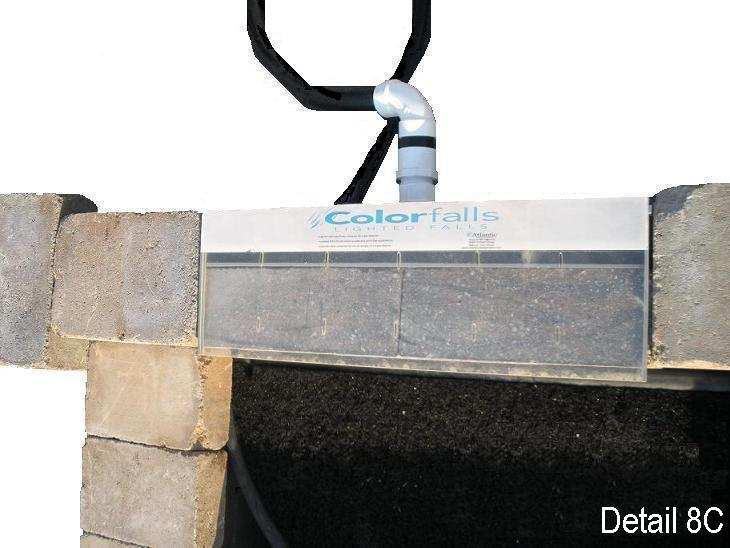
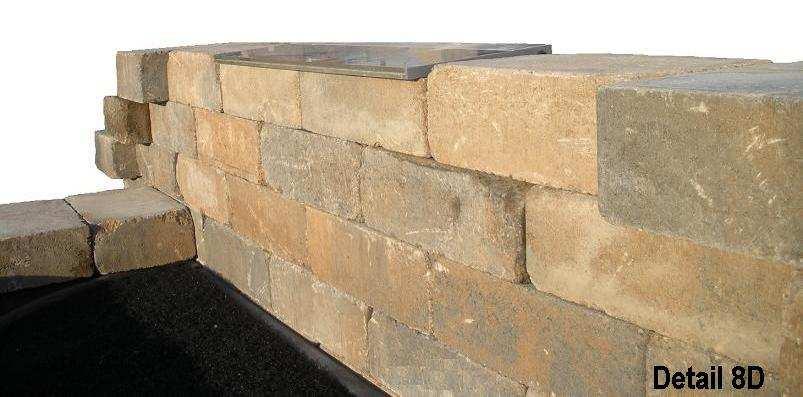
14 Layer 8A The two B cut faces should be positioned as follows: the 3 ½ machine face should face forward. The cut face should face upward toward the sky as shown in detail 8A. Before final placement of water fall attach the pressure hose to the back as per manufacturer s instructions 8B. Once the hose is attached, place the water fall on top of the B cuts as shown in details 8C & 8D. Glue all wall stones to the previous layer. Page 14 Capa 8A Las dos caras del corte B se deben colocar como sigue: La cara de la máquina de 3 ½ tiene que encare hacia adelante. La cara del corte debe encarar hacia arriba hacia el cielo como demostrado en el detalle 8A. Antes de colocación final de la cascada, conecte la manga de la presión en la parte de atras en acuerdo con las instrucciones del fabricante. Vea detalle 8B. Quando se ata la manguera, ponga la cascada encima de los cortes B como demostrado en los detalles 8C y 8D. Pegue todas las piezas de la pared a la capa anterior.
15 Page 15

16 Layer 9 Install 5 wall stones as shown in the layer 9 detail. Make sure to spin the two end wall stones with the proper 2 overhang and 6 set back. Glue all wall stones to the previous layer. Capa 9 Instale 5 piezas completas de la pared como demostrado en el detalle de paso 9. Aségurese para girar las dos piezas finales como demostrado con el apropiado 2 sobre la orilla y 6 sobre la orilla atras. Pegue todas las piezas de la Page 16

17 Layer 10 Install 5 wall stones as shown in the layer 10 detail. Make sure to set the proper 2 overhang on all wall stones. You can add a planter or fill with decorative stones if you so desire. Plug in and be proud of the Cambridge waterfall you just built. Thank you, Cambridge Pavers, Inc. Capa 10 Instale 5 piezas completas de la pared como demostrado en el detalle de paso 10. Aségurese para tiener el apropiado alero de 2 sobre la orilla en todas las piezas. Usted puede incluir un plantador o llenar de piedras decorativas si usted desea. Conecte y esté orgulloso de la cascada de Cambridge que usted acaba de construir. Gracias, Cambridge Pavers, Inc. Page 17
Cambridge Pre-Packaged / Pre-Cut OldeEnglishWallWaterfall Kit Instruction Manual
 OldeEnglishWallWaterfall Kit Instruction Manual Manual de Instrucciones para la Cascada de Cambridge Olde Ingles Pared Pre-Empaquetado Layer Reference Guide: Guía de Referencia: Layer 10 Layer 9 Layer
Cambridge Pre-Packaged / Pre-Cut Olde English Round Waterfall Kit Instruction Manual
 Instruction Manual Manual de Instrucciones para la Cascada de Cambridge Olde Ingles Pared Pre-Empaquetado Layer Reference Guide: Guía de Referencia: Layer 10 Layer 9 Layer 8 Layer 7 Layer 6 Layer 5 Layer
Cambridge Fully Assembled Olde English Wall Grand Column with Mailbox
 Olde English Wall Grand Column with Mailbox Layer Reference Guide: Guía de Referencia: Finished Grade 4 Above Foundation 4 Compacted 3/4 stone 8 Concrete slab (4000 PSI) 1 Tools Required For Grand Column
Cambridge Pre-Packaged / Pre-Cut Olde English Wall Firewood Box (Left Hand)
") Olde English Wall Firewood Box (Left Hand) NOTE: Woodbox may be installed on either side of the fireplace. These instructions are for a left side woodbox. For a right side woodbox, reverse the placement
Olde English Wall Firewood Box (Left Hand) NOTE: Woodbox may be installed on either side of the fireplace. These instructions are for a left side woodbox. For a right side woodbox, reverse the placement
Cambridge Pre-Packaged Olde English Paver Firewood Box (Left Hand)
") Cambridge Pre-Packaged Olde English Paver Firewood Box (Left Hand) Note: Woodbox may be installed on either side of the fireplace. Instructions shown are for the left side woodbox. Reverse the placement
Cambridge Pre-Packaged Olde English Paver Firewood Box (Left Hand) Note: Woodbox may be installed on either side of the fireplace. Instructions shown are for the left side woodbox. Reverse the placement
Cambridge Pre-Packeged / Pre-Cut Olde English Wall Patio Pub & Bistro Table Kit
 Cambridge Pre-Packeged / Pre-Cut Olde English Wall Patio Pub & Bistro Table Kit Cambridge Pre-Cortado Kit de Mesa para uso Afuerra de Olde Inglés Pared Layer Reference Guide: Guía de Referencia: Layer
Cambridge Pre-Packaged / Pre-Cut MaytRx Wall Patio and Pub Bistro Table
 Cambridge Pre-Cortado Kit de Mesa para uso Afuerra de MaytRx Pared Layer Reference Guide: Guía de Referencia: Layer 9 Layer 8 Layer 7 Layer 6 Layer 5 Finished Grade (7 1/4 Above Top of Foundation) Grado
Cambridge Pre-Packaged / Pre-Cut Olde English Wall Mailbox
 Note: Cap layer is not included in the kit and is sold separately. Nota: La capa del casquillo no se incluye en el kit y se vende por separado. Cambridge Pre-Envasados / Pre-Cortadas Olde Inglés Buzón
Cambridge Fully Assembled Outdoor Fireplace Instruction Manual
 Instruction Manual Cambridge Montado Completamente Manual de Instrucciones Chimenea al Aire Libre 1 Layer Reference Guide: Guía de Referencia: Fireplace Dimensions: 4 11 7/8 Long 4 7 7/8 Deep 8 5 1/2 High
Cambridge Fully Assembled Outdoor Veneer Fireplace Instruction Manual
 Instruction Manual Cambridge Montado Completamente Manual de Instrucciones Chimenea al Aire Libre 1 Layer Reference Guide: Guía de Referencia: Fireplace Dimensions: 59 7/8 Long 55 7/8 Deep 101 1/2 High
MODEL: F / MODELO: F END TABLE WITH MEDIA STAND & MAGAZINE HOLDER MESA RINCONERA CON ESTANTE & REVISTERO
 MODEL: 11225479F / MODELO: 11225479F END TABLE WITH MEDIA STAND & MAGAZINE HOLDER MESA RINCONERA CON ESTANTE & REVISTERO NO A B C D E F G H I J K L PARTS LIST AND HARDWARE PARTES Y ACCESORIOS PARTS LIST
Enkadrain. Installation Instructions Instrucciones para la Instalación. Toll Free / Línea Gratis: Web:
 Installation Instructions Instrucciones para la Instalación Toll Free / Línea Gratis: 800-365-7391 Web: www.colbond-usa.com Vertical Installation Instructions Instrucciones para la Instalación Vertical
Cambridge Pre-Envasados / Pre-Cortado Olde Inglés Kit de Pared de la Chimenea al Aire Libre
 Cambridge Pre-Envasados / Pre-Cortado Olde Inglés Kit de Pared de la Chimenea al Aire Libre Layer Reference Guide: Guía de Referencia: 28 Finished Grade 27 26 25 24 23 22 21 20 19 18 17 16 15 14 13 12
WOW SECOND SKIN INSTALLATION GUIDE. Steps and recommendations to install and enhance your Second Skin product. WOW SECOND SKIN GUÍA DE INSTALACIÓN
 WOW SECOND SKIN INSTALLATION GUIDE Steps and recommendations to install and enhance your Second Skin product. WOW SECOND SKIN GUÍA DE INSTALACIÓN Pasos y recomendaciones para instalar y ensalzar Second
Cambridge Pre-Packaged / Pre-Cut MaytRx Fireplace Kit (with Deluxe Cast Stone Surround)
") Cambridge Pre-Packaged / Pre-Cut (with Deluxe Cast Stone Surround) Cambridge Pre-Envasados/Pre-Cortado MaytRx Kit Pared de la Chimenea al Aire Libre( anillo de piedra echado de lujo) Layer Reference Guide:
Cambridge Pre-Packaged / Pre-Cut (with Deluxe Cast Stone Surround) Cambridge Pre-Envasados/Pre-Cortado MaytRx Kit Pared de la Chimenea al Aire Libre( anillo de piedra echado de lujo) Layer Reference Guide:
Cambridge Pre-Packaged Old English Paver Outdoor Fireplace Kit (Basic Surround) Instruction Manual
 Instruction Manual") Old English Paver Outdoor Fireplace Kit (Basic Surround) Instruction Manual Cambridge Prembaló Chimenea Al Aire Libre de Olde English Ladrillos (Anillo Básico) Manual de Instrucción Layer Reference Guide:
Old English Paver Outdoor Fireplace Kit (Basic Surround) Instruction Manual Cambridge Prembaló Chimenea Al Aire Libre de Olde English Ladrillos (Anillo Básico) Manual de Instrucción Layer Reference Guide:
Cambridge Pre-Packaged / Pre-Cut Olde English Wall Outdoor Fireplace Kit (with Deluxe Surround)
") Olde English Wall Outdoor Fireplace Kit (with Deluxe Surround) Cambridge Pre-Envasados / Pre-Cut Olde Inglés Kit de Pared de la Chimenea al Aire Libre (con sonido envolvente de lujo) Layer Reference Guide:
Olde English Wall Outdoor Fireplace Kit (with Deluxe Surround) Cambridge Pre-Envasados / Pre-Cut Olde Inglés Kit de Pared de la Chimenea al Aire Libre (con sonido envolvente de lujo) Layer Reference Guide:
Desk End Panel (DEP) For Supporting One or Both Ends of a Countertop
 For Supporting One or Both Ends of a Countertop") THESE INSTRUCTIONS SHOULD ONLY BE PRINTED USING ADOBE ACROBAT AND SHOULD NOT BE FAXED OR REPRODUCED ON A DIGITAL COPIER. AMERICAN WOODMARK CORPORATION PROVIDES THESE INSTRUCTIONS ON AN AS IS BASIS AND
THESE INSTRUCTIONS SHOULD ONLY BE PRINTED USING ADOBE ACROBAT AND SHOULD NOT BE FAXED OR REPRODUCED ON A DIGITAL COPIER. AMERICAN WOODMARK CORPORATION PROVIDES THESE INSTRUCTIONS ON AN AS IS BASIS AND
WOODEN MAGAZINE TABLE MESA REVISTERO DE MADERA
 ODEL: 11224545V / ODELO: 11224545V WOODEN AGAZINE TABLE ESA REVISTERO DE ADERA NO A B C D E F G H I J L N PARTS AND HARDWARE LISTA DE PARTES Y HARDWARE HARDWARE LIST LISTA DE HARDWARE LEFT BAC SIDE PANEL
1
 PARTS AND ACCESSORIES COLOR OF PIECES MAY VARY PARTES Y ACCESORIOS EL COLOR DE LAS PIEZAS PUEDE VARIAR 5 x 7 x IMPORTANT PRE-BUILD STEPS PREVIA IMPORTANTE PASOS DE COMPILACIÓN STEP PASO SEPARATE AND COUNT
Manual de Instrucciones para la Chimenea de Cambridge Olde Ingles Ladrillos Pre-Empaquetado para Uso Afuera
 Olde English Paver Outdoor Fireplace Kit Instruction Manual Manual de Instrucciones para la Chimenea de Cambridge Olde Ingles Ladrillos Pre-Empaquetado para Uso Afuera Layer Reference Guide: Guía de Referencia:
Cambridge Pre-Packaged Olde English Paver Outdoor Fireplace Kit (Deluxe Surround) Instruction Manual
 Instruction Manual") Olde English Paver Outdoor Fireplace Kit (Deluxe Surround) Instruction Manual Manual de Instrucciones Para La Chimenea Cambridge Olde Ingles Ladrillos (Anillo de Lujo) Pre- Empaquetado Para Uso Afuera
Olde English Paver Outdoor Fireplace Kit (Deluxe Surround) Instruction Manual Manual de Instrucciones Para La Chimenea Cambridge Olde Ingles Ladrillos (Anillo de Lujo) Pre- Empaquetado Para Uso Afuera
RTA-2706A DIMENSIONS
 MODEL RTA - 706A Thanks for purchasing one of our products. Please read carefully the assembly instructions before the installation. Please save this manual for future reference. MODEL RTA-706A MODELO
LAPTOP DESK WITH 3 BINS MESA PARA COMPUTADORA PERSONAL CON 3 CONTENEDORES
 MODEL: 11222775R / MODELO: 11222775R LAPTOP DESK WITH 3 BINS MESA PARA COMPUTADORA PERSONAL CON 3 CONTENEDORES NO A B C D E F G H 1 2 3 4 5 6 7 8 9 PARTS AND HARDWARE LISTA DE PARTES Y HARDWARE TOP PANEL
Cambridge Pre-Packaged / Pre-Cut MaytRx Fireplace Kit Instruction Manual
 Cambridge Pre-Packaged / Pre-Cut Instruction Manual Cambridge Pre-Envasados/Pre-Cortado MaytRx Kit Pared de la Chimenea al Aire Libre Cambridge Pre-Packaged / Pre-Cut 2011 Layer Reference Guide: Guía de
Public Health Vocabulary. Key Terms For Your Brigade
 Public Health Vocabulary Key Terms For Your Brigade PUBLIC HEALTH BRIGADE VOCABULARY Tools : alambre wire alicate pliers arena sand balde bucket bloque cinder block bolsa de cemento cement bag concreto
Process Control Work Instructions Control de Procesos Instrucciones de Trabajo. for / para
 Process Control Work Instructions Control de Procesos Instrucciones de Trabajo for / para 629096898 VFCB Kit Relay Cable Harness Assy Ensamblar el Kit del Arnés de Cables del Relevador Publication Number:
Flashcards Series 5 El Agua
 Flashcards Series 5 El Agua Flashcards are one of the quickest and easiest ways to test yourself on Spanish vocabulary, no matter where you are! Test yourself on just these flashcards at first. Then, as
INSTRUCCIONES DE ENSAMBLAJE.
 English MULTI-FUNCTIONAL COMPUTER TABLE ASSEMBLY INSTRUCTION MODEL RTA - 3806 IMPORTANT: Surfaces must be cleaned with a solution of a smooth soap and water, then cleared with a dry towel. Do not use solvents
Tiding with a double nut all together.
 Instrucciones para el material de práctica y uso del Reloj y La Hora para utilizarse en centros. 1. Imprima todo el material siguiente en cartonite tamaño 8.5 x 11 y corte las tarjetas en las líneas continuas
SANTA LUZIA MOULDINGS INSTALLATION METHODS
 MOULDINGS SPECIALTY BOARDS Casa Cor SC 0 Arq. Isabela Faraco Image Rô Reitz Wall & Trim Chair Rails Guardasillas Door & Window Casings Contramarcos Appliques Plinth Blocks and Rosettes Zócalines y Rosetas
BUILT-IN TRIM KIT INSTALLATION INSTRUCTION
 BUILT-IN TRIM KIT INSTALLATION INSTRUCTION FOR KENMORE TRIM-KIT MODEL - 30 : 63002, 63004, 63009, 64003 27 : 63012, 63014, 63019, 63013 FOR USE WITH KENMORE MICROWAVE OVEN MODEL: 721.62462200, 721.62463200,
ENTERTAINMENT CENTER / BOOKSHELF ESTANTE PARA LIBROS / ESTANTE PARA TV
 MODEL: 11223726 / MODELO: 11223726 ENTERTAINMENT CENTER / BOOKSHELF ESTANTE PARA LIBROS / ESTANTE PARA TV PARTS LIST AND HARDWARE LISTA DE PARTES Y ACCESORIOS NO A B C D 2-1 3 4 5 6 7 HARDWARE LIST LISTA
π H-3905 PUSH FOAMING SOAP DISPENSER INSTALLATION 1-800-295-5510 uline.com MOUNTING INSTRUCTIONS APPLYING DISPENSER LABEL TOOLS NEEDED TAPE MOUNTING
 π H-3905 PUSH FOAMING SOAP DISPENSER 1-800-295-5510 uline.com Para Español, vea páginas 4-6. TOOLS NEEDED Phillips Screwdriver Electric Drill INSTALLATION APPLYING DISPENSER LABEL 1. Peel label from backing.
MYLEX CORNER DESK ESCRITORIO DE ESQUINA IMPORTANT IMPORTANTE
 MYLEX 09 CORNER DESK ESCRITORIO DE ESQUINA IMPORTANT IMPORTANTE TO OUR CUSTOMERS: A NUESTROS CLIENTES: THIS PRODUCT HAS BEEN CAREFULLY ESTE PRODUCTO HA SIDO RIGUROSAMENTE QUALITY CONTROLLED, HOWEVER HUMAN
Buenos días, Sr. Smith. Limpio el piso del edificio? Hola, Francisco. Sí, limpie usted el piso. Primero use la
 Limpiando la obra Francisco: Rick Smith: Buenos días, Sr. Smith. Limpio el piso del edificio? Hola, Francisco. Sí, limpie usted el piso. Primero use la pala para retirar toda la basura, y después use la
1-1/4 IN. FAUX WOOD COLONIAL SHUTTERS
 Shade and shutter THE FACTORY 1-1/4 IN. FAUX WOOD COLONIAL SHUTTERS Español p. 7 PACKAGE CONTENTS HARDWARE CONTENTS PC3 Part Description Quantity 2-1/2 in. Screw 4 2 in. Screw 4 1-1/8 in. Screw 2 Knob
COMPUTER DESK ESCRITORIO DE COMPUTADORA
 MODEL: 11222327F / MODELO: 11222327F COMPUTER DESK ESCRITORIO DE COMPUTADORA NO A B C D E F G H I J PARTS AND HARDWARE LISTA DE PARTES Y HARDWARE TOP PANEL PANEL SUPERIOR KEYBOARD PANEL PANEL DE TECLADO
Stem Glass Holder (SGH36U)
") THESE INSTRUCTIONS SHOULD ONLY BE PRINTED USING ADOBE ACROBAT AND SHOULD NOT BE FAXED OR REPRODUCED ON A DIGITAL COPIER. AMERICAN WOODMARK CORPORATION PROVIDES THESE INSTRUCTIONS ON AN AS IS BASIS AND
THESE INSTRUCTIONS SHOULD ONLY BE PRINTED USING ADOBE ACROBAT AND SHOULD NOT BE FAXED OR REPRODUCED ON A DIGITAL COPIER. AMERICAN WOODMARK CORPORATION PROVIDES THESE INSTRUCTIONS ON AN AS IS BASIS AND
π H-4039 SPILL CONTAINMENT WORKSTATION CONNECTORS ASSEMBLY 1-800-295-5510 uline.com TOOL NEEDED
 π H-4039 SPILL CONTAINMENT WORKSTATION CONNECTORS uline.com Para Español, vea páginas 3-4. Pour le français, consulter les pages 5-6. TOOL NEEDED Plastic or Rubber Mallet ASSEMBLY 1. Locate one of the
exy neon fl flexy neon
 flexy neon flexy neon LED NEON led neon Led neon es un producto innovador que combina una tira de led con cubierta de silicona. Esto permite una luz uniforme sin puntos y una gran flexibilidad para colocarlo
LOCK JAW DEVICE INSTRUCTIONS
 LOCK JAW DEVICE INSTRUCTIONS INSTALLATION & MAITENANCE: Each box of Lock Jaw Device includes: 4 Permanent Plates 4 Anchor Clamps 8 Screws Blue Coating 8 Screws Tap-Caps Items needed: Drill 3/16 drill bit
Meijer.com A
 English MOBILE LAPTOP CART STORAGE ASSEMBLY INSTRUCTION MODEL RTA - B00 IMPORTANT: Surfaces must be cleaned with a solution of a smooth soap and water, then cleared with a dry towel. Do not use solvents
Installation Guide C. Countertop
 Installation Guide Countertop K-2447, K-14027, K-14028, K-14029, K-14031, K-14032, K-14033 M product numbers are for Mexico (i.e. K-12345M) Los números de productos seguidos de M corresponden a México
Universal aftermarket speaker installation kit
 INSTALLATION INSTRUCTIONS FOR PART 82-4600 APPLICATIONS Universal aftermarket speaker installation kit 82-4600 KIT FEATURES Provides spacing for 6-1/2 aftermarket speaker installation. KIT COMPONENTS A)
INSTRUCCIONES DE ENSAMBLAJE.
 English MULTI-FUNCTIONAL COMPUTER TALE ASSEMLY INSTRUCTION MODEL RTA - 2706A IMPORTANT: Surfaces must be cleaned with a solution of a smooth soap and water, then cleared with a dry towel. Do not use solvents
Cambridge Pre-Packaged / Pre-Cut MaytRx Grill Module Instruction Manual
 Instruction Manual Cambridge Pre- Empaquetado / Pre-Cortado Manual de Instrucciones para la Prilla de MaytRx Pared Layer Reference Guide: Guía de Referencia: Finished Grade Layer 8 Layer 7 Layer 6 Layer
ASSEMBLY INSTRUCTIONS INSTRUCCIONES DE MONTAJE
 ASSEMBLY INSTRUCTIONS INSTRUCCIONES DE MONTAJE 4 PC PATIO CONVERSATION SET JUEGO DE PATIO C/ MESA, 2 SILLAS Y UN SILLÓN 250559R /250559T/250559G PLEASE NOTED / POR FAVOR A TENER EN CUENTA: THIS SET OF
INSTRUCCIONES DE ENSAMBLAJE.
 English MULTI-FUNCTIONAL COMPUTER TABLE ASSEMBLY INSTRUCTION MODEL RTA - S06 IMPORTANT: Surfaces must be cleaned with a solution of a smooth soap and water, then cleared with a dry towel. Do not use solvents
Parts Included / Partes incluidas (1) Instruction Guide / Guía de instrucciones (1-2) Remodel Bracket / Soporte de remodelación
 Instruction Guide / Guía de instrucciones (1-2) Remodel Bracket / Soporte de remodelación") Remodeling Bracket Installation Guide Guía de instalación del soporte de remodelación for Andersen A-Series Hinged Inswing Patio Doors and A-Series Hinged Inswing Patio Doors with Stormwatch Protection
Remodeling Bracket Installation Guide Guía de instalación del soporte de remodelación for Andersen A-Series Hinged Inswing Patio Doors and A-Series Hinged Inswing Patio Doors with Stormwatch Protection
PREMIER WRIST BLOOD PRESSURE MONITOR UB ) Install the batteries to your blood pressure monitor. LR03 or AAA batteries only.
 Install the batteries to your blood pressure monitor. LR03 or AAA batteries only.") PREMIER WRIST BLOOD PRESSURE MONITOR UB-543 1) Install the batteries to your blood pressure monitor. LR03 or AAA batteries only Battery cover Used batteries New batteries 2) (Optional) Set the Built-in
PREMIER WRIST BLOOD PRESSURE MONITOR UB-543 1) Install the batteries to your blood pressure monitor. LR03 or AAA batteries only Battery cover Used batteries New batteries 2) (Optional) Set the Built-in
These instructions should only be printed using Adobe Acrobat and should not be faxed or reproduced on a digital copier.
 These instructions should only be printed using Adobe Acrobat and should not be faxed or reproduced on a digital copier. American Woodmark Corporation provides these instructions on an AS IS basis and
English language / Idioma Español AK90-E. Leaflet No. / No. de folleto rev 00
 English language / Idioma Español AK90-E Leaflet No. / No. de folleto 466295 rev 00 Read through ALL instructions before commencing installation. If you have any questions about this product or issues
Unidades del Paisaje. Oxnard 4575 E. Vineyard Avenue Oxnard, CA Tel: Fax:
 Rialto 3435 S. Riverside Avenue Rialto, CA 92316 Tel: 951.328.9115 Fax: 951.321.0115 Oxnard 4575 E. Vineyard Avenue Oxnard, CA 93036 Tel: 805.485.1137 Fax: 805.983.7697 Unidades del Paisaje www.angeluspavingstones.com
Cambridge Fully Assembled Outdoor Grill Island Instruction Manual
 Outdoor Grill Island Instruction Manual Cambridge montado completamente Isla parrilla al aire libre Manual de instrucciones Layer Reference Guide: Grill Island Dimension: 751/4 Long 36 Deep 38 High Grill
INTRODUCING DECORATIVE INTERIOR SLIDING DOOR HARDWARE
 FAQ Do the kits include the door and header board? No, door and header board are purchased separately. What size header board is required? A 2 x 6 header board is recommended, however, a 1 x 6 header board
Bow Window without Head and Seat Boards Ventana panorámica en curva sin cabeceras ni bases
 Bow Window Rough Opening Sizes Tamaños de abertura no acabada de la ventana panorámica en curva for ndersen Casement CR, CN, C, CW, CX & CXW Windows para ventanas batientes ndersen CR, CN, C, CW, CX y
WOODEN WALL STORAGE WITH 3 NON-WOVEN BINS ALMACENAMIENTO DE MADERA DE PARED DE 3 CAJONES
 MODEL: 11224544V / MODELO: 11224544V WOODEN WALL STORAGE WTH 3 NON-WOVEN BNS ALMACENAMENTO DE MADERA DE PARED DE 3 CAONES NO A B C D E F G H L M PARTS AND HARDWARE LSTA DE PARTES Y HARDWARE TOP PANEL PANEL
MODEL: / MODELO: SPACE SAVER CABINET GABINETE PARA EL BAÑO
 MODEL: 125675 / MODELO: 125675 SPACE SAVER CABINET GABINETE PARA EL BAÑO NO A B C D E F G H I J K L M PARTS AND HARDWARE LISTA DE PARTES Y HARDWARE LEFT FRAME MARCO IZQUIERDO RIGHT FRAME MARCO DERECHO
MODEL: / MODELO: BATHROOM CABINET MUEBLE DE BAÑO
 MODEL: 227 / MODELO: 227 BATHROOM CABINET MUEBLE DE BAÑO NO A B C D E F G H 2 3 PARTS AND HARDWARE LISTA DE PARTES Y HARDWARE RIGHT FRAME MARCO DERECHO LEFT FRAME MARCO IZQUIERDO TOP PANEL PANEL SUPERIOR
Flat Digital Amplified Antenna User s Manual
 34342 Flat Digital Amplified Antenna User s Manual Version 1 Introduction: The 34342 Flat Digital Amplified Antenna is specially designed to receive digital and analog terrestrial broadcasted TV signals.
BASE & WALL EASY REACH CABINET 170º Hinge Replacement
 These instructions should only be printed using Adobe Acrobat and should not be faxed or reproduced on a digital copier. American Woodmark Corporation provides these instructions on an AS IS basis and
Flashcards Series 3 El Aeropuerto
 Flashcards Series 3 El Aeropuerto Flashcards are one of the quickest and easiest ways to test yourself on Spanish vocabulary, no matter where you are! Test yourself on just these flashcards at first. Then,
Cambridge Pre-Packaged / Pre-Cut Olde English Wall Bar Module Instruction Manual
 Instruction Manual Cambridge Pre-Embaló / Manual de Instrucción del Olde Ingles Pared Barra Layer Reference Guide: Guía de Referencia: Finished Grade Layer 11 Layer 10 Layer 9 Layer 8 Layer 7 Layer 6 Layer
3DPrint Quality Troubleshooting Guide
 3DPrint Quality Troubleshooting Guide Guía de solución de problemas Mastoner Distribucion Informatica, s.l. https://www.mastoner.com Tel 918416002 info@mastoner.com Not Extruding at Start of Print Print
Installation Guide F. Shower Arms
 Installation Guide Shower Arms K-9511 K-9512 M product numbers are for Mexico (i.e. K-12345M) Los números de productos seguidos de M corresponden a México (Ej. K-12345M) Français, page Français-1 Español,
1) Through the left navigation on the A Sweet Surprise mini- site. Launch A Sweet Surprise Inicia Una dulce sorpresa 2016
 Through the left navigation on the A Sweet Surprise mini- site. Launch A Sweet Surprise Inicia Una dulce sorpresa 2016") [[Version One (The user has not registered and is not logged in) Inicia Una dulce sorpresa 2016 To launch the Global Siddha Yoga Satsang for New Year s Day 2016, A Sweet Surprise, enter your username and
[[Version One (The user has not registered and is not logged in) Inicia Una dulce sorpresa 2016 To launch the Global Siddha Yoga Satsang for New Year s Day 2016, A Sweet Surprise, enter your username and
MT442 MT642 U S E R S M A N U A L
 T I L T S L I M M O U N T Display Size: 24-55 Maximum load: 70 lbs / 32 kg VESA Patterns: 75 x 75 to 400 x 400 Display Size: 30-65 Maximum load: 75 lbs / 34 kg VESA Patterns: 75 x 75 to 600 x 400 MT442
Interlock Weatherstrip Replacement
 Replacement Reemplazo del burlete de enganche for Andersen 400 Series Frenchwood and 00 Series Narroline Gliding Patio Doors, 00 Series Perma-Shield Gliding Patio Doors and 00 Series Perma-Shield Gliding
Frederick Douglass Elementary School School Year
 Kindergarten Supply List 1 Pencil box Approximately 8 X 5 inches, in which to store items such as crayons, scissors, glue, etc. Spiral Notebook Large Elmer s glue sticks Crayons (16 pack or 24 pack, regular
School Supply List for Pre-Kindergarten
 2016-2017 School Supply List for Pre-Kindergarten Lista del Material Escolar para Pre-Kindergarten 2016-2017 (2) Boxes 24 count crayons (12) Sharpened #2 pencils (1) Bottle (4 ounce) white school glue
monofilamento EL SISTEMA IDEAL THE IDEAL SYSTEM
 pelucas wigs 38 monofilamento EL SISTEMA IDEAL THE IDEAL SYSTEM La técnica del monofilamento se realiza sobre una base de tela transparente en la que se implantan cabellos uno a uno de forma artesanal,
USER MANUAL LOGAN CAM VIEW FOR PC LOGAN CAM VIEW PARA PC English / Español
 USER MANUAL LOGAN CAM VIEW FOR PC LOGAN CAM VIEW PARA PC English / Español ENGLISH SECTION PC Installation 1. Download the application Logan Cam View for PC through the following link: https://support.logan-cam.com/hc/enus/articles/115000940287-logan-cam-view
Installation Instructions
 Flat Mount FF44, FF64, FF84 Universal Mount for LCD, LED & Plasma TV s FF44 Soporte Universal Plano para TV s de LCD, LED y Plasma Support Universel Fixé pour TV LCD, LED et Plasma Soporte Universal Plano
TOOLS REQUIRED. Measuring tape Level Philips head screwdriver HERRAMIENTAS NECESARIAS. Cinta métrica Nivel Destornillador Phillips
 RECESS STAINLESS STEEL MEDICINE CABINET BOTIQUÍN EMPOTRADO DE ACERO INOXIDABLE INSTALLATION INSTRUCTION INSTRUCCIONES DE INSTALACIÓN RECESS MOUNT ONLY. IT IS RECOMMENDED THAT A LICENSED CONTRACTOR BE HIRED
Extractor Mecánico Exterior Serie External mechanical puller Serie Manual User manual
 Extractor Mecánico Exterior Serie 1000 External mechanical puller Serie 1000 Manual User manual 1000 ÍNDICE 1. Caracteristicas técnicas 3 Thecnical features 2. Dimensiones del extractor 3 Dimensions of
Universal 1 speaker spacer rings (For mounting 6 to 6-3/4 speakers to various locations)
") INSTALLATION INSTRUCTIONS FOR PART 82-4301 APPLICATIONS Universal 1 speaker spacer rings (For mounting 6 to 6-3/4 speakers to various locations) 82-4301 KIT FEATURES Provides spacing for aftermarket speaker
INSTALLATION INSTRUCTIONS FOR PART 82-4301 APPLICATIONS Universal 1 speaker spacer rings (For mounting 6 to 6-3/4 speakers to various locations) 82-4301 KIT FEATURES Provides spacing for aftermarket speaker
BAT/ Regenera los vapores en líquido - Altura adaptable - Conexión Push-in. BAT/ Kit 24V. BAT/ Kit 36 V. BAT/ Kit 48 V
 BAT/16277 Standard filler cap Manual filler cap diameter 35, colour black Tapones de llenado estándar Tapón-medida manual diámetro 35, color negro BAT/17368 Standard automatic filler cap automatic standard
You and Me Designed by Antoni Pallejà Office USER S MANUAL MANUAL DEL USUARIO
 You and Me Designed by Antoni Pallejà Office USER S MANUAL MANUAL DEL USUARIO PIECES & TOOLS PIECE A: 2 UNITS PIEZA A PIECE B: 2 UNITS PIEZA B NET RED NET BRACKET: 2 UNITS SOPORTE RED TOOLS / HERRAMIENTAS
Meijer.com A
 English MULTI-FUNCTIONL COMPUTER TLE SSEMLY INSTRUCTION Meijer.com C MODEL RT - 350 IMPORTNT: Surfaces must be cleaned with a solution of a smooth soap and water, then cleared with a dry towel. Do not
CONTROLADORA PARA PIXELS CONPIX
 The LedEdit Software Instructions 1, Install the software to PC and open English version: When we installed The LedEdit Software, on the desktop we can see following icon: Please Double-click it, then
Cambridge Pre-Packaged / Pre-Cut Ledgestone Wall Grill Module Instruction Manual
 Instruction Manual Cambridge Pre-Cortado Parilla Para Uso Afuerra de Olde Inglés Pared Layer Reference Guide: Guía de Referencia: Layer 10 Finished Grade Layer 9 Layer 8 Layer 7 Layer 6 Layer 5 Layer 4
Flashcards Series 1 Saludos y Despedidas
 Flashcards Series 1 Saludos y Despedidas Flashcards are one of the quickest and easiest ways to test yourself on Spanish vocabulary, no matter where you are! Setting Up Print this file. (In Adobe Acrobat,
Manual para Cambio de Apariencia en Acrobat Reader DC. Change of Appearance in Acrobat Reader DC
 Manual para Cambio de Apariencia en Acrobat Reader DC Change of Appearance in Acrobat Reader DC Desarrollado por: DTE, LLC Versión: 02.2016 Developed by: DTE, LLC Revisado en:25 de Octubre de 2016 support@dtellcpr.com
essentialhome TM OWNER'S MANUAL
 essentialhome TM OWNER'S MANUAL Belmont Mates Bed 5536026KP caution carefully read instructions and procedures for safe operation product code 0-06790917-6 upc code 0-2998655362-1 date of purchase / /
STOP WARNING. Contempo Futon - Charcoal-HN. Weight Limit: 300Lbs \ 136 Kgs. or access our website. Date of Purchase / /
 0 9986 355 6 35596 Contempo Futon - Charcoal-HN Weight Limit: 300Lbs \ 36 Kgs STOP O NOT RETURN PROUCT TO THE STORE Individual stores do not stock parts. If a part is missing or damaged, call our toll-free
Zune 8GB/4GB Start. Iniciar.
 Zune 8GB/4GB Start. Iniciar. SETUP 1 Visit www.zune.net/setup to install the Zune software. 2 When installation is complete, connect your Zune to your PC to start syncing. Your Zune charges whenever
Safety. Purpose of Hazard Communication Laws. Purpose of Hazard Communication Laws Personal Protective Equipment. Material Safety Data Sheets.
 Purpose of Hazard Communication Laws Hazard Communication Standard 29 CFR 1910.1200: Workers have the right-to-know the identities and hazards of chemicals they work with and around under conditions of
Cambridge Pre-Packaged / Pre-Cut MaytRx Pizza Oven Kit Instruction Manual
 MaytRx Pizza Oven Kit Instruction Manual Cambridge Pre-Cortado MaytRx Horno de Pizza Manual de Instrucciones Layer Reference Guide: Guía de Referencia: Layer 18 Layer 17 Layer 16 Layer 15 Layer 14 Layer
NCTE 2018 Step by Step Registration Tutorial Teo.cr + Sched NCTE Proceso de Matrícula Paso a Paso Teo.cr + Sched
 NCTE 2018 Step by Step Registration Tutorial Teo.cr + Sched NCTE Proceso de Matrícula Paso a Paso Teo.cr + Sched Use this tutorial to register online through Teo.cr. Follow the steps and pictures as a
FIREPLACE Chimenea. RUMBLESTONE PROJECT BUILDING INSTRUCTIONS Edificio del proyecto Instrucciones RumbleStone SIZE: 38.5" L X 84" W X 94.
 FIREPLACE Chimenea SIZE: 385" L X 84" W X 945" H NUMBER OF PIECES PER PROJECT: Número de piezas por proyecto HOME DEPOT SKU# Café Sierra Blend Grey Stone 2 Pallets Medium (7" L x 7" W x 3 1/2" H) 2 Paletas
Herramientas. Joaquín habla con Phil. Buenas tardes, Joaquín. Cómo va todo? Joaquín: Hola, jefe. Muy bien. Estoy revisando los tornillos.
 Herramientas Joaquín habla con Phil Phil: Buenas tardes, Joaquín. Cómo va todo? Joaquín: Hola, jefe. Muy bien. Estoy revisando los tornillos. Phil: Están bien apretados? Joaquín: Sí, jefe. Los tornillos
Maquina laminadora automática y semi-automática tipo flauta
 Maquina laminadora automática y semi-automática tipo flauta Cantidad mínima: 1 Pieza Tipo de pago: 30% al colocar la orden, 40% al envío del BL y 30% al instalar el equipo en su planta de trabajo. Incluye
Steel Workbench Frame
 INSTRUCTIONS Adjustable Height and Length Steel Workbench Frame LENGTH ADJUSTABLE FOR 4', 5', 6' WORK SURFACES 29" - 41" ADJUSTABLE HEIGHT (1" INCREMENTS) WORK SURFACE NOT INCLUDED USE 4', 5', 6' LONG
Junior High Sacraments Schedule
 Junior High Sacraments Schedule The retreat and gatherings are all mandatory. Your student must attend ALL of these in preparation for receiving the Sacraments. If you have an emergency or illness and
Car Seat Adapter Adaptador de la silla para el coche
 CHICCO/PEG-PEREGO Car Seat Adapter Adaptador de la silla para el coche PD348997B babyjogger.com ASSEMBLY INSTRUCTIONS INSTRUCCIONES DEL ENSAMBLAJE CITY PREMIER CITY SELECT PEG-PEREGO 1 A B 2 3 CLICK 4
COMPANY OUTDOOR LIVING. Imagine. Stack. Create. Exclusively at The Home Depot 1
 A COMPANY OUTDOOR LIVING Made Easy Imagine. Stack. Create. Exclusively at The Home Depot 1 YOU CAN DO IT WE CAN HELP In-Store Pickup and Delivery Options PAGE 04 Special Financing Offers PAGE 06 Online
PROYECTO FAMILIAR: SUDODDKU PROYECTO FAMILIAR. UCI Math CEO Meeting 4 (FEBRUARY 8, 2017) Estimado estudiante,
 Estimado estudiante,") Family project PROYECTO FAMILIAR PROYECTO FAMILIAR: S O 9 4 5 SUOKU U 3 Estimado estudiante, por favor completa esta actividad y tra tu respuesta el miércoles 15 de febrero. Podrás participar en rifas!
Family project PROYECTO FAMILIAR PROYECTO FAMILIAR: S O 9 4 5 SUOKU U 3 Estimado estudiante, por favor completa esta actividad y tra tu respuesta el miércoles 15 de febrero. Podrás participar en rifas!
Recommended # of people needed for assembly: 2
 DO NOT RETURN PRODUCT TO THE STORE Individual stores do not stock parts. NO DEVUELVA ESTE PRODUCTO A LA TIENDA Las tiendas no almacenan partes. Lot Number / Número de Lote: Date Of Purchase / Fecha de
1) Install the included batteries into your blood pressure monitor (BPM).
 Install the included batteries into your blood pressure monitor (BPM).") DELUXE CONNECTED BLOOD PRESSURE ONITOR UA-651BLE 1) Install the included batteries into your blood pressure monitor (BP). 2) Insert the air connector plug into the air socket. 3) Download the free A&D
DELUXE CONNECTED BLOOD PRESSURE ONITOR UA-651BLE 1) Install the included batteries into your blood pressure monitor (BP). 2) Insert the air connector plug into the air socket. 3) Download the free A&D