|
|
|
- David Márquez Lozano
- hace 8 años
- Vistas:
Transcripción
1 GRND CHEROKEE BCKUP CMER GRND CHEROKEE CMÉR D IDE U RECUL GRND CHEROKEE CÁMR RETROVISOR 1 B C D E 15X NOTE TO INSTLLER: Rear outer applique (B) must be painted to match body color. NOTE À L'INSTLLTEUR: Nouveau panneau arrière (B) doit être peint pour correspondre à la couleur du corps. NOT PR EL INSTLDOR: panel trasero Nuevo (B) debe estar pintado para que coincida con el color del cuerpo. RETIN LL FSTENERS FOR REINSTLLTION Maintenir toutes les vis pour la réinstallation Mantenga todos los tornillos para la reinstalación 1 2
 debe estar pintado para que coincida con el color del cuerpo.")
2

3

4 X 16 4X 4X 17 18

5 NOTE: NEW PNEL (B) MUST BE PINTED TO MTCH BODY COLOR REMRQUE: Nouveau panneau arrière (B) doit être peint pour correspondre à la couleur du corps. NOT: panel trasero Nuevo (B) debe estar pintado para que coincida con el color del cuerpo. D C B 21
 debe estar pintado para que")
6 6 B 22 4X 4X X 25

7 7 150mm E 26 REMOVE BK/BL WIRE ND WT/OR WIRE FROM VEHICLE CONNECTOR SUPPRIMER FIL BK/BL ET WT/OR RETIRE BK/BL Y WT/OR LMBRES NOTE: Use Miller 6680 Depopulate Tool to remove wires. REMRQUE : Pour dégager les fils du connecteur, utilisez l'outil Miller NOT: Utilice la Herramienta de Extracción Miller 6680 para retirar los cables. INSERT BK/BL WIRE INTO PIN 8 INSERT WT/OR WIRE INTO PIN 9 INSÉREZ FIL BK/BL DNS LE TROU 8 INSÉREZ FIL WT/OR DNS LE TROU 9 27 INSERTE BK/BL LMBRE EN PIN 8 INSERTE WT/OR LMBRE EN PIN 9 PIN 8 PIN 9 E 150mm 28

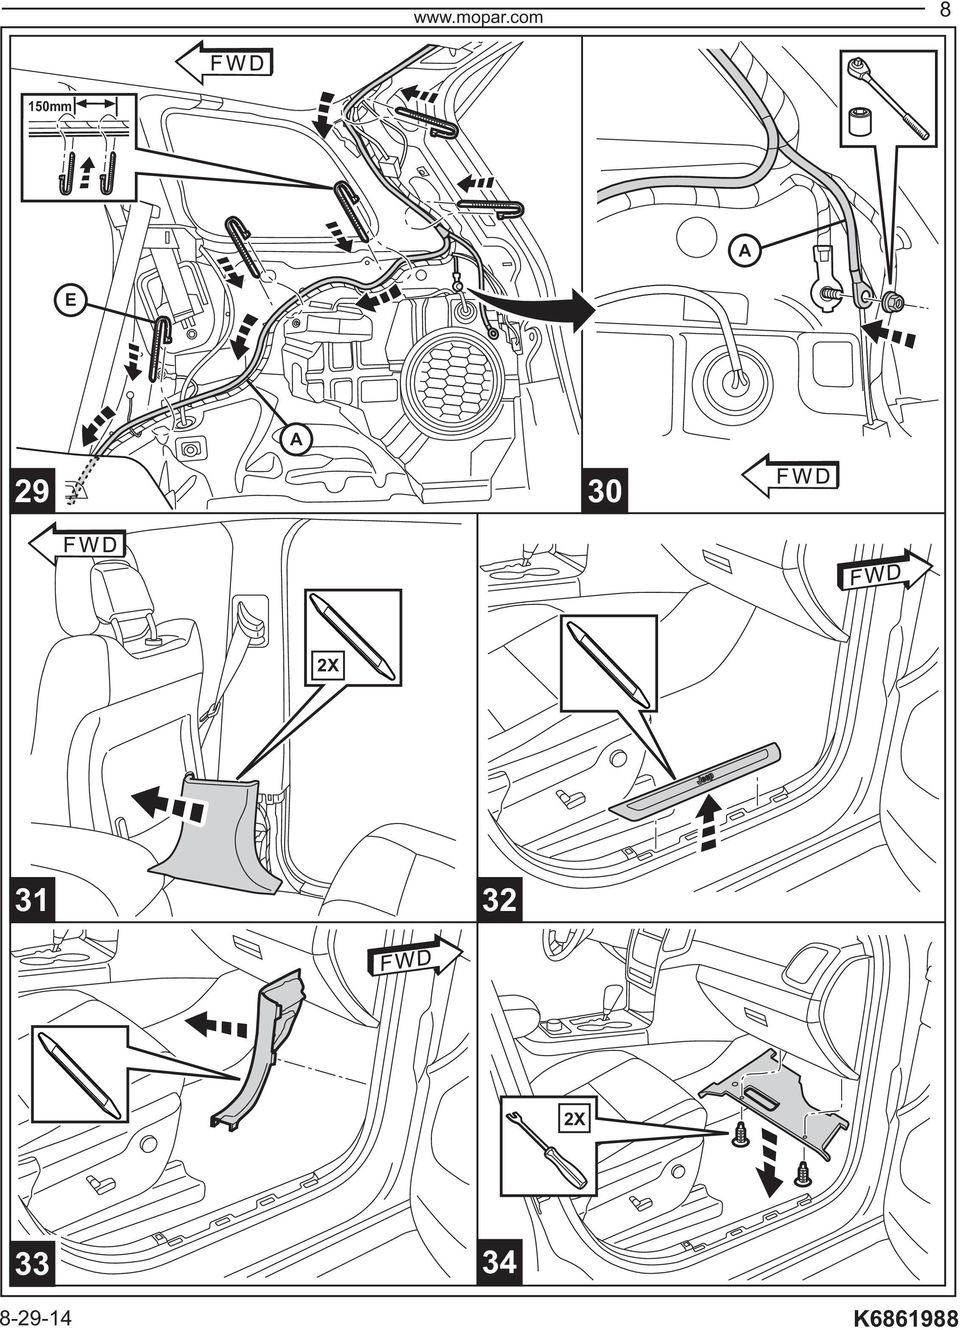
8 8 150mm E
9 9 Damper Cable

10 10 4X C

11 11 NOTE: If Pin 45 has a factory harness wire present, remove the factory wire and tape it back on the harness. Si le câblage existant est présent,retirez-la et fixez-le avec du ruban adhésif. Si el cableado existente está presente, retírelo y fijarlo con cinta adhesiva. NOTE: Use Miller 6680 Depopulate Tool to remove wires. REMRQUE : Pour dégager les fils du connecteur, utilisez l'outil Miller NOT: Utilice la Herramienta de Extracción Miller 6680 para retirar los cables. INSERT BL WIRE INTO PIN 45 INSÉREZ FIL BK DNS LE TROU 45 INSERTE BK LMBRE EN PIN 45 C5 LIGHT GREY 46 PIN

12 12 100mm E C NOTE: If Pin 13 has factory harness wire present, splice into existing circuit using Chrysler approved splice procedure. This procedure can be found on DealerConnect - Wire Splicing 29 - Non DTC Diagnostics / Circuit Testing / Standard Procedure. Si le câblage existant est présent, trancher dans le fil existant à l'aide de la Chrysler approuvé procédure d'épissure. Cette procédure peut être trouvé sur DealerConnect - Fil épissage 29 - Diagnostic non DTC / Circuit Testing / Procédure standard Si el cableado existente está presente, empalmar el nuevo cable en el cable existente mediante el procedimiento de empalme Chrysler aprobado. Este procedimiento se puede encontrar en DealerConnect - Empalme de cable 29 - Diagnóstico no DTC / Pruebas de circuitos / Procedimiento estándar C7 NOTE: Use Miller 6680 Depopulate Tool to remove wires. REMRQUE : Pour dégager les fils du connecteur, utilisez l'outil Miller NOT: Utilice la Herramienta de Extracción Miller 6680 para retirar los cables. PIN 13 INSERT RD WIRE INTO PIN 13 INSÉREZ FIL RD DNS LE TROU 13 INSERTE RD LMBRE EN PIN 13 55

13 mm E NOTE: If a factory harness wire present, remove the factory wire and tape it back on the harness. Si le câblage existant est présent,retirez-la et fixez-le avec du ruban adhésif. Si el cableado existente está presente, retírelo y fijarlo con cinta adhesiva. NOTE: Use Miller 6680 Depopulate Tool to remove wires. REMRQUE : Pour dégager les fils du connecteur, utilisez l'outil Miller NOT: Utilice la Herramienta de Extracción Miller 6680 para retirar los cables. PIN 31 PIN 32 PIN 33 INSERT GY/OR WIRE INTO PIN 31 INSERT GY/BL WIRE INTO PIN 32 INSERT BRE WIRE INTO PIN 33 INSÉREZ FIL GY/OR DNS LE TROU 31 INSÉREZ FIL GY/BL DNS LE TROU 32 INSÉREZ FIL BRE DNS LE TROU INSERTE GY/OR LMBRE EN PIN 31 INSERTE GY/BL LMBRE EN PIN 32 INSERTE DESNUDO LMBRE EN PIN 9

14 14 4X CHECK LL WIRING ND TRIM LL CBLE TIES. REVERSE STEPS 31 THROUGH 38 ND 3 THROUGH 15 TO REINSTLL LL BODY PNELS ND COMPONENTS. Contrôlez tout le câblage et coupez l'excédent des attaches-câbles. Pour reposer les garnitures intérieures, refaites à l inverse les étapes 31 par 38 et 3 par 15. Revise todos los cables y ajuste los sujetacables. Invierta los pasos 45 a través de 52 y 3 a través de 15 para volver a instalar los componentes interiores

15 15 DD SLES CODE TO VEHICLE IN DealerCONNECT. NOTE: The witech software level must be at the latest release to perform this procedure. NOTE: Vehicle VIN must be updated with the sales code of the added accessory in order to enable system functionality. Using the DealerCONNECT web site and the scan tool, complete the procedure below: 1. Log on to 2. In the "Service tab"-"warranty dministration" box -"Vehicle Option Updates" screen, enter the vehicle VIN and add the sales code XC (Backup Camera) as a "Dealer Installed Option". 3. Confirm that the new sales code has been successfully added to the VIN. JOUTER CODE DE VENTE DE VEHICULE EN DealerCONNECT. Contacter personnel des concessionnaires autorisés pour le code PIN à 4 chiffres. REMRQUE: ssurez-vous que la dernière version du logiciel est installée WiTech avant de commencer. Pour mettre le système à jour, le NIV du véhicule doit être saisi avec le code de vente de l accessoire ajouté. En étant connecté au site Web DealerCONNECT et à l aide du balayeur de codes, suivez la procédure suivante: 1. Ouvrez une session à 2. Sous l onglet de Service, à l intérieur de la case dministration de garantie, localisez «Vehicle Option Updates» (mises à jour des options de véhicules). Saisissez le code VIN du véhicule et ajoutez le code de ventes XBM (Démarrage à distance) comme "Option Installée par un concessionnaire". 3. Confirmation que le nouveau code de vente a bien été ajouté au NIV. ÑDIR CÓDIGO DE VEHÍCULO EN VENTS WEB DealerCONNECT. Obtener número de 4 dígitos PIN del personal de los concesionarios autorizados. NOT: segúrese de que tiene el software actual Witech para realizar este procedimiento Se debe actualizar el VIN del vehículo con el código de ventas del accesorio que se instaló para habilitar la funcionalidad del sistema. Utilizando el sitio Web DealerCONNECT y la herramienta de diagnóstico, realice el procedimiento siguiente: 1. Inicie sesión en 2. En la pestaña de servicio, dentro del cuadro de dministración de la garantía, localice "Vehicle Option Updates" (actualización de opciones del vehículo). Ingrese el VIN del vehículo y añada el código de ventas XBM (rranque remoto) como "Dealer Installed Option" (opción instalada por el distribuidor). 3. Confirme que el nuevo código de ventas se haya añadido correctamente al VIN.
 as a \"Dealer Installed Option\". 3.")
 TRILER HRNESS REMORQUE HRNIS RNÉS DE REMOLQUE DODGE DURNGO 1 B 4X D 30X NOTE: VEHILE MUST BE EQUIPPED WITH TRILER HITH BEFORE PROEEDING Remarque: Le véhicule doit être équipé d'attelage de remorque. Nota:
JEEP PATRIOT Fog Lamp Kit
 JEEP PATRIOT Fog Lamp Kit 1of11 2of11 3of11 4of11 5of11 2007MY Jeep Patriot 6of11 2007MY Jeep Patriot 7of11 2008MY Jeep Patriot Vehicle VIN must be updated with the sales code of the added accessory in
JEEP WRANGLER Hard Top Wiring Kit
 JEEP WRNGLER Hard Top Wiring Kit B 10X C E D F T-20 7mm 10mm 04-01-09 1 of 16 K6860088B 1 2 3 4 B B 5 04-01-09 2 of 16 K6860088B 6 7 B 10 8 9 B 10 11 04-01-09 3 of 16 K6860088B 10 mm 12 13 F G E D C B
DODGE RAM 2009 Onward FOG LAMP KIT
 DODGE RAM 2009 Onward FOG LAMP KIT A C D B E 2x F 2x G 2x H 2x I 4x J 4x K 6x L 6x M 10x O P N 10mm 12mm 13mm 8mm 10mm 12mm 1 of 12 G 2x F O E 12mm 2x 12mm A I 8mm J H Side View 1 I J Block Out Plate 2
 JP WRANGLR lectronic Sway ar Kit A C D 7 mm 10 mm 16 mm 18 mm 18 mm 06-22-06 1 of 10 1 2 18 mm 3 4 2X 16 mm 16 mm 61 N m (45 ft.-lbs.) A 5 6 06-22-06 2 of 10 A C 18 mm 7 2X 10² N m (75 ft.-lbs.) 8 9 10
2 2X 3 4 2X
 JEEP CHEROKEE BCKUP CMER JEEP CHEROKEE CMÉR D IDE U RECUL JEEP CHEROKEE CÁMR RETROVISOR www.mopar.com 1 B NOTE: CMER BEZEL (B) MUST BE PINTED TO MTCH BODY COLOR REMRQUE: Lunette doit être peint pour correspondre
 HRYSLER 200 AKUP AMERA HRYSLER 200 AMÉRA D AIDE AU REUL HRYSLER 200 ÁMARA RETROVISORA www.mopar.com A ALOHOL PAD F 52X E D 8X G RETAIN ALL FASTENERS FOR REINSTALLATION Maintenir toutes les vis pour la
Instalación Drivers Nyos 100 Driver Installation Nyos 100 Installation des Pilotes Nyos 100
 Instalación Drivers Nyos 100 Driver Installation Nyos 100 Installation des Pilotes Nyos 100 Windows XP 1. Instale los controladores en el orden indicado: 2. Compruebe tras la instalación que todos los
GMT900 Pick-Up Instrument Panel DIC Switch
 GMT900 Pick-Up Instrument Panel DIC Switch Contents Description Quantity Trim plate 1 DIC Switch 1 200 Grand Pointe Dr., Grand Blanc, MI 48439 4. Remove the park brake release handle from the knee bolster.
2.4L ENGINE BLOCK HEATER CHRYSLER 200 / DODGE AVENGER. www.mopar.com 1. CALL OUT DESCRIPTION QUANTITY 1 Engine Block Heater 1 2 Cord 1 3 Tie Straps 2
 www.mopar.com 1 2.4L ENGINE BLOCK HEATER CHRYSLER 200 / DODGE AVENGER CALL OUT DESCRIPTION QUANTITY 1 Engine Block Heater 1 2 Cord 1 3 Tie Straps 2 TOOLS REQUIRED Front End Cutters Flat Bladed, Phillips
2011 Hyundai Sonata 99-7342
 KIT FEATURES INSTALLATION INSTRUCTIONS FOR PART 99-7342 APPLICATIONS 2011 Hyundai Sonata (For models equipped without Nav and with manual climate controls) 99-7342 ISO DIN head unit provision with pocket
microsoft.com/hardware/support
 2015 Microsoft microsoft.com/hardware/support X20-43694-01 Back Cover Front Cover K65 Set up Note: You can wirelessly connect Wi-Fi CERTIFIED Miracast enabled devices to a TV or monitor (available HDMI
INSTALLATION INSTRUCTIONS FOR PART 99-7341B APPLICATIONS 2010 HYUNDAI TUCSON
 INSTALLATION INSTRUCTIONS FOR PART 99-74B KIT FEATURES KIT COMPONENTS APPLICATIONS 00 HYUNDAI TUCSON 99-74B ISO DIN Head Unit Provision With Pocket DDIN Head Unit Provision Painted Matte Black To Match
 ONTNTS Rear ackup amera Kit 1) Lancia Flavia 2) Jeep ompass / Patriot LANIA FLAVIA Rear ackup amera Kit Kit caméra de recul Kit de cámara trasera 7mm 10mm 13/16" T-30 T-45 PN 82300508 1/2" (12mm) 1/8"
KMR SCA-05 Mounting Instructions Instrucción de Montaje Instruções de Montagem 0899.4897
 0899.4897 KMR SCA-05 Mounting Instructions Instrucción de Montaje Instruções de Montagem 0899.4897 KMR SCA-05 Mounting Instructions Instrucción de Montaje Instruções de Montagem The KMR SCA-05 kit is a
 1 Chrome Mirror Trim Cap JEEP GRAND CHEROKEE A CALL OUT DESCRIPTION QUANTITY A Chrome Mirror Trim Cap 2 CHROME MIRROR TRIM CAP REMOVAL WARNING: Always wear eye and hand protection when servicing the mirror
GMC Yukon / Yukon XL Grille Inserts
 Kit Contents Quantity Grille Assembly Installation Instructions 00 Grand Pointe Dr., Grand Blanc, MI 4849. Remove front bumper fascia. See Figure. a. Remove fascia screws. See callout in Figure. b. Remove
HYUNDAI TUCSON (without 4.3 screen) 2010-UP 99-7341B
 2010-UP 99-7341B") Installation instructions for part 99-7341B HYUNDAI TUCSON (without 4.3 screen) 2010-UP 99-7341B KIT FEATURES ISO DIN Head Unit Provision With Pocket DDIN Head Unit Provision Painted Matte Black to match
Installation instructions for part 99-7341B HYUNDAI TUCSON (without 4.3 screen) 2010-UP 99-7341B KIT FEATURES ISO DIN Head Unit Provision With Pocket DDIN Head Unit Provision Painted Matte Black to match
JEEP LIBERTY Fog Lamp Kit
 JP LIBRTY Fog Lamp Kit A B F C 4X T-20 T-25 10mm 1 of 10 2X 1 2 T-20 3 4 F 2X 5 6 2 of 10 T-20 7 8 CONN. CONN. 9 10 3 of 10 CAV 16 WT/YL CAV 11 WT/OR CAV 16 WT/YL CAV 11 WT/OR 11 CONN. 12 13 C 14 15 4
INSTALLATION INSTRUCTIONS SLM14 SLM22 SLM24 SLM- LED SLIM PANEL
 INSTALLATION INSTRUCTIONS SLM14 SLM22 SLM24 SLM- LED SLIM PANEL SAFETY PRECAUTION: IMPORTANT: READ INSTUCTIONS CAREFULLY BEFORE INSTALLING. KEEP THESE INSTRUCTIONS FOR FUTURE REFERENCE. Fixtures must be
PUB. DIM-1012-000. Transfer Utility. Installation Guide. Guide d Installation. Guía de instalación
 PUB. DIM-1012-000 Transfer Utility Installation Guide Guide d Installation Guía de instalación Jp En Fr Es Jp 02 Windows users only: The supplied software offers a convenient way to save your movies to
4. Cierre la caja e inserte el cable de alimentación en la computadora, luego encienda la computadora.
 1. Apague su computadora y desconecte el cable de alimentación; 2. Abra la caja y localice una ranura PCI-E de la tarjeta madre; 3. Inserte el adaptador PCI Express en la ranura PCI-E. Asegúrese de que
DODGE DART REAR SPOILER BECQUET ARRIÈRE ALERÓN TRASERO. 1 of 7 SK619. Drill Bit Stopper 10mm & 3mm 3/8 & 1/8
 DODGE DART REAR SPOILER BECQUET ARRIÈRE ALERÓN TRASERO Right Left A B 1x RU E F G ST IN HI BI TO te Templa te Templa C 1x R 1x Drill Bit Stopper & 3mm 3/8 & 1/8 Guide de trépan Tope limitador de profundidad
MISE A JOUR EZEE TAB 10D11M
 MISE A JOUR EZEE TAB 10D11M 1. Téléchargez le fichier de mise à jour à l adresse suivante : http://www.storex.fr/download/fw/ezeetab_10d11m.zip 2. Une fois le fichier télécharger, décompressez le puis
MISE A JOUR EZEE TAB 7D12-S
 MISE A JOUR EZEE TAB 7D12-S 1. Téléchargez le fichier de mise à jour à l adresse suivante : http://www.storex.fr/download/fw/7d12-s.rar 2. Une fois le fichier télécharger, décompressez le puis installez
2 2. Support RH side of fuel tank with jack stand. TO FRONT OF VEHICLE 3. Remove (1) and (3) support bolts from around fuel tank.
 and (3) support bolts from around fuel tank.") 1 Fuel Tank Skid Plate JEEP GRAND CHEROKEE B C A CALL OUT DESCRIPTION QUANTITY A RH Fuel Tank Skid Plate 1 B LH Fuel Tank Skid Plate 1 C Flange Bolt 6 FUEL TANK SKID PLATE 1. Mounting location shown. NOTE:
1 Fuel Tank Skid Plate JEEP GRAND CHEROKEE B C A CALL OUT DESCRIPTION QUANTITY A RH Fuel Tank Skid Plate 1 B LH Fuel Tank Skid Plate 1 C Flange Bolt 6 FUEL TANK SKID PLATE 1. Mounting location shown. NOTE:
Installation Guide. Green momit
 Installation Guide Green momit 2015 www.momit.com momit Deviceses Gateway: Model 1 and 2 Wall option The momit Gateway allows your thermostat to be connected to the Internet. It s included in the Starter
Process Control Work Instructions Control de Procesos Instrucciones de Trabajo. for / para
 Process Control Work Instructions Control de Procesos Instrucciones de Trabajo for / para 629096898 VFCB Kit Relay Cable Harness Assy Ensamblar el Kit del Arnés de Cables del Relevador Publication Number:
DODGE RAM Front and Rear Wheel Flares
 2002-05 DODGE RAM Front and Rear Wheel Flares C LH D LH A RH E 14x B RH F 24x DETERMINE VEHICLE MANUFACTURING LOCATION DÉTERMINER L'EMPLACEMENT DE FABRICATION DU VÉHICULE DETERMINE EL LUGAR DE FABRICACIÓN
Dodge Durango 2011-2013 Jeep Grand Cherokee 2011-2013 95-6513B
 INSTALLATION INSTRUCTIONS FOR PART 95-6513B Dodge Durango 2011-2013 Jeep Grand Cherokee 2011-2013 95-6513B KIT FEATURES Double DIN radio provision Painted matte black to match factory Table of Contents
 PRNT THS DOCUMENT AT 100% ORGNAL SZE. UNCHECK PRNTER AUTO SCALNG FEATURES TO ENSURE ACCURACY OF TEMPLATE PAGES 2009 DODGE RAM Rear Sensing System ADHESON PROMOTER A C D E F G H 6X M O 5 AMP J K L N P T20
300 BPS WiFI N 2.0 USB ADAPter. User's guide. Manuel d'utilisation Guia del usario
 300 BPS WiFI N 2.0 USB ADAPter User's guide Manuel d'utilisation Guia del usario WIRELESS N USB ADAPTER MODEL # WUB-1900R Quick Install Guide 2. INSTALLATION: This section provides instructions on how
A BLACK / GREEN NEGRO/VERDE NOIR/VERT 2000-2004 ALL RADIOS EXCEPT 2000-2001 SONY AUDIOPHILE AND 2003-2004 BOSCH AUDIOPHILE. Copyright Ford 2006
 7 2000-2004 LL RDIOS EXCEPT 2000-200 SONY UDIOPHILE ND 2003-2004 BOSCH UDIOPHILE PIN # 6 CLVIJ N. 6 BROCHE No. 6 7 TERMINL END EXTREMO DEL TERMINL BLCK BLCK / GREEN /VERDE /VERT BLCK BLCK / GREEN /VERDE
Hyundai Elantra 2011-2013 99-7346B
 Installation Instructions for 99-7346B Hyundai Elantra 2011-2013 99-7346B KIT FEATURES Double DIN radio provision ISO DIN radio provision with pocket Painted black to match factory finish Dash Disassembly
www.mopar.com 1 REMOTE START DODGE CHALLENGER
 www.mopar.com 1 REMOTE START DODGE CHALLENGER 2 CALL OUT DESCRIPTION QUANTITY 1 Hood Switch Harness 1 2 Wireless Ignition Module (WIN) 1 3 FOBIK 2 4 WIN Antenna 1 5 Hood Ajar Switch 1 6 Zip Ties 10 7 Tape
Honda Fit 2015-up 95-7883HG
 INSTALLATION INSTRUCTIONS FOR PART 95-7883HG APPLICATIONS Honda Fit 2015-up 95-7883HG Table of Contents Dash Disassembly Honda Fit 2015-up... 2 KIT FEATURES Double DIN radio provision Painted high gloss
JEEP GRAND CHEROKEE 2011 RUNNING BOARDS ESTRIBOS LATERALES TUBULARES MARCHEPIEDS TUBULAIRES. LH 8mm 8mm 1.5" 6mm 8mm. 05-15-13 1 of 7 K6861199 12X
 P RAND CHRK 2011 RUNNN BARDS STRBS ATRAS TUBUARS MARCHPDS TUBUARS Front Double 8mm 8mm 1.5" 6mm 8mm 3X 3X 3X 9X 3X 3X 6X 6X 12X 3X Front Double H 8mm 8mm 1.5" 6mm 8mm 3X 3X 3X 9X 3X 3X 6X 6X 12X 3X 1 of
Download and install Sengled Element Home app on your mobile device. Connect your IOS or Android device to your 2.4GHz Wi-Fi network.
 EN LED + Smart Control Quick Start Guide Sengled Element Home Download and install Sengled Element Home app on your mobile device. Connect your IOS or Android device to your 2.4GHz Wi-Fi network. Connect
Toyota Tacoma TB, TG
 INSTALLATION INSTRUCTIONS FOR PART 95-8214 APPLICATIONS 95-8214TB, 95-8214TG KIT FEATURES Double DIN head unit provision Painted and textured to match factory dash Both kits are factory golf ball style
Nueva confirmación de pedido de compra con cambios: proveedor ES
 Ayuda de trabajo Nueva confirmación de pedido de compra con cambios: proveedor ES Step 1. This Supplier portal activity lists the steps necessary for confirming a new purchase order with changes on price,
VCM II inalámbrico Manual del usuario
 VCM II inalámbrico Manual del usuario Publicación: 20 de marzo de 2012 CONTENIDO Introducción... 3 Descargue e instale el software de IDS... 3 Prepare la COMPUTADORA para un VCM II inalámbrico... 3 Configurar
Dodge Durango 2011-2013 Jeep Grand Cherokee 2011-2013 99-6513B
 INSTALLATION INSTRUCTIONS FOR PART 99-6513B Dodge Durango 2011-2013 Jeep Grand Cherokee 2011-2013 99-6513B KIT FEATURES DIN radio provision with pocket ISO DIN radio provision with pocket Painted matte
www.microsoft.com/hardware
 www.microsoft.com/hardware english - EN ESPAÑOL (LATINOAMERICANO) - XX PORTUGUÊS (BRASIL) - XC FRANÇAIS CANADIEN - XD 1 2 www.microsoft.com/hardware/productguide 3 www.microsoft.com/hardware/downloads
Chevy Cruze (with single color, monochrome screen) 2011-up 99-3011S
 2011-up 99-3011S") Installation instructions for part 99-3011S KIT FEATURES ISO DIN radio provision with pocket Double DIN radio provision Painted Silver to match factory finish APPLICATIONS Chevy Cruze (with single color,
Installation instructions for part 99-3011S KIT FEATURES ISO DIN radio provision with pocket Double DIN radio provision Painted Silver to match factory finish APPLICATIONS Chevy Cruze (with single color,
Mazda up B
 INSTALLATION INSTRUCTIONS FOR PART 95-7521B APPLICATIONS Mazda 5 2012-up 95-7521B KIT FEATURES Double DIN head unit provision Painted scratch-resistant Matte Black KIT COMPONENTS A) Radio Housing B) Radio
Instalación del Hardware
 Instalación del Hardware Nota El modelo utilizado en esta guía a modo de ejemplo es el TL-WN851N. 1. Apague el ordenador y desenchúfelo; 2. Abra la cubierta y localice una ranura PCI libre en la placa
elements enviro Owner s Manual Manuel du propriétaire Manual del usuario ecofriendly solutions organizing
 enviro elements TM ecofriendly solutions organizing Made with 50% recycled resin Fait de 50 % de résine recyclée Hecho en un 50% con resina reciclada Owner s Manual Manuel du propriétaire Manual del usuario
START INICIAR - DÉMARRAGE - INIZIO - INICIAR - INICIO
 START INICIAR - DÉMARRAGE - INIZIO - INICIAR - INICIO ENG: Microsoft wireless mouse PTB: Mouse sem fio da Microsoft FRA: Souris sans fil Microsoft ITA: Mouse senza fili Microsoft PTG: Rato sem fios Microsoft
Hyundai Accent 2012-up 99-7347B
 INSTALLATION INSTRUCTIONS FOR PART 99-7347B APPLICATIONS Hyundai Accent 2012-up 99-7347B KIT FEATURES ISO DIN head unit provision with pocket Double DIN head unit provisions Painted Black to match factory
DAIMLERCHRYSLER 06 de Junio del 2007
 CIRCULAR DE CONTRATOS DE SERVICIO CCS 010 07 RED NACIONAL DE DISTRIBUIDORES CHRYSLER - DODGE - JEEP Atención: Director General Gerente General Gerente de Ventas Gerente de Servicio Gerente de Negocios
MANUAL EASYCHAIR. A) Ingresar su nombre de usuario y password, si ya tiene una cuenta registrada Ó
 Ingresar su nombre de usuario y password, si ya tiene una cuenta registrada Ó") MANUAL EASYCHAIR La URL para enviar su propuesta a la convocatoria es: https://easychair.org/conferences/?conf=genconciencia2015 Donde aparece la siguiente pantalla: Se encuentran dos opciones: A) Ingresar
MANUAL EASYCHAIR La URL para enviar su propuesta a la convocatoria es: https://easychair.org/conferences/?conf=genconciencia2015 Donde aparece la siguiente pantalla: Se encuentran dos opciones: A) Ingresar
Vedi foto 4. See photo 4. Voir photo 4. Ver foto 4
 MARCA MAKE FAIRE - HACER MODELLO MODEL MODÈLE - MODELO REV. 00 HYUNDAI TUCSON 15 Funzione - Function SCHEDA TECNICA DI INSTALLAZIONE PER SISTEMI DI ALLARME CAN CAN ALARM SYSTEM FITTING INSTRUCTIONS SCHEMA
H-3900 PRODUCE BAG STAND STANDARD
 π H-3900 PRODUCE BAG STAND STANDARD uline.com Para Español, vea páginas 3-4. Pour le français, consulter les pages 5-6. TOOL INCLUDED Wrench ASSEMBLY 1. Attach the bottom pole to the base by inserting
Wi-Fi HD Camera Quick Setup Guide
 Wi-Fi HD Camera Quick Setup Guide What s Included First Alert HD IP Camera Unit Power Cord Ethernet Cable Camera Software CD Removable Antenna Mounting Bracket and Hardware Quick Setup Guide Initial Camera
Rear Compartment Floor Stowage Compartment Package Installation
 Installation Kit Contents Qty Description 1 Rear Under Seat Storage Compartment 1 Installation Instructions Procedure 1. Flip the rear seat cushions in the upward position. 2. Remove and retain the tool
English - EN Español (Latinoamérica) - XX Português (Brasil) - XC Français (Canada) - XD.
 - XX Português (Brasil) - XC Français (Canada) - XD.") English - EN Español (Latinoamérica) - XX Português (Brasil) - XC Français (Canada) - XD www.microsoft.com/hardware 1 Insert the two AAA alkaline batteries and turn on the mouse. To connect the mouse to
English - EN Español (Latinoamérica) - XX Português (Brasil) - XC Français (Canada) - XD www.microsoft.com/hardware 1 Insert the two AAA alkaline batteries and turn on the mouse. To connect the mouse to
AMBIENT LIGHT KIT Call Out Description Parts Quantity
 1 AMBIENT LIGHT KIT Call Out Description Parts Quantity 1 Plastic Mounting Strap Not used in all vehicles 2 Adhesive Tape (Double-Sided) Supplied in Kit 1 Switch Frame Supplied in Kit 1 4 Power Harness
 Instalación rápida Antes de proceder con la instalación, es importante que sepa: Una instalación completa incluye "Drivers" y "Programa", ambos elementos se pueden instalar fácilmente desde el CD del software.
Quick start guide. www.hd.philips.com
 For product support, visit Para obtener asistencia técnica, visite Pour en savoir plus sur l assistance sur les produits, visitez le site www.hd.philips.com HTL5110 Quick start guide EN For Product recycling
Vedi foto 4. See photo 4. Voir photo 4. Ver foto 4
 MARCA MAKE FAIRE - HACER MODELLO MODEL MODÈLE - MODELO REV. 00 JEEP GRAND CHEROKEE 14 Funzione - Function SCHEDA TECNICA DI INSTALLAZIONE PER SISTEMI DI ALLARME CAN CAN ALARM SYSTEM FITTING INSTRUCTIONS
Tarjeta PCI USB 2.0 / FireWire IEEE 1394a
 Tarjeta PCI USB 2.0 / FireWire IEEE 1394a 1 Contenido 1. Instalación del hardware 3 2. Limitaciones 3 3. Instalación de drivers Windows VISTA 4 4. Instalación de drivers Windows XP 5 5. Instalación de
TOOLS REQUIRED - OUTILS NÉCESSAIRES - HERRAMIENTAS NECESARIAS
 Fender Flares Ram 500 www.mopar.com Left Front Right Front Left Rear Right Rear Avant gauche Arrière gauche Avant droit Arrière droit Parte delantera izquierda Parte posterior izquierda Parte delantera
Lexus RX Lexus RX400H Lexus RX S
 INSTALLATION INSTRUCTIONS FOR PART 99-8159S APPLICATIONS Lexus RX350 2007-2009 Lexus RX400H 2006-2009 Lexus RX330 2004-2006 99-8159S KIT FEATURES ISO DIN head unit provision with pocket Double DIN head
INSTALLATION INSTRUCTIONS FOR PART 95-6513B APPLICATIONS 2011 JEEP GRAND CHEROKEE TOOLS REQUIRED
 INSTLLTION INSTRUCTIONS FOR PRT 95-6513B KIT FETURES KIT COMPONENTS PPLICTIONS 2011 JEEP GRND CHEROKEE 95-6513B Double DIN Head unit provision Painted matte black to match factory ) DDIN Brackets WIRING
Hyundai Entourage 2007-2008 Kia Sedona 2006-2014 95-7323
 INSTALLATION INSTRUCTIONS FOR PART 95-7323 KIT FEATURES Double DIN radio provision Hyundai Entourage 2007-2008 Kia Sedona 2006-2014 95-7323 Table of Contents Dash Disassembly Hyundai Entourage 2007-2008...Kia
Hyundai Santa Fe 2007-up 95-7325
 INSTALLATION INSTRUCTIONS FOR PART 95-7325 APPLICATIONS Hyundai Santa Fe 2007-up 95-7325 (not for factory equipped NAV models) KIT FEATURES Double DIN Radio Provision Stacked ISO Units Provision KIT COMPONENTS
π H-4694, H-4695 RIPACK HEAT GUN EXTENSION ATTACH EXTENSION 1-800-295-5510 uline.com
 π H-4694, H-4695 RIPACK HEAT GUN EXTENSION uline.com Para Español, vea páginas 3-4. Pour le français, consulter les pages 5-6. ATTACH EXTENSION 1. In order to use a Ripack Heat Gun Extension, you must
Vedi foto 4. See photo 4. Voir photo 4. Ver foto 4
 MARCA MAKE FAIRE - HACER MODELLO MODEL MODÈLE - MODELO REV. 00 PEUGEOT 308 (Keyless) 2014 Funzione - Function SCHEDA TECNICA DI INSTALLAZIONE PER SISTEMI DI ALLARME CAN CAN ALARM SYSTEM FITTING INSTRUCTIONS
. GM full-size trucks and SUV s 1999-2002
 INSTALLATION INSTRUCTIONS FOR PART DP-3002B KIT FEATURES Double DIN radio provision Painted scratch resistant matte black APPLICATIONS GM full-size trucks and SUV s 1999-2002 (models with message center
1-800-295-5510 uline.com. Phillips Screwdriver Mini Flathead Screwdriver Electric Drill 5/16" Drill Bit PARTS. Flat Display Wall Mount Bracket x 1
 π H-2769, H-4665 TAKE-A-NUMBER-SYSTEM ADDITIONAL 2 AND 3-DIGIT LED DISPLAY 1-800-295-5510 uline.com Para Español, vea páginas 3-4. Pour le français, consulter les pages 5-6. TOOLS NEEDED Phillips Screwdriver
π S-20247 2 x 1.25" PRICE TAG INSERTS INSTRUCTIONS 1-800-295-5510 uline.com MICROSOFT WORD 2010 SETUP (PC USERS) CREATING LABELS
 CREATING LABELS") π S-20247 2 x 1.25" PRICE TAG INSERTS uline.com Para Español, vea páginas 3-4. Pour le français, consulter les pages 5-6. INSTRUCTIONS MICROSOFT WORD 2010 SETUP (PC USERS) CREATING LABELS 1. On the toolbar
π S-20247 2 x 1.25" PRICE TAG INSERTS uline.com Para Español, vea páginas 3-4. Pour le français, consulter les pages 5-6. INSTRUCTIONS MICROSOFT WORD 2010 SETUP (PC USERS) CREATING LABELS 1. On the toolbar
1. Sign in to the website, http://www.asisonline.org / Iniciar sesión en el sitio, http://www.asisonline.org
 Steps to Download Standards & Guidelines from the ASIS International Website / Pasos para Descargar los Standards & Guidelines de la Página Web de ASIS International 1. Sign in to the website, http://www.asisonline.org
CENTRO DE BACHILLERATO TECNOLÓGICO INDUSTRIAL Y DE SERVICIOS #166 Pablo Torres Burgos
 INSTRUCCIONES: Crear una máquina virtual con CentOS. Esperar a que cargue el SO y abrir una terminal de comandos. Realizar lo siguiente. NOTA: Para cada comando que se ejecute exitosamente: tomar una captura
π H-2307 CENTER PULL WIPER DISPENSER PARTS LOADING DRY WIPERS uline.com CAN BE MOUNTED INVERTED
 π H-2307 CENTER PULL WIPER DISPENSER uline.com Para Español, vea páginas 3-4. Pour le français, consulter les pages 5-6. CAN BE MOUNTED INVERTED PARTS Dispenser x 1 NOTE: When mounting for use with dry
T-CONNECTOR INSTALLATION INSTRUCTIONS Toyota Rav4
 33465 T-CONNECTOR 2001-2005 Toyota Rav4 INSTALLATION INSTRUCTIONS Kit Includes: (1) Wiring Harness w/4-flat Connector (1) 14.5 Cable Tie (1) #8 Self Tapping Screw Tools Required: Test Light 3/32 Drill
www.mopar.com Tools Required
 1 BACKUP CAMERA Callout Description Quantity A Mirror Wire Harness 1 B Video Display Mirror without 1 Hands Free Microphones C Camera/Body Harness 1 D Mirror Cover 1 E Camera / Lock Jumper 1 Harness F
Mitsubishi Outlander 2014-up CHG
 INSTALLATION INSTRUCTIONS FOR PART 95-7015CHG KIT FEATURES Double DIN radio provision Painted charcoal high gloss APPLICATIONS Mitsubishi Outlander 2014-up 95-7015CHG Table of Contents Dash Disassembly
Documentación PopGrabber
 Documentación PopGrabber En esta documentación se detallará el funcionamiento y configuración del programa PopGrabber. 1. Funcionamiento: Eclarsys PopGrabber es un programa que recupera e mails desde cuentas
Guía del usuario de KIP sobre el estado de la impresora Instalación y guía del usuario de KIP sobre el estado de la impresora
 Instalación y guía del usuario de KIP sobre el estado de la impresora - 1 - Contenido 1 Introducción... 3 2 Instalación y configuración... 4 3 Funcionalidad del estado de la impresora KIP... 6 4 Uso del
CORTE Y PERFORACIÓN CUTTING AND DRILLING DÉCOUPAGE ET PERÇAGE
 CORTE Y PERFORACIÓN CUTTING AND DRILLING DÉCOUPAGE ET PERÇAGE CONSEJOS DE COLOCACIÓN ESP Tanto el corte como la perforación no deben suponer ningún problema si se utilizan las herramientas adecuadas y
Mitsubishi Outlander 2014-up CHG
 INSTALLATION INSTRUCTIONS FOR PART 99-7015CHG KIT FEATURES ISO DIN radio provision with pocket Painted charcoal high gloss APPLICATIONS Mitsubishi Outlander 2014-up 99-7015CHG Table of Contents Dash Disassembly
T-CONNECTOR INSTALLATION INSTRUCTIONS
 30023 T-CONNECTOR 1997-03 Acura CL Series 1994-01 Acura Integra 2001-06 Acrua MDX 1996-03 Acura RL Series 1996-04 AcuraTL Series 1994-02 Honda Accord 1997-06 Honda CR-V 1993-97 Honda Del Sol 2003-04 Honda
1. Remove strut and shock actuators. 2. Remove the CCR module located under the drivers seat.
 APPENDIX "A" ELECTRONIC ADJUSTABLE SUSPENSION Occasionally a customer will inquire if their vehicle's electronic suspension can be replaced with a non-adjustable product. The following is a list of vehicles
Mitsubishi Mirage 2014-up GHG
 INSTALLATION INSTRUCTIONS FOR PART 95-7016GHG KIT FEATURES DDIN radio provision Painted Gloss Gray/Black to match factory APPLICATIONS Mitsubishi Mirage 2014-up 95-7016GHG Table of Contents Dash Disassembly.Mitsubishi
Cher client, Toute l équipe COMMENCAL vous remercie d avoir effectué votre commande.
 Cher client, Toute l équipe COMMENCAL vous remercie d avoir effectué votre commande. Vous avez fait le choix du paiement par virement bancaire. Afin de réaliser ce dernier, merci de bien vouloir respecter
2011 Hyundai Sonata
 KIT FEATURES INSTALLATION INSTRUCTIONS FOR PART 99-7343 APPLICATIONS 2011 Hyundai Sonata (For models equipped without Nav and with auto climate controls) 99-7343 ISO DIN head unit provision with pocket
Kaseya 2. Guía de inicio rápido. Versión 7.0. Español
 Kaseya 2 Using ShadowControl ImageManager for Offsite Replication Guía de inicio rápido Versión 7.0 Español Septiembre 16, 2014 Agreement The purchase and use of all Software and Services is subject to
INSTRUCTIONS, ME2 BACKUP BAR KIT
 LIFT CORPORATION Sht. 1 of 16 DSG# M-16-27 Rev. A Date: 03/03/17 INSTRUCTIONS, ME2 BACKUP BAR KIT KIT P/N 296845-01 KIT P/N 296845-01G (GALVANIZED) FORD F-150 (2014-2016), F-250/F-350 (2014 & 2017 MODELS)
B. Kia Sedona 2015-up* *Visit MetraOnline.com for up-to-date vehicle specific applications.
 95-7365B INSTALLATION INSTRUCTIONS KIT COMPONENTS A) Radio trim panel B) Radio brackets A B Kia Sedona 2015-up* *Visit MetraOnline.com for up-to-date vehicle specific applications. KIT FEATURES ISO DDIN
T-CONNECTOR INSTALLATION INSTRUCTIONS Hyundai Az era Toyota Highlander (All Models Except Hybrid)
") 33425 T-CONNECTOR 2006-07 Hyundai Az era 2001-07 Toyota Highlander (All Models Except Hybrid) INSTALLATION INSTRUCTIONS Kit Includes: (1) Wiring Harness w/4-flat Connector (1) 15 Cable Tie (2) 6 Cable
33425 T-CONNECTOR 2006-07 Hyundai Az era 2001-07 Toyota Highlander (All Models Except Hybrid) INSTALLATION INSTRUCTIONS Kit Includes: (1) Wiring Harness w/4-flat Connector (1) 15 Cable Tie (2) 6 Cable
dash LED Light Luz LED dash INTEGRATED & SOTO RAILS RIELES INTEGRADOS Y SOTO
 dash LED Light Luz LED dash INTEGRATED & SOTO RAILS RIELES INTEGRADOS Y SOTO M HEX LLAVE HEX M b e a c d SIDE VIEW VISTA LATERAL FREESTANDING BASE BASE AUTÓNOMA ON OFF ON OFF If you have a problem, question,
Guía de inicio. Compro el equipo por primera vez. Cómo empiezo? Primeros pasos.
 Guía de inicio Compro el equipo por primera vez. Cómo empiezo? Primeros pasos. 1. Instalar la última versión del software BrightAuthor (sólo funciona en Windows) descargable en http://www.brightsign.es/download/brightauthor
T-CONNECTOR INSTALLATION INSTRUCTIONS Chevrolet Express Full Size Van GMC Savana Full Size Van
 30072 T-CONNECTOR 2000-02 Chevrolet Express Full Size Van 2000-02 GMC Savana Full Size Van INSTALLATION INSTRUCTIONS Kit Includes: (1) Wiring Harness w/4-flat Connector (1) 15 Cable Tie (2) #10 Self Tapping
9233506 Edición 1 ES. Nokia y Nokia Connecting People son marcas comerciales registradas de Nokia Corporation
 9233506 Edición 1 ES Nokia y Nokia Connecting People son marcas comerciales registradas de Nokia Corporation Guía del usuario de Zip Manager Guía del usuario de Zip Manager Vaya a Zip Manager Pro. Nota:
Hyundai Accent 2012-up 99-7347B
 INSTALLATION INSTRUCTIONS FOR PART 99-7347B APPLICATIONS Hyundai Accent 2012-up 99-7347B KIT FEATURES ISO DIN head unit provision with pocket Double DIN head unit provisions Painted Black to match factory
Honda Civic G
 INSTALLATION INSTRUCTIONS FOR PART 95-7881G KIT FEATURES Double DIN radio provision Painted to match factory dash APPLICATIONS Honda Civic 2012 95-7881G Table of Contents Dash Disassembly Honda Civic 2012...
Puede pagar facturas y gastos periódicos como el alquiler, el gas, la electricidad, el agua y el teléfono y también otros gastos del hogar.
 SPANISH Centrepay Qué es Centrepay? Centrepay es la manera sencilla de pagar sus facturas y gastos. Centrepay es un servicio de pago de facturas voluntario y gratuito para clientes de Centrelink. Utilice
Hyundai Elantra 2007-2010 (US Model Only) (Non Radio Delete) (Non Touring Model) 95-7326
 (Non Radio Delete) (Non Touring Model) 95-7326") Installation instructions for part 95-7326 Hyundai Elantra 2007-2010 (US Model Only) (Non Radio Delete) (Non Touring Model) 95-7326 Table of Contents Dash Disassembly... 2 Kit Assembly. ISO DDIN radio
Installation instructions for part 95-7326 Hyundai Elantra 2007-2010 (US Model Only) (Non Radio Delete) (Non Touring Model) 95-7326 Table of Contents Dash Disassembly... 2 Kit Assembly. ISO DDIN radio