Direct 90 RF IS902. Start Pack Startpaket Kit de démarrage Start - Paket Start Pack
|
|
|
- Luis Miguel Escobar Nieto
- hace 8 años
- Vistas:
Transcripción
1 USER MANUAL BRUKSANVISNING MODE D'EMPLOI BEDIENUNGSANLEITUNG MANUAL DEL USUARIO Start Pack Startpaket Kit de démarrage Start - Paket Start Pack Direct 90 RF IS902 Copyright 2001 Checkpoint Systems, Inc.

2 Product description; Start Pack Produkt beskrivning; Startpaket Description du produit; kit de démarrage Produktbeschreibung; Start-Paket Descripción del producto; Start Pack Ref. SP Direct 90 RF IS902 Part No (English Sign), (Spanish Sign) Contents / Innehåll / Contient / Inhalt / Contenido C 1 2 A D 7 9 T 2
, 9118968 (Spanish Sign) Contents / Innehåll / Contient /")
3 1. Indicator IS902/RF (C = Black) 2. Adaptor Set 1P (A = US) 3. MASTER Wireless Pushbutton 4. COPY Wireless Pushbutton 5. Holder, Wireless Pushbutton 6. Dispenser D90 (D = Red) 7. Tickets T90, 6 rolls x 4000 (T = White) 8. Counter Stand 9. Mounting hardware for Counter Stand 10.Sign for Counter Stand 1. Afficheur IS902/RF(C = Noir) 2. Transformateur 1P (A = US) 3. Télécommande MAÎTRE 4. Télécommande SECONDAIRE 5. Fixation de la télécommande 6. Distributeur D90 (D = Rouge) 7. Billets T90, 6 rouleaux de 4000 (T = Blanc) 8. Support de comptoir 9. Quincaillerie pour support de comptoir 10. Affiche 1. Indicador IS902/RF(C = Negro) 2. Transformador 1P (A = US) 3. Pulsador inalámbrico MAESTRO 4. Pulsador inalámbrico DE COPIA 5. Soporte para pulsador inalámbrico 6. Dispensador D90 (D = Rojo) 7. Tickets T90, 6 rollos de unidades (T = Blanco) 8. Mostrador 9. Montaje para Mostrador 10. Anuncio 1. Tablå IS902/RF (C = Svart) 2. Adaptor Sats 1P (A = US) 3. MASTER Trådlös Tryckknapp 4. KOPIA Trådlös Tryckknapp 5. Hållare, Trådlös Tryckknapp 6. Dispenser D90 (D = Röd) 7. Nummerlappar T90, 6 rullar x 4000 (T = Vit) 8. Bänkstativ 9. Skruvsats till bänkstativ 10.Skylt till bänkstativ 1. Anzeige IS902/RF (C = schwarz) 2. Stecker-Netzteil 1P (A = US) 3. MASTER Funk-Fernbedienung 4. COPY Funk-Fernbedienung 5. Halter für Funk-Fernbedienung 6. Ticket-Geber D90 (D = rot) 7. Tickets T90, 6 Rollen x 4000 Tickets (T = weiß) 8. Ständer 9. Befästigungsmaterial 10. Schild 3
 2. Transformador 1P (A = US) 3. Pulsador inalámbrico MAESTRO 4. Pulsador inalámbrico DE COPIA 5.")
4 Dispenser Location Dispenser placering Emplacement du distributeur Platzierung des Ticket-Gebers Ubicación del dispensador ft (3 m) 4

5 1. Near to where people enter serving area, placed to be easily seen. 2. Not blocked by customers being served, placed 10 ft (3 m) from serving point. 1. I närheten av entrén / betjäningspunkten, väl synliga. 2. Inte blockerad av kunder, 3 meter från betjäningspunkten. 1. Tout près de l'entrée de l'aire de service aux clients, disposé de façon visible 2. Non cacher par les clients servis, placé à 10 pi. (3 m) de l'aire de service 1. In der Nähe des Eingangs zum Service-Bereich 2. 3 m von der Service-Punkte entfernt. 1. Colocar en un area visible, cerca de donde la gente entra al area de servico. 2. Para evitar el bloqueo por los clientes recibiendo servicio, favor colocar 10 ft (3 metro) del punto de servicio. 5
 del punto de servicio. 5")
6 Dispenser Bracket Mounting - OPTION! Deluxe Floor Stand FS902 >> Montera Dispenser fäste - Alternativ! Golvstativ FS902>> Montage de la fixation du distributeur - OPTION! Pied pour distributeur FS902>> Befestigung der Ticket-Geber Halterung Option: Bodenständer FS902 >> Colocación del soporte del dispensador (OPCIÓN FS902) >> Part No UP 2 6

7 1. Place the sign and the mounting bracket in place over the holes on the stand. 2. Set in the two screws from the back and screw the nuts on to the screws. 3. Tighten the screws with the allen wrench while holding the nuts from turning. 1. Placera skylten och väggfästet så att hålen i stativet passar in. 2. Sätt in skruvarna från baksidan av stativet. 3. Skruva fast skruvarna med insexsnyckeln och håll fast muttern så den inte snurrar. 1. Placer l'enseigne et la braquette vis-à-vis les trous du support. 2. Poser les deux vis de l'arrière et viser les écrous sur les vis. 3. Serrer les vis avec la cle hexagonale pendant que vous retenez les écrous. 1. Coloca el anuncio y el brazo de montaje firme sobre el agujero de la base. 2. Coloca los tornillos de atras hacia delante y enrosca la tuerca en el tornillo. 3. Apretar los tornillos con la llave allen, mientras se sujetan las tuercas, evitando que jiren. 1. Plazieren Sie zunächst das Schild und darüber die Halterung in der Weise am Ständer, dass die vorgebohrten Löcher in Ständer, Schild und Halterung glatt übereinanderliegen. 2. Führen Sie die zwei Schrauben von hinten nach vorne durch die Löcher und befestigen Sie diese mit den Schraubenmuttern. 3. Ziehen Sie die Schrauben mit dem Innensechskant-Schlüssel an, während Sie die Schraubenmuttern gegenhaltern. 7

8 Indicator Location Placering av Tablå Emplacement de l'afficheur Platzierung der Anzeige Ubicación del indicador 16½ ft (5 m) ft (10 m) 3 8
 2 1 1 33")
9 1. Easily seen by arriving / waiting customers and serving staff 2. Max. 16½ ft (5 m) cable run length to nearest mains power outlet 3. Approx. 33 ft (10 m) range from Wireless Push Button to Indicator 1. Lätt att se för anländade och väntande kunder, samt för personalen. 2. Max. 5m kabel dragning till ett 220 volt uttag. 3. Ungefär 10m mellan den trådlösa tryckknappen och Tablån. 1. Le placer de manière à ce que les employès et les clients/visiteurs le voient bien. 2. Câble d'un maximum de 16½ pi. (5 m) de long jusqu'à la prise de secteur. 3. Environ 33 pi. (10 m) de distance entre la télécommande et l'afficheur du guichet. 1. Allseits gut sichtbar von Kunden und Mitarbeitern. 2. Max. 5 m Kabel zum nächsten 230 V Anschluss. 3. ca. 10 m zwischen Anzeige und Funk-Fernbedienung. 1. El indicador deberá situarse en un lugar fácil de ver tanto para el personal como para los clientes que llegan o esperan. 2. Distancia a la toma de corriente más próxima: máx. 16½ ft (5 m) (longitud del cable). 3. Distancia entre el pulsador inalámbrico y el indicador: máx. 33 ft (10 m). 9
 de long jusqu'à la prise de secteur. 3. Environ 33 pi. (10 m) de distance entre la télécommande et l'afficheur du guichet. 1. Allseits gut sichtbar von Kunden und Mitarbeitern. 2. Max.")
10 Indicator Bracket Mounting - OPTION! Ceiling Bracket CB902 >> Montering av väggfäste Tablå - Alternativ! Takstativ CB902 >> Montage de la fixation de l'afficheur OPTION! CB902 >> Befestigung der Anzeige-Halterung Option: Deckenhalterung CB902 >> Colocación del soporte del indicador (OPCIÓN CB902) >> Part No mm 1 inch (25 mm) min. 10

11 1. Mark hole location using bracket as template. 2. For fastening in other than solid wood, install included expander plugs. 3. Screw in included wood screws - not so hard that bracket bends. 1. Markera var ni skall borra med hjälp av väggfästet. 2. Använd expander-plugg om det inte är trä ni skall skruva i. 3. Skruva in träskruven, skruva inte fast så hårt att fästet böjer sig. 1. Repérer l'emplacement des trous en utilisant la fixation comme modèle. 2. Pour fixer dans une autre matière que du bois solide, mettez en place les chevilles fournies. 3. Visser les vis à bois qui sont fournies pas trop fort pour ne pas tordre la fixation. 1. Markieren Sie die Bohrlöcher. Benutzen Sie dabei den Halter als Schablone. 2. Zur Befestigung in anderen Untergründen als stabilem Holz verwenden Sie die beiliegenden Dübel. 3. Drehen Sie die beiliegenden Schrauben fest. Achten Sie darauf, dass sich dabei der Halter nicht verbiegt. 1. Utilizar el soporte como plantilla para marcar los taladros. 2. Salvo que se perfore en madera maciza, atornillar con taco. 3. Atornillar firmemente, aunque sin llegar a doblar el soporte. 11

12 Indicator Address Check Kontroll av Tablåns adress inställning Vérification des adresses de l'afficheur Kontrolle der Anzeige-Adresse Comprobación de las clavijas de dirección del indicador

13 1. Locate address switches on back of indicator. 2. Check that address is set to If address change is needed, rotate pointer to correct position with a small screwdriver Hitta adress switcharna som sitter på baksidan av Tablån. Kontrollera att adressen är inställd på 2 1. Om adressen behöver ställas om, använd en liten skruvmejsel och vrid på pilarna till rätt adress. 1. Les boutons de règlage des adresses se situent au dos de l'afficheur. 2. Vérifiez que l' adresse est sur `2 1`. 3. S' il est nécessaire de changer l' adresse, tourner les molettes dans la bonne position à l' aide d' un tournevis. 1. Die Adressen Schalter befinden sich auf der Rückseite der Anzeige. 2. Prüfen Sie, ob die Adresse 2 1 eingestellt ist. 3. Sollte dies nicht der Fall sein, drehen Sie den Zeiger mit einem kleinen Schraubendreher in die richtige Position. 1. Las clavijas de dirección se sitúan en la parte trasera del indicador. 2. Comprobar que las clavijas del indicador se encuentran en posición Si no lo estuviesen, girar la flecha hasta la posición adecuada con un destornillador pequeño. 13

14 Connections; Indicator Kopplingar; Tablå Branchements de l'afficheur Verbindungen; Anzeige Conexiones del indicador

15 1. 2. Locate edge contacts on back of indicator, in the opening at the top. Push the Adaptor connector on the right side contact Hitta kontakterna på kretskortet, på baksidan av Tablån. Tryck dit plugg-in kontakten för adaptorn till höger på kretskortet. 1. Les prises de branchement se trouvent au dos de l'afficheur dans l' ouverture du haut. 2. Raccordez le transfomateur sur la prise à droite. 1. Die Steckleiste befindet sich in der oberen Öffnung auf der Rückseite der Anzeige. 2. Drücken Sie den Stecker des Netzteils auf die rechte Seite der Steckleiste. 1. Localizar los contactos en la parte trasera del indicador (en el borde superior). 2. Realizar la conexión con el transformador en los contactos apropiados (los situados más a la derecha). 15
. 2.")
16 System Start-up System Start Démarrage du système System Start Inicio del sistema

17 1. Plug Adaptor in a suitable mains power outlet. 2. Indicator displays start sequence, starting with firmware program version. 3. Indicator displays TOM-Net address setting. 4. Indicator display is blanked, waiting for input. 1. Sätt in adaptorn i vägguttaget 220V. 2. Tablåns mjukvarutest / och version nummer visas. 3. Tablåns adress inställning visas. 4. Tablån är helt blank, den är klar att användas. 1. Brancher le transformateur sur une prise de secteur. 2. L'afficheur affiche le début de la séquence, en commençant par le numéro de version du programme. 3. Affichage de l' adresse de l'afficheur. 4. L 'afficheur s'éteint et est prêt à l' emploi. 1. Stecken Sie das Stecker-Netzteil in eine 230 V Steckdose. 2. Startroutine, Anzeige zeigt die Programmversion. 3. Anzeige zeigt die eingestellte Adresse. 4. Anzeige ist frei, bereit für die Eingabe. 1. Enchufar el transformador en la toma de corriente. 2. El indicador mostrará la secuencia de inicio, que arranca con la versión del microprograma. 3. A continuación, aparecerá la configuración de dirección de la red del sistema (TOM-Net). 4. Tras ello, el indicador quedará en blanco, a la espera de nuevos datos. 17

18
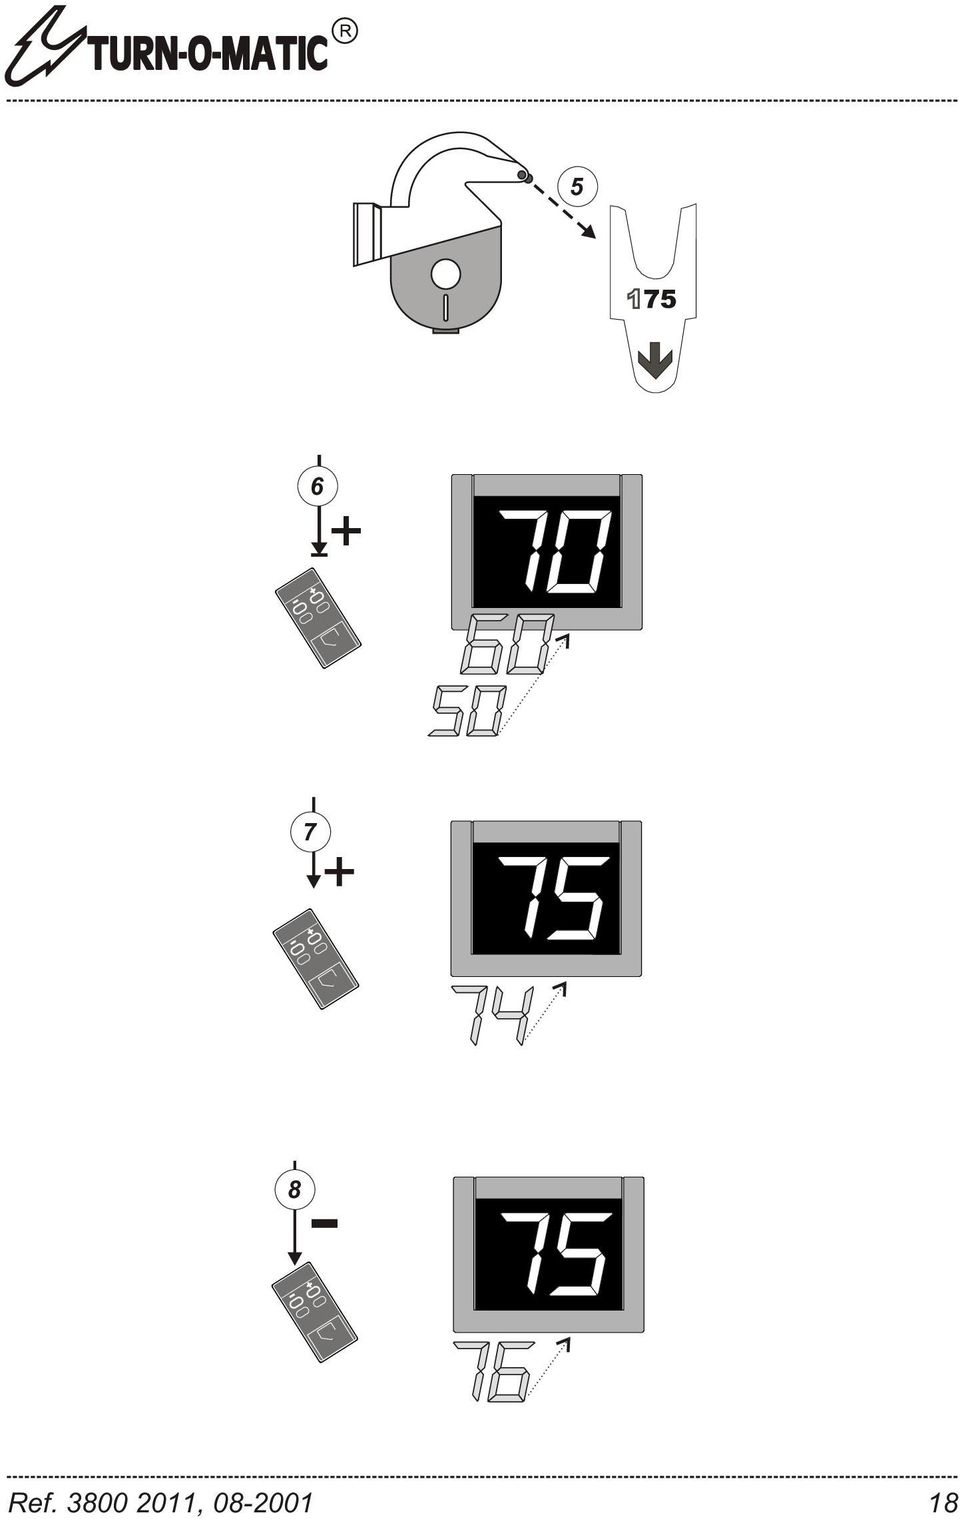
19 5. Take a ticket from the dispenser for the system start number. 6. Hold the + Pushbutton pressed to fast forward the Indicator by tens. 7. Press the + Pushbutton once (hold for approx. 1/2 second) to step forward. 8. Press the - Pushbutton to step backward, if indicator is stepped forward too far. 5. Tag en biljett från Dispensern, notera numret. Detta nummer skall ställas in på Tablån. 6. Håll + Tryckknappen nere då den börjar att räkna tiotal. 7. För att räkna ental tryck på + knappen, håll knappen intryckt ca 1/2 sekund. 8. För att backa tryck på - knappen. 5. Prendre un ticket du distributeur pour déclencher l'incrémentation. 6. Maintenir la touche + appuyée pour avancer rapidement de dix en dix sur l'afficheur. 7. Appuyer sur la touche + une fois (pendant environ ½ seconde) pour avancer de un en un. 8. Appuyer sue la touche - pour reculer le déroulement des nombres a avancé trop loin. 5.Tomar un ticket del dispensador para arrancar con el número indicado el sistema. 6.Mantener el botón + presionado para hacer avanzar el indicador por decenas. 7.Una vez en la decena adecuada, presionar el botón + sucesivamente (a intervalos de ½ segundo aproximadamente), hasta llegar a la cifra deseada. 8.En caso de sobrepasar la cifra deseada, presionar el botón sucesivamente para volver atrás. 5. Nehmen Sie ein Ticket aus demticket-geber und stellen Sie die Ticket-Nummer auf der Anzeige ein. 6. Halten Sie den + Knopf gedrückt. Der Vorlauf erfolgt in 10er Schritten. 7. Drücken Sie den + Knopf kurz, um auf die nächst höhere Zahl zu schalten. 8. Drücken Sie den Knopf kurz, wenn Sie die Anzeige zurückstellen wollen. 19

20 System Operation; Overview Funktion av system; Översikt Fonctionnement du système; Généralités Funktionsweise des Systems; Überblick Manejo del sistema

21 1. Arriving customers take a ticket. 2. The ticket number reserves their turn for service. 3. Serving staff call each customer in turn by stepping the NOW SERVING indicator. 4. Waiting customers are free to move around, browse, shop until their serving turn number is displayed. 1. Anländande kunder tar en biljett. 2. Biljett numret reserverar kundens turordning. 3. Personalen kallar fram kunderna i turordning, genom att trycka på tryckknappen. 4. Väntande kunder är fria att röra sig i butiken, titta, handla tills deras nummer visas på Tablån. 1. A leur arrivée les clients prennent un ticket. 2. Le numèro du ticket indique leur ordre darrivèe. ' 3. La personne au guichet appelle la personne suivante en faisant avancer les numèros de l'afficheur. 4. Ainsi les clients ont le loisir de regarder, d' acheter jusqu`à ce que leur numèro soit affichè. 1. Los clientes, al llegar, toman un tique del dispensador. 2. Con el número del tique, reservan su turno. 3. El personal va llamando a los clientes uno a uno, siguiendo el orden mostrado en el indicador de SU TURNO. 4. Los clientes que esperan tienen libertad para moverse, ojear, comprar 5. hasta que aparezca su turno en el indicador Ankommende Kunden ziehen ein Ticket. 2. Die Ticket-Nummer sichert ihre Bedienung in der richtigen Reihenfolge. 3. Das Service-Personal ruft die Kunden der Reihe nach durch Weiterschalten der Anzeige auf. 4. Wartende Kunden können sich frei bewegen, umschauen, kaufen bis ihre Service-Nummer auf der Anzeige erscheint.
22 Expansion options; Plus Packs Alternativ på utbyggnad; Pluspaket Expansion en option; Kit Plus Erweiterungs-Option; Plus Pakete Opciones de expansión; paquetes Plus 82 ft (25 m) 82 ft (25 m) PP IS902 Part No PP Two IS902 Part No ft (25 m) PP Two IS902 Bracket Part No ft (25 m) PP Three IS902 Part No ft (25 m) PP Three IS902 Bracket Part No
23 Accessories Tillbehör Accessoires Zubehör Accesorios Wireless RF Pushbutton Trådlös Tryckknapp Télécommande Funk-Fernbedienung Pulsador inalámbrico Part No Tickets T90, 24 rolls x 4000 per roll. Biljetter T90, 24 rullar x 4000 per rulle. Billets T90, 24 rouleaux de 4000 par rouleaux Tickets T90, 24 Rollen x 4000 Tickets Tickets T90, 24 rollos de unidades Part No WH ( White / Vit / Blanc / Weiß / Blanco) YL ( Yellow / Gul / Jaune / Gelb / Amarillo) BL (Blue / Blå / Bleu / Blau / Azul) GR (Green / Grön / Vert / Grün / Verde) PN (Pink / Rosa / Rose / Rosa / Rosa) 23
24 MASTER and COPY Pushbuttons MASTER och KOPIA Tryckknappar Télécommandes MAÎTRE et SECONDAIRE MASTER und COPY Funk-Fernbedienungen Pulsadores MAESTRO y DE COPIA 1 2 MASTER
25 1. The MASTER Pushbutton is identified with a label on the backside. 2. The MASTER is hard-coded to its Indicator and functions only with this Indicator. 3. Store the MASTER in a safe place, DO NOT USE FOR OPERATION. 4. Use the COPY Pushbutton for operation. 5. The MASTER can be copied to additional COPY Pushbuttons. 1. La télécommande MAÎTRE est reconnaissable par une étiquette située à l'arrière. 2. Chaque télécommande MAÎTRE est programmée avec un afficheur en particulier, et ne fonctionne qu'avec cet afficheur. 3. Mettre de côté la télécommande MAÎTRE, NE PAS L'UTILISER POUR FAIRE FONCTIONNER L'AFFICHEUR. 4. Une télécommande SECONDAIRE est fournie, elle s'utilise pour le fonctionnement de l'afficheur. 5. La télécommande MAÎTRE peut paramétrer des télécommandes supplémentaires. 1. El pulsador MAESTRO se reconoce por la etiqueta que lleva en la parte trasera ( MASTER ). 2. El código del pulsador MAESTRO está vinculado al indicador y sólo funciona con él. 3. Almacenar el pulsador MAESTRO en un lugar seguro. NO UTILIZAR PARA MANEJAR EL SISTEMA. 4. Para el manejo del sistema, se suministra un pulsador DE COPIA del MAESTRO. 5. El código del pulsador MAESTRO puede copiarse en varios pulsadores DE COPIA. 1. MASTER, Trådlöstryckknapp identifieras med ett MASTER märke på baksidan. 2. MASTER tryckknappen är kodad till Tablån och fungerar enbart till just den Tablån. 3. Förvara MASTERN på ett säkertställe. OBS! ANVÄNDS EJ FÖR DAGLIGTBRUK. 4. En kopia av MASTERN följer med för dagligtbruk. 5. MASTERN kan även kopieras till flera trådlösa tryckknappar. 1. Die MASTER Funk-Fernbedienung ist auf der Rückseite gekennzeichnet. 2. Die MASTER Funk-Fernbedienung ist so codiert, dass sie nur mit dieser Anzeige funktioniert. 3. Bewahren Sie die MASTER Funk- Fernbedienung sicher auf. BENUTZEN SIE DIESE NICHT FÜR DEN BETRIEB. 4. Eine COPY der MASTER Funk- Fernbedienung wird für den Betrieb mitgeliefert. 5. Die MASTER Funk-Fernbedienung kann auf weitere Funk- Fernbedienungen kopiert werden. 25
26 Copy MASTER code to COPY Push Button Kopiera MASTER sändarens kod till Kopian Copier le programme de la télécommande MAÎTRE sur la télécommande SECONDAIRE Kopieren des MASTER Codes auf eine COPY Funk-Fernbedienung Traspaso del código del pulsador MAESTRO al pulsador DE COPIA
27 1. Place MASTER and COPY facing each other. 2. Hold the + button on the MASTER. 3. While holding the MASTER + button, hold the COPY + button until the LED stops blinking. 4. Hold the - button on the MASTER. 5. While holding the MASTER - button, hold the COPY - button until the LED stops blinking. 1. Placer la télécommande MAÎTRE et la SECONDAIRE face à face. 2. Appuyer sur la touche + de la télécommande MAÎTRE. 3. Pendant que l'on appuie sur le bouton + de la télécommande MAÎTRE, appuyer sur le bouton + de la télécommande SECONDAIRE jusqu'à ce que le voyant s'arrête de clignoter. 4. Appuyer sur le bouton - de la télécommande MAÎTRE. 5. Pendant que l'on appuie sur le bouton - de la télécommande MAÎTRE, appuyer sur le bouton - de la télécommande SECONDAIRE jusqu'à ce que le voyant s'arrête de clignoter. 1. Colocar el pulsador MAESTRO y el DE COPIA enfrentados el uno al otro. 2. Presionar el botón + del pulsador MAESTRO. 3. Sin soltar el botón + del pulsador MAESTRO, presionar el botón + del pulsador DE COPIA hasta que el indicador luminoso deje de parpadear. 4. Presionar el botón del pulsador MAESTRO. 5. Sin soltar el botón del pulsador MAESTRO, presionar el botón del pulsador DE COPIA hasta que el indicador luminoso deje de parpadear. 1. Placera MASTERN och KOPIAN mittemot varandra. 2. Tryck ned + knappen på MASTERN. 3. Håll + knappen nere på MASTERN och tryck samtidigt ned + knappen på kopian, när dioden slutat blinka är det klart. 4. Tryck ned - knappen på MASTERN. 5. Håll - knappen nere på MASTERN och tryck samtidigt ned - knappen på kopian, när dioden slutat blinka är det klart. 1. Legen Sie MASTER und COPY Funk- Fernbedienungen einander gegenüber. 2. Halten Sie den + Knopf der MASTER gedrückt. 3. Drücken Sie gleichzeitig den + Knopf der COPY so lange, bis die LED aufhört zu blinken. 4. Halten Sie den - Knopf der MASTER gedrückt. 5. Drücken Sie gleichzeitig den - Knopf der COPY so lange, bis die LED aufhört zu blinken. 27
28 Replacement batteries for Wireless Push Button Byte av batteri på trådlös tryckknapp Remplacement des piles de la télécommande Ersatz-Batterien für die Funk-Fernbedienung Sustitución de las pilas del pulsador inalámbrico
29 1. Battery type - Alkaline MN21 12V (2 required) Art Slide open the front cover to access batteries. 3. Dispose of used batteries properly and safely! 1. Batteri typ - Alkaline MN21 12V (2 st) Art Skjut frontluckan bakåt på sändaren för att komma åt batterierna. 3. Lämna förbrukade batterier för återvinning. 1. Tipe de piles - Alkaline MN21 12V (il en faut 2) Art Faire glisser le couvercle à l'avant pour atteindre les piles. 3. Jeter les piles usagées dans les lieux appropriés en respectant l'environnement! 1. Batterie Typ Alkaline MN21 12 V (2 St.) Art Schieben Sie die Abdeckung auf der Vorderseite nach unten, um die Batterien zu wechseln. 3. Entsorgen Sie die gebrauchten Batterien ordnungsgemäß. 1. Tipo de pila: alcalina, MN21 12 V (2 unidades), Art Deslizar hacia abajo la tapa situada en la parte delantera del pulsador. 3. Retirar las pilas gastadas. Arrojar a un contenedor adecuado! 29
30 30
31 31
32 Your local Turn-O-Matic supplier : Din Turn-O-Matic leverantör : Votre distributeur Turn-O-Matic local : Der Turn-O-Matic Lieferant an Ihrem Standort : Éste es su proveedor más cercano de productos Turn-O-Matic : Regional contacts for Turn-O-Matic information: USA Checkpoint Systems, Inc. 101 Wolf Drive Thorofare, NJ TEL: or FAX: Asia Pacific Checkpoint Asia Pacific HQ No. 1 Hung To Road Unit 1111, Ngau Tau Kok Kowloon, Hong Kong TEL: FAX: Canada and Latin America Checkpoint Systems Americas International Office 9300 So. Dadeland Blvd, Suite 500 Miami, FL 33156, USA TEL: FAX: Europe, Middle East and Africa Checkpoint Systems Sverige AB Turn-O-Matic International Kanalvägen Upplands Väsby, Sweden TEL: FAX: COPYRIGHT Checkpoint Systems, Inc All rights reserved. This publication may not be copied in whole or in part, or transferred to another medium, or translated into another language without the express written permission of Checkpoint Systems, Inc. is a registered trademark of Checkpoint Systems, Inc.
1-800-295-5510 uline.com. Phillips Screwdriver Mini Flathead Screwdriver Electric Drill 5/16" Drill Bit PARTS. Flat Display Wall Mount Bracket x 1
 π H-2769, H-4665 TAKE-A-NUMBER-SYSTEM ADDITIONAL 2 AND 3-DIGIT LED DISPLAY 1-800-295-5510 uline.com Para Español, vea páginas 3-4. Pour le français, consulter les pages 5-6. TOOLS NEEDED Phillips Screwdriver
1-800-295-5510 uline.com TECHNICAL DATA MODEL H-2051. Alkaline MN21 12V. (1 Second) Button Life Approx. 100,000 Push Button Presses 0.125 lbs. (2 oz.
 Button Life Approx. 100,000 Push Button Presses 0.125 lbs. (2 oz.") π H-2051 TAKE-A-NUMBER SYSTEM WIRELESS REMOTE uline.com Para Español, vea páginas 3-4. Pour le français, consulter les pages 5-6. TECHNICAL DATA MODEL H-2051 Frequency RF Power Output 433.92 MHz (+/ Max.
π H-2051 TAKE-A-NUMBER SYSTEM WIRELESS REMOTE uline.com Para Español, vea páginas 3-4. Pour le français, consulter les pages 5-6. TECHNICAL DATA MODEL H-2051 Frequency RF Power Output 433.92 MHz (+/ Max.
1. DESCARGA DEL SOFTWARE DE BLUETOOTH EN EL SMARTPHONE
 MANUAL DEL USUARIO PARA BLUETOOTH ES 1. DESCARGA DEL SOFTWARE DE BLUETOOTH EN EL SMARTPHONE Entre en Apple Store o Google Play y busque: - BH Premium BH Premium 2. FIJACIÓN DEL MÓDULO BLUETOOTH Fije el
Direct 90 Parallel IS902. Start Pack Startpaket Kit de démarrage Start - Paket Start Pack
 USER MANUAL BRUKSANVISNING MODE D'EMPLOI BEDIENUNGSANLEITUNG MANUAL DEL USUARIO Start Pack Startpaket Kit de démarrage Start - Paket Start Pack Direct 90 Parallel IS90 Copyright 00 Checkpoint Systems,
Continental Bed Rails Assembly Instructions. Instructions d'assemblage pour traverses de lit Continental
 Continental Bed Rails Assembly Instructions Instructions d'assemblage pour traverses de lit Continental Instrucciones de montaje de travesaños Continental Q010 Parts: A 2x Bed Rails C 14 x Wood Screw B
Sierra Security System
 Using Your SpreadNet Accessories With Your Sierra Security System Uso de Sus Accesorios SpreadNet Con Su Sistema de Seguridad Sierra SN990-KEYPAD SN961-KEYFOB SN991-REMOTE 1 SN990-KEYPAD The SN990-KEYPAD
MODEL: 11222895 / MODELO: 11222895 COMPUTER DESK ESCRITORIO DE COMPUTADORA
 MODEL: 222895 / MODELO: 222895 COMPUTER DESK ESCRITORIO DE COMPUTADORA NO 2 3 4 5 6 7 8 9 PARTS LIST AND HARDWARE LISTA DE PARTES Y ACCESORIOS HARDWARE LIST LISTA DE PARTES Y ACCESORIOS CHIPBOARD SCREW
Video Server. Quick Installation Guide. English, Español
 Video Server Quick Installation Guide English, Español 2 Video Server NOTES Quick Installation Guide 3 Video Server Quick Installation Guide To get your Video Server up and running on an Ethernet network,
ASSEMBLY INSTRUCTIONS INSTRUCTIONS DE MONTAGE INSTRUCCIONES DE ENSAMBLAJE
 an LDI Company New Hope, MN 55428 www.safcoproducts.com ASSEMBLY INSTRUCTIONS INSTRUCTIONS DE MONTAGE INSTRUCCIONES DE ENSAMBLAE 8926 Impromptu Flat Panel TV Cart Charoit téléviseur à écran plat Carro
SP-U. Soporte colgado universal para JK26 / JK10 / JK10MA / JK12 / JK12MA / JK15 / KEY10 / KEY12 / KEY15
 Soporte colgado universal para JK26 / JK10 / JK10MA / JK12 / JK12MA / JK15 / KEY10 / KEY12 / KEY15 Universal U-bracket for JK26 / JK10 / JK10MA / JK12 / JK12MA / JK15 / KEY10 / KEY12 / KEY15 Copyright
π H-4694, H-4695 RIPACK HEAT GUN EXTENSION ATTACH EXTENSION 1-800-295-5510 uline.com
 π H-4694, H-4695 RIPACK HEAT GUN EXTENSION uline.com Para Español, vea páginas 3-4. Pour le français, consulter les pages 5-6. ATTACH EXTENSION 1. In order to use a Ripack Heat Gun Extension, you must
Door Stop Kit, 316 SS Compas de porte, 316 SS Tope para puerta, 316 SS
 Door Stop Kit, 316 SS Compas de porte, 316 SS Tope para puerta, 316 SS Rev. E 2018 Hoffman Enclosures Inc. PH 763 422 2211 nvent.com/hoffman P/N 87798474 87798663 NOTE: Door stop kit is not intended for
MODEL: F / MODELO: F END TABLE WITH MEDIA STAND & MAGAZINE HOLDER MESA RINCONERA CON ESTANTE & REVISTERO
 MODEL: 11225479F / MODELO: 11225479F END TABLE WITH MEDIA STAND & MAGAZINE HOLDER MESA RINCONERA CON ESTANTE & REVISTERO NO A B C D E F G H I J K L PARTS LIST AND HARDWARE PARTES Y ACCESORIOS PARTS LIST
Ø 5/16" Ø 1/8" (8 mm) (3 mm) 3
 (3 mm) 3") HEMNES 2 AA-1923538-3 Ø 5/16" Ø 1/8" (8 mm) (3 mm) 3 24x 7 109048 121714 Design and Quality IKEA of Sweden IKEA of Sweden AB SE-343 81 Älmhult 1x 1x 107967 100823 109049 1x 2x 1x 326454 4 AA-1923538-3
HEMNES 2 AA-1923538-3 Ø 5/16" Ø 1/8" (8 mm) (3 mm) 3 24x 7 109048 121714 Design and Quality IKEA of Sweden IKEA of Sweden AB SE-343 81 Älmhult 1x 1x 107967 100823 109049 1x 2x 1x 326454 4 AA-1923538-3
Ø 5/16" Ø 1/8" (8 mm) (3 mm) 3
 (3 mm) 3") HEMNES 2 AA-1925608-6 Ø 5/16" Ø 1/8" (8 mm) (3 mm) 3 1 118331 112996 157876 157877 158569 158570 7 1x 109048 1x 121714 Design and Quality IKEA of Sweden IKEA of Sweden AB SE-343 81 Älmhult 1x 107967 2x
HEMNES 2 AA-1925608-6 Ø 5/16" Ø 1/8" (8 mm) (3 mm) 3 1 118331 112996 157876 157877 158569 158570 7 1x 109048 1x 121714 Design and Quality IKEA of Sweden IKEA of Sweden AB SE-343 81 Älmhult 1x 107967 2x
Start. Démarrer. Iniciar.
 Zune CABLE Pack câble de synchronisation Zune cable de sincronizacíon Zune Start. Démarrer. Iniciar. To sync and charge, connect the sync cable to your Zune and your PC. Just need to charge? Connect your
Process Control Work Instructions Control de Procesos Instrucciones de Trabajo. for / para
 Process Control Work Instructions Control de Procesos Instrucciones de Trabajo for / para 629096898 VFCB Kit Relay Cable Harness Assy Ensamblar el Kit del Arnés de Cables del Relevador Publication Number:
LECTOR PROXIMIDAD 4K AUTONOMO STANDALONE 4K PROXIMITY READER REF: 507222 HI / 255 01/14
 LECTO POXIMIDAD 4K AUTONOMO STANDALONE 4K POXIMITY EADE EF: 507222 HI / 255 01/14 LECTO POXIMIDAD 4K AUTONOMO egistro de la maestra y para suprimir 1. Apagar el lector 2. Poner el dipswitch nº1 en posición
π H-2561 Parts Assembly 1-800-295-5510 uline.com Tools needed H-2562 rectangular picnic table
 π H-2561 H-2562 rectangular picnic table 1-800-295-5510 uline.com Para Español, vea páginas 3-4. Pour le français, consulter les pages 5-6. Tools needed 3/4" (19mm) Socket Wrench Power Drill 3/8" (10mm)
KMR SCA-05 Mounting Instructions Instrucción de Montaje Instruções de Montagem 0899.4897
 0899.4897 KMR SCA-05 Mounting Instructions Instrucción de Montaje Instruções de Montagem 0899.4897 KMR SCA-05 Mounting Instructions Instrucción de Montaje Instruções de Montagem The KMR SCA-05 kit is a
Ø 5/16" Ø 1/8" (8 mm) (3 mm) 3
 (3 mm) 3") TARVA 2 AA-1936489-3 Ø 5/16" Ø 1/8" (8 mm) (3 mm) 3 1 100712 100037 109049 118331 112996 100214 109570 101350 110630 100001 14x 4x 3x 14x 13x 14x 1x 16x 100347 24x 4x 4x 100854 4x 104859 1x 101225 110470
TARVA 2 AA-1936489-3 Ø 5/16" Ø 1/8" (8 mm) (3 mm) 3 1 100712 100037 109049 118331 112996 100214 109570 101350 110630 100001 14x 4x 3x 14x 13x 14x 1x 16x 100347 24x 4x 4x 100854 4x 104859 1x 101225 110470
Ø 5/16" Ø 1/8" (8 mm) (3 mm) 3
 (3 mm) 3") HEMNES 2 AA-1925608-3 Ø 5/16" Ø 1/8" (8 mm) (3 mm) 3 1 118331 112996 7 Design and Quality IKEA of Sweden 326454 109048 121714 IKEA of Sweden AB SE-343 81 Älmhult 1x 1x 107967 100823 109049 1x 2x 1x 326454
HEMNES 2 AA-1925608-3 Ø 5/16" Ø 1/8" (8 mm) (3 mm) 3 1 118331 112996 7 Design and Quality IKEA of Sweden 326454 109048 121714 IKEA of Sweden AB SE-343 81 Älmhult 1x 1x 107967 100823 109049 1x 2x 1x 326454
Ø 5/16" Ø 1/8" (8 mm) (3 mm) 3
 (3 mm) 3") HEMNES 2 AA-1922828-3 Ø 5/16" Ø 1/8" (8 mm) (3 mm) 3 1 118331 112996 7 Design and Quality IKEA of Sweden 326454 109048 121714 IKEA of Sweden AB SE-343 81 Älmhult 1x 1x 107967 100823 109049 1x 2x 1x 326454
HEMNES 2 AA-1922828-3 Ø 5/16" Ø 1/8" (8 mm) (3 mm) 3 1 118331 112996 7 Design and Quality IKEA of Sweden 326454 109048 121714 IKEA of Sweden AB SE-343 81 Älmhult 1x 1x 107967 100823 109049 1x 2x 1x 326454
beatsbydre.com facebook.com/beatsbydre @beatsbydre QUICK START GUIDE
 QUICK START GUIDE GETTING STARTED EN To turn on your Pill XL TM, press power button. FR Pour allumer le Pill XL TM, appuyez sur le bouton d alimentation. ES Para encender su Pill XL TM, presione el botón
Quickstart Guide. WiPry 5x. 1) Connect antenna to the appropriate port. TM
 Connect antenna to the appropriate port. TM") Quickstart Guide ACCESSORY ANTENNA W A R N I N G DO NOT APPLY MORE THAN 20DBM TO THE ANTENNA WITHOUT EXTERNAL ATTENUATION CONNECT TO HOST DEVICE 1) Connect antenna to the appropriate port. TM 2) Download
Quickstart Guide ACCESSORY ANTENNA W A R N I N G DO NOT APPLY MORE THAN 20DBM TO THE ANTENNA WITHOUT EXTERNAL ATTENUATION CONNECT TO HOST DEVICE 1) Connect antenna to the appropriate port. TM 2) Download
You and Me Designed by Antoni Pallejà Office USER S MANUAL MANUAL DEL USUARIO
 You and Me Designed by Antoni Pallejà Office USER S MANUAL MANUAL DEL USUARIO PIECES & TOOLS PIECE A: 2 UNITS PIEZA A PIECE B: 2 UNITS PIEZA B NET RED NET BRACKET: 2 UNITS SOPORTE RED TOOLS / HERRAMIENTAS
BATTERY PLUGS CONECTORES DE BATERÍA. Voltage colour combinations. Combinaciones de color del voltaje
 Voltage colour combinations All S-plugs can function until 600V DC. When several electric devices with different voltages are used, it s recommended to choose a colour code for every voltage! None of these
SYSTEM INSTALLATION MANUAL MANUAL DE INSTALACIÓN
 SYSTEM INSTALLATION MANUAL MANUAL DE INSTALACIÓN Measuring Tape Cinta métrica Ø 8 mm twist drill (wood) Broca espiral Ø 8 mm (para madera) Ø 14 mm stone drill (brick) Broca para piedra Ø14 mm (ladrillo)
www.microsoft.com/hardware
 www.microsoft.com/hardware english - EN ESPAÑOL (LATINOAMERICANO) - XX PORTUGUÊS (BRASIL) - XC FRANÇAIS CANADIEN - XD 1 2 www.microsoft.com/hardware/productguide 3 www.microsoft.com/hardware/downloads
ENKVM-USBB. 2-Port USB KVM switch with Easy Switch and Cable. User Guide
 ENKVM-USBB 2-Port USB KVM switch with Easy Switch and Cable User Guide i Package Contents 1 ENKVM-USBB 2-Port USB KVM Switch with Easy Switch and Cable 1 User Guide Requirements Console A VGA, SVGA, XGA,
TYPE SUITABLE FOR INPUT VOLTAGE. 1 ~ 3 leds 1W 100-240 VAC 2-12 VDC 350 ma IP67 Blanco White FUSCC-4-350T TYPE POWER INPUT VOLTAGE.
 Nuestros distintos productos basados en los diodos leds no estarían completos sin una gama de drivers y fuentes de alimentación lo más completa posible. Hemos querido dotar a nuestros clientes del máximo
EP-2906 Manual de instalación
 EP-2906 Manual de instalación Con el botón situado a la izquierda se configura en el modo de cliente y de la derecha es el modo de Punto de acceso AP (nota: El USB es sólo para la función de fuente de
T87 Range Stops INSTALLATION APPLICATION INSTALLATION INSTRUCTIONS EFS
 T87 Range Stops APPLICATION Use the 0144-001 range stops with the T87K, N thermostats to limit the minimum and maximum temperature settings. The 0144-001 contains two range stop scales and two #2-28 x
DELUXE SHOP DESKS PARTS uline.com TOOLS NEEDED H-6865, H-6866, H-6867 H-6868, H-6870
 H-6865, H-6866, H-6867 H-6868, H-6870 π DELUXE SHOP DESKS uline.com Para Español, vea páginas 3-4. Pour le français, consulter les pages 5-6. TOOLS NEEDED Phillips Screwdriver 10 mm Wrench PARTS Shop Desk
HIGH LITE. grupo-mci.com
 grupo-mci.com Efficacy 95 lm/w. 4 versions de 6.500, 12.500, 19.000, 25.000 lm. 2 beams: wide and narrow. Modular IP65 light fixture, each 375 mm. Extra flat: height 55mm. Contemporary design. Applications:
Guía de instalación rápida TEG-160WS TEG-240WS
 Guía de instalación rápida TEG-160WS TEG-240WS C2 Table of Contents Español 1 1. Antes de iniciar 1 2. Instalación del Hardware 2 3. Herramienta de gestión Web 3 Troubleshooting 6 Version 02.02.2010 1.
MANUAL DE INSTRUCCIONES PARRILLA BARBACOA (18 ) ED-4047BQ
 ED-4047BQ") MANUAL DE INSTRUCCIONES PARRILLA BARBACOA (18 ) ED-4047BQ ESTIMADO CLIENTE Con el fin de que obtenga el mayor desempeño de su producto, por favor lea este manual de instrucciones cuidadosamente antes de
MANUAL DE INSTRUCCIONES PARRILLA BARBACOA (18 ) ED-4047BQ ESTIMADO CLIENTE Con el fin de que obtenga el mayor desempeño de su producto, por favor lea este manual de instrucciones cuidadosamente antes de
GARAGE DOOR OPENER CONNECTIVITY HUB QUICK START GUIDE
 GARAGE DOOR OPENER CONNECTIVITY HUB QUICK START GUIDE Thank you for purchasing a Craftsman garage door opener Connectivity Hub enabled with AssureLink technology. Once you have created your account and
24-Port 10/100Mbps Web Smart PoE Switch with 4 Gigabit Ports and 2 Mini-GBIC Slots TPE-224WS
 24-Port 10/100Mbps Web Smart PoE Switch with 4 Gigabit Ports and 2 Mini-GBIC Slots TPE-224WS ŸGuía de instalación rápida (1) ŸTroubleshooting (3) 1.12 1. Antes de iniciar Contenidos del Paquete ŸTPE-224WS
ASSEMBLY INSTRUCTIONS INSTRUCTIONS DE MONTAGE INSTRUCCIONES DE ENSAMBLAJE
 an LI ompany New Hope, MN 55428 www.safcoproducts.com SSMLY INSTRUTIONS INSTRUTIONS MONTG INSTRUIONS NSML 1857 Impromptu Machine Stand Meuble pour appareils de bureau stante para máquinas de oficina PROUT
Roomba 900. Quick Start Guide Guide de Démarrage Rapide Guía de Inicio Rápido
 Roomba 900 Quick Start Guide Guide de Démarrage Rapide Guía de Inicio Rápido To get started, you will need the robot, Home Base, line cord and your smart device. For a full list of box contents refer
Quick start guide. www.hd.philips.com
 For product support, visit Para obtener asistencia técnica, visite Pour en savoir plus sur l assistance sur les produits, visitez le site www.hd.philips.com HTL5110 Quick start guide EN For Product recycling
P/N INSTALLING HD3000 SERIES HANDLE SET : INSTALL LATCH / DEADBOLT STRIKERS:
 INSTALLING HD3000 SERIES HANDLE SET : A: Drill the 1/8" diameter handle hole ( third from the top of the door, on the room side ) to a 5/16" diameter. B: Slide the inside handle into its base. Tighten
Installation Guide. Green momit
 Installation Guide Green momit 2015 www.momit.com momit Deviceses Gateway: Model 1 and 2 Wall option The momit Gateway allows your thermostat to be connected to the Internet. It s included in the Starter
Steel Workbench Frame
 INSTRUCTIONS Adjustable Height and Length Steel Workbench Frame LENGTH ADJUSTABLE FOR 4', 5', 6' WORK SURFACES 29" - 41" ADJUSTABLE HEIGHT (1" INCREMENTS) WORK SURFACE NOT INCLUDED USE 4', 5', 6' LONG
FlexCage. User Manual MB975SP-B. 5 HDD Slots in 3 Device Bay. Tray-Less SATA Backplane Module
 FlexCage MB975SP-B 5 HDD Slots in 3 Device Bay Tray-Less SATA Backplane Module User Manual English Package Contents Front Panel Information HDD3 POWER BUTTON POWER / ACCESS LED INDICATOR HDD2 POWER BUTTON
ASSEMBLY INSTRUCTIONS INSTRUCTIONS DE MONTAGE INSTRUCCIONES DE ENSAMBLAJE
 an LDI Company New Hope, MN 55428 www.safcoproducts.com ASSEMBLY INSTRUCTIONS INSTRUCTIONS DE MONTAGE INSTRUCCIONES DE ENSAMBLAE 8926 Impromptu Flat Panel TV Cart Charoit téléviseur à écran plat Carro
DODGE RAM Front and Rear Wheel Flares
 2002-05 DODGE RAM Front and Rear Wheel Flares C LH D LH A RH E 14x B RH F 24x DETERMINE VEHICLE MANUFACTURING LOCATION DÉTERMINER L'EMPLACEMENT DE FABRICATION DU VÉHICULE DETERMINE EL LUGAR DE FABRICACIÓN
Conditioning Exercises: Standing
 Conditioning Exercises: Standing Do all these exercises slowly. Do not hold your breath during these exercises. If unusual pain occurs in your joints or muscles while you are exercising, do not continue
One Drawer Nightstand Table de chevet de tiroir Mesilla de noche con 1 cajone
 Assembly Instructions Instructions de montage Instrucciones de armado One Drawer Nightstand Table de chevet de tiroir Mesilla de noche con 1 cajone DATE STAMP Nightstand Hardware / Quincaillerie de la
Trademarks Third-Party Information
 Trademarks campus language training, clt and digital publishing are either registered trademarks or trademarks of digital publishing AG and may be registered in Germany or in other jurisdictions including
Emax DOC. N. 1SDH000460R L3633
 Emax DOC. N. 1SDH000460R0629 - L3633 Contatti ausiliari supplementari dditional auxiliary contacts Zusätzliche Hilfsschalter Contacts auxiliaires supplémentaires Contacto auxiliares suplementarios In aggiunta
Quick Installation Guide Internet Setup
 CBR-970 Wireless-N Broadband Router www.cnet.com.tw Established in California, U.S.A. since 1987 Quick Installation Guide Internet Setup What s included in the box CBR-970 Wireless N Broadband Router Quick
English - EN Français - FR Deutsch - DE Italiano - IT Português - PT Español - ES
 English - EN Français - FR Deutsch - DE Italiano - IT Português - PT Español - ES Push upward to open battery door, insert batteries as shown. Pair your mouse with your Windows device: A. On the underside
Agustiniano Ciudad Salitre School Computer Science Support Guide - 2015 Second grade First term
 Agustiniano Ciudad Salitre School Computer Science Support Guide - 2015 Second grade First term UNIDAD TEMATICA: INTERFAZ DE WINDOWS LOGRO: Reconoce la interfaz de Windows para ubicar y acceder a los programas,
SFD-200-N-B DESPERTADOR-PROYECTOR-CON VOZ. Manual de instrucciones
 SFD-200-N-B DESPERTADOR-PROYECTOR-CON VOZ Manual de instrucciones Funciones: - Proyección de la hora - Proyección controlada por sonidos y vibraciones (palmada, etc.) - Pantalla retroiluminada azul - Hora
ROCK N STEREO SOUND DESK
 Read and save these instructions ROCK N STEREO SOUND DESK RTA-M1102-BK INSTRUCTIONS TABLE OF CONTENTS PACKAGE INCLUDES Package Includes... 2 Specifications... 2 Product Parts List... 3 1 2 3 Product Details...
Vedi foto 4. See photo 4. Voir photo 4. Ver foto 4
 MARCA MAKE FAIRE - HACER MODELLO MODEL MODÈLE - MODELO REV. 00 HYUNDAI TUCSON 15 Funzione - Function SCHEDA TECNICA DI INSTALLAZIONE PER SISTEMI DI ALLARME CAN CAN ALARM SYSTEM FITTING INSTRUCTIONS SCHEMA
Guía de inicio rápido
 Terminal Portátil Dolphin 6500 con Windows CE 5.0 Guía de inicio rápido Terminal Portátil Dolphin 6500 Cuando retire el embalaje Verifique que el cartón contenga los siguientes elementos: Terminal Portátil
Suzuki Grand Vitara 2006--up 95-7953
 INSTALLATION INSTRUCTIONS FOR PART 95-7953 APPLICATIONS Suzuki Grand Vitara 2006--up 95-7953 KIT FEATURES Double DIN radio provision Stacked ISO mount units provision KIT COMPONENTS A) Radio housing B)
File naming. Dateibenennung. Nommage de fichiers. Nomenclatura de archivo. 3shape. Release. Version. Version. Version. Software CAD.
 ENGLISH DEUTSCH FRANÇAIS ESPAÑOL DESS-3SHAPE LIBRARIES Download and installation instructions of dess interfaces (titan bases, gap cemented 0.09mm diameter) 3shape libraries. Download der Bibliotheken
ASSEMBLY INSTRUCTIONS INSTRUCCIONES DE MONTAJE
 ASSEMBLY INSTRUCTIONS INSTRUCCIONES DE MONTAJE 4 PC PATIO CONVERSATION SET JUEGO DE PATIO C/ MESA, 2 SILLAS Y UN SILLÓN 250559R /250559T/250559G PLEASE NOTED / POR FAVOR A TENER EN CUENTA: THIS SET OF
Power Windows Leve-glace Electrique Elektrische Fensterheber Elevalunas Electricos Alzacristalli Elettrici. Suzuki Santana 410. Suzuki Santana 413
 Power Windows Leve-glace Electrique Elektrische Fensterheber Elevalunas Electricos Alzacristalli Elettrici 2 doors - 2 portes - 2 türen - 2 puertas - 2 porte 82012 Suzuki Santana 410 Suzuki Santana 413
BOHANDL30 Handle Installation Instructions
 BOHANDL30 Handle Installation Instructions Tools and Parts Included Attaching Handles Only attach the handles once the appliance has been positioned in its installation location and has been leveled (see
With Flange: 1/2" Copper pipe stub-out length from finished wall surface
 Stub out length for tub spouts (measured from finished wall surface) With Flange: 1/2" Copper pipe stub-out length from finished wall surface Without Flange: 1/2" Copper pipe stub-out length from finished
INSTALLATION INSTRUCTIONS FOR PART 99-7341B APPLICATIONS 2010 HYUNDAI TUCSON
 INSTALLATION INSTRUCTIONS FOR PART 99-74B KIT FEATURES KIT COMPONENTS APPLICATIONS 00 HYUNDAI TUCSON 99-74B ISO DIN Head Unit Provision With Pocket DDIN Head Unit Provision Painted Matte Black To Match
GUÍA RÁPIDA DE. Instalación de Nokia Connectivity Cable Drivers
 GUÍA RÁPIDA DE Instalación de Nokia Connectivity Cable Drivers Contenido 1. Introducción...1 2. Requisitos...1 3. Instalación de Nokia Connectivity Cable Drivers...2 3.1 Antes de la instalación...2 3.2
 Control and Functions Guia de Funcionamiento Front View Configuración PAN/TILT 9 1 11 1 13 "Assign" 1 PROGRAM MUSIC/BKC MIDI/REC AUTO/DEL TAP/DISP 15~ BLACKOUT PAN TILT ASSIGN REVERSE MODE TILT PAN FINE
2008 Series Hemodialysis Machine Operator s Manuals Addendum for Concentrate Connection
 2008 Series Hemodialysis Machine Operator s Manuals Addendum for Concentrate Connection Caution: Federal (US) law restricts this device to sale only by or on the order of a physician. This is an addendum
AT07. Board for Arduino UNO with terminal block placa para Arduino UNO con bornes Plaque pour ARDUINO UNO avec borniers pour CI
 Board for Arduino UNO with terminal block placa para Arduino UNO con bornes Plaque pour ARDUINO UNO avec borniers pour CI AT07 Support board for the Arduino UNO. It makes easier the installation and assembly
USA/Canada: 1-800-4KOHLER México: 001-800-456-4537 kohler.com 2011 Kohler Co.
 Installation Guide Guide d installation Guía de instalación Cabinet Mounted Stereo Stéréo montée sur armoire Estereo de montaje en gabinete K-2958 M product numbers are for Mexico (i.e. K-12345M) Los números
English - EN Español (América Latina) - XX Português (Brasil) - XC Français (Canadá) - XD
 - XX Português (Brasil) - XC Français (Canadá) - XD") English - EN Español (América Latina) - XX Português (Brasil) - XC Français (Canadá) - XD Push upward to open battery door Insert batteries as shown Pair your mouse with your Windows device: A. On the
English - EN Español (América Latina) - XX Português (Brasil) - XC Français (Canadá) - XD Push upward to open battery door Insert batteries as shown Pair your mouse with your Windows device: A. On the
1) Install the included batteries into your blood pressure monitor (BPM).
 Install the included batteries into your blood pressure monitor (BPM).") DELUXE CONNECTED BLOOD PRESSURE ONITOR UA-651BLE 1) Install the included batteries into your blood pressure monitor (BP). 2) Insert the air connector plug into the air socket. 3) Download the free A&D
DELUXE CONNECTED BLOOD PRESSURE ONITOR UA-651BLE 1) Install the included batteries into your blood pressure monitor (BP). 2) Insert the air connector plug into the air socket. 3) Download the free A&D
HYUNDAI TUCSON (without 4.3 screen) 2010-UP 99-7341B
 2010-UP 99-7341B") Installation instructions for part 99-7341B HYUNDAI TUCSON (without 4.3 screen) 2010-UP 99-7341B KIT FEATURES ISO DIN Head Unit Provision With Pocket DDIN Head Unit Provision Painted Matte Black to match
Installation instructions for part 99-7341B HYUNDAI TUCSON (without 4.3 screen) 2010-UP 99-7341B KIT FEATURES ISO DIN Head Unit Provision With Pocket DDIN Head Unit Provision Painted Matte Black to match
HD Media Tower / Tour Hi-Fi / Medios de Torre
 English This page lists the contents included in the box. Please take time to identify the hardware as well as the individual components of the product. s you unpack and prepare for assembly, place the
Retrofit Brake Activation Assembly on Empath Recliner
 Retrofit Brake Activation Assembly on Empath Recliner 1/8 & 5/32 ALLEN WRENCH 3/8 & 7/16 If you have a problem, question, or request, call your local dealer, or Steelcase Line 1 at 888.STEELCASE (888.783.3522)
PRODUCT WARRANTY is available online at: For questions or concerns, please call
 an LDI Spaces Company inneapolis, 55428 www.safcoproducts.com SSEBLY ISTRUCTIS ISTRUCTIS DE TGE ISTRUCCIES DE ESBLJE 1936 Xpressions Desk with Shelf Bureau avec étagère Escritorio con estante SHW WITH
π H-2888 RECYCLED PLASTIC BENCH WITH BACK parts 1-800-295-5510 uline.com TOols NEEDED
 π H-2888 RECYCLED PLASTIC BENCH WITH BACK uline.com Para Español, vea páginas 3-4. Pour le français, consulter les pages 5-6. TOols NEEDED 7/16" Socket Wrench or 7/16" Drill and Socket Bit parts Single
RGM-300 User s Manual Manuel de l'utilisateur Manual del usuario
 Wired Optical Gaming Mouse Souris de jeu optique câblée Ratón óptico cableado para juegos User s Manual Manuel de l'utilisateur Manual del usuario Gaming Mouse User manual English Thank you for purchasing
GMT900 Pick-Up Instrument Panel DIC Switch
 GMT900 Pick-Up Instrument Panel DIC Switch Contents Description Quantity Trim plate 1 DIC Switch 1 200 Grand Pointe Dr., Grand Blanc, MI 48439 4. Remove the park brake release handle from the knee bolster.
 E Dependiendo de la versión y el año, una parte del paragolpes puede ser necesariamente recortada. La información proporcionada por nosotros para el recorte del paragolpes es sólo una ayuda no vinculante.
VISUALIZACÓN DE LA TEMPERATURA DEL MOTOR Y DEL VOLTAJE DEL SISTEMA ELÉCTRICO
 (( l-alarm))) ( VISUALIZACÓN DE LA TEMPERATURA DEL MOTOR Y DEL VOLTAJE DEL SISTEMA ELÉCTRICO Un sistema de vigilancia que controla el sobrecalentamiento del motor y la descarga de la batería. 1 CARACTERISTICAS
PA600 Rugged Enterprise PDA
 PA600 Rugged Enterprise PDA unitech unitech is a member of Oracle Embedded Software Licensing Program Quick Reference Guide 400577G RevB Front Left View 1 8 7 English 6 3 4 5 1 Status indicator 5 Universal
EMC SourceOne TM para Microsoft SharePoint 7.0 Búsqueda de archivo Tarjeta de referencia rápida
 EMC SourceOne TM para Microsoft SharePoint 7.0 Búsqueda de archivo Tarjeta de referencia rápida Utilice la búsqueda de archivo para buscar y restaurar contenido de SharePoint que se encuentre archivado
CESVA USB DRIVER. M_CUD_v0001_20130226_ESP_ENG
 CESVA USB DRIVER M_CUD_v0001_20130226_ESP_ENG CESVA USB DRIVER ESPAÑOL CONTENIDO 1. Instalación del CESVA USB Driver... 2 2. Conocer el puerto COM asignado para la comunicación con el PC... 2 2.1. Windows
DT-210/DT-210L/DT-210V. E Revision 1
 DT-210/DT-210L/DT-210V E Revision 1 1 2 3 4 5 6 7 8 9 10 11 12 13 14 A B C D E F Controles Interruptor de selección estéreo/mono/ altavoz Botón de memoria Sintonización ascendente/descendente Conector
Select 900 IS902. Start Pack Startpaket Kit de démarrage Start - Paket Start Pack
 USER MANUAL BRUKSANVISNING MODE D'EMPLOI BEDIENUNGSANLEITUNG MANUAL DEL USUARIO Start Pack Startpaket Kit de démarrage Start - Paket Start Pack Select 900 IS902 Copyright 2001 Checkpoint Systems, Inc.
english - EN português do Brasil - XC français - FR español - ES
 english - EN português do Brasil - XC français - FR español - ES www.microsoft.com/hardware 1 1 Insert two AAA alkaline batteries. Slide the power switch to the on position. To connect the keyboard to
Network & Systems Presenta: Sistema TMI. Introducción, Instalación Programacion y Reparación
 Network & Systems Presenta: Sistema TMI Introducción, Instalación Programacion y Reparación Overview: Conociéndo el sistema TMI Veremos los diferentes Modelos del sistema TMI de telefonía Inalámbrica Conoceremos
1. Sign in to the website, http://www.asisonline.org / Iniciar sesión en el sitio, http://www.asisonline.org
 Steps to Download Standards & Guidelines from the ASIS International Website / Pasos para Descargar los Standards & Guidelines de la Página Web de ASIS International 1. Sign in to the website, http://www.asisonline.org
Wall Mount Bracket [9A474]
![Wall Mount Bracket [9A474]](/thumbs/71/64957710.jpg "Wall Mount Bracket [9A474]") Wall Mount Bracket [9A474] Compatible with: Ritter 253 Exam Light Intended Use: To mount Ritter 253 exam light to wall. Equipment Alert The wall anchors supplied are designed for drywall. If your wall
Wall Mount Bracket [9A474] Compatible with: Ritter 253 Exam Light Intended Use: To mount Ritter 253 exam light to wall. Equipment Alert The wall anchors supplied are designed for drywall. If your wall
Neo HE. power and protect. User s Manual. High Efficiency Power Supply
 power and protect User s Manual Manuel de l utilisateur / Anwenderhandbuch Manuale per l operatore / Manual del usuario Neo HE High Efficiency Power Supply Manual del usuario de Antec Neo HE Fuente de
Schnellinstallationsanleitung
 Schnellinstallationsanleitung TL-WR340G/TL-WR340GD/TL-WR541G/ TL-WR542G/TL-WR641G/TL-WR642G Drahtloser 54M/108M-Router Rev: 1.0.0 1 Konfiguration des Computers 1) Verbinden Sie den drahtlosen Router wie
2.4 GHz Wireless Mouse Souris sans fil 2,4 GHz Ratón inalámbrico de 2,4 GHz
 2.4 GHz Wireless Mouse Souris sans fil 2,4 GHz Ratón inalámbrico de 2,4 GHz User s Manual Manuel de l'utilisateur Manual del usuario 2.4 GHz Wireless Mouse User manual English Thank you for purchasing
MANUAL DE USO - Línea RGB-IR 1.0/13. /Use Manual - RGB-IR Club 1.0/13
 MANUAL DE USO - Línea RGB-IR 1.0/13 /Use Manual - RGB-IR Club 1.0/13 Productos Línea RGB-IR /RGB-IR Club products *iball RGB-IR /iball RGB-IR Club *Clava Prophecy RGB-IR /Prophecy RGB-IR Club *Luxeon RGB-IR
Hyundai Santa Fe 2007-up 99-7325
 INSTALLATION INSTRUCTIONS FOR PART 99-7325 APPLICATIONS Hyundai Santa Fe 2007-up 99-7325 (not for factory equipped NAV models) KIT FEATURES DIN radio provision with pocket ISO radio provision with pocket
3 PIECE BAR SET JUEGO DE BAR DE 3 PIEZAS
 MODEL: 11222152VW / MODELO: 11222152VW 3 PIECE BAR SET JUEGO DE BAR DE 3 PIEZAS NO A B C D E F G H I J K L M N O P1 P2 Q PARTS LIST AND HARDWARE LISTA DE PARTES Y ACCESORIOS HARDWARE LIST LISTA DE ACCESORIOS