PFAFF v 34 =7. Instruction Book. Instrucciones de manejo. Mode dëmploi. Libretto istruzioni
|
|
|
- Rosa San Segundo Velázquez
- hace 8 años
- Vistas:
Transcripción
1 Libretto istruzioni Mode dëmploi nstrucciones de manejo nstruction Book PFAFF v 34 =7

2 C A, lavoro. parts. 4 Extienda esta hoja Fold out this page 4 l ampoule: 15 Watts. C) Be sure to use only a 15-watt light c) Puissance maximale admissible de mécaniques ou d accessoires. change mechanical and accessory secteur avant de quitter a machine, b) Toujours débrancher a machine du continuellement surveiller le travail. avant les travaux d entretien et en a) Toujours faire preuve de prudence et Mesures de sécurité cas de remplacement de pièces machine or want to clean it, oil it or cord whenever you have to leave the b) Make sure you unplug the power fingers by the needle during sewing. a) Take care to avoid injury to your Some safety rules Safety rules for United Kingdom see page 2 Contents on page 61 ndice en a Pág. 63 D bombilla es de 15 vatios. C) La potencia maxima admisible de a desenchufarse. deberá tener todo el cuidado posible tarse eléctricamente, es decir, deberá durante el trabajo y no apartar a cuando no se use, deberá desconec limpiar o engrasar a maquina, o a placa de aguja, 10 mismo que al aguja, el pie prensatelas, a canilla o b) Siempre que haya que cambiar a vista de a zona de costura. usuarlo de toda máquina de coser a) Debido al movimiento de a aguja, el segén DN 57730, sección 2C DN parte 28 a) ln virtü del movimento alternativo a corrente della macchina togliendo c) La potenza massima consentita per a lampadina è di 15 Watt. di manutenzione si deve disinserire a spina dalla presa a muro. placca d ago. nelle interruzioni non b) Nel cambiare ago, piedino, spolina e sufficiente attenzione e tenere dell ago, utente deve prestare o EC 335 parte 28 para máquinas de coser domésticas cucire per usa famiglia secondo Normas sabre medidas de seguridad constantemente d occhio il punto di Norme di sicurezza per macchine per custodite del lavoro e durante i lavori bulb in the sewing lamp. K Rabattre ce volet vers extérieur Girare questa pagina verso l esterno )
 Make sure you unplug the power fingers by the needle during sewing.")
3 4
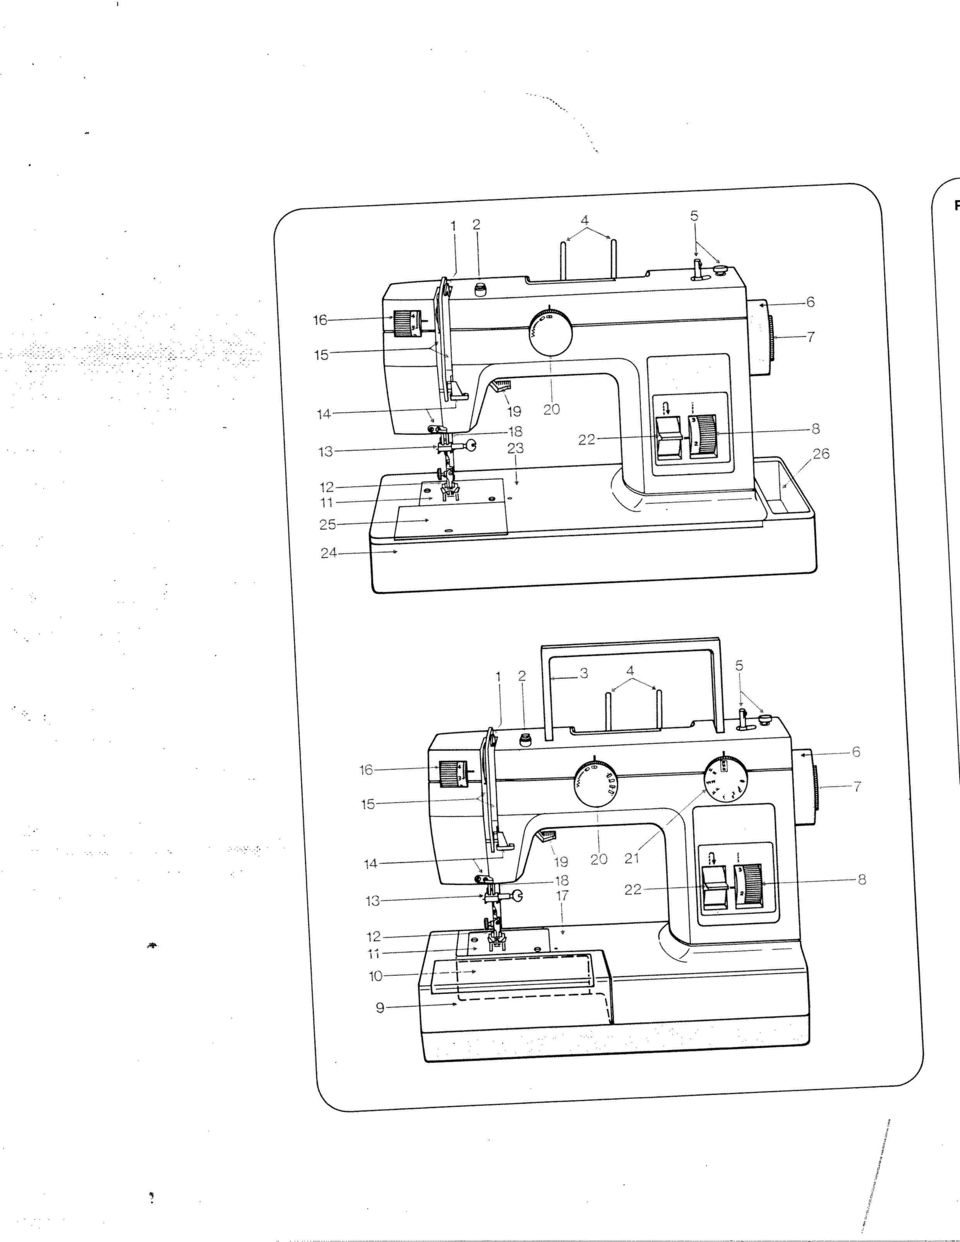
4 2 Bobbin winder tension 3 Carrying handle 1 Take-up lever Mandos y elementos principales de a 20 Zigzag- and utility-stitch knob knob, Models ; Reverse control 25 Bedplate cover, enclosing sewing 26 Accessories compartment hook hook 23 Bedplate 24 Base 21 Utility-stitch, stretch-and fancy-stitch 12 Sewing foot holder with sewing foot 18 Presser bar with thread cutter 1 1 Needle plate accessories box 6 Hand wheel and insert) 4 Spool pins (remove from accessories 5 Bobbin winder 7 Disengaging knob 8 Stitch length control 9 Detachable work support with 10 Free-arm cover, enclosing sewing 13 Needle holder with retaining screw 14 Thread guides 15 Threading slots 16 Needle thread tension 17 Free arm 19 Presser bar lifter Parts of the sewing machine 1 // en los accesorios) 22 Botón para costura en retroceso 24 Zócalo 25 Tapa de Ta placa base 26 Compartimento para accesorios (debajo está el garfio) 20 BotOn para puntadas utilitarias y 23 Placa base zigzag modelos ; stretch y de adorno en el 21 BotOn para puntadas utilitarias, 12 Portaprensatelas con prensatelas 13 Portagujas con tornillo de sujeciôn 14 Guiahilos 15 Ranuras para el enhebrado 17 Brazo al aire 11 Placa de aguja (con el garfio dentro) compartimento para accesorios 8 Regulador del largo de puntada 2 Tensor del devanador 3 Asa 4 Espigas portacarretes (se encuentran 5 Devanador (bobinadora) 6 Volante 7 Disco de desembrague 9 Superficie de costura variable con 10 Casquete de cierre 16 Tensor del hilo superior 18 Barra del prensatelas con cortahilos 19 Palanca alzaprensatelas 1 Palanca tirahilos máquina de coser

5 4 4 Elements constitutits de a machine a coudre 1 Levier releveur de fil 2 Tension du dévidoir 3 Poignee 4 Broches a bobines (jointes aux accessoires; a mettre en place) 5 Dévidoir 6 Volant 7 Disque de debrayage 8 Sélecteur de longueur de point 9 Boite de rangement formant plan de travail 10 Capot couvrant le compartiment du crochet 11 Plaque a aiguille 12 Support de semelle du pied presseur avec semelle 13 Pince-aiguille avec vis de fixation 14 Guide-fil 15 Passage du til 16 Tension du fil d aiguille 17 Bras libre 18 Barre de pied presseur avec coupe-fil 19 Releveur du pied presseur 20 Bouton de reglage points zigzags et utilitaires 21 Modéles ; : Bouton de reglage points utilitaires, points elastique et fantaisie 22 Levier de marche arrière 23 Plateau fondamental 24 Socle 25 Cache couvrant le compartimont du crochet 26 Compartiment a accessoires Parti della macchina per cucire 1 Leva tendifilo 2 Tensione per c spolatore 3 Maniglia 4 Perni porta-rocchetti (togliere dal corredo e infilarli) 5 Spolatore 6 Volantino 7 Disco di disinnesto 8 Regolatore della lunghezza del punto 9 Piano di lavoro variabile con scomparto per accessori 10 Sportellino, dietro il crochet 11 Placca d ago 12 Supporto del piedino con piedino 13 Morsetto dago con vite di fissaggio 14 Guide del fib 15 Fessure per rinfilatura 16 Tensione superiore 17 Braccio libero 18 Barra premistoffa con rasa-filo 19 Leva premistoffa 20 Bottone regolatore per c zig-zag e per i punti utili 21 Bottone regolatore per punti utili, flexi e ricami nel modelli ; Tasto per ii ritorno 23 Placca base 24 Zoccolo 25 Chiusura scorrevole della placca base, sotto ii crochet 26 Scomparto per gli accessori L 1 /

6 Some safety rules valid for United Kingdom only The wires in this mains lead are coloured according to following code: Blue: Neutral Brown: Live As the colours of the wires in the mains lead of this appliance may not correspond with the colour coding of the terminals in your plug, proceed as follows: the wire which is coloured blue must be connected to the terminal which is marked with the letter N or coloured black. The wire which is coloured brown must be connected to the terminal which is marked with the letter L or coloured red. Please note: When a 13-ampere plug is used a 3-ampere fuse has to be fitted. nserting the spool pins Two spool pins are included in the accessories. nsert these in the holes provided in the machine. Colocaciôn de los portacarretes: En los accesorios se encuentran dos portacarretes. ColOquelos en los orificios previstos en a máquina y déjelos intro ducidos. Mise en place des broches a bobines Aux accessoires sont jointes deux broches a bobines. Les engager définiti vement dans les logements prevus a cet effet dans le corps de a machine. Come inserire i porta-rocchetti Nel corredo troverete due perni porta rocchetti. Questi devono essere inseriti negli appositi fori sulla macchina e rimangono montati. 2

7 up (B). fully down (A), then allow them to move /7 3 volto trova sistemazione ii reostato. Nel piano di lavoro supplementare capo travail retourné. Le rheostat est loge dans le plan de adaptable (suplemento). El pedal va alojado en a placa detachable work plate. The foot control is stored in the upturned Sollevare ii coperchio. Dégager le coffret vers a haut. Saque Ta maleta hacia arriba. 4 Lift the case off. - Spingere ambedue le cerniere comple valigia nel modelli a base plana: spostino in su (B). revenir vers le haut (B). fond vers le bas (A) et es laisser Pour retirer a valisette Modéles a plateau: Basculer les deux fermetures a Modelos de base plana: Abra hacia Come sollevare il coperchio della tamente in basso (A) e lasciare che Si Cómo quitar a maleta-funda abajo los dos cierres (A) y suéltelos (B). machine models: Push both catches 4 Removing the carry case, Flatbed
 et es laisser Pour retirer a valisette Modéles a plateau: Basculer les deux fermetures a Modelos de base plana: Abra hacia Come sollevare il coperchio della tamente in basso (A)")
8 4 J presa a muro. Sollevare ii coperchio. Lift off the case. Come sollevare ii coperchio del a flecha. Fold down the carrying handle. models / N 4 N 4 4 Removing the carry case, free-arm Collegamento elettrico: Enlever a valisette. \.bbassare a maniglia. modelli a braccio libero. Modèles a bras libre Pour retirer a valisette modelos de brazo al aire Cômo sacar a maleta-funda de los Tire ahora de a maleta hacia arriba. Placer le rheostat a pédale sur le sol. Brancher a fiche A dans a machine et Branchement electrique: en el enchufe de a red. Conexión eléctrica Eche hacia atrás el asa en direccion de Basculer a poignee vers l arrière. control on the floor. nsert plug A in the Electrical connection: Set the foot Coloque el pedal en el suelo. lntroduzca machine and plug B in the wall socket. spina A nella macchina, e spina B nella Porre il reostato sul pavimento. nserire a clavija A en a maquina, y a clavija B a fiche B dans a prise murale.

9 Bobbin winding preparations: Reach under work support 9 and pull it out towards the left. Preparación para & devanado: Meta a mano izquierda por debajo del brazo 9 y desvielo hacia a izquierda. Preparer le bobinage: Passer a main sous a bolte de rangement 9 et retirer celle-ci vers a gauche. Preparazione per bobinare: nfilare a mano sotto piano di lavoro ed estrarre \quest ultimo verso sinistra. 7- Remove bed plate cover 25 or fold free arm cover 10 downwards. Quite a tapa 25 de a placa base o abra el casquete de cierre 10 hacia abajo. Enlever le cache 25 ou ouvrir le capot 10 vers le bas. Togliere a placca scorrevole della base 25 oppure aprire 10 sportellino di chiusura verso basso. Raise latch A and pull out the bobbin case. N Levante a bisagrita A y saqu a cápsula. Lever le loquet A et retirer a bolte a canette. Alzare sportello A e togliere a capsula della spolina. 4 Release latch A and take out the bobbin. Suelte a bisagrita A y saque a canilla. Lãcher le loquet A et retirer a canette. Rilasciare sportello A e togliere a spolina. J 5 /

10 4 Place the bobbin on winder spindle 5. lntroduzca a canilla en el husillo 5 del devanador. Placer a canette sur a broche 5 du dévidoir, nfilare a spolina sub perno 5. Push the bobbin to the right against stop A. Presione a canilla hacia a derecha contra el tope A. Pousser a canette vers a droite, contre a butée A. Spingere a spolina verso destra contro ii fermo A.,4bisengaging the sewing mechanism \ Hold hand wheel 6 firmly and turn knob 7 towards you. Desconexión del mecanismo del costura: Sujete con una mano el volante 6 y gire con a otra el disco do desem brague 7 hacia el frente. Debrayer le mécanisme de couture: Retenir le volant 6 et tourner be disque 7 vers avant. Disinnesto del meccanismo di cucito: Tenere fermo il volantino 6 e girare il \sco 7 in avanti. 4 Placa a spool on one of the pins 4. lntroduzca el carrete en uno de los portacarretes 4. Passer a bobine do fil sur une des broches 4. nfilare ii rocchetto del fib su uno dei perni. 6

11 J 4 gauche, a retirer et couper le fil. tours. Pousser a canette garnie vers a et e maintenir. Appuyer sur le rheostat et bobiner. Lâcher le fil après quelques Enfiler e fil de intérieur vers l extérieur ne clans a tension 2 et vers a canette. Bobinage: Faire passer le fil de a bobi thread. bin to the left, remove it and cut the of the thread again. Push the filled bob wind the bobbin. After a few turns, let go hold it there. Press the foot control to through one hole of the bobbin, then the spool into tensioner 2, to the bobbin, Bobbin winding: Pull the thread from / 7 sinistra, toglierla e tagliare ib fib. del fib. Premere a spolina piena verso Dopo alcuni gin lasciare libero ii capo reostato e bobinare. verso a spolina, infilarlo in un foro della spolina e tenerlo fermo. Azionare il nella tensione dello spolatore 2, portarlo Bobinare: Tirare ii fib dal rocchetto J J saquela y corte el hilo. a canilla, empüjela hacia a izquierda, devanar. Después de unas vueltas de introdüzcalo en uno de sus agujeros y sujételo. Pise el pedal y comience a tensor 2, lévelo hacia a canilla, devanado, suelte el hilo. Una vez lena hilo desde el carrete, páselo por el Devanado del hilo (bobinado): Tome el

12 4 Engaging the sewing mechanism: Hold the balance wheel firmly and turn knob 7 away from you. Conexiôn del mecanismo de costura: Sujete el volante y gire el disco 7 hacia atrás. Embrayage du mécanisme: Retenir le volant et tourner le disque 7 vers arrière. lnserire ii meccanismo di cucito: Tenere fermo ii volantino e girare ii disco 7 verso dietro. nserting the bobbin: With thread hanging down at back (A), pull it into slot B, under the spring and out of spring C. Colocación de a canilla en a cápsula: Coloque a canilla en a cápsula de forma que el hilo caiga hacia atrás (A). Paso luego el hilo por a ranura B y por debajo del muelle tensor hasta salir por el orificio C. Mise en place de a canette (A), le fil Se déroulant vers arriére. Tirer e fil par a fente B et, sous le ressort, jusqu à louverture C. nserire a spolina A (fib verso dietro). Tirare ii fib nella fessura B e quindi sotto a molla nel apertura C. 8 ii
.")
13 for a weaker tension and to the right for slip downwards. (Turn screw A to the left 4 your hand, the bobbin must gradually / 4 9 inserirsi nell apertura E. perno C. l nasello delta capsula D deve inserire Ta capsula fino atl arresto sut spolina: SolTevare il chiusino B e Come inserire a capsula della D doit s engager dans T encoche E. canette a fond sur Ta broche C. Le doigt Mise en place de a boite a canette: Lever Te Toquet B et engager Ta boite a canilla: Levante a bisagrita B e intro duzca a cápsula en a espiga C hasta el encajar en a escotadura E. tope. El dedo D de Ta copsula deberá Colocación de a cãpsula con a case finger D must fit into cutout E. onto pin C until it snaps in place. Bobbin Open latch B and push the bobbin case nserting the bobbin case: l alto. Deve abbassarsi gradatamente a capsula con leggeri colpetti verso renforcement, sinistra si allenta, verso destra si rinforza. canette. ETle doit descendre graduelle Controllo della tensione inferiore: Tirare tension aumenta. a tension; rotation vers Ta droite: dor A hacia a izquierda, a tension citos del hilo (girando el tornillo regula canilla de su propio hilo, a capsula no disminuye; girandoto hacia a derecha, a ment quand on imprime a Ta main de (girando Ta vite di regolaggio A verso inferior: Suspendiendo a capsula con a pendre Ta canette garnie au fit de a egères saccades ascendantes. Rotation Comprobación de a tension del hilo deberã deslizarse más que al dar tiron Tension du fil de canette: Laisser a tighter tension.) de a vis A vers Ta gauche reduction de With a brief sharp upward movement of Checking the bobbin thread tension:

14 / 10 1, back through slot D, into guides E, F C, upwards into slot D, into take-up lever take-up lever must be raised. Pull the Upper threading: The needle and the thread into guide A, slot B, behind guide 4 dietro attraverso a cruna delb ago. nfilare ii fib superiore dal davanti verso arrière par be chas d aiguille. Enfiler le fil d aiguille de l avant en el ojo de a aguja. superior desde el frente hacia atrãs por Enhebre a aguja pasando el hilo 4Thread the needle from front to back. guide E, F e nella guida di destra sul morsetto dell ago. indietro attraverso a fessura D, nelle fessura D, nella leva tenditilo 1, quindi Posizione ago e leva tendifilo superiore. guida A nella fessura B, dietro a lamiera di guida C, verso l alto nella Sollevare il piedino. Tirare 1 fib nella Come inserire fib superiore: pince-aiguille. fil E, F et dans le guide-u droit au revenir dans a fente D, dans les guide a fente D, dans le releveur de fil, fil dans le guide A, dans a fente B, releveur de fil en position haute. Tirer le Passage du fit d aiguille: Aiguille et portagujas. gulas E, F y en el guiahilos derecho del nura B, por detrãs de a chapa-gula C, desde el carrete por a gula A, por a ra Levante el pie prensatelas. Pase el hilo a a palanca tirahilos 1. A continuaciôn elevados. páselo de nuevo por la ranura D, en las y a palanca tirahilos deberán estar Enhebrado del hilo superior: La aguja holder. and into the right guide of the needle hacia arriba en a ranura D hasta llegar derriere a plaque C, vers le haut dans

15 needle thread. bobbin thread up by pulling on the take-up lever must be raised. Pull the / chiudere a sportellino 10. nserire a pbacca della base 25, oppure Mettre le cache 25 en place ou fermer cierre a tapa 10. Coloque Ta tapa 25 de Ta placa base o nsert bedpbate cover 25 or close freearm cover 10. piedino. Porre fili superiore ed inferiore sotto droite sous le pied presseur. Coucher les deux fils vers l arrière a debajo del prensatelas. Coloque ambos fibs hacia a derecha Place both threads towards the right under the sewing foot. con l aiuto del fib superiore. L ago e a leva tendifibo devono essere volantino in avanti. Cucire un punto. Tenere fermo ii fib superiore. Girare Tirer le f T de canette vers le haut a l aide du fit d aiguille. l aiguille et le releveur de fit en haut. vers sot et coudre un point. Arréter Retenir le fit d aiguille. Tourner le volant dos. Saque el hilo inferior tirando del hacia el frente y haga una puntada. La aguja y el tirahilos deberan estar eleva Sujete el hilo superior, gire el volante moves down and up again. Needle and hand wheel toward you until the needle Hold the needle thread taut. Turn the hilo superior. in alto. Tirare il fib inferiore verso l alto le capot 10. \ 4 N J 11 N

16 4 Free-arm models have a free arm for sewing tubular shaped articles. Los modelos de brazo al aire van provistos de brazo al aire para coser articulos tubuluares. Les modèles a bras libre possèdent un bras libre pour a mise en ceuvre d articles tubulaires. modelli a braccio libero hanno un braccio libero per cucire capi tubolari. Push the detachable work support onto the machine (guide pin in hole). Acople el suplemento a a mãquina de forma que el perno gula encaje en el orificio. Mettre le plan de travail en place (les broches doivent sengager dans les trous correspondants). Spingere piano di lavoro verso a macchina (i perni di guida devono entrare negli appositi fori). 4 N Place fabric under the sewing foot. Coloque a tela debajo del pie prensatelas. Placer du tissu sous le pied presseur. Porre a stoff a sotto 1 piedino. 4 Lower presser bar lifter 19. Baje a palanca alzaprensatelas 19. Descendre le levier 19. Abbassare a leva premistoffa
. Spingere piano di lavoro verso a macchina (i perni di guida devono entrare negli appositi fori).")
17 profundo pise el pedal tanto mayor será Accionamiento del pedal: Cuanto más machine runs. 4 interlock in the middle of the material. Sew a short seam. The threads should wide zigzag stitch. between 3 and 5. The higher the check the tension, set the machine at a number, the tighter the tension. To The normal setting is in the white range Checking the needle thread tension: 4 1 / / 13 dentro del material. el nümero tanto mayor serã a tension. Los hilos deberán quedar anudados zigzag ancha. Haga una costura corta. La comprobacion so hace con puntada blanca entre 3 y 5. Cuanto más alto sea La regulacion normal se halla en a zona Comprobación de a tension del hilo: A = marcatura per a regolazione. Tensione superiore 16 A repère do réglage. Tension du fil d aiguille 16 A = Marca para a regulacion. Tension del hilo superior 16 A = Setting mark. Needle thread tension 16 hobby preme ii pedale, piü veloce cucirà a coudra vito. pédale sera abaissée, plus a Hobby Abaisser a pédale du rheostat. Plus a Premere ii reostato: PiU a fondo Si a velocidad de costura de a Hobby. you press the pedal down the faster the 4 N Operating the foot contro : The farther

18 4 Tensions des fits Position do reglage normale dans a plage blanche, entre 3 et 5. Tension d autant plus forte que le chiffre est grand. ContrOler a aide d un point zigzag large. Coudre quelques points. Los fits doivent so nouer dans lépais seur des tissus. 4 Controllo della tensione del f ito: La tensione normale si trova net settore bianco da 3 5. PiU alto il numero, piü forte sara a tensio ne. controllo viene fatto con To zig-zag piü largo. Cucire una breve cucitura. L annoda mento dei fili deve avvenire al centro dello spessore del materiale. //\ j Raise presser bar lifter 19. Remove the fabric by pulling it towards the back. Alce a palanca alzaprensatelas 19. Saque a tela hacia atrás. Relever le levier 19. Degager le tissu vers l arriére. Alzare a leva alzapiedino 19. Togliere a stoff a verso dietro, - L1J Thread cutter A: Draw the threads into the slot and pull them downwards. N Cortahilos A. Coloque los hilos en a ranura y tire de ellos hacia abajo. Coupe-fit A. Coucher los fits dans a fente et les tirer vers To bas. Tagtiafito A: nserire i ii basso. fili e tirarli verso 14 /

19 from 0 to 1 is for sewing buttonholes. / 15 j indietro. rimane premuto a macchina cucirà Premere 1 tasto 22. Fintanto che il tasto Cucire indietro: touche est tenue abaissée. en arrière aussi longtemps que cette Abaisser a touche 22. La machine coud Couture en arrière: botón esté pulsado. Pulse el boton 22 hacia abajo. La máquina cose hacia atrás mientras el Costura en retroceso: key is held down. sews backwards as long as the control Press down control 22. The machine Reverse sewing: marcatura A. settore rosso tra 0 e 1 serve per a cucitura degli occhielli. Si regola a lunghezza del punto punto (8): Regolazione della lunghezza del desiderata girando tra 0 e 4 sulla coudre es boutonnières. La plage rouge, entre 0 et 1, sort pour 0 et 4 mm, soit placée face au repère A. longueur de point désirée, entre Tourner le bouton 8 jusqu a ce quo a Selection de a longueur du point (8): se usa para coser ojales. puntada deseado entre 0 y 4 coincida Gire el boton hasta que el argo de con a marca A. La zona roja entre 0 y 1 Regulación del largo de puntada (8): 4 mm, at mark A. The red setting range Set the required stitch length, from 0 to Setting the stitch length (8):
: Regolazione della lunghezza del desiderata girando tra 0 e 4 sulla coudre es boutonnières.")
20 turning the control towards + or 16 18/19. Vedere a tabella dei motivi a pagina marcatura A. Giraro il motivo dosiderato sotto a nei modelli e 720, 721. bottone regolatore dei punti 20 Tableau des points, voir pages 18, 19. désiré face au repere A. Par rotation du bouton, placer le point pour los modèlos et 720, 721. Sélecteur de points 20 paginas 18 y 19. A. Véase a tabla do puntadas en las puntada deseado coincida con a marca Gire el boton do forma que el tipo do de los modelos y 720, 721: Botón selector de puntadas 20 Stitch pattern knob 20 pages 18/19. A. For a table of stitch patterns see Models and 720, 721 Turn the required stitch symbol to mark A seconda del tipo di stoffa Si puo tion vers. du bouton vors + ou raccourci par rota bouton sélecteur do point 8 devra être Pour coudre le point elastique (Vert), le Per cucire i punti flexi (verde) occorre tejido. para adaptarse a las caracteristicas del elastique peut êtro agrandi par rotation lunghezza del punto sul simbolo S. S. alargar o acortar a puntada elãstica place sur le symbole S. S. regolare il bottone regolatore per a allungare o accorciare il punto flexi dor do puntada sobre el simbolo S. S. (sector Verde) hay que colocar el regula Girando hacia + o hacia se puede Suivant le genre de tissu, le point girando verso + o a manopola. shortened by turning it towards Para coser puntadas elásticas (stretch) Stretch stitches can be lengthened by the stitch length control at S. S. For sewing stretch stitches (green), set

21 / 1 7, 18/19. pages 18 et 19. Le tableau des points est reproduit points décoratifs, régler le bouton 20 sur le point zigzag le plus large. Pour coudre les points utilitaires et es Placer le point désiré face au repère A. Placer le motif désiré sous le repère B. a Sélecteur de point zigzag et de boutonniere 20 Sélecteur de motif 21 droite. Pour coudre ces points, regler le bouton 21 comme le montre lillustration a Per cucire questi punti è necessario Vedere a tabella dei motivi a pagina Regolare 1 motivo desiderato sotto a regolatore per lo zig-zag 20 sullo zigzag massimo. regolare ii bottorie 21 come si mostra ricamo occorre regolare il bottone marcatura 8. Per cucire i punti utili e da : Bottone regolatore dello zig-zag e per Bottone regolatore dei motivi 21: Girare ii punto desiderato sotto a nella figura destra. Modèles et marcatura A. occhielll 20: Modell e fl L La tabla de puntadas se halla en las J the widest zigzag stitch. zgzag seting knob 20 must be set at For sewing the utility- and fancy stitches. Stitch pattern setting knob 21 the right. switch 21 as shown in the illustration at For sewing these stitches set selector For a table of stitch patterns, see pages Turn the required stitch to mark A. Turn the required stitch pattern to mark B. en a figura de a derecha. tivas, el botán selector de zigzag (20) ajustarse el botón 21 como se muestra deberã estar colocado sobre el zigzag deseada coincida con a marca A. Gire el boton de forma que a puntada Gire el botón de forma que el tipo de Zigzag- and utility-stitch knob 20 más ancho. Models and Botón selector de zigzag y ojales (20). Botón selector de puntadas (21). Para coser puntadas utilitarias y decora-. pãginas 18 y 19. Modelos y j. Para coser estas puntadas, deberá puntada deseado coincida con a marca B.
22 t) Strarght stitch, left needle posuon Punto rect poscidn icqulerda de a punted Pont droll. position gauche C) Strarght sttch, toddle needle sition Punto recto, p scidtt central de a puntalla Pont droll, postion mddlane Stitch Puntada Point 18 Feather stitch Punto pluma Point d epi Elastic decorative stitch Punto elástico do adorno Point zigzag fantaisie cerrado (overlock) large \/\7 Closed overlock stitch Punto de sobrehilar Point overlock fermé \J\J Joining stitch Punto do enlace Point en crénau Fancy stitch Punto do adorno Point fantaisie 11 pt, i \, Elastic seam Costura elástica Point zigzag piqué 1Q11 llillic Fancy stitch Punto do adorno Point fantaisie th!! Fancy stitch Punto de adorno Point fantaisie lj Fancy stitch Punto de adorno Point fantaisie \\\ Overlock stitch (overlock) Punto de sobrehilar \[ \[ Shell-edging stitch bordes en forma de choncha Puntada para remate de Point cocotte Point overlock Pullover stitch Punto pullover Point tricot 1JJ Elastic blind stitch Punto invisible elâstico Point invisible eiastique Honeycomb stitch Punto nido de abeja Point nid d abeille vvv tap jj Jfi Buttonhole symbols Simbolos para ojales Symboles de boutonniere v-- stretch stitch triple extensible Zigzag triple Punto zigzag Triple point zigzag = stretch stitch triple extensible Straight triple Punto recto Triple couture point droit \/\JiAAJVA Zigzag stitch range Punto zigzag Point zigzag SymboSimboo SymbolelSimboll Stitch pattern table Tabla de puntadas Tableau des
23 ho,,,, uflo Punto dntto posiziona ago OniOn unto diotto pottzona ago Canon 1 iaisie kmé Jau Jo is 1c istique ie ue onnière zag nt droit l its 1 / / Punto piuma ornamentale 0 Punto elastico Punto overlock chiuso Punto congiuntura Punto ornamentale Punto ornamentale Punto ornamentale Punto ornamentale Punto Overlock Punto conchiglia ) Punto pullover Punto invisibile elastico 0 Punto nido d ape Purito elastico ) Simboli per l occhiello zig-zagflexi Cucitura tripla a Cucitura tripla diritta flexi Settore dello zigzag Punto tabella del punti Modelle Types
24 Changing the needle (System H): Loosen screw A. Take out the needle. Push the needle (with its flat side facing towards the back) up as far as it will go. Tighten the screw. Cambio de a aguja (sistema 130/705 H): Afloje el tornillo A. Saque a aguja. ntro duzca a nueva aguja (lada piano hacia atrás) hasta el tope. Apriete el torniilo. Remplacement de aiguille (système 130/705 H): Desserrer a vis A et retirer l aiguille. Engager l aiguille neuve (le meplat du talon vers l arrière) jusqu à a butée et serrer a vis. Sostituzione dell ago (sistema 130/705 H): Allentare vite A. Togflere ago. inserire ago nuovo (parte piatta del fusto verso dietro) completamente in sü. Fissare a vite. Dropping the feed: Remove bedpiate cover 25 or free-arm cover 10. Push the drop-feed control to C = feed disengaged, and to B again for sewing. Ocultaciôn del transportador: Retire a tapa 25 de a placa base o abra a tapa 10 del brazo al aire. Corriendo a palanca hacia C, queda oculto el transportador; corriéndola hacia B, pasa a a posición normal para coser. Abaissement de a griffe: Enlever le cache 25 ou ouvrir le capot 10 du bras libre. Levier en position C = griffe escamotée; levier en position B = griffe en position couture. Abbassare ii trasporto: Togliere a placca della base 25 0 aprire sportello 10. Spostare ii cursore per abbassamento verso C = abbassato. spostare verso B = in posizione cucito. 20 1
25 Camblo del pie prensatelas: Pulse el the sewing foot, push the red button A. Changing the sewing foot: To release et U o. cii qto ;go. ing f supporto del piedino. lineale. F e a vite di fissaggio per ii D y E sirven para fijar guias. F sirve D et E servent a fixer l ètrier guide D e E servono per ii fissaggio del semelle. bord. La vis F fixe le support de para fijar el soporte del prensatelas. is the Sewing foot holder srew. attaching an edge guide, while screw F Hole E and Screw D are used for scanalatura C. maniera che ii perno B si innesti nella eva premistoffa e inserire ii piedino in Applicazione del piedino: Abbassare a s emboite dans es rainures C. semelle de manière que l étrier B le levier du pied presseur et deplacer a Mise en place de a semelle: Abaisser que el puente B encaje en a ranura C. mismo tiempo el prensatelas de forma palanca alzaprensatelas y posicione al Colocación del pie prensatelas: Baje a fits in slots C. reposition the sewing foot so that stud B presser bar lifter and at the same time Attaching the sewing foot: Lower the disinnesta. est libérée. Enfoncer le bouton rouge A; a semelle bottoncino rosso A. piedino Si Changement de a semelle du pied: Sostituzione del piedino: Premere botón rojo A. El prensatelas se suelta. j 21 J
26 Clear-view foot foot 4 Zipper D (Mod ) Prensatelas 4 Prensatelas para Pieds presseurs (accessoires standards) 2 Semelle poser a 1 Semelle norrnale 4 Semelle pour 3 Semelle a point glissiere 1 Ordinary sewing 3 Blindstitch foot Sewing feet (standard accessories) piedini (corredo normale): 2 piedino 4 piedino per Pies prensatelas (accesorios normales) 1 piedino 3 piedino per (Modelos de brazo al aire) Abriendo a tapa del suplemento 9 se normal puntada invisible 1 Prensatelas 3 Prensatelas para Accessory compartment: transparente cremalleras (Free-arm models) cover of work support 9. To open accessory compartment raise Compartimento para accesorios transparerite fermeture a encuentra espacio para colocar invisible accesorios. Compartiment a accessoires (Modeles a bras libre) travail 9 pour accéder aux accessoires de couture, Lever le couvercle dans le plan de normale punto invisibile trasparente cerniere Scomparto per accessori: (Modelli a braccio libero) Sollevare ii coperchio del piano di accessori. lavoro 9. Sotto si trova posto per gli
27 it Compartment is in right side of base (26). Se halla a a derecha en el zocalo (26). (Modelos de base plana) Compartimento para accesorios (Flatbed machine models) Accessory compartment 8 jds) ara ble ara es) 23 leggermente in basso. Dopo aver agganciato il piano premerlo l horizontale. Ensuite, abaisser le plateau amovible a nelo un poco hacia abajo. Una vez encajado el suplemento, presio downwards a little. After attaching the support, push it base. innestano nelle aperture sullo zoccolo. los dos ganchos encajen en los orificios (Modelli a base piana) s accrochent dans es trous corres Piano di lavoro supplementare: pondants du socle. facon que les deux crochets Glisser le plateau contre a machine do Plateau amovible del zocalo. lntroduzca el suplemento de forma que Suplemento de costura hooks engage in the openings on the (Modèles a plateau) Attach the work support so that its two (Modelos de base plana) (Flatbed machine models) Accostarlo in maniera che i due ganci Detachab e work support... scomparto è a destra nello zoccolo (26),! (Modelli a base piana) Scomparto per accessori dans le socle (26). Ce compartiment se trouve a droite, (Modèles a plateau) Compartiment a accessoires
28 /=iil=ri/ C\ 4 / 24 accurate. E). The seam thus made looks neat and ching margin for various applications. stitch parallel to the edge. The guide along the preceding line of stitches (Fig. making parallel lines of stitches runs either follows an edge (Fig. D) or when With the edge guide attached, it is easy to sew parallel lines of stitches or to (Special accessory): guide can be adjusted to the desired stit secure it in position with screw C. The Push edge guide A through hole B and Fitting the edge guide all sewing feet. Edge guide A can be used with nearly Stitch: straight stitch guide (special accessory): clear-view foot and edge Sewing foot: Ordinary sewing foot or Topstitching 0 B D) o a 10 largo de a costura anterior en. Fijación de a gula (accesorio especial): impecables. esta forma se obtienen costuras el caso de costuras paralelas (fig. E). De a gula marcha a 10 argo del borde (fig. las o pespuntes al canto. En tales casos, coser con toda facilidad costuras parale Con a ayuda de a gula se pueden ajustar, segün a labor, a a distancia con el tornillo C. La gula se puede Pase a gula A por el agujero B y fijela deseada. con casi todos los pies prensatelas. La guia marginal A puede emplearse Puntada: Punto recto especial) a guia marginal (accesorio Prensatelas: Normal o el transparente, y Pespunteados DJ -U
29 4 Surpiquage Pied presseur: pied presseur normal ou pied a semelle en plexi glas et guide-droit (accessoire special) Point: point droit Le guide-droit A convient a presque tous les pieds presseurs. Fixation du guide-droit: Glisser le guide A par le trou B et serrer a vis C. Suivant l application, regler le guide sur lécartement désiré. Le guide-droit facilite considérablement es surpiqâres paralléles et le surpiquage des bords. Ce faisant, le bord du tissu (fig. D) ou bien a piqüre precédente suit le guide-droit (fig. E). La couture sera toujours nette et reguliere. Lavori di impunture: Piedino: piedino normale o piedino trasparente e lineale di guida (accessorlo fuori corredo) Punto: punto diritto lineale A Si puo usare con quasi tutti piedini. Fissaggio del lineale: (accessorio fuori corredo) Passare ii lineale A attraverso ii foro B e fissarlo con a vite C a seconda della neccessità si puo regolare a distanza desiderata. E facile eseguire cuciture parallele usando il lineale. bordo (fig. D) oppure a cucitura parallela precedente (fig, E). La direzione della cucitura sara cosi sempre corretta. 25 / //
30 26 of waste material. Turn screw A to adjust edge guide B so to far the left that the needle picks up First make a sewing test using a piece penetrating on the left side (Figs. C and D). only one thread of the outer fabric when the blindstitch sewing foot. outer fabric runs along edge guide B of Place the prepared hem under the blindstitch sewing foot. The crease line of the penetration How to regulate the need!e Needle: Stitch length: Stitch: elastic blind stitch size 70 or 80 Thread: little slack. 3 4 Sewing foot: blindstitch foot ordinary sewing thread Tension: needle thread tension a Elastic blind stitch 4 4 / / / izquierda solo prenda un hilo del borde ahora el tope B hacia a izquierda de forma que al clavarse a aguja por Ta Con el tornillo regulador A deberá correr del prensatelas. te preparado. El borde del doblez supe puntada invisible el dobladillo previamen prueba sobre un retal. Coloque debajo del prensatelas para Haga primeramente una costura de Regulación de a penetración de a aguja: Aguja: N 70 u 80 Largo de puntada: 3 a 4 elastica Puntada invisible Hilo: Normal normal Algo más floja de lo rior deberá deslizarse contra el tope B (fig. C y D). Puntada: superior: TensiOn del hilo puntada invisible Prensatelas: Prensatelas para Punto invisible elástico:
31 lo Point invisible elastique: Pied presseur: Pied a points invisibles Tension: Fil daiguille moms tendu Fil: Fil a coudre Point: Point invisible elastique Longueur de point: 3 a 4 Aiguille: Grosseur 70 ou 80 f Punto invisibile elastico: Piedino: piedino per punto invisibile Tensione: allentare leggermente a tensione superiore Filato: filato per cucire Punto: punto invisibile elastico Lunghezza punto: 3 4 Ago: grossezza 70 o 80 a amen B Orre r le for rde Reglage de a jetée du point Poser l ourlet prepare sous le pied a points invisibles, La cassure du tissu extérieur longe a butée B du pied a points invisibles. A l aide de a vis de reglage A, déplacer a butée B vers a gauche de sorte que l aiguille, au point gauche, ne saisisse qu un fil du tissu extérieur (fig. C et D). Réaliser tout d abord une couture d essai sur une chute de tissu. Ecco come si regola l entrata deirago nel tessuto: Porre orlo preparato sotto ii piedino per punto invisibile. La piegatura della stoffa superiore scorre in tal maniera lungo a guida B del piedino. Girare con a vite A a guida B verso sinistra in modo che l ago prenda nel entrata a sinistra solo un fib della stoffa superiore (fig. C e D). Si consiglia di eseguire prima una prova su un ritaglio di stoffa. 27 / /
32 28 aguja. aguja. derecha. Aguja: thread puntada: Largo de normal Ojales f 4 J /.: Sewing buttonholes (Models 340, 341, 520 and 521) Tension: needle thread tension a Sewing foot: clear-view foot Thread: tine machine embroidery Stitch length: buttonhole range (red) Needle: sizes 70/80 1 Set zigzag stitch knob 20 to sew a 2. nsert the needle at the right, raise 3. Set the zigzag knob at C and sew 4. Set knob at B and sew the second 5. Set knob at C and sew about five 6. Set the knob at D and sew a num right. Turn knob 20 one place to the right. buttonhole seam width of 2 mm, i. e. end, the needle must be raised at the roughly at B. Sew the first buttonhole seam. At the the sewing foot, turn the material through 180, set the knob at B again, lower the sewing foot and raise the needle. about five tacking stitches. Raise needle at left. buttonhole seam as long as the first. tacking stitches. Raise the needle. Raise needle at left. ber of securing stitches. Cut buttonhole open with slitting knife (special accessory). little slack TensOn del (modelos 340, 341, 520 y 521): Prensatelas: Transparente 1. Con el botón selector del zigzag 20 Hilo: Hilo fino de bordar hilo superior: Algo más floja de 10 a aguja a a izquierda. 5. Gire el botón 20 al sector C y haga 2. Haga que se dave a aguja a a 3. Gire el botán 20 al sector C y haga 4. Gire de nuevo el boton 20 al sector 6. Gire el botán 20 a punto recto y elija una anchura de unos 2 mm, ojal. La aguja deberá quedar al final aprox. en B. Cosa el primer labio del a a derecha y elevada. Gire ahora el botón 20 un paso hacia a derecha, alce el prensatelas, gire a tela 180, gire de nuevo el botón 20 a B, baje el prensatelas y eleve a Eleve a aguja a a izquierda. unas 5 puntadas de presilla. B y cosa el segundo labio del ojal igual de largo que el primero. Eleve unas 5 puntadas de presilla. Eleve a Abra el ojal con el descosedor (acce haga unas puntadas de remate. sorio especial). 70 u 80 Zona del ojal (sector rojo) V 4
33 H.. -z*. (acce D y haga leveta Eleve ojat ctor haga te a 6n20 Jire a la liora!ilfinal bio del g20 ir rojo) (contre supplement>. 1. A aide du bouton 20, choisir une Aiguilte: Grosseur 70 a 80 du point: Plage rouge Ouvrir a boutonniere au Découvit quelques points d arrêt sur place. 2. Descendre t aiguilte a droite dans le 3. Tourner le bouton 20 sur un cran en 4. Remettre te bouton sur te cran B et 5. Régter te bouton 20 sur le cran C et 6. Régter le bouton sur et coudre, descendre te pied presseur et Remettre te bouton 20 sur le cran B; remonter t aiguitte. coudre Ta deuxième tèvre aussi taiguitle a gauche en position haute. coudre env. 5 points d arrêt. gauche. Sortir t aiguilte du tissu en position C et coudre env. 5 points d arrêt. premiere tèvre. Arréter laiguille en tes lèvres (position B). Coudre a position haute a droite. Tourner le Longueur (boutonniere) targeur de point d env. 2 mm pour bouton 20 dun cran vers ta droite. tissu; tourner l ouvrage de 180. tongue que a premiere. Arréter Fit: Fit a broder fin Pied presseur: Pied a semette moms tendu Tension: Fit daiguitte un peu transparente (modèles 340, 341, 520 et 521) Boutonnières 4 29 Aprire t occhielto con un taglia-asole 2 mm, all incirca su B. Cucire a 2. Penetrare con ago a destra, atzare 5. Regolare bottone su tacca C e cuci 6. Regotare bottone su 9D e cucire tago. re circa 5 punti di travetta. Alzare di travetta. Atzare ago a sinistra. tacca presso C e cucire circa 5 punti 3. Regolare it bottone zig-zag su una atzare ago. it piedino, girare a stoffa di 180, prima costina. Lago rimane al riportare it bottone nuovamente su zag 20 per un cordoncino largo circa bottone 20 una tacca verso destra. cucire a seconda costina in uguate sinistra. 1. Regotare bottone regolatore zig grossezza tacca B, abbassare it piedino e macchina termine a destra in alto. Spostare ii filato per ricamo a 4. Regotare it bottone su tacca B e leggermente at settore occhielti tensione superiore lentata tunghezza delta prima. Aizare t ago a (accessorio a parte). piedino trasparente 520 e 521) (rosso) alcuni punti di fissaggio. Ago: Fitato: Tensione: Piedino: (modetti 340, 341, Occhielli: Lunghezza punto: 4 / /
34 4 Sewing buttonholes (Models 350, 351 and ) Sewing foot: clear-view sewing foot Tension: needle thread tension a little slack Thread: fine machine embroidery thread Stitch length: buttonhole range (red) Utility-stitch knob 21 at Models and : Needle: red buttonhole symbol sizes 70 to 80 1, Set utility-stitch knob 20 at 1J and sew the first buttonhole seam. Raise the needle. 2. Set knob 20 at ijj and sew four to six tacking stitches. Raise the needle. 3. Set knob 20 at and sew the second buttonhole seam as long as the first. Raise the needle. 4. Set knob 20 at ir and sew four to six tacking stitches. Raise the needle. 5. Set knob 20 at ED and sew a few securing stitches. 6. Cut buttonhole with special knife (special accessory). Ojales (modelos 350, 351 y ) Prensatelas: Transparente TensiOn del hilo superior: Hilo: Largo de puntada: Selector de puntada utili tarialen el modelos y : Aguja: Ago más floja de 10 normal Hilo fino de bordar Zona del ojal (sector rojo) En sombolo para ojal rojo N 70 u Ponga el selector de puntada utilitaria 20 en y cosa el primer abio del ojal. Eleve a aguja. 2. Ponga el botôn 20 en y haga de 4 a 6 puntadas de presilla. Eleve a aguja. 3. Ponga el botôn 20 en 1J y cosa el segundo labio del ojal igual de largo que el primero. Eleve a aguja. 4. Ponga el botón 20 en y haga de 4 a 6 puntadas de presilla. Eleve a aguja. 5. Ponga el boton 20 en ED y haga unas puntadas de remate. N 6. Abra el ojal con el descosedor (acce sorio especial) /
35 / / Pied presseur: Pied a semelle Piedino: piedino trasparente Modèles Modellos (contre supplement). 1 Régler le bouton 20 (points utilitaires) ill e cucire a prima costina. Aizare r (acce- 6. Ouvrir a boutonniere au Découvit 1 1. Regolare bottone per punti utili 20 su o1a rojo Aiguille: Grosseur 70 a : symbole de boutonniere : simbolo per occhielli rosso et e Bouton a points utilitaires 21 Bottone regolatore per punti utili 21 sul r rojo) point: (boutonniere) del punto: settore occhielli (rosso) Longueur du Plage rouge Lunghezza rouge Ago: grossezza Fil: Fil a broder fin fine moms tendu Filato: filato per ricamo a macchina Tension: Fil d aiguille un peu leggermente allentata haga 5. Régler le bouton 20 sur et (accessorio a parte). 6. Aprire occhiello con ii taglia-asole leve a coudre 4 a 6 points d arrét. Arrêter alcuni punti di fissagglo. aiguille en haut. L aigue en haut. 4 6 punti di travetta. Aizare ago. largo longue que a premiere. Arréter 4. Regolare bottone 20 su e cucire sa el coudre a deuxième évre aussi laga de coudre 4 a 6 points d arrèt. Arréter 2. Regolare bottone 20 su Jill e cucire 2. Régler le bouton 20 sur,ujj et 4 6 punti di travetta. Aizare ago. a seconda costina nella medesima 3. Régler le bouton 20 sur ll et lunghezza della prima. Aizare ago. primer Arrêter l aiguille en position haute. ye a l aiguille en haut. 3. Regolare bottone 20 su tll e cucire transparente Tensione: tensione superiore modèles 350, 351 et ) (modelli 350, 351 e ) sur 111 et coudre a premiere lèvre. lago. coudre quelques points de nouage. Boutonnières Occhielli: aga de 4. le bouton 20 sur et 5. Regolare bottone 20 su e cucire
36 ches in the left only (A). Posiciôn de izquierdo (fig. A). a puntada: lzquierda Costura de botones: 32 clear-view foot Stitch: straight stitch, left needle position Sewing on buttons sition in which the needle enters the right hole of the button when the hand Sewing foot: without sewing foot or with Thread: fine sewing thread end of about 6 inches. Pull the needleand bobbin threads through (C). Wrap Feed: dropped foot holder into the button. Lower the sewing foot holder. Lower the sewing beforehand and push it under the Place the button in the location marked needle into the left hole of the button. wheel is turned. Sew six to eight zigzag stitches and a number of securing stit Raise the needle. Turn knob 20 to a po Sewing on buttons with stems (for large a match on the middle of the button. Lower the needle into the left hole. Place buttons in heavy materials) the stem (D) and tie off the threads. Lower the sewing foot (B). Sew a num ber of zigzag stitches and leave a thread de hilo. Pase los hilos superior e inferior de las puntadas (D) y anüdelos. puntadas en zigzag y deje unos 15 cm grandes en generos pesados): prensatelas transparente (B). Haga unas del botón. Coloque un palillo de dientes Clave a aguja en el agujero izquierdo Botón con cuello (costura de botones unas puntadas de remate en el agujero soporte del prensatelas. Haga descender previamente e introdüzcalo debajo del ante, se dave en el agujero derecho del Coloque el botón en el punto marcado en el agujero izquierdo del botón. Eleve zigzag hasta que a aguja, al girar el vo Hilo: Hilo fino a barra del prensatelas. Clave a aguja a aguja. Gire el boton 20 en a zona de boton. Haga de 6 a 8 puntos en zigzag y o similar en el centro del botôn. Baje el al ado de abajo (C), arrollelos airededor Transportador:Oculto Puntada: Punto recto Prensatelas: Sin prensatelas a con el transparente N N
37 e infericr :15cm 3ga unas Bate el dierites ;uierdo el3nes :agujero zigzag y recho del zona de. Eleve a aguja scender ajc del - arado Poser le bouton a l emplacement quelques points sur place dans le trou gauche du bouton (A). bouton 20 dans a plage point zigzag bouton. Executer 6 a 8 points zigzags et votant, pique dans le trou droit du jusquà ce que t aiguille, en tournant le t aiguille en position haute. Tourner le du pied presseur. Descendre le support marqué auparavant et sous le support Fit a coudre fin escamotée du pied presseur et faire piquer l aiguille dans le trou gauche du bouton. Arrêter gauche Pied presseur: sans pied presseur ou pied a semelte Faire piquer l aiguille dans be trou pied presseur (B) et coudre quelques points zigzags et laisser depasser env. Nouer tes fits. sous be bouton pour former a tige (D). (C) et es enrouber sur es fits aches 15 cm de fib. Passer les fits sur be tissu sur te milieu du bouton. Descendre le gauche du bouton. Poser une ablumette Grands boutons sur tissus tourds. Boutons a tige Fit: Griffe: Point: point droit déporté a transparente Pose de boutons H 33 i tilt. (C) e avvolgere it gambo (D) e annodare di fib. Passare fili superiore ed inferiore Bottone con gambo, per bottoni grossi destra. Cucire 6 8 punti zig-zag e alcuni 20 net settore dello zig-zag finchè ago, Abbassare it supporto del piedino. Fare penetrare ago net foro a sinistra del Fitato: filato fine Trasporto: abbassato Porre it bottone sul punto segnato, e girando ii volantino penetri nel foro a Porre un fiammifero sut centro del bottone. Abbassare ii piedino (B). Cucire Punto: punto diritto, posizione ago Far penetrare ago nel foro a sinistra. sinistra spingerlo sotto it supporto del piedino. piedino trasparente bottone. Alzare ago. Girare ii bottone Piedino: senza piedino oppure punti diritti nel foro a sinistra (A). su stoffe pesanti. alcuni sopragitti e tasciare circa 15 cm Attaccatura bottone: / N D,,
38 // 34 nsert the foot with the back pin in the back groove E and push the shoe of the required width. Leave the needle down again and sew to the end. Thread: sewing thread Baste in zip by hand first. Push the Place the open zip under the foot so that about half the length of the zip at the sew across the end. the seam leave the needle down in the the zip (Fig. D). Lower the zipper foot foot again, continue the seam and then zipper foot to the left as far as it will go. Completely concealed zip closure in. The zipper foot can be pushed to the foot upwards, until the front pin F snaps This is how the zipper foot is engaged needle position close the zip (Fig. C). Lower the zipper on the sole of the foot (Fig. B). Sew its teeth run along the right guiding edge in the material, raise the zipper foot and Stitch: Straight stitch, middle Stitch length: 2 to 3 Sewing foot: zipper sewing foot positions: left (Fig. A), right, or centre. Sew the other side of the zip at the material, raise the zipper foot and open same margin. Shortly before the end of a puntada: Central Hilo: Normal a ranura posterior E y empuje hacia a barrita anterior F. El pie puede correr (fig. A) y central. a cremallera discurran a lo largo de a el prensatelas y termine a costura. arriba a planta del pie hasta que encaje Enganche a barrita posterior del pie en cremalleras: Posición de puntada: 2 a 3 Puntada: Punto recto Largo de cremalleras aproximadamente. Deje a aguja clavada cremallera (fig. C). Baje el prensatelas, clavada a aguja en a tela. Alce el pren Coloque a cremallera abierta debajo del termine de hacer a costura y haga a Poco antes del final de a costura, deje las hacia a izquierda hasta el tope. en a tela, alce el prensatelas y cierre a gua derecha (fig. B). Cosa a cremallera Hilvane a cremallera. Corra el prensate a a anchura deseada hasta a mitad Cremalleras cubiertas del todo se a las posiciones derecha, izquierda Cosa el segundo lado de a cremallera paralelamente y a a misma distancia. costura lateral de remate. Sewing in zippers Prensatelas: Prensatelas para Colocación del prensatelas para prensatelas de forma que los dientes de satelas, abra a cremallera (fig. D), baje 4 Costura de cremalleras
 (for some optional presser feet) 2 1. Raise needle and presser foot. 2. Remove the needle. 3. Loosen presser foot screw (1) and remove presser foot with shank (2), guiding it toward you and to the right.
 2 (For some optional presser feet) 1. Raise needle and presser foot. 2. Remove the needle. 3. Loosen presser foot screw (1) and remove presser foot with shank (2), guiding it toward you and to the right.
 (for some optional presser feet) 2 1. Raise needle and presser foot. 2. Remove the needle. 3. Loosen presser foot screw (1) and remove presser foot with shank (2), guiding it toward you and to the right.
 Aplicaciones con puntada recta 1 2 1. Raise needle and presser foot. 2. Remove the needle. 3. Loosen presser foot screw (1) and remove presser foot with shank (2), guiding it toward you and to the right.
hobby 307/309 Instruction Book Mode d emploi Instrucciones de manejo Libretto istruzioni
 307/309 hobby Instruction Book Libretto istruzioni Mode d emploi Instrucciones de manejo / Safety rules nor to a plug with three pins. nected to the safety lead terminal I The leads must definit&y not
Process Control Work Instructions Control de Procesos Instrucciones de Trabajo. for / para
 Process Control Work Instructions Control de Procesos Instrucciones de Trabajo for / para 629096898 VFCB Kit Relay Cable Harness Assy Ensamblar el Kit del Arnés de Cables del Relevador Publication Number:
π H-4694, H-4695 RIPACK HEAT GUN EXTENSION ATTACH EXTENSION 1-800-295-5510 uline.com
 π H-4694, H-4695 RIPACK HEAT GUN EXTENSION uline.com Para Español, vea páginas 3-4. Pour le français, consulter les pages 5-6. ATTACH EXTENSION 1. In order to use a Ripack Heat Gun Extension, you must
Conditioning Exercises: Standing
 Conditioning Exercises: Standing Do all these exercises slowly. Do not hold your breath during these exercises. If unusual pain occurs in your joints or muscles while you are exercising, do not continue
With Flange: 1/2" Copper pipe stub-out length from finished wall surface
 Stub out length for tub spouts (measured from finished wall surface) With Flange: 1/2" Copper pipe stub-out length from finished wall surface Without Flange: 1/2" Copper pipe stub-out length from finished
SP-U. Soporte colgado universal para JK26 / JK10 / JK10MA / JK12 / JK12MA / JK15 / KEY10 / KEY12 / KEY15
 Soporte colgado universal para JK26 / JK10 / JK10MA / JK12 / JK12MA / JK15 / KEY10 / KEY12 / KEY15 Universal U-bracket for JK26 / JK10 / JK10MA / JK12 / JK12MA / JK15 / KEY10 / KEY12 / KEY15 Copyright
happy safari travel cot cuna de viaje happy safari guía para el usuario importante. retenga para referencia futura - lea con cuidado.
 happy safari travel cot user guide important. retain for future reference - read carefully cuna de viaje happy safari guía para el usuario importante. retenga para referencia futura - lea con cuidado.
INSTRUCTION MANUAL NOTICE D INSTRUCTIONS MANUAL DE INSTRUCCIONES
 A E I INSTRUCTION MANUAL NOTICE D INSTRUCTIONS MANUAL DE INSTRUCCIONES SY 6 A B C D E F G H I J K L M M L K J H D CB F G Design and Quality IKEA of Sweden ENGLISH FRANÇAIS 30 ESPAÑOL 6 ENGLISH CONTENTS
Flashcards Series 3 El Aeropuerto
 Flashcards Series 3 El Aeropuerto Flashcards are one of the quickest and easiest ways to test yourself on Spanish vocabulary, no matter where you are! Test yourself on just these flashcards at first. Then,
π H-2561 Parts Assembly 1-800-295-5510 uline.com Tools needed H-2562 rectangular picnic table
 π H-2561 H-2562 rectangular picnic table 1-800-295-5510 uline.com Para Español, vea páginas 3-4. Pour le français, consulter les pages 5-6. Tools needed 3/4" (19mm) Socket Wrench Power Drill 3/8" (10mm)
BOHANDL30 Handle Installation Instructions
 BOHANDL30 Handle Installation Instructions Tools and Parts Included Attaching Handles Only attach the handles once the appliance has been positioned in its installation location and has been leveled (see
SYSTEM INSTALLATION MANUAL MANUAL DE INSTALACIÓN
 SYSTEM INSTALLATION MANUAL MANUAL DE INSTALACIÓN Measuring Tape Cinta métrica Ø 8 mm twist drill (wood) Broca espiral Ø 8 mm (para madera) Ø 14 mm stone drill (brick) Broca para piedra Ø14 mm (ladrillo)
ROCK N STEREO SOUND DESK
 Read and save these instructions ROCK N STEREO SOUND DESK RTA-M1102-BK INSTRUCTIONS TABLE OF CONTENTS PACKAGE INCLUDES Package Includes... 2 Specifications... 2 Product Parts List... 3 1 2 3 Product Details...
P/N INSTALLING HD3000 SERIES HANDLE SET : INSTALL LATCH / DEADBOLT STRIKERS:
 INSTALLING HD3000 SERIES HANDLE SET : A: Drill the 1/8" diameter handle hole ( third from the top of the door, on the room side ) to a 5/16" diameter. B: Slide the inside handle into its base. Tighten
BAI-220 AURICULAR INALÁMBRICO
 BAI-220 AURICULAR INALÁMBRICO Manual de usuario ESPECIFICACIONES TÉCNICAS EMISOR Frecuencia: 86 ± 0.5 MHz Modulación: FM Distancia de emisión: 30 m. Recepción de cualquier equipo de audio y video con salida
Deluxe 6ft Drawer Kit
 Thanks for shopping with Improvements! Deluxe 6ft Drawer Kit Item #461567 To order, call 1-800-642-2112 West Chester, OH 45069 0114 If you have questions regarding this product, call 1-800-642-2112 Mon.-Fri.
EP-2906 Manual de instalación
 EP-2906 Manual de instalación Con el botón situado a la izquierda se configura en el modo de cliente y de la derecha es el modo de Punto de acceso AP (nota: El USB es sólo para la función de fuente de
PA600 Rugged Enterprise PDA
 PA600 Rugged Enterprise PDA unitech unitech is a member of Oracle Embedded Software Licensing Program Quick Reference Guide 400577G RevB Front Left View 1 8 7 English 6 3 4 5 1 Status indicator 5 Universal
MANUAL EASYCHAIR. A) Ingresar su nombre de usuario y password, si ya tiene una cuenta registrada Ó
 Ingresar su nombre de usuario y password, si ya tiene una cuenta registrada Ó") MANUAL EASYCHAIR La URL para enviar su propuesta a la convocatoria es: https://easychair.org/conferences/?conf=genconciencia2015 Donde aparece la siguiente pantalla: Se encuentran dos opciones: A) Ingresar
MANUAL EASYCHAIR La URL para enviar su propuesta a la convocatoria es: https://easychair.org/conferences/?conf=genconciencia2015 Donde aparece la siguiente pantalla: Se encuentran dos opciones: A) Ingresar
Accesorios / Accesoires not included base de empotrar Ø60. 140 recessed base INCL. INCL. INCL. INCL. 170 surface base
 120 350º MR16LED IP20 351 LAMP NOT 13845 aluminio inyectado die cast aluminium código W lm lámpara casquillo ºK 120 351 7,5W.12V. 500 MR16LED GU-5,3 2.700 code W lm lamp socket ºK No todas las lámparas
START INICIAR - DÉMARRAGE - INIZIO - INICIAR - INICIO
 START INICIAR - DÉMARRAGE - INIZIO - INICIAR - INICIO ENG: Microsoft wireless mouse PTB: Mouse sem fio da Microsoft FRA: Souris sans fil Microsoft ITA: Mouse senza fili Microsoft PTG: Rato sem fios Microsoft
I. J. K. L. K A. C E C. A G L H J
 1. 2. K. B. C E C. 5 PCS D. 1 PC B G E. 1 PC 1 PC F. 3. L 4. I L H J G. 1 PC 1 PC H. D F 1 PIR I. J. 5/16 x3/4 3 PCS 5. 6. 5/16 x1 4 PCS K. L. 3 PCS 2 PCS 1 PC 08-016/1 LE-HPS4201/HPS4202 Manufactured
CORTE Y PERFORACIÓN CUTTING AND DRILLING DÉCOUPAGE ET PERÇAGE
 CORTE Y PERFORACIÓN CUTTING AND DRILLING DÉCOUPAGE ET PERÇAGE CONSEJOS DE COLOCACIÓN ESP Tanto el corte como la perforación no deben suponer ningún problema si se utilizan las herramientas adecuadas y
1) Install the included batteries into your blood pressure monitor (BPM).
 Install the included batteries into your blood pressure monitor (BPM).") DELUXE CONNECTED BLOOD PRESSURE ONITOR UA-651BLE 1) Install the included batteries into your blood pressure monitor (BP). 2) Insert the air connector plug into the air socket. 3) Download the free A&D
DELUXE CONNECTED BLOOD PRESSURE ONITOR UA-651BLE 1) Install the included batteries into your blood pressure monitor (BP). 2) Insert the air connector plug into the air socket. 3) Download the free A&D
elements enviro Owner s Manual Manuel du propriétaire Manual del usuario ecofriendly solutions organizing
 enviro elements TM ecofriendly solutions organizing Made with 50% recycled resin Fait de 50 % de résine recyclée Hecho en un 50% con resina reciclada Owner s Manual Manuel du propriétaire Manual del usuario
Installation Instructions Front Floor Liner
 Installation Instructions Front Floor Vehicle Application Jeep Wrangler (TJ) 1997-2006 Part Number: 51509 Jeep Wrangler (CJ / YJ) 1976-1995 Part Number: 51511 INSTALLATION TIME SKILL LEVEL 1/2 Hour 1 -
JEEP WRANGLER & WRANGLER UNLIMITED Sun Bonnet
 JEEP WRNGLER & WRNGLER UNLIMITED Sun onnet 82214320 82214676 8-27-14 65526 Rev. 1 of 5 K6862100 JEEP WRNGLER & WRNGLER UNLIMITED Sun onnet 6-19-12 65526 Rev. 1 2 of 5 K 1X 4X D E 1X F T-25 Torx Ratchet
Operation Manual Manual de Instrucciones
 4 5 6 KNOWING YOUR SEWING MACHINE CONOZCA SU MÁQUINA DE COSER STRAIGHT AND ZIGZAG STITCHING COSTURA RECTA Y EN ZIG-ZAG BUILT-IN STITCHES PUNTADAS DE COSTURA INCORPORADAS SEWING BUTTONHOLES AND BUTTONS
MODEL: F / MODELO: F END TABLE WITH MEDIA STAND & MAGAZINE HOLDER MESA RINCONERA CON ESTANTE & REVISTERO
 MODEL: 11225479F / MODELO: 11225479F END TABLE WITH MEDIA STAND & MAGAZINE HOLDER MESA RINCONERA CON ESTANTE & REVISTERO NO A B C D E F G H I J K L PARTS LIST AND HARDWARE PARTES Y ACCESORIOS PARTS LIST
π H-3539 MONARCH 1130 ONE LINE LABEL GUN
 π H- MONARCH ONE LINE LABEL GUN --- uline.com Para Español, vea páginas -. INSTRUCTIONS Changing the ink roller. Pull the latches back and swing the cover open completely. You should hear a click. NOTE:
INSTALLATION INSTRUCTIONS
 Brix Ratio Check Instructions for ColdFusion and Flavor Overload Units INSTALLATION INSTRUCTIONS Brix Ratio Check Instructions For Coldfusion, Flavorfusion and Flavor Overload Units Kit P/N 629096865 SAFETY
HZL-E61 INSTRUCTION MANUAL MANUEL D INSTRUCTIONS MANUAL DE INSTRUCCIONES MANUALE DI ISTRUZIONI
 COMPUTER SEWING MACHINE MACHINE A COUDRE ELECTRONIQUE MAQUINA DE COSER ELECTRONICA MACCHINA PER CUCIRE ELETTRONICA HZL-E61 INSTRUCTION MANUAL MANUEL D INSTRUCTIONS MANUAL DE INSTRUCCIONES MANUALE DI ISTRUZIONI
2.4L ENGINE BLOCK HEATER CHRYSLER 200 / DODGE AVENGER. www.mopar.com 1. CALL OUT DESCRIPTION QUANTITY 1 Engine Block Heater 1 2 Cord 1 3 Tie Straps 2
 www.mopar.com 1 2.4L ENGINE BLOCK HEATER CHRYSLER 200 / DODGE AVENGER CALL OUT DESCRIPTION QUANTITY 1 Engine Block Heater 1 2 Cord 1 3 Tie Straps 2 TOOLS REQUIRED Front End Cutters Flat Bladed, Phillips
10 Suplemento del Manual de Vuelo-Barquillas Ultramagic de Pasajeros Discapacitados
 MV04 Rev. 22 ULT RA MA GI C, S.A P á g in a 1 de 12 10 Suplemento del Manual de Vuelo-Barquillas Ultramagic de Pasajeros Discapacitados 10.1 Información General Este suplemento detalla las instrucciones
WARNING AVERTISSEMENT ADVERTENCIA. Selecting Disney characters Sélection des personnages Disney Seleccionando caracteres Disney
 WARNING AVERTISSEMENT ADVERTENCIA The embroidery patterns which are pre-programmed into this sewing machine are for personal, private use only. Any commercial or business use is strictly forbidden by copyright
Guía de acolchados básica Crear un acolchado 1 Preparar los materiales y el equipo
 Guía de acolchados básica Crear un acolchado Preparar los materiales y el equipo Tela... Recomendamos algodón 00% que no sea demasiado grueso. Relleno del acolchado... Normalmente se utiliza un relleno
Agustiniano Ciudad Salitre School Computer Science Support Guide - 2015 Second grade First term
 Agustiniano Ciudad Salitre School Computer Science Support Guide - 2015 Second grade First term UNIDAD TEMATICA: INTERFAZ DE WINDOWS LOGRO: Reconoce la interfaz de Windows para ubicar y acceder a los programas,
Door Stop Kit, 316 SS Compas de porte, 316 SS Tope para puerta, 316 SS
 Door Stop Kit, 316 SS Compas de porte, 316 SS Tope para puerta, 316 SS Rev. E 2018 Hoffman Enclosures Inc. PH 763 422 2211 nvent.com/hoffman P/N 87798474 87798663 NOTE: Door stop kit is not intended for
Creating your Single Sign-On Account for the PowerSchool Parent Portal
 Creating your Single Sign-On Account for the PowerSchool Parent Portal Welcome to the Parent Single Sign-On. What does that mean? Parent Single Sign-On offers a number of benefits, including access to
π H x 6' DRY ERASE BOARD/PARTITION PARTS uline.com TOOL INCLUDED
 π H-5861 4 x 6' DRY ERASE BOARD/PARTITION 1-800-295-5510 uline.com Para Español, vea páginas 3-4. Pour le français, consulter les pages 5-6. TOOL INCLUDED Allen Wrench PARTS 3/8 x 1½" Screw x 2 Locking
I N S T R U C C I O N E S D E M O N TA J E Y N O R M A S D E S E G U R I D A D PORTABICICLETAS SAFFIER IV SAFFIER III
 I N S T R U C C I O N E S D E M O N TA J E Y N O R M A S D E S E G U R I D A D PORTABICICLETAS SAFFIER IV SAFFIER III Número homologación : e4*79/488*2007/15*0086*00 Tipo : Luke IV / Saffier IV 1 MONTAJE
Sierra Security System
 Using Your SpreadNet Accessories With Your Sierra Security System Uso de Sus Accesorios SpreadNet Con Su Sistema de Seguridad Sierra SN990-KEYPAD SN961-KEYFOB SN991-REMOTE 1 SN990-KEYPAD The SN990-KEYPAD
flat bar storage desk buffet de rangement plat escritorio de barras planas para almacenaje Parts
 ! Tools required:! Do not throw away packaging materials until assembly is complete.! ssemble this item on a soft surface, such as cardboard or carpet, to protect finish.! Proper assembly of this item
Stem Glass Holder (SGH36U)
") THESE INSTRUCTIONS SHOULD ONLY BE PRINTED USING ADOBE ACROBAT AND SHOULD NOT BE FAXED OR REPRODUCED ON A DIGITAL COPIER. AMERICAN WOODMARK CORPORATION PROVIDES THESE INSTRUCTIONS ON AN AS IS BASIS AND
THESE INSTRUCTIONS SHOULD ONLY BE PRINTED USING ADOBE ACROBAT AND SHOULD NOT BE FAXED OR REPRODUCED ON A DIGITAL COPIER. AMERICAN WOODMARK CORPORATION PROVIDES THESE INSTRUCTIONS ON AN AS IS BASIS AND
MANUAL DE INSTRUCCIONES PARRILLA BARBACOA (14 ) ED-4045BQ
 ED-4045BQ") MANUAL DE INSTRUCCIONES PARRILLA BARBACOA (14 ) ED-4045BQ ESTIMADO CLIENTE Con el fin de que obtenga el mayor desempeño de su producto, por favor lea este manual de instrucciones cuidadosamente antes de
MANUAL DE INSTRUCCIONES PARRILLA BARBACOA (14 ) ED-4045BQ ESTIMADO CLIENTE Con el fin de que obtenga el mayor desempeño de su producto, por favor lea este manual de instrucciones cuidadosamente antes de
π H-4286 RUBBERMAID parts uline.com tools needed 1. Tip convertible utility cart on its side with cart slightly open.
 2 π H-4286 RUBBERMAID convertible UTILITY CART 1-800-295-5510 uline.com Para Español, vea páginas 4-6. Pour le français, consulter les pages 7-9. tools needed Flathead Screwdriver 13 mm Wrench parts Rigid
R167EV. for. YAMAHA Xmax
 R17V for YAMAHA Xmax 1 2 R17V YAMAHA Xmax L x 4 B x 2 x 4 x 2 KIT DI MONTAGGIO ASSMBLY KIT x 1 VISTA RIPILOGATIVA Summary view step 1 step B 1 step A step D step L B 3 bis step 2 bis 2 step G 3 STP A I
Puede pagar facturas y gastos periódicos como el alquiler, el gas, la electricidad, el agua y el teléfono y también otros gastos del hogar.
 SPANISH Centrepay Qué es Centrepay? Centrepay es la manera sencilla de pagar sus facturas y gastos. Centrepay es un servicio de pago de facturas voluntario y gratuito para clientes de Centrelink. Utilice
Instruction Manual Manual de instrucciones Manuel d instructions
 Instruction Manual Manual de instrucciones Manuel d instructions XL500/5200/5300 PX00/200/300 XL5300/5200/500 PX300/200/00 IMPORTANT SAFETY INSTRUCTIONS When using the sewing machine, basic safety precautions
KAISSA Manual Rápido De Usuario. Rev 1.0
 KAISSA Manual Rápido De Usuario Rev 1.0 Ante todo gracias por adquirir el innovador reloj de ajedrez KAISSA, diseñado bajo la filosofía del Diseño Para Todos. KAISSA tiene dos modos de funcionamiento principales
Learning Masters. Early: Force and Motion
 Learning Masters Early: Force and Motion WhatILearned What important things did you learn in this theme? I learned that I learned that I learned that 22 Force and Motion Learning Masters How I Learned
Applying the PreFab LSO Brace
 Applying the PreFab LSO Brace Your doctor will tell you when to wear your brace during the day and for how long to wear it. Always wear a t-shirt under the brace to provide a barrier between your skin
QUICK ADJUST WIRE SHELVING
 π QUICK ADJUST WIRE SHELVING 1-800-295-5510 uline.com Para Español, vea páginas 3-4. Pour le français, consulter les pages 5-6. PARTS Standard Shelf x 2 Standard Shelf Support x 8 Quick Adjust Shelf Lock
Matemáticas Muestra Cuadernillo de Examen
 Matemáticas Muestra Cuadernillo de Examen Papel-Lápiz Formato Estudiante Español Versión, Grados 3-5 Mathematics Sample Test Booklet Paper-Pencil Format Student Spanish Version, Grades 3 5 Este cuadernillo
Tagliacuci. Máquina overlock Instrucciones de uso. Tagliacuci. Istruzioni per l uso. Máquina de costura Overlock Manual de instruções
 5 new Máquina overlock SON 90 A1 Tagliacuci Máquina overlock Instrucciones de uso Tagliacuci Istruzioni per l uso Máquina de costura Overlock Manual de instruções KOMPERNASS GMBH BURGSTRASSE 21 D-44867
π H-2307 CENTER PULL WIPER DISPENSER PARTS LOADING DRY WIPERS uline.com CAN BE MOUNTED INVERTED
 π H-2307 CENTER PULL WIPER DISPENSER uline.com Para Español, vea páginas 3-4. Pour le français, consulter les pages 5-6. CAN BE MOUNTED INVERTED PARTS Dispenser x 1 NOTE: When mounting for use with dry
FIRE RED FUZZ. Bill Of Materials
 FIRE RED FUZZ FIRE RED FUZZ We hope you enjoy your new FIRE RED FUZZ! In this manual, you will find documentation and guidelines helpful to build either your Kit or PuzzleKit. For any further information,
Instruction Manual Manual de Instrucciones Manuel d'instruction
 4411 Instruction Manual Manual de Instrucciones Manuel d'instruction IMPORTANT SAFETY INSTRUCTIONS When using an electrical appliance, basic safety should always be followed, including the following: Read
Como desempacar el Time Attendant Además de ésta guía, el empaque debe incluír lo siguiente: Time Attendant Quick Install Reference Guide
 Como desempacar el Time Attendant Además de ésta guía, el empaque debe incluír lo siguiente: Terminal para colectar datos Cable de comunicación Adaptador de 25 a 9-DB CD con Software Adaptador de Corriente
Zune 8GB/4GB Start. Iniciar.
 Zune 8GB/4GB Start. Iniciar. SETUP 1 Visit www.zune.net/setup to install the Zune software. 2 When installation is complete, connect your Zune to your PC to start syncing. Your Zune charges whenever
USER GUIDE GUIDE D UTILISATION GUÍA DE USUARIO
 USER GUIDE GUIDE D UTILISATION GUÍA DE USUARIO English How to turn on your tablet How to set up your tablet You press the on/off button to turn on your tablet You pressed the on/off button but the tablet
DIAMOND Gear Company, LTD. an ERIKS Company. Installation, Maintenance, & Operation Manual DECLUTCHABLE WORM GEAR
 DIAMOND Gear Company, LTD. an ERIKS Company Installation, Maintenance, & Operation Manual 2013 INSTRUCTIONS This is an instructional manual which provides general installation, operation, and maintenance
Lector de microfilm-nmi 2020 Manual de limpieza y reparación
 Lector de microfilm-nmi 2020 Manual de limpieza y reparación Lector de microfilm-nmi 2020 Manual de limpieza y reparación Índice de temas ---------------------------------------------- Carrete de microfilm
KMR SCA-05 Mounting Instructions Instrucción de Montaje Instruções de Montagem 0899.4897
 0899.4897 KMR SCA-05 Mounting Instructions Instrucción de Montaje Instruções de Montagem 0899.4897 KMR SCA-05 Mounting Instructions Instrucción de Montaje Instruções de Montagem The KMR SCA-05 kit is a
2008 Series Hemodialysis Machine Operator s Manuals Addendum for Concentrate Connection
 2008 Series Hemodialysis Machine Operator s Manuals Addendum for Concentrate Connection Caution: Federal (US) law restricts this device to sale only by or on the order of a physician. This is an addendum
Make your own Box Tops collection container
 Make your own Box Tops collection container It s easy here s what you need: Scissors or craft knife (make sure children are supervised when using cutting tools!) Glue or tape Crayons or markers A box from
Vamos a Multiplicar Al estilo maya!
 Vamos a Multiplicar Al estilo maya! Resumen de la actividad Esta lección le permite a los estudiantes realizar multiplicación al estilo maya como una actividad de seguimiento a la herramienta interactiva
1-800-295-5510 uline.com TECHNICAL DATA MODEL H-2051. Alkaline MN21 12V. (1 Second) Button Life Approx. 100,000 Push Button Presses 0.125 lbs. (2 oz.
 Button Life Approx. 100,000 Push Button Presses 0.125 lbs. (2 oz.") π H-2051 TAKE-A-NUMBER SYSTEM WIRELESS REMOTE uline.com Para Español, vea páginas 3-4. Pour le français, consulter les pages 5-6. TECHNICAL DATA MODEL H-2051 Frequency RF Power Output 433.92 MHz (+/ Max.
π H-2051 TAKE-A-NUMBER SYSTEM WIRELESS REMOTE uline.com Para Español, vea páginas 3-4. Pour le français, consulter les pages 5-6. TECHNICAL DATA MODEL H-2051 Frequency RF Power Output 433.92 MHz (+/ Max.
burdastyle download 3197 C
 Size Taille Talla 2 3 4 5 6 7 8 9 0 inches 36 42 inches 30 3 /2 33 3/4 36 /4 37 3/4 39 /2 76 80 84 88 92 96 00 inches 23 24 /2 26 27 3/4 29 /4 30 3/4 /2 58 62 66 70 74 78 82 inches /2 35 /2 37 3/4 /4 4
1-800-295-5510 uline.com. Phillips Screwdriver Mini Flathead Screwdriver Electric Drill 5/16" Drill Bit PARTS. Flat Display Wall Mount Bracket x 1
 π H-2769, H-4665 TAKE-A-NUMBER-SYSTEM ADDITIONAL 2 AND 3-DIGIT LED DISPLAY 1-800-295-5510 uline.com Para Español, vea páginas 3-4. Pour le français, consulter les pages 5-6. TOOLS NEEDED Phillips Screwdriver
Copyright FIL KATIA, S.A.
 50B 49 50A JAIPUR - PANAMA 25 P. listado 1: trab. a p. jersey der.: * 4 vtas col. verde 30, 4 vtas col. beige 38*, repetir de * a *. P. listado 2: trab. a p. jersey der.: * 4 vtas col. verde claro 44,
Celebrando Kwanzaa. La historia de Kwanzaa
 Celebrando La historia de es una fiesta nueva. La Dr. Maulana Karenga lo creo en 1966. Él vivía en California en ese tiempo. Es un festival en honor a la herencia afroamericana. El nombre significa primeros
π H-3905 PUSH FOAMING SOAP DISPENSER INSTALLATION 1-800-295-5510 uline.com MOUNTING INSTRUCTIONS APPLYING DISPENSER LABEL TOOLS NEEDED TAPE MOUNTING
 π H-3905 PUSH FOAMING SOAP DISPENSER 1-800-295-5510 uline.com Para Español, vea páginas 4-6. TOOLS NEEDED Phillips Screwdriver Electric Drill INSTALLATION APPLYING DISPENSER LABEL 1. Peel label from backing.
Active Leg Range of Motion Exercises: Lying
 Active Leg Range of Motion Exercises: Lying Do these exercises on your back times, times each day. Do only the exercises checked. Do the exercises with: Both legs Right leg Left leg Exercises Ankle Pumps
CASTER INSTALLATION HARDWARE INCLUDED:
 CASTER INSTALLATION HARDWARE INCLUDED: CASTER INSTALLATION METHOD 1.1 FOR OPEN SIDE BOLSTERS SEE FIGURE 1. USE 16 EACH OF HARDWARE ITEMS A, B, AND C (4 OF EACH PER CASTER). INSERT BOLTS THROUGH LOCK WASHERS,
INSTALLATION INSTRUCTIONS ECLIPSE FUEL DOOR PART # MZ313512
 INSTALLATION INSTRUCTIONS ECLIPSE FUEL DOOR PART # MZ313512 APPLICATION Mitsubishi Eclipse TOOLS REQUIRED Socket Wrench with extension and 10 mm socket Small Screwdriver Soft Cloth Cleaning Solution BILL
MANUAL DE INSTRUCCIONES PARRILLA BARBACOA (18 ) ED-4047BQ
 ED-4047BQ") MANUAL DE INSTRUCCIONES PARRILLA BARBACOA (18 ) ED-4047BQ ESTIMADO CLIENTE Con el fin de que obtenga el mayor desempeño de su producto, por favor lea este manual de instrucciones cuidadosamente antes de
MANUAL DE INSTRUCCIONES PARRILLA BARBACOA (18 ) ED-4047BQ ESTIMADO CLIENTE Con el fin de que obtenga el mayor desempeño de su producto, por favor lea este manual de instrucciones cuidadosamente antes de
Copyright FIL KATIA, S.A.
 Ganchillo Puntos empleados MODELO 37FIL KATIA PANAMA pág. 25 E SPAÑOL TALLA: ÚNICA MATEIALES PANAMA col. 1: 5 ovillos Nº 2 mm MUESTA DEL PUNTO A p. relieve, ganchillo nº 2 mm 10x10 cm. = 24 p. y 12 vtas.
Funda para móvil. Patrón 1 Patrón 2 Recorte para la guata adhesiva
 Instrucciones Necesitas: Máquina de coser Totally Me! 2 trozos de tela (4,5" x 13") (11,4 cm x 33 cm) 1 trozo de guata adhesiva 2,5" (6,4 cm ) de goma elástica fina 1 botón de color Tijeras Alfileres Patrones
Portable Work Station Model No. BMC001 Repair Sheet. Poste de travail portatif Numéro de modèle BMC001 Feuille de réparation
 Portable Work Station Model No. Repair Sheet Poste de travail portatif Numéro de modèle Feuille de réparation Estación de trabajo portátil Número de modelo Listas de piezas de repuesto 988000-815 2-7-12
H-3900 PRODUCE BAG STAND STANDARD
 π H-3900 PRODUCE BAG STAND STANDARD uline.com Para Español, vea páginas 3-4. Pour le français, consulter les pages 5-6. TOOL INCLUDED Wrench ASSEMBLY 1. Attach the bottom pole to the base by inserting
Lump Sum Final Check Contribution to Deferred Compensation
 Memo To: ERF Members The Employees Retirement Fund has been asked by Deferred Compensation to provide everyone that has signed up to retire with the attached information. Please read the information from
Graphic L Mini GRAN FORMATO PRE-PRENSA / WEB. Catálogo del producto. Graphic L Mini SOLUCIONES GRAFICAS
 Catálogo del producto Graphic L Mini Graphic L Mini Modo de Empleo: Puntos de Ventas (P.O.P) Ferias y exposiciónes Eventos / Presentaciones / Shows Sistema: Barra central plegable 2 barras extensibles
SAVE THESE INSTRUCTIONS This product is for household use, or equivalent.
 IMPORTANT SAFETY INSTRUCTIONS When using an electrical appliance, basic safety precautions should always be followed, including the following. Read all instructions before using this sewing machine. CAUTION-
TOUCH MATH. Students will only use Touch Math on math facts that are not memorized.
 TOUCH MATH What is it and why is my child learning this? Memorizing math facts is an important skill for students to learn. Some students have difficulty memorizing these facts, even though they are doing
JEEP WRANGLER 4 Door Top Kit
 JEEP WRNGLER 4 oor Top Kit 82213651 82213652 10-16-12 65353 / 65370 Rev. 1 1 of 7 K6861654 JEEP WRNGLER 4 oor Top Kit B C E F G I J K L M 10-16-12 65353 / 65370 Rev. 1 2 of 7 K6861654 N 4X O P 8X T-30
Save Money 2-up Single Doorhanger Set OH payday advance edition, 4 different doorhangers, Spanish
 Save Money 2-up Single Doorhanger Set OH payday advance edition, 4 different doorhangers, Spanish PACKAGE CONTENTS How to Customize 4-color doorhanger, Editable PDF (50% OFF first loan) 1-color (black)
Continental Bed Rails Assembly Instructions. Instructions d'assemblage pour traverses de lit Continental
 Continental Bed Rails Assembly Instructions Instructions d'assemblage pour traverses de lit Continental Instrucciones de montaje de travesaños Continental Q010 Parts: A 2x Bed Rails C 14 x Wood Screw B
1 PC 1 PC 1 PC 5 PCS NOTE:
 2.. B. D H C. D. B C 3. 4. G F NOTE: 1. It is important to put the screw (F) vertically to the arm hole and bolt (Nut). 2. The allen key (G) should be fully inserted to the screw head (F), then start tighten.
burdastyle download
 Size Taille Talla 1 1 2 3 4 5 8 32 34 36 38 40 inches 66 1/4 66 1/4 66 1/4 66 1/4 66 1/4 66 1/4 66 1/4 66 1/4 66 1/4 66 1/4 66 1/4 66 1/4 66 1/4 66 1/4 66 1/4 cm 168 168 168 168 168 168 168 168 168 168
T87 Range Stops INSTALLATION APPLICATION INSTALLATION INSTRUCTIONS EFS
 T87 Range Stops APPLICATION Use the 0144-001 range stops with the T87K, N thermostats to limit the minimum and maximum temperature settings. The 0144-001 contains two range stop scales and two #2-28 x
GRACIAS POR PREFERIR COCHES MOMA INDICE. Advertencias. Configuración. Abrir Coche. Ensamble rueda delantera. Ensamble ruedas traseras.
 GRACIAS POR PREFERIR COCHES MOMA INDICE Advertencias 1 Felicitaciones y gracias por preferir Configuración 2 un coche MOMA. Por favor lea prim- Abrir Coche 3 Ensamble rueda delantera 4 Ensamble ruedas
Hyundai Santa Fe 2007-up 99-7325
 INSTALLATION INSTRUCTIONS FOR PART 99-7325 APPLICATIONS Hyundai Santa Fe 2007-up 99-7325 (not for factory equipped NAV models) KIT FEATURES DIN radio provision with pocket ISO radio provision with pocket
Identificación de las áreas de atasco de papel
 La mayoría de los atascos de papel se puede evitar si se selecciona con cuidado el material de impresión y se carga de forma adecuada. (Consulte las sugerencias de Sugerencias para evitar atascos del papel.)