Building Basics Start Building
|
|
|
- Vicenta Toledo Pereyra
- hace 6 años
- Vistas:
Transcripción
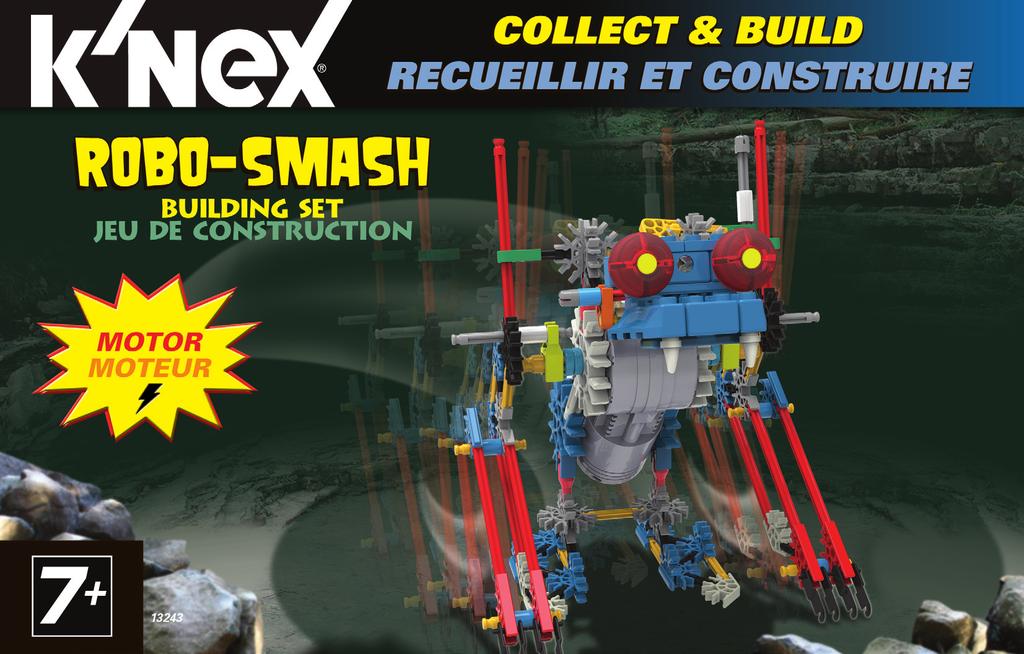
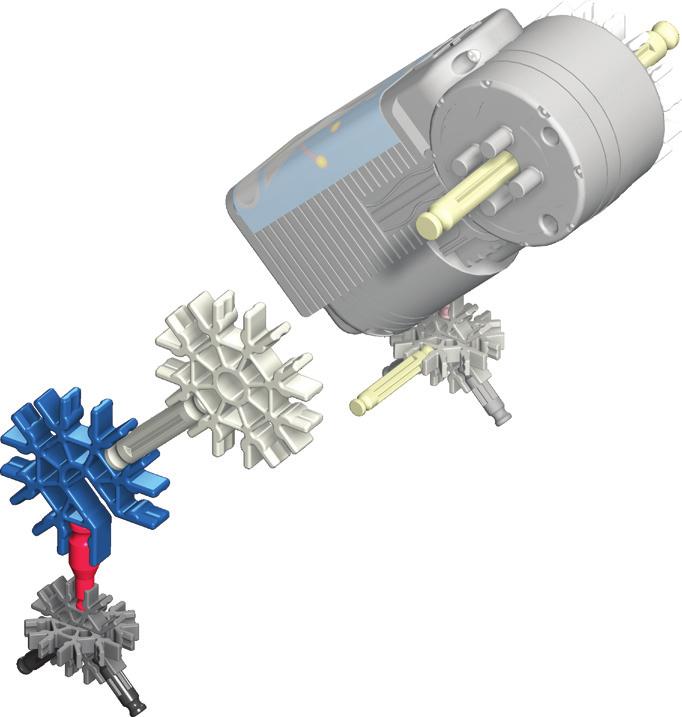
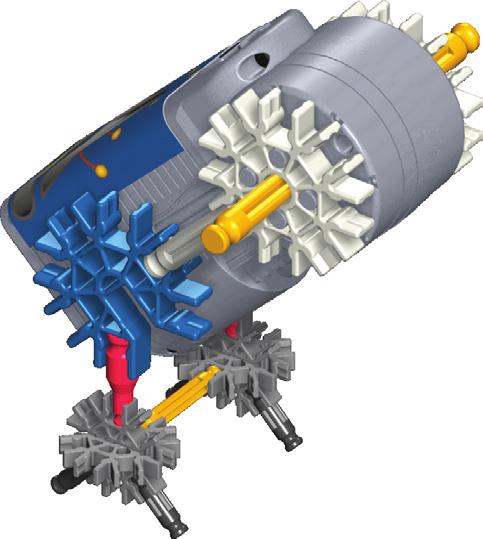
1


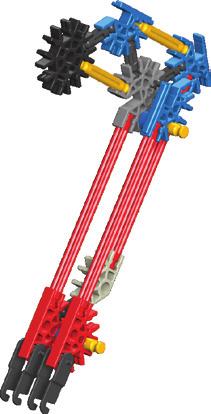
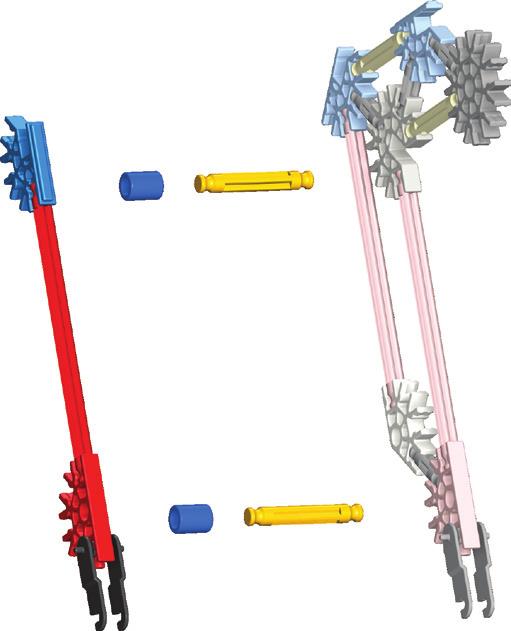
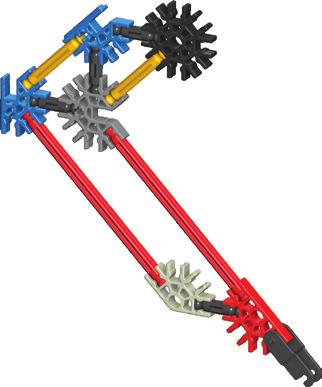
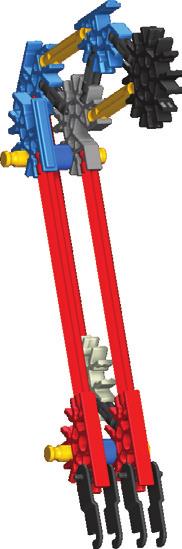
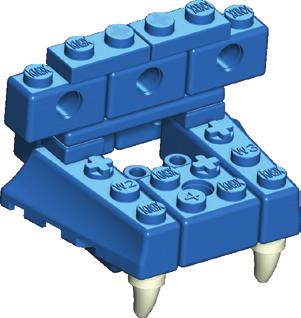
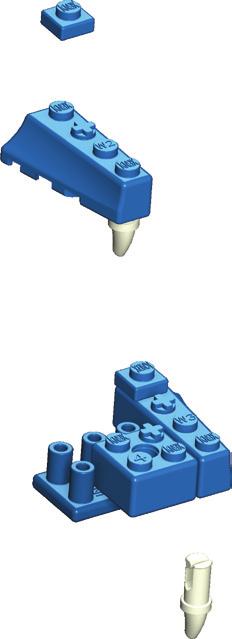
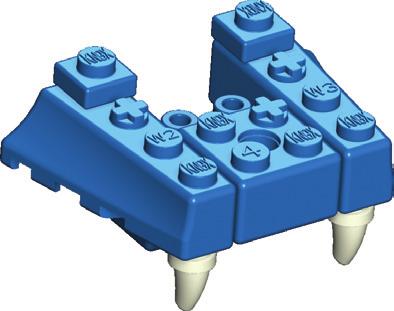
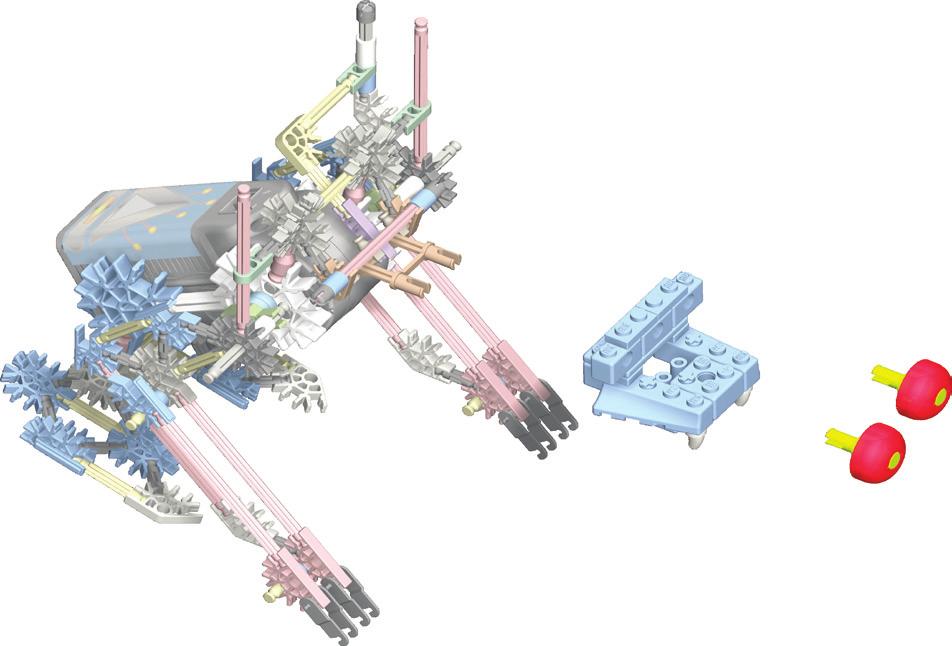
2 Building Basics Start Building To begin your model, find the own shape and color. Just look at the pictures, find the pieces in your set that match and then connect them together. Try to face your model in the same direction as the instructions while you build. The arrows show you where the parts connect, but not all connections points have arrows. Faded colors show you this section is already built. Connectors There are blue and gray connectors with special long slots. They slide together as you see in the pictures. Push these parts together until you hear a click. Bases de la Construction Démarre ta Construction 1 and follow the numbers. Each piece has its Pour commencer ton modèle, trouve l étape numéro 1 et suis les numéros. Chaque pièce a sa propre forme et sa 1 propre couleur. Regarde les illustrations, trouve les pièces qui correspondent à ce que tu vois et assemble-les. Pour t aider pendant que tu construis, oriente ton modèle dans le même sens que les instructions. Les flèches t indiquent où les pièces 2 s assemblent, mais les points de raccordement n ont pas tous des flèches. Les pièces de couleur délavée sont celles que tu as déjà assemblées. Connecteurs Vous pouvez assembler ces connecteurs tout à fait uniques en les faisant glisser l un dans l autre. Pousser fort jusqu au «clic». Lire les instructions attentivement et es positionner horizontalement ou verticalement, en suivant exactement les illustrations. Battery Information CAUTION: Be sure to insert the batteries correctly and always follow the toy and battery manufacturers instructions. Do not mix old and new batteries or alkaline, standard (carbon-zinc) or rechargeable (nickel-cadmium) batteries. Only batteries of the same or equivalent type recommended should be used. Always remove weak or dead batteries from the product; do not short-circuit supply terminals. Insert batteries with correct polarity (+/-) as shown. Important tips Alkaline batteries are recommended. Rechargeable batteries are not recommended. Remove rechargeable batteries from toy before charging; they must be charged only under adult supervision. Non-rechargeable batteries must not be recharged. Keep components free of dust; do not immerse or use in water. Do not dispose of batteries in a fire; they could leak or explode and cause injury. Remove all batteries if the toy will not be used for a long period of time. Do not put rods smaller than 2 inches in any openings of the motor; they will damage the motor and cannot be removed. Help the environment by disposing of your product and packaging responsibly. The wheelie bin symbol indicates that the product and batteries must not be disposed of in the domestic waste as they contain substances which can be damaging to the environment and health. Please use designated collection points or recycling facilities when disposing of the item or batteries. 2


3 How to Insert and Remove Batteries Use a small Phillips head screwdriver to loosen the screw. Insert 2 fresh AA batteries (LR6) into the compartment with the correct polarity (+/-) as shown here. Comment Mettre et Retirer des Piles Utiliser un petit Phillips tournevis à pointe cruciforme pour desserrer la vis et pour enlever la couverture de piles. Insérer 2 AA (LR6) neuves dans le compartiment à piles en respectant la polarité (+/-). Parts List Before you start building, be sure to compare the parts in your set with the parts list here. If anything is missing, call or write to us using the information on the back cover. We are here to help you! Liste des pièces Avant de commencer à construire, assure-toi de comparer les pièces dans ta boîte à la liste de pièces fournie ici. S il manque quelque chose, téléphone-nous ou écrisnous en te servant des informations figurant au verso de la notice. Nous sommes là pour t aider! Informations Pile ATTENTION : S assurer d installer les piles correctement et de suivre toujours les directives des fabricants du jouet et des piles. Ne pas mélanger des piles neuves avec des piles usées. Ne pas mélanger des pilesalcalines avec des piles standard (Leclanché), ou des piles rechargeables (au nickelcadmium). Il convient d utiliser uniquement des piles du type recommandé ou d un type équivalent. Retirer toujours les piles faibles ou mortes du produit ; ne pas faire court-circuiter lesterminaux. Installer les piles en respectant la polarité (+/-) comme l indique le schéma. Conseils importants Les piles alcalines sont recommandées. l est déconseillé d utiliser des piles rechargeables. Retirer les piles rechargeables du jouet avant de les recharger; elles doivent être chargées exclusivement en présence d un adulte. Les piles qui ne sont pas rechargeables ne doivent pas être rechargées. Veiller à ce que les éléments restent à l abri de la poussière ; ne pas les plonger dans l eau ; ne pas utiliser dans l eau. Ne pas jeter les piles dans le feu ; elles risqueraient de fuir ou d exploser et d entraîner des blessures. Retirer toutes les piles si le jouet restera inutilisé pendant longtemps. Ne mettez pas les petites tiges dans les trous du moteur, elles endommageraient le moteur et il n est pas possible de les enlever. Aidez l environnement en jetant votre produit et son emballage de manière responsable. Le symbole de la poubelle à roulettes indique qu il ne faut pas jeter le produit et les piles avec les ordures ménagères car ils contiennent des substances pouvant être nocives à l environnement et à la santé. Veuillez utiliser les points de collecte de déchets ou les centres de tri désignés lorsque vous jetez l article ou les piles. 3


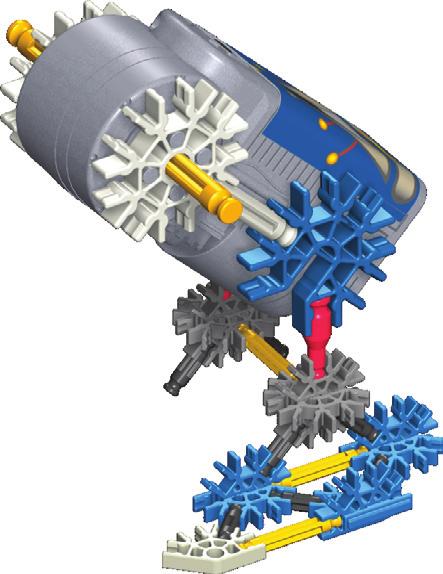
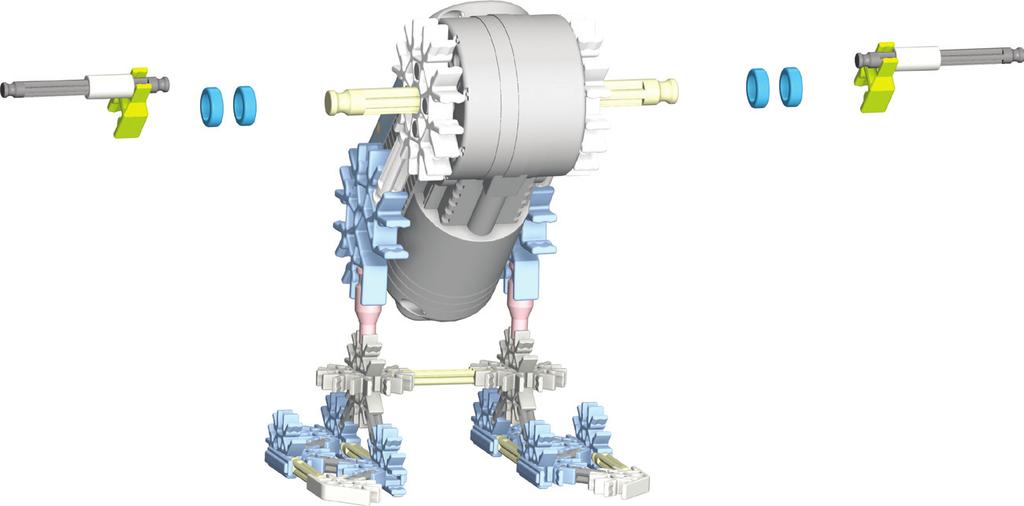
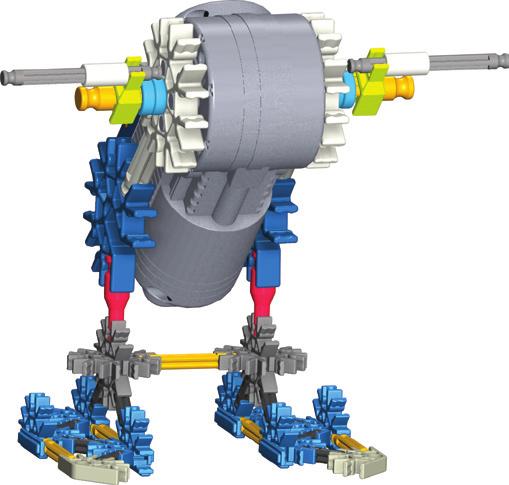
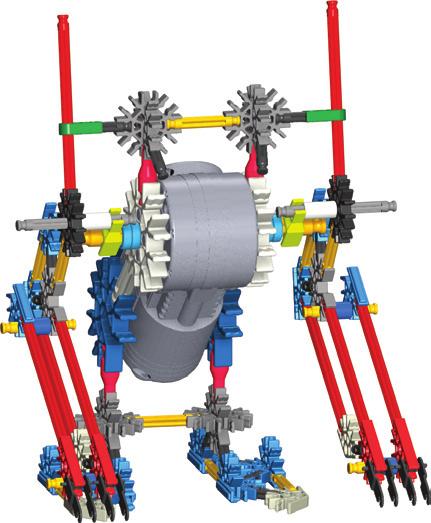
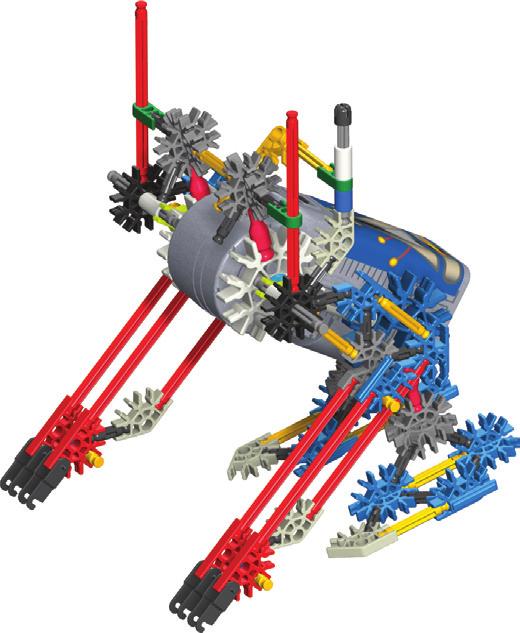
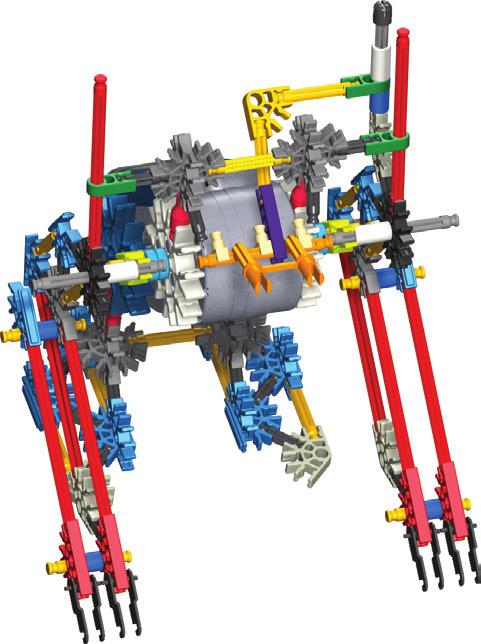
4 TS. PETITE s. ROBO-SMASH EN FR ES DE IT LE. PT TIENE anni. S. ade. E NL EN FR ES DE RTS. IT AS PT PETITE s. LE. NL EN FR ES DE IT PT NL CAUTION: Keep hands, face, hair and clothing away from all moving parts. ATTENTION : Garde les cheveux, les doigts, la figure et les vêtements àl écart de toutes les pièces mobiles. PRECAUCIÓN: Mantén el cabello, los dedos, la cara y la ropa alejada de las piezas móviles. VORSICHT: Haare, Finger, Gesicht und Kleidungsstücke nicht mit beweglichen Teilen in Berührung kommen lassen. ATTENZIONE: Tenere i capelli, le dita, il viso e i vestiti lontano da tutte le parti in movimento. CUIDADO: Mantém o cabelo, os dedos, a cara e a roupa afastados de todas as peças móveis. OPGEPAST: Hou het haar, de vingers, het gezicht en kledij verwijderd van alle bewegende onderdelen A pply sticker Apposez des autocollant Aplicar pegatina Anbringen von Aufklebern Applicare gli adesivi Aplicar adesivo Aanbrengen sticker Did you install 2 AA (or LR6) batteries in the motor? Est-ce que tu as installé 2 piles AA (ou LR6) dans le moteur? Instaló 2 baterías AA (o LR6) en el motor? Hast du 2 AA (oder LR6) Batterien in den Motor eingelegt? Hai installato 2 batterie AA (o LR6) nel motore? Você instalou 2 pilhas AA (ou LR6) no motor? Heb je er 2 AA (of LR6) batterijen ingestoken?


5


6


7
8


9


10

11

12

13

14


15
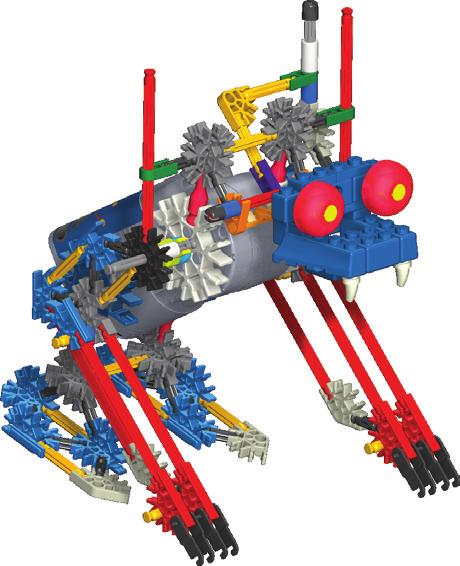


16 16 ROBO-SMASH
17 ES Español Básicos de Construcción Empieza a construir Para comenzar tu modelo, busca el 1 y sigue los números. Cada pieza tiene su propia forma y color. Simplemente mira los dibujos, busca las piezas correspondientes en tu juego y después conéctalas. Mientras construyes, trata de colocar tu modelo en la misma dirección que se muestra en las instrucciones. Los colores desteñidos muestran que esta sección ya está construida. Conecta las nuevas secciones en los lugares señalados por las flechas. Las nuevas piezas que agregues estarán en colores vivos. Conectores Hay conectores azules y plateados con ranuras largas especiales. Se enganchan deslizándose como ves en los dibujos. Conecta estas piezas empujándolas hasta que oigas clic. Información de la batería PRECAUCIÓN: Asegúrese de insertar las pilas correctamente y de siempre seguir las instrucciones del fabricante del juguete y de las pilas. No mezcle pilas viejas con nuevas, ni pilas alcalinas, estándar (carbón-cinc) o recargables (níquel-cadmio). Se debe usar solamente pilas del mismo tipo, o las que se recomienden como equivalentes. Siempre retire las pilas débiles o gastadas del producto; no forme cortocircuito en los puntos de intercambio. Inserte las pilas de acuerdo con los esquemas de polaridad (+/-). Consejos importantes Se recomiendan las pilas alcalinas. No se recomiendan las pilas recargables. Retire las pilas recargables del juguete antes de cargarlas; éstas deben ser cargadas solamente bajo la supervisión de un adulto. No se debe recargar las pilas que no son recargables. Mantenga los componentes sin polvo; no sumerja ni use en agua. No deseche las pilas en el fuego ya que pueden tener fugas, explotar y causar lesiones personales. Retire todas las pilas si el juguete no se usará por mucho tiempo. No meta las vanilas pequeñas en los orificios del motor ya que dañarian el motor y no se podrian sacar. Proteja el medio ambiente desechando su producto y el embalaje de una manera responsable. El símbolo del recipiente con ruedas indica que el producto y las pilas no deben tirarse en la basura doméstica, ya que contienen sustancias que pueden dañar el medio ambiente y la salud. Por favor acuda a los lugares de recolección designados o a instalaciones de reciclaje para desechar el artículo o las pilas. Cómo colocar y retirar las baterías Utilice un destornillador Phillips pequeño para aflojar el tornillo. Inserte 2 baterías AA nuevas (LR6) en el compartimiento con la polaridad correcta (+/-), como se muestra aquí. Lista de piezas Antes de comenzar a construir, compare las piezas de su juego con las que se enumeran aquí. Si falta algo, llámenos o escríbanos utilizando la información que se encuentra en el reverso. Estamos aquí para ayudarle! DE Deutsch Grundlegende Bauanleitungen für K NEX Los geht s mit dem Bauen Um mit dem Bauen deines Modells zu beginnen, suche die Nummer 1 und folge den laufenden Nummern. Jedes Teil hat seine eigene Form und Farbe. Schau dir einfach die Abbildungen an, such die Teile in deinem Bausatz, die so aussehen wie das, was du auf der Abbildung siehst und steck sie ineinander. Versuche, dein Modell beim Zusammenbauen so zu orientieren, dass es in die gleiche Richtung weist, wie es in den Anleitungen beschrieben und gezeigt wird. Blasse Farben weisen darauf hin, dass dieser Streckenabschnitt bereits zusammengebaut ist. Verbindungsstücke Blaue und silberfarbene verbindungsstücke haben besonders lange Schlitze. Wie du vauf der Abbildung sehen kannst, lassen sie sich ineinander schieben. Achte beim Aneinanderfügen dieser Teile darauf, dass du ein Klickgeräusch hörst. Erst dann sind die Teile fest miteinander verbunden. Informationen zu den Batterien VORSICHT: Achte darauf dass die Batterien korrekt eingelegt werden und folge den Anweisungen der Spielzeug- und Batterienfabrikanten. Mische keine alten und neuen Batterien oder alkaline Batterien, Standardbatterien (Kohle-Zink) oder wiederaufladbare Batterien (Nickel-Cadmium). Verwende nur Batterien des gleichen Typs oder des empfohlenen äquivalenten Typs. Leere oder verbrauchte Batterien aus dem Spielzeug entfernen; darauf achten, dass die Pole der Batterie nicht kurzgeschlossen werden. Beim Einlegen der Batterien auf die korrekte Polarität (+/-), wie dargestellt, achten. Wichtige Tipps Alkaline Batterien werden empfohlen. Wiederaufladbare Batterien sind nicht empfohlen. Bei Verwendung von wiederaufladbaren Batterien müssen diese aus dem Spielzeug entfernt werden, bevor sie wieder aufgeladen werden; das Wiederaufladen darf nur unter Aufsicht eines Erwachsenen stattfinden. Nichtwiederaufladbare Batterien dürfen nicht wieder aufgeladen werden. Die Komponenten von Staub freihalten; nicht in Wasser tauchen. 17
18 Zu entsorgende Batterien nicht ins Feuer werfen; sie können auslaufen oder explodieren und Körperverletzungen verursachen. Wenn das Spielzeug längere Zeit nicht verwendet werden soll, alle Batterien entfernen. In keine der Öffnungen des Motor kleine Stangen einsetzen; sie beschädigen den Motor un können nicht entfernt werden. Trage zum Umweltschutz bei und entsorge unser Produkt sowie die Verpackung in verantwortungsvoller Weise. Das Mülltonnen-Symbol bedeutet, dass das Produkt und die Batterien nicht dem Restmüll zugeführt werden dürfen, weil sie Stoffe enthalten, die sich schädigend auf die Umwelt und die Gesundheit auswirken können. Bitte recycle den Artikel bzw. die Batterien und werfe sie in die entsprechenden Recyclingcontainer. Anweisungen zum Einlegen und Entfernen der Batterien Einen kleinen Kreuzkopfschraubenzieher benutzen, um die Schraube zu lösen und die Batterieabdeckung zu entfernen. 2 frische AA (oder LR6) Batterien in den Batterieraum mit der korrekten Polarität einsetzen (+/-). Teileliste Bevor du mit dem Bauen anfängst, solltest du prüfen ob die Teile in deinem Bausatz mit denen auf dieser Teileliste übereinstimmen. Falls etwas fehlt, rufe uns an oder schreibe uns (siehe Rückseite). Wir sind für dich da! IT Italiano Istruzioni di base per costruire con K NEX Comincia a costruire Per iniziare il modello, cerca il numero 1 e segui i numeri. Ogni pezzo ha una sua forma e un suo colore. Guarda la figura, trova i pezzi corrispondenti nel set e mettili insieme. Cerca di tenere il modello nella stessa direzione della figura e in tal modo sarà più semplice attaccare i pezzi nei posti giusti. I colori spenti ti dicono che questa sezione è già stata costruita. Dovrai collegare la nuova sezione al punto indicato dalla punta della freccia. Connettori È molto importante posizionare i connettori blu e argento in una specifica direzione. Presta molta attenzione alle istruzioni e posiziona i connettori orizzontalmente o verticalmente proprio come illustrato. Spingi con forza fino ad udire un clic. Informazioni sulle batterie ATTENZIONE: Accertarsi di inserire le batterie correttamente e seguire sempre le istruzioni del produttore delle batterie e del giocattolo. Non mettere insieme batterie nuove e vecchie o alcaline, standard (carbonio-zinco) e ricaricabili (nichel-cadmio). Usare sempre batterie raccomandate dello stesso tipo o di tipo equivalente. Rimuovere sempre batterie quasi scariche o completamente scariche dal prodotto; non causare corto circuito ai terminali di alimentazione. Inserire le batterie con la polarità corretta (+/-) come illustrato. Consigli importanti Si raccomanda l uso di batterie alcaline. Non si raccomanda l uso di batterie ricaricabili. Rimuovere le batterie ricaricabili dal giocattolo prima della carica: devono essere caricate solo sotto la supervisione di un adulto. Le batterie non ricaricabili non devono essere ricaricate. Mantenere i componenti privi di polvere; non immergere o usare in acqua. Non gettare le batterie nel fuoco, poiché potrebbero perdere o esplodere e causare lesioni. Rimuovere tutte le batterie se il giocattolo non verrà usato per un lungo periodo di tempo. Non inserire aste più corte di 5,1 cm (2 pollici) nei fori del motore, in quanto danneggerebbero il motore e non possono essere rimosse. Aiuta l ambiente eliminando il prodotto e la confezione in modo responsabile. Il simbolo concernente il secchio con le ruote indica che il prodotto e le batterie non possono essere eliminati con la spazzatura domestica in quanto contengono sostanze che possono danneggiare l ambiente e la salute. Usare i punti di raccolta designati o gli impianti di riciclaggio quando si devono eliminare l articolo e le batterie. Come inserire e rimuovere le batterie Utilizzare un piccolo cacciavite phillips per allentare la vite e per rimuovere la copertura di batteria. Inserire 2 AA (o LR6) batterie fresche nello scompartimento di batteria con la polarità corretta (+/-). Elenco delle parti Prima di cominciare a costruire, accertati di confrontare le parti che sono nel tuo set con l elenco delle parti qui. Se ne manca una chiamaci o scrivici usando le informazioni che sono nella retrocopertina. Noi siamo qui per aiutarti! PT Português Instruções básicas para montar o K NEX Comece a montar Para começar a montar o modelo, encontre o número 1 do passo e siga os números. Cada peça tem a sua própria forma e cor. Estude as ilustrações, encontre as peças que coincidem com o que você estiver vendo e conecte-as. Fique de frente para o modelo, na mesma direção que as figuras mostradas nas instruções. As setas mostram onde as peças se conectam, mas nem todos os pontos de conexão têm setas. As partes com cores desbotadas são as que você já montou. Conectores Você pode fazer com que estes conectores se deslizem e se conectem. Empurre até ouvir um clique. Preste atenção às instruções e posicione-os horizontal ou verticalmente exatamente conforme a ilustração. 18
19 Informações sobre as pilhas CUIDADO: Coloque as pilhas corretamente e sempre siga as instruções de fabricantes de brinquedos e pilhas. Não misture pilhas velhas com pilhas novas ou alcalinas, ou pilhas padrão (carvão-zinco) com pilhas recarregáveis (níquel-cádmio). Somente pilhas do mesmo tipo ou tipo equivalente devem ser usadas. Sempre remova as pilhas fracas ou descarregadas do produto; não provoque um curto circuito nos terminais. Coloque as pilhas com a polaridade correta (+/-), como exibido. Conselhos importantes Recomenda se o uso de pilhas alcalinas. Não é recomendado o uso de pilhas recarregáveis. Remova as pilhas recarregáveis do brinquedo antes de carregar; elas devem ser carregadas somente sob a supervisão de um adulto. As pilhas não recarregáveis não devem ser colocadas. Mantenha os componentes livres de pó e não submerja ou use abaixo d água. Não descarte as pilhas perto do fogo, pois elas podem vazar ou explodir e causar ferimentos. Remova todas as pilhas se o brinquedo não estiver sendo usado por um longo período de tempo. Não coloque varetas de tamanho inferior a 5,1 cm (2 pol.) em nenhuma abertura do motor; as varetas causarão danos no motor e não podem ser removidas. Ajude ao meio ambiente descartando o produto e a embalagem de maneira responsável. O símbolo da lata de lixo com rodinhas indica que o produto e as pilhas não devem ser descartados no lixo doméstico, pois eles contêm substâncias que podem ser prejudiciais ao ambiente e à saúde. Use os pontos designados de coleta de lixo ao descartar o item ou as pilhas. Como inserir e remover as pilhas Usar uma chave de fenda principal pequena de Phillips para afrouxar o parafuso e para remover a tampa de bateria. Introduzir 2 AA (ou LR6) baterias frescas no compartimento de bateria com a polaridade correta (+/-). Liste des pièces Avant de commencer à construire, assure-toi de comparer les pièces dans ta boîte à la liste de pièces fournie ici. S il manque quelque chose, téléphone-nous ou écris-nous en te servant des informations figurant au verso de la notice. Nous sommes là pour t aider! NL Nederlands Basisstappen voor K NEX bouwen Begin te bouwen Om met je model te beginnen, vind eerst het nummer 1 en volg de nummers. Elk stuk heeft zijn eigen vorm en kleur. Kijk gewoonweg naar de afbeeldingen, vind de overeenstemmende stukken terug in je geheel en maak ze aan mekaar vast. Tracht je model in dezelfde richting te plaatsen als de aanwijzingen terwijl je bouwt en monteert. De vervaagde kleuren duiden aan dat dit deel reeds is opgebouwd. Gelieve het nieuwe deel vast te koppelen op de plaats aangeduid door de pijlen. Koppelstukken Er zijn blauwe en zilveren koppelstukken met speciale lange gleuven. Ze schuiven in mekaar zoals je kunt zien op de afbeeldingen. Duw deze onderdelen in mekaar tot je een klik hoort. Batterijgegevens OPGEPAST: Verzeker je ervan dat de batterijen er op de juiste manier in te steken en volg steeds de aanduidingen van de speelgoed- en batterijenfabrikanten. Meng geen oude en nieuwe batterijen of alkalische, gewone (koolstof-zink) of herlaadbaarse (nikkel-cadmium) batterijen met mekaar. Uitsluitend batterijen van dezelfde of van een aanbevolen equivalente soort dienen gebruikt te worden. Verwijder steeds uitgeputte of ontladen batterijen uit het produkt; veroorzaak geen kortsluiting van de voedingspolen. Steek de batterijen erin volgens de juiste polariteit (+/-) zoals afgebeeld. Belangrijke tips Alkalische batterijen worden aanbevolen. Herlaadbare batterijen worden niet aanbevolen. Verwijder herlaadbare batterijen uit het speelgoed alvorens ze te herladen; ze moeten slechts herladen worden onder het toezicht van een volwassene. Niet-herlaadbare batterijen mogen niet herladen worden. Bescherm onderdelen tegen stof; dompel ze niet of gebruik ze niet in water. Werp de batterijen niet in het vuur; ze zouden kunnen lekken of ontploffen en verwondingen veroorzaken. Verwijder alle batterijen wanneer het speelgoed gedurende lange tijd niet gebruikt zal worden. Plaats staafjes in de openingen van het motor, zij zouden de motor beschadigen en kunnen niet worden verwijderd. Help de omgeving door uw product en verpakking verantwoordelijk weg te werpen. Het symbol met de vuilnisbak op wieltjes duidt aan dat het product en de batterijen niet mogen weggeworpen worden in huishoudvuil vermits ze stoffen bevatten die de omgeving en de gezondheid kunnen schaden. Gelieve de aangeduide verzamelpunten of recyclageinstallaties te gebruiken wanneer u zich wil ontdoen van dit artikel of deze batterijen. Insteken en verwijderen van batterijen Gebruik een kleine hoofdschroevedraaier Phillips om de schroef los te maken en de batterijdekking te verwijderen. Neem 2 verse AA (of LR6) batterijen in het batterijcompartiment met op de correcte polariteit (+/-). Onderdelen Lijst Voordat u begint met bouwen, moet u de onderdelen vergelijken de set met de onderdelen lijst hier. Als er iets ontbreekt, bel of schrijf ons gebruik van de informatie op de achterkant. We zijn hier om u te helpen! 19
20
Building Basics Start Building
 Building Basics Start Building To begin your model, find the own shape and color. Just look at the pictures, find the pieces in your set that match and then connect them together. Try to face your model
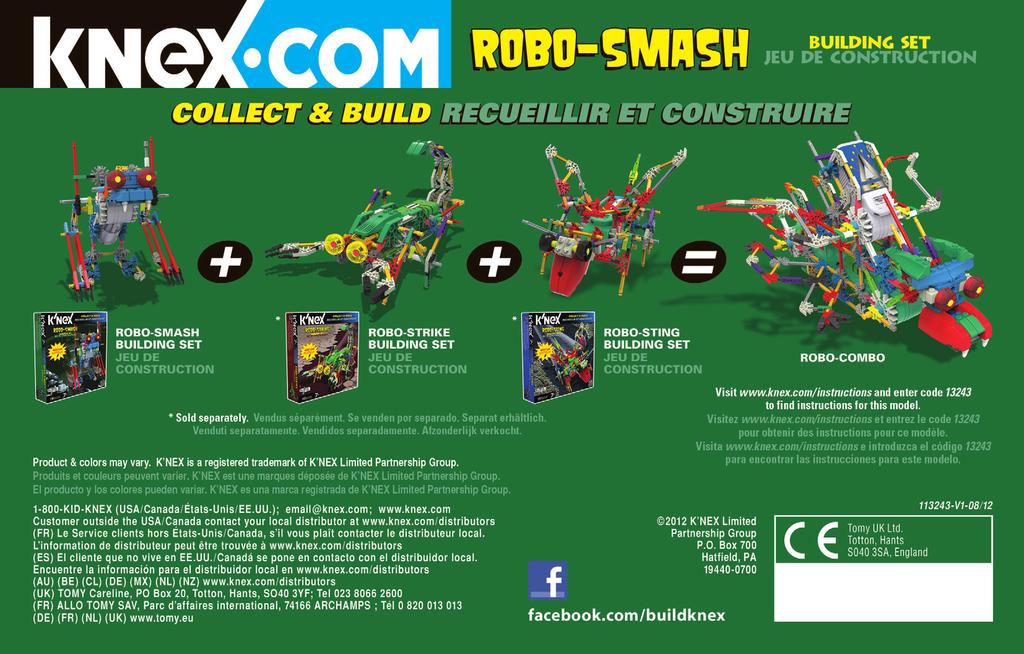
ROBO-SMASH. Building Worlds Kids Love BUILDING SET JEU DE CONSTRUCTION
 Building Worlds Kids Love ROBO-SMASH BUILDING SET JEU DE CONSTRUCTION 7+ 3243 LR6 ) A ( A 2X Not included Pas inclus No se incluyen Nicht enthalten Non incluse Não estão incluídas Niet inberepen Building
START INICIAR - DÉMARRAGE - INIZIO - INICIAR - INICIO
 START INICIAR - DÉMARRAGE - INIZIO - INICIAR - INICIO ENG: Microsoft wireless mouse PTB: Mouse sem fio da Microsoft FRA: Souris sans fil Microsoft ITA: Mouse senza fili Microsoft PTG: Rato sem fios Microsoft
1. DESCARGA DEL SOFTWARE DE BLUETOOTH EN EL SMARTPHONE
 MANUAL DEL USUARIO PARA BLUETOOTH ES 1. DESCARGA DEL SOFTWARE DE BLUETOOTH EN EL SMARTPHONE Entre en Apple Store o Google Play y busque: - BH Premium BH Premium 2. FIJACIÓN DEL MÓDULO BLUETOOTH Fije el
1 # 80 981 DE SW Tat pod_v14.indd 1 9/17/13 11:41 AM
 1 # 80 981 DE SW Tat pod_v14.indd 1 9/17/13 11:41 AM X2 X1 5 x30 x30 x30 5 2 DE SW Tat pod_v14.indd 2 9/17/13 11:41 AM x2 x2 3 DE SW Tat pod_v14.indd 3 9/17/13 11:41 AM x4 4 DE SW Tat pod_v14.indd 4 9/17/13
English - EN Français - FR Deutsch - DE Italiano - IT Português - PT Español - ES
 English - EN Français - FR Deutsch - DE Italiano - IT Português - PT Español - ES Push upward to open battery door, insert batteries as shown. Pair your mouse with your Windows device: A. On the underside
series série GOOMBA COLLECT ALL 7! COLLECTIONNEZ LES 7!* 1 Figure/Figura Building Worlds Kids Love
 5 series 38009 série GOOMBA TM COLLECT ALL 7! COLLECTIONNEZ LES 7!* 1 Figure/Figura Building Worlds Kids Love TM & 2014 Nintendo. 2014 K NEX Limited Partnership Group, P.O. Box 700, Hatfield, PA 19440-0700;
CONTROLADORA PARA PIXELS CONPIX
 The LedEdit Software Instructions 1, Install the software to PC and open English version: When we installed The LedEdit Software, on the desktop we can see following icon: Please Double-click it, then
1 PATENT PENDING/ BREVET EN ATTENTE/ PATENTE PENDIENTE
 20-1/4 514 mm 67-3/4 1721 mm 93-3/4 2382 mm NOTE/ NOTE/ NOTA 1) THIS WALLBED IS TO BE USED IN HOMES WITH STANDARD CONSTRUCTION, THE BUTTERFLY TOGGLES ARE TO BE USED IN DRY- WALL THAT IS AT LEAST 1/2 DEEP.
Agustiniano Ciudad Salitre School Computer Science Support Guide - 2015 Second grade First term
 Agustiniano Ciudad Salitre School Computer Science Support Guide - 2015 Second grade First term UNIDAD TEMATICA: INTERFAZ DE WINDOWS LOGRO: Reconoce la interfaz de Windows para ubicar y acceder a los programas,
MODEL: 11222895 / MODELO: 11222895 COMPUTER DESK ESCRITORIO DE COMPUTADORA
 MODEL: 222895 / MODELO: 222895 COMPUTER DESK ESCRITORIO DE COMPUTADORA NO 2 3 4 5 6 7 8 9 PARTS LIST AND HARDWARE LISTA DE PARTES Y ACCESORIOS HARDWARE LIST LISTA DE PARTES Y ACCESORIOS CHIPBOARD SCREW
M DJ SERIES. User Manual/Manual de Uso
 M DJ SERIES User Manual/Manual de Uso User Manual Installation 1. In order to enhance the cast function of listening to space sound, it is appropriate to set the center part of tweeter right to the position
627129-161 1. English. Português. Español
 English IMPORTANT: Follow these part replacement instructions: Match the part you received to the illustration on the next page. Go to the page number indicated ( #) for that part. 3 Complete only the
ES ARMARIO ZAPATERO Instrucciones de montaje MT Istruzioni per il montaggio. SHOE STORAGE CUPBOARD Assembly instruction
 ES ARMARIO ZAPATERO IT SCARPIERA Instrucciones de montaje MT Istruzioni per il montaggio PT SAPATEIRA Instruções de montagem GB MT SHOE STORAGE CUPBOARD Assembly instruction DE AT Schuhschrank Montageanleitung
www.microsoft.com/hardware
 www.microsoft.com/hardware english - EN ESPAÑOL (LATINOAMERICANO) - XX PORTUGUÊS (BRASIL) - XC FRANÇAIS CANADIEN - XD 1 2 www.microsoft.com/hardware/productguide 3 www.microsoft.com/hardware/downloads
MANUAL DE INSTRUÇÕES (PORTUGUÊS) MANUAL DE INSTRUCCIONES (ESPAÑOL)
 MANUAL DE INSTRUCCIONES (ESPAÑOL)") MANUAL DE INSTRUÇÕES (PORTUGUÊS) MANUAL DE INSTRUCCIONES (ESPAÑOL) PKS915 Versão/version 02/2013 ÍNDICE/ ÍNDICE 01/ MANUAL DE INSTRUÇÕES (PORTUGUÊS) P.5 02/ MANUAL DE INSTRUCCIONES (ESPAÑOL) P.9 MANUAL
MANUAL DE INSTRUÇÕES (PORTUGUÊS) MANUAL DE INSTRUCCIONES (ESPAÑOL) PKS915 Versão/version 02/2013 ÍNDICE/ ÍNDICE 01/ MANUAL DE INSTRUÇÕES (PORTUGUÊS) P.5 02/ MANUAL DE INSTRUCCIONES (ESPAÑOL) P.9 MANUAL
 E Dependiendo de la versión y el año, una parte del paragolpes puede ser necesariamente recortada. La información proporcionada por nosotros para el recorte del paragolpes es sólo una ayuda no vinculante.
MILANO ART. 72000H091
 MILANO Istruzioni di preinstallazione / Pre-Installation Instructions / Instructions de pré-installation / Pre-Installationsanleitung / Instrucciones previas a la instalación ART. 72000H091 Installazione
TCO REFERENCE: PACK BALANCE WS-30 + PULSE O2 CODIC:
 TCO MARQUE: WITHINGS REFERENCE: PACK BALANCE WS-30 + PULSE O2 CODIC: 4077261 Wireless Scale WS-30 Balance connectée WS-30 Online-Waage WS-30 Báscula conectada WS-30 Bilancia wireless WS-30 Quick Installation
KMR SCA-05 Mounting Instructions Instrucción de Montaje Instruções de Montagem 0899.4897
 0899.4897 KMR SCA-05 Mounting Instructions Instrucción de Montaje Instruções de Montagem 0899.4897 KMR SCA-05 Mounting Instructions Instrucción de Montaje Instruções de Montagem The KMR SCA-05 kit is a
Verklaring van Conformite
 Verklaring van Conformite Wij, ondergetekende, Adres certificeert en verklaart onder eigen verantwoordelijkheid dat het volgende product Omschrijving Merk Identificatie In overeenstemming is met de essentiële
 Instalación rápida Antes de proceder con la instalación, es importante que sepa: Una instalación completa incluye "Drivers" y "Programa", ambos elementos se pueden instalar fácilmente desde el CD del software.
USB 2.0 INTERNAL MEMORY CARD READER/WRITER USER MANUAL CRW-UINB
 USB 2.0 INTERNAL MEMORY CARD READER/WRITER USER MANUAL CRW-UINB FEATURES HARDWARE INTRODUCTION 1 USB port for plugging into any USB device 2 Slot for SD, MMC and RS-MMC cards 3 Slot for Memory Stick, Memory
File naming. Dateibenennung. Nommage de fichiers. Nomenclatura de archivo. 3shape. Release. Version. Version. Version. Software CAD.
 ENGLISH DEUTSCH FRANÇAIS ESPAÑOL DESS-3SHAPE LIBRARIES Download and installation instructions of dess interfaces (titan bases, gap cemented 0.09mm diameter) 3shape libraries. Download der Bibliotheken
 Table of Contents Part Replacement Instructions Instructions pour le remplacement des pièces Instructies voor het vervangen van onderdelen Anleitung für den Austausch von Bauteilen Instrucciones para el
Verklaring van Conformite
 Verklaring van Conformite Wij, ondergetekende, Adres certificeert en verklaart onder eigen verantwoordelijkheid dat het volgende product Omschrijving Merk Identificatie In overeenstemming is met de essentiële
FIRE RED FUZZ. Bill Of Materials
 FIRE RED FUZZ FIRE RED FUZZ We hope you enjoy your new FIRE RED FUZZ! In this manual, you will find documentation and guidelines helpful to build either your Kit or PuzzleKit. For any further information,
AFEITAR ELÉCTRICA USB MODELO: ZHB681N ZHB682B
 AFEITAR ELÉCTRICA USB MODELO: ZHB681N ZHB682B MANUAL DE INSTRUCCIONES Por favor, lea este manual de instrucciones en el interior, ya que hay información importante sobre seguridad, operación y mantenimiento
Veja formato no MediaMind
 Veja formato no MediaMind Billboard (970x250 px) Última atualização: 05/02/2014 Especificação do formato Assim que o banner carrega, ele expande automaticamente para as dimensões de 970x250px. Caso o usuário
SECADOR MODELO: ZHB2065
 SECADOR MODELO: ZHB2065 MANUAL DE INSTRUCCIONES Por favor, lea este manual de instrucciones en el interior, ya que hay información importante sobre seguridad, operación y mantenimiento del aparato. Guarde
Table of Contents ACT LABS GS Addendum
 GS Addendum Table of Contents ACT LABS GS Addendum English --------------------------------------------------------------- 4 Français ------------------------------------------------------------- 5 Deutsche
Verklaring van Conformite
 Verklaring van Conformite Wij, ondergetekende, Digital Data Communications GmbH Adres certificeert en verklaart onder eigen verantwoordelijkheid dat het volgende product Omschrijving Media Converter Merk
MANUALE D ISTRUZIONI INSTRUCTION MANUAL MANUEL D INSTRUCTIONS HANDBUCH ANWEISUNGEN MANUAL DE INSTRUCCIONES MANUAL DE INSTRUÇÕES CORNETTA PER CELLULARE
 MANUALE D ISTRUZIONI INSTRUCTION MANUAL MANUEL D INSTRUCTIONS HANDBUCH ANWEISUNGEN MANUAL DE INSTRUCCIONES MANUAL DE INSTRUÇÕES CORNETTA PER CELLULARE 2Italiano manuale d istruzioni ISTRUZIONI D USO Inserisci
Utilizar como sistema de viaje
 Utilizar como sistema de viaje Consulte las instrucciones de funcionamiento suministradas con el cochecito. El portabebés se puede utilizar como un sistema de viaje en todos los chasis de cochecito equipados
SERIES PHASING OUT. Range chart. Initial force. Stroke
 NE SERIES PHASING OUT Range chart Model Body Ø Stroke Initial force mm inch mm inch dan Ib SKUDO OSAS OPAS NE 16 x 1,5 M 16 x 1,5 M 16 x 1,5 10-125 0,39-4,92 2,8-42 6,3-94,4 - - - NE 16 x 2 M 16 x 2 M
How to play CONTINUO For individual play and basic rules
 How to play CONTINUO For individual play and basic rules E1 Shuffle and place pack face down. Then simply take one card at a time from the top of the pack and place it face up on a flat surface touching
Matemáticas Muestra Cuadernillo de Examen
 Matemáticas Muestra Cuadernillo de Examen Papel-Lápiz Formato Estudiante Español Versión, Grados 3-5 Mathematics Sample Test Booklet Paper-Pencil Format Student Spanish Version, Grades 3 5 Este cuadernillo
Verklaring van Conformite
 Verklaring van Conformite Wij, ondergetekende, Digital Data Communications GmbH Adres certificeert en verklaart onder eigen verantwoordelijkheid dat het volgende product Omschrijving HDMI extender Merk
89)3:432433;.9)%9<=-+889
3:432433;.9)%9<=-+889") !"#$%&'()*+,-.)))))))))))))))))))))))))))))))))))))))))))))))))))))))))))))))))))))))))))))))))))))))))))))))))))))/0)10233402305 ))))))))))))))))))))))))))))))))))))))))))))))))))))))))))))))))))))6#$7*)0)
!"#$%&'()*+,-.)))))))))))))))))))))))))))))))))))))))))))))))))))))))))))))))))))))))))))))))))))))))))))))))))))))/0)10233402305 ))))))))))))))))))))))))))))))))))))))))))))))))))))))))))))))))))))6#$7*)0)
Spanish Advanced Unit 4: Research, Understanding and Written Response
 Write your name here Surname Other names Edexcel GCE Centre Number Candidate Number Spanish Advanced Unit 4: Research, Understanding and Written Response Tuesday 12 June 2012 Afternoon Time: 2 hours 30
2010 Encore Electronics, Inc. All rights reserved.cover
 2010 Encore Electronics, Inc. All rights reserved.cover 2012 Encore Electronics, Inc. Product specifications, size, and shape are subject to change without notice, and actual product appearance may differ
Quick Start Guide. EHS Advanced. Wireless-Headset Adapter
 Quick Start Guide HS dvanced Wireless-Headset dapter snom technology G snom rance SRL Wittestr. 0 G Parc des fontenelles 0 erlin, eutschland 0 ailly, rance Tel. + 0-0 Tel. + 0 a + 0 a + 0 info@snom.com,
Qué viva la Gráfica de Cien!
 Qué viva la Gráfica de Cien! La gráfica de cien consiste en números del 1 al 100 ordenados en cuadrilones de diez números en hileras. El resultado es que los estudiantes que utilizan estás gráficas pueden
Process Control Work Instructions Control de Procesos Instrucciones de Trabajo. for / para
 Process Control Work Instructions Control de Procesos Instrucciones de Trabajo for / para 629096898 VFCB Kit Relay Cable Harness Assy Ensamblar el Kit del Arnés de Cables del Relevador Publication Number:
HD Media Tower / Tour Hi-Fi / Medios de Torre
 English This page lists the contents included in the box. Please take time to identify the hardware as well as the individual components of the product. s you unpack and prepare for assembly, place the
EINSTUFUNGSTEST SPANISCH/ SPANISH ASSESSMENT TEST. Name/ Name:... Datum/ Date:...
 EINSTUFUNGSTEST SPANISCH/ SPANISH ASSESSMENT TEST Name/ Name:... Datum/ Date:... Dieser kurze Test soll dafür sorgen, daß Sie den für Sie richtigen Kurs belegen. Keine Angst - wenn Sie schon alles richtig
PC380 Web Cam. User s Guide Version 1.1
 PC380 Web Cam User s Guide Version 1.1 Web Camera User s Guide System Requirements Microsoft Windows 98SE, Windows Me, Windows 2000, Windows XP. Software Installation Attention: Make sure to install
Sheridan Kitchen Cart / Cuisine Panier / Cocina Cesta
 English This page lists the contents included in the box. Please take time to identify the hardware as well as the individual components of the product. s you unpack and prepare for assembly, place the
MANUAL EASYCHAIR. A) Ingresar su nombre de usuario y password, si ya tiene una cuenta registrada Ó
 Ingresar su nombre de usuario y password, si ya tiene una cuenta registrada Ó") MANUAL EASYCHAIR La URL para enviar su propuesta a la convocatoria es: https://easychair.org/conferences/?conf=genconciencia2015 Donde aparece la siguiente pantalla: Se encuentran dos opciones: A) Ingresar
MANUAL EASYCHAIR La URL para enviar su propuesta a la convocatoria es: https://easychair.org/conferences/?conf=genconciencia2015 Donde aparece la siguiente pantalla: Se encuentran dos opciones: A) Ingresar
Y9856. fisher-price.com
 Y9856 Race Lightning McQueen and Mater down the ramps! Haz que Rayo McQueen y Mate bajen volando por las rampas! Faites dévaler Flash McQueen et Mater le long des rampes! Corra com o McQueen e com o Mate
Power Windows Leve-glace Electrique Elektrische Fensterheber Elevalunas Electricos Alzacristalli Elettrici. Suzuki Santana 410. Suzuki Santana 413
 Power Windows Leve-glace Electrique Elektrische Fensterheber Elevalunas Electricos Alzacristalli Elettrici 2 doors - 2 portes - 2 türen - 2 puertas - 2 porte 82012 Suzuki Santana 410 Suzuki Santana 413
2008 Series Hemodialysis Machine Operator s Manuals Addendum for Concentrate Connection
 2008 Series Hemodialysis Machine Operator s Manuals Addendum for Concentrate Connection Caution: Federal (US) law restricts this device to sale only by or on the order of a physician. This is an addendum
T87 Range Stops INSTALLATION APPLICATION INSTALLATION INSTRUCTIONS EFS
 T87 Range Stops APPLICATION Use the 0144-001 range stops with the T87K, N thermostats to limit the minimum and maximum temperature settings. The 0144-001 contains two range stop scales and two #2-28 x
Northwestern University, Feinberg School of Medicine
 Improving Rates of Repeat Colorectal Cancer Screening Appendix Northwestern University, Feinberg School of Medicine Contents Patient Letter Included with Mailed FIT... 3 Automated Phone Call... 4 Automated
DODGE JOURNEY 08 FIAT FREEMONT 2011
 DODGE JOURNEY 08 FIAT FREEMONT 0 Nº Revisión Fecha Aprobación Nº 006 05-09-0 Homologation EC/94/0 DODGE JOURNEY 08 FIAT FREEMONT 0 A 50-X A 50-X F F F e3 00-3454 e3 00-3455 e3 00-880 e3 00-880 e3 00-880
Cher client, Toute l équipe COMMENCAL vous remercie d avoir effectué votre commande.
 Cher client, Toute l équipe COMMENCAL vous remercie d avoir effectué votre commande. Vous avez fait le choix du paiement par virement bancaire. Afin de réaliser ce dernier, merci de bien vouloir respecter
Verklaring van Conformite
 Verklaring van Conformite Wij, ondergetekende, Digital Data Communications GmbH Adres certificeert en verklaart onder eigen verantwoordelijkheid dat het volgende product Omschrijving Print Server Merk
Connection from School to Home Kindergarten Math Module 2 Topic A. Making 3 with Triangles and Chips
 Connection from School to Home Kindergarten Math Module 2 Topic A Making 3 with Triangles and Chips Here is a simple activity to help your child learn about composing and decomposing the number 3 and analyzing
Entrevista: el medio ambiente. A la caza de vocabulario: come se dice en español?
 A la caza de vocabulario: come se dice en español? Entrevista: el medio ambiente 1. There are a lot of factories 2. The destruction of the ozone layer 3. In our city there is a lot of rubbish 4. Endangered
Modbus RTU - RS-485 Kit. Kit Modbus RTU / RS-485. Kit Modbus RTU / RS-485. SSW-07 / SSW-08 English / Español / Português Document: 0899.
 Modbus RTU - RS-485 Kit Kit Modbus RTU / RS-485 Kit Modbus RTU / RS-485 Installation Guide SSW-07 / SSW-08 English / Español / Português Document: 0899.5711 / 03 Guia de Instalación Guia de Instalação
Mission Berlin. Deutsch lernen und unterrichten Arbeitsmaterialien. EPISODIO 26 Contrarreloj
 EPISODIO 26 Contrarreloj Ya en 2006, Anna decide bloquear blockieren la máquina. Para ello necesitan un código que desconocen. Anna sigue la música, pero aparece la mujer de rojo. Frustrará ésta los planes
Notas del instructor / Instructor s notes:
 Vestidores Lockers Los vestidores o casilleros son proporcionados por la empresa para que pueda cambiarse, guardar su ropa y sus pertenencias mientras trabaja. Esta prohibido almacenar alimentos, bebidas
PARRILLA MODELO: ZHC654
 PARRILLA MODELO: ZHC654 230V~50Hz 2000W MANUAL DE INSTRUCCIONES LEA ATENTAMENTE EL MANUAL 1. Esta unidad sólo se puede usar con fines domésticos. No utilice el aparato para otro de lo recomendado o al
1
 GETTING STARTED BATTERY INFORMATION FOR PARENTS AND KIDS INICIO INFORMACIÓN DE LAS BATERÍAS PARA PADRES Y NIÑOS Motorized gear uses AA (UM/LR6) size battery, (not included). Engrane máquina requiere AA
Installation Guide 1052943-2-C. Lavatory Drains
 Installation Guide Lavatory Drains K-7127 K-7128 M product numbers are for Mexico (i.e. K-12345M) Los números de productos seguidos de M corresponden a México (Ej. K-12345M) Français, page Français-1 Español,
The Passive Revolution! FrigoDynamics Passive 2-Phase HX Solutions for Bridgelux BXRA Light Engines
 The Passive Revolution! FrigoDynamics Passive 2-Phase HX Solutions Der SC 2-Phasen Wärmetauscher besticht durch ein besonderes, patentiertes Design, nützt den Kamineffekt aus und maximiert dadurch die
Vedi foto 4. See photo 4. Voir photo 4. Ver foto 4
 MARCA MAKE FAIRE - HACER MODELLO MODEL MODÈLE - MODELO REV. 00 HYUNDAI TUCSON 15 Funzione - Function SCHEDA TECNICA DI INSTALLAZIONE PER SISTEMI DI ALLARME CAN CAN ALARM SYSTEM FITTING INSTRUCTIONS SCHEMA
Calibre-Caliber-Kaliber-Calibre 9238/1970 (WITH ALL THE FUNCTIONS) 9231/1890 (WITHOUT 24-HOUR / SECOND TIME ZONE) 9238/1960 (WITHOUT DAY)
 9231/1890 (WITHOUT 24-HOUR / SECOND TIME ZONE) 9238/1960 (WITHOUT DAY)") JOUR, DATE, 24-HEURES / DEUXIÈME FUSEAU HORAIRE DAY, DATE, 24-HOUR / SECOND TIME ZONE TAG, DATUM, 24-STUNDEN / ZWEITE ZEITZONE DIA, FECHA, 24-HORAS / SEGUNDA ZONA HORARIA Calibre-Caliber-Kaliber-Calibre
JOUR, DATE, 24-HEURES / DEUXIÈME FUSEAU HORAIRE DAY, DATE, 24-HOUR / SECOND TIME ZONE TAG, DATUM, 24-STUNDEN / ZWEITE ZEITZONE DIA, FECHA, 24-HORAS / SEGUNDA ZONA HORARIA Calibre-Caliber-Kaliber-Calibre
Model/Modelo: SR42UBEVS
 SmartRack Assembly Instructions Instrucciones de Ensamble del SmartRack Model/Modelo: SRUBEVS West 35th Street, Chicago, IL 60609 USA www.tripplite.com/support Copyright 03 Tripp Lite. All trademarks are
BALANZA DE GRASA CORPORAL
 BALANZA DE GRASA CORPORAL MODELO: ZHS814 MANUAL DE INSTRUCCIONES Por favor, lea este manual de instrucciones en el interior, ya que hay información importante sobre seguridad, operación y mantenimiento
ui Quick Guide M-BOX M-SNOOP manual RW* manual RW4 PLUS + M-BOX FASTCOPY PLUS + M-BOX EZCLONE PLUS+ M-BOX
 Quick Guide = manual M-SNOOP manual + + RW* manual + QUICK-GUIDE BROCHURE + SRS PROGRAM RW4 PLUS + FASTCOPY PLUS + EZCLONE PLUS+ 1 LAN 2 USB 15Vdc Quick Guide RW4 + + P-BOX FASTCOPY + + P-BOX EZCLONE +
USA/Canada: 1-800-4KOHLER México: 001-800-456-4537 kohler.com 2011 Kohler Co.
 Installation Guide Guide d installation Guía de instalación Cabinet Mounted Stereo Stéréo montée sur armoire Estereo de montaje en gabinete K-2958 M product numbers are for Mexico (i.e. K-12345M) Los números
π H-4039 SPILL CONTAINMENT WORKSTATION CONNECTORS ASSEMBLY 1-800-295-5510 uline.com TOOL NEEDED
 π H-4039 SPILL CONTAINMENT WORKSTATION CONNECTORS uline.com Para Español, vea páginas 3-4. Pour le français, consulter les pages 5-6. TOOL NEEDED Plastic or Rubber Mallet ASSEMBLY 1. Locate one of the
Keep reading, for a list of required elements and questions to inspire you!
 You will write at least TEN sentences describing a typical week in the life of a BCC student YOU! -- based on the three Encuestas (surveys) you conducted with your classmates: If you can t think of what
PLANCHA DE PELO MODELO: ZHB719B
 PLANCHA DE PELO MODELO: ZHB719B MANUAL DE INSTRUCCIONES INSTRUCCIONES DE USO Es aconsejable lavar, secar y peinar el cabello. Utilice la placa con el pelo seco. La placa garantiza una mejor modelización
Matrox M-Series. Getting Started Guide Guide de mise en route Erste Schritte- Handbuch Guida introduttiva Guía de introducción
 Matrox M-Series Getting Started Guide Guide de mise en route Erste Schritte- Handbuch Guida introduttiva Guía de introducción 20071-G50-0220 FMSR-BKT22I Install your graphics hardware Choose a PCI Express
Push Pull Installation Procedure
 Push Pull Installation Procedure IMPORTANT SAFETY INSTRUCTIONS READ AND FOLLOW ALL INSTRUCTIONS SAVE THESE INSTRUCTIONS WARNING Before installing this product, read and follow all warning notices and instructions
1) Install the included batteries into your blood pressure monitor (BPM).
 Install the included batteries into your blood pressure monitor (BPM).") DELUXE CONNECTED BLOOD PRESSURE ONITOR UA-651BLE 1) Install the included batteries into your blood pressure monitor (BP). 2) Insert the air connector plug into the air socket. 3) Download the free A&D
DELUXE CONNECTED BLOOD PRESSURE ONITOR UA-651BLE 1) Install the included batteries into your blood pressure monitor (BP). 2) Insert the air connector plug into the air socket. 3) Download the free A&D
Los seres vivos/ living things. CONOCIMIENTO DEL MEDIO 3º DE PRIMARIA
 CONOCIMIENTO DEL MEDIO 3º DE PRIMARIA Los contenidos de la asignatura Conocimiento del Medio se agrupan en tres bloques, uno por trimestre y constan de 5 unidades cada uno. Teniendo en cuenta la temporalización
Matrox Epica Series 20162-G50-0110 FEP2-BKT11I
 Matrox Epica Series Epica TC20+ Epica TC48 Getting Started Guide Guide de mise en route Erste Schritte- Handbuch Guida introduttiva Guía de introducción 20162-G50-0110 FEP2-BKT11I Install your graphics
Modbus RTU - RS-232 Kit. Kit Modbus RTU / RS-232. Kit Modbus RTU / RS-232. Installation Guide. Guia de Instalación. Guia de Instalação
 Modbus RTU - RS-232 Kit Kit Modbus RTU / RS-232 Kit Modbus RTU / RS-232 Installation Guide Guia de Instalación Guia de Instalação 1. DESCRIPTION OF THE KIT Contents: Table 1 - Contents of the Kit SSW-07
appkbws03 Wireless Multimedia Keyboard Set Black
 appkbws03 Wireless Multimedia Keyboard Set Black Español 01 English 06 Capítulo 1. Introducción y descripción del producto Gracias por elegir el teclado inalámbrico APPKBWS03. Descripción del producto
Disfruten su verano! Hola estudiantes,
 Hola estudiantes, We hope that your experience during Spanish 1 was enjoyable and that you are looking forward to improving your ability to communicate in Spanish. As we all know, it is very difficult
3PIECES KIDS TABLE SET JUEGO DE MESA PARA NIÑOS DE 3 PIEZAS
 MODEL: 11224487 / MODELO: 11224487 3PIECES KIDS TABLE SET JUEO DE MESA PARA NIÑOS DE 3 PIEZAS NO A B C D E F PARTS LIST AND ARDWARE LISTA DE PARTES Y ACCESORIOS ARDWARE LIST LISTA DE ACCESORIOS TABLE TOP
Votre talent révélé Serving your talent
 Votre talent révélé Serving your talent CABERNET COLLECTION CABERNET CABERNET Finesse du buvant (1,2 mm) Fine rim (1,2 mm) contact agréable aux lèvres pleasant feel against the lips Finura de la boca (1.2
Start. Démarrer. Iniciar.
 Zune CABLE Pack câble de synchronisation Zune cable de sincronizacíon Zune Start. Démarrer. Iniciar. To sync and charge, connect the sync cable to your Zune and your PC. Just need to charge? Connect your
SERENGETI SAFARI SAFARI
 SERENGETI SAFARI SAFARI 16207 GB F E D NL I P R Please print at scale 1 without the printer margins. Merci d'imprimer à l'échelle 1 sans les marges de l'imprimante. Imprimir a escala 1 sin márgenes de
Video Server. Quick Installation Guide. English, Español
 Video Server Quick Installation Guide English, Español 2 Video Server NOTES Quick Installation Guide 3 Video Server Quick Installation Guide To get your Video Server up and running on an Ethernet network,
Structuring Numbers (ST) Score out of 4
 Score out of 4") VASD 1 st Grade WINTER and SPRING Minimal Basic Proficient Winter 0-9 10-12 13-20 Spring 0-12 13-15 16-20 Fall 0-12 13-15 16-20 and 2 nd Grade Fall Math Screener If student gets 20/20 in WINTER do NOT
VASD 1 st Grade WINTER and SPRING Minimal Basic Proficient Winter 0-9 10-12 13-20 Spring 0-12 13-15 16-20 Fall 0-12 13-15 16-20 and 2 nd Grade Fall Math Screener If student gets 20/20 in WINTER do NOT
Flashcards Series 5 El Agua
 Flashcards Series 5 El Agua Flashcards are one of the quickest and easiest ways to test yourself on Spanish vocabulary, no matter where you are! Test yourself on just these flashcards at first. Then, as
ROCK N STEREO SOUND DESK
 Read and save these instructions ROCK N STEREO SOUND DESK RTA-M1102-BK INSTRUCTIONS TABLE OF CONTENTS PACKAGE INCLUDES Package Includes... 2 Specifications... 2 Product Parts List... 3 1 2 3 Product Details...
Make your own Box Tops collection container
 Make your own Box Tops collection container It s easy here s what you need: Scissors or craft knife (make sure children are supervised when using cutting tools!) Glue or tape Crayons or markers A box from
MINI corniche. Istruzioni di montaggio Installation instructions Instructions de montage Montageanleitung Instrucciones de montaje. www.platek.
 MINI corniche Istruzioni di montaggio Installation instructions Instructions de montage Montageanleitung Instrucciones de montaje www.platek.eu I Sicurezza e avvertenze per l installazione: L installazione
Pañuelos y Turbantes. Design by. Julia Mazzoni
 Pañuelos y Turbantes Headscarfs and Turbans Mouchoirs et Turbans Lencos e Turbantes s Design by Julia Mazzoni 1 Ubiotex presenta la nueva colección de pañuelos y turbantes en su línea de belleza. Se compone
Sierra Security System
 Using Your SpreadNet Accessories With Your Sierra Security System Uso de Sus Accesorios SpreadNet Con Su Sistema de Seguridad Sierra SN990-KEYPAD SN961-KEYFOB SN991-REMOTE 1 SN990-KEYPAD The SN990-KEYPAD
In the following you see an example of a SPAC calculation run. BKtel systems 26.07.2004 Seite 1/8
 SPAC (System Performance Analysis for CATV Systems) is a tool for planning the performance of CATV distribution networks and their return path channel. SPAC calculates all important system parameters like
Mi ciudad interesante
 Mi ciudad interesante A WebQuest for 5th Grade Spanish Designed by Jacob Vuiller jvuiller@vt.edu Introducción Tarea Proceso Evaluación Conclusión Créditos Introducción Bienvenidos! Eres alcalde de una
Multicube 3D MULTICUBE. Design by Gabriel Songel, Innoarea.
 Multicube 3D Design by Gabriel Songel, Innoarea. MULTICUBE. Design by Gabriel Songel, Innoarea. Miniland S.A. P.Ind. La Marjal I C/ La Patronal s/nº. 03430 ONIL (Alicante) ESPAÑA Tel. Atención al Cliente
GARANT Werkstattwagen GARANT roller cabinets / Servantes d atelier GARANT Carrelli portautensili GARANT / Carro de taller GARANT
 GARANT Werkstattwagen GARANT roller cabinets / Servantes d atelier GARANT Carrelli portautensili GARANT / Carro de taller GARANT DE Bedienungsanleitung / User manual / Manual de instrucciones Manuel d
MANUAL DEL PROPIETARIO
 NasalClear Battery Operated Nasal Aspirator NasalClear Aspirador nasal de pilas OWNER'S MANUAL KEEP INSTRUCTIONS FOR FUTURE REFERENCE MANUAL DEL PROPIETARIO GUARDE LAS INSTRUCCIONES PARA USO FUTURO. 2011