SEROS 9000 EQUIPO DE ALINEACIÓN 3D
|
|
|
- Fernando Lucero Valverde
- hace 5 años
- Vistas:
Transcripción

1 SEROS 9000 EQUIPO DE ALINEACIÓN 3D Puesta en marcha V.15-02
2 Condiciones de transporte de equipo El alineador debe ser enviado en su embalaje original y guardado en la posición indicada en el exterior Fig. 1. Embalaje Instrucciones de Desembalaje Retire cuidadosamente los materiales del embalaje y retire todos los tornillos del embalaje Tenga cuidado cuando corte los flejes pueden aflojarse las maderas y caer causando lesión o daño personales. Siempre utilice guantes y tener cuidad con las herramientas de desembalar y evitar arañazos, abrasiones o cortes debido al contacto con los materiales de embalaje. Conserve todos los embalajes en caso necesitas devolver las piezas en garantía. Desembale cuidadosamente todos los artículos del inventario. Familiarícese con todos los componentes antes de comenzar a montar el alineador Revisar la lista de piezas del alineador El alineador debe incluir los siguientes elementos (1) 1 Barra con las cámaras (2) 1 Póster (3) 4 Black Target 1 carton (4) 4 Garras 2 carton
3 (5) 1 Mueble de ordenador (6) 1 Ordenador (7) 1 Llave de seguridad USB (8) 1 Monitor LCD (9) 1 Impresora (10) 2 Platos (11) 1 Bloqueo del volante (12) 1 Bloca freno Preparación de la barra de medición tolerancias de medidas admisibles: Entre izquierda y derecha max. 1 mm Entre la parte delante y parte de trasera max. 2 mm En diagonal desde la parte frontal izquierda a la parte derecha trasera max. 2 mm En diagonal desde la parte derecha delantera a la parte trasera izquierda max. 2 mm Fig. 2. Tolerancias de medidas admisibles: Checking the pit si es necesario, corregir la diferencia de altura encajando los platos y las placas oscilante
4 Comprobación de la plataforma de elevación Cuando se utiliza una plataforma de elevación, asegúrese de que la medición y altura de trabajo es idéntico a los platos Las placas oscilantes deben ser fijadas a la plataforma de levantamiento. Comprobación de Poste y cámaras El póster y las cámaras, deberían quedarse a media altura o en la marca de la pista/plataforma, y vertical al suelo. Compruebe las diferentes posiciones en las medidas de altura, debería asegurarse que el rayo de la cámara esté al mismo nivel en esas posiciones. Fig. 3. Requisitos para la instalación Fig. 4. Requisitos necesarios para la instalación en un elevadores de 4 columnas
5 Fig. 5. Requisitos necesarios para la instalación en un elevador de tijera Fig. 6. Posicionamiento de las diferentes medidas del póster Table 1. Standard Target Table 2. BDM Target L H Target to Floor L H Target to Floor

6 Fig. 7. Área del sistema de medición Fig. 8. Posicionamiento Posicionamiento de la cámara 1. Medir la distancia entre los dos lados interiores de la marca de la plataforma y encuentra el punto central. Mostrado como A y B. Encuentre la línea central del elevador usando estos dos puntos. 2. Con la mesa de giro bloqueda, en el nivel de alineación, encuentre el punto central de la mesa de giro. Una los dos puntos centrales de la mesa de giro, como se muestra en C. 3.De la línea central de la mesa de giro, mida L1. Marque la primera posición del poste 4. Marque el cuatro punto para la base del poste. Como se muestra en los puntos E y D.


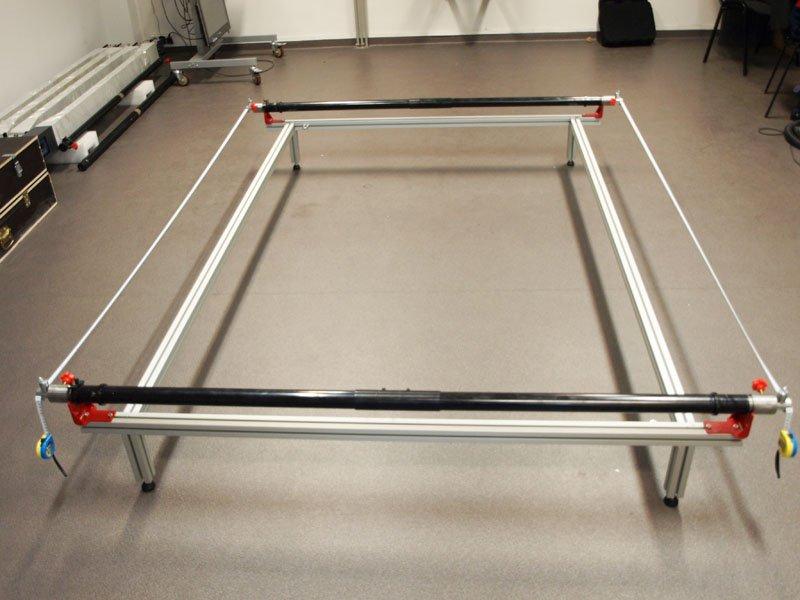
7 Assemble Portable Calibration Kit A B I F C D H G E Fig. 9. Calibration kit; A-Calibration rod, B-Calibration V shaped bar, C-Connection bar, D-Frame leg, E-Knob, F- Tape measurement (5Mx2, 3Mx2), G-Tape measure lock, H-Tension cable, I-Box 1. Connect two leg for each calibration V shaped bar, use screw to lock them as shown in diagram 10 and Connect two connection bar for each calibration V shaped bar as shown in diagram 12,13,14. Make sure that marking adjacent parts are identical 3. Place two calibration rod to the V shaped bars in front and rear position, as shown in diagram 16/17. Fig. 10. Fig.11


8 Fig.12 Fig.13 Fig. 14 Fig 15 Fig.16 Fig.17

9 4. Check the position of calibration fixture, see diagram 18 and 19 LA=LB=LC=LD= 345 mm A=B=C=D Fig.18. Fig Place four right trangle tool to each hold of calibration rod Fig.20. Trangle Tool


10 6. Level the right triangle tool and lock them. 7. Put the 3m tape measurement in the right triangle tool and fixed one side at 100 mm. 8. Put two 3m long tape measurement in the right triangle tool from front to rear of the calibration fixture, see diagram Both side should be equal, if not adjust the calibration fixture 10. Put two 5m long tape measurement in upper right triangle tool and fix them at 100 mm 11. Place two 5m tape measurement from front to rear calibration bar diagonaly 12. Adjust the calibration fixture so diagonally are equal 13. Adjust until both A/A and B/B are equal A B A B Fig.21. Fig.22.


11 Calibration procedure 1. Connect power cable, monitor, two usb cable for camera, keyboards, mouse, software key and printer to the back of the computer. Fig. 29; A. Power B. Monitor C. Camera 1 D. Camera 2 G: Mouse H: Software key, I Printer 2. Run alignment software and enter simplified version of calibration program Fig According to the instruction shown on the screen, adjust the camera beam and post, so the targets are in the center of each windows. Make sure the Z value from both side are equal.
12 Distance between camera and front target is 2.8M,wheelbase is 2.4M Distance between camera and front target is 2.8M,wheelbase 2.8M Distance between camera and front target is 2.8M,wheelbase 3.5M 4. Once the position is ok, fix the anchor bolts, make sure the post is fixed.

13 5. Adjust the target to -20±0.5, make sure the fine tuning tools is at front position on both calibration bar

14 6. Start calibration, make sure there is no interruption during the calibration process. 7.Rotate the calibration bar so the front target is at -20 degree. 8. Rotate the bar to 20 degree and follow the instruction.
15 9. After the calibration, the software will say calibration finished, then ask for save calibration data. The default password is Remark: After the calibration, the angle shown in left screen should be within ±0.05. If this angle is more than ±0.05, then adjust the post and camera beam and redo this calibration until this value is within range.
INSTRUCCIONES DE ENSAMBLAJE.
 English MULTI-FUNCTIONAL COMPUTER TABLE ASSEMBLY INSTRUCTION MODEL RTA - S06 IMPORTANT: Surfaces must be cleaned with a solution of a smooth soap and water, then cleared with a dry towel. Do not use solvents
INSTRUCCIONES DE ENSAMBLAJE.
 English MULTI-FUNCTIONAL COMPUTER TABLE ASSEMBLY INSTRUCTION MODEL RTA - 3806 IMPORTANT: Surfaces must be cleaned with a solution of a smooth soap and water, then cleared with a dry towel. Do not use solvents
MODEL: F / MODELO: F END TABLE WITH MEDIA STAND & MAGAZINE HOLDER MESA RINCONERA CON ESTANTE & REVISTERO
 MODEL: 11225479F / MODELO: 11225479F END TABLE WITH MEDIA STAND & MAGAZINE HOLDER MESA RINCONERA CON ESTANTE & REVISTERO NO A B C D E F G H I J K L PARTS LIST AND HARDWARE PARTES Y ACCESORIOS PARTS LIST
RTA-B002 DIMENSIONS MAXIMUM WEIGHT CAPACITIES. Highest position. Lowest position. Product Size: 22"W x 16"D x 30.5~46.5"H
 MODEL RTA - B002 Thanks for purchasing one of our products. Please read carefully the assembly instructions before the installation. Please save this manual for future reference. MODEL RTA-B002 MODELO
Model :RFBW01014 Model :RFBE Model :RFBG 01014
 Model :RFBW01014 Model :RFBE 01014 Model :RFBG 01014 Wall Cabinet Operators Manual Manual de Operadora del Gabinete de pared Inspect product prior to installation. Contact info@runfinegroups.com prior
Meijer.com A
 English MULTI-FUNCTIONL COMPUTER TLE SSEMLY INSTRUCTION Meijer.com C MODEL RT - 350 IMPORTNT: Surfaces must be cleaned with a solution of a smooth soap and water, then cleared with a dry towel. Do not
Meijer.com A
 English MOBILE LAPTOP CART STORAGE ASSEMBLY INSTRUCTION MODEL RTA - B00 IMPORTANT: Surfaces must be cleaned with a solution of a smooth soap and water, then cleared with a dry towel. Do not use solvents
3 PIECE BAR SET JUEGO DE BAR DE 3 PIEZAS
 MODEL: 11222152VW / MODELO: 11222152VW 3 PIECE BAR SET JUEGO DE BAR DE 3 PIEZAS NO A B C D E F G H I J K L M N O P1 P2 Q PARTS LIST AND HARDWARE LISTA DE PARTES Y ACCESORIOS HARDWARE LIST LISTA DE ACCESORIOS
GUÍA RÁPIDA QUICK GUIDE
 GUÍA RÁPIDA QUICK GUIDE GUÍA RÁPIDA - VINCULACIÓN Medidor de potencia VINCULACIÓN AUTOMÁTICA ES Asegúrese de que está al menos 10 metros alejado de cualquier otro sensor ANT+TM y siga los siguientes pasos.
INSTRUCCIONES DE ENSAMBLAJE.
 English MULTI-FUNCTIONAL COMPUTER TABLE ASSEMBLY INSTRUCTION MODEL RTA - 3327 IMPORTANT: Surfaces must be cleaned with a solution of a smooth soap and water, then cleared with a dry towel. Do not use solvents
BUILT-IN TRIM KIT INSTALLATION INSTRUCTION
 BUILT-IN TRIM KIT INSTALLATION INSTRUCTION FOR KENMORE TRIM-KIT MODEL - 30 : 63002, 63004, 63009, 64003 27 : 63012, 63014, 63019, 63013 FOR USE WITH KENMORE MICROWAVE OVEN MODEL: 721.62462200, 721.62463200,
1. Encendido / apagado 6. Auriculares 11. LED de Carga 2. Volumen + 7. Micro SD 12. MIC 3. Volumen - 8. Micro USB 13. Sensor de luz 4.
 25.65 32GB 2GB 2 3 1. Encendido / apagado 6. Auriculares 11. LED de Carga 2. Volumen + 7. Micro SD 12. MIC 3. Volumen - 8. Micro USB 13. Sensor de luz 4. Tecla windows 9. Corriente continua 14. Cámara
ASSEMBLY INSTRUCTIONS
 ASSEMBLY INSTRUCTIONS 2 DOOR WALL CABINET ADULT ASSEMBLY REQUIRED This product requires assembly by an adult because of the small parts. Care should be taken in unpacking and assembling this item to keep
Plataforma Universal de Torno con Extensión Para Mini y Midi Tornos
 70-90 70-93 Plataforma Universal de Torno con Extensión Para Mini y Midi Tornos Plataforma mostrada con extensión opcional Instrucciones de Ensamblaje Escriba la fecha de compra en su manual para referencia
Cambridge Pre-Packaged / Pre-Cut MaytRx Wall Patio and Pub Bistro Table
 Cambridge Pre-Cortado Kit de Mesa para uso Afuerra de MaytRx Pared Layer Reference Guide: Guía de Referencia: Layer 9 Layer 8 Layer 7 Layer 6 Layer 5 Finished Grade (7 1/4 Above Top of Foundation) Grado
MODEL: / MODELO: SPACE SAVER CABINET GABINETE PARA EL BAÑO
 MODEL: 125675 / MODELO: 125675 SPACE SAVER CABINET GABINETE PARA EL BAÑO NO A B C D E F G H I J K L M PARTS AND HARDWARE LISTA DE PARTES Y HARDWARE LEFT FRAME MARCO IZQUIERDO RIGHT FRAME MARCO DERECHO
INSTRUCTION, LIFTGATE MOUNTING KIT FOR FRAMELESS TRAILERS WITH SLIDER AXLES (GPT)
") LIFT CORPORATION Sht. 1 of 12 DSG# M-08-05 Rev. C Date: 06/19/2017 INSTRUCTION, LIFTGATE MOUNTING KIT FOR FRAMELESS TRAILERS WITH SLIDER AXLES (GPT) NOTE: Kits can only be installed on slider axle trailers
LIFT CORPORATION Sht. 1 of 12 DSG# M-08-05 Rev. C Date: 06/19/2017 INSTRUCTION, LIFTGATE MOUNTING KIT FOR FRAMELESS TRAILERS WITH SLIDER AXLES (GPT) NOTE: Kits can only be installed on slider axle trailers
RTA-3325 DIMENSIONS MAXIMUM WEIGHT CAPACITIES. Product Size: 60"W x 23.5"D x 35"H
 MODEL RTA-3325 MODELO RTA - 3325 Gracias por comprar uno de nuestros productos. Por favor lea cuidadosamente las instrucciones de ensamblaje antes de instalar la unidad. Por favor guarde este manual para
Do Now! Question 1: Pregunta 1
 Do Now! Question 1: What do you predict Scratch Cat will do according to this block of code? Write your response in your journal. Pregunta 1 : Qué predices el gato hará de acuerdo con este bloque de código?
MODEL: / MODELO: BATHROOM CABINET MUEBLE DE BAÑO
 MODEL: 227 / MODELO: 227 BATHROOM CABINET MUEBLE DE BAÑO NO A B C D E F G H 2 3 PARTS AND HARDWARE LISTA DE PARTES Y HARDWARE RIGHT FRAME MARCO DERECHO LEFT FRAME MARCO IZQUIERDO TOP PANEL PANEL SUPERIOR
Cambridge Pre-Packeged / Pre-Cut Olde English Wall Patio Pub & Bistro Table Kit
 Cambridge Pre-Packeged / Pre-Cut Olde English Wall Patio Pub & Bistro Table Kit Cambridge Pre-Cortado Kit de Mesa para uso Afuerra de Olde Inglés Pared Layer Reference Guide: Guía de Referencia: Layer
ADULT ASSEMBLY REQUIRED
 HORIZONTAL BOOKCASE White Espresso Gray ADULT ASSEMBLY REQUIRED This product requires assembly by an adult because of small parts. Care should be taken in unpacking and assembling this item to keep small
COMPUTER DESK ESCRITORIO DE COMPUTADORA
 MODEL: 11222327F / MODELO: 11222327F COMPUTER DESK ESCRITORIO DE COMPUTADORA NO A B C D E F G H I J PARTS AND HARDWARE LISTA DE PARTES Y HARDWARE TOP PANEL PANEL SUPERIOR KEYBOARD PANEL PANEL DE TECLADO
Guía de instalación rápida TFM-561U
 Guía de instalación rápida TFM-561U V1 Table of Contents Español 1 1. Antes de iniciar 1 2. Cómo se instala 2 Troubleshooting 5 Version 08.25.2010 1. Antes de iniciar Contenidos del paquete TFM-561U CD-ROM
WOODEN MAGAZINE TABLE MESA REVISTERO DE MADERA
 ODEL: 11224545V / ODELO: 11224545V WOODEN AGAZINE TABLE ESA REVISTERO DE ADERA NO A B C D E F G H I J L N PARTS AND HARDWARE LISTA DE PARTES Y HARDWARE HARDWARE LIST LISTA DE HARDWARE LEFT BAC SIDE PANEL
IMPORTANT! Must be attached to a R cabinet or a GT storage unit or side-byside or anchored to the wall.
 Locker / Storage Unit R Line Assembly Guide Guía de montaje Ligne R All required hardware is included. Please check the contents with your packing slip. Read instructions carefully. Two people are required
Bluebeam Digital Certification Manual
 Manual Certificación Digital en Bluebeam Revu Bluebeam Digital Certification Manual Desarrollado por: DTE, LLC support@dtellcpr.com Developed by: DTE, LLC Revisado en: 20 de julio de 2016. Ver. 1.101.0720
4 DRAWER ORGANIZER ORGANIZADOR DE 4 CAJONES
 MODEL: 11210913 / MODELO: 11210913 DRAWER ORGANIZER ORGANIZADOR DE CAJONES NO N o 1 2 3 NO N o A B C D E PARTS LIST AND HARDWARE LISTA DE ACCESORIOS Y PARTES HARDWARE LIST / LISTA DE ACCESORIOS SCREW /
ASSEMBLY INSTRUCTIONS
 ASSEMBLY INSTRUCTIONS 3-Shelf Corner Cabinet WHITE ESPRESSO ADULT ASSEMBLY REQUIRED This product requires assembly by an adult because of small parts. Care should be taken in unpacking and assembling this
MANUAL DE INSTRUCCIONES
 Edizione : 10/16 Revisione : 00 MANUAL DE INSTRUCCIONES 3 Step 1 Sujeta el estabilizador frontal y trasero (N&M) con 4 tornillos (M-1). Step 2 Cierre y ajuste el pedal izquierdo (K-L) y el pedal derecho
INSTRUCCIONES DE ENSAMBLAJE.
 English MULTI-FUNCTIONAL COMPUTER TALE ASSEMLY INSTRUCTION MODEL RTA - 2706A IMPORTANT: Surfaces must be cleaned with a solution of a smooth soap and water, then cleared with a dry towel. Do not use solvents
TALLER DE FUERZA ELÉCTRICA
 TALLER DE FUERZA ELÉCTRICA MULTIPLE CHOICE. Choose the one alternative that best completes the statement or answers the question. 1) Figura 21.2a 1) 1.1 m 1.7 m Dos cargas puntuales, Q1 = -1.0 µc y Q2
Do Now Question 1: Pregunta 1
 Do Now Question 1: What do you predict Scratch Cat will do according to this block of code? Write your response in your journal. Pregunta 1: Qué predices el gato hará de acuerdo con este bloque de código?
INSTRUCCIONES DE ENSAMBLAJE ASSEMBLY INSTRUCTIONS DELTA IDELTA0117_R2
 INSTRUCCIONES DE ENSAMBLAJE ASSEMBLY INSTRUCTIONS DELTA IDELTA0117_R2 INSTRUCCIONES DE ENSAMBLAJE ASSEMBLY INSTRUCTIONS DELTA INFORMACIÓN IMPORTANTE: LEER DETENIDAMENTE GUARDA ESTA INFORMACIÓN PARA CONSULTARLA
3PCS 20 DERECHO. Right. Left
 PARTS LIST LISTA DE PARTES 1 2 3 4 CPU Left Panel CPU Right Panel Studs CPU Bottom Panel Panel Izquierdo del porta CPU Panel derecho del porta CPU Patas Panel Inferior del Porta CPU 5 6 7 8 CPU Back Panel
CONTROLADORA PARA PIXELS CONPIX
 The LedEdit Software Instructions 1, Install the software to PC and open English version: When we installed The LedEdit Software, on the desktop we can see following icon: Please Double-click it, then
WOODEN WALL STORAGE WITH 3 NON-WOVEN BINS ALMACENAMIENTO DE MADERA DE PARED DE 3 CAJONES DE TELA
 MODE: 11224540V / MODEO: 11224540V WOODEN WA STORAGE WITH 3 NON-WOVEN BINS AMACENAMIENTO DE MADERA DE PARED DE 3 CAJONES DE TEA NO A B C D E F G H I J K M N PARTS AND HARDWARE ISTA DE PARTES Y HARDWARE
Ready-To-Finish Fire Pit Cabinet Assembly Instructions
 Ready-To-Finish Fire Pit Cabinet Assembly Instructions For Part Numbers: RTF-S36 RTF-S42 RTF-S48 RTF-S60 Top Panel with Burner Cutout Templates Adjustable Burner Frame Back Panel Side Panel Pre-Drilled
MT442 MT642 U S E R S M A N U A L
 T I L T S L I M M O U N T Display Size: 24-55 Maximum load: 70 lbs / 32 kg VESA Patterns: 75 x 75 to 400 x 400 Display Size: 30-65 Maximum load: 75 lbs / 34 kg VESA Patterns: 75 x 75 to 600 x 400 MT442
TX MULTI MANUAL TX MULTI. Mando copiador multifrecuencia 1. PASOS PARA COPIAR UN MANDO CÓDIGO FIJO Y ROLLING ESTÁNDAR:
 MANUAL TX MULTI Mando copiador multifrecuencia 1. PASOS PARA COPIAR UN MANDO CÓDIGO FIJO Y ROLLING ESTÁNDAR: 1. Situar el mando original que desea copiar junto al TX Multi, en torno a 2-4 centímetros de
T R A N S TECHNICAL SPECIFICATIONS:
 A R P O L T R A N S TECHNICAL SPECIFICATIONS: 1, or - look casing Specially designed rubber gasket (various models) Steps of up tc 8 mm between outside diameters Working pressures up to bar F l e x i b
IE12_ CONSOLIDACIÓN Y DESARROLLO DE NUEVAS TÉCNICAS DE EVALUACIÓN INTENSIVAS ON-LINE YA IMPLEMENTADAS POR EL GIE E4
 IE12_13-03001 - CONSOLIDACIÓN Y DESARROLLO DE NUEVAS TÉCNICAS DE EVALUACIÓN Departamento de Estructuras de la Edificación Escuela Técnica Superior de Arquitectura de Madrid Universidad Politécnica de Madrid
Añadir para firmar digitalmente documentos EDE. Add digital signatures to EDE documents
 Añadir para firmar digitalmente documentos EDE Add digital signatures to EDE documents Desarrollado por: DTE, LLC Versión: 01.2017 Developed by: DTE, LLC Revisado en: 27 de Marzo de 201 support@dtellcpr.com
TELEVISOR A COLORES MANUAL DE SERVICIO MODELO : CP-29C40P. ATENCIÓN Antes de dar servicio al chasis, lea las PRECAUCIONES DE SEGURIDAD en este manual.
 LG TELEVISOR A COLORES MANUAL DE SERVICIO CHASIS : MC-53A MODELO : CP-29C40P ATENCIÓN Antes de dar servicio al chasis, lea las PRECAUCIONES DE SEGURIDAD en este manual. - 1 - - 2 - - 3 - - 4 - - 1 - -
INSTRUCTION, BMR FOOT GUARD SWITCH FOR PARTS BOX P/N AND PARTS BOX P/N
 LIFT CORPORATION Sht. 1 of 16 DSG# M-16-01 Rev. A Date: 08/23/18 INSTRUCTION, BMR FOOT GUARD SWITCH FOR PARTS BOX P/N 296805-01-200 AND PARTS BOX P/N 296805-12-200 TEE CABLE, FOOT GUARD SWITCH P/N 297146-01
LAPTOP DESK WITH 3 BINS MESA PARA COMPUTADORA PERSONAL CON 3 CONTENEDORES
 MODEL: 11222775R / MODELO: 11222775R LAPTOP DESK WITH 3 BINS MESA PARA COMPUTADORA PERSONAL CON 3 CONTENEDORES NO A B C D E F G H 1 2 3 4 5 6 7 8 9 PARTS AND HARDWARE LISTA DE PARTES Y HARDWARE TOP PANEL
RTA-2706A DIMENSIONS
 MODEL RTA - 706A Thanks for purchasing one of our products. Please read carefully the assembly instructions before the installation. Please save this manual for future reference. MODEL RTA-706A MODELO
Package Contents. Hardware Package. Tools Needed
 Reverso en español HWGWTR-1 REAR REGISTER KIT INSTALLATION INSTRUCTIONS INSTRUCTIONS MUST BE LEFT WITH THE OWNER FOR FUTURE REFERENCE AFTER INSTALLATION. Package Contents REGISTER BOOT REGISTER WITH DAMPER
USER MANUAL LOGAN CAM VIEW FOR PC LOGAN CAM VIEW PARA PC English / Español
 USER MANUAL LOGAN CAM VIEW FOR PC LOGAN CAM VIEW PARA PC English / Español ENGLISH SECTION PC Installation 1. Download the application Logan Cam View for PC through the following link: https://support.logan-cam.com/hc/enus/articles/115000940287-logan-cam-view
CLINICAL PAPER. Dr. Pablo Echarri. TREATMENT WITH DISTALIZATION USING CA CLEAR ALIGNER Y CA DISTALIZER KIT (Part 1)
") 29 TRATAMIENTO CON DISTALIZACIÓN UTILIZANDO CA CLEAR ALIGNER Y CA DISTALIZER KIT (Parte 1) TREATMENT WITH DISTALIZATION USING CA CLEAR ALIGNER Y CA DISTALIZER KIT (Part 1) Los casos expuestos han sido
29 TRATAMIENTO CON DISTALIZACIÓN UTILIZANDO CA CLEAR ALIGNER Y CA DISTALIZER KIT (Parte 1) TREATMENT WITH DISTALIZATION USING CA CLEAR ALIGNER Y CA DISTALIZER KIT (Part 1) Los casos expuestos han sido
8 BIN WOODEN STORAGE ORGANIZER ORGANIZADOR DE 8 CAJONES DE TELA
 MODEL: 11223768V / MODELO: 11223768V 8 BIN WOODEN STORAGE ORGANIZER ORGANIZADOR DE 8 CAJONES DE TELA PARTS LIST AND HARDWARE LISTA DE PARTES Y ACCESORIOS NO A B C D E F G H1 H2 I J K L M N O HARDWARE LIST
GAUDI MODEL HOTEL LOCK
 INSTRUCTION MANUAL and SPARE PARTS GAUDI MODEL HOTEL LOCK HOTEL: ADDRESS: TOWN: TELEPHONE: FAX: E-MAIL: OMNITEC DEALER: CONTACT: ADDRESS: TOWN: TELEPHONE: FAX: E-MAIL: ZARAGOZA, Month and year of manufacture.
KAWASAKI VERSYS
 Montaje para Soporte de exploradora. Nota: No apriete todos los tornillos hasta que no estén completamente alineadas todas las perforaciones con respecto a los puntos de sujeción. y las piezas esten completas.
Taller de Electrostática
 Taller de Electrostática MULTIPLE CHOICE. Choose the one alternative that best completes the statement or answers the question. 1) Figura 21.2a 1) 1.1 m 1.7 m Dos cargas puntuales, Q 1 = -1.0 µc y Q 2
Instruction Manual. Safety Warning and Precautions
 Art# GAZ201490/5055 Instruction Manual Save this Manual for future reference. Your Gazebo requires assembly prior to use. It is important that you read the entire manual to become familiar with the unit
ÍNDICE / INDEX A.- INSTRUCCIONES DE MONTAJE / ASSEMBLY INSTRUCTIONS B.- INSTRUCCIONES DE DESMONTAJE / DRAWER DISMANTLING INSTRUCTIONS
 ÍNDICE / INDEX A.- INSTRUCCIONES DE MONTAJE / ASSEMBLY INSTRUCTIONS A.1.- Montaje del Cajón al Módulo / Drawer Assembly into the Carcass (pulsar/press) pag. 1-6 A.2.- Montaje del Frontal / Drawer Front
1
 PARTS AND ACCESSORIES COLOR OF PIECES MAY VARY PARTES Y ACCESORIOS EL COLOR DE LAS PIEZAS PUEDE VARIAR 5 x 7 x IMPORTANT PRE-BUILD STEPS PREVIA IMPORTANTE PASOS DE COMPILACIÓN STEP PASO SEPARATE AND COUNT
Ill!!/ LISTA DE PARTES PARTS LIST P.3. Pane/es Laterales. Porta CPU. Tubos Horizontales. Conectores. Panel Porta Tee/ado.
 ASSEMBLY INSTRUCTION IMPORTANT: Surfaces must be cleaned with a solution of a smooth soap and water, then cleared with a dry towel. Do not use solvents over surfaces or structural tubes. IMPORTANTE: Para
ASSEMBLY INSTRUCTIONS
 ASSEMBLY INSTRUCTIONS SINGLE DOOR / 3 DRAWER CABINET WHITE GRAY ADULT ASSEMBLY REQUIRED This product requires assembly by an adult because of the small parts. Care should be taken in unpacking and assembling
Cambridge Pre-Packaged / Pre-Cut Olde English Wall Mailbox
 Note: Cap layer is not included in the kit and is sold separately. Nota: La capa del casquillo no se incluye en el kit y se vende por separado. Cambridge Pre-Envasados / Pre-Cortadas Olde Inglés Buzón
Installation Guide. Green momit
 Installation Guide Green momit 2015 www.momit.com momit Deviceses Gateway: Model 1 and 2 Wall option The momit Gateway allows your thermostat to be connected to the Internet. It s included in the Starter
SP-U. Soporte colgado universal para JK26 / JK10 / JK10MA / JK12 / JK12MA / JK15 / KEY10 / KEY12 / KEY15
 Soporte colgado universal para JK26 / JK10 / JK10MA / JK12 / JK12MA / JK15 / KEY10 / KEY12 / KEY15 Universal U-bracket for JK26 / JK10 / JK10MA / JK12 / JK12MA / JK15 / KEY10 / KEY12 / KEY15 Copyright
MF222 U S E R M A N U A L
 S L I M F L A T M O U N T Display Size: 10-40 Maximum load: 44 lbs / 20 kg VESA Patterns: 75 x 75 to 200 x 200 MF222 U S E R M A N U A L ATTENTION: BEFORE INSTALLING, READ ALL WARNINGS AND CAUTIONS ON
ASSEMBLY INSTRUCTIONS
 ASSEMBLY INSTRUCTIONS RiverRidge ASHLAND 2 DOOR WALL CABINET ITEM# 06-084 WHITE ITEM# 06-085 GRAY ADULT ASSEMBLY REQUIRED This product requires assembly by an adult because of the small parts. Care should
MANUAL DE INSTRUCCIONES SOPORTE PARA TV LED/LCD (23 42 ) WM-5293
 WM-5293") MANUAL DE INSTRUCCIONES SOPORTE PARA TV LED/LCD (23 42 ) WM-5293 ESTIMADO CLIENTE Con el fin de que obtenga el mayor desempeño de su producto, por favor lea este manual de instrucciones cuidadosamente
MANUAL DE INSTRUCCIONES SOPORTE PARA TV LED/LCD (23 42 ) WM-5293 ESTIMADO CLIENTE Con el fin de que obtenga el mayor desempeño de su producto, por favor lea este manual de instrucciones cuidadosamente
KMR SCA-05 Mounting Instructions Instrucción de Montaje Instruções de Montagem 0899.4897
 0899.4897 KMR SCA-05 Mounting Instructions Instrucción de Montaje Instruções de Montagem 0899.4897 KMR SCA-05 Mounting Instructions Instrucción de Montaje Instruções de Montagem The KMR SCA-05 kit is a
ASSEMBLY INSTRUCTIONS
 ASSEMBLY INSTRUCTIONS SINGLE DOOR FLOOR CABINET W/SIDE SHELVES WHITE ESPRESSO ADULT ASSEMBLY REQUIRED This product requires assembly by an adult because of small parts. Care should be taken in unpacking
Flashcards Series 4 El Hotel
 Flashcards Series 4 El Hotel Flashcards are one of the quickest and easiest ways to test yourself on Spanish vocabulary, no matter where you are! Test yourself on just these flashcards at first. Then,
MULTI-FUNCTIONAL COMPUTER TABLE
 English MULTI-FUNCTIONAL COMPUTER TABLE ASSEMBLY INSTRUCTION IMPORTANT: Surfaces must be cleaned with a solution of a smooth soap and water, then cleared with a dry towel. Do not use solvents over surfaces
Timulus. Setup Manual CLEARTON, LLC. The Smart Security Camera. Better Technology for Humanity
 Timulus The Smart Security Camera Setup Manual CLEARTON, LLC Better Technology for Humanity Welcome to the World of Timulus! The smart security camera enabling the Free Use, the Never 21, and the Free
QUICK GUIDE RECORD SETUP CONFIGURACIÓN DE GRABACIÓN English / Español
 QUICK GUIDE RECORD SETUP CONFIGURACIÓN DE GRABACIÓN English / Español ENGLISH SECTION Once you enter to the Main Screen on your DVR, press right button on the mouse and select the third icon called Record
English language / Idioma Español AK90-E. Leaflet No. / No. de folleto rev 00
 English language / Idioma Español AK90-E Leaflet No. / No. de folleto 466295 rev 00 Read through ALL instructions before commencing installation. If you have any questions about this product or issues
Sesión 4: Practica PL 2c. Análisis de señales para el control de motor CC: Generación de señales PWM.
 Sesión 4: Practica PL 2c. Análisis de señales para el control de motor CC: Generación de señales PWM. Objetivo... 2 Tune Parameters Using xpc Target Explorer... 3 Monitor Signals Using xpc Target Explorer...
Bluebeam Change Digital Certification Appearance Manual. Manual Cambio de Apariencia en Bluebeam Revu
 Manual Cambio de Apariencia en Bluebeam Revu Bluebeam Change Digital Certification Appearance Manual Desarrollado por: DTE, LLC support@dtellcpr.com Developed by: DTE, LLC Revisado en: 21 de julio de 2016.
E - Electrical disposal Ficha (1) L (black) N (white) BALAST
 L (black) N (white) BALAST") SSEMLY INSTRUCTIONS INSTRUCCIONES DE MONTJE ox contains Contenido de la caja: - Lampshade Tulipa (1) - Frame Soporte (1) C - Screws Tornillos (4) D - Wall Plugs Tacos (4) E - Electrical disposal Ficha
SSEMLY INSTRUCTIONS INSTRUCCIONES DE MONTJE ox contains Contenido de la caja: - Lampshade Tulipa (1) - Frame Soporte (1) C - Screws Tornillos (4) D - Wall Plugs Tacos (4) E - Electrical disposal Ficha
Package Contents Hardware Package Tools Needed
 Reverso en español HWGWTW2-1 OUT-OF -THE -WALL INSTALLATION INSTRUCTIONS INSTRUCTIONS MUST BE LEFT WITH THE OWNER FOR FUTURE REFERENCE AFTER INSTALLATION. Package Contents NOTE: Items shown are NOT actual
happy safari travel cot cuna de viaje happy safari guía para el usuario importante. retenga para referencia futura - lea con cuidado.
 happy safari travel cot user guide important. retain for future reference - read carefully cuna de viaje happy safari guía para el usuario importante. retenga para referencia futura - lea con cuidado.
Manual de Exportación de Certificados Digitales
 Manual de Exportación de Certificados Digitales Desarrollado por: DTE, LLC Revisado en: 25 de abril de 2016 Versión: 1.160425 support@dtellcpr.com Este manual es para aquellos que quieran llevar su Certificado
Flashcards Series 5 El Agua
 Flashcards Series 5 El Agua Flashcards are one of the quickest and easiest ways to test yourself on Spanish vocabulary, no matter where you are! Test yourself on just these flashcards at first. Then, as
MANUAL DE INSTRUCCIONES CALEFACTOR ELECTRICO HALOGENO CON SOPORTE DE PIE INSTRUCTION MANUAL PATIO HEATER HALOGEN TUBE STAND TYPE 2000W
 MANUAL DE INSTRUCCIONES CALEFACTOR ELECTRICO HALOGENO CON SOPORTE DE PIE INSTRUCTION MANUAL PATIO HEATER HALOGEN TUBE STAND TYPE 2000W REF IMP16108BH Lote/Lot: J160222-08-2016 Año/Year: 2016 COMPOSICION
LIRIC SERIE MODEL LIRIC 8 / LIRIC 6 / LIRIC 5
 LIRIC SERIE MODEL LIRIC 8 / LIRIC 6 / LIRIC 5 ENGLISH INSTALLATION manual INSTALLATION INSTRUCTION FOR SURFACE MOUNT BOX TYPE SPEAKER MODEL: LIRIC 5 / LIRIC 6 / LIRIC 8 1) When mounting speakers, use the
WebForms con LeadTools
 WebForms con LeadTools 21.01.2007 Danysoft Con la aparición de la version 15 de LEADTOOLS, LEAD ha incluido un control.net para la gestión de formularios en la Web. A continuación le incluimos unas instrucciones
dash LED Light Luz LED dash INTEGRATED & SOTO RAILS RIELES INTEGRADOS Y SOTO
 dash LED Light Luz LED dash INTEGRATED & SOTO RAILS RIELES INTEGRADOS Y SOTO M HEX LLAVE HEX M b e a c d SIDE VIEW VISTA LATERAL FREESTANDING BASE BASE AUTÓNOMA ON OFF ON OFF If you have a problem, question,
MANUAL DE INSTRUCCIONES / USER'S GUIDE VD53
 MANUAL DE INSTRUCCIONES / USER'S GUIDE VD53 ESP AJUSTAR LA POSICIÓN DE LAS MANECILLAS DEL CRONÓMETRO - Antes de fijar la hora, compruebe que todas las manecillas del cronógrafo - segundos, minutos - estén
ASSEMBLY INSTRUCTIONS INSTRUCCIONES DE MONTAJE
 ASSEMBLY INSTRUCTIONS INSTRUCCIONES DE MONTAJE 4 PC PATIO CONVERSATION SET JUEGO DE PATIO C/ MESA, 2 SILLAS Y UN SILLÓN 250559R /250559T/250559G PLEASE NOTED / POR FAVOR A TENER EN CUENTA: THIS SET OF
Herramientas de renombre mundial
 Herramientas de renombre mundial TRAKRITE WHEEL ALIGNMENT RANGE Trakrite Medidor de Avance, Comba y Ángulo de Salida Nº de pieza 77099 Instrucciones Introducción: Especificaciones: Medidor de inclinación
INSTRUCTION MANUAL Smart Security Light
 SPL06-07A1W1-BKT-K1 INSTRUCTION MANUAL Smart Security Light Questions, problems, or missing parts? Before returning to the store, call MAXIMUS customer service at 1-866-897-2098, Monday Friday, 9:30am
STOP WARNING. Contempo Futon - Charcoal-HN. Weight Limit: 300Lbs \ 136 Kgs. or access our website. Date of Purchase / /
 0 9986 355 6 35596 Contempo Futon - Charcoal-HN Weight Limit: 300Lbs \ 36 Kgs STOP O NOT RETURN PROUCT TO THE STORE Individual stores do not stock parts. If a part is missing or damaged, call our toll-free
QUICK GUIDE RECORD SETUP CONFIGURACIÓN DE GRABACIÓN English / Español
 QUICK GUIDE RECORD SETUP CONFIGURACIÓN DE GRABACIÓN English / Español ENGLISH SECTION Once you enter to the Main Screen on your DVR, press right button on the mouse and select the third icon called Record
www.totalspanishsimulator.com
 I ) Instalación / Installation Pg. 2 II ) Conexión del cableado / Plug in the connectors Pg. 4 III ) Cambiar Posición Imán / Change Magnet Position Pg. 6 IV ) Configuración de Software Pg. 7 IV ) Software
Copyright FIL KATIA, S.A.
 Ganchillo Puntos empleados MODELO 37FIL KATIA PANAMA pág. 25 E SPAÑOL TALLA: ÚNICA MATEIALES PANAMA col. 1: 5 ovillos Nº 2 mm MUESTA DEL PUNTO A p. relieve, ganchillo nº 2 mm 10x10 cm. = 24 p. y 12 vtas.
MODEL: N / MODELO: N GAZEBO / GAZEBO
 MODEL: 5046N / MODELO: 5046N GAZEBO / GAZEBO Precautions:. Check all parts and hardware listed on the part list.. It is recommended to have people for assembly.. Step stool is also recommended during the
ASSEMBLY INSTRUCTIONS
 ASSEMBLY INSTRUCTIONS MODEL RTA - 2202 Thanks for purchasing one of our products. Please read carefully the assembly instructions before the installation. Please save this manual for future reference.
ALINEACIÓN A MÁXIMA VELOCIDAD ALINEADORA DE DIRECCIÓN CON TECNOLOGÍA 3D PRESENTAMOS EL MP - G681
 ALINEACIÓN A MÁXIMA VELOCIDAD LA FORMA MÁS RÁPIDA DE AUMENTAR SUS INGRESOS Y PRODUCTIVIDAD PRESENTAMOS EL MP - G681 ALINEADORA DE DIRECCIÓN CON TECNOLOGÍA 3D ALINEACIÓN MÁS RÁPIDA Y SIN ERRORES ALINEADORA
STOCK NO.: A DELANEY WRITING DESK
 USER MANUAL STOCK NO.: 384-16A-11-12 DELANEY WRITING DESK THIS INSTRUCTION BOOKLET CONTAINS IMPORTANT SAFETY INFORMATION. PLEASE READ AND KEEP THIS MANUAL FOR FUTURE REFERENCE. PLEASE DO NOT RETURN ANY
Ángulo conector, guía de conexión. Unidad: 1 pieza Peso: 0,22 kg Material: Acero zincado
 130050 Ángulo conector, guía de conexión Peso: 0,22 kg Descripción: Para unir sets de guías verticales de 2 tramos, unión para ángulos verticales Aplicación: industrial Cantidad por caja: 25 Cantidad por
PART QTY HARDWARE PART QTY HARDWARE
 JUSTBL B Page 1 of 3 xamine all packaging material for small parts that may have come loose during shipment. Periodic checks are recommended to insure that all components are in proper position, tight
Manual para Cambio de Apariencia en Acrobat Reader DC. Change of Appearance in Acrobat Reader DC
 Manual para Cambio de Apariencia en Acrobat Reader DC Change of Appearance in Acrobat Reader DC Desarrollado por: DTE, LLC Versión: 02.2016 Developed by: DTE, LLC Revisado en:25 de Octubre de 2016 support@dtellcpr.com
EP-2906 Manual de instalación
 EP-2906 Manual de instalación Con el botón situado a la izquierda se configura en el modo de cliente y de la derecha es el modo de Punto de acceso AP (nota: El USB es sólo para la función de fuente de