TM-J7000/J7100 TM-J7500/J7600
|
|
|
- Felisa Redondo Ruiz
- hace 8 años
- Vistas:
Transcripción
1 TM-J7000/J7100 TM-J7500/J7600 User s Manual / Bedienungsanleitung Gebruikershandleiding / Manuel d utilisation Manual do utilizador / Manual del usuario Manuale dell utente

2 A A TM-J7000/J TM-J7500/J B B TM-J7000/J TM-J7100/J C C TM-J7000/J7100 TM-J7500/J7600

3 D D E E F F
4 G G TM-J7000/J7100 TM-J7500/J7600 H H TM-J7000/J7100 TM-J7500/J7600 I I TM-J7000/J7500 TM-J7100/J7600


5 M M J J K K TM-J7000/J7500 TM-J7100/J7600 L L TM-J7000/J7100

6 M M TM-J7500/J mm {12"} 200 mm {8"} 150 mm {6"}

7 DIP Switch Tables Serial SW Function On Off 1 Reserved Fixed to Off 2 Interface condition selection By the DIP switch By the memory switch 3 Handshaking XON/XOFF DTR/DSR 4 Word length 7 bits 8 bits 5 Parity check Yes No 6 Parity selection Even Odd 7 8 Transmission speed selection (See Serial transmission speed table.) Serial transmission speed Transmission speed On On 9600 bps Off On bps On Off bps Off Off bps Parallel SW Function On Off 1-8 Reserved Fixed to Off. TM-J7000/J7100, TM-J7500/J7600 Specifications Receipt Slip Endorsement (TM-J7000/J7100) Print method Serial inkjet Dot Matrix Method Print density dpi Print font Font (standard) Font A: 12 24, Font B: 9 17 *Full-column printing Column capacity (columns) Character size (W H) (standard) Character set Characters per inch (standard) 82.5 mm: 42/56 76 mm: 40/ mm: 36/ mm: 30/40 TM-J7000/J7100: 48/64 TM-J7500/J7600: 80/ mm/ mm (not including horizontal spacing) Paper Dimensions (mm) 57.5 ± 0.5, 69.5 ± 0.5, 76 ± 0.5, 82.5 ± 0.5 Maximum outside diameter: 83 mm Print speed (Economy, High speed mode) 46/61 95 Alphanumeric, 37 International, Graphic Font A (12 24): 15 cpi, Font B (9 17): 20 cpi 68~230 (W) 68~297 (L) (min ) 68~101.6 (W) 150~223 (L) Thickness (mm) 0.06~ ~ ~0.13 Character (font B) Graphic Bar code, Two-dimentional code Paper width 76 mm: 14.3 lps Paper width 76 mm: 43 mm/s TM-J7000/J7100: 13.7 lps * TM-J7500/J7600: 9.9 lps * TM-J7000/J7100: 40 mm/s * TM-J7500/J7600: 29.1 mm/s * UPC-A, UPC-E, JAN13(EAN13), JAN8(EAN8), CODE39, CODE93, CODE128, ITF, CODABAR(NW7), PDF417
 Print method Serial inkjet Dot Matrix Method Print density 180 180 dpi Print font Font (standard) Font A: 12")
8 TM-J7000/J7100 TM-J7500/J7600 Interface RS-232 or IEEE 1284 Dealer option: RS-485, USB, 10Base-T I/F Data buffer Receive buffer 4 KB User defined 12 KB buffer User NV memory 384 KB (Max.) Ink cartridge Color Single color: Black SJIC8(K) (for TM-J7000 or TM-J7500 only) Two color: Black SJIC6(K) (for TM-J7100 or TM-J7600 only), Red SJIC7(R), Blue SJIC7(B), Green SJIC7(G) Life Single color: Approx. 20 million characters Two color: Approx. 15 million characters Power 24 VDC ± 10% Power Operating Mean: Approx. 0.5 A consumption Stand-by Approx. 70 ma Approx. 80 ma D.K.D. function 2drives Reliability Mechanism Receipt: 15,000,000 lines, Slip: 5,000,000 lines Life Print head 1600 million shots/nozzle Autocutter 1,500,000 cuts Temperature /humidity Printing Operating dpi: dots per 25.4 mm (dots per inch) lps: lines per second cpi: characters per 25.4 mm (dots per inch) 10~35 C {50~95 F} 20~80% RH Must be no condensation 5~40 C {41~104 F} 20~80% RH Must be no condensation Storage Ink installed: 20~40 C { 4~104 F} 20~85% RH Ink not installed: 20~60 C { 4~140 F} 5~85% RH Must be no condensation Overall dimensions (mm) (W D H) (W D H) Mass (approx.) 4.4 kg (including the ink cartridge) 4.9 kg (including the ink cartridge)

9 English TM-J7000/J7100 TM-J7500/J7600 User s Manual DIP Switches and Specifications The technical specifications and the information about the DIP switches are at the beginning of this manual. Illustrations All of the illustrations are at the beginning of this manual. They are identified by letters (A, B, C...). In the text the illustrations are referred to by these letters. ( See illustration A, for example.) Some of these illustrations have numbered arrows or lines pointing to parts of the illustration. See the list below for the meaning of the numbers. Illustration A Illustration B Illustration M 1. Roll paper cover 5. PAPER FEED 9. INK OUT (Black) 13. Projections 2. Ink cartridge cover 6. CLEANING 10. INK OUT (Color) 14. Screws 3. Control panel 7. PAPER OUT 11. ERROR 15. Fixing plate 4. Power supply switch 8. CUT SHEET 12. POWER All rights reserved. No part of this publication may be reproduced, stored in a retrieval system, or transmitted in any form or by any means, electronic, mechanical, photocopying, recording, or otherwise, without the prior written permission of Seiko Epson Corporation. No patent liability is assumed with respect to the use of the information contained herein. While every precaution has been taken in the preparation of this book, Seiko Epson Corporation assumes no responsibility for errors or omissions. Neither is any liability assumed for damages resulting from the use of the information contained herein. Neither Seiko Epson Corporation nor its affiliates shall be liable to the purchaser of this product or third parties for damages, losses, costs, or expenses incurred by purchaser or third parties as a result of: accident, misuse, or abuse of this product or unauthorized modifications, repairs, or alterations to this product, or (excluding the U.S.) failure to strictly comply with Seiko Epson Corporation s operating and maintenance instructions. Seiko Epson Corporation shall not be liable against any damages or problems arising from the use of any options or any consumable products other than those designated as Original EPSON Products or EPSON Approved Products by Seiko Epson Corporation. EPSON and ESC/POS are registered trademarks of Seiko Epson Corporation. NOTICE: The contents of this manual are subject to change without notice. Copyright 2003 by Seiko Epson Corporation, Nagano, Japan.
 13. Projections 2. Ink cartridge cover 6. CLEANING 10. INK OUT (Color) 14. Screws 3. Control panel 7.")
10 English EMC and Safety Standards Applied Product Name: TM-J7000/TM-J7100, TM-J7500/TM-J7600 Model Name: M184A, M184B The following standards are applied only to the printers that are so labeled. (EMC is tested using the EPSON power supplies.) Europe: CE marking Safety: TÜV (EN 60950) North America: EMI: FCC/ICES-003 Class A Safety: UL 60950/CSA C22.2 No Japan: EMI: VCCI Class A Oceania: EMC: AS/NZS 3548 Class B WARNING The connection of a non-shielded printer interface cable to this printer will invalidate the EMC standards of this device. You are cautioned that changes or modifications not expressly approved by Seiko Epson Corporation could void your authority to operate the equipment. CE Marking The printer conforms to the following Directives and Norms: Directive 89/336/EEC EN Class B EN IEC IEC IEC IEC IEC Only for TM-J7000/J7100 IEC IEC FCC Compliance Statement For American Users This equipment has been tested and found to comply with the limits for a Class A digital device, pursuant to Part 15 of the FCC Rules. These limits are designed to provide reasonable protection against harmful interference when the equipment is operated in a commercial environment. This equipment generates, uses, and can radiate radio frequency energy and, if not installed and used in accordance with the instruction manual, may cause harmful interference to radio communications. Operation of this equipment in a residential area is likely to cause harmful interference, in which case the user will be required to correct the interference at his own expense. For Canadian Users This Class A digital apparatus complies with Canadian ICES-003. Important Safety Information This section presents important information intended to ensure safe and effective use of this product. Read this section carefully and store it in an accessible location. Key to Symbols The symbols in this manual are identified by their level of importance, as defined below. Read the following carefully before handling the product. WARNING: Warnings must be followed carefully to avoid serious bodily injury. 2 TM-J7000/J7100 TM-J7500/J7600 User s Manual

11 English CAUTION: Cautions must be observed to avoid minor injury to yourself or damage to your equipment. Safety Precautions WARNING: Shut down your equipment immediately if it produces smoke, a strange odor, or unusual noise. Continued use may lead to fire. Immediately unplug the equipment and contact your dealer or a Seiko Epson service center for advice. Never attempt to repair this product yourself. Improper repair work can be dangerous. Never disassemble or modify this product. Tampering with this product may result in injury or fire. Be sure to use the specified power source. Connection to an improper power source may cause fire. Do not allow foreign matter to fall into the equipment. Penetration by foreign objects may lead to fire. If water or other liquid spills into this equipment, do not continue to use it. Continued use may lead to fire. Unplug the power cord immediately and contact your dealer or a Seiko Epson service center for advice. CAUTION: Do not connect cables in ways other than those mentioned in this manual. Different connections may cause equipment damage and burning. Be sure to set this equipment on a firm, stable, horizontal surface. Product may break or cause injury if it falls. Do not use in locations subject to high humidity or dust levels. Excessive humidity and dust may cause equipment damage or fire. Do not place heavy objects on top of this product. Never stand or lean on this product. Equipment may fall or collapse, causing breakage and possible injury. To ensure safety, unplug this product before leaving it unused for an extended period. Before moving the product, unplug it and unplug all cables connected to it. If ink leaks out of the printer, wipe up the ink with a cloth or similar material immediately and contact your dealer or a Seiko Epson service center for advice. When using compressed air products; such as air dusters, for cleaning during repair and maintenance, the use of such products containing flammable gas is prohibited. TM-J7000/J7100 TM-J7500/J7600 User s Manual 3

12 English Safety Label WARNING: Do not connect a telephone line to the drawer kick out connector or to the display module connector; otherwise, the printer and the telephone line may be damaged. Notes on Usage When using the printer, be sure that the printer is installed horizontally. Do not install the printer in a dusty place. Protect the printer from impact. Cords or other foreign objects must not be caught on the printer. Do not apply excessive force to the printer case. Do not place food or beverages such as coffee on the case of the printer. Purpose of This Manual This manual provides information to operators of the TM-J7000/J7100 and TM- J7500/J7600 printers to describe basic operations to enable safe and correct use of the printer. Transporting To transport this printer, follow these steps: 1. Remove the roll paper and ink cartridge. 2. Turn off the power supply. 3. Check that the POWER LED is off. 4. Remove the power supply connector and other connectors. Keep the printer upright and horizontal while you pack it and during transporting. Be sure not to ship the ink cartridge that has been removed from the packing. Unpacking The following items are included for the standard specification printer. If any item is damaged, contact your dealer. Printer Roll paper Ink cartridge Power switch cover Fixing plate for AC adapter and screws (only for the TM-J7500/J7600) Instruction sheet Peel away the 3 pieces of tape on the printer and remove the spacer from the slip paper path after unpacking. 4 TM-J7000/J7100 TM-J7500/J7600 User s Manual

13 English Control Panel (LEDs and Buttons) See illustration B. LEDs POWER Lights when the power is on and is off when the power is off; flashes during cleaning and other operations such as power-on and power-off. Note: Never open the printer cover or turn off the printer when the POWER LED is flashing. ERROR Lights when the printer is offline (when the ink cartridge is removed because the ink is out, the roll paper is at the end, or the printer cover is open.) Off when the printer is online. Flashes when an error occurs. (See the Troubleshooting section.) INK OUT Lights when the ink cartridge is not installed or ink is out. The ink cartridge needs to be replaced. Off when the ink cartridge is installed and ink is adequate. Flashes when the ink is nearly out. The TM-J7100 and TM-J7600 have two INK OUT LEDs, one for the color cartridge and one for the black cartridge. CUT SHEET Lights when cut sheet (slip, check) is selected as print sheet. Off when roll paper is selected as print sheet. Flashes when the printer is in the cut sheet insertion or removal waiting state. PAPER OUT Lights when roll paper is out or nearly out. Buttons PAPER FEED PAPER FEED feeds the roll paper or the cut sheet. Note: Paper cannot be fed using this button in the following cases: The printer cover is open. Printer is in the cut sheet insertion or removal state. When head cleaning is being performed or an error has occurred with any sheet selected. When check is selected as print sheet. CLEANING If printing becomes faint or uneven and the INK OUT LED is not on or flashing, use this button to clean the print head. Press the button more than 3 seconds. When the cleaning stops, the printer is ready for normal printing. Note: Do not use the CLEANING button unless there is a problem with print quality. Unnecessary cleaning will waste ink. TM-J7000/J7100 TM-J7500/J7600 User s Manual 5
 Off when the printer is online.")
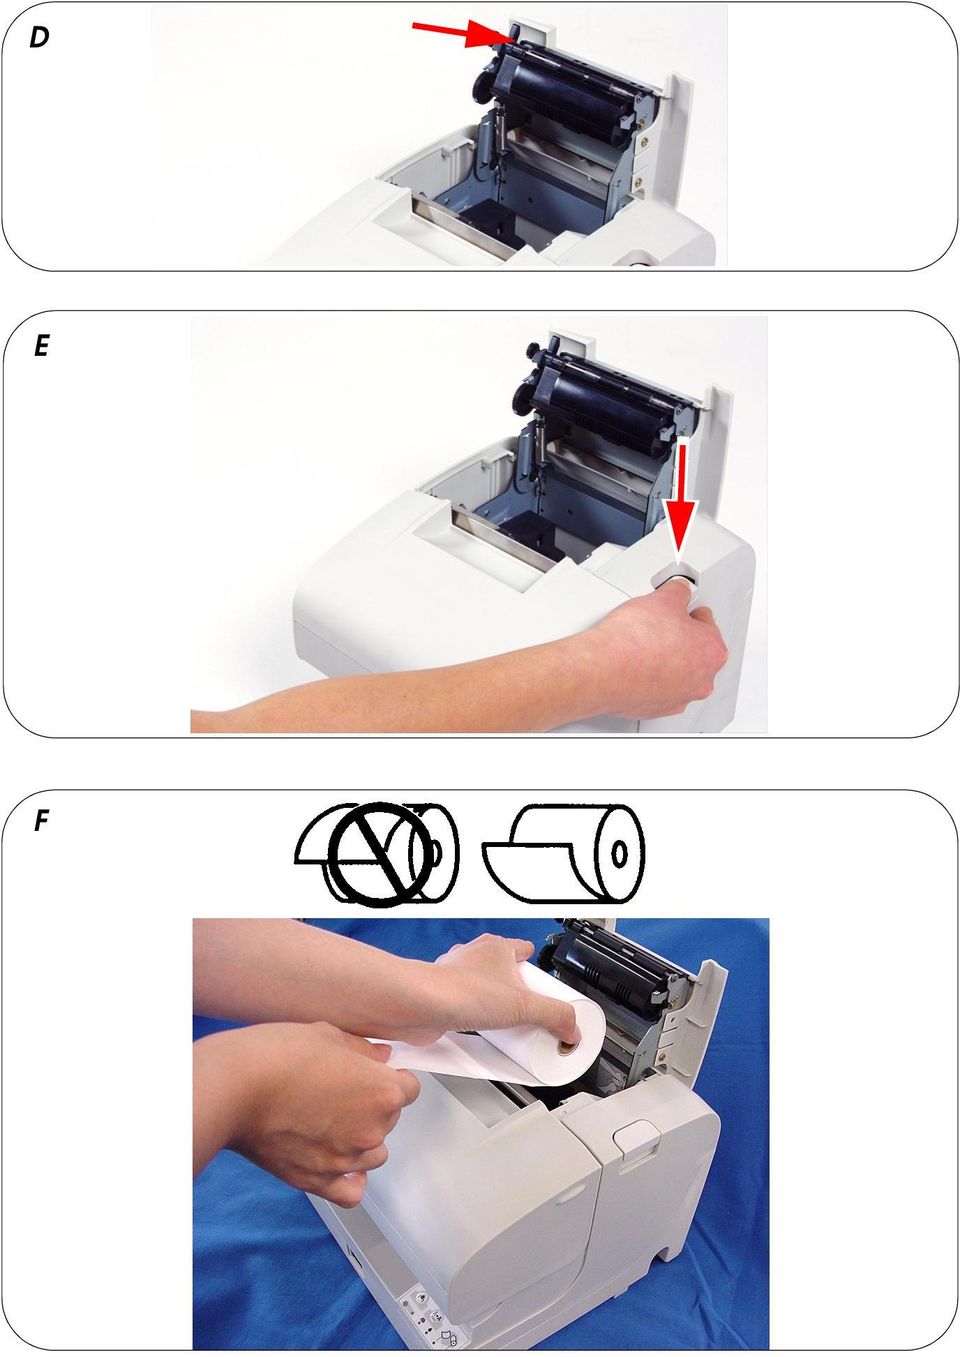
14 English Power Switch and Power Switch Cover The power switch is on the front of the printer. Press the power switch to turn on the printer. To maintain print quality (by capping the print head), be sure to follow these instructions for turning off the power: Wait at least 8 seconds after printing on roll paper or after removing a cut sheet; then turn off the power switch. Note: Never open the printer cover or turn off the printer when the POWER LED is flashing. Power Switch Cover You can use the enclosed power switch cover to make sure that the power switch is not accidentally pressed. Just press the cover into place to install it. If you need to turn the power switch on or off with the cover attached, you can insert a thin tool into one of the holes in the cover to operate the switch. See illustration C. WARNING: If an accident occurs when the power switch cover is attached, immediately unplug the power supply cable to avoid fire. If you are going to store the printer or leave it unused for a long time, turn it off using the power switch on the printer. Installing or Replacing Roll Paper CAUTION: Be careful not to insert your fingers into the paper exit. The cutter blade is installed inside the paper exit and you might be injured. See illustration D. CAUTION: Be sure to use roll paper that meets the specifications. Follow these steps to install or replace paper: 1. Make sure the printer is on. 2. Open the roll paper cover by pressing the cover open button. See illustration E. 3. Remove the used roll paper core if there is one. 4. Put the roll paper inside the printer in the correct direction, as shown in illustration F. 5. Pull out the leading edge of the roll paper; then close the roll paper cover until it is firmly locked by pushing the top of the cover. 6. The printer will automatically feed the roll paper to remove any slack in the paper. Note: Do not open the roll paper cover during printing or paper feeding. 6 TM-J7000/J7100 TM-J7500/J7600 User s Manual

15 Inserting Slip Paper English Note: Be sure the paper is flat, without curls, folds, or wrinkles. Use only single sheet paper. Do not insert any multiple sheet paper, as this may cause a paper jam. Because the printer is an inkjet printer, pressure sensitive copy paper cannot be used. To prevent jams, roll paper must be installed even for printing on slip paper. Be sure to insert a slip with the right side of the paper against the right side of the paper guide as far as it will go, as shown in illustration G. See the label instructions attached to the printer as a guide. Installing or Replacing an Ink Cartridge CAUTION: Usage: Do not disassemble the cartridge. The ink can permanently stain clothing. Do not refill ink cartridges. Spills can result, causing damage to the printer. Do not remove the cartridge except to replace it or to prepare the printer for shipment. Otherwise, ink may be wasted and the life of the ink cartridge may be reduced. For good printing quality, do not remove the ink cartridge from its packing until immediately before installing it. Use up the ink cartridge within 6 months after unpacking it. The expiration date is indicated on the cartridge box or the ink cartridge itself. Print quality problems may occur if an ink cartridge that is almost empty (the INK OUT LED flashes) is removed and reinstalled. A used cartridge may have some ink on the convex part of the bottom of the cartridge. Avoid touching that part to keep your hands clean. Do not puncture the convex part of the bottom of the ink cartridge or remove the transparent film on the bottom of the ink cartridge; otherwise the ink might leak. Once the ink cartridge is used, the ink supply needle (plastic projection) in the ink cartridge holder that supplies ink to the printer is covered with ink. Avoid touching the cartridge holder to keep your hands clean. Use Seiko Epson specified ink cartridges. Performance of the printer when other ink cartridges are used is not guaranteed. Do not open or close the ink cartridge cover during printing. Misalignment of the print position will occur. Storage: Keep the ink cartridge out of the reach of children. Do not drink the ink. Do not store the ink cartridge where it will be subject to high temperatures or freezing. TM-J7000/J7100 TM-J7500/J7600 User s Manual 7

16 English When the INK OUT LED flashes, it is almost time to change the ink cartridge. Change the cartridge as soon as it is convenient. When the INK OUT LED is on, printing stops and you must change the cartridge. The TM-J7100 and TM-J7600 have two separate cartridges, one each for black and colored ink (either red, green, or blue). Therefore, the TM-J7100 and TM-J7600 have two INK OUT LEDs, one for the black and one for the color. Follow these steps to install an ink cartridge for the first time or to replace an empty ink cartridge. 1. Make sure the printer is on. If it is not on, plug in the power supply cable and turn on the power using the switch on the front of the printer. 2. Make sure an INK OUT LED is on or flashing. When using two colors, notice which ink cartridge INK OUT LED is on or flashing; this indicates which cartridge is empty. 3. Be sure that roll paper is installed. 4. Open the ink cartridge cover using the tabs on the sides of the cover. See illustration H. 5. Lift up the empty ink cartridge by using the tab. See illustration I. CAUTION: Do not put your fingers inside the ink cartridge compartment or you may be injured by a plastic projection. Once the ink cartridge is used, the ink supply needle (plastic projection) in the ink cartridge holder that supplies ink to the printer is covered with ink. Avoid touching the cartridge holder to keep your hands clean. 6. Take a new ink cartridge out of its packing and remove the yellow tape. See illustration J. CAUTION: You must not remove any tape on which the EPSON logo is printed. 7. Carefully insert a new ink cartridge from the top and push it firmly but gently until it clicks into place. Be sure the inserting direction is correct, as shown in illustration K. 8. Close the ink cartridge cover completely. Note: The INK OUT LED will now be off. The POWER LED flashes for approximately 1 minute as the ink delivery system is charged. To save ink, this sequence will not be executed every time you replace an ink cartridge. The time to execute the sequence is controlled by the printer. Note: Do not turn off the power while the POWER LED is flashing. This will waste ink because the printer has to re-start the ink charging process. Be sure not to open the printer cover while the POWER LED is flashing. When the POWER LED quits flashing and stays on, the printer is ready for printing. 8 TM-J7000/J7100 TM-J7500/J7600 User s Manual

17 Disposal of Used Cartridges English Dispose of used ink cartridges as industrial waste products. Observe the laws and regulations of your country and district. Ink Cartridge Life To make your ink cartridges last as long as possible, follow these simple rules: Do not turn off the power supply switch immediately after printing is completed. Do not remove an ink cartridge unless you are replacing the cartridge. Do not turn the printer on and off unnecessarily. Do not press the CLEANING button unless the print is faint or uneven. Troubleshooting ERROR LED is flashing or lit The print head temperature may be high or low. Wait until the print head cools or warms and the printer resumes printing automatically. Make sure that the printer cover is properly closed. If a paper jam has occurred, open the roll paper cover or the ink cartridge cover and remove the jammed paper. Do not pull the jammed paper by force or use tools. Be sure to remove it manually. Turn off the power, wait several seconds, and then turn it on again. If the error remains, contact your supervisor or a qualified service person. Cleaning If printing becomes faint or uneven and the INK OUT LED is not on or flashing, press the CLEANING button until the printer mechanism begins to clean the print head (more than 3 seconds). The POWER LED flashes during cleaning. When the cleaning stops, the printer is ready for normal printing. Note: Do not use the CLEANING button unless there is a problem with print quality. Unnecessary cleaning will waste ink. Do not turn off the power or open any covers while the POWER LED is flashing. If you turn off the power during cleaning and turn on the printer again, a noise will occur due to a carriage movement, but this is not a problem with the mechanism. Please be sure to wait until the cleaning is complete (the POWER LED is off.) Message for Replacing Mechanical Unit The following message will be printed every time the printer is turned on when the pump unit is near the end of its life. Please follow the instructions in the message. Caution: The pump unit must be replaced. Contact a qualified service person. TM-J7000/J7100 TM-J7500/J7600 User s Manual 9

18 English MICR Reading (Factory installed option only for the TM-J7000/J7100) CAUTION: Do not insert checks with staples in them. This may cause paper jams, MICR reading errors, and damage to the MICR head. Never open the roll paper cover while the MICR reader is being used. Be sure the checks are flat, without curls, folds, or wrinkles. Do not use multipart checks. 1. Wait until the CUT SHEET LED blinks. Then insert the check face up with the right side of the check against the right side of the paper guide as far as it will go. Be sure that the MICR characters are on the right, as shown by the arrow in illustration L. 2. The printer will detect the check and start drawing it in. When the printer starts drawing it in, let go of the check immediately. When the printer ejects the check and the CUT SHEET LED starts blinking again; remove the check by pulling it straight up; do not pull it at an angle. Cleaning the MICR Mechanism Approximately every 12 months clean the MICR head with a moistened cleaning sheet. Use the following or an equivalent commercially available cleaning sheet: PRESAT brand (KIC) CHECK READER CLEANING CARD. Note: Be sure not to use an adhesive cleaning sheet. Follow the steps below: 1. Load roll paper in the printer; turn off the power; then open the roll paper cover and turn the power back on while holding down the CLEANING button. 2. Press the CLEANING button 7 times; then close the paper roll cover. The printer prints the following message on the roll paper and the CUT SHEET LED flashes. **** RECOGNITION MODE **** Please set check. 3. Insert the cleaning sheet like a standard check. CAUTION: Be sure that the sheet is inserted with the correct side up and that it is inserted in the correct direction. Use a cleaning sheet only one time; then discard it. 10 TM-J7000/J7100 TM-J7500/J7600 User s Manual

19 English Notes on using the MICR reader Do not install the printer near any magnetic fields. Be especially careful where you install your display device and be sure to check the recognition rate of the MICR reader with the display device in place. Make sure that the printer is not subjected to any impact or vibration when it is performing a MICR reading. Attaching the Fixing Plate for AC Adapter (only for the TM-J7500/J7600) Refer to illustration M as you follow these steps. The bold numbers refer to the numbers in the illustration. 1. Loop the middle of the power cord as shown in the illustration. (The measurements are only approximate; use them as a guide.) 2. Put the looped part of the power cord inside the printer in the location indicated by the circle. 3. Arrange the power cord beside the two projections (13) on the bottom of the printer to hold it in place; then place the power supply into the printer with the label side face up. 4. Attach the fixing plate (15) and tighten the screws (14). Notes: When integrating the AC adapter in the printer, be sure to carry out the following. Be sure to use AC adapter PS-180 (Model name: M159A). Use a straight plug for the AC inlet side of the power cable, if possible. If you do use an L-shaped plug, install the printer near the power outlet and be sure that the plug can be easily disconnected. Be sure to read the information on the label of the AC adapter (rating, Warning/ Cautions) thoroughly and understand it well before you integrate the AC adapter into the printer unit. EPSON Ecology Label This product is in compliance with the EPSON ecology label requirements. Please see the following link for detailed information on label criteria. ( TM-J7000/J7100 TM-J7500/J7600 User s Manual 11
 Refer to illustration M as you follow these steps. The bold numbers refer to the numbers in the illustration. 1.")
20 Deutsch TM-J7000/J7100 TM-J7500/J7600 Bedienungsanleitung DIP-Schalter und Technische Angaben Die technische Leistungsbeschreibung und Angaben zu den DIP-Schaltern befinden sich am Anfang dieses Handbuchs. Abbildungen Alle Abbildungen befinden sich am Anfang dieses Handbuchs und sind mit den Buchstaben (A, B, C ) gekennzeichnet. Im Text wird auf die Abbildungen anhand dieser Buchstaben Bezug genommen (z.b. Siehe Abbildung A ). Einige dieser Abbildungen haben numerierte Pfeile bzw. Linien, die auf einen Teil der Abbildung zeigen. Die Bedeutung der Nummern ist unten aufgeführt. Abbildung A Abbildung B Abbildung M 1. Papierrollenabdeckung 5. Papiervorschub 9. Tinte leer (Schwarz) 13. Vorsprünge 2. Tintenpatronenabdeckung 6. Reinigung 10. Tinte leer (Farbe) 14. Schrauben 7. Papierende- 11. Fehleranzeige 15. Fixierplatte 3. Bedienfeld anzeige 12. Betriebsanzeige 4. Ein-/Ausschalter 8. Einzelblatt Alle Rechte vorbehalten. Diese Veröffentlichung darf ohne ausdrückliche schriftliche Genehmigung der Seiko Epson Corporation nicht reproduziert, in einem Abrufsystem gespeichert oder in beliebiger Form und auf jedwede Weise übermittelt werden, weder durch Fotokopieren, Aufzeichnen, noch auf elektronische, mechanische oder sonstige Weise. Für die hierin enthaltenen Informationen wird keine Patenthaftung übernommen. Obgleich bei der Zusammenstellung dieser Anleitung mit Sorgfalt vorgegangen wurde, übernimmt die Seiko Epson Corporation keine Verantwortung für Fehler und Auslassungen. Zudem wird keine Haftung übernommen für Schäden, die aus der Verwendung der hierin enthaltenen Informationen entstehen. Weder die Seiko Epson Corporation noch ihre Tochtergesellschaften sind dem Käufer dieses Produkts oder Drittparteien gegenüber für Schäden, Verluste, Kosten oder Ausgaben haftbar, die für den Käufer oder etwaige Drittparteien aufgrund von Unfall, Mißbrauch oder Zweckentfremdung dieses Produkts, nicht autorisierten Modifikationen, Reparaturen oder Produktumbauten sowie (mit Ausnahme USA) aufgrund des Versäumnisses anfallen, die Bedienungs- und Wartungsanleitungen der Seiko Epson Corporation genau einzuhalten. Die Seiko Epson Corporation ist nicht haftbar für Schäden oder Probleme, die bei Verwendung von Optionen oder Verschleißteilen auftreten, die nicht als Original-EPSON-Produkte oder von der Seiko Epson Corporation zugelassene EPSON Produkte gelten. EPSON und ESC/POS sind eingetragene Warenzeichen der Seiko Epson Corporation. HINWEIS: Änderungen am Inhalt dieser Anleitung ohne Vorankündigung vorbehalten. Copyright 2003 Seiko Epson Corporation, Nagano, Japan.

21 Geltende EMC- und Sicherheitsnormen Produktname: TM-J7000/TM-J7100, TM-J7500/TM-J7600 Typenname: M184A, M184B Die folgenden Normen gelten nur für entsprechend gekennzeichnete Drucker. (Die EMC-Prüfung erfolgt anhand der EPSON Stromversorgung.) Europa: CE-Plakette Sicherheit: TÜV (EN 60950) Nordamerika: EMI: FCC/ICES-003 Klasse A Sicherheit: UL 60950/CSA C22.2 No Japan: EMI: VCCI Klasse A Ozeanien: EMC: AS/NZS 3548 Klasse B WARNUNG Die EMC-Normen für dieses Gerät werden ungültig, wenn ein nicht isoliertes Drucker- Schnittstellenkabel an den Drucker angeschlossen wird. Bitte beachten Sie, daß durch Änderungen oder Modifikationen, die nicht ausdrücklich von der Seiko Epson Corporation genehmigt wurden, die Bedienung des Geräts unter Umständen unzulässig wird. Wichtige Sicherheitshinweise Deutsch CE-Plakette Der Drucker entspricht den folgenden Direktiven and Normen: Direktive 89/336/EEC EN Klasse B EN IEC IEC IEC IEC IEC Nur für TM-J7000/J7100 IEC IEC GERÄUSCHPEGEL Gemäß der Dritten Verordnung zum Gerätesicherheitsgesetz (Maschinenlärminformations- Verordnung-3. GSGV) ist der arbeitsplatzbezogene Geräusch- Emissionswert kleiner als 70 db(a) (basierend auf ISO 7779). Dieser Abschnitt enthält wichtige Informationen für die sichere und effektive Nutzung dieses Produkts. Bitte lesen Sie diesen Abschnitt sorgfältig durch und bewahren Sie ihn leicht zugänglich auf. Symbole Die in diesem Handbuch verwendeten Symbole sind der untenstehenden Wichtigkeit entsprechend definiert. Folgende Angaben vor Umgang mit dem Produkt sorgfältig durchlesen. WARNUNG: Warnungen müssen zur Vermeidung von möglicherweise schweren Körperverletzungen genau beachtet werden. VORSICHT: Vorsichtshinweise müssen zur Vermeidung leichter Körperverletzungen und Beschädigungen des Gerätes beachtet werden. TM-J7000/J7100 TM-J7500/J7600 Bedienungsanleitung 13
A 1 2 3 4 B 5 6 5 6 12 11 9 8 7 12 11 10 9 8 7 TM-J7000 TM-J7100 C
 TM-J7000/J7100 User s Manual / Bedienungsanleitung Gebruikershandleiding / Manuel d utilisation Manual do utilizador / Manual del usuario Manuale dell utente 402532400 A 1 2 3 4 B 5 6 5 6 12 11 TM-J7000
FCC Information : Warning: RF warning statement:
 FCC Information : This device complies with Part 15 of the FCC Rules. Operation is subject to the following two conditions: (1) This device may not cause harmful interference, and (2) This device must
ENKVM-USBB. 2-Port USB KVM switch with Easy Switch and Cable. User Guide
 ENKVM-USBB 2-Port USB KVM switch with Easy Switch and Cable User Guide i Package Contents 1 ENKVM-USBB 2-Port USB KVM Switch with Easy Switch and Cable 1 User Guide Requirements Console A VGA, SVGA, XGA,
Quick Installation Guide TU2-DVIV H/W: V1.0R
 Quick Installation Guide TU2-DVIV H/W: V1.0R Table Table of Contents of Contents Español... 1. Antes de iniciar... 2. Cómo se instala... 1 1 3 Troubleshooting... 6 Version 06.27.2008 1. Antes de iniciar
Video Server. Quick Installation Guide. English, Español
 Video Server Quick Installation Guide English, Español 2 Video Server NOTES Quick Installation Guide 3 Video Server Quick Installation Guide To get your Video Server up and running on an Ethernet network,
Installation Guide. Green momit
 Installation Guide Green momit 2015 www.momit.com momit Deviceses Gateway: Model 1 and 2 Wall option The momit Gateway allows your thermostat to be connected to the Internet. It s included in the Starter
INSTALLATION INSTRUCTIONS
 Brix Ratio Check Instructions for ColdFusion and Flavor Overload Units INSTALLATION INSTRUCTIONS Brix Ratio Check Instructions For Coldfusion, Flavorfusion and Flavor Overload Units Kit P/N 629096865 SAFETY
Table of Contents. Español... 1. Antes de iniciar... 2. Cómo conectar... 3. Cómo utilizar el conmutador... Troubleshooting... Version 10.13.
 Quick Installation Guide TE100-S800i TE100-S810Fi Table of Contents Español... 1. Antes de iniciar... 2. Cómo conectar... 3. Cómo utilizar el conmutador... Troubleshooting... 1 1 2 3 5 Version 10.13.05
Save Money 2-up Single Doorhanger Set OH payday advance edition, 4 different doorhangers, Spanish
 Save Money 2-up Single Doorhanger Set OH payday advance edition, 4 different doorhangers, Spanish PACKAGE CONTENTS How to Customize 4-color doorhanger, Editable PDF (50% OFF first loan) 1-color (black)
Steps to Understand Your Child s Behavior. Customizing the Flyer
 Steps to Understand Your Child s Behavior Customizing the Flyer Hello! Here is the PDF Form Template for use in advertising Steps to Understanding Your Child s Behavior (HDS Behavior Level 1B). Because
Agustiniano Ciudad Salitre School Computer Science Support Guide - 2015 Second grade First term
 Agustiniano Ciudad Salitre School Computer Science Support Guide - 2015 Second grade First term UNIDAD TEMATICA: INTERFAZ DE WINDOWS LOGRO: Reconoce la interfaz de Windows para ubicar y acceder a los programas,
Flashcards Series 3 El Aeropuerto
 Flashcards Series 3 El Aeropuerto Flashcards are one of the quickest and easiest ways to test yourself on Spanish vocabulary, no matter where you are! Test yourself on just these flashcards at first. Then,
Extension Cords Extensiones Eléctricas We light your world
 We light your world 07.14.1 Household Domésticas 3 outlet indoor cords allow use of up to three items in one small place. This provides flexibility, while allowing multiple devices to be use without the
Xperia TX TV Dock DK22 Xperia T TV Dock DK23
 Guía del usuario Xperia TX TV Dock DK22 Xperia T TV Dock DK23 Contenido Introducción...3 Descripción general de TV Dock...3 Primeros pasos...4 Conexión inteligente...4 Actualización de Conexión inteligente...4
Quick Installation Guide TU-S9
 Quick Installation Guide TU-S9 Table of of Contents Contents Español... 1 1. Antes de iniciar... 1 2. Instalación del Hardware... 2 Troubleshooting... 5 Version 11.08.2007 1. Antes de iniciar Contenidos
Guía del usuario. Xperia P TV Dock DK21
 Guía del usuario Xperia P TV Dock DK21 Contenido Introducción...3 Descripción general de la parte posterior de TV Dock...3 Primeros pasos...4 Gestor de LiveWare...4 Actualización de Gestor de LiveWare...4
FlexCage. User Manual MB975SP-B. 5 HDD Slots in 3 Device Bay. Tray-Less SATA Backplane Module
 FlexCage MB975SP-B 5 HDD Slots in 3 Device Bay Tray-Less SATA Backplane Module User Manual English Package Contents Front Panel Information HDD3 POWER BUTTON POWER / ACCESS LED INDICATOR HDD2 POWER BUTTON
PC USER GUIDE. Read this user guide carefully before using this device. Overview. Battery status indicator
 PC-240860 USER GUIDE Read this user guide carefully before using this device. Overview Battery status indicator Press ON/OFF button to check the battery capacity, battery status indicators as following:
GARAGE DOOR OPENER CONNECTIVITY HUB QUICK START GUIDE
 GARAGE DOOR OPENER CONNECTIVITY HUB QUICK START GUIDE Thank you for purchasing a Craftsman garage door opener Connectivity Hub enabled with AssureLink technology. Once you have created your account and
Como desempacar el Time Attendant Además de ésta guía, el empaque debe incluír lo siguiente: Time Attendant Quick Install Reference Guide
 Como desempacar el Time Attendant Además de ésta guía, el empaque debe incluír lo siguiente: Terminal para colectar datos Cable de comunicación Adaptador de 25 a 9-DB CD con Software Adaptador de Corriente
PA600 Rugged Enterprise PDA
 PA600 Rugged Enterprise PDA unitech unitech is a member of Oracle Embedded Software Licensing Program Quick Reference Guide 400577G RevB Front Left View 1 8 7 English 6 3 4 5 1 Status indicator 5 Universal
SIGUIENDO LOS REQUISITOS ESTABLECIDOS EN LA NORMA ISO 14001 Y CONOCIENDO LAS CARACTERISTICAS DE LA EMPRESA CARTONAJES MIGUEL Y MATEO EL ALUMNO DEBERA
 SIGUIENDO LOS REQUISITOS ESTABLECIDOS EN LA NORMA ISO 14001 Y CONOCIENDO LAS CARACTERISTICAS DE LA EMPRESA CARTONAJES MIGUEL Y MATEO EL ALUMNO DEBERA ELABORAR LA POLITICA AMBIENTAL PDF File: Siguiendo
Save Money Tear-off Flyer Set: 8.5 x11 CA edition, 4 different flyers, Spanish
 Save Money Tear-off Flyer Set: 8.5 x11 CA edition, 4 different flyers, Spanish PACKAGE CONTENTS How to Customize 4-color flyer with tear-off coupons, Editable PDF (50% OFF first loan) 1-color (black) flyer
Litio-Solar: Small Solar Home System and Portable Power supply User Manual
 Litio-Solar: Small Solar Home System and Portable Power supply User Manual Litio-Solar is a highly integrated 12V DC Solar Power storage device with plug and play functionality, advanced user interface
Part No: KTI (Page 1-13) (Pagina 14-26) K-Tool International Wixom, MI 48393
 (Pagina 14-26) K-Tool International Wixom, MI 48393") Part No: KTI-70099 (Page 1-13) (Pagina 14-26) K-Tool International Wixom, MI 48393 (800) 762-6002 www.ktoolinternational.com support@ktoolinternational.com The KTool Walkie-Talkie can use a NiMH rechargeable
Part No: KTI-70099 (Page 1-13) (Pagina 14-26) K-Tool International Wixom, MI 48393 (800) 762-6002 www.ktoolinternational.com support@ktoolinternational.com The KTool Walkie-Talkie can use a NiMH rechargeable
Process Control Work Instructions Control de Procesos Instrucciones de Trabajo. for / para
 Process Control Work Instructions Control de Procesos Instrucciones de Trabajo for / para 629096898 VFCB Kit Relay Cable Harness Assy Ensamblar el Kit del Arnés de Cables del Relevador Publication Number:
24-Port 10/100Mbps Web Smart PoE Switch with 4 Gigabit Ports and 2 Mini-GBIC Slots TPE-224WS
 24-Port 10/100Mbps Web Smart PoE Switch with 4 Gigabit Ports and 2 Mini-GBIC Slots TPE-224WS ŸGuía de instalación rápida (1) ŸTroubleshooting (3) 1.12 1. Antes de iniciar Contenidos del Paquete ŸTPE-224WS
GUÍA DE USUARIO PC-331117. Bienvenidos al mundo Perfect Choice. Antes de comenzar a usar el producto es importante que leas esta guía.
 GUÍA DE USUARIO PC-331117 Bienvenidos al mundo Perfect Choice Antes de comenzar a usar el producto es importante que leas esta guía. Conexión 1. Inserta el transmisor en el conector para encendedor de
Ready. Set. Go. Vonage Box. Quick Start Guide
 Ready. Set. Go. TM Vonage Box Quick Start Guide Start here. Congratulations and welcome to Vonage! Now that you have your Vonage Box TM, it s time to enjoy exceptional home phone service, including a wide
DIAMOND Gear Company, LTD. an ERIKS Company. Installation, Maintenance, & Operation Manual DECLUTCHABLE WORM GEAR
 DIAMOND Gear Company, LTD. an ERIKS Company Installation, Maintenance, & Operation Manual 2013 INSTRUCTIONS This is an instructional manual which provides general installation, operation, and maintenance
Guía de instalación rápida TEG-PCITXR TEG-PCITXRL 3.02
 Guía de instalación rápida TEG-PCITXR TEG-PCITXRL 3.02 Table of Contents Español 1 1. Antes de iniciar 1 2. Cómo se instala 2 Troubleshooting 5 Version 03.18.2010 1. Antes de iniciar ENGLISH Contenidos
manual de servicio nissan murano z51
 manual de servicio nissan murano z51 Reference Manual To understand featuring to use and how to totally exploit manual de servicio nissan murano z51 to your great advantage, there are several sources of
Quick Installation Guide TMR-121EC H/W: V1.0R
 Quick Installation Guide TMR-121EC H/W: V1.0R Table Table of Contents of Contents Español... 1. Antes de iniciar... 2. Cómo se instala... 1 1 3 Troubleshooting... 5 Version 07.09.2008 1. Antes de iniciar
Wall Mounted Range Hood System
 These instructions should not be faxed or reproduced on a digital copier. American Woodmark Corporation provides these instructions on an AS IS basis and disclaims any and all liability for any inaccuracies,
Quick Installation Guide TEG-160WS TEG-240WS H/W: C1
 Quick Installation Guide TEG-160WS TEG-240WS H/W: C1 Table Table of Contents of Contents Español... 1. Antes de iniciar... 2. Instalación del Hardware... 3. Herramienta de gestión Web... Troubleshooting...
ROCK N STEREO SOUND DESK
 Read and save these instructions ROCK N STEREO SOUND DESK RTA-M1102-BK INSTRUCTIONS TABLE OF CONTENTS PACKAGE INCLUDES Package Includes... 2 Specifications... 2 Product Parts List... 3 1 2 3 Product Details...
A I RTRONIC. Manual de usuario User Manual.
 A I RTRONIC Manual de usuario User Manual AIRTRONIC Partes que incluye Parts inlcuded 1 Goldeneye Airtonic Unit 1 Power supply Input: 100-240 V ~ 50-60 Hz Output: 12 VDC, max. 1000 ma 12 W max. 1 Dermograph
Flashcards Series 2 Las Necesidades de la Vida
 Flashcards Series 2 Las Necesidades de la Vida Flashcards are one of the quickest and easiest ways to test yourself on Spanish vocabulary, no matter where you are! Test yourself on just these flashcards
Conditioning Exercises: Standing
 Conditioning Exercises: Standing Do all these exercises slowly. Do not hold your breath during these exercises. If unusual pain occurs in your joints or muscles while you are exercising, do not continue
Super Mini Retractable Mouse
 Super Mini Retractable Mouse Instruction Manual 98820 www.jascoproducts.com 98820-1 2/10 Package Contents Super Mini Retractable Mouse Instruction Manual System Requirements Windows 2000, XP, Vista, Windows
SFD-200-N-B DESPERTADOR-PROYECTOR-CON VOZ. Manual de instrucciones
 SFD-200-N-B DESPERTADOR-PROYECTOR-CON VOZ Manual de instrucciones Funciones: - Proyección de la hora - Proyección controlada por sonidos y vibraciones (palmada, etc.) - Pantalla retroiluminada azul - Hora
Quick Installation Guide TEW-624UB H/W:B1.1R
 Quick Installation Guide TEW-624UB H/W:B1.1R Table of of Contents Contents Español... 1. Antes de iniciar... 2. Cómo se instala... 3. Configuración inalámbrica... Troubleshooting... 1 1 2 3 5 Version 02.29.2008
INSTRUCCIONES PARA ENVIAR SU PELICULA PARA LA VIDEOLIBRERIA
 For English version, please scroll down to page 11 (eleven) INSTRUCCIONES PARA ENVIAR SU PELICULA PARA LA VIDEOLIBRERIA Especificaciones técnicas Container format:.mp4 / tamaño de archivo no superior a
Connecting Cloudino Connector to FIWARE IoT
 Hoja 1 DE 9 Connecting Cloudino Connector to FIWARE IoT 1. What is FIWARE IoT FIWARE is an open software ecosystem provided by the FIWARE Community (htttp://www.fiware.org). FIWARE exposes to developers
M DJ SERIES. User Manual/Manual de Uso
 M DJ SERIES User Manual/Manual de Uso User Manual Installation 1. In order to enhance the cast function of listening to space sound, it is appropriate to set the center part of tweeter right to the position
Guía del usuario. MHL to HDMI Adapter IM750
 Guía del usuario MHL to HDMI Adapter IM750 Contenido Introducción...3 Descripción general de MHL to HDMI Adapter...3 Primeros pasos...4 Conexión inteligente...4 Actualización de Conexión inteligente...4
MANUAL EASYCHAIR. A) Ingresar su nombre de usuario y password, si ya tiene una cuenta registrada Ó
 Ingresar su nombre de usuario y password, si ya tiene una cuenta registrada Ó") MANUAL EASYCHAIR La URL para enviar su propuesta a la convocatoria es: https://easychair.org/conferences/?conf=genconciencia2015 Donde aparece la siguiente pantalla: Se encuentran dos opciones: A) Ingresar
MANUAL EASYCHAIR La URL para enviar su propuesta a la convocatoria es: https://easychair.org/conferences/?conf=genconciencia2015 Donde aparece la siguiente pantalla: Se encuentran dos opciones: A) Ingresar
A Type A Type B Type D
 TM-U220 Printers User s Manual / Bedienungsanleitung Gebruikershandleiding / Manuel d utilisation Manual do utilizador / Manual del usuario Manuale dell utente 404312201 A Type A Type B Type D 1 3 4 2
BAI-220 AURICULAR INALÁMBRICO
 BAI-220 AURICULAR INALÁMBRICO Manual de usuario ESPECIFICACIONES TÉCNICAS EMISOR Frecuencia: 86 ± 0.5 MHz Modulación: FM Distancia de emisión: 30 m. Recepción de cualquier equipo de audio y video con salida
IntesisBox PA-RC2-xxx-1 Panasonic compatibilities
 IntesisBox PA-RC2-xxx-1 Panasonic compatibilities In this document the compatible Panasonic models with the following IntesisBox RC2 interfaces are listed: / En éste documento se listan los modelos PANASONIC
CONTROLADORA PARA PIXELS CONPIX
 The LedEdit Software Instructions 1, Install the software to PC and open English version: When we installed The LedEdit Software, on the desktop we can see following icon: Please Double-click it, then
DECLARACION DE CONFORMIDAD DECLARATION OF CONFORMITY
 DECLARACION DE CONFORMIDAD DECLARATION OF CONFORMITY La Empresa: BASOR ELECTRIC, S.A. The Company: BASOR ELECTRIC, S.A. Declara que el producto: Declares that the product: Instalado de acuerdo con las
P23000 Mini Solar Set - Summer series Die Mini Solarsommerserie El Mini Equipo Solar Serie Verano
 P23000 Mini Solar Set - Summer series Die Mini Solarsommerserie El Mini Equipo Solar Serie Verano This package includes: 1. Solar battery (Main unit) 2. Fan unit 3. Flashlight unit Lieferumfang: 1. Solarbatterie
TELEVISOR A COLORES MANUAL DE SERVICIO MODELO : CP-29C40P. ATENCIÓN Antes de dar servicio al chasis, lea las PRECAUCIONES DE SEGURIDAD en este manual.
 LG TELEVISOR A COLORES MANUAL DE SERVICIO CHASIS : MC-53A MODELO : CP-29C40P ATENCIÓN Antes de dar servicio al chasis, lea las PRECAUCIONES DE SEGURIDAD en este manual. - 1 - - 2 - - 3 - - 4 - - 1 - -
Learning Masters. Early: Force and Motion
 Learning Masters Early: Force and Motion WhatILearned What important things did you learn in this theme? I learned that I learned that I learned that 22 Force and Motion Learning Masters How I Learned
Guía de instalación rápida TFM-561U
 Guía de instalación rápida TFM-561U V1 Table of Contents Español 1 1. Antes de iniciar 1 2. Cómo se instala 2 Troubleshooting 5 Version 08.25.2010 1. Antes de iniciar Contenidos del paquete TFM-561U CD-ROM
2008 Series Hemodialysis Machine Operator s Manuals Addendum for Concentrate Connection
 2008 Series Hemodialysis Machine Operator s Manuals Addendum for Concentrate Connection Caution: Federal (US) law restricts this device to sale only by or on the order of a physician. This is an addendum
Preguntas y respuestas con respectos a los requisitos por la impresora fiscal.
 Preguntas y respuestas con respectos a los requisitos por la impresora fiscal. Fecha 16/08/2010 Puntos que debe cumplir un software que usará una impresora fiscal EPSON. El objetivo principal de esta
Schnellinstallationsanleitung
 Schnellinstallationsanleitung TL-WR340G/TL-WR340GD/TL-WR541G/ TL-WR542G/TL-WR641G/TL-WR642G Drahtloser 54M/108M-Router Rev: 1.0.0 1 Konfiguration des Computers 1) Verbinden Sie den drahtlosen Router wie
appkbws03 Wireless Multimedia Keyboard Set Black
 appkbws03 Wireless Multimedia Keyboard Set Black Español 01 English 06 Capítulo 1. Introducción y descripción del producto Gracias por elegir el teclado inalámbrico APPKBWS03. Descripción del producto
Guía de instalación rápida TEG-160WS TEG-240WS
 Guía de instalación rápida TEG-160WS TEG-240WS C2 Table of Contents Español 1 1. Antes de iniciar 1 2. Instalación del Hardware 2 3. Herramienta de gestión Web 3 Troubleshooting 6 Version 02.02.2010 1.
www.jbctools.com Page English 2 Español 8 Stands
 Page English 2 Español 8 Stands Packing List The following items should be included: All these stands can be connected to the following JBC Control units: DI, DDE, DME. Stand... 1 unit See references on
Passaic County Technical Institute 45 Reinhardt Road Wayne, New Jersey 07470
 Note: Instructions in Spanish immediately follow instructions in English (Instrucciones en español inmediatamente siguen las instrucciónes en Inglés) Passaic County Technical Institute 45 Reinhardt Road
Quick Installation Guide TW100-BRV304
 Quick Installation Guide TW100-BRV304 Table Table of Contents of Contents Español... 1 1. Antes de iniciar... 1 2. Instalación del Hardware... 2 3. Configuración del enrutador... 3 Troubleshooting... 5
Sistemas de impresión y tamaños mínimos Printing Systems and minimum sizes
 Sistemas de impresión y tamaños mínimos Printing Systems and minimum sizes Para la reproducción del Logotipo, deberán seguirse los lineamientos que se presentan a continuación y que servirán como guía
GUÍA DE USUARIO USER GUIDE 2.1 Multimedia Speaker System Design Line APPSP2102
 GUÍA DE USUARIO USER GUIDE 2.1 Multimedia Speaker System Design Line APPSP2102 Gracias por adquirir los Altavoces Multimedia 2.1 de Approx. Podrá conectar sus altavoces a cualquier ordenador, walkman,
Quick Installation Guide TPE-224WS
 Quick Installation Guide TPE-224WS Table of of Contents Contents... 1. Antes de iniciar... 2. Instalación del Hardware... 3. Herramienta de gestión Web... Troubleshooting... 1 1 2 3 6 Version 03.13.2006
MODEL: 11222895 / MODELO: 11222895 COMPUTER DESK ESCRITORIO DE COMPUTADORA
 MODEL: 222895 / MODELO: 222895 COMPUTER DESK ESCRITORIO DE COMPUTADORA NO 2 3 4 5 6 7 8 9 PARTS LIST AND HARDWARE LISTA DE PARTES Y ACCESORIOS HARDWARE LIST LISTA DE PARTES Y ACCESORIOS CHIPBOARD SCREW
Welcome to lesson 2 of the The Spanish Cat Home learning Spanish course.
 Welcome to lesson 2 of the The Spanish Cat Home learning Spanish course. Bienvenidos a la lección dos. The first part of this lesson consists in this audio lesson, and then we have some grammar for you
TX MULTI MANUAL TX MULTI. Mando copiador multifrecuencia 1. PASOS PARA COPIAR UN MANDO CÓDIGO FIJO Y ROLLING ESTÁNDAR:
 MANUAL TX MULTI Mando copiador multifrecuencia 1. PASOS PARA COPIAR UN MANDO CÓDIGO FIJO Y ROLLING ESTÁNDAR: 1. Situar el mando original que desea copiar junto al TX Multi, en torno a 2-4 centímetros de
SAMPLE EXAMINATION BOOKLET
 S SAMPLE EXAMINATION BOOKLET New Zealand Scholarship Spanish Time allowed: Three hours Total marks: 24 EXAMINATION BOOKLET Question ONE TWO Mark There are three questions. You should answer Question One
Flashcards Series 4 El Hotel
 Flashcards Series 4 El Hotel Flashcards are one of the quickest and easiest ways to test yourself on Spanish vocabulary, no matter where you are! Test yourself on just these flashcards at first. Then,
Quick Installation Guide TEW-623PI
 Quick Installation Guide TEW-623PI Table of of Contents Contents... 1 1. Antes de iniciar... 1 2. Cómo se instala... 2 3. Cómo usar el adaptador inalámbrico... 5 Troubleshooting... 6 Version 07.21.2006
Quick Installation Guide TEW-435BRM
 Quick Installation Guide TEW-435BRM Table of of Contents Contents Español... 1 1. Antes de iniciar... 1 2. Instalación del Hardware... 2 3. Configurar el Modem... 3 4. Configuración de encriptación...
Level 1 Spanish, 2012
 90908 909080 1SUPERVISOR S Level 1 Spanish, 2012 90908 Demonstrate understanding of a variety of spoken Spanish texts on areas of most immediate relevance 9.30 am Tuesday 4 December 2012 Credits: Five
In the following you see an example of a SPAC calculation run. BKtel systems 26.07.2004 Seite 1/8
 SPAC (System Performance Analysis for CATV Systems) is a tool for planning the performance of CATV distribution networks and their return path channel. SPAC calculates all important system parameters like
MANUAL DE INSTRUCCIONES TECLADO PARA TABLETA ACC-5188TKB
 MANUAL DE INSTRUCCIONES TECLADO PARA TABLETA ACC-5188TKB ESTIMADO CLIENTE Con el fin de que obtenga el mayor desempeño de su producto, por favor lea este manual de instrucciones cuidadosamente antes de
Microsoft Office Word
 Designed by:mary Luz Roa M. Microsoft Office Word Cinta Diseño de Página Márgenes Orientación Tamaño de página Cinta Insertar Imágenes Tablas Formas Agustiniano Salitre School 2017 Autor: Valor Creativo
Some examples. I wash my clothes, I wash the dishes, I wash the car, I wash the windows. I wash my hands, I wash my hair, I wash my face.
 Reflexive verbs In this presentation, we are going to look at a special group of verbs called reflexives. Let s start out by thinking of the English verb wash. List several things that you can wash. Some
Flashcards Series 5 El Agua
 Flashcards Series 5 El Agua Flashcards are one of the quickest and easiest ways to test yourself on Spanish vocabulary, no matter where you are! Test yourself on just these flashcards at first. Then, as
Quick Installation Guide. TEG-224WSplus
 Quick Installation Guide TEG-224WSplus Table of of Contents Contents... 1. Antes de iniciar... 2. Instalación del Hardware... 3. Herramienta de gestión Web... Troubleshooting... 1 1 2 3 6 Version 04.28.2006
A rough guide through the wilderness of the RyC on-line application forms!
 ! A rough guide through the wilderness of the RyC on-line application forms!! First, go to! http://cort.as/moiq!! Next, click on! Solicitud. Convocatoria 2014! in order to unfold a menu. You will see a
ENKVM-PS2. 2-Port PS/2 KVM switch with built-in cables. User Guide
 ENKVM-PS2 2-Port PS/2 KVM switch with built-in cables User Guide 0 Package Contents 1 ENKVM-PS2 KVM Switch with Attached Cables 1 User Guide Requirements Console A VGA, SVGA, or Multisync monitor capable
PARLED 56 PARLED 64 PARLED 56/PARLED 64. User Manual/Manual de Uso
 PARLED 56 PARLED 64 PARLED 56/PARLED 64 User Manual/Manual de Uso EN Thanks for purchasing this product. For your own safety, please, read this user manual carefully before you initially start-up. SAFETY
Software TRENDnetVIEW Pro. Guía de instalación rápida de TRENDnetVIEW Pro (1)
") Software TRENDnetVIEW Pro Guía de instalación rápida de TRENDnetVIEW Pro (1) TRENDnetVIEW Pro/10.08.2013 Índice Requisitos del software de gestión TRENDnetVIEW Pro... 19 Instalación de TRENDnetVIEW Pro...
Software TRENDnetVIEW Pro Guía de instalación rápida de TRENDnetVIEW Pro (1) TRENDnetVIEW Pro/10.08.2013 Índice Requisitos del software de gestión TRENDnetVIEW Pro... 19 Instalación de TRENDnetVIEW Pro...
T R A N S TECHNICAL SPECIFICATIONS:
 A R P O L T R A N S TECHNICAL SPECIFICATIONS: 1, or - look casing Specially designed rubber gasket (various models) Steps of up tc 8 mm between outside diameters Working pressures up to bar F l e x i b
KMR SCA-05 Mounting Instructions Instrucción de Montaje Instruções de Montagem 0899.4897
 0899.4897 KMR SCA-05 Mounting Instructions Instrucción de Montaje Instruções de Montagem 0899.4897 KMR SCA-05 Mounting Instructions Instrucción de Montaje Instruções de Montagem The KMR SCA-05 kit is a
Cómo comprar en la tienda en línea de UDP y cómo inscribirse a los módulos UDP
 Cómo comprar en la tienda en línea de UDP y cómo inscribirse a los módulos UDP Sistema de registro y pago Este sistema está dividido en dos etapas diferentes*. Por favor, haga clic en la liga de la etapa
EP-2906 Manual de instalación
 EP-2906 Manual de instalación Con el botón situado a la izquierda se configura en el modo de cliente y de la derecha es el modo de Punto de acceso AP (nota: El USB es sólo para la función de fuente de
RX MULTI. MANUAL RX MULTI 433 A 868 MHz
 1. Esquema RX Multi RX MULTI MANUAL RX MULTI 433 A 868 2. Selector de marca Con el selector de 8 DIPs, el usuario puede realizar diferentes combinaciones para las diferentes marcas de mandos. La selección
Quick Installation Guide TV-IP400 TV-IP400W
 Quick Installation Guide TV-IP400 TV-IP400W Table of of Contents Contents Español... 1. Antes de iniciar... 2. Instalación del Hardware... 3. Configuración de la cámara Internet... Troubleshooting... 1
Model/Modelo: SR42UBEVS
 SmartRack Assembly Instructions Instrucciones de Ensamble del SmartRack Model/Modelo: SRUBEVS West 35th Street, Chicago, IL 60609 USA www.tripplite.com/support Copyright 03 Tripp Lite. All trademarks are
RS MULTI MANUAL OF RS MULTI
 MANUAL OF RS MULTI 1. RS MULTI Central for tubular motor with power supply 110-240 V. With function OPEN/STOP/CLOSE available for AC switch and control remotes (frequency ). 2. Brand selector With 8 dip
AI-900559 *ai Router/Controller. Welcome to Adventure Interactive World \ Bienvenidos al mundo Adventure Interactive
 AI-900559 *ai Router/Controller Welcome to Adventure Interactive World \ Bienvenidos al mundo Adventure Interactive Before using the *ai Router/Controller is important to read this manual\antes de comenzar
NXLI PC LAPTOP INTERFACE. Installation Instructions / Owner's Manual
 NXLI PC LAPTOP INTERFACE Installation Instructions / Owner's Manual SOFTWARE INSTALLATION ENGLISH The software is designed for use with Windows XP. Windows Vista was not supported at the time of printing
Adobe Acrobat Reader X: Manual to Verify the Digital Certification of a Document
 dobe crobat Reader X: Manual de verificación de Certificación Digital de un documento dobe crobat Reader X: Manual to Verify the Digital Certification of a Document support@bioesign.com Desarrollado por:
Qué viva la Gráfica de Cien!
 Qué viva la Gráfica de Cien! La gráfica de cien consiste en números del 1 al 100 ordenados en cuadrilones de diez números en hileras. El resultado es que los estudiantes que utilizan estás gráficas pueden
Level 1 Spanish, 2014
 90911 909110 1SUPERVISOR S Level 1 Spanish, 2014 90911 Demonstrate understanding of a variety of Spanish texts on areas of most immediate relevance 2.00 pm Friday 28 November 2014 Credits: Five Achievement
Puede pagar facturas y gastos periódicos como el alquiler, el gas, la electricidad, el agua y el teléfono y también otros gastos del hogar.
 SPANISH Centrepay Qué es Centrepay? Centrepay es la manera sencilla de pagar sus facturas y gastos. Centrepay es un servicio de pago de facturas voluntario y gratuito para clientes de Centrelink. Utilice