ARLO CHANGER INSTRUCTIONS
|
|
|
- Ricardo Lucero Torres
- hace 8 años
- Vistas:
Transcripción
1 ARLO CHANGER INSTRUCTIONS E Instrucciones para Vestidor Arlo GUARANTEE E Garantía de 4 años válida sólo en Reino Unido e Irlanda

2 11 (1) (2) (3) (4) (5) (6) (7) (8)
 (7)")
3 1 (9) (10) (11) (12) (13) A D B E C F

4 A x6 D x A x2 C x4 D x12

5 3 7 A x2 C x B x32
6 A x A x4
7 8 9 G

8 GB IMPORTANT: READ THESE INSTRUCTIONS CAREFULLY BEFORE USE AND KEEP THEM FOR FUTURE REFERENCE. YOUR CHILD S SAFETY MAY BE AFFECTED IF YOU DO NOT FOLLOW THESE INSTRUCTIONS user guide Thank you for choosing a Cosatto product. Please take a little time to read the important safety notes detailed below. This will ensure many years of happy, safe use. safety: take note WARNING: A CHILDS SAFETY IS YOUR RESPONSIBILITY The changer must be used on a level and stable surface. Discourage your child from climbing on or playing with this changer as it is not a toy. Glue is not included but can be used at your discretion on dowelled joints to further strengthen the changer. Once assembled, it is inadvisable to disassemble the changer. parts information Please retain all packaging until you are certain no parts are missing. In the case of assembly difficulties, missing parts or other queries, please contact our aftersales team on +44 (0) or techhelp@cosatto.com After assembly, please dispose of all packaging carefully, recycling where possible. A medium sized flat bladed and medium sized cross head screwdrivers are required for assembly. The help of an assistant will make assembly easier. list of parts 34 x 25mm flat headed screw (A) 32 x 16mm round headed screw (B) 8 x bolt (C) 24 x wooden dowel (D) 1 x allen key (E) 1 x safety strap (inc. screw) (F) 1 x top panel (1) 2 x top bar (2) 1 x bottom panel (3) 1 x left side panel (4) 1 x centre support panel (5) 2 x draw support panel (6) 1 x right side panel (7) 2 x back panel (8) 3 x left drawer side (9) 3 x right drawer side (10) 3 x rear drawer side (11) 3 x drawer base (12) 3 x drawer front (13)

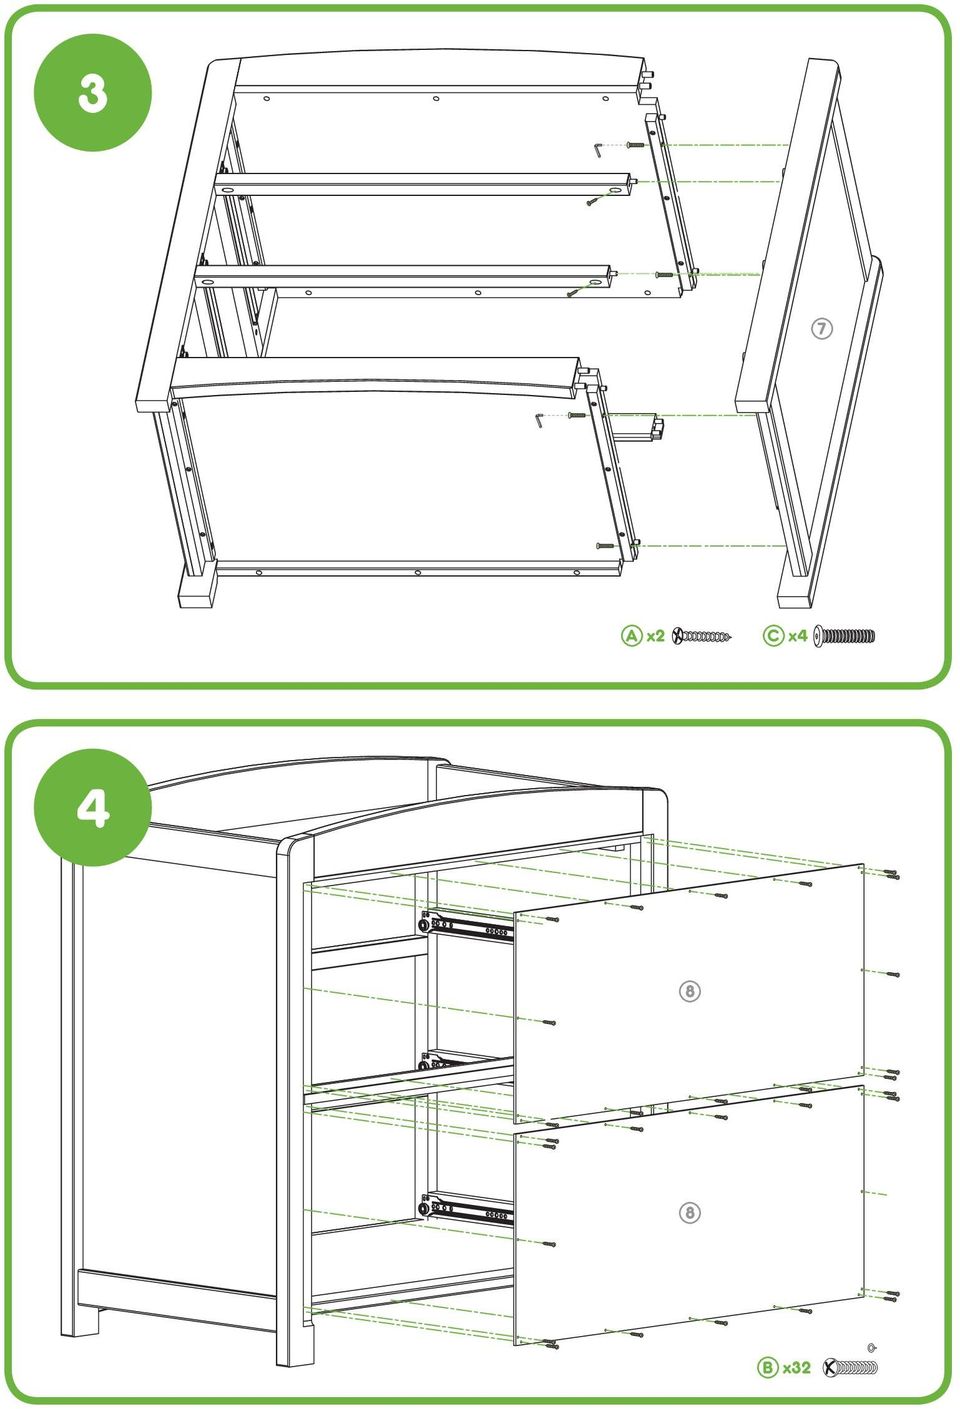
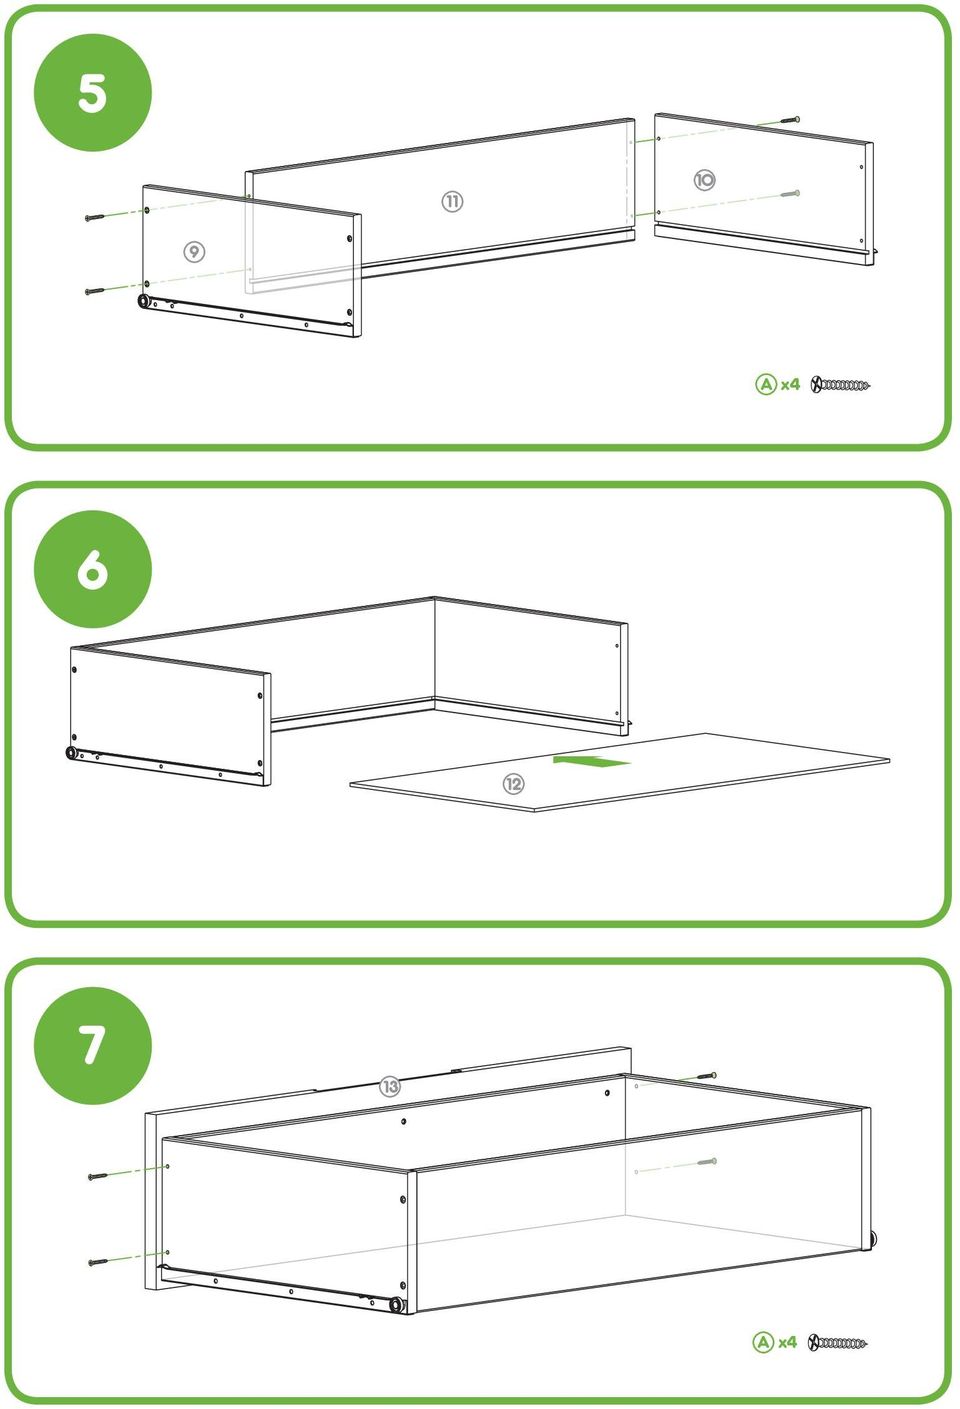
9 changer assembly Step 1 top panel Insert four wooden dowels (D) into the top panel (1) and four wooden dowels (D) into each top bar (2). Secure each top bar (2), with the lip facing outward, onto the top panel, using three 25mm screws (A) for the each top bar. Step 2 outer frame Insert four wooden dowels (D) into the bottom panel (3), four wooden dowels (D) into the centre support panel (5) and two wooden dowels (D) into the two draw support panels (6). Secure the bottom panel using two bolts (C), top panel (1) using two bolts (C), two draw support panels using one 25mm screw (A) per draw support and the centre support panel to the left side panel (4), making sure all of the wooden dowels (E) are aligned and bolts are tightened with the supplied allen key. Step 3 right side panel Secure the right side panel (7) to the assembled piece. Secure the bottom panel using two bolts (C), top panel (1) using two bolts (C), two draw support panels using one 25mm screw (A) per draw support and the centre support panel to the right side panel (7), making sure all of the wooden dowels (E) are aligned and bolts are tightened with the supplied allen key. Step 4 back panel Stand the changer upright and secure the two back panels (8) using thirty two 16mm (B) screws. Step 5 drawer sides Using two 25mm (A) screws per side, secure one left drawer side (9) and one right drawer side (10) to one rear drawer side (11). Step 6 drawer base Slide one drawer base (12) into the grove of the assembled piece. Step 7 drawer front Using two 25mm (A) screws per side, secure drawer front (13) to the assembled piece. Repeat steps 5 to 7 twice more. Step 8 inserting three drawers Feed a drawer, with the front slightly elevated, making sure the drawer wheels engage with the runners. Repeat for each of the remaining drawers. Step 9 security Secure the safety strap (F) to the rear of the changer using the supplied screw and secure to your wall. We suggest a number 12 round head screw of at least 5 cm in length be used in conjunction with a wall fixing appropriate to the wall type (please note: wall fixings not included). If you are uncertain about doing this, consult a builder. WARNING: Failing to secure your changer may cause injury to your loved ones.
, top panel (1) using two bolts (C), two draw support panels using one 25mm screw (A) per draw support and the centre support panel to the left side panel")
10 care, maintenance and cleaning Regularly check the tightness of bolts and tighten as necessary. Check for damage which could render your changer unsafe or cause splinters. To clean use a damp cloth, avoiding the use of strong detergents or abrasives. An occasional light application of a wax polish will help maintain a good appearance. replacement parts The replacement parts listed below are available for your product. In the event that you require any of these parts, please contact your local store or contact us at spares@cosatto.com top panel bottom panel top bar left side panel right side panel back panel centre support panel draw support panel left drawer side right drawer side rear drawer side drawer base drawer front fixing pack safety strap (inc. screw)

11 E IMPORTANTE: LEA ESTAS INSTRUCCIONES CUIDADOSA- MENTE ANTES DE USAR Y GUÁRDELAS PARA REFERENCIA FUTURA. LA SEGURIDAD DEL NIÑO PUEDE VERSE AFECTADA SI USTED NO SIGUE ESTAS INSTRUCCIONES Guía del usuario Gracias por elegir los productos Cosatto. Por favor, tenga un poco de tiempo para leer las notas de seguridad importantes se detallan a continuación. Esto asegurará muchos años de uso alegre y seguro. seguridad: tomar nota ADVERTENCIA: SEGURIDAD DE UN NIÑO ES SU RESPONSABILIDAD El cambiador debe ser usado en una superficie plana y estable Disuadir a los niños trepen a la o jugar con este cambiador, ya que no es un juguete. Pegar no está incluido pero se puede utilizar a su discreción en las articulaciones enclavijados para fortalecer aún más el cambiador. Una vez montado, no es aconsejable desmontar el cambiador. piezas de información Por favor retenga todo el embalaje hasta que esté seguro no le faltan piezas. En el caso de dificultades en el montaje, piezas faltantes o duda, por favor contacte con nuestro equipo de postventa de +44 (0) o por correo electrónico techhelp@cosatto.com Después del montaje del equipo disponga de todos los envases con cuidado, el reciclado siempre que sea posible. Un medianas empresas de hoja plana y medianas empresas destornilladores con cabeza de cruz son necesarias para armar. La ayuda de un asistente facilitar el montaje lista de piezas 34 x 25mm tornillo de cabeza plana (A) 32 x 16mm nillo de cabeza redonda (B) 8 x tornillo (C) 24 x clavija de madera (D) 1 x llave allen (E) 1 x cinturón de seguridad (con tornillo) (F) 1 x panel superior (1) 2 x barra superior (2) 1 x panel inferior (3) 1 x panel lateral izquierdo (4) 1 x panel de soporte central (5) 2 x borar panel de soporte (6) 1 x panel lateral derecho (7) 2 x panel posterior (8) 3 x lado del cajón a la izquierda (9) 3 x lado del cajón derecho (10) 3 x parte posterior de cajón (11) 3 x cajón de base (12) 3 x Frente de cajón (13)

12 cambiador de montaje Paso 1 - panel superior Inserte cuatro clavijas de madera (D) en la cara superior (1) y cuatro tacos de madera (D) en la barra de cada uno superior (2). Asegure cada barra superior (2), con el labio hacia afuera, en el panel superior, con tres tornillos de 25 mm (A) de la barra de cada tapa. Paso 2 - marco exterior Inserte cuatro clavijas de madera (D) en el panel inferior (3), cuatro clavijas de madera (D) en el panel de soporte central (5) y dos clavijas de madera (D) en los dos paneles de soporte dibujar (6). Fije el panel inferior con dos tornillos (C), el panel superior (1) utilizando dos tornillos (C), dos paneles de obtener apoyo mediante un tornillo de 25 mm (A) por el apoyo dibujar y el panel de soporte central para el panel lateral izquierdo (4), asegurándose de que todas las clavijas de madera (E) estén alineados y tornillos se aprietan con la llave Allen. Paso 3 - panel lateral derecho Asegure el panel lateral derecho (7) a la pieza ensamblada. Fije el panel inferior con dos tornillos (C), el panel superior (1) utilizando dos tornillos (C), dos paneles de obtener apoyo mediante un tornillo de 25 mm (A) por el apoyo dibujar y el panel de soporte central para el panel lateral derecho (7), asegurándose de que todas las clavijas de madera (E) estén alineados y tornillos se aprietan con la llave Allen. Paso 4 - panel trasero Coloque verticalmente el cambiador y asegurar los dos paneles posteriores (8) con treinta y dos de 16 mm (B) tornillos. Paso 5 - los lados del cajón El uso de dos tornillos de 25 mm (A) por lado, asegurar un lado del cajón a la izquierda (9) y un lado del cajón derecho (10) a un lado del cajón posterior (11). Paso 6 - base del cajón Deslice una base de cajón (12) en la arboleda de la pieza ensamblada. Paso 7 - frente del cajón El uso de dos tornillos de 25 mm (A) por lado, el frente del cajón segura (13) a la pieza ensamblada. Repita los pasos 5 a 7 veces más. Paso 8 - la inserción de tres cajones Alimentar a un cajón, con la parte frontal ligeramente elevada, lo que hace que las ruedas cajón de comprometerse con los corredores. Repita este procedimiento para cada uno de los cajones restantes.
.")
13 Paso 9 - seguridad Asegure la correa de seguridad (F) en la parte trasera del cambiador con el tornillo incluido y seguro a su pared. Le proponemos una serie de tornillo 12 de cabeza redonda de al menos 5 cm de longitud se utiliza junto con una fijación a pared adecuada al tipo de pared (por favor, tenga en cuenta: las fijaciones no incluidos). Si no está seguro acerca de cómo hacerlo, consulte a un constructor. ADVERTENCIA: El no poder garantizar su armario puede causar daño a sus seres queridos. cuidado, mantenimiento y limpieza Regularmente Eck ch el apriete de los tornillos y apriete según sea necesario. Compruebe si hay daños que podría hacer su cambiador de seguros o hacer astillas. Para la limpieza utilice un paño húmedo, evitando el uso de detergentes fuertes o abrasivos. Una aplicación ocasional de poca intensidad de un pulimento de cera ayudará a mantener una buena apariencia. piezas de repuesto Las piezas de repuesto se enumeran a continuación están disponibles para su producto. En caso de necesitar alguna de estas piezas, por favor póngase en contacto con su tienda local o póngase en contacto con nosotros en spares@cosatto.com panel superior parte inferior del panel barra superior panel lateral izquierdo panel lateral derecho panel trasero panel de soporte central sacar panel de soporte el lado izquierdo del cajón el lado derecho del cajón el lado posterior de cajón base de cajón frente del cajón pack de fijación correa de seguridad (inc. tornillo)

14 Cosatto Ltd, Bentinck Mill, Bentinck Street, Farnworth, Bolton, Lancashire, BL4 7EP. Tel: +44(0) For up to date information and manuals for all cosatto products visit

MODEL: 11222895 / MODELO: 11222895 COMPUTER DESK ESCRITORIO DE COMPUTADORA
 MODEL: 222895 / MODELO: 222895 COMPUTER DESK ESCRITORIO DE COMPUTADORA NO 2 3 4 5 6 7 8 9 PARTS LIST AND HARDWARE LISTA DE PARTES Y ACCESORIOS HARDWARE LIST LISTA DE PARTES Y ACCESORIOS CHIPBOARD SCREW
8 BIN WOODEN STORAGE ORGANIZER ORGANIZADOR DE 8 CAJONES DE TELA
 MODEL: 11223768V / MODELO: 11223768V 8 BIN WOODEN STORAGE ORGANIZER ORGANIZADOR DE 8 CAJONES DE TELA PARTS LIST AND HARDWARE LISTA DE PARTES Y ACCESORIOS NO A B C D E F G H1 H2 I J K L M N O HARDWARE LIST
RTA-B002 DIMENSIONS MAXIMUM WEIGHT CAPACITIES. Highest position. Lowest position. Product Size: 22"W x 16"D x 30.5~46.5"H
 MODEL RTA - B002 Thanks for purchasing one of our products. Please read carefully the assembly instructions before the installation. Please save this manual for future reference. MODEL RTA-B002 MODELO
MODEL: F / MODELO: F END TABLE WITH MEDIA STAND & MAGAZINE HOLDER MESA RINCONERA CON ESTANTE & REVISTERO
 MODEL: 11225479F / MODELO: 11225479F END TABLE WITH MEDIA STAND & MAGAZINE HOLDER MESA RINCONERA CON ESTANTE & REVISTERO NO A B C D E F G H I J K L PARTS LIST AND HARDWARE PARTES Y ACCESORIOS PARTS LIST
3 PIECE BAR SET JUEGO DE BAR DE 3 PIEZAS
 MODEL: 11222152VW / MODELO: 11222152VW 3 PIECE BAR SET JUEGO DE BAR DE 3 PIEZAS NO A B C D E F G H I J K L M N O P1 P2 Q PARTS LIST AND HARDWARE LISTA DE PARTES Y ACCESORIOS HARDWARE LIST LISTA DE ACCESORIOS
Read all instructions BEFORE assembly and USE of product. KEEP INSTRUCTIONS FOR FUTURE USE.
 Read all instructions BEFORE assembly and USE of product. KEEP INSTRUCTIONS FOR FUTURE USE. Lea todas las instrucciones ANTES de armar y USAR este producto. GUARDE LAS INSTRUCCIONES PARA USO FUTURO. 2013
Model :RFBW01014 Model :RFBE Model :RFBG 01014
 Model :RFBW01014 Model :RFBE 01014 Model :RFBG 01014 Wall Cabinet Operators Manual Manual de Operadora del Gabinete de pared Inspect product prior to installation. Contact info@runfinegroups.com prior
INSTRUCCIONES DE ENSAMBLAJE.
 English MULTI-FUNCTIONAL COMPUTER TABLE ASSEMBLY INSTRUCTION MODEL RTA - S06 IMPORTANT: Surfaces must be cleaned with a solution of a smooth soap and water, then cleared with a dry towel. Do not use solvents
3PIECES KIDS TABLE SET JUEGO DE MESA PARA NIÑOS DE 3 PIEZAS
 MODEL: 11224487 / MODELO: 11224487 3PIECES KIDS TABLE SET JUEO DE MESA PARA NIÑOS DE 3 PIEZAS NO A B C D E F PARTS LIST AND ARDWARE LISTA DE PARTES Y ACCESORIOS ARDWARE LIST LISTA DE ACCESORIOS TABLE TOP
MANUAL EASYCHAIR. A) Ingresar su nombre de usuario y password, si ya tiene una cuenta registrada Ó
 Ingresar su nombre de usuario y password, si ya tiene una cuenta registrada Ó") MANUAL EASYCHAIR La URL para enviar su propuesta a la convocatoria es: https://easychair.org/conferences/?conf=genconciencia2015 Donde aparece la siguiente pantalla: Se encuentran dos opciones: A) Ingresar
MANUAL EASYCHAIR La URL para enviar su propuesta a la convocatoria es: https://easychair.org/conferences/?conf=genconciencia2015 Donde aparece la siguiente pantalla: Se encuentran dos opciones: A) Ingresar
You and Me Designed by Antoni Pallejà Office USER S MANUAL MANUAL DEL USUARIO
 You and Me Designed by Antoni Pallejà Office USER S MANUAL MANUAL DEL USUARIO PIECES & TOOLS PIECE A: 2 UNITS PIEZA A PIECE B: 2 UNITS PIEZA B NET RED NET BRACKET: 2 UNITS SOPORTE RED TOOLS / HERRAMIENTAS
COMPUTER DESK ESCRITORIO DE COMPUTADORA
 MODEL: 11222327F / MODELO: 11222327F COMPUTER DESK ESCRITORIO DE COMPUTADORA NO A B C D E F G H I J PARTS AND HARDWARE LISTA DE PARTES Y HARDWARE TOP PANEL PANEL SUPERIOR KEYBOARD PANEL PANEL DE TECLADO
INSTRUCCIONES DE ENSAMBLAJE.
 English MULTI-FUNCTIONAL COMPUTER TABLE ASSEMBLY INSTRUCTION MODEL RTA - 3806 IMPORTANT: Surfaces must be cleaned with a solution of a smooth soap and water, then cleared with a dry towel. Do not use solvents
INSTRUCCIONES DE ENSAMBLAJE.
 English MULTI-FUNCTIONAL COMPUTER TABLE ASSEMBLY INSTRUCTION MODEL RTA - 3327 IMPORTANT: Surfaces must be cleaned with a solution of a smooth soap and water, then cleared with a dry towel. Do not use solvents
ASSEMBLY INSTRUCTIONS INSTRUCCIONES DE MONTAJE
 ASSEMBLY INSTRUCTIONS INSTRUCCIONES DE MONTAJE 4 PC PATIO CONVERSATION SET JUEGO DE PATIO C/ MESA, 2 SILLAS Y UN SILLÓN 250559R /250559T/250559G PLEASE NOTED / POR FAVOR A TENER EN CUENTA: THIS SET OF
Model/Modelo: SR42UBEVS
 SmartRack Assembly Instructions Instrucciones de Ensamble del SmartRack Model/Modelo: SRUBEVS West 35th Street, Chicago, IL 60609 USA www.tripplite.com/support Copyright 03 Tripp Lite. All trademarks are
ROCK N STEREO SOUND DESK
 Read and save these instructions ROCK N STEREO SOUND DESK RTA-M1102-BK INSTRUCTIONS TABLE OF CONTENTS PACKAGE INCLUDES Package Includes... 2 Specifications... 2 Product Parts List... 3 1 2 3 Product Details...
Conditioning Exercises: Standing
 Conditioning Exercises: Standing Do all these exercises slowly. Do not hold your breath during these exercises. If unusual pain occurs in your joints or muscles while you are exercising, do not continue
ASSEMBLY INSTRUCTIONS
 ASSEMBLY INSTRUCTIONS 2 DOOR WALL CABINET ADULT ASSEMBLY REQUIRED This product requires assembly by an adult because of the small parts. Care should be taken in unpacking and assembling this item to keep
4 DRAWER ORGANIZER ORGANIZADOR DE 4 CAJONES
 MODEL: 11210913 / MODELO: 11210913 DRAWER ORGANIZER ORGANIZADOR DE CAJONES NO N o 1 2 3 NO N o A B C D E PARTS LIST AND HARDWARE LISTA DE ACCESORIOS Y PARTES HARDWARE LIST / LISTA DE ACCESORIOS SCREW /
MODEL: / MODELO: SPACE SAVER CABINET GABINETE PARA EL BAÑO
 MODEL: 125675 / MODELO: 125675 SPACE SAVER CABINET GABINETE PARA EL BAÑO NO A B C D E F G H I J K L M PARTS AND HARDWARE LISTA DE PARTES Y HARDWARE LEFT FRAME MARCO IZQUIERDO RIGHT FRAME MARCO DERECHO
WOODEN MAGAZINE TABLE MESA REVISTERO DE MADERA
 ODEL: 11224545V / ODELO: 11224545V WOODEN AGAZINE TABLE ESA REVISTERO DE ADERA NO A B C D E F G H I J L N PARTS AND HARDWARE LISTA DE PARTES Y HARDWARE HARDWARE LIST LISTA DE HARDWARE LEFT BAC SIDE PANEL
Meijer.com A
 English MOBILE LAPTOP CART STORAGE ASSEMBLY INSTRUCTION MODEL RTA - B00 IMPORTANT: Surfaces must be cleaned with a solution of a smooth soap and water, then cleared with a dry towel. Do not use solvents
MODEL: / MODELO: BATHROOM CABINET MUEBLE DE BAÑO
 MODEL: 227 / MODELO: 227 BATHROOM CABINET MUEBLE DE BAÑO NO A B C D E F G H 2 3 PARTS AND HARDWARE LISTA DE PARTES Y HARDWARE RIGHT FRAME MARCO DERECHO LEFT FRAME MARCO IZQUIERDO TOP PANEL PANEL SUPERIOR
Messina TM 4 - Piece Sectional Loveseat, Sofa, & Corner Table
 Page 1 of 7 Assembly Instructions Messina TM 4 - Piece Sectional Loveseat, Sofa, & Corner Table Model #: 523125 Thank you for purchasing this quality product. Be sure to check all packing materials carefully
ASSEMBLY INSTRUCTIONS
 ASSEMBLY INSTRUCTIONS 3-Shelf Corner Cabinet WHITE ESPRESSO ADULT ASSEMBLY REQUIRED This product requires assembly by an adult because of small parts. Care should be taken in unpacking and assembling this
3PCS 20 DERECHO. Right. Left
 PARTS LIST LISTA DE PARTES 1 2 3 4 CPU Left Panel CPU Right Panel Studs CPU Bottom Panel Panel Izquierdo del porta CPU Panel derecho del porta CPU Patas Panel Inferior del Porta CPU 5 6 7 8 CPU Back Panel
Sierra Security System
 Using Your SpreadNet Accessories With Your Sierra Security System Uso de Sus Accesorios SpreadNet Con Su Sistema de Seguridad Sierra SN990-KEYPAD SN961-KEYFOB SN991-REMOTE 1 SN990-KEYPAD The SN990-KEYPAD
LAPTOP DESK WITH 3 BINS MESA PARA COMPUTADORA PERSONAL CON 3 CONTENEDORES
 MODEL: 11222775R / MODELO: 11222775R LAPTOP DESK WITH 3 BINS MESA PARA COMPUTADORA PERSONAL CON 3 CONTENEDORES NO A B C D E F G H 1 2 3 4 5 6 7 8 9 PARTS AND HARDWARE LISTA DE PARTES Y HARDWARE TOP PANEL
RTA-2706A DIMENSIONS
 MODEL RTA - 706A Thanks for purchasing one of our products. Please read carefully the assembly instructions before the installation. Please save this manual for future reference. MODEL RTA-706A MODELO
ASSEMBLY INSTRUCTIONS
 ASSEMBLY INSTRUCTIONS SINGLE DOOR / 3 DRAWER CABINET WHITE GRAY ADULT ASSEMBLY REQUIRED This product requires assembly by an adult because of the small parts. Care should be taken in unpacking and assembling
TOURNEY ! WARNING! MODEL # / No.de Modelo # ADULT ASSEMBLY REQUIRED. foosball table mesa de futbol
 TOURNEY foosball table mesa de futbol! WARNING! ADULT ASSEMBLY REQUIRED. MODEL # / No.de Modelo #390008 Assembly, Instructions and Rules Instrucciones de ensamblaje y reglas 630 Mondial Parkway / Streetaboro
Meijer.com A
 English MULTI-FUNCTIONL COMPUTER TLE SSEMLY INSTRUCTION Meijer.com C MODEL RT - 350 IMPORTNT: Surfaces must be cleaned with a solution of a smooth soap and water, then cleared with a dry towel. Do not
RTA-3325 DIMENSIONS MAXIMUM WEIGHT CAPACITIES. Product Size: 60"W x 23.5"D x 35"H
 MODEL RTA-3325 MODELO RTA - 3325 Gracias por comprar uno de nuestros productos. Por favor lea cuidadosamente las instrucciones de ensamblaje antes de instalar la unidad. Por favor guarde este manual para
ASSEMBLY INSTRUCTIONS
 ASSEMBLY INSTRUCTIONS MODEL RTA - 2202 Thanks for purchasing one of our products. Please read carefully the assembly instructions before the installation. Please save this manual for future reference.
INSTRUCCIONES DE ENSAMBLAJE.
 English MULTI-FUNCTIONAL COMPUTER TALE ASSEMLY INSTRUCTION MODEL RTA - 2706A IMPORTANT: Surfaces must be cleaned with a solution of a smooth soap and water, then cleared with a dry towel. Do not use solvents
ENTERTAINMENT CENTER / BOOKSHELF ESTANTE PARA LIBROS / ESTANTE PARA TV
 MODEL: 11223726 / MODELO: 11223726 ENTERTAINMENT CENTER / BOOKSHELF ESTANTE PARA LIBROS / ESTANTE PARA TV PARTS LIST AND HARDWARE LISTA DE PARTES Y ACCESORIOS NO A B C D 2-1 3 4 5 6 7 HARDWARE LIST LISTA
Process Control Work Instructions Control de Procesos Instrucciones de Trabajo. for / para
 Process Control Work Instructions Control de Procesos Instrucciones de Trabajo for / para 629096898 VFCB Kit Relay Cable Harness Assy Ensamblar el Kit del Arnés de Cables del Relevador Publication Number:
MULTI-FUNCTIONAL COMPUTER TABLE
 English MULTI-FUNCTIONAL COMPUTER TABLE ASSEMBLY INSTRUCTION IMPORTANT: Surfaces must be cleaned with a solution of a smooth soap and water, then cleared with a dry towel. Do not use solvents over surfaces
END TABLE MODEL: P. Capacidad máxima del estante: 105 lbs. (47.6 kg) Capacidad máxima del estante: 43 lbs. (19.5 kg)
 Capacidad máxima del estante: 43 lbs. (19.5 kg)") Capacidad máxima del estante: 10 lbs. (47. kg) Capacidad máxima del estante: 4 lbs. (19. kg) Esta unidad está destinada sólo para su uso con los productos y pesos máximos indicados. Si usted utilize esta
Capacidad máxima del estante: 10 lbs. (47. kg) Capacidad máxima del estante: 4 lbs. (19. kg) Esta unidad está destinada sólo para su uso con los productos y pesos máximos indicados. Si usted utilize esta
MODEL: P COFFEE TABLE
 Capacidad máxima del estante: 184 lbs. (83.4 kg) Capacidad máxima del estante: 87 lbs. (39.4 kg) Esta unidad está destinada sólo para su uso con los productos y pesos máximos indicados. Si usted utilize
Car Seat Adapter Adaptador de la silla para el coche
 CHICCO/PEG-PEREGO Car Seat Adapter Adaptador de la silla para el coche PD348997B babyjogger.com ASSEMBLY INSTRUCTIONS INSTRUCCIONES DEL ENSAMBLAJE CITY PREMIER CITY SELECT PEG-PEREGO 1 A B 2 3 CLICK 4
ADULT ASSEMBLY REQUIRED
 HORIZONTAL BOOKCASE White Espresso Gray ADULT ASSEMBLY REQUIRED This product requires assembly by an adult because of small parts. Care should be taken in unpacking and assembling this item to keep small
car seat adapter adaptador del asiento de automóvil CXBEX/MAXI COSI/NUNA babyjogger.com ASSEMBLY INSTRUCTIONS INSTRUCCIONES DEL ENSAMBLAJE PD349778A
 CXBEX/MAXI COSI/NUNA car seat adapter adaptador del asiento de automóvil PD349778A babyjogger.com ASSEMBLY INSTRUCTIONS INSTRUCCIONES DEL ENSAMBLAJE CITY PREMIER CITY SELECT CITY SELECT LUX 1 2 CLICK 3
MANUAL DE INSTRUCCIONES PARRILLA BARBACOA (18 ) ED-4047BQ
 ED-4047BQ") MANUAL DE INSTRUCCIONES PARRILLA BARBACOA (18 ) ED-4047BQ ESTIMADO CLIENTE Con el fin de que obtenga el mayor desempeño de su producto, por favor lea este manual de instrucciones cuidadosamente antes de
MANUAL DE INSTRUCCIONES PARRILLA BARBACOA (18 ) ED-4047BQ ESTIMADO CLIENTE Con el fin de que obtenga el mayor desempeño de su producto, por favor lea este manual de instrucciones cuidadosamente antes de
Preparación de la Piel para la Cirugía
 Skin Prep for Surgery Patient identification label Preparación de la Piel para la Cirugía Esta preparación de la piel antes de la cirugía puede ayudar a reducir el riesgo de infección. Lea estos 12 pasos
MODEL: N / MODELO: N GAZEBO / GAZEBO
 MODEL: 5046N / MODELO: 5046N GAZEBO / GAZEBO Precautions:. Check all parts and hardware listed on the part list.. It is recommended to have people for assembly.. Step stool is also recommended during the
User Guide Manual del usuario
 User Guide Manual del usuario CUE ORGANIZER ORGANIZADOR DE CUOS English... Page 3 Español... Página 11 2 CUES HIGH / 3 CUES WIDE 2 CUOS DE ALTO / 3 CUOS DE ANCHO 3 CUES HIGH / 2 CUES WIDE 3 CUOS DE ALTO
ASSEMBLY INSTRUCTIONS
 ASSEMBLY INSTRUCTIONS RiverRidge ASHLAND 2 DOOR WALL CABINET ITEM# 06-084 WHITE ITEM# 06-085 GRAY ADULT ASSEMBLY REQUIRED This product requires assembly by an adult because of the small parts. Care should
ASSEMBLY INSTRUCTIONS
 ASSEMBLY INSTRUCTIONS RiverRidge ELLSWORTH TWO DOOR WALL CABINET ITEM# 06-023 ITEM# 06-024 WHITE ESPRESSO ADULT ASSEMBLY REQUIRED This product requires assembly by an adult because of small parts. Care
ASSEMBLY INSTRUCTIONS
 ASSEMBLY INSTRUCTIONS SINGLE DOOR FLOOR CABINET W/SIDE SHELVES WHITE ESPRESSO ADULT ASSEMBLY REQUIRED This product requires assembly by an adult because of small parts. Care should be taken in unpacking
Matemáticas Muestra Cuadernillo de Examen
 Matemáticas Muestra Cuadernillo de Examen Papel-Lápiz Formato Estudiante Español Versión, Grados 3-5 Mathematics Sample Test Booklet Paper-Pencil Format Student Spanish Version, Grades 3 5 Este cuadernillo
ASSEMBLY INSTRUCTIONS
 ASSEMBLY INSTRUCTIONS RiverRidge 3 Cubby, 2 Veggie Bin Cabinet ITEM# 02-146 White ITEM# 02-147 Gray ADULT ASSEMBLY REQUIRED This product requires assembly by an adult because of the small parts. Care should
Instruction Manual. Safety Warning and Precautions
 Art# GAZ201490/5055 Instruction Manual Save this Manual for future reference. Your Gazebo requires assembly prior to use. It is important that you read the entire manual to become familiar with the unit
ASSEMBLY INSTRUCTIONS
 ASSEMBLY INSTRUCTIONS RiverRidge ASHLAND CORNER CABINET ITEM# 06-080 WHITE ITEM# 06-081 GRAY ADULT ASSEMBLY REQUIRED This product requires assembly by an adult because of the small parts. Care should be
www.tricam.com 800-867-6763 7677 Equitable Drive Tricam PRECAUCIÓN: Antes de utilizar este producto, lea, comprenda y siga TODAS las instrucciones.
 SC100-D manual 1/8/08 10:6 AM Page 1 1/08 Para preguntas acerca del producto: Tricam 7677 Equitable Drive Eden Prairie, MN 55344 800-867-6763 www.tricam.com PRECAUCIÓN: Antes de utilizar este producto,
PRODUCT ASSEMBLY INSTRUCTIONS
 PRODUCT ASSEMBLY INSTRUCTIONS KARLSEN SWIVEL GLIDER RECLINER SAM S CLUB #402411 BERKLINE #4160061 PLEASE READ THIS BOOKLET CONTAINS IMPORTANT INFORMATION. KEEP FOR FUTURE REFERENCE. Page (Pagina) 1 of
DWG#: IMPORTANT SAFETY NOTICE READ CAREFULLY BEFORE BEGINNING ASSEMBLY
 INSTRUCTION SHEET FOR HEADBOARD PANEL ASSEMBLY IMPORTANT SAFETY NOTICE READ CAREFULLY BEFORE BEGINNING ASSEMBLY - Always use proper tools. - Carefully review the list of parts. If parts are missing, contact
PRODUCT ASSEMBLY INSTRUCTIONS
 PRODUCT ASSEMBLY INSTRUCTIONS HAUGEN SOFA SAM S CLUB # 610256 BERKLINE #2450438 PLEASE READ THIS BOOKLET CONTAINS IMPORTANT INFORMATION. KEEP FOR FUTURE REFERENCE. Page 1 of 10 CUSTOMER SERVICE INFORMATION
TOUCH MATH. Students will only use Touch Math on math facts that are not memorized.
 TOUCH MATH What is it and why is my child learning this? Memorizing math facts is an important skill for students to learn. Some students have difficulty memorizing these facts, even though they are doing
Creating your Single Sign-On Account for the PowerSchool Parent Portal
 Creating your Single Sign-On Account for the PowerSchool Parent Portal Welcome to the Parent Single Sign-On. What does that mean? Parent Single Sign-On offers a number of benefits, including access to
Instructivo de uso y cuidado del Aplicador de Implantes Lapisa. Productos Destacados
 Instructivo de uso y cuidado del Aplicador de Implantes Lapisa Productos Destacados Diseño ergonómico Producido con materiales de larga duración para asegurar una vidá útil prolongada Espacio para aguja
2008 Series Hemodialysis Machine Operator s Manuals Addendum for Concentrate Connection
 2008 Series Hemodialysis Machine Operator s Manuals Addendum for Concentrate Connection Caution: Federal (US) law restricts this device to sale only by or on the order of a physician. This is an addendum
ASSEMBLY INSTRUCTIONS
 ASSEMBLY INSTRUCTIONS RiverRidge ASHLAND SINGLE DOOR WALL CABINET ITEM# 06-088 WHITE ITEM# 06-089 GRAY ADULT ASSEMBLY REQUIRED This product requires assembly by an adult because of the small parts. Care
Apéndice B. Guía de instalación del estante
 Apéndice B Guía de instalación del estante Este apéndice explica cómo instalar el estante opcional para el servidor Acer Altos G700. 105 Instalación del estante del sistema El servidor Altos G701 puede
ASSEMBLY INSTRUCTIONS
 ASSEMBLY INSTRUCTIONS RiverRidge 6-BIN STORAGE CABINET ITEM# 16-007 ESPRESSO WITH BROWN BINS ITEM# 16-008 ESPRESSO WITH GRAY BINS ADULT ASSEMBLY REQUIRED This product requires assembly by an adult because
Garden Dump Cart. Owners Manual. 1-year Limited Warranty. Model GOR108D-SC
 Garden Dump Cart Owners Manual Model GOR108D-SC Important Safety Instructions Assembly Instructions Parts and Hardware Identification U.S. Patent #s 6,851,756, 7,210,697 and 7,390,065 Other U.S. and Foreign
Creando Cuentas Nuevas para Padres / Alumnos en el
 Creando Cuentas Nuevas para Padres / Alumnos en el Portal de Internet Aeries de YCJUSD El portal de Internet Aeries proporciona una manera segura para acceder a información sobre la asistencia y el progreso
School Preference through the Infinite Campus Parent Portal
 School Preference through the Infinite Campus Parent Portal Welcome New and Returning Families! Enrollment for new families or families returning to RUSD after being gone longer than one year is easy.
1. Sign in to the website, http://www.asisonline.org / Iniciar sesión en el sitio, http://www.asisonline.org
 Steps to Download Standards & Guidelines from the ASIS International Website / Pasos para Descargar los Standards & Guidelines de la Página Web de ASIS International 1. Sign in to the website, http://www.asisonline.org
STOCK NO.: A DELANEY WRITING DESK
 USER MANUAL STOCK NO.: 384-16A-11-12 DELANEY WRITING DESK THIS INSTRUCTION BOOKLET CONTAINS IMPORTANT SAFETY INFORMATION. PLEASE READ AND KEEP THIS MANUAL FOR FUTURE REFERENCE. PLEASE DO NOT RETURN ANY
essentialhome TM OWNER'S MANUAL
 essentialhome TM OWNER'S MANUAL Belmont Mates Bed 5536026KP caution carefully read instructions and procedures for safe operation product code 0-06790917-6 upc code 0-2998655362-1 date of purchase / /
Steps to Understand Your Child s Behavior. Customizing the Flyer
 Steps to Understand Your Child s Behavior Customizing the Flyer Hello! Here is the PDF Form Template for use in advertising Steps to Understanding Your Child s Behavior (HDS Behavior Level 1B). Because
ASSEMBLY INSTRUCTIONS
 ASSEMBLY INSTRUCTIONS RiverRidge ELLSWORTH TALL CORNER CABINET ITEM # 06-027 ITEM # 06-028 WHITE ESPRESSO ADULT ASSEMBLY REQUIRED This product requires assembly by an adult because of small parts. Care
INSTRUCTION MANUAL Smart Security Light
 SPL06-07A1W1-BKT-K1 INSTRUCTION MANUAL Smart Security Light Questions, problems, or missing parts? Before returning to the store, call MAXIMUS customer service at 1-866-897-2098, Monday Friday, 9:30am
La Video conferencia con Live Meeting
 Página 1 INSTRUCCIONES PARA TRABAJAR CON LIVE MEETING.- PREVIO. Para que tenga sentido la videoconferencia es conveniente que tengamos sonido (no suele ser problemático) y que tengamos vídeo. Si el ordenador
Child Care Assistance Program Búsqueda de Trabajo
 Child Care Assistance Program Búsqueda de Trabajo Usted ha pedido cuidado para sus niños mientras busca trabajo a través del programa de CCAP. Este programa ofrece un total de 30 días mientras busca trabajo.
Wall Mounted Range Hood System
 These instructions should not be faxed or reproduced on a digital copier. American Woodmark Corporation provides these instructions on an AS IS basis and disclaims any and all liability for any inaccuracies,
WOODEN STORAGE CABINET WITH 3 BINS CABINETE DE MADERA CON 3 CAJONES
 MODEL: 11224551V / MODELO: 11224551V WOODEN STORAGE CABNET WTH 3 BNS CABNETE DE MADERA CON 3 CAONES NO A B C D E F G H L PARTS AND HARDWARE LSTA DE PARTES Y HARDWARE HARDWARE LST LSTA DE HARDWARE LEFT
Continental Bed Rails Assembly Instructions. Instructions d'assemblage pour traverses de lit Continental
 Continental Bed Rails Assembly Instructions Instructions d'assemblage pour traverses de lit Continental Instrucciones de montaje de travesaños Continental Q010 Parts: A 2x Bed Rails C 14 x Wood Screw B
WOODEN WALL STORAGE WITH 3 NON-WOVEN BINS ALMACENAMIENTO DE MADERA DE PARED DE 3 CAJONES DE TELA
 MODE: 11224540V / MODEO: 11224540V WOODEN WA STORAGE WITH 3 NON-WOVEN BINS AMACENAMIENTO DE MADERA DE PARED DE 3 CAJONES DE TEA NO A B C D E F G H I J K M N PARTS AND HARDWARE ISTA DE PARTES Y HARDWARE
P A R T S I D E N T I F I C A T I O N I I D E N T I F I C A C I Ó N D E P A R T E S
 I This instruction manual contains important information. Follow the consecutive order. Please read and keep for future reference. Este Manual contiene información importante. Siga el orden consecutivo
ASSEMBLY INSTRUCTIONS 3-SEAT CUSHIONED SWING WITH CANOPY FR / FG INSTRUCCIONES DE MONTAJE HAMACA DE 3 ASIENTOS CON TECHO DE LONA
 ASSEMBLY INSTRUCTIONS 3-SEAT CUSHIONED SWING WITH CANOPY 12505483FR /12505483FG INSTRUCCIONES DE MONTAJE HAMACA DE 3 ASIENTOS CON TECHO DE LONA PART LIST/LISTA DE PARTES: M840 M860 M868 2 WARNING: HAVE
Si tiene cualquier pregunta llame a su trabajadora de CCAP al número de teléfono indicado abajo. Boulder County Child Care Assistance Program
 Child Care Assistance Program Búsqueda de Trabajo Usted ha pedido cuidado para sus niños mientras busca trabajo a través del programa de CCAP. Este programa ofrece un total de 30 días mientras busca trabajo.
Cómo comprar en la tienda en línea de UDP y cómo inscribirse a los módulos UDP
 Cómo comprar en la tienda en línea de UDP y cómo inscribirse a los módulos UDP Sistema de registro y pago Este sistema está dividido en dos etapas diferentes*. Por favor, haga clic en la liga de la etapa
Manual de instrucciones. Minigarabatos A B. 2013 VTech Impreso en China 91-009630-001 SP
 Manual de instrucciones Minigarabatos C D Minigarabatos A B??? G S I 2013 VTech Impreso en China 91-009630-001 SP Queridos padres: En VTech sabemos que los niños tienen la capacidad de hacer grandes cosas.
Citizenship. Citizenship means obeying the rules and working to make your community a better place.
 Citizenship Citizenship means obeying the rules and working to make your community a better place. I show good citizenship when I help keep my school and community clean. I am a good citizen when I follow
Construyendo Nuestro Boe-Bot
 Construyendo Nuestro Boe-Bot Qué contiene nuestro kit? Nuestro kit cuenta con todas las piezas requeridas para armar nuestro primer robot, con este robot aprenderemos distintos conceptos de programación
Instalación y desinstalación de las unidades reemplazables in situ para Secure Access 6000
 Instalación y desinstalación de las unidades reemplazables in situ para Secure Access 6000 No. de pieza: 093-1691-000 Rev. B Esta guía contiene información sobre la instalación y desinstalación de las
cuánto debe girar? señal de dirección como lo indican las manecillas
 MINIFIX - PERNOS/MINIFIX CONNECTOR - DOWELS Es un herraje de unión, la cabeza esférica del perno se ubica en el centro de la caja embutida en forma de copa desde cualquier ángulo y luego se sujeta firmemente.
PART QTY HARDWARE PART QTY HARDWARE
 JUSTBL B Page 1 of 3 xamine all packaging material for small parts that may have come loose during shipment. Periodic checks are recommended to insure that all components are in proper position, tight
PAGE 1. RIGIDBOT (Parte Grande #2117) Enlace a los vídeos: www.rigidbot.com PAGE 2 PAGE 3. PAGE 4 Sub ensamblaje
 Enlace a los vídeos: www.rigidbot.com PAGE 2 PAGE 3. PAGE 4 Sub ensamblaje") PAGE 1 RIGIDBOT (Parte Grande #2117) Enlace a los vídeos: www.rigidbot.com PAGE 2 PAGE 3 Bienvenido! Gracias por comprar el RIGIDBOT! Hemos proveído este manual para asistirle en el ensamblaje de su producto
PAGE 1 RIGIDBOT (Parte Grande #2117) Enlace a los vídeos: www.rigidbot.com PAGE 2 PAGE 3 Bienvenido! Gracias por comprar el RIGIDBOT! Hemos proveído este manual para asistirle en el ensamblaje de su producto
STOP. Cómo Ensamblar su tocador de 5 cajones zzz place to be. How to Assemble Your zzz place to be 5-drawer chest
 How to Assemble Your zzz place to be 5-drawer chest Cómo Ensamblar su tocador de 5 cajones zzz place to be Model # White: WM244P2W-DC Walnut: WM244P2-DC Lot Number: Date Purchased: / / Modelo # Blanca:
A W. Product Label Identification. Etiqueta de identificación del producto. Andersen
 Product Label Identification Etiqueta de identificación for Andersen Windows and Patio Doors para puertas para patio y ventanas de Andersen Use this document to locate product identification () of your
Add Counterweights for Opus Bedside Tables - HT18MAL and HT18MBL
 HEALTH Add Counterweights for Opus Bedside Tables - HT18MAL and HT18MBL CAUTION FAILURE TO FOLLOW THESE INSTRUCTIONS COULD RESULT IN PROPERTY DAMAGE OR PERSONAL INJURY. Read the entire Assembly Direction
STOP. How to Assemble Your zzz place to be desk, hutch and chair. Cómo Ensamblar su escritorio, armario y silla zzz place to be
 How to Assemble Your zzz place to be desk, hutch and chair Cómo Ensamblar su escritorio, armario y silla zzz place to be Model # White: WM2442P2W-DC/WM2442P2W-2DC Walnut: WM2442P2-DC/WM2442P2-2DC Lot Number:
NeoRomántico Liviano 100% Aluminio
 NeoRomántico Liviano 100% Aluminio Miguel Milá 2002 ADI FAD PLATA 2003 ADI FAD PLATA 2005 The NeoRomántico Liviano 100% Aluminio bench ADI is the FAD first piece of street furniture in SELECCIÓN 1991 Spain